Series 7 AdjusTables FitWork™ Walkstation - Steelcase
Series 7 AdjusTables FitWork™ Walkstation - Steelcase
Series 7 AdjusTables FitWork™ Walkstation - Steelcase

You also want an ePaper? Increase the reach of your titles
YUMPU automatically turns print PDFs into web optimized ePapers that Google loves.
FitWork <strong>Walkstation</strong><br />
<strong>Series</strong> 7 <strong>AdjusTables</strong><br />
Installation Instructions<br />
005720D Rev D Page 2 of 20<br />
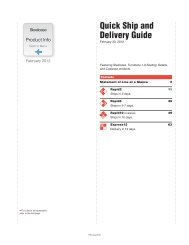
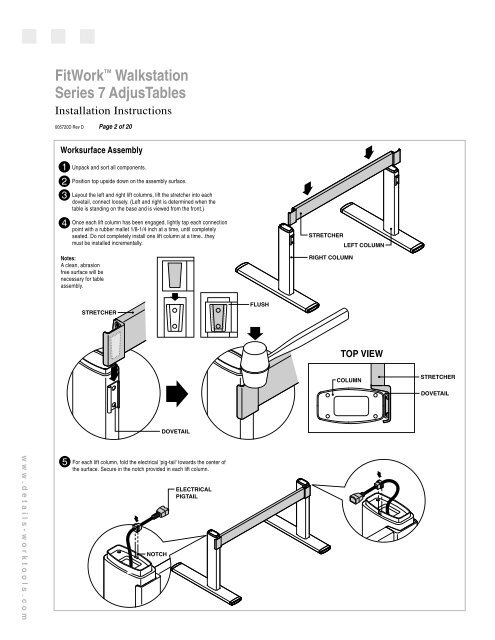
Worksurface Assembly<br />
1<br />
2<br />
3<br />
4<br />
Unpack and sort all components.<br />
Position top upside down on the assembly surface.<br />
Layout the left and right lift columns, lift the stretcher into each<br />
dovetail, connect loosely. (Left and right is determined when the<br />
table is standing on the base and is viewed from the front.)<br />
Once each lift column has been engaged, lightly tap each connection<br />
point with a rubber mallet 1/8-1/4 inch at a time, until completely<br />
seated. Do not completely install one lift column at a time...they<br />
must be installed incrementally.<br />
Notes:<br />
A clean, abrasion<br />
free surface will be<br />
necessary for table<br />
assembly.<br />
STRETCHER<br />
RIGHT COLUMN<br />
LEFT COLUMN<br />
STRETCHER<br />
FLUSH<br />
TOP VIEW<br />
COLUMN<br />
STRETCHER<br />
DOVETAIL<br />
DOVETAIL<br />
www.details-worktools.com<br />
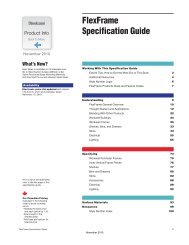
5<br />
For each lift column, fold the electrical 'pig-tail' towards the center of<br />
the surface. Secure in the notch provided in each lift column.<br />
NOTCH<br />
ELECTRICAL<br />
PIGTAIL