SLI for NVIDIA Quadro: Quick Installation Guide - Servodata
SLI for NVIDIA Quadro: Quick Installation Guide - Servodata
SLI for NVIDIA Quadro: Quick Installation Guide - Servodata

Create successful ePaper yourself
Turn your PDF publications into a flip-book with our unique Google optimized e-Paper software.
<strong>SLI</strong> <strong>for</strong> <strong>NVIDIA</strong> <strong>Quadro</strong>: <strong>Installation</strong> <strong>Guide</strong><br />
This document provides the in<strong>for</strong>mation necessary to successfully install and configure your <strong>SLI</strong>capable<br />
graphics boards and system. You may also review the full <strong>Installation</strong> <strong>Guide</strong> <strong>for</strong><br />
additional in<strong>for</strong>mation. Topics covered in this document include:<br />
• <strong>NVIDIA</strong> <strong>SLI</strong> technology<br />
• Motherboard and power supply requirements<br />
• <strong>SLI</strong> hardware setup and configuration<br />
• Display driver installation and enabling <strong>SLI</strong><br />
• <strong>SLI</strong> questions and answers<br />
<strong>NVIDIA</strong> <strong>SLI</strong> Technology<br />
<strong>NVIDIA</strong> <strong>SLI</strong> (Scalable Link Interface) technology allows users to install and benefit from two PCI<br />
Express (PCIe) graphics boards in a single PC. Just as dual processors or dual core CPUs<br />
improve compute per<strong>for</strong>mance, <strong>SLI</strong> allows dual GPUs (Graphics Processing Units) to significantly<br />
accelerate graphics per<strong>for</strong>mance. Professional users benefit by using <strong>SLI</strong> technology on dual<br />
<strong>NVIDIA</strong> <strong>Quadro</strong> GPUs to span an OpenGL window across multiple displays, or to run a single<br />
application per GPU. Additionally, the <strong>SLI</strong> connector offers dual GPU per<strong>for</strong>mance on a single<br />
display by leveraging the capabilities of two <strong>NVIDIA</strong> <strong>Quadro</strong> GPUs.<br />
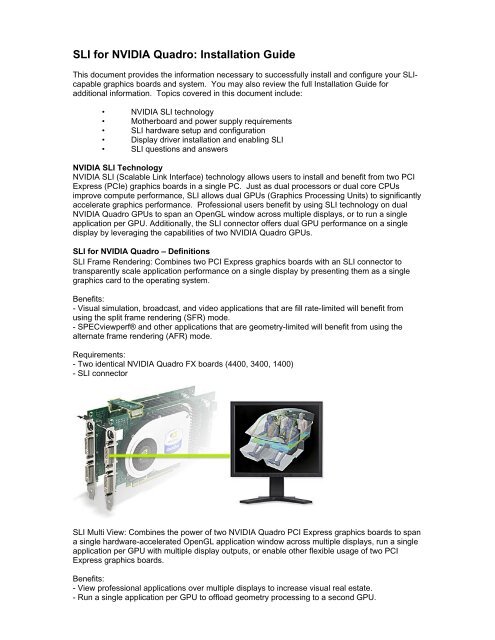
<strong>SLI</strong> <strong>for</strong> <strong>NVIDIA</strong> <strong>Quadro</strong> – Definitions<br />
<strong>SLI</strong> Frame Rendering: Combines two PCI Express graphics boards with an <strong>SLI</strong> connector to<br />
transparently scale application per<strong>for</strong>mance on a single display by presenting them as a single<br />
graphics card to the operating system.<br />
Benefits:<br />
- Visual simulation, broadcast, and video applications that are fill rate-limited will benefit from<br />
using the split frame rendering (SFR) mode.<br />
- SPECviewperf® and other applications that are geometry-limited will benefit from using the<br />
alternate frame rendering (AFR) mode.<br />
Requirements:<br />
- Two identical <strong>NVIDIA</strong> <strong>Quadro</strong> FX boards (4400, 3400, 1400)<br />
- <strong>SLI</strong> connector<br />
<strong>SLI</strong> Multi View: Combines the power of two <strong>NVIDIA</strong> <strong>Quadro</strong> PCI Express graphics boards to span<br />
a single hardware-accelerated OpenGL application window across multiple displays, run a single<br />
application per GPU with multiple display outputs, or enable other flexible usage of two PCI<br />
Express graphics boards.<br />
Benefits:<br />
- View professional applications over multiple displays to increase visual real estate.<br />
- Run a single application per GPU to offload geometry processing to a second GPU.
Requirements:<br />
- Any two <strong>NVIDIA</strong> <strong>Quadro</strong> PCI Express graphics boards: <strong>NVIDIA</strong> <strong>Quadro</strong> FX 4400, 3400, 1400,<br />
1300, 540, 330<br />
Motherboard and Power Supply Requirements<br />
To support <strong>SLI</strong>, your PC motherboard must be PCI Express-based, with two available and<br />
adjacent PCI Express expansion slots. Both slots must be x16 mechanical with the following<br />
allowed electrical slots:<br />
x16 + x16<br />
x16 + x8<br />
x16 + x4<br />
Since <strong>SLI</strong> supports up to two high-end graphics boards, the load on the system’s power supply<br />
can increase significantly. A minimum of a 450W Power Supply Unit (PSU) is recommended. An<br />
inadequate power supply will result in erratic and unpredictable system behavior.<br />
<strong>SLI</strong> Hardware <strong>Installation</strong><br />
Figure 1. below shows an <strong>SLI</strong>-capable <strong>NVIDIA</strong> <strong>Quadro</strong> FX 1400 professional graphics board<br />
along with <strong>SLI</strong> Hardware Bridge Connector. The <strong>NVIDIA</strong> <strong>Quadro</strong> FX 3400 and 4400 also support<br />
<strong>SLI</strong> and require an auxiliary power connector cable, which is also shown. Please remember the<br />
following:<br />
- <strong>SLI</strong> is supported only on PCI Express-based motherboards<br />
- Two available and adjacent PCI Express expansion slots are required, one must be x16, the<br />
second slot can be x16, x8, or x4<br />
- Some <strong>SLI</strong> capable graphics boards require an external power cable (FX 3400, FX 4400) make<br />
sure that these cables are properly connected to ensure reliable system operation<br />
- An <strong>SLI</strong> bridge connector (provided with your graphics board) must be installed to utilize the full<br />
capabilities of <strong>SLI</strong> Frame Rendering<br />
Figure 1.
Figure 2. shows two <strong>SLI</strong>-capable graphics boards installed in PCI Express expansion slots with<br />
the <strong>SLI</strong> bridge connector and auxiliary power connector cables installed. From a hardware<br />
perspective this system is ready <strong>for</strong> <strong>SLI</strong> driver installation and configuration.<br />
Figure 2.<br />
Now that we have reviewed <strong>SLI</strong> system requirements let’s proceed with the hardware installation<br />
by per<strong>for</strong>ming the following steps in the order given. Obtain the <strong>SLI</strong>-capable display driver (on the<br />
<strong>Quadro</strong> Utilities CD included with your <strong>NVIDIA</strong> <strong>Quadro</strong> graphics board or on the FTP site). You<br />
may also visit www.pny.com or www.nvidia.com to download the latest <strong>SLI</strong>-capable driver.<br />
* Be<strong>for</strong>e removing current graphics boards and installing two <strong>NVIDIA</strong> <strong>Quadro</strong> FX boards, please<br />
uninstall any current drivers and save the <strong>SLI</strong> drivers provided on your Windows desktop. When<br />
removing current <strong>NVIDIA</strong> drivers (using Start/Control Panel/Add or Remove Programs) please<br />
make sure to ONLY REMOVE <strong>NVIDIA</strong> DISPLAY DRIVER (In the “Remove <strong>NVIDIA</strong> Components”<br />
window, select “Remove only the following” and then select “<strong>NVIDIA</strong> Display Driver”). You can<br />
erase all saved nView profiles as well when asked in the next window that appears.<br />
1. Power off the system and remove the power cord from the power supply.
2. Gently remove or open the systems enclosure (refer to owners manual that came with your<br />
computer if necessary).<br />
3. Per<strong>for</strong>m the installation in a static safe environment and utilize a properly grounded anti-static<br />
wristband. Place any static sensitive components in anti-static bags.<br />
4. If a non-<strong>SLI</strong> capable graphics board occupies the x16 expansion slot, carefully remove it and<br />
replace it with your <strong>SLI</strong>-capable graphics board.<br />
5. Install the second <strong>SLI</strong>-capable graphics board in the adjacent slot, you may also need to<br />
relocate a card and the chosen slot must be x16, x8 or x4 capable.<br />
6. Connect the two graphics boards with the <strong>SLI</strong> bridge connector (used <strong>for</strong> <strong>SLI</strong> Frame Rendering<br />
only).<br />
7. If your graphics boards have an auxiliary power connector, connect them to the power supply<br />
using the supplied power connector cables.<br />
8. Replace the system’s cover and reconnect your display(s) to the <strong>SLI</strong>-capable graphics board<br />
installed in the x16 expansion slot.<br />
9. Plug the power cable back into the system<br />
If you removed an existing graphics board, or any other PCI Express expansion boards during<br />
this installation place them into antistatic bags/packaging <strong>for</strong> storage and safekeeping.<br />
Display Driver <strong>Installation</strong> and Enabling <strong>SLI</strong><br />
Follow the steps listed below to install your driver software:<br />
1. Power on the system and log into Windows.<br />
2. Cancel the Windows “Found New Hardware Wizard” (you should see this window twice – one<br />
<strong>for</strong> each graphics board) and run “setup.exe” in the <strong>SLI</strong> driver you saved to your desktop<br />
previously to start the software installation process (if you open the zip file, you should see the<br />
setup.exe file).<br />
3. Follow the “Next” prompt to proceed with driver installation. You should see the message<br />
“<strong>NVIDIA</strong> <strong>Quadro</strong> FX xxxx has not passed Windows Logo testing to verify its compatibility with<br />
Windows XP.” This is because the <strong>SLI</strong> driver was not included on the Microsoft Windows XP CD.<br />
Click “Continue Anyway” to proceed with driver installation. You should see this message a<br />
second time because the <strong>SLI</strong> installer will detect the presence of the second graphics board and<br />
install driver software <strong>for</strong> it as well. If this happens, click “Continue Anyway” a second time.<br />
4. Once the software has been installed, choose “Yes, I want to restart my computer now” and<br />
select “Finish” to reboot the system.<br />
5. After logging back into Windows, you should see the message “<strong>SLI</strong> capable system” in the<br />
bottom right corner of the screen as shown in Figure 3.<br />
Figure 3.
6. Click anywhere on the message above (if the message disappears, right click on the desktop<br />
and select Properties/Settings/Advanced/<strong>Quadro</strong> FX xxxx/<strong>SLI</strong> multi-GPU). Check the “Enable <strong>SLI</strong><br />
multi-GPU” as shown in the screen capture below and select OK.<br />
Select “Restart”.<br />
Setting Up For Testing<br />
The system is now setup and configured <strong>for</strong> <strong>SLI</strong>. When you log back into Windows, you will<br />
default into “<strong>SLI</strong> Frame Rendering” (single screen) mode. SPECviewperf benchmarks are run in<br />
“<strong>SLI</strong> Frame Rendering” mode.<br />
SPECviewperf is the benchmark that <strong>NVIDIA</strong> currently uses to analyze <strong>SLI</strong> per<strong>for</strong>mance <strong>for</strong><br />
<strong>NVIDIA</strong> <strong>Quadro</strong> graphics. An example of the benchmark results we have recorded can be found<br />
at the bottom of this document.<br />
Be<strong>for</strong>e running the SPECviewperf benchmarks, please ensure the display resolution is set to<br />
1280 x 1024 (right click on the desktop and select Properties/Settings).
You will then need to select the appropriate profile in the control panel. You can do this by<br />
selecting: Properties/Settings/Advanced/<strong>Quadro</strong> FX xxxx/Per<strong>for</strong>mance & Quality Settings. In the<br />
“Active profile” drop-down menu, select “3D App – Modeling AFR”.<br />
Finally, you need to turn “Vertical sync” off. While still in the “Per<strong>for</strong>mance & Quality Settings”<br />
window, check the “Vertical sync” box under the “Settings <strong>for</strong> 3D App – Modeling AFR”. Then uncheck<br />
the box at the bottom of the window that reads “Application-controlled”.<br />
Select “Apply” and “OK”. You are now ready to run the SPECviewperf benchmarks.<br />
You can download the SPECviewperf benchmarks at: www.spec.org/benchmarks.html#gpc<br />
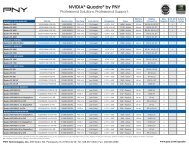
Comparison Benchmark Results (<strong>SLI</strong> Frame Rendering <strong>for</strong> Windows)<br />
Test plat<strong>for</strong>m:<br />
HP xw9300 workstation<br />
<strong>NVIDIA</strong> nForce Professional MCP<br />
Two AMD Opteron 250 processors (2.39 GHz)<br />
1 or 2 <strong>NVIDIA</strong> <strong>Quadro</strong> FX 4400 graphics boards<br />
2 GB RAM ECC Registered DRAM<br />
Microsoft Windows XP Professional SP2<br />
<strong>NVIDIA</strong> graphics driver version 77.13<br />
SPECviewperf 8.1 results<br />
Benchmarks<br />
<strong>SLI</strong>: Two GPUs<br />
Single GPU<br />
Two <strong>NVIDIA</strong> <strong>Quadro</strong> FX 4400 boards One <strong>NVIDIA</strong> <strong>Quadro</strong> FX 4400 board<br />
3dsmax-03 36.02 34.38<br />
catia-01 27.97 26.63<br />
ensight-01 30.02 21.83<br />
light-07 21.87 21.78<br />
maya-01 54.19 53.97<br />
proe-03 61.11 54.96<br />
sw-01 34.04 25.33<br />
ugs-04 54.59 37.02
Important Benchmark Reminders<br />
<strong>NVIDIA</strong> has encountered a number of installation and configuration issues that you need to be<br />
aware of while benchmarking. Here is a checklist of things to look <strong>for</strong> when your numbers don’t<br />
match some of the numbers provided, or when applications will not run:<br />
1. The <strong>NVIDIA</strong> <strong>Quadro</strong> FX 4400 and 3400 graphics solutions require the PCI Express power<br />
dongle.<br />
2. Make sure you test at high resolutions. <strong>NVIDIA</strong> recommends testing at a minimum resolution of<br />
1280x1024 x 32-bit with a refresh rate of 75Hz. <strong>NVIDIA</strong> <strong>Quadro</strong> FX graphics solutions are<br />
designed to push the state of the art <strong>for</strong> per<strong>for</strong>mance and features. They are designed to drive<br />
ultra high resolutions like 1280x1024 and higher.<br />
3. Always disable V-SYNC. V-sync is controlled separately <strong>for</strong> different APIs. Disabling V-sync is<br />
recommended because all professional workstation applications use double buffering to deliver<br />
high-quality images during dynamic graphics. When running benchmarks built on top of these<br />
applications, synchronization of the swapping display buffers to the monitor vertical retrace can<br />
prevent the GPU from delivering its true per<strong>for</strong>mance. This is likely to be the case as GPUs<br />
become increasingly powerful.<br />
a. To disable V-sync in OpenGL go to the Display Properties->Settings->Advanced-><br />
<strong>Quadro</strong> FX ->Additional Properties->OpenGL Settings->Vertical sync panel. Make sure to<br />
set this to either “Always off” or “Off by default.”<br />
b. To disable V-sync in D3D the “cool bits” feature must be enabled to give you access to<br />
V-sync control in the D3D control panel of the <strong>NVIDIA</strong> display drivers. Enable this by<br />
using regedit (Start -> Run -> regedit) to add the following registry DWORD:<br />
\\HKLM\Software\<strong>NVIDIA</strong>Corporation\Global\NVTweak\coolbits . Modify the value of this<br />
DWORD to be 3. Once this is enabled you can disable V-sync by entering your Display<br />
Properties->Settings->Advanced-> <strong>Quadro</strong> FX ->Additional Properties->D3D Settings-<br />
>More D3D->Vertical Sync Mode.<br />
4. Uni<strong>for</strong>mly set the monitor refresh rate. Refresh rate WILL effect per<strong>for</strong>mance regardless of<br />
whether V-sync is turned on or off.<br />
5. Install the latest chipset drivers and IDE/SCSI drivers. It’s crucial <strong>for</strong> you to load the latest AMD<br />
and Intel updates <strong>for</strong> optimal compatibility/per<strong>for</strong>mance. To check <strong>for</strong> current versions go to:<br />
http://support.intel.com/support/chipsets/driver.htm<br />
http://www.amd.com/support/support.html<br />
After installing the chipset drivers, check that the graphics board can correctly use the<br />
AGP by downloading and running the AGP memory utility from here:<br />
http://developer.nvidia.com/view.asp?IO=agp_memoryapp<br />
Note: If zero AGP memory is available, double-check that the chipset drivers are installed. For<br />
example, when using some Intel P4 chipsets the intelinfinst_enu and the intelata610_enu drivers<br />
may need to be loaded to ensure optimal per<strong>for</strong>mance.<br />
6. Run testing from a clean disk. Remains of older or competitor drivers may alter per<strong>for</strong>mance.<br />
For best results, you’ll want to reload the OS on a freshly <strong>for</strong>matted disk.<br />
7. Remove unnecessary startup programs. Unload memory resident software such as anti-virus<br />
or task scheduler software.<br />
8. Restart the application be<strong>for</strong>e each test. Optimal scores may not be achieved if applications<br />
aren’t restarted be<strong>for</strong>e each test.<br />
9. When benchmarking 3ds max use the MAXtreme <strong>Quadro</strong> Application utility. This can be<br />
downloaded from <strong>NVIDIA</strong>’s web site at: http://www.nvidia.com/object/maxtreme_6.00.07.html<br />
10. Use the correct application specific setting within the OpenGL driver. To set the application<br />
setting within the driver go to the Display Properties->Settings->Advanced-> <strong>Quadro</strong> FX-
Additional Properties->OpenGL Settings panel and select the appropriate application in the<br />
Custom OpenGL Application Setting pane. Application specific settings exist <strong>for</strong> many<br />
applications including: 3ds max; AutoCAD; CATIA; Maya / Studio Tools; Pro/ENGINEER; Solid<br />
Edge; SolidWorks; and Unigraphics, among others.<br />
11. Turn off hyperthreading. To achieve maximum per<strong>for</strong>mance, particularly in SolidWorks, turn<br />
off hyperthreading.<br />
12. Pay close attention to system memory size. Many benchmarks are sensitive to how much<br />
system memory is in the computer. For example, the 3ds max benchmarks run significantly faster<br />
with 1GB of memory than with 512 MB. This is true regardless of which video card is in the<br />
machine.<br />
13. Always use the latest version of DirectX <strong>for</strong> testing. To check on the current version, go to:<br />
http://www.microsoft.com/DirectX/<br />
Note: After selecting the correct application setting REMEMBER TO DISABLE V-SYNC<br />
Configure <strong>SLI</strong> Multi-View <strong>for</strong> Linux<br />
To configure <strong>SLI</strong> Multi-View mode <strong>for</strong> Linux, please follow these steps:<br />
If you want 2 displays, one per GPU, then use copy the config file XF86Config.sample-2 to<br />
/etc/X11/XF86Config by running these commands.<br />
cp /etc/X11/XF86Config /etc/X11/XF86Config.bak<br />
cp XF86Config.sample-2 /etc/X11/XF86Config<br />
If you want 4 displays, two per GPU, then use copy the config file XF86Config.sample-4 to<br />
/etc/X11/XF86Config by running these commands.<br />
cp /etc/X11/XF86Config /etc/X11/XF86Config.bak<br />
cp XF86Config.sample-4 /etc/X11/XF86Config<br />
You'll need to modify the config file to specify the correct GPUs. To do this, first determine the<br />
BUSID of both of your GPUs. You can do this by running the command<br />
/sbin/lspci | grep -i <strong>NVIDIA</strong> | grep VGA<br />
You should see output that looks something like this:<br />
02:00.0 VGA compatible controller: nVidia Corporation: Unknown device 00f8 (rev a2)<br />
06:00.0 VGA compatible controller: nVidia Corporation: Unknown device 00f8 (rev a2)<br />
The numbers are the start of two lines (01:00.0 and 05:00.0) are the BUSIDs of your GPUs.<br />
Write these numbers down.<br />
Now edit the file /etc/X11/XF86Config using your favorite text editor.<br />
Find the lines in the XF86Config file that say "BusID". There should be two. Replace each of the<br />
numeric ids with one of the BUSIDs you found in the previous step. For example, you would<br />
replace<br />
BusID "PCI:01:00:0"'<br />
with<br />
BusID "PCI:02:00:0"'.<br />
The order doesn't matter but be sure to use both BUSIDs.<br />
That's it. Now you should be able to restart your X server and the changes will take effect.<br />
Please refer to the sample configuration files <strong>for</strong> additional details (please open using word pad)
XF86Config.sample- XF86Config.sample-<br />
4 (7 KB)<br />
2 (7 KB)<br />
<strong>SLI</strong> Questions and Answers<br />
Here are answers to some common <strong>SLI</strong> questions:<br />
Q: Can I take advantage of <strong>SLI</strong> and run four displays at the same time?<br />
A: Yes, you can drive four displays simultaneously by using the <strong>SLI</strong> Multi View mode – two<br />
<strong>NVIDIA</strong> <strong>Quadro</strong> FX PCI Express boards, each driving two displays. The two boards do not<br />
require the <strong>SLI</strong> bridge connector.<br />
Q: Why didn’t the POST (Power On Self Test) screen come up during the reboot and why<br />
can’t I see the Windows display?<br />
A: Make sure that both <strong>SLI</strong> graphics boards are inserted properly and firmly, and make sure<br />
that neither board is twisted or partially lifted out of its bus slot when screwing the board bracket<br />
down.<br />
Q: Why isn’t the <strong>SLI</strong> Multi-GPU option available under the <strong>NVIDIA</strong> <strong>Quadro</strong> pop-up menu?<br />
A: Check My Computer / Properties / Hardware / Display Adapter; if there is only one <strong>SLI</strong><br />
driver shown, then you need to install the driver <strong>for</strong> the second <strong>SLI</strong> board, as noted in the section<br />
Display Driver <strong>Installation</strong> and Enabling <strong>SLI</strong>.<br />
Q: How can I get answers to other <strong>SLI</strong> support questions I might have?<br />
A: Contact the Professional Solutions Group PR Manager: David Higham,<br />
dhigham@nvidia.com or 408-486-8287.