1 Overview 2 Details of the Model Construction - Canada France ...
1 Overview 2 Details of the Model Construction - Canada France ...
1 Overview 2 Details of the Model Construction - Canada France ...

You also want an ePaper? Increase the reach of your titles
YUMPU automatically turns print PDFs into web optimized ePapers that Google loves.
<strong>Canada</strong>-<strong>France</strong>-Hawaii Telescope Corporation<br />
65-1238 Mamalahoa Highway<br />
Kamuela, Hawaii, USA 96743<br />
808 885-7944<br />
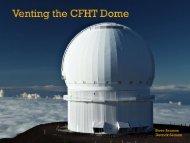
CFHT Dome Venting Studies: University <strong>of</strong> Washington Water and Wind Tunnel<br />
Tests, March 2011 – Description <strong>of</strong> work performed and distributed data<br />
Authors: Marc Baril, Tom Benedict and Karun Thanjavur<br />
Revision date: April 14 th , 2011<br />
1 <strong>Overview</strong><br />
Water tunnel tests using three models <strong>of</strong> <strong>the</strong> CFHT observatory were performed in <strong>the</strong> 30” water tunnel<br />
at <strong>the</strong> University <strong>of</strong> Washington Aerodynamics Laboratory (UWAL) on March 7 th through March 10 th ,<br />
2011. In addition, a half-day <strong>of</strong> testing on March 11 th was performed in <strong>the</strong> UWAL 36” wind tunnel to<br />
verify survivability <strong>of</strong> <strong>the</strong> models used in <strong>the</strong> water tunnel when subjected to 145 mph wind speeds as<br />
well as to provide a comparison <strong>of</strong> <strong>the</strong> general nature <strong>of</strong> <strong>the</strong> flow with what was observed in <strong>the</strong> water<br />
tunnel.<br />
The purpose <strong>of</strong> this document is to provide a description <strong>of</strong> <strong>the</strong> tests made ra<strong>the</strong>r than an interpretation<br />
<strong>of</strong> <strong>the</strong> data which is to be treated in one or more follow-up documents. We do however provide here an<br />
interpretation <strong>of</strong> <strong>the</strong> test performed to determine <strong>the</strong> water tunnel operating speed as this was necessary<br />
at <strong>the</strong> beginning <strong>of</strong> testing to validate our experimental conditions.<br />
2 <strong>Details</strong> <strong>of</strong> <strong>the</strong> <strong>Model</strong> <strong>Construction</strong><br />
The models consisted <strong>of</strong> three acrylic domes that could be interchanged and mounted on a single model<br />
<strong>of</strong> <strong>the</strong> observatory building and telescope. Each dome incorporated a ring gear on its base that allowed<br />
for easy rotation <strong>of</strong> <strong>the</strong> dome while testing (Figure 2). The diameter <strong>of</strong> <strong>the</strong> domes was 20.3 cm (8” ±<br />
0.1”) which corresponds to a model scale <strong>of</strong> 1:160.<br />
The observatory building was made <strong>of</strong> marine grade mahogany plywood, stacked, glued (with a<br />
waterpro<strong>of</strong> PVA adhesive) and turned on a wood la<strong>the</strong>. The dome floor was fabricated from aluminum,<br />
as were <strong>the</strong> mezzanine and freight elevator blocks. These latter two items were secured with machine<br />
screws through <strong>the</strong> bottom <strong>of</strong> <strong>the</strong> model to allow interchange <strong>of</strong> <strong>the</strong> model domes.<br />
The acrylic spheres from which <strong>the</strong> domes were cut were procured from California Quality Plastics<br />
Inc.; <strong>the</strong> shutter apertures were cut into <strong>the</strong>se spheres by <strong>the</strong> same company. The vent holes were<br />
manually cut on <strong>the</strong> mill at CFHT by Tom Benedict. Structures on <strong>the</strong> dome such as <strong>the</strong> lip on <strong>the</strong> edge<br />
<strong>of</strong> <strong>the</strong> shutter opening, windscreen (deployed at 50% and 100%) <strong>the</strong> existing vents on <strong>the</strong> top <strong>of</strong> <strong>the</strong><br />
dome and <strong>the</strong> shutter itself were produced out <strong>of</strong> ABS plastic using a 3D printer by Solid Concepts, Inc.<br />
Steve Bauman reduced and simplified Dan Sabin's detailed 3D CAD model <strong>of</strong> <strong>the</strong> dome for this<br />
purpose. In addition, ABS pieces representing shutters for <strong>the</strong> (proposed new) vents were produced<br />
using <strong>the</strong> same technique so that <strong>the</strong> effect <strong>of</strong> blocking <strong>the</strong>se could be investigated.<br />
The vent placement for <strong>the</strong> small and large vent domes are shown in Figure 1 and Figure 2 respectively<br />
and <strong>the</strong> vent sizes are shown in Figure 3. The actual CFHT dome dimensions are shown in Figure 4 for<br />
reference.<br />
The vent edges were outlined with acrylic pens to improve <strong>the</strong>ir visibility in <strong>the</strong> water.
Figure 1: Geometry <strong>of</strong> placement <strong>of</strong> <strong>the</strong> small vents on <strong>the</strong> dome.<br />
The vents are centered on <strong>the</strong> dome "equator", where <strong>the</strong> zenith<br />
position is mapped to a pole.<br />
Figure 2: Geometry <strong>of</strong> placement <strong>of</strong> <strong>the</strong> large vents on <strong>the</strong> dome.<br />
The lower edge <strong>of</strong> <strong>the</strong> vents is at <strong>the</strong> elevation on <strong>the</strong> dome as for<br />
<strong>the</strong> small vents.
Figure 3: Vent dimensions in inches. The “spring line” refers to <strong>the</strong><br />
equatorial plane normal to <strong>the</strong> zentih described inFigure 1.<br />
Figure 4: Actual CFHT dome dimensions<br />
for reference.<br />
The 3D printed components were cemented to <strong>the</strong> dome using two-part epoxy and cyanoacrylate<br />
adhesive. Gores made <strong>of</strong> 100 μm mono-filament sewing thread were attached to <strong>the</strong> dome at 7.5<br />
degree azimuth increments using cyanoacrylate. A simple in-house jig was used involving a rotational<br />
table and an arm to hold <strong>the</strong> taut fishing line at <strong>the</strong> correct height when applying <strong>the</strong> thread (on which
adhesive had been applied) to <strong>the</strong> dome. These steps required great care to avoid having <strong>the</strong><br />
cyanoacrylate spread on <strong>the</strong> dome or have its vapors fog up <strong>the</strong> acrylic. Thoroughly wiping all surfaces<br />
with denatured alcohol prior to work helped minimize fogging.<br />
The observatory model was mounted on a plywood cutout model <strong>of</strong> <strong>the</strong> terrain at CFHT. The terrain<br />
was a scale replica taken from a topographic map, and was made by Eli Hart as part <strong>of</strong> his internship at<br />
CFHT in <strong>the</strong> summer <strong>of</strong> 2010. The terrain was oriented so that <strong>the</strong> east side was directly facing <strong>the</strong><br />
flow direction in <strong>the</strong> water tunnel, which corresponds roughly to <strong>the</strong> median prevailing wind direction<br />
at <strong>the</strong> observatory. The terrain model consisted <strong>of</strong> 8 layers <strong>of</strong> 3/8” marine grade mahogany plywood<br />
mounted on a 91.4 cm x 74.9 cm x 3/8” (36” x 29.5” x 9.5 mm) rectangular base sheet. The base sheet<br />
had a rounded leading and trailing edge to reduce surface effects in <strong>the</strong> water tunnel. The scaled<br />
height represented by <strong>the</strong> terrain (not including <strong>the</strong> base sheet) is 12 m; this corresponds to 1.5 m <strong>of</strong><br />
elevation per step in <strong>the</strong> terrain. All wooden parts were treated with at least one primer paint coat<br />
followed by 2 coats <strong>of</strong> exterior grade acrylic based white paint. Despite this, some minor delamination<br />
<strong>of</strong> <strong>the</strong> plywood was noticed on <strong>the</strong> fourth day <strong>of</strong> testing.<br />
Figure 5: View <strong>of</strong> <strong>the</strong> south side <strong>the</strong> small vent dome model<br />
The azimuth angles written on <strong>the</strong> dome base ring correspond to <strong>the</strong> direction <strong>of</strong> <strong>the</strong> slit (shutter<br />
aperture) with 0 degrees at north, 90 degrees to <strong>the</strong> east, 180 degrees to <strong>the</strong> south and 270 degrees to<br />
<strong>the</strong> west with a fixed fiducial set directly south.<br />
3 Testing in Waimea<br />
A plywood and glass tank with cross sectional dimensions similar to that <strong>of</strong> <strong>the</strong> UWAL water tunnel<br />
was constructed by Roger Wood for use at HQ in Waimea. This was used to test visibility <strong>of</strong> <strong>the</strong> model
Figure 6: View through <strong>the</strong> shutter aperture showing <strong>the</strong> aluminum base ring on which <strong>the</strong> gear was<br />
milled.<br />
Figure 7: The three model domes, from left to right; large vents, unvented and small vents.
Figure 8: Closeup view <strong>of</strong> <strong>the</strong> small vent dome showing <strong>the</strong><br />
telescope model. The aluminum block right <strong>of</strong> center <strong>of</strong> <strong>the</strong><br />
telescope represents <strong>the</strong> freight elevator, while <strong>the</strong> aluminum<br />
segment representing <strong>the</strong> mezzanine is in <strong>the</strong> foreground.<br />
in <strong>the</strong> water, determine optimal lighting and camera positions, dye injection using a hand syringe, and<br />
check for o<strong>the</strong>r o<strong>the</strong>r unforeseen logistical issues. A “dry” run with <strong>the</strong> video cameras was performed<br />
at night in <strong>the</strong> HQ parking lot to simulate realistic lighting conditions to be encountered at <strong>the</strong> UWAL<br />
facility.<br />
The tempered glass used in <strong>the</strong> tank was 3/8” thick; <strong>the</strong> tank had windows on both sides as well as at<br />
<strong>the</strong> bottom, similar to <strong>the</strong> UWAL water tunnel.<br />
Figure 9: The plywood and glass testing tank used to test model visibility and o<strong>the</strong>r logistic issues<br />
in Waimea. Slightly leaky, but serviceable!
4 Dye Probe Locations<br />
Dye probe ports were installed on <strong>the</strong> telescope floor, inside <strong>the</strong>, in <strong>the</strong> Cassegrain baffle and at several<br />
locations on <strong>the</strong> terrain. The probe ports consisted <strong>of</strong> 9/32” (7.1 mm) brass tubing fitted with Delrin<br />
caps and packed with dense open-cell foam (art foam) to provide friction. The Delrin caps were drilled<br />
to allow insertion <strong>of</strong> 17 gauge 304 stainless hypodermic tubing. The inner and outer diameter <strong>of</strong> <strong>the</strong><br />
tubing was 0.047” (1.19 mm) and 0.058” (1.47 mm), respectively. With this arrangement <strong>the</strong> stainless<br />
tubing could be easily moved up and down through <strong>the</strong> port to adjust <strong>the</strong> height <strong>of</strong> <strong>the</strong> probe in relation<br />
to <strong>the</strong> model. The probes external to <strong>the</strong> model (labeled “B” below) had a 90 o , 0.25” radius bend, ~0.5”<br />
(12.7 mm) long formed to allow <strong>the</strong> dye to be injected into <strong>the</strong> flow in a more laminar nature. The dye<br />
ports were labeled as follows;<br />
Inside <strong>the</strong> dome:<br />
A1: Probe installed so that <strong>the</strong> dye exits at <strong>the</strong> level <strong>of</strong> <strong>the</strong> Cassegrain mirror fold above <strong>the</strong><br />
primary mirror.<br />
A2: Probe on <strong>the</strong> north side <strong>of</strong> <strong>the</strong> telescope pier at a 2” (50.8 mm) radial distance from <strong>the</strong><br />
dome center.<br />
A3: Probe on <strong>the</strong> east side <strong>of</strong> <strong>the</strong> dome (same radial distance from <strong>the</strong> dome center as A2).<br />
A4: Probe on <strong>the</strong> south side <strong>of</strong> <strong>the</strong> telescope pier (same radial distance as A2).<br />
A5: Probe on <strong>the</strong> west side <strong>of</strong> <strong>the</strong> telescope pier (same radial distance as A2).<br />
Outside <strong>the</strong> dome:<br />
B1, B2, B3, B4, B5: Probes from North to South respectively on <strong>the</strong> upwind (east) side <strong>of</strong> <strong>the</strong><br />
dome, 7.5 cm distant from <strong>the</strong> building measured along an east/west line.<br />
B6: Probe located directly upwind (east) on <strong>the</strong> down-slope <strong>of</strong> <strong>the</strong> terrain, 20.7 cm from <strong>the</strong><br />
dome building as projected on <strong>the</strong> horizontal plane.<br />
B7: Probe located directly downwind (west) <strong>of</strong> <strong>the</strong> dome, approximately 4 cm from <strong>the</strong><br />
building.<br />
Probes B1 to B7 could be inserted to be at any level, from a maximum extension in level with <strong>the</strong><br />
mezzanine to being totally retracted in <strong>the</strong>ir grooves; this permitted us to visualize <strong>the</strong> flow at various<br />
heights above <strong>the</strong> terrain.<br />
5 The UWAL 30” Water Tunnel Facility<br />
The UWAL 30” water tunnel is located in <strong>the</strong> Aerodynamics Laboratory on <strong>the</strong> UW main campus in<br />
Seattle Washington. Jack Ross (electrical engineer) is <strong>the</strong> business manager for <strong>the</strong> Kirsten Wind<br />
Tunnel as well as for <strong>the</strong> water tunnel facility. The water tunnel itself is maintained by Robert Gordon<br />
(research engineer) and was originally built by pr<strong>of</strong>essor Robert (Bob) Breidenthal and his students.<br />
Following is <strong>the</strong> contact information for <strong>the</strong>se individuals:<br />
Jack Ross: 206 543-0439, jwross@u.washington.edu<br />
Robert Gordon: 206 685-3011 (<strong>of</strong>fice), 206 713-2971 (cell), deepsnow@aa.washington.edu<br />
Robert Breidenthal: 206 685-1098, breident@aa.washington.edu<br />
The CFHT staff involved in performing <strong>the</strong> tests in Seattle were Karun Thanjavur, Tom Benedict and<br />
Marc Baril. Derrick Salmon observed and provided guidance via internet teleconference from Waimea.
Figure 10: Dye probe port locations on <strong>the</strong> model<br />
Figure 11: Dye tubing running to <strong>the</strong> probes B1-B5 (blue) and B6 (red). Note <strong>the</strong> brass handles used<br />
to lift <strong>the</strong> model out <strong>of</strong> <strong>the</strong> terrain to allow for easy interchange <strong>of</strong> <strong>the</strong> domes, installation <strong>of</strong> <strong>the</strong> vent<br />
plugs and <strong>the</strong> windscreen plugs.<br />
The model was mounted upside down in <strong>the</strong> water tunnel with approximately 15 mm <strong>of</strong> <strong>the</strong> base plate<br />
submerged so that <strong>the</strong> rounded-over leading edge was halfway submerged. The total cross section <strong>of</strong><br />
<strong>the</strong> model was 960 cm 2 , which corresponds to a blockage ratio <strong>of</strong> 20.6% with a 62 cm water tunnel<br />
depth.<br />
The water tunnel is located in <strong>the</strong> Fluid Dynamics lab, along with several o<strong>the</strong>r graduate student<br />
research areas and experimental set ups. The water tunnel is approximately 9-10 m long and consists<br />
<strong>of</strong> a test section 0.7 m wide by 0.7 m deep and 2.5 m long. The water flows through <strong>the</strong> test section<br />
down into a ~40 cm pipe back to a large centrifugal pump that sets up <strong>the</strong> flow. After exiting <strong>the</strong> pump<br />
<strong>the</strong> water enters a very wide section <strong>of</strong> tunnel in which a ~3-4 m wide bank <strong>of</strong> plastic drinking straws<br />
have been packed toge<strong>the</strong>r; <strong>the</strong>se act to set up laminar flow conditions in <strong>the</strong> tunnel. The tunnel <strong>the</strong>n
gradually narrows down over a length <strong>of</strong> ~4-5 m to <strong>the</strong> dimensions <strong>of</strong> <strong>the</strong> test section. A smaller pump<br />
continuously filters <strong>the</strong> water in <strong>the</strong> tunnel. At night, we normally left <strong>the</strong> water tunnel running at a<br />
slow speed (~5 cm/s), with <strong>the</strong> filter pump on to help clarify <strong>the</strong> water and reduce bubbles due to<br />
entrained air. A large valve is provided on one side <strong>of</strong> <strong>the</strong> tunnel for draining out <strong>the</strong> water. The<br />
capacity <strong>of</strong> <strong>the</strong> water tunnel is ~5000 gallons, and it is filled directly from <strong>the</strong> mains through a 1” pipe.<br />
O<strong>the</strong>r than <strong>the</strong> chlorine in <strong>the</strong> water supply, no additional bleach nor pH modifiers were used.<br />
The exact width <strong>of</strong> <strong>the</strong> test channel is 75.2 cm (29-5/8”) and was operated at a depth <strong>of</strong> 62 cm as<br />
measured approximately 80 cm from <strong>the</strong> model in <strong>the</strong> upstream direction. At this depth <strong>the</strong> free-stream<br />
water speed in cm/s is determined by multiplying <strong>the</strong> variable frequency pump drive frequency by<br />
1.013 and adding <strong>the</strong> correction -0.224 cm/s. Thus at <strong>the</strong> selected operating frequency <strong>of</strong> 30 Hz that<br />
was used for most <strong>of</strong> <strong>the</strong> testing, <strong>the</strong> nominal free-speed water speed was 30.2 cm/s. For simplicity, in<br />
<strong>the</strong> following we rounded-<strong>of</strong>f <strong>the</strong> water speed to <strong>the</strong> nearest cm/s, which is equivalent to <strong>the</strong> nominal<br />
pump frequency used with Hz units directly exchanged for cm/s.At <strong>the</strong> nominal speed <strong>of</strong> 30 cm/s, with<br />
water temperature at 5°C, <strong>the</strong> Reynolds number is 4x10 4 , using <strong>the</strong> dome diameter as <strong>the</strong> characteristic<br />
length.<br />
Figure 12: The observatory model installed in <strong>the</strong> University <strong>of</strong> Washington water tunnel facility. Note<br />
<strong>the</strong> two storyboards (to <strong>the</strong> left and above <strong>the</strong> model) used for noting <strong>the</strong> experimental conditions. The<br />
“side view” video camera was located immediately to <strong>the</strong> left <strong>of</strong> <strong>the</strong> vantage point seen here, centered<br />
on <strong>the</strong> model and perpendicular to <strong>the</strong> tank wall.
6 Experimental methodology<br />
6.1 Dyes<br />
The dye was injected using electric micro-pumps provided by UWAL. Dyes were “Lucky” brand<br />
concentrated food colouring supplied by UWAL. The dye was sourced from a 1 liter container on <strong>the</strong><br />
input side <strong>of</strong> <strong>the</strong> pump and <strong>the</strong> dye flow was started/interrupted using a hose clamp on <strong>the</strong> output side.<br />
The 1.2 mm inner diameter stainless steel dye probe lines were connected to <strong>the</strong> dye source using an<br />
assortment <strong>of</strong> flexible hoses that were slipped on and <strong>of</strong>f <strong>the</strong> dye probes as necessary. For <strong>the</strong> tests<br />
where probes B1-B5 were alternately fired, aquarium air-line gang valves were used to redirect <strong>the</strong> dye<br />
to <strong>the</strong> individual probes.<br />
In a single day <strong>of</strong> testing it was unusual to use more than 1 litre <strong>of</strong> each <strong>of</strong> <strong>the</strong> red and blue food<br />
coloring dyes when only flushing tests were being performed. The dyes were diluted in ratios near<br />
50:1 to obtain a good balance between visibility and minimal use <strong>of</strong> <strong>the</strong> dye which would eventually<br />
cloud up <strong>the</strong> water. Change-out <strong>of</strong> <strong>the</strong> water was performed on a daily basis and required<br />
approximately 1.5-2 hours to complete. It was found necessary to flush <strong>the</strong> tunnel and <strong>the</strong>n<br />
immediately refill it in order to avoid getting air trapped in <strong>the</strong> plastic straws that make up <strong>the</strong> flow<br />
straightener. The trapped air in <strong>the</strong> flow straightener results in small bubbles being entrained in <strong>the</strong><br />
flow which significantly reduces <strong>the</strong> transparency <strong>of</strong> <strong>the</strong> water. The only solution when this happens is<br />
to flush out <strong>the</strong> straws using a hose. However, this results in large amounts <strong>of</strong> trapped sediment being<br />
flushed from <strong>the</strong> straws, which (at least in our one attempt at this procedure) muddies <strong>the</strong> water beyond<br />
usability for testing.<br />
Tests requiring relatively small amounts <strong>of</strong> dye (i.e. flushing time tests) were generally performed early<br />
in <strong>the</strong> day when <strong>the</strong> water was still clear. Flow visualization tests requiring continuous dye input over<br />
several seconds were performed at <strong>the</strong> end <strong>of</strong> <strong>the</strong> day when <strong>the</strong> dye had significantly clouded <strong>the</strong> water.<br />
The red and blue dyes were selected based on <strong>the</strong>ir better contrast in <strong>the</strong> water as suggested by Robert<br />
Gordon, with red being more visible than blue.<br />
The method used for initiating <strong>the</strong> dye injection was to first turn on <strong>the</strong> micro-pumps, wait a few<br />
seconds for <strong>the</strong> output pressure to build up and <strong>the</strong>n simultaneously open <strong>the</strong> hose clamps to begin <strong>the</strong><br />
dye injection (this was generally controlled by Karun). In this way, if more than one dye color was<br />
used, <strong>the</strong> dyes would be injected simultaneously to within a few 100 ms. It is important to note this as<br />
some <strong>of</strong> <strong>the</strong> video footage appears to indicate that <strong>the</strong> blue and red dyes (e.g. for <strong>the</strong> A3 & A5 probe<br />
flushing time tests) enter <strong>the</strong> chamber at very different times. This is an illusion caused by <strong>the</strong> strong<br />
flow along <strong>the</strong> dome floor in certain slit to wind orientations compounded by <strong>the</strong> mezzanine blocking<br />
<strong>the</strong> camera's view <strong>of</strong> <strong>the</strong> dome floor.<br />
6.2 Lighting<br />
The model was lit from one side with three 500 W halogen light fixtures. Two <strong>of</strong> <strong>the</strong> light fixtures<br />
were placed approximately 50 cm above floor level (~35 cm below <strong>the</strong> bottom <strong>of</strong> <strong>the</strong> tank) while <strong>the</strong><br />
third fixture (a spot light) was at tank level aimed towards <strong>the</strong> downstream tank direction. With this<br />
arrangement, reflections were avoided from <strong>the</strong> vantage point <strong>of</strong> <strong>the</strong> cameras. However, some<br />
shadowing is visible due to partial blocking <strong>of</strong> <strong>the</strong> spot light by <strong>the</strong> storyboard (this is particularly<br />
evident in <strong>the</strong> bottom camera views).<br />
A white fluorescent light panel (part <strong>of</strong> <strong>the</strong> UWAL water tunnel setup) was placed on <strong>the</strong> side <strong>of</strong> <strong>the</strong><br />
tunnel opposite <strong>the</strong> “side-view” camera.
6.3 Video capture<br />
Two Panasonic Lumix ZS7 digital cameras were used for <strong>the</strong> video capture. This camera was selected<br />
based on a combination <strong>of</strong> video quality (1280:720 @ 30 Hz), flexibility (10X optical zoom), price<br />
($200) and ready availability. The video was captured in AVCHD “Lite” format (.MTS file extension)<br />
with <strong>the</strong> highest compression mode selected to minimize <strong>the</strong> amount <strong>of</strong> data to be handled later. It was<br />
determined that <strong>the</strong>se settings would not reduce <strong>the</strong> quality <strong>of</strong> <strong>the</strong> captured video in a meaningful way.<br />
The optical stabilization and GPS modes <strong>of</strong> <strong>the</strong> camera were disabled to maximize battery run time.<br />
Between <strong>the</strong> two cameras, three spare batteries were used with a typical run-time on a single charge<br />
being approximately two hours. The time required to charge <strong>the</strong> battery was ~1 hour. Both cameras<br />
were mounted on high quality, sturdy tripods. One camera viewed through <strong>the</strong> side <strong>of</strong> <strong>the</strong> tunnel (<strong>the</strong><br />
“sideview” camera), while <strong>the</strong> o<strong>the</strong>r was mounted close to <strong>the</strong> floor below <strong>the</strong> test section and looking<br />
up through <strong>the</strong> bottom window (<strong>the</strong> “bottom view” camera). The side view camera was mounted upside<br />
down so that <strong>the</strong> dome orientation appears correct in <strong>the</strong> video but <strong>the</strong> storyboard text is inverted.<br />
Two storyboards were made visible in <strong>the</strong> side-view video frame, each describing <strong>the</strong> relevant details <strong>of</strong><br />
<strong>the</strong> experimental setup for that video. The storyboard is correct in all instances except for <strong>the</strong><br />
“boundary layer investigation” experiment (described below) where <strong>the</strong> dome angle appearing on <strong>the</strong><br />
board is 0 degrees but is in fact at 90 degrees (which is clear from <strong>the</strong> video). White board markers and<br />
erasers were used to edit <strong>the</strong> storyboards (seen in Figure 12).<br />
6.4 The capture sequence<br />
Each video capture instance generally followed <strong>the</strong> sequence below:<br />
• The side-view camera was started first with <strong>the</strong> operator (Marc Baril) simultaneously calling<br />
out, “Start”. This call-out is not always heard on <strong>the</strong> video.<br />
• The bottom-view camera was started with <strong>the</strong> operator (Tom Benedict) calling out, “Rolling”.<br />
At this point both cameras were capturing video.<br />
• The dye probe operator (Karun Thanjavur) would start <strong>the</strong> slower <strong>of</strong> <strong>the</strong> two dye pumps running<br />
(assuming two dyes were used), wait a few seconds and <strong>the</strong>n start <strong>the</strong> faster pump. We <strong>the</strong>n<br />
waited a couple <strong>of</strong> seconds for <strong>the</strong> pressure in both dye lines to build up. The hose clamps on<br />
both lines were <strong>the</strong>n released simultaneously with Karun calling out, “Open”. Usually, ei<strong>the</strong>r<br />
Marc Baril, Robert Gordon or a UWAL student would assist with <strong>the</strong> task <strong>of</strong> opening one <strong>of</strong> <strong>the</strong><br />
hose clamps.<br />
For flushing time tests, <strong>the</strong> dye injection lasted for ~3sec, after which <strong>the</strong> hose clamps were shut <strong>of</strong>f (on<br />
<strong>the</strong> call, “close”), and <strong>the</strong> dye pumps turned <strong>of</strong>f. For flow visualization, dye flow was maintained long<br />
enough to provide adequate footage <strong>of</strong> <strong>the</strong> flow pattern that was being investigated. For visualizing <strong>the</strong><br />
flow upstream and downstream <strong>of</strong> <strong>the</strong> dome simultaneously, dye was injected through <strong>the</strong> downstream<br />
B7 probe first, <strong>the</strong>n B6 (with B7 still running); after a few seconds <strong>of</strong> both probes injecting, B7 was<br />
turned <strong>of</strong>f, <strong>the</strong>n B6 a few seconds later. For flow visualization around <strong>the</strong> dome using probes B1 to B5,<br />
<strong>the</strong> output <strong>of</strong> <strong>the</strong> micro-pump was connected to an aquarium air-line gang valve which <strong>the</strong>n fed all five<br />
probes. In this test, for <strong>the</strong> sake <strong>of</strong> visual clarity, dye was injected through only one probe at a time by<br />
opening <strong>the</strong> appropriate valve.<br />
7 Determination <strong>of</strong> <strong>the</strong> Operating Tunnel Flow Speed<br />
The first experiment carried out involved <strong>the</strong> determination <strong>of</strong> <strong>the</strong> water flow speed in <strong>the</strong> channel
above which a transition between laminar flow over and around <strong>the</strong> terrain to turbulent flow would be<br />
obtained. A set <strong>of</strong> visualization tests were performed with <strong>the</strong> upwind terrain probe B6 set at various<br />
elevations above <strong>the</strong> model while varying <strong>the</strong> flow speed from 10 to 50 cm/s in increments <strong>of</strong> 10 cm/s.<br />
At <strong>the</strong> time <strong>the</strong> experiment was conducted we believed that we saw a transition in <strong>the</strong> flow pattern from<br />
a 10 cm/s to 20 cm/s free flow water speed in <strong>the</strong> tunnel. Namely, <strong>the</strong> clear formation <strong>of</strong> a vortex on<br />
<strong>the</strong> leading edge <strong>of</strong> <strong>the</strong> observatory building with a scaled height <strong>of</strong> 5-6 m. However, examination <strong>of</strong><br />
<strong>the</strong> video footage after <strong>the</strong> fact does not lend evidence for this. The video stills in Figure 13 with <strong>the</strong><br />
B6 probe set 50 mm above <strong>the</strong> model terrain indicate that <strong>the</strong> vortex is present and <strong>of</strong> similar size at all<br />
<strong>the</strong> flow speeds investigated (side view images). Fur<strong>the</strong>rmore, <strong>the</strong> pr<strong>of</strong>ile and extent <strong>of</strong> <strong>the</strong> wake<br />
around <strong>the</strong> building does not change in a noticeable way when looking at <strong>the</strong> top-down view.<br />
The flow speed <strong>of</strong> 30 cm/s was used for all but a few <strong>of</strong> <strong>the</strong> tests. This speed was selected partly on <strong>the</strong><br />
basis <strong>of</strong> remaining well above <strong>the</strong> velocity <strong>of</strong> <strong>the</strong> perceived transition between 10 and 20 cm/s. O<strong>the</strong>r<br />
factors that influenced this choice was that operation above 40 cm/s for extended periods <strong>of</strong> time was<br />
discouraged by <strong>the</strong> UWAL staff and that <strong>the</strong> flushing time (from some quick undocumented tests with<br />
<strong>the</strong> unvented dome) was found to be short enough to allow efficient progress <strong>of</strong> <strong>the</strong> experiments while<br />
being long enough to allow accurate measurement <strong>of</strong> <strong>the</strong> flushing time.<br />
Note that at 30 cm/s <strong>the</strong> Reynolds number Re associated with an ideal spherical obstruction <strong>of</strong> diameter<br />
L is;<br />
Re= ρ VL<br />
μ =999.7(kg /m3 )⋅0.3(m⋅s −1 )⋅0.2 (m)/1.307x10 −3 ( N⋅s⋅m −2 @10 o C )=4.6x10 4<br />
where ρ is <strong>the</strong> density and μ is dynamic viscosity <strong>of</strong> water at <strong>the</strong> test temperature (average <strong>of</strong> ~10 C<br />
over <strong>the</strong> testing period). The dynamic viscosity <strong>of</strong> air depends primarily on temperature; at 0 C it is<br />
1.35x10 -5 N s m -2 . The air density at 4200 m is 0.80 kg/m 3 and with 32 m diameter dome <strong>the</strong> wind<br />
speed to which <strong>the</strong> above model Reynold's number corresponds to in <strong>the</strong> real-world observatory is 2.4<br />
cm/s. For comparison, <strong>the</strong> median wind speed at <strong>the</strong> location <strong>of</strong> CFHT on <strong>the</strong> summit <strong>of</strong> Mauna Kea is<br />
15 knots (7.7 m/s); which is over 300 times greater than <strong>the</strong> scale speed obtained in our water tunnel<br />
experiment.<br />
8 Description <strong>of</strong> <strong>the</strong> tests performed<br />
8.1 Parameters investigated<br />
The basic parameters that could be varied in <strong>the</strong> tests were as follows (numbers in paren<strong>the</strong>ses indicate<br />
<strong>the</strong> possible number <strong>of</strong> free parameters involved with each item):<br />
1. Water flow speed (1): Except for some quick investigations, this was kept fixed as <strong>the</strong><br />
dynamics <strong>of</strong> <strong>the</strong> flow would not change significantly unless order <strong>of</strong> magnitude changes were<br />
made to <strong>the</strong> speed. The flow rate was set to 30 cm/s.<br />
2. Dome configuration (3): Unvented dome, dome with small vents, dome with large vents.<br />
3. Dye probe locations. This was narrowed down to a few configurations for <strong>the</strong> bulk <strong>of</strong> <strong>the</strong> tests.<br />
Inside <strong>the</strong> dome (2): Probe A1 alone, and probes A3 & A5 combined. This was used for<br />
determination <strong>of</strong> dome flushing times.<br />
Outside <strong>the</strong> dome (1-2): Probes B1-B5 fired <strong>of</strong>f in succession to view flow around and into <strong>the</strong><br />
dome (this was not done for all <strong>the</strong> dome types), and probes B6 and B7 fired <strong>of</strong>f in succession<br />
to view flow around <strong>the</strong> dome on <strong>the</strong> upwind side and <strong>the</strong> reverse flow on <strong>the</strong> downwind side.
4. Windscreen position (3): Ei<strong>the</strong>r <strong>the</strong> windscreen was down, 50% raised or 100% raised.<br />
5. Vent plugs (3-4): The purpose <strong>of</strong> <strong>the</strong> vent plugs was to simulate throttling <strong>of</strong> <strong>the</strong> flow by<br />
completely closing some <strong>of</strong> <strong>the</strong> proposed dome vents. We investigated two configurations; one<br />
in which <strong>the</strong> upwind vents were closed and <strong>the</strong> slit was facing partially or completely upwind,<br />
with <strong>the</strong> windscreen at different positions, ano<strong>the</strong>r with similar dome orientations but with <strong>the</strong><br />
vents closed on <strong>the</strong> downwind side. For each configuration <strong>the</strong> maximum number <strong>of</strong> vent plugs<br />
were installed in <strong>the</strong> dome (up to 3 plugs) and a fixed set <strong>of</strong> experiments was run in each<br />
configuration, removing a single vent plug once a set <strong>of</strong> experiments was complete.<br />
At <strong>the</strong> time <strong>of</strong> <strong>the</strong> experiment, <strong>the</strong> configuration <strong>of</strong> vent plugs tested represented <strong>the</strong> most likely<br />
real-world operational configuration <strong>of</strong> <strong>the</strong> dome. Hypo<strong>the</strong>tically, with <strong>the</strong> upwind vents<br />
blocked, <strong>the</strong> effect <strong>of</strong> <strong>the</strong> wind on <strong>the</strong> telescope shake would be minimized. On <strong>the</strong> o<strong>the</strong>r hand,<br />
having <strong>the</strong> down-wind vents closed allowed us to investigate <strong>the</strong> potentially compromising<br />
effect on flushing time having <strong>the</strong>se vents closed. The reason we might want to have <strong>the</strong>se<br />
vents closed is that <strong>the</strong>re was an indication (prior to <strong>the</strong> tests, but later borne out by our<br />
experiments) that <strong>the</strong> downwind counter-flow might lead to entrainment <strong>of</strong> <strong>the</strong> warm air from<br />
<strong>the</strong> building exhaust into <strong>the</strong> dome.<br />
6. Dome position (4-13): The number <strong>of</strong> dome positions investigated for each dome configuration<br />
depended on <strong>the</strong> particular configuration with <strong>the</strong> vents and windscreen plugs installed. With<br />
<strong>the</strong> exception <strong>of</strong> <strong>the</strong> boundary layer investigation test, <strong>the</strong> dome positions explored were from<br />
90 o (dome slit facing east) through 180 o (dome facing south) to 270 o (dome slit facing west) in<br />
increments <strong>of</strong> 15 o . This was <strong>the</strong> case for each configuration in which <strong>the</strong> vent plugs were not<br />
installed. The north facing orientations were not explored due to <strong>the</strong> symmetry <strong>of</strong> <strong>the</strong> model<br />
and <strong>the</strong> lack <strong>of</strong> visibility into <strong>the</strong> dome with <strong>the</strong> slit facing north (due to <strong>the</strong> opaque dome<br />
shutter). Note however that <strong>the</strong> symmetry is not perfect due to <strong>the</strong> structures on <strong>the</strong> dome floor<br />
(e.g. <strong>the</strong> mezzanine on <strong>the</strong> south side <strong>of</strong> <strong>the</strong> dome floor). Note that in some configurations with<br />
<strong>the</strong> vent plugs installed, small angles to <strong>the</strong> ENE were explored.<br />
Typically, after 20 or more tests had been performed, <strong>the</strong> videos were downloaded to a laptop. This<br />
minimized <strong>the</strong> possibility <strong>of</strong> data loss as well as <strong>the</strong> loss <strong>of</strong> sequencing <strong>of</strong> <strong>the</strong> video files between <strong>the</strong><br />
two cameras. Care was taken to erase <strong>the</strong> camera memory after each download session so that file<br />
names on <strong>the</strong> side-view and bottom-view cameras would match. The laptop was backed up to an<br />
external disk every evening once testing for <strong>the</strong> day was complete.<br />
Most <strong>of</strong> <strong>the</strong> routine experiments involved first installing <strong>the</strong> maximum number <strong>of</strong> plugs (on a given<br />
upwind or downwind side) that would be used with a set dome (if applicable). The data taking would<br />
proceed by taking video at <strong>the</strong> defined set <strong>of</strong> angles for a given configuration (see next section for<br />
details), almost always in increments <strong>of</strong> 15 degrees. The probe configuration would <strong>the</strong>n be changed<br />
and a new sequence <strong>of</strong> video at <strong>the</strong> relevant angles would be taken. This provided <strong>the</strong> smoo<strong>the</strong>st data<br />
taking work flow. However, a few experiments did not fit this mold and <strong>the</strong>se are described below.<br />
8.2 Boundary layer investigation<br />
This was previously described in “Determination <strong>of</strong> <strong>the</strong> Operating Tunnel Flow Speed”.<br />
8.3 Flow Visualization Near <strong>the</strong> Heat Vent Locations<br />
The purpose <strong>of</strong> this experiment was to determine if <strong>the</strong> fluid in <strong>the</strong> vicinity <strong>of</strong> <strong>the</strong> heat vents to <strong>the</strong> NW<br />
and NE <strong>of</strong> <strong>the</strong> observatory could be drawn into <strong>the</strong> dome from certain orientations. The location <strong>of</strong> <strong>the</strong><br />
heat vents was visually estimated referring to <strong>the</strong> topographical map shown in Figure 14. A hand held
Figure 13: Still frames <strong>of</strong> boundary layer visualization experiment with probe B6 set at a 50 mm<br />
height above <strong>the</strong> terrain. Side view (left) is looking due north and <strong>the</strong> top view is shown on <strong>the</strong><br />
right. Variations in dye contrast are due to <strong>the</strong> effect <strong>of</strong> <strong>the</strong> varying flow speed at fixed dye injection<br />
rate (<strong>the</strong> dye is more diffuse at <strong>the</strong> higher velocities). The top view images (right) have been<br />
processed to improve <strong>the</strong> contrast <strong>of</strong> <strong>the</strong> blue dye.
dye probe was held near each vent location to visualize <strong>the</strong> entrainment <strong>of</strong> dye towards and into <strong>the</strong><br />
unvented dome model.<br />
8.4 Turbulence Generator Investigation<br />
Robert Breidenthal suggested that if we wished to increase <strong>the</strong> level <strong>of</strong> turbulent layer up to <strong>the</strong> level <strong>of</strong><br />
<strong>the</strong> dome that we could install some turbulence generators upwind <strong>of</strong> <strong>the</strong> dome. In practice this is<br />
unlikely to be feasible, however to give this idea a try we cut a sawtooth shaped turbulence generator<br />
board out <strong>of</strong> corrugated plastic poster-board with teeth 38 mm tall and 19 mm wide at <strong>the</strong> base. This<br />
structure was held on <strong>the</strong> upstream edge <strong>of</strong> <strong>the</strong> model base plate and <strong>the</strong> flow was visualized using dye<br />
probe B6. The depth <strong>of</strong> <strong>the</strong> turbulence generator in <strong>the</strong> water was varied to determine at what point it<br />
had an effect on <strong>the</strong> vortex on <strong>the</strong> upstream side <strong>of</strong> <strong>the</strong> observatory base. The turbulence generator<br />
board is shown in Figure 15.<br />
9 Basic Data Product<br />
The files were saved in <strong>the</strong> AVCHD Lite format <strong>of</strong> <strong>the</strong> Panasonic ZS7 cameras. There were a few<br />
issues around using <strong>the</strong> files in this format. For one, <strong>the</strong> AVCHD format is not commonly supported by<br />
older video display s<strong>of</strong>tware; this is a fairly easy problem to work around. Secondly, we wished to use<br />
MATLAB to automatically process <strong>the</strong> video to determine <strong>the</strong> flushing times in a more quantitative<br />
way, however this video format is not supported by MATLAB. Thirdly, <strong>the</strong> 720p HD format video was<br />
unnecessarily large for most common use and precluded easy distribution on inexpensive data media<br />
(e.g. DVD disks).<br />
The video files were first renamed and organized in a self-explanatory and intuitive path structure that<br />
makes it easy to navigate to <strong>the</strong> video pertaining to a specific experimental configuration. These files<br />
were <strong>the</strong>n converted using <strong>the</strong> SUPER video conversion tool to a AVI format using <strong>the</strong> following<br />
settings:<br />
• Format: AVI<br />
• Output video codec: DivX<br />
• Output audio codec: mp3<br />
• Video scale size: 640 x 360 pixels<br />
• Frame per sec: 14.985 Hz<br />
• Bitrate: 9600 kbps<br />
• Options: Hi-quality<br />
• Audio: 1 Channel, 22050 Hz sampling, 96 kbps bitrate<br />
• MEncoder and DirectShow decode selected (<strong>the</strong> latter only works for <strong>the</strong> Windows OS).<br />
Down-conversion from <strong>the</strong> nominal 60 Hz (30 Hz actual!) frame rate to 15 Hz was necessary to ensure<br />
normal playback speed <strong>of</strong> <strong>the</strong> video. Conversion to <strong>the</strong> actual 30 Hz frame rate <strong>of</strong> <strong>the</strong> video resulted in<br />
video that played back at approximately twice <strong>the</strong> correct speed; this was found for at least 4<br />
conversion packages tried. This problem is related to <strong>the</strong> decoders <strong>of</strong> <strong>the</strong> AVCHD Lite format ignoring<br />
a bit that indicates that each 30 Hz frame should be played twice to achieve <strong>the</strong> nominal 60 Hz<br />
playback.
Figure 14: Topographic view <strong>of</strong> <strong>the</strong> summit showing <strong>the</strong> building heat exhaust vents. South is on <strong>the</strong><br />
bottom, west is to <strong>the</strong> left.<br />
Figure 15: Turbulence generator installed on <strong>the</strong> up-stream edge <strong>of</strong> <strong>the</strong> model base plate.<br />
Scale is 6" (15 cm) long.<br />
The AVI files were saved with file names identical to <strong>the</strong> AVCHD files (.MTS extension) but with <strong>the</strong><br />
“.avi” extension appended. The path structure was maintained when converting to <strong>the</strong> AVI format files.<br />
The path structure showing <strong>the</strong> different experimental configurations used is shown in Figure 16,<br />
Figure 17 and Figure 18. Unless noted o<strong>the</strong>rwise <strong>the</strong> dome angle ranges in <strong>the</strong>se figures indicate data<br />
taken at 15 degree increments inclusive <strong>of</strong> <strong>the</strong> angles at <strong>the</strong> extremes <strong>of</strong> <strong>the</strong> range.
10 Lessons learned<br />
• A dome shutter made <strong>of</strong> a transparent material would have been helpful and <strong>the</strong> same could be<br />
said for <strong>the</strong> vent plugs; in some orientations <strong>the</strong> dome shutter or vent plugs considerably<br />
blocked <strong>the</strong> view <strong>of</strong> <strong>the</strong> flow inside <strong>the</strong> dome.<br />
• All aluminum parts on <strong>the</strong> inside <strong>of</strong> <strong>the</strong> dome (e.g. <strong>the</strong> dome floor) should have been painted<br />
white to improve <strong>the</strong> contrast with <strong>the</strong> dye. The telescope would <strong>the</strong>n have to be painted a<br />
bright contrasting color to stand out against dome floor. Choice <strong>of</strong> this colour should be such<br />
that it is not confused with any <strong>of</strong> <strong>the</strong> dyes used.<br />
• The use <strong>of</strong> fluorescent or o<strong>the</strong>r lighting fixtures with a strong periodic intensity variation should<br />
be avoided. In this case <strong>the</strong> 60 Hz frequency <strong>of</strong> <strong>the</strong> fluorescent panel intensity time variation<br />
was a very close multiple <strong>of</strong> <strong>the</strong> 30 Hz camera frame rate which led to low frequency “beats” in<br />
<strong>the</strong> background intensity that appear to have a chromatic component.<br />
• A vent in <strong>the</strong> base <strong>of</strong> <strong>the</strong> model should have been provided to allow air to be released from<br />
inside <strong>the</strong> dome when it is inverted in <strong>the</strong> water. In our tests we used a siphon to remove <strong>the</strong> air<br />
from <strong>the</strong> dome, which was effective but very awkward.<br />
• A model <strong>of</strong> <strong>the</strong> MKAM/wea<strong>the</strong>r tower would have been useful to see <strong>the</strong> effect <strong>of</strong> <strong>the</strong> dome<br />
wake at this location.
Figure 16: Path structure used to organize <strong>the</strong> captured video files. Page A: file<br />
breakdown for <strong>the</strong> large vent dome. Items in yellow are folders, items in blue are <strong>the</strong> files<br />
contained in <strong>the</strong> bottom level folder. Continued on pages B and C.
Figure 17: Path structure used to organize <strong>the</strong> captured video files: Page B: file<br />
breakdown for <strong>the</strong> small vent dome. Items in yellow are folders, items in blue are <strong>the</strong> files<br />
contained in <strong>the</strong> bottom level folder. Continued on pages A and C.
Figure 18: Path structure used to organize <strong>the</strong> captured video files. Page C: file<br />
breakdown for <strong>the</strong> unvented dome. Items in yellow are folders, items in blue are <strong>the</strong> files<br />
contained in <strong>the</strong> bottom level folder. Continued on pages A and B.
11 University <strong>of</strong> Washington 36” Wind Tunnel Tests<br />
11.1 <strong>Overview</strong><br />
Having successfully completed all our tests in <strong>the</strong><br />
UWAL Water Tunnel facility ahead <strong>of</strong> schedule, on 11<br />
March we were given access to <strong>the</strong> 36” wind tunnel<br />
facility for half a day <strong>of</strong> preliminary tests in preparation<br />
for <strong>the</strong> full scale wind tunnel tests planned for later this<br />
year. The principal objectives were to test <strong>the</strong> structural<br />
integrity <strong>of</strong> <strong>the</strong> water tunnel model under <strong>the</strong> more<br />
rigorous operating conditions in <strong>the</strong> wind tunnel, as well<br />
as to explore options for flow visualization and flushing<br />
time tests. Here we document our findings and lessons<br />
learned to provide a reference for work to follow.<br />
Figure 19: View <strong>of</strong> <strong>the</strong> UWAL 36” wind<br />
tunnel shownfrom <strong>the</strong> inlet end, looking<br />
toward <strong>the</strong> testsection and <strong>the</strong> power unit at<br />
<strong>the</strong> rear.<br />
11.2 UWAL 36” Wind Tunnel<br />
The UWAL 36” wind tunnel is housed in an<br />
independent building adjoining <strong>the</strong> Kirsten wind tunnel<br />
facility. This single story building is completely<br />
devoted to <strong>the</strong> wind tunnel, so <strong>the</strong>re is no intrusion with<br />
any o<strong>the</strong>r laboratories or <strong>of</strong>fice space. The wind tunnel<br />
uses an open circuit, straight through design, with an<br />
inlet filter and baffle section, tapering down to <strong>the</strong> test<br />
section, <strong>the</strong>n diverging to <strong>the</strong> single propeller power unit at <strong>the</strong> exhaust end.<br />
The test section has a rectangular, 36”x36” cross section, and is 8’ long. Both sides and <strong>the</strong> top are<br />
made <strong>of</strong> plexiglass, with steel streng<strong>the</strong>ning members which <strong>of</strong>fers clear visibility <strong>of</strong> <strong>the</strong> model being<br />
tested for a wide range <strong>of</strong> viewing angles. Since <strong>the</strong> wind tunnel is located in <strong>the</strong> middle <strong>of</strong> <strong>the</strong><br />
building, <strong>the</strong>re is adequate room ( > 10’) between <strong>the</strong> building walls and <strong>the</strong> test section for convenient<br />
placement <strong>of</strong> cameras, lights and video equipment. This wind tunnel does not have any lighting<br />
equipment, so all <strong>the</strong> necessary lights with tripods will have to be provided by us.<br />
The floor <strong>of</strong> <strong>the</strong> test section has a rectangular opening, ~2’6”x2’, closed by a wooden trap door on<br />
which <strong>the</strong> model is mounted (see Figure 21). The trap door is bolted from underneath, making access<br />
easy. In addition, one <strong>of</strong> <strong>the</strong> side walls <strong>of</strong> <strong>the</strong> test section is a hinged window running almost <strong>the</strong> entire<br />
length <strong>of</strong> <strong>the</strong> test section, which thus provides free access to <strong>the</strong> model between tests (and is <strong>of</strong> course<br />
kept closed during testing).<br />
The power unit is a variable pitch propeller driven by an electric drive (Figure 20, right). The wind<br />
speed is controlled manually by adjusting <strong>the</strong> pitch <strong>of</strong> <strong>the</strong> blades through a hydraulic control<br />
mechanism. The free stream wind speed in <strong>the</strong> test section is measured using a U-tube manometer<br />
(Figure 20, left) one end <strong>of</strong> which is connected to a fixed point on <strong>the</strong> upwind side and <strong>the</strong> o<strong>the</strong>r to <strong>the</strong><br />
test section. The differential reading on manometer has been directly calibrated to wind speed. The<br />
maximum wind speed at which <strong>the</strong> unit may be run continuously is 140 mph.
Figure 20: (Left) U-tube manometer for flow speed measurement, start stop button for <strong>the</strong> electric<br />
drive, and hydraulic control unit to set <strong>the</strong> pitch <strong>of</strong> <strong>the</strong> propeller blades. (Right) Power unit consisting<br />
<strong>of</strong> <strong>the</strong> variable pitch propeller driven by an electric motor (view from test section toward <strong>the</strong> exhaust<br />
end).<br />
Figure 21: (left) Telescope model mounted on <strong>the</strong> wooden trapdoor in floor <strong>of</strong> <strong>the</strong> test section prior to<br />
<strong>the</strong> flow visualization using china clay (i.e. zero windspeed). (right) View from top showing <strong>the</strong> width <strong>of</strong><br />
<strong>the</strong> test section and <strong>the</strong> trapdoor. The flexible poly<strong>the</strong>ne piece upwind <strong>of</strong> <strong>the</strong> test section has a hole<br />
through which a wand with tufts,or a pitot tube may be inserted into <strong>the</strong> flow. The poly<strong>the</strong>ne sheet<br />
slides from side to side across <strong>the</strong> flow direction permitting probing <strong>the</strong> flow at various points (picture<br />
taken after <strong>the</strong> ‘china clay’ test).<br />
Unlike <strong>the</strong> Kirsten wind tunnel, <strong>the</strong> 36” tunnel does not have a balance or o<strong>the</strong>r instrumentation for<br />
force and moment measurement. Should such measurements be needed, we would have to instrument<br />
<strong>the</strong> model with load cells or similar sensors, and all <strong>the</strong> required readout electronics; UWAL provides<br />
no facility for such measurements. The bottom <strong>of</strong> <strong>the</strong> test section is ~ 3’ <strong>of</strong>f <strong>the</strong> floor, so <strong>the</strong>re is<br />
adequate room for wiring and instrumentation. At most, UWAL may be able to provide hand held pitot<br />
tubes for dynamic and static pressure measurement, and a smoke wand for flow visualization.
Note: at <strong>the</strong> expected operating wind speed <strong>of</strong> > 100 mph during our tests, smoke for flow visualization<br />
is ineffective.<br />
11.3 Tests performed<br />
In <strong>the</strong> half day available for testing we ran two classes <strong>of</strong> tests, mechanical integrity and flow<br />
visualization. The model was mounted on <strong>the</strong> wooden trapdoor without any terrain in order to keep <strong>the</strong><br />
blockage factor well below <strong>the</strong> 10% advised. We used only <strong>the</strong> unvented dome for all <strong>the</strong> tests. The<br />
wind speed was maintained at 140 mph, which translates to Re ~ 10 6 using <strong>the</strong> diameter <strong>of</strong> <strong>the</strong> model<br />
dome as <strong>the</strong> characteristic length. Compared to <strong>the</strong> Re in <strong>the</strong> water tunnel, this is more representative<br />
<strong>of</strong> <strong>the</strong> Reynolds numbers, ~10 7 , expected in <strong>the</strong> flow around <strong>the</strong> telescope facility on Mauna Kea..<br />
11.3.1 Mechanical integrity <strong>of</strong> <strong>the</strong> model<br />
Our main objective was to test <strong>the</strong> mechanical integrity <strong>of</strong> <strong>the</strong> model used in <strong>the</strong> water tunnel tests<br />
when exposed to wind speeds <strong>of</strong> 140 mph. With this information, we aimed to assess whe<strong>the</strong>r we could<br />
carry out <strong>the</strong> wind tunnel tests using a similar model in this 36” wind tunnel facility, which is rarely<br />
used and is available for <strong>the</strong> asking. This is unlike <strong>the</strong> Kirsten wind tunnel, which we were told was<br />
booked completely for <strong>the</strong> next few months till August 2011.<br />
The unvented dome was oriented such that <strong>the</strong> slit was at 15° to <strong>the</strong> wind direction (dome azimuth <strong>of</strong><br />
105°). This is <strong>the</strong> angle at which we had observed <strong>the</strong> minimum flushing times in <strong>the</strong> water tunnel tests.<br />
The wind speed was gradually increased to <strong>the</strong> maximum <strong>of</strong> 140mph, and was sustained at this value<br />
for a considerable time (~20min). During this period, <strong>the</strong> dome orientation was changed using <strong>the</strong><br />
thumb-wheel, in order to expose <strong>the</strong> dome to <strong>the</strong> full range <strong>of</strong> forces.<br />
The dome stood up to <strong>the</strong> wind speed without any obvious distress, except for a loud whistling noise<br />
due to <strong>the</strong> wind entering <strong>the</strong> slit at certain angles. Given this very encouraging success with Tom and<br />
Marc’s fabricated model, it is quite feasible to carry out <strong>the</strong> wind tunnel tests using a similar model.<br />
11.3.2 Flow visualization with tufts<br />
The aim here was to use “tufts” to visualize <strong>the</strong> flow both outside <strong>the</strong> telescope building and inside <strong>the</strong><br />
dome, and thus benchmark <strong>the</strong> patterns we had observed during <strong>the</strong> water tunnel tests. Tufts are small<br />
pieces <strong>of</strong> yarn, each ~ 1/2” to 1” long, fixed at regular intervals on <strong>the</strong> test surface, e.g. on <strong>the</strong> dome<br />
skin using scotch tape, as in Figure 22 (left). (see Appendix 1).<br />
For <strong>the</strong> initial tests, <strong>the</strong> tufts were affixed horizontally at equal intervals along <strong>the</strong> dome, as well as on<br />
<strong>the</strong> building at approximately <strong>the</strong> height at which we had seen <strong>the</strong> top <strong>of</strong> <strong>the</strong> Horseshoe vortex in <strong>the</strong><br />
water tunnel test. In addition, we laid a few rows <strong>of</strong> tufts behind <strong>the</strong> building in order to visualize <strong>the</strong><br />
eddy and backwash also observed in <strong>the</strong> water tunnel. Two video cameras recorded <strong>the</strong> trials, one<br />
filming from <strong>the</strong> North, and <strong>the</strong> o<strong>the</strong>r from <strong>the</strong> top looking down on <strong>the</strong> model; <strong>the</strong> directory structure<br />
given at <strong>the</strong> end <strong>of</strong> <strong>the</strong> document lists <strong>the</strong> names <strong>of</strong> <strong>the</strong> video clips corresponding to <strong>the</strong>se tests.<br />
In addition to <strong>the</strong>se fixed tufts, we also fixed two long tufts on a hand-held metal probe which we<br />
introduced into <strong>the</strong> flow through <strong>the</strong> hole in <strong>the</strong> movable poly<strong>the</strong>ne sheet or from an entry hole on top<br />
<strong>of</strong> <strong>the</strong> test section (seen in Figure 21). The tufted probe was moved methodically from side to side in<br />
<strong>the</strong> flow as well as in <strong>the</strong> vertical direction in order to scan <strong>the</strong> flow pattern on <strong>the</strong> upwind side <strong>of</strong> <strong>the</strong><br />
dome thoroughly.<br />
For <strong>the</strong> initial tests, <strong>the</strong> tufts were affixed horizontally at equal intervals along <strong>the</strong> dome, as well<br />
as on <strong>the</strong> building at approximately <strong>the</strong> height at which we had seen <strong>the</strong> top <strong>of</strong> <strong>the</strong> Horseshoe
vortex in <strong>the</strong> water tunnel test. In addition, we laid a few rows <strong>of</strong> tufts behind <strong>the</strong> building in<br />
order to visualize <strong>the</strong> eddy and backwash also observed in <strong>the</strong> water tunnel. Two video cameras<br />
recorded <strong>the</strong> trials, one filming from <strong>the</strong> North, and <strong>the</strong> o<strong>the</strong>r from <strong>the</strong> top looking down on <strong>the</strong><br />
model; <strong>the</strong> directory structure given at <strong>the</strong> end <strong>of</strong> <strong>the</strong> document lists <strong>the</strong> names <strong>of</strong> <strong>the</strong> video clips<br />
corresponding to <strong>the</strong>se tests.<br />
Figure 22: (Left) Tufts used for flow visualization, outside <strong>the</strong> telescope building, around <strong>the</strong> dome, as<br />
well as <strong>the</strong> wake <strong>of</strong> <strong>the</strong> telescope superstructure. (Right) Tufts fixed to a long hand-held probe and<br />
scanned to visualize <strong>the</strong> flow at various points.<br />
11.3.3 Flow visualization with china clay<br />
At UWAL, <strong>the</strong>y also use china-clay mixed with kerosene, in a thick soup, to trace <strong>the</strong> flow pattern. For<br />
this test, <strong>the</strong> model is ‘painted’ with this china-clay/kerosene mix in <strong>the</strong> areas where <strong>the</strong> flow is to be<br />
visualized. The flow is <strong>the</strong>n quickly brought up to operating speed, so that <strong>the</strong> china-clay/kerosene mix<br />
flows into patterns representing <strong>the</strong> actual airflow on <strong>the</strong> surface <strong>of</strong> <strong>the</strong> model. Within a few minutes,<br />
<strong>the</strong> kerosene evaporates leaving <strong>the</strong> china clay fixed in position. This sequence is clearly seen in <strong>the</strong><br />
before and after images shown in Figure 21. It is to be noted that <strong>the</strong> china-clay mix was only applied<br />
all around <strong>the</strong> exterior <strong>of</strong> <strong>the</strong> telescope building. However, <strong>the</strong> flow removed most <strong>of</strong> <strong>the</strong> mix from <strong>the</strong><br />
upstream side and smeared it along <strong>the</strong> sides and behind <strong>the</strong> telescope building, as well as up on to <strong>the</strong><br />
rear <strong>of</strong> <strong>the</strong> dome due to <strong>the</strong> backwash. This is a very powerful technique to identify actual points <strong>of</strong><br />
flow separation, eddy formation and so on. After <strong>the</strong> testing, <strong>the</strong> dried china clay may be removed using<br />
a damp cloth.<br />
11.3.4 Lessons learned<br />
• If we're planning to visualize with China clay, we need to paint <strong>the</strong> model black and make it<br />
easy to wipe down.<br />
• There is a removable top panel as well that we should probably make a custom unit for so we<br />
can have an unobstructed top-view camera and lighting.<br />
• Using a smoke wand for flow visualization at 140 mph is not practical<br />
• Everyone wears hearing protection when <strong>the</strong> tunnel is running: no voice communication!<br />
• The audio on <strong>the</strong> camera is overwhelmed by <strong>the</strong> sound <strong>of</strong> <strong>the</strong> fan: no audio<br />
• sync <strong>of</strong> multiple cameras.<br />
• There is just one table and a few chairs in <strong>the</strong> room. No tools, workbenches, etc. We need to
ing everything needed.<br />
• It takes a while to spin <strong>the</strong> fan up and down, but wind speed changes can be made fairly<br />
quickly. When planning tests, we need to keep this in mind.<br />
• The model can be accessed when <strong>the</strong> fan is running by fea<strong>the</strong>ring <strong>the</strong> blades to zero wind speed<br />
(e.g. while applying <strong>the</strong> China clay, so that <strong>the</strong> fan may be brought to full speed without any<br />
delay.)<br />
• The camera on top <strong>of</strong> <strong>the</strong> wind tunnel is not easy to access. Having remote control over one or<br />
both cameras would be beneficial, though not necessary.<br />
• Everything that enters <strong>the</strong> room must be carried down a flight <strong>of</strong> stairs.<br />
Appendix 1: The UWAL tuft-making loom<br />
Figure 23 shows <strong>the</strong> design <strong>of</strong> <strong>the</strong> loom used at UWAL for easily making long strips <strong>of</strong> tufts for<br />
flow visualization. The loom consists <strong>of</strong> an aluminum channel section, ~6” wide, (shown in grey)<br />
with three or four wooden rails (in yellow), about ~1” apart, and running <strong>the</strong> length; <strong>the</strong> length <strong>of</strong><br />
<strong>the</strong> channel is about 3’. The tuft yarn is woven across <strong>the</strong> channel, going through <strong>the</strong> opposite<br />
slots in <strong>the</strong> side members. A long piece <strong>of</strong> Scotch tape is <strong>the</strong>n used to fix <strong>the</strong> yarn along <strong>the</strong><br />
length <strong>of</strong> each <strong>of</strong> <strong>the</strong> wooden rails. The yarn is <strong>the</strong>n cut on one side only in each <strong>of</strong> <strong>the</strong> gaps<br />
between <strong>the</strong> wooden rails and also <strong>the</strong> sides <strong>of</strong> <strong>the</strong> channel, leaving ~1” lengths <strong>of</strong> yarn stuck to<br />
<strong>the</strong> Scotch tape. The tape is peeled <strong>of</strong>f with <strong>the</strong>se tufts stuck to <strong>the</strong>m and fixed where required on<br />
<strong>the</strong> model.<br />
Figure 23: Design <strong>of</strong> <strong>the</strong> UWAL tuft making loom.
Appendix 2: Packing List<br />
Weight and volume limitations for shipping by Fedex are; 150 lbs weight, 119” length and 165" in<br />
length plus girth (L+2W+2H). This required shipment <strong>of</strong> <strong>the</strong> model in two ABS shipping containers<br />
(43”x21”x28” & 16”x25”x35”).<br />
<br />
<br />
<br />
<br />
<br />
<br />
<br />
<br />
<br />
<br />
<br />
<br />
<br />
<br />
<br />
<br />
<br />
<br />
<br />
<br />
<br />
Tool List:<br />
<br />
<br />
<br />
<br />
<br />
<br />
<br />
<br />
Terrain + Side Panels<br />
Side Blocks, 6x Fender Washers, 6x Thumb Screws<br />
Building + Mezzanine, 4x Thumb Screws<br />
3x Domes (Unvented, Small Vents, Large Vents)<br />
Telescope <strong>Model</strong><br />
2x Cameras<br />
2x Tripods<br />
Tools (See Next List)<br />
Shop Towels<br />
11x Dye Probes (stainless, hose, syringes, etc.)<br />
11x Dye Probe Mating Hardware (to mate our probes to <strong>the</strong>ir pumps)<br />
30x Spare Probe Material (SS tubing, Teflon tubing, Syringes, etc.)<br />
Magnet Board + Run Parameter Labels<br />
Handheld Flash Unit<br />
Wind Screen Tape (same as previously tested)<br />
Vent Plugs (Solid Litho - Steve)<br />
Windscreen Plugs (Solid Litho - Steve)<br />
Blocking Foam<br />
Light Stands<br />
Black Cloth<br />
Gaffer's Tape and/or Duct Tape<br />
Screw Drivers<br />
T-Handle Ball Drivers<br />
Acrylic Paint Pen<br />
Magic Marker<br />
Sand Paper Assortment<br />
Needle File Assortment<br />
Large file assortment<br />
Small tools toolbag (Tom Benedict's)
![Documentation [PDF] - Canada France Hawaii Telescope ...](https://img.yumpu.com/26965302/1/190x245/documentation-pdf-canada-france-hawaii-telescope-.jpg?quality=85)