PDF Download - Glidewell Dental Labs
PDF Download - Glidewell Dental Labs
PDF Download - Glidewell Dental Labs
You also want an ePaper? Increase the reach of your titles
YUMPU automatically turns print PDFs into web optimized ePapers that Google loves.
Inclusive Tooth Replacement<br />
Solution Implant Treatment<br />
Workflow<br />
1. Implant Consultation and<br />
Data Collection<br />
2. Day of Surgery Protocol<br />
3. Healing Phase<br />
4. Restorative Phase:<br />
Final Impressions<br />
5. Delivery of Final Prosthesis<br />
Implant Consultation<br />
and Data Collection<br />
As with any larger, more complex<br />
dental case, the taking of preoperative<br />
records and thorough treatment<br />
planning are of paramount importance<br />
when implants are prescribed —<br />
whether it be a single-tooth replacement<br />
or full-mouth rehabilitation. A<br />
truly comprehensive treatment plan<br />
consists of the following:<br />
1. Full-arch upper and lower impressions<br />
(preferably PVS) for the<br />
fabrication of study models<br />
2. An accurate bite registration<br />
3. Full-mouth radiographs, including<br />
a panoramic and CBCT scan (as<br />
needed)<br />
NOTE: If you do not have a CBCT scanner<br />
in your office, the patient can be referred<br />
to an imaging center.<br />
4. Shade match of the existing dentition<br />
5. Preoperative patient photos<br />
While obtaining the aforementioned<br />
records will minimize risk and optimize<br />
the chances of success, the issue<br />
of cost can be a limiting factor, particularly<br />
when dealing with a CBCT scan.<br />
If necessary, explain to the patient the<br />
rationale for the expense of the CBCT<br />
scan by detailing the advantages of<br />
this technology over conventional radiography.<br />
In instances where the cost<br />
is prohibitive, single-tooth implant<br />
cases can still be undertaken with<br />
a high degree of predictability using<br />
conventional radiography alone. Success<br />
in such cases is largely dependent<br />
on the experience level of the clinician,<br />
so an honest assessment of your own<br />
comfort level and abilities will be invaluable<br />
in avoiding potential pitfalls.<br />
Once you have collected the various<br />
data mentioned above and selected<br />
a diameter and length of implant,<br />
forward the appropriate diagnostic<br />
materials (i.e., impressions, models,<br />
bite registration, shade selection and<br />
implant size) to <strong>Glidewell</strong> Laboratories<br />
for fabrication of the Inclusive Tooth<br />
Replacement Solution components.<br />
Upon receipt, the laboratory will pour<br />
and articulate the models, then assemble<br />
the following components:<br />
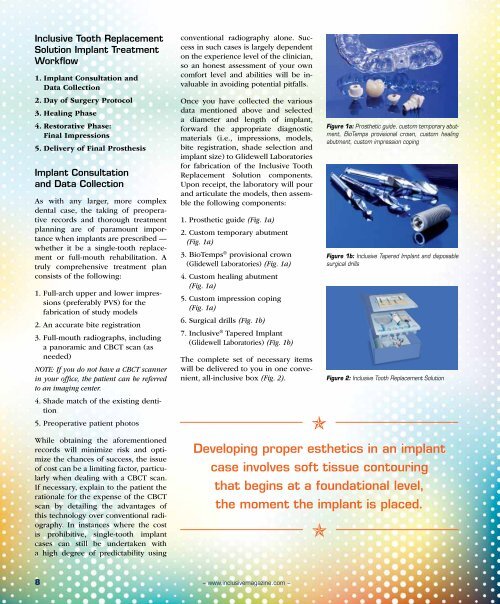
1. Prosthetic guide (Fig. 1a)<br />
2.Custom temporary abutment<br />
(Fig. 1a)<br />
3.BioTemps ® provisional crown<br />
(<strong>Glidewell</strong> Laboratories) (Fig. 1a)<br />
4. Custom healing abutment<br />
(Fig. 1a)<br />
5. Custom impression coping<br />
(Fig. 1a)<br />
6. Surgical drills (Fig. 1b)<br />
7. Inclusive ® Tapered Implant<br />
(<strong>Glidewell</strong> Laboratories) (Fig. 1b)<br />
The complete set of necessary items<br />
will be delivered to you in one convenient,<br />
all-inclusive box (Fig. 2).<br />
<br />
Figure 1a: Prosthetic guide, custom temporary abutment,<br />
BioTemps provisional crown, custom healing<br />
abutment, custom impression coping<br />
Figure 1b: Inclusive Tapered Implant and disposable<br />
surgical drills<br />
Figure 2: Inclusive Tooth Replacement Solution<br />
Developing proper esthetics in an implant<br />
case involves soft tissue contouring<br />
that begins at a foundational level,<br />
the moment the implant is placed.<br />
<br />
8<br />
– www.inclusivemagazine.com –


