

PDF Download - Glidewell Dental Labs
PDF Download - Glidewell Dental Labs
PDF Download - Glidewell Dental Labs

Create successful ePaper yourself
Turn your PDF publications into a flip-book with our unique Google optimized e-Paper software.
Clinical Tip:<br />
Placing Custom Healing Abutments<br />
Go online for<br />
in-depth content<br />
by Bradley C. Bockhorst, DMD<br />
For some cases, delivering a restoration on<br />
an implant that has a standard, round healing<br />
abutment can literally be the equivalent of putting a square<br />
or triangular peg in a round hole. Integral to the <strong>Glidewell</strong><br />
Laboratories Inclusive ® Tooth Replacement Solution are the<br />
components that help sculpt the peri-implant soft tissues.<br />
Utilizing an anatomically shaped custom healing abutment<br />
not only sets the stage for a superior restoration, but also<br />
simplifies the restorative process, allowing for easier, complete<br />
seating of the prosthetic components.<br />
Custom healing abutments provide a superior option<br />
to standard, round healing abutments if the case is not<br />
going to be immediately provisionalized. The abutments<br />
are fabricated from polyether ether ketone (PEEK), and<br />
can be modified as needed. In cases where the soft tissue<br />
is reflected, complete seating can be visualized and the<br />
flap reapproximated and sutured into place around the<br />
abutment. In flapless cases, the sulcus can be created<br />
by various surgical means, such as a tissue punch of<br />
appropriate diameter, a scalpel or a bur. In this case, a CO 2<br />
laser was used. The model was used as a guide to remove<br />
the tissue in the approximate transgingival shape of the<br />
healing abutment. Complete seating can be confirmed with<br />
a periapical radiograph.<br />
When placing a custom healing abutment, the abutment<br />
screw should be tightened to 12–15 Ncm. If space allows,<br />
the screw access opening should be sealed to prevent food<br />
and debris from accumulating in the screw access hole.<br />
Cover the head of the screw with a cotton pellet, Teflon tape<br />
or gutta-percha. Seal the opening with composite, acrylic or<br />
a light-cure resin cement, as is demonstrated in this case.<br />
For the final impressions, the screw can easily be uncovered,<br />
and the custom healing abutment removed and replaced<br />
with the matching custom impression coping.<br />
The following case, courtesy of Dr. Dean Saiki, Oceanside,<br />
Calif., illustrates this technique. IM<br />
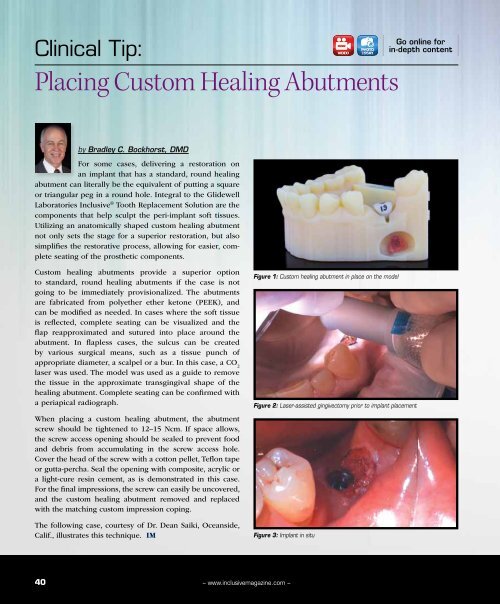
Figure 1: Custom healing abutment in place on the model<br />
Figure 2: Laser-assisted gingivectomy prior to implant placement<br />
Figure 3: Implant in situ<br />
40<br />
– www.inclusivemagazine.com –


