DVR2 TDM Manual English - TC Electronic
DVR2 TDM Manual English - TC Electronic
DVR2 TDM Manual English - TC Electronic
Create successful ePaper yourself
Turn your PDF publications into a flip-book with our unique Google optimized e-Paper software.
MANUAL
<strong>TC</strong> Support Interactive<br />
The <strong>TC</strong> Support Interactive website www.tcsupport.tc is designed as an online support<br />
and information center. At the site you can find answers to specific questions regarding<br />
<strong>TC</strong> software and hardware. All known issues are stored in a database searchable by<br />
product, category, keywords, or phrases. Under the section "My Stuff" you can login to<br />
check the status of your questions, download materials such as product manuals, software<br />
updates and new presets.<br />
This site has been specifically designed to meet the needs of our users. We constantly<br />
update the database and you will find the site to be a huge resource of information.<br />
Browse through Q&A's and discover new aspects of your <strong>TC</strong> product.<br />
If you can't find an answer online, you have the option of submitting a question to our<br />
technical support staff who will then reply to you by e-mail. The <strong>TC</strong> Support Team is<br />
on constant alert to help you in any way they can.<br />
Contact Details<br />
Alternatively, you may contact the <strong>TC</strong> <strong>Electronic</strong> distributor in your area, or write to:<br />
<strong>TC</strong> ELECTRONIC A/S<br />
Customer Support<br />
Sindalsvej 34<br />
Risskov DK-8240<br />
Denmark<br />
USA:<br />
<strong>TC</strong> <strong>Electronic</strong>, Inc.<br />
5706 Corsa Avenue, Suite 107<br />
Westlake Village, CA 91362<br />
E N G L I S H<br />
www.tcelectronic.com<br />
© BY <strong>TC</strong> ELECTRONIC A/S 2006. ALL PRODUCT AND COMPANY NAMES ARE<br />
TRADEMARKS OF THEIR RESPECTIVE OWNERS. ALL SPECIFICATIONS SUBJECT<br />
TO CHANGE WITHOUT NOTICE.ALL RIGHTS RESERVED.<br />
<strong>TC</strong> ELECTRONIC IS A <strong>TC</strong> GROUP COMPANY.<br />
2 / <strong>DVR2</strong> - <strong>TDM</strong>
TABLE OF CONTENTS<br />
Contact & Support Information . . . . . . . . . . . . . . . . . . . . . . . . . . . . . . . . . . . . . . . . . 2<br />
Table Of Contents . . . . . . . . . . . . . . . . . . . . . . . . . . . . . . . . . . . . . . . . . . . . . . . . . . 3<br />
<strong>DVR2</strong> Digital Vintage Reverb . . . . . . . . . . . . . . . . . . . . . . . . . . . . . . . . . . . . . . . . . . 4<br />
System Requirements . . . . . . . . . . . . . . . . . . . . . . . . . . . . . . . . . . . . . . . . . . . . . . . .5<br />
Global Plug-In Controls . . . . . . . . . . . . . . . . . . . . . . . . . . . . . . . . . . . . . . . . . . . . . . 5<br />
The Plug-In Parameters . . . . . . . . . . . . . . . . . . . . . . . . . . . . . . . . . . . . . . . . . . . . . . 7<br />
Preset Management . . . . . . . . . . . . . . . . . . . . . . . . . . . . . . . . . . . . . . . . . . . . . . . 10<br />
Converting <strong>DVR2</strong> Presets from System 6000 and Reverb 4000 . . . . . . . . . . . . . . . .11<br />
Compare settings with A/B Mem . . . . . . . . . . . . . . . . . . . . . . . . . . . . . . . . . . . . . . 12<br />
Locking Parameter values using the Parameter Lock . . . . . . . . . . . . . . . . . . . . . . . 13<br />
E N G L I S H<br />
<strong>DVR2</strong> - <strong>TDM</strong> / 3
<strong>DVR2</strong> DIGITAL VINTAGE REVERB<br />
Congratulations with the purchase of your new <strong>TDM</strong> Vintage Reverb plug-in. <strong>DVR2</strong><br />
offers a pristine Generic Reverb with true vintage flavor.<br />
The term “Generic Reverb” is used to describe a flattering sustain effect, which can<br />
be added to many sources of a mix. It produces little character but also does no harm,<br />
because the effect is blurred or washed out. Instead, it adds a good sense of spaciousness<br />
and more or less pronounced modulation.<br />
Recreation of a Classic<br />
The development of <strong>DVR2</strong> has been a process extending several years, with the goal of<br />
recreating the most shining Generic Reverb of all times, the EMT250. A particularly<br />
well sounding machine was refurbished, and in the making of <strong>DVR2</strong> many design disciplines<br />
were involved...<br />
Hardware technical: What was the precision of converters and how where they implemented<br />
in the eighties with emphasis, block scaling, linearity, filters etc? How much<br />
processing and RAM was available, what was the sample rate etc?<br />
Software technical: Which kind of processing was done in discrete circuitry, what type<br />
of truncation and noise floor artifacts would result, how could the low sample rate be<br />
mimicked precisely, and how could all of this be transferred to a modern DSP platform.<br />
Perceptual: Making sure the qualities of the original processor was preserved. Sweet<br />
modulation, spectral characteristics, spaciousness, distortion, saturation etc.<br />
Hundreds of hours spent listening and measuring.<br />
User: The four basic parameters of the EMT250 were carefully laid out, offering a<br />
remarkably simple user interface with complex, yet optimized interactions under the<br />
hood. <strong>DVR2</strong> is a resemblance of that including range and coarseness of parameters.<br />
Better than the Classic?<br />
While <strong>DVR2</strong> in Normal mode is very close to the sound of a perfectly aligned 250,<br />
having used much DSP power to mimic artifacts of old hardware, the algorithm can<br />
also be put in a High Resolution mode. Using this function, the noise floor is much<br />
lower – but use your own ears to determine if this is actually a plus for a specific situation.<br />
E N G L I S H<br />
Please note: Many of the constraints and criteria listed above produce non-linear<br />
audio behavior, making it impossible to obtain more than a static and crude result if<br />
trying to sample an original processor. A minute emulation does more justice to the<br />
original from an audio point of view, and can also still be adjusted.<br />
4 / <strong>DVR2</strong> - <strong>TDM</strong>
SYSTEM REQUIREMENTS<br />
• Mac OS X (10.4 or higher) / Windows XP<br />
• Pro Tools <strong>TDM</strong> 7.2.1 software (or higher)<br />
• Pro Tools HD or HD Accel hardware<br />
• iLok USB key<br />
• iLok.com account and internet access required for product authorization<br />
• System must meet Digidesign’s system requirements for Pro Tools <strong>TDM</strong> systems!<br />
Global Plug-In Controls<br />
KEYBOARD COMMANDS<br />
The <strong>TDM</strong> version of <strong>DVR2</strong> supports keyboard commands for certain functions.<br />
The following key commands are available for all plug-in parameters:<br />
Key Commands in Mac OS X:<br />
Fine Adjust = Apple key + mouse movement<br />
Reset To Default = Option + mouse click<br />
Key Commands in Windows:<br />
Fine Adjust = Ctrl + mouse movement<br />
Reset To Default = Alt + Control + mouse click<br />
AUTOMATION<br />
Please be aware that automation of certain parameters, can cause audible artifacts.<br />
In case you need to automate these parameters, you should take care that<br />
changes only take place in parts where no audio is sent to the plug-in.<br />
FOCUS FIELDS<br />
You can place your own set of parameters in the 6 focus fields at the bottom of the<br />
plug-in. Making use of the focus fields can give you a better workflow, since you will<br />
not have to switch pages all the time to find the parameters that you work with. You<br />
can assign any parameter to the focus fields, and the focus fields are stored with the<br />
session as well as when you save your presets.<br />
To change the assignment:<br />
• Press the Assign button. The Assign button as well as one of the Focus Fields<br />
will be highlighted.<br />
• Select the Focus Field you wish to link a parameter to, by clicking on that field.<br />
E N G L I S H<br />
<strong>DVR2</strong> - <strong>TDM</strong> / 5
• Click on the parameter you wish to link to the selected Focus Field.<br />
• To get an unassigned (empty) Focus Field, click again on the selected parameter.<br />
• Once you have finished the assignments, click again on the Assign button<br />
to leave the assign mode.<br />
OVERLOAD INDICATION (O/L)<br />
The O/L-LED in the metering section, on the left side of the input meters, will light up<br />
in case internal DSP overloads are detected. You should lower the input level to avoid<br />
these overloads. To reset the indication, click on the O/L LED.<br />
E N G L I S H<br />
6 / <strong>DVR2</strong> - <strong>TDM</strong>
THE PLUG-IN PARAMETERS<br />
MAIN PAGE<br />
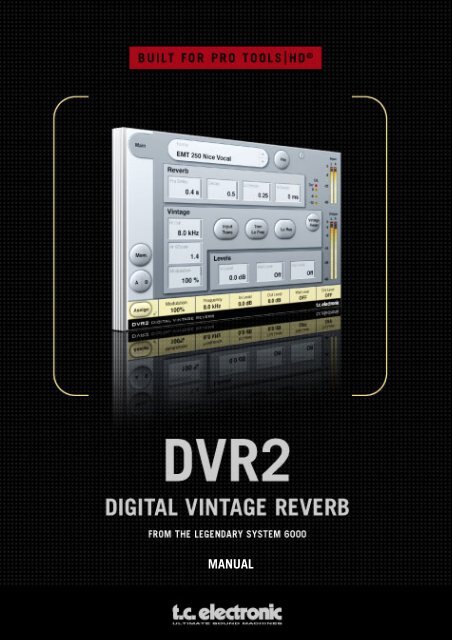
On the <strong>DVR2</strong> Main page, you can find all controls of <strong>DVR2</strong> as well as the plug-in’s<br />
preset handling. More about the preset handling can be found in the section “Preset<br />
Handling” later in this manual.<br />
REVERB<br />
Decay<br />
Range: 0.4 – 4.5s<br />
Adjusts the Master Decay time.<br />
Lo Decay<br />
Range: 0.5 to 2.0<br />
Decay multiplier for low frequencies. For a x1.0 setting, low frequency decay will<br />
equal the Decay setting.<br />
Hi Decay<br />
Range: 0.25 to Max.<br />
Decay multiplier for hi frequencies. For a x1.0 setting, high frequency decay will<br />
equal the Decay setting.<br />
E N G L I S H<br />
<strong>DVR2</strong> - <strong>TDM</strong> / 7
Pre Delay<br />
Range: 0-500ms (Vintage values: 0, 20, 40 and 60ms)<br />
Pre delay is the amount of time from an input is received until reverb starts building<br />
up at the output.<br />
VINTAGE<br />
Modulation<br />
Range: 0% – 200% (default: 100%)<br />
Sets the Depth of the modulation. Normal set to 100%. Increase if you like a more<br />
liquid, chorus like sound.<br />
Hi Cut<br />
Range: 8kHz – 13kHz (default: 11kHz)<br />
This is <strong>DVR2</strong>´s HiCut and can be used to limit or extend the overall frequency spectrum.<br />
Q Scale<br />
Range: 0.3 – 1.4 (default: 1.2)<br />
Corresponds the small potmeters inside older reverbs used to equalize sound differences<br />
caused by electric component-tolerances. Use the Q-scale in combination with<br />
the HiCut Frequency to shape the treble to your personal flavor.<br />
Input Trans<br />
Range: on/off (default: off)<br />
Emulates the sound of Input transformers typically used in vintage Reverbs. Use it to<br />
create a warm vintage like sound. Especially good for short Decay times.<br />
Trim Lo Freq<br />
Range: on/off (default: on)<br />
A subtle damping of selected frequencies in the lower end.<br />
Lo Res<br />
Range: on/off (default: on)<br />
Switches the <strong>DVR2</strong> to a lower bit-resolution. This adds an older and more grainy<br />
sound and also noise giving a simulation of various vintage reverbs.<br />
E N G L I S H<br />
Vintage Reset<br />
Clicking on this button will reset the controls in the “Vintage” section back to the values<br />
as they are found on the vintage original.<br />
8 / <strong>DVR2</strong> - <strong>TDM</strong>
LEVELS<br />
Input Level<br />
Range: Off to 0dB<br />
Sets the Input level for the plug-in. It may be necessary to lower the input level if signals<br />
close to full scale are fed to the plug-in. Reduce the input level in case you experience<br />
overloads (O/L).<br />
Wet Level<br />
Range: Off – 0dB<br />
Adjusts the reverb (wet) level of the output channels.<br />
Dry Level<br />
Range: Off to 0dB<br />
Adjusts the dry signal level of the output channels. For a typical send/return configuration,<br />
leave dry level off.<br />
E N G L I S H<br />
<strong>DVR2</strong> - <strong>TDM</strong> / 9
Preset Management<br />
<strong>TC</strong>'s comprehensive file based preset architecture makes archiving presets a simple<br />
process. This allows you to organize your presets the way you find most comfortable<br />
for your workflow, and to exchange presets with other users, no matter the platform or<br />
application. Presets are saved as discrete files on your hard drive. Once a preset is<br />
saved into the default location, it will automatically appear in the 'File' menu every<br />
time you use the plug-in. The files can then be organized into sub-folders, where you<br />
can delete, rearrange or create your own sub-folders to accommodate your needs.<br />
NOTE: A folder will appear in the Preset File Menu if it contains at least one preset.<br />
NEXT/PREVIOUS PRESETS<br />
From the plug-in's Main page, you can directly jump from one preset to the next (or<br />
previous) by clicking on the UP/DOWN arrows to the right of the preset name.<br />
All presets available at the default plug-in preset location will be considered, so you<br />
could in theory reach every preset this way. Direct access to specific presets is done<br />
via the "File" button:<br />
PRESET FILE MENU<br />
Pressing the 'File' button will open the plug-in's File menu. The following options are<br />
available from the File menu.<br />
Loading a Preset<br />
By selecting 'Load', you can navigate to any folder on the system that you have read<br />
access to, including any shared folder. By default, these will be loaded from the<br />
default location for <strong>DVR2</strong> presets. Only presets located in the default file location will<br />
appear in the <strong>DVR2</strong> pop-up preset menu.<br />
E N G L I S H<br />
Naming a Preset<br />
• Double click on the name field<br />
• Type in the new name<br />
• Press Enter<br />
Saving a Preset<br />
By selecting 'Save', you can save your preset to any folder on the system that you have<br />
write access to, including any shared folder. By default, presets are saved to the<br />
default location for the <strong>DVR2</strong> presets.<br />
10 / <strong>DVR2</strong> - <strong>TDM</strong>
DEFAULT PRESET LOCATIONS<br />
The following locations will describe where you can find the <strong>DVR2</strong> presets. The presets<br />
are stored in a folder that is unique to each plug-in:<br />
The plug-in’s own preset handling is storing the presets in the following locations:<br />
Mac OS<br />
Factory Presets:<br />
/Library/Application Support/<strong>TC</strong> <strong>Electronic</strong>/<strong>DVR2</strong>/Presets/<br />
User Presets:<br />
~/Library/Application Support/<strong>TC</strong> <strong>Electronic</strong>/<strong>DVR2</strong>/Presets/<br />
Windows<br />
Factory Presets:<br />
{System Drive}/Program Files/<strong>TC</strong> <strong>Electronic</strong>/<strong>DVR2</strong>/Presets/<br />
User Presets:<br />
My Documents/<strong>TC</strong> <strong>Electronic</strong>/<strong>DVR2</strong>/Presets/<br />
• To delete a file, simply move it to the 'Trash' or 'Recycle bin'.<br />
• To create a new sub-folder that appears in the plug-in menu, simply create a new<br />
folder in the plug-in folder that resides in the PRESETS folder of the <strong>DVR2</strong> default<br />
preset location.<br />
NOTE: A folder will not appear in the Preset File Menu unless it has at least one preset inside.<br />
CONVERTING <strong>DVR2</strong> PRESETS FROM SYSTEM 6000 AND<br />
REVERB 4000<br />
In case you are the happy owner of the <strong>DVR2</strong> algorithm for System 6000 or the<br />
Reverb 4000, here is something to get you in an even better mood: The <strong>DVR2</strong> plug-in<br />
is able to read your System 6000/Reverb 4000 presets.<br />
In order to convert presets from System 6000/Reverb 4000 to <strong>DVR2</strong>, you need to<br />
store the System 6000/Reverb 4000 presets in a preset file. The file extension has to<br />
be either “.syx” (for example: MyPresets.syx) or .mid for a MIDI file.<br />
The easiest way to export System 6000/Reverb 4000 presets is to use the “export to<br />
file” function from the Icon Editor for Mac/Windows (requires version 3.5 or higher).<br />
Alternatively, you can save a bank to a floppy disk (System 6000 only) or do a SysEx-<br />
Dump to a MIDI file in your sequencer.<br />
Note: For details regarding the export of presets from System 6000 or Reverb 4000,<br />
please refer to your System 6000/Reverb 4000 and Icon Editor documentation.<br />
The generated SysEx/MIDI preset file needs to be placed in the default <strong>DVR2</strong> Preset<br />
folder (at the root level; subfolders are not considered). The file needs to have either<br />
the extension “.syx” (for example: MyPresets.syx) or .mid for a MIDI file.<br />
E N G L I S H<br />
<strong>DVR2</strong> - <strong>TDM</strong> / 11
Note: In case you are running the Icon Editor on the same computer as the <strong>DVR2</strong><br />
plug-in, the <strong>DVR2</strong> will automatically search for preset files in the default locations for<br />
Reverb 4000 and System 6000 files. You do not need to copy the files!<br />
Once your preset file has been placed in the default <strong>DVR2</strong> Preset folder, it will show<br />
up the next time you click the "File" button. At the top of the pop-up list you'll find a<br />
section called "Convert", and the name of your preset file will be listed here.<br />
To convert your preset file to <strong>DVR2</strong> presets, simply select the name of the preset file.<br />
The conversion will only take a few seconds and only needs to be done once.<br />
When the conversion is done, all presets from your preset file will be available in a<br />
subfolder that has the same name as the preset file had. The presets will show up in<br />
the same bank structure as on the System 6000, and presets that are not based on<br />
the <strong>DVR2</strong> algorithm will not be converted.<br />
The preset file will disappear from the Convert section of the file menu.<br />
Note: As the plug-in implementation of the <strong>DVR2</strong> is stereo only, the surround settings<br />
from the System 6000 version will be ignored during preset conversion!<br />
E N G L I S H<br />
12 / <strong>DVR2</strong> - <strong>TDM</strong>
COMPARE SETTINGS WITH A/B MEM.<br />
With the A/B compare function you can easily compare different parameter settings<br />
when you work with your music. You have two buttons: the “Mem” and the “A/B” button.<br />
When you start working with your preset, the A/B button is grayed out. This state indicates<br />
that the settings in both memory locations A and B are identical – so there is<br />
actually nothing to compare.As soon as you touch one of the parameters, the memory<br />
location “A” will get active, and the “A”-part of the A/B button will light up. All<br />
parameter changes will be applied to memory location “A”. If you switch to memory<br />
location “B”, you get back to your starting point, and all further changes will now be<br />
applied to memory location “B”. Every time you press the A/B button, you will toggle<br />
between these two memory locations.<br />
Note: The A/B memory locations are temporary settings only! Saving a preset (e.g. via<br />
the File button or with your session) will only save the currently selected memory location.<br />
The setting of the other (hidden) memory location will not be saved!<br />
The “Mem” button will reset the A/B memory locations to the current setting.<br />
LOCKING PARAMETER VALUES – USING THE PARAMETER LOCK<br />
The parameter lock function allows you to lock the parameters In Level, Out Level, Dry<br />
Level, Wet Level and the assignment of the Focus fields from changing when you<br />
change preset.<br />
By using the parameter lock, you can easily browse through the extensive set of presets<br />
that comes with the <strong>DVR2</strong>, without having to change back the locked parameter<br />
with each preset change.<br />
To lock a parameter, simply click on the small lock in the parameter field. To unlock<br />
it, click again.<br />
E N G L I S H<br />
<strong>DVR2</strong> - <strong>TDM</strong> / 13
The parameter lock only affects parameter changes made with the mouse. The parameter<br />
lock does not affect automation data or preset changes initialized from the host<br />
application. These changes will always pass.<br />
An example: You have inserted the <strong>DVR2</strong> on a channel. When you use the <strong>DVR2</strong> as an<br />
insert effect, you would probably like the dry part of the signal to go trough the <strong>DVR2</strong>,<br />
and therefore you’d probably turn up the “Dry Level”.<br />
Now, if you browse through a couple of presets, using the up and down arrows on the<br />
right side of the preset name, you will see that most of the presets have the Dry Level<br />
set to “Off”. In other words, the Dry Level goes to “Off” all the time – which can<br />
become quite annoying.<br />
And here comes the Parameter Lock. Press the small lock in the Dry Level parameter<br />
field, and the Dry Level will stay at the value that you’ve set it on – no matter what is<br />
saved with the preset you choose.<br />
Once you touch the parameter or send automation data, the lock will automatically<br />
unlock.<br />
E N G L I S H<br />
14 / <strong>DVR2</strong> - <strong>TDM</strong>


