ELEKTRA - Small Bone Innovations
ELEKTRA - Small Bone Innovations
ELEKTRA - Small Bone Innovations

Create successful ePaper yourself
Turn your PDF publications into a flip-book with our unique Google optimized e-Paper software.
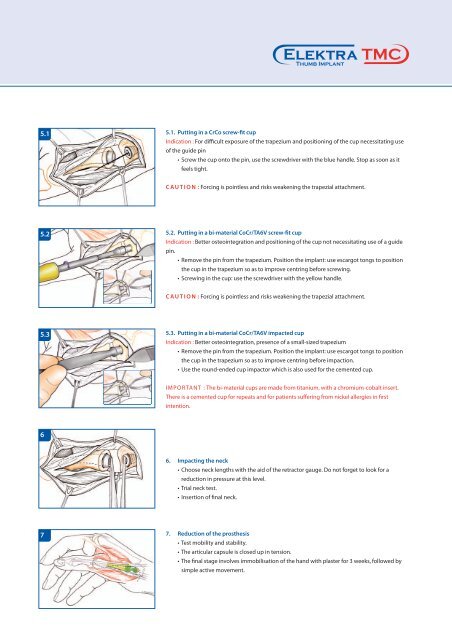
5.1<br />
5.1. Putting in a CrCo screw-fit cup<br />
Indication : For difficult exposure of the trapezium and positioning of the cup necessitating use<br />
of the guide pin<br />
• Screw the cup onto the pin, use the screwdriver with the blue handle. Stop as soon as it<br />
feels tight.<br />
CAUTION :Forcing is pointless and risks weakening the trapezial attachment.<br />
5.2<br />
5.2. Putting in a bi-material CoCr/TA6V screw-fit cup<br />
Indication : Better osteointegration and positioning of the cup not necessitating use of a guide<br />
pin.<br />
• Remove the pin from the trapezium. Position the implant: use escargot tongs to position<br />
the cup in the trapezium so as to improve centring before screwing.<br />
• Screwing in the cup: use the screwdriver with the yellow handle.<br />
CAUTION :Forcing is pointless and risks weakening the trapezial attachment.<br />
5.3<br />
5.3. Putting in a bi-material CoCr/TA6V impacted cup<br />
Indication : Better osteointegration, presence of a small-sized trapezium<br />
• Remove the pin from the trapezium. Position the implant: use escargot tongs to position<br />
the cup in the trapezium so as to improve centring before impaction.<br />
• Use the round-ended cup impactor which is also used for the cemented cup.<br />
IMPORTANT : The bi-material cups are made from titanium, with a chromium-cobalt insert.<br />
There is a cemented cup for repeats and for patients suffering from nickel allergies in first<br />
intention.<br />
6<br />
6. Impacting the neck<br />
• Choose neck lengths with the aid of the retractor gauge. Do not forget to look for a<br />
reduction in pressure at this level.<br />
• Trial neck test.<br />
• Insertion of final neck.<br />
7<br />
7. Reduction of the prosthesis<br />
• Test mobility and stability.<br />
• The articular capsule is closed up in tension.<br />
• The final stage involves immobilisation of the hand with plaster for 3 weeks, followed by<br />
simple active movement.