Lesson #10 The Fascinating World Of Insects A Lesson In ... - Amaco
Lesson #10 The Fascinating World Of Insects A Lesson In ... - Amaco
Lesson #10 The Fascinating World Of Insects A Lesson In ... - Amaco
Create successful ePaper yourself
Turn your PDF publications into a flip-book with our unique Google optimized e-Paper software.
<strong>Lesson</strong> <strong>#10</strong><br />
<strong>The</strong> <strong>Fascinating</strong> <strong>World</strong> <strong>Of</strong> <strong><strong>In</strong>sects</strong><br />
A <strong>Lesson</strong><br />
<strong>In</strong> Bug Making With Polymer Clay<br />
<strong><strong>In</strong>sects</strong> are fascinating to study, because<br />
there are so many and they’re all very<br />
different. Children are intrigued by bugs.<br />
Because of their curiosity and creativity,<br />
they see the beauty, colors, and uniqueness<br />
of insects. This lesson, with the<br />
co op er a tion of classroom teachers, provides<br />
an ex cit ing interdisciplinary study<br />
of insects, including art, science, history,<br />
and writing. Let this innovative <strong>Lesson</strong> in<br />
Bug Making ignite your students’ imag i<br />
na tions!
<strong>Lesson</strong> goals<br />
and ob jec tives:<br />
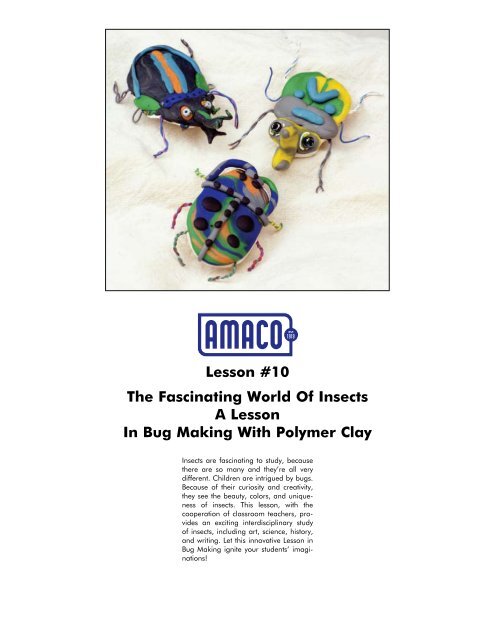
1. Students will design and create polymer<br />
clay beetles.<br />
2. <strong>The</strong> lesson will incorporate art history,<br />
aes thet ics, criticism with a hands on activity.<br />
3. <strong>The</strong> lesson, with the cooperation of the<br />
classroom teachers, will also focus on the<br />
interdisciplinary study of insects, including<br />
art, science, history, and writing.<br />
Notes:________________________________<br />
_____________________________________<br />
_____________________________________<br />
_____________________________________<br />
_____________________________________<br />
Background<br />
and prep a ra tion:<br />
1. Work with the classroom teachers to<br />
create an interdisciplinary lesson that will<br />
com ple ment the students’ science cur ric u lum.<br />
2. Be sure students understand that,<br />
although we use the terms “bug” and<br />
“insect” in ter change ably, not all bugs are<br />
insects. <strong><strong>In</strong>sects</strong> are the ones with six legs.<br />
3. Explain to students that if they take<br />
the time to observe, they will see art everywhere,<br />
es pe cial ly in nature. <strong><strong>In</strong>sects</strong> are a<br />
huge part of the world. Just because they’re<br />
so small, doesn’t mean that they should<br />
be over looked as a source of inspiration.<br />
<strong><strong>In</strong>sects</strong> are sur vi vors. <strong>The</strong>y can live in freezing<br />
weather; they can live in the hottest<br />
weather; they can live anywhere on earth.<br />
<strong>The</strong>y fly; they crawl; they live under things.<br />
<strong><strong>In</strong>sects</strong> were among the first living creatures<br />
on earth, and they’ll probably be among<br />
the last. <strong>The</strong> world of insects is fas ci nat ing<br />
to look at and to study, because there are<br />
so many and they’re all so different.<br />
4. Urge students to look beyond the fear or<br />
disgust insects are supposed to invoke. Look<br />
for the beauty, the colors, and the unique ness<br />
in insects. Begin by encouraging the students<br />
to look at as many visual resources as pos sible<br />
— photographs, pictures in books, slides,<br />
movies, models, even real insects. If possible,<br />
bring real insects into the class room because<br />
most students have never seen an insect up<br />
close. Have students use a magnifying glass<br />
to examine the insects. <strong>The</strong>y should observe<br />
the body parts; find the head, the thorax,<br />
and the abdomen; discuss how many legs an<br />
insect has; find the antennae. How do they<br />
fly? Where are the wings?<br />
5. After the students have observed and<br />
researched enough to know quite a bit about<br />
the insects they’re going to create, have them<br />
draw several different types. Drawing helps<br />
them grasp the different body parts and<br />
shapes. Depending on how old or advanced<br />
the students are, have them include more<br />
detail. <strong>The</strong> students discover that insects come<br />
in all kinds of shapes and forms — long ones,<br />
thin ones, round ones, even kind of tri an gular-shaped<br />
ones — and they have all different<br />
lengths of legs.<br />
6. Beetles are excellent to use for this<br />
project, because they are among the largest<br />
insects, there are so many different types, and<br />
many are quite beautiful. Most beetles have<br />
two pair of wings, but we don’t see them<br />
because they are hidden under their hard<br />
outer shell. <strong>The</strong> rear pair (used for flying) is<br />
covered by the fore wings which are usually<br />
hard. Beetles have six legs, a pair of antennae,<br />
and three body parts — head, thorax,<br />
and abdomen.<br />
Notes:________________________________<br />
_____________________________________<br />
_____________________________________<br />
_____________________________________<br />
Glos sa ry:<br />
Ab do men — the lower region of an in sect’s<br />
body that contains the stom ach<br />
An ten nae — a pair of movable sensory<br />
at tach ments to the head of an insect<br />
Bug — a non-technical term for insects or<br />
other creeping, crawling in ver te brate<br />
<strong>In</strong>sect — any one of nu mer ous small in verte<br />
brate animals that have segmented bodies<br />
and six legs<br />
<strong>In</strong>vertebrate — an animal having no backbone<br />
or internal skeleton<br />
Knead — to work and press with the hands<br />
to make a material soft and smooth<br />
Polymer — a natural or synthetic chemical<br />
compound<br />
Thorax — the middle portion of an insect’s<br />
body
Supplies:<br />
Paper or Cardboard (cut into 5" x 7" pieces)<br />
Polymer Clay — 4 cubes of<br />
different colors (A one-color 2 oz.<br />
package can be divided into 12 cubes)<br />
Easy-to-bend wire —<br />
telephone plastic-coat ed wire is per fect<br />
Small glass beads — 2 per student<br />
Scissors<br />
Cookie sheet<br />
Parchment paper<br />
Additional Sup plies:<br />
Wire cutters (if needed)<br />
Cabochon Push Molds (Catalog #12218R)<br />
Needle Tool (Catalog #70488R)<br />
Equipment:<br />
Polymer Clay & Craft Oven (Catalog<br />
#12505P)<br />
Pho to #1 Pho to #2<br />
<strong>In</strong>structions:<br />
1. Pre pare clay. Soft en by knead ing and<br />
mix colors, if de sired. Blend ing colors with<br />
very young chil dren is not rec om mend ed.<br />
With young er children, it is better to keep<br />
the colors sim ple.<br />
2. Make a ball/oval for the bottom of the<br />
beetle, about the size of a nickel. See photo<br />
#1. <strong>The</strong> AMACO ® Cabochon Push Mold<br />
can also be used to make bugs. <strong>The</strong> mold<br />
has four different size ovals and two sizes of<br />
circles. Press the clay into one of the shapes,<br />
making sure clay fills the entire area. Pull a<br />
sharp, smooth knife against edge of mold<br />
to remove excess clay. Gently lift edges of<br />
clay from mold using needle tool.<br />
3. Flatten on the paper to a rectangle<br />
about 1 /8" thick. See photo #2.<br />
4. Cut three wires about 3” long for the<br />
legs.<br />
Photo #3<br />
5. Lay wires flat on clay rect an gle. See photo<br />
#3. Front and back pairs should be V shaped<br />
in opposite directions, and the mid dle should<br />
be straight. Do not bend legs up or down.<br />
6. Make three more balls of clay, each<br />
one a different color. <strong>The</strong> head should be<br />
approximately 1 /2" in diameter, the thorax<br />
3<br />
/4" in diameter, and the abdomen 1" in<br />
di am e ter.<br />
Photo #4 Photo #5<br />
Photo #6 Photo #7<br />
7. Shape each body part to desired form.<br />
Press down slightly, on base. <strong>The</strong> wire legs<br />
will be between the base and the body<br />
parts. See photos 4-6. Press and shape.<br />
Keep legs flat; do not bend.<br />
8. Add two beads for eyes. Push them into<br />
the polymer clay head so they will stick.<br />
9. Add antennae with two wires pushed<br />
into the head. Straight pins can be used<br />
for antennae, by inserting the point into the<br />
clay and using the head of the pin as the<br />
antennae end. See photo #7.<br />
10. Bake clay beetle on a cookie sheet lined<br />
with parchment paper. Keep legs flat while<br />
baking.<br />
11. After baking, let the beetle cool. Bend<br />
legs so that the insect will stand. You may<br />
need to trim legs to make sure they are the<br />
same length.<br />
12. Be sure to store unused polymer clay in<br />
a sealed plastic container or bag to prevent<br />
drying or hardening.<br />
Specific <strong>In</strong> struc tions<br />
for Hard en ing<br />
Polymer Clay Bee tles:<br />
Polymer clays harden in a kitchen oven or<br />
a toaster oven. Place beetles on aluminum<br />
foil or a cookie sheet. Be sure to keep legs<br />
flat while baking. Bake in a pre-heated<br />
home oven or toaster oven according to<br />
pack age in struc tions for individual colors<br />
and product. For best re sults, verify oven<br />
temperature with a cook ing thermometer.<br />
Do not harden in a mi cro wave oven, and<br />
do not heat above rec om mend ed temperature<br />
or over bake. Heating polymer<br />
clays above 375°F (191°C) and over bak ing<br />
will cause de com position and the release of<br />
toxic fumes. DO NOT inhale fumes.<br />
Additional Sug ges tions<br />
for Work ing with<br />
Polymer Clays<br />
l. Keep working surface clean. Use 5" x<br />
7" paper or card as base so clay will not<br />
pick up dirt.<br />
2. Wash hands before and after working<br />
with the clay. Clean hands help keep the<br />
clay looking bright and fresh.<br />
3. Use the heat of your hands to soften<br />
the clay. <strong>The</strong> clay may be stiff and crumbly<br />
when first taken from the package. It<br />
becomes soft and easy to model if you<br />
warm it and knead it in your hands.<br />
4. Try to use every little bit. Even the<br />
small est scraps are useful . Store scraps in<br />
resealable plastic bags. Be sure different<br />
colors are wrapped in wax paper to prevent<br />
color con tam i na tion.<br />
5. Store clay in dark place at room temper<br />
a ture.
6. Follow package directions for hard ening.<br />
Do not over or under bake.<br />
7. Although polymer clays are completely<br />
safe to use and are AP Non tox ic, proper<br />
safety precautions should still be followed.<br />
Don’t eat the clay; don’t use tools for clay<br />
and then food; don’t eat while work ing, and<br />
don’t overbake clay.<br />
Notes:________________________________<br />
_____________________________________<br />
_____________________________________<br />
_____________________________________<br />
_____________________________________<br />
Additional Ideas:<br />
1. Make a beetle pin by gluing a pin back<br />
to the bottom underside of the bug.<br />
2. Work with classroom teacher to create<br />
an insect fair or a magnified fantasy insect<br />
environment in the classroom or one of the<br />
school’s showcases.<br />
3. Have students read books (fiction<br />
or non-fiction) on insects and write book<br />
reviews or reports.<br />
4. Ask students to create imaginary insects<br />
— have them draw them, make them out of<br />
polymer clay, and write about them.<br />
Notes:________________________________<br />
_____________________________________<br />
_____________________________________<br />
_____________________________________<br />
This lesson was created by Penny Carpenter, middle school art teacher for Pomona Uni fied School District, Pomona, California. Ex am ples for this lesson<br />
were created by her students.<br />
This is one lesson in a series of art plans for elementary and secondary programs using American Art Clay Co., <strong>In</strong>c. products.<br />
American Art Clay Co., <strong>In</strong>c. • 6060 Guion Road • <strong>In</strong>dianapolis, <strong>In</strong>diana 46254 • (317) 244-6871 (800) 374-1600<br />
30101C 50M0296


