2013 Bushnell HD Max Owner's Manual - Trail Camera
2013 Bushnell HD Max Owner's Manual - Trail Camera
2013 Bushnell HD Max Owner's Manual - Trail Camera

Create successful ePaper yourself
Turn your PDF publications into a flip-book with our unique Google optimized e-Paper software.
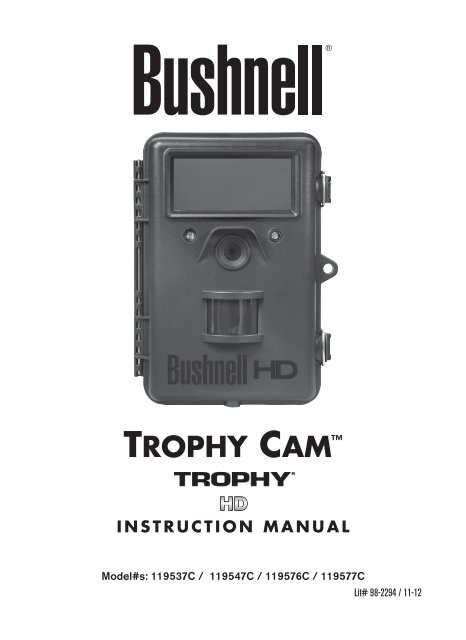
TROPHY CAM <br />
INSTRUCTION MANUAL<br />
VIDEO<br />
Model#s: 119537C / 119547C / 119576C / 119577C<br />
Lit# 98-2294 / 11-12<br />
<strong>2013</strong> TrophyCams_119537C+119547C+119576C+119577C_1LIM_rev110912.indd 1 11/14/12 11:05 AM
IMPORTANT NOTE<br />
Congratulations on your purchase of one of the best trail cameras<br />
on the market! <strong>Bushnell</strong> is very proud of this camera and we are<br />
sure you will be pleased with it as well. We appreciate your<br />
business and want to earn your trust. Please refer to the notes<br />
below and the instructions in this manual to ensure that you are<br />
completely satisfied with this product.<br />
If your <strong>Bushnell</strong> Trophy Cam does not seem to be<br />
functioning properly or if you are having photo/video quality<br />
issues, please check the Troubleshooting/FAQ section<br />
on pages 31-35.<br />
Problems are often due to something simple that was<br />
overlooked, or require only changing one setting to solve.<br />
If your problem continues after trying the solutions in<br />
the Troubleshooting/FAQ section, please call <strong>Bushnell</strong><br />
Customer Service at (800) 423-3537. In Canada, call (800)<br />
361-5702.<br />
2<br />
<strong>Bushnell</strong> recommends using a full set of Energizer ® Lithium AA<br />
batteries (8 or 12, depending on the model) in these Trophy Cam<br />
models to obtain maximum battery life<br />
Do not mix old and new batteries<br />
Do not mix battery types-use ALL lithium or ALL alkaline<br />
<strong>Bushnell</strong> recommends using SanDisk ® SD and SDHC Cards<br />
(up to 32GB capacity, Ultra ® or Extreme ® series for <strong>HD</strong> video)<br />
in these Trophy Cam models<br />
<strong>2013</strong> TrophyCams_119537C+119547C+119576C+119577C_1LIM_rev110912.indd 2 11/14/12 11:05 AM
INTRODUCTION<br />
About the Trophy Cam<br />
The <strong>Bushnell</strong> Trophy Cam is a digital scouting camera. It can be triggered by<br />
any movement of game in a location, detected by a highly sensitive Passive<br />
Infra-Red (PIR) motion sensor, and then take high quality pictures (up to 8MP<br />
still photos), or video clips.<br />
The Trophy Cam consumes very little power (less than 0.2 mA) in a standby<br />
(surveillance) state. This means it can deliver up to six months standby<br />
operation time when the device is powered by the full capacity of AA<br />
alkaline batteries, and up to twelve months utilizing lithium AA batteries.<br />
Once motion in the monitored area is detected, the digital camera unit will be<br />
triggered at once (typically within one second) and then automatically take<br />
photos or videos according to previously programmed settings. The Trophy<br />
Cam is equipped with built-in infrared LEDs (“black” IR LEDs on models<br />
119576C/119577C) that function as a flash, so that it delivers clear photos<br />
or videos (in black & white) even in the dark, and it can take color photos or<br />
videos under sufficient daylight. The Trophy Cam is designed for outdoor<br />
use and is resistant against water and snow.<br />
Your trail camera is one of the latest generation of <strong>Bushnell</strong> Trophy Cams,<br />
and includes many new or improved features, including:<br />
• Auto PIR Sensitivity-the camera monitors ambient temperature<br />
conditions and automatically adjusts the sensor/trigger signal to be<br />
more sensitive to slight variations in temperature on hot days, less<br />
sensitive on cold days.<br />
• Hyper NightVision-The IR LED Flash array now has increased range,<br />
brighter output and better coverage for improved nighttime images.<br />
• Field Scan 2x with Live Trigger-The “time lapse” feature added in last<br />
year’s models has been enhanced with the addition of the option for<br />
a second block of recording with its own start/stop times. Trigger<br />
signals generated by nearby wildlife activity will still generate additional<br />
photos/videos as they normally would, independently of the Field Scan<br />
operation.<br />
• GPS Geotag Capability-allows the user to input the longitude and<br />
latitude of the camera’s position, which will be embedded in each<br />
photo file. This enables Google Earth, Picassa and other geotag<br />
3<br />
<strong>2013</strong> TrophyCams_119537C+119547C+119576C+119577C_1LIM_rev110912.indd 3 11/14/12 11:05 AM
enabled software to automatically show a map pinpointing each<br />
camera’s location when a group of photos are reviewed on a computer.<br />
Especially useful for those who setup multiple Trophy Cams to monitor<br />
large or widely separated areas.<br />
• Multi Flash Mode (LED Control)- prevents overexposed flash photos in<br />
close range applications<br />
• Hybrid Capture Mode-allows both still photos and videos to be<br />
captured at each trigger, up to highest resolution settings for each.<br />
• NV Shutter-user can select shutter speed for images captured at night<br />
allowing control over brightness vs. ability to stop motion<br />
• <strong>Camera</strong> Operating Mode can be limited to Day only, Night only, or 24<br />
HRs<br />
And many more features such as <strong>HD</strong> Video with Audio, widescreen or<br />
fullscreen format still photos, imprintable camera name (user set) along with<br />
current data including temperature, moon phase and barometric pressure*<br />
(*imprinted barometer data only available on black LED models).<br />
Applications<br />
The Trophy Cam can be used as a trail camera for hunting or scouting<br />
game. It is also suitable for surveillance usage.<br />
4<br />
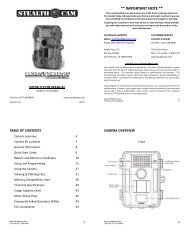
PARTS AND CONTROLS<br />
The Trophy Cam provides the following connections for external devices:<br />
USB port, SD card slot, A/V Out, and external DC power in (pg 5, Fig. 1).<br />
A 3-way power switch is used to select the main operating modes: OFF,<br />
SETUP, and ON (pg 5, Fig. 2).<br />
A control key interface with six keys is primarily used in SETUP mode to<br />
select operational functions and parameters. As shown on the next page,<br />
these keys are: UP, DOWN, LEFT, RIGHT, OK and MENU. Four of the keys<br />
can also perform a second function (shortcut operations in SETUP mode) in<br />
addition to their main function: The DOWN key can be used to set the camera<br />
to Photo mode (still camera icon), and the UP key can set the camera to<br />
Video mode (movie camera icon). The RIGHT key also serves as the manual<br />
shutter (“SHOT”) button of the camera and the OK key switches the camera<br />
to the Playback (“REPLAY”) mode. These secondary functions are indicated<br />
<strong>2013</strong> TrophyCams_119537C+119547C+119576C+119577C_1LIM_rev110912.indd 4 11/14/12 11:05 AM
y icons or text above the key as shown below.<br />
Light<br />
Sensor<br />
FRONT VIEW<br />
LED IR Flash<br />
Video Mic<br />
Motion/ Low<br />
Battery Indicator<br />
Lens<br />
Lock Hole<br />
DC in<br />
Cover Plug<br />
Tripod Socket<br />
PIR Sensor<br />
Latch<br />
Fig. 1: Connections<br />
Video Mic<br />
A/V Out<br />
USB Port<br />
INSIDE VIEW<br />
DC In<br />
SD Card Slot<br />
LCD Screen<br />
Power/Mode<br />
Switch<br />
ON<br />
SETUP<br />
OFF<br />
Cable to Battery<br />
Compartment<br />
UP/Video<br />
DOWN/Photo<br />
LEFT<br />
MENU<br />
OK/Replay<br />
RIGHT/Shot<br />
Fig. 2: Button and<br />
Switch Guide<br />
5<br />
<strong>2013</strong> TrophyCams_119537C+119547C+119576C+119577C_1LIM_rev110912.indd 5 11/14/12 11:05 AM
6<br />
INSTALLING THE BATTERIES AND SD CARD<br />
Before you begin learning how to use your Trophy Cam, you will first need<br />
to install a set of batteries and insert an SD card. Although that may only take<br />
you a minute, there are some important notes about both batteries and SD<br />
cards you should be aware of, so please take the time to read the following<br />
directions and cautions:<br />
Loading Batteries<br />
After opening the two latches on the right side of the<br />
Trophy Cam, you will see that the Trophy Cam has<br />
eight or twelve battery slots, depending on your model.<br />
For maximum battery life, you should install a full set<br />
of batteries. The Trophy Cam may also be operated<br />
by just four batteries installed in the first slots only<br />
(starting on the top or left-see photos). Battery life will<br />
be shorter with 4 batteries, but the camera will operate<br />
normally. Whether you use 4 or a full set, be sure<br />
to insert each battery with correct polarity (negative<br />
or “flat” end against the long spring of each battery<br />
slot).<br />
<strong>Bushnell</strong> recommends using a full set of new lithium<br />
AA (Energizer ® brand) or alkaline AA batteries. NiMh<br />
Rechargeable batteries are not recommended, as the<br />
lower voltage they produce can cause operational<br />
issues. It is also possible to use a lead-acid external<br />
battery cell with 6V output or suitable AC adapter-see<br />
below for more details.<br />
Using an External Power Source (optional, user provided)<br />
Optionally, you can connect an external 6V DC power source to the “DC In”<br />
jack at the bottom of the Trophy Cam. It is recommended to use a power<br />
source with a current output greater than 1550mA. However, during bright<br />
daytime operation when no flash is required, the Trophy Cam can function<br />
with much less current ( >400mA). Please use a compatible power source<br />
cable (not provided) to connect the external DC power source with the power<br />
input jack of the Trophy Cam, making sure that the polarity is correct. Note:<br />
The power connector is a 4.0x1.7mm coaxial DC power plug with positive<br />
“tip” (inside pin) polarity (Radio Shack P/N 274-1532 or equivalent).<br />
<strong>2013</strong> TrophyCams_119537C+119547C+119576C+119577C_1LIM_rev110912.indd 6 11/14/12 11:05 AM
If both an external power source is connected and batteries are installed, the<br />
Trophy Cam will be powered by the external power source.<br />
When the batteries become weak, the low-battery indicator LED will glow<br />
blue, indicating the batteries should be changed (pg 5, Front View).<br />
Inserting the SD Card<br />
The Trophy Cam has 32MB of internal memory, which can hold only about<br />
20 photos (@ 5MP resolution). This is handy for testing and getting familiar<br />
with the camera, but you will no doubt want to leave the camera unattended<br />
for longer than a day, so using an SD card is recommended for all models.<br />
Insert the SD card (with the camera’s power switch in the OFF position)<br />
before beginning to operate the camera. Don’t insert or remove the SD card<br />
when the power switch is in the ON position.<br />
The Trophy Cam uses a standard SD (Secure Digital) memory card to save<br />
photos (in .jpg format) and/or videos (in .avi format). SD and SDHC (High<br />
Capacity) cards up to a maximum 32GB capacity are supported. High speed<br />
SD cards are recommended if you will use the 1280x720 video resolution<br />
setting (<strong>HD</strong>). Before inserting the SD card into the card slot after opening the<br />
camera’s front cover, please make sure that the write-protect switch on the<br />
side of the card is “off” (NOT in the “Lock” position). The following describes<br />
how to insert and remove the SD card:<br />
• Insert the SD card into the card slot with its label side upwards (see<br />
below). A “click” sound indicates that the card is installed successfully.<br />
If the wrong side of the card is facing up, you will not be able to insert<br />
it without force-there is only one correct way to insert cards. If the SD<br />
card is not installed correctly, the device will not display an SD card icon<br />
on the LCD in SETUP mode (the SD card icon displayed after switching<br />
to SETUP mode will have a “lock” symbol inside it in it if the card is locked).<br />
Formatting the SD card by using the Trophy Cam’s “Format” parameter<br />
before using it for the first time is recommended, especially when a<br />
card has been used in other devices (see “Changing Menu Parameter<br />
Settings” for details).<br />
• To take out the SD card, just gently push in the<br />
card (do not try to pull it out without pushing<br />
in first). The card is released from the slot and<br />
ready to be removed when you hear the click.<br />
WARNING: Be sure the camera’s power is switched OFF<br />
before inserting or removing SD cards or batteries.<br />
7<br />
<strong>2013</strong> TrophyCams_119537C+119547C+119576C+119577C_1LIM_rev110912.indd 7 11/14/12 11:05 AM
8<br />
USING THE TROPHY CAM<br />
Once you’ve prepared your Trophy Cam by properly installing batteries and<br />
an SD card, you could simply take it outside, strap it to a tree, switch it on<br />
and leave-and you might get some great photos that are exactly what you<br />
wanted. However, we highly recommend that you first spend some additional<br />
time indoors with this manual and your camera until you know a bit more<br />
about what the 3-way switch and those control keys do. If nothing else, you’ll<br />
probably want to at least set the date and time so the camera will imprint<br />
them (or not-it’s your option) on your photos as they are taken, learn how to<br />
set the camera to shoot video clips instead of still photos if you like, and read<br />
some tips about mounting it on a tree.<br />
THE OFF, ON, AND SETUP MODES<br />
The Trophy Cam has three basic operational modes:<br />
• OFF mode: Power switch in the OFF position.<br />
• ON mode: Power switch in the ON position (LCD screen is off.)<br />
• SETUP mode: Power switch at SETUP position (LCD screen is on).<br />
OFF Mode<br />
The OFF mode is the “safe” mode when any actions must be taken, e.g.,<br />
replacing the SD card or batteries, or transporting the device. You will also<br />
use OFF mode if you connect the camera to a computer’s USB port later<br />
to download your photos/videos. And of course, when you are storing or not<br />
using the camera, you will switch it to OFF. Please note that even in the OFF<br />
mode the Trophy Cam still consumes power at a very low level. Therefore,<br />
it’s a good idea to take the batteries out of the battery compartment if the<br />
camera will not be used for a long time.<br />
ON Mode<br />
Anytime after the batteries and SD card have been inserted, you can switch<br />
on the camera. When the power switch is moved to the top position, the<br />
camera will enter into the ON (Live) mode. The motion indicator LED (pg. 6,<br />
“Front View”) will blink red for about 10 seconds. This interval allows time for<br />
you to close the Trophy Cam’s front cover, lock it, and leave the monitored<br />
area. Once in the ON mode, no manual controls are needed or possible<br />
(the control keys have no effect). The Trophy Cam will take photos or<br />
<strong>2013</strong> TrophyCams_119537C+119547C+119576C+119577C_1LIM_rev110912.indd 8 11/14/12 11:05 AM
videos automatically (according to its current parameter settings) when it is<br />
triggered by the PIR sensor’s detection of activity in the area it covers.<br />
You can either move the power switch directly from OFF to ON mode, or<br />
stop at the SETUP position first to change one or more settings, then move<br />
the switch to ON after you have finished doing so.<br />
SETUP Mode<br />
In the SETUP mode you can check and change the settings of the Trophy<br />
Cam with the help of its built-in LCD (or a monitor connected to the TV out<br />
jack). These settings, found in the SETUP Menu, let you change the photo<br />
or video resolution, interval between photos, switch the time imprint on, etc.<br />
Moving the power switch to the SETUP position will turn on the LCD display,<br />
and you will see an information screen that shows how many images have<br />
been taken, the battery level, camera or video mode, etc (Fig. 3, next page).<br />
NOTE: Always move the power switch from OFF to SETUP mode. It<br />
is possible that the camera could lockup if it is switched from ON to<br />
SETUP mode. If this occurs, simply move the switch to OFF and then<br />
push it up to SETUP again.<br />
SETUP Mode Shortcut Keys/Functions<br />
As mentioned earlier in “Parts & Controls”, four of the keys below the LCD<br />
have secondary, “shortcut” functions when the camera is switched to<br />
SETUP mode (but the MENU key has not been pressed):<br />
• Press the UP key to quickly set the camera to shoot video clips.<br />
• Press the DOWN key to quickly set the camera to take still photos.<br />
• Press the RIGHT key to manually trigger the shutter. This is useful<br />
for testing the camera-make sure you are in SETUP mode, press the<br />
RIGHT key, and a few seconds later a photo or video (depending on<br />
how the camera was set) will be saved to the SD card (or internal<br />
memory if no card is inserted). The “number of images taken” counter<br />
on the bottom left of the LCD will increase by one. If the display<br />
indicates “SD PROTECTED” when you press the SHOT key, switch<br />
the camera OFF, remove the SD card and slide its protect switch off.<br />
• Press the OK key to replay (review or playback) photos/videos on the<br />
LCD (119577C color viewer model only), or a connected TV monitor<br />
(std. display models). See “Playing Back/Deleting the Photos/Videos”<br />
(pg. 27) for more details.<br />
9<br />
<strong>2013</strong> TrophyCams_119537C+119547C+119576C+119577C_1LIM_rev110912.indd 9 11/14/12 11:05 AM
Fig. 3: SETUP Information Screen (standard display model shown)<br />
<strong>Camera</strong> (Still Photo) Mode<br />
Image Size (Resolution)<br />
SD Card Status<br />
Still Photo Mode<br />
Battery Level<br />
Time Stamp<br />
Field Scan On<br />
2<br />
Date:Month-Day-Year<br />
Time<br />
Hour:Minute:Second<br />
# of Photos Taken Remaining Photo Capacity<br />
Video Mode<br />
Video Sound On<br />
Video Resolution<br />
Video Mode<br />
2<br />
Available Video Recording Time<br />
10<br />
<strong>2013</strong> TrophyCams_119537C+119547C+119576C+119577C_1LIM_rev110912.indd 10 11/14/12 11:05 AM
Using the SETUP Menu to<br />
Change Settings<br />
The main purpose of the SETUP mode is to allow you to change the settings<br />
of the camera’s parameters (18 different ones are available!) so your Trophy<br />
Cam operates exactly the way you want it to. You will do this by entering the<br />
SETUP Menu and pressing the keys below the LCD display, which will show<br />
you each parameter and its setting.<br />
Changing Parameter Settings in SETUP Mode<br />
A wide range of options or “parameters” are provided to allow you to set<br />
the Trophy Cam to your operational preferences. To change the setting of<br />
any parameter you must first switch to the SETUP mode. Once in SETUP<br />
mode, pressing the MENU button will allow you to select any parameter and<br />
change its setting. The name of the parameter and its current setting will be<br />
shown on the LCD. Pressing the RIGHT or LEFT key scrolls to the next or<br />
previous parameter (RIGHT key to move on to the next parameter and LEFT<br />
key to go back to the previous parameter), and pressing the UP or DOWN<br />
key lets you select a different setting for the currently displayed parameter.<br />
Once you have selected your preferred new setting for a parameter, press<br />
the OK button to save the new setting (actually change it). When you are<br />
finished changing the settings of one or more parameters, press MENU<br />
again to exit the SETUP menu. MENU can also be pressed anytime you<br />
want to cancel changing a parameter’s setting after a new setting has been<br />
selected (but OK has not been pressed yet). After setting the parameters<br />
to your preferences, be sure to move the switch to ON to begin actually<br />
taking photos or videos. No images will be captured if the switch is left in the<br />
SETUP position (unless you press the RIGHT/Shot key after exiting the menu)-<br />
in fact, the camera will power off automatically after a few seconds with no<br />
key pressed.<br />
Color Viewer vs. Standard Display Models<br />
There is a slight difference in how the settings for a parameter are shown<br />
between the two different types of Trophy Cam models:<br />
• On the color LCD display model (119577C), all the available settings<br />
for the currently displayed parameter are shown on one screen, with a<br />
checkmark next to the current setting (Fig. 4a). To change the setting, first<br />
use the UP/DOWN keys to highlight (select) the new setting you want<br />
(Fig. 4b), then press OK to “Execute” the actual change to the selected<br />
11<br />
<strong>2013</strong> TrophyCams_119537C+119547C+119576C+119577C_1LIM_rev110912.indd 11 11/14/12 11:05 AM
setting. The checkmark will appear next to your new setting to confirm this<br />
(Fig. 4c).<br />
• On models with standard (non-color) display, only one setting is<br />
displayed at a time, starting with the current setting for the parameter<br />
when it is first selected (Fig. 4d). To change the setting, use the UP/<br />
DOWN keys to display the new setting you want (Fig. 4e), then press<br />
OK to “Execute” (make the actual change to this setting). If you want to<br />
confirm this setting is now the current one, just press the RIGHT key<br />
to scroll to the next parameter, then press LEFT to go back again to the<br />
previous one. You should see the parameter setting you just made.<br />
Fig. 4: Selecting Parameter Settings<br />
COLOR VIEWER<br />
(119577C only)<br />
Press MENU<br />
STANDARD DISPLAY<br />
(4a)<br />
(4d)<br />
Press DOWN<br />
(4b)<br />
(4e)<br />
Press OK<br />
(4c)<br />
12<br />
<strong>2013</strong> TrophyCams_119537C+119547C+119576C+119577C_1LIM_rev110912.indd 12 11/14/12 11:05 AM
EXAMPLES-Changing the Settings of Some Common<br />
Parameters<br />
Following this page, you will find tables listing all of the parameters found in<br />
the SETUP Menu, along with their possible settings (or range of settings),<br />
and a detailed description of what the parameter controls and what<br />
the settings do. If you read the previous section detailing how to select<br />
parameters and change their settings, you should be able to dive right in, find<br />
the parameter(s) you want, and setup the camera to suit your preferences.<br />
But maybe you’d rather walk through an example or two first:<br />
To change any parameter’s setting, always start with the power switch in the<br />
SETUP position. After the LCD comes on, press the MENU key.<br />
The first parameter you will see when you first enter the SETUP Menu<br />
is “Mode”. To change it from its default setting of “<strong>Camera</strong>” (still photos)<br />
to “Video” (shoot video clips), press the DOWN key to highlight “Video”<br />
(119577C only) or to select the “Video” setting (std. display models). Press<br />
the OK key to “Execute” (Set) the new setting you’ve selected for this<br />
parameter.<br />
Now press the RIGHT key to move to another parameter in the Menu.<br />
Pressing it three times will take you to “Capture Number”. Try using the UP<br />
and DOWN keys to scroll through the range of settings, then press OK to<br />
lock in your setting for the number of photos the camera takes each time it's<br />
triggered.<br />
Pressing the RIGHT key until you reach the last menu item, you'll see the<br />
“Default Set” parameter. Highlight or select “Execute” (using UP or DOWN)<br />
and press OK to restore all parameters (including the Mode and Video<br />
Length parameters you changed a minute ago) back to their original factory<br />
default settings. The default settings for each parameter are indicated in bold<br />
type in the SETUP Menu tables on the next several pages.<br />
Be sure to set the current date and time, using the “Set Clock” parameter, if you<br />
choose to change the “Time Stamp” parameter setting to “On” since that will tell<br />
the camera to imprint the date and time on each of the images it captures.<br />
13<br />
<strong>2013</strong> TrophyCams_119537C+119547C+119576C+119577C_1LIM_rev110912.indd 13 11/14/12 11:05 AM
Field Scan 2x with Live Trigger Feature<br />
Field Scan is a revolutionary new feature for the <strong>Bushnell</strong> Trophy Cam,<br />
which allows you to monitor your food plots or field edges with time lapse<br />
images or video. When set to “On”, the Trophy Cam will take a photo (or<br />
record a video clip) automatically at your choice of intervals (for example,<br />
once every five minutes) during one or two blocks of time you set up for each<br />
day, without requiring a trigger from an active animal. This has the<br />
advantage of giving you the ability to monitor the edge of a field that might<br />
be 50 or 150 yards away from the camera out of the PIR sensor’s range. The<br />
result is an effective range much greater than it would normally be, with the<br />
camera dependant on triggers generated by nearby animals. This is a great<br />
tool for hunters to scout an entire field with only one camera.<br />
If an animal does enter the area covered by the PIR sensor and generate a<br />
trigger event during a time in between the Field Scan intervals you set, the<br />
camera will capture an image or video just as it normally would, based on<br />
your other menu settings. Here’s how to setup and use Field Scan (be sure<br />
you’ve set the current time in “Set Clock” first, so your Field Scan recording<br />
will stop and start at the correct times of day):<br />
1. Move the main switch to SETUP, then press MENU.<br />
2. Keep pressing the RIGHT key, stepping through the Setup Menu until<br />
you reach Field Scan.<br />
3. Press the UP key to select On, and press OK (Step 1, pg.16). You will<br />
see "A", representing the first block of time you can define (a second<br />
block of time later in the day, "B" can also be setup if you wish). Press<br />
OK (Step 2). This takes you to the screen to set Start and Stop times,<br />
which determines the clock times when the first block of Field Scan<br />
recording will begin and end for each day. You can set these times to<br />
the exact hour and minute you want, for a recording “window” that<br />
lasts anywhere from just a minute to a full 24 hours.<br />
4. Set the [Start] and [Stop] times, beginning with the Start hour, using<br />
the UP/DOWN keys to change the setting (Step 3). The hour setting<br />
is based on a 24-hour clock, with “00” hours = midnight, “12” hours<br />
= noon, “23” hrs = 11PM, etc. To move to the next setting, press the<br />
RIGHT key, change the minute for the Start time with UP/DOWN,<br />
then on to the hour and minute settings for the Stop time.<br />
14<br />
<strong>2013</strong> TrophyCams_119537C+119547C+119576C+119577C_1LIM_rev110912.indd 14 11/14/12 11:05 AM
5. After you finish setting the Stop minutes, press OK to confirm your<br />
settings for the first block of Field Scan recording. If desired, you can<br />
create a second block of time by pressing the DOWN key to select "B"<br />
(Step 4), then press OK and follow the same process to set Start and<br />
Stop times for Field Scan block "B" (Step 5). As an example of how you<br />
might use these two available time blocks, you could setup Field Scan<br />
time block "A" for the dawn hours from 6 AM to 8 AM, and block "B"<br />
to capture images between 5:30 and 7 PM. No Field Scan recording<br />
would occur from 8AM to 5:30PM, or from 7PM to 6AM.<br />
6. After setting Start/Stop times to define Field Scan block "A" and/or<br />
"B", press OK, then press the UP or DOWN key to select "Interval"<br />
and press OK (Step 6). The Field Scan "Interval" setting lets you<br />
control how often a photo or video clip is recorded during the block(s)<br />
of time you defined with the Start and Stop settings. Your options are<br />
60 minutes, 30 minutes, 15 minutes, 5 minutes (this is the default), or<br />
1 minute (still photo mode only). Use the UP/DOWN keys to select<br />
your preference, then press OK to save it (Step 7). Note that for videos,<br />
"Interval" is independent of the Length of each video recording-it’s<br />
how often videos are recorded, not how long each one lasts.<br />
7. Here’s an example of how the camera would operate, based on the<br />
following Field Scan settings:<br />
Field Scan: On<br />
Field Scan A:<br />
[Start]: 6:00<br />
[Stop]: 8:00<br />
Field Scan B:<br />
[Start]: 17:30<br />
[Stop]: 19:00<br />
Interval: 15M<br />
Note: avoid any "overlap" of Field Scan A & B<br />
recording blocks when setting their start and stop<br />
times, to assure correct operation. Also-if the "<strong>Camera</strong><br />
Mode" menu parameter is set to "Day" or "Night"<br />
operation only, that will take priority over your Field<br />
Scan settings. Set the <strong>Camera</strong> Model to "24 HR" if<br />
you are setting both day and night start and/or stop<br />
times in Field Scan.<br />
These settings would cause the camera to capture a photo (or video,<br />
if the camera is set to that mode) once every 15 minutes, beginning at<br />
6 AM, until the Field Scan "A" recording block stops at 8:00 AM. Later<br />
that day, the camera would again take a photo or video every 15 minutes<br />
between 5:30 PM and 7:00 PM (during Field Scan time block "B").<br />
The next day, the camera would again record an image or video once<br />
every 15 minutes between 6:00 and 8:00 AM, and between 5:30 and<br />
15<br />
<strong>2013</strong> TrophyCams_119537C+119547C+119576C+119577C_1LIM_rev110912.indd 15 11/14/12 11:05 AM
7:00 PM. No Field Scan recording would occur from 8AM to 5:30PM,<br />
or from 7PM to 6AM. Remember, Field Scan recording is independent<br />
of normal triggers due to animal activity–even if no animals enter the IR<br />
sensor coverage zone, an image or video will still be captured every 15<br />
minutes during the block(s) of time. If an animal triggers the camera “in<br />
between” the 15 minute intervals, it will be recorded, same as it would<br />
if you had setup the camera with Field Scan turned Off. Note: Field<br />
Scan settings of frequent intervals and/or long periods between<br />
start and stop time can reduce battery life.<br />
(Step 1)-set Field<br />
Scan Mode to “On”<br />
(Step 2)-select Field<br />
Scan "A" (press OK)<br />
(Step 3)-set Field<br />
Scan "A" Stop & Start<br />
Steps 4 & 5 are<br />
optional (only<br />
required if you want<br />
to set up a second<br />
block of Field Scan<br />
recording with<br />
different stop and<br />
start times)<br />
(Step 4) (opt)-select Field<br />
Scan "B" (press OK)<br />
(Step 5) (opt)-set Field<br />
Scan "B" Stop & Start<br />
16<br />
Note: the Interval<br />
Setting sets the<br />
timing between each<br />
image for both Field<br />
Scan "A" and "B"<br />
recording blocks.<br />
(Step 6)-select Field<br />
Scan "Interval"<br />
(Step 7)-set Field<br />
Scan Interval<br />
<strong>2013</strong> TrophyCams_119537C+119547C+119576C+119577C_1LIM_rev110912.indd 16 11/14/12 11:05 AM
The SETUP Menu – Parameters and Settings List<br />
w/Descriptions<br />
Parameter<br />
Mode<br />
Image Size<br />
(only affects<br />
still photos<br />
in <strong>Camera</strong> or<br />
Hybrid modes)<br />
Image Format<br />
(only affects still<br />
photosformat<br />
for video<br />
is tied to Video<br />
Size)<br />
Capture<br />
Number<br />
(only affects<br />
still photos<br />
in <strong>Camera</strong> or<br />
Hybrid modes)<br />
Settings<br />
(Bold=default)<br />
<strong>Camera</strong>, Video,<br />
Hybrid<br />
3M Pixel,<br />
5M Pixel,<br />
8M Pixel,<br />
Full Screen,<br />
Wide Screen<br />
1 Photo,<br />
2 Photo,<br />
3 Photo<br />
Description<br />
Selects whether still photos or video<br />
clips are captured when the camera<br />
is triggered. Hybrid mode combines<br />
both <strong>Camera</strong> and Video, so a still<br />
photo and a video clip are both<br />
captured for each trigger.<br />
Selects resolution for still photos<br />
from 3 to 8 megapixels. Higher<br />
resolution produces better quality<br />
photos, but creates larger files<br />
that take up more of the SD card<br />
capacity (fills up faster). 5M is a good<br />
compromise between quality and<br />
file size.<br />
Selects 4:3 (Fullscreen, like old TV<br />
sets) or 16:9 (Widescreen, like new<br />
flat TVs) “aspect ratio” for still photos.<br />
If you like to view your photos on a<br />
TV set or computer monitor, you can<br />
set the format to match it.<br />
Selects how many photos are taken<br />
in sequence per trigger in <strong>Camera</strong><br />
mode. This setting affects photos<br />
taken in Field Scan mode as well (to<br />
snap two photos every 10 minutes,<br />
for example). Please also refer to the<br />
Interval parameter.<br />
17<br />
<strong>2013</strong> TrophyCams_119537C+119547C+119576C+119577C_1LIM_rev110912.indd 17 11/14/12 11:05 AM
Parameter<br />
Settings<br />
(Bold=default)<br />
Description<br />
LED Control<br />
(Multi-Flash<br />
feature)<br />
Low, Medium,<br />
High<br />
<strong>Camera</strong> Name (Input)<br />
Video Size<br />
(only affects<br />
video clips in<br />
Video or Hybrid<br />
modes)<br />
See "Using the<br />
Setup Menu Input<br />
Screens"<br />
1280x720,<br />
640x480,<br />
320x240<br />
Controls how many LED lamps fire<br />
when images are taken in low light.<br />
“High”=all 32 LEDs fire, which is<br />
the default setting. Set to Medium or<br />
Low if you are getting overexposed<br />
flash photos or will place the camera<br />
at very close range to the subject<br />
you want to photograph. In general,<br />
select High if most of your intended<br />
subjects will be over 30 ft. from the<br />
camera, Medium for the 15 to 30 ft.<br />
range, and Low for subjects under<br />
15 ft. away. Note: in video mode, 24<br />
LEDs fire in both High & Medium<br />
(default) settings. Set to Low if<br />
videos are overexposed.<br />
Allows the user to set a custom<br />
name for the camera. Useful for ID<br />
purposes when multiple cameras are<br />
setup, since each camera will imprint<br />
its name on all photos (but not<br />
videos) it captures.<br />
Selects video resolution (in pixels per<br />
frame). Higher resolution produces<br />
better quality videos, but creates<br />
larger files that take up more of the<br />
SD card capacity (fills up faster). The<br />
default 640x480 is VGA video in<br />
standard 4:3 format. The 1280x720<br />
setting provides “widescreen” format<br />
<strong>HD</strong> video. Using high speed SD<br />
cards (SanDisk ® Ultra ® or Extreme ®<br />
series or similar) is recommended<br />
if you will use the 1280x720 video<br />
setting.<br />
18<br />
<strong>2013</strong> TrophyCams_119537C+119547C+119576C+119577C_1LIM_rev110912.indd 18 11/14/12 11:05 AM
Parameter<br />
Video Length<br />
(only affects<br />
video clips in<br />
Video or Hybrid<br />
modes)<br />
Interval<br />
Settings<br />
(Bold=default)<br />
10S (second)<br />
default, with 60S<br />
to5S possible<br />
range<br />
10S (second)<br />
default, with a<br />
60M (minute)<br />
to1S (second)<br />
range of settings<br />
available.<br />
(60M-1M are set<br />
in one minute<br />
increments,<br />
59S-1S are set<br />
in one second<br />
increments)<br />
Description<br />
Sets length per captured video<br />
clip. Settings begin with 10 second<br />
default when parameter is first<br />
selected. After stepping down to<br />
5S, video length settings start over<br />
at 60S.<br />
Selects the length of time that the<br />
camera will “wait” until it responds<br />
to any additional triggers from the<br />
PIR after an animal is first detected<br />
and remains within the sensor’s<br />
range. During this user set “ignore<br />
triggers” interval, the camera will not<br />
capture photos/videos. This prevents<br />
the card from filling up with too<br />
many redundant images. Settings<br />
begin with 10 second default when<br />
parameter is first selected. Note: after<br />
setting down past “1S”, settings start<br />
over at “60M”.<br />
19<br />
<strong>2013</strong> TrophyCams_119537C+119547C+119576C+119577C_1LIM_rev110912.indd 19 11/14/12 11:05 AM
Parameter<br />
Settings<br />
(Bold=default)<br />
Description<br />
Sensor Level<br />
NV (Night<br />
Vision) Shutter<br />
<strong>Camera</strong> Mode<br />
Low, Normal,<br />
High, Auto<br />
High, Medium,<br />
Low<br />
24 Hrs, Day,<br />
Night<br />
Selects the sensitivity of the PIR<br />
sensor. The “High” setting will make<br />
the camera more sensitive to infrared<br />
(heat) and more easily triggered by<br />
motion, and the “Low” setting makes<br />
it less sensitive to heat and motion.<br />
The High setting can be useful<br />
when the ambient temperature is<br />
warm (making it more difficult for the<br />
sensor to detect animals), and the<br />
Low setting may help in cold weather<br />
if the camera is being triggered too<br />
often by anything warmer than the<br />
surroundings. “Normal” is for average<br />
or moderate conditions. The default<br />
“Auto” setting will allow the camera<br />
to determine the best setting based<br />
on its current operating temperature.<br />
This is an ideal setting if the weather<br />
is expected to change significantly<br />
during the period the camera will be<br />
used.<br />
Affects the shutter speed during<br />
Night Vision operation. High will<br />
freeze motion better, but photos<br />
may be darker. A Low shutter speed<br />
setting will produce brighter photos,<br />
but rapid motion may be blurred.<br />
Medium is a good compromise.<br />
Allows user to limit operation to only<br />
day or night period if desired. An<br />
ambient light level sensor determines<br />
"Day" vs "Night" automatically. This<br />
setting takes priority over any Field<br />
Scan settings.<br />
20<br />
<strong>2013</strong> TrophyCams_119537C+119547C+119576C+119577C_1LIM_rev110912.indd 20 11/14/12 11:05 AM
Parameter<br />
Settings<br />
(Bold=default)<br />
Description<br />
Format<br />
Execute (followed<br />
by an additional<br />
No/Yes step)<br />
Deletes (erases) all files stored<br />
on a card to prepare it for reuse.<br />
Always format a card that has been<br />
previously used in other devices.<br />
Caution! Make sure you have<br />
downloaded and backed up any<br />
files you want to preserve first!<br />
Press OK to execute (then select Yes<br />
and press OK again on color viewer<br />
models), press MENU (or select<br />
NO then press OK) to exit without<br />
formatting.<br />
TV Out NTSC, PAL Selects video standard /format for<br />
the “A/V Out” output jack. The video<br />
standard is NTSC for the United<br />
States, Canada, Mexico, Asia and<br />
South America. PAL is used primarily<br />
in Europe.<br />
Time Stamp Off, On Select “On” if you want the date &<br />
time (that the image was captured)<br />
imprinted on every photo/video,<br />
select “Off” for no imprint. Note: the<br />
current temperature, moon phase,<br />
and (user set) camera name will also<br />
be imprinted on your still photos.<br />
Models 119576C/119577C imprint<br />
the barometric pressure as well (on<br />
still photos only).<br />
Set Clock (Set) Press OK and use the UP/DOWN<br />
keys (to change the setting) and<br />
LEFT/RIGHT keys ( to move<br />
to the next field) to set the hour<br />
(24-hr format only, “00”=midnight,<br />
“12”=noon) and minute, and then<br />
(on the lower row), the year, month<br />
and date.<br />
21<br />
<strong>2013</strong> TrophyCams_119537C+119547C+119576C+119577C_1LIM_rev110912.indd 21 11/14/12 11:05 AM
22<br />
Parameter<br />
Field Scan<br />
Coordinate<br />
Input<br />
Settings<br />
(Bold=default)<br />
On, Off<br />
(After On is<br />
selected): “A”<br />
Start/Stop, “B”<br />
Start/Stop,<br />
Interval<br />
Off, On<br />
See "Using the<br />
Setup Menu<br />
Input Screens"<br />
Description<br />
Turns Field Scan (Time Lapse)<br />
recording mode on/off. When activated,<br />
Field Scan forces the camera<br />
to take photos or videos even when<br />
it is not triggered by a nearby live<br />
animal, useful for constant monitoring<br />
of an area that might be far away<br />
from the camera. The user can set<br />
the start and stop times for up to two<br />
independent “blocks” of Field Scan<br />
recording, as well as the interval time<br />
between each photo/video. To ensure<br />
correct operation, avoid setting<br />
overlapping start/stop times for Field<br />
Scan A and B. Please read the “Field<br />
Scan 2x…” section of this manual<br />
(pgs 14-16) for details on using this<br />
feature. NOTE: If the "<strong>Camera</strong> Mode"<br />
parameter is set to "Day" or "Night"<br />
operation only, that will take priority<br />
over your Field Scan settings. Set<br />
<strong>Camera</strong> Mode to "24HR" if you are<br />
setting day and night Field Scan start<br />
and/or stop times.<br />
Allows the user to input latitude<br />
and longitude coordinates for the<br />
camera’s location. This data will<br />
be embedded in the files saved on<br />
the camera’s SD card (if “On” is<br />
selected). This makes it possible<br />
to see each camera’s location as a<br />
“pushpin” on Google Earth maps<br />
when reviewing a folder full of photos<br />
from multiple cameras, or use<br />
other “geotag” capable software<br />
(Picassa, etc).<br />
<strong>2013</strong> TrophyCams_119537C+119547C+119576C+119577C_1LIM_rev110912.indd 22 11/14/12 11:05 AM
Parameter<br />
Video Sound<br />
(only affects<br />
video clips in<br />
Video or Hybrid<br />
modes)<br />
Default Set<br />
Settings<br />
(Bold=default)<br />
On, Off<br />
Cancel,<br />
Execute<br />
Description<br />
Select “On” to record audio along<br />
with the video when the camera is<br />
set to video mode (saved file sizes<br />
will be slightly larger).<br />
Select “Execute” and press OK<br />
to restore all parameters to the<br />
original factory default settings.<br />
If the camera is behaving oddly<br />
and you think you may have<br />
changed the setting for something<br />
accidently (but aren’t sure which<br />
one), this will reset all parameters<br />
to their most commonly used or<br />
“generic” settings.<br />
23<br />
<strong>2013</strong> TrophyCams_119537C+119547C+119576C+119577C_1LIM_rev110912.indd 23 11/14/12 11:05 AM
USING THE SETUP MENU INPUT SCREENS<br />
<strong>Camera</strong> Name Input<br />
After selecting the <strong>Camera</strong> Name parameter (the only setting is "Input"),<br />
press OK. If necessary, delete the previous or default name by pressing the<br />
RIGHT key until the backspace symbol ( ) (located between letters "A"<br />
& "B", also between "j" & "k") is highlighted, then keep pressing OK. Select<br />
(highlight) each alphanumeric character you want, using the LEFT/RIGHT<br />
keys, and pressing OK after each one to set it. When finished naming the<br />
camera, press MENU to save the name to memory.<br />
Coordinate Input<br />
After selecting the Coordinate Input parameter, press UP or DOWN to<br />
select the On setting and press OK. The latitude and longitude for any<br />
location where you plan to place the camera can be obtained at many<br />
websites, for example: http://itouchmap.com/latlong.html. You can enter<br />
a nearby street address, just zip code, or use the various types of maps to<br />
locate the approximate position. The format you will need to use to enter the<br />
coordinates in the Trophy Cam menu screen is shown below:<br />
N=North,<br />
S=South<br />
Degrees<br />
Latitude<br />
(3 digits)<br />
Minutes<br />
Seconds<br />
Latitude<br />
Longitude<br />
(La) N000,00'00"<br />
(Lo) W000,00'00"<br />
W=West,<br />
E=East<br />
Degrees<br />
Longitude<br />
(3 digits)<br />
Minutes<br />
Seconds<br />
24<br />
Note: You may see "negative" latitude or longitude coordinates online. These<br />
designate South latitudes and West longitudes. US/Canada locations will<br />
have North (+) latitude coordinates and West (-) longitude coordinates.<br />
<strong>2013</strong> TrophyCams_119537C+119547C+119576C+119577C_1LIM_rev110912.indd 24 11/14/12 11:05 AM
MOUNTING AND POSITIONING<br />
THE TROPHY CAM<br />
Mounting<br />
After you’ve set up the camera’s parameters to your personal preferences<br />
at home or in your truck, you’re ready to take it outside and slide the power<br />
switch to “ON”. When setting up the Trophy Cam for scouting game or other<br />
outdoor applications, you must be sure to mount it in place correctly and<br />
securely. We recommend mounting the Trophy Cam on a sturdy tree with<br />
a diameter of about 6 in. (15cm). To get the optimal picture quality, the tree<br />
should be about 16-17 ft. (5 meters) away from the place to be monitored,<br />
with the camera placed at a height of 5-6.5 ft. (1.5~2 m). Also, keep in mind<br />
that you will get the best results at night when the subject is within the ideal<br />
flash range, no farther than 45’ (14m) and no closer than 10’ (3m) from the<br />
camera.<br />
There are two ways to mount the Trophy Cam: using the provided adjustable<br />
web belt, or the tripod socket.<br />
Using the adjustable web belt: Fig. 5 illustrates using the web belt on<br />
the Trophy Cam. Push one end of the belt through the two brackets on<br />
the back of the Trophy Cam. Thread one plastic buckle part onto each<br />
end of the belt. Fasten the belt securely around the tree trunk by clicking<br />
the buckle ends together after tightening the belt so there is no slack left.<br />
Using the tripod socket: The camera is equipped with a socket at the<br />
bottom end to enable mounting on a tripod or other mounting accessories<br />
with a standard1/4-20 thread.<br />
Fig. 5: Attaching the Belt<br />
25<br />
<strong>2013</strong> TrophyCams_119537C+119547C+119576C+119577C_1LIM_rev110912.indd 25 11/14/12 11:05 AM
Two optional mounting accessories, a “Bear Safe” metal camera box<br />
(Model# 119654C for 119576C/119577C, or Model# 119653C for<br />
119537C/119547C) and Deluxe Tree Bracket (Model# 119652C) are also<br />
available-please see your <strong>Bushnell</strong> dealer or website for more details.<br />
Sensing Angle and Distance Test<br />
To test whether the Trophy Cam can effectively monitor the area you<br />
choose, this test is recommended to check the sensing angle and monitoring<br />
distance of the Trophy Cam. To perform the test:<br />
• Switch the Trophy Cam to the SETUP mode.<br />
• Make movements in front of the camera at several positions within<br />
the area where you expect the game or subjects to be. Try different<br />
distances and angles from the camera.<br />
• If the motion indicator LED light blinks, it indicates that position can be<br />
sensed. If it does not blink, that position is outside of the sensing area.<br />
The results of your testing will help you find the best placement when<br />
mounting and aiming the Trophy Cam. The height away from the ground for<br />
placing the device should vary with the animal size appropriately. In general,<br />
3 to 6 feet is preferred.<br />
You can avoid potential false triggers due to temperature and motion<br />
disturbances in front of the camera by not aiming it at a heat source or nearby<br />
tree branches or brush (especially on windy days).<br />
Switching ON the <strong>Camera</strong><br />
Once you switch to the ON mode, the motion indicator LED (red) will blink<br />
for about 10 seconds. This gives you time to close and lock the front cover of<br />
the Trophy Cam and then walk away. During this time, the motion indicator<br />
LED will blink red continuously. After it stops blinking, the PIR is active, and<br />
any motion that is detected by it will trigger the capture of photos or videos<br />
as programmed in the SETUP Menu. Be sure you have read the descriptions<br />
of the Capture Number, Video Length, Interval and Sensor Level parameters.<br />
Please note, the PIR is strongly sensitive to ambient temperature. The greater<br />
the temperature difference between the environment and your subject, the<br />
farther the possible sensing distance. The average sensing distance is about<br />
45 ft.<br />
26<br />
<strong>2013</strong> TrophyCams_119537C+119547C+119576C+119577C_1LIM_rev110912.indd 26 11/14/12 11:05 AM
Before leaving the camera unattended, please check for the following:<br />
• Are the batteries or DC power supply inserted/connected with correct<br />
polarity and is the power level is sufficient?<br />
• Does the SD card have sufficient available space and is its writeprotection<br />
(lock) switch off?<br />
• Is the Power switch in the ON position? (do not leave it in SETUP).<br />
PLAYING BACK/DELETING THE PHOTOS/<br />
VIDEOS<br />
After you have setup, mounted and activated your Trophy Cam, you will of<br />
course be eager to return later and review the images it has captured for<br />
you. There are several different ways this can be done.<br />
Reviewing Images Directly From the SD Card<br />
This is the most popular method of viewing images. Since unmounting the<br />
camera and taking it to your computer isn’t very convenient, you may find it<br />
easier to just take the card out. By removing the SD card (swapping it for a<br />
new empty card if you like) and taking it to your home or campsite to view<br />
the images by using an SD card “reader” (user supplied) connected to your<br />
computer (some computers and TVs have a built in SD card slot), you can<br />
leave the camera in place ready to capture more images. Once connected,<br />
the card reader works the same way as described below-please read that<br />
section if you have any problem finding your files.<br />
Reviewing Images on the Trophy Cam Color LCD (Model<br />
#119577 only)<br />
• Put the power switch in SETUP mode (switch to OFF first).<br />
• Push the OK (Replay) key to enter image review mode.<br />
• If you are in still photo mode, you’ll see the still photo review screen. If<br />
you are in video mode, you’ll see the video review screen.<br />
• Use the UP/DOWN keys to scroll through your photos or videos.<br />
A zoom feature is available for still photos: first press the LEFT<br />
key, then use the UP/DOWN keys to zoom in or out. After<br />
zooming in, you can then press OK, and use the UP/DOWN/<br />
LEFT/RIGHT keys to move around and examine small details in<br />
different areas of the photo. Press OK at anytime to exit and return to<br />
the full view.<br />
• Press the RIGHT (Shot) key to play a video. If “Video Sound” was set<br />
27<br />
<strong>2013</strong> TrophyCams_119537C+119547C+119576C+119577C_1LIM_rev110912.indd 27 11/14/12 11:05 AM
to “On” in the Setup Menu, you should hear audio from the speaker<br />
during playback.<br />
• Push MENU to delete an image. Image delete mode works as<br />
described below. To exit image review mode, press the OK key.<br />
Reviewing Images on an External Video Monitor<br />
A TV monitor can also be used to play back pictures (or<br />
videos) from the device. Connect a TV monitor or a viewing<br />
device (such as a digital picture frame) that has a standard<br />
composite video input (RCA jack) to the Trophy Cam ‘s<br />
“A/V Out” mini jack using the supplied cable. Then:<br />
• Put the power switch in SETUP mode (switch to<br />
OFF first).<br />
• Press the OK key. The most recently captured image<br />
will be shown on the video monitor. For video clips,<br />
press the SHOT (RIGHT) key to start playing, press<br />
again to stop.<br />
Cable from<br />
“A/V Out”<br />
• Press the UP key for the previous photo or video and the DOWN key<br />
for the next one. When viewing images, the total number of all images<br />
in the SD card and the index of the displaying image are shown in the<br />
center of LCD and at the bottom of the video monitor respectively.<br />
• Press the OK key to return to live preview state (SETUP mode) when<br />
playback is finished.<br />
Reviewing Images by Connecting the <strong>Camera</strong> to a Computer<br />
You can always unmount the entire camera from the tree and connect its<br />
USB port to a computer-it will be recognized as a “removable disk”, without<br />
the need to install any drivers or software. When using a PC (or Mac*) to view<br />
photos (or video clips*), first connect the device to the computer with the<br />
supplied USB cable. Then use commercial software with an image browser<br />
feature, or an image browser included with the PC’s operating system to<br />
view images saved on the SD card in the folder \DCIM\100EK113. Each<br />
new image or video will be numbered incrementally in order of the time it was<br />
captured. For example, you will see file names such as “EK0001.JPG” or<br />
“EK0001.AVI”, etc. Through the file format suffix you can distinguish whether<br />
the file is a still photo (with suffix .JPG) or a video (with suffix .AVI).<br />
*video files may require additional software for viewing on a Mac.<br />
28<br />
<strong>2013</strong> TrophyCams_119537C+119547C+119576C+119577C_1LIM_rev110912.indd 28 11/14/12 11:05 AM
The Trophy Cam supports 3 kinds of file system formats, FAT12, FAT16,<br />
and FAT32. The default value is FAT16 to save photos and videos. Here are<br />
some related notes:<br />
• You don’t need to be concerned about the file system format of the<br />
Trophy Cam unless your equipment has problems reading the SD<br />
card. If this happens, please format the SD card with the Trophy Cam<br />
or in your computer first and then insert the card into your Trophy Cam<br />
and try again.<br />
• The default file system format of the Trophy Cam is FAT16, which most<br />
computers can read. If you format an SD card for the Trophy Cam<br />
in your computer, you should choose the file system format FAT16.<br />
Normally FAT16 is recommended unless you have another image<br />
viewer that uses FAT12 or FAT32 format.<br />
Deleting Photos or Videos<br />
If you see a photo or video during playback on the LCD or video monitor<br />
that you want to delete, it can be done easily without leaving SETUP mode:<br />
• Press the MENU key. You will see the first “Delete” screen, which lets<br />
you selects the option to delete only the currently displayed photo/<br />
video, or all photos/videos (see below).<br />
• Highlight the “Delete Current” or “Delete All” option, then press OK.<br />
• Next, select “Yes” and press OK to erase only the last displayed photo<br />
or video (if you selected “Delete Current”), or every photo and video file<br />
on the card (if you selected “Delete All”)-or select “No” and press OK<br />
to cancel the operation without deleting any files.<br />
NOTE: after deleting a picture or a video file, the deleted files can’t be restored!<br />
It is also possible to delete all files from the card by using the Format parameter<br />
(see pg. 21).<br />
29<br />
<strong>2013</strong> TrophyCams_119537C+119547C+119576C+119577C_1LIM_rev110912.indd 29 11/14/12 11:05 AM
DOWNLOADING THE PHOTOS/VIDEOS<br />
To download your photos/videos to a PC or Mac, first make sure the Trophy<br />
Cam power switch is in the OFF position. Connect the supplied cable to the<br />
camera’s USB port, then directly to a main USB port on your computer-do<br />
not use front panel/keyboard USB ports or unpowered “hubs”.<br />
The Trophy Cam will be recognized as a standard “USB Mass Storage”<br />
device (this may take several seconds the first time you connect it). If you<br />
would rather leave your camera in the woods and just pull its SD card out, an<br />
SD card reader works the same way as described in this section once the<br />
card is inserted and the reader is connected to your computer.<br />
With Windows XP or later, you can then simply use the options in the pop-up<br />
window to copy, view, or print your photos (right).<br />
On all Windows OS, the Trophy Cam will also be<br />
listed as a “Removable Disk” if you open the “My<br />
Computer” window (on Macs, an icon will appear<br />
on your desktop). The Trophy Cam’s photo files are<br />
named “EK0001.JPG” etc, and are located in the<br />
“DCIM\100EK113” folder on this “Removable Disk”.<br />
Video file names will end with “.AVI”. You may copy the<br />
photos/videos to your hard drive as you would any filejust<br />
copy/paste or drag the file names or icons to your<br />
drive or desktop.<br />
After the photos are copied to your hard drive, you can disconnect the<br />
Trophy Cam. (On Mac computers, drag the “disk” that appeared on your<br />
desktop when the camera was connected into your Trash to “eject” it before<br />
disconnecting.) The .JPG format photo files from the Trophy Cam may be<br />
viewed and edited with any photo software you choose to use. The .AVI video<br />
files may be viewed with the Windows Media Player on PCs with Windows 7.<br />
If your computer is running an older version of Windows, or you are on a Mac,<br />
and you don’t already have a compatible video player, you can download a<br />
free version of the DivX player from http://www.divx.com/.<br />
30<br />
<strong>2013</strong> TrophyCams_119537C+119547C+119576C+119577C_1LIM_rev110912.indd 30 11/14/12 11:05 AM
TROUBLESHOOTING / FAQ<br />
<strong>Camera</strong> takes continuous images of no subject<br />
A camera has what is known as a “false trigger” if the PIR sensor thinks<br />
that there is motion and heat in front of the camera lens when there is<br />
no subject in the image. These “False Triggers” are the result of placing<br />
the camera in an environment where there is motion associated with tree<br />
branches creating motion in front of the camera or an area where there<br />
is high heat in the foreground and any motion from wind could set off the<br />
camera. Setting a camera up over water is also a potential cause for this<br />
issue. To remedy this situation:<br />
1. Try moving the camera to an area that does not have any of these issues<br />
or try changing the sensor level on the menu settings.<br />
2. If the camera continues to take images when there is no subject in<br />
them, try placing the camera in an inside environment and aiming at a<br />
location where there is no motion.<br />
3. If the camera continues to show issues, then there is probably an<br />
electronic component issue. If this is the case, please contact our<br />
customer service to send the camera back for repair.<br />
Battery life is shorter than expected<br />
1. Battery life will vary with operating temperature and the number of<br />
images taken over time. Typically, the Trophy Cam will be able to<br />
capture several thousand images before the batteries die.<br />
2. Check to make sure you have used new alkaline or lithium batteries.<br />
<strong>Bushnell</strong> recommends using a full set of Energizer ® Lithium AA<br />
batteries in your Trophy Cam model to obtain maximum battery<br />
life.<br />
3. Make sure that the power switch was turned to the “On” position and<br />
that the camera was not left in “Setup” mode while in the field.<br />
4. Make sure that you are using a good quality name brand SD card in<br />
your camera. <strong>Bushnell</strong> recommends SanDisk ® brand SD Cards up<br />
to 32GB (Ultra ® or Extreme ® series for <strong>HD</strong> video). Our experience<br />
indicates that poor quality SD cards can sometimes reduce your<br />
Trophy Cam battery life.<br />
<strong>Camera</strong> stops taking images or won’t take images<br />
1. Please make sure that the SD card is not full. If the card is full, the<br />
camera will stop taking images.<br />
31<br />
<strong>2013</strong> TrophyCams_119537C+119547C+119576C+119577C_1LIM_rev110912.indd 31 11/14/12 11:05 AM
2. Check the batteries to make sure that they are new alkaline or lithium<br />
AA batteries. See note above about short battery life.<br />
3. Make sure that the camera power switch is in the “On” position and<br />
not in the “Off” or “Setup” modes.<br />
4. Make sure that you are using a good quality SD card in your camera.<br />
<strong>Bushnell</strong> recommends SanDisk ® SD Cards up to 32GB (Ultra ® or<br />
Extreme ® series for <strong>HD</strong> video) .<br />
5. If the SD card has its write protect switch in the lock position, the<br />
camera will not take images.<br />
6. If you have used an SD card in another device before inserting it in<br />
your Trophy Cam, you might want to try formatting the card using the<br />
“Format” parameter in Setup mode (make sure you have backed up any<br />
important files first, as formatting will erase all previous files). In some<br />
cases, other devices may change the formatting of the SD card so that<br />
it will not work properly with the Trophy Cam.<br />
<strong>Camera</strong> won’t power up<br />
1. Make sure that you have installed at least 4 batteries (the required<br />
minimum #) in the battery compartment, starting at the top, filling<br />
battery spaces 1-4 with no “gaps”.<br />
<strong>Bushnell</strong> recommends using a full set of 8 or 12 Energizer ®<br />
Lithium AA batteries in your Trophy Cam (the max. capacity for<br />
your model).<br />
2. Make sure that the batteries are installed correctly, observing proper<br />
polarity. Always place the negative (flat) end of each battery in contact<br />
with the spring side of its slot inside the camera.<br />
3. After moving the switch from “Off” to “Setup” or “On”, make sure<br />
that the switch is correctly in position to ensure the proper mode (avoid<br />
positions “between” two modes).<br />
4. Do not move the switch directly from “On” to “Setup”-always move<br />
the switch all the way down to “Off” first, then back up to “Setup”.<br />
Still Photo and/or Video Quality Problems<br />
1. Night photos or videos appear too dark<br />
a. Check the battery indicator icon to see if battery power is full. The<br />
flash will stop operating near the end of the battery life.<br />
b. You will get the best results when the subject is within the ideal<br />
flash range, no farther than 45’ (14m) from the camera (or 60' (19m)<br />
for models 119537C/119547C). Subjects may appear too dark at<br />
greater distances.<br />
32<br />
<strong>2013</strong> TrophyCams_119537C+119547C+119576C+119577C_1LIM_rev110912.indd 32 11/14/12 11:05 AM
c. Please note that when the Capture Number parameter is set higher<br />
than "1 Photo", or with very short Interval settings, some images<br />
may appear darker than others due to the quick response and rapid<br />
retriggering of the camera, allowing less time for the flash to fully<br />
recharge before firing again.<br />
d. Make sure "LED Control" in the setup menu is set to "High" to<br />
ensure maximum output. You can also try setting "NV Shutter" in the<br />
menu to "Low" (slower shutter speed=brighter images, with tradeoff<br />
of increased blur if subject moves rapidly).<br />
2. Daytime photos or videos appear too dark<br />
a. Make sure that the camera is not aimed at the sun or other light<br />
sources during the day, as this may cause the auto exposure to produce<br />
darker results.<br />
3. Night photos or videos appear too bright<br />
a. If the subject is close to the camera (less than10ft/3m), change<br />
the LED Control parameter in the Setup Menu to "Medium" or "Low".<br />
4. Daytime photos or videos appear too bright<br />
a. Make sure that the camera is not aimed at the sun or other light<br />
sources during the day.<br />
5. Photos with streaked subject<br />
a. In some cases with low lighting conditions and fast moving subjects,<br />
the 5MP or 8MP resolution settings may not perform as well as the<br />
3MP setting.<br />
b. If you have multiple images where fast moving subjects produce<br />
streaks on the photo, try the 3MP setting instead.<br />
c. Set "NV Shutter" to "High" to minimize motion blur.<br />
6. Red, green or blue color cast<br />
a. Under certain lighting conditions, the sensor can become confused<br />
resulting in poor color images.<br />
b. If this is seen on a consistent basis, then the sensor may need<br />
servicing. Please contact <strong>Bushnell</strong> customer service.<br />
7. Short video clips—not recording to the length set<br />
a. Check to make sure that the SD card is not full.<br />
b. Make sure that the camera has good batteries in it. Near the end<br />
of the battery life, the camera may choose to record shorter video clips<br />
to conserve power.<br />
Date/Time Stamp not appearing on images<br />
1. Make sure that the “Time Stamp” parameter is set to “On”.<br />
33<br />
<strong>2013</strong> TrophyCams_119537C+119547C+119576C+119577C_1LIM_rev110912.indd 33 11/14/12 11:05 AM
Photos Do Not Capture Subject of Interest<br />
1. Check the “Sensor Level” (PIR sensitivity) parameter setting. For<br />
warm temperature conditions, set the Sensor Level to “High” and for<br />
cold weather use, set the sensor for “Low”. For variable weather, use<br />
"Auto".<br />
2. Try to set your camera up in an area where there is not a heat source in<br />
the camera’s line of sight.<br />
3. In some cases, setting the camera near water will make the camera take<br />
images with no subject in them. Try aiming the camera over ground.<br />
4. Try to avoid setting the camera up on small trees that are prone to<br />
being moved by strong winds.<br />
5. Remove any limbs which are right in front of the camera lens.<br />
PIR Sensor LED Flashes/Doesn’t Flash<br />
1. When the camera is in the “Setup” mode, a special LED on the front of<br />
the camera will flash when it senses motion. This is for setup purposes<br />
only and will help the user aim the camera.<br />
2. During use, the LED will not flash when the camera takes an image.<br />
This is to help keep the camera hidden from game.<br />
LCD Screen Issues<br />
1. LCD screen powers on but no text is present.<br />
a. After moving the switch from “Off” to “Setup” or “On”, make sure<br />
that the switch is correctly in position to ensure the proper mode (avoid<br />
positions “between” two modes).<br />
b. Do not move the switch directly from “On” to “Setup”-always move<br />
the switch all the way down to “Off” first, then back up to “Setup”.<br />
2. LCD screen shows a faint black line after turning from “Setup” to “On”.<br />
a. The LCD will turn off when you slide the switch to the “On”<br />
position. In some cases, this black line will appear and then fade in<br />
about 1 second. This is normal and the camera will function properly.<br />
3. Screen comes on but then powers off<br />
a. Make sure that you have installed the SD card correctly.<br />
34<br />
<strong>2013</strong> TrophyCams_119537C+119547C+119576C+119577C_1LIM_rev110912.indd 34 11/14/12 11:05 AM
<strong>Camera</strong> won’t retain settings<br />
Make sure that you have been saving the changes to any parameter<br />
settings that you made while in Setup mode, by pressing “OK” after<br />
changing the setting. If you don’t save your new setting after changing<br />
it, the camera will continue to use the original default setting for that<br />
parameter.<br />
Moisture or Ants Inside <strong>Camera</strong><br />
1. To ensure humidity or rain is kept out of the camera, secure the DC In<br />
plug firmly in place.<br />
2. Ants can be attracted by low level electronic vibrations, and enter<br />
through any gaps between the exterior and interior of the camera.<br />
Make sure the DC In plug is securely attached.<br />
Field Scan (Time Lapse) not working properly<br />
1. Make sure that the stop and start times of Field Scan "A" and "B" do<br />
not overlap (for example, do not set the start time of "B" to 8AM if the<br />
stop time of "A" is 10AM).<br />
2. When using Field Scan in video mode, the smallest interval time<br />
available is 5 min, to avoid potential overheating of the batteries and<br />
electronic components, which could cause operational failure or<br />
damage to the camera. In still photo mode, a 1 min. Interval can be set.<br />
Difficulty removing the batteries<br />
Before removing the batteries from the Trophy Cam you can simply<br />
remove the battery compartment insert bar by grasping it in the middle<br />
and lifting out. This will give you easier access to the batteries. After<br />
removing them, you can replace the battery compartment insert bar by<br />
inserting one side into the battery compartment wall and flexing the<br />
insert until you can place the second side of the bar into the opposite<br />
wall of the battery compartment. Make sure that the bar is seated<br />
securely. The bar should be inserted with the text/numbers printed on<br />
the insert facing correctly up so that you can read them. Make sure<br />
that the insert bar is inserted correctly inside the battery compartment<br />
before replacing batteries.<br />
Do not mix old and new batteries.<br />
Do not mix battery types-use ALL lithium or ALL alkaline.<br />
Rechargeable batteries are not recommended.<br />
35<br />
<strong>2013</strong> TrophyCams_119537C+119547C+119576C+119577C_1LIM_rev110912.indd 35 11/14/12 11:05 AM
TECHNICAL SPECIFICATIONS<br />
Image Sensor<br />
<strong>Max</strong>imum Pixel Size<br />
Lens<br />
IR-Flash Range<br />
Display Screen<br />
5 Megapixel Color CMOS<br />
3264x2448 (8MP)<br />
F = 3.1; FOV=45°; Auto IR-Cut-Remove (at night)<br />
Selectable (Low/Med/High), up to 60’(19m) on High<br />
Std B&W Display: 24x32mm(1.5”) ; Color Display<br />
(Model 119577 only): 32x42mm (2.4”)<br />
Memory Card<br />
Internal RAM<br />
Picture Size<br />
Video Size<br />
PIR sensitivity<br />
Operation<br />
Response Time<br />
Triggering Interval<br />
Shooting Numbers<br />
Video Length<br />
Power Supply<br />
Stand-by Current<br />
Power Consumption<br />
Night Vision Shutter<br />
Speed<br />
Interface<br />
SD or SDHC Card, <strong>Max</strong>imum capacity 32GB<br />
32MB<br />
8MP = 3264x2448; 5MP = 2560x1920;<br />
3MP = 2048x1536<br />
1280x720 (widescreen), 640x480 (fullscreen), or<br />
320x240 (fullscreen) pixels per frame at 20-30 fps<br />
(Day) / 15-20 fps (Night)<br />
Hyper PIR with 4 sensitivity settings: Low/Normal/<br />
High/Auto<br />
User selectable: 24 Hour, Day only, or Night only<br />
(based on ambient light level)<br />
0.6 second<br />
1 sec. - 60 min. programmable<br />
1— 3 programmable<br />
5-60sec. programmable<br />
8x (119537C/119547C) or 12x (119576C/119577C)<br />
AA batteries recommended, 4xAA as emergency power<br />
< 0.2mA (
TWO-YEAR LIMITED WARRANTY<br />
Your <strong>Bushnell</strong>® product is warranted to be free of defects in materials and workmanship for<br />
two years after the date of purchase. In the event of a defect under this warranty, we will,<br />
at our option, repair or replace the product, provided that you return the product postage<br />
prepaid. This warranty does not cover damages caused by misuse, improper handling,<br />
installation, or maintenance provided by someone other than a <strong>Bushnell</strong> Authorized Service<br />
Department.<br />
Any return made under this warranty must be accompanied by the items listed below:<br />
1. A check/money order in the amount of $10.00 to cover the cost of postage and<br />
handling<br />
2. Name and address for product return<br />
3. An explanation of the defect<br />
4. Proof of Date Purchased<br />
5. Product should be well packed in a sturdy outside shipping carton, to prevent damage<br />
in transit, with return postage prepaid to the address listed below:<br />
IN U.S.A. Send To:<br />
IN CANADA Send To:<br />
<strong>Bushnell</strong> Outdoor Products<br />
<strong>Bushnell</strong> Outdoor Products<br />
Attn.: Repairs<br />
Attn.: Repairs<br />
9200 Cody 25A East Pearce Street, Unit 1<br />
Overland Park, Kansas 66214<br />
Richmond Hill, Ontario L4B 2M9<br />
For products purchased outside the United States or Canada please contact your local<br />
dealer for applicable warranty information. In Europe you may also contact <strong>Bushnell</strong> at:<br />
<strong>Bushnell</strong> Germany GmbH<br />
European Service Centre<br />
Mathias-Brüggen-Str. 80<br />
D-50827 Köln<br />
GERMANY<br />
Tel: +49 221 995568-0<br />
Fax: +49 221 995568-20<br />
This warranty gives you specific legal rights.<br />
You may have other rights which vary from country to country.<br />
©2012 <strong>Bushnell</strong> Outdoor Products<br />
Specifications and designs are subject to change without<br />
any notice or obligation on the part of the manufacturer.<br />
37<br />
<strong>2013</strong> TrophyCams_119537C+119547C+119576C+119577C_1LIM_rev110912.indd 37 11/14/12 11:05 AM
FCC Compliance Statement:<br />
This equipment has been tested and found to comply with the limits for a Class B digital<br />
device, pursuant to part 15 of the FCC Rules. These limits are designed to provide reasonable<br />
protection against harmful interference in a residential installation.<br />
Operation is subject to the following two conditions: (1) This device may not cause harmful<br />
interference, and (2) this device must accept any interference received, including interference<br />
that may cause undesired operation.<br />
This equipment generates, uses and can radiate radio frequency energy and, if not installed<br />
and used in accordance with the instructions, may cause harmful interference to radio<br />
communications. However, there is no guarantee that interference will not occur in a particular<br />
installation. If this equipment does cause harmful interference to radio or television reception,<br />
which can be determined by turning the equipment off and on, the user is encouraged to try to<br />
correct the interference by one or more of the following measures:<br />
· Reorient or relocate the receiving antenna.<br />
· Increase the separation between the equipment and receiver.<br />
· Connect the equipment into an outlet on a circuit different from that to which the receiver<br />
is connected.<br />
· Consult the dealer or an experienced radio/TV technician for help.<br />
The device does not contain any user-serviceable parts. Repairs should only be made by<br />
an Authorized <strong>Bushnell</strong> repair center. Unauthorized repairs or modifications could result in<br />
permanent damage to the equipment, and will void your warranty and your authority to operate<br />
this device under Part 15 regulations.<br />
The shielded interface cable which is provided must be used with the equipment in order to<br />
comply with the limits for a digital device pursuant to Subpart B of Part 15 of FCC Rules.<br />
Disposal of Electric and Electronic Equipment<br />
(Applicable in the EU and other European countries<br />
with separate collection systems)<br />
This equipment contains electric and/or electronic parts and must therefore not be disposed of<br />
as normal household waste. Instead, it should be disposed at the respective collection points for<br />
recycling provided by the communities. For you, this is free of charge.<br />
If the equipment contains exchangeable (rechargeable) batteries, these too must be removed<br />
before and, if necessary, in turn be disposed of according to the relevant regulations (see also the<br />
respective comments in this unit’s instructions).<br />
Further information about the subject is available at your community administration, your local<br />
waste collection company, or in the store where you purchased this equipment.<br />
<strong>2013</strong> TrophyCams_119537C+119547C+119576C+119577C_1LIM_rev110912.indd 38 11/14/12 11:05 AM
<strong>2013</strong> TrophyCams_119537C+119547C+119576C+119577C_1LIM_rev110912.indd 39 11/14/12 11:05 AM
For further questions or additional information<br />
please contact:<br />
<strong>Bushnell</strong> Outdoor Products<br />
9200 Cody, Overland Park, Kansas 66214<br />
(800) 423-3537 • www.bushnell.com<br />
©2012 <strong>Bushnell</strong> Outdoor Products<br />
<strong>2013</strong> TrophyCams_119537C+119547C+119576C+119577C_1LIM_rev110912.indd 40 11/14/12 11:05 AM