Husqvarna - AR19 - JW Hire & Sales Ltd
Husqvarna - AR19 - JW Hire & Sales Ltd
Husqvarna - AR19 - JW Hire & Sales Ltd

Create successful ePaper yourself
Turn your PDF publications into a flip-book with our unique Google optimized e-Paper software.
MAINTENANCE<br />
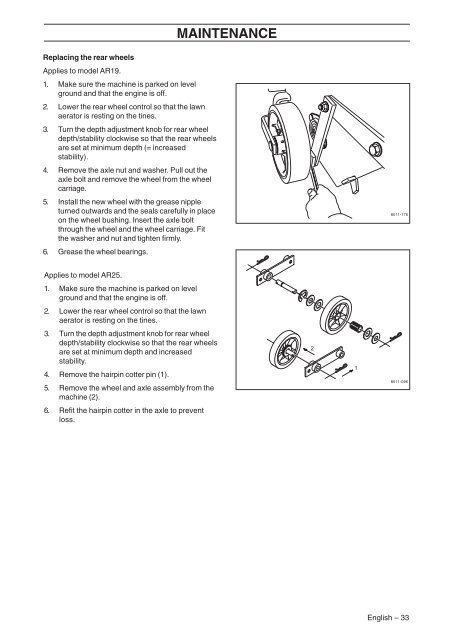
Replacing the rear wheels<br />
Applies to model <strong>AR19</strong>.<br />
1. Make sure the machine is parked on level<br />
ground and that the engine is off.<br />
2. Lower the rear wheel control so that the lawn<br />
aerator is resting on the tines.<br />
3. Turn the depth adjustment knob for rear wheel<br />
depth/stability clockwise so that the rear wheels<br />
are set at minimum depth (= increased<br />
stability).<br />
4. Remove the axle nut and washer. Pull out the<br />
axle bolt and remove the wheel from the wheel<br />
carriage.<br />
5. Install the new wheel with the grease nipple<br />
turned outwards and the seals carefully in place<br />
on the wheel bushing. Insert the axle bolt<br />
through the wheel and the wheel carriage. Fit<br />
the washer and nut and tighten firmly.<br />
6. Grease the wheel bearings.<br />
8011-176<br />
Applies to model AR25.<br />
1. Make sure the machine is parked on level<br />
ground and that the engine is off.<br />
2. Lower the rear wheel control so that the lawn<br />
aerator is resting on the tines.<br />
3. Turn the depth adjustment knob for rear wheel<br />
depth/stability clockwise so that the rear wheels<br />
are set at minimum depth and increased<br />
stability.<br />
4. Remove the hairpin cotter pin (1).<br />
5. Remove the wheel and axle assembly from the<br />
machine (2).<br />
6. Refit the hairpin cotter in the axle to prevent<br />
loss.<br />
8011-096<br />
English – 33