Frame a door rough opening ___ - Tru-Burn
Frame a door rough opening ___ - Tru-Burn
Frame a door rough opening ___ - Tru-Burn

You also want an ePaper? Increase the reach of your titles
YUMPU automatically turns print PDFs into web optimized ePapers that Google loves.
<strong>Frame</strong> a <strong>door</strong> <strong>rough</strong> <strong>opening</strong> - Fine Homebuilding Article<br />
http://www.taunton.com/finehomebuilding/how-to/departments/building-sk...<br />
1 of 4 2/3/2009 7:55 AM<br />
<strong>Frame</strong> a <strong>door</strong> <strong>rough</strong> <strong>opening</strong><br />
A pro teaches you his three simple rules for framing <strong>rough</strong> <strong>opening</strong>s<br />
efficiently<br />
by Scott Grice<br />
If you can cut a 2x4 and drive a nail, then you have all the skills you need to frame a <strong>rough</strong> <strong>opening</strong><br />
for a <strong>door</strong>. As with most homebuilding tasks, however, there's a fine line between getting it done<br />
and doing it efficiently, without causing headaches down the line.<br />
Whether framing a <strong>rough</strong> <strong>opening</strong> in a new home or on a remodeling project, I follow the same<br />
sequence. I always frame <strong>rough</strong> <strong>opening</strong>s before I install the surrounding studs. This gives me<br />
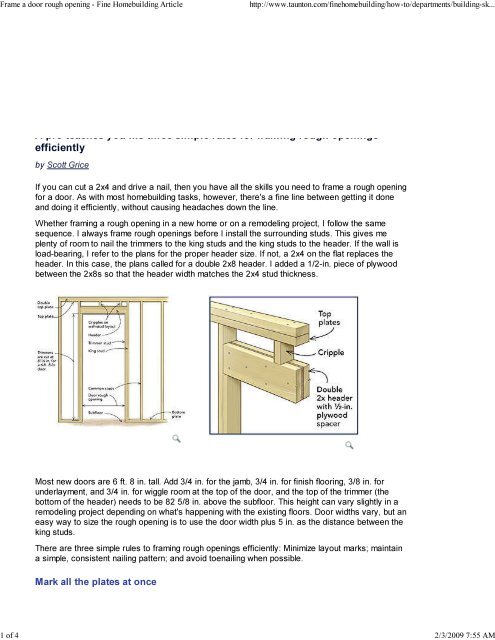
plenty of room to nail the trimmers to the king studs and the king studs to the header. If the wall is<br />
load-bearing, I refer to the plans for the proper header size. If not, a 2x4 on the flat replaces the<br />
header. In this case, the plans called for a double 2x8 header. I added a 1/2-in. piece of plywood<br />
between the 2x8s so that the header width matches the 2x4 stud thickness.<br />
Most new <strong>door</strong>s are 6 ft. 8 in. tall. Add 3/4 in. for the jamb, 3/4 in. for finish flooring, 3/8 in. for<br />
underlayment, and 3/4 in. for wiggle room at the top of the <strong>door</strong>, and the top of the trimmer (the<br />
bottom of the header) needs to be 82 5/8 in. above the subfloor. This height can vary slightly in a<br />
remodeling project depending on what's happening with the existing floors. Door widths vary, but an<br />
easy way to size the <strong>rough</strong> <strong>opening</strong> is to use the <strong>door</strong> width plus 5 in. as the distance between the<br />
king studs.<br />
There are three simple rules to framing <strong>rough</strong> <strong>opening</strong>s efficiently: Minimize layout marks; maintain<br />
a simple, consistent nailing pattern; and avoid toenailing when possible.<br />
Mark all the plates at once
<strong>Frame</strong> a <strong>door</strong> <strong>rough</strong> <strong>opening</strong> - Fine Homebuilding Article<br />
http://www.taunton.com/finehomebuilding/how-to/departments/building-sk...<br />
2 of 4 2/3/2009 7:55 AM<br />
Measure the distance between the king studs (<strong>door</strong><br />
width plus 5 in.). For efficiency, I mark only the inside<br />
edge of the king studs on the bottom and top plates. To<br />
the inside of the marks, I write T for trimmer. To the<br />
outside, I mark an X to indicate the king stud.<br />
TIP: Mark and measure at the same time. The<br />
rectangular shape of a carpenter’s pencil makes it easy<br />
to hold against the end of the tape.<br />
Mark the cripple locations. I save myself a little time<br />
and the potential confusion of too many lines by marking<br />
the cripple locations only on the top plate. The crow’s<br />
foot indicates the layout mark, and the X tells me which<br />
side of the line to locate the cripple. Later, I transfer<br />
these marks to the header.<br />
Assemble the parts, then transfer the layout
<strong>Frame</strong> a <strong>door</strong> <strong>rough</strong> <strong>opening</strong> - Fine Homebuilding Article<br />
http://www.taunton.com/finehomebuilding/how-to/departments/building-sk...<br />
3 of 4 2/3/2009 7:55 AM<br />
Keep edges flush. When assembling the king studs, the<br />
trimmers, and the header, I use my fingers, my eyes, and<br />
a Speed Square to keep all the edges flush. I alternate<br />
pairs of nails with single nails (like the #5 pattern on a<br />
domino) when nailing along the length of the trimmer or<br />
header. I separate nails by 16 in. for studs and by 8 in.<br />
for headers.<br />
Transfer the layout marks to the header. Before<br />
nailing the header in place, I align it with the king-stud<br />
marks I made on the top plate and transfer the cripple<br />
locations to the header.<br />
Just a hammer, please<br />
Sequence assembly to avoid toenailing<br />
First, fasten the header to the king stud. Before<br />
installing any adjacent studs or the top plate, I connect<br />
the header to the king stud. Again, I use the #5 domino<br />
nailing pattern. To stay friends with the finish carpenter<br />
and to avoid creating bumps in the wall, I keep the edges<br />
flush<br />
Add the cripples before the double top plate.<br />
Th<strong>rough</strong>-nailing is faster, stronger, and tidier than<br />
toenailing. Before adding the double top plate, I can<br />
th<strong>rough</strong>-nail into the king studs and the cripples. I nail the<br />
king studs on each side of the <strong>door</strong> before adding the<br />
cripples.
<strong>Frame</strong> a <strong>door</strong> <strong>rough</strong> <strong>opening</strong> - Fine Homebuilding Article<br />
http://www.taunton.com/finehomebuilding/how-to/departments/building-sk...<br />
4 of 4 2/3/2009 7:55 AM<br />
Nail the plate<br />
next to the<br />
studs. To<br />
save the<br />
plumbers and<br />
the<br />
electricians<br />
from ruining<br />
their drill bits, I<br />
keep nails<br />
close to the<br />
studs when<br />
fastening the<br />
bottom plate to<br />
the floor.<br />
Magazine<br />
extra: Watch<br />
a video of Scott framing this <strong>rough</strong> <strong>opening</strong> and hear why he uses a rigger's hatchet instead of a<br />
regular hammer.<br />
Photos by: John Ross, except where noted; drawing by: Dan Thornton<br />
From Fine Homebuilding 201, pp. 98-100<br />
January 14, 2009<br />
Related Topics: Framing | Doors | Interior Doors | New Construction | Remodeling<br />
Related Articles<br />
VIDEO: Learn to <strong>Frame</strong> a Rough Opening<br />
Scott Grice shares his method for framing <strong>rough</strong> <strong>door</strong> <strong>opening</strong>s efficiently<br />
by Scott Grice<br />
Weatherproofing Dormers<br />
Flashing dormers using peel-and-stick bowties<br />
by Rick Arnold<br />
A Home for the Next 50 Years<br />
Updated Arts & Crafts detailing enhances a home remodeled for baby boomers who plan to stay<br />
by John P.S. Salmen<br />
10 Rules for Framing<br />
Guidelines for working efficiently and knowing how good is good enough<br />
by Larry Haun<br />
Framing Floors With I-Joists<br />
Whether you're building a new house or remodeling an old one, engineered lumber can give you<br />
squeak-free floors with fewer callbacks<br />
by Rick Arnold, Mike Guertin