How to Tie Meat - Tru-Burn
How to Tie Meat - Tru-Burn
How to Tie Meat - Tru-Burn

You also want an ePaper? Increase the reach of your titles
YUMPU automatically turns print PDFs into web optimized ePapers that Google loves.
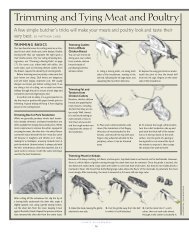
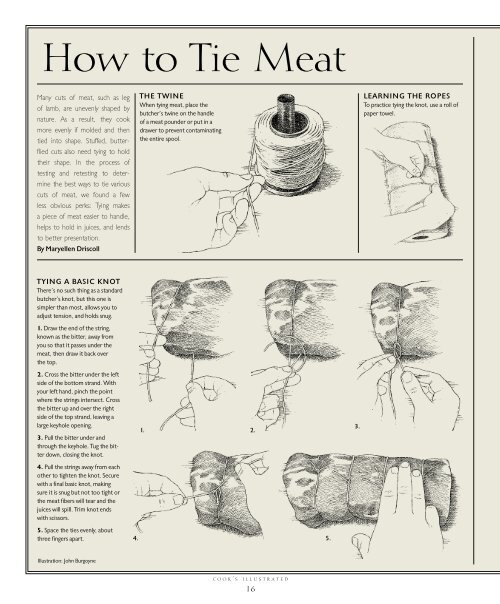
<strong>How</strong> <strong>to</strong> <strong>Tie</strong> <strong>Meat</strong><br />
Many cuts of meat, such as leg<br />
of lamb, are unevenly shaped by<br />
nature. As a result, they cook<br />
more evenly if molded and then<br />
tied in<strong>to</strong> shape. Stuffed, butterflied<br />
cuts also need tying <strong>to</strong> hold<br />
their shape. In the process of<br />
testing and retesting <strong>to</strong> determine<br />
the best ways <strong>to</strong> tie various<br />
cuts of meat, we found a few<br />
less obvious perks: Tying makes<br />
a piece of meat easier <strong>to</strong> handle,<br />
helps <strong>to</strong> hold in juices, and lends<br />
<strong>to</strong> better presentation.<br />
By Maryellen Driscoll<br />
THE T WINE<br />
When tying meat, place the<br />
butcher’s twine on the handle<br />
of a meat pounder or put in a<br />
drawer <strong>to</strong> prevent contaminating<br />
the entire spool.<br />
LEARNING THE ROPES<br />
To practice tying the knot, use a roll of<br />
paper <strong>to</strong>wel.<br />
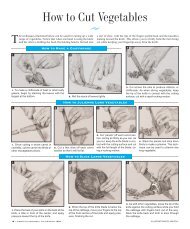
T YING A BASIC KNOT<br />
There’s no such thing as a standard<br />
butcher’s knot, but this one is<br />
simpler than most, allows you <strong>to</strong><br />
adjust tension, and holds snug.<br />
1. Draw the end of the string,<br />
known as the bitter, away from<br />
you so that it passes under the<br />
meat, then draw it back over<br />
the <strong>to</strong>p.<br />
2. Cross the bitter under the left<br />
side of the bot<strong>to</strong>m strand. With<br />
your left hand, pinch the point<br />
where the strings intersect. Cross<br />
the bitter up and over the right<br />
side of the <strong>to</strong>p strand, leaving a<br />
large keyhole opening.<br />
3. Pull the bitter under and<br />
through the keyhole. Tug the bitter<br />
down, closing the knot.<br />
1.<br />
2.<br />
3.<br />
4. Pull the strings away from each<br />
other <strong>to</strong> tighten the knot. Secure<br />
with a final basic knot, making<br />
sure it is snug but not <strong>to</strong>o tight or<br />
the meat fibers will tear and the<br />
juices will spill. Trim knot ends<br />
with scissors.<br />
5. Space the ties evenly, about<br />
three fingers apart.<br />
4.<br />
5.<br />
Illustration: John Burgoyne<br />
C O O K ’ S I L L U S T R A T E D<br />
16
1.<br />
1.<br />
2.<br />
2.<br />
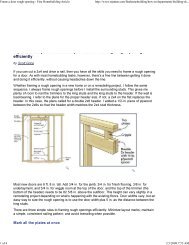
LEG OF L AMB<br />
Tying is imperative <strong>to</strong> hold <strong>to</strong>gether the multiple small muscles on a semi-boned leg of lamb. (Have your butcher remove<br />
as much fat and silver skin from this cut as possible.)<br />
1.<br />
1. <strong>Tie</strong> twice diagonally, once around the upper part of the leg and again at the opposite angle.<br />
2. <strong>Tie</strong> four times around the width <strong>to</strong> secure.<br />
3.<br />
4.<br />
BONED MEAT<br />
1. Certain boned cuts, such as sirloin<br />
(pork) roast, must be molded in<strong>to</strong><br />
shape before tying.<br />
2. <strong>Tie</strong> lengthwise once or twice after tying<br />
widthwise in order <strong>to</strong> hold its shape.<br />
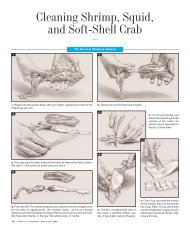
BUTTERFLIED MEATS<br />
Butterflied and stuffed meats need<br />
tying. We like this butterflying method<br />
for beef tenderloin used in “Chez<br />
Panisse Cooking” (Random House,<br />
1988), because it adds 25 percent<br />
more length <strong>to</strong> the meat roll than if it<br />
were simply butterflied across the<br />
center width.<br />
1. Positioning your knife about 3 ⁄4”<br />
from the edge, make a lengthwise cut<br />
two-thirds of the way down. Fold back<br />
the cut edge.<br />
2. Slice horizontally until you are about<br />
3<br />
⁄4” from the other edge. Fold the flap<br />
open like a book.<br />
3. Slice the flap horizontally until you<br />
are about 3 ⁄4” from the other edge.<br />
Fold the flap open like a book.<br />
4. After spreading filling on the opened<br />
meat, roll and tie, following steps 1—5<br />
opposite page.<br />
1.<br />
RIB EYE STEAKS<br />
1. At Savenor’s specialty foods in Bos<strong>to</strong>n, owner and butcher Ronald Savenor likes<br />
<strong>to</strong> remove the thick vein of fat and gristle in rib eye steaks.<br />
2. He then ties each steak around its width <strong>to</strong> hold it <strong>to</strong>gether. This tying method<br />
also works well for beef tenderloin medallions.<br />
2.<br />
TENDERLOIN<br />
1. Curl and tie the tapered tip of a<br />
tenderloin. <strong>Tie</strong> the tip so that it cooks<br />
at the same rate as the rest of the cut.<br />
J A N U A R Y & F E B R U A R Y 1 9 9 8<br />
17