Trimming and Tying Meat and Poultry - Tru-Burn
Trimming and Tying Meat and Poultry - Tru-Burn
Trimming and Tying Meat and Poultry - Tru-Burn

You also want an ePaper? Increase the reach of your titles
YUMPU automatically turns print PDFs into web optimized ePapers that Google loves.
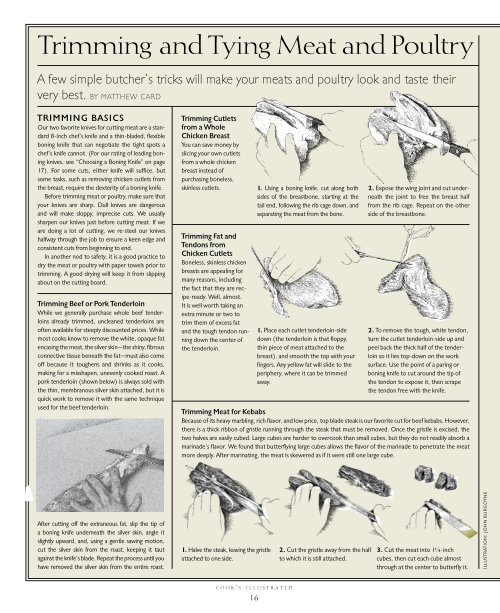
<strong>Trimming</strong> <strong>and</strong> <strong>Tying</strong> <strong>Meat</strong> <strong>and</strong> <strong>Poultry</strong><br />
A few simple butcher’s tricks will make your meats <strong>and</strong> poultry look <strong>and</strong> taste their<br />
very best. BY MATTHEW CARD<br />
T R I M M I N G B ASICS<br />
Our two favorite knives for cutting meat are a st<strong>and</strong>ard<br />
8-inch chef’s knife <strong>and</strong> a thin-bladed, flexible<br />
boning knife that can negotiate the tight spots a<br />
chef’s knife cannot. (For our rating of leading boning<br />
knives, see “Choosing a Boning Knife” on page<br />
17). For some cuts, either knife will suffice, but<br />
some tasks, such as removing chicken cutlets from<br />
the breast, require the dexterity of a boning knife.<br />
Before trimming meat or poultry, make sure that<br />
your knives are sharp. Dull knives are dangerous<br />
<strong>and</strong> will make sloppy, imprecise cuts. We usually<br />
sharpen our knives just before cutting meat. If we<br />
are doing a lot of cutting, we re-steel our knives<br />
halfway through the job to ensure a keen edge <strong>and</strong><br />
consistent cuts from beginning to end.<br />
In another nod to safety, it is a good practice to<br />
dry the meat or poultry with paper towels prior to<br />
trimming. A good drying will keep it from slipping<br />
about on the cutting board.<br />
<strong>Trimming</strong> Beef or Pork Tenderloin<br />
While we generally purchase whole beef tenderloins<br />
already trimmed, uncleaned tenderloins are<br />
often available for steeply discounted prices. While<br />
most cooks know to remove the white, opaque fat<br />
encasing the meat, the silver skin—the shiny, fibrous<br />
connective tissue beneath the fat—must also come<br />
off because it toughens <strong>and</strong> shrinks as it cooks,<br />
making for a misshapen, unevenly cooked roast. A<br />
pork tenderloin (shown below) is always sold with<br />
the thin, membranous silver skin attached, but it is<br />
quick work to remove it with the same technique<br />
used for the beef tenderloin.<br />
<strong>Trimming</strong> Cutlets<br />
from a Whole<br />
Chicken Breast<br />
You can save money by<br />
slicing your own cutlets<br />
from a whole chicken<br />
breast instead of<br />
purchasing boneless,<br />
skinless cutlets.<br />
<strong>Trimming</strong> Fat <strong>and</strong><br />
Tendons from<br />
Chicken Cutlets<br />
Boneless, skinless chicken<br />
breasts are appealing for<br />
many reasons, including<br />
the fact that they are recipe-ready.<br />
Well, almost.<br />
It is well worth taking an<br />
extra minute or two to<br />
trim them of excess fat<br />
<strong>and</strong> the tough tendon running<br />
down the center of<br />
the tenderloin.<br />
1. Using a boning knife, cut along both<br />
sides of the breastbone, starting at the<br />
tail end, following the rib cage down, <strong>and</strong><br />
separating the meat from the bone.<br />
1. Place each cutlet tenderloin-side<br />
down (the tenderloin is that floppy,<br />
thin piece of meat attached to the<br />
breast), <strong>and</strong> smooth the top with your<br />
fingers. Any yellow fat will slide to the<br />
periphery, where it can be trimmed<br />
away.<br />
2. Expose the wing joint <strong>and</strong> cut underneath<br />
the joint to free the breast half<br />
from the rib cage. Repeat on the other<br />
side of the breastbone.<br />
2. To remove the tough, white tendon,<br />
turn the cutlet tenderloin-side up <strong>and</strong><br />
peel back the thick half of the tenderloin<br />
so it lies top-down on the work<br />
surface. Use the point of a paring or<br />
boning knife to cut around the tip of<br />
the tendon to expose it, then scrape<br />
the tendon free with the knife.<br />
<strong>Trimming</strong> <strong>Meat</strong> for Kebabs<br />
Because of its heavy marbling, rich flavor, <strong>and</strong> low price, top blade steak is our favorite cut for beef kebabs. However,<br />
there is a thick ribbon of gristle running through the steak that must be removed. Once the gristle is excised, the<br />
two halves are easily cubed. Large cubes are harder to overcook than small cubes, but they do not readily absorb a<br />
marinade’s flavor. We found that butterflying large cubes allows the flavor of the marinade to penetrate the meat<br />
more deeply. After marinating, the meat is skewered as if it were still one large cube.<br />
After cutting off the extraneous fat, slip the tip of<br />
a boning knife underneath the silver skin, angle it<br />
slightly upward, <strong>and</strong>, using a gentle sawing motion,<br />
cut the silver skin from the roast, keeping it taut<br />
against the knife’s blade. Repeat the process until you<br />
have removed the silver skin from the entire roast.<br />
1. Halve the steak, leaving the gristle<br />
attached to one side.<br />
2. Cut the gristle away from the half<br />
to which it is still attached.<br />
3. Cut the meat into 1 1 ⁄4-inch<br />
cubes, then cut each cube almost<br />
through at the center to butterfly it.<br />
I L L U ST R AT I O N : J O H N B U RG OY N E<br />
C O O K ’ S I L L U S T R A T E D<br />
16
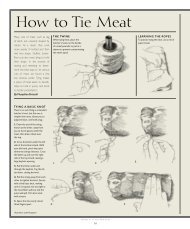
T YING BASICS<br />
<strong>Tying</strong> cuts of meat keeps them compact <strong>and</strong> ensures even cooking. While<br />
we prefer butcher’s twine because it is thick <strong>and</strong> easy to work with, any<br />
kitchen twine will do the job in a pinch. Make sure to use all-natural<br />
cotton or linen twine, which won’t taint the meat or burn in the oven.<br />
<strong>Tying</strong> a Butcher’s Knot<br />
This basic knot can be<br />
made without a spare<br />
finger to hold the<br />
string in place.<br />
<strong>Tying</strong> a Beef Tenderloin<br />
Because the tenderloin narrows at one end, the thin portion must be tucked under itself<br />
<strong>and</strong> tied so that it will cook at the same rate as the rest of the roast.<br />
1. Tuck the skinny<br />
end portion, about<br />
the last 6 inches,<br />
underneath the tenderloin<br />
<strong>and</strong> secure<br />
with a 12-inch length<br />
of twine.<br />
Begin by tying an overh<strong>and</strong> knot as<br />
if tying a bow, but loop the free end<br />
around the other end once more, then<br />
pull the ends to tighten the twine around the meat.<br />
2. Tie off the<br />
rest of the roast<br />
at 1 1 ⁄2-inch<br />
intervals. The twine<br />
should be tied firmly<br />
but not too tight,<br />
in which case it will<br />
squeeze out the<br />
meat’s juices.<br />
<strong>Tying</strong> Medallions <strong>and</strong> Other Steaks<br />
Round, boneless steaks such as tenderloin <strong>and</strong> rib-eye will hold their shape better during cooking if tied<br />
first. A slice of bacon can be wrapped around lean cuts of beef before they are tied. We also like to bind<br />
veal <strong>and</strong> lamb shanks before cooking so that the meat remains attached to the bone.<br />
Wrap a 12-inch piece of twine firmly around the steak’s circumference <strong>and</strong> secure it with a<br />
butcher’s knot. If using bacon, wrap it around the steak before the twine.<br />
<strong>Tying</strong> a St<strong>and</strong>ing Rib Roast<br />
If left untied, the outer layer<br />
of meat on a st<strong>and</strong>ing rib<br />
roast tends to separate<br />
from the rib-eye muscle<br />
as it cooks, making for an<br />
unappealing presentation.<br />
The solution is easy: Tie<br />
a piece of twine around<br />
both ends of the roast,<br />
running the twine<br />
between the bones.<br />
T E S T I N G E Q U I P M E N T : C H O O S I N G A B O N I N G K N I F E<br />
The slim, flexible blade of a boning knife may look eccentric, but it is perfectly designed to slide<br />
nimbly through joints, between bones, <strong>and</strong> under silver skin. It is an essential tool for such tasks<br />
as removing cutlets from a whole chicken breast <strong>and</strong> can also be used to remove fat <strong>and</strong> silver<br />
skin (see illustrations on page 16).<br />
Because most home cooks are likely to use a boning knife infrequently, we wondered if a<br />
cheaper knife would do. To find out, we tested six leading knives with blades between 5 <strong>and</strong><br />
7 inches long <strong>and</strong> prices between $9 <strong>and</strong> $71. Both large- <strong>and</strong> small-h<strong>and</strong>ed testers used each<br />
knife to butcher a whole chicken <strong>and</strong> to trim beef ribs of fat <strong>and</strong> silver skin. Each knife was<br />
evaluated for h<strong>and</strong>le comfort, slipperiness (h<strong>and</strong>s become very greasy when butchering), agility<br />
(including flexibility), <strong>and</strong> sharpness.<br />
Best Boning Knife<br />
An extremely narrow blade makes the Forschner Fibrox especially agile.<br />
The winning Forschner Fibrox, priced at $18, received high marks for its uniquely designed<br />
ergonomic h<strong>and</strong>le as well as its slim, highly maneuverable blade <strong>and</strong> razor-sharp edge. The<br />
plastic h<strong>and</strong>le nestled comfortably into both large <strong>and</strong> small h<strong>and</strong>s, <strong>and</strong> it stayed there even<br />
when our h<strong>and</strong>s became slick with fat. The blade was the narrowest of the lot, which made<br />
it very agile. And while all the knives arrived with razor-sharp edges, the Forschner seemed<br />
exceptionally keen, gliding effortlessly through tough tendon <strong>and</strong> thick skin.<br />
TESTERS’ COMMENTS ON THE KNIVES (listed in order of preference)<br />
( Forschner (Victorinox) Fibrox: $17.90<br />
C O M M E N T S : Comfortable, “easy-to-grip” h<strong>and</strong>le <strong>and</strong> narrow blade impressed all<br />
comers. “Great flexibility around bones.” “Amazing” sharpness out of the box.<br />
( J. A. Henckels Professional S: $49.99<br />
C O M M E N T S : Finished a close second with a blade “nearly as agile as the Forschner”<br />
but lost points for its “slippery” h<strong>and</strong>le.<br />
( Wüsthof-Trident Gr<strong>and</strong> Prix: $54<br />
C O M M E N T S : H<strong>and</strong>le fit “like a glove” but turned slippery when coated in chicken<br />
fat. “Fiendishly sharp” blade is wider than most <strong>and</strong> not as agile as the top choices.<br />
( Global: $70.99<br />
C O M M E N T S : The textured metal h<strong>and</strong>le received very mixed reviews. The narrowness<br />
of the bolster (the piece of metal couched between the blade <strong>and</strong> the h<strong>and</strong>le)<br />
felt “dangerous,” although the blade was “quite agile.”<br />
( Chicago Cutlery: $14.99<br />
C O M M E N T S : Testers complained that the h<strong>and</strong>le felt “boxy” <strong>and</strong> the long blade was<br />
“hard to control.”<br />
( Farberware Professional: $8.99<br />
C O M M E N T S : Very awkward, ill-designed h<strong>and</strong>le fit neither large nor small h<strong>and</strong>s.<br />
The blade felt “flimsy” during use.<br />
M A Y & J U N E 2 0 0 2<br />
17