Illustrated Guide to Kitchen Knives.pdf - Tru-Burn
Illustrated Guide to Kitchen Knives.pdf - Tru-Burn
Illustrated Guide to Kitchen Knives.pdf - Tru-Burn

You also want an ePaper? Increase the reach of your titles
YUMPU automatically turns print PDFs into web optimized ePapers that Google loves.
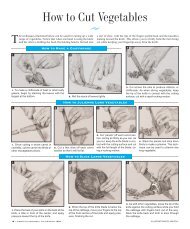
<strong>Illustrated</strong> <strong>Guide</strong> <strong>to</strong> <strong>Kitchen</strong> <strong>Knives</strong><br />
Do you really need $400 worth of forged German steel? Here’s our guide <strong>to</strong> choosing<br />
(and using) the essential knives—and which ones don’t make the cut. By Sean L awler<br />
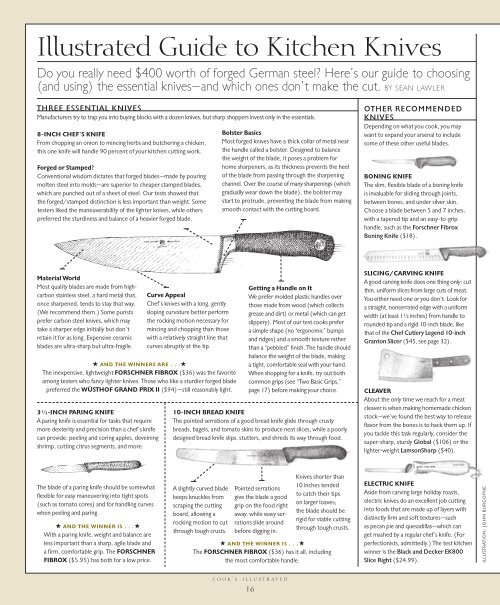
THREE ESSENTIAL KNIVES<br />
Manufacturers try <strong>to</strong> trap you in<strong>to</strong> buying blocks with a dozen knives, but sharp shoppers invest only in the essentials.<br />
8-Inch Chef’s Knife<br />
From chopping an onion <strong>to</strong> mincing herbs and butchering a chicken,<br />
this one knife will handle 90 percent of your kitchen cutting work.<br />
Forged or Stamped?<br />
Conventional wisdom dictates that forged blades—made by pouring<br />
molten steel in<strong>to</strong> molds—are superior <strong>to</strong> cheaper stamped blades,<br />
which are punched out of a sheet of steel. Our tests showed that<br />
the forged/stamped distinction is less important than weight. Some<br />
testers liked the maneuverability of the lighter knives, while others<br />
preferred the sturdiness and balance of a heavier forged blade.<br />
Bolster Basics<br />
Most forged knives have a thick collar of metal near<br />
the handle called a bolster. Designed <strong>to</strong> balance<br />
the weight of the blade, it poses a problem for<br />
home sharpeners, as its thickness prevents the heel<br />
of the blade from passing through the sharpening<br />
channel. Over the course of many sharpenings (which<br />
gradually wear down the blade), the bolster may<br />
start <strong>to</strong> protrude, preventing the blade from making<br />
smooth contact with the cutting board.<br />
OT H E R RECOMMENDED<br />
K N I V E S<br />
Depending on what you cook, you may<br />
want <strong>to</strong> expand your arsenal <strong>to</strong> include<br />
some of these other useful blades.<br />
Boning Knife<br />
The slim, flexible blade of a boning knife<br />
is invaluable for sliding through joints,<br />
between bones, and under silver skin.<br />
Choose a blade between 5 and 7 inches,<br />
with a tapered tip and an easy-<strong>to</strong>-grip<br />
handle, such as the Forschner Fibrox<br />
Boning Knife ($18).<br />
Material World<br />
Most quality blades are made from highcarbon<br />
stainless steel, a hard metal that,<br />
once sharpened, tends <strong>to</strong> stay that way.<br />
(We recommend them.) Some purists<br />
prefer carbon steel knives, which may<br />
take a sharper edge initially but don’t<br />
retain it for as long. Expensive ceramic<br />
blades are ultra-sharp but ultra-fragile.<br />
3 1 ⁄2-Inch Paring Knife<br />
A paring knife is essential for tasks that require<br />
more dexterity and precision than a chef’s knife<br />
can provide: peeling and coring apples, deveining<br />
shrimp, cutting citrus segments, and more.<br />
Curve Appeal<br />
Chef’s knives with a long, gently<br />
sloping curvature better perform<br />
the rocking motion necessary for<br />
mincing and chopping than those<br />
with a relatively straight line that<br />
curves abruptly at the tip.<br />
A nd the w i nners are . . .<br />
The inexpensive, lightweight Forschner Fibrox ($36) was the favorite<br />
among testers who fancy lighter knives. Those who like a sturdier forged blade<br />
preferred the WÜsthof Grand Prix II ($94)—still reasonably light.<br />
Getting a Handle on It<br />
We prefer molded plastic handles over<br />
those made from wood (which collects<br />
grease and dirt) or metal (which can get<br />
slippery). Most of our test cooks prefer<br />
a simple shape (no “ergonomic” bumps<br />
and ridges) and a smooth texture rather<br />
than a “pebbled” finish. The handle should<br />
balance the weight of the blade, making<br />
a tight, comfortable seal with your hand.<br />
When shopping for a knife, try out both<br />
common grips (see “Two Basic Grips,”<br />
page 17) before making your choice.<br />
10-Inch Bread Knife<br />
The pointed serrations of a good bread knife glide through crusty<br />
breads, bagels, and <strong>to</strong>ma<strong>to</strong> skins <strong>to</strong> produce neat slices, while a poorly<br />
designed bread knife slips, stutters, and shreds its way through food.<br />
Slicing/Carving Knife<br />
A good carving knife does one thing only: cut<br />
thin, uniform slices from large cuts of meat.<br />
You either need one or you don’t. Look for<br />
a straight, nonserrated edge with a uniform<br />
width (at least 1 1 ⁄2 inches) from handle <strong>to</strong><br />
rounded tip and a rigid 10-inch blade, like<br />
that of the Chef Cutlery Legend 10-inch<br />
Gran<strong>to</strong>n Slicer ($45, see page 32).<br />
Cleaver<br />
About the only time we reach for a meat<br />
cleaver is when making homemade chicken<br />
s<strong>to</strong>ck—we’ve found the best way <strong>to</strong> release<br />
flavor from the bones is <strong>to</strong> hack them up. If<br />
you tackle this task regularly, consider the<br />
super-sharp, sturdy Global ($106) or the<br />
lighter-weight LamsonSharp ($40).<br />
The blade of a paring knife should be somewhat<br />
flexible for easy maneuvering in<strong>to</strong> tight spots<br />
(such as <strong>to</strong>ma<strong>to</strong> cores) and for handling curves<br />
when peeling and paring.<br />
A n d t h e winner i s . . .<br />
With a paring knife, weight and balance are<br />
less important than a sharp, agile blade and<br />
a firm, comfortable grip. The Forschner<br />
Fibrox ($5.95) has both for a low price.<br />
A slightly curved blade<br />
keeps knuckles from<br />
scraping the cutting<br />
board, allowing a<br />
rocking motion <strong>to</strong> cut<br />
through <strong>to</strong>ugh crusts.<br />
Pointed serrations<br />
give the blade a good<br />
grip on the food right<br />
away, while wavy serrations<br />
slide around<br />
before digging in.<br />
<strong>Knives</strong> shorter than<br />
10 inches tended<br />
<strong>to</strong> catch their tips<br />
on larger loaves;<br />
the blade should be<br />
rigid for stable cutting<br />
through <strong>to</strong>ugh crusts.<br />
And the winner is . . .<br />
The Forschner Fibrox ($36) has it all, including<br />
the most comfortable handle.<br />
Electric Knife<br />
Aside from carving large holiday roasts,<br />
electric knives do an excellent job cutting<br />
in<strong>to</strong> foods that are made up of layers with<br />
distinctly firm and soft textures—such<br />
as pecan pie and quesadillas—which can<br />
get mashed by a regular chef’s knife. (For<br />
perfectionists, admittedly.) The test kitchen<br />
winner is the Black and Decker EK800<br />
Slice Right ($24.99).<br />
I llust r ation: John Bur g oy n e<br />
c o o k ’ s i l l u s t r a t e d<br />
16
KEEPING K NIVES SHARP<br />
A knife loses its sharpness when the fine tip of the cutting edge gets knocked slightly<br />
out of alignment, which can happen any time the blade makes contact with food<br />
or a cutting board. The knife may “act dull” even though the edge is still quite sharp<br />
—it’s just pointed in the wrong direction. This can happen very quickly if you are doing<br />
a lot of heavy cutting work, but the edge can be just as quickly res<strong>to</strong>red by using<br />
a sharpening steel, which realigns the edge and removes slight irregularities.<br />
Two ways <strong>to</strong> protect your knife’s edge are <strong>to</strong> avoid hard cutting surfaces such as<br />
glass or acrylic (stick <strong>to</strong> wood and plastic cutting boards) and <strong>to</strong> keep them out of<br />
the dishwasher, where getting knocked around might damage their edge.<br />
Is It Sharp?<br />
To determine if your knife needs <strong>to</strong> be<br />
sharpened, put it <strong>to</strong> the paper test.<br />
1. Hold a folded, but not creased, sheet<br />
of newspaper by one end.<br />
2. Lay the blade against the <strong>to</strong>p edge at<br />
an angle and slice outward. If the knife<br />
fails <strong>to</strong> slice cleanly, try steeling it. If it still<br />
fails, it needs sharpening.<br />
Choosing—and using—‚a Steel<br />
You should steel your knives regularly, before each use if possible, but sharpen them<br />
only when necessary. Traditional steels are lightly grooved, magnetized iron rods,<br />
but we prefer the newer diamond steels—hollow oval tubes coated with diamond<br />
dust. These grind trace amounts of metal from the knife with each swipe, partially<br />
sharpening the blade while straightening it and extending the period between<br />
sharpenings. However, keep in mind that steeling will only realign a fairly sharp<br />
blade; a dull knife has <strong>to</strong> be sharpened (see below).<br />
1. Hold the steel perpendicular <strong>to</strong> the work surface,<br />
with the tip resting on a cutting board.<br />
2. Place the heel of the blade against the steel, with the<br />
blade at a 20-degree angle away from it.<br />
3. With a locked wrist and light pressure, slide<br />
the blade down the length of the steel in a sweeping<br />
motion, pulling the back of the blade <strong>to</strong>ward you<br />
so that the entire length of the blade comes in<br />
contact with the steel.<br />
4. Repeat the motion on the other side of<br />
the blade. Four or five strokes per side should<br />
realign the edge.<br />
Sharpening<br />
There are two options for grinding a new edge on a knife at home:<br />
1. Sharpening s<strong>to</strong>ne. This method is effective but takes some practice, and it’s<br />
more work than many home cooks want <strong>to</strong> do. It involves a double-sided sharpening<br />
s<strong>to</strong>ne, some elbow grease, and about 15 minutes per blade. (For step-by-step<br />
instructions, see Cook’s Extra, below at right.)<br />
2. Knife sharpener. An electric home sharpener can res<strong>to</strong>re the edge of even a<br />
seriously neglected blade, provided you buy one with a coarse regrinding wheel,<br />
such as our favorite, the Chef’sChoice<br />
110 ($80). Some less expensive models<br />
feature only medium- and fine-grade slots,<br />
good for perking up a slightly dull blade but<br />
unable <strong>to</strong> grind a completely new edge.<br />
These machines do remove a certain amount<br />
of metal from the blade with each use, so<br />
use them no more than necessary.<br />
B A S I C K N I F E T E CH N I Q U E S<br />
Two Basic Grips<br />
Handle Grip<br />
With the handle grip, the thumb rests<br />
on the side of the handle opposite the<br />
index finger. This grip is the favored by<br />
test cooks with smaller hands. For those<br />
who work long hours with a knife, it also<br />
causes fewer calluses.<br />
Safe Slicing with a ‘Guiding Hand’<br />
By properly positioning the hand that is not holding the knife, you can prevent<br />
slippage, control the size of the cut, and<br />
protect your fingers.<br />
In this “bear claw” position, the fingertips<br />
are curled back away from the knife <strong>to</strong> hold<br />
the food in place, while the knuckles rest<br />
against the side of the blade, providing<br />
guidance with no danger of being cut.<br />
To cut multiple slices, use the curvature<br />
of the blade <strong>to</strong> guide the knife through a<br />
series of smooth cutting strokes. Some part<br />
of the blade should remain in contact with<br />
the cutting board at all times. During the<br />
upward motion, reposition the guiding<br />
hand <strong>to</strong> set up the next slice.<br />
Chopping and Mincing<br />
This fast, continuous motion makes<br />
quick work of fresh herbs, onions, and<br />
the like. It begins with the handle held<br />
high and the knife tip on the cutting<br />
board, held gently in place with the<br />
guiding hand. The front half of the blade<br />
remains in contact with the cutting<br />
board at all times.<br />
cook’s<br />
ex tra<br />
Blade Grip<br />
Go <strong>to</strong> www.cooksillustrated.com<br />
• Key in code 70613 for our <strong>Illustrated</strong><br />
<strong>Guide</strong> <strong>to</strong> Sharpening <strong>Knives</strong>.<br />
• Available until January 1, 2007.<br />
Cooks with larger hands often prefer<br />
the blade grip, in which the thumb and<br />
index finger actually grip the heel of<br />
the blade. While this grip requires a bit<br />
more hand strength, it also provides<br />
more control over the tip of the blade.<br />
Careful Carving<br />
The key <strong>to</strong> smooth, even cuts<br />
is a long stroke with very mild<br />
downward pressure. Let the<br />
knife do the work, and avoid<br />
short, sawing strokes, which<br />
yield ragged slices.<br />
j u l y & a u g u s t 2 0 0 6<br />
17