Outline installation & maintenance instructions
Outline installation & maintenance instructions
Outline installation & maintenance instructions

Create successful ePaper yourself
Turn your PDF publications into a flip-book with our unique Google optimized e-Paper software.
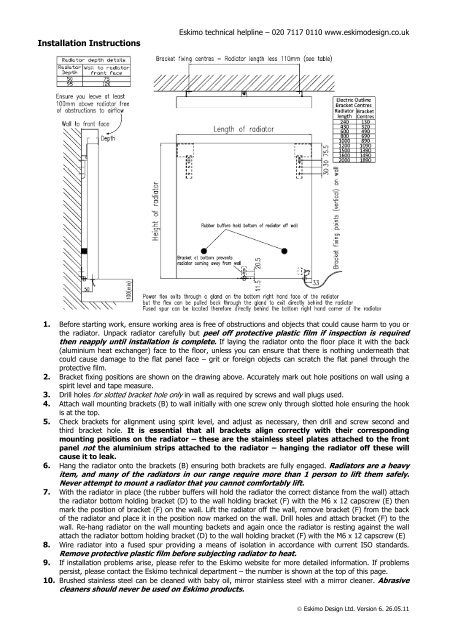
Installation Instructions<br />
Eskimo technical helpline – 020 7117 0110 www.eskimodesign.co.uk<br />
1. Before starting work, ensure working area is free of obstructions and objects that could cause harm to you or<br />
the radiator. Unpack radiator carefully but peel off protective plastic film if inspection is required<br />
then reapply until <strong>installation</strong> is complete. If laying the radiator onto the floor place it with the back<br />
(aluminium heat exchanger) face to the floor, unless you can ensure that there is nothing underneath that<br />
could cause damage to the flat panel face – grit or foreign objects can scratch the flat panel through the<br />
protective film.<br />
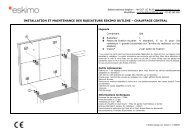
2. Bracket fixing positions are shown on the drawing above. Accurately mark out hole positions on wall using a<br />
spirit level and tape measure.<br />
3. Drill holes for slotted bracket hole only in wall as required by screws and wall plugs used.<br />
4. Attach wall mounting brackets (B) to wall initially with one screw only through slotted hole ensuring the hook<br />
is at the top.<br />
5. Check brackets for alignment using spirit level, and adjust as necessary, then drill and screw second and<br />
third bracket hole. It is essential that all brackets align correctly with their corresponding<br />
mounting positions on the radiator – these are the stainless steel plates attached to the front<br />
panel not the aluminium strips attached to the radiator – hanging the radiator off these will<br />
cause it to leak.<br />
6. Hang the radiator onto the brackets (B) ensuring both brackets are fully engaged. Radiators are a heavy<br />
item, and many of the radiators in our range require more than 1 person to lift them safely.<br />
Never attempt to mount a radiator that you cannot comfortably lift.<br />
7. With the radiator in place (the rubber buffers will hold the radiator the correct distance from the wall) attach<br />
the radiator bottom holding bracket (D) to the wall holding bracket (F) with the M6 x 12 capscrew (E) then<br />
mark the position of bracket (F) on the wall. Lift the radiator off the wall, remove bracket (F) from the back<br />
of the radiator and place it in the position now marked on the wall. Drill holes and attach bracket (F) to the<br />
wall. Re-hang radiator on the wall mounting backets and again once the radiator is resting against the wall<br />
attach the radiator bottom holding bracket (D) to the wall holding bracket (F) with the M6 x 12 capscrew (E)<br />
8. Wire radiator into a fused spur providing a means of isolation in accordance with current ISO standards.<br />
Remove protective plastic film before subjecting radiator to heat.<br />
9. If <strong>installation</strong> problems arise, please refer to the Eskimo website for more detailed information. If problems<br />
persist, please contact the Eskimo technical department – the number is shown at the top of this page.<br />
10. Brushed stainless steel can be cleaned with baby oil, mirror stainless steel with a mirror cleaner. Abrasive<br />
cleaners should never be used on Eskimo products.<br />
© Eskimo Design Ltd. Version 6. 26.05.11