Outline installation & maintenance instructions
Outline installation & maintenance instructions
Outline installation & maintenance instructions

You also want an ePaper? Increase the reach of your titles
YUMPU automatically turns print PDFs into web optimized ePapers that Google loves.
Installation Instructions<br />
Eskimo technical helpline – 020 7117 0110 www.eskimodesign.co.uk<br />
1. Before starting work, ensure working area is free of obstructions and objects that could cause harm<br />
to you or the radiator. Unpack radiator carefully but do not fully remove protective plastic film<br />
until <strong>installation</strong> is complete, if necessary unpeel film to check for transit damage then<br />
replace. If laying the radiator onto the floor, place it with the back (aluminium heat exchanger) face<br />
to the floor, unless you can ensure that there is nothing underneath that could cause damage to the<br />
flat panel face – grit or foreign objects can scratch the flat panel through the protective film.<br />
2. Apply sufficient PTFE tape to valve tail threads to provide a leak-tight seal.<br />
3. Screw valve tails into threaded pipe connections on radiators please note, the female aluminium<br />
threads in the radiator can be damaged by cross-threading of the valve tails – ensure<br />
that thread is correctly aligned before tightening. Do not over-tighten.<br />
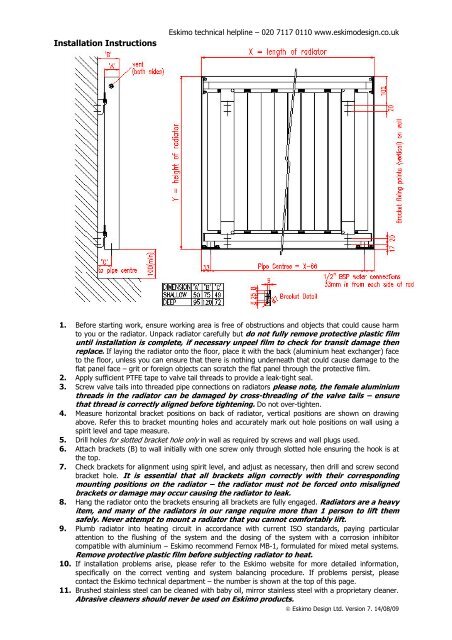
4. Measure horizontal bracket positions on back of radiator, vertical positions are shown on drawing<br />
above. Refer this to bracket mounting holes and accurately mark out hole positions on wall using a<br />
spirit level and tape measure.<br />
5. Drill holes for slotted bracket hole only in wall as required by screws and wall plugs used.<br />
6. Attach brackets (B) to wall initially with one screw only through slotted hole ensuring the hook is at<br />
the top.<br />
7. Check brackets for alignment using spirit level, and adjust as necessary, then drill and screw second<br />
bracket hole. It is essential that all brackets align correctly with their corresponding<br />
mounting positions on the radiator – the radiator must not be forced onto misaligned<br />
brackets or damage may occur causing the radiator to leak.<br />
8. Hang the radiator onto the brackets ensuring all brackets are fully engaged. Radiators are a heavy<br />
item, and many of the radiators in our range require more than 1 person to lift them<br />
safely. Never attempt to mount a radiator that you cannot comfortably lift.<br />
9. Plumb radiator into heating circuit in accordance with current ISO standards, paying particular<br />
attention to the flushing of the system and the dosing of the system with a corrosion inhibitor<br />
compatible with aluminium – Eskimo recommend Fernox MB-1, formulated for mixed metal systems.<br />
Remove protective plastic film before subjecting radiator to heat.<br />
10. If <strong>installation</strong> problems arise, please refer to the Eskimo website for more detailed information,<br />
specifically on the correct venting and system balancing procedure. If problems persist, please<br />
contact the Eskimo technical department – the number is shown at the top of this page.<br />
11. Brushed stainless steel can be cleaned with baby oil, mirror stainless steel with a proprietary cleaner.<br />
Abrasive cleaners should never be used on Eskimo products.<br />
© Eskimo Design Ltd. Version 7. 14/08/09