14 Router Connection Details.pdf - TSL
14 Router Connection Details.pdf - TSL
14 Router Connection Details.pdf - TSL

You also want an ePaper? Increase the reach of your titles
YUMPU automatically turns print PDFs into web optimized ePapers that Google loves.
<strong>Router</strong> <strong>Connection</strong> <strong>Details</strong><br />
Television Systems Limited.<br />
Vanwall Road, Maidenhead, Berkshire, SL6 4UB<br />
Telephone +44 (0)1628 676200, FAX +44 (0)1628 676299<br />
1 <strong>Router</strong>s
Contents<br />
1 GVG Encore / Prelude / Jupiter SMS 7000 Family <strong>Router</strong>s<br />
2 Harris / Leitch <strong>Router</strong>s<br />
3 Nevion / Network <strong>Router</strong>s<br />
4 Pesa <strong>Router</strong>s<br />
5 GVG Thomson/Philips/BTS <strong>Router</strong>s<br />
6 ProBel <strong>Router</strong>s<br />
7 Evertz / Quartz <strong>Router</strong>s<br />
8 Sony <strong>Router</strong>s; MVS/DVS Series, <br />
9 Sigma <strong>Router</strong>s<br />
10 NVision <strong>Router</strong>s<br />
11 Talia <strong>Router</strong>s<br />
Appendix 1 TallyMan <strong>Router</strong> support as at April 2008<br />
Note: Please check pin functions with connector details published for the routers as<br />
these connections shown might be out of date.<br />
The routers have been added in the order that software requirements have arisen.<br />
V3.0 Oct 09 2 <strong>Router</strong>s
1 GVG Encore / Prelude / Jupiter & SMS 7000 Family <strong>Router</strong>s<br />
• The cable details in the boxes refer to the cable connectors.<br />
• In TallyMan be sure to set priority numbers for the active <strong>Router</strong> Buses and set the<br />
correct Level, with the ASCII code.<br />
• The SMS7000 router needs an AMEZI serial interface to be installed.<br />
• Start with Level 0 in the TallyMan settings.<br />
The system will only import the names that exist on the selected level. The level names can<br />
be viewed under "Edit Levels".<br />
The GVG Encore/SMS 7000 router is different from other manufacturers’ routers in that it<br />
uses only names to identify the following:<br />
• levels<br />
• inputs<br />
• outputs.<br />
The <strong>TSL</strong> TallyMan Controller uses the names that are programmed into the router to deduce<br />
the cross point information. The TallyMan program will allow access to the up-loading of the<br />
router’s names when the Read Names button is pressed in the screen.<br />
In the TallyMan program, in the <strong>Router</strong> Properties box menu item, the video level could<br />
show something like 0:128SDV<br />
The leading part of the names in the UMD Controller must match exactly the names in the<br />
router, including case, punctuation and spacing.<br />
The easiest way to ensure this has happened is to select Read Names and then import them<br />
to the UMD mnemonics. Allow a few moments (10~20 secs) for the update box to appear,<br />
when OK is pressed.<br />
However, if the Encore/SMS 7000 names are, say, only 5 characters long, any default name<br />
in the Edit router source names box e.g. SRCE 1, will not be completely overwritten.<br />
For example, the 1 part of SRCE 1 will remain. This is so user-mnemonics may be added to<br />
the <strong>TSL</strong> router lists as long as the leading names/mnemonics match those from the<br />
SMS7000.<br />
V3.0 Oct 09 3 <strong>Router</strong>s
<strong>Router</strong> Names may be copied across to the UMD mnemonics.<br />
Current software will overwrite the names entirely on a router upload but the user can then<br />
still enter the additional user-mnemonic part.<br />
e.g. CAM1 Bob Bob is the user- entered part of the mnemonic. CAM1 has been uploaded<br />
from the SMS 7000.<br />
This facility will be especially useful for 16 character displays.<br />
<strong>Connection</strong>s<br />
The TallyMan Controller usually connects into the SMS 7000 router via the ASYNC I/F<br />
connector(s), depending on configuration of the SMS 7000.<br />
If more than one connector is fitted, it can configured either be as MAIN/STANDBY or as two<br />
separate control connectors.<br />
There may be one or two serial ports available on the SMS 7000. Either can be used, as long<br />
as the port is set correctly.<br />
The connector supports both RS232 and RS422 standards. The TallyMan Controller is fitted<br />
with an RS422 interface (connected as a Device), and is identified as a socket on the chassis.<br />
The Encore routers use a RJ45 connector.<br />
Cable details<br />
TALLYMAN<br />
CONTROLLER TM1/TM2<br />
RS-422<br />
D9 Plug<br />
GVG SMS 7000<br />
ROUTER<br />
J1, RS-422<br />
D25 plug<br />
2 → TX- 4<br />
8 ← RX- 5<br />
3 ← RX+ 3<br />
7 → TX+ 2<br />
4, 6 GND 7<br />
TALLYMAN CONTROLLER TM1/TM2<br />
GVG SMS 7000 ROUTER<br />
RS-232<br />
J1, RS-232<br />
D9<br />
D25 Socket<br />
2 ← RX 3<br />
3 → TX 2<br />
4 → DTR 6/8<br />
5 GND 7<br />
7 → RTS 4<br />
8 ← CTS 5<br />
V3.0 Oct 09 4 <strong>Router</strong>s
Encore <strong>Router</strong>s<br />
Also please see Notes below<br />
TALLYMAN<br />
CONTROLLER<br />
TM1/TM2<br />
TALLYMAN<br />
CONTROLLER<br />
TMC-1<br />
ENCORE FRAME 6100884XX<br />
RS-422 RS-422 COM 2, Serial 1 - 8<br />
D9 Plug D9 Skt RJ45<br />
2 1 → TX- → 6<br />
8 4 ← RX- ← 8<br />
3 3 ← RX+ ← 3<br />
7 2 → TX+ → 1<br />
4, 6 5 GND 4, 5<br />
Check the configuration of the Encore for it to work with the UMD TallyMan Controller. Be<br />
sure to Set GVG Native or NP in the protocol selection box.<br />
The configuration is as follows.<br />
Communication details.<br />
• Baud rate 9600<br />
• Parity NONE<br />
• Stop Bits 1<br />
• Data Bits 8<br />
• Protocol NATIVE<br />
Notes<br />
With GVG Native Protocol, read the router names while online to achieve communications.<br />
Although the Encore does not provide an automatic update of status changes within the<br />
router, it is interrogated for changes that have occurred since the last request. This is done<br />
about 5 times a second, so a UMD display should respond within about ¼second.<br />
If the Comms are good between the Encore and the TallyMan Controller, and TallyMan is<br />
online when the router name database is changed, there should be an automatic update<br />
shown in TallyMan.<br />
Amendments for recent Encore Frames (July 2007)<br />
RJ 45 For Encore Frame<br />
6100884xx<br />
1 Rx+<br />
2 No Connect<br />
3 Tx+<br />
4 Ground<br />
5 Ground<br />
6 Rx-<br />
7 No Connect<br />
8 Tx-<br />
RJ45 For Encore Frame<br />
6101000xx<br />
1 Tx+<br />
2 Tx-<br />
3 Ground<br />
4 Ground<br />
5 Ground<br />
6 Ground<br />
7 Rx-<br />
8 Rx+<br />
V3.0 Oct 09 5 <strong>Router</strong>s
For Prelude - configured units<br />
Communication details.<br />
• Baud rate 38400<br />
• Parity NONE<br />
• Stop Bits 1<br />
• Data Bits 8<br />
• Protocol NP<br />
The cable required between the D9 connector on a Prelude-configured UCP is as follows:<br />
TALLYMAN<br />
CONTROLLER<br />
RS-422<br />
D9 Plug<br />
<strong>TSL</strong><br />
Functions<br />
GVG Prelude Panel<br />
D9 Plug<br />
3 ← RX+ 7<br />
8 ← RX- 2<br />
4 SCN 4<br />
7 → TX+ 3<br />
2 → TX- 8<br />
6 SCN 6<br />
Twisted cable pairs are: 2 & 7 and 3 & 8.<br />
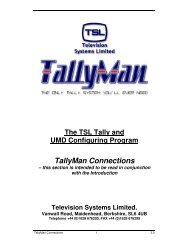
Screen shots of a panel configuration – courtesy of GVG UK.<br />
V3.0 Oct 09 6 <strong>Router</strong>s
V3.0 Oct 09 7 <strong>Router</strong>s
2 Harris / Leitch <strong>Router</strong>s<br />
• The cable details in the boxes refer to the cable connectors.<br />
• The router cable is plugged into a RS422 Port on the TallyMan Controller.<br />
• In TallyMan be sure to set priority numbers for the active <strong>Router</strong> Buses .<br />
• Start with Level 0 set in the TallyMan dialog box.<br />
• With a RS422 data/LED checker, background polling on the communications link<br />
must be seen both ways at the rate of about once a second. The Leitch router acts<br />
as a Controller.<br />
These routers may connected to the TallyMan Controller via either a RS232 or a reverseconnected<br />
RS422/485 link.<br />
Cable Requirements<br />
TALLYMAN CONTROLLER<br />
TM1/TM2<br />
RS-232<br />
D9<br />
LEITCH ROUTER<br />
D9 Socket<br />
2 RX 3<br />
3 TX 2<br />
5 GND 5<br />
TALLYMAN<br />
TM1/TM2<br />
CONTROLLER<br />
RS-422<br />
D9 Plug<br />
<strong>TSL</strong><br />
Functions<br />
LEITCH ROUTER<br />
D9 Socket<br />
3 ← RX+ 7<br />
8 ← RX- 2<br />
4 SCN 4<br />
7 → TX+ 3<br />
2 → TX- 8<br />
6 SCN 6<br />
For RS422 cables 2 & 7 and 3 & 8 are twisted pairs.<br />
Communication details.<br />
• Baud 9600 / 38K4<br />
• No Parity<br />
• 8 Bits<br />
• 1stop Bit<br />
For Integrator models<br />
• Set the Integrator Serial 1 Port on the Logic Module to RS422 by suitably fitting the<br />
links the correct way up.<br />
• Set the baud rate for Serial Port 1 to 9600 - and<br />
• Set RH Serial Port 1 Protocol switches 1 and 2 to Leitch (Auto Detect).<br />
For Leitch router levels 1 and 2 set the <strong>TSL</strong> levels in TallyMan to Levels 0 and 1 respectively<br />
etc.<br />
V3.0 Oct 09 8 <strong>Router</strong>s
Leitch VIA32 <strong>Router</strong><br />
• The cable details in the boxes refer to the cable connectors.<br />
• The router cable is normally plugged into a Comms Port on the TallyMan Controller.<br />
• In TallyMan be sure to set priority numbers for the active <strong>Router</strong> Buses.<br />
Leitch VIA32S series routing switchers.<br />
The control port on the TallyMan Controller should be fitted with an RS232 interface. This is<br />
identified as a D9 plug mounted on the rear of the TallyMan Controller.<br />
The SERIAL CONTROL connector on the rear of the LEITCH frame is connected to the <strong>TSL</strong><br />
TallyMan Controller.<br />
The settings are as follows:<br />
Communication details.<br />
• RS232<br />
• 9600 baud<br />
• 8 bit data<br />
• No parity<br />
• One stop bit<br />
The configuration DIP switches should be set as shown: (See Fig 2-5, P2-6 in the Leitch<br />
Installation & Maintenance Manual).<br />
S1 S2<br />
On<br />
1 2 3 4 5 6 7 8 1 2 3 4 5 6 7 8<br />
S1-5 [ON] sets flow control on.<br />
S1-6 [ON] sets echo mode on.<br />
S1-7,8 [OFF] sets baud rate to 9600 Baud.<br />
An interface cable should be made up as below.<br />
TALLYMAN CONTROLLER<br />
TM1/TM2<br />
D9<br />
LEITCH ROUTER<br />
Serial Control Port<br />
D9 Socket<br />
3 → 2<br />
2 ← 3<br />
5 GND 7<br />
During operation, TallyMan is “listening” for status messages from the LEITCH router,<br />
identifying the cross-points as they are made.<br />
In addition, the TallyMan carries out a background poll of the LEITCH router at the rate of 1<br />
bus per second.<br />
V3.0 Oct 09 9 <strong>Router</strong>s
For Platinum Models<br />
• Set the protocol in Tallyman as Leitch X-Y Passthrough.<br />
• Set the router size in TallyMan<br />
• Set up the appropriate matching communications parameters on the Harris PTR-RES<br />
Platinum Resource Module (card) and in TallyMan<br />
• Set the Matrix number in TallyMan at 0<br />
• Initially set the Level number in TallyMan at 0 or check Multi Level and set the<br />
appropriate numbers on levels for the router.<br />
• Using a Terminal program with the PC attached to the other Harris serial port will<br />
allow crosspoint changes to be made locally. Press Q to see the Command<br />
Summary screen<br />
• When successfully On-Line, the <strong>Router</strong> Object will appear in TallyMan with a bright<br />
green dot alongside and activity will be seen in Tools > <strong>Router</strong> Mimic at the instant of<br />
a crosspoint change.<br />
Settings: 38K4/8/N/1. No Flow Control.<br />
Cable details<br />
TALLYMAN<br />
TM1/TM2<br />
CONTROLLER RS-<br />
422<br />
D9 Plug<br />
<strong>TSL</strong><br />
Functions<br />
HARRIS ROUTER<br />
D9 Socket<br />
3 ← RX+ 7<br />
8 ← RX- 2<br />
4 SCN 4<br />
7 → TX+ 3<br />
2 → TX- 8<br />
6 SCN 6<br />
V3.0 Oct 09 10 <strong>Router</strong>s
3 Nevion / Network <strong>Router</strong>s<br />
• The cable details in the boxes refer to the cable connectors.<br />
• The router cable is plugged into a Comms Port on the TallyMan Controller.<br />
• Correct protocol is the “Nevion (VikinX) ” serial protocol<br />
• If there is a checkbox labeled “<strong>Router</strong>s are connected to this serial port”, it should be unticked.<br />
• In TallyMan be sure to set priority numbers for the active <strong>Router</strong> Buses.<br />
TallyMan Programming<br />
The <strong>Router</strong> Level is the same as the <strong>Router</strong>’s Address. For example, if the <strong>Router</strong> Address is<br />
0, the Level that must be set in the Tallyman <strong>Router</strong> Properties box is 0.<br />
All Midi data links must be fitted for operation.<br />
TallyMan Controller RS232 details<br />
TALLYMAN CONTROLLER RS 232 CONNECTORS<br />
D9 CONNECTOR<br />
1 - 6 -<br />
2 RX 7 RTS<br />
3 TX 8 CTS<br />
4 DTR 9 -<br />
5 0v<br />
Cable <strong>Details</strong><br />
TALLYMAN CONTROLLER TMC-1/TM1/TM2<br />
RS-232<br />
D9<br />
Network <strong>Router</strong><br />
RS-232<br />
D9 Plug<br />
2 RX ← TX 2<br />
3 TX → RX 3<br />
5 GND 5<br />
Communication details.<br />
• 19K2 for 16 x 16, 32 x 32 and 64 x 64. Early V 16 x 16 routers are 9600<br />
Baud<br />
• No Parity<br />
• 8 Bits<br />
• 1 Stop Bit<br />
The maximum cable length is 15m.<br />
Note<br />
To interface using the older MIDI based serial protocol, the TallyMan file should be set to<br />
“Nevion (MIDI)” with baud rate at 19200.<br />
The VikinX series routers need a port specifically configured for this older protocol.<br />
V3.0 Oct 09 11 <strong>Router</strong>s
4 Pesa <strong>Router</strong>s<br />
• The cable details in the boxes refer to the cable connectors.<br />
• The router cable is plugged into a Comms Port on the TallyMan Controller.<br />
• In TallyMan be sure to set priority numbers for the active <strong>Router</strong> Buses.<br />
TallyMan Programming.<br />
The <strong>Router</strong> Level that must be set in the main screen in <strong>Router</strong> Properties Menu is 0.<br />
Be sure to set <strong>Router</strong> Bus priorities in TallyMan.<br />
<strong>Router</strong> Programming<br />
• Open the CPU Link window.<br />
• Select Port 2.<br />
• Set the Baud Rate as 38400<br />
• Set the Stop Bits at 1<br />
• Select Protocol Type as USP.<br />
• Set Check Sum as None.<br />
• Set the Terminator as CR-Carriage Return<br />
• Check all boxes in the Status Filter<br />
• Select OK.<br />
Normal RS232 <strong>Connection</strong>s – Cable Requirements<br />
TALLYMAN CONTROLLER TM1/TM2<br />
RS-232<br />
D9<br />
PESA<br />
RS-232<br />
D9 Socket<br />
1 + 6 --- 4<br />
2 --- 3<br />
3 --- 2<br />
4 --- 1 + 6<br />
5 GND 5<br />
7 --- 8<br />
8 --- 7<br />
9 N/C 9<br />
V3.0 Oct 09 12 <strong>Router</strong>s
Hardware Information<br />
PESA J13/J<strong>14</strong> RS 232<br />
Connectors<br />
D9 Plug on equipment<br />
FUNCTION<br />
1 CD<br />
2 RX<br />
3 TX<br />
4 DTR<br />
5 GROUND<br />
6 DSR<br />
7 RTS<br />
8 CTS<br />
9 N/C<br />
Hardware Information<br />
PESA J15 Connector<br />
FUNCTION<br />
D9 Plug on equipment<br />
1 GROUND<br />
2 RX+<br />
3 TX-<br />
4 GROUND<br />
5 N/C<br />
6 GROUND<br />
7 RX-<br />
8 TX+<br />
9 GROUND<br />
RS 422/485 <strong>Connection</strong>s – Cable Requirements<br />
TALLYMAN TM1/TM2<br />
CONTROLLER RS-422<br />
D9 Plug<br />
PESA ROUTER<br />
RS-422<br />
D9 Socket<br />
2 7<br />
8 3<br />
4 SCN 4<br />
7 2<br />
3 8<br />
6 SCN 6<br />
V3.0 Oct 09 13 <strong>Router</strong>s
TallyMan Programming<br />
General<br />
The Pesa router is different from other manufacturers’ routers in that it uses names and levels<br />
to identify the following:<br />
• levels<br />
• inputs<br />
• outputs.<br />
TallyMan uses the names that are programmed into the router to deduce the cross point<br />
information.<br />
The TallyMan program will allow access to the up-loading of the router’s names when the<br />
Configure <strong>Router</strong> Names button is pressed in main router screen.<br />
In the TallyMan program, in <strong>Router</strong> Properties, the Level could show something like<br />
0:128SDV<br />
The leading part of the names in the Controller must match exactly the names in the router,<br />
including case, punctuation and spacing.<br />
The easiest way to ensure this is to force an Import <strong>Router</strong> Database Names to<br />
Mnemonics. This is achieved via the Read Names button. Allow a few moments (10~20<br />
secs) for the update box to appear, when OK is pressed.<br />
User-mnemonics may be added to the <strong>TSL</strong> router lists as long as the leading<br />
names/mnemonics match those from the Pesa <strong>Router</strong>.<br />
<strong>Router</strong> Names may be copied across to the UMD mnemonics.<br />
V3.0 Oct 09 <strong>14</strong> <strong>Router</strong>s
5 GVG Thomson/Philips/BTS <strong>Router</strong>s<br />
• The cable details in the boxes refer to the cable connectors.<br />
• The router cable is normally plugged into a Comms Port on the TallyMan Controller.<br />
• In TallyMan be sure to set priority numbers for the active <strong>Router</strong> Buses.<br />
• The Jupiter VM3000 needs to be programmed with a set of CP input and output tables,<br />
for the ASCII interface to the Controller (similar to setting up a control panel).<br />
This will allow which sources and destinations TallyMan looks at by compiling these<br />
tables.<br />
• The ASCII protocol used does not support transfer of mnemonics between the Jupiter and<br />
third party Controllers; this is a limitation imposed by Philips.<br />
<strong>Router</strong>s Using ‘BTS ASCII’ Interface<br />
In order for TallyMan to communicate with the router, the correct type of interface must be<br />
installed and configured inside the router main frame.<br />
• One serial port, on the rear of the BTS control system must be allocated for use with<br />
TallyMan and configured as an ASCII port.<br />
• The Source and Destination tables must be built for this port and the file saved back<br />
to configure the router.<br />
The connector supports both RS232 and RS422 standards.<br />
The serial interconnection cable between the BTS router and the TallyMan Controller should<br />
be wired as shown below.<br />
TALLYMAN CONTROLLER<br />
TM1/TM2<br />
RS232<br />
D9<br />
BTS ROUTER<br />
ASCII PORT(7), RS232<br />
D9 Socket<br />
2 RX ← 3<br />
3 TX → 2<br />
5 GND 1<br />
+ 6<br />
+ 7<br />
V3.0 Oct 09 15 <strong>Router</strong>s
TALLYMAN<br />
CONTROLLER TM1/TM2<br />
RS422<br />
D9 Plug<br />
BTS ROUTER<br />
ASCII<br />
RS422<br />
D9 plug<br />
2 → TX- 2<br />
7 → TX+ 7<br />
4 GND 4<br />
8 ← RX- 8<br />
3 ← RX+ 3<br />
6 GND 6<br />
The BTS router serial port used by TallyMan needs to be set up as:<br />
Communication details.<br />
• Baud Rate: 38K4 with ASCII interface<br />
• Data bits: 8<br />
• Parity: None<br />
• Stop bits: 1<br />
Refer to the BTS Control system (Installation & Operation) manuals for details on:<br />
Hardware Installation......... BTS ASCII 2-49<br />
(computer interface protocol)<br />
Software Installation .......… Serial protocol 3-28<br />
MPK devices 3-44<br />
Notes.<br />
During operation, TallyMan initiates a ‘Watch Output’ command, at the rate of 1 bus per<br />
second for each for each bus it is interested in. The router immediately replies with a status<br />
as well as responding to any changes on that bus.<br />
For the ASCII interface within the Jupiter config, you must define sets of inputs, outputs and<br />
levels and associate them with the ASCII configured port.<br />
The index numbers on the left of these sets determine the numbers sent in the ASCII protocol<br />
to TallyMan.<br />
If unsure of level number, then tick the "Multi Level" box in TM and specify e.g. 8 levels. It is,<br />
however normally preferable to operate as single level if you are only interested in one level,<br />
as it removes unnecessary compilations in subsequent programming.<br />
Note that only those levels specified in the CP Level set will appear on the interface.<br />
V3.0 Oct 09 16 <strong>Router</strong>s
6 Snell & Wilcox / ProBel <strong>Router</strong>s<br />
• The cable details in the boxes refer to the cable connectors.<br />
• In TallyMan be sure to set priority numbers for the active <strong>Router</strong> Buses.<br />
• Problems with communication are invariably due to incorrect configuring of the ProBel<br />
port.<br />
• Check whether the protocol set in the router is SWP02 or SWP08.<br />
System - General Setup<br />
Set the number of the router video and matrix levels.<br />
• For General Remote Protocol, System 3 (SWP08), Aurora and Freeway, this starts at<br />
00 (zero).<br />
• For General Switcher protocol, System 2 (SWP02), this starts at 01.<br />
Check in the router manual for router matrix number setting. If there is doubt as to the correct<br />
number, start at 0.<br />
A control port on the TallyMan Controller is fitted with an RS422 interface; this is identified as<br />
a D9 socket.<br />
In order for TallyMan to communicate with a router, it is necessary for the correct type of<br />
interface to be installed and configured inside the router main frame.<br />
ProBel routers need to have a Remote (communications) Port assigned and configured to act<br />
as an interface to TallyMan. In order to achieve this, a computer terminal needs to be<br />
connected to the router maintenance interface port and the router configured to the following<br />
specification:<br />
Communication details.<br />
• General Remote Protocol SWP08 / General Switcher Protocol SWP02<br />
• RS422<br />
• 38400 baud<br />
• 8 bit data<br />
• No parity<br />
• One stop bit<br />
Set the Remote Port to be General Remote or General Switcher protocol, as appropriate.<br />
ProBel port RS485/422 should be used.<br />
The serial interconnection cables between the PROBEL router and the UMD TallyMan<br />
controller should be wired as shown below for the particular application.<br />
V3.0 Oct 09 17 <strong>Router</strong>s
Pin-out <strong>Details</strong><br />
RS232 <strong>Connection</strong>s – where appropriate<br />
TALLYMAN CONTROLLER<br />
PROBEL ROUTER<br />
Control Port<br />
D9<br />
D9 Socket<br />
3 (Tx) → 3<br />
2 (Rx) ← 2<br />
5 (0v) GND 5/7<br />
General Switcher protocol – SWP02.<br />
RS422 <strong>Connection</strong>s where there is a ProBel controller in the system.<br />
TALLYMAN<br />
CONTROLLER TM1/TM2<br />
D9 Plug<br />
PROBEL ROUTER<br />
Control Port<br />
D9 plug<br />
3 ← 3<br />
8 ← 8<br />
7 → 7<br />
2 → 2<br />
4,6 GND 6,4<br />
General Remote protocol – SWP08.<br />
RS422 <strong>Connection</strong>s where there is a ProBel controller in the system.<br />
TALLYMAN<br />
CONTROLLER TM1/TM2<br />
D9 Plug<br />
PROBEL ROUTER<br />
Control Port<br />
D9 plug<br />
3 ← 7<br />
8 ← 2<br />
7 → 3<br />
2 → 8<br />
4,6 GND 6,4<br />
V3.0 Oct 09 18 <strong>Router</strong>s
RS422 <strong>Connection</strong>s where there is no ProBel controller in the system.<br />
TALLYMAN<br />
CONTROLLER<br />
TM1/TM2<br />
D9 Plug<br />
PROBEL ROUTER<br />
Control Port<br />
D9 plug<br />
3 ← 3<br />
8 ← 8<br />
7 → 7<br />
2 → 2<br />
4,6 GND 6,4<br />
During operation TallyMan is “listening” for status messages from the ProBel router identifying<br />
the cross-points as they are made.<br />
In addition, TallyMan carries out a background poll of the ProBel router at the rate of 1 bus<br />
per second.<br />
For routers on different levels, an extra <strong>Router</strong> module will need to be inserted into the<br />
TallyMan tree and assigned to the existing one for the communications connections.<br />
Note: In case of no communications with the ProBel frame, please be prepared to try a 1:1<br />
cable or crossed cable, as the case may be. Also, check the matrix level numbers set in<br />
TallyMan.<br />
V3.0 Oct 09 19 <strong>Router</strong>s
7 Evertz / Quartz <strong>Router</strong>s<br />
• The cable details in the boxes refer to the cable connectors.<br />
• The router cable is plugged into a Comms Port on the TallyMan Controller.<br />
• In TallyMan be sure to set priority numbers for the active <strong>Router</strong> Buses.<br />
The Quartz routers, Q1600/Q3200, may not have a suitable serial interface installed and it<br />
must be fitted retrospectively if the routers were ordered without the interface board.<br />
The router serial interface may be configured as RS232 or RS422 by changing the position of<br />
the jumpers on the card. All jumpers must be set the same way. See the following charts for<br />
connection details.<br />
TALLYMAN CONTROLLER<br />
TM1/TM2<br />
RS-232<br />
D9<br />
QUARTZ ROUTER<br />
RS-232<br />
D9 Plug<br />
2 RX 7<br />
3 TX 3<br />
5 GND 6<br />
TALLYMAN<br />
CONTROLLER<br />
TM1/TM2<br />
D9 Plug<br />
FROM<br />
TALLYMAN<br />
QUARTZ ROUTER<br />
RS-422<br />
D9 Plug<br />
3 RX+ 7<br />
8 Rx- 2<br />
4 0v 4<br />
7 Tx+ 3<br />
2 Tx- 8<br />
6 0v 6<br />
The TallyMan Controller uses the default serial communication settings of the Quartz router.<br />
Use Quartz protocol (Quartz Type 1 or Quartz Native).<br />
Communication details.<br />
• 9600 / 38K4 baud (depends on version)<br />
• 8 bits<br />
• No parity<br />
• 1 stop bit<br />
Note: The Matrix setting in TallyMan has no effect with Quartz <strong>Router</strong>s. If you have difficulty<br />
with finding the correct Level, check the Multi-level box in the TallyMan router dialog page and<br />
enter, say 4, in the Levels box. Then inspect the data in Tools > Tally Mimic to ascertain<br />
which level you want to read.<br />
V3.0 Oct 09 20 <strong>Router</strong>s
Courtesy of Evertz Quartz UK<br />
V3.0 Oct 09 21 <strong>Router</strong>s
8 Sony <strong>Router</strong>s<br />
MVS/DVS Series<br />
• The cable details in the boxes refer to the cable connectors.<br />
• The router cable is plugged into a Comms Port on the TallyMan Controller.<br />
• In TallyMan be sure to set priority numbers for the active <strong>Router</strong> Buses.<br />
The communication is RS422 and operates at 38K4 baud.<br />
ROT 16 is supported<br />
TALLYMAN TM1/TM2<br />
CONTROLLER RS-422<br />
D9 Plug<br />
SONY ROUTER<br />
RS-422<br />
D9 Plug<br />
3 7<br />
8 2<br />
4 SCN 4<br />
7 3<br />
2 8<br />
6 SCN 6<br />
The protocol is multi-drop, allowing multiple devices to be on the bus. This allows for several<br />
routers to be controlled, or monitored from one serial port.<br />
Addressing on the Sony equipment is by means of a DIP switch. This address is designated<br />
Unit Address 2. Addressing is bit mapped. This allows operations to take place on more than<br />
one router at a time, i.e. Video + Audio etc.<br />
In the TallyMan Controller, the address is set by using the Video Level number and the<br />
addresses generated are as follows:-<br />
TALLYMAN CONTROLLER<br />
VIDEO LEVEL<br />
DECIMAL<br />
SONY<br />
UNIT ADDRESS 2<br />
HEXADECIMAL<br />
1 1 0x01<br />
2 2 0x02<br />
3 4 0x04<br />
4 8 0x08<br />
5 16 0x10<br />
6 32 0x20<br />
7 64 0x40<br />
8 128 0x80<br />
This facility precludes an automatic update from the router to the TallyMan Controller. This<br />
normally provides a quick update when a change occurs.<br />
With 16 or less outputs and inputs, the complete status can be requested and this is done<br />
twice a second to keep display update time reasonably short.<br />
<br />
Set the IP address to be in the same group as the TallyMan TMx unit.<br />
The Port in TallyMan must be set to 8004.<br />
Assign a spare SBUS number to the TM system.<br />
V3.0 Oct 09 22 <strong>Router</strong>s
9 Sigma <strong>Router</strong>s<br />
Please check on the pin functions as shown in the manuals for the correct connectivity.<br />
Usually RS 232: Pin 2-3<br />
Pin 3-2<br />
Pin 5-5<br />
• Baud rate is fixed at 9600 in TallyMan.<br />
• Switches will need setting in the MRX <strong>Router</strong><br />
• The MRX <strong>Router</strong> module is RS232 by default.<br />
• Its logical address is 0 which corresponds to Matrix number 0 in the TallyMan<br />
program<br />
• Handshaking should be set to OFF.<br />
• Sigma Switch Settings:<br />
RS232 Baud Rate setting:<br />
S2-1 and S2-2 ON /DOWN<br />
Protocol format:<br />
S2-9, S2-10. S2-11 ON/DOWN<br />
Control Level:<br />
S2-12 DOWN/ON (8 Levels)<br />
Handshaking<br />
S3-2 OFF/UP<br />
10 NVision <strong>Router</strong>s<br />
• Connect using TCP/IP<br />
• The level number corresponds to the physical level number (-1) in the NVision<br />
software.<br />
• For multiple levels, each level should be entered as a separate router object,<br />
communicating with the same IP/port on the NVision router.<br />
V3.0 Oct 09 23 <strong>Router</strong>s
11 Talia <strong>Router</strong>s<br />
Select the correct protocol in TallyMan.<br />
Set the Communications.<br />
Note. For this high baud rate, Control Ports 1, 2 or 3 must only be used on the TMx.<br />
V3.0 Oct 09 24 <strong>Router</strong>s
Typical Comms details for the Geneous CPU<br />
• Baud Rate: 57600<br />
• Parity: None<br />
• Data: 8<br />
• Stop Bits: 1<br />
Cable details<br />
D25 Plug Aux to CPU D9 Socket PC9 to<br />
TallyMan Port 3 RS232<br />
Pin Number<br />
Pin Number<br />
1 -<br />
2 2<br />
3 3<br />
4 -<br />
5 7/8<br />
6 -<br />
7 5<br />
8 -<br />
9 -<br />
10 -<br />
11 -<br />
12 -<br />
13 -<br />
<strong>14</strong> -<br />
15 -<br />
16 -<br />
17 -<br />
18 -<br />
19 -<br />
20 -<br />
21 -<br />
22 -<br />
23 -<br />
24 -<br />
25 -<br />
TallyMan can control the router.<br />
V3.0 Oct 09 25 <strong>Router</strong>s
Appendix 1<br />
TallyMan <strong>Router</strong> support as at July 2008<br />
Protocol Control Alphanumeric<br />
BTS ASCII Yes No<br />
GVG Native Yes From <strong>Router</strong><br />
BTS ESSwitch Yes From <strong>Router</strong><br />
Kramer Yes No<br />
Leitch Yes No<br />
Nevion Yes No<br />
NVision Yes From <strong>Router</strong><br />
Pesa Yes From <strong>Router</strong><br />
Quartz Yes From <strong>Router</strong><br />
SBUS (ROT16) Yes From <strong>Router</strong><br />
Sigma Yes No<br />
Sony Yes No<br />
SWP02 Yes No<br />
SWP08 Yes From <strong>Router</strong><br />
Talia Yes No<br />
VikinX Yes No<br />
V3.0 Oct 09 26 <strong>Router</strong>s