JSP - Custom Tags - Tutorials Point
JSP - Custom Tags - Tutorials Point
JSP - Custom Tags - Tutorials Point
You also want an ePaper? Increase the reach of your titles
YUMPU automatically turns print PDFs into web optimized ePapers that Google loves.
<strong>JSP</strong> - CUSTOM TAGS<br />
http://www.tuto rialspo int.co m/jsp/jsp_custo m_tag s.htm<br />
Copyrig ht © tutorialspoint.com<br />
A custom tag is a user-defined <strong>JSP</strong> lang uag e element. When a <strong>JSP</strong> pag e containing a custom tag is translated<br />
into a servlet, the tag is converted to operations on an object called a tag handler. The Web container then<br />
invokes those operations when the <strong>JSP</strong> pag e's servlet is executed.<br />
<strong>JSP</strong> tag extensions let you create new tag s that you can insert directly into a JavaServer Pag e just as you would<br />
the built-in tag s you learned about in earlier chapter. The <strong>JSP</strong> 2.0 specification introduced Simple Tag Handlers<br />
for writing these custom tag s.<br />
To write a customer tab you can simply extend SimpleTag Support class and override the doTag () method,<br />
where you can place your code to g enerate content for the tag .<br />
Create "Hello" Tag :<br />
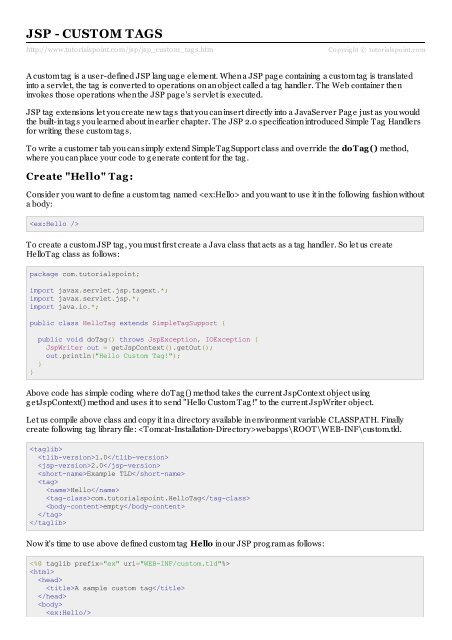
Consider you want to define a custom tag named and you want to use it in the following fashion without<br />
a body:<br />
<br />
To create a custom <strong>JSP</strong> tag , you must first create a Java class that acts as a tag handler. So let us create<br />
HelloTag class as follows:<br />
package com.tutorialspoint;<br />
import javax.servlet.jsp.tagext.*;<br />
import javax.servlet.jsp.*;<br />
import java.io.*;<br />
public class HelloTag extends SimpleTagSupport {<br />
}<br />
public void doTag() throws JspException, IOException {<br />
JspWriter out = getJspContext().getOut();<br />
out.println("Hello <strong>Custom</strong> Tag!");<br />
}<br />
Above code has simple coding where doTag () method takes the current JspContext object using<br />
g etJspContext() method and uses it to send "Hello <strong>Custom</strong> Tag !" to the current JspWriter object.<br />
Let us compile above class and copy it in a directory available in environment variable CLASSPATH. Finally<br />
create following tag library file: webapps\ROOT\WEB-INF\custom.tld.<br />
<br />
1.0<br />
2.0<br />
Example TLD<br />
<br />
Hello<br />
com.tutorialspoint.HelloTag<br />
empty<br />
<br />
<br />
Now it's time to use above defined custom tag Hello in our <strong>JSP</strong> prog ram as follows:<br />
<br />
<br />
<br />
A sample custom tag<br />
<br />
<br />
<br />
Try to call above <strong>JSP</strong> and this should produce following result:<br />
Hello <strong>Custom</strong> Tag!<br />
Accessing the Tag Body:<br />
You can include a messag e in the body of the tag as you have seen with standard tag s. Consider you want to<br />
define a custom tag named and you want to use it in the following fashion with a body:<br />
<br />
This is message body<br />
<br />
Let us make following chang es in above our tag code to process the body of the tag :<br />
package com.tutorialspoint;<br />
import javax.servlet.jsp.tagext.*;<br />
import javax.servlet.jsp.*;<br />
import java.io.*;<br />
public class HelloTag extends SimpleTagSupport {<br />
}<br />
StringWriter sw = new StringWriter();<br />
public void doTag()<br />
throws JspException, IOException<br />
{<br />
getJspBody().invoke(sw);<br />
getJspContext().getOut().println(sw.toString());<br />
}<br />
In this case, the output resulting from the invocation is first captured into a String Writer before being written to<br />
the JspWriter associated with the tag . Now according ly we need to chang e TLD file as follows:<br />
<br />
1.0<br />
2.0<br />
Example TLD with Body<br />
<br />
Hello<br />
com.tutorialspoint.HelloTag<br />
scriptless<br />
<br />
<br />
Now let us call above tag with proper body as follows:<br />
<br />
<br />
<br />
A sample custom tag<br />
<br />
<br />
<br />
This is message body<br />
<br />
<br />
<br />
This will produce following result:
This is message body<br />
<strong>Custom</strong> Tag Attributes:<br />
You can use various attributes along with your custom tag s. To accept an attribute value, a custom tag class<br />
needs to implement setter methods, identical to JavaBean setter methods as shown below:<br />
package com.tutorialspoint;<br />
import javax.servlet.jsp.tagext.*;<br />
import javax.servlet.jsp.*;<br />
import java.io.*;<br />
public class HelloTag extends SimpleTagSupport {<br />
}<br />
private String message;<br />
public void setMessage(String msg) {<br />
this.message = msg;<br />
}<br />
StringWriter sw = new StringWriter();<br />
public void doTag()<br />
throws JspException, IOException<br />
{<br />
if (message != null) {<br />
/* Use message from attribute */<br />
JspWriter out = getJspContext().getOut();<br />
out.println( message );<br />
}<br />
else {<br />
/* use message from the body */<br />
getJspBody().invoke(sw);<br />
getJspContext().getOut().println(sw.toString());<br />
}<br />
}<br />
The attribute's name is "messag e", so the setter method is setMessag e(). Now let us add this attribute in TLD<br />
file using element as follows:<br />
<br />
1.0<br />
2.0<br />
Example TLD with Body<br />
<br />
Hello<br />
com.tutorialspoint.HelloTag<br />
scriptless<br />
<br />
message<br />
<br />
<br />
<br />
Now let us try following <strong>JSP</strong> with messag e attribute as follows:<br />
<br />
<br />
<br />
A sample custom tag<br />
<br />
<br />
<br />
<br />
This will produce following result:<br />
This is custom tag<br />
Hope above example makes sense for you. It would be worth to note that you can include following properties<br />
for an attribute:<br />
Property<br />
name<br />
required<br />
rtexprvalue<br />
type<br />
description<br />
frag ment<br />
Purpose<br />
The name element defines the name of an attribute. Each attribute name<br />
must be unique for a particular tag .<br />
This specifies if this attribute is required or optional. It would be false for<br />
optional.<br />
Declares if a runtime expression value for a tag attribute is valid<br />
Defines the Java class-type of this attribute. By default it is assumed as<br />
String<br />
Informational description can be provided.<br />
Declares if this attribute value should be treated as a JspFrag ment.<br />
Following is the example to specify properties related to an attribute:<br />
.....<br />
<br />
attribute_name<br />
false<br />
java.util.Date<br />
false<br />
<br />
.....<br />
If you are using two attributes then you can modify your TLD as follows:<br />
.....<br />
<br />
attribute_name1<br />
false<br />
java.util.Boolean<br />
false<br />
<br />
<br />
attribute_name2<br />
true<br />
java.util.Date<br />
<br />
.....


