Atlas DVR 1055 Manual - Mediacom
Atlas DVR 1055 Manual - Mediacom
Atlas DVR 1055 Manual - Mediacom

You also want an ePaper? Increase the reach of your titles
YUMPU automatically turns print PDFs into web optimized ePapers that Google loves.
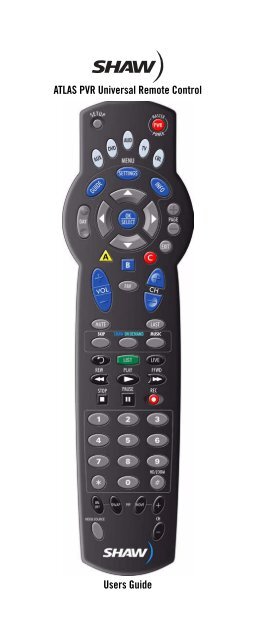
ATLAS PVR Universal Remote Control<br />
Users Guide
TABLE OF CONTENTS<br />
Introduction . . . . . . . . . . . . . . . . . . . . . . . . . . . . . . . . . . . . . . . . . . . . 3<br />
Features and Functions . . . . . . . . . . . . . . . . . . . . . . . . . . . . . . . . . . . 4<br />
Key Charts. . . . . . . . . . . . . . . . . . . . . . . . . . . . . . . . . . . . . . . . . 5<br />
Device Table . . . . . . . . . . . . . . . . . . . . . . . . . . . . . . . . . . . . . . . 7<br />
Installing Batteries . . . . . . . . . . . . . . . . . . . . . . . . . . . . . . . . . . . . . . . 8<br />
Programming Device Control . . . . . . . . . . . . . . . . . . . . . . . . . . . . . . . 8<br />
Programming TV/VCR Combo Control . . . . . . . . . . . . . . . . . . . . . . . 10<br />
Searching for Your Code . . . . . . . . . . . . . . . . . . . . . . . . . . . . . . . . . 11<br />
Checking the Codes . . . . . . . . . . . . . . . . . . . . . . . . . . . . . . . . . . . . . 12<br />
Using Learning . . . . . . . . . . . . . . . . . . . . . . . . . . . . . . . . . . . . . . . . . 12<br />
Learning Precautions . . . . . . . . . . . . . . . . . . . . . . . . . . . . . . . 12<br />
Programming a Learned Key . . . . . . . . . . . . . . . . . . . . . . . . . 13<br />
Deleting a Single Learning Key. . . . . . . . . . . . . . . . . . . . . . . . 14<br />
Deleting All Learned Keys in a Specific Mode . . . . . . . . . . . . 14<br />
Programming Channel Control Lock . . . . . . . . . . . . . . . . . . . . . . . . 15<br />
Unlocking Channel Control. . . . . . . . . . . . . . . . . . . . . . . . . . . 15<br />
Locking Channel Control to CBL. . . . . . . . . . . . . . . . . . . . . . . 16<br />
Changing Volume Lock . . . . . . . . . . . . . . . . . . . . . . . . . . . . . . . . . . . 16<br />
Unlocking Volume Control for a Single Device (Individual<br />
Volume Unlock) . . . . . . . . . . . . . . . . . . . . . . . . . . . . . . . . . 16<br />
Unlocking All Volume Control (Global Volume Unlock) . . . . . 17<br />
Locking Volume Control To One Mode (Global Volume Lock) 17<br />
Programming ID Lock. . . . . . . . . . . . . . . . . . . . . . . . . . . . . . . . . . . . 18<br />
Using the Master Power Key. . . . . . . . . . . . . . . . . . . . . . . . . . . . . . . 18<br />
Programming the Master Power Key . . . . . . . . . . . . . . . . . . . 19<br />
Using the Master Power Key. . . . . . . . . . . . . . . . . . . . . . . . . . 19<br />
Clearing the Master Power Key . . . . . . . . . . . . . . . . . . . . . . . 19<br />
Re-Assigning Device Keys. . . . . . . . . . . . . . . . . . . . . . . . . . . . . . . . . 20<br />
Clearing Custom Programming . . . . . . . . . . . . . . . . . . . . . . . . . . . . 21<br />
Troubleshooting . . . . . . . . . . . . . . . . . . . . . . . . . . . . . . . . . . . . . . . . 21<br />
FCC Notice . . . . . . . . . . . . . . . . . . . . . . . . . . . . . . . . . . . . . . . . . . . . 22<br />
Additional Information . . . . . . . . . . . . . . . . . . . . . . . . . . . . . . . . . . . 23<br />
Manufacturer’s Codes . . . . . . . . . . . . . . . . . . . . . . . . . . . . . . . . . . . 24<br />
Setup Codes for Audio Amplifiers. . . . . . . . . . . . . . . . . . . . . . 24<br />
Setup Codes for Audio Amp/Tuners . . . . . . . . . . . . . . . . . . . . 25<br />
Setup Codes for Miscellaneous Audio . . . . . . . . . . . . . . . . . . 28<br />
Setup Codes for Cable Boxes/Converters . . . . . . . . . . . . . . . 28<br />
Setup Codes for DVD Players . . . . . . . . . . . . . . . . . . . . . . . . . 29<br />
Setup Codes for PVRs. . . . . . . . . . . . . . . . . . . . . . . . . . . . . . . 32<br />
Setup Codes for Satellite Receivers . . . . . . . . . . . . . . . . . . . 33<br />
Setup Codes for TVs . . . . . . . . . . . . . . . . . . . . . . . . . . . . . . . . 34<br />
Setup Codes for VCRs. . . . . . . . . . . . . . . . . . . . . . . . . . . . . . . 39<br />
Setup Codes for Video Accessories . . . . . . . . . . . . . . . . . . . . 43<br />
2
INTRODUCTION<br />
The <strong>Atlas</strong> PVR Universal Remote Control by Universal<br />
Electronics is our latest generation universal remote<br />
control. Its sophisticated technology allows you to<br />
consolidate up to five of your original home<br />
entertainment remote controls into one easy-to-use<br />
product. Moreover, its packed with advanced features<br />
such as:<br />
• Preprogrammed control to operate the cable<br />
converter supplied by your cable service provider<br />
Dedicated keys to control popular functions on your<br />
<strong>DVR</strong>/PVR (Digital/Personal Video Recorder)<br />
Programmable Master Power key for master on/off<br />
control of your home entertainment equipment with<br />
a single keystroke<br />
Channel Lock to lock channel selection only to the<br />
cable converter<br />
Volume Lock to lock volume controls to one mode or<br />
individual modes<br />
Device Key Re-Assignment to remotely control a<br />
second (duplicate) device<br />
Code Search to help program control of older or<br />
discontinued components<br />
Color-coded keys to quickly locate popular<br />
functions<br />
Code library for popular video and audio devices<br />
Before using the product, you will need to install the<br />
enclosed batteries and also perform some programming<br />
to operate the specific home entertainment devices you<br />
wish to control.<br />
Please follow the instructions detailed in this manual to<br />
set up the unit and then start enjoying your new remote<br />
control and cable service.<br />
3
FEATURES AND FUNCTIONS<br />
Use the illustration below to locate features on the <strong>Atlas</strong><br />
PVR Universal Remote Control and then study the Key<br />
Charts (on the next three pages) to learn how they<br />
function.<br />
To find out what type of devices can be controlled by<br />
each device key after programming, see “Device Table”<br />
on page 7.<br />
4
Key Charts<br />
Key Function<br />
Use SETUP for all programming<br />
sequences.<br />
Press PWR once to turn on or off a home<br />
entertainment device. For MASTER<br />
POWER control, see “Using the Master<br />
Power Key” on page 18.<br />
Press AUX, DVD, AUD, TV, or CBL once to<br />
select a home entertainment device to<br />
control. Also see “Device Table” on<br />
page 7.<br />
Each device key has an embedded LED<br />
(red light) that blinks upon selection<br />
and indicates the remote control is<br />
working and (after programming) is<br />
sending signals.<br />
Use GUIDE to display the program<br />
guide.<br />
Press MENU/SETTINGS once to display<br />
available menu options.<br />
Use INFO to display the current channel<br />
and program information.<br />
Use DAY+ (or DAY-) to move a day<br />
forward (or back) on your cable<br />
converter’s program guide.<br />
Use the Cursor keys to move the cursor<br />
in the program guide and menu screens<br />
and to navigate within the interactive<br />
service.<br />
Use OK/SELECT to choose options, PPV<br />
events, and to tune programs from the<br />
program guide.<br />
Use PAGE+ (or PAGE-) to page up (or<br />
page down) through menu screens and<br />
the program guide.<br />
Use EXIT to exit out of your cable<br />
converters menu and guide.<br />
Use A, B, or C to access additional cable<br />
features (future functionality).<br />
Use VOL+ (or VOL-) to raise (or lower)<br />
the audio volume.<br />
Use FAV to cycle through your favorite<br />
channels stored in the program guide.<br />
5
Key Function<br />
Use CH+ (or CH-) to select the next<br />
higher (or lower) channel.<br />
For DVD players, use these keys to skip<br />
forward (or reverse) through chapters.<br />
For amplifiers/receivers, use these keys<br />
to select the next higher (or lower)<br />
preset station.<br />
Press MUTE once to turn the sound off<br />
or on.<br />
Press LAST once to recall the last<br />
channel.<br />
Press SKIP to skip forward in<br />
predetermined increments.<br />
Press SHAWONDEMAND to access Shaw<br />
Video On Demand VOD services.<br />
Press MUSIC to access the available<br />
Digital Music services.<br />
Use to command your PVR to<br />
instantly replay the last 15 seconds of a<br />
program you are watching.<br />
Press LIST once to display a list of<br />
recorded shows on your PVR.<br />
Press LIVE to return to watching live TV.<br />
In all modes except CBL, use REW, PLAY,<br />
FFWD, STOP, and PAUSE to control a<br />
VCR, DVD player, or a PVR (after<br />
selecting a desired device). To record in<br />
the VCR mode, press REC twice.<br />
In the CBL mode, use these keys to<br />
control the <strong>DVR</strong>/PVR functions of the<br />
set-top box.<br />
Use the keypad numbers (1-9, and 0) to<br />
directly tune channels (e.g., 009).<br />
For amplifiers/receivers, use the keypad<br />
numbers to select inputs 1 through 10.<br />
Press HD/ZOOM once to change the aspect<br />
ratio of the show you are watching. (Not<br />
available on all set-top boxes).<br />
6
Key Function<br />
Use PIP ON-OFF to switch the Picture-<br />
In-Picture feature on or off (if available<br />
on your TV or cable service).<br />
Use PIP SWAP to switch images and<br />
sound between the main and window<br />
pictures, or to swap tuners on dualtuner<br />
PVRs.<br />
Use PIP MOVE to move the window picture<br />
to different positions in the main picture.<br />
Use PIP CH+ (or CH-) to select the next<br />
higher (or lower) PIP channel.<br />
In the CBL mode, use VIDEO SOURCE to<br />
view other video sources (A or B)<br />
instead of cable.<br />
In all other modes, use VIDEO SOURCE<br />
to watch TV or video programs on a<br />
desired device.<br />
For amplifiers/receivers, use VIDEO<br />
SOURCE to select an input source.<br />
Device Table<br />
NOTE: Please refer to the table below when<br />
performing the instructions in<br />
“Programming Device Control” on page 8 or<br />
“Programming TV/VCR Combo Control” on<br />
page 10.<br />
After programming, the<strong>Atlas</strong> PVR Universal Remote<br />
Control will be able to control the following types of<br />
devices:<br />
Device Key Controls these types of devices<br />
VCR, TV/VCR Combo, PVR (Personal<br />
Video Recorder), or extra PVR Player<br />
DVD Player<br />
Audio Amplifier, Tuner, or Receiver<br />
Television<br />
Cable Box (Converter) or Satellite<br />
Receiver, including PVR and VOD<br />
controls<br />
7
INSTALLING BATTERIES<br />
1. On the back of the remote control, push the<br />
tab and lift off the battery cover.<br />
2. Locate the two (2) enclosed AA batteries.<br />
Match the + and - marks with those in the<br />
battery case, then insert them.<br />
3. Align the cover’s keys with the case’s holes and<br />
press the cover back into place. The tab should<br />
click when the cover is locked.<br />
4. Test the remote control by pressing any mode<br />
key (e.g., TV). If the batteries are inserted<br />
correctly, the LED (red light) will blink once.<br />
NOTE: When batteries need replacement, the remote<br />
control will cease to operate. Replace the<br />
batteries and the unit will be restored to its<br />
full functionality, complete with your favorite<br />
settings.<br />
PROGRAMMING DEVICE CONTROL<br />
The <strong>Atlas</strong> PVR Universal Remote Control is<br />
preprogrammed to operate the cable box (converter)<br />
provided by your cable system, an RCA TV, a Toshiba<br />
DVD player, an RCA VCR (as an AUX device), and a<br />
Pioneer audio receiver. To control devices other than the<br />
default brands, perform the following steps; otherwise<br />
skip this section.<br />
8<br />
❶<br />
❷<br />
❸
NOTES: For TV/VCR Combo control, skip this section<br />
and perform the instructions on “Programming<br />
TV/VCR Combo Control” on page 10.<br />
Also refer to “Device Table” on page 7 to find<br />
out which devices can be programmed onto<br />
each device key.<br />
If you have another brand of cable converter<br />
or a satellite receiver you would like to control,<br />
you’ll need to unlock the cable ID Lock before<br />
changing the converter code (see “Programming<br />
ID Lock” on page 18).<br />
1. Turn on a device and, if applicable, insert<br />
video media, (e.g., cassette or disc).<br />
NOTE: Please read steps 2 through 4 completely<br />
before proceeding. Highlight or write down<br />
the codes and device you wish to program<br />
before moving on to step 2.<br />
2. On the remote control, press a device key once<br />
(i.e., AUX, DVD, AUD, TV, or CBL); it will blink<br />
once. Then press and hold SETUP until the<br />
selected mode key blinks twice.<br />
3. Use the “Manufacturer’s Codes” starting on<br />
page 24) to locate the type of device and<br />
brand name and then enter the first four-digit<br />
code for your device. If performed correctly,<br />
the selected mode key will blink twice.<br />
NOTE: If the selected mode key emits a long blink,<br />
the entry is invalid. Repeat steps 2 through 3<br />
and try entering the same code again.<br />
4. Aim the remote control at the device and<br />
press PWR once. The device should turn off. If<br />
it does not, repeat steps 2 through 3, trying<br />
each code for your brand until you find one<br />
that works. If it still does not respond, try<br />
searching for the code (see “Searching for<br />
Your Code” on page 11).<br />
NOTE: If the device does not have a PWR key, press<br />
the�(Play) key.<br />
5. Repeat steps 1 through 4 for each device you<br />
want the remote control to operate. For future<br />
reference, write down each working device<br />
code in the boxes on the following page.<br />
AUX Code<br />
Device Type:___________________<br />
9
DVD Code<br />
Device Type:___________________<br />
AUD Code<br />
Device Type:___________________<br />
CBL Code<br />
Device Type:___________________<br />
TV Code<br />
Device Type:___________________<br />
PROGRAMMING TV/VCR COMBO CONTROL<br />
If you own a TV/VCR Combo, perform the following<br />
instructions to control this device:<br />
1. Turn on your TV/VCR Combo and insert a<br />
video cassette.<br />
2. On the remote control, press AUX once; it will<br />
blink once. Then press and hold SETUP until<br />
the AUX key blinks twice.<br />
3. Use the “Manufacturer’s Codes” starting on<br />
page 24 to locate the brand name and enter<br />
the first four-digit code for your TV/VCR<br />
Combo. If you perform this procedure<br />
correctly, the AUX key will blink twice.<br />
NOTE: If the AUX key did not blink twice after entering<br />
the codes last digit, repeat steps 2 through<br />
3 and try entering the same code again.<br />
If you’ve located a TV/VCR setup code that<br />
works for your TV/VCR Combo and a separate<br />
TV code is also listed, you’ll need to program<br />
this code into the remote control to access volume<br />
control (see “Programming Device Control”<br />
starting on page 8).<br />
10
4. Aim the remote control at your TV/VCR<br />
Combo and press PWR once. The device<br />
should turn off. If it does not respond, repeat<br />
steps 2 through 3, trying each code listed for<br />
your brand until you find one that works. If it<br />
still does not respond, try searching for the<br />
code (“Searching for Your Code” starting on<br />
page 11).<br />
5. For future reference, write down each working<br />
device code in the boxes below:<br />
TV/VCR Code<br />
TV Code (if used)<br />
SEARCHING FOR YOUR CODE<br />
If your home entertainment device does not respond to<br />
the<strong>Atlas</strong> PVR Universal Remote Control after trying all<br />
of the codes listed for your brand, or if your brand is not<br />
listed at all, try searching for your code.<br />
For example, to search for a code for your TV:<br />
1. Turn on your TV.<br />
2. On the remote control, press TV once; it will<br />
blink once. Then press and hold SETUP until<br />
the TV key blinks twice.<br />
3. Enter 9 9 1. The TV key will blink twice.<br />
4. Aim the remote control at the TV and press<br />
PWR once.<br />
5. Press CH+ one or more times and stop when<br />
the TV turns off.<br />
NOTE: In the search mode, the remote control will<br />
send IR codes from its library to the selected<br />
device, starting with the most popular code<br />
first.<br />
6. Press SETUP once to lock in the code. The TV<br />
key will blink twice.<br />
11
7. To search for the codes of your other devices,<br />
repeat steps 1 through 5, but substitute the<br />
appropriate key (e.g., AUX, DVD, AUD, or CBL)<br />
for the device you are searching for.<br />
CHECKING THE CODES<br />
If you have set up the<strong>Atlas</strong> PVR Universal Remote<br />
Control by searching for your device code (on the<br />
previous page), you may need to find out which fourdigit<br />
code is operating your equipment.<br />
For example, to find out which code is operating your TV:<br />
1. On the remote control, press TV once; it will<br />
blink once. Then press and hold SETUP until<br />
the TV key blinks twice.<br />
2. Enter 9 9 0. The TV key will blink twice.<br />
3. To view the code for the first digit, press 1<br />
once. Count the number of times the TV key<br />
blinks (e.g., 3 blinks = 3) and write down the<br />
number in the leftmost TV Code box on<br />
page 10.<br />
NOTE: If a code digit is 0, the selected mode key will<br />
not blink.<br />
4. Repeat step 3 three more times for the<br />
remaining digits. Use 2 for the second digit, 3<br />
for the third digit, and 4 for the fourth digit.<br />
Finish writing down the code in the TV Code<br />
boxes on page 10.<br />
5. To check for other device codes, repeat steps 1<br />
through 4, but substitute the appropriate key<br />
(e.g., AUX, DVD, AUD, or CBL) for the device<br />
you are checking. Write down the codes in the<br />
appropriate boxes on page 10.<br />
USING LEARNING<br />
The <strong>Atlas</strong> PVR Universal Remote Control includes a<br />
Learning feature so you can add functions that are<br />
unique to your home entertainment devices (e.g.,VCR<br />
Tracking Up or Down). However, there are some<br />
considerations.<br />
Learning Precautions<br />
Your original remote controls must be in working<br />
order for learning to work properly.<br />
12
Learned keys are mode-specific, so each one can<br />
store a unique function for each mode.<br />
Do not use the following keys for learning: Device<br />
Keys, SETUP, Record (•), Tune-In Keys.<br />
Learning capacity is approximately 16 to 25 keys,<br />
depending on the code being learned.<br />
Certain device functions are not learnable including<br />
multi-frequency types, some high frequency ones,<br />
and other unusual formats.<br />
For optimum learning, avoid high levels of ambient<br />
light such as natural sunlight or energy-efficient<br />
fluorescent lights.<br />
NOTE: Please have your original remote controls<br />
handy before programming learning.<br />
Programming a Learned Key<br />
NOTE: If more than 15 seconds pass between key<br />
presses, the remote exits programming.<br />
1. Press and hold SETUP until the last-selected<br />
mode key blinks twice, then press 9 7 5.<br />
NOTE: If the LED displays one long flash instead,<br />
either your batteries are low, or the <strong>Atlas</strong> PVR<br />
Universal Remote Control has a memory fault.<br />
In either case, the remote will not learn a new<br />
key. See “Additional Information” on page 23.<br />
2. Press a mode key once (i.e., AUX, DVD, AUD,<br />
TV, or CBL) to assign a mode for learning, then<br />
the key that will learn the new code.<br />
3. Place the <strong>Atlas</strong> PVR Universal Remote Control<br />
head-to-head (about 2" apart) from your<br />
original remote control. Also locate the key<br />
(on your original remote control) that you<br />
want the <strong>Atlas</strong> PVR Universal Remote Control<br />
to learn.<br />
4. On the original remote, press and hold the key<br />
to be learned. The <strong>Atlas</strong> PVR Universal<br />
Remote Control’s LED will blink rapidly, then<br />
13<br />
2"
turn off. Continue holding the key on the<br />
original remote until the <strong>Atlas</strong> PVR Universal<br />
Remote Control’s LED blinks twice.<br />
NOTE: If the LED displays one long blink, a learning<br />
error has occurred. Try repeating this step<br />
again until a successful capture occurs. If the<br />
function is still not captured, press and hold<br />
SETUP to exit programming and review the<br />
“Learning Precautions” on the previous page.<br />
If needed, also see “Troubleshooting” on<br />
page 21. After review, start programming<br />
again at step 1.<br />
5. Repeat steps 2 through 4 for another mode<br />
and/or key or press and hold SETUP to exit<br />
programming.<br />
Deleting a Single Learning Key<br />
This process returns the key to its original programming<br />
for the mode you select. You can also delete learned<br />
programming by teaching a different function to the key<br />
(see “Programming a Learned Key” on page 13)<br />
NOTE: If more than 15 seconds pass between key<br />
presses, the remote exits programming.<br />
1. Press and hold SETUP until the last-selected<br />
mode key blinks twice, then press 9 7 6.<br />
2. Press a mode key once (i.e., AUX, DVD, AUD,<br />
TV, or CBL).<br />
3. Press the key containing the learned function<br />
to be deleted twice. The remote will blink<br />
twice.<br />
4. Repeat steps 2 through 3 for another key or<br />
press and hold SETUP to exit programming.<br />
Deleting All Learned Keys in a Specific Mode<br />
NOTE: If more than 15 seconds pass between key<br />
presses, the remote exits programming.<br />
1. Press and hold SETUP until the last-selected<br />
mode key blinks twice, then press 9 7 6.<br />
14
2. Press a mode key twice (i.e., AUX, DVD, AUD,<br />
TV, or CBL) to clear all the learned keys for<br />
that mode. The LED blinks twice.<br />
3. Repeat step 2 for another mode or press and<br />
hold SETUP to exit programming.<br />
PROGRAMMING CHANNEL CONTROL LOCK<br />
By default, the remote control’s channel-control<br />
capabilities are locked to the cable converter. The<br />
affected keys * are 1 through 0, CH+, CH-, ENTER, and<br />
LAST. This will guarantee that you do not inadvertently<br />
change a channel on your TV or VCR. However, you can<br />
de-activate this feature to allow full access to these keys<br />
in the TV and VCR modes.<br />
*NOTE: This feature does not affect the AUD mode.<br />
Unlocking Channel Control<br />
1. On the remote control, press CBL once; it will<br />
blink once. Press and hold SETUP until the<br />
CBL key blinks twice.<br />
2. Enter 9 7 3. The CBL key will blink twice.<br />
3. Press CH- once. The CBL key will blink four<br />
times.<br />
Now the remote control will provide TV and VCR<br />
channel-control capabilities while in the TV or VCR<br />
mode.<br />
15
Locking Channel Control to CBL<br />
1. On the remote control, press CBL once; it will<br />
blink once. Press and hold SETUP until the<br />
CBL key blinks twice.<br />
2. Enter 9 7 3.The CBL key will blink twice.<br />
3. Press CH+ once. The CBL key will blink twice.<br />
Now, regardless of what mode you select (except AUD),<br />
the channel keys will only change channels on your cable<br />
converter.<br />
CHANGING VOLUME LOCK<br />
Volume Lock allows you to control the volume through<br />
the device identified as having your primary speaker(s),<br />
regardless of which mode you are using. On the<strong>Atlas</strong><br />
PVR Universal Remote Control, Global Volume Lock is<br />
set to TV, so you can control TV volume while in the AUX,<br />
DVD, TV or CBL mode. You can perform Individual<br />
Volume Unlock on a selected device to set its volume<br />
control for independent operation.<br />
NOTE: The audio mode’s (AUD) volume controls are<br />
active regardless of Volume Lock settings.<br />
However, if you lock the volume controls to<br />
the AUD mode, you will have control of the<br />
audio device’s volume in all other modes (i.e.,<br />
AUX, DVD, TV, and CBL). This can be an advantage<br />
if, for example, you always listen to home<br />
entertainment devices through your receiver’s<br />
speakers.<br />
Unlocking Volume Control for a Single Device<br />
(Individual Volume Unlock)<br />
1. Assuming Global Volume Lock is active, select<br />
a mode on the remote control that you want to<br />
unlock (e.g., CBL) and press it once. Next,<br />
press and hold SETUP until the device key<br />
blinks twice.<br />
2. Enter 9 9 3. The last-selected device key will<br />
blink twice.<br />
16
3. Press VOL- once. The last-selected device key<br />
will blink four times.<br />
4. Repeat steps 1 through 3 for each device you<br />
want volume to be unlocked.<br />
Now, after you select a device that has volume unlocked<br />
(e.g., CBL), pressing VOL+, VOL-,or MUTE, will control<br />
only that device’s volume.<br />
Unlocking All Volume Control (Global Volume Unlock)<br />
NOTE: Performing these instructions will set independent<br />
volume control for all programmed<br />
devices.<br />
1. On the remote control, press and hold SETUP<br />
until the last-selected device key blinks twice.<br />
2. Enter 9 9 3. The last-selected device key will<br />
blink twice.<br />
3. Press VOL+ once. The last-selected device key<br />
will blink four times.<br />
Locking Volume Control To One Mode (Global<br />
Volume Lock)<br />
NOTE: The audio mode’s volume controls are active<br />
regardless of Volume Lock settings. However,<br />
if you lock the volume controls to the AUD<br />
mode, you will control the audio device’s volume<br />
in all other modes (i.e., AUX, DVD, TV, or<br />
CBL). This can be an advantage if, for example,<br />
you always listen to home entertainment<br />
devices through your receiver’s speakers.<br />
1. On the remote control, press and hold SETUP<br />
until the last-selected device key blinks twice.<br />
2. Enter 9 9 3. The last-selected device key will<br />
blink twice.<br />
3. Select a mode (e.g., TV or AUD) which you<br />
want to use to control the volume. The<br />
selected device key will blink twice.<br />
Now, when you press VOL+, VOL-,or MUTE, the volume of<br />
the selected device (e.g., TV) is controlled regardless of<br />
mode.<br />
17
PROGRAMMING ID LOCK<br />
The<strong>Atlas</strong> PVR Universal Remote Control is locked at the<br />
factory to operate a Motorola Digital Cable Terminal<br />
(DCT). However, if you have another brand or model of<br />
cable converter or satellite service that you would like to<br />
control, then you’ll need to perform the following steps<br />
to unlock the ID Lock, enter a new manufacturer’s code,<br />
and lock the ID Lock again.<br />
1. Turn on the cable converter.<br />
2. On the remote control, press CBL once; it will<br />
blink once. Then press and hold SETUP until<br />
the CBL key blinks twice.<br />
3. Enter 9 8 2. The CBL key will blink four<br />
times, indicating ID Lock is unlocked.<br />
4. Perform the instructions under<br />
“Programming Device Control” on page 8 to<br />
program device control for the desired cable<br />
converter or satellite receiver.<br />
When you are done, perform steps 5 and 6 on<br />
this page to again lock the ID Lock.<br />
5. On the remote control, press CBL once; it will<br />
blink once. Then press and hold SETUP until<br />
the CBL key blinks twice.<br />
6. Enter 9 8 2. The CBL key will blink twice,<br />
indicating ID Lock is again locked.<br />
USING THE MASTER POWER KEY<br />
The <strong>Atlas</strong> PVR Universal Remote Control has a unique<br />
feature that allows you to sequentially turn up to five of<br />
your home entertainment devices on or off with a single<br />
key press.<br />
NOTE: MASTER POWER (PWR) only works in the CBL<br />
mode. If it is not programmed, only the cable<br />
converter will turn on or off. In any other<br />
mode, pressing MASTER POWER (PWR) once<br />
will turn the selected device on or off.<br />
18
Programming the Master Power Key<br />
1. On the remote control, press and hold SETUP<br />
until the last-selected device key blinks twice.<br />
2. Enter 9 9 5. The last-selected device key<br />
blinks twice.<br />
3. Press PWR once.<br />
4. For the first device you want in the power on<br />
sequence, press a device key (e.g., CBL) once.<br />
Then press PWR once.<br />
5. Repeat step 4 up to four more times to add the<br />
second, third, fourth, and fifth device, as<br />
desired.<br />
6. To save the settings and exit the program:<br />
a. Press CBL once.<br />
b. Press and hold SETUP until the CBL key blinks<br />
twice.<br />
Using the Master Power Key<br />
1. After programming, point the remote control<br />
at the devices. Press CBL once.<br />
2. Press PWR once to sequentially turn the<br />
programmed home entertainment devices on<br />
or off.<br />
You will see the devices turn on or off according to the<br />
programmed sequence.<br />
Clearing the Master Power Key<br />
1. On the remote control, press and hold SETUP<br />
until the last-selected device key blinks twice.<br />
2. Enter 9 9 5. The last-selected device key<br />
blinks twice.<br />
3. Press and release the MASTER POWER key.<br />
19
4. Press and hold SETUP until the CBL key blinks<br />
twice.<br />
RE-ASSIGNING DEVICE KEYS<br />
The <strong>Atlas</strong> PVR Universal Remote Control can be set up<br />
to control a second device of an already-assigned type.<br />
For example, to have the unit control a TV, a Cable<br />
Converter, and two DVD players, re-assign the unused<br />
AUX key to operate the second DVD Player as follows:<br />
NOTE: AUX is preset at the factory to control an RCA<br />
VCR. Performing the steps below will overwrite<br />
those settings.<br />
1. On the remote control, press AUX once; it will<br />
blink once. Then press and hold SETUP until<br />
the AUX key blinks twice.<br />
2. Enter 9 9 2. The AUX key will blink twice.<br />
3. Press DVD once, then press AUX once. The AUX<br />
key will blink twice.<br />
The AUX key is now ready to be programmed for your<br />
second DVD player. See “Programming Device Control”<br />
on page 8. To re-assign other device keys, repeat these<br />
and substitute the key sequence using the following<br />
chart:<br />
NOTE: Only one device can be assigned to an unused<br />
device key at a time.<br />
To Re-Assign Perform Key Sequence<br />
AUX as 2nd AUX�SETUP�9�9�2�AUD�AUX<br />
AUD key<br />
AUX as 2nd AUX�SETUP�9�9�2�TV�AUX<br />
TV key<br />
AUX as 2nd AUX�SETUP�9�9�2�CBL�AUX<br />
CBL key<br />
AUX back to AUX�SETUP�9�9�2�AUX�AUX<br />
AUX<br />
To re-assign another unused device key, substitute it for<br />
the AUX key above and then perform the sequence. For<br />
example, to re-assign an unused AUD key as a second<br />
20
DVD key, perform<br />
AUD�SETUP�9�9��DVD�AUD.<br />
When a re-assignment is done, the selected device key<br />
(e.g., AUD) will blink twice to confirm your choice. At<br />
that time, you will need to program device control (see<br />
“Programming Device Control” on page 8).<br />
CLEARING CUSTOM PROGRAMMING<br />
The <strong>Atlas</strong> PVR Universal Remote Control contains a<br />
Custom Programming Reset program. You can use it to<br />
remove all custom programming, except your setup<br />
codes and reassigned device keys.<br />
IMPORTANT: Executing this program will erase all custom<br />
settings for Volume Lock, Learned Keys,<br />
Tune-In Keys, and Channel Lock. However,<br />
your device programming remains.<br />
1. On the remote control, press and hold SETUP<br />
until the last-selected device key blinks twice.<br />
2. Enter 9 8 0. The last-selected device key<br />
blinks twice, pauses, and blinks twice again to<br />
confirm that all custom programming is<br />
cleared.<br />
TROUBLESHOOTING<br />
PROBLEM: Device key does not blink when you press a<br />
key.<br />
SOLUTION: Replace the batteries with two (2) new AA<br />
alkaline batteries (see “Installing Batteries” on page 8).<br />
PROBLEM: Device key blinks when you press a key, but<br />
home entertainment device does not respond.<br />
SOLUTION: Make sure you are aiming the remote control<br />
at your home entertainment device and that you are<br />
within 15 feet of the device you are trying to control.<br />
PROBLEM: The remote control does not control home<br />
entertainment devices or commands are not performing<br />
properly.<br />
SOLUTION: Try all listed codes for the device brand<br />
being set up. Make sure all devices can be operated with<br />
an infrared remote control.<br />
PROBLEM: TV/VCR Combo does not respond properly.<br />
SOLUTION: Use the VCR codes for your brand. Some<br />
combo units may require both a TV code and a VCR<br />
code for full operation (see page 10).<br />
PROBLEM: No volume on a second TV.<br />
SOLUTION: Follow instructions under “Changing<br />
Volume Lock” on page 16.<br />
21
PROBLEM: PLAY and STOP keys do not work on a<br />
Motorola DCT-2000 cable converter.<br />
SOLUTION: Re-program the CBL key for cable code 0476<br />
(see “Programming Device Control” on page 8).<br />
PROBLEM: Tried Search Method and still could not find<br />
a working code.<br />
SOLUTION: Try the Search Method again after clearing<br />
out the device key as follows:<br />
a. Press and hold SETUP until device key blinks twice.<br />
b. Enter 9 9 2.<br />
c. Press and release the device key to be cleared twice.<br />
PROBLEM: Remote control does not turn on Sony or<br />
Sharp TV/VCR Combo.<br />
SOLUTION: For power on, these products require<br />
programming TV codes on the remote control. For Sony,<br />
use TV code 0000 and VCR code 0032. For Sharp, use<br />
TV code 0093 and VCR code 0048.<br />
FCC NOTICE<br />
This equipment has been tested and found to comply<br />
with the limits for a class B digital device, pursuant to<br />
part 15 of the FCC Rules. These limits are designed to<br />
provide reasonable protection against harmful<br />
interference in a residential installation. This equipment<br />
generates, uses and can radiate radio frequency energy<br />
and if not installed and used in accordance with the<br />
instructions, may cause harmful interference to radio<br />
communications.<br />
However, there is no guarantee that interference will not<br />
occur in a particular installation. If this equipment does<br />
cause harmful interference to radio or television<br />
reception, which can be determined by turning the<br />
equipment off and on, the user is encouraged to try to<br />
correct the interference by one or more of the following<br />
measures:<br />
Reorient or relocate the receiving antenna.<br />
Increase the separation between the equipment and<br />
receiver.<br />
Connect the equipment into an outlet on a circuit<br />
different from that to which the receiver is<br />
connected.<br />
Consult the dealer or an experienced radio/TV<br />
technician for help.<br />
It is strongly recommended that the TV be plugged<br />
into a separate wall outlet.<br />
This equipment has been verified to comply with the<br />
limits for a class B computing device, pursuant to FCC<br />
Rules. In order to maintain compliance with FCC<br />
regulations, shielded cables must be used with this<br />
equipment. Operation with non-approved equipment or<br />
22
unshielded cables is likely to result in interference to<br />
radio and TV reception. The user is cautioned that<br />
changes and modifications made to the equipment<br />
without the approval of manufacturer could void the<br />
user’s authority to operate this equipment.<br />
ADDITIONAL INFORMATION<br />
This product does not have any user-serviceable parts.<br />
Opening the case, except for the battery cover, may<br />
cause permanent damage to your <strong>Atlas</strong> PVR Universal<br />
Remote Control.<br />
For help via the Internet, visit us at:<br />
www.urcsupport.com<br />
For information about Shaw services, visit us at:<br />
www.shaw.ca<br />
©Copyright 2005 by Universal Electronics Inc. No part<br />
of this publication may be reproduced, transmitted,<br />
transcribed, stored in any retrieval system, or translated<br />
to any language, in any form or by any means,<br />
electronic, mechanical, magnetic, optical, manual, or<br />
otherwise, without prior written permission of<br />
Universal Electronics Inc.<br />
M1<strong>1055</strong> FS 08/05<br />
23
MANUFACTURER’S CODES<br />
Setup Codes for Audio Amplifiers<br />
Accuphase 0382<br />
Acurus 0765<br />
Adcom 1100, 0577<br />
Aiwa 0406<br />
Amstrad 0078<br />
Aragon 0765<br />
Arcam 0269<br />
Audiolab 0269<br />
AudioSource 0011<br />
Biamp 0582<br />
Bose 0674<br />
Carver 0269<br />
Cinema Sound 0160<br />
Classe 1461, 1462<br />
Conrad 0011<br />
Curtis Mathes 0300<br />
Denon 0160<br />
Digital Audio Control 0085<br />
Durabrand 1561<br />
Elan 0647<br />
Forte 0606<br />
GE 0078<br />
Genexxa 0395<br />
GoldStar 0031<br />
Grundig 0269<br />
Harman/Kardon 0892, 0106<br />
JVC 0331<br />
Kenwood 0356<br />
Klipsch 0765<br />
Korsun 1483<br />
Left Coast 0892<br />
Lenoxx 1561<br />
Linn 0269<br />
Logitech 1408<br />
Luxman 0165<br />
Magnavox 0269<br />
Marantz 0892, 0321, 0269<br />
Mark Levinson 1483<br />
McIntosh 0251<br />
Memorex 0031<br />
Micromega 0269<br />
Mondial 0765<br />
Myryad 0269<br />
Nakamichi 0321<br />
NEC 0264<br />
Optimus 0395, 0300<br />
24
Panasonic 0308, 0521<br />
Parasound 0246<br />
Pass Labs 0269<br />
Philips 0892, 0269<br />
Pioneer 0300, 0013<br />
Polk Audio 0892, 0269<br />
RCA 0300<br />
Realistic 0395<br />
Revox 0269<br />
Sansui 0321<br />
Shure 0264<br />
Sony 0689, 0220, 0815<br />
Soundesign 0078, 0211<br />
Technics 0521, 0308<br />
SuperTech 0031<br />
Technics 0308, 0521<br />
Thorens 0269<br />
Victor 0331<br />
Wards 0078, 0013, 0211<br />
Yamaha 0354, 0143, 0133, 0504<br />
Setup Codes for Audio Amp/Tuners<br />
ADC 0531<br />
Adcom 0616<br />
Aiwa 1405, 0158, 0189, 0121, 0405, 1388, 1243,<br />
1641<br />
Akai 1255, 0224, 0076, 1512<br />
Alco 1390<br />
AMC 1077<br />
Amphion Media Works 1563<br />
AMW 1563<br />
Anam 1609, 1074<br />
Apex Digital 1430, 1257<br />
Arcam 1120<br />
Audiotronic 1189<br />
Audiovox 1390<br />
Bose 1229, 0639, 1253<br />
Cambridge Soundworks 1370<br />
Capetronic 0531<br />
Carver 1189, 0189, 0042, 0008, 0360<br />
Casio 0195<br />
Clarinette 0195<br />
Classic 1352<br />
Coby 1263, 1389<br />
Compaq 1136<br />
Criterion 1420<br />
Curtis Mathes 0080<br />
Daewoo 1250<br />
Dell 1383<br />
Denon 1360, 0004, 1142, 0771, 0273<br />
25
Emerson 0424<br />
Fisher 0042, 1801, 0360, 0219<br />
Garrard 0463, 0424<br />
Gateway 1517<br />
Glory Horse 1263<br />
Go Video 1532<br />
Harman/Kardon 0110, 0189, 0891<br />
Hewlett Packard 1181<br />
Hitachi 1273, 1801<br />
Initial 1426<br />
Inkel 0062<br />
Integra 1298, 0135<br />
JBL 0110, 1306<br />
JVC 0074, 1263, 1495, 1374<br />
Kenwood 1313, 1570, 1569, 0027, 0042, 0239, 0569,<br />
0186, 0314, 1052, 0077, 0313, 1051<br />
KLH 1390, 1428, 1412<br />
Koss 1366, 0424<br />
Lasonic 1798<br />
Lenoxx 1437<br />
Lexicon 1076<br />
LG 1293<br />
Linn 0189<br />
Liquid Video 1497<br />
Lloyd's 0195<br />
LXI 0181<br />
Magnavox 1189, 1269, 0189, 0531, 1514, 0128, 0391,<br />
0195<br />
Marantz 1189, 1269, 0039, 0189, 1289, 0128<br />
McIntosh 1289<br />
MCS 0039, 0346<br />
Micromega 1189<br />
Mitsubishi 1393<br />
Modulaire 0195<br />
Myryad 1189<br />
NAD 0320<br />
Nakamichi 0347, 0097, 1555<br />
NEC 0235<br />
Norcent 1389<br />
Onkyo 0135, 1298, 0842, 0380, 1531<br />
Optimus 1023, 1074, 0080, 0186, 0670, 0042, 0181,<br />
0531, 0801, 0177, 0219, 0738<br />
Oritron 1497, 1366<br />
Panasonic 1518, 0039, 0518, 1764, 0367, 1316, 1763,<br />
0309, 1288, 1548<br />
Penney 0195<br />
Philco 1390<br />
Philips 1189, 1269, 0189, 0391, 1266, 1120<br />
Pioneer 1023, 0080, 0531, 1384, 0014, 0244, 0150,<br />
0630<br />
26
Polaroid 1508<br />
Polk Audio 0189, 1289<br />
Proscan 1254<br />
Quasar 0039<br />
RadioShack 1263<br />
RCA 1023, 1609, 1254, 0054, 0360, 0346, 0531,<br />
1154, 1511, 0080, 0530, 1074, 1390<br />
Realistic 0163, 0195, 0181<br />
Regent 1437<br />
Rio 1869, 1383<br />
Saba 1519<br />
Samsung 1500, 1295<br />
Sansui 0189, 0346, 0193<br />
Sanyo 0219, 1469, 1251, 0801<br />
Scott 0163, 0322<br />
Sharp 1286, 0186<br />
Sharper Image 1556, 1263<br />
Sherwood 0062, 1077, 0502, 1653, 0491, 1423<br />
Shinsonic 1426<br />
Sonic Blue 1869, 1532, 1383<br />
Sony 1058, 1441, 1258, 1759, 0158, 1042, 1349,<br />
1442, 1758, 0474, 1658, 1858, 0168, 1406,<br />
1558<br />
Soundesign 0670<br />
Stereophonics 1023<br />
Sunfire 1313, 1052, 0314, 0313<br />
Teac 0463, 1390, 0163, 1267, 1074, 1528<br />
Technics 1308, 1518, 0039, 0208, 0518, 0309<br />
Thorens 1189<br />
Toshiba 0080, 0135<br />
Venturer 1390<br />
Victor 0074<br />
Wards 0158, 0189, 0080, 0054, 0014<br />
XM 1406<br />
Yamaha 0176, 1331, 1176, 0186, 1375<br />
Yorx 0195<br />
Zenith 1293, 0857, 1869<br />
27
Setup Codes for Miscellaneous Audio<br />
Aiwa 0010, 0159, 0404<br />
Altec Lansing 1485<br />
Cambridge Soundworks 1530<br />
Fisher 0052<br />
Imerge 1491<br />
Jerrold 0520, 0459<br />
JVC 0073<br />
Marantz 1491<br />
Motorola 1464<br />
Omnifi 1605<br />
Scientific Atlanta 0460<br />
Sony 0010, 0159, 0576<br />
Starcom 0459<br />
Setup Codes for Cable Boxes/Converters<br />
ABC 0003, 0008, 0014, 0017<br />
Americast 0899<br />
Bell & Howell 0014<br />
Bell South 0899<br />
Clearmaster 0883<br />
ClearMax 0883<br />
Comcast 1376<br />
Coolmax 0883<br />
Digi 0637<br />
Director 0476<br />
Dumont 0637<br />
General Instrument 0476, 0810, 0276, 0003<br />
GoldStar 0144<br />
Hamlin 0009, 0273<br />
Jerrold 0476, 0810, 0276, 0003, 0012, 0014<br />
Media One 0305<br />
Memorex 0000<br />
Motorola 0476, 0810, 0276, 1254, 1106, 1376<br />
MultiVision 0012<br />
Pace 1877, 0237<br />
Panasonic 0000, 0107<br />
Panther 0637<br />
Paragon 0000<br />
Philips 0305, 0317<br />
Pioneer 1877, 0877, 0144, 0533<br />
Pulsar 0000<br />
Quasar 0000<br />
RadioShack 0883<br />
Regal 0279, 0273<br />
Runco 0000<br />
Samsung 0144<br />
Scientific Atlanta 1877, 0877, 0477, 0008, 0017<br />
Sony 1006<br />
Starcom 0003<br />
28
Supercable 0276<br />
Supermax 0883<br />
Time Warner 1877<br />
Tocom 0012<br />
Torx 0003<br />
Toshiba 0000<br />
Tristar 0883<br />
V2 0883<br />
Viewmaster 0883<br />
Vision 0883<br />
Vortex View 0883<br />
Zenith 0000, 0525, 0899<br />
Setup Codes for DVD Players<br />
Adcom 1094<br />
Advent 1016<br />
Aiwa 0641, 1912<br />
Akai 0899, 0770, 1975, 1089<br />
Allegro 0869<br />
Amphion Media Works 2016, 2001<br />
AMW 0872, 2016, 2001<br />
Anam 1913<br />
Apex Digital 0672, 0717, 0830, 1056, 1915, 0755, 0797,<br />
1020, 1100, 0796, 1004, 1061, 1937, 0794<br />
Audiologic 0736<br />
Audiovox 1041, 1121, 1072, 1071, 1122<br />
Axion 1072, 1071<br />
B & K 0655, 0662<br />
Blaupunkt 0717<br />
Blue Parade 0571<br />
Broksonic 0868, 0695<br />
California Audio Labs 0490<br />
Cambridge Soundworks 1916<br />
CAVS 1057<br />
CineVision 0876, 0869<br />
Classic 1917<br />
Coby 1086, 0778, 1923, 1107<br />
Criterion 2007<br />
Curtis Mathes 1087<br />
CyberHome 1024, 1023, 0816, 1117<br />
Daewoo 0784, 1918, 0705, 0869, 0833<br />
Daytek 0872<br />
Denon 0490, 0634<br />
Disney 0675<br />
Dual 1068, 1085<br />
DVD2000 0521<br />
Emerson 0591, 0675, 0821<br />
Enterprise 0591<br />
Fisher 0670, 1919<br />
Funai 0675<br />
29
Gateway 1073, 1077<br />
GE 0522, 0815, 0717<br />
Go Video 0744, 1044, 1970, 0869, 1099, 0715, 0833,<br />
1075, 0783<br />
Go Vision 1071, 1072<br />
GPX 0769, 0699<br />
Gradiente 0490<br />
Greenhill 0717<br />
Grundig 0539<br />
Harman/Kardon 0702, 0582<br />
Hitachi 0573, 0664, 1919<br />
Hiteker 0672<br />
Initial 0717, 1931<br />
Integra 0627, 1924<br />
Jamo 2003<br />
Jaton 1078<br />
JBL 0702, 1926<br />
Jensen 1016<br />
JVC 0558, 0623, 1901, 0867, 1940<br />
jWin 1051, 1049<br />
Kenwood 0490, 0534, 0737, 0682<br />
KLH 0717, 1939, 1020<br />
Konka 0720, 0719, 0711, 0721<br />
Koss 0651<br />
Landel 0826<br />
Lasonic 0798<br />
Lecson 1533<br />
Lenoxx 1938<br />
LG 0801<br />
Liquid Video 1980<br />
Lite-On 1058<br />
Loewe 0511<br />
Magnavox 0503, 1914, 0821, 0675, 1976<br />
Malata 0782<br />
Marantz 0539<br />
McIntosh 1533<br />
Memorex 0695<br />
Microsoft 0522<br />
Mintek 0839, 0717<br />
Mitsubishi 1521, 0521<br />
Momitsu 1082<br />
NAD 0591, 0692<br />
NEC 0785<br />
Nesa 0717<br />
Next Base 0826<br />
Norcent 1003, 1107, 0872, 1923<br />
Nova 1923<br />
Onkyo 0503, 0627, 1985, 1924, 0792<br />
Oritron 0651, 1980<br />
30
Panasonic 0490, 1490, 1908, 1925, 2017, 1462, 1907,<br />
1910, 1990, 1362, 1762, 1909, 1986, 0632<br />
Philco 2000<br />
Philips 0503, 0539, 0646, 1914, 0885, 0854<br />
PianoDisc 1024<br />
Pioneer 0525, 0571, 0632, 1902<br />
Polaroid 1086, 1061, 1998<br />
Polk Audio 0539<br />
Portland 0770<br />
Prima 1016<br />
Princeton 0674<br />
Proceed 0672<br />
Proscan 0522<br />
ProVision 0778<br />
Qwestar 0651<br />
RCA 0522, 0571, 0717, 1022, 1974, 0822, 1965,<br />
1913<br />
Regent 1938<br />
Rio 0869<br />
Rotel 0623<br />
Rowa 0823<br />
Saba 1977<br />
Sampo 0698, 0752<br />
Samsung 0490, 0573, 0820, 1932, 1075, 0899, 1979<br />
Sansui 0695<br />
Sanyo 0670, 1967, 0873, 0695<br />
Sharp 0630, 0752<br />
Sharper Image 1117, 1995<br />
Sherwood 1043, 0770, 0633, 1077<br />
Shinsonic 0533, 0839, 1931<br />
Sigma Designs 0674<br />
Sonic Blue 0869, 1970, 1099<br />
Sony 0533, 1533, 0864, 1981, 1934, 1033, 1904,<br />
2020, 1903<br />
Sova 1122<br />
Sungale 1074<br />
Superscan 0821<br />
SVA 1105, 0860<br />
Sylvania 0675, 0821<br />
Symphonic 0675<br />
Teac 0809, 1984<br />
Technics 0490<br />
Techwood 0692<br />
Terapin 1031<br />
Theta Digital 0571<br />
Tivo 1996<br />
Toshiba 0503, 1988, 1045, 2006, 0695, 1996<br />
Tredex 0799, 0804, 0803, 0800<br />
TYT 0705<br />
Urban Concepts 0503<br />
31
US Logic 0839<br />
V Inc. 1064<br />
Vizio 1064<br />
Vocopro 1027<br />
Xbox 0522<br />
Xwave 1001<br />
Yamaha 0490, 0539, 0545<br />
Yamakawa 0872<br />
Zenith 0503, 0591, 0869, 2002, 1906<br />
Setup Codes for PVRs<br />
ABS 1972<br />
Alienware 1972<br />
CyberPower 1972<br />
Dell 1972<br />
DirecTV 0739, 1949, 1954, 1989<br />
Dish Network System 1943, 1944, 1945, 1946<br />
Dishpro 1943, 1944<br />
Echostar 1943, 1944, 1945, 1946<br />
Expressvu 1944<br />
Gateway 1972<br />
GOI 1944<br />
Hauppauge 1992<br />
Hewlett Packard 1972<br />
Howard Computers 1972<br />
HP 1972<br />
HTS 1944<br />
Hughes Network Systems 0739, 1949<br />
Humax 0739<br />
Hush 1972<br />
Hyundai 1951<br />
iBUYPOWER 1972<br />
JVC 1944, 1945<br />
LG 2010<br />
Linksys 1972<br />
Media Center PC 1972<br />
Microsoft 1972<br />
Mind 1972<br />
Niveus Media 1972<br />
Northgate 1972<br />
Panasonic 0616<br />
Philips 0739, 0618<br />
Proscan 1954<br />
RCA 0880, 1954, 1989<br />
ReplayTV 0616, 0614<br />
Sonic Blue 0614, 0616<br />
Sony 1972, 0636<br />
Stack 9 1972<br />
Systemax 1972<br />
Tagar Systems 1972<br />
32
Tivo 0618, 0739, 0636<br />
Toshiba 1972<br />
Touch 1972<br />
UltimateTV 1989<br />
Viewsonic 1972<br />
Voodoo 1972<br />
ZT Group 1972<br />
Setup Codes for Satellite Receivers<br />
AlphaStar 0772<br />
Channel Master 0212<br />
Chaparral 0216, 0209, 0053<br />
Crossdigital 1109<br />
DirecTV 0392, 0566, 0639, 1639, 1142, 0247, 0749,<br />
1749, 0724, 0819, 1856, 1076, 1109, 0099,<br />
1392, 1444, 1443, 1640, 1442<br />
Dish Network System 1005, 0775, 1775, 1505, 1170<br />
Dishpro 1005, 0775, 1775, 1505<br />
Echostar 1005, 0775, 0280, 1170, 0269, 1775, 0159,<br />
1505<br />
Expressvu 0775, 1775<br />
GE 0566<br />
General Instrument 0869<br />
GOI 0775, 1775<br />
Goodmans 1246<br />
Hitachi 0819, 1250<br />
Homecable 0238<br />
HTS 0775, 1775<br />
Hughes 0749, 1442, 1749<br />
Hughes Network Systems 1142, 0749, 1749, 1444, 1443, 1442<br />
IQ 0210<br />
IQ Prism 0210<br />
Janeil 0152<br />
JVC 0775, 1775, 1170<br />
Jerrold 0869<br />
Legend 0269<br />
LG 1226<br />
Magnavox 0724, 0722<br />
Memorex 0724, 0269<br />
Mitsubishi 0749<br />
Motorola 0869<br />
NEC 1270<br />
Next Level 0869<br />
Panasonic 0247, 0701, 0152<br />
Paysat 0724<br />
Philips 1142, 0749, 1749, 0724, 1076, 0722, 0099,<br />
1442<br />
Pioneer 1442<br />
Proscan 0392, 0566<br />
RadioShack 0869<br />
RCA 0392, 0566, 0855, 0143, 1392<br />
33
Realistic 0052<br />
Samsung 1276, 1109<br />
Sanyo 1219<br />
SKY 0856<br />
Sony 0639, 1639, 1640<br />
Star Choice 0869<br />
Star Trak 0180<br />
STS 0210<br />
Tivo 1142, 1444, 1443, 1442<br />
Toshiba 0749, 1749, 0790, 0082, 1285<br />
UltimateTV 1392, 1640<br />
Uniden 0724, 0722, 0074, 0052, 0238, 0076<br />
Voom 0869<br />
Zenith 0856, 1856<br />
Setup Codes for TVs<br />
A-Mark 0003<br />
Abex 0032<br />
Admiral 0093, 0463<br />
Advent 0761, 0783, 0842, 0817, 0815, 1933<br />
Adventura 0046<br />
Aiko 0092<br />
Aiwa 1914<br />
Akai 0812, 0702, 0030, 0672, 1903<br />
Alaron 0179<br />
Albatron 0843, 0700<br />
Ambassador 0177<br />
America Action 0180<br />
Ampro 0751<br />
Anam 0180<br />
Anam National 0055<br />
AOC 0030, 0019, 0185, 0003, 0052<br />
Apex Digital 0748, 0765, 0879, 0767, 1943<br />
Archer 0003<br />
Audiovox 0451, 0180, 0003, 0875, 1952, 0802, 1951,<br />
0092, 0623, 1937<br />
Aventura 0171<br />
Axion 1937<br />
Belcor 0019<br />
Bell & Howell 0154, 0016<br />
Bradford 0180<br />
Brockwood 0019<br />
Broksonic 0236, 0463, 0003, 1905, 1935, 1929, 1911,<br />
1938<br />
Candle 0030, 0056, 0046, 0186<br />
Carnivale 0030<br />
Carver 0054<br />
CCE 0217<br />
Celebrity 0000<br />
Celera 0765<br />
34
Changhong 0765<br />
Citizen 0060, 0030, 1928, 0039, 0280, 0056, 0186,<br />
0046, 0092<br />
Clairtone 0185<br />
Clarion 0180<br />
Colt 1906<br />
Commercial Solutions 0047, 1447<br />
Concerto 0056<br />
Contec 0180, 0157, 0185<br />
Craig 0180<br />
Crosley 0054<br />
Crown 0180, 0039<br />
Curtis Mathes 0047, 0054, 0154, 0451, 0093, 0060, 0702,<br />
0030, 0145, 0166, 0016, 1919, 0466, 1347,<br />
0039, 0056, 1147<br />
CXC 0180<br />
Daewoo 0451, 1661, 0092, 0672, 1928, 0039, 0623,<br />
1909, 0019<br />
Dell 1178, 1454<br />
Daytron 0019<br />
Denon 0145, 0511<br />
Denstar 0628<br />
Dumont 0017, 0019<br />
Durabrand 0463, 0180, 0178, 0171, 0003<br />
Dwin 0774, 0720<br />
Electroband 0000, 0185<br />
Electrograph 1755<br />
Electrohome 0381<br />
Elektra 0017, 1661<br />
Emerson 0154, 0236, 0463, 0180, 0178, 0171, 1909,<br />
0038, 1929, 0185, 0282, 1905, 0019, 1928,<br />
0280, 0623, 1911, 0039, 1944, 0177, 0179<br />
Envision 0030, 0813<br />
Epson 0840, 0833<br />
ESA 0171, 0812<br />
Fisher 0154, 0159<br />
Fujitsu 0809, 0683, 0179, 0853<br />
Funai 0180, 0171, 0179, 1904<br />
Futuretech 0180<br />
Gateway 1756, 1755<br />
GE 0047, 0051, 0451, 0178, 1447, 0055, 0282,<br />
1347, 1917, 0021, 1147, 1907, 1922, 0135,<br />
1919, 0027<br />
Gibralter 0017, 0030, 0019<br />
GoldStar 0030, 0178, 0019, 0001, 0032, 1926<br />
Goodmans 0360<br />
Grunpy 0180, 0179<br />
Grundig 0683<br />
Haier 0768<br />
Hallmark 0178<br />
Harley Davidson 1904, 0179<br />
35
Harman/Kardon 0054<br />
Harvard 0180<br />
Havermy 0093<br />
Helios 0865<br />
Hello Kitty 0451<br />
Himitsu 0180, 0628<br />
Hisense 0748<br />
Hitachi 1145, 0145, 0016, 0056, 0038, 0151, 0032,<br />
1904<br />
Hyundai 0849<br />
Infinity 0054<br />
Inteq 0017<br />
Janeil 0046<br />
JBL 0054<br />
JCB 0000<br />
Jensen 0761, 0817, 0815, 1933<br />
JVC 0053, 1253, 1923<br />
Kaypani 0052<br />
KEC 0180<br />
Kenwood 0030, 0019<br />
KLH 0765, 0767<br />
Kloss 0046, 0024<br />
Konka 0628, 0703, 1940, 0638, 1939, 0632, 0707<br />
KTV 0180, 0030, 0280, 0039, 0217, 0185<br />
LG 1178, 0856, 0442<br />
Lloyd's 1904<br />
Loewe 0136<br />
Logik 0016<br />
Luxman 0056<br />
LXI 0047, 0054, 0154, 0156, 0178<br />
Magnasonic 1913, 1928<br />
Magnavox 0054, 0030, 1454, 0706, 0179, 0386, 1931,<br />
0024, 0096, 0187, 1254, 1913, 0020, 0186,<br />
1904, 1944<br />
Magnin 1907<br />
Majestic 0016<br />
Marantz 0054, 0030, 0854, 0704, 1154, 0855<br />
Matsushita 0250, 0650<br />
Maxent 1755<br />
Megapower 0700<br />
Megatron 0178, 0145, 0003<br />
MEI 0185<br />
Memorex 0154, 0463, 0150, 0178, 1911, 1926, 1924,<br />
0179, 1920, 1927, 0016<br />
MGA 0150, 0030, 0178, 1907, 0019<br />
Midland 0047, 0017, 0051, 0039, 0135, 0032<br />
Minutz 0021<br />
Mitsubishi 0093, 0150, 1250, 0178, 0868, 0836, 1917,<br />
0019<br />
Monivision 0700, 0843<br />
36
Motorola 0093, 0055<br />
MTC 0060, 0030, 0056, 0185, 0019<br />
Multitech 0180, 0217<br />
NAD 0156, 0178, 0866<br />
NEC 0030, 0056, 1704, 0019, 0497<br />
NetTV 1755<br />
Nikko 0030, 0178, 0092<br />
Norcent 0748, 0824<br />
Noshi 0018<br />
NTC 0092<br />
Onwa 0180<br />
Optimus 0154, 0250, 0166, 1924, 1913, 0650, 1927<br />
Optonica 0093, 0165<br />
Orion 0236, 0463, 1905, 1929, 1911, 0179<br />
Panasonic 0250, 0051, 0650, 1924, 1946, 1919, 1941,<br />
0055, 1410, 1927, 1947<br />
Penney 0047, 0156, 0051, 0060, 0030, 0178, 0019,<br />
0135, 1347, 0018, 1926, 0027, 0039, 0003,<br />
1919, 0021, 0032, 1907<br />
Philco 0054, 0030, 0019, 0020, 0096<br />
Philips 0054, 1454, 0690, 1154<br />
Pilot 0030, 0019, 0039<br />
Pioneer 0166, 0038, 0866, 0679<br />
Polaroid 0765, 0865<br />
Portland 0019, 0092, 0039<br />
Prima 0761, 0817, 0815, 0783, 1933<br />
Princeton 0717, 0700<br />
Prism 0051<br />
Proscan 0047, 1447, 1347, 1922<br />
Proton 0178, 0052, 0003, 0466<br />
Pulsar 0017, 0019<br />
Quasar 0250, 0051, 0055, 0650, 1924, 0165, 1919<br />
RadioShack 0047, 0154, 0180, 0030, 0178, 0165, 1904,<br />
0019, 0039, 0032, 0056, 1920<br />
RCA 0047, 1447, 1147, 1917, 0019, 1948, 0090,<br />
1047, 1347, 1907, 0018, 1922, 1958, 0679,<br />
1247, 1547, 1919, 0038, 1953, 0135<br />
Realistic 0154, 0180, 0030, 0178, 0056, 0019, 0039,<br />
0165, 0032<br />
Rhapsody 0185<br />
Runco 0017, 0030, 0603, 0497<br />
Sampo 0030, 0039, 0032, 1755, 0052<br />
Samsung 0060, 0812, 0702, 0030, 0178, 0766, 1060,<br />
0019, 0056, 0814, 0032, 1903<br />
Samsux 0039<br />
Sansui 0463, 1929, 1911, 1904<br />
Sanyo 0154, 0088, 0159, 1907, 0146, 0799<br />
Scimitsu 0019<br />
Scotch 0178<br />
Scott 0236, 0180, 0178, 0019, 0179<br />
Sears 0047, 0054, 0154, 0156, 0178, 0171, 0146,<br />
0159, 0179, 0056, 1926, 1904<br />
37
Sharp 0093, 0689, 0039, 0165, 0688, 1917, 0157,<br />
0491, 0851, 0386<br />
Sharper Image 1950<br />
Sheng Chia 0093<br />
Shogun 0019<br />
Signature 0016<br />
Simpson 0187, 0186<br />
Sole 0813<br />
Sony 1100, 0000, 0834, 1925, 0111, 1904, 0080<br />
Soundesign 0180, 0178, 0186, 0179<br />
Sova 1952<br />
Spectricon 0003<br />
Squareview 0171<br />
SSS 0180, 0019<br />
Starlite 0180<br />
Studio Experience 0843<br />
Superscan 0864<br />
Supre-Macy 0046<br />
Supreme 0000<br />
SVA 0748, 0870, 0587, 0865, 0872, 0768, 0871<br />
Sylvania 0054, 0030, 0171, 0020, 0096, 1931, 0381,<br />
1944<br />
Symphonic 0180, 0171, 1913, 1904<br />
Tandy 0093<br />
Tatung 0003, 1756, 0055<br />
Technics 0250, 0051<br />
Technol Ace 0179<br />
Techview 0847<br />
Techwood 0051, 0056, 0003<br />
Teknika 0054, 0180, 0150, 0060, 0092, 0039, 0179,<br />
0019, 0056, 0186, 0016<br />
Telefunken 0702, 0056<br />
Thomas 1904<br />
TMK 0178, 0177, 0056<br />
TNCi 0017<br />
Toshiba 0154, 0156, 0060, 1256, 0832, 1704, 1936,<br />
0650, 1156, 1656, 1935, 0845, 1356, 1918,<br />
1945<br />
Tosonic 0185<br />
Totevision 0039<br />
Trical 0157<br />
TVS 0463<br />
Universal 0027<br />
V Inc. 0864, 1756<br />
Vector Research 0030<br />
Victor 0053<br />
Vidikron 0054<br />
Vidtech 0178, 0019<br />
Viewsonic 1755, 0864, 0857<br />
Viking 0046<br />
38
Wards 0054, 0030, 0178, 0080, 0165, 0866, 0019,<br />
0027, 0056, 0111, 0179, 0016, 0021, 0096,<br />
1156, 0020<br />
Vizio 0864, 1756<br />
Wards 0016, 0019, 0020, 0021, 0027, 0030, 0054,<br />
0056, 0080, 0096, 0111, 0165, 0178, 0179,<br />
0866, 1156<br />
Waycon 0156<br />
Westinghouse 0451<br />
White Westinghouse 0463, 1909, 0623<br />
Yamaha 0030, 0839, 0019, 0833, 0769<br />
Zenith 0017, 0463, 0178, 0092, 1904, 1929, 1911,<br />
0016, 1909<br />
Zonda 0003<br />
Setup Codes for VCRs<br />
ABS 1972<br />
Admiral 0048, 0209<br />
Adventura 0000<br />
Aiko 0278<br />
Aiwa 0037, 0000, 0307, 0124<br />
Akai 0041, 0106, 0061, 0175<br />
Alienware 1972<br />
America Action 0278<br />
American High 0035<br />
Asha 0240<br />
Audiovox 0037, 0278<br />
Beaumark 0240<br />
Bell & Howell 0104<br />
Broksonic 0184, 0121, 0209, 0002, 1479, 0479<br />
Calix 0037<br />
Canon 0035<br />
Capehart 0020<br />
Carver 0081<br />
CCE 0072, 0278<br />
Citizen 0037, 0278, 1278<br />
Colt 0072<br />
Craig 0037, 0047, 0240, 0072, 0271<br />
Curtis Mathes 0060, 0035, 0162, 0041, 0760, 1035<br />
Cybernex 0240<br />
CyberPower 1972<br />
Daewoo 0045, 0278, 0020, 0561, 1278<br />
Daytron 0020<br />
Dell 1972<br />
Denon 0042<br />
DirecTV 1949, 0739, 1989, 1954<br />
Dish Network System 1943, 1946, 1945, 1944<br />
Dishpro 1943, 1944<br />
Durabrand 0039, 0038<br />
Dynatech 0000<br />
Echostar 1944, 1943, 1946, 1945<br />
39
Electrohome 0037<br />
Electrophonic 0037<br />
Emerex 0032<br />
Emerson 0037, 0184, 0000, 0121, 0043, 0209, 0002,<br />
0278, 0061, 0208, 0479, 1479, 1278, 0561,<br />
1593<br />
Euro1 1962<br />
Expressvu 1944<br />
Fisher 0047, 0104<br />
Fuji 0035, 0033<br />
Funai 0000, 1593<br />
Garrard 0000<br />
Gateway 1972<br />
GE 0060, 0035, 0240, 0760, 1035, 0807, 0202,<br />
0761, 1060<br />
Go Video 0526, 0432<br />
GOI 1944<br />
GoldStar 0037, 0038, 1237<br />
Gradiente 0000<br />
Harley Davidson 0000<br />
Harman/Kardon 0081, 0038<br />
Harwood 0072<br />
Hauppauge 1992<br />
Headquarter 0046<br />
Hewlett Packard 1972<br />
HI-Q 0047<br />
Hitachi 0000, 0042, 0041, 0089, 0105<br />
Howard Computers 1972<br />
HP 1972<br />
HTS 1944<br />
Hughes Network Systems 0042, 0739, 1949<br />
Humax 0739<br />
Hush 1972<br />
Hyundai 1951<br />
iBUYPOWER 1972<br />
Jensen 0041<br />
JVC 0067, 0041, 1945, 0008, 1944<br />
KEC 0037, 0278<br />
Kenwood 0067, 0041, 0038<br />
KLH 0072<br />
Kodak 0035, 0037<br />
LG 2010<br />
Linksys 1972<br />
Lloyd's 0000, 0208<br />
Logik 0072<br />
LXI 0037<br />
Magnasonic 1278, 0593<br />
Magnavox 0035, 0039, 0081, 0000, 0149, 1781, 0593,<br />
0563<br />
Magnin 0240<br />
40
Marantz 0035, 0081<br />
Marta 0037<br />
Matsushita 0035, 0162, 1162<br />
Media Center PC 1972<br />
MEI 0035<br />
Memorex 0035, 0162, 0037, 0048, 0039, 0047, 0240,<br />
0000, 0104, 0209, 1037, 1262, 0479, 1237,<br />
0307, 0046, 1162<br />
MGA 0240, 0043, 0061<br />
MGN Technology 0240<br />
Microsoft 1972<br />
Mind 1972<br />
Minolta 0042, 0105<br />
Mitsubishi 0067, 0043, 0061, 0807<br />
Motorola 0035, 0048<br />
MTC 0240, 0000<br />
Multitech 0000, 0072<br />
NEC 0104, 0067, 0041, 0038<br />
Nikko 0037<br />
Niveus Media 1972<br />
Noblex 0240<br />
Northgate 1972<br />
Olympus 0035<br />
Onkyo 0222<br />
Optimus 1062, 0162, 0037, 0048, 0104, 0432, 1048,<br />
1262, 0593, 1162<br />
Orion 0184, 0209, 0002, 1479, 0479<br />
Panarex 1950<br />
Panasonic 1062, 0035, 0162, 1035, 1262, 0616, 1162,<br />
0225<br />
Pansat 1950<br />
Penney 0035, 0037, 0240, 0042, 0038, 1035, 1237<br />
Pentax 0042, 0105<br />
Philco 0035, 0479<br />
Philips 0035, 0081, 0739, 1949, 0618, 1181, 1081<br />
Pilot 0037<br />
Pioneer 0067<br />
Polk Audio 0081<br />
Portland 0020<br />
Profitronic 0240<br />
Proscan 0060, 0202, 1060, 0761, 0760, 1954<br />
Protec 0072<br />
Pulsar 0039<br />
Quarter 0046<br />
Quartz 0046<br />
Quasar 0035, 0162, 1162, 1035<br />
RadioShack 0000, 1037<br />
Radix 0037<br />
Randex 0037<br />
41
RCA 0060, 0240, 0042, 0149, 0807, 1060, 1989,<br />
0105, 0202, 0761, 1035, 1964, 0760, 0880,<br />
1954, 0106<br />
Realistic 0035, 0037, 0048, 0047, 0000, 0104, 0046<br />
ReplayTV 0616, 0614<br />
Ricavision 1972<br />
Runco 0039<br />
Samsung 0240, 0045, 1014<br />
Sanky 0048, 0039<br />
Sansui 0000, 0067, 0209, 0041, 1479, 0479, 0271<br />
Sanyo 0047, 0240, 0104, 0159, 0046<br />
Scott 0184, 0045, 0121, 0043<br />
Sears 0035, 0037, 0047, 0000, 0042, 0104, 1237,<br />
0046, 0105<br />
Sharp 0048, 0807, 0848<br />
Shintom 0072<br />
Shogun 0240<br />
Singer 0072<br />
Sonic Blue 0616, 0614<br />
Sony 0035, 0032, 0033, 0000, 1972, 1032, 1957,<br />
0636, 1956, 1232<br />
Stack 9 1972<br />
STS 0042<br />
Sylvania 0035, 0081, 0000, 0043, 0593, 1781, 1593<br />
Symphonic 0000, 1593, 0593<br />
Systemax 1972<br />
Tagar Systems 1972<br />
Tatung 0041<br />
Teac 0000, 0041<br />
Technics 0035, 0162<br />
Teknika 0035, 0037, 0000<br />
Thomas 0000<br />
Tivo 0739, 1957, 0636, 1956, 0618, 1503<br />
TMK 0240, 0208<br />
Toshiba 0045, 0043, 1145, 1008, 1972, 0845, 1503<br />
Totevision 0037, 0240<br />
Touch 1972<br />
UltimateTV 1989<br />
Unitech 0240<br />
Vector 0045<br />
Vector Research 0038<br />
Video Concepts 0045, 0061<br />
Videomagic 0037<br />
Videosonic 0240<br />
Viewsonic 1972<br />
Villain 0000<br />
Voodoo 1972<br />
Wards 0060, 0035, 0048, 0047, 0081, 0240, 0000,<br />
0042, 0072, 0149, 0760<br />
White Westinghouse 0209, 0072<br />
42
XR-1000 0035, 0000, 0072<br />
Yamaha 0038<br />
Zenith 0039, 0033, 0000, 0209, 1479, 0479<br />
ZT Group 1972<br />
Setup Codes for Video Accessories<br />
ABS 1272<br />
Alienware 1272<br />
CyberPower 1272<br />
Gateway 1272<br />
Hewlett Packard 1272, 1267<br />
Howard Computers 1272<br />
HP 1272<br />
Hush 1272<br />
iBUYPOWER 1272<br />
InterVideo 1393<br />
Keyspan 1344<br />
KWorld 1403<br />
Linksys 1365<br />
Macro Image Technology 1383<br />
Media Center PC 1272<br />
Microsoft 1272<br />
Mind 1272<br />
Motorola 1363<br />
MyHD 1383<br />
Niveus Media 1272<br />
Northgate 1272<br />
Panasonic 1120<br />
Pinnacle Systems 1268<br />
Pioneer 1010<br />
Princeton 0113, 0295<br />
Ricavision 1272<br />
Samsung 1190, 1490<br />
Sensory Science 1126<br />
Sharp 1010<br />
Sony 1272, 1324, 1364<br />
Stack 9 1272<br />
Streamzap 1309<br />
Systemax 1272<br />
Tagar Systems 1272<br />
Toshiba 1272<br />
Touch 1272<br />
Viewsonic 1272, 1329<br />
Vizio 1126<br />
Voodoo 1272<br />
ZT Group 1272<br />
43
M1<strong>1055</strong> FS<br />
44