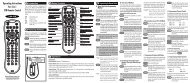
MX3000 Owners Manual - URC - Universal Remote Control
MX3000 Owners Manual - URC - Universal Remote Control
MX3000 Owners Manual - URC - Universal Remote Control

Create successful ePaper yourself
Turn your PDF publications into a flip-book with our unique Google optimized e-Paper software.
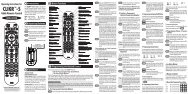
MRF-250<br />
MX-3000<br />
Multi-Room “No-Pointing” RF <strong>Control</strong><br />
<strong>Owners</strong> <strong>Manual</strong>
This remote control was<br />
Custom Programmed for you by:<br />
For questions about your Custom<br />
Programming call:<br />
Custom Programming of a complex home theater and/or a<br />
multi-room system is one of the most challenging tasks<br />
within an audio/video installation. It involves an intimate<br />
knowledge of how the components interact and exact details<br />
on the proper sequences of control.<br />
Only a Home Theater Master dealer has the requisite<br />
experience and training to quickly and effectively customize a<br />
remote control for true automated operation.<br />
Congratulations on your choice!<br />
MX-3000 <strong>Owners</strong> <strong>Manual</strong> © 2004 <strong>Universal</strong> <strong>Remote</strong> <strong>Control</strong>, Inc.<br />
The information in this manual is copyright protected. No part of this manual may<br />
be copied or reproduced in any form without prior written consent from <strong>Universal</strong><br />
<strong>Remote</strong> <strong>Control</strong>, Inc.<br />
UNIVERSAL REMOTE CONTROL, INC. SHALL NOT BE LIABLE FOR OPERATIONAL,<br />
TECHNICAL OR EDITORIAL ERRORS/OMISSIONS MADE IN THIS MANUAL.<br />
The information in this manual may be subject to change without prior notice.<br />
Home Theater Master is a registered trademark of <strong>Universal</strong> <strong>Remote</strong> <strong>Control</strong>, Inc.<br />
Entertainment Made Simple is a trademark of <strong>Universal</strong> <strong>Remote</strong> <strong>Control</strong>, Inc.<br />
All other brand or product names are trademarks or registered trademarks of their<br />
respective companies or organizations.<br />
500 Mamaroneck Avenue, Harrison, NY 10528<br />
Phone: (914) 835-4484 Fax: (914) 835-4532
TABLE OF CONTENTS<br />
Congratulations 1<br />
Connecting the Battery Pack 1<br />
Using the Charging Base 2<br />
Programming the MX-3000 2<br />
No More Pointing! 3<br />
Operating Your System 4<br />
Displaying the Settings Screen 5<br />
Adjusting Backlighting 5<br />
Adjusting Brightness 5<br />
Button Light Settings 5<br />
Sound 6<br />
Setting Time and Date 6<br />
Power Settings 6<br />
System 6<br />
Pickup Settings 7<br />
Calibration 7<br />
Factory Default 7<br />
Exit 7<br />
Maintaining Your MX-3000 8<br />
Warranty 8<br />
Specifications 8
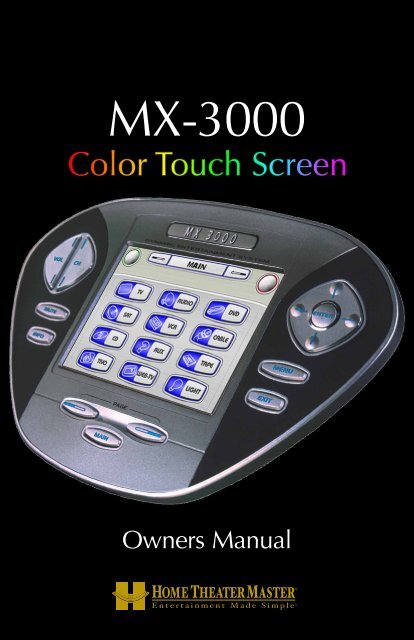
MX-3000 COLOR TOUCH SCREEN<br />
Congratulations<br />
You’ve purchased a unique synthesis of<br />
hardware and software engineering, the<br />
Home Theater Master MX-3000. The twin<br />
goals of the design team were to improve<br />
the elegance and usability of touch screens<br />
through the physical design while providing<br />
a new standard in brightness, clarity and<br />
animation for the touch screen itself.<br />
Easy Operation<br />
By assigning the important home theater operational buttons to the<br />
natural resting place of the end users thumbs, the MX-3000 achieves a<br />
new standard in use and comfort.<br />
Automatic Backlighting<br />
The integral motion sensor detects any movement of the touch screen and<br />
automatically backlights the screen. You do not have to press any button<br />
to display the screen. Any movement of the MX-3000 renews the<br />
backlighting. To adjust the backlighting, see page 5.<br />
Connecting the Battery Pack<br />
Unlock the rear cover by using a coin to move the locking screw to the<br />
Unlock position.<br />
Remove the cover. For shipment from the<br />
factory, the battery cable is left unplugged.<br />
Plug the cable into the socket next to the<br />
battery. The connector is slotted to prevent<br />
plugging it in the wrong way, so don’t force it.<br />
Replace the cover and lock it into place with<br />
a coin.<br />
Locked<br />
Un-Locked<br />
Battery Cable Plugged In<br />
Page 1
MX-3000 COLOR TOUCH SCREEN<br />
Using the Charging Base<br />
Plug the 5V DC adapter into a<br />
power outlet and into the back of<br />
the charging base.<br />
Gently place the MX-3000 into the<br />
cradle of the charging base.<br />
Push down on the base of the<br />
MX-3000 until you hear and feel a<br />
firm “click”.<br />
The Status light should immediately<br />
light. Red indicates that it is<br />
The MX-3000 on it’s Charging Base.<br />
charging. Blue shows that it is fully<br />
charged. There is no harm in leaving the MX-3000 on its charging base<br />
whenever it is not in use.<br />
Programming the MX-3000<br />
The MX-3000 is programmed via a windows PC equipped with a USB<br />
port (we include a programming cable in the box), using our proprietary<br />
software, MX-3000 Editor. You can download this software from our<br />
website:<br />
www.universalremote.com<br />
Basic setup takes only a few minutes with this software. However, to fully<br />
automate an audio/video system the user must have a detailed knowledge<br />
of how the system is connected and operated. We highly recommend that<br />
you use a professional audio/video installer to program your MX-3000 if<br />
you would like to enjoy one touch operation via macros.<br />
Page 2
MX-3000 COLOR TOUCH SCREEN<br />
No More Pointing!<br />
The combination of the MX-3000 with it’s companion MRF-250 base<br />
station will enable you to place your audio/video components out of sight<br />
behind closed doors and/or in another room of your house. The MX-3000<br />
sends radio signals to the MRF-250 throughout your house (50-100’ away,<br />
indoors or outdoors). The MRF-250 converts your commands to the<br />
infrared signals that control your A/V components.<br />
1.The MX-3000 remote<br />
control sends radio waves in<br />
every direction, so you don’t<br />
have to point the remote<br />
anymore!<br />
2.The MRF-250’s built-in Front Blaster sends commands to<br />
components in the same cabinet space as the MRF-250.<br />
3. Self-adhesive “Flashers” affix to the<br />
Infrared sensors on the front panels<br />
of your components. The Flashers<br />
relay commands to components out<br />
of sight of the MRF-250’s Front<br />
Blaster. The flashers plug in to the<br />
MRF-250’s rear flasher line outputs<br />
via their 10 foot cables.<br />
Page 3
MX-3000 COLOR TOUCH SCREEN<br />
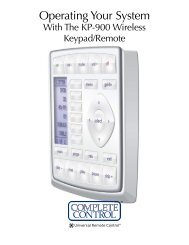
Operating Your System<br />
The MX-3000’s MAIN menu displays the most popular activities and<br />
devices in your system. Press the MAIN button to see the MAIN menu.<br />
Large systems may have more than one page. Press the page button if you<br />
don’t see all your devices.<br />
Gently press any screen button with your finger to select an activity or a<br />
device. The screen will change to a display of the buttons you need for<br />
that activity/device. The PAGE buttons may reveal additional buttons for<br />
some devices and activities.<br />
When you would like to control another device, press the MAIN button<br />
and select a new device from the MAIN menu.<br />
The Volume and<br />
Mute buttons are<br />
always available<br />
regardless of what<br />
screen is displayed.<br />
The 4 way cursor<br />
buttons enable you<br />
to navigate on<br />
screen guides and<br />
menus with ease.<br />
To select a touch<br />
screen button,<br />
touch the screen<br />
with a gentle tap of<br />
your finger.<br />
The PAGE buttons<br />
reveal additional<br />
pages of buttons<br />
when they are<br />
available.<br />
The MAIN Button below the<br />
screen always takes you to the first<br />
page of the MAIN Menu.<br />
Page 4
MX-3000 COLOR TOUCH SCREEN<br />
Displaying the Settings Screen<br />
You can adjust the settings of the<br />
MX-3000 whenever you like by pressing<br />
and holding the MAIN button for five<br />
seconds. When you do, the screen will<br />
change to the SETTINGS screen. If you<br />
do not press any button on the<br />
SETTINGS screen within 30 seconds, the<br />
MX-3000 will time out and automatically<br />
return to normal operation.<br />
Adjusting Backlighting<br />
The Settings Screen<br />
If you uncheck the check boxes, the<br />
MX-3000 will stay lit until the<br />
battery is exhausted. If you check the check<br />
boxes, you can select from the list of delays.<br />
The amount of delay you select will be the<br />
how long the MX-3000 stays lit. You can save<br />
battery life this way.<br />
Adjusting Brightness<br />
The Backlight Screen<br />
Simply touch and drag the brightness slider<br />
to the desired level. Increased brightness<br />
does affect battery life.<br />
Button Light Settings<br />
The Brightness Screen<br />
You can opt to conserve battery life by<br />
disabling the LED lighting behind the<br />
buttons.<br />
This is done by pulling down the list box and<br />
selecting “always off” from the list.<br />
The Button Light Screen<br />
Page 5
MX-3000 COLOR TOUCH SCREEN<br />
Sound<br />
Your MX-3000 may have been programmed<br />
to make sounds. This is optional, and some<br />
professional installers may prefer to keep it<br />
silent. However, you can adjust the volume<br />
to any level you like by touching and<br />
dragging the volume control here.<br />
The Sound Screen<br />
Setting Time and Date<br />
Your MX-3000 may have been programmed<br />
to display the time or date on a touch screen<br />
button. If so, you can correct the time<br />
displayed by changing the settings on this<br />
screen.<br />
Power Settings<br />
The Time and Date Screen<br />
You can display the remaining charge<br />
by selecting Power Settings.<br />
You can also adjust when the low battery<br />
warning screen will appear.<br />
The Power Screen<br />
System<br />
The System screen displays data about your<br />
MX-3000’s operating system, memory etc.<br />
The System Screen<br />
Page 6
MX-3000 COLOR TOUCH SCREEN<br />
Pickup Settings<br />
You can set your MX-3000 to only turn on<br />
when touched, or every time you move it.<br />
Calibration<br />
The Pickup Screen<br />
If you like, you can calibrate where you tap<br />
by running the calibration. You will need a<br />
pen top or PDA stylus to do this. Do not<br />
attempt to calibrate using your fingers.<br />
Factory Default<br />
The Calibration Screen<br />
WARNING! Only use this button when<br />
instructed to by Technical Support. It resets<br />
the memory of the MX-3000 to the factory<br />
condition. All your programming will be lost!<br />
Exit<br />
The Default Screen<br />
When you have finished adjusting Settings,<br />
simply tap the EXIT button to return to<br />
normal operation.<br />
The Exit Button<br />
Page 7
MX-3000 COLOR TOUCH SCREEN<br />
Maintaining Your MX-3000<br />
Be careful not to scratch the touch screen, only use your finger to tap the<br />
LCD touch screen or use a plastic pen top or PDA stylus. Never use a real<br />
pen, pencil or any other sharp object on the screen. Keep it away from<br />
extreme cold or heat. The MX-3000 is not waterproof. Do not use it in any<br />
location that is damp or wet.<br />
If you spill water on it, take out the battery pack and let the MX-3000 dry for<br />
48 hours before you try powering it up again. If you spill coffee or another<br />
beverage on it, clean it with distilled water. Make sure no water gets inside<br />
the MX-3000. The touch screen contains a glass element. Don’t drop the<br />
MX-3000 or impact it against anything.<br />
Use a soft, damp cloth to clean the screen. If the screen still shows finger<br />
prints, clean it with watered down window-cleaner. Do not use anything<br />
abrasive and don’t use too much water, some might leak into the interior.<br />
Warranty<br />
The MX-3000 is covered against any manufacturing defects or faults in<br />
workmanship for a period of one year from the date of purchase when<br />
purchased from an authorized Home Theater Master dealer. Units<br />
purchased from online auction sites or other unauthorized resellers have<br />
no warranty. This warranty does not cover the following items:<br />
Damage from misuse, neglect, or acts of nature.<br />
Products that have been modified or incorporated into other products.<br />
Products purchased more than 12 months ago.<br />
Units purchased from unauthorized dealers or companies.<br />
Specifications<br />
Microprocessor: 206MHz RISC<br />
Memory - 16 Megabytes of RAM (for User Configuration)<br />
Devices - Supports up to 255 Devices<br />
Pages- Supports up to 255 Pages on each Device<br />
Learning Capability - Standard frequencies (15kHz to 100kHz)<br />
Macro Capability - Up to 255 steps each, however nesting is allowed<br />
IR Range (Line of Sight via Infrared): 30-50 feet, depending on the environment<br />
RF Range (radio frequency): 50 to 100 feet, depending upon the environment<br />
RF Frequency: 418MHz<br />
Weight: 10.4 oz. (with batteries)<br />
Size: 7.17” x 4.76” x 1.18”<br />
Batteries: Lithium Ion battery pack included<br />
Page 8
500 Mamaroneck Avenue, Harrison, NY 10528<br />
Phone: (914) 835-4484 Fax: (914) 835-4532<br />
www.universalremote.com