Installing and Administering NFS Services - Previous Directory
Installing and Administering NFS Services - Previous Directory
Installing and Administering NFS Services - Previous Directory

Create successful ePaper yourself
Turn your PDF publications into a flip-book with our unique Google optimized e-Paper software.
<strong>Installing</strong> <strong>and</strong> <strong>Administering</strong> <strong>NFS</strong><br />
<strong>Services</strong><br />
HP 9000 Networking<br />
Manufacturing Part Number: B1031-90048<br />
E0601<br />
U.S.A.<br />
© Copyright 2001 Hewlett-Packard Company.
Legal Notices<br />
The information in this document is subject to change without notice.<br />
Hewlett-Packard makes no warranty of any kind with regard to this<br />
manual, including, but not limited to, the implied warranties of<br />
merchantability <strong>and</strong> fitness for a particular purpose. Hewlett-Packard<br />
shall not be held liable for errors contained herein or direct, indirect,<br />
special, incidental or consequential damages in connection with the<br />
furnishing, performance, or use of this material.<br />
Warranty. A copy of the specific warranty terms applicable to your<br />
Hewlett- Packard product <strong>and</strong> replacement parts can be obtained from<br />
your local Sales <strong>and</strong> Service Office.<br />
Restricted Rights Legend. Use, duplication or disclosure by the U.S.<br />
Government is subject to restrictions as set forth in subparagraph (c) (1)<br />
(ii) of the Rights in Technical Data <strong>and</strong> Computer Software clause at<br />
DFARS 252.227-7013 for DOD agencies, <strong>and</strong> subparagraphs (c) (1) <strong>and</strong><br />
(c) (2) of the Commercial Computer Software Restricted Rights clause at<br />
FAR 52.227-19 for other agencies.<br />
Hewlett-Packard Co.<br />
19420 Homestead Road<br />
Cupertino, CA 95014 USA<br />
Use of this manual <strong>and</strong> CD(s) supplied for this pack is restricted to this<br />
product only. Additional copies of the programs may be made for security<br />
<strong>and</strong> back-up purposes only. Resale of the programs in their present form<br />
or with alterations, is expressly prohibited.<br />
Copyright Notices<br />
©copyright 1983-2000 Hewlett-Packard Company, all rights reserved.<br />
Reproduction, adaptation, or translation of this document without prior<br />
written permission is prohibited, except as allowed under the copyright<br />
laws.<br />
©copyright 1979, 1980, 1983, 1985-94 Regents of the University of<br />
California<br />
This software is based in part on the Fourth Berkeley Software<br />
Distribution under license from the Regents of the University of<br />
California.<br />
2
©copyright 1986-1997 Sun Microsystems, Inc.<br />
©copyright 1985-86, 1988 Massachusetts Institute of Technology<br />
©copyright 1989-93 The Open Software Foundation, Inc.<br />
©copyright 1986 Digital Equipment Corporation<br />
©copyright 1990 Motorola, Inc.<br />
©copyright 1990, 1991, 1992 Cornell University<br />
©copyright 1989-1991 The University of Maryl<strong>and</strong><br />
©copyright 1988 Carnegie Mellon University<br />
Trademark Notices<br />
UNIX is a registered trademark of The Open Group.<br />
X Window System is a trademark of the Massachusetts Institute of<br />
Technology.<br />
OSF/Motif is a trademark of the Open Software Foundation, Inc. in the<br />
U.S. <strong>and</strong> other countries.<br />
<strong>NFS</strong>® is a registered trademark of Sun Microsystems, Inc.<br />
NIS <strong>and</strong> NIS+ are trademarks of Sun Microsystems, Inc.<br />
NOTE<br />
The Network Information Service (NIS) was formerly known as Yellow<br />
Pages (YP). The functionality is the same; only the name has changed.<br />
“Yellow Pages” is a registered trademark in the United Kingdom of<br />
British Telecommunications plc.<br />
3
Contents<br />
1. <strong>Installing</strong> the <strong>NFS</strong> <strong>Services</strong><br />
<strong>Installing</strong> the <strong>NFS</strong> <strong>Services</strong> Software. . . . . . . . . . . . . . . . . . . . . . . . . . . . . . . . . . . . . . . 15<br />
Overview of the <strong>NFS</strong> <strong>Services</strong> . . . . . . . . . . . . . . . . . . . . . . . . . . . . . . . . . . . . . . . . . . . . . 16<br />
2. Configuring <strong>and</strong> <strong>Administering</strong> <strong>NFS</strong><br />
Preparing for <strong>NFS</strong> Configuration . . . . . . . . . . . . . . . . . . . . . . . . . . . . . . . . . . . . . . . . . . 21<br />
To Check the Network Connections. . . . . . . . . . . . . . . . . . . . . . . . . . . . . . . . . . . . . . . 21<br />
To Set User IDs <strong>and</strong> Group IDs (if neither NIS nor NIS+ is used) . . . . . . . . . . . . . . 21<br />
To Ensure that No User is a Member of Too Many Groups . . . . . . . . . . . . . . . . . . . . 22<br />
Configuring <strong>and</strong> <strong>Administering</strong> an <strong>NFS</strong> Server. . . . . . . . . . . . . . . . . . . . . . . . . . . . . . . 24<br />
To Make Directories Available to <strong>NFS</strong> Clients (Export Directories) . . . . . . . . . . . . . 24<br />
To Enable <strong>NFS</strong> Server Capability . . . . . . . . . . . . . . . . . . . . . . . . . . . . . . . . . . . . . . . . 28<br />
To Remove (Unexport) an Exported <strong>Directory</strong> . . . . . . . . . . . . . . . . . . . . . . . . . . . . . . 28<br />
To Enable PC <strong>NFS</strong> Server Capability . . . . . . . . . . . . . . . . . . . . . . . . . . . . . . . . . . . . . 30<br />
To Disable <strong>NFS</strong> Server Capability. . . . . . . . . . . . . . . . . . . . . . . . . . . . . . . . . . . . . . . . 31<br />
Configuring <strong>and</strong> <strong>Administering</strong> an <strong>NFS</strong> Client . . . . . . . . . . . . . . . . . . . . . . . . . . . . . . . 34<br />
Deciding Between Automounter <strong>and</strong> AutoFS . . . . . . . . . . . . . . . . . . . . . . . . . . . . . . . 34<br />
Deciding Between St<strong>and</strong>ard-Mounted Directories <strong>and</strong> Automounted Directories . . 35<br />
To Mount a Remote <strong>Directory</strong> Using a St<strong>and</strong>ard <strong>NFS</strong> Mount . . . . . . . . . . . . . . . . . . 40<br />
To Enable <strong>NFS</strong> Client Capability . . . . . . . . . . . . . . . . . . . . . . . . . . . . . . . . . . . . . . . . 42<br />
To Verify Your <strong>NFS</strong> Client Configuration . . . . . . . . . . . . . . . . . . . . . . . . . . . . . . . . . . 43<br />
To Change the Default Mount Options . . . . . . . . . . . . . . . . . . . . . . . . . . . . . . . . . . . . 43<br />
To Ensure Data Integrity Between the Client <strong>and</strong> Server . . . . . . . . . . . . . . . . . . . . . 49<br />
To Remove (Unmount) a Mounted <strong>Directory</strong> . . . . . . . . . . . . . . . . . . . . . . . . . . . . . . . 50<br />
To Disable <strong>NFS</strong> Client Capability . . . . . . . . . . . . . . . . . . . . . . . . . . . . . . . . . . . . . . . . 51<br />
<strong>NFS</strong> Client <strong>and</strong> Server Transport Connections . . . . . . . . . . . . . . . . . . . . . . . . . . . . . . . 52<br />
<strong>NFS</strong> Client TCP Connections. . . . . . . . . . . . . . . . . . . . . . . . . . . . . . . . . . . . . . . . . . . . 52<br />
Specifying TCP or UDP Connections. . . . . . . . . . . . . . . . . . . . . . . . . . . . . . . . . . . . . . 52<br />
<strong>NFS</strong> Server TCP Connections . . . . . . . . . . . . . . . . . . . . . . . . . . . . . . . . . . . . . . . . . . . 53<br />
Configuring <strong>and</strong> <strong>Administering</strong> the <strong>NFS</strong> Automounter . . . . . . . . . . . . . . . . . . . . . . . . 55<br />
To Automount All Exported Directories from Any Host Using the -hosts Map . . . . 56<br />
To Decide Between Direct <strong>and</strong> Indirect <strong>NFS</strong> Automounts. . . . . . . . . . . . . . . . . . . . . 58<br />
To Mount a Remote <strong>Directory</strong> Using a Direct Automounter Map . . . . . . . . . . . . . . . 61<br />
To Mount a Remote <strong>Directory</strong> Using an Indirect Automounter Map . . . . . . . . . . . . 64<br />
To Configure Multiple (Replicated) Servers for an Automounted <strong>Directory</strong> . . . . . . . 68<br />
To Use Environment Variables as Shortcuts in Automounter Maps. . . . . . . . . . . . . 69<br />
To Use Wildcard Characters as Shortcuts in Automounter Maps . . . . . . . . . . . . . . . 69<br />
To Automount Users’ Home Directories with the -passwd Map . . . . . . . . . . . . . . . . 71<br />
5
Contents<br />
6<br />
To Automount Users’ Home Directories with Wildcard Characters . . . . . . . . . . . . . 74<br />
To Automount Multiple Directories Simultaneously (Hierarchical Mounts) . . . . . . 77<br />
To Improve Automounter Performance with Subdirectory Notation in Indirect Maps<br />
77<br />
To Include an Automounter Map in Another Automounter Map. . . . . . . . . . . . . . . . 79<br />
To Turn Off an Automounter Map with the -null Map. . . . . . . . . . . . . . . . . . . . . . . . 80<br />
To Enable the <strong>NFS</strong> Automounter. . . . . . . . . . . . . . . . . . . . . . . . . . . . . . . . . . . . . . . . . 81<br />
To Verify Your Automounter Configuration . . . . . . . . . . . . . . . . . . . . . . . . . . . . . . . . 81<br />
To Modify or Remove (Unmount) an Automounted <strong>Directory</strong> . . . . . . . . . . . . . . . . . . 83<br />
To Restart the Automounter . . . . . . . . . . . . . . . . . . . . . . . . . . . . . . . . . . . . . . . . . . . . 83<br />
Configuring <strong>and</strong> <strong>Administering</strong> AutoFS. . . . . . . . . . . . . . . . . . . . . . . . . . . . . . . . . . . . . 86<br />
Advantages of AutoFS Versus Automounter. . . . . . . . . . . . . . . . . . . . . . . . . . . . . . . . 87<br />
Migrating From Automounter to AutoFS . . . . . . . . . . . . . . . . . . . . . . . . . . . . . . . . . . 88<br />
To Underst<strong>and</strong> How AutoFS Works. . . . . . . . . . . . . . . . . . . . . . . . . . . . . . . . . . . . . . . 89<br />
To Automount All Exported Directories from Any Host Using the -hosts Map . . . . 90<br />
To Decide Between Direct <strong>and</strong> Indirect <strong>NFS</strong> Automounts. . . . . . . . . . . . . . . . . . . . . 92<br />
To Mount a Remote <strong>Directory</strong> Using a Direct Automounter Map . . . . . . . . . . . . . . . 95<br />
To Mount a Remote <strong>Directory</strong> Using an Indirect Automounter Map . . . . . . . . . . . . 99<br />
To Configure Multiple (Replicated) Servers for an Automounted <strong>Directory</strong> . . . . . . 102<br />
To Use Environment Variables as Shortcuts in Automounter Maps. . . . . . . . . . . . 103<br />
To Use Wildcard Characters as Shortcuts in Automounter Maps . . . . . . . . . . . . . . 104<br />
To Automount Users’ Home Directories . . . . . . . . . . . . . . . . . . . . . . . . . . . . . . . . . . 106<br />
To Automount Multiple Directories Simultaneously (Hierarchical Mounts) . . . . . 108<br />
To Include an Automounter Map in Another Automounter Map. . . . . . . . . . . . . . . 109<br />
To Create a Hierarchy of Automounter Maps . . . . . . . . . . . . . . . . . . . . . . . . . . . . . . 110<br />
To Turn Off an Automounter Map with the -null Map. . . . . . . . . . . . . . . . . . . . . . . 111<br />
To Enable AutoFS . . . . . . . . . . . . . . . . . . . . . . . . . . . . . . . . . . . . . . . . . . . . . . . . . . . . 111<br />
To Disable AutoFS . . . . . . . . . . . . . . . . . . . . . . . . . . . . . . . . . . . . . . . . . . . . . . . . . . . 112<br />
To Verify Your AutoFS Configuration . . . . . . . . . . . . . . . . . . . . . . . . . . . . . . . . . . . . 112<br />
To Modify or Remove (Unmount) an Automounted <strong>Directory</strong> . . . . . . . . . . . . . . . . . 114<br />
Configuring <strong>and</strong> Using <strong>NFS</strong> Netgroups . . . . . . . . . . . . . . . . . . . . . . . . . . . . . . . . . . . . 115<br />
To Create Netgroups in the /etc/netgroup File . . . . . . . . . . . . . . . . . . . . . . . . . . . . . 115<br />
To Create Netgroups in the NIS+ netgroup Table . . . . . . . . . . . . . . . . . . . . . . . . . . 117<br />
To Use Netgroups in Configuration Files . . . . . . . . . . . . . . . . . . . . . . . . . . . . . . . . . 118<br />
Configuring the Other <strong>NFS</strong> Daemons <strong>and</strong> <strong>Services</strong>. . . . . . . . . . . . . . . . . . . . . . . . . . . 122<br />
To Enable the Other <strong>NFS</strong> <strong>Services</strong> . . . . . . . . . . . . . . . . . . . . . . . . . . . . . . . . . . . . . . 122<br />
To Restrict Access to the Other <strong>NFS</strong> <strong>Services</strong>. . . . . . . . . . . . . . . . . . . . . . . . . . . . . . 124
Contents<br />
3. Configuring the Cache File System (CacheFS)<br />
The Cache File System . . . . . . . . . . . . . . . . . . . . . . . . . . . . . . . . . . . . . . . . . . . . . . . . . 128<br />
CacheFS Terms . . . . . . . . . . . . . . . . . . . . . . . . . . . . . . . . . . . . . . . . . . . . . . . . . . . . . . . 129<br />
Configuring CacheFS . . . . . . . . . . . . . . . . . . . . . . . . . . . . . . . . . . . . . . . . . . . . . . . . . . . 130<br />
To Configure a Local File System as Cache. . . . . . . . . . . . . . . . . . . . . . . . . . . . . . . . 131<br />
To Mount an <strong>NFS</strong> File System Using CacheFS . . . . . . . . . . . . . . . . . . . . . . . . . . . . 132<br />
To Automount a File System Using CacheFS . . . . . . . . . . . . . . . . . . . . . . . . . . . . . . 133<br />
4. Configuring <strong>and</strong> <strong>Administering</strong> NIS<br />
Overview of NIS . . . . . . . . . . . . . . . . . . . . . . . . . . . . . . . . . . . . . . . . . . . . . . . . . . . . . . . 137<br />
Information Managed by NIS . . . . . . . . . . . . . . . . . . . . . . . . . . . . . . . . . . . . . . . . . . 137<br />
Structure of the NIS Network . . . . . . . . . . . . . . . . . . . . . . . . . . . . . . . . . . . . . . . . . . 138<br />
Planning the NIS Network . . . . . . . . . . . . . . . . . . . . . . . . . . . . . . . . . . . . . . . . . . . . . . 140<br />
To Determine the Number of NIS Domains You Need . . . . . . . . . . . . . . . . . . . . . . . 140<br />
To Determine the Number of NIS Servers You Need . . . . . . . . . . . . . . . . . . . . . . . . 141<br />
To Determine Which Hosts Will Be NIS Servers . . . . . . . . . . . . . . . . . . . . . . . . . . . 141<br />
To Draw an NIS Network Map . . . . . . . . . . . . . . . . . . . . . . . . . . . . . . . . . . . . . . . . . 142<br />
Configuring <strong>and</strong> <strong>Administering</strong> an NIS Master Server. . . . . . . . . . . . . . . . . . . . . . . . 143<br />
To Create the Master passwd File . . . . . . . . . . . . . . . . . . . . . . . . . . . . . . . . . . . . . . . 144<br />
To Create the Master group File . . . . . . . . . . . . . . . . . . . . . . . . . . . . . . . . . . . . . . . . 145<br />
To Create the Master hosts File. . . . . . . . . . . . . . . . . . . . . . . . . . . . . . . . . . . . . . . . . 146<br />
To Enable NIS Master Server Capability . . . . . . . . . . . . . . . . . . . . . . . . . . . . . . . . . 147<br />
To Verify Your NIS Master Server Configuration . . . . . . . . . . . . . . . . . . . . . . . . . . . 148<br />
To Configure the NIS Master Server to Use a Private passwd File. . . . . . . . . . . . . 149<br />
To Restrict Client <strong>and</strong> Slave Server Access to the Master Server . . . . . . . . . . . . . . 150<br />
To Check the Contents of an NIS Map . . . . . . . . . . . . . . . . . . . . . . . . . . . . . . . . . . . 151<br />
To Modify an NIS Map . . . . . . . . . . . . . . . . . . . . . . . . . . . . . . . . . . . . . . . . . . . . . . . . 152<br />
To Add an Automounter Map to Your NIS Domain . . . . . . . . . . . . . . . . . . . . . . . . . 153<br />
To Remove an Automounter Map from Your NIS Domain . . . . . . . . . . . . . . . . . . . . 155<br />
To Add a Slave Server to Your NIS Domain . . . . . . . . . . . . . . . . . . . . . . . . . . . . . . . 156<br />
To Remove a Slave Server from Your NIS Domain. . . . . . . . . . . . . . . . . . . . . . . . . . 157<br />
To Query BIND for Host Information After Querying NIS . . . . . . . . . . . . . . . . . . . 158<br />
To Use NIS With Short File Names. . . . . . . . . . . . . . . . . . . . . . . . . . . . . . . . . . . . . . 159<br />
To Configure an HP-UX Master Server in a Domain with Sun Systems . . . . . . . . 159<br />
Configuring <strong>and</strong> <strong>Administering</strong> an NIS Slave Server . . . . . . . . . . . . . . . . . . . . . . . . . 161<br />
To Edit the Slave Server’s passwd File . . . . . . . . . . . . . . . . . . . . . . . . . . . . . . . . . . . 162<br />
To Edit the Slave Server’s group File . . . . . . . . . . . . . . . . . . . . . . . . . . . . . . . . . . . . 163<br />
To Enable NIS Slave Server Capability. . . . . . . . . . . . . . . . . . . . . . . . . . . . . . . . . . . 164<br />
7
Contents<br />
To Verify Your NIS Slave Server Configuration . . . . . . . . . . . . . . . . . . . . . . . . . . . . 166<br />
To Schedule Regular Map Transfers from the NIS Master Server . . . . . . . . . . . . . 167<br />
To Restrict Access to the Slave Server. . . . . . . . . . . . . . . . . . . . . . . . . . . . . . . . . . . . 168<br />
Configuring <strong>and</strong> <strong>Administering</strong> an NIS Client . . . . . . . . . . . . . . . . . . . . . . . . . . . . . . 169<br />
To Edit the NIS Client’s passwd File. . . . . . . . . . . . . . . . . . . . . . . . . . . . . . . . . . . . . 170<br />
To Edit the NIS Client’s group File . . . . . . . . . . . . . . . . . . . . . . . . . . . . . . . . . . . . . . 171<br />
To Enable NIS Client Capability . . . . . . . . . . . . . . . . . . . . . . . . . . . . . . . . . . . . . . . . 172<br />
To Verify Your NIS Client Configuration. . . . . . . . . . . . . . . . . . . . . . . . . . . . . . . . . . 174<br />
To Tell Users How to Use yppasswd . . . . . . . . . . . . . . . . . . . . . . . . . . . . . . . . . . . . . 175<br />
To Prevent a Client from Binding to Unknown Servers. . . . . . . . . . . . . . . . . . . . . . 176<br />
To Bind an NIS Client to a Server on a Different Subnet . . . . . . . . . . . . . . . . . . . . 177<br />
Configuring <strong>and</strong> <strong>Administering</strong> Secure RPC (if NIS+ is not used) . . . . . . . . . . . . . . . 178<br />
To Have Users Create their Secure RPC Keys . . . . . . . . . . . . . . . . . . . . . . . . . . . . . 179<br />
To Create Secure RPC Keys for Users. . . . . . . . . . . . . . . . . . . . . . . . . . . . . . . . . . . . 180<br />
To Create Secure RPC Keys for Hosts . . . . . . . . . . . . . . . . . . . . . . . . . . . . . . . . . . . . 181<br />
To Tell Users How to Use Secure RPC . . . . . . . . . . . . . . . . . . . . . . . . . . . . . . . . . . . 182<br />
Summary of NIS Comm<strong>and</strong>s. . . . . . . . . . . . . . . . . . . . . . . . . . . . . . . . . . . . . . . . . . . . . 183<br />
5. Configuring <strong>and</strong> <strong>Administering</strong> NIS+<br />
Overview of NIS+ . . . . . . . . . . . . . . . . . . . . . . . . . . . . . . . . . . . . . . . . . . . . . . . . . . . . . . 187<br />
Advantages of NIS+ over NIS . . . . . . . . . . . . . . . . . . . . . . . . . . . . . . . . . . . . . . . . . . 187<br />
Disadvantages of NIS+ . . . . . . . . . . . . . . . . . . . . . . . . . . . . . . . . . . . . . . . . . . . . . . . . 188<br />
Structure of the NIS+ Namespace . . . . . . . . . . . . . . . . . . . . . . . . . . . . . . . . . . . . . . . 189<br />
Structure of an NIS+ Domain . . . . . . . . . . . . . . . . . . . . . . . . . . . . . . . . . . . . . . . . . . 190<br />
How NIS+ Information is Stored <strong>and</strong> Propagated . . . . . . . . . . . . . . . . . . . . . . . . . . 191<br />
NIS+ Tables. . . . . . . . . . . . . . . . . . . . . . . . . . . . . . . . . . . . . . . . . . . . . . . . . . . . . . . . . 191<br />
NIS+ Authentication <strong>and</strong> Authorization . . . . . . . . . . . . . . . . . . . . . . . . . . . . . . . . . . 193<br />
NIS Compatibility Mode. . . . . . . . . . . . . . . . . . . . . . . . . . . . . . . . . . . . . . . . . . . . . . . 196<br />
Planning the NIS+ Namespace . . . . . . . . . . . . . . . . . . . . . . . . . . . . . . . . . . . . . . . . . . . 197<br />
To Determine the Number of NIS+ Domains You Need . . . . . . . . . . . . . . . . . . . . . . 197<br />
To Determine the Number of NIS+ Servers You Need . . . . . . . . . . . . . . . . . . . . . . . 198<br />
To Determine Which Hosts Will Be NIS+ Servers . . . . . . . . . . . . . . . . . . . . . . . . . . 198<br />
Setting Up the NIS+ Namespace . . . . . . . . . . . . . . . . . . . . . . . . . . . . . . . . . . . . . . . . . 199<br />
To Set Up the Root Master Server . . . . . . . . . . . . . . . . . . . . . . . . . . . . . . . . . . . . . . . 200<br />
To Populate the NIS+ Tables on the Master Server . . . . . . . . . . . . . . . . . . . . . . . . . 202<br />
To Add Administrators to the NIS+ admin Group . . . . . . . . . . . . . . . . . . . . . . . . . . 205<br />
8
Contents<br />
To Set Up NIS+ Client Hosts . . . . . . . . . . . . . . . . . . . . . . . . . . . . . . . . . . . . . . . . . . . 206<br />
To Set Up NIS+ Replica Servers . . . . . . . . . . . . . . . . . . . . . . . . . . . . . . . . . . . . . . . . 208<br />
To Initialize NIS+ Client Users . . . . . . . . . . . . . . . . . . . . . . . . . . . . . . . . . . . . . . . . . 210<br />
To Set Up an NIS+ Subdomain . . . . . . . . . . . . . . . . . . . . . . . . . . . . . . . . . . . . . . . . . 211<br />
To Use BIND With NIS+ . . . . . . . . . . . . . . . . . . . . . . . . . . . . . . . . . . . . . . . . . . . . . . 214<br />
To Allow an NIS+ User Authenticated Access to Another Domain . . . . . . . . . . . . . 216<br />
<strong>Administering</strong> NIS+. . . . . . . . . . . . . . . . . . . . . . . . . . . . . . . . . . . . . . . . . . . . . . . . . . . . 217<br />
To List the Properties of NIS+ Objects . . . . . . . . . . . . . . . . . . . . . . . . . . . . . . . . . . . 218<br />
To Change the Default Properties for New NIS+ Objects . . . . . . . . . . . . . . . . . . . . 219<br />
To Change the Permissions for NIS+ Objects . . . . . . . . . . . . . . . . . . . . . . . . . . . . . . 220<br />
To Change the Ownership of NIS+ Objects. . . . . . . . . . . . . . . . . . . . . . . . . . . . . . . . 222<br />
To Change the Search Order of Domains . . . . . . . . . . . . . . . . . . . . . . . . . . . . . . . . . 223<br />
To List the Contents of an NIS+ Table . . . . . . . . . . . . . . . . . . . . . . . . . . . . . . . . . . . 224<br />
To Search an NIS+ Table . . . . . . . . . . . . . . . . . . . . . . . . . . . . . . . . . . . . . . . . . . . . . . 225<br />
To Add an Entry to an NIS+ Table . . . . . . . . . . . . . . . . . . . . . . . . . . . . . . . . . . . . . . 226<br />
To Remove an Entry from an NIS+ Table . . . . . . . . . . . . . . . . . . . . . . . . . . . . . . . . . 228<br />
To Modify an Entry in an NIS+ Table . . . . . . . . . . . . . . . . . . . . . . . . . . . . . . . . . . . . 229<br />
To Add a Host to an NIS+ Domain . . . . . . . . . . . . . . . . . . . . . . . . . . . . . . . . . . . . . . 231<br />
To Add a User to an NIS+ Domain . . . . . . . . . . . . . . . . . . . . . . . . . . . . . . . . . . . . . . 233<br />
To Create New Credentials for an Existing NIS+ Principal . . . . . . . . . . . . . . . . . . 236<br />
To Create New Credentials for the Root Master Server. . . . . . . . . . . . . . . . . . . . . . 237<br />
To Change a Password . . . . . . . . . . . . . . . . . . . . . . . . . . . . . . . . . . . . . . . . . . . . . . . . 239<br />
To Create an NIS+ Table . . . . . . . . . . . . . . . . . . . . . . . . . . . . . . . . . . . . . . . . . . . . . . 240<br />
To Remove an NIS+ Table . . . . . . . . . . . . . . . . . . . . . . . . . . . . . . . . . . . . . . . . . . . . . 241<br />
To Create or Remove Paths Among Tables . . . . . . . . . . . . . . . . . . . . . . . . . . . . . . . . 242<br />
To Create or Remove an NIS+ Group . . . . . . . . . . . . . . . . . . . . . . . . . . . . . . . . . . . . 243<br />
To Add or Remove Members of an NIS+ Group . . . . . . . . . . . . . . . . . . . . . . . . . . . . 244<br />
To Remove a Replica Server from an NIS+ Domain . . . . . . . . . . . . . . . . . . . . . . . . . 246<br />
To Remove an NIS+ Domain . . . . . . . . . . . . . . . . . . . . . . . . . . . . . . . . . . . . . . . . . . . 247<br />
To Back Up NIS+ Tables . . . . . . . . . . . . . . . . . . . . . . . . . . . . . . . . . . . . . . . . . . . . . . 248<br />
Summary of NIS+ Comm<strong>and</strong>s. . . . . . . . . . . . . . . . . . . . . . . . . . . . . . . . . . . . . . . . . . . . 250<br />
6. Configuring the Name Service Switch<br />
<strong>Installing</strong> <strong>and</strong> Customizing the nsswitch.conf File . . . . . . . . . . . . . . . . . . . . . . . . . . . 256<br />
Syntax of the nsswitch.conf File . . . . . . . . . . . . . . . . . . . . . . . . . . . . . . . . . . . . . . . . . . 258<br />
Default Configuration . . . . . . . . . . . . . . . . . . . . . . . . . . . . . . . . . . . . . . . . . . . . . . . . . . 261<br />
Troubleshooting the Name Service Switch. . . . . . . . . . . . . . . . . . . . . . . . . . . . . . . . . . 263<br />
9
Contents<br />
7. Configuring <strong>and</strong> Using the Remote Execution Facility (REX)<br />
How REX Works. . . . . . . . . . . . . . . . . . . . . . . . . . . . . . . . . . . . . . . . . . . . . . . . . . . . . . . 267<br />
REX Example . . . . . . . . . . . . . . . . . . . . . . . . . . . . . . . . . . . . . . . . . . . . . . . . . . . . . . . 268<br />
Configuring REX . . . . . . . . . . . . . . . . . . . . . . . . . . . . . . . . . . . . . . . . . . . . . . . . . . . . . . 269<br />
To Configure REX . . . . . . . . . . . . . . . . . . . . . . . . . . . . . . . . . . . . . . . . . . . . . . . . . . . . 269<br />
To Configure REX Security . . . . . . . . . . . . . . . . . . . . . . . . . . . . . . . . . . . . . . . . . . . . 271<br />
To Configure Logging for the rexd Daemon. . . . . . . . . . . . . . . . . . . . . . . . . . . . . . . . 272<br />
8. Troubleshooting <strong>NFS</strong> <strong>Services</strong><br />
Common Problems with <strong>NFS</strong> . . . . . . . . . . . . . . . . . . . . . . . . . . . . . . . . . . . . . . . . . . . . 275<br />
If You Receive an <strong>NFS</strong> “Server Not Responding” Message. . . . . . . . . . . . . . . . . . . . 276<br />
If You Receive an “Access Denied” Message . . . . . . . . . . . . . . . . . . . . . . . . . . . . . . . 279<br />
If You Receive a “Permission Denied” Message. . . . . . . . . . . . . . . . . . . . . . . . . . . . . 281<br />
If You Receive an “Unknown Host” or “Not In Hosts Database” Message . . . . . . . 283<br />
If You Receive a “Device Busy” Message . . . . . . . . . . . . . . . . . . . . . . . . . . . . . . . . . . 284<br />
If You Receive a “Stale File H<strong>and</strong>le” Message. . . . . . . . . . . . . . . . . . . . . . . . . . . . . . 285<br />
If a Program Hangs . . . . . . . . . . . . . . . . . . . . . . . . . . . . . . . . . . . . . . . . . . . . . . . . . . 287<br />
If Data is Lost Between the Client <strong>and</strong> the Server. . . . . . . . . . . . . . . . . . . . . . . . . . 289<br />
If You Cannot Start New Processes . . . . . . . . . . . . . . . . . . . . . . . . . . . . . . . . . . . . . . 290<br />
If You Receive a “Too Many Levels of Remote in Path” Message . . . . . . . . . . . . . . . 291<br />
Common Problems with NIS . . . . . . . . . . . . . . . . . . . . . . . . . . . . . . . . . . . . . . . . . . . . . 292<br />
If You Receive an NIS “Server Not Responding” Message . . . . . . . . . . . . . . . . . . . . 293<br />
If a User Cannot Log In . . . . . . . . . . . . . . . . . . . . . . . . . . . . . . . . . . . . . . . . . . . . . . . 294<br />
If You Receive an “Unknown Host” Message. . . . . . . . . . . . . . . . . . . . . . . . . . . . . . . 296<br />
If an NIS Client Cannot Bind to a Server . . . . . . . . . . . . . . . . . . . . . . . . . . . . . . . . . 298<br />
If NIS Returns Incorrect Information . . . . . . . . . . . . . . . . . . . . . . . . . . . . . . . . . . . . 299<br />
Common Problems with NIS+. . . . . . . . . . . . . . . . . . . . . . . . . . . . . . . . . . . . . . . . . . . . 301<br />
If NIS+ Cannot Find an Object . . . . . . . . . . . . . . . . . . . . . . . . . . . . . . . . . . . . . . . . . 302<br />
If You Have Authentication or Permissions Problems . . . . . . . . . . . . . . . . . . . . . . . 304<br />
If You Have Insufficient Memory or Disk Space . . . . . . . . . . . . . . . . . . . . . . . . . . . . 307<br />
If You Receive an “Unable to Fork” Message. . . . . . . . . . . . . . . . . . . . . . . . . . . . . . . 308<br />
If a User Cannot Log In . . . . . . . . . . . . . . . . . . . . . . . . . . . . . . . . . . . . . . . . . . . . . . . 309<br />
If nisping -C Fails or Transaction Logs Are Not Truncated . . . . . . . . . . . . . . . . . . . 311<br />
If a Replica Update Fails . . . . . . . . . . . . . . . . . . . . . . . . . . . . . . . . . . . . . . . . . . . . . . 312<br />
If You Receive an “Illegal Object Type” Message . . . . . . . . . . . . . . . . . . . . . . . . . . . 312<br />
If You Receive a “Could Not Bind to Server” Message . . . . . . . . . . . . . . . . . . . . . . . 313<br />
10
Contents<br />
If You Receive a “Generic System Error” or “Possible Loop Detected” Message . . . 313<br />
If You Receive a “Corrupt Log” or “Corrupt Database” Message . . . . . . . . . . . . . . . 314<br />
Performance Tuning. . . . . . . . . . . . . . . . . . . . . . . . . . . . . . . . . . . . . . . . . . . . . . . . . . . . 315<br />
To Diagnose <strong>NFS</strong> Performance Problems . . . . . . . . . . . . . . . . . . . . . . . . . . . . . . . . . 316<br />
To Improve <strong>NFS</strong> Server Performance . . . . . . . . . . . . . . . . . . . . . . . . . . . . . . . . . . . . 318<br />
To Adjust the Number of nfsd Processes . . . . . . . . . . . . . . . . . . . . . . . . . . . . . . . . . . 320<br />
To Improve <strong>NFS</strong> Client Performance. . . . . . . . . . . . . . . . . . . . . . . . . . . . . . . . . . . . . 321<br />
To Improve NIS+ Performance. . . . . . . . . . . . . . . . . . . . . . . . . . . . . . . . . . . . . . . . . . 323<br />
Logging <strong>and</strong> Tracing of <strong>NFS</strong> <strong>Services</strong>. . . . . . . . . . . . . . . . . . . . . . . . . . . . . . . . . . . . . . 325<br />
<strong>NFS</strong> Logging . . . . . . . . . . . . . . . . . . . . . . . . . . . . . . . . . . . . . . . . . . . . . . . . . . . . . . . . 326<br />
Automounter Logging. . . . . . . . . . . . . . . . . . . . . . . . . . . . . . . . . . . . . . . . . . . . . . . . . 329<br />
Automounter Tracing . . . . . . . . . . . . . . . . . . . . . . . . . . . . . . . . . . . . . . . . . . . . . . . . . 331<br />
Logging for the Other <strong>NFS</strong> <strong>Services</strong> . . . . . . . . . . . . . . . . . . . . . . . . . . . . . . . . . . . . . 333<br />
NIS Logging . . . . . . . . . . . . . . . . . . . . . . . . . . . . . . . . . . . . . . . . . . . . . . . . . . . . . . . . 335<br />
NIS+ Logging . . . . . . . . . . . . . . . . . . . . . . . . . . . . . . . . . . . . . . . . . . . . . . . . . . . . . . . 338<br />
Logging With nettl <strong>and</strong> netfmt. . . . . . . . . . . . . . . . . . . . . . . . . . . . . . . . . . . . . . . . . . 339<br />
Tracing With nettl <strong>and</strong> netfmt . . . . . . . . . . . . . . . . . . . . . . . . . . . . . . . . . . . . . . . . . . 340<br />
Normal System Startup. . . . . . . . . . . . . . . . . . . . . . . . . . . . . . . . . . . . . . . . . . . . . . . . . 341<br />
A. NIS+ Error Messages<br />
11
Contents<br />
12
1 <strong>Installing</strong> the <strong>NFS</strong> <strong>Services</strong><br />
Chapter 1 13
<strong>Installing</strong> the <strong>NFS</strong> <strong>Services</strong><br />
This chapter tells you how to install the <strong>NFS</strong> <strong>Services</strong> <strong>and</strong> briefly<br />
describes each one. It contains the following sections:<br />
• <strong>Installing</strong> the <strong>NFS</strong> <strong>Services</strong> Software<br />
• Overview of the <strong>NFS</strong> <strong>Services</strong><br />
This manual does not document <strong>NFS</strong> Diskless. For information on <strong>NFS</strong><br />
Diskless configuration <strong>and</strong> administration, see the Managing Systems<br />
<strong>and</strong> Workgroups manual.<br />
For more information, see Managing <strong>NFS</strong> <strong>and</strong> NIS, by Hal Stern,<br />
published by O’Reilly & Associates.<br />
14<br />
Chapter 1
<strong>Installing</strong> the <strong>NFS</strong> <strong>Services</strong><br />
<strong>Installing</strong> the <strong>NFS</strong> <strong>Services</strong> Software<br />
<strong>Installing</strong> the <strong>NFS</strong> <strong>Services</strong> Software<br />
Before you begin to install the software, make sure you have the correct<br />
operating system on your computer. The HP-UX operating system, the<br />
required link software, <strong>and</strong> the <strong>NFS</strong> <strong>Services</strong> software must all be the<br />
same version. You can check your HP-UX operating system version with<br />
the uname -r comm<strong>and</strong>.<br />
Use the HP-UX Software Distributor (SD) to install the <strong>NFS</strong> <strong>Services</strong> file<br />
set. Issue the following comm<strong>and</strong> to start the SD swinstall utility:<br />
/usr/sbin/swinstall<br />
The Software Distributor is documented in Managing HP-UX Software<br />
with SD-UX.<br />
Chapter 1 15
<strong>Installing</strong> the <strong>NFS</strong> <strong>Services</strong><br />
Overview of the <strong>NFS</strong> <strong>Services</strong><br />
Overview of the <strong>NFS</strong> <strong>Services</strong><br />
Hewlett-Packard’s <strong>NFS</strong> <strong>Services</strong> include the following:<br />
• Network File System (<strong>NFS</strong>) provides transparent access to files<br />
from anywhere on the network. An <strong>NFS</strong> server makes a directory<br />
available to other hosts on the network by “exporting” the directory.<br />
An <strong>NFS</strong> client provides access to the <strong>NFS</strong> server’s directory by<br />
“mounting” the directory. To users on the <strong>NFS</strong> client, the directory<br />
looks like part of the local file system. For information on configuring<br />
<strong>and</strong> administering <strong>NFS</strong>, see “Configuring <strong>and</strong> <strong>Administering</strong> <strong>NFS</strong>” on<br />
page 19.<br />
• Network Information Service (NIS) allows centralized<br />
management of common configuration files, like /etc/passwd,<br />
/etc/hosts, <strong>and</strong> /etc/services. An NIS “master server” holds<br />
master copies of the configuration files, or “maps”. The master server<br />
may distribute copies of the maps to NIS “slaves servers” to provide<br />
load balancing <strong>and</strong> reliability. An NIS client gets configuration<br />
information from the master server or a slave server instead of from<br />
its local configuration files. (Some local configuration files, like<br />
/etc/passwd <strong>and</strong> /etc/group, can be used in addition to the NIS<br />
maps.) For more information, see “Configuring <strong>and</strong> <strong>Administering</strong><br />
NIS” on page 135.<br />
• Network Information Service Plus (NIS+) is the next generation<br />
of NIS. Like NIS, it provides centralized management of common<br />
configuration files. Unlike NIS, it allows you to create multiple<br />
domains in a hierarchical structure called a “namespace.” It also has<br />
enhanced security features. It allows you to update the NIS+<br />
databases from any client host in the network without having to log<br />
into the master server. For more information, see “Configuring <strong>and</strong><br />
<strong>Administering</strong> NIS+” on page 185.<br />
• Network Lock Manager <strong>and</strong> Network Status Monitor<br />
(rpc.lockd <strong>and</strong> rpc.statd) provide file locking <strong>and</strong> synchronized file<br />
access to files that are shared with <strong>NFS</strong>. Files may be locked with<br />
lockf or fcntl. For more information, see the following man pages:<br />
lockd(1M), statd(1M), lockf(2), <strong>and</strong> fcntl(2).<br />
• Remote Procedure Call (RPC) is the mechanism that allows <strong>NFS</strong><br />
clients <strong>and</strong> <strong>NFS</strong> servers to communicate. You can write your own<br />
RPC applications, using rpcgen, an RPC compiler that simplifies<br />
16<br />
Chapter 1
<strong>Installing</strong> the <strong>NFS</strong> <strong>Services</strong><br />
Overview of the <strong>NFS</strong> <strong>Services</strong><br />
RPC programming. On HP-UX 10.30 <strong>and</strong> later,<br />
Transport-Independent RPC (TI-RPC) is supported. For information<br />
on RPC <strong>and</strong> rpcgen, see Power Programming with RPC, by John<br />
Bloomer, published by O’Reilly <strong>and</strong> Associates, Inc.<br />
• Remote Execution Facility (REX) allows you to execute<br />
comm<strong>and</strong>s interactively on a remote host while your local<br />
environment is simulated on the remote host. To use REX, you issue<br />
the on comm<strong>and</strong> on your local host, supplying the comm<strong>and</strong> you want<br />
to execute remotely <strong>and</strong> the name of the remote host where you want<br />
the comm<strong>and</strong> to execute. Your current environment variables are<br />
then copied to the remote host, <strong>and</strong> your home directory is mounted<br />
on the remote host using <strong>NFS</strong>. For information on configuring,<br />
administering, <strong>and</strong> using REX, see Chapter 7, “Configuring <strong>and</strong><br />
Using the Remote Execution Facility (REX).”<br />
• The rup comm<strong>and</strong> collects <strong>and</strong> displays status information about the<br />
hosts on the local network. All hosts running the rstatd daemon will<br />
respond to queries from the rup comm<strong>and</strong>. For more information, see<br />
the man pages rstatd(1M) <strong>and</strong> rup(1). For information on<br />
configuring rstatd, see “Configuring the Other <strong>NFS</strong> Daemons <strong>and</strong><br />
<strong>Services</strong>” on page 122.<br />
• The rusers comm<strong>and</strong> collects <strong>and</strong> displays information about all<br />
users logged into the hosts on the local network. All hosts running the<br />
rusersd daemon will respond to queries from the rusers comm<strong>and</strong>.<br />
For more information, see the man pages rusersd(1M) <strong>and</strong><br />
rusers(1). For information on configuring rusersd, see “Configuring<br />
the Other <strong>NFS</strong> Daemons <strong>and</strong> <strong>Services</strong>” on page 122.<br />
• The rwall program allows you to broadcast a message to all the users<br />
logged into a remote host. The rwall program sends a message to a<br />
specified host where the rwalld daemon is running. The rwalld<br />
daemon then writes the message to all the users logged into that host.<br />
For more information, see the man pages rwalld(1M) <strong>and</strong> rwall(1M).<br />
For information on configuring rwalld, see “Configuring the Other<br />
<strong>NFS</strong> Daemons <strong>and</strong> <strong>Services</strong>” on page 122.<br />
• The spray comm<strong>and</strong> sends a stream of packets to a specified host <strong>and</strong><br />
then reports how many of the packets were received <strong>and</strong> what the<br />
transfer rate was. All hosts running the sprayd daemon will respond<br />
to packets sent by the spray comm<strong>and</strong>. For more information, see the<br />
man pages sprayd(1M) <strong>and</strong> spray(1M). For information on<br />
configuring sprayd, see “Configuring the Other <strong>NFS</strong> Daemons <strong>and</strong><br />
<strong>Services</strong>” on page 122.<br />
Chapter 1 17
<strong>Installing</strong> the <strong>NFS</strong> <strong>Services</strong><br />
Overview of the <strong>NFS</strong> <strong>Services</strong><br />
• The quota comm<strong>and</strong>, which displays information about a user’s disk<br />
usage <strong>and</strong> limits, may be used to get information about a user on a<br />
remote host, if the rquotad daemon is running on the remote host.<br />
For more information, see the man pages rquotad(1M) <strong>and</strong> quota(1).<br />
For information on configuring rquotad, see “Configuring the Other<br />
<strong>NFS</strong> Daemons <strong>and</strong> <strong>Services</strong>” on page 122.<br />
18<br />
Chapter 1
2 Configuring <strong>and</strong> <strong>Administering</strong><br />
<strong>NFS</strong><br />
This chapter tells you how to configure <strong>and</strong> administer an HP 9000 as an<br />
<strong>NFS</strong> server or client, by editing files <strong>and</strong> issuing HP-UX comm<strong>and</strong>s.<br />
Chapter 2 19
Configuring <strong>and</strong> <strong>Administering</strong> <strong>NFS</strong><br />
An <strong>NFS</strong> server is a machine that “exports” (makes available) its local<br />
files <strong>and</strong> directories to <strong>NFS</strong> clients. An <strong>NFS</strong> client is a machine that<br />
“mounts” files <strong>and</strong> directories exported by <strong>NFS</strong> servers. <strong>NFS</strong>-mounted<br />
files <strong>and</strong> directories look to users like part of the <strong>NFS</strong> client’s local file<br />
system.<br />
A machine can be an <strong>NFS</strong> server <strong>and</strong> an <strong>NFS</strong> client at the same time.<br />
NOTE<br />
HP does not support NIS over Wide Area Networks (WANs). WANs<br />
include network links using X.25, microwave links, public common<br />
carriers, or high speed lines (such as 56kb).<br />
This chapter is intended for system administrators who prefer not to use<br />
SAM. However, Hewlett-Packard recommends that you use SAM to<br />
configure <strong>and</strong> administer <strong>NFS</strong>. SAM (System Administration Manager)<br />
is Hewlett-Packard’s windows-based user interface for performing<br />
system administration tasks. To run SAM, type sam at the HP-UX<br />
prompt. SAM has an extensive online help facility.<br />
This chapter contains the following sections:<br />
• Preparing for <strong>NFS</strong> Configuration<br />
• Configuring <strong>and</strong> <strong>Administering</strong> an <strong>NFS</strong> Server<br />
• Configuring <strong>and</strong> <strong>Administering</strong> an <strong>NFS</strong> Client<br />
• Configuring <strong>and</strong> <strong>Administering</strong> the <strong>NFS</strong> Automounter<br />
• Configuring <strong>and</strong> Using <strong>NFS</strong> Netgroups<br />
• Configuring the Other <strong>NFS</strong> Daemons <strong>and</strong> <strong>Services</strong><br />
20<br />
Chapter 2
Configuring <strong>and</strong> <strong>Administering</strong> <strong>NFS</strong><br />
Preparing for <strong>NFS</strong> Configuration<br />
Preparing for <strong>NFS</strong> Configuration<br />
Before you configure your machine as an <strong>NFS</strong> server or client, you must<br />
perform the following tasks:<br />
1. To Check the Network Connections<br />
2. To Set User IDs <strong>and</strong> Group IDs (if neither NIS nor NIS+ is used)<br />
3. To Ensure that No User is a Member of Too Many Groups<br />
The rest of this section explains the procedures for performing these<br />
tasks.<br />
To Check the Network Connections<br />
• Issue the /usr/sbin/ping(1M) comm<strong>and</strong> for each system with which<br />
your system will communicate using <strong>NFS</strong>.<br />
If the ping(1M) comm<strong>and</strong> fails, see the manuals listed below for<br />
troubleshooting procedures.<br />
Before you configure <strong>NFS</strong>, you must have already installed <strong>and</strong><br />
configured the network hardware <strong>and</strong> software on all the machines that<br />
will use <strong>NFS</strong>. For information on installing <strong>and</strong> configuring the network<br />
hardware <strong>and</strong> software, refer to the following manuals:<br />
<strong>Installing</strong> <strong>and</strong> <strong>Administering</strong> LAN/9000 Software<br />
<strong>Installing</strong> <strong>and</strong> <strong>Administering</strong> Token Ring/9000 Software<br />
<strong>Installing</strong> <strong>and</strong> <strong>Administering</strong> FDDI/9000 Software<br />
To Set User IDs <strong>and</strong> Group IDs (if neither NIS nor<br />
NIS+ is used)<br />
• Create one /etc/passwd file <strong>and</strong> one /etc/group file that contain all<br />
the users <strong>and</strong> groups on the network, <strong>and</strong> then copy these files to all<br />
the machines on the network.<br />
or<br />
• Edit the /etc/passwd <strong>and</strong> /etc/group files on each machine to<br />
ensure that the following conditions are true:<br />
Chapter 2 21
Configuring <strong>and</strong> <strong>Administering</strong> <strong>NFS</strong><br />
Preparing for <strong>NFS</strong> Configuration<br />
— Each user has the same user ID on all machines where that user<br />
has an account.<br />
— No two users anywhere on the network have the same user ID.<br />
— Each group has the same group ID on all machines where that<br />
group exists.<br />
— No two groups on the network have the same group ID.<br />
When users request <strong>NFS</strong> access to remote files, their user IDs <strong>and</strong> group<br />
IDs are used to check file ownership <strong>and</strong> permissions, just as they are<br />
locally.<br />
If a user has one user ID on an <strong>NFS</strong> client <strong>and</strong> a different user ID on an<br />
<strong>NFS</strong> server, the server will not grant the user access to his or her files on<br />
the server, because it thinks the files belong to someone else.<br />
If a user on one machine has the same user ID as a user on another<br />
machine, one user may gain access to the other user’s files.<br />
For information on the /etc/passwd <strong>and</strong> /etc/group files, type man 4<br />
passwd or man 4 group at the HP-UX prompt.<br />
If you are using NIS or NIS+, the /etc/passwd <strong>and</strong> /etc/group files are<br />
managed by a master server, <strong>and</strong> all other machines on the network<br />
request user <strong>and</strong> group information from the servers. With NIS or NIS+,<br />
it is unnecessary to set user IDs <strong>and</strong> group IDs on each machine. For<br />
instructions on configuring NIS, see “Configuring <strong>and</strong> <strong>Administering</strong><br />
NIS” on page 135. For instructions on configuring NIS+, see<br />
“Configuring <strong>and</strong> <strong>Administering</strong> NIS+” on page 185.<br />
To Ensure that No User is a Member of Too Many<br />
Groups<br />
1. If you are not running NIS or NIS+, issue the following comm<strong>and</strong> for<br />
each user on your system:<br />
/usr/bin/grep -c username /etc/group<br />
This comm<strong>and</strong> returns the number of occurrences of username in the<br />
/etc/group file.<br />
If you are using NIS to manage your group database, issue the<br />
following comm<strong>and</strong> for each user in your domain:<br />
/usr/bin/ypcat -k group | /usr/bin/grep -c username<br />
22<br />
Chapter 2
Configuring <strong>and</strong> <strong>Administering</strong> <strong>NFS</strong><br />
Preparing for <strong>NFS</strong> Configuration<br />
This comm<strong>and</strong> returns the number of occurrences of username in the<br />
NIS group database.<br />
If you are using NIS+ to manage your group database, issue the<br />
following comm<strong>and</strong> for each user in your domain:<br />
niscat -M group.org_dir | /usr/bin/grep -c username<br />
2. If any user is a member of more than 16 groups, remove the user from<br />
some of the groups. See “To Modify an NIS Map” on page 152 for<br />
instructions on modifying an NIS map. See “To Modify an Entry in an<br />
NIS+ Table” on page 229 for instructions on modifying an NIS+<br />
table.<br />
If you are running a version of HP-UX older than release 9.0, a user<br />
can be a member of only 8 groups, rather than 16.<br />
If a user is a member of too many groups, <strong>NFS</strong> returns an RPC<br />
authentication error when the user attempts access to files or directories<br />
using <strong>NFS</strong>.<br />
Chapter 2 23
Configuring <strong>and</strong> <strong>Administering</strong> <strong>NFS</strong><br />
Configuring <strong>and</strong> <strong>Administering</strong> an <strong>NFS</strong> Server<br />
Configuring <strong>and</strong> <strong>Administering</strong> an <strong>NFS</strong> Server<br />
An <strong>NFS</strong> server is a machine that “exports” its local directories (makes<br />
them available for client machines to mount using <strong>NFS</strong>). On the <strong>NFS</strong><br />
client, these mounted files <strong>and</strong> directories look to users like part of the<br />
client’s local file system. An <strong>NFS</strong> server can also be an <strong>NFS</strong> client.<br />
Following are the tasks involved in configuring <strong>and</strong> administering an<br />
<strong>NFS</strong> server. The first two tasks are the only ones required to get your<br />
server up <strong>and</strong> running.<br />
• To Make Directories Available to <strong>NFS</strong> Clients (Export Directories)<br />
• To Enable <strong>NFS</strong> Server Capability<br />
• To Remove (Unexport) an Exported <strong>Directory</strong><br />
• To Enable PC <strong>NFS</strong> Server Capability<br />
• To Disable <strong>NFS</strong> Server Capability<br />
This section tells you how to perform these tasks, by editing files <strong>and</strong><br />
issuing HP-UX comm<strong>and</strong>s. However, Hewlett-Packard recommends that<br />
you use SAM to configure <strong>and</strong> administer <strong>NFS</strong>. SAM (System<br />
Administration Manager) is Hewlett-Packard’s windows-based user<br />
interface for performing system administration tasks. To run SAM, type<br />
sam at the HP-UX prompt. SAM has an extensive online help facility.<br />
To Make Directories Available to <strong>NFS</strong> Clients (Export<br />
Directories)<br />
1. Add a line to the /etc/exports file for each directory you want to<br />
make available to <strong>NFS</strong> clients, using a text editor like vi. If the<br />
/etc/exports file does not exist on your system, you will have to<br />
create it. Following is the syntax of a line in the /etc/exports file:<br />
directory [-option[,option]]<br />
Type man 4 exports at the HP-UX prompt for a complete list of the<br />
export options. After adding your exported directories to the<br />
/etc/exports file, you must enable <strong>NFS</strong> server capability before<br />
<strong>NFS</strong> clients can mount your exported directories. See “To Enable <strong>NFS</strong><br />
Server Capability” on page 28.<br />
24<br />
Chapter 2
Configuring <strong>and</strong> <strong>Administering</strong> <strong>NFS</strong><br />
Configuring <strong>and</strong> <strong>Administering</strong> an <strong>NFS</strong> Server<br />
2. If your system is already running as an <strong>NFS</strong> server, issue the<br />
following comm<strong>and</strong> to add the directory to your server’s internal list<br />
of exported directories:<br />
/usr/sbin/exportfs directory<br />
You can issue the exportfs -i comm<strong>and</strong> to add the directory to your<br />
server’s internal list of exported directories, without adding the directory<br />
to the /etc/exports file. However, it will stop being exported when you<br />
reboot your system or restart <strong>NFS</strong>, unless you also add it to the<br />
/etc/exports file. (Issuing the exportfs comm<strong>and</strong> does not change the<br />
contents of the /etc/exports file.) Type man 1M exportfs for more<br />
information.<br />
You cannot export a directory <strong>and</strong> its ancestor or descendant, if they are<br />
on the same disk or logical volume. For example, if you are exporting the<br />
root directory (/), you cannot also export /opt, unless / <strong>and</strong> /opt are on<br />
different disks or logical volumes. Likewise, if you are exporting<br />
/opt/frame, you cannot also export /opt unless /opt/frame <strong>and</strong> /opt<br />
are on different disks or logical volumes. However, if a directory <strong>and</strong> its<br />
ancestor or descendant are on different disks or logical volumes, <strong>and</strong> you<br />
want to export both of them, you must export them using two separate<br />
entries in /etc/exports. Use the bdf(1M) comm<strong>and</strong> to determine<br />
whether your file systems are on different disks or logical volumes. Each<br />
line in the bdf output is a separate disk or volume that requires its own<br />
entry in /etc/exports if you want to export it.<br />
The /etc/exports file should be owned by root <strong>and</strong> have mode 644<br />
(-rw-r--r--).<br />
The export options that restrict access to an exported directory are<br />
applied in addition to the regular HP-UX permissions already in place on<br />
that directory. For example, if only the owner of a file has permission to<br />
write to it, nobody else can write to the file, even if it is exported to the<br />
world with read/write permission.<br />
Access permissions may also be specified on the <strong>NFS</strong> client when a<br />
directory is mounted. If these permissions are different from the<br />
permissions for the exported directory on the <strong>NFS</strong> server, the more<br />
restrictive permissions are used.<br />
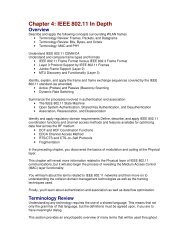
It is not a good idea to export a directory if it contains a symbolic link<br />
that points outside the exported directory. Once the directory is mounted<br />
on an <strong>NFS</strong> client, the symbolic link will be resolved locally on the client,<br />
so the destination of the symbolic link must exist on the client as well as<br />
the server. If the destination of the symbolic link does not exist on the<br />
Chapter 2 25
Configuring <strong>and</strong> <strong>Administering</strong> <strong>NFS</strong><br />
Configuring <strong>and</strong> <strong>Administering</strong> an <strong>NFS</strong> Server<br />
client, a No such file or directory message will be displayed<br />
whenever anyone attempts access to it.<br />
Figure 2-1 illustrates the problem of symbolic links in <strong>NFS</strong> mounts,<br />
where the destination of the symbolic link exists on the <strong>NFS</strong> server but<br />
might not exist on the <strong>NFS</strong> client.<br />
Figure 2-1<br />
Symbolic Links in <strong>NFS</strong> Mounts<br />
<strong>NFS</strong> server<br />
/<br />
<strong>NFS</strong> client<br />
/<br />
/exports<br />
/dir1<br />
/nonexports<br />
/file2<br />
/nfs<br />
/dir1<br />
Where is<br />
/file2?<br />
/file1 /link<br />
/file1 /link<br />
symbolic link<br />
Examples from /etc/exports<br />
The following example exports the /usr/bin directory to <strong>NFS</strong> clients<br />
cabbage, cauliflower, <strong>and</strong> broccoli. Users on client broccoli have<br />
read/write access to the /usr/bin directory. Users on cabbage <strong>and</strong><br />
cauliflower have read-only access. In addition to the export options,<br />
the HP-UX permissions for the /usr/bin directory must be set to allow<br />
access to the world or to a group that includes the users on broccoli,<br />
cabbage <strong>and</strong> cauliflower.<br />
/usr/bin -access=cabbage:cauliflower:broccoli,rw=broccoli<br />
The following example allows all <strong>NFS</strong> clients read-only access to the<br />
directory /usr/share/man. The /usr/share/man directory must also<br />
allow read access to <strong>NFS</strong> users (for example, with -r--r--r--<br />
permissions).<br />
/usr/share/man -ro<br />
The following example exports the /var/mail directory. It allows root<br />
access to clients sage, thyme, <strong>and</strong> basil. The root users on all other <strong>NFS</strong><br />
clients are considered “unknown” to the <strong>NFS</strong> server, so they are given<br />
the access privileges of user nobody. Non-root users on all <strong>NFS</strong> clients<br />
26<br />
Chapter 2
Configuring <strong>and</strong> <strong>Administering</strong> <strong>NFS</strong><br />
Configuring <strong>and</strong> <strong>Administering</strong> an <strong>NFS</strong> Server<br />
are allowed read/write access to the /var/mail directory, if the HP-UX<br />
permissions on the /var/mail directory allow them read/write access.<br />
/var/mail -root=sage:thyme:basil<br />
The following example exports the private root directory of diskless<br />
client sage. It allows root access to the root user on client sage. All other<br />
users on client sage have read/write access, if they are allowed<br />
read/write access through the regular HP-UX permissions. Users on<br />
other <strong>NFS</strong> clients have read-only access, if they are allowed read access<br />
through the HP-UX permissions.<br />
/export/private_roots/sage -rw=sage,root=sage<br />
In the following example, any user without a valid user ID who attempts<br />
access to client basil’s private root directory will receive an RPC<br />
authentication error, because anonymous access is denied with the<br />
anon=65535 option. The root user on client basil is allowed root access<br />
to the directory, but the root users on all other machines are treated as<br />
“unknown” <strong>and</strong> denied access. The non-root users on all <strong>NFS</strong> clients are<br />
allowed read/write access, if the HP-UX permissions on that directory<br />
allow them read/write access.<br />
/export/private_roots/basil -root=basil,anon=65535<br />
The following example exports the /export/newsletter directory to all<br />
<strong>NFS</strong> clients. Root users will be given the effective user ID of 200. Other<br />
anonymous users will keep their own user IDs (even though they do not<br />
exist in the <strong>NFS</strong> server’s passwd database), but they will be given the<br />
access permissions associated with user ID 200. If a root user is allowed<br />
to create a file in this directory, the ls comm<strong>and</strong> will show that it is<br />
owned by user ID 200. If an anonymous user with a non-zero user ID (for<br />
example, 840) is allowed to create a file in this directory, the ls comm<strong>and</strong><br />
will show that it is owned by user ID 840.<br />
/export/newsletter -anon=200<br />
The following example exports the /opt/frame directory to all <strong>NFS</strong><br />
clients. Non-root users have read/write access (if the regular HP-UX<br />
permissions allow it), <strong>and</strong> root users are given the access privileges of<br />
user nobody. <strong>NFS</strong> writes are done asynchronously; that is, when an <strong>NFS</strong><br />
client writes data to a mounted directory, the server returns a response<br />
before writing the data to disk. This allows the client to continue<br />
processing without waiting for the write request to complete.<br />
/opt/frame -async<br />
Chapter 2 27
Configuring <strong>and</strong> <strong>Administering</strong> <strong>NFS</strong><br />
Configuring <strong>and</strong> <strong>Administering</strong> an <strong>NFS</strong> Server<br />
To Enable <strong>NFS</strong> Server Capability<br />
1. In the /etc/rc.config.d/nfsconf file, make sure the <strong>NFS</strong>_SERVER<br />
<strong>and</strong> START_MOUNTD variables are set to 1, as follows:<br />
<strong>NFS</strong>_SERVER=1<br />
START_MOUNTD=1<br />
2. Issue the following comm<strong>and</strong> to run the <strong>NFS</strong> startup script:<br />
/sbin/init.d/nfs.server start<br />
The <strong>NFS</strong> startup script uses the variables in<br />
/etc/rc.config.d/nfsconf to determine which processes to start.<br />
The START_MOUNTD variable causes the <strong>NFS</strong> startup script to start<br />
rpc.mountd, the mount daemon.<br />
CAUTION<br />
If rpc.mountd is configured in /etc/inetd.conf on your system, set the<br />
START_MOUNTD flag to 0. Mounts will fail if rpc.mountd is enabled<br />
through both /etc/inetd.conf <strong>and</strong> /etc/rc.config.d/nfsconf.<br />
For more information, see the following man pages: mountd(1M) <strong>and</strong><br />
inetd.conf(4).<br />
To Remove (Unexport) an Exported <strong>Directory</strong><br />
1. On the <strong>NFS</strong> server, issue the following comm<strong>and</strong> for a list of all the<br />
<strong>NFS</strong> clients that have mounted the directory you want to unexport:<br />
/usr/sbin/showmount -a<br />
NOTE<br />
The output of the showmount comm<strong>and</strong> is not always complete. If an <strong>NFS</strong><br />
client mounts a remote directory twice <strong>and</strong> unmounts it only once, the<br />
remote directory is still mounted on the client, but the showmount<br />
comm<strong>and</strong> does not list that client. Also, clients configured to<br />
automount a directory will not be listed by the showmount comm<strong>and</strong> if<br />
the directory is not currently mounted.<br />
2. On every <strong>NFS</strong> client that has the directory mounted, issue the<br />
following comm<strong>and</strong> for a list of the process IDs <strong>and</strong> user names of<br />
28<br />
Chapter 2
Configuring <strong>and</strong> <strong>Administering</strong> <strong>NFS</strong><br />
Configuring <strong>and</strong> <strong>Administering</strong> an <strong>NFS</strong> Server<br />
everyone using the mounted directory:<br />
/usr/sbin/fuser -u servername:/directory<br />
3. Warn any users to cd out of the directory, <strong>and</strong> kill any processes that<br />
are using the directory, or wait until the processes terminate. You can<br />
use the following comm<strong>and</strong> to kill all processes using the directory:<br />
/usr/sbin/fuser -ck local_mount_point<br />
4. On every <strong>NFS</strong> client that has the directory mounted, issue the<br />
following comm<strong>and</strong> to unmount the directory:<br />
/usr/sbin/umount local_mount_point<br />
or<br />
/usr/sbin/umount servername:/directory<br />
5. On every <strong>NFS</strong> client that had the directory mounted, use a text editor<br />
to comment out or remove the line in the /etc/fstab file that lists<br />
the directory you want to unexport. This prevents clients from<br />
attempting to mount the directory when they reboot.<br />
6. On every client that has the directory configured to be automounted,<br />
edit the /etc/auto_* files to comment out or remove the directory<br />
from the automounter maps. Clients that automount the directory<br />
may not be listed by the showmount comm<strong>and</strong>.<br />
If you are using NIS to manage your automounter maps, edit the<br />
/etc/auto_* files on the NIS master server, <strong>and</strong> then issue the<br />
following comm<strong>and</strong>s to regenerate the maps <strong>and</strong> push them to the<br />
slave servers:<br />
cd /var/yp<br />
/usr/ccs/bin/make auto.mapname auto.mapname ...<br />
If you are using NIS+ to manage your automounter maps, see “To<br />
Remove an Entry from an NIS+ Table” on page 228.<br />
7. If you modified any direct automounter maps or the automounter<br />
master map, restart the automounter. See “To Restart the<br />
Automounter” on page 83.<br />
8. On the <strong>NFS</strong> server, use a text editor to remove the line in the<br />
/etc/exports file that lists the directory you want to unexport.<br />
9. On the <strong>NFS</strong> server, issue the following comm<strong>and</strong> to unexport the<br />
directory:<br />
/usr/sbin/exportfs -u directory<br />
Chapter 2 29
Configuring <strong>and</strong> <strong>Administering</strong> <strong>NFS</strong><br />
Configuring <strong>and</strong> <strong>Administering</strong> an <strong>NFS</strong> Server<br />
If you unexport a directory that an <strong>NFS</strong> client currently has mounted,<br />
the next time someone on that client requests access to the directory,<br />
<strong>NFS</strong> will return an <strong>NFS</strong> stale file h<strong>and</strong>le error message. The client<br />
may be able to unmount the directory, but if that does not work, the<br />
client must reboot to recover.<br />
For more information, see the following man pages: showmount(1M),<br />
fuser(1M), umount(1M), <strong>and</strong> exportfs(1M), make(1), <strong>and</strong> ypmake(1M).<br />
To Enable PC <strong>NFS</strong> Server Capability<br />
1. If necessary, create a file called /etc/pcnfsd.conf <strong>and</strong> add PC <strong>NFS</strong><br />
configuration information to it. The /etc/pcnfsd.conf file is not<br />
required in order to run pcnfsd. For more information on the<br />
/etc/pcnfsd.conf file, type man 1M pcnfsd at the HP-UX prompt.<br />
2. In the /etc/rc.config.d/nfsconf file, use a text editor to set the<br />
PC<strong>NFS</strong>_SERVER flag to 1, as follows:<br />
PC<strong>NFS</strong>_SERVER=1<br />
3. Issue the following comm<strong>and</strong> to run the <strong>NFS</strong> startup script:<br />
/sbin/init.d/nfs.server start<br />
The PC<strong>NFS</strong>_SERVER flag causes the <strong>NFS</strong> startup script to start the PC<br />
<strong>NFS</strong> server daemon, pcnfsd. As a PC <strong>NFS</strong> server, your system can<br />
export its directories <strong>and</strong> files to PC <strong>NFS</strong> clients.<br />
Following are some reasons why you might want to create an<br />
/etc/pcnfsd.conf file:<br />
• If your PC <strong>NFS</strong> client software is assigning user IDs smaller than 101<br />
or greater than 60002, set the uidrange in the /etc/pcnfsd.conf<br />
file to allow access to a different range of user IDs, as in the following<br />
example:<br />
uidrange 80-60005<br />
• If you want to give PC users a different set of default print options,<br />
the /etc/pcnfsd.conf file should contain a line similar to the<br />
following, which defines raw as a default print option for PC users<br />
submitting jobs to the printer lj3_2:<br />
printer lj3_2 lj3_2 lp -dlj3_2 -oraw<br />
The /etc/pcnfsd.conf file is read when the pcnfsd daemon starts up.<br />
If you make any changes to /etc/pcnfsd.conf while pcnfsd is running,<br />
30<br />
Chapter 2
Configuring <strong>and</strong> <strong>Administering</strong> <strong>NFS</strong><br />
Configuring <strong>and</strong> <strong>Administering</strong> an <strong>NFS</strong> Server<br />
you must restart pcnfsd before your changes will take effect.<br />
A PC must have <strong>NFS</strong> client software installed in order to use your<br />
system as a PC <strong>NFS</strong> server.<br />
For more information on pcnfsd, type man 1M pcnfsd at the HP-UX<br />
prompt.<br />
To Disable <strong>NFS</strong> Server Capability<br />
1. On the <strong>NFS</strong> server, issue the following comm<strong>and</strong> for a list of all the<br />
<strong>NFS</strong> clients that have directories mounted from the <strong>NFS</strong> server you<br />
are planning to disable:<br />
/usr/sbin/showmount -a<br />
NOTE<br />
The output of the showmount comm<strong>and</strong> is not always complete. If an <strong>NFS</strong><br />
client mounts a remote directory twice <strong>and</strong> unmounts it only once, the<br />
remote directory is still mounted on the client, but the showmount<br />
comm<strong>and</strong> does not list that client. Also, clients that are configured to<br />
automount a directory will not be listed by the showmount comm<strong>and</strong> if<br />
the directory is not currently mounted.<br />
2. On every <strong>NFS</strong> client listed by the showmount comm<strong>and</strong>, issue the<br />
following comm<strong>and</strong> for each directory that is mounted from your <strong>NFS</strong><br />
server:<br />
/usr/sbin/fuser -u servername:/directory<br />
This comm<strong>and</strong> lists the process IDs <strong>and</strong> user names of everyone using<br />
the mounted directory.<br />
3. Warn any users to cd out of the directory, <strong>and</strong> kill any processes that<br />
are using the directory, or wait until the processes terminate. You can<br />
use the following comm<strong>and</strong> to kill all processes using the directory:<br />
/usr/sbin/fuser -ck local_mount_point<br />
4. On every client that has directories mounted from your server, issue<br />
the following comm<strong>and</strong>:<br />
/usr/sbin/umount -h servername<br />
5. If your server will be down for a long time, edit the /etc/fstab file on<br />
each client to comment out or remove any <strong>NFS</strong> mounts from the<br />
Chapter 2 31
Configuring <strong>and</strong> <strong>Administering</strong> <strong>NFS</strong><br />
Configuring <strong>and</strong> <strong>Administering</strong> an <strong>NFS</strong> Server<br />
server you are planning to disable. This prevents the clients from<br />
attempting to mount directories from your server when the clients<br />
are rebooted.<br />
6. If your server will be down for a long time, edit the /etc/auto_* files<br />
on each client to comment out or remove any automounts from the<br />
server you are planning to disable. Clients that automount the<br />
server’s directories might not be listed by the showmount comm<strong>and</strong>.<br />
If you are using NIS to manage your automounter maps, edit the<br />
/etc/auto_* files on the NIS master server, <strong>and</strong> then issue the<br />
following comm<strong>and</strong>s to regenerate the maps <strong>and</strong> push them to the<br />
slave servers:<br />
cd /var/yp<br />
/usr/ccs/bin/make auto.mapname auto.mapname ...<br />
If you are using NIS+ to manage your automounter maps, see “To<br />
Remove an Entry from an NIS+ Table” on page 228.<br />
7. If you modified any direct automounter maps or the automounter<br />
master map, restart the automounter. See “To Restart the<br />
Automounter” on page 83.<br />
8. Issue the following comm<strong>and</strong> on the server to unexport all exported<br />
directories:<br />
/usr/sbin/exportfs -au<br />
9. On the <strong>NFS</strong> server, edit the /etc/rc.config.d/nfsconf file to set<br />
the <strong>NFS</strong>_SERVER variable to 0. This prevents the <strong>NFS</strong> server daemons<br />
from starting up when your system reboots. If your server will be<br />
down only a short time, this step is unnecessary.<br />
<strong>NFS</strong>_SERVER=0<br />
10.Edit the /etc/inetd.conf file to comment out the line that contains<br />
rpc.mountd (if it exists) <strong>and</strong> the lines for the other RPC services.<br />
11.Issue the following comm<strong>and</strong> to disable <strong>NFS</strong> server capability:<br />
/sbin/init.d/nfs.server stop<br />
If your <strong>NFS</strong> server will be down for only a very short period of time, this<br />
procedure is not necessary. If the server is down for only a few minutes,<br />
<strong>and</strong> directories are hard-mounted on the clients, clients attempting<br />
access to the server will simply hang until it comes back up. Then, they<br />
will resume access to it as if nothing had happened.<br />
32<br />
Chapter 2
Configuring <strong>and</strong> <strong>Administering</strong> <strong>NFS</strong><br />
Configuring <strong>and</strong> <strong>Administering</strong> an <strong>NFS</strong> Server<br />
However, if the server will be down for a long time, <strong>NFS</strong> clients<br />
attempting access to it will have to interrupt their attempts, usually<br />
with [CTRL]-C. If directories are mounted with the nointr option,<br />
clients must reboot their systems in order to stop trying to access a down<br />
server.<br />
See the following man pages for more information: showmount(1M),<br />
fuser(1M), exportfs(1M), <strong>and</strong> mountd(1M).<br />
Chapter 2 33
Configuring <strong>and</strong> <strong>Administering</strong> <strong>NFS</strong><br />
Configuring <strong>and</strong> <strong>Administering</strong> an <strong>NFS</strong> Client<br />
Configuring <strong>and</strong> <strong>Administering</strong> an <strong>NFS</strong> Client<br />
An <strong>NFS</strong> client is a machine that “mounts” remote directories using<br />
<strong>NFS</strong>. These mounted remote directories appear to users as if they are<br />
part of the <strong>NFS</strong> client’s local file system. An <strong>NFS</strong> client can also be an<br />
<strong>NFS</strong> server. Following are the tasks involved in configuring <strong>and</strong><br />
administering an <strong>NFS</strong> client. Only the first four tasks are required in<br />
order to get your client up <strong>and</strong> running.<br />
• Deciding Between St<strong>and</strong>ard-Mounted Directories <strong>and</strong> Automounted<br />
Directories<br />
• To Mount a Remote <strong>Directory</strong> Using a St<strong>and</strong>ard <strong>NFS</strong> Mount<br />
• To Enable <strong>NFS</strong> Client Capability<br />
• To Verify Your <strong>NFS</strong> Client Configuration<br />
• To Change the Default Mount Options<br />
• To Ensure Data Integrity Between the Client <strong>and</strong> Server<br />
• To Remove (Unmount) a Mounted <strong>Directory</strong><br />
• To Disable <strong>NFS</strong> Client Capability<br />
This section tells you how to perform these tasks, by editing files <strong>and</strong><br />
issuing HP-UX comm<strong>and</strong>s. However, Hewlett-Packard recommends that<br />
you use SAM to configure <strong>and</strong> administer <strong>NFS</strong>. SAM (System<br />
Administration Manager) is Hewlett-Packard’s windows-based user<br />
interface for performing system administration tasks. To run SAM, type<br />
sam at the HP-UX prompt. SAM has an extensive online help facility.<br />
Deciding Between Automounter <strong>and</strong> AutoFS<br />
Beginning with the HP-UX Extension Pack Release, August 1998 (for<br />
HP-UX 11.0), a new automounting utility, AutoFS, is available in<br />
addition to the pre-existing Automounter. You can configure your system<br />
to use either Automounter or AutoFS. Automounter is the default on a<br />
newly installed or updated system. However, you may choose to migrate<br />
to AutoFS, since it has several advantages over Automounter:<br />
• AutoFS can be used to mount any type of file system, including <strong>NFS</strong><br />
Protocol Version 3. (The pre-existing Automounter can be used only<br />
for <strong>NFS</strong> PV2.)<br />
34<br />
Chapter 2
Configuring <strong>and</strong> <strong>Administering</strong> <strong>NFS</strong><br />
Configuring <strong>and</strong> <strong>Administering</strong> an <strong>NFS</strong> Client<br />
• With AutoFS the configured mount points are the actual mount<br />
points. (The pre-existing Automounter mounts directories under<br />
/tmp_mnt <strong>and</strong> creates symbolic links from the configured mount<br />
points to the actual ones under /tmp_mnt.)<br />
• You do not have to stop AutoFS to change your automounter maps.<br />
The AutoFS daemon, automountd, runs continuously. When you<br />
make a change to an automounter map, you run the automount<br />
comm<strong>and</strong>, which reads the maps <strong>and</strong> then exits. (The pre-existing<br />
automounter has to be killed <strong>and</strong> restarted whenever you make a<br />
change to an automounter map.)<br />
For information on migrating to AutoFS, see “Migrating From<br />
Automounter to AutoFS” on page 88.<br />
Deciding Between St<strong>and</strong>ard-Mounted Directories <strong>and</strong><br />
Automounted Directories<br />
Before you mount any remote directories on your local system, decide<br />
whether you want each directory to be st<strong>and</strong>ard-mounted or<br />
automounted; you can automount directories using either AutoFS or<br />
Automounter. Table 2-1 lists the advantages <strong>and</strong> disadvantages of each<br />
type of mount.<br />
St<strong>and</strong>ard-mounted directories stay mounted until you explicitly<br />
unmount them. Automounted directories stay mounted until they are<br />
left idle for five minutes. You can change this default as follows:<br />
• If you are using AutoFS, you can change the five minute default by<br />
adding the -t duration option to the AUTOMOUNT_OPTIONS<br />
variable in the /etc/rc.config.d/nfsconf file.<br />
For instructions on using AutoFS, see “Configuring <strong>and</strong><br />
<strong>Administering</strong> AutoFS” on page 86.<br />
• If you are using the Automounter, you can change the five minute<br />
default by adding the -tl duration option to the AUTO_OPTIONS<br />
variable in the /etc/rc.config.d/nfsconf file.<br />
For instructions on using the Automounter, see “Configuring <strong>and</strong><br />
<strong>Administering</strong> the <strong>NFS</strong> Automounter” on page 55.<br />
Chapter 2 35
Configuring <strong>and</strong> <strong>Administering</strong> <strong>NFS</strong><br />
Configuring <strong>and</strong> <strong>Administering</strong> an <strong>NFS</strong> Client<br />
Table 2-1<br />
St<strong>and</strong>ard-Mounted vs. Automounted Directories<br />
St<strong>and</strong>ard-Mounted<br />
<strong>Directory</strong><br />
Advantage:<br />
Configuration is simpler<br />
than for automounted<br />
directories. Only one file<br />
(/etc/fstab) is used to<br />
configure st<strong>and</strong>ard<br />
mounts.<br />
Advantage: St<strong>and</strong>ard<br />
mounts can be added<br />
<strong>and</strong> removed easily<br />
during run time,<br />
without interrupting<br />
<strong>NFS</strong> access to other<br />
directories.<br />
Advantage: The<br />
directory stays<br />
mounted, so you never<br />
have to wait for it to be<br />
mounted after you issue<br />
a read or write request.<br />
Automounted <strong>Directory</strong><br />
(using AutoFS)<br />
Disadvantage: Configuration<br />
can be more complicated<br />
than for st<strong>and</strong>ard mounts.<br />
Multiple files are usually<br />
required to configure<br />
AutoFS.<br />
Advantage: Directories<br />
mounted using AutoFS can<br />
be added <strong>and</strong> removed easily<br />
during run time, without<br />
interrupting <strong>NFS</strong> access to<br />
other directories.<br />
Disadvantage: If the<br />
automounted directory has<br />
timed out <strong>and</strong> been<br />
unmounted, <strong>and</strong> you attempt<br />
to read it or write to it, you<br />
may have to wait a few<br />
seconds for it to be mounted<br />
again.<br />
Automounted <strong>Directory</strong><br />
(using Automounter)<br />
Disadvantage: Configuration<br />
can be more complicated than<br />
for st<strong>and</strong>ard mounts. Multiple<br />
files are usually required to<br />
configure the Automounter.<br />
Disadvantage: Some<br />
automounted directories can be<br />
changed easily during run time,<br />
but others cannot be changed,<br />
added, or removed without<br />
restarting the automounter.<br />
Disadvantage: If the<br />
automounted directory has<br />
timed out <strong>and</strong> been unmounted,<br />
<strong>and</strong> you attempt to read it or<br />
write to it, you may have to wait<br />
a few seconds for it to be<br />
mounted again.<br />
36<br />
Chapter 2
Configuring <strong>and</strong> <strong>Administering</strong> <strong>NFS</strong><br />
Configuring <strong>and</strong> <strong>Administering</strong> an <strong>NFS</strong> Client<br />
Table 2-1<br />
St<strong>and</strong>ard-Mounted vs. Automounted Directories<br />
St<strong>and</strong>ard-Mounted<br />
<strong>Directory</strong><br />
Advantage: The<br />
configured mount point<br />
is the actual mount<br />
point. This is<br />
straightforward <strong>and</strong><br />
does not confuse users<br />
or programs that<br />
require <strong>NFS</strong>-mounted<br />
files <strong>and</strong> directories.<br />
Automounted <strong>Directory</strong><br />
(using AutoFS)<br />
Advantage: The configured<br />
mount point is the actual<br />
mount point. This is<br />
straightforward <strong>and</strong> does not<br />
confuse users or programs<br />
that require <strong>NFS</strong>-mounted<br />
files <strong>and</strong> directories.<br />
Automounted <strong>Directory</strong><br />
(using Automounter)<br />
Disadvantage: The<br />
automounter maintains its own<br />
directory of mount points, <strong>and</strong><br />
the mount points you configure<br />
are links to this directory. A<br />
user using an automounted<br />
directory could be confused by<br />
the output of the pwd comm<strong>and</strong><br />
in a C or Bourne shell, which<br />
displays the actual mount point<br />
under /tmp_mnt rather than<br />
the configured mount point.<br />
(The Korn shell pwd comm<strong>and</strong><br />
displays the configured mount<br />
point.)<br />
If a directory is not mounted,<br />
attempting access to the actual<br />
mount point will not cause a<br />
mount to occur, but attempting<br />
access to the configured mount<br />
point will. This can be confusing<br />
to users <strong>and</strong> to programs that<br />
use the pwd comm<strong>and</strong>, like the<br />
at comm<strong>and</strong>.<br />
Chapter 2 37
Configuring <strong>and</strong> <strong>Administering</strong> <strong>NFS</strong><br />
Configuring <strong>and</strong> <strong>Administering</strong> an <strong>NFS</strong> Client<br />
Table 2-1<br />
St<strong>and</strong>ard-Mounted vs. Automounted Directories<br />
St<strong>and</strong>ard-Mounted<br />
<strong>Directory</strong><br />
Disadvantage: If a<br />
directory is configured<br />
to be st<strong>and</strong>ard- mounted<br />
when your system boots,<br />
<strong>and</strong> the <strong>NFS</strong> server for<br />
the directory is not<br />
booted yet, your system<br />
will hang until the <strong>NFS</strong><br />
server becomes<br />
available. If your system<br />
<strong>and</strong> the server are<br />
configured to mount<br />
directories from each<br />
other at boot time,<br />
st<strong>and</strong>ard mounts can<br />
cause both systems to<br />
hang indefinitely.<br />
Disadvantage: The<br />
configuration file for<br />
st<strong>and</strong>ard mounts<br />
(/etc/fstab) must be<br />
maintained separately<br />
on each <strong>NFS</strong> client.<br />
Not Applicable<br />
Automounted <strong>Directory</strong><br />
(using AutoFS)<br />
Advantage: A directory<br />
automounted with AutoFS is<br />
not mounted until a user or<br />
process requests access to it,<br />
so both your system <strong>and</strong> the<br />
<strong>NFS</strong> server will have time to<br />
boot before any attempt is<br />
made to mount the directory.<br />
Advantage: AutoFS<br />
configuration files (maps)<br />
may be managed centrally<br />
through NIS or NIS+.<br />
Advantage: You do not have<br />
to stop AutoFS to change<br />
your automounter maps. The<br />
AutoFS daemon,<br />
automountd, runs<br />
continuously. When you<br />
make a change to an<br />
automounter map, you run<br />
the automount comm<strong>and</strong>,<br />
which reads the maps <strong>and</strong><br />
then exits.<br />
Automounted <strong>Directory</strong><br />
(using Automounter)<br />
Advantage: A directory<br />
automounted with<br />
Automounter is not mounted<br />
until a user or process requests<br />
access to it, so both your system<br />
<strong>and</strong> the <strong>NFS</strong> server will have<br />
time to boot before any attempt<br />
is made to mount the directory.<br />
Advantage: Automounter<br />
configuration files (maps) may<br />
be managed centrally through<br />
NIS or NIS+.<br />
Disadvantage: Automounter<br />
must be killed <strong>and</strong> restarted<br />
whenever you make a change to<br />
an automounter map.<br />
38<br />
Chapter 2
Configuring <strong>and</strong> <strong>Administering</strong> <strong>NFS</strong><br />
Configuring <strong>and</strong> <strong>Administering</strong> an <strong>NFS</strong> Client<br />
Table 2-1<br />
St<strong>and</strong>ard-Mounted vs. Automounted Directories<br />
St<strong>and</strong>ard-Mounted<br />
<strong>Directory</strong><br />
Disadvantage: Only one<br />
<strong>NFS</strong> server may be<br />
configured for each<br />
st<strong>and</strong>ard-mounted<br />
directory.<br />
Disadvantage: If you<br />
have to configure many<br />
similar st<strong>and</strong>ard<br />
mounts, you must<br />
configure each of them<br />
individually, because<br />
you cannot use wildcard<br />
characters or<br />
environment variables<br />
when you configure<br />
st<strong>and</strong>ard <strong>NFS</strong> mounts.<br />
Disadvantage: St<strong>and</strong>ard<br />
<strong>NFS</strong> mounts provide no<br />
shortcut for configuring<br />
all available remote<br />
directories; each<br />
directory must be<br />
configured explicitly. If<br />
the <strong>NFS</strong> servers change<br />
which directories they<br />
are exporting, you must<br />
change your local <strong>NFS</strong><br />
client configuration.<br />
Automounted <strong>Directory</strong><br />
(using AutoFS)<br />
Advantage: Multiple servers<br />
may be configured for a<br />
single automounted<br />
directory, for reliability <strong>and</strong><br />
load balancing. All servers<br />
are polled simultaneously,<br />
<strong>and</strong> the directory is mounted<br />
from the first server to<br />
respond.<br />
Advantage: AutoFS allows<br />
you to use wildcard<br />
characters <strong>and</strong> environment<br />
variables in configuration<br />
files (maps) as shortcuts<br />
when you are configuring<br />
many similar automounts.<br />
Advantage: AutoFS allows<br />
you to configure a special<br />
“built-in” map (the -hosts<br />
map), which causes all the<br />
exported directories from<br />
any <strong>NFS</strong> server on the<br />
network to be automounted<br />
on your system whenever<br />
anyone requests access to a<br />
directory on that server. The<br />
servers can change which<br />
directories they export, <strong>and</strong><br />
your configuration remains<br />
valid.<br />
Automounted <strong>Directory</strong><br />
(using Automounter)<br />
Advantage: Multiple servers<br />
may be configured for a single<br />
automounted directory, for<br />
reliability <strong>and</strong> load balancing.<br />
All servers are polled<br />
simultaneously, <strong>and</strong> the<br />
directory is mounted from the<br />
first server to respond.<br />
Advantage: The automounter<br />
allows you to use wildcard<br />
characters <strong>and</strong> environment<br />
variables in configuration files<br />
(maps) as shortcuts when you<br />
are configuring many similar<br />
automounts.<br />
Advantage: The automounter<br />
allows you to configure a special<br />
“built-in” map (the -hosts<br />
map), which causes all the<br />
exported directories from any<br />
<strong>NFS</strong> server on the network to<br />
be automounted on your system<br />
whenever anyone requests<br />
access to a directory on that<br />
server. The servers can change<br />
which directories they export,<br />
<strong>and</strong> your configuration remains<br />
valid.<br />
Chapter 2 39
Configuring <strong>and</strong> <strong>Administering</strong> <strong>NFS</strong><br />
Configuring <strong>and</strong> <strong>Administering</strong> an <strong>NFS</strong> Client<br />
To Mount a Remote <strong>Directory</strong> Using a St<strong>and</strong>ard <strong>NFS</strong><br />
Mount<br />
1. In the /etc/fstab file, use a text editor to add a line for each remote<br />
directory you want mounted on your system. If the /etc/fstab file<br />
does not exist, you will have to create it. A line in the /etc/fstab file<br />
has the following syntax:<br />
server:remote_directory local_directory nfs defaults 0 0<br />
or<br />
server:remote_directory local_directory nfs<br />
option[,option...] 0 0<br />
For descriptions of the mount options, see “To Change the Default<br />
Mount Options” on page 43.<br />
2. If your system is already running as an <strong>NFS</strong> client, issue the<br />
following comm<strong>and</strong> to mount each remote directory you have added to<br />
the /etc/fstab file:<br />
/usr/sbin/mount local_directory<br />
Or, issue the following comm<strong>and</strong> to mount all the directories listed in<br />
the /etc/fstab file:<br />
/usr/sbin/mount -a<br />
The remote directories listed in the /etc/fstab file will be mounted<br />
automatically when you enable <strong>NFS</strong> client capability or reboot your<br />
system. See “To Enable <strong>NFS</strong> Client Capability” on page 42.<br />
The local directory you configure as a mount point must exist <strong>and</strong> should<br />
be empty. If the local mount point contains files or directories, they will<br />
be hidden <strong>and</strong> inaccessible while the remote directory is mounted over<br />
them.<br />
Before you can mount a remote directory on your system, the remote<br />
system where the directory is located must be configured as an <strong>NFS</strong><br />
server <strong>and</strong> must export the directory.<br />
To mount a directory temporarily, issue the mount comm<strong>and</strong>, but do not<br />
add the mount to the /etc/fstab file. It will stay mounted until you<br />
reboot your system or until you unmount it with the umount comm<strong>and</strong>.<br />
For more information, type man 4 fstab or man 1M mount at the HP-UX<br />
prompt.<br />
40<br />
Chapter 2
Configuring <strong>and</strong> <strong>Administering</strong> <strong>NFS</strong><br />
Configuring <strong>and</strong> <strong>Administering</strong> an <strong>NFS</strong> Client<br />
Example <strong>NFS</strong> Mount of man pages<br />
broccoli:/usr/share/man /usr/share/man <strong>NFS</strong> ro 0 0<br />
This example mounts the directory /usr/share/man from the <strong>NFS</strong><br />
server broccoli. The local mount point is also /usr/share/man. The<br />
directory is mounted read-only. Figure 2-2 illustrates this example:<br />
Figure 2-2<br />
<strong>NFS</strong> Mount of man pages<br />
<strong>NFS</strong> server "broccoli"<br />
/<br />
local <strong>NFS</strong> client<br />
/<br />
/usr /etc<br />
/opt<br />
/usr /etc<br />
/opt<br />
/share<br />
/share<br />
/man<br />
/man<br />
/man1 /man2 /man3<br />
/man1 /man2 /man3<br />
Chapter 2 41
Configuring <strong>and</strong> <strong>Administering</strong> <strong>NFS</strong><br />
Configuring <strong>and</strong> <strong>Administering</strong> an <strong>NFS</strong> Client<br />
Example <strong>NFS</strong> Mount of Home Directories<br />
broccoli:/home/broccoli /home/broccoli nosuid 0 0<br />
cauliflower:/home/cauliflower /home/cauliflower nosuid 0 0<br />
This example mounts the home directories from <strong>NFS</strong> servers broccoli<br />
<strong>and</strong> cauliflower on the local <strong>NFS</strong> client. The nosuid option prevents<br />
programs with setuid permission from executing on the local client.<br />
Figure 2-3 illustrates this example:<br />
Figure 2-3<br />
<strong>NFS</strong> Mount of Home Directories<br />
<strong>NFS</strong> server "cauliflower"<br />
/<br />
local <strong>NFS</strong> client<br />
/<br />
<strong>NFS</strong> server "broccoli"<br />
/<br />
/usr<br />
/home<br />
/etc<br />
/usr<br />
/home<br />
/etc<br />
/usr<br />
/home<br />
/etc<br />
/cauliflower<br />
/cauliflower<br />
/broccoli<br />
/broccoli<br />
/s<strong>and</strong>ra /wendie /s<strong>and</strong>ra /wendie /claudia /ann /claudia /ann<br />
To Enable <strong>NFS</strong> Client Capability<br />
1. In the /etc/rc.config.d/nfsconf file, make sure the <strong>NFS</strong>_CLIENT<br />
variable is set to 1, as follows:<br />
<strong>NFS</strong>_CLIENT=1<br />
2. Run the <strong>NFS</strong> startup script by issuing the following comm<strong>and</strong>:<br />
/sbin/init.d/nfs.client start<br />
Setting the <strong>NFS</strong>_CLIENT variable to 1 causes the <strong>NFS</strong> startup script to be<br />
run whenever you reboot your system.<br />
The <strong>NFS</strong> startup script starts the necessary <strong>NFS</strong> client daemons <strong>and</strong><br />
mounts the remote directories configured in the /etc/fstab file.<br />
42<br />
Chapter 2
Configuring <strong>and</strong> <strong>Administering</strong> <strong>NFS</strong><br />
Configuring <strong>and</strong> <strong>Administering</strong> an <strong>NFS</strong> Client<br />
To Verify Your <strong>NFS</strong> Client Configuration<br />
• After you have configured the directories you want to mount <strong>and</strong><br />
enabled <strong>NFS</strong> client capability, issue the ls comm<strong>and</strong> in the local<br />
directories you have configured as <strong>NFS</strong> mount points. If your <strong>NFS</strong><br />
client is working correctly, the ls comm<strong>and</strong> will list the contents of<br />
mounted directories. If the local directories are empty, or if you get<br />
error messages, see “Troubleshooting <strong>NFS</strong> <strong>Services</strong>” on page 273.<br />
To Change the Default Mount Options<br />
1. Include the <strong>NFS</strong> mount options in your /etc/fstab file or<br />
automounter map as needed. Table 2-2 lists the <strong>NFS</strong> mount options.<br />
2. If you changed the mount options in the automounter master map,<br />
you must restart the automounter before your changes will take<br />
effect. See “To Restart the Automounter” on page 83.<br />
If you changed the mount options for a directory that is currently<br />
mounted, you must unmount <strong>and</strong> remount it before your changes will<br />
take effect. Issue the following comm<strong>and</strong>s:<br />
/usr/sbin/umount local_directory<br />
/usr/sbin/mount local_directory<br />
Table 2-2<br />
rw<br />
(read/write)<br />
or<br />
ro (read-only)<br />
(default: rw)<br />
suid<br />
or<br />
nosuid<br />
(default: suid)<br />
<strong>NFS</strong> Mount Options<br />
Use rw for data that users need to modify. In order for you to mount a<br />
directory read/write, the <strong>NFS</strong> server must export it read/write.<br />
Use ro for data you do not want users to change. A directory that is<br />
automounted from several servers should be read-only, to keep versions<br />
identical on all servers.<br />
Specify suid if you want to allow mounted programs that have setuid<br />
permission to run with the permissions of their owners, regardless of who<br />
starts them. If a program with setuid permission is owned by root, it will<br />
run with root permissions, regardless of who starts it.<br />
Specify nosuid to protect your system against setuid programs that may<br />
run as root <strong>and</strong> damage your system.<br />
Chapter 2 43
Configuring <strong>and</strong> <strong>Administering</strong> <strong>NFS</strong><br />
Configuring <strong>and</strong> <strong>Administering</strong> an <strong>NFS</strong> Client<br />
Table 2-2<br />
hard<br />
or<br />
soft<br />
(default: hard)<br />
intr<br />
or<br />
nointr<br />
(default: intr)<br />
fg<br />
(foreground)<br />
or<br />
bg<br />
(background)<br />
(default: fg)<br />
<strong>NFS</strong> Mount Options<br />
Specify hard if users will be writing to the mounted directory or running<br />
programs located in it. When <strong>NFS</strong> tries to access a hard-mounted<br />
directory, it keeps trying until it succeeds or someone interrupts its<br />
attempts. If the server goes down, any processes using the mounted<br />
directory hang until the server comes back up <strong>and</strong> then continue<br />
processing without errors. Interruptible hard mounts may be interrupted<br />
with CTRL-C or kill (see the intr option, later).<br />
Specify soft if the server is unreliable <strong>and</strong> you want to prevent systems<br />
from hanging when the server is down. When <strong>NFS</strong> tries to access a<br />
soft-mounted directory, it gives up <strong>and</strong> returns an error message after<br />
trying retrans times (see the retrans option, later). Any processes using<br />
the mounted directory will return errors if the server goes down.<br />
Specify intr if users are not likely to damage critical data by manually<br />
interrupting an <strong>NFS</strong> request. If a hard mount is interruptible, a user may<br />
press [CTRL]-C or issue the kill comm<strong>and</strong> to interrupt an <strong>NFS</strong> mount<br />
that is hanging indefinitely because a server is down.<br />
Specify nointr if users might damage critical data by manually<br />
interrupting an <strong>NFS</strong> request, <strong>and</strong> you would rather have the system<br />
hang while the server is down than risk losing data between the client<br />
<strong>and</strong> the server.<br />
Specify fg for directories that are necessary for the client machine to boot<br />
or operate correctly. If a foreground mount fails, it is retried again in the<br />
foreground until it succeeds or is interrupted. All automounted<br />
directories are mounted in the foreground; you cannot specify the bg<br />
option with automounted directories.<br />
Specify bg for mounting directories that are not necessary for the client to<br />
boot or operate correctly. Background mounts that fail are retried in the<br />
background, allowing the mount process to consider the mount complete<br />
<strong>and</strong> go on to the next one. If you have two machines configured to mount<br />
directories from each other, configure the mounts on one of the machines<br />
as background mounts. That way, if both systems try to boot at once, they<br />
will not become deadlocked, each waiting to mount directories from the<br />
other. The bg option cannot be used with automounted directories.<br />
44<br />
Chapter 2
Configuring <strong>and</strong> <strong>Administering</strong> <strong>NFS</strong><br />
Configuring <strong>and</strong> <strong>Administering</strong> an <strong>NFS</strong> Client<br />
Table 2-2<br />
devs<br />
or nodevs<br />
(default: devs)<br />
timeo=n<br />
(default=7)<br />
retrans=n<br />
(default=4)<br />
retry=n<br />
(default=1)<br />
<strong>NFS</strong> Mount Options<br />
Specify devs if you are mounting device files from a server whose device<br />
files will work correctly on the client. The devs option allows you to use<br />
<strong>NFS</strong>-mounted device files to read <strong>and</strong> write to devices from the <strong>NFS</strong><br />
client. It is useful for maintaining a st<strong>and</strong>ard, centralized set of device<br />
files, if all your systems are configured similarly.<br />
Specify nodevs if device files mounted from a server will not work<br />
correctly for reading <strong>and</strong> writing to devices on the <strong>NFS</strong> client. The<br />
nodevs option generates an error if a process on the <strong>NFS</strong> client tries to<br />
read or write to an <strong>NFS</strong>-mounted device file.<br />
The timeout, in tenths of a second, for <strong>NFS</strong> requests (read <strong>and</strong> write<br />
requests to mounted directories). If an <strong>NFS</strong> request times out, this<br />
timeout value is doubled, <strong>and</strong> the request is retransmitted. After the <strong>NFS</strong><br />
request has been retransmitted the number of times specified by the<br />
retrans option (see below), a soft mount returns an error, <strong>and</strong> a hard<br />
mount retries the request. The maximum timeo value is 30 (3 seconds).<br />
Try doubling the timeo value if you see several server not responding<br />
messages within a few minutes. This can happen because you are<br />
mounting directories across a gateway, because your server is slow, or<br />
because your network is busy with heavy traffic.<br />
The number of times an <strong>NFS</strong> request (a read or write request to a<br />
mounted directory) is retransmitted after it times out. If the request does<br />
not succeed after n retransmissions, a soft mount returns an error, <strong>and</strong> a<br />
hard mount retries the request.<br />
Increase the retrans value for a directory that is soft-mounted from a<br />
server that has frequent, short periods of down time. This gives the<br />
server sufficient time to recover, so the soft mount does not return an<br />
error.<br />
The number of times the <strong>NFS</strong> client attempts to mount a directory after<br />
the first attempt fails. If you specify intr, you can interrupt the mount<br />
before n retries. However, if you specify nointr, you must wait until n<br />
retries have been made, until the mount succeeds, or until you reboot the<br />
system.<br />
If mounts are failing because your server is very busy, increasing the<br />
retry value may fix the problem.<br />
Chapter 2 45
Configuring <strong>and</strong> <strong>Administering</strong> <strong>NFS</strong><br />
Configuring <strong>and</strong> <strong>Administering</strong> an <strong>NFS</strong> Client<br />
Table 2-2<br />
rsize=n<br />
(default=8192<br />
)<br />
wsize=n<br />
(default=8192<br />
)<br />
vers=n<br />
(default=3)<br />
O (Overlay<br />
mount)<br />
default: not<br />
specified<br />
<strong>NFS</strong> Mount Options<br />
The number of bytes the <strong>NFS</strong> client requests from the <strong>NFS</strong> server in a<br />
single read request.<br />
If packets are being dropped between the client <strong>and</strong> the server, decrease<br />
rsize to 4096 or 2048. To find out whether packets are being dropped,<br />
issue the <strong>NFS</strong>stat -rc comm<strong>and</strong> at the HP-UX prompt. If the timeout<br />
<strong>and</strong> retrans values returned by this comm<strong>and</strong> are high, but the badxid<br />
number is close to zero, then packets are being dropped somewhere in the<br />
network.<br />
The number of bytes the <strong>NFS</strong> client sends to the <strong>NFS</strong> server in a single<br />
write request.<br />
If packets are being dropped between the client <strong>and</strong> the server, decrease<br />
wsize to 4096 or 2048. To find out whether packets are being dropped,<br />
issue the <strong>NFS</strong>stat -rc comm<strong>and</strong> at the HP-UX prompt. If the timeout<br />
<strong>and</strong> retrans values returned by this comm<strong>and</strong> are high, but the badxid<br />
number is close to zero, then packets are being dropped somewhere in the<br />
network.<br />
The version of the <strong>NFS</strong> protocol to use. By default, the local <strong>NFS</strong> client<br />
will attempt to mount the file system using <strong>NFS</strong> version 3. If the <strong>NFS</strong><br />
server does not support version 3, the file system will be mounted using<br />
version 2.<br />
If you know that the <strong>NFS</strong> server does not support version 3, specify<br />
vers=2, <strong>and</strong> you will save time during the mount, because the client will<br />
not attempt to use version 3 before using version 2.<br />
Allows the file system to be mounted over an existing mount point,<br />
making the underlying file system inaccessible. If you attempt to mount a<br />
file system over an existing mount point without the -O option, the mount<br />
will fail with the error device busy.<br />
Caution: Using the -O mount option can put your system in a confusing<br />
state. The -O option allows you to hide local data under an <strong>NFS</strong> mount<br />
point without receiving any warning. Local data hidden beneath an <strong>NFS</strong><br />
mount point will not be backed up during regular system backups.<br />
On HP-UX, the -O option is valid only for <strong>NFS</strong>-mounted file systems. For<br />
this reason, if you specify the -O option, you must also specify the -F nfs<br />
option to the mount comm<strong>and</strong> or the nfs file system type in the<br />
/etc/fstab file.<br />
46<br />
Chapter 2
Configuring <strong>and</strong> <strong>Administering</strong> <strong>NFS</strong><br />
Configuring <strong>and</strong> <strong>Administering</strong> an <strong>NFS</strong> Client<br />
Table 2-2<br />
proto=<br />
remount<br />
default: not<br />
specified<br />
grpid<br />
default: not<br />
specified<br />
Table 2-3<br />
<strong>NFS</strong> Mount Options<br />
Allows user to specify which transport option should be used: UDP or<br />
TCP. Once specified, <strong>NFS</strong> only attempts to connect using that transport<br />
option. If the specified transport option is not available, the mount fails.<br />
If the file system is mounted read-only, this option remounts it<br />
read/write. This allows you to change the access permissions from<br />
read-only to read/write without forcing everyone to leave the mounted<br />
directory or killing all processes using it.<br />
Forces a newly created file in the mounted file system to inherit the group<br />
ID of the parent directory.<br />
By default, a newly created file inherits the effective group ID of the<br />
calling process, unless the GID bit is set on the parent directory. If the<br />
GID bit is set, the new file inherits the group ID of the parent directory.<br />
Several <strong>NFS</strong> mount options allow you to change the length of time file<br />
<strong>and</strong> directory attributes remain cached on the <strong>NFS</strong> client. By default, an<br />
<strong>NFS</strong> client caches certain attributes of files <strong>and</strong> directories, like their<br />
ownership, size, <strong>and</strong> modification time. If a user on an <strong>NFS</strong> client is<br />
making a series of changes to a file, the changes to the file’s attributes<br />
are cached <strong>and</strong> modified locally on the client, <strong>and</strong> finally, the resulting<br />
attributes are sent to the server.<br />
<strong>NFS</strong> Caching Options<br />
noac<br />
(default: not<br />
specified)<br />
nocto<br />
(default: not<br />
specified)<br />
If specified, this option prevents the <strong>NFS</strong> client from caching attributes for<br />
the mounted directory.<br />
Specify noac for a directory that will be used frequently by many <strong>NFS</strong><br />
clients. The noac option ensures that the file <strong>and</strong> directory attributes on the<br />
server are up to date, because no changes are cached on the clients.<br />
However, if many <strong>NFS</strong> clients using the same <strong>NFS</strong> server all disable<br />
attribute caching, the server may become overloaded with attribute<br />
requests <strong>and</strong> updates. You can also use the actimeo option to set all the<br />
caching timeouts to a small number of seconds, like 1 or 3.<br />
If you specify noac, do not specify the other caching options.<br />
If specified, this option suppresses fresh attributes when opening a file.<br />
Specify nocto for a file or directory that never changes, to decrease the load<br />
on your network.<br />
Chapter 2 47
Configuring <strong>and</strong> <strong>Administering</strong> <strong>NFS</strong><br />
Configuring <strong>and</strong> <strong>Administering</strong> an <strong>NFS</strong> Client<br />
Table 2-3<br />
acdirmax=n<br />
(default=60)<br />
acdirmin=n<br />
(default=30)<br />
acregmax=n<br />
(default=60)<br />
acregmin=n<br />
(default=3)<br />
<strong>NFS</strong> Caching Options<br />
The maximum number of seconds a directory’s attributes are cached on the<br />
<strong>NFS</strong> client. When this timeout period expires, the client flushes its attribute<br />
cache, <strong>and</strong> if the attributes have changed, the client sends them to the <strong>NFS</strong><br />
server.<br />
For a directory that rarely changes or that is owned <strong>and</strong> modified by only<br />
one user, like a user’s home directory, you can decrease the load on your<br />
network by setting acdirmax=120 or higher.<br />
The minimum number of seconds a directory’s attributes are cached on the<br />
<strong>NFS</strong> client. If the directory is modified before this timeout expires, the<br />
timeout period is extended by acdirmin seconds.<br />
For a directory that rarely changes or that is owned <strong>and</strong> modified by only<br />
one user, like a user’s home directory, you can decrease the load on your<br />
network by setting acdirmin=60 or higher.<br />
The maximum number of seconds a file’s attributes are cached on the <strong>NFS</strong><br />
client. When this timeout period expires, the client flushes its attribute<br />
cache, <strong>and</strong> if the attributes have changed, the client sends them to the <strong>NFS</strong><br />
server.<br />
For a file that rarely changes or that is owned <strong>and</strong> modified by only one user,<br />
like a file in a user’s home directory, you can decrease the load on your<br />
network by setting acregmax=120 or higher.<br />
The minimum number of seconds a file’s attributes are cached on the <strong>NFS</strong><br />
client. If the file is modified before this timeout expires, the timeout period<br />
is extended by acregmin seconds.<br />
For a file that rarely changes or that is owned <strong>and</strong> modified by only one user,<br />
like a file in a user’s home directory, you can decrease the load on your<br />
network by setting acdirmin=30 or higher.<br />
48<br />
Chapter 2
Configuring <strong>and</strong> <strong>Administering</strong> <strong>NFS</strong><br />
Configuring <strong>and</strong> <strong>Administering</strong> an <strong>NFS</strong> Client<br />
Table 2-3<br />
actimeo=n<br />
(no default)<br />
<strong>NFS</strong> Caching Options<br />
Setting actimeo to n seconds is equivalent to setting acdirmax, acdirmin,<br />
acregmax, <strong>and</strong> acregmin to n seconds.<br />
Set actimeo=1 or actimeo=3 for a directory that is used <strong>and</strong> modified<br />
frequently by many <strong>NFS</strong> clients. This ensures that the file <strong>and</strong> directory<br />
attributes are kept reasonably up to date, even if they are changed<br />
frequently from various client locations.<br />
Set actimeo=120 or higher for a directory that rarely or never changes.<br />
If you set the actimeo value, do not set the acdirmax, acdirmin, acregmax,<br />
or acregmin values.<br />
To Ensure Data Integrity Between the Client <strong>and</strong><br />
Server<br />
• Make sure the directory is exported from the server with the noasync<br />
option (the default). If the directory is exported with the async<br />
option, the <strong>NFS</strong> server will acknowledge <strong>NFS</strong> writes before writing<br />
data to disk. Changing an exported directory from async to noasync<br />
degrades write performance for that directory.<br />
• If users or applications will be writing to the <strong>NFS</strong>-mounted directory,<br />
make sure it is mounted with the hard option (the default), rather<br />
than the soft option.<br />
• If you have a small number of <strong>NFS</strong> applications that require absolute<br />
data integrity, add the O_SYNC flag to the open() calls in your<br />
applications. When you open a file with the O_SYNC flag, a write()<br />
call will not return until the write request has been sent to the <strong>NFS</strong><br />
server <strong>and</strong> acknowledged. The O_SYNC flag degrades write<br />
performance for applications that use it.<br />
• If you have a large number of <strong>NFS</strong> applications requiring absolute<br />
data integrity, or if your entire installation needs a high degree of<br />
data integrity, set the NUM_<strong>NFS</strong>IOD variable to 0 in the<br />
/etc/rc.config.d/nfsconf file on each client, as follows,<br />
NUM_<strong>NFS</strong>IOD=0<br />
<strong>and</strong> issue the following comm<strong>and</strong>s to kill all the biod daemons (PID is<br />
a process ID returned by the ps comm<strong>and</strong>):<br />
/usr/bin/ps -ef | /usr/bin/grep biod<br />
Chapter 2 49
Configuring <strong>and</strong> <strong>Administering</strong> <strong>NFS</strong><br />
Configuring <strong>and</strong> <strong>Administering</strong> an <strong>NFS</strong> Client<br />
/usr/bin/kill PID PID ...<br />
The biod daemons improve write performance by h<strong>and</strong>ling <strong>NFS</strong><br />
write requests from users <strong>and</strong> applications. After a write request is<br />
passed to a biod daemon, control is returned to the user or<br />
application. Running a client without biod daemons degrades write<br />
performance for all users <strong>and</strong> applications on that client.<br />
• If multiple <strong>NFS</strong> users will be writing to the same file, add the<br />
lockf() call to your applications to lock the file so that only one user<br />
may modify it at a time.<br />
If multiple users on different <strong>NFS</strong> clients will be writing to the file,<br />
you must also turn off attribute caching on those clients by mounting<br />
the file with the noac option.<br />
For more information, see the following man pages: mount(1M), open(2),<br />
write(2), lockf(2), <strong>and</strong> biod(1M).<br />
To Remove (Unmount) a Mounted <strong>Directory</strong><br />
1. On the <strong>NFS</strong> client, issue the following comm<strong>and</strong> to determine<br />
whether the directory you want to unmount is currently in use:<br />
/usr/sbin/fuser -cu local_mount_point<br />
This comm<strong>and</strong> lists the process IDs <strong>and</strong> user names of everyone using<br />
the mounted directory.<br />
2. Warn any users to cd out of the directory, <strong>and</strong> kill any processes that<br />
are using the directory, or wait until the processes terminate. You can<br />
use the following comm<strong>and</strong> to kill all processes using the mounted<br />
directory:<br />
/usr/sbin/fuser -ck local_mount_point<br />
3. If you want to remove the mounted directory permanently, use an<br />
editor to remove the appropriate line in the /etc/fstab file.<br />
If you want to remove the mounted directory temporarily, leave the<br />
line in /etc/fstab, <strong>and</strong> the directory will be mounted again when<br />
you reboot your system or run the <strong>NFS</strong> startup script.<br />
4. Issue the following comm<strong>and</strong> at the HP-UX prompt:<br />
/usr/sbin/umount local_mount_point<br />
If any user or process is using the remote directory, <strong>NFS</strong> cannot<br />
unmount it <strong>and</strong> will issue an error message.<br />
50<br />
Chapter 2
Configuring <strong>and</strong> <strong>Administering</strong> <strong>NFS</strong><br />
Configuring <strong>and</strong> <strong>Administering</strong> an <strong>NFS</strong> Client<br />
For more information, type man 1M mount or man 1M fuser at the<br />
HP-UX prompt.<br />
To Disable <strong>NFS</strong> Client Capability<br />
1. On the <strong>NFS</strong> client, issue the mount(1M) comm<strong>and</strong> with no options, to<br />
get a list of all the mounted file systems on the client:<br />
/usr/sbin/mount<br />
2. For every <strong>NFS</strong>-mounted directory listed by the mount comm<strong>and</strong>, issue<br />
the following comm<strong>and</strong> to determine whether the directory is<br />
currently in use:<br />
/usr/sbin/fuser -cu local_mount_point<br />
This comm<strong>and</strong> lists the process IDs <strong>and</strong> user names of everyone using<br />
the mounted directory.<br />
3. Warn any users to cd out of the directory, <strong>and</strong> kill any processes that<br />
are using the directory, or wait until the processes terminate. You can<br />
use the following comm<strong>and</strong> to kill all processes using the mounted<br />
directory:<br />
/usr/sbin/fuser -ck local_mount_point<br />
4. Issue the following comm<strong>and</strong> on the client to unmount all<br />
<strong>NFS</strong>-mounted directories:<br />
/usr/sbin/umount -at nfs<br />
5. Edit the /etc/rc.config.d/nfsconf file on the client to set the<br />
<strong>NFS</strong>_CLIENT <strong>and</strong> AUTOMOUNT variables to 0. This prevents the client<br />
processes from starting up again when you reboot the client.<br />
<strong>NFS</strong>_CLIENT=0<br />
AUTOMOUNT=0<br />
6. Issue the following comm<strong>and</strong> to disable <strong>NFS</strong> client capability:<br />
/sbin/init.d/nfs.client stop<br />
For more information, type man 1M mount or man 1M fuser at the<br />
HP-UX prompt.<br />
Chapter 2 51
Configuring <strong>and</strong> <strong>Administering</strong> <strong>NFS</strong><br />
<strong>NFS</strong> Client <strong>and</strong> Server Transport Connections<br />
<strong>NFS</strong> Client <strong>and</strong> Server Transport Connections<br />
<strong>NFS</strong> runs over both UDP <strong>and</strong> TCP transport protocols. The default<br />
transport protocol is TCP. Using the TCP protocol increases<br />
dependability on wide-area networks. Packets are successfully delivered<br />
more consistently. TCP provides congestion control <strong>and</strong> error recovery.<br />
<strong>NFS</strong> over TCP works with <strong>NFS</strong> version 2 <strong>and</strong> version 3.<br />
<strong>NFS</strong> Client TCP Connections<br />
An <strong>NFS</strong> client has a maximum number of connections for each server. By<br />
default the maximum number of connections is one. The total maximum<br />
number of connections on the client is the number of <strong>NFS</strong> servers<br />
multiplied by the maximum number of connections allowed for each<br />
server.<br />
For example, say the maximum number of connections allowed for<br />
client1 is two, if the network environment allowed client1 access to five<br />
servers, the total number of connections allowed for client1 is 10: two on<br />
each server. An <strong>NFS</strong> client remains connected to the <strong>NFS</strong> server until<br />
the client becomes inactive: idle or disconnected by the client. By default,<br />
idle time is 5 minutes. This means that there is no outbound request for<br />
more than 5 minutes.<br />
Support of 32K Transfer<br />
<strong>NFS</strong> supports 32K transfer sizes across both TCP <strong>and</strong> UDP transport.<br />
By default, <strong>NFS</strong> transfers 8K sizes. To specify 32k transfer sizes, set the<br />
mount option for read- <strong>and</strong> write- size to 32k.<br />
mount -F nfs -o rsize=32768, w=32768<br />
Specifying TCP or UDP Connections<br />
Using the mount comm<strong>and</strong> from the client with no protocol parameters,<br />
the behavior will be first to try to establish a TCP connection with the<br />
server. If that fails, then it will try to establish a UDP connection with<br />
the server.<br />
You can tell <strong>NFS</strong> to establish ONLY a TCP connection using the<br />
following comm<strong>and</strong>:<br />
52<br />
Chapter 2
Configuring <strong>and</strong> <strong>Administering</strong> <strong>NFS</strong><br />
<strong>NFS</strong> Client <strong>and</strong> Server Transport Connections<br />
mount -o proto=tcp<br />
If TCP is not available on the server, the mount fails.<br />
You can tell <strong>NFS</strong> to establish ONLY a UDP connection using the<br />
following comm<strong>and</strong>:<br />
mount -o proto=udp<br />
If UDP is not available on the server, the mount fails.<br />
<strong>NFS</strong> Server TCP Connections<br />
On the <strong>NFS</strong> server, to ensure a request for a TCP connection will be<br />
successful, the service must be advertised in the /etc/services name<br />
database file. This database advertises the availability of TCP on the<br />
server through port 2049. The entry appears in the /etc/services<br />
name database file. There is also an entry for UDP. They are as follows:<br />
nfsd 2049/tcp #<strong>NFS</strong> remote file system<br />
nfsd 2049/udp #<strong>NFS</strong> remote file system<br />
NOTE<br />
Note that these entries are automatically added to the /etc/services<br />
file since this service must be advertised in order to start the server<br />
daemon (nfsd) correctly. Be sure that the local map resolution points to<br />
the local file. If NIS maps are used, be sure that the services file used by<br />
NIS also contains this additional entry for TCP.<br />
Changes to the <strong>NFS</strong> Server Daemon<br />
For <strong>NFS</strong> over UDP, the number of <strong>NFS</strong> server daemons (nfsd) is at<br />
minimum equal to the number of active processors. This number can<br />
actually be a multiple of the number of active processors running. When<br />
<strong>NFS</strong> is running over TCP, only one additional daemon is started.<br />
You can start a daemon for either transport type or both. Here’s a list of<br />
ways you can specify the <strong>NFS</strong> daemon.<br />
• You can start one daemon that will run over all the supported<br />
transports, including UDP <strong>and</strong> TCP. Type: /usr/sbin/nfsd -a<br />
, where is the number of UDP <strong>and</strong> TCP<br />
daemons you want started.<br />
Chapter 2 53
Configuring <strong>and</strong> <strong>Administering</strong> <strong>NFS</strong><br />
<strong>NFS</strong> Client <strong>and</strong> Server Transport Connections<br />
• You can start the <strong>NFS</strong> daemon over either protocol you choose: TCP<br />
or UDP. To specify one or the other, type: /usr/sbin/nfsd -p<br />
where is either<br />
TCP or UDP.<br />
• You can start the daemon for the transport protocol that the device<br />
specifies. Type: /usr/sbin/nfsd -t , where<br />
is the name of the device that specifies the transport<br />
protocol you want to use.<br />
Severing the Connection<br />
The server connection is terminated by nfsd when one of the following<br />
occurs:<br />
1. When the connection has been idle for more than six minutes. Idle is<br />
defined as no outbound requests.<br />
2. When the maximum number of connections is reached. If a request<br />
for a connection comes in when this is the case, the least recently<br />
used connection will be broken. The request for a connection is then<br />
established.<br />
3. When the <strong>NFS</strong> daemon (nfsd) receives a disconnecting event or<br />
unrecoverable error. For example, when a client crashes.<br />
54<br />
Chapter 2
Configuring <strong>and</strong> <strong>Administering</strong> <strong>NFS</strong><br />
Configuring <strong>and</strong> <strong>Administering</strong> the <strong>NFS</strong> Automounter<br />
Configuring <strong>and</strong> <strong>Administering</strong> the <strong>NFS</strong><br />
Automounter<br />
This section tells you how to configure the <strong>NFS</strong> automounter. The<br />
automounter mounts directories automatically when users or processes<br />
request access to them, <strong>and</strong> it unmounts them automatically after they<br />
have been idle for a period of time (five minutes, by default). Following<br />
are the tasks involved in configuring the <strong>NFS</strong> automounter. Tasks 1 <strong>and</strong><br />
14 alone will get the automounter up <strong>and</strong> running on your system.<br />
Before configuring the automounter, see “Deciding Between<br />
St<strong>and</strong>ard-Mounted Directories <strong>and</strong> Automounted Directories” on page<br />
35.<br />
The automounter does not support <strong>NFS</strong> protocol version 3. Automounted<br />
file systems will be mounted with <strong>NFS</strong> protocol version 2. The following<br />
topics are covered in this section:<br />
1. “To Automount All Exported Directories from Any Host Using the<br />
-hosts Map” on page 56<br />
2. “To Decide Between Direct <strong>and</strong> Indirect <strong>NFS</strong> Automounts” on page<br />
58<br />
3. “To Mount a Remote <strong>Directory</strong> Using a Direct Automounter Map” on<br />
page 61<br />
4. “To Mount a Remote <strong>Directory</strong> Using an Indirect Automounter Map”<br />
on page 64<br />
5. “To Configure Multiple (Replicated) Servers for an Automounted<br />
<strong>Directory</strong>” on page 68<br />
6. “To Use Environment Variables as Shortcuts in Automounter Maps”<br />
on page 69<br />
7. “To Use Wildcard Characters as Shortcuts in Automounter Maps” on<br />
page 69<br />
8. “To Automount Users’ Home Directories with the -passwd Map” on<br />
page 71<br />
9. “To Automount Users’ Home Directories with Wildcard Characters”<br />
on page 74<br />
10.“To Automount Multiple Directories Simultaneously (Hierarchical<br />
Chapter 2 55
Configuring <strong>and</strong> <strong>Administering</strong> <strong>NFS</strong><br />
Configuring <strong>and</strong> <strong>Administering</strong> the <strong>NFS</strong> Automounter<br />
Mounts)” on page 77<br />
11.“To Improve Automounter Performance with Subdirectory Notation<br />
in Indirect Maps” on page 77<br />
12.“To Include an Automounter Map in Another Automounter Map” on<br />
page 79<br />
13.“To Turn Off an Automounter Map with the -null Map” on page 80<br />
14.“To Enable the <strong>NFS</strong> Automounter” on page 81<br />
15.“To Verify Your Automounter Configuration” on page 81<br />
16.“To Modify or Remove (Unmount) an Automounted <strong>Directory</strong>” on<br />
page 83<br />
17.“To Restart the Automounter” on page 83<br />
This section tells you how to perform these tasks, by editing files <strong>and</strong><br />
issuing HP-UX comm<strong>and</strong>s. However, Hewlett-Packard recommends that<br />
you use SAM to configure <strong>and</strong> administer the automounter. SAM<br />
(System Administration Manager) is Hewlett-Packard’s windows-based<br />
user interface for performing system administration tasks. To run SAM,<br />
type sam at the HP-UX prompt. SAM has an extensive online help<br />
facility.<br />
NOTE<br />
SAM does not support specifying maps or directories on the automount<br />
comm<strong>and</strong> line. SAM finds automounter maps only if they are listed in<br />
the master map. SAM recognizes automounted directories only if they<br />
are listed in an automounter map.<br />
To Automount All Exported Directories from Any<br />
Host Using the -hosts Map<br />
• If you are using local files for your automounter maps, use an editor<br />
to add the following line to the automounter master map file (usually<br />
called /etc/auto_master):<br />
/net -hosts -nosuid<br />
If you are using NIS to manage your automounter maps, add the line<br />
to the master map file on the NIS master server, <strong>and</strong> then issue the<br />
following comm<strong>and</strong>s to rebuild the map <strong>and</strong> push it out to slave<br />
56<br />
Chapter 2
Configuring <strong>and</strong> <strong>Administering</strong> <strong>NFS</strong><br />
Configuring <strong>and</strong> <strong>Administering</strong> the <strong>NFS</strong> Automounter<br />
servers:<br />
cd /var/yp<br />
/usr/ccs/bin/make auto.master<br />
If you are using NIS+ to manage your automounter maps, issue the<br />
following comm<strong>and</strong> to add an entry to the NIS+ auto_master table:<br />
nistbladm -a key=”/net” value=”-hosts -nosuid” \<br />
auto_master.org_dir<br />
The local mount point (/net) should not exist.<br />
This configuration change will not take effect until you restart the<br />
automounter or reboot your system with the automounter enabled. See<br />
“To Enable the <strong>NFS</strong> Automounter” on page 81 or “To Restart the<br />
Automounter” on page 83.<br />
The -hosts map is a “built-in” automounter map; you do not have to<br />
create it. The -hosts map causes the automounter to mount all the<br />
exported directories from any <strong>NFS</strong> server on the network whenever a<br />
user or process requests access to one of the exported directories from<br />
that server.<br />
CAUTION<br />
Because the -hosts map allows <strong>NFS</strong> access to any reachable remote<br />
system, a user may inadvertently cause an <strong>NFS</strong> mount over X.25 or<br />
SLIP, which is unsupported, or through a slow router or gateway. Mounts<br />
over slow links may cause excessive retransmissions <strong>and</strong> degrade<br />
performance for all users.<br />
When a user or process requests a directory from an <strong>NFS</strong> server, the<br />
automounter creates a subdirectory, named after the <strong>NFS</strong> server, under<br />
the local mount point you configured in the automounter master map.<br />
(The conventional mount point for the -hosts map is /net.) Then the<br />
automounter mounts all the exported directories from that server under<br />
the subdirectory it created. Directories will stay mounted until they are<br />
left idle for five minutes. The five minute default can be changed by<br />
adding the -tl duration option to the AUTO_OPTIONS variable in the<br />
/etc/rc.config.d/nfsconf file.<br />
For example, if server sage exports /opt <strong>and</strong> /apps, <strong>and</strong> a user on your<br />
<strong>NFS</strong> client types the following comm<strong>and</strong>,<br />
cd /net/sage/opt/frame<br />
Chapter 2 57
Configuring <strong>and</strong> <strong>Administering</strong> <strong>NFS</strong><br />
Configuring <strong>and</strong> <strong>Administering</strong> the <strong>NFS</strong> Automounter<br />
the subdirectory /sage is created under /net, <strong>and</strong> /opt <strong>and</strong> /apps are<br />
mounted under /sage. Figure 2-4 shows the automounted file structure<br />
after the user’s comm<strong>and</strong>.<br />
Figure 2-4<br />
Automounted Directories from -hosts Map—One Server<br />
/net<br />
/sage<br />
/opt /apps<br />
If server thyme exports the directory /exports/proj1, <strong>and</strong> a user types<br />
the following comm<strong>and</strong>,<br />
more /net/thyme/exports/proj1/readme<br />
the subdirectory /thyme is created under /net, <strong>and</strong> /exports/proj1 is<br />
mounted under /thyme. Figure 2-5 shows the automounted directory<br />
structure after the second user’s comm<strong>and</strong>.<br />
Figure 2-5<br />
Automounted Directories from -hosts Map—Two Servers<br />
/net<br />
/sage<br />
/thyme<br />
/opt /apps<br />
/exports<br />
/proj1<br />
The -hosts map is an indirect map. It uses the hosts database (the<br />
/etc/hosts file, the NIS hosts map, the NIS+ hosts table, or BIND<br />
[DNS]) to find a host on the network.<br />
To Decide Between Direct <strong>and</strong> Indirect <strong>NFS</strong><br />
Automounts<br />
• Before you automount a remote directory, decide whether you want to<br />
use a direct or indirect automounter map. Table 2-4 lists the<br />
advantages <strong>and</strong> disadvantages of each type of map.<br />
58<br />
Chapter 2
Configuring <strong>and</strong> <strong>Administering</strong> <strong>NFS</strong><br />
Configuring <strong>and</strong> <strong>Administering</strong> the <strong>NFS</strong> Automounter<br />
Table 2-4<br />
Direct Map<br />
In general, an indirect map is better than a direct map, because it is<br />
easier to modify while the automounter is running, <strong>and</strong> because it does<br />
not cause “mount storms” in directories with many automount points.<br />
However, if your automounted directory must share the same parent<br />
directory with local or st<strong>and</strong>ard-mounted directories, or if users must<br />
always get a complete list of available files <strong>and</strong> directories when they<br />
issue the ls comm<strong>and</strong>, you should choose a direct map.<br />
Table 2-4 lists the advantages <strong>and</strong> disadvantages of direct <strong>and</strong> indirect<br />
automounter maps.<br />
Direct vs. Indirect Automounter Map Types<br />
Indirect Map<br />
Advantage: A user can see the contents of<br />
a direct-mounted directory with the ls<br />
comm<strong>and</strong>. If the contents are not currently<br />
mounted, ls causes them to be mounted.<br />
Advantage: Direct-mounted automounted<br />
directories can share the same parent<br />
directory with local or st<strong>and</strong>ard-mounted<br />
files <strong>and</strong> directories.<br />
Disadvantage: If you add or remove<br />
mounts in a direct map, or if you change<br />
the local mount point for an existing<br />
mount in a direct map, you have to restart<br />
the automounter or reboot your system<br />
before the automounter sees the changes<br />
you made.<br />
Disadvantage: When a user or program<br />
accesses a directory containing many<br />
direct mount points, all the directories are<br />
mounted, whether they are needed or not.<br />
This can cause a flurry of mount activity.<br />
Disadvantage: If a user types ls to see the<br />
contents of an indirect-mounted directory, it<br />
appears empty unless its subdirectories are<br />
currently mounted. The user must cd to a<br />
subdirectory or type ls subdirectory to<br />
cause it to be mounted.<br />
Disadvantage: An indirect map turns the<br />
parent directory of the mount points into a<br />
symbolic link <strong>and</strong> hides any local,<br />
st<strong>and</strong>ard-mounted, or direct-mounted files or<br />
directories underneath it.<br />
Advantage: If you modify an indirect map, the<br />
automounter will see the changes the next<br />
time it mounts the directory, so you don’t have<br />
to restart the automounter.<br />
Advantage: When a user or program accesses<br />
a directory containing many indirect mount<br />
points, only directories that are already<br />
mounted appear.<br />
Chapter 2 59
Configuring <strong>and</strong> <strong>Administering</strong> <strong>NFS</strong><br />
Configuring <strong>and</strong> <strong>Administering</strong> the <strong>NFS</strong> Automounter<br />
How the Automounter Sets Up Direct <strong>and</strong> Indirect Mounts<br />
When a user or program requests access to a remote directory, the<br />
automounter mounts it under its own directory, called /tmp_mnt. Then,<br />
the automounter creates a symbolic link from the mount point you<br />
configured to the mount point under /tmp_mnt. For example, if you<br />
configured the local mount point as /usr/bin, the automounter would<br />
mount the directory under /tmp_mnt/usr/bin <strong>and</strong> create a symbolic link<br />
from /usr/bin to /tmp_mnt/usr/bin.<br />
The automounts configured in a direct map may be mounted in various<br />
places in the local file system. Symbolic links are created from the<br />
configured mount points to the corresponding mount points under<br />
/tmp_mnt.<br />
The automounts configured in an indirect map are all mounted under the<br />
same local parent directory. A symbolic link is created from the parent<br />
directory of the configured mount points to the corresponding parent<br />
directory under /tmp_mnt.<br />
Figure 2-6 shows the difference between direct mounts <strong>and</strong> indirect<br />
mounts on an <strong>NFS</strong> client.<br />
Figure 2-6<br />
The Difference Between Direct Mounts <strong>and</strong> Indirect Mounts<br />
direct mounts<br />
indirect mounts<br />
/<br />
/<br />
/tmp_mnt<br />
configured<br />
parent directory<br />
/tmp_mnt<br />
configured<br />
parent directory<br />
actual<br />
parent directory<br />
actual<br />
parent directory<br />
= mounted directory<br />
= symbolic link<br />
Attempting to read or write directly to the /tmp_mnt directory does not<br />
60<br />
Chapter 2
Configuring <strong>and</strong> <strong>Administering</strong> <strong>NFS</strong><br />
Configuring <strong>and</strong> <strong>Administering</strong> the <strong>NFS</strong> Automounter<br />
cause the automounter to mount any directories that are not already<br />
mounted. You must access the automounted directories through the<br />
mount points you configured, which are symbolic links into the /tmp_mnt<br />
directory.<br />
To Mount a Remote <strong>Directory</strong> Using a Direct<br />
Automounter Map<br />
1. If you are using local files for your automounter maps, use an editor<br />
to open or create a direct map in the /etc directory. The direct map is<br />
commonly called /etc/auto_direct. Add a line to the direct map<br />
with the following syntax:<br />
local_directory [mount_options] server:remote_directory<br />
If you are using NIS to manage your automounter maps, add the line<br />
to the direct map on the NIS master server.<br />
If you are using NIS+ to manage your automounter maps, issue the<br />
following comm<strong>and</strong> to add an entry to the NIS+ direct map table<br />
(commonly called auto_direct.org_dir):<br />
nistbladm -a key=”local_directory” value=”mount_options \<br />
server:remote_directory” auto_direct.org_dir<br />
2. If you are using local files for your automounter maps, use an editor<br />
to open or create the automounter master map in the /etc directory.<br />
The master map should be called /etc/auto_master. If you are using<br />
NIS, open the master map on the NIS master server.<br />
If the direct map you just modified is not listed in the automounter<br />
master map, add the following line to the master map:<br />
/- direct_map_name [mount_options]<br />
If you are using NIS+ to manage your automounter maps, issue the<br />
following comm<strong>and</strong> to add an entry for the auto_direct map to the<br />
auto_master map:<br />
nistbladm -a key=”/-” value=”direct_map_name mount_options”<br />
\<br />
auto_master.org_dir<br />
3. If you are using NIS to manage your automounter maps, issue the<br />
following comm<strong>and</strong>s on the NIS master server to rebuild the maps<br />
<strong>and</strong> push them to the slave servers:<br />
cd /var/yp<br />
Chapter 2 61
Configuring <strong>and</strong> <strong>Administering</strong> <strong>NFS</strong><br />
Configuring <strong>and</strong> <strong>Administering</strong> the <strong>NFS</strong> Automounter<br />
/usr/ccs/bin/make auto.master auto.direct<br />
The local directory you configure as the mount point should be empty or<br />
non-existent. The automounter will create any non-existent directories<br />
between the root directory <strong>and</strong> the configured mount point. If the local<br />
directory you configure is not empty, any local files or directories in it will<br />
be hidden <strong>and</strong> inaccessible while the remote directory is mounted over it.<br />
CAUTION<br />
Do not automount a remote directory on a local directory that is a<br />
symbolic link.<br />
The mount options are the same ones used for st<strong>and</strong>ard <strong>NFS</strong>-mounted<br />
directories. See “To Change the Default Mount Options” on page 43 for a<br />
list of mount options. The bg option cannot be used for an automounted<br />
directory. The mount options configured in the direct map override the<br />
ones in the master map if there is a conflict.<br />
You can configure all your direct automounts in the same map. Many<br />
people use the file name /etc/auto_direct for their direct map.<br />
If the direct map name in the automounter master map contains a slash<br />
(/), the automounter assumes it is a local file. If it does not contain a<br />
slash, the automounter uses the Name Service Switch to determine<br />
whether it is a file, an NIS map, or an NIS+ table. See “Configuring the<br />
Name Service Switch” on page 253.<br />
If you plan to use NIS or NIS+ to manage your automounter maps, you<br />
can have only one direct map in your configuration. If you plan to use<br />
NIS to manage your automounter maps, <strong>and</strong> your file system does not<br />
allow file names longer than 14 characters, keep the map name to 10<br />
characters or fewer.<br />
Before you can mount a remote directory on your system, the remote<br />
system where the directory is located must be configured as an <strong>NFS</strong><br />
server <strong>and</strong> must export the directory.<br />
After you configure the directories you want automounted, you must<br />
enable the automounter. See “To Enable the <strong>NFS</strong> Automounter” on page<br />
81. If the automounter is already running when you add a direct mount<br />
to your configuration, you must restart the automounter before your<br />
changes will take effect. See “To Restart the Automounter” on page 83.<br />
Automounted directories stay mounted until they are left idle for five<br />
minutes. The five minute default can be changed by adding the<br />
62<br />
Chapter 2
Configuring <strong>and</strong> <strong>Administering</strong> <strong>NFS</strong><br />
Configuring <strong>and</strong> <strong>Administering</strong> the <strong>NFS</strong> Automounter<br />
-tl duration option to the AUTO_OPTIONS variable in the<br />
/etc/rc.config.d/nfsconf file.<br />
If you change the mount options, the remote server name, or the remote<br />
directory name for an existing direct mount while the automounter is<br />
running, the changes you made will take effect the next time the<br />
directory is mounted. However, if you change the local directory name in<br />
the direct map, or if you change the master map, these changes will not<br />
take effect until you restart the automounter. See “To Restart the<br />
Automounter” on page 83.<br />
Automounted directories in the /etc/mnttab file contain the keyword<br />
ignore to prevent them from being mounted at boot time.<br />
For more information on automounter configuration, type man 1M<br />
automount at the HP-UX prompt.<br />
Example File Entries for Direct Automounts<br />
Following are example lines from an automounter direct map on <strong>NFS</strong><br />
client sage. The sharp sign (#) indicates a comment line.<br />
# /etc/auto_direct file<br />
# local mount point mount options remote server:directory<br />
/auto/project/specs -nosuid<br />
thyme:/export/project/specs<br />
/auto/project/budget -nosuid basil:/finance/FY94/proj1<br />
Following are example lines from the automounter master map on <strong>NFS</strong><br />
client sage.<br />
# /etc/auto_master file<br />
# local mount point map name mount options<br />
/- /etc/auto_direct<br />
Figure 2-7 illustrates how the automounter sets up the direct mounts for<br />
this configuration.<br />
Chapter 2 63
Configuring <strong>and</strong> <strong>Administering</strong> <strong>NFS</strong><br />
Configuring <strong>and</strong> <strong>Administering</strong> the <strong>NFS</strong> Automounter<br />
Figure 2-7<br />
Example of Direct Mounts<br />
<strong>NFS</strong> server "basil"<br />
/<br />
<strong>NFS</strong> server "thyme"<br />
/<br />
<strong>NFS</strong> client "sage"<br />
/<br />
/finance<br />
/export<br />
/tmp_mnt<br />
/auto<br />
/FY94<br />
/project<br />
/auto<br />
/project<br />
/proj1<br />
/specs<br />
/project<br />
/specs<br />
/budget<br />
/targets /ytd<br />
/reqmnts /designs<br />
/specs<br />
/budget<br />
/reqmnts /designs<br />
/targets /ytd<br />
<strong>NFS</strong> mounts<br />
symbolic links<br />
To Mount a Remote <strong>Directory</strong> Using an Indirect<br />
Automounter Map<br />
1. If you are using local files for your automounter maps, use an editor<br />
to open or create an indirect map in the /etc directory. Add a line<br />
with the following syntax to the indirect map:<br />
local_subdirectory [mount_options] server:remote_directory<br />
If you are using NIS to manage your automounter maps, add the line<br />
to an indirect map on the NIS master server.<br />
If you are using NIS+ to manage your automounter maps, issue the<br />
following comm<strong>and</strong> to add an entry to an NIS+ indirect map table:<br />
nistbladm -a key=”local_subdirectory” value=”mount_options<br />
\<br />
server:remote_directory” indirect_mapname.org_dir<br />
2. If you are using local files for your automounter maps, use an editor<br />
to open or create the automounter master map in the /etc directory.<br />
The master map should be called /etc/auto_master. If you are using<br />
NIS, open the master map on the NIS master server.<br />
64<br />
Chapter 2
Configuring <strong>and</strong> <strong>Administering</strong> <strong>NFS</strong><br />
Configuring <strong>and</strong> <strong>Administering</strong> the <strong>NFS</strong> Automounter<br />
If the indirect map you just modified is not listed in the automounter<br />
master map, add the following line to the master map:<br />
local_parent_directory indirect_map_name [mount_options]<br />
If you are using NIS+ to manage your automounter maps, issue the<br />
following comm<strong>and</strong> to add an entry for the indirect map to the<br />
auto_master map:<br />
nistbladm -a key=”local_parent_directory”<br />
value=”indirect_map_name \<br />
mount_options” auto_master.org_dir<br />
3. If you are using NIS to manage your automounter maps, issue the<br />
following comm<strong>and</strong>s on the NIS master server to rebuild the maps<br />
<strong>and</strong> push them to the slave servers:<br />
cd /var/yp<br />
/usr/ccs/bin/make auto.master indirect_mapname<br />
The local_subdirectory specified in the indirect map is the deepest<br />
subdirectory in the local directory pathname. For example, if you were<br />
mounting a remote directory on /nfs/apps/draw, the<br />
local_subdirectory specified in the indirect map would be draw.<br />
The local_parent_directory specified in the master map is all but the<br />
deepest subdirectory in the local directory pathname. For example, if you<br />
were mounting a remote directory on /nfs/apps/draw, the<br />
local_parent_directory specified in the master map would be<br />
/nfs/apps.<br />
The local_parent_directory <strong>and</strong> local_subdirectory should not<br />
exist; the automounter will create them when it mounts the remote<br />
directory. If the local_parent_directory or local_subdirectory<br />
contains files or directories, they will be hidden beneath the remote<br />
directory when it is mounted.<br />
CAUTION<br />
The local_subdirectory <strong>and</strong> local_parent_directory must not be<br />
symbolic links.<br />
The mount options are the same ones used for st<strong>and</strong>ard <strong>NFS</strong>-mounted<br />
directories. See “To Change the Default Mount Options” on page 43 for a<br />
list of mount options. The bg option cannot be used for an automounted<br />
directory. The mount options configured in the indirect map override the<br />
ones in the master map if there is a conflict.<br />
Chapter 2 65
Configuring <strong>and</strong> <strong>Administering</strong> <strong>NFS</strong><br />
Configuring <strong>and</strong> <strong>Administering</strong> the <strong>NFS</strong> Automounter<br />
You can configure indirect automounts in the same indirect map only if<br />
their local_parent_directory, as specified in the automounter master<br />
map, is the same. For example, indirect mounts with the local mount<br />
points /nfs/apps/draw <strong>and</strong> /nfs/apps/word could be configured in the<br />
same indirect map.<br />
Indirect maps are usually called /etc/auto_name, where name is<br />
something that helps you remember what is configured in the map. If<br />
you plan to use NIS to manage your automounter maps, <strong>and</strong> if your file<br />
system does not support file names longer than 14 characters, keep your<br />
indirect map names to 10 characters or fewer.<br />
If the indirect map name in the automounter master map contains a<br />
slash (/), the automounter assumes it is a local file. If it does not contain<br />
a slash, the automounter uses the Name Service Switch to determine<br />
whether it is a file, an NIS map, or an NIS+ table. See “Configuring the<br />
Name Service Switch” on page 253.<br />
Before you can mount a remote directory on your system, the remote<br />
system where the directory is located must be configured as an <strong>NFS</strong><br />
server <strong>and</strong> must export the directory.<br />
Automounted directories stay mounted until they are left idle for five<br />
minutes. The five minute default can be changed by adding the<br />
-tl duration option to the AUTO_OPTIONS variable in the<br />
/etc/rc.config.d/nfsconf file.<br />
After you configure the directories you want automounted, you must<br />
enable the automounter. See “To Enable the <strong>NFS</strong> Automounter” on page<br />
81. If the automounter is already running when you add an indirect<br />
mount to your configuration, you do not have to restart the automounter<br />
unless you change the master map. Any changes you make to an existing<br />
indirect map will take effect the next time the automounter mounts the<br />
directory. However, changes to the master map will not take effect until<br />
you restart the automounter. See “To Restart the Automounter” on page<br />
83.<br />
Automounted directories in the /etc/mnttab file contain the keyword<br />
ignore to prevent them from being mounted at boot time.<br />
For more information on automounter configuration, type man 1M<br />
automount at the HP-UX prompt.<br />
Example File Entries for Indirect Automounts<br />
Following are example lines from an automounter indirect map on <strong>NFS</strong><br />
66<br />
Chapter 2
Configuring <strong>and</strong> <strong>Administering</strong> <strong>NFS</strong><br />
Configuring <strong>and</strong> <strong>Administering</strong> the <strong>NFS</strong> Automounter<br />
client sage. The sharp sign (#) indicates a comment. Everything from the<br />
sharp sign to the end of the line is ignored by the automounter.<br />
# /etc/auto_desktop file<br />
# local mount point mount options remote<br />
server:directory<br />
draw -nosuid thyme:/export/apps/draw<br />
write -nosuid basil:/exprort/write<br />
Following are example lines from the automounter master map on <strong>NFS</strong><br />
client sage. The master map also includes an entry for the direct map<br />
/etc/auto_direct.<br />
# /etc/auto_master file<br />
# local mount point map name mount options<br />
/- /etc/auto_direct<br />
/nfs/desktop<br />
/etc/auto_desktop<br />
Figure 2-8 illustrates how the automounter sets up the indirect mounts<br />
for this configuration.<br />
Figure 2-8<br />
How the Automounter Sets Up Indirect Mounts<br />
<strong>NFS</strong> server "basil"<br />
/<br />
/export<br />
/write<br />
readme /wordtool<br />
<strong>NFS</strong> server "thyme"<br />
/<br />
/export<br />
/apps<br />
/draw<br />
/pics /bin<br />
<strong>NFS</strong> client "sage"<br />
/<br />
/tmp_mnt<br />
/nfs<br />
/nfs<br />
/desktop<br />
/desktop<br />
symbolic link<br />
/draw /write<br />
/pics /bin<br />
readme<br />
/wordtool<br />
<strong>NFS</strong> mounts<br />
Chapter 2 67
Configuring <strong>and</strong> <strong>Administering</strong> <strong>NFS</strong><br />
Configuring <strong>and</strong> <strong>Administering</strong> the <strong>NFS</strong> Automounter<br />
To Configure Multiple (Replicated) Servers for an<br />
Automounted <strong>Directory</strong><br />
1. Follow the instructions in “To Mount a Remote <strong>Directory</strong> Using a<br />
Direct Automounter Map” on page 61 or “To Mount a Remote<br />
<strong>Directory</strong> Using an Indirect Automounter Map” on page 64.<br />
2. In the direct or indirect map, modify the line that mounts the remote<br />
directory so that multiple servers are listed.<br />
• If the remote directory has a different name on the different<br />
servers, use a syntax like the following example from a direct map:<br />
/nfs/proj2/schedule -ro<br />
\<br />
broccoli:/export/proj2/schedule<br />
cauliflower:/proj2/FY94/schedule<br />
The automounter reads this entry as one line. The line has been<br />
broken for readability, <strong>and</strong> the backslash (\) tells the automounter<br />
that the line continues after the line break.<br />
• If the remote directory has the same name on every server, use a<br />
syntax like the following example from an indirect map:<br />
man -ro broccoli,cabbage,cauliflower:/usr/share/man<br />
Directories with multiple servers should be mounted read-only to ensure<br />
that the versions remain the same on all the servers.<br />
When a user requests access to a directory with multiple servers<br />
configured, the automounter polls all the servers simultaneously <strong>and</strong><br />
mounts the directory from the server that responds first. Multiple<br />
servers give users reliable access to a mounted directory, because if one<br />
server is down, the directory can be mounted from another. Also,<br />
multiple servers provide some load balancing across the network; a<br />
server that is not busy will respond more quickly to the automounter’s<br />
poll than one that is heavily loaded, so the directory will be mounted<br />
from the server that is not busy.<br />
If you configure multiple servers on both sides of a gateway, the servers<br />
on the same side of the gateway as the <strong>NFS</strong> client will always be used,<br />
because they will always respond to the client’s poll before the servers on<br />
the other side of the gateway.<br />
68<br />
Chapter 2
Configuring <strong>and</strong> <strong>Administering</strong> <strong>NFS</strong><br />
Configuring <strong>and</strong> <strong>Administering</strong> the <strong>NFS</strong> Automounter<br />
To Use Environment Variables as Shortcuts in<br />
Automounter Maps<br />
1. Use an environment variable anywhere in a direct or indirect<br />
automounter map except the first field, which specifies the local<br />
mount point. An environment variable must be preceded by a dollar<br />
sign ($) or enclosed in curly braces {}. The following direct map uses<br />
a variable called HOST:<br />
/private_files sage:/export/private_files/$HOST<br />
2. Add the -D option to the AUTO_OPTIONS variable in the<br />
/etc/rc.config.d/nfsconf file to assign a value to the variable, as<br />
in the following example:<br />
AUTO_OPTIONS=”-f $AUTO_MASTER -D HOST='hostname'”<br />
The example shown above assumes that <strong>NFS</strong> server sage has<br />
subdirectories in its /export/private_files directory that are named<br />
after the hosts in its network. Every host in the network can use the<br />
same automounter map <strong>and</strong> the same AUTO_OPTIONS definition to mount<br />
its private files from server sage.<br />
For example, when the automounter starts up on host basil, it assigns<br />
the value basil to the HOST variable. Then, when someone requests<br />
access to the local /private_files directory on basil, the automounter<br />
mounts /export/private_files/basil from server sage.<br />
Any environment variable that is set to a value may be used in an<br />
automounter map. If you do not set the variable with the -D option in<br />
/etc/rc.config.d/nfsconf, the automounter uses the current value of<br />
the environment variable on the local host.<br />
To Use Wildcard Characters as Shortcuts in<br />
Automounter Maps<br />
1. Use the asterisk (*) in an indirect map as a wildcard character to<br />
represent the local subdirectory, when you want the local<br />
subdirectory to be the same as the remote system name or the remote<br />
subdirectory.<br />
2. Use the ampers<strong>and</strong> (&) in a direct or indirect map as the remote<br />
system name or the remote subdirectory. Whatever is in the local<br />
directory name field will replace the ampers<strong>and</strong>. If you have used an<br />
asterisk to represent the local subdirectory, whatever replaces the<br />
Chapter 2 69
Configuring <strong>and</strong> <strong>Administering</strong> <strong>NFS</strong><br />
Configuring <strong>and</strong> <strong>Administering</strong> the <strong>NFS</strong> Automounter<br />
asterisk (*) in the local subdirectory field also replaces the ampers<strong>and</strong><br />
(&) in the remote system name or remote subdirectory field.<br />
You cannot use the asterisk (*) wildcard in a direct map.<br />
The following example automounts users’ home directories. The home<br />
directories are physically located on <strong>NFS</strong> server basil, under the remote<br />
directory /home. On the local <strong>NFS</strong> client, the home directories will also<br />
be mounted under /home.<br />
Following is the line from the automounter master map<br />
/etc/auto_master that lists the indirect map /etc/auto_home.<br />
# /etc/auto_master file<br />
# local mount point map name mount options<br />
/home /etc/auto_home -nosuid<br />
Following is the line from the automounter indirect map<br />
/etc/auto.home that mounts users’ home directories on dem<strong>and</strong>.<br />
# /etc/auto_home file<br />
# local mount point mount options remote<br />
server:directory<br />
* basil:/home/&<br />
A user’s home directory is configured in the /etc/passwd file as<br />
/home/username. For example, the home directory of user terry is<br />
/home/terry. When Terry logs in, the automounter looks in the<br />
/etc/auto_home map <strong>and</strong> substitutes terry for both the asterisk <strong>and</strong><br />
the ampers<strong>and</strong>. The automounter then mounts Terry’s home directory<br />
from /home/terry on server basil to /home/terry on the local <strong>NFS</strong><br />
client.<br />
The ampers<strong>and</strong> character can be used to represent both the remote<br />
server <strong>and</strong> the remote subdirectory, in the same line of the indirect map.<br />
For example, if users’ home directories are physically located on many<br />
different servers, but the directory under which the home directories are<br />
located is called /home/servername on all the servers, the following line<br />
in the /etc/auto_home map will mount all users’ home directories from<br />
any server:<br />
* &:/home/&<br />
If the home directory of user terry is configured in the /etc/passwd file<br />
as /home/basil/terry, when Terry logs in, the automounter will mount<br />
the remote directory /home/basil from server basil on the local<br />
70<br />
Chapter 2
Configuring <strong>and</strong> <strong>Administering</strong> <strong>NFS</strong><br />
Configuring <strong>and</strong> <strong>Administering</strong> the <strong>NFS</strong> Automounter<br />
directory /home/basil.<br />
The line with the asterisk <strong>and</strong> ampers<strong>and</strong> should be the last line in an<br />
indirect map. The automounter reads the lines in the indirect map<br />
sequentially until it finds a match for the requested local subdirectory.<br />
The asterisk (*) matches any subdirectory, so the automounter stops<br />
reading at the line with the asterisk, because it has found a match. Any<br />
lines after the asterisk are never read.<br />
For example, if the /etc/auto_home map contains the following lines,<br />
* basil:/home/&<br />
charlie thyme:/home/charlie<br />
the automounter attempts to mount /home/charlie from host basil.<br />
The asterisk is a match for charlie, so the automounter looks no further<br />
<strong>and</strong> never reads the second line. However, if the /etc/auto_home map<br />
contains the following lines,<br />
charlie thyme:/home/charlie<br />
* basil:/home/&<br />
the automounter will mount Charlie’s home directory from host thyme<br />
<strong>and</strong> everyone else’s home directory from host basil.<br />
For more information on automounter configuration, type man 1M<br />
automount at the HP-UX prompt.<br />
To Automount Users’ Home Directories with the<br />
-passwd Map<br />
This task might require you to make some changes to your <strong>NFS</strong> servers<br />
as well as your <strong>NFS</strong> clients.<br />
NOTE<br />
The -passwd map requires that users’ home directories be located under<br />
the same directory on all systems in the network. On HP-UX release 9.x<br />
or earlier, home directories are usually located under /users. On HP-UX<br />
release 10.0 or later, home directories are usually located under /home.<br />
For this reason, you should not set up the -passwd map until all of your<br />
systems are running HP-UX release 10.0 or later.<br />
Chapter 2 71
Configuring <strong>and</strong> <strong>Administering</strong> <strong>NFS</strong><br />
Configuring <strong>and</strong> <strong>Administering</strong> the <strong>NFS</strong> Automounter<br />
Setting up the <strong>NFS</strong> Server<br />
1. On the <strong>NFS</strong> servers where home directories are located, make sure<br />
every user’s home directory is of the form<br />
directory/servername/username. For example, if the home<br />
directories are located under the /home directory on server sage, user<br />
Claire’s home directory would be /home/sage/claire.<br />
2. Make sure the machines where users’ home directories are located<br />
are set up as <strong>NFS</strong> servers <strong>and</strong> are exporting the home directories. See<br />
“Configuring <strong>and</strong> <strong>Administering</strong> an <strong>NFS</strong> Server” on page 24.<br />
Setting up the <strong>NFS</strong> Client<br />
1. In the /etc/passwd file on the <strong>NFS</strong> clients, or in the NIS passwd map<br />
or NIS+ passwd table, configure the home directory of each user as<br />
directory/servername/username, where servername is the name<br />
of the machine where the user’s home directory is physically located.<br />
For example, if home directories are mounted under /home on <strong>NFS</strong><br />
client thyme, Claire’s home directory, which is located on server sage,<br />
would be configured as /home/sage/claire in the /etc/passwd file<br />
on client thyme.<br />
2. Create a directory of the form directory/servername on the <strong>NFS</strong><br />
clients for each <strong>NFS</strong> server where users’ home directories are located.<br />
For example, if users’ home directories are located on servers sage<br />
<strong>and</strong> basil, <strong>and</strong> they will be automounted under the directory /home<br />
on host thyme, you would create the directories /home/sage <strong>and</strong><br />
/home/basil on host thyme.<br />
3. If you are using local files for your automounter maps, add the<br />
following line to the automounter master map (usually called<br />
/etc/auto_master) on the <strong>NFS</strong> clients. If you are using NIS to<br />
manage your automounter maps, add the line to the master map on<br />
the NIS master server.<br />
local_parent_directory -passwd [mount_options]<br />
The local_parent_directory is the directory under which users’<br />
home directories will be mounted. This directory must be different<br />
from the directory in the user’s passwd entry. For example, you might<br />
use homes as the directory, as in the following example:<br />
/homes -passwd -nosuid<br />
If you are using NIS+ to manage your automounter maps, issue the<br />
72<br />
Chapter 2
Configuring <strong>and</strong> <strong>Administering</strong> <strong>NFS</strong><br />
Configuring <strong>and</strong> <strong>Administering</strong> the <strong>NFS</strong> Automounter<br />
following comm<strong>and</strong> to add an entry to the NIS+ auto_master table:<br />
nistbladm -a key=”/homes” value=”-passwd -nosuid” \<br />
auto_master.org_dir<br />
4. If you are using NIS to manage your automounter maps, issue the<br />
following comm<strong>and</strong>s on the NIS master server to rebuild the master<br />
map <strong>and</strong> push it to slave servers:<br />
cd /var/yp<br />
/usr/ccs/bin/make auto.master<br />
5. Create a symbolic link from each user’s home directory as it is<br />
configured in /etc/passwd (for example, /home/sage/claire) to<br />
local_parent_directory/username, where<br />
local_parent_directory is the local mount point you configured in<br />
the automounter master map, as in the following example:<br />
ln -s /homes/claire /home/sage/claire<br />
The changes you have made will not take effect until you enable or<br />
restart the automounter. See “To Enable the <strong>NFS</strong> Automounter” on page<br />
81 or “To Restart the Automounter” on page 83.<br />
The -passwd map is a built-in automounter map that you do not have to<br />
create. It uses the /etc/passwd file, the NIS passwd map, or the NIS+<br />
passwd table to find a user’s home system <strong>and</strong> then mounts the user’s<br />
home directory under the configured mount point when the user logs in.<br />
Figure 2-9 illustrates a configuration using the -passwd map.<br />
Chapter 2 73
Configuring <strong>and</strong> <strong>Administering</strong> <strong>NFS</strong><br />
Configuring <strong>and</strong> <strong>Administering</strong> the <strong>NFS</strong> Automounter<br />
Figure 2-9<br />
Home Directories Automounted with -passwd Map<br />
<strong>NFS</strong> server "sage"<br />
/<br />
<strong>NFS</strong> server "basil"<br />
/<br />
<strong>NFS</strong> client "thyme"<br />
/<br />
/home<br />
/home<br />
/homes<br />
/home<br />
/sage<br />
/basil<br />
/mark<br />
/annalee /claire /alex /mark<br />
.cshrc /Mail<br />
.kshrc /mydocs .cshrc /Mail<br />
/sage /basil<br />
/claire<br />
/claire /mark<br />
.kshrc /mydocs<br />
<strong>NFS</strong> mounts<br />
symbolic links<br />
To Automount Users’ Home Directories with Wildcard<br />
Characters<br />
1. Make sure every user’s home directory is of the form<br />
directory/servername/username, on the <strong>NFS</strong> servers where the<br />
directories are located. For example, if the home directories are<br />
located under the /home directory on server sage, user Claire’s home<br />
directory pathname would be /home/sage/claire.<br />
NOTE<br />
This configuration requires that users’ home directories be located under<br />
the same directory on all systems in the network. On HP-UX release<br />
9.x or earlier, home directories are usually located under /users. On<br />
HP-UX release 10.0 or later, home directories are usually located<br />
under /home. For this reason, you should not set up this configuration<br />
until all of your systems are running HP-UX release 10.0 or later.<br />
2. Make sure the machines where users’ home directories are located<br />
are set up as <strong>NFS</strong> servers <strong>and</strong> are exporting the home directories. See<br />
“Configuring <strong>and</strong> <strong>Administering</strong> an <strong>NFS</strong> Server” on page 24.<br />
74<br />
Chapter 2
Configuring <strong>and</strong> <strong>Administering</strong> <strong>NFS</strong><br />
Configuring <strong>and</strong> <strong>Administering</strong> the <strong>NFS</strong> Automounter<br />
3. In the /etc/passwd file on the <strong>NFS</strong> clients, or in the NIS passwd map<br />
or NIS+ passwd table, configure the home directory of each user as<br />
directory/servername/username, where servername is the name<br />
of the machine where the user’s home directory is physically located.<br />
For example, if home directories are mounted under /home on <strong>NFS</strong><br />
client thyme, Claire’s home directory, which is located on server sage,<br />
would be configured as /home/sage/claire in the /etc/passwd file<br />
on client thyme.<br />
4. If you are using local files for your automounter maps, create a file<br />
called /etc/auto_home on the <strong>NFS</strong> clients, <strong>and</strong> add the following line<br />
to it. If you are using NIS to manage your automounter maps, add the<br />
line to the /etc/auto_home file on the NIS master server.<br />
* &:/home/& -nosuid<br />
The asterisk (*) <strong>and</strong> ampers<strong>and</strong> (&) characters are explained in “To<br />
Use Wildcard Characters as Shortcuts in Automounter Maps” on<br />
page 69.<br />
If you are using NIS+ to manage your automounter maps, issue the<br />
following comm<strong>and</strong> to add an entry to the auto_home table:<br />
nistbladm -a key=”*” value=”&/home/& -nosuid” \<br />
auto_home.org_dir<br />
5. If you are using local files for your automounter maps, add the<br />
following line to the automounter master map (usually called<br />
/etc/auto_master) on the <strong>NFS</strong> clients:<br />
/home /etc/auto_home<br />
If you are using NIS to manage your automounter maps, add the<br />
following line to the /etc/auto_master file on the NIS master server:<br />
/home auto.home<br />
If you are using NIS+ to manage your automounter maps, issue the<br />
following comm<strong>and</strong> to add an entry to the NIS+ auto_master table:<br />
nistbladm -a key=”/home” value=”auto_home”<br />
auto_master.org_dir<br />
6. If you are using NIS to manage your automounter maps, issue the<br />
following comm<strong>and</strong>s on the NIS master server to rebuild the maps<br />
<strong>and</strong> push them to slave servers:<br />
cd /var/yp<br />
/usr/ccs/bin/make auto.master<br />
Chapter 2 75
Configuring <strong>and</strong> <strong>Administering</strong> <strong>NFS</strong><br />
Configuring <strong>and</strong> <strong>Administering</strong> the <strong>NFS</strong> Automounter<br />
The changes you have made will not take effect until you enable or<br />
restart the automounter. See “To Enable the <strong>NFS</strong> Automounter” on page<br />
81 or “To Restart the Automounter” on page 83.<br />
Example of Automounting a User’s Home <strong>Directory</strong><br />
User Howard’s home directory is located on <strong>NFS</strong> server basil, where it<br />
is called /home/basil/howard. On all the machines in the network,<br />
Howard has the following entry in the /etc/passwd file:<br />
howard:MILQ3N1tBHXhM:828:Howard:/home/basil/howard:/bin/ksh<br />
When Howard logs into any <strong>NFS</strong> client, the automounter recognizes<br />
/home as an automounter mount point, because it is configured in the<br />
master map:<br />
/home auto_home<br />
The automounter reads the auto_home to find out how to mount<br />
Howard’s home directory. The subdirectory basil is not listed in the<br />
auto_home map, but the asterisk (*) in the following line matches any<br />
subdirectory:<br />
* &:/home/& -nosuid<br />
So the automounter substitutes basil for all wildcard characters in that<br />
line:<br />
basil<br />
basil:/home/basil<br />
The automounter mounts /home/basil from server basil to the local<br />
mount point /home/basil on the <strong>NFS</strong> client. All the home directories on<br />
server basil are located under /home/basil. Figure 2-10 illustrates this<br />
configuration:<br />
Figure 2-10<br />
Home Directories Automounted with Wildcards<br />
<strong>NFS</strong> server "basil"<br />
/<br />
/home<br />
/basil<br />
local <strong>NFS</strong> client<br />
/<br />
/home<br />
/basil<br />
/james<br />
/howard<br />
/james /howard<br />
76<br />
Chapter 2
Configuring <strong>and</strong> <strong>Administering</strong> <strong>NFS</strong><br />
Configuring <strong>and</strong> <strong>Administering</strong> the <strong>NFS</strong> Automounter<br />
To Automount Multiple Directories Simultaneously<br />
(Hierarchical Mounts)<br />
• Use an editor to create an entry with the following format in a direct<br />
or indirect automounter map. (Create the map, if necessary, <strong>and</strong> add<br />
it to the automounter master map.)<br />
local_dir /local_subdirectory [-options]<br />
server:remote_directory \<br />
/local_subdirectory [-options]<br />
server:remote_directory \ . . .<br />
The backslash (\) characters tell the automounter to ignore the line<br />
breaks, so this entry is effectively all one line. Map entries with this<br />
format cause all the remote directories on the line to be mounted at the<br />
same time. For example, the following entry from a direct map mounts<br />
the source code <strong>and</strong> the data files for a project at the same time;<br />
whenever anyone requests access to either one, they are both mounted.<br />
/our_project /source -ro broccoli:/opt/proj1/src \<br />
/datafiles cauliflower:/opt/proj1/samples/data<br />
Because the directories are always mounted simultaneously, you can use<br />
relative pathnames to move from one to another, for example,<br />
cd ../source<br />
Here is another example from an indirect map. In this example, the same<br />
mount option (nosuid) applies to all three automounted directories.<br />
chap2 -nosuid /text sage:/our_book/chap2 \<br />
/graphics basil:/our_book/artwork/chap2 \<br />
/old sage:/our_book/oldfiles/chap2<br />
To Improve Automounter Performance with<br />
Subdirectory Notation in Indirect Maps<br />
1. Look for entries in your indirect maps that specify the same server<br />
<strong>and</strong> remote pathname <strong>and</strong> differ only in the local mount point <strong>and</strong> the<br />
deepest subdirectory on the remote system. For example, the<br />
following entries in an indirect map are good c<strong>and</strong>idates for<br />
subdirectory notation:<br />
terriers<br />
hunting_dogs<br />
local_breeders<br />
akcserver:/breeders/terriers<br />
akcserver:/breeders/retrievers<br />
akcserver:/breeders/SFbayarea<br />
Chapter 2 77
Configuring <strong>and</strong> <strong>Administering</strong> <strong>NFS</strong><br />
Configuring <strong>and</strong> <strong>Administering</strong> the <strong>NFS</strong> Automounter<br />
2. Replace the last slash (/) in the remote pathnames with a colon, as in<br />
the following example:<br />
terriers<br />
hunting_dogs<br />
local_breeders<br />
akcserver:/breeders:terriers<br />
akcserver:/breeders:retrievers<br />
akcserver:/breeders:SFbayarea<br />
When the automounter encounters subdirectory notation, it mounts the<br />
parent directory instead of mounting each subdirectory individually.<br />
In the above example using subdirectory notation, the automounter<br />
mounts akcserver:/breeders whenever one of the remote<br />
subdirectories (terriers, retrievers, or SFbayarea) is requested.<br />
Then, when another subdirectory is requested, it is already mounted,<br />
<strong>and</strong> all the automounter has to do is create a symbolic link for it.<br />
Subdirectory notation creates some very confusing path names on the<br />
local host. The following example shows how the automounter sets up<br />
mounts using subdirectory notation.<br />
Assume that the indirect map shown above is called auto.dogs <strong>and</strong> is<br />
listed in the master map as follows:<br />
/pets/dogs<br />
auto.dogs<br />
Suppose someone requests access to a file in the hunting_dogs directory,<br />
<strong>and</strong> while it is mounted, someone else requests access to a file in the<br />
local_breeders directory. If you use subdirectory notation, the<br />
automounter performs the following steps:<br />
1. Mounts remote directory /breeders from <strong>NFS</strong> server akcserver<br />
onto local directory /tmp_mnt/breeders/hunting_dogs.<br />
The path to the mount point is the path name on the server, <strong>and</strong> the<br />
mount point itself is the subdirectory name that was requested on the<br />
local host. The subdirectories hunting_dogs <strong>and</strong> local_breeders<br />
are underneath this mount point.<br />
2. Creates a symbolic link from /pets/dogs/hunting_dogs to<br />
/tmp_mnt/breeders/hunting_dogs/hunting_dogs.<br />
3. Creates a symbolic link from /pets/dogs/local_breeders to<br />
/tmp_mnt/breeders/hunting_dogs/local_breeders.<br />
Without subdirectory notation, the automounter performs the following<br />
steps:<br />
1. Mounts remote directory /breeders/retrievers from <strong>NFS</strong> server<br />
akcserver onto local directory /tmp_mnt/pets/dogs/hunting_dogs.<br />
78<br />
Chapter 2
Configuring <strong>and</strong> <strong>Administering</strong> <strong>NFS</strong><br />
Configuring <strong>and</strong> <strong>Administering</strong> the <strong>NFS</strong> Automounter<br />
2. Creates a symbolic link from /pets/dogs/hunting_dogs to<br />
/tmp_mnt/pets/dogs/hunting_dogs.<br />
3. Mounts remote directory /breeders/SFbayarea from <strong>NFS</strong> server<br />
akcserver onto local directory<br />
/tmp_mnt/pets/dogs/local_breeders.<br />
4. Creates a symbolic link from /pets/dogs/local_breeders to<br />
/tmp_mnt/pets/dogs/local_breeders.<br />
To Include an Automounter Map in Another<br />
Automounter Map<br />
• To include the contents of an automounter map in another<br />
automounter map, add a plus sign (+) before the map name, as in the<br />
following example:<br />
# /etc/auto_home file<br />
# local mount point mount options remote<br />
server:directory<br />
basil -nosuid basil:/home/basil<br />
+auto.home<br />
Assume the /etc/auto_home map is listed in the master map with the<br />
following line:<br />
/home<br />
/etc/auto_home<br />
This example has the following effect:<br />
If a user logs in whose home directory is in /home/basil, the<br />
automounter will mount the directory /home/basil from host basil.<br />
If a user logs in whose home directory is in /home/sage, /home/thyme,or<br />
any subdirectory of /home other than basil, the automounter will look<br />
in either the NIS or NIS+ auto.home map for information on mounting<br />
the user’s home directory (depending on the Name Service Switch<br />
configuration).<br />
The plus sign (+) tells the automounter to look in a different map for the<br />
information it needs to mount the directory. If the map name following<br />
the plus sign begins with a slash, the automounter assumes it is a local<br />
map. If the map name contains no slashes, the automounter uses the<br />
Name Service Switch to determine whether it is a file, an NIS map, or an<br />
NIS+ table. See “Configuring the Name Service Switch” on page 253.<br />
Chapter 2 79
Configuring <strong>and</strong> <strong>Administering</strong> <strong>NFS</strong><br />
Configuring <strong>and</strong> <strong>Administering</strong> the <strong>NFS</strong> Automounter<br />
You can include an NIS or NIS+ map inside an NIS or NIS+ master or<br />
direct map. You cannot include an NIS or NIS+ map inside an NIS or<br />
NIS+ indirect map.<br />
If you specify an included NIS+ automounter map with no dots in the<br />
name, the automounter appends org_dir.defaultdomain to the map<br />
name. For example, if the map name you specify is auto_home, <strong>and</strong> your<br />
Name Service Switch configuration indicates that NIS+ is to be used, the<br />
automounter will look for a map called<br />
auto_home.org_dir.defaultdomain.<br />
For more information, type man 1M automount or man 4<br />
nsswitch.conf.<br />
To Turn Off an Automounter Map with the -null Map<br />
1. Add a line with the following syntax to the automounter master map:<br />
local_directory -null<br />
2. If the automounter is running, restart it to force it to read its maps.<br />
See “To Restart the Automounter” on page 83.<br />
The -null option “turns off” the map that is mounted on<br />
local_directory. For example, if the NIS auto.master map mounts<br />
the auto.home map on /home, <strong>and</strong> you include the following line in your<br />
local /etc/auto_master file,<br />
/home -null<br />
the NIS auto.home map will not be used on your system.<br />
The -null option is useful for turning off NIS or NIS+ automounter<br />
maps that do not apply to your host.<br />
You can also replace NIS maps with local maps, as in the following<br />
example from /etc/auto_master:<br />
/home /etc/auto_ourhome<br />
Because the automounter reads the local /etc/auto_master file before<br />
the NIS auto.master map, this entry causes the automounter to look for<br />
mount information in the local file /etc/auto_ourhome instead of the<br />
auto.home NIS map.<br />
To use a local automounter master map, make sure the AUTO_OPTIONS<br />
variable in /etc/rc.config.d/nfsconf includes the string<br />
-f $AUTO_MASTER, <strong>and</strong> make sure the AUTO_MASTER variable is set to the<br />
80<br />
Chapter 2
Configuring <strong>and</strong> <strong>Administering</strong> <strong>NFS</strong><br />
Configuring <strong>and</strong> <strong>Administering</strong> the <strong>NFS</strong> Automounter<br />
name of your local automounter master map file.<br />
For more information, type man 1M automount.<br />
To Enable the <strong>NFS</strong> Automounter<br />
1. In the /etc/rc.config.d/nfsconf file, make sure the <strong>NFS</strong>_CLIENT<br />
<strong>and</strong> AUTOMOUNT variables are set to 1, as follows:<br />
<strong>NFS</strong>_CLIENT=1<br />
AUTOMOUNT=1<br />
2. If you will use a local file as your automounter master map, make<br />
sure the AUTO_MASTER variable in /etc/rc.config.d/nfsconf is set<br />
to the name of your automounter master map. (The default master<br />
map name is /etc/auto_master.)<br />
AUTO_MASTER=”/etc/auto_master”<br />
If you will use an NIS or NIS+ automounter master map, remove -f<br />
$AUTO_MASTER from the AUTO_OPTIONS variable.<br />
3. Issue the following comm<strong>and</strong> to run the <strong>NFS</strong> client startup script:<br />
/sbin/init.d/nfs.client start<br />
When the automounter starts up, if your AUTO_OPTIONS variable<br />
specifies a master map file with the -f filename option, the<br />
automounter will look for a file by that name on the local host. It will also<br />
use the Name Service Switch to determine which name services you are<br />
using <strong>and</strong> find the master maps that are available from those name<br />
services. If your AUTO_OPTIONS variable does not specify the -f<br />
filename option, the automounter will consult the Name Service Switch<br />
configuration to determine where to look for your automounter master<br />
map.<br />
The automounter does not support <strong>NFS</strong> protocol version 3. Automounted<br />
file systems will be mounted with <strong>NFS</strong> protocol version 2.<br />
For more information, type man 4 nsswitch.conf or man 1M automount<br />
at the HP-UX prompt.<br />
To Verify Your Automounter Configuration<br />
1. Type the following comm<strong>and</strong> to change the current working directory<br />
to an automounted directory:<br />
Chapter 2 81
Configuring <strong>and</strong> <strong>Administering</strong> <strong>NFS</strong><br />
Configuring <strong>and</strong> <strong>Administering</strong> the <strong>NFS</strong> Automounter<br />
/usr/bin/cd local_directory<br />
where local_directory is the configured mount point in the<br />
automounter map.<br />
2. Type the following comm<strong>and</strong> to verify that the contents of the remote<br />
directory have been mounted under the local mount point:<br />
/usr/bin/ls<br />
If the directory is configured in an indirect map, issuing the ls comm<strong>and</strong><br />
from the parent directory will display nothing. When you cd to a<br />
subdirectory configured in the indirect map, or issue the comm<strong>and</strong><br />
ls subdirectory, the subdirectory will be mounted.<br />
Therefore, if you have the following indirect map configuration,<br />
# /etc/auto_master file<br />
# local mount point map name mount options<br />
/nfs/desktop<br />
/etc/auto_desktop<br />
# /etc/auto_desktop file<br />
# local mount point mount options remote<br />
server:directory<br />
draw<br />
-nosuid<br />
thyme:/export/apps/draw<br />
write -nosuid basil:/export write<br />
<strong>and</strong> you issue the following comm<strong>and</strong>s,<br />
cd /nfs/desktop<br />
ls<br />
the ls comm<strong>and</strong> will produce no output, because the draw <strong>and</strong> write<br />
subdirectories are not currently mounted. However, if you issue the<br />
following comm<strong>and</strong>s,<br />
cd /nfs/desktop/write<br />
cd /nfs/desktop/draw<br />
cd ..<br />
ls<br />
the ls comm<strong>and</strong> will display<br />
draw<br />
write<br />
If the automounter is not mounting your configured directories, see<br />
“Troubleshooting <strong>NFS</strong> <strong>Services</strong>” on page 273.<br />
82<br />
Chapter 2
Configuring <strong>and</strong> <strong>Administering</strong> <strong>NFS</strong><br />
Configuring <strong>and</strong> <strong>Administering</strong> the <strong>NFS</strong> Automounter<br />
To Modify or Remove (Unmount) an Automounted<br />
<strong>Directory</strong><br />
1. Use an editor to make your changes to the direct or indirect map.<br />
2. If you removed the last entry in the direct or indirect map, remove the<br />
line for that map in the automounter master map.<br />
3. If you made any of the following changes, you need to restart the<br />
automounter before your changes will take effect:<br />
• any changes to the master map<br />
• changes to the local directory name in a direct map<br />
See “To Restart the Automounter” on page 83.<br />
To Restart the Automounter<br />
1. Issue the following comm<strong>and</strong> to get a list of all the automounted<br />
directories on the client:<br />
/usr/bin/grep tmp_mnt /etc/mnttab<br />
2. For every automounted directory listed by the grep comm<strong>and</strong>, issue<br />
the following comm<strong>and</strong> to determine whether the directory is<br />
currently in use:<br />
/usr/sbin/fuser -cu local_mount_point<br />
This comm<strong>and</strong> lists the process IDs <strong>and</strong> user names of everyone using<br />
the mounted directory.<br />
3. Warn any users to cd out of the directory, <strong>and</strong> kill any processes that<br />
are using the directory, or wait until the processes terminate. You can<br />
issue the following comm<strong>and</strong> to kill all the processes using the<br />
mounted directory:<br />
/usr/sbin/fuser -ck local_mount_point<br />
4. Issue the following comm<strong>and</strong>s to kill the automounter (PID is the<br />
process ID returned by the ps comm<strong>and</strong>):<br />
ps -ef | grep automount<br />
kill -SIGTERM PID<br />
CAUTION<br />
Do not kill the automounter with -SIGKILL (-9). The SIGKILL signal can<br />
Chapter 2 83
Configuring <strong>and</strong> <strong>Administering</strong> <strong>NFS</strong><br />
Configuring <strong>and</strong> <strong>Administering</strong> the <strong>NFS</strong> Automounter<br />
cause any currently automounted directories to become inaccessible<br />
until you reboot your system.<br />
5. Type the ps comm<strong>and</strong> to make sure the automounter is no longer<br />
active:<br />
/usr/bin/ps -ef | grep automount<br />
If the ps comm<strong>and</strong> indicates the automounter is still active, make<br />
sure all users are out of the automounted directories <strong>and</strong> then try<br />
again. Do not restart the automounter until all automount processes<br />
have terminated.<br />
6. Issue the following comm<strong>and</strong> to start the automounter:<br />
/usr/sbin/automount options<br />
options is the list of options configured in the AUTO_OPTIONS<br />
variable in the /etc/rc.config.d/nfsconf file. You can also source<br />
the /etc/rc.config.d/nfsconf file, <strong>and</strong> then enter the automount<br />
comm<strong>and</strong> as follows:<br />
/usr/sbin/automount $AUTO_OPTIONS<br />
If you attempt to kill the automounter while a user or process is working<br />
in a directory containing indirect mount points (for example, if you have<br />
the -hosts map mounted at /net, <strong>and</strong> a process is using /net as its<br />
current working directory), the automounter creates a child process to<br />
serve the directory while the parent process continues to try to shut<br />
down. Therefore, you may notice that the ps comm<strong>and</strong> lists two<br />
automount processes. When all automounted directories have been<br />
unmounted, both processes terminate.<br />
If you restart the automounter before these automount processes<br />
terminate, the new process attempts to shut itself down, finds that a<br />
directory is busy, <strong>and</strong> creates a child process. You then have three<br />
automount processes.<br />
If you attempt to kill the automounter while a user or process is using an<br />
automounted directory underneath an automounter mount point (for<br />
example, if you have the -hosts map mounted at /net, <strong>and</strong> a user’s<br />
current directory is /net/basil/tools), the directory remains mounted<br />
under /tmp_mnt, <strong>and</strong> the configured mount point <strong>and</strong> its symbolic link<br />
are removed.<br />
84<br />
Chapter 2
Configuring <strong>and</strong> <strong>Administering</strong> <strong>NFS</strong><br />
Configuring <strong>and</strong> <strong>Administering</strong> the <strong>NFS</strong> Automounter<br />
Even after you restart the automounter, the directory remains mounted<br />
under /tmp_mnt, <strong>and</strong> the automounter will not unmount it. You can use<br />
the umount(1M) comm<strong>and</strong> to unmount the directory under /tmp_mnt.<br />
For more information, type man 1M automount at the HP-UX prompt.<br />
Chapter 2 85
Configuring <strong>and</strong> <strong>Administering</strong> <strong>NFS</strong><br />
Configuring <strong>and</strong> <strong>Administering</strong> AutoFS<br />
Configuring <strong>and</strong> <strong>Administering</strong> AutoFS<br />
This section tells you how to configure AutoFS. AutoFS mounts<br />
directories automatically when users or processes request access to<br />
them, <strong>and</strong> it unmounts them automatically after they have been idle for<br />
a period of time (five minutes, by default).<br />
Following are the tasks involved in configuring AutoFS. Tasks 4 <strong>and</strong> 16<br />
alone will get AutoFS up <strong>and</strong> running on your system.<br />
Before configuring AutoFS, see “Deciding Between St<strong>and</strong>ard-Mounted<br />
Directories <strong>and</strong> Automounted Directories” on page 35. The following<br />
topics are covered in this section:<br />
1. “Advantages of AutoFS Versus Automounter” on page 87<br />
2. “Migrating From Automounter to AutoFS” on page 88<br />
3. “To Underst<strong>and</strong> How AutoFS Works” on page 89<br />
4. “To Automount All Exported Directories from Any Host Using the<br />
-hosts Map” on page 90<br />
5. “To Decide Between Direct <strong>and</strong> Indirect <strong>NFS</strong> Automounts” on page<br />
92<br />
6. “To Mount a Remote <strong>Directory</strong> Using a Direct Automounter Map” on<br />
page 95<br />
7. “To Mount a Remote <strong>Directory</strong> Using an Indirect Automounter Map”<br />
on page 99<br />
8. “To Configure Multiple (Replicated) Servers for an Automounted<br />
<strong>Directory</strong>” on page 102<br />
9. “To Use Environment Variables as Shortcuts in Automounter Maps”<br />
on page 103<br />
10.“To Use Wildcard Characters as Shortcuts in Automounter Maps” on<br />
page 104<br />
11.“To Automount Users’ Home Directories” on page 106<br />
12.“To Automount Multiple Directories Simultaneously (Hierarchical<br />
Mounts)” on page 108<br />
13.“To Include an Automounter Map in Another Automounter Map” on<br />
page 109<br />
86<br />
Chapter 2
Configuring <strong>and</strong> <strong>Administering</strong> <strong>NFS</strong><br />
Configuring <strong>and</strong> <strong>Administering</strong> AutoFS<br />
14.“To Create a Hierarchy of Automounter Maps” on page 110<br />
15.“To Turn Off an Automounter Map with the -null Map” on page 111<br />
16.“To Enable AutoFS” on page 111<br />
17.“To Disable AutoFS” on page 112<br />
18.“To Verify Your AutoFS Configuration” on page 112<br />
19.“To Modify or Remove (Unmount) an Automounted <strong>Directory</strong>” on<br />
page 114<br />
NOTE<br />
SAM does not currently support AutoFS. To perform AutoFS tasks you<br />
need to edit files <strong>and</strong> issue HP-UX comm<strong>and</strong>s as described in the<br />
following sections.<br />
Advantages of AutoFS Versus Automounter<br />
Beginning with the HP-UX Extension Pack Release, August 1998 (for<br />
HP-UX 11.0), the new automounting utility, AutoFS, is available in<br />
addition to the pre-existing Automounter. You can configure your system<br />
to use either Automounter or AutoFS. Automounter is the default on a<br />
newly installed or updated system. However, you may choose to migrate<br />
to AutoFS, since it has several advantages over Automounter:<br />
• AutoFS can be used to mount any type of file system, including <strong>NFS</strong><br />
Protocol Version 3. (The pre-existing Automounter can be used only<br />
for <strong>NFS</strong> PV2.)<br />
• With AutoFS, the configured mount points are the actual mount<br />
points. (The pre-existing Automounter mounts directories under<br />
/tmp_mnt <strong>and</strong> creates symbolic links from the configured mount<br />
points to the actual ones under /tmp_mnt.)<br />
• You do not have to stop AutoFS to change your automounter maps.<br />
The AutoFS daemon, automountd, runs continuously. When you<br />
make a change to an automounter map, you run the automount<br />
comm<strong>and</strong>, which reads the maps <strong>and</strong> then exits. (The pre-existing<br />
automounter has to be killed <strong>and</strong> restarted whenever you make a<br />
change to an automounter map.)<br />
Chapter 2 87
Configuring <strong>and</strong> <strong>Administering</strong> <strong>NFS</strong><br />
Configuring <strong>and</strong> <strong>Administering</strong> AutoFS<br />
Migrating From Automounter to AutoFS<br />
If you were using the automounter before you updated to the HP-UX<br />
Extension Pack Release, August 1998, you must perform the following<br />
tasks to migrate your automounter configuration to AutoFS:<br />
For more information, see the automount(1M) or automountd(1M) man<br />
pages.<br />
Table 2-5<br />
1. Move the /etc/rc.config.d/nfsconf file to<br />
/etc/rc.config.d.nfsconf.old.<br />
2. Copy the /usr/newconfig/etc/rc.config.d/nfsconf file to<br />
/etc/rc.config.d/nfsconf.<br />
3. In the /etc/rc.config.d/nfsconf file set the AUTOFS variable equal<br />
to 1.<br />
4. Copy any options you had specified in the AUTO_OPTIONS variable to<br />
either the AUTOMOUNT_OPTIONS or the AUTOMOUNTD_OPTIONS variable.<br />
Remove obsolete options.<br />
Table 2-5 lists the options to the old automount comm<strong>and</strong> <strong>and</strong> the<br />
equivalent AutoFS comm<strong>and</strong> options. It also indicates which<br />
automount options are obsolete with AutoFS.<br />
Old Automount Comm<strong>and</strong>-Line Options Used By AutoFS<br />
Old automount<br />
Option<br />
-D<br />
variable=value<br />
Equivalent<br />
AutoFS Comm<strong>and</strong><br />
Option<br />
automountd -D<br />
variable=value<br />
Purpose<br />
Assign value to<br />
environment<br />
variable.<br />
-f master_file automount -f<br />
master_file<br />
Use master_file as<br />
local master map.<br />
-M<br />
mount_directory<br />
Obsolete with<br />
AutoFS.<br />
Automount directories<br />
under<br />
mount_directory<br />
instead of /tmp_mnt.<br />
-m Obsolete with<br />
AutoFS.<br />
Ignore NIS<br />
auto.master map.<br />
88<br />
Chapter 2
Configuring <strong>and</strong> <strong>Administering</strong> <strong>NFS</strong><br />
Configuring <strong>and</strong> <strong>Administering</strong> AutoFS<br />
Table 2-5<br />
Old Automount Comm<strong>and</strong>-Line Options Used By AutoFS<br />
Old automount<br />
Option<br />
Equivalent<br />
AutoFS Comm<strong>and</strong><br />
Option<br />
Purpose<br />
-n Obsolete with<br />
AutoFS.<br />
Allow automounts<br />
only of previously<br />
mounted target file<br />
systems.<br />
-T automountd -T Enable automount<br />
tracing.<br />
-tl duration automount -t<br />
duration<br />
Specify time before<br />
unmounting idle<br />
directories.<br />
-tm interval<br />
-tw interval<br />
Obsolete with<br />
AutoFS.<br />
Obsolete with<br />
AutoFS.<br />
Specify interval<br />
between mount<br />
attempts.<br />
Specify interval<br />
between unmount<br />
attempts.<br />
-v automount -v<br />
automountd -v<br />
Verbose mode.<br />
5. Modify any scripts you have that kill <strong>and</strong> restart automount. The new<br />
AutoFS daemon, automountd, rarely needs to be restarted. If you<br />
need to make changes to your automounter maps, just run the<br />
automount program after modifying the maps. It is not a daemon, like<br />
the old automount process; it is a program that runs once to read the<br />
maps <strong>and</strong> then terminates.<br />
To Underst<strong>and</strong> How AutoFS Works<br />
AutoFS consists of the following components:<br />
1. The automount comm<strong>and</strong>, for reading automounter maps into<br />
memory.<br />
2. The AutoFS file system.<br />
Chapter 2 89
Configuring <strong>and</strong> <strong>Administering</strong> <strong>NFS</strong><br />
Configuring <strong>and</strong> <strong>Administering</strong> AutoFS<br />
3. The automountd daemon, which automounts file systems when they<br />
are requested by users.<br />
The automount comm<strong>and</strong> is invoked at system startup. It reads the<br />
automounter master map to create the initial set of AutoFS mount<br />
points in the internal mount table, /etc/mnttab. The automounted file<br />
systems are not automatically mounted at startup. They are points<br />
under which file systems will be mounted later, when users request<br />
access to them.<br />
When AutoFS receives a request to mount a file system that is not<br />
currently mounted, it calls the automountd daemon, which actually<br />
mounts the requested file system. Once the file system is mounted,<br />
further access does not require any action from the automountd daemon.<br />
Unlike the old automounter, AutoFS mounts file systems at the<br />
configured mount points. It does not maintain its own directory of mount<br />
points with symbolic links into it the way the old automounter does.<br />
The automountd daemon is completely independent from the automount<br />
comm<strong>and</strong>. Because of this separation, it is possible to add, delete, or<br />
change automounter map information without having to stop <strong>and</strong> restart<br />
the automountd daemon.<br />
After system startup, when the AutoFS mount points are set up, you can<br />
modify the set of mount points by modifying the automounter maps <strong>and</strong><br />
running the automount comm<strong>and</strong> to read them <strong>and</strong> modify the mount<br />
table accordingly. You do not have to stop <strong>and</strong> restart AutoFS.<br />
If an automounted file system has been idle for 5 minutes, AutoFS<br />
unmounts it.<br />
For more information on AutoFS, type man 1M automount or man 1M<br />
automountd at the HP-UX prompt.<br />
To Automount All Exported Directories from Any<br />
Host Using the -hosts Map<br />
1. If you are using local files for your automounter maps, use an editor<br />
to add the following line to the automounter master map file,<br />
/etc/auto_master:<br />
/net -hosts -nosuid<br />
If you are using NIS to manage your automounter maps, add the line<br />
to the master map file on the NIS master server, <strong>and</strong> then issue the<br />
following comm<strong>and</strong>s to rebuild the map <strong>and</strong> push it out to slave<br />
90<br />
Chapter 2
Configuring <strong>and</strong> <strong>Administering</strong> <strong>NFS</strong><br />
Configuring <strong>and</strong> <strong>Administering</strong> AutoFS<br />
servers:<br />
cd /var/yp<br />
/usr/ccs/bin/make auto_master<br />
2. On each host that will use the map you have just modified, issue the<br />
following comm<strong>and</strong> to force AutoFS to read the modified map:<br />
/usr/sbin/automount<br />
The local mount point (/net) should not exist.<br />
You must enable AutoFS before any directories can be automounted. See<br />
“To Enable the <strong>NFS</strong> Automounter” on page 81.<br />
The -hosts map is a “built-in” automounter map; you do not have to<br />
create it. The -hosts map causes AutoFS to mount all the exported<br />
directories from any <strong>NFS</strong> server on the network whenever a user or<br />
process requests access to one of the exported directories from that<br />
server.<br />
CAUTION<br />
Because the -hosts map allows <strong>NFS</strong> access to any reachable remote<br />
system, a user may inadvertently cause an <strong>NFS</strong> mount over X.25 or<br />
SLIP, which is unsupported, or through a slow router or gateway. Mounts<br />
over slow links may cause excessive retransmissions <strong>and</strong> degrade<br />
performance for all users.<br />
When a user or process requests a directory from an <strong>NFS</strong> server, AutoFS<br />
creates a subdirectory, named after the <strong>NFS</strong> server, under the local<br />
mount point you configured in the automounter master map. (The<br />
conventional mount point for the -hosts map is /net.) Then AutoFS<br />
mounts all the exported directories from that server under the<br />
subdirectory it created. Directories will stay mounted until they are left<br />
idle for five minutes. The five minute default can be changed by adding<br />
the -t duration option to the AUTOMOUNT_OPTIONS variable in the<br />
/etc/rc.config.d/nfsconf file.<br />
For example, if server sage exports /opt <strong>and</strong> /apps, <strong>and</strong> a user on your<br />
<strong>NFS</strong> client types the following comm<strong>and</strong>,<br />
cd /net/sage/opt/frame<br />
the subdirectory /sage is created under /net, <strong>and</strong> /opt <strong>and</strong> /apps are<br />
mounted under /sage. Figure 2-11 shows the automounted file structure<br />
after the user’s comm<strong>and</strong>.<br />
Chapter 2 91
Configuring <strong>and</strong> <strong>Administering</strong> <strong>NFS</strong><br />
Configuring <strong>and</strong> <strong>Administering</strong> AutoFS<br />
Figure 2-11<br />
Automounted Directories from -hosts Map—One Server<br />
/net<br />
/sage<br />
/opt /apps<br />
If server thyme exports the directory /exports/proj1, <strong>and</strong> a user types<br />
the following comm<strong>and</strong>,<br />
more /net/thyme/exports/proj1/readme<br />
the subdirectory /thyme is created under /net, <strong>and</strong> /exports/proj1 is<br />
mounted under /thyme. Figure 2-12 shows the automounted directory<br />
structure after the second user’s comm<strong>and</strong>.<br />
Figure 2-12<br />
Automounted Directories from -hosts Map—Two Servers<br />
/net<br />
/sage<br />
/thyme<br />
/opt /apps<br />
/exports<br />
/proj1<br />
The -hosts map is an indirect map. It uses the hosts database (the<br />
/etc/hosts file, the NIS hosts map, or BIND [DNS]) to find a host on<br />
the network. The Name Service Switch configuration determines which<br />
name services will be searched for host information. See “Configuring the<br />
Name Service Switch” on page 253.<br />
To Decide Between Direct <strong>and</strong> Indirect <strong>NFS</strong><br />
Automounts<br />
• Before you automount a remote directory, decide whether you want to<br />
use a direct or indirect automounter map. Table 2-6 lists the<br />
advantages <strong>and</strong> disadvantages of each type of map.<br />
In general, an indirect map is better than a direct map, because it is<br />
easier to modify while AutoFS is running, <strong>and</strong> because it does not cause<br />
92<br />
Chapter 2
Configuring <strong>and</strong> <strong>Administering</strong> <strong>NFS</strong><br />
Configuring <strong>and</strong> <strong>Administering</strong> AutoFS<br />
Table 2-6<br />
“mount storms” in directories with many automount points.<br />
However, if your automounted directory must share the same parent<br />
directory with local or st<strong>and</strong>ard-mounted directories, or if users must<br />
always get a complete list of available files <strong>and</strong> directories when they<br />
issue the ls comm<strong>and</strong>, you should choose a direct map.<br />
Table 2-6 lists the advantages <strong>and</strong> disadvantages of direct <strong>and</strong> indirect<br />
automounter maps.<br />
Direct vs. Indirect Automounter Map Types<br />
Direct Map<br />
Advantage: A user can see the<br />
contents of a direct-mounted<br />
directory with the ls comm<strong>and</strong>. If<br />
the contents are not currently<br />
mounted, ls causes them to be<br />
mounted.<br />
Advantage: Direct-mounted<br />
automounted directories can<br />
share the same parent directory<br />
with local or st<strong>and</strong>ard-mounted<br />
files <strong>and</strong> directories.<br />
Disadvantage: If you add or<br />
remove mounts in a direct map,<br />
or if you change the local mount<br />
point for an existing mount in a<br />
direct map, you have to force<br />
AutoFS to reread its maps or<br />
reboot your system before AutoFS<br />
sees the changes you made.<br />
Indirect Map<br />
Disadvantage: If a user types ls to<br />
see the contents of an<br />
indirect-mounted directory, it<br />
appears empty unless its<br />
subdirectories are currently<br />
mounted. The user must cd to a<br />
subdirectory or type ls<br />
subdirectory to cause it to be<br />
mounted.<br />
Disadvantage: An indirect map<br />
hides any local, st<strong>and</strong>ard-mounted,<br />
or direct-mounted files or directories<br />
underneath the mount point for the<br />
map.<br />
Advantage: If you modify an indirect<br />
map, AutoFS will see the changes<br />
the next time it mounts the<br />
directory, so you don’t have to force<br />
AutoFS to reread its maps.<br />
Chapter 2 93
Configuring <strong>and</strong> <strong>Administering</strong> <strong>NFS</strong><br />
Configuring <strong>and</strong> <strong>Administering</strong> AutoFS<br />
Table 2-6<br />
Direct vs. Indirect Automounter Map Types<br />
Direct Map<br />
Disadvantage: When a user or<br />
program accesses a directory<br />
containing many direct mount<br />
points, all the directories are<br />
mounted, whether they are<br />
needed or not. This can cause a<br />
flurry of mount activity.<br />
Disadvantage: When automount<br />
reads a direct map, it creates an<br />
entry for each automounted<br />
directory in the internal mount<br />
table, /etc/mnttab. This can<br />
cause the mount table to become<br />
very large.<br />
Indirect Map<br />
Advantage: When a user or program<br />
accesses a directory containing many<br />
indirect mount points, only<br />
directories that are already mounted<br />
appear.<br />
Advantage: When automount reads<br />
an indirect map, it creates only one<br />
entry for the entire map in the<br />
internal mount table, /etc/mnttab.<br />
Additional entries are created as<br />
directories are actually mounted.<br />
The mount table takes up no more<br />
space than necessary, because only<br />
mounted directories appear in it.<br />
How AutoFS Sets Up Direct <strong>and</strong> Indirect Mounts<br />
The automounts configured in a direct map may be mounted in various<br />
places in the local file system; they do not have to be located under the<br />
same parent directory.<br />
The automounts configured in an indirect map are all mounted under the<br />
same local parent directory.<br />
Figure 2-13 shows the difference between direct mounts <strong>and</strong> indirect<br />
mounts on an <strong>NFS</strong> client.<br />
94<br />
Chapter 2
Configuring <strong>and</strong> <strong>Administering</strong> <strong>NFS</strong><br />
Configuring <strong>and</strong> <strong>Administering</strong> AutoFS<br />
Figure 2-13<br />
The Difference Between Direct Mounts <strong>and</strong> Indirect Mounts<br />
mounts in a direct map<br />
mounts in an indirect map<br />
/<br />
/<br />
= automounted directory<br />
To Mount a Remote <strong>Directory</strong> Using a Direct<br />
Automounter Map<br />
1. If you are using local files for your automounter maps, use an editor<br />
to open or create a direct map in the /etc directory. The direct map is<br />
commonly called /etc/auto_direct. Add a line to the direct map<br />
with the following syntax:<br />
local_directory [mount_options] server:remote_directory<br />
If you are using NIS to manage your automounter maps, add the line<br />
to the direct map on the NIS master server.<br />
2. If you are using local files for your automounter maps, use an editor<br />
to open or create the automounter master map in the /etc directory.<br />
The master map should be called /etc/auto_master. If you are using<br />
NIS, open the master map on the NIS master server.<br />
If the direct map you just modified is not listed in the automounter<br />
master map, add the following line to the master map:<br />
/- direct_map_name [mount_options]<br />
3. If you are using NIS to manage your automounter maps, issue the<br />
following comm<strong>and</strong>s on the NIS master server to rebuild the maps<br />
<strong>and</strong> push them to the slave servers:<br />
cd /var/yp<br />
/usr/ccs/bin/make auto_master auto_direct<br />
Chapter 2 95
Configuring <strong>and</strong> <strong>Administering</strong> <strong>NFS</strong><br />
Configuring <strong>and</strong> <strong>Administering</strong> AutoFS<br />
4. On each host that will use the map you have just modified, issue the<br />
following comm<strong>and</strong> to force AutoFS to read the modified map:<br />
/usr/sbin/automount<br />
The local directory you configure as the mount point should be empty or<br />
non-existent. AutoFS will create any non-existent directories between<br />
the root directory <strong>and</strong> the configured mount point. If the local directory<br />
you configure is not empty, any local files or directories in it will be<br />
hidden <strong>and</strong> inaccessible while the remote directory is mounted over it.<br />
CAUTION<br />
Do not automount a remote directory on a local directory that is a<br />
symbolic link.<br />
If you are using NIS to manage your automounter maps, make sure the<br />
local mount point is different from the exported directory on the server. If<br />
they are the same, the server may attempt to mount its exported<br />
directory over itself, <strong>and</strong> the directory will become unavailable.<br />
The mount options are the same ones used for st<strong>and</strong>ard <strong>NFS</strong>-mounted<br />
directories. See “To Change the Default Mount Options” on page 43 for a<br />
list of mount options. The bg option cannot be used for an automounted<br />
directory. The mount options configured in the direct map override the<br />
ones in the master map if there is a conflict.<br />
You can configure all your direct automounts in the same map. Many<br />
people use the file name /etc/auto_direct for their direct map. If you<br />
plan to use NIS to manage your automounter maps, you can have only<br />
one direct map in your configuration. If you plan to use NIS to manage<br />
your automounter maps, <strong>and</strong> your file system does not allow file names<br />
longer than 14 characters, keep the map name to 10 characters or fewer.<br />
If the direct map name in the automounter master map contains a slash<br />
(/), AutoFS assumes it is a local file. If it does not contain a slash, AutoFS<br />
uses the Name Service Switch to determine whether it is a file or an NIS<br />
map. See “Configuring the Name Service Switch” on page 253.<br />
Before you can mount a remote directory on your system, the remote<br />
system where the directory is located must be configured as an <strong>NFS</strong><br />
server <strong>and</strong> must export the directory.<br />
You must enable AutoFS before any directories can be automounted. See<br />
“To Enable the <strong>NFS</strong> Automounter” on page 81.<br />
96<br />
Chapter 2
Configuring <strong>and</strong> <strong>Administering</strong> <strong>NFS</strong><br />
Configuring <strong>and</strong> <strong>Administering</strong> AutoFS<br />
Automounted directories stay mounted until they are left idle for five<br />
minutes. The five minute default can be changed by adding the<br />
-t duration option to the AUTOMOUNT_OPTIONS variable in the<br />
/etc/rc.config.d/nfsconf file.<br />
If you change the mount options, the remote server name, or the remote<br />
directory name for an existing direct mount while AutoFS is running, the<br />
changes you made will take effect the next time the directory is mounted.<br />
However, if you change the local directory name in the direct map, or if<br />
you change the master map, these changes will not take effect until you<br />
issue the automount comm<strong>and</strong> to force AutoFS to reread its maps.<br />
You can list executable automounter maps in the master map, or include<br />
them in local automounter map files. Executable automounter maps<br />
return a map entry on st<strong>and</strong>ard output when automountd supplies them<br />
with a key to look up. If they cannot supply a map entry for the key, they<br />
should return nothing. AutoFS determines whether a map is executable<br />
by checking whether the execute bit is set in its permissions string. If a<br />
map is not executable, make sure its execute bit is not set.<br />
Automounted directories in the /etc/mnttab file contain the keyword<br />
ignore to prevent them from being mounted at boot time.<br />
For more information on AutoFS configuration, type man 1M automount<br />
at the HP-UX prompt.<br />
Example File Entries for Direct Automounts<br />
Following are example lines from an automounter direct map on <strong>NFS</strong><br />
client sage. The sharp sign (#) indicates a comment line.<br />
# /etc/auto_direct file<br />
# local mount point mount options remote server:directory<br />
/auto/project/specs -nosuid<br />
thyme:/export/project/specs<br />
/auto/project/budget -nosuid basil:/export/FY94/proj1<br />
Following are example lines from the automounter master map on <strong>NFS</strong><br />
client sage.<br />
# /etc/auto_master file<br />
# local mount point map name mount options<br />
/- /etc/auto_direct<br />
Figure 2-14 illustrates how the AutoFS sets up the direct mounts for this<br />
Chapter 2 97
Configuring <strong>and</strong> <strong>Administering</strong> <strong>NFS</strong><br />
Configuring <strong>and</strong> <strong>Administering</strong> AutoFS<br />
configuration.<br />
Figure 2-14<br />
Example of Direct Mounts<br />
<strong>NFS</strong> server "basil"<br />
/<br />
/export<br />
/FY94<br />
<strong>NFS</strong> server "thyme"<br />
/<br />
/export<br />
/project<br />
<strong>NFS</strong> client "sage"<br />
/<br />
/auto<br />
/project<br />
/proj1<br />
/specs<br />
/targets /ytd<br />
/reqmnts /designs<br />
/specs<br />
/budget<br />
/reqmnts /designs<br />
/targets /ytd<br />
<strong>NFS</strong> mounts<br />
98<br />
Chapter 2
Configuring <strong>and</strong> <strong>Administering</strong> <strong>NFS</strong><br />
Configuring <strong>and</strong> <strong>Administering</strong> AutoFS<br />
To Mount a Remote <strong>Directory</strong> Using an Indirect<br />
Automounter Map<br />
1. If you are using local files for your automounter maps, use an editor<br />
to open or create an indirect map in the /etc directory. Add a line<br />
with the following syntax to the indirect map:<br />
local_subdirectory [mount_options] server:remote_directory<br />
If you are using NIS to manage your automounter maps, add the line<br />
to an indirect map on the NIS master server.<br />
2. If you are using local files for your automounter maps, use an editor<br />
to open or create the automounter master map in the /etc directory.<br />
The master map should be called /etc/auto_master. If you are using<br />
NIS, open the master map on the NIS master server.<br />
If the indirect map you just modified is not listed in the automounter<br />
master map, add the following line to the master map:<br />
local_parent_directory indirect_map_name [mount_options]<br />
3. If you are using NIS to manage your automounter maps, issue the<br />
following comm<strong>and</strong>s on the NIS master server to rebuild the maps<br />
<strong>and</strong> push them to the slave servers:<br />
cd /var/yp<br />
/usr/ccs/bin/make auto_master indirect_mapname<br />
4. If you modified the automounter master map, issue the following<br />
comm<strong>and</strong> on each host that will use the map, to force AutoFS to read<br />
the modified master map:<br />
/usr/sbin/automount<br />
The local_subdirectory specified in the indirect map is the deepest<br />
subdirectory in the local directory pathname. For example, if you were<br />
mounting a remote directory on /nfs/apps/draw, the<br />
local_subdirectory specified in the indirect map would be draw.<br />
The local_parent_directory specified in the master map is all but the<br />
deepest subdirectory in the local directory pathname. For example, if you<br />
were mounting a remote directory on /nfs/apps/draw, the<br />
local_parent_directory specified in the master map would be<br />
/nfs/apps.<br />
The local_parent_directory <strong>and</strong> local_subdirectory should not<br />
exist; AutoFS will create them when it mounts the remote directory. If<br />
Chapter 2 99
Configuring <strong>and</strong> <strong>Administering</strong> <strong>NFS</strong><br />
Configuring <strong>and</strong> <strong>Administering</strong> AutoFS<br />
the local_parent_directory or local_subdirectory contains files or<br />
directories, they will be hidden beneath the remote directory when it is<br />
mounted.<br />
CAUTION<br />
The local_subdirectory <strong>and</strong> local_parent_directory must not be<br />
symbolic links.<br />
If you are using NIS to manage your automounter maps, make sure the<br />
local mount point is different from the exported directory on the server. If<br />
they are the same, the server may attempt to mount its exported<br />
directory over itself, <strong>and</strong> the directory will become unavailable.<br />
The mount options are the same ones used for st<strong>and</strong>ard <strong>NFS</strong>-mounted<br />
directories. See “To Change the Default Mount Options” on page 43 for a<br />
list of mount options. The bg option cannot be used for an automounted<br />
directory. The mount options configured in the indirect map override the<br />
ones in the master map if there is a conflict.<br />
You can configure indirect automounts in the same indirect map only if<br />
their local_parent_directory, as specified in the automounter master<br />
map, is the same. For example, indirect mounts with the local mount<br />
points /nfs/apps/draw <strong>and</strong> /nfs/apps/word could be configured in the<br />
same indirect map.<br />
Indirect maps are usually called /etc/auto_name, where name is<br />
something that helps you remember what is configured in the map. If<br />
you plan to use NIS to manage your automounter maps, <strong>and</strong> if your file<br />
system does not support file names longer than 14 characters, keep your<br />
indirect map names to 10 characters or fewer.<br />
If the indirect map name in the automounter master map contains a<br />
slash (/), AutoFS assumes it is a local file. If it does not contain a slash,<br />
AutoFS uses the Name Service Switch to determine whether it is a file or<br />
an NIS map. See “Configuring the Name Service Switch” on page 253.<br />
Before you can mount a remote directory on your system, the remote<br />
system where the directory is located must be configured as an <strong>NFS</strong><br />
server <strong>and</strong> must export the directory.<br />
Automounted directories stay mounted until they are left idle for five<br />
minutes. The five minute default can be changed by adding the<br />
-t duration option to the AUTOMOUNT_OPTIONS variable in the<br />
/etc/rc.config.d/nfsconf file.<br />
100<br />
Chapter 2
Configuring <strong>and</strong> <strong>Administering</strong> <strong>NFS</strong><br />
Configuring <strong>and</strong> <strong>Administering</strong> AutoFS<br />
You must enable AutoFS before any directories can be automounted. See<br />
“To Enable the <strong>NFS</strong> Automounter” on page 81.<br />
If AutoFS is already running when you add an indirect mount to your<br />
configuration, you do not have to run the automount comm<strong>and</strong> unless<br />
you change the master map. Any changes you make to an existing<br />
indirect map will take effect the next time AutoFS mounts the directory.<br />
However, changes to the master map will not take effect until you issue<br />
the automount comm<strong>and</strong> to force AutoFS to reread its maps.<br />
You can list executable automounter maps in the master map, or include<br />
them in local automounter map files. Executable automounter maps<br />
return a map entry on st<strong>and</strong>ard output when automountd supplies them<br />
with a key to look up. If they cannot supply a map entry for the key, they<br />
should return nothing. AutoFS determines whether a map is executable<br />
by checking whether the execute bit is set in its permissions string. If a<br />
map is not executable, make sure its execute bit is not set.<br />
Automounted directories in the /etc/mnttab file contain the keyword<br />
ignore to prevent them from being mounted at boot time.<br />
For more information on AutoFS configuration, type man 1M automount<br />
at the HP-UX prompt.<br />
Example File Entries for Indirect Automounts<br />
Following are example lines from an automounter indirect map on <strong>NFS</strong><br />
client sage. The sharp sign (#) indicates a comment. Everything from the<br />
sharp sign to the end of the line is ignored by AutoFS.<br />
# /etc/auto_desktop file<br />
# local mount point mount options remote<br />
server:directory<br />
draw -nosuid thyme:/export/apps/draw<br />
write -nosuid basil:/exprort/write<br />
Following are example lines from the automounter master map on <strong>NFS</strong><br />
client sage. The master map also includes an entry for the direct map<br />
/etc/auto_direct.<br />
# /etc/auto_master file<br />
# local mount point map name mount options<br />
/- /etc/auto_direct<br />
/nfs/desktop<br />
/etc/auto_desktop<br />
Figure 2-15 illustrates how AutoFS sets up the indirect mounts for this<br />
Chapter 2 101
Configuring <strong>and</strong> <strong>Administering</strong> <strong>NFS</strong><br />
Configuring <strong>and</strong> <strong>Administering</strong> AutoFS<br />
configuration.<br />
Figure 2-15<br />
How AutoFS Sets Up Indirect Mounts<br />
<strong>NFS</strong> server "basil"<br />
/<br />
/export<br />
/write<br />
<strong>NFS</strong> server "thyme"<br />
/<br />
/export<br />
/apps<br />
<strong>NFS</strong> client "sage"<br />
/<br />
/nfs<br />
/desktop<br />
readme /wordtool<br />
/draw<br />
/draw<br />
/write<br />
/pics /bin<br />
/pics /bin<br />
readme<br />
/wordtool<br />
<strong>NFS</strong> mounts<br />
To Configure Multiple (Replicated) Servers for an<br />
Automounted <strong>Directory</strong><br />
1. Follow the instructions in “To Mount a Remote <strong>Directory</strong> Using a<br />
Direct Automounter Map” on page 61 or “To Mount a Remote<br />
<strong>Directory</strong> Using an Indirect Automounter Map” on page 64.<br />
2. In the direct or indirect map, modify the line that mounts the remote<br />
directory so that multiple servers are listed.<br />
• If the remote directory has a different name on the different<br />
servers, use a syntax like the following example from a direct map:<br />
/nfs/proj2/schedule -ro<br />
\<br />
broccoli:/export/proj2/schedule<br />
cauliflower:/proj2/FY94/schedule<br />
AutoFS reads this entry as one line. The line has been broken for<br />
readability, <strong>and</strong> the backslash (\) tells AutoFS that the line<br />
continues after the line break.<br />
102<br />
Chapter 2
Configuring <strong>and</strong> <strong>Administering</strong> <strong>NFS</strong><br />
Configuring <strong>and</strong> <strong>Administering</strong> AutoFS<br />
• If the remote directory has the same name on every server, use a<br />
syntax like the following example from an indirect map:<br />
man -ro broccoli,cabbage,cauliflower:/usr/share/man<br />
• You can assign weights to the various servers, by specifying a<br />
number in parentheses after each server name. The lower the<br />
weight number, the more likely the server is to be selected.<br />
man -ro<br />
broccoli(1),cabbage(2),cauliflower(3):/usr/share/man<br />
Servers with no weight specified have a default weight of zero<br />
(most likely to be selected).<br />
Server proximity is more important than the weights you assign.<br />
A server on the same network segment as the client is more likely<br />
to be selected than a server on another network segment,<br />
regardless of the weights you assign.<br />
Directories with multiple servers should be mounted read-only to ensure<br />
that the versions remain the same on all the servers.<br />
When a user requests access to a directory with multiple servers<br />
configured, AutoFS polls all the servers simultaneously <strong>and</strong> mounts the<br />
directory from the server that responds first. Multiple servers give users<br />
reliable access to a mounted directory, because if one server is down, the<br />
directory can be mounted from another. Also, multiple servers provide<br />
some load balancing across the network; a server that is not busy will<br />
respond more quickly to AutoFS’s poll than one that is heavily loaded, so<br />
the directory will be mounted from the server that is not busy.<br />
If you configure multiple servers on both sides of a gateway, a server on<br />
the same side of the gateway as the <strong>NFS</strong> client will always be used,<br />
because it will always respond to the client’s poll before the servers on<br />
the other side of the gateway.<br />
To Use Environment Variables as Shortcuts in<br />
Automounter Maps<br />
1. Use an environment variable anywhere in a direct or indirect<br />
automounter map except the first field, which specifies the local<br />
mount point. An environment variable must be preceded by a dollar<br />
sign ($) or enclosed in curly braces {}. The following direct map uses<br />
a variable called HOST:<br />
Chapter 2 103
Configuring <strong>and</strong> <strong>Administering</strong> <strong>NFS</strong><br />
Configuring <strong>and</strong> <strong>Administering</strong> AutoFS<br />
/private_files sage:/export/private_files/$HOST<br />
2. Add the -D option to the AUTOMOUNTD_OPTIONS variable in the<br />
/etc/rc.config.d/nfsconf file to assign a value to the variable, as<br />
in the following example:<br />
AUTOMOUNTD_OPTIONS=”-D HOST='hostname'”<br />
The example shown above assumes that <strong>NFS</strong> server sage has<br />
subdirectories in its /export/private_files directory that are named<br />
after the hosts in its network. Every host in the network can use the<br />
same automounter map <strong>and</strong> the same AUTOMOUNTD_OPTIONS definition to<br />
mount its private files from server sage.<br />
For example, when AutoFS starts up on host basil, it assigns the value<br />
basil to the HOST variable. Then, when someone requests access to the<br />
local /private_files directory on basil, AutoFS mounts<br />
/export/private_files/basil from server sage.<br />
Any environment variable that is set to a value may be used in an<br />
automounter map. If you do not set the variable with the -D option in<br />
/etc/rc.config.d/nfsconf, AutoFS uses the current value of the<br />
environment variable on the local host.<br />
You cannot use environment variables in the automounter master map.<br />
To Use Wildcard Characters as Shortcuts in<br />
Automounter Maps<br />
1. Use the asterisk (*) in an indirect map as a wildcard character to<br />
represent the local subdirectory, when you want the local<br />
subdirectory to be the same as the remote system name or the remote<br />
subdirectory.<br />
2. Use the ampers<strong>and</strong> (&) in a direct or indirect map as the remote<br />
system name or the remote subdirectory. Whatever is in the local<br />
directory name field will replace the ampers<strong>and</strong>. If you have used an<br />
asterisk to represent the local subdirectory, whatever replaces the<br />
asterisk (*) in the local subdirectory field also replaces the ampers<strong>and</strong><br />
(&) in the remote system name or remote subdirectory field.<br />
You cannot use the asterisk (*) wildcard in a direct map.<br />
The following example automounts users’ home directories. The home<br />
directories are physically located on <strong>NFS</strong> server basil, under the remote<br />
directory /export/home. On the local <strong>NFS</strong> client, the home directories<br />
104<br />
Chapter 2
Configuring <strong>and</strong> <strong>Administering</strong> <strong>NFS</strong><br />
Configuring <strong>and</strong> <strong>Administering</strong> AutoFS<br />
will be mounted under /home.<br />
Following is the line from the automounter master map<br />
/etc/auto_master that lists the indirect map /etc/auto_home.<br />
# /etc/auto_master file<br />
# local mount point map name mount options<br />
/home /etc/auto_home -nosuid<br />
Following is the line from the automounter indirect map<br />
/etc/auto_home that mounts users’ home directories on dem<strong>and</strong>.<br />
# /etc/auto_home file<br />
# local mount point mount options remote<br />
server:directory<br />
* basil:/export/home/&<br />
A user’s home directory is configured in the /etc/passwd file as<br />
/home/username. For example, the home directory of user terry is<br />
/home/terry. When Terry logs in, AutoFS looks in the /etc/auto_home<br />
map <strong>and</strong> substitutes terry for both the asterisk <strong>and</strong> the ampers<strong>and</strong>.<br />
AutoFS then mounts Terry’s home directory from /export/home/terry<br />
on server basil to /home/terry on the local <strong>NFS</strong> client.<br />
The ampers<strong>and</strong> character can be used to represent both the remote<br />
server <strong>and</strong> the remote subdirectory, in the same line of the indirect map.<br />
For example, if users’ home directories are physically located on many<br />
different servers, but the directory under which the home directories are<br />
located is called /export/home/servername on all the servers, the<br />
following line in the /etc/auto_home map will mount all users’ home<br />
directories from any server:<br />
* &:/export/home/&<br />
If the home directory of user terry is configured in the /etc/passwd file<br />
as /home/basil/terry, when Terry logs in, AutoFS will mount the<br />
remote directory /export/home/basil from server basil on the local<br />
directory /home/basil.<br />
The line with the asterisk <strong>and</strong> ampers<strong>and</strong> should be the last line in an<br />
indirect map. AutoFS reads the lines in the indirect map sequentially<br />
until it finds a match for the requested local subdirectory. The asterisk<br />
(*) matches any subdirectory, so AutoFS stops reading at the line with<br />
the asterisk, because it has found a match. Any lines after the asterisk<br />
are never read.<br />
Chapter 2 105
Configuring <strong>and</strong> <strong>Administering</strong> <strong>NFS</strong><br />
Configuring <strong>and</strong> <strong>Administering</strong> AutoFS<br />
For example, if the /etc/auto_home map contains the following lines,<br />
* basil:/export/home/&<br />
charlie thyme:/export/home/charlie<br />
AutoFS attempts to mount /export/home/charlie from host basil.<br />
The asterisk is a match for charlie, so AutoFS looks no further <strong>and</strong><br />
never reads the second line. However, if the /etc/auto_home map<br />
contains the following lines,<br />
charlie thyme:/export/home/charlie<br />
* basil:/export/home/&<br />
AutoFS will mount Charlie’s home directory from host thyme <strong>and</strong><br />
everyone else’s home directory from host basil.<br />
For more information on AutoFS configuration, type man 1M automount<br />
at the HP-UX prompt.<br />
To Automount Users’ Home Directories<br />
NOTE<br />
This configuration requires that users’ home directories be located under<br />
the same directory on all systems in the network. On HP-UX release 9.x<br />
or earlier, home directories are usually located under /users. On HP-UX<br />
release 10.0 or later, home directories are usually located under /home.<br />
For this reason, you should not set up this configuration until all of your<br />
systems are running HP-UX release 10.0 or later.<br />
1. Make sure the machines where users’ home directories are located<br />
are set up as <strong>NFS</strong> servers <strong>and</strong> are exporting the home directories. See<br />
“Configuring <strong>and</strong> <strong>Administering</strong> an <strong>NFS</strong> Server” on page 24.<br />
2. In the /etc/passwd file on the <strong>NFS</strong> clients, or in the NIS passwd map<br />
or NIS+ passwd table, configure the home directory of each user as<br />
the <strong>NFS</strong> mount point where the user’s home directory will be<br />
mounted. For example, if home directories are mounted under /home,<br />
Claire’s home directory would be configured as /home/claire in the<br />
/etc/passwd file.<br />
3. If you are using local files for your automounter maps, create a file<br />
called /etc/auto_home on the <strong>NFS</strong> clients, <strong>and</strong> add a line to it for<br />
each user, like the following example. If you are using NIS to manage<br />
your automounter maps, add the lines to the /etc/auto_home file on<br />
106<br />
Chapter 2
Configuring <strong>and</strong> <strong>Administering</strong> <strong>NFS</strong><br />
Configuring <strong>and</strong> <strong>Administering</strong> AutoFS<br />
the NIS master server.<br />
sammy thyme:/export/home/& -nosuid<br />
The ampers<strong>and</strong> (&) character takes the value of the user name in<br />
each line. In the example above, user sammy’s home directory is<br />
physically located on host thyme in /export/home/sammy.<br />
4. If you are using local files for your automounter maps, add the<br />
following line to the automounter master map, /etc/auto_master,<br />
on the <strong>NFS</strong> clients:<br />
/home /etc/auto_home<br />
If you are using NIS to manage your automounter maps, add the line<br />
to the /etc/auto_master file on the NIS master server.<br />
5. If you are using NIS to manage your automounter maps, issue the<br />
following comm<strong>and</strong>s on the NIS master server to rebuild the maps<br />
<strong>and</strong> push them to slave servers:<br />
cd /var/yp<br />
/usr/ccs/bin/make auto_master<br />
6. Issue the following comm<strong>and</strong>, on each <strong>NFS</strong> client that will use these<br />
automounter maps, to force AutoFS to reread the maps:<br />
/usr/sbin/automount<br />
Before you can automount home directories, you must enable AutoFS.<br />
See “To Enable the <strong>NFS</strong> Automounter” on page 81.<br />
Example of Automounting a User’s Home <strong>Directory</strong><br />
User Howard’s home directory is located on <strong>NFS</strong> server basil, where it<br />
is called /export/home/howard. On all the machines in the network,<br />
Howard has the following entry in the /etc/passwd file:<br />
howard:MILQ3N1tBHXhM:828:Howard:/home/howard:/bin/ksh<br />
When Howard logs into any <strong>NFS</strong> client, AutoFS recognizes /home as an<br />
AutoFS mount point, because it is configured in the master map:<br />
/home auto_home<br />
AutoFS reads the auto_home map to find out how to mount Howard’s<br />
home directory. It finds the following line:<br />
howard basil:/export/home/& -nosuid<br />
AutoFS substitutes howard for the ampers<strong>and</strong> (&) character in that line:<br />
Chapter 2 107
Configuring <strong>and</strong> <strong>Administering</strong> <strong>NFS</strong><br />
Configuring <strong>and</strong> <strong>Administering</strong> AutoFS<br />
howard basil:/export/home/howard -nosuid<br />
AutoFS mounts /export/home/howard from server basil to the local<br />
mount point /home/howard on the <strong>NFS</strong> client. Figure 2-16 illustrates<br />
this configuration:<br />
Figure 2-16<br />
Home Directories Automounted with Wildcards<br />
<strong>NFS</strong> server "basil"<br />
/<br />
/export<br />
/home<br />
local <strong>NFS</strong> client<br />
/<br />
/home<br />
/howard<br />
/howard<br />
.profile<br />
mystuff<br />
.profile<br />
mystuff<br />
To Automount Multiple Directories Simultaneously<br />
(Hierarchical Mounts)<br />
• Use an editor to create an entry with the following format in a direct<br />
or indirect automounter map. (Create the map, if necessary, <strong>and</strong> add<br />
it to the automounter master map.)<br />
local_dir /local_subdirectory [-options]<br />
server:remote_directory \<br />
/local_subdirectory [-options]<br />
server:remote_directory \ . . .<br />
The backslash (\) characters tell AutoFS to ignore the line breaks, so<br />
this entry is effectively all one line.<br />
Map entries with this format cause all the remote directories on the line<br />
to be mounted at the same time. For example, the following entry from a<br />
direct map mounts the source code <strong>and</strong> the data files for a project at the<br />
same time; whenever anyone requests access to either one, they are both<br />
mounted.<br />
/our_project /source -ro broccoli:/opt/proj1/src \<br />
/datafiles cauliflower:/opt/proj1/samples/data<br />
108<br />
Chapter 2
Configuring <strong>and</strong> <strong>Administering</strong> <strong>NFS</strong><br />
Configuring <strong>and</strong> <strong>Administering</strong> AutoFS<br />
Because the directories are always mounted simultaneously, you can use<br />
relative pathnames to move from one to another, for example,<br />
cd ../source<br />
Here is another example from an indirect map. In this example, the same<br />
mount option (nosuid) applies to all three automounted directories.<br />
chap2 -nosuid /text sage:/our_book/chap2 \<br />
/graphics basil:/our_book/artwork/chap2 \<br />
/old sage:/our_book/oldfiles/chap2<br />
To Include an Automounter Map in Another<br />
Automounter Map<br />
• To include the contents of an automounter map in another<br />
automounter map, add a plus sign (+) before the map name, as in the<br />
following example:<br />
# /etc/auto_home file<br />
# local mount point mount options remote<br />
server:directory<br />
basil<br />
-nosuid<br />
basil:/export/home/basil<br />
+auto_home<br />
Assume the /etc/auto_home map is listed in the master map with the<br />
following line:<br />
/home<br />
/etc/auto_home<br />
This example has the following effect:<br />
If a user logs in whose home directory is in /home/basil, AutoFS will<br />
mount the directory /export/home/basil from host basil.<br />
If a user logs in whose home directory is in /home/sage, /home/thyme,or<br />
any subdirectory of /home other than basil, AutoFS will consult the NIS<br />
map auto_home for information on mounting the user’s home directory.<br />
The plus sign (+) tells AutoFS to look in a different map for the<br />
information it needs to mount the directory. If the map name following<br />
the plus sign begins with a slash, AutoFS assumes it is a local file. If the<br />
map name contains no slashes, AutoFS uses the Name Service Switch to<br />
determine whether it is a file or an NIS map. See “Configuring the Name<br />
Service Switch” on page 253.<br />
Chapter 2 109
Configuring <strong>and</strong> <strong>Administering</strong> <strong>NFS</strong><br />
Configuring <strong>and</strong> <strong>Administering</strong> AutoFS<br />
You can include an automounter map inside a local file but not inside an<br />
NIS map.<br />
For more information, type man 1M automount or man 4<br />
nsswitch.conf.<br />
To Create a Hierarchy of Automounter Maps<br />
An organization made up of many departments may wish to organize a<br />
shared automounted directory structure. In the following example, the<br />
shared top-level directory is called /org. The /org directory contains<br />
several subdirectories, listed in the auto_org automounter map. Each<br />
department administers its own automounter map for its subdirectory.<br />
The automounter master map needs just a single entry for /org:<br />
# auto_master map<br />
# <strong>Directory</strong> Map Name<br />
/org<br />
auto_org<br />
The auto_org map looks like this:<br />
finance -fstype=autofs auto_finance<br />
marketing -fstype=autofs auto_marketing<br />
legal -fstype=autofs auto_legal<br />
research -fstype=autofs auto_research<br />
eng -fstype=autofs auto_eng<br />
And the engineering department’s map, auto_eng, looks like this:<br />
releases<br />
bigiron:/export/releases<br />
tools<br />
mickey,minnie:/export/tools<br />
source -fstype=autofs auto_eng_source<br />
projects -fstype=autofs auto_eng_projects<br />
A user in the ‘‘blackhole’’ project within engineering might use the<br />
following path:<br />
/org/eng/projects/blackhole<br />
Beginning with the AutoFS mount at /org, the evaluation of this path<br />
would dynamically create additional AutoFS mounts at /org/eng <strong>and</strong><br />
/org/eng/projects. Since AutoFS mounts are created only when<br />
needed, changes to maps require no action to become visible at the user’s<br />
workstation. The automount comm<strong>and</strong> needs to be run only when<br />
changes are made to the master map or to a direct map.<br />
Hierarchical automounter maps provide a framework within which large<br />
110<br />
Chapter 2
Configuring <strong>and</strong> <strong>Administering</strong> <strong>NFS</strong><br />
Configuring <strong>and</strong> <strong>Administering</strong> AutoFS<br />
shared filesystems can be organized. Together with NIS, which allows<br />
you to share information across administrative domains, the<br />
maintenance of the shared namespace can be effectively decentralized.<br />
To Turn Off an Automounter Map with the -null Map<br />
1. Add a line with the following syntax to the automounter master map:<br />
local_directory -null<br />
2. If AutoFS is running, issue the following comm<strong>and</strong>, on each client<br />
that will use the map, to force AutoFS to reread its maps:<br />
/usr/sbin/automount<br />
The -null option “turns off” the map that is mounted on<br />
local_directory. For example, if the NIS auto_master map mounts<br />
the auto_home map on /home, <strong>and</strong> you include the following line in your<br />
local /etc/auto_master file,<br />
/home -null<br />
the NIS auto_home map will not be used on your system.<br />
The -null option is useful for turning off NIS automounter maps that do<br />
not apply to your host.<br />
You can also replace NIS maps with local maps, as in the following<br />
example from /etc/auto_master:<br />
/home /etc/auto_ourhome<br />
Because AutoFS reads the local /etc/auto_master file before the NIS<br />
auto_master map, this entry causes AutoFS to look for mount<br />
information in the local file /etc/auto_ourhome instead of the<br />
auto_home NIS map.<br />
For more information, type man 1M automount.<br />
To Enable AutoFS<br />
1. In the /etc/rc.config.d/nfsconf file, make sure the <strong>NFS</strong>_CLIENT,<br />
AUTOMOUNT, <strong>and</strong> the AUTOFS variables are set to 1, as follows:<br />
<strong>NFS</strong>_CLIENT=1<br />
AUTOMOUNT=1<br />
AUTOFS=1<br />
2. Issue the following comm<strong>and</strong> to run the <strong>NFS</strong> client startup script:<br />
Chapter 2 111
Configuring <strong>and</strong> <strong>Administering</strong> <strong>NFS</strong><br />
Configuring <strong>and</strong> <strong>Administering</strong> AutoFS<br />
/sbin/init.d/nfs.client start<br />
The nfs.client start script will start any <strong>NFS</strong> client processes<br />
that are not already running, including AutoFS.<br />
When AutoFS starts up, it uses the Name Service Switch to determine<br />
which name services you are using <strong>and</strong> to find the master maps that are<br />
available from those name services.<br />
For more information, type man 4 nsswitch.conf or man 1M automount<br />
at the HP-UX prompt.<br />
To Disable AutoFS<br />
1. Issue the following comm<strong>and</strong> to run the <strong>NFS</strong> client shutdown script:<br />
/sbin/init.d/nfs.client stop<br />
2. In the /etc/rc.config.d/nfsconf file, make sure the <strong>NFS</strong>_CLIENT<br />
<strong>and</strong> AUTOMOUNT variables are set to 1, <strong>and</strong> the AUTOFS variable is set<br />
to 0, as follows:<br />
<strong>NFS</strong>_CLIENT=1<br />
AUTOMOUNT=1<br />
AUTOFS=0<br />
CAUTION<br />
Do not kill the automountd daemon with the kill comm<strong>and</strong>. It does not<br />
die gracefully. It does not unmount AutoFS mount points before it dies.<br />
Use the nfs.client stop script to ensure that automountd dies cleanly.<br />
After you have disabled AutoFS using the nfs.client stop script, you<br />
may notice that the autofs_proc process is still running. You can safely<br />
ignore this process. (The autofs_proc cannot be ‘‘killed’’; the only way to<br />
stop autofs_proc is to reboot.)<br />
To Verify Your AutoFS Configuration<br />
1. Type the following comm<strong>and</strong> to change the current working directory<br />
to an automounted directory:<br />
/usr/bin/cd local_directory<br />
where local_directory is the configured mount point in the<br />
automounter map.<br />
112<br />
Chapter 2
Configuring <strong>and</strong> <strong>Administering</strong> <strong>NFS</strong><br />
Configuring <strong>and</strong> <strong>Administering</strong> AutoFS<br />
2. Type the following comm<strong>and</strong> to verify that the contents of the remote<br />
directory have been mounted under the local mount point:<br />
/usr/bin/ls<br />
If the directory is configured in an indirect map, issuing the ls comm<strong>and</strong><br />
from the parent directory will display nothing. When you cd to a<br />
subdirectory configured in the indirect map, or issue the comm<strong>and</strong><br />
ls subdirectory, the subdirectory will be mounted.<br />
Therefore, if you have the following indirect map configuration,<br />
# /etc/auto_master file<br />
# local mount point map name mount options<br />
/nfs/desktop<br />
/etc/auto_desktop<br />
# /etc/auto_desktop file<br />
# local mount point mount options remote<br />
server:directory<br />
draw<br />
-nosuid<br />
thyme:/export/apps/draw<br />
write -nosuid basil:/export/write<br />
<strong>and</strong> you issue the following comm<strong>and</strong>s,<br />
cd /nfs/desktop<br />
ls<br />
the ls comm<strong>and</strong> will produce no output, because the draw <strong>and</strong> write<br />
subdirectories are not currently mounted. However, if you issue the<br />
following comm<strong>and</strong>s,<br />
cd /nfs/desktop/write<br />
cd /nfs/desktop/draw<br />
cd ..<br />
ls<br />
the ls comm<strong>and</strong> will display<br />
draw<br />
write<br />
If AutoFS is not mounting your configured directories, see<br />
“Troubleshooting <strong>NFS</strong> <strong>Services</strong>” on page 273.<br />
Chapter 2 113
Configuring <strong>and</strong> <strong>Administering</strong> <strong>NFS</strong><br />
Configuring <strong>and</strong> <strong>Administering</strong> AutoFS<br />
To Modify or Remove (Unmount) an Automounted<br />
<strong>Directory</strong><br />
1. If you are planning to remove an automounted directory, issue the<br />
following comm<strong>and</strong> to determine whether the directory is currently in<br />
use:<br />
/usr/sbin/fuser -cu local_mount_point<br />
This comm<strong>and</strong> lists the process IDs <strong>and</strong> user names of everyone using<br />
the mounted directory.<br />
2. Warn any users to cd out of the directory, <strong>and</strong> kill any processes that<br />
are using the directory, or wait until the processes terminate. You can<br />
issue the following comm<strong>and</strong> to kill all the processes using the<br />
mounted directory:<br />
/usr/sbin/fuser -ck local_mount_point<br />
3. Use an editor to make your changes to the direct or indirect map.<br />
4. If you removed the last entry in the direct or indirect map, remove the<br />
line for that map in the automounter master map.<br />
5. If you made any changes to the master map, or if you added or<br />
modified a local mount point in a direct map, run the following<br />
comm<strong>and</strong> to force AutoFS to reread its maps:<br />
/usr/sbin/automount<br />
114<br />
Chapter 2
Configuring <strong>and</strong> <strong>Administering</strong> <strong>NFS</strong><br />
Configuring <strong>and</strong> Using <strong>NFS</strong> Netgroups<br />
Configuring <strong>and</strong> Using <strong>NFS</strong> Netgroups<br />
This section tells you how to create <strong>and</strong> use <strong>NFS</strong> netgroups to restrict<br />
<strong>NFS</strong> access to your system. It describes the following tasks:<br />
• To Create Netgroups in the /etc/netgroup File<br />
• To Create Netgroups in the NIS+ netgroup Table<br />
• To Use Netgroups in Configuration Files<br />
To Create Netgroups in the /etc/netgroup File<br />
1. If you are using the local /etc/netgroup file or the NIS netgroup<br />
map for netgroups, add lines with the following syntax to the<br />
/etc/netgroup file. If you are using NIS, be sure to edit the<br />
/etc/netgroup file only on the NIS master server.<br />
netgroup_name (host, user, NIS_domain), (host, user,<br />
NIS_domain) ...<br />
2. If you are using NIS to manage your netgroups database, issue the<br />
following comm<strong>and</strong> on the NIS master server to generate the<br />
netgroup, netgroup.byhost, <strong>and</strong> netgroup.byuser maps from the<br />
/etc/netgroup file <strong>and</strong> push the generated maps out to the NIS<br />
slave servers:<br />
cd /var/yp<br />
/usr/ccs/bin/make netgroup<br />
A netgroup can be used in most <strong>NFS</strong> <strong>and</strong> NIS configuration files instead<br />
of a host name or a user name. A netgroup does not create a relationship<br />
between users <strong>and</strong> hosts. When a netgroup is used in a configuration file,<br />
it represents either a group of hosts or a group of users but never both.<br />
If you are using BIND (DNS) for hostname resolution, hosts must be<br />
specified as fully qualified domain names, for example<br />
turtle.bio.nmt.edu.<br />
If the host, user, or NIS_domain is left blank in a netgroup, that field<br />
can take any value. If a dash (-) is specified in any field of a netgroup,<br />
that field can take no value.<br />
The NIS_domain field specifies the NIS domain in which the (host,<br />
user, NIS_domain) triple is valid. For example, if the netgroup<br />
Chapter 2 115
Configuring <strong>and</strong> <strong>Administering</strong> <strong>NFS</strong><br />
Configuring <strong>and</strong> Using <strong>NFS</strong> Netgroups<br />
database contains the following netgroup,<br />
myfriends (sage,-,bldg1), (cauliflower,-,bldg2),<br />
(pear,-,bldg3)<br />
<strong>and</strong> an <strong>NFS</strong> server running NIS in the domain bldg1 exports a directory<br />
only to the netgroup myfriends, only host sage may mount that<br />
directory. The other two triples are ignored, because they are not valid in<br />
the bldg1 domain.<br />
If an HP-UX host not running NIS exports a directory to the netgroup<br />
myfriends, the NIS_domain field is ignored, <strong>and</strong> all three hosts (sage,<br />
cauliflower, <strong>and</strong> pear) may mount the directory.<br />
If the netgroup database contains the following netgroup,<br />
mydomain (,,bldg1)<br />
<strong>and</strong> a host in the NIS domain bldg1 exports a directory to the netgroup<br />
mydomain, any host in any domain may mount the directory, because the<br />
host field is blank.<br />
If an HP-UX host not running NIS exports a directory to the netgroup<br />
mydomain, shown above, the NIS_domain field is ignored, but the host<br />
field is used, so any host in any domain may mount the directory.<br />
If a host in the NIS domain bldg2 exports a directory to the netgroup<br />
mydomain, no host in any domain may mount the directory, because the<br />
triple is not valid in the bldg2 domain, so it is ignored.<br />
Netgroup Examples<br />
The following netgroup specifies a group of hosts:<br />
trusted_hosts (sage, , ), (basil, , ), (thyme, , )<br />
The trusted_hosts netgroup could be used in the -access option of a<br />
line in the /etc/exports file, as follows:<br />
/usr -access=trusted_hosts<br />
The following netgroup specifies a group of users:<br />
administrators ( ,jane, ), ( ,art, ), ( ,mel, )<br />
If this netgroup were ever accidentally included in a list of hosts rather<br />
than users, the blank space would be interpreted as a wildcard meaning<br />
any host. For example, if someone used this netgroup in a -access list in<br />
the /etc/exports file, any host would have access to the exported<br />
directory. For this reason, if a netgroup is used strictly as a list of users,<br />
116<br />
Chapter 2
Configuring <strong>and</strong> <strong>Administering</strong> <strong>NFS</strong><br />
Configuring <strong>and</strong> Using <strong>NFS</strong> Netgroups<br />
it is better to put a dash in the host field, as follows:<br />
administrators (-,jane, ), (-,art, ), (-,mel, )<br />
The dash indicates that no hosts are included in the netgroup.<br />
The trusted_hosts <strong>and</strong> administrators netgroups could be used<br />
together in the /etc/hosts.equiv file, as follows:<br />
+@trusted_hosts +@administrators<br />
The first netgroup would be read for host names, <strong>and</strong> the second would<br />
be read for user names. Users in the administrators netgroup could log<br />
into the local host from any host in the trusted_hosts netgroup without<br />
supplying a password.<br />
The two netgroups could be combined into one, as follows:<br />
goodguys (sage,jane, ), (basil,art, ), (thyme,mel, )<br />
If the two netgroups were combined this way, the same netgroup could be<br />
used as both the host name <strong>and</strong> the user name in the /etc/hosts.equiv<br />
file:<br />
+@goodguys<br />
+@goodguys<br />
The first occurrence of it would be read for the host name, <strong>and</strong> the second<br />
occurrence would be read for the user name. No relationship exists<br />
between the host <strong>and</strong> user in any of the triples. For example, user jane<br />
might not even have an account on host sage.<br />
A netgroup can contain other netgroups, as in the following example:<br />
root-users (dill,-, ), (sage,-, ), (thyme,- , ), (basil,-, )<br />
mail-users (rosemary, , ), (oregano, , ), root-users<br />
The root-users netgroup is a group of four systems. The mail-users<br />
netgroup uses the root-users netgroup as part of a larger group of<br />
systems. The blank space in the third field of each triple indicates that<br />
these netgroups are valid in any NIS domain.<br />
To Create Netgroups in the NIS+ netgroup Table<br />
If you are using NIS+ to manage your netgroups, issue comm<strong>and</strong>s with<br />
the following syntax to add entries to the NIS+ netgroup table:<br />
nistbladm -a group= host=host user=user domain=domain \<br />
comment= netgroup.org_dir<br />
or<br />
Chapter 2 117
Configuring <strong>and</strong> <strong>Administering</strong> <strong>NFS</strong><br />
Configuring <strong>and</strong> Using <strong>NFS</strong> Netgroups<br />
nistbladm -a group=netgroup host= user= domain= \<br />
comment= netgroup.org_dir<br />
In the NIS+ netgroup table, each netgroup may consist of multiple table<br />
entries. Each table entry specifies either a (host, user, domain) triple or<br />
an included netgroup. Each entry may contain a comment in the last<br />
column.<br />
For information on the general syntax of netgroups <strong>and</strong> how they are<br />
used, see “To Create Netgroups in the /etc/netgroup File” on page 115.<br />
For more information on NIS+, see “Configuring <strong>and</strong> <strong>Administering</strong><br />
NIS+” on page 185.<br />
To Use Netgroups in Configuration Files<br />
Netgroups may be used in the following files:<br />
• /etc/exports, in the -access list<br />
• /etc/hosts.equiv or $HOME/.rhosts, in place of a host name or<br />
user name<br />
• /etc/passwd, to tell processes whether to look in the NIS password<br />
database for information about the users in the netgroup<br />
• /etc/group, to tell processes whether to look in the NIS group<br />
database for information about the users in the netgroup<br />
The next few sections explain how to use netgroups in these files.<br />
Using Netgroups in the /etc/exports File<br />
In the /etc/exports file, netgroups can be used in the list of <strong>NFS</strong> clients<br />
following the -access option, as in the following example:<br />
/var/mail -access=mail_clients<br />
The mail_clients netgroup is defined as follows:<br />
mail_clients (cauliflower, , ), (broccoli, , ), (cabbage, , )<br />
Only the host names from the netgroup are used. If the netgroup also<br />
contains user names, these are ignored. This netgroup is valid in any<br />
NIS domain, because the third field in each triple is left blank.<br />
Using Netgroups in the /etc/hosts.equiv or $HOME/.rhosts File<br />
In the /etc/hosts.equiv file, or in a .rhosts file in a user’s home<br />
118<br />
Chapter 2
Configuring <strong>and</strong> <strong>Administering</strong> <strong>NFS</strong><br />
Configuring <strong>and</strong> Using <strong>NFS</strong> Netgroups<br />
directory, netgroups can be used in either the host name field or the user<br />
name field, as in the following example:<br />
+@our_friends<br />
+@our_friends<br />
The netgroup our_friends can be used as both the host name <strong>and</strong> the<br />
user name, because it includes both host names <strong>and</strong> user names, as<br />
follows:<br />
our_friends (sage,sara, ), (sage,eric, ), (dill,-, ), (<br />
,monica, )<br />
The blank host name field in the fourth triple serves as a wildcard,<br />
allowing users from any host on the network to log in without supplying<br />
a password. However, only the users listed in the netgroup are given this<br />
privileged access, because each user name field contains either a user<br />
name or a dash.<br />
Netgroups can also be used to deny privileged access to certain hosts or<br />
users in the /etc/hosts.equiv or $HOME/.rhosts file, as in the<br />
following example:<br />
+ -@v<strong>and</strong>als<br />
The plus sign (+) is a wildcard in the /etc/hosts.equiv or<br />
$HOME/.rhosts file syntax, allowing privileged access from any host in<br />
the network. The netgroup v<strong>and</strong>als is defined as follows:<br />
v<strong>and</strong>als ( ,pat, ), ( ,harriet, ), ( ,reed, )<br />
All users except those listed in the v<strong>and</strong>als netgroup can log into the<br />
local system without supplying a password from any system in the<br />
network.<br />
CAUTION<br />
Any users who are denied privileged access in the /etc/hosts.equiv<br />
file can still be allowed privileged access in a user’s $HOME/.rhosts file.<br />
The $HOME/.rhosts file is read after the /etc/hosts.equiv file <strong>and</strong><br />
overrides it.<br />
For more information, type man 4 hosts.equiv at the HP-UX prompt.<br />
Using Netgroups in the /etc/passwd File<br />
In the /etc/passwd file, netgroups can be used to indicate whether user<br />
information should be looked up in the NIS or NIS+ passwd database.<br />
Chapter 2 119
Configuring <strong>and</strong> <strong>Administering</strong> <strong>NFS</strong><br />
Configuring <strong>and</strong> Using <strong>NFS</strong> Netgroups<br />
The following example line from the /etc/passwd file indicates that<br />
users in the netgroup animals should be looked up in the NIS or NIS+<br />
passwd database:<br />
+@animals<br />
The animals netgroup is defined as follows in the /etc/netgroup file:<br />
animals (-,mickey, ), (-,daffy, ), (-,porky, ), (-,bugs, )<br />
Note that the /etc/passwd file is searched sequentially, so if user<br />
mickey, daffy, porky, or bugs appears before the animals netgroup in<br />
the /etc/passwd file, the NIS or NIS+ database will never be consulted<br />
for information on that user.<br />
The Name Service Switch configuration is used to determine where to<br />
look for the contents of a netgroup. See “Configuring the Name Service<br />
Switch” on page 253.<br />
Netgroups can also be used to prevent lookups of certain users in the NIS<br />
or NIS+ passwd database. The following example lines from the<br />
/etc/passwd file indicate that if the NIS or NIS+ passwd database<br />
contains entries for users in the bears netgroup, these entries cannot be<br />
used on the local system. Any other users can be looked up in the NIS or<br />
NIS+ database.<br />
-@bears<br />
+::-2:60001:::<br />
The line beginning with + causes the NIS or NIS+ database to be<br />
searched for any users (except those in the bears netgroup) who are not<br />
listed before the line beginning with +.<br />
For more information on NIS, see “Configuring <strong>and</strong> <strong>Administering</strong> NIS”<br />
on page 135.<br />
For more information on NIS+, see “Configuring <strong>and</strong> <strong>Administering</strong><br />
NIS+” on page 185.<br />
For information on the /etc/passwd file, type man 4 passwd at the<br />
HP-UX prompt.<br />
Using Netgroups in the /etc/group File<br />
In the /etc/group file, netgroups can be used to indicate whether group<br />
information about certain users should be looked up in the NIS or NIS+<br />
group database.<br />
The following example line from the /etc/group file indicates that group<br />
120<br />
Chapter 2
Configuring <strong>and</strong> <strong>Administering</strong> <strong>NFS</strong><br />
Configuring <strong>and</strong> Using <strong>NFS</strong> Netgroups<br />
information for users in the netgroup animals can be found in the NIS or<br />
NIS+ group database:<br />
+@animals<br />
The animals netgroup is defined as follows in the /etc/netgroup file:<br />
animals (-,mickey, ), (-,daffy, ), (-,porky, ), (-,bugs, )<br />
Members of the animals netgroup can belong to groups listed in the local<br />
/etc/group file as well as in the NIS or NIS+ group database. The<br />
following lines in the /etc/group file give users bugs <strong>and</strong> daffy<br />
membership in the group wiseguys <strong>and</strong> in any group in the NIS or NIS+<br />
database that includes them as members:<br />
wiseguys::22:bugs,daffy<br />
+@animals<br />
Netgroups can also be used in the /etc/group file to prevent lookups for<br />
certain users. The bears netgroup is defined as follows in the<br />
/etc/netgroup file:<br />
bears (-,yogi, ), (-,smokey, ), (-,pooh, )<br />
The following lines in the /etc/group file allow user pooh membership<br />
in group teddybears but not in any other group listed in the NIS or<br />
NIS+ database or after the -@bears line in the /etc/group file:<br />
teddybears::23:pooh,paddington<br />
-@bears<br />
For more information on NIS, see “Configuring <strong>and</strong> <strong>Administering</strong> NIS”<br />
on page 135.<br />
For more information on NIS+, see “Configuring <strong>and</strong> <strong>Administering</strong><br />
NIS+” on page 185.<br />
For information on the /etc/group file, type man 4 group at the HP-UX<br />
prompt.<br />
Chapter 2 121
Configuring <strong>and</strong> <strong>Administering</strong> <strong>NFS</strong><br />
Configuring the Other <strong>NFS</strong> Daemons <strong>and</strong> <strong>Services</strong><br />
Configuring the Other <strong>NFS</strong> Daemons <strong>and</strong><br />
<strong>Services</strong><br />
If you want to use some of the other <strong>NFS</strong> services, like the Remote<br />
Execution Facility (REX) or the rup(1) <strong>and</strong> rusers(1) comm<strong>and</strong>s, this<br />
section tells you how to enable those daemons <strong>and</strong> services. This section<br />
tells you how to perform the following tasks:<br />
• To Enable the Other <strong>NFS</strong> <strong>Services</strong><br />
• To Restrict Access to the Other <strong>NFS</strong> <strong>Services</strong><br />
To Enable the Other <strong>NFS</strong> <strong>Services</strong><br />
1. In the /etc/inetd.conf file, use a text editor to uncomment the lines<br />
that begin with “rpc.” (Delete the sharp sign [#] in the first column.)<br />
If the lines do not exist, type them into the /etc/inetd.conf file.<br />
Table 2-7 gives the line you need to enter for each <strong>NFS</strong> service.<br />
2. If <strong>NFS</strong> is not yet running on your system, issue the following<br />
comm<strong>and</strong>:<br />
/sbin/init.d/nfs.client start<br />
3. Issue the following comm<strong>and</strong> to force inetd to read its configuration<br />
file:<br />
/usr/sbin/inetd -c<br />
CAUTION<br />
Do not issue the /usr/sbin/inetd comm<strong>and</strong> if <strong>NFS</strong> is not yet running<br />
on your system. The <strong>NFS</strong> startup script starts the rpcbind(1M) process,<br />
which must be running before you start inetd.<br />
Table 2-7 lists the <strong>NFS</strong> daemons <strong>and</strong> services that can be started by the<br />
inetd daemon. It briefly describes each one <strong>and</strong> tells you which man<br />
pages you can read for more information. It also gives the line that<br />
configures each service in the inetd.conf file.<br />
You cannot use SAM to enable the other <strong>NFS</strong> services.<br />
122<br />
Chapter 2
Configuring <strong>and</strong> <strong>Administering</strong> <strong>NFS</strong><br />
Configuring the Other <strong>NFS</strong> Daemons <strong>and</strong> <strong>Services</strong><br />
Table 2-7<br />
rexd<br />
rstatd<br />
rusersd<br />
rwalld<br />
Other <strong>NFS</strong> <strong>Services</strong><br />
The rpc.rexd program is the server for the on comm<strong>and</strong>, which starts the<br />
Remote Execution Facility (REX). The on comm<strong>and</strong> sends a comm<strong>and</strong> to be<br />
executed on a remote system. The rpc.rexd program on the remote system<br />
executes the comm<strong>and</strong>, simulating the environment of the user who issued<br />
the on comm<strong>and</strong>. See Chapter 7, “Configuring <strong>and</strong> Using the Remote<br />
Execution Facility (REX),” or see man pages rexd(1M) <strong>and</strong> on(1). The<br />
following line configures rexd in inetd.conf:<br />
rpc stream tcp nowait root /usr/sbin/rpc.rexd 100017 1 rpc.rexd<br />
The rpc.rstatd program answers requests from the rup comm<strong>and</strong>, which<br />
collects <strong>and</strong> displays status information about the machines on the local<br />
network. For more information, see man pages rstatd(1M) <strong>and</strong> rup(1). The<br />
following line configures rstatd in inetd.conf:<br />
rpc dgram udp wait root /usr/lib/netsvc/rstat/rpc.rstatd 100001<br />
1-3 \<br />
rpc.rstatd<br />
The rpc.rusersd program responds to requests from the rusers comm<strong>and</strong>,<br />
which collects <strong>and</strong> displays information about all users logged into the<br />
machines on the local network. For more information, see man pages<br />
rusersd(1M) <strong>and</strong> rusers(1). The following line configures rusersd in<br />
inetd.conf:<br />
rpc dgram udp wait root /usr/lib/netsvc/rusers/rpc.rusersd 100002<br />
1-2 \<br />
rpc.rusersd<br />
The rpc.rwalld program h<strong>and</strong>les requests from the rwall program. The<br />
rwall program sends a message to a specified machine where the<br />
rpc.rwalld program is running, <strong>and</strong> the message is written to all users<br />
logged onto the machine. For more information, see man pages rwalld(1M)<br />
<strong>and</strong> rwall(1M). The following line configures rwalld in inetd.conf:<br />
rpc dgram udp wait root /usr/lib/netsvc/rwall/rpc.rwalld 100008 1 \<br />
rpc.rwalld<br />
Chapter 2 123
Configuring <strong>and</strong> <strong>Administering</strong> <strong>NFS</strong><br />
Configuring the Other <strong>NFS</strong> Daemons <strong>and</strong> <strong>Services</strong><br />
Table 2-7<br />
sprayd<br />
rquotad<br />
Other <strong>NFS</strong> <strong>Services</strong><br />
The rpc.sprayd program is the server for the spray comm<strong>and</strong>, which sends a<br />
stream of packets to a specified host <strong>and</strong> then reports how many were<br />
received <strong>and</strong> how fast. For more information, see man pages sprayd(1M) <strong>and</strong><br />
spray(1M). The following line configures sprayd in inetd.conf:<br />
rpc dgram udp wait root /usr/lib/netsvc/spray/rpc.sprayd 100012 1 \<br />
rpc.sprayd<br />
The rpc.rquotad program responds to requests from the quota comm<strong>and</strong>,<br />
which displays information about a user’s disk usage <strong>and</strong> limits. For more<br />
information, see man pages rquotad(1M) <strong>and</strong> quota(1). The following line<br />
configures rquotad in inetd.conf:<br />
rpc dgram udp wait root /usr/sbin/rpc.rquotad 100011 1 rpc.rquotad<br />
To Restrict Access to the Other <strong>NFS</strong> <strong>Services</strong><br />
• In the /var/adm/inetd.sec file, create a line with the following<br />
syntax for each service to which you want to restrict access:<br />
service {allow} host_or_network [host_or_network...]<br />
{deny}<br />
If the /var/adm/inetd.sec file does not exist, you will have to create it.<br />
service must match one of the service names in the /etc/rpc file.<br />
Specify either allow or deny but not both. Enter only one line per<br />
service.<br />
host_or_network can be either an official host name or network name or<br />
an IP address. Any of the four numbers in an IP address can be specified<br />
as a range (for example, 1-28) or the wildcard character (*).<br />
The inetd.sec file is checked only when the service is started. If a<br />
service remains active <strong>and</strong> accepts more requests without being<br />
restarted, the inetd.sec file is not checked again.<br />
You can use SAM to modify the /var/adm/inetd.sec file.<br />
For more information see the man pages inetd.conf(4) <strong>and</strong><br />
inetd.sec(4).<br />
Examples from /var/adm/inetd.sec<br />
The following example allows only hosts on subnets 15.13.2.0 through<br />
124<br />
Chapter 2
Configuring <strong>and</strong> <strong>Administering</strong> <strong>NFS</strong><br />
Configuring the Other <strong>NFS</strong> Daemons <strong>and</strong> <strong>Services</strong><br />
15.13.12.0 to use the spray comm<strong>and</strong>:<br />
sprayd allow 15.13.2-12.0<br />
The following example prevents host cauliflower from using the rwall<br />
comm<strong>and</strong>:<br />
rwalld deny cauliflower<br />
Chapter 2 125
Configuring <strong>and</strong> <strong>Administering</strong> <strong>NFS</strong><br />
Configuring the Other <strong>NFS</strong> Daemons <strong>and</strong> <strong>Services</strong><br />
126<br />
Chapter 2
3 Configuring the Cache File<br />
System (CacheFS)<br />
This chapter describes the benefits of using the Cache File System <strong>and</strong><br />
how to configure it on HP-UX. CacheFS is not available on HP-UX 11.0.<br />
Chapter 3 127
Configuring the Cache File System (CacheFS)<br />
The Cache File System<br />
The Cache File System<br />
IMPORTANT CacheFS is not available on HP-UX 11.0.<br />
The Cache File System (CacheFS) is a general purpose file system<br />
caching mechanism that improves <strong>NFS</strong> server performance <strong>and</strong><br />
scalability by reducing server <strong>and</strong> network load. CacheFS provides the<br />
ability to cache one file system on another.<br />
In an <strong>NFS</strong> environment, CacheFS increases the client per server ratio,<br />
reduces server <strong>and</strong> network loads, <strong>and</strong> improves performance for clients<br />
on slow links (for example, PPP).<br />
CacheFS performs local disk caching of file systems, which reduces the<br />
network traffic. Individual client machines become less reliant on the<br />
server, thereby decreasing overall server load, which leads to an increase<br />
in server performance.<br />
CacheFS improves read performance for data that will be read more<br />
than once. It does not improve write performance at all.<br />
Good choices for cached file systems include man pages <strong>and</strong> executable<br />
programs, which are read multiple times <strong>and</strong> rarely modified. Using<br />
CacheFS for /var/mail is not a good use of resources. The /var/mail<br />
file is modified frequently <strong>and</strong> is typically read only once <strong>and</strong> then<br />
thrown away.<br />
By default, CacheFS maintains consistency with the back file system<br />
using a consistency checking model like that of <strong>NFS</strong> (polling for changes<br />
in file attributes).<br />
The first time data is read from an <strong>NFS</strong>-mounted file system, there is<br />
actually some overhead while CacheFS writes the data to its local cache.<br />
After the data is written to the cache, read performance for the file<br />
system is significantly improved.<br />
128<br />
Chapter 3
Configuring the Cache File System (CacheFS)<br />
CacheFS Terms<br />
CacheFS Terms<br />
Following are some CacheFS terms that will be used in this chapter:<br />
back file system The file system that is being cached. On HP-UX, <strong>NFS</strong> is<br />
the supported back file system.<br />
front file system The file system that contains the cached data. HFS is<br />
the supported front file systems.<br />
cold cache A cache that does not yet have any data in its front file<br />
system. In this case, requested data must be copied<br />
from the back file system to the front file system (that<br />
is, the cache must be populated). An attempt to<br />
reference data that is not yet cached is called a “cache<br />
miss.”<br />
warm cache A cache that contains the desired data in its front file<br />
system. In this case, the cached data can be returned to<br />
the user without requiring any action from the back file<br />
system. An attempt to reference data that has been<br />
cached is called a “cache hit.”<br />
Chapter 3 129
Configuring the Cache File System (CacheFS)<br />
Configuring CacheFS<br />
Configuring CacheFS<br />
IMPORTANT CacheFS is not available on HP-UX 11.0.<br />
You can use CacheFS to cache <strong>NFS</strong>-mounted or automounted <strong>NFS</strong> file<br />
systems. You must decide whether to use CacheFS before you mount a<br />
file system. Before you can mount a file system using CacheFS, you must<br />
configure a local file system as the cache directory.<br />
NOTE<br />
You cannot use SAM to mount a file system with CacheFS.<br />
Configuring CacheFS involves several procedures. This section provides<br />
instructions for completing tasks needed to configure CacheFS:<br />
• To Configure a Local File System as Cache<br />
• To Mount an <strong>NFS</strong> File System Using CacheFS<br />
• To Automount a File System Using CacheFS<br />
For more information on CacheFS, see the following man pages:<br />
cfsadmin(1M), fsck_cachefs(1M), mount(1M), mount_cachefs(1M),<br />
<strong>and</strong> cachefsstat(1M).<br />
130<br />
Chapter 3
Configuring the Cache File System (CacheFS)<br />
Configuring CacheFS<br />
To Configure a Local File System as Cache<br />
1. If necessary, configure <strong>and</strong> mount the HFS file system, the front file<br />
system, on the client system where data will be cached. See the<br />
HP-UX System Administration Tasks manual for more information.<br />
No special disk partitioning is necessary for creating a CacheFS front<br />
file system. If you already have a mounted file system with sufficient<br />
disk space for caching your <strong>NFS</strong> file systems, you can create a<br />
subdirectory in the existing file system to use for your CacheFS front<br />
file system.<br />
2. Become root user.<br />
3. Create a CacheFS directory with the data structures necessary to<br />
allow a CacheFS mount, by typing the following comm<strong>and</strong>:<br />
/usr/sbin/cfsadmin -c /cache_directory<br />
For example, if you had a mounted file system called /disk2, you<br />
could create a CacheFS directory called /disk2/cache with the<br />
following comm<strong>and</strong>:<br />
/usr/sbin/cfsadmin -c /disk2/cache<br />
CacheFS manages its resources most effectively in cases where the<br />
entire front file system is dedicated to caching, or in cases where the<br />
non-cache portions of the front file system are static, read-only files.<br />
CacheFS allows more than one file system to be cached in the same<br />
cache. There is no need to create a separate cache directory for each<br />
CacheFS mount. In typical usage, you need to run cfsadmin -c only<br />
once to create a single cache for all of your CacheFS mounts.<br />
For more information, type man 1M cfsadmin at the HP-UX prompt.<br />
Chapter 3 131
Configuring the Cache File System (CacheFS)<br />
Configuring CacheFS<br />
To Mount an <strong>NFS</strong> File System Using CacheFS<br />
Before you can mount an <strong>NFS</strong> file system with CacheFS, you must<br />
configure a directory in a local file system as cache. See “To Configure a<br />
Local File System as Cache” on page 131.<br />
1. Mount an <strong>NFS</strong> file system using CacheFS by typing the mount(1M)<br />
comm<strong>and</strong>, as in the following examples:<br />
mount -F cachefs -o backfstype=nfs,cachedir=/disk2/cache \<br />
nfsserver:/opt/frame /opt/frame<br />
2. Add a line to the /etc/fstab file, as in the following example, to<br />
cause your <strong>NFS</strong> file system to be mounted at system boot:<br />
nfsserver:/opt/frame /opt/frame cachefs \<br />
backfstype=nfs,cachedir=/disk2/cache 0 0<br />
This example <strong>NFS</strong>-mounts the directory /opt/frame from server<br />
nfsserver to the local /opt/frame directory. Now /opt/frame can be<br />
accessed just like any mounted file system. As data in /opt/frame is<br />
referenced, it will be copied into /disk2/cache. Further references to<br />
the data will access the data on the local disk instead of the data on the<br />
remote server.<br />
For more information, type man 1M mount at the HP-UX prompt.<br />
132<br />
Chapter 3
Configuring the Cache File System (CacheFS)<br />
Configuring CacheFS<br />
To Automount a File System Using CacheFS<br />
Before you can automount an <strong>NFS</strong> file system with CacheFS, you must<br />
configure a directory in a local file system as cache. See “To Configure a<br />
Local File System as Cache” on page 131.<br />
1. Add a line for the automounted file system to the appropriate<br />
automounter direct or indirect map, as in the following examples:<br />
# direct map example:<br />
/usr/dist -ro,nosuid,fstype=cachefs,backfstype=nfs, \<br />
cachedir=/disk2/cache distserver:/export/dist<br />
# indirect map example:<br />
proj1 -nosuid,fstype=cachefs,backfstype=nfs,\<br />
cachedir=/disk2/cache \<br />
/src testbox1:/export/proj1/src<br />
/data testbox2:/export/proj1/data<br />
2. If you modified a direct map or the automounter master map, (Step 1<br />
instructs users to edit direct map. When did or would users edit<br />
master map?) issue the following comm<strong>and</strong>, on each <strong>NFS</strong> client that<br />
will use the map, to force AutoFS to reread its maps:<br />
/usr/sbin/automount<br />
You can specify caching in an NIS automounter map only if all clients<br />
who will use the map have their caching directory set up in the same<br />
location (/disk2/cache, in the examples).<br />
For more information, type man 1M automount at the HP-UX prompt.<br />
• cachefsstat shows information, gathered from the cache, about a<br />
specific file system or all cached file systems.<br />
Chapter 3 133
Configuring the Cache File System (CacheFS)<br />
Configuring CacheFS<br />
134<br />
Chapter 3
4 Configuring <strong>and</strong> <strong>Administering</strong><br />
NIS<br />
The Network Information Service (NIS), previously called “Yellow<br />
Pages,” is a distributed database system that allows you to maintain<br />
Chapter 4 135
Configuring <strong>and</strong> <strong>Administering</strong> NIS<br />
commonly used configuration information on a master server <strong>and</strong><br />
propagate the information to all the hosts in your network. This chapter<br />
explains how to configure <strong>and</strong> administer the servers <strong>and</strong> clients in an<br />
NIS domain. It contains the following sections:<br />
• Overview of NIS<br />
• Planning the NIS Network<br />
• Configuring <strong>and</strong> <strong>Administering</strong> an NIS Master Server<br />
• Configuring <strong>and</strong> <strong>Administering</strong> an NIS Slave Server<br />
• Configuring <strong>and</strong> <strong>Administering</strong> an NIS Client<br />
• Configuring <strong>and</strong> <strong>Administering</strong> Secure RPC (if NIS+ is not used)<br />
• Summary of NIS Comm<strong>and</strong>s<br />
NOTE<br />
NIS is not supported across extended LANs (LANs separated by routers<br />
or bridges). NIS is also not supported across WAN links, like X.25 <strong>and</strong><br />
SLIP.<br />
136<br />
Chapter 4
Configuring <strong>and</strong> <strong>Administering</strong> NIS<br />
Overview of NIS<br />
Overview of NIS<br />
NIS allows you to administer the configuration of many hosts from a<br />
central location. Common configuration information, which would have<br />
to be maintained separately on each host in a network without NIS, can<br />
be stored <strong>and</strong> maintained in a central location <strong>and</strong> propagated to all of<br />
the nodes in the network.<br />
Information Managed by NIS<br />
By default, NIS manages the following configuration files:<br />
• /etc/hosts, a file that maps internet addresses to host names.<br />
• /etc/passwd, a list of the users on your system, along with their<br />
passwords, home directories, <strong>and</strong> other information.<br />
• /etc/group, a list of groups of users.<br />
• /etc/netgroup, a list of <strong>NFS</strong> netgroups, which are groups of host<br />
names or user names used for allowing or denying access to systems<br />
<strong>and</strong> services.<br />
• /etc/services, a file that associates network services with their<br />
port numbers <strong>and</strong> protocols.<br />
• /etc/protocols, a file that associates network protocols with<br />
protocol numbers.<br />
• /etc/networks, a list of network names <strong>and</strong> numbers.<br />
• /etc/rpc, a file that maps RPC program names to program numbers.<br />
• /etc/auto_master, an <strong>NFS</strong> automounter map that lists the direct<br />
<strong>and</strong> indirect automounter maps <strong>and</strong> their mount points.<br />
• /etc/mail/aliases, a list of sendmail aliases.<br />
• /etc/publickey, a list of secure RPC encryption keys.<br />
• /etc/netid, a list of secure RPC netnames (unix.UID@domainname<br />
or unix.hostname@domainname) for users <strong>and</strong> hosts outside your NIS<br />
domain.<br />
• /etc/vhe_list, a configuration file for the Virtual Home<br />
Environment. (Type man 4 vhe_list for more information.) VHE is<br />
Chapter 4 137
Configuring <strong>and</strong> <strong>Administering</strong> NIS<br />
Overview of NIS<br />
not supported on 10.0 <strong>and</strong> later releases.<br />
The information in these files is put into NIS databases automatically<br />
when you create an NIS master server. Other system files may be<br />
managed by NIS, if you wish to customize your configuration.<br />
Structure of the NIS Network<br />
The center of the NIS network is the NIS master server. When you<br />
create an NIS master server, the configuration files on that host are used<br />
to create NIS maps, which are hashed database versions of the<br />
configuration files. Once the NIS network is set up, any changes to the<br />
maps must be made on the master server.<br />
In addition to the master server, you can create backup servers, called<br />
NIS slave servers, to take some load off the master server <strong>and</strong> to<br />
substitute for the master server when it is down. When you create an<br />
NIS slave server, the maps on the master server are transferred to the<br />
slave server. Whenever a change is made to a map on the master server,<br />
the modified map must be transferred to the slave servers.<br />
Typically, all the hosts in the network, including the master <strong>and</strong> slave<br />
servers, are NIS clients. Whenever a process on an NIS client requests<br />
configuration information, it calls NIS instead of looking in its local<br />
configuration files. (For group <strong>and</strong> password information <strong>and</strong> mail<br />
aliases, the /etc files may be consulted first, <strong>and</strong> NIS may be consulted if<br />
the requested information is not found in the /etc files.)<br />
The set of maps shared by the servers <strong>and</strong> clients is called the NIS<br />
domain. The master copies of the maps are located on the NIS master<br />
server, in the directory /var/yp/domainname. Under the domainname<br />
directory, each map is stored as two files: mapname.dir <strong>and</strong><br />
mapname.pag. Each slave server has an identical directory containing<br />
the same set of maps.<br />
When a client starts up, it broadcasts a request for a server that serves<br />
its domain. Any server that has the set of maps for the client’s domain<br />
may answer the request. The client “binds” to the first server to answer<br />
its request, <strong>and</strong> that server answers all of its NIS queries.<br />
Figure 4-1 shows the flow of information in an NIS domain.<br />
138<br />
Chapter 4
Configuring <strong>and</strong> <strong>Administering</strong> NIS<br />
Overview of NIS<br />
Figure 4-1<br />
Flow of Information in an NIS Network<br />
Master<br />
Server<br />
Maps are created from<br />
configuration files on<br />
the master server.<br />
maps<br />
Slave<br />
Server<br />
maps<br />
Slave<br />
Server<br />
Maps are transferred<br />
from the master server<br />
to the slave servers.<br />
data<br />
data<br />
data<br />
Servers send<br />
configuration data<br />
to clients.<br />
Client<br />
Client<br />
Client<br />
A host cannot be the master server for more than one NIS domain.<br />
However, a master server for one domain may be a slave server for<br />
another domain. A host can be a slave server for multiple domains. A<br />
client belongs to only one domain. Figure 4-2 shows an NIS network with<br />
servers that serve multiple domains.<br />
Figure 4-2<br />
Servers that Server Multiple NIS Domains<br />
Master<br />
Server<br />
Domain 1<br />
Master Slave<br />
Server Server<br />
Slave<br />
Serve<br />
Domain<br />
Slave<br />
Server<br />
Slave<br />
Server<br />
Slave<br />
Server<br />
Client Client Client<br />
Clien Clien Clien Clien<br />
Chapter 4 139
Configuring <strong>and</strong> <strong>Administering</strong> NIS<br />
Planning the NIS Network<br />
Planning the NIS Network<br />
This section explains how to plan the layout of your NIS network. It tells<br />
you how to perform the following tasks:<br />
• To Determine the Number of NIS Domains You Need<br />
• To Determine the Number of NIS Servers You Need<br />
• To Determine Which Hosts Will Be NIS Servers<br />
• To Draw an NIS Network Map<br />
To Determine the Number of NIS Domains You Need<br />
For many sites, all hosts can belong to the same domain, <strong>and</strong> it is not<br />
necessary to set up more than one. However, you might want to create<br />
multiple domains for the following reasons:<br />
• If your site is divided into multiple administrative departments, with<br />
a different system administrator for each department, you should<br />
allow each system administrator to maintain a separate NIS domain.<br />
• If your site is divided into multiple administrative departments, <strong>and</strong><br />
each department requires different configuration data <strong>and</strong> allows<br />
access to different users <strong>and</strong> hosts, you should create a separate NIS<br />
domain for each administrative department.<br />
140<br />
Chapter 4
Configuring <strong>and</strong> <strong>Administering</strong> NIS<br />
Planning the NIS Network<br />
To Determine the Number of NIS Servers You Need<br />
Following are some guidelines for determining the number of NIS<br />
servers you will need in your domain:<br />
• You must put a server on each subnetwork in your domain. When a<br />
client starts up, it broadcasts a message to find the nearest server.<br />
This broadcast message is not propagated across routers or gateways,<br />
so each subnet must have at least one server.<br />
• In general, a server can serve about 30 NIS clients if the clients <strong>and</strong><br />
servers run at the same speed. If the clients are faster than the<br />
servers, you will need more servers. If the clients are slower than the<br />
servers, each server can serve 50 or more clients.<br />
To Determine Which Hosts Will Be NIS Servers<br />
• Choose servers that are reliable <strong>and</strong> highly available.<br />
• Choose fast servers that are not used for CPU-intensive applications.<br />
Do not use gateways or terminal servers as NIS servers.<br />
• Distribute servers appropriately among client networks. Because an<br />
NIS client can bind only to a server on its own subnet, each subnet<br />
must have enough servers to accommodate the clients on that subnet.<br />
Chapter 4 141
Configuring <strong>and</strong> <strong>Administering</strong> NIS<br />
Planning the NIS Network<br />
To Draw an NIS Network Map<br />
It is a very good idea to draw a map of your NIS network, to help with<br />
maintenance <strong>and</strong> troubleshooting in the future. Figure 4-3 shows an<br />
example of an NIS network map.<br />
Figure 4-3<br />
Example NIS Network Map<br />
hostname: eeyore<br />
role: slave (PoohCorners)<br />
domain: PoohCorners<br />
network: 192.6.36.0<br />
domain: PoohCorners<br />
number of clients: 12<br />
hostname: pooh<br />
role: master (PoohCorners)<br />
domain: PoohCorners<br />
hostname: tigger<br />
role: slave (PoohCorners)<br />
domain: PoohCorners<br />
network: 192.6.27.0<br />
domain: PoohCorners<br />
number of clients: 10<br />
network: 192.6.45.0<br />
domain: PoohCorners<br />
number of clients: 18<br />
hostname: rabbit<br />
role: master (Wonderl<strong>and</strong>)<br />
slave (PoohCorners)<br />
domain: Wonderl<strong>and</strong><br />
network: 192.6.81.0<br />
domain: Wonderl<strong>and</strong><br />
number of clients: 7<br />
hostname: alice<br />
role: slave (Wonderl<strong>and</strong>)<br />
domain: Wonderl<strong>and</strong><br />
hostname: hatter<br />
role: slave (Wonderl<strong>and</strong>)<br />
domain: Wonderl<strong>and</strong><br />
network: 192.6.85.0<br />
domain: Wonderl<strong>and</strong><br />
number of clients: 9<br />
142<br />
Chapter 4
Configuring <strong>and</strong> <strong>Administering</strong> NIS<br />
Configuring <strong>and</strong> <strong>Administering</strong> an NIS Master Server<br />
Configuring <strong>and</strong> <strong>Administering</strong> an NIS Master<br />
Server<br />
An NIS master server holds the source files for all the NIS maps in the<br />
domain. Any changes to the NIS maps must be made on the NIS master<br />
server. The NIS master server delivers information to NIS clients <strong>and</strong><br />
supplies the NIS slave servers with up-to-date maps.<br />
An NIS master server must also be an NIS client.<br />
This section explains how to perform the following tasks. Only the first<br />
five tasks are required to get your NIS master server up <strong>and</strong> running.<br />
• To Create the Master passwd File<br />
• To Create the Master group File<br />
• To Create the Master hosts File<br />
• To Enable NIS Master Server Capability<br />
• To Verify Your NIS Master Server Configuration<br />
• To Configure the NIS Master Server to Use a Private passwd File<br />
• To Restrict Client <strong>and</strong> Slave Server Access to the Master Server<br />
• To Check the Contents of an NIS Map<br />
• To Modify an NIS Map<br />
• To Add an Automounter Map to Your NIS Domain<br />
• To Remove an Automounter Map from Your NIS Domain<br />
• To Add a Slave Server to Your NIS Domain<br />
• To Remove a Slave Server from Your NIS Domain<br />
• To Query BIND for Host Information After Querying NIS<br />
• To Use NIS With Short File Names<br />
• To Configure an HP-UX Master Server in a Domain with Sun<br />
Systems<br />
Chapter 4 143
Configuring <strong>and</strong> <strong>Administering</strong> NIS<br />
Configuring <strong>and</strong> <strong>Administering</strong> an NIS Master Server<br />
To Create the Master passwd File<br />
1. Copy the /etc/passwd file from each host in your NIS domain to the<br />
/etc directory on the host that will be the master server. Name each<br />
copy /etc/passwd.hostname, where hostname is the name of the<br />
host it came from.<br />
2. Concatenate all the passwd files together, including the master<br />
server’s passwd file, into a temporary passwd file, as follows:<br />
cd /etc<br />
cat passwd passwd.hostname1 passwd.hostname2... ><br />
passwd.temp<br />
3. Issue the following comm<strong>and</strong> to sort the temporary passwd file by<br />
user name:<br />
sort -o /etc/passwd.temp -t: -k1,1 /etc/passwd.temp<br />
4. Examine /etc/passwd.temp for duplicate user names. If you find<br />
multiple entries for the same user, edit the file to remove redundant<br />
ones. Make sure each user in your network has a unique user name.<br />
5. Issue the following comm<strong>and</strong> to sort the temporary passwd file by<br />
user ID:<br />
sort -o /etc/passwd.temp -t: -k3n,3 /etc/passwd.temp<br />
6. Examine /etc/passwd.temp for duplicate user IDs. If you find<br />
multiple entries with the same user ID, edit the file to change the<br />
user IDs so that no two users have the same user ID.<br />
7. Move /etc/passwd.temp (the sorted, edited file) to /etc/passwd.<br />
This file will be used to generate the passwd map for your NIS<br />
domain.<br />
8. Remove all the /etc/passwd.hostname files from the master server.<br />
NOTE<br />
NIS does not require that the passwd file be sorted in any particular way.<br />
Sorting the passwd file simply makes it easier to find duplicate entries.<br />
For more information, type man 4 passwd or man 1 sort at the HP-UX<br />
prompt.<br />
144<br />
Chapter 4
Configuring <strong>and</strong> <strong>Administering</strong> NIS<br />
Configuring <strong>and</strong> <strong>Administering</strong> an NIS Master Server<br />
To Create the Master group File<br />
1. Copy the /etc/group file from each host in your NIS domain to the<br />
/etc directory on the host that will be the master server. Name each<br />
copy /etc/group.hostname, where hostname is the name of the host<br />
it came from.<br />
2. Concatenate all the group files together, including the master server’s<br />
group file, into a temporary group file, as follows:<br />
cd /etc<br />
cat group group.hostname1 group.hostname2... > group.temp<br />
3. Issue the following comm<strong>and</strong> to sort the temporary group file by<br />
group name:<br />
sort -o /etc/group.temp -t: -k1,1 /etc/group.temp<br />
4. Examine /etc/group.temp for duplicate group names. If a group<br />
name appears more than once, merge the groups with the same name<br />
into one group <strong>and</strong> remove the duplicate entries.<br />
5. Issue the following comm<strong>and</strong> to sort the temporary group file by<br />
group ID:<br />
sort -o /etc/group.temp -t: -k3n,3 /etc/group.temp<br />
6. Examine /etc/group.temp for duplicate group IDs. If you find<br />
multiple entries with the same group ID, edit the file to change the<br />
group IDs so that no two groups have the same group ID.<br />
7. Move /etc/group.temp (the sorted, edited file) to /etc/group. This<br />
file will be used to generate the group map for your NIS domain.<br />
8. Remove the /etc/group.hostname files from the master server.<br />
NOTE<br />
NIS does not require that the group file be sorted in any particular way.<br />
Sorting the group file simply makes it easier to find duplicate entries.<br />
For more information, type man 4 group or man 1 sort at the HP-UX<br />
prompt.<br />
Chapter 4 145
Configuring <strong>and</strong> <strong>Administering</strong> NIS<br />
Configuring <strong>and</strong> <strong>Administering</strong> an NIS Master Server<br />
To Create the Master hosts File<br />
1. Copy the /etc/hosts file from each host in your NIS domain to the<br />
/etc directory on the host that will be the master server. Name each<br />
copy /etc/hosts.hostname, where hostname is the name of the host<br />
it came from.<br />
2. Concatenate all the hosts files together, including the master server’s<br />
hosts file, into a temporary hosts file, as follows:<br />
cd /etc<br />
cat hosts hosts.hostname1 hosts.hostname2... > hosts.temp<br />
3. Issue the following comm<strong>and</strong> to sort the temporary hosts file so that<br />
duplicate IP addresses are on adjacent lines:<br />
sort -o /etc/hosts.temp /etc/hosts.temp<br />
4. Examine /etc/hosts.temp for duplicate IP addresses. If the same IP<br />
address appears in multiple entries, remove all the entries but one. If<br />
you need to map an IP address to multiple host names, include them<br />
as aliases in a single entry.<br />
5. Issue the following comm<strong>and</strong> to sort the temporary hosts file by host<br />
name:<br />
sort -o /etc/hosts.temp -b -k2,2 /etc/hosts.temp<br />
6. Examine /etc/hosts.temp for duplicate host names. A host name<br />
may be mapped to multiple IP addresses only if the IP addresses<br />
belong to different LAN cards on the same host. If a host name<br />
appears in multiple entries, mapped to IP addresses on different<br />
hosts, remove all the entries but one.<br />
7. Examine /etc/hosts.temp for duplicate aliases. No alias should<br />
appear in more than one entry.<br />
8. Move /etc/hosts.temp (the sorted, edited file) to /etc/hosts. This<br />
file will be used to generate the hosts map for your NIS domain.<br />
9. Remove the /etc/hosts.hostname files from the master server.<br />
NOTE<br />
NIS does not require that the hosts file be sorted in any particular way.<br />
Sorting the hosts file simply makes it easier to find duplicate entries.<br />
For more information, type man 4 hosts or man 1 sort at the HP-UX<br />
146<br />
Chapter 4
Configuring <strong>and</strong> <strong>Administering</strong> NIS<br />
Configuring <strong>and</strong> <strong>Administering</strong> an NIS Master Server<br />
prompt.<br />
To Enable NIS Master Server Capability<br />
1. Log in as root to the host that will be the master server.<br />
2. On the host that will be the master server, ensure that the $PATH<br />
environment variable includes the following directory paths:<br />
• /var/yp<br />
• /usr/lib/netsvc/yp<br />
• /usr/ccs/bin<br />
3. Issue the following comm<strong>and</strong> to set the NIS domain name:<br />
/usr/bin/domainname domainname<br />
If your host uses short file names, make sure the first 14 characters of<br />
domainname uniquely identify your domain among the other NIS<br />
domains in your network.<br />
4. In the /etc/rc.config.d/namesvrs file, set the NIS_DOMAIN<br />
variable to the domain name:<br />
NIS_DOMAIN=domainname<br />
5. In the /etc/rc.config.d/namesvrs file, set the NIS_MASTER_SERVER<br />
<strong>and</strong> NIS_CLIENT variables to 1, as follows:<br />
NIS_MASTER_SERVER=1<br />
NIS_CLIENT=1<br />
If the host that will be the master server is already a slave server for<br />
another domain, set the NIS_MASTER_SERVER variable to 1 <strong>and</strong> the<br />
NIS_SLAVE_SERVER variable to 0.<br />
If the host is an NIS+ server or client, set the NISPLUS_SERVER <strong>and</strong><br />
NISPLUS_CLIENT flags to 0.<br />
6. Issue the following comm<strong>and</strong> to create the NIS maps for the domain:<br />
/usr/sbin/ypinit -m<br />
The ypinit script will prompt you for the names of your slave<br />
servers. Enter the names of your slave servers in response to the<br />
prompt.<br />
7. Issue the following comm<strong>and</strong>s to run the NIS startup scripts:<br />
Chapter 4 147
Configuring <strong>and</strong> <strong>Administering</strong> NIS<br />
Configuring <strong>and</strong> <strong>Administering</strong> an NIS Master Server<br />
/sbin/init.d/nis.server start<br />
/sbin/init.d/nis.client start<br />
The master server is now running as both an NIS master server <strong>and</strong> an<br />
NIS client. Next, you must configure the slave servers you listed when<br />
you ran the ypinit script. See “Configuring <strong>and</strong> <strong>Administering</strong> an NIS<br />
Slave Server” on page 161.<br />
For more information, see the following man pages: domainname(1),<br />
ypinit(1M), <strong>and</strong> ypfiles(4).<br />
To Verify Your NIS Master Server Configuration<br />
• Log into the master server <strong>and</strong> issue the following comm<strong>and</strong>:<br />
/usr/bin/ypwhich -m<br />
The ypwhich -m comm<strong>and</strong> lists all the NIS maps available to the local<br />
client <strong>and</strong> gives the name of the master server that serves each map. In<br />
this case, the local host is both the client <strong>and</strong> the master server. Your<br />
display should look something like this, where mastername is the name<br />
of your local host:<br />
# /usr/bin/ypwhich -m<br />
vhe_list mastername<br />
servi.bynp mastername<br />
services.byname mastername<br />
rpc.byname mastername<br />
protocols.bynumber mastername<br />
protocols.byname mastername<br />
rpc.bynumber mastername<br />
passwd.byuid mastername<br />
passwd.byname mastername<br />
networks.byname mastername<br />
networks.byaddr mastername<br />
netgroup.byuser mastername<br />
netgroup.byhost mastername<br />
netgroup mastername<br />
hosts.byname mastername<br />
hosts.byaddr mastername<br />
group.byname mastername<br />
group.bygid mastername<br />
publickey.byname mastername<br />
netid.byname mastername<br />
mail.byaddr mastername<br />
mail.aliases mastername<br />
auto.master mastername<br />
148<br />
Chapter 4
Configuring <strong>and</strong> <strong>Administering</strong> NIS<br />
Configuring <strong>and</strong> <strong>Administering</strong> an NIS Master Server<br />
ypservers mastername<br />
If you do not see a similar display, see “Troubleshooting <strong>NFS</strong> <strong>Services</strong>” on<br />
page 273. Type man 1 ypwhich for more information on the ypwhich<br />
comm<strong>and</strong>.<br />
To Configure the NIS Master Server to Use a Private<br />
passwd File<br />
CAUTION<br />
Do not use this procedure if your NIS master server is also a mail server.<br />
If the NIS master server uses only a subset of the information in the NIS<br />
passwd map, it cannot resolve mail addresses, <strong>and</strong> mail messages will<br />
fail.<br />
1. Log in as root to the NIS master server.<br />
2. Copy the /etc/passwd file to /etc/passwd.yp.<br />
3. Using a text editor, remove users from the /etc/passwd file who<br />
should not be allowed access to the NIS master server. Do not include<br />
a plus sign (+) in this file.<br />
4. Use a text editor to edit the /var/yp/Makefile file. Change the<br />
following line<br />
PWFILE=$(DIR)/passwd<br />
to the following:<br />
PWFILE=$(DIR)/passwd.yp<br />
5. In the /etc/rc.config.d/namesvrs file, modify the<br />
YPPASSWDD_OPTIONS variable. Change the following line<br />
YPPASSWDD_OPTIONS=”/etc/passwd -m passwd<br />
PWFILE=/etc/passwd”<br />
to the following:<br />
YPPASSWDD_OPTIONS=”/etc/passwd.yp -m passwd<br />
PWFILE=/etc/passwd.yp”<br />
6. Issue the following comm<strong>and</strong>s to regenerate the NIS passwd maps<br />
from /etc/passwd.yp:<br />
cd /var/yp<br />
Chapter 4 149
Configuring <strong>and</strong> <strong>Administering</strong> NIS<br />
Configuring <strong>and</strong> <strong>Administering</strong> an NIS Master Server<br />
/usr/ccs/bin/make passwd<br />
This comm<strong>and</strong> generates both the passwd.byname <strong>and</strong> the<br />
passwd.byuid maps <strong>and</strong> pushes them to the slave servers.<br />
If your slave servers are not up <strong>and</strong> running yet, run make with the<br />
NOPUSH flag set to 1:<br />
cd /var/yp<br />
/usr/ccs/bin/make NOPUSH=1 passwd<br />
This procedure creates a restricted /etc/passwd file that is used only by<br />
the NIS master server. The unrestricted /etc/passwd.yp file is used to<br />
generate the NIS passwd maps, which are used by the rest of the hosts in<br />
the NIS domain.<br />
For more information, see the following man pages: passwd(4), make(1),<br />
ypmake(1M), <strong>and</strong> ypinit(1M).<br />
To Restrict Client <strong>and</strong> Slave Server Access to the<br />
Master Server<br />
1. On the NIS master server, create a file called /var/yp/securenets,if<br />
it does not already exist.<br />
2. Add lines to the file with the following syntax:<br />
address_mask IP_address<br />
The IP_address is the internet address of an NIS client, NIS slave<br />
server, or subnet that may request NIS information or transfer NIS<br />
maps from the NIS master server.<br />
The address_mask indicates which bits in the IP_address field are<br />
important. If a bit is set in the address_mask field, the corresponding<br />
bit in the source address of any incoming NIS requests must match<br />
the same bit in the IP_address field.<br />
3. Issue the following comm<strong>and</strong>s to kill <strong>and</strong> restart the ypserv process:<br />
/sbin/init.d/nis.server stop<br />
/sbin/init.d/nis.server start<br />
If a client or slave host has multiple network interface cards, add a line<br />
to the securenets file for the IP address of each card.<br />
Type man 4 securenets at the HP-UX prompt for more information.<br />
150<br />
Chapter 4
Configuring <strong>and</strong> <strong>Administering</strong> NIS<br />
Configuring <strong>and</strong> <strong>Administering</strong> an NIS Master Server<br />
Examples from /var/yp/securenets<br />
The following line from a /var/yp/securenets file allows only the NIS<br />
client at IP address 10.11.12.13 to request information from the NIS<br />
master server. Because every bit is set in the address mask, the source IP<br />
address on the NIS request must match exactly, or the master server will<br />
not return the requested information.<br />
255.255.255.255 10.11.12.13<br />
The following line from a /var/yp/securenets file allows any host on<br />
the network 10.11.12.0 to request NIS information or transfer NIS maps<br />
from the master server. The last 8 bits of the IP address are ignored,<br />
because the last 8 bits of the address mask are set to 0. Any host whose<br />
IP address begins 10.11.12 will be allowed access to the master server.<br />
255.255.255.0 10.11.12.13<br />
To Check the Contents of an NIS Map<br />
• Issue the following comm<strong>and</strong> to verify that an NIS map contains the<br />
data you expect it to contain:<br />
/usr/bin/ypcat -k mapname<br />
The -k option lists the key for each item in the map as well as the data<br />
associated with the key. For example, in the netgroup map, the netgroup<br />
name is the key. Without the -k option, ypcat would list all the data<br />
associated with each netgroup name, but not the netgroup name itself.<br />
For more information on the ypcat comm<strong>and</strong>, type man 1 ypcat at the<br />
HP-UX prompt.<br />
Chapter 4 151
Configuring <strong>and</strong> <strong>Administering</strong> NIS<br />
Configuring <strong>and</strong> <strong>Administering</strong> an NIS Master Server<br />
To Modify an NIS Map<br />
1. Log in as root to the NIS master server.<br />
2. Make your changes to the source file for the NIS map. For example, if<br />
you want to change the NIS hosts map, make your changes to the<br />
/etc/hosts file.<br />
3. Issue the following comm<strong>and</strong>s to generate the map <strong>and</strong> push it to the<br />
slave servers:<br />
cd /var/yp<br />
/usr/ccs/bin/make mapname<br />
If your slave servers are not up <strong>and</strong> running yet, run the make<br />
comm<strong>and</strong> with the NOPUSH flag set to 1:<br />
cd /var/yp<br />
/usr/ccs/bin/make NOPUSH=1 mapname<br />
This procedure works for all NIS maps except the ypservers map, which<br />
has no source file. For instructions on modifying the ypservers map, see<br />
“To Add a Slave Server to Your NIS Domain” on page 156 or “To Remove<br />
a Slave Server from Your NIS Domain” on page 157.<br />
If you make changes to the passwd, group, or hosts maps, regenerate<br />
the netid.byname map. The netid.byname map is a mapping of users to<br />
groups, where each user is followed by a list of all the groups to which<br />
the user belongs. The netid.byname map is generated from the<br />
/etc/passwd <strong>and</strong> /etc/group files.<br />
For more information, see the following man pages: make(1), ypmake(1M),<br />
yppush(1M), <strong>and</strong> ypxfr(1M).<br />
152<br />
Chapter 4
Configuring <strong>and</strong> <strong>Administering</strong> NIS<br />
Configuring <strong>and</strong> <strong>Administering</strong> an NIS Master Server<br />
To Add an Automounter Map to Your NIS Domain<br />
1. Log in as root to the NIS master server.<br />
2. In the /usr/sbin/ypinit script, use a text editor to add the<br />
automounter map to the MASTER_MAPS list, as follows:<br />
MASTER_MAPS=”group.bygid group.byname \<br />
hosts.byaddr bosts.byname netgroup netgroup.byhost \<br />
netgroup.byuser networks.byaddr networks.byname<br />
passwd.byname \<br />
passwd.byuid protocols.byname protocols.bynumber<br />
rpc.bynumber \<br />
services.byname vhe_list publickey.byname netid.byname<br />
mail.byaddr \<br />
mail.aliases auto.master rpc.byname servi.bynp<br />
auto.mapname”<br />
3. In the /var/yp/Makefile file, add the automounter map to the list of<br />
maps that begins with all:, as follows:<br />
all: passwd group hosts networks rpc services protocols \<br />
netgroup aliases publickey netid vhe_list auto.master \<br />
auto.mapname<br />
4. In the /var/yp/Makefile file, copy the statement that begins<br />
$(YPDBDIR)/$(DOM)/auto_master.time to the space below it.<br />
Change all occurrences of auto.master or auto_master to the name<br />
of the map you are adding. Note that some occurrences must be<br />
auto_mapname (the name of the ASCII file), <strong>and</strong> some must be<br />
auto.mapname (the name of the NIS database).<br />
$ (YPDBDIR)/$(DOM)/auto_master.time: $(DIR)/auto_master<br />
@(sed -e ”s/ˆ[ | ]*//g” -e ”/ˆ#/d” -e s/#.*$$// <<br />
$(DIR)/auto_master $(CHKPIPE)) |<br />
$(MAKEDBM) - $(YPDBDIR) /$(DOM)/auto.master;<br />
@touch $(YPDBDIR)/$(DOM)/auto_master.time;<br />
@echo ”updated auto.master”;<br />
@if [ ! $(NOPUSH) ]; then $(YPPUSH) -d $(DOM)<br />
auto.master; fi<br />
@if [ ! $(NOPUSH) ]; then echo ”pushed auto.master”;<br />
fi<br />
$ (YPDBDIR)/$(DOM)/auto_mapmame.time: $(DIR)/auto_mapname<br />
@(sed -e ”s/ˆ[ | ]*//g” -e ”/ˆ#/d” -e s/#.*$$// <<br />
$(DIR)/auto_mapname $(CHKPIPE)) |<br />
$(MAKEDBM) - $(YPDBDIR) /$(DOM)/auto.mapname;<br />
@touch $(YPDBDIR)/$(DOM)/auto_mapname.time;<br />
@echo ”updated auto.mapname”;<br />
@if [ ! $(NOPUSH) ]; then $(YPPUSH) -d $(DOM)<br />
Chapter 4 153
Configuring <strong>and</strong> <strong>Administering</strong> NIS<br />
Configuring <strong>and</strong> <strong>Administering</strong> an NIS Master Server<br />
auto.mapname; fi<br />
@if [ ! $(NOPUSH) ]; then echo ”pushed<br />
auto.mapname”; fi<br />
5. In the /var/yp/Makefile file, copy the statement that begins<br />
auto.master: to the space below it. Change auto.master to<br />
auto.mapname, <strong>and</strong> change both occurrences of auto_master.time to<br />
auto_mapname.time.<br />
auto.master:<br />
@if [ $(NOPUSH) ]; then $(MAKE) $(MFLAGS) -k \<br />
$(YPDBDIR)/$(DOM)/auto_master.time DOM=$(DOM)<br />
DIR=$(DIR); \<br />
else $(MAKE) $(MFLAGS) -k<br />
$(YPDBDIR)/$(DOM)/auto_master.time \<br />
DOM=$(DOM) DIR=$(DIR) NOPUSH=$(NOPUSH);fi<br />
auto.mapname:<br />
@if [ $(NOPUSH) ]; then $(MAKE) $(MFLAGS) -k \<br />
$(YPDBDIR)/$(DOM)/auto_mapname.time DOM=$(DOM)<br />
DIR=$(DIR); \<br />
else $(MAKE) $(MFLAGS) -k<br />
$(YPDBDIR)/$(DOM)/auto_mapname.time \<br />
DOM=$(DOM) DIR=$(DIR) NOPUSH=$(NOPUSH);fi<br />
6. Issue the following comm<strong>and</strong>s to generate the map:<br />
cd /var/yp<br />
/usr/ccs/bin/make NOPUSH=1 auto.mapname<br />
7. If you have slave servers configured in your domain, log into each<br />
slave server <strong>and</strong> issue the following comm<strong>and</strong> to copy the new map to<br />
the slave server:<br />
/usr/sbin/ypxfr auto.mapname<br />
For more information, see the man page for ypinit(1M), make(1),<br />
ypmake(1M), or ypxfr(1M).<br />
154<br />
Chapter 4
Configuring <strong>and</strong> <strong>Administering</strong> NIS<br />
Configuring <strong>and</strong> <strong>Administering</strong> an NIS Master Server<br />
To Remove an Automounter Map from Your NIS<br />
Domain<br />
1. Log in as root to the NIS master server.<br />
2. In the /usr/sbin/ypinit script, use a text editor to remove the map<br />
name from the MASTER_MAPS list.<br />
3. In the /var/yp/Makefile file, remove the map from the list of maps<br />
that begins with all:.<br />
4. In the /var/yp/Makefile file, remove the statement that begins<br />
$(YPDBDIR)/$(DOM)/auto_mapname.time. For example, if you were<br />
removing the auto.home map, you would remove the following lines:<br />
$ (YPDBDIR)/$(DOM)/auto_home.time: $(DIR)/auto_home<br />
@(sed -e ”s/ˆ[ | ]*//g” -e ”/ˆ#/d” -e s/#.*$$// <<br />
$(DIR)/auto_home $(CHKPIPE)) |<br />
$(MAKEDBM) - $(YPDBDIR) /$(DOM)/auto.home;<br />
@touch $(YPDBDIR)/$(DOM)/auto_home.time;<br />
@echo ”updated auto.home”;<br />
@if [ ! $(NOPUSH) ]; then $(YPPUSH) -d $(DOM)<br />
auto.home; fi<br />
@if [ ! $(NOPUSH) ]; then echo ”pushed auto.home”;<br />
fi<br />
5. In the /var/yp/Makefile file, remove the statement that begins<br />
auto.mapname:. For example, if you were removing the auto.home<br />
map, you would remove the following lines:<br />
auto.home:<br />
@if [ $(NOPUSH) ]; then $(MAKE) $(MFLAGS) -k \<br />
$(YPDBDIR)/$(DOM)/auto_home.time DOM=$(DOM)<br />
DIR=$(DIR); \<br />
else $(MAKE) $(MFLAGS) -k<br />
$(YPDBDIR)/$(DOM)/auto_home.time \<br />
DOM=$(DOM) DIR=$(DIR) NOPUSH=$(NOPUSH);fi<br />
6. On the master <strong>and</strong> on each of the slave servers, remove the map files,<br />
mapname.dir <strong>and</strong> mapname.pag from the directory where your maps<br />
are stored. The directory is called /var/yp/domainname, where<br />
domainname is the name of your NIS domain. For example, if you<br />
were removing the auto.home map from the Finance domain, you<br />
would issue the following comm<strong>and</strong>s on the master server <strong>and</strong> on<br />
each of the slave servers:<br />
cd /var/yp/Finance<br />
rm auto.home.dir auto.home.pag<br />
Chapter 4 155
Configuring <strong>and</strong> <strong>Administering</strong> NIS<br />
Configuring <strong>and</strong> <strong>Administering</strong> an NIS Master Server<br />
For more information, see the man pages ypinit(1M), make(1),<br />
ypmake(1M), <strong>and</strong> ypfiles(4).<br />
To Add a Slave Server to Your NIS Domain<br />
1. Log in as root to the NIS master server.<br />
2. Issue the following comm<strong>and</strong>, where domainname is the name of the<br />
domain to which you want to add the slave server:<br />
cd /var/yp/domainname<br />
3. Issue the following comm<strong>and</strong> to create an editable ASCII text file<br />
from the ypservers map:<br />
/usr/sbin/makedbm -u ypservers > tempfile<br />
4. Use a text editor to add the name of the new server to the ASCII file,<br />
tempfile.<br />
5. Issue the following comm<strong>and</strong> to regenerate the ypservers map from<br />
the ASCII file:<br />
/usr/sbin/makedbm tempfile ypservers<br />
6. Log in as root to the new slave server <strong>and</strong> configure it as an NIS slave<br />
server. See “Configuring <strong>and</strong> <strong>Administering</strong> an NIS Slave Server” on<br />
page 161.<br />
For more information, see the man page for makedbm(1M) or ypfiles(4).<br />
156<br />
Chapter 4
Configuring <strong>and</strong> <strong>Administering</strong> NIS<br />
Configuring <strong>and</strong> <strong>Administering</strong> an NIS Master Server<br />
To Remove a Slave Server from Your NIS Domain<br />
1. Log in as root to the NIS master server.<br />
2. Issue the following comm<strong>and</strong>s to create an editable ASCII text file<br />
from the ypservers map:<br />
cd /var/yp/domainname<br />
/usr/sbin/makedbm -u ypservers > tempfile<br />
3. Use a text editor to remove the name of the slave server from the<br />
ASCII file, tempfile.<br />
4. Issue the following comm<strong>and</strong> to regenerate the ypservers map from<br />
the ASCII file:<br />
/usr/sbin/makedbm tempfile ypservers<br />
5. Log in as root to the slave server.<br />
6. Remove all the map files from the map directory, <strong>and</strong> remove the map<br />
directory. The directory is called /var/yp/domainname, where<br />
domainname is the name of your NIS domain. For example, if you<br />
were removing a slave server from the Finance domain, you would<br />
issue the following comm<strong>and</strong>s:<br />
cd /var/yp/Finance<br />
rm *<br />
cd ..<br />
rmdir Finance<br />
7. If the slave is not a slave server in any other NIS domain, use a text<br />
editor to set the NIS_SLAVE_SERVER variable to 0 in the<br />
/etc/rc.config.d/namesvrs file.<br />
NIS_SLAVE_SERVER=0<br />
8. If the slave is not a server in any other NIS domain, issue the<br />
following comm<strong>and</strong> to turn off NIS server capability:<br />
/sbin/init.d/nis.server stop<br />
For more information, see the man pages makedbm(1M) <strong>and</strong> ypfiles(4).<br />
Chapter 4 157
Configuring <strong>and</strong> <strong>Administering</strong> NIS<br />
Configuring <strong>and</strong> <strong>Administering</strong> an NIS Master Server<br />
To Query BIND for Host Information After Querying<br />
NIS<br />
This section tells you how to set up server-side hostname fallback,<br />
which causes your NIS servers to query BIND for host information after<br />
querying NIS. A server will search the NIS hosts database first, but if<br />
the hosts database does not contain the requested information, the<br />
server will query the BIND name service. The server will return the host<br />
information to the clients through NIS.<br />
1. Configure your NIS servers as BIND name servers, or install an<br />
/etc/resolve.conf file on each server that allows it to query a<br />
BIND name server. See <strong>Installing</strong> <strong>and</strong> <strong>Administering</strong> Internet<br />
<strong>Services</strong> for more information.<br />
2. On the NIS master server, in the /var/yp/Makefile file, set the B<br />
variable to -b, as follows:<br />
B=-b<br />
3. Issue the following comm<strong>and</strong> on the master server to change the<br />
modification time on /etc/hosts so that make will regenerate the<br />
hosts database:<br />
/usr/bin/touch /etc/hosts<br />
4. Issue the following comm<strong>and</strong>s to regenerate the NIS maps on the<br />
master server <strong>and</strong> push them to the NIS slave servers:<br />
cd /var/yp<br />
/usr/ccs/bin/make<br />
5. On all the NIS servers in your domain, change the hosts line in the<br />
/etc/nsswitch.conf file to the following:<br />
hosts: nis dns files<br />
Hewlett-Packard recommends that you use the Name Service Switch on<br />
your NIS clients instead of server-side hostname fallback. However, if<br />
your NIS clients are PCs that do not have a feature like the Name<br />
Service Switch, use the server-side hostname fallback described in this<br />
section if you want to force BIND lookups after NIS lookups. See<br />
“Configuring the Name Service Switch” on page 253.<br />
158<br />
Chapter 4
Configuring <strong>and</strong> <strong>Administering</strong> NIS<br />
Configuring <strong>and</strong> <strong>Administering</strong> an NIS Master Server<br />
To Use NIS With Short File Names<br />
1. Make sure the first 14 characters of your domain name uniquely<br />
identify your domain among the other NIS domains in your network.<br />
2. If you plan to use NIS to manage your automounter maps, keep the<br />
automounter map names to 10 characters or fewer.<br />
3. Log in as root to the NIS master server.<br />
4. In the /var/yp/Makefile file, uncomment all the lines between<br />
START OF EXAMPLE <strong>and</strong> END OF EXAMPLE. (Remove the sharp sign [#]<br />
from the beginning of each line.) Do not uncomment the START OF<br />
EXAMPLE <strong>and</strong> END OF EXAMPLE lines.<br />
5. In the /var/yp/Makefile file, delete everything after the END OF<br />
EXAMPLE line.<br />
This procedure causes your NIS master server to use HP’s proprietary<br />
ypmake script instead of the Makefile. The Makefile does not support<br />
short filenames, but ypmake does. Type man 1M ypmake at the HP-UX<br />
prompt for more information.<br />
To Configure an HP-UX Master Server in a Domain<br />
with Sun Systems<br />
1. Log in as root to the host that will be the master server.<br />
2. If you have customized your HP Makefile, move it to<br />
/var/yp/Makefile.hp.<br />
3. Copy your Sun Makefile into the /var/yp directory on the HP system.<br />
If your Sun Makefile is not called Makefile, use a text editor to set<br />
the MAKEFILE_NAME variable to the name of your Sun Makefile in the<br />
/usr/sbin/ypinit script.<br />
4. If you have customized your HP Makefile, add those changes into<br />
your Sun Makefile.<br />
5. In the /usr/sbin/ypinit script on the HP host that will be the<br />
master server, add the netmasks.byaddr, bootparams,<br />
ethers.byaddr, <strong>and</strong> ethers.byname maps to the MASTER_MAPS<br />
variable.<br />
6. On one of your Sun systems, locate or create an /etc/ethers file, an<br />
/etc/bootparams file, <strong>and</strong> an /etc/netmasks file that contain all the<br />
Chapter 4 159
Configuring <strong>and</strong> <strong>Administering</strong> NIS<br />
Configuring <strong>and</strong> <strong>Administering</strong> an NIS Master Server<br />
information required by the Sun systems in your NIS domain.<br />
7. Copy the /etc/ethers, /etc/bootparams, <strong>and</strong> /etc/netmasks files<br />
to the HP host that will be the master server.<br />
8. Follow the instructions in “To Enable NIS Master Server Capability”<br />
on page 147.<br />
160<br />
Chapter 4
Configuring <strong>and</strong> <strong>Administering</strong> NIS<br />
Configuring <strong>and</strong> <strong>Administering</strong> an NIS Slave Server<br />
Configuring <strong>and</strong> <strong>Administering</strong> an NIS Slave<br />
Server<br />
An NIS slave server provides information to NIS clients, taking some<br />
load off the NIS master server <strong>and</strong> substituting for the master server<br />
when it is down. The NIS maps are created on the NIS master server <strong>and</strong><br />
then transferred from the master server to the slave servers. Changes to<br />
NIS maps must be made on the NIS master server, which then pushes<br />
the changed maps to the NIS slave servers.<br />
An NIS slave server must also be an NIS client.<br />
The NIS master server must be configured <strong>and</strong> running before you start<br />
your slave servers.<br />
This section explains how to perform the following tasks:<br />
• To Edit the Slave Server’s passwd File<br />
• To Edit the Slave Server’s group File<br />
• To Enable NIS Slave Server Capability<br />
• To Verify Your NIS Slave Server Configuration<br />
• To Schedule Regular Map Transfers from the NIS Master Server<br />
• To Restrict Access to the Slave Server<br />
Chapter 4 161
Configuring <strong>and</strong> <strong>Administering</strong> NIS<br />
Configuring <strong>and</strong> <strong>Administering</strong> an NIS Slave Server<br />
To Edit the Slave Server’s passwd File<br />
• Remove all users from the /etc/passwd file except the root user <strong>and</strong><br />
the system entries required for your system to boot. By convention,<br />
system entries usually have user IDs less than 100, so you can<br />
remove all entries with user IDs of 100 or greater.<br />
• The Name Service Switch configuration file provided for NIS<br />
(/etc/nsswitch.nis) causes your host to check its local<br />
/etc/passwd file <strong>and</strong> then continue to the NIS passwd map if the<br />
requested information is not in the local file. However, in previous<br />
releases, you had to add a plus sign (+) to the /etc/passwd file to<br />
cause your host to check the NIS passwd database.<br />
If you want your host to behave as it did before HP-UX release 10.30,<br />
add the following entry as the last line in the /etc/passwd file:<br />
+::-2:60001:::<br />
Also, make sure your /etc/nsswitch.conf file specifies compat as<br />
the name service for passwd. See “Configuring the Name Service<br />
Switch” on page 253.<br />
The plus sign (+) causes processes to consult NIS for any user<br />
information not found in the local /etc/passwd file.<br />
The -2 in the user ID field restricts the access of people who may<br />
attempt to log in using “+” as a valid user name when NIS is not<br />
running. Anyone who successfully logs in as “+” will be granted only<br />
the access permissions of user nobody.<br />
CAUTION<br />
Do not put an asterisk (*) in the password field on HP systems. On Sun<br />
systems, an asterisk in the password field prevents people from<br />
logging in as “+” when NIS is not running. However, on HP systems,<br />
the asterisk prevents all users from logging in when NIS is running.<br />
The changes you make to the /etc/passwd file on an NIS slave server<br />
are the same changes you make on an NIS client. Following is an<br />
example /etc/passwd file on an NIS slave server:<br />
root:0AnhFBmriKvHA:0:3::/:/bin/ksh<br />
daemon:*:1:5::/:/bin/sh<br />
bin:*:2:2::/bin:/bin/sh<br />
adm:*:4:4::/usr/adm:/bin/sh<br />
162<br />
Chapter 4
Configuring <strong>and</strong> <strong>Administering</strong> NIS<br />
Configuring <strong>and</strong> <strong>Administering</strong> an NIS Slave Server<br />
uucp:*:5:3::/usr/spool/uucppublic:/usr/lib/uucp/uucico<br />
lp:*:9:7::/usr/spool/lp:/bin/sh<br />
hpdb:*:27:1:ALLBASE:/:/bin/sh<br />
+::-2:60001:::<br />
For more information, type man 4 passwd at the HP-UX prompt.<br />
To Edit the Slave Server’s group File<br />
• Remove all groups from the /etc/group file except the group entries<br />
required for your system to boot.<br />
• The Name Service Switch configuration file provided for NIS<br />
(/etc/nsswitch.nis) causes your host to check its local /etc/group<br />
file <strong>and</strong> then continue to the NIS group map if the requested<br />
information is not in the local file. However, in previous releases, you<br />
had to add a plus sign (+) to the /etc/group file to cause your host to<br />
check the NIS group database.<br />
If you want your host to behave as it did before HP-UX release 10.30,<br />
add the following entry as the last line in the /etc/group file:<br />
+:*:*<br />
Also, make sure your /etc/nsswitch.conf file specifies compat as<br />
the name service for group. See “Configuring the Name Service<br />
Switch” on page 253.<br />
The plus sign (+) causes processes to consult NIS for any group<br />
information not found in the local /etc/group file. The asterisk (*) in<br />
the password field prevents people from using the plus sign as a valid<br />
group name if NIS is not running.<br />
The changes you make to the /etc/group file on an NIS slave server are<br />
the same changes you make on an NIS client. Following is an example<br />
/etc/group file on an NIS slave server:<br />
root::0:rootl,sam<br />
other::1:<br />
bin::2:<br />
sys::3:<br />
adm::4:<br />
daemon::5:<br />
mail::6:<br />
lp::7:<br />
+:*:*<br />
For more information, type man 4 group at the HP-UX prompt.<br />
Chapter 4 163
Configuring <strong>and</strong> <strong>Administering</strong> NIS<br />
Configuring <strong>and</strong> <strong>Administering</strong> an NIS Slave Server<br />
To Enable NIS Slave Server Capability<br />
1. Make sure the NIS master server is already configured <strong>and</strong> running<br />
NIS.<br />
2. Log in as root to the host that will be the slave server.<br />
3. On the host that will be the slave server, ensure that the $PATH<br />
environment variable includes the following directory paths:<br />
• /var/yp<br />
• /usr/lib/netsvc/yp<br />
• /usr/ccs/bin<br />
4. Issue the following comm<strong>and</strong> to set the NIS domain name:<br />
/usr/bin/domainname domainname<br />
where domainname is the same as the domain name on the NIS<br />
master server.<br />
5. In the /etc/rc.config.d/namesvrs file, set the NIS_DOMAIN<br />
variable to the domain name:<br />
NIS_DOMAIN=domainname<br />
6. In the /etc/rc.config.d/namesvrs file, set the NIS_SLAVE_SERVER<br />
<strong>and</strong> NIS_CLIENT variables to 1, as follows:<br />
NIS_SLAVE_SERVER=1<br />
NIS_CLIENT=1<br />
If the slave server is a master server in another NIS domain, set the<br />
NIS_MASTER_SERVER variable to 1 <strong>and</strong> the NIS_SLAVE_SERVER<br />
variable to 0. The yppasswdd daemon, which is required on the<br />
master server, is started only if NIS_MASTER_SERVER=1.<br />
If the slave server is an NIS+ server or client, set the<br />
NISPLUS_SERVER <strong>and</strong> NISPLUS_CLIENT variables to 0.<br />
7. Issue the following comm<strong>and</strong> to set up the NIS slave server <strong>and</strong> copy<br />
the NIS maps from the master server:<br />
/usr/sbin/ypinit -s NIS_server_name [DOM=domainname]<br />
The NIS_server_name is the name of the master server or a slave<br />
server that has a complete set of up-to-date maps for the domain. If<br />
the slave server will serve a domain different from the one set by the<br />
domainname comm<strong>and</strong>, specify the domainname after the<br />
164<br />
Chapter 4
Configuring <strong>and</strong> <strong>Administering</strong> NIS<br />
Configuring <strong>and</strong> <strong>Administering</strong> an NIS Slave Server<br />
NIS_server_name.<br />
8. Issue the following comm<strong>and</strong>s to run the NIS startup scripts:<br />
/sbin/init.d/nis.server start<br />
/sbin/init.d/nis.client start<br />
In order to receive map updates from the NIS master server, you must<br />
add the new slave server to the ypservers map on the master server. See<br />
“To Add a Slave Server to Your NIS Domain” on page 156.<br />
For more information, see the following man pages: domainname(1),<br />
ypinit(1M), <strong>and</strong> ypfiles(4).<br />
Chapter 4 165
Configuring <strong>and</strong> <strong>Administering</strong> NIS<br />
Configuring <strong>and</strong> <strong>Administering</strong> an NIS Slave Server<br />
To Verify Your NIS Slave Server Configuration<br />
1. Log in as root to the slave server.<br />
2. In the /etc/rc.config.d/namesvrs file, add -ypset to the<br />
YPBIND_OPTIONS variable:<br />
YPBIND_OPTIONS=”-ypset”<br />
3. Issue the following comm<strong>and</strong>s to restart ypbind (the NIS client<br />
process) on the slave server:<br />
/sbin/init.d/nis.client stop<br />
/sbin/init.d/nis.client start<br />
4. Issue the following comm<strong>and</strong> to force the NIS client process on the<br />
slave server to bind to the server process on the same host:<br />
/usr/sbin/ypset slave_server_name<br />
5. Issue the following comm<strong>and</strong> to check whether the NIS slave server is<br />
working:<br />
/usr/bin/ypwhich<br />
The ypwhich comm<strong>and</strong> should return the host name of the slave<br />
server. If the ypwhich comm<strong>and</strong> does not return the name of the slave<br />
server, see “Troubleshooting <strong>NFS</strong> <strong>Services</strong>” on page 273.<br />
6. In the /etc/rc.config.d/namesvrs file, remove -ypset from the<br />
YPBIND_OPTIONS variable:<br />
YPBIND_OPTIONS=””<br />
7. Issue the following comm<strong>and</strong>s to restart ypbind (the NIS client<br />
process) on the slave server:<br />
/sbin/init.d/nis.client stop<br />
/sbin/init.d/nis.client start<br />
For more information, see the following man pages: ypbind(1M),<br />
ypset(1M), <strong>and</strong> ypwhich(1).<br />
166<br />
Chapter 4
Configuring <strong>and</strong> <strong>Administering</strong> NIS<br />
Configuring <strong>and</strong> <strong>Administering</strong> an NIS Slave Server<br />
To Schedule Regular Map Transfers from the NIS<br />
Master Server<br />
1. Log in as root to the slave server.<br />
2. Copy the ypxfr_1perday, ypxfr_2perday, <strong>and</strong> ypxfr_1perhour<br />
scripts from the /usr/newconfig/var/yp directory to the /var/yp<br />
directory:<br />
cp /usr/newconfig/var/yp/ypxfr_1perday /var/yp<br />
cp /usr/newconfig/var/yp/ypxfr_2perday /var/yp<br />
cp /usr/newconfig/var/yp/ypxfr_1perhour /var/yp<br />
3. Create a crontab file that invokes these files at regular times.<br />
Following is an example crontab file:<br />
0 21 * * * /var/yp/ypxfr_1perday<br />
30 5,19 * * * /var/yp/ypxfr_2perday<br />
15 * * * * /var/yp/ypxfr_1perhour<br />
This file runs the ypxfr_1perday script at 9:00 PM every night. It<br />
runs the ypxfr_2perday script at 5:30 AM <strong>and</strong> 7:30 PM every day. It<br />
runs the ypxfr_1perhour at 15 minutes past every hour.<br />
4. Issue the following comm<strong>and</strong> to enter the file into crontab,<br />
crontab filename<br />
where filename is the crontab file you just created.<br />
If you have created customized NIS maps for your domain, you will have<br />
to add them to the appropriate scripts. You can also use the scripts<br />
provided as templates for creating your own scripts.<br />
In some domains, transferring the passwd maps once per hour generates<br />
too much network traffic. If you find this is the case, schedule transfers of<br />
the passwd maps for less frequent intervals.<br />
If you have multiple slave servers, schedule map transfers for different<br />
times on different servers, so all the servers are not performing transfers<br />
at the same time.<br />
For more information, see the following man pages: cron(1M),<br />
crontab(1), <strong>and</strong> ypxfr(1M).<br />
Chapter 4 167
Configuring <strong>and</strong> <strong>Administering</strong> NIS<br />
Configuring <strong>and</strong> <strong>Administering</strong> an NIS Slave Server<br />
To Restrict Access to the Slave Server<br />
1. On the NIS slave server, create a file called /var/yp/securenets, if<br />
it does not already exist.<br />
2. Add lines to the file with the following syntax:<br />
address_mask IP_address<br />
The IP_address is the internet address of an NIS client, NIS slave<br />
server, or subnet that may request NIS information or transfer NIS<br />
maps from the NIS master server.<br />
The address_mask indicates which bits in the IP_address field are<br />
important. If a bit is set in the address_mask field, the corresponding<br />
bit in the source address of any incoming NIS requests must match<br />
the same bit in the IP_address field.<br />
3. Issue the following comm<strong>and</strong>s to kill <strong>and</strong> restart the ypserv process:<br />
/sbin/init.d/nis.server stop<br />
/sbin/init.d/nis.server start<br />
If a client or slave host has multiple network interface cards, add a line<br />
to the securenets file for the IP address of each card.<br />
Type man 4 securenets at the HP-UX prompt for more information.<br />
Examples from /var/yp/securenets<br />
The following line from a /var/yp/securenets file allows only the NIS<br />
client at IP address 10.11.12.13 to request information from the NIS<br />
slave server. Because every bit is set in the address mask, the source IP<br />
address on the NIS request must match exactly, or the slave server will<br />
not return the requested information.<br />
255.255.255.255 10.11.12.13<br />
The following line from a /var/yp/securenets file allows any host on<br />
the network 10.11.12.0 to request NIS information or transfer NIS maps<br />
from the slave server. The last 8 bits of the IP address are ignored,<br />
because the last 8 bits of the address mask are set to 0. Any host whose<br />
IP address begins 10.11.12 will be allowed access to the slave server.<br />
255.255.255.0 10.11.12.13<br />
168<br />
Chapter 4
Configuring <strong>and</strong> <strong>Administering</strong> NIS<br />
Configuring <strong>and</strong> <strong>Administering</strong> an NIS Client<br />
Configuring <strong>and</strong> <strong>Administering</strong> an NIS Client<br />
An NIS client gets its configuration information from an NIS master<br />
server or an NIS slave server. When an NIS client is started, it sends out<br />
a broadcast message requesting a server. Any server on the client’s<br />
network that holds the NIS maps for the client’s domain may respond to<br />
the message. The NIS client “binds” to the first server to respond to its<br />
broadcast message, <strong>and</strong> that server answers all the client’s queries for<br />
information.<br />
This section explains how to perform the following tasks. Only the first<br />
five tasks are necessary for getting your NIS client up <strong>and</strong> running.<br />
• To Edit the NIS Client’s passwd File<br />
• To Edit the NIS Client’s group File<br />
• To Enable NIS Client Capability<br />
• To Verify Your NIS Client Configuration<br />
• To Tell Users How to Use yppasswd<br />
• To Prevent a Client from Binding to Unknown Servers<br />
• To Bind an NIS Client to a Server on a Different Subnet<br />
Chapter 4 169
Configuring <strong>and</strong> <strong>Administering</strong> NIS<br />
Configuring <strong>and</strong> <strong>Administering</strong> an NIS Client<br />
To Edit the NIS Client’s passwd File<br />
• Remove all users from the /etc/passwd file except the root user <strong>and</strong><br />
the system entries required for your system to boot. By convention,<br />
system entries usually have user IDs less than 100, so you can<br />
remove all entries with user IDs of 100 or greater.<br />
• The Name Service Switch configuration file provided for NIS<br />
(/etc/nsswitch.nis) causes your host to check its local<br />
/etc/passwd file <strong>and</strong> then continue to the NIS passwd map if the<br />
requested information is not in the local file. However, in previous<br />
releases, you had to add a plus sign (+) to the /etc/passwd file to<br />
cause your host to check the NIS passwd database.<br />
If you want your host to behave as it did before HP-UX release 10.30,<br />
add the following entry as the last line in the /etc/passwd file:<br />
+::-2:60001:::<br />
Also, make sure your /etc/nsswitch.conf file specifies compat as<br />
the name service for passwd. See “Configuring the Name Service<br />
Switch” on page 253.<br />
The plus sign (+) causes processes to consult NIS for any user<br />
information not found in the local /etc/passwd file.<br />
The -2 in the user ID field restricts the access of people who may<br />
attempt to log in using “+” as a valid user name when NIS is not<br />
running. Anyone who successfully logs in as “+” will be granted only<br />
the access permissions of user nobody.<br />
CAUTION<br />
Do not put an asterisk (*) in the password field on HP systems. On Sun<br />
systems, an asterisk in the password field prevents people from<br />
logging in as “+” when NIS is not running. However, on HP systems,<br />
the asterisk prevents all users from logging in when NIS is running.<br />
The changes you make to the /etc/passwd file on an NIS client are the<br />
same changes you make on an NIS slave server. Following is an example<br />
/etc/passwd file on an NIS client:<br />
root:0AnhFBmriKvHA:0:3: :/:/bin/ksh<br />
daemon:*:1:5::/:/bin/sh<br />
bin:*:2:2::/bin:/bin/sh<br />
adm:*:4:4::/usr/adm:/bin/sh<br />
170<br />
Chapter 4
Configuring <strong>and</strong> <strong>Administering</strong> NIS<br />
Configuring <strong>and</strong> <strong>Administering</strong> an NIS Client<br />
uucp:*:5:3::/usr/spool/uucppublic:/usr/lib/uucp/uucico<br />
lp:*:9:7::/usr/spool/lp:/bin/sh<br />
hpdb:*:27:1:ALLBASE:/:/bin/sh<br />
+::-2:60001:::<br />
For more information, type man 4 passwd at the HP-UX prompt.<br />
To Edit the NIS Client’s group File<br />
• Remove all groups from the /etc/group file except the group entries<br />
required for your system to boot.<br />
• The Name Service Switch configuration file provided for NIS<br />
(/etc/nsswitch.nis) causes your host to check its local /etc/group<br />
file <strong>and</strong> then continue to the NIS group map if the requested<br />
information is not in the local file. However, in previous releases, you<br />
had to add a plus sign (+) to the /etc/group file to cause your host to<br />
check the NIS group database.<br />
If you want your host to behave as it did before HP-UX release 10.30,<br />
add the following entry as the last line in the /etc/group file:<br />
+:*:*<br />
Also, make sure your /etc/nsswitch.conf file specifies compat as<br />
the name service for group. See “Configuring the Name Service<br />
Switch” on page 253.<br />
The plus sign (+) causes processes to consult NIS for any group<br />
information not found in the local /etc/group file. The asterisk (*) in<br />
the password field prevents people from using the plus sign as a valid<br />
group name if NIS is not running.<br />
The changes you make to the /etc/group file on an NIS client are the<br />
same changes you make on an NIS slave server. Following is an example<br />
/etc/group file on an NIS client:<br />
root::0:rootl,sam<br />
other::1:<br />
bin::2:<br />
sys::3:<br />
adm::4:<br />
daemon::5:<br />
mail::6:<br />
lp::7:<br />
+:*:*<br />
For more information, type man 4 group at the HP-UX prompt.<br />
Chapter 4 171
Configuring <strong>and</strong> <strong>Administering</strong> NIS<br />
Configuring <strong>and</strong> <strong>Administering</strong> an NIS Client<br />
To Enable NIS Client Capability<br />
1. Make sure at least one NIS master or slave server is running on the<br />
client’s subnetwork.<br />
2. Log in as root to the NIS client.<br />
3. On the NIS client, ensure that the $PATH environment variable<br />
includes the following directory paths:<br />
• /var/yp<br />
• /usr/lib/netsvc/yp<br />
• /usr/ccs/bin<br />
4. Issue the following comm<strong>and</strong> to set the NIS domain name:<br />
/usr/bin/domainname domainname<br />
where domainname is a domain served by an NIS server on the client’s<br />
subnetwork.<br />
5. In the /etc/rc.config.d/namesvrs file, set the NIS_DOMAIN<br />
variable to the domain name:<br />
NIS_DOMAIN=domainname<br />
6. In the /etc/rc.config.d/namesvrs file, set the NIS_CLIENT<br />
variable to 1, as follows:<br />
NIS_CLIENT=1<br />
If the host was previously an NIS+ client, set the NISPLUS_CLIENT<br />
variable to 0.<br />
7. Copy the /etc/nsswitch.nis file to /etc/nsswitch.conf:<br />
cp /etc/nsswitch.nis /etc/nsswitch.conf<br />
If you have plus <strong>and</strong> minus signs in your /etc/passwd or /etc/group<br />
files, they will be ignored. If you want your host to use the plus <strong>and</strong><br />
minus signs in your files as signals to consult NIS, modify the passwd<br />
<strong>and</strong> group lines in /etc/nsswitch.conf to specify compat, as<br />
follows:<br />
passwd: compat<br />
group: compat<br />
8. Reboot the client host to ensure that long-running processes read the<br />
new /etc/nsswitch.conf file. Rebooting the client will also cause<br />
the NIS client startup script to execute, because the NIS_CLIENT<br />
172<br />
Chapter 4
Configuring <strong>and</strong> <strong>Administering</strong> NIS<br />
Configuring <strong>and</strong> <strong>Administering</strong> an NIS Client<br />
variable is set to 1.<br />
To start the NIS client processes without rebooting the host, issue the<br />
following comm<strong>and</strong> to run the NIS startup script:<br />
/sbin/init.d/nis.client start<br />
For more information, see the following man pages: domainname(1),<br />
ypbind(1M), <strong>and</strong> nsswitch.conf(4).<br />
Chapter 4 173
Configuring <strong>and</strong> <strong>Administering</strong> NIS<br />
Configuring <strong>and</strong> <strong>Administering</strong> an NIS Client<br />
To Verify Your NIS Client Configuration<br />
• Log into the NIS client <strong>and</strong> issue the following comm<strong>and</strong>:<br />
/usr/bin/ypwhich -m<br />
The ypwhich -m comm<strong>and</strong> lists all the NIS maps available to the client<br />
<strong>and</strong> gives the name of the master server that serves each map. Your<br />
display should look something like this, where mastername is the name<br />
of the master server for your domain:<br />
# /usr/bin/ypwhich -m<br />
vhe_list mastername<br />
servi.bynp mastername<br />
services.byname mastername<br />
rpc.byname mastername<br />
protocols.bynumber mastername<br />
protocols.byname mastername<br />
rpc.bynumber mastername<br />
passwd.byuid mastername<br />
passwd.byname mastername<br />
networks.byname mastername<br />
networks.byaddr mastername<br />
netgroup.byuser mastername<br />
netgroup.byhost mastername<br />
netgroup mastername<br />
hosts.byname mastername<br />
hosts.byaddr mastername<br />
group.byname mastername<br />
group.bygid mastername<br />
publickey.byname mastername<br />
netid.byname mastername<br />
mail.byaddr mastername<br />
mail.aliases mastername<br />
auto.master mastername<br />
ypservers mastername<br />
If you do not see a similar display, see “Troubleshooting <strong>NFS</strong> <strong>Services</strong>” on<br />
page 273. Type man 1 ypwhich for more information on the ypwhich<br />
comm<strong>and</strong>.<br />
174<br />
Chapter 4
Configuring <strong>and</strong> <strong>Administering</strong> NIS<br />
Configuring <strong>and</strong> <strong>Administering</strong> an NIS Client<br />
To Tell Users How to Use yppasswd<br />
• Tell all the users in your NIS domain that they must use<br />
/usr/bin/yppasswd or passwd -r nis instead of the passwd<br />
comm<strong>and</strong> when they want to change their login passwords.<br />
• Tell users that, when they want to change their login passwords, they<br />
should do so just before they leave for the day. This will allow time for<br />
the updated NIS maps on the master server to be pushed to the slave<br />
servers.<br />
The yppasswd comm<strong>and</strong> is a link to the passwd -r nis comm<strong>and</strong>. It<br />
changes the /etc/passwd file on the NIS master server, regenerates the<br />
NIS passwd maps from the updated /etc/passwd file, <strong>and</strong> then pushes<br />
the NIS passwd maps to the slave servers.<br />
For more information, see the following man pages: yppasswd(1),<br />
yppasswdd(1M), passwd(1), ypxfr(1M), <strong>and</strong> yppush(1M).<br />
Chapter 4 175
Configuring <strong>and</strong> <strong>Administering</strong> NIS<br />
Configuring <strong>and</strong> <strong>Administering</strong> an NIS Client<br />
To Prevent a Client from Binding to Unknown Servers<br />
1. On the NIS client, create a file called /var/yp/secureservers, if it<br />
does not already exist.<br />
2. Add lines to the file with the following syntax:<br />
address_mask IP_address<br />
The IP_address is the internet address of an NIS server or the<br />
subnet of an NIS server from which the client will accept NIS<br />
information.<br />
The address_mask indicates which bits in the IP_address field are<br />
important. If a bit is set in the address_mask field, the corresponding<br />
bit in the address of any NIS server must match the same bit in the<br />
IP_address field.<br />
3. Issue the following comm<strong>and</strong>s to kill <strong>and</strong> restart the ypbind process:<br />
/sbin/init.d/nis.client stop<br />
/sbin/init.d/nis.client start<br />
If an NIS server host has multiple network interface cards, add a line to<br />
the secureservers file for the IP address of each card.<br />
If you start ypbind with the -ypset option <strong>and</strong> issue the ypset<br />
comm<strong>and</strong> to bind to a specific server, the /var/yp/secureservers file is<br />
ignored, <strong>and</strong> the client may bind to any server.<br />
Type man 1M ypbind at the HP-UX prompt for more information.<br />
Examples from /var/yp/secureservers<br />
The following line from a /var/yp/secureservers file allows the NIS<br />
client to bind only to the server at IP address 20.21.22.23. Because every<br />
bit is set in the address mask, the IP address of the NIS server must<br />
match the IP_address field exactly, or the client will not bind to it.<br />
255.255.255.255 20.21.22.23<br />
The following line from a /var/yp/secureservers file allows the client<br />
to bind to any NIS server on the network 20.21.22.0. The last 8 bits of the<br />
server’s IP address are ignored, because the last 8 bits of the address<br />
mask are set to 0. The client may bind to any server whose IP address<br />
begins 20.21.22.<br />
255.255.255.0 20.21.22.23<br />
176<br />
Chapter 4
Configuring <strong>and</strong> <strong>Administering</strong> NIS<br />
Configuring <strong>and</strong> <strong>Administering</strong> an NIS Client<br />
To Bind an NIS Client to a Server on a Different<br />
Subnet<br />
Hewlett-Packard recommends that you configure a server on each subnet<br />
where you have NIS clients; however, if you cannot do that, follow these<br />
steps to force an NIS client to bind to a server on a different subnet:<br />
1. Log in as root to the NIS client.<br />
2. Add the -ypset option to the YPBIND_OPTIONS variable in the<br />
/etc/rc.config.d/namesvrs file, as follows:<br />
YPBIND_OPTIONS=”-ypset”<br />
3. In the /etc/rc.config.d/namesvrs file, set the YPSET_ADDR<br />
variable to the IP address of an NIS server, as in the following<br />
example:<br />
YPSET_ADDR=”15.13.115.168”<br />
4. Issue the following comm<strong>and</strong>s to restart the NIS client:<br />
/sbin/init.d/nis.client stop<br />
/sbin/init.d/nis.client start<br />
If the server you specify in the ypset comm<strong>and</strong> is unavailable when your<br />
client boots up, your client will broadcast a request for a server to its<br />
local network. If no server exists on the local network, the client will<br />
hang.<br />
For more information, type man 1M ypset or man 1M ypbind.<br />
Chapter 4 177
Configuring <strong>and</strong> <strong>Administering</strong> NIS<br />
Configuring <strong>and</strong> <strong>Administering</strong> Secure RPC (if NIS+ is not used)<br />
Configuring <strong>and</strong> <strong>Administering</strong> Secure RPC<br />
(if NIS+ is not used)<br />
Configuring secure RPC allows you to write applications that use secure<br />
RPC. You must be running NIS in order to use secure RPC.<br />
If you are using NIS+, your secure RPC credentials are created <strong>and</strong><br />
updated when you configure <strong>and</strong> administer your NIS+ domain. Follow<br />
the procedures in this section only if you are using NIS <strong>and</strong> not NIS+.<br />
NOTE<br />
Secure <strong>NFS</strong>, the ability to export <strong>and</strong> mount directories with the secure<br />
option, is not supported on HP-UX.<br />
Configuring <strong>and</strong> administering secure RPC involves the following tasks:<br />
• To Have Users Create their Secure RPC Keys<br />
or<br />
To Create Secure RPC Keys for Users<br />
• To Create Secure RPC Keys for Hosts<br />
• To Tell Users How to Use Secure RPC<br />
178<br />
Chapter 4
Configuring <strong>and</strong> <strong>Administering</strong> NIS<br />
Configuring <strong>and</strong> <strong>Administering</strong> Secure RPC (if NIS+ is not used)<br />
To Have Users Create their Secure RPC Keys<br />
1. In the /etc/publickey file on the NIS master server, make sure the<br />
entry for user nobody exists <strong>and</strong> is not commented out (is not<br />
preceded by #).<br />
2. Tell each user in your NIS domain to issue the chkey comm<strong>and</strong>:<br />
/usr/bin/chkey<br />
At the Password prompt, the user should enter his or her login<br />
password.<br />
The chkey comm<strong>and</strong> displays a message saying it is generating a key for<br />
unix.UID@NIS_domain. This string identifies the user in the<br />
publickey.byname NIS map. UID is the user ID of the user for whom the<br />
key is being generated, <strong>and</strong> NIS_domain is the default NIS domain,<br />
returned by the domainname comm<strong>and</strong>.<br />
The secure RPC key is encrypted with the user’s login password. The<br />
/usr/bin/yppasswd comm<strong>and</strong> reencrypts the secure RPC key with the<br />
new password whenever a user changes the login password.<br />
In order for users to create keys for themselves with the chkey<br />
comm<strong>and</strong>, the publickey.byname map must have an entry for user<br />
nobody. If you remove the entry for user nobody, users can change their<br />
secure RPC keys with the chkey comm<strong>and</strong>, but they cannot create keys if<br />
they do not already have them.<br />
For more information, see the following man pages: publickey(4),<br />
chkey(1), <strong>and</strong> yppasswd(1).<br />
Chapter 4 179
Configuring <strong>and</strong> <strong>Administering</strong> NIS<br />
Configuring <strong>and</strong> <strong>Administering</strong> Secure RPC (if NIS+ is not used)<br />
To Create Secure RPC Keys for Users<br />
Use this procedure if you do not want users to be able to create their own<br />
secure RPC keys.<br />
1. Log in as root to the NIS master server.<br />
2. Comment out the entry in the /etc/publickey file for user nobody.<br />
(Insert a sharp sign [#] as the first character on the line.)<br />
3. Issue the following comm<strong>and</strong>s to regenerate the publickey.byname<br />
map from the /etc/publickey file <strong>and</strong> push it to the slave servers:<br />
cd /var/yp<br />
/usr/ccs/bin/make publickey<br />
4. Issue the newkey -u comm<strong>and</strong> for each user in your NIS domain:<br />
# /usr/sbin/newkey -u username<br />
Enter a password when prompted for it by the newkey -u comm<strong>and</strong>.<br />
5. Tell users the passwords you assigned for them. Users should issue<br />
the /usr/bin/keylogin comm<strong>and</strong>, using the passwords you<br />
assigned. Then, they should issue the /usr/bin/yppasswd comm<strong>and</strong><br />
to change their login passwords. The yppasswd comm<strong>and</strong> will<br />
reencrypt their secure RPC keys with their new login passwords.<br />
The newkey -u comm<strong>and</strong> displays a message saying it is adding a key for<br />
unix.UID@NIS_domain. This string identifies the user in the<br />
publickey.byname NIS map. UID is the user ID of the user for whom the<br />
key is being generated, <strong>and</strong> NIS_domain is the default NIS domain,<br />
returned by the domainname comm<strong>and</strong>.<br />
For more information, see the following man pages: publickey(4),<br />
newkey(1M), chkey(1), keylogin(1), yppasswd(1), make(1), ypmake(1M),<br />
<strong>and</strong> yppush(1M).<br />
180<br />
Chapter 4
Configuring <strong>and</strong> <strong>Administering</strong> NIS<br />
Configuring <strong>and</strong> <strong>Administering</strong> Secure RPC (if NIS+ is not used)<br />
To Create Secure RPC Keys for Hosts<br />
1. Log in as root to the NIS master server.<br />
2. Issue the newkey -h comm<strong>and</strong> for each host in your NIS domain:<br />
# /usr/sbin/newkey -h hostname<br />
3. Enter the root password for hostname when prompted for it by the<br />
newkey -h comm<strong>and</strong>.<br />
4. On each host for which you have just created a secure RPC key, log in<br />
as root. This registers the secure RPC password with the<br />
/usr/sbin/keyserv daemon.<br />
The newkey -h comm<strong>and</strong> displays a message saying it is adding a key for<br />
unix.hostname@NIS_domain. This string identifies the host in the<br />
publickey.byname NIS map.<br />
Whenever you change the root password with the passwd comm<strong>and</strong>, the<br />
passwd comm<strong>and</strong> automatically reencrypts the secure RPC key with the<br />
new root password.<br />
For more information, see the following man pages: newkey(1M),<br />
publickey(4), passwd(1), <strong>and</strong> keyserv(1M).<br />
Chapter 4 181
Configuring <strong>and</strong> <strong>Administering</strong> NIS<br />
Configuring <strong>and</strong> <strong>Administering</strong> Secure RPC (if NIS+ is not used)<br />
To Tell Users How to Use Secure RPC<br />
Tell the users who require secure RPC authorization to follow these<br />
guidelines:<br />
• If you allow users to create their own secure RPC keys with the chkey<br />
comm<strong>and</strong>, they should enter their login passwords at the Password<br />
prompt.<br />
• If you use the newkey -u comm<strong>and</strong> to add users to the publickey<br />
database, users should issue the /usr/bin/keylogin comm<strong>and</strong> using<br />
the password you assigned. Then, they should issue the<br />
/usr/bin/yppasswd comm<strong>and</strong> to change their login passwords. The<br />
yppasswd comm<strong>and</strong> will automatically reencrypt their secure RPC<br />
keys with their new passwords.<br />
• When users log into a host without supplying a password (for<br />
example, when they use rlogin to log into a host that has their local<br />
host configured in /etc/hosts.equiv), they should issue the<br />
/usr/bin/keylogin comm<strong>and</strong> after logging in, to register the secure<br />
RPC password with the /usr/sbin/keyserv daemon.<br />
For more information, see the following man pages: publickey(4),<br />
newkey(1M), chkey(1), keylogin(1), yppasswd(1), rlogin(1).<br />
182<br />
Chapter 4
Configuring <strong>and</strong> <strong>Administering</strong> NIS<br />
Summary of NIS Comm<strong>and</strong>s<br />
Table 4-1<br />
chkey(1)<br />
domainname(1)<br />
keylogin(1)<br />
keylogout(1)<br />
makedbm(1M)<br />
newkey(1M)<br />
ypcat(1)<br />
ypinit(1M)<br />
ypmake(1M)<br />
ypmatch(1)<br />
yppasswd(1)<br />
yppoll(1M)<br />
yppush(1M)<br />
ypset(1M)<br />
ypwhich(1)<br />
Summary of NIS Comm<strong>and</strong>s<br />
Summary of NIS Comm<strong>and</strong>s<br />
Creates or changes a secure RPC key.<br />
Sets or displays the name of the NIS domain.<br />
Decrypts <strong>and</strong> stores a secure RPC key. keylogin is called when a user<br />
logs in, but the user must issue keylogin if no password was provided<br />
at login or if a password other than the login password was used to<br />
encrypt the secure RPC key.<br />
Deletes a stored decrypted secure RPC key.<br />
Generates an NIS map from an ASCII input file.<br />
Creates a secure RPC key for a user or host.<br />
Prints all the values in an NIS map.<br />
Sets up an NIS master server or slave server.<br />
Generates one or more NIS maps from ASCII files <strong>and</strong> optionally<br />
pushes them to NIS slave servers. /var/yp/Makefile <strong>and</strong> make(1) do<br />
the same thing.<br />
Prints the values associated with one or more selected keys in an NIS<br />
map.<br />
Changes a login password stored in the NIS passwd map.<br />
Returns the name of the master server for an NIS map <strong>and</strong> the time<br />
when the map was built.<br />
Forces NIS slave servers to transfer one or more NIS maps from the<br />
master server. Slave servers use ypxfr to transfer the maps. ypmake<br />
calls yppush unless it is invoked with NOPUSH=1.<br />
Tells an NIS client process (ypbind[1M]) to bind to a specified NIS<br />
server. ypset can be used only if ypbind is invoked with the -ypset<br />
option.<br />
Returns the name of the NIS server for the local client or the name of<br />
the NIS master server for one or more NIS maps.<br />
Chapter 4 183
Configuring <strong>and</strong> <strong>Administering</strong> NIS<br />
Summary of NIS Comm<strong>and</strong>s<br />
Table 4-1<br />
ypxfr(1M)<br />
Summary of NIS Comm<strong>and</strong>s<br />
Transfers one or more NIS maps from a master server to the local<br />
slave server. A slave server calls ypxfr when yppush is executed on<br />
the master server.<br />
184<br />
Chapter 4
5 Configuring <strong>and</strong> <strong>Administering</strong><br />
NIS+<br />
The Network Information Service Plus (NIS+), is the next generation of<br />
the Network Information Service (NIS). It is not an enhancement to NIS;<br />
Chapter 5 185
Configuring <strong>and</strong> <strong>Administering</strong> NIS+<br />
it is a whole new service. Like NIS, it is a distributed database system<br />
that allows you to maintain commonly used configuration information on<br />
a master server <strong>and</strong> propagate the information to all the hosts in your<br />
network. This chapter explains how to configure <strong>and</strong> administer the<br />
servers <strong>and</strong> clients in an NIS+ namespace. It contains the following<br />
sections:<br />
• Overview of NIS+<br />
• Planning the NIS+ Namespace<br />
• Setting Up the NIS+ Namespace<br />
• <strong>Administering</strong> NIS+<br />
• Summary of NIS+ Comm<strong>and</strong>s<br />
You cannot use SAM to configure NIS+. However, you can use SAM to<br />
update NIS+ tables <strong>and</strong> to configure NIS+ groups.<br />
For more information on NIS+, type man 1 nis at the HP-UX prompt, or<br />
see All About <strong>Administering</strong> NIS+, by Rick Ramsey, published by<br />
SunSoft Press, ISBN 0-13-309576-2.<br />
186<br />
Chapter 5
Configuring <strong>and</strong> <strong>Administering</strong> NIS+<br />
Overview of NIS+<br />
Overview of NIS+<br />
NIS+ allows you to maintain configuration information for many hosts in<br />
a set of distributed databases. You can read or modify these databases<br />
from any host in the network, if you have the proper credentials <strong>and</strong><br />
access permissions. Common configuration information, which would<br />
have to be maintained separately on each host in a network without<br />
NIS+, can be stored <strong>and</strong> maintained in a single location <strong>and</strong> propagated<br />
to all of the hosts in the network.<br />
Advantages of NIS+ over NIS<br />
NIS+ has the following advantages over NIS:<br />
• NIS+ supports a hierarchical domain structure called the NIS+<br />
namespace. You can create a separate domain for each workgroup or<br />
department in your organization. Each domain can be managed<br />
independently of the others. Hosts in any domain may have access to<br />
information in all the other domains in the namespace.<br />
• The NIS+ namespace can grow with your organization. Because<br />
information may be distributed over multiple domains, each with its<br />
own servers, the size of the NIS+ namespace is not limited by the<br />
capacity of any single server.<br />
• NIS+ is not limited by subnet boundaries. NIS+ clients do not<br />
broadcast requests, so you do not need a server on every subnet.<br />
• NIS+ is secure. It uses a private key/public key authentication<br />
scheme with DES encryption. Every user <strong>and</strong> host in the namespace<br />
has its own unique credentials, <strong>and</strong> you can decide which users <strong>and</strong><br />
hosts will be allowed to read or modify the information in each NIS+<br />
domain.<br />
• You can modify the information in an NIS+ table from any host in the<br />
namespace. Modifications are made directly to the NIS+ table, so you<br />
do not have to rebuild the table from a file.<br />
• Replica servers in NIS+ domains receive each table update as it is<br />
made. You do not have to push whole tables to the replica servers.<br />
• An NIS+ table may contain many columns, <strong>and</strong> you can search for<br />
entries based on the information in any column.<br />
Chapter 5 187
Configuring <strong>and</strong> <strong>Administering</strong> NIS+<br />
Overview of NIS+<br />
Disadvantages of NIS+<br />
NIS+ has the following disadvantages:<br />
• NIS+ is difficult to administer. It requires dedicated system<br />
administrators trained in NIS+ administration. NIS+ administration<br />
is very different from NIS administration.<br />
• The NIS+ databases are not automatically backed up to flat files. The<br />
system administrator must create <strong>and</strong> maintain a backup strategy for<br />
NIS+ databases, which includes dumping them to flat files <strong>and</strong><br />
backing up the files.<br />
188<br />
Chapter 5
Configuring <strong>and</strong> <strong>Administering</strong> NIS+<br />
Overview of NIS+<br />
Structure of the NIS+ Namespace<br />
An NIS+ namespace may be “flat,” consisting of a single domain, or it<br />
may be hierarchical, like the DNS domain structure. Every namespace<br />
has exactly one root domain. All other domains are subdomains of the<br />
root domain. Figure 5-1 shows a sample hierarchical NIS+ namespace.<br />
The master server of the root domain is the root master server. Master<br />
servers of subdomains are called non-root master servers. NIS+<br />
backup servers are called replica servers. Replica servers are the NIS+<br />
equivalent of slave servers in an NIS domain. The replica servers of the<br />
root domain are called root replica servers, <strong>and</strong> the replica servers of<br />
the non-root domains are called non-root replica servers. A server<br />
may serve more than one domain, but it is not recommended.<br />
All NIS+ servers must also be NIS+ clients. The root master <strong>and</strong> root<br />
replica servers are clients of the root domain. However, a non-root server<br />
serves a subdomain of the domain in which it is a client. The domain in<br />
which it is a client is the parent domain of the domain it serves.<br />
Figure 5-1<br />
Sample NIS+ Namespace<br />
Wiz.Com domain (root domain)<br />
client<br />
root master server<br />
client<br />
root replica server<br />
client<br />
client<br />
client<br />
client<br />
master server<br />
replica server<br />
master server<br />
replica server<br />
client client client client<br />
Sales.Wiz.Com domain (subdomain)<br />
Eng.Wiz.Com domain (subdomain)<br />
Chapter 5 189
Configuring <strong>and</strong> <strong>Administering</strong> NIS+<br />
Overview of NIS+<br />
Structure of an NIS+ Domain<br />
An NIS+ domain is an NIS+ directory whose name is the domain name.<br />
An NIS+ directory is not an HP-UX directory. You must use the nisls(1)<br />
comm<strong>and</strong> to see the directory structure of an NIS+ domain. Figure 5-2<br />
shows the NIS+ directory structure of the Wiz.Com.<strong>and</strong> Eng.Wiz.Com.<br />
domains.<br />
Each NIS+ domain contains two NIS+ subdirectories, called groups_dir<br />
<strong>and</strong> org_dir. The groups_dir subdirectory contains NIS+ groups, which<br />
are like HP-UX groups except they are used only to determine access to<br />
NIS+ objects. The org_dir subdirectory contains all the st<strong>and</strong>ard NIS+<br />
tables. Any other NIS+ directories are subdomains. In the example in<br />
Figure 5-2, Eng.Wiz.Com. is a subdomain.<br />
Figure 5-2<br />
NIS+ <strong>Directory</strong> Structure of the “Wiz.Com.” <strong>and</strong> “Eng.Wiz.Com.”<br />
Domains<br />
Wiz.Com.<br />
groups_dir org_dir Eng.Wiz.Com.<br />
admin<br />
Hosts<br />
Passwd<br />
groups_dir<br />
org_dir<br />
Group<br />
admin<br />
Hosts<br />
Passwd<br />
Group<br />
. . .<br />
. . .<br />
The full name of an NIS+ object includes the names of all the NIS+<br />
directories in its directory path. For example, the full name of the hosts<br />
table in the Wiz.Com. domain is hosts.org_dir.Wiz.Com. To specify an<br />
entry in this table, you need to specify enough column values to uniquely<br />
identify it. For example, to identify a host whose canonical name in the<br />
cname column is romney, you would specify<br />
[cname=romney],hosts.org_dir.Wiz.Com. If the default domain on<br />
the local host is Wiz.Com., you can leave off the domain name <strong>and</strong> type<br />
just hosts.org_dir or [cname=romney],hosts.org_dir. Domain<br />
190<br />
Chapter 5
Configuring <strong>and</strong> <strong>Administering</strong> NIS+<br />
Overview of NIS+<br />
names always end in a period, except when you are setting the default<br />
domain with the domainname comm<strong>and</strong>.<br />
How NIS+ Information is Stored <strong>and</strong> Propagated<br />
NIS+ information is stored in the /var/nis directory. On a server, the<br />
/var/nis/data subdirectory, or the /var/nis/hostname subdirectory<br />
(where hostname is the name of the local host), contains the NIS+<br />
directories <strong>and</strong> tables that make up the domain.<br />
You can make changes to the NIS+ objects from any NIS+ client in the<br />
namespace, if you are authenticated <strong>and</strong> have the proper access<br />
permissions. Whenever anyone makes a change to an NIS+ object, the<br />
change is sent to all the replica servers. NIS+ sends only the changes to<br />
replica servers, not whole tables. A transaction log in the /var/nis<br />
directory on each server keeps track of all the changes that have been<br />
made. To keep the transaction log from growing too large, you must<br />
checkpoint the domain regularly. When you checkpoint the domain<br />
(with the nisping[1M] comm<strong>and</strong>), the changes in the transaction log on<br />
all the servers are incorporated into the tables on disk, <strong>and</strong> the<br />
transaction log is cleared.<br />
An NIS+ client may get information from any domain in the namespace,<br />
if it is authenticated <strong>and</strong> has the proper access permissions. Each NIS+<br />
client has a file called NIS_COLD_START in the /var/nis directory, which<br />
contains the internet addresses of servers the client can contact for NIS+<br />
information. Because all servers are also clients, every server has a cold<br />
start file, too. An NIS+ client does not “bind” to a server the way an NIS<br />
client does. It contacts a server directly to request information. If a client<br />
requests information about a domain from a server that does not serve<br />
the domain, the server tells the client how to find a server that serves the<br />
domain. As the client learns about other servers, it adds the information<br />
to a cache file called NIS_SHARED_DIRCACHE in the /var/nis directory,<br />
<strong>and</strong> it uses the information to find servers later.<br />
NIS+ Tables<br />
By default, an NIS+ domain that you set up with the st<strong>and</strong>ard scripts<br />
contains the NIS+ tables listed in Table 5-1. Table 5-1 also gives the<br />
configuration files <strong>and</strong> the NIS maps that are equivalent to the NIS+<br />
Chapter 5 191
Configuring <strong>and</strong> <strong>Administering</strong> NIS+<br />
Overview of NIS+<br />
Table 5-1<br />
tables.<br />
St<strong>and</strong>ard NIS+ Tables<br />
NIS+ Table<br />
Equivalent File<br />
Equivalent NIS<br />
maps<br />
Purpose<br />
auto_home /etc/auto_home auto.home Location of users’<br />
home directories.<br />
auto_master /etc/auto_master auto.master Mapping of<br />
automounter mount<br />
points to<br />
automounter maps.<br />
bootparams none on HP-UX bootparams Not used on HP-UX.<br />
Provided for Sun<br />
interoperability.<br />
cred /etc/publickey publickey.byname Secure RPC keys <strong>and</strong><br />
netnames for<br />
authenticating users<br />
<strong>and</strong> hosts.<br />
ethers none on HP-UX ethers.byname<br />
ethers.byaddr<br />
group /etc/group group.bygid<br />
group.byname<br />
hosts /etc/hosts hosts.byaddr<br />
hosts.byname<br />
mail_aliases /etc/mail/aliases mail.aliases<br />
mail.byaddr<br />
netgroup /etc/netgroup netgroup<br />
netgroup.byhost<br />
netgroup.byuser<br />
Not used on HP-UX.<br />
Provided for Sun<br />
interoperability.<br />
List of HP-UX<br />
groups, their group<br />
IDs <strong>and</strong> members.<br />
Mapping of host<br />
names to internet<br />
addresses.<br />
sendmail aliases <strong>and</strong><br />
their corresponding<br />
mailing lists.<br />
List of netgroups<br />
(used only with <strong>NFS</strong><br />
services) <strong>and</strong> their<br />
members.<br />
192<br />
Chapter 5
Configuring <strong>and</strong> <strong>Administering</strong> NIS+<br />
Overview of NIS+<br />
Table 5-1<br />
St<strong>and</strong>ard NIS+ Tables<br />
NIS+ Table<br />
Equivalent File<br />
Equivalent NIS<br />
maps<br />
Purpose<br />
netmasks none on HP-UX netmasks.byaddr Not used on HP-UX.<br />
Provided for Sun<br />
interoperability.<br />
networks /etc/networks networks.byaddr<br />
networks.byname<br />
passwd /etc/passwd passwd.byname<br />
passwd.byuid<br />
protocols /etc/protocols protocols.byname<br />
protocols.bynumb<br />
er<br />
rpc /etc/rpc rpc.bynumber<br />
rpc.byname<br />
Mapping of network<br />
names to network<br />
addresses.<br />
List of user names<br />
<strong>and</strong> IDs with<br />
associated user<br />
information.<br />
Mapping of<br />
networking protocols<br />
to protocol numbers.<br />
Mapping of RPC<br />
programs to program<br />
numbers.<br />
sendmailvars none on HP-UX none Not used on HP-UX.<br />
Provided for Sun<br />
interoperability.<br />
services /etc/services services.byname<br />
servi.bynp<br />
Mapping of<br />
networking services<br />
to port numbers <strong>and</strong><br />
protocols.<br />
timezone /etc/TIMEZONE none Timezone of the local<br />
host.<br />
trusted<br />
/tcb/files/auth<br />
directory<br />
none<br />
User information for<br />
trusted systems.<br />
NIS+ Authentication <strong>and</strong> Authorization<br />
Authentication is the process by which NIS+ determines who you are.<br />
Chapter 5 193
Configuring <strong>and</strong> <strong>Administering</strong> NIS+<br />
Overview of NIS+<br />
To be an authenticated NIS+ user, you must have an entry in the cred<br />
table, <strong>and</strong> your password must decrypt your secure RPC key, which is<br />
stored in the cred table.<br />
When you log in <strong>and</strong> supply your password, NIS+ identifies you as an<br />
NIS+ principal. If you are a non-root user, your NIS+ principal name is<br />
loginname.domainname. For example, if you log in as user ming in<br />
domain Wiz.Com., your NIS+ principal name is ming.Wiz.Com. If you<br />
are a root user, NIS+ identifies you by the host name where you logged<br />
in, <strong>and</strong> your NIS+ principal name is hostname.domainname. For<br />
example, if you logged in as root to host garlic in the Eng.Wiz.Com.<br />
domain, your NIS+ principal name is garlic.Eng.Wiz.Com.<br />
The cred table stores two types of credentials: Local <strong>and</strong> DES. A Local<br />
credential associates an NIS+ principal name with a user ID. Only<br />
non-root users have Local credentials. A DES credential contains the<br />
secure RPC keys for authenticating an NIS+ user. Both root <strong>and</strong> non-root<br />
users may have DES credentials. Each NIS+ principal has only one DES<br />
credential, in his or her home domain, but he or she may have Local<br />
credentials in many domains.<br />
Authorization is the process by which NIS+ determines what you are<br />
allowed to do with NIS+ objects. Every NIS+ object has a permissions<br />
string that determines who can read, modify, create, or destroy it. This<br />
permissions string is similar to the HP-UX file permissions string that<br />
grants read, write, <strong>and</strong> execute permissions to HP-UX users.<br />
NIS+ grants 4 types of permissions: (r)ead, (m)odify, (c)reate, <strong>and</strong><br />
(d)estroy. It grants permissions to 4 types of users: nobody, owner, group,<br />
<strong>and</strong> world. Figure 5-3 shows the format of an NIS+ permissions string:<br />
Figure 5-3<br />
Format of the NIS+ Permissions String<br />
- read<br />
- modify<br />
- create<br />
- destroy<br />
r m c d r m c d r m c d r m c d<br />
}<br />
}<br />
}<br />
}<br />
nobody owner group world<br />
User nobody is the group of all unauthenticated users. If you have no<br />
entry in the cred table, NIS+ identifies you as user nobody <strong>and</strong> assigns<br />
you a user ID of -2.<br />
194<br />
Chapter 5
Configuring <strong>and</strong> <strong>Administering</strong> NIS+<br />
Overview of NIS+<br />
The owner of an NIS+ object is typically the NIS+ principal who created<br />
it. However, you can change the owner of an NIS+ object with the<br />
nischown(1) comm<strong>and</strong>.<br />
The group is the NIS+ group that owns the object. NIS+ groups are<br />
stored in the groups_dir subdirectory under each domain directory. An<br />
NIS+ domain typically has an admin group consisting of the NIS+<br />
principals who administer the domain. Not every NIS+ object has a<br />
group owner. For more information on NIS+ groups, type man 1<br />
nisgrpadm at the HP-UX prompt.<br />
The world is the group of all authenticated NIS+ principals. If you are<br />
an authenticated NIS+ principal, but you are not the owner of an object,<br />
<strong>and</strong> you are not a member of the NIS+ group that owns the object, then<br />
you will have whatever access permissions are granted to the world.<br />
Every NIS+ directory has an owner <strong>and</strong> permissions associated with it.<br />
Every table has an owner <strong>and</strong> permissions. Entries <strong>and</strong> columns in a<br />
table have all the permissions the table has, but you can assign more<br />
permissions to an entry or column than the table has. An entry’s owner<br />
<strong>and</strong> group owner may be different from the owner <strong>and</strong> group owner of the<br />
table to which the entry belongs.<br />
When an NIS+ object is created, it inherits a default owner <strong>and</strong><br />
permissions. Most NIS+ comm<strong>and</strong>s have an option for overriding these<br />
defaults. You can also change these defaults. Type man 1 nisdefaults<br />
at the HP-UX prompt for more information. After an NIS+ object has<br />
been created, you can change its owner with the nischown(1) comm<strong>and</strong>,<br />
its group owner with the nischgrp(1) comm<strong>and</strong>, <strong>and</strong> its permissions<br />
with the nischmod(1) comm<strong>and</strong>.<br />
Chapter 5 195
Configuring <strong>and</strong> <strong>Administering</strong> NIS+<br />
Overview of NIS+<br />
NIS Compatibility Mode<br />
An NIS+ server may serve NIS clients, by running in NIS<br />
compatibility mode. NIS compatibility mode is intended as a<br />
migration tool, to allow you to migrate your servers from NIS to NIS+<br />
without having to migrate all your clients to NIS+ at the same time.<br />
NIS compatibility mode has the following disadvantages:<br />
• NIS compatibility mode is less secure than regular mode. NIS clients<br />
cannot be authenticated by NIS+, so NIS compatibility mode allows<br />
unauthenticated clients to read the passwd table.<br />
• If you have links or concatenation paths in NIS+ tables, NIS clients<br />
will not be able to follow them.<br />
• NIS clients may read information only in their default domain. They<br />
cannot read information in other domains in the namespace.<br />
• Every NIS client must have a server on its local subnet, unless its<br />
server name has been set with the ypset comm<strong>and</strong>.<br />
If any server in an NIS+ domain is running in NIS compatibility mode,<br />
all servers for that domain must run in NIS compatibility mode.<br />
All servers in an NIS+ domain must be NIS+ servers. You cannot mix<br />
NIS servers <strong>and</strong> NIS+ servers in the same domain.<br />
196<br />
Chapter 5
Configuring <strong>and</strong> <strong>Administering</strong> NIS+<br />
Planning the NIS+ Namespace<br />
Planning the NIS+ Namespace<br />
This section explains how to plan your NIS+ namespace. It tells you how<br />
to perform the following tasks:<br />
• To Determine the Number of NIS+ Domains You Need<br />
• To Determine the Number of NIS+ Servers You Need<br />
• To Determine Which Hosts Will Be NIS+ Servers<br />
To Determine the Number of NIS+ Domains You Need<br />
For many sites, all hosts can belong to the same domain, <strong>and</strong> it is not<br />
necessary to set up a hierarchical namespace with multiple domains.<br />
However, you might want to create multiple domains for the following<br />
reasons:<br />
• NIS+ works most efficiently when each domain contains fewer than<br />
10,000 table entries. 10,000 table entries translates roughly into<br />
about 1000 users. Therefore, you should create enough domains so<br />
that no domain contains more than 1000 users.<br />
• If your site is divided into multiple administrative departments, with<br />
a different system administrator for each department, you should<br />
allow each system administrator to maintain a separate NIS+<br />
domain.<br />
• If your site is divided into multiple administrative departments, <strong>and</strong><br />
each department requires different configuration data <strong>and</strong> allows<br />
access to different users <strong>and</strong> hosts, you should create a separate NIS+<br />
domain for each administrative department.<br />
Chapter 5 197
Configuring <strong>and</strong> <strong>Administering</strong> NIS+<br />
Planning the NIS+ Namespace<br />
To Determine the Number of NIS+ Servers You Need<br />
Following are some guidelines for determining the number of NIS+<br />
servers you will need in your domain:<br />
• You must configure one master server per NIS+ domain.<br />
• Configure at least one replica server per NIS+ domain, but no more<br />
than 10 replica servers per domain.<br />
• A server may serve more than one domain, but it is not<br />
recommended.<br />
To Determine Which Hosts Will Be NIS+ Servers<br />
• Choose servers that are reliable <strong>and</strong> highly available.<br />
• Choose fast servers that are not used for CPU-intensive applications.<br />
Do not use gateways or terminal servers as NIS+ servers. Do not use<br />
<strong>NFS</strong> or database servers as NIS+ servers.<br />
• Choose servers with sufficient disk space. NIS+ data is stored in<br />
/var/nis. The /var/nis directory requires approximately 5 Kbytes<br />
of disk space per client of the domain. For example, if a domain has<br />
1000 clients, /var/nis requires about 5 Mbytes of disk space. You<br />
should add an additional 10-15 Mbytes to allow transaction logs to<br />
grow. So, for a server in a domain of 1000 clients, you should allocate<br />
15-20 Mbytes of disk space.<br />
• Choose servers with sufficient memory. The minimum amount of<br />
memory required for an NIS+ server is 64 Mbytes, but servers of<br />
medium <strong>and</strong> large domains should have at least 128 Mbytes.<br />
198<br />
Chapter 5
Configuring <strong>and</strong> <strong>Administering</strong> NIS+<br />
Setting Up the NIS+ Namespace<br />
Setting Up the NIS+ Namespace<br />
An NIS+ namespace may be “flat,” consisting of a single domain, or it<br />
may be hierarchical, like the HP-UX directory structure. Every<br />
namespace has exactly one root domain. All other domains are<br />
subdomains of the root domain.<br />
This section explains how to perform the following tasks. Only the first<br />
six tasks are required to set up a “flat” namespace consisting of a single<br />
domain.<br />
• To Set Up the Root Master Server<br />
• To Populate the NIS+ Tables on the Master Server<br />
• To Add Administrators to the NIS+ admin Group<br />
• To Set Up NIS+ Client Hosts<br />
• To Set Up NIS+ Replica Servers<br />
• To Initialize NIS+ Client Users<br />
• To Set Up an NIS+ Subdomain<br />
• To Use BIND With NIS+<br />
• To Allow an NIS+ User Authenticated Access to Another Domain<br />
Chapter 5 199
Configuring <strong>and</strong> <strong>Administering</strong> NIS+<br />
Setting Up the NIS+ Namespace<br />
To Set Up the Root Master Server<br />
Before you perform this task, make sure no one is using the host that<br />
will be the root master server. The nisserver script copies the<br />
/etc/nsswitch.nisplus file to /etc/nsswitch.conf. This may render<br />
the host unusable until the NIS+ tables are populated <strong>and</strong> NIS+ is<br />
operational.<br />
1. Log in as root to the host that will be the root master server.<br />
2. Issue the following comm<strong>and</strong> to set the default domain name:<br />
/usr/bin/domainname default_domain<br />
The domain name must have at least two components, for example,<br />
Wiz.Com. Do not type a period at the end of the domain name.<br />
3. Set the PATH variable to include /usr/lib/nis. If you are running<br />
the C shell, type the following comm<strong>and</strong>:<br />
setenv PATH $PATH:/usr/lib/nis<br />
If you are running the Bourne or Korn shell, type the following<br />
comm<strong>and</strong>s:<br />
PATH=$PATH:/usr/lib/nis<br />
export PATH<br />
4. Issue the following comm<strong>and</strong> to set up the root master server:<br />
nisserver -r<br />
If you want the server to run in NIS compatibility mode so that it can<br />
serve NIS clients, add the -Y option. See “NIS Compatibility Mode” on<br />
page 196 for more information.<br />
nisserver -r -Y<br />
The nisserver script asks you if the information it has is correct. You<br />
can change it by typing n. The script then allows you to change each<br />
piece of information. To make a change, just type the correct<br />
information after the incorrect information <strong>and</strong> press [Return]. You<br />
cannot change the security level.<br />
When the nisserver script asks you for a password, type the root<br />
password. The nisserver script will use the root password to create<br />
credentials for the local host in the cred table.<br />
5. To verify that the nisserver script created the root domain<br />
successfully, issue the following comm<strong>and</strong>:<br />
200<br />
Chapter 5
Configuring <strong>and</strong> <strong>Administering</strong> NIS+<br />
Setting Up the NIS+ Namespace<br />
nisls -lR<br />
The nisls comm<strong>and</strong> should list the domain name, the org_dir <strong>and</strong><br />
groups_dir NIS+ directories, the admin group, <strong>and</strong> all the st<strong>and</strong>ard<br />
tables listed in Table 5-1.<br />
6. If the host was previously an NIS server or client, set the<br />
NIS_MASTER_SERVER, NIS_SLAVE_SERVER, <strong>and</strong> NIS_CLIENT variables<br />
to 0 in the /etc/rc.config.d/namesvrs file.<br />
7. Create a cron job that runs nisping -Ca at least once a day, during a<br />
time when the network is not busy. The following example crontab<br />
file runs nisping -Ca once a day, at 3:00 AM. It directs st<strong>and</strong>ard<br />
output <strong>and</strong> st<strong>and</strong>ard error from the nisping comm<strong>and</strong> to the file<br />
/tmp/nisping.log.<br />
0 3 * * * /usr/lib/nis/nisping -Ca > /tmp/nisping.log 2& >1<br />
The nisping -Ca comm<strong>and</strong> causes all servers of the domain to<br />
update their tables with the changes in the transaction log <strong>and</strong> to<br />
clear the transaction log. If you do not issue the nisping -Ca<br />
comm<strong>and</strong> regularly, your transaction log may grow too large, <strong>and</strong> you<br />
may not have enough disk space to checkpoint it.<br />
After you run the nisserver script, the local host is set up as the root<br />
master server <strong>and</strong> as a client of the default domain. However, the domain<br />
tables are still empty. The next section, “To Populate the NIS+ Tables on<br />
the Master Server”, explains how to fill the tables with data.<br />
For more information, see the following man pages: nisserver(1M),<br />
domainname(1M), nisls(1), nsswitch.conf(4), crontab(1),<br />
rpc.nisd(1M), <strong>and</strong> nis(1).<br />
Chapter 5 201
Configuring <strong>and</strong> <strong>Administering</strong> NIS+<br />
Setting Up the NIS+ Namespace<br />
To Populate the NIS+ Tables on the Master Server<br />
You can populate NIS+ tables from files or from NIS maps. Before you<br />
populate the master server’s tables, you must run the nisserver script<br />
to create the tables. See “To Set Up the Root Master Server” on page 200<br />
or “To Set Up an NIS+ Subdomain” on page 211.<br />
NOTE<br />
The nispopulate script may fail if there is insufficient /tmp space on the<br />
system. To keep this from happening, you can set the environment<br />
variable TMPDIR to a different directory. If TMPDIR is not set to a valid<br />
directory, the script will use the /tmp directory instead.<br />
1. Log in as root to the master server.<br />
2. If you will populate the NIS+ tables from files, create a temporary<br />
directory, <strong>and</strong> copy the files into it from the /etc directory:<br />
mkdir /nis+files<br />
cd /etc<br />
cp auto_home auto_master group hosts mail/aliases netgroup \<br />
networks passwd protocols rpc services TIMEZONE ../nis+files<br />
3. In the temporary directory, remove the entry for root from the passwd<br />
file. Remove all other entries with user ID 0 (zero) from the passwd<br />
file. Remove all the system entries such as root <strong>and</strong> bin, with user<br />
IDs of less than 100, from the passwd file. This should be done both<br />
for security <strong>and</strong> for interoperability with NIS <strong>and</strong> other NIS+<br />
implementations. Remove any other entries from the passwd,<br />
aliases, or hosts files that you do not want distributed across the<br />
namespace.<br />
4. In the temporary directory, remove any fully-qualified DNS domain<br />
names from the hosts file. NIS+ cannot find fully-qualified DNS<br />
domain names in its hosts table unless the DNS domain name<br />
matches one of the NIS+ domain names in its namespace.<br />
5. Replace any periods in automounter map names with underbars. For<br />
example, if your master map is called auto.master, rename it to<br />
auto_master. If you will populate your NIS+ tables from NIS maps,<br />
make sure your NIS map names contain no periods. If you will<br />
populate your NIS+ tables from files, make sure your file names<br />
contain no periods.<br />
6. To populate the NIS+ tables from files, issue the following comm<strong>and</strong>.<br />
202<br />
Chapter 5
Configuring <strong>and</strong> <strong>Administering</strong> NIS+<br />
Setting Up the NIS+ Namespace<br />
The -p option specifies the path to the files.<br />
nispopulate -F -p /nis+files -d domainname<br />
To populate the NIS+ tables from NIS maps, issue the following<br />
comm<strong>and</strong>:<br />
nispopulate -Y -h NIS_server_name -a NIS_server_address \<br />
-y NIS_domain -d domainname<br />
The nispopulate script asks you if the information it has is correct.<br />
You can change it by typing n. The script then allows you to change<br />
each piece of information. To make a change, just type the correct<br />
information after the incorrect information <strong>and</strong> press [Return].<br />
If you are populating files on the root master server, you do not need<br />
the -d domainname option, because the default domain is the domain<br />
the host will serve. However, on subdomain master servers, it is very<br />
important to specify the domain, because it is different from the<br />
default domain.<br />
7. To verify that your tables have been populated successfully, issue the<br />
niscat comm<strong>and</strong> for several st<strong>and</strong>ard tables. The st<strong>and</strong>ard tables are<br />
listed in Table 5-1. The following example lists the contents of the<br />
NIS+ passwd table:<br />
niscat passwd.org_dir.domainname.<br />
8. Issue the following comm<strong>and</strong> to checkpoint the domain:<br />
nisping -Ca<br />
CAUTION<br />
If you do not have enough swap or disk space, the server will be unable to<br />
checkpoint properly, but it won’t notify you. To ensure that the<br />
checkpoint completed successfully, issue the niscat comm<strong>and</strong> to list<br />
the contents of a table:<br />
niscat rpc.org_dir<br />
If you do not have enough swap space, you’ll see the following error<br />
message:<br />
can’t list table: Server busy, Try Again.<br />
To fix this problem, increase the swap space <strong>and</strong> checkpoint the<br />
domain again.<br />
Chapter 5 203
Configuring <strong>and</strong> <strong>Administering</strong> NIS+<br />
Setting Up the NIS+ Namespace<br />
9. Reboot the host to force long-running processes to read the new<br />
/etc/nsswitch.conf file. (The nisserver script copies<br />
/etc/nsswitch.nisplus to /etc/nsswitch.conf.)<br />
The nispopulate script populates the cred table from the passwd <strong>and</strong><br />
hosts files or NIS maps. Every NIS+ principal except the root user on<br />
the root master server is given the default NIS+ password, which is<br />
nisplus. (The credentials for the root user on the root master server<br />
were created using the root password.) When you run the nisclient<br />
script to initialize a client host in the root domain, the nisclient script<br />
will change the client’s credentials to use the client’s root password<br />
instead of the default NIS+ password. See “To Set Up NIS+ Client Hosts”<br />
on page 206.<br />
For more information, see the following man pages: nispopulate(1M),<br />
nispasswd(1), niscat(1), nisping(1M), <strong>and</strong> nis(1).<br />
204<br />
Chapter 5
Configuring <strong>and</strong> <strong>Administering</strong> NIS+<br />
Setting Up the NIS+ Namespace<br />
To Add Administrators to the NIS+ admin Group<br />
Follow this procedure to add administrators to the NIS+ admin group, or<br />
use SAM (System Administration Manager). To run SAM type sam at the<br />
HP-UX prompt. For more information, type man 1M sam.<br />
1. Type the following comm<strong>and</strong> to add NIS+ principals to the admin<br />
group:<br />
nisgrpadm -a admin.domainname NIS+_principal<br />
[NIS+_principal ...]<br />
For example, to add users ming <strong>and</strong> sara to the admin group in the<br />
Wiz.Com. domain, you would type the following comm<strong>and</strong>:<br />
nisgrpadm -a admin.Wiz.Com. ming.Wiz.Com. sara.Wiz.Com.<br />
2. Issue the following comm<strong>and</strong> to list the members of the admin group<br />
to make sure the administrators you added are there:<br />
nisgrpadm -l admin.Wiz.Com.<br />
The members of the NIS+ admin group may make any modifications to<br />
the NIS+ objects in the domain that the group owner is allowed to make.<br />
See “NIS+ Authentication <strong>and</strong> Authorization” on page 193 for an<br />
explanation of NIS+ permissions.<br />
It is useful to add non-root users to the admin group, because they can<br />
administer the domain while logged into any host in the namespace.<br />
Root users must be logged in as root to a specific host in order to be<br />
recognized as members of the admin group.<br />
The admin group is an NIS+ group stored in the groups_dir<br />
subdirectory of the domain directory. It is not one of the HP-UX groups<br />
stored in the /etc/group file or the NIS+ group table.<br />
For more information, type man 1M nisgrpadm or man 1 nis at the<br />
HP-UX prompt.<br />
Chapter 5 205
Configuring <strong>and</strong> <strong>Administering</strong> NIS+<br />
Setting Up the NIS+ Namespace<br />
To Set Up NIS+ Client Hosts<br />
Before you set up an NIS+ client host, the master server must be set up<br />
<strong>and</strong> running, <strong>and</strong> the client must have an entry in the NIS+ hosts table<br />
on the master server. Also, make sure no one is using the client host. The<br />
nisclient script copies the /etc/nsswitch.nisplus file to<br />
/etc/nsswitch.conf. This may render the host unusable until NIS+ is<br />
operational.<br />
1. Log into the master server <strong>and</strong> issue the following comm<strong>and</strong> to<br />
determine whether the client host has NIS+ credentials in the<br />
domain’s cred table:<br />
nisgrep client_hostname cred.org_dir.domainname<br />
The nispopulate script creates credentials for every host that is in<br />
the /etc/hosts file or NIS hosts map when the comm<strong>and</strong> is run. If<br />
the client host did not have a hosts entry when nispopulate was<br />
run, it will not have credentials in the cred table.<br />
2. If the nisgrep comm<strong>and</strong> returns nothing, issue the following<br />
comm<strong>and</strong> on the master server to add a credential for the client host:<br />
nisclient -co client_hostname<br />
When prompted for a password, type the default password, nisplus.<br />
3. Log in as root to the host that will be the NIS+ client.<br />
4. Issue the following comm<strong>and</strong> to set the NIS+ domain name:<br />
/usr/bin/domainname domainname<br />
5. If the host was previously an NIS server or client, set the<br />
NIS_MASTER_SERVER, NIS_SLAVE_SERVER, <strong>and</strong> NIS_CLIENT variables<br />
to 0 in the /etc/rc.config.d/namesvrs file.<br />
6. Set the PATH variable to include /usr/lib/nis. If you are running<br />
the C shell, type the following comm<strong>and</strong>:<br />
setenv PATH $PATH:/usr/lib/nis<br />
If you are running the Bourne or Korn shell, type the following<br />
comm<strong>and</strong>s:<br />
PATH=$PATH:/usr/lib/nis<br />
export PATH<br />
7. Issue the following comm<strong>and</strong> to initialize the client host:<br />
nisclient -i -h master_server_name<br />
206<br />
Chapter 5
Configuring <strong>and</strong> <strong>Administering</strong> NIS+<br />
Setting Up the NIS+ Namespace<br />
If the master server’s internet address is not in the client’s<br />
/etc/hosts file, the nisclient script will prompt you for the master<br />
server’s internet address.<br />
The nisclient script will prompt you for the secure RPC password<br />
for root. Type the default NIS+ password, nisplus.<br />
The nisclient script will then prompt you for the root password on<br />
the client host. After you type the password, the nisclient script<br />
will change the client host’s entry in the cred table to use the root<br />
password instead of the default password.<br />
8. Issue the following comm<strong>and</strong> on the new NIS+ client host to verify<br />
that the host can receive information from the NIS+ server:<br />
nisls<br />
The nisls comm<strong>and</strong> should list the domain name <strong>and</strong> the org_dir<br />
<strong>and</strong> groups_dir NIS+ directories.<br />
9. To verify that your client can get information from NIS+ tables, issue<br />
the niscat comm<strong>and</strong> for several st<strong>and</strong>ard tables. The st<strong>and</strong>ard tables<br />
are listed in Table 5-1. The following example lists the contents of the<br />
NIS+ passwd table:<br />
niscat passwd.org_dir<br />
10.Reboot the host to force long-running processes to read the new<br />
/etc/nsswitch.conf file. (The nisclient script copies<br />
/etc/nsswitch.nisplus to /etc/nsswitch.conf.)<br />
For more information, see the following man pages: domainname(1),<br />
nisaddcred(1M), nisclient(1M), nisls(1), <strong>and</strong> nis(1).<br />
Chapter 5 207
Configuring <strong>and</strong> <strong>Administering</strong> NIS+<br />
Setting Up the NIS+ Namespace<br />
To Set Up NIS+ Replica Servers<br />
Before you can set up a replica server, the master server must be set up<br />
<strong>and</strong> running, <strong>and</strong> the hosts table on the master server must contain an<br />
entry for the host that will be a replica.<br />
When you run the nisserver script to initialize a replica server, the<br />
NIS+ tables on the master server are copied to the replica. Copying the<br />
tables can take anywhere from a few minutes to a couple of hours,<br />
depending on the size of your tables, the network load, <strong>and</strong> the system<br />
load on the master <strong>and</strong> replica servers.<br />
1. Log in as root to the host that will be a replica server.<br />
2. Set the PATH variable to include /usr/lib/nis. If you are running<br />
the C shell, type the following comm<strong>and</strong>:<br />
setenv PATH $PATH:/usr/lib/nis<br />
If you are running the Bourne or Korn shell, type the following<br />
comm<strong>and</strong>s:<br />
PATH=$PATH:/usr/lib/nis<br />
export PATH<br />
3. If the host will be a root replica server, set it up as a client in the root<br />
domain. If the host will be a non-root replica server, set it up as a<br />
client in the parent domain of the domain it will serve. See “To Set Up<br />
NIS+ Client Hosts” on page 206.<br />
4. Type the following comm<strong>and</strong> if the master server is not running in<br />
NIS compatibility mode:<br />
rpc.nisd<br />
Type the following comm<strong>and</strong> if the master server is running in NIS<br />
compatibility mode:<br />
rpc.nisd -Y<br />
If the master server is running in NIS compatibility mode, its replica<br />
servers must also run in NIS compatibility mode. See “NIS<br />
Compatibility Mode” on page 196 for more information.<br />
5. Set the NISPLUS_SERVER variable to 1 in the<br />
/etc/rc.config.d/namesvrs file:<br />
NISPLUS_SERVER=1<br />
If the host was previously an NIS server or client, set the<br />
208<br />
Chapter 5
Configuring <strong>and</strong> <strong>Administering</strong> NIS+<br />
Setting Up the NIS+ Namespace<br />
NIS_MASTER_SERVER, NIS_SLAVE_SERVER, <strong>and</strong> NIS_CLIENT variables<br />
to 0.<br />
6. Log in as root to the master server.<br />
7. Type the following comm<strong>and</strong> to initialize the replica server:<br />
nisserver -R -h replica_host_name<br />
The nisserver script asks you if the information it has is correct. You<br />
can change it by typing n. The script then allows you to change each<br />
piece of information. To make a change, just type the correct<br />
information after the incorrect information <strong>and</strong> press [Return].<br />
8. Type the following comm<strong>and</strong> on the master server to checkpoint the<br />
domain <strong>and</strong> copy the domain directories to the new replica server:<br />
nisping -a<br />
9. To verify that the replica server is operating correctly, issue the<br />
following comm<strong>and</strong>:<br />
nisstat -H replica_host_name<br />
The nisstat comm<strong>and</strong> should return a list of statistics about the<br />
replica server.<br />
It is recommended that you have only a few replicas per domain, for<br />
performance reasons. Do not configure more than 10 replicas per domain.<br />
If your domain includes sites that are distant from the master server,<br />
configure replica servers at the distant sites to avoid unnecessary<br />
network traffic.<br />
For more information, see the following man pages: nisserver(1M),<br />
rpc.nisd(1M), nisping(1M), nisstat(1M), <strong>and</strong> nis(1).<br />
Chapter 5 209
Configuring <strong>and</strong> <strong>Administering</strong> NIS+<br />
Setting Up the NIS+ Namespace<br />
To Initialize NIS+ Client Users<br />
Tell all of your non-root users to perform this task. This task sets a user’s<br />
secure RPC password to be the same as the user’s login password.<br />
1. Log into any NIS+ client host using your non-root user login.<br />
2. Issue the following comm<strong>and</strong>:<br />
/usr/lib/nis/nisclient -u<br />
The nisclient script will prompt you for the secure RPC password.<br />
Type the default password, nisplus.<br />
The nisclient script will then prompt you for your login password.<br />
After you type your login password, the nisclient script will change<br />
your cred table entry to use your login password instead of the<br />
default password.<br />
To change your password in the future, use the nispasswd comm<strong>and</strong>,<br />
which changes your login password <strong>and</strong> your secure RPC password at<br />
the same time.<br />
For more information, see the following man pages: nisclient(1M),<br />
nispasswd(1), <strong>and</strong> nis(1).<br />
210<br />
Chapter 5
Configuring <strong>and</strong> <strong>Administering</strong> NIS+<br />
Setting Up the NIS+ Namespace<br />
To Set Up an NIS+ Subdomain<br />
Before you can set up a subdomain, the parent domain must be set up,<br />
<strong>and</strong> its master server must be running. The master server for the parent<br />
domain must have an entry in its hosts table for the master server of the<br />
new subdomain.<br />
1. Log in as root to the host that will be the master server for the<br />
subdomain.<br />
2. Set the PATH variable to include /usr/lib/nis. If you are running<br />
the C shell, type the following comm<strong>and</strong>:<br />
setenv PATH $PATH:/usr/lib/nis<br />
If you are running the Bourne or Korn shell, type the following<br />
comm<strong>and</strong>s:<br />
PATH=$PATH:/usr/lib/nis<br />
export PATH<br />
3. Set up the host as a client in the parent domain. For example, if the<br />
root domain is Wiz.Com., <strong>and</strong> you are setting up a subdomain called<br />
Eng.Wiz.Com., make the host a client in the Wiz.Com. domain. See<br />
“To Set Up NIS+ Client Hosts” on page 206.<br />
4. Type the following comm<strong>and</strong> if the new master server will not run in<br />
NIS compatibility mode:<br />
rpc.nisd<br />
If the new master server will be required to serve NIS clients, type<br />
the following comm<strong>and</strong> to run the server in NIS compatibility mode.<br />
See “NIS Compatibility Mode” on page 196 for more information.<br />
rpc.nisd -Y<br />
5. Set the NISPLUS_SERVER variable to 1 in the<br />
/etc/rc.config.d/namesvrs file:<br />
NISPLUS_SERVER=1<br />
If the host was previously an NIS server or client, set the<br />
NIS_MASTER_SERVER, NIS_SLAVE_SERVER, <strong>and</strong> NIS_CLIENT variables<br />
to 0.<br />
6. Log in as root to the master server for the parent domain of the new<br />
subdomain. For example, if the new subdomain will be called<br />
Eng.Wiz.Com., log in as root to the master server for the Wiz.Com.<br />
domain.<br />
Chapter 5 211
Configuring <strong>and</strong> <strong>Administering</strong> NIS+<br />
Setting Up the NIS+ Namespace<br />
7. Issue the following comm<strong>and</strong> if the master server of the new<br />
subdomain will not run in NIS compatibility mode:<br />
nisserver -M -d subdomain_name -h<br />
subdomain_master_server_name<br />
If the master server of the new subdomain will be required to serve<br />
NIS clients, issue the following comm<strong>and</strong> to set up the master server<br />
in NIS compatibility mode:<br />
nisserver -M -Y -d subdomain_name -h<br />
subdomain_master_server_name<br />
8. Log in as root to the master server of the new subdomain.<br />
9. Populate the new master server’s tables from files or from NIS maps.<br />
See “To Populate the NIS+ Tables on the Master Server” on page 202.<br />
Be sure to specify the -d domainname option in the nispopulate<br />
comm<strong>and</strong>.<br />
10.To verify that the subdomain was created successfully, issue the<br />
following comm<strong>and</strong>:<br />
nisls -lR subdomain_name<br />
The nisls comm<strong>and</strong> should list the subdomain name, the org_dir<br />
<strong>and</strong> groups_dir NIS+ directories, the admin group, <strong>and</strong> all the<br />
st<strong>and</strong>ard tables listed in Table 5-1.<br />
11.Create a cron job that runs nisping -Ca at least once a day, during a<br />
time when the network is not busy. The following example crontab<br />
file runs nisping -Ca once a day, at 3:00 AM. It directs st<strong>and</strong>ard<br />
output <strong>and</strong> st<strong>and</strong>ard error from the nisping comm<strong>and</strong> to the file<br />
/tmp/nisping.log.<br />
0 3 * * * /usr/lib/nis/nisping -Ca > /tmp/nisping.log 2& >1<br />
The nisping -Ca comm<strong>and</strong> causes all servers of the domain to<br />
update their tables with the changes in the transaction log <strong>and</strong> to<br />
clear the transaction log. If you do not issue the nisping -Ca<br />
comm<strong>and</strong> regularly, your transaction log may grow too large, <strong>and</strong> you<br />
may not have enough disk space to checkpoint it.<br />
12.Initialize the clients of the new subdomain. See “To Set Up NIS+<br />
Client Hosts” on page 206.<br />
13.Set up one or more replica servers for the new subdomain. See “To Set<br />
Up NIS+ Replica Servers” on page 208.<br />
14.Initialize the client users of the new subdomain. See “To Initialize<br />
212<br />
Chapter 5
Configuring <strong>and</strong> <strong>Administering</strong> NIS+<br />
Setting Up the NIS+ Namespace<br />
NIS+ Client Users” on page 210.<br />
Every time you create a master server, you create a new subdomain. You<br />
can create as many domains as you need. You can create subdomains<br />
beneath subdomains. It is recommended that you keep your namespace<br />
hierarchy as simple as possible <strong>and</strong> that you keep an accurate map of<br />
your namespace.<br />
For more information, see the following man pages: nisserver(1M),<br />
rpc.nisd(1M), nispopulate(1M), nisclient(1M), <strong>and</strong> nis(1).<br />
Chapter 5 213
Configuring <strong>and</strong> <strong>Administering</strong> NIS+<br />
Setting Up the NIS+ Namespace<br />
To Use BIND With NIS+<br />
An NIS+ client can consult BIND (DNS), NIS, NIS+, or the /etc/hosts<br />
file when it needs to resolve a host name to an IP address. The Name<br />
Service Switch determines where an NIS+ client will look for host<br />
information.<br />
Some clients, like PCs, cannot use the Name Service Switch. If your<br />
domain includes PC clients, you can configure the NIS+ server to query<br />
BIND when its NIS+ hosts table does not contain the information that a<br />
client requests. The server then returns the information to the client<br />
through NIS+.<br />
Only NIS+ servers running in NIS compatibility mode may consult<br />
BIND to answer client queries. See “NIS Compatibility Mode” on page<br />
196 for more information.<br />
This section tells you how to perform the following tasks:<br />
• To Configure an NIS+ Client to Query BIND<br />
• To Configure an NIS+ Server to Return BIND Information to Clients<br />
If your NIS+ clients support the Name Service Switch, configure the<br />
clients to query BIND.<br />
If your NIS+ clients do not support the Name Service Switch, configure<br />
their server to return BIND information.<br />
NOTE<br />
BIND must already be configured <strong>and</strong> running before you can configure<br />
an NIS+ client or server to query it. To configure BIND, see the<br />
<strong>Installing</strong> <strong>and</strong> <strong>Administering</strong> Internet <strong>Services</strong> manual.<br />
214<br />
Chapter 5
Configuring <strong>and</strong> <strong>Administering</strong> NIS+<br />
Setting Up the NIS+ Namespace<br />
To Configure an NIS+ Client to Query BIND<br />
1. Log in as root to the NIS+ client host.<br />
2. Use a text editor to open the /etc/nsswitch.conf file, <strong>and</strong> find the<br />
line that begins with hosts. It probably looks something like this:<br />
hosts: nisplus [NOTFOUND=return] files<br />
Change the hosts line so that it looks like this:<br />
hosts: dns [NOTFOUND=return] nisplus [NOTFOUND=return]<br />
files<br />
The NIS+ client will now query BIND first for host information. If the<br />
BIND server is down or unreachable, it will query NIS+. Then, if no<br />
NIS+ server is available, it will consult its local /etc/hosts file. For<br />
more information, type man 4 nsswitch.conf at the HP-UX prompt.<br />
To Configure an NIS+ Server to Return BIND Information to<br />
Clients<br />
Only servers running in NIS compatibility mode may return BIND<br />
information to clients through NIS+.<br />
1. Log in as root to the NIS+ server.<br />
2. In the /etc/rc.config.d/namesvrs file, set the EMULYP variable to<br />
“-Y -B”, as follows:<br />
EMULYP=”-Y -B”<br />
3. Kill the rpc.nisd daemon, <strong>and</strong> restart it with the -Y <strong>and</strong> -B options:<br />
ps -ef | grep rpc.nisd<br />
kill PID<br />
rpc.nisd -Y -B<br />
For more information, type man 1M rpc.nisd at the HP-UX prompt.<br />
Chapter 5 215
Configuring <strong>and</strong> <strong>Administering</strong> NIS+<br />
Setting Up the NIS+ Namespace<br />
To Allow an NIS+ User Authenticated Access to<br />
Another Domain<br />
A user’s home domain is defined as the domain where the user has a<br />
DES credential in the cred table. (Each NIS+ principal has a DES<br />
credential in only one domain.) If a user needs to be authenticated in<br />
another domain, the user must have a Local credential in that domain.<br />
In domains where the user does not have a Local credential, the user is<br />
treated as “nobody.”<br />
1. From any NIS+ client host, issue the following comm<strong>and</strong>s to copy the<br />
passwd table entry from the user’s home domain to the remote<br />
domain where the user needs authenticated access:<br />
nismatch name=username passwd.org_dir.user’s_homedomain \<br />
> tempfile<br />
nisaddent -a -f tempfile passwd remote_domainname<br />
2. If necessary, change the user ID in the entry to ensure that it is<br />
unique in the passwd table of the remote domain. Each user ID may<br />
occur only once in a passwd table. See “To Modify an Entry in an<br />
NIS+ Table” on page 229.<br />
3. From any NIS+ client host, issue the following comm<strong>and</strong>:<br />
nisaddcred -p UID -P loginname.domainname local<br />
remote_domainname<br />
The argument following the -p option is the user’s user ID from the<br />
NIS+ passwd table in the remote domain where the user needs<br />
authenticated access. The argument following the -P option is the<br />
user’s NIS+ principal name <strong>and</strong> must end with a period.<br />
The remote_domainname argument is the domain where the<br />
credential will be created (the domain where the user needs<br />
authenticated access).<br />
The following example allows NIS+ principal sara.Eng.Wiz.Com to be<br />
authenticated in domain Sales.Wiz.Com.:<br />
nisaddcred -p 7899 -P sara.Eng.Wiz.Com. local Sales.Wiz.Com.<br />
You must have create permission for the cred table <strong>and</strong> the passwd table<br />
in the remote domain in order to complete this task.<br />
For more information, see the following man pages: nisaddcred(1M),<br />
nismatch(1), <strong>and</strong> nisaddent(1M).<br />
216<br />
Chapter 5
Configuring <strong>and</strong> <strong>Administering</strong> NIS+<br />
<strong>Administering</strong> NIS+<br />
<strong>Administering</strong> NIS+<br />
This section explains how to administer <strong>and</strong> maintain your NIS+ domain<br />
or namespace after you have set it up. It explains how to perform the<br />
following tasks:<br />
• To List the Properties of NIS+ Objects<br />
• To Change the Default Properties for New NIS+ Objects<br />
• To Change the Permissions for NIS+ Objects<br />
• To Change the Ownership of NIS+ Objects<br />
• To Change the Search Order of Domains<br />
• To List the Contents of an NIS+ Table<br />
• To Search an NIS+ Table<br />
• To Add an Entry to an NIS+ Table<br />
• To Remove an Entry from an NIS+ Table<br />
• To Modify an Entry in an NIS+ Table<br />
• To Add a Host to an NIS+ Domain<br />
• To Add a User to an NIS+ Domain<br />
• To Create New Credentials for an Existing NIS+ Principal<br />
• To Create New Credentials for the Root Master Server<br />
• To Change a Password<br />
• To Create an NIS+ Table<br />
• To Remove an NIS+ Table<br />
• To Create or Remove Paths Among Tables<br />
• To Create or Remove an NIS+ Group<br />
• To Add or Remove Members of an NIS+ Group<br />
• To Remove a Replica Server from an NIS+ Domain<br />
• To Remove an NIS+ Domain<br />
• To Back Up NIS+ Tables<br />
Chapter 5 217
Configuring <strong>and</strong> <strong>Administering</strong> NIS+<br />
<strong>Administering</strong> NIS+<br />
To List the Properties of NIS+ Objects<br />
• To list the object properties of any NIS+ directory, table, table entry,<br />
group, or link, issue the following comm<strong>and</strong> from an NIS+ client host:<br />
niscat -o NIS+_object<br />
For example, to list the object properties of the passwd table entry for<br />
user jane in the default domain, you would issue this comm<strong>and</strong>:<br />
niscat -o ’[name=jane],passwd.org_dir’<br />
The niscat -o comm<strong>and</strong> gives you information about the object,<br />
including its owner, group owner, <strong>and</strong> permissions. If the NIS+ object is a<br />
table, the niscat -o comm<strong>and</strong> gives the number of columns in the table,<br />
the names of the columns, <strong>and</strong> the permissions for each column.<br />
For more information, type man 1 niscat at the HP-UX prompt.<br />
218<br />
Chapter 5
Configuring <strong>and</strong> <strong>Administering</strong> NIS+<br />
<strong>Administering</strong> NIS+<br />
To Change the Default Properties for New NIS+<br />
Objects<br />
Whenever you create a new NIS+ object (a directory, table, table entry,<br />
group, or link), it inherits a set of default properties (owner, group owner,<br />
permissions, time to live, <strong>and</strong> so on). You can override the default object<br />
properties by setting the NIS_DEFAULTS environment variable.<br />
You can use SAM (System Administration Manager) to change all the<br />
default object properties except time to live. To run SAM type sam at the<br />
HP-UX prompt. For more information, type man 1M sam.<br />
1. Issue the nisdefaults comm<strong>and</strong> to find out the current default<br />
values:<br />
nisdefaults<br />
2. If you are using the Korn or Bourne shell, issue the following<br />
comm<strong>and</strong>:<br />
NIS_DEFAULTS=access=perms:owner=owner:group=group:ttl=time<br />
export NIS_DEFAULTS<br />
If you are using the C shell, issue the following comm<strong>and</strong>:<br />
setenv NIS_DEFAULTS<br />
access=perms:owner=owner:group=group:ttl=time<br />
You do not have to specify all four values. For example, you could<br />
change just the default owner <strong>and</strong> group owner, as in the following<br />
example:<br />
setenv NIS_DEFAULTS<br />
owner=garlic.Eng.Wiz.Com.:group=admin.Eng.Wiz.Com.<br />
You can also set the default group owner by setting the NIS_GROUP<br />
environment variable, but if the NIS_DEFAULTS variable specifies a<br />
default group owner, it overrides the NIS_GROUP variable.<br />
The time to live (ttl) applies only to NIS+ directories <strong>and</strong> groups. It tells<br />
NIS+ clients when to purge the information in their caches <strong>and</strong> get new<br />
information from a server. (To change the ttl value for an existing NIS+<br />
object, use the nischttl[1] comm<strong>and</strong>.)<br />
For more information, see the following man pages: nisdefaults(1),<br />
nischttl(1), sam(1M), <strong>and</strong> nis(1).<br />
Chapter 5 219
Configuring <strong>and</strong> <strong>Administering</strong> NIS+<br />
<strong>Administering</strong> NIS+<br />
To Change the Permissions for NIS+ Objects<br />
• To change the permissions of an NIS+ directory, table, table entry,<br />
group, or link, issue the nischmod comm<strong>and</strong> from an NIS+ client<br />
host.<br />
The following example changes the permissions for the group table in<br />
the Wiz.Com. domain. It gives user nobody no permissions, owner<br />
<strong>and</strong> group owner full permissions, <strong>and</strong> world read permission only.<br />
nischmod n=,og=rmcd,w=r group.org_dir.Wiz.Com.<br />
The following example gives user nobody read permission for the<br />
groups_dir directory in the default domain <strong>and</strong> takes away modify,<br />
create, <strong>and</strong> destroy permission from the group owner:<br />
nischmod n+r,g-mcd groups_dir<br />
• To change permissions for a table column, use the nistbladm -u<br />
comm<strong>and</strong>.<br />
The following example changes the permissions on the passwd<br />
column of the passwd table in the default domain. It gives nobody,<br />
group, <strong>and</strong> world no permissions <strong>and</strong> takes away create <strong>and</strong> destroy<br />
permissions from the owner.<br />
nistbladm -u passwd=ngw=,o-cd passwd.org_dir<br />
In order to change the permissions for an NIS+ object, you need modify<br />
permission for that object.<br />
You can use SAM (System Administration Manager) to change the<br />
permissions for groups, tables, table entries, <strong>and</strong> table columns. To run<br />
SAM type sam at the HP-UX prompt. For more information, type man 1M<br />
sam.<br />
The actual permissions for an entry or column are the entry or column<br />
permissions plus the permissions for the table. For example, if the<br />
passwd table has permissions ----rmcdrmcd----, <strong>and</strong> the passwd<br />
column of the passwd table has permissions r---------------, the<br />
actual permissions for the passwd column are r---rmcdrmcd----.<br />
NOTE<br />
The cred table must allow read permission to user nobody in order for<br />
NIS+ to start up.<br />
220<br />
Chapter 5
Configuring <strong>and</strong> <strong>Administering</strong> NIS+<br />
<strong>Administering</strong> NIS+<br />
For more information, see the following man pages: nischmod(1),<br />
nistbladm(1), sam(1M), <strong>and</strong> nis(1).<br />
Chapter 5 221
Configuring <strong>and</strong> <strong>Administering</strong> NIS+<br />
<strong>Administering</strong> NIS+<br />
To Change the Ownership of NIS+ Objects<br />
• To change the owner of an NIS+ directory, table, table entry, group, or<br />
link, issue the nischown comm<strong>and</strong> from an NIS+ client host.<br />
The following example changes the owner of the passwd table entry<br />
for user sid to sid.Sales.Wiz.Com.:<br />
nischown sid.Sales.Wiz.Com. ’[name=sid],passwd.org_dir’<br />
The following example makes sid.Sales.Wiz.Com. the owner of his<br />
own cred table entries:<br />
nischown sid ’[cname=sid.Sales.Wiz.Com.],cred.org_dir’<br />
In this example, the owner (sid) not a fully qualified NIS+ principal<br />
name. NIS+ will append the default domain to sid when it processes<br />
the comm<strong>and</strong>. The cred table contains two entries for<br />
sid.Sales.Wiz.Com.: a Local credential <strong>and</strong> a DES credential. The<br />
comm<strong>and</strong> in this example will change the ownership of both entries,<br />
because both entries have the same value in the cname column.<br />
• To change the group owner of an NIS+ directory, table, table entry,<br />
group, or link, issues the nischgrp comm<strong>and</strong>.<br />
The following example changes the group owner of the<br />
Sales.Wiz.Com. directory to admin.Sales.Wiz.Com.:<br />
nischgrp admin.Sales.Wiz.Com. Sales.Wiz.Com.<br />
The following example changes the group owner of all the entries in<br />
the hosts table to the admin group in the default domain:<br />
nischgrp admin ’[]hosts.org_dir’<br />
To change the ownership of an NIS+ object, you need modify permission<br />
for the object.<br />
You can use SAM (System Administration Manager) to change the<br />
ownership for groups, tables, <strong>and</strong> table entries. To run SAM type sam at<br />
the HP-UX prompt. For more information, type man 1M sam.<br />
You cannot change the owner or group owner of a table column, because<br />
it is always the same as the owner <strong>and</strong> group owner of the table.<br />
For more information, see the following man pages: nischown(1),<br />
nischgrp(1), sam(1M), <strong>and</strong> nis(1).<br />
222<br />
Chapter 5
Configuring <strong>and</strong> <strong>Administering</strong> NIS+<br />
<strong>Administering</strong> NIS+<br />
To Change the Search Order of Domains<br />
When a client requests information from an NIS+ table without<br />
specifying a domain, by default, the table in the client’s default domain is<br />
searched first. If the information is not found, <strong>and</strong> the default domain is<br />
not the root domain, the table in the default domain’s parent domain is<br />
searched. The search continues up the hierarchy until the information is<br />
found or the root domain has been searched.<br />
You can override this default search path by setting the NIS_PATH<br />
environment variable.<br />
• If you are using the Korn or Bourne shell, issue the following<br />
comm<strong>and</strong>s:<br />
NIS_PATH=domain:domain:...<br />
export NIS_PATH<br />
• If you are using the C shell, issue the following comm<strong>and</strong>:<br />
setenv NIS_PATH domain:domain:...<br />
You can use the $ character as a wildcard, as in the following example:<br />
NISPATH=’org_dir.$:$:Eng.Wiz.Com.’<br />
Single quotes are required to prevent the shell from interpreting the $<br />
character.<br />
When the $ character replaces part of a domain path name, as in<br />
org_dir.$, it represents the default domain. So, if the default domain is<br />
Sales.Wiz.Com., the domain path org_dir.$ is interpreted as<br />
org_dir.Sales.Wiz.Com.<br />
When the $ character is used to represent an entire domain path name,<br />
like the second $ character in the example above, it represents the<br />
default search path (default domain, then parent domain, <strong>and</strong> on up to<br />
the root domain). If your default domain is Sales.Wiz.Com., <strong>and</strong> the<br />
root domain is Wiz.Com., the NIS_PATH value shown in the above creates<br />
the following search path:<br />
• org_dir.Sales.Wiz.Com.<br />
• Sales.Wiz.Com.<br />
• Wiz.Com.<br />
• Eng.Wiz.Com.<br />
For more information, type man 1 nis at the HP-UX prompt.<br />
Chapter 5 223
Configuring <strong>and</strong> <strong>Administering</strong> NIS+<br />
<strong>Administering</strong> NIS+<br />
To List the Contents of an NIS+ Table<br />
• Issue the following comm<strong>and</strong> from an NIS+ client host:<br />
niscat tablename<br />
For example, to list the contents of the passwd table in the domain<br />
Wiz.Com., you would issue the following comm<strong>and</strong>:<br />
niscat passwd.org_dir.Wiz.Com.<br />
If the table is in the default domain, you do not have to include the<br />
domain name, but you do have to include org_dir.<br />
If you do not have read permission for the table, no entries will be<br />
displayed. If you have read permission only for certain entries, only those<br />
entries will be displayed. If you have read permission only for certain<br />
columns, any columns for which you do not have read permission will be<br />
displayed as *NP*.<br />
You can use SAM (System Administration Manager) to view or modify<br />
the contents of NIS+ tables. To run SAM type sam at the HP-UX prompt.<br />
For more information, type man 1M sam.<br />
For more information, see the following man pages: niscat(1) <strong>and</strong><br />
sam(1M).<br />
224<br />
Chapter 5
Configuring <strong>and</strong> <strong>Administering</strong> NIS+<br />
<strong>Administering</strong> NIS+<br />
To Search an NIS+ Table<br />
• Issue one of the following comm<strong>and</strong>s from any NIS+ client host:<br />
nisgrep ’column_name=regular_expression’ tablename<br />
nismatch column_name=text_string tablename<br />
For example, the following comm<strong>and</strong> returns all the entries from users in<br />
the passwd table whose home directories are under /users:<br />
nisgrep ’home=/users/*’ passwd.org_dir<br />
If you do not specify a column name, the first column of the table is<br />
searched. The following comm<strong>and</strong> returns the Local <strong>and</strong> DES credentials<br />
for NIS+ principal liz.Eng.Wiz.Com. from the cred table:<br />
nismatch liz.Eng.Wiz.Com. cred.org_dir<br />
The nismatch comm<strong>and</strong> can search only columns that were defined as<br />
searchable when the table was created. The nisgrep comm<strong>and</strong> can<br />
search any column in a table.<br />
To get the name of a column, or to determine whether a column is<br />
searchable, issue the following comm<strong>and</strong>:<br />
niscat -o tablename.org_dir<br />
The nisgrep comm<strong>and</strong> can search on regular expressions, but the<br />
nismatch comm<strong>and</strong> can search only for exact matches of text strings.<br />
The nisgrep comm<strong>and</strong> is slower than the nismatch comm<strong>and</strong>.<br />
You must have read permission on the table or the entries you are<br />
searching for, or NIS+ will not display the entries.<br />
You can use SAM (System Administration Manager) to search NIS+<br />
tables. To run SAM type sam at the HP-UX prompt.<br />
For more information, see the following man pages: nismatch(1) <strong>and</strong><br />
sam(1M).<br />
Chapter 5 225
Configuring <strong>and</strong> <strong>Administering</strong> NIS+<br />
<strong>Administering</strong> NIS+<br />
To Add an Entry to an NIS+ Table<br />
To add an entry to an NIS+ table, follow one of these procedures, or use<br />
SAM (System Administration Manager). To run SAM, type sam at the<br />
HP-UX prompt.<br />
To Add an Entry with nistbladm<br />
1. Issue the following comm<strong>and</strong> from any NIS+ client host:<br />
nistbladm -a column_name=value column_name=value ...<br />
tablename<br />
The following example adds an entry to the hosts table:<br />
nistbladm -a cname=romney name=romney.Eng.Wiz.Com \<br />
addr=15.14.13.12 comment=”acb, pillar R4” hosts.org_dir<br />
2. Issue the following comm<strong>and</strong> to make sure the entry was added<br />
successfully:<br />
nismatch column_name=value tablename<br />
The following example searches the hosts table for the entry for host<br />
romney:<br />
nismatch cname=romney hosts.org_dir<br />
If the entry exists, <strong>and</strong> if you have read access to it, the nismatch<br />
comm<strong>and</strong> will return the entry.<br />
In the nistbladm -a comm<strong>and</strong>, you must specify the value for every<br />
column. To leave a column blank, specify no value after the equal sign<br />
(=). The following example adds an entry to the group table without<br />
specifying a password:<br />
nistbladm -a name=staff passwd= gid=10 members=root<br />
group.org_dir<br />
To get the names of the columns in a table, issue the following comm<strong>and</strong>:<br />
niscat -o tablename.org_dir<br />
You must have create permission for the table in order to add an entry to<br />
it.<br />
For more information, see the following man pages: nistbladm(1),<br />
niscat(1), <strong>and</strong> sam(1M).<br />
226<br />
Chapter 5
Configuring <strong>and</strong> <strong>Administering</strong> NIS+<br />
<strong>Administering</strong> NIS+<br />
To Add an Entry with nisaddent<br />
1. Issue the following comm<strong>and</strong> to dump the NIS+ table to a temporary<br />
file:<br />
nisaddent -d table_type > filename<br />
Do not include “org_dir” in the table type. The following example<br />
dumps the group.org_dir table to tempfile:<br />
nisaddent -d group > tempfile<br />
To find out the table type for a table, issue the niscat -o tablename<br />
comm<strong>and</strong>. Type man 1 niscat for more information.<br />
2. Use a text editor to add an entry to the temporary file.<br />
3. Issue the following comm<strong>and</strong> to merge the contents of the temporary<br />
file into the NIS+ table:<br />
nisaddent -m -f filename table_type<br />
For example, the following comm<strong>and</strong> merges the contents of<br />
tempfile into the group.org_dir table:<br />
nisaddent -m -f tempfile group<br />
For more information, type man 1M nisaddent at the HP-UX prompt.<br />
Chapter 5 227
Configuring <strong>and</strong> <strong>Administering</strong> NIS+<br />
<strong>Administering</strong> NIS+<br />
To Remove an Entry from an NIS+ Table<br />
To remove an entry from an NIS+ table, follow this procedure, or use<br />
SAM (System Administration Manager). To run SAM, type sam at the<br />
HP-UX prompt.<br />
• Issue the following comm<strong>and</strong> from any NIS+ client host:<br />
nistbladm -r column_name=value column_name=value ...<br />
tablename<br />
The following example removes an entry from the hosts table:<br />
nistbladm -r cname=romney addr=15.14.13.12 hosts.org_dir<br />
In the nistbladm -r comm<strong>and</strong>, specify as many column values as you<br />
need to identify a single entry. If the criteria you specify identify more<br />
than one entry, NIS+ displays an error. If you want to remove all entries<br />
matching a set of criteria, use the -R option instead of the -r option. The<br />
following example removes both the Local <strong>and</strong> DES credentials for<br />
principal liz.Eng.Wiz.Com. from the cred table:<br />
nistbladm -R cname=liz.Eng.Wiz.Com. cred.org_dir<br />
To get the names of the columns in a table, issue the following comm<strong>and</strong>:<br />
niscat -o tablename.org_dir<br />
You must have destroy permission for the table or for the entries you<br />
want to remove.<br />
For more information, see the following man pages: nistbladm(1),<br />
niscat(1), <strong>and</strong> sam(1M).<br />
228<br />
Chapter 5
Configuring <strong>and</strong> <strong>Administering</strong> NIS+<br />
<strong>Administering</strong> NIS+<br />
To Modify an Entry in an NIS+ Table<br />
You can use either of two methods to modify a table entry:<br />
1. You can use nistbladm(1) to modify the entry directly.<br />
2. You can use nisaddent(1M) to dump the table to a file, <strong>and</strong> you can<br />
modify the file. Then, you can use nisaddent to update the NIS+<br />
table from the file.<br />
You can use SAM (System Administration Manager) to modify entries in<br />
NIS+ tables. To run SAM, type sam at the HP-UX prompt.<br />
You must have modify permission for the table or for the entries you<br />
want to modify.<br />
For more information, see the following man pages: nistbladm(1),<br />
nisaddent(1M), niscat(1), <strong>and</strong> sam(1M).<br />
To Modify an Entry with nistbladm<br />
• Issue the following comm<strong>and</strong> from any NIS+ client host:<br />
nistbladm -m column_name=new_value column_name=new_value<br />
... \<br />
’[column_name=old_value,column_name=old_value<br />
...],tablename’<br />
The following example changes a user’s shell in the passwd table:<br />
nistbladm -m shell=ksh ’[name=maddy,uid=6789],passwd.org_dir’<br />
The values you specify inside the square brackets must identify a single<br />
entry.<br />
To get the names of the columns in a table, issue the following comm<strong>and</strong>:<br />
niscat -o tablename.org_dir<br />
For more information, see the following man pages: nistbladm(1M) <strong>and</strong><br />
niscat(1).<br />
Chapter 5 229
Configuring <strong>and</strong> <strong>Administering</strong> NIS+<br />
<strong>Administering</strong> NIS+<br />
To Modify an Entry with nisaddent<br />
1. Issue the following comm<strong>and</strong> to dump the NIS+ table to a temporary<br />
file:<br />
nisaddent -d table_type > filename<br />
Do not include “org_dir” in the table type. The following example<br />
dumps the group.org_dir table to tempfile:<br />
nisaddent -d group > tempfile<br />
To find out the table type for a table, issue the niscat -o tablename<br />
comm<strong>and</strong>. Type man 1 niscat for more information.<br />
2. Use a text editor to make your changes to the temporary file.<br />
3. Issue the following comm<strong>and</strong> to merge the contents of the temporary<br />
file into the NIS+ table:<br />
nisaddent -m -f filename table_type<br />
For example, the following comm<strong>and</strong> merges the contents of<br />
tempfile into the group.org_dir table:<br />
nisaddent -m -f tempfile group<br />
For more information, type man 1M nisaddent at the HP-UX prompt.<br />
230<br />
Chapter 5
Configuring <strong>and</strong> <strong>Administering</strong> NIS+<br />
<strong>Administering</strong> NIS+<br />
To Add a Host to an NIS+ Domain<br />
1. Issue the following comm<strong>and</strong>, from any NIS+ client host, to add the<br />
new host to the NIS+ hosts table:<br />
nistbladm -a cname=hostname name=hostname addr=IPaddress \<br />
comment=comment hosts.org_dir.domainname<br />
You must have create permission for the hosts table to use this<br />
comm<strong>and</strong>.<br />
You must create one hosts table entry in which the cname <strong>and</strong> name<br />
columns are both set to the official host name. If you wish to configure<br />
aliases for the host name, create entries in which the cname column<br />
contains the official host name <strong>and</strong> the name column contains the<br />
alias.<br />
If the domain is the default domain, you do not have to specify the<br />
domain name, as in the following example:<br />
nistbladm -a cname=romney.Eng.Wiz.Com<br />
name=romney.Eng.Wiz.Com \<br />
addr=15.14.13.12 comment= hosts.org_dir<br />
2. Issue the following comm<strong>and</strong> to add a DES credential for the new<br />
host to the cred table:<br />
nisaddcred -p unix.hostname@domainname -P<br />
hostname.domainname \<br />
des domainname<br />
If you do not specify the domain name as the last argument, the<br />
credential is created in the default domain, as in the following<br />
example:<br />
nisaddcred -p unix.romney@Eng.Wiz.Com -P romney.Wiz.Com.<br />
des<br />
The argument following the -p option is the host’s secure RPC<br />
netname <strong>and</strong> does not end with a period. The argument following the<br />
-P option is the host’s NIS+ principal name <strong>and</strong> must end with a<br />
period.<br />
When NIS+ prompts you for a password, enter the root password of<br />
the new host.<br />
You must have create permission for the cred table to use this<br />
comm<strong>and</strong>.<br />
3. If you want to allow the root user on this host to administer the NIS+<br />
Chapter 5 231
Configuring <strong>and</strong> <strong>Administering</strong> NIS+<br />
<strong>Administering</strong> NIS+<br />
domain, add the host to the domain’s admin group. Issue this<br />
comm<strong>and</strong>:<br />
nisgrpadm -a hostname.domainname admin_groupname.domainname<br />
The admin group for most domains is called “admin,” as in the<br />
following example:<br />
nisgrpadm -a romney.Eng.Wiz.Com. admin.Eng.Wiz.Com.<br />
You must have modify permission for the admin group in order to add<br />
members to it.<br />
4. Set up the host as a client of the NIS+ domain to which you just<br />
added the host’s data <strong>and</strong> credentials. See “To Set Up NIS+ Client<br />
Hosts” on page 206.<br />
You can use SAM (System Administration Manager) to add hosts to the<br />
hosts table, cred table, <strong>and</strong> admin group in an NIS+ domain, but you<br />
cannot use SAM to set up NIS+ clients. To run SAM, type sam at the<br />
HP-UX prompt.<br />
For more information, see the following man pages: nistbladm(1),<br />
nisaddcred(1M), nisgrpadm(1), sam(1M), <strong>and</strong> nis(1).<br />
232<br />
Chapter 5
Configuring <strong>and</strong> <strong>Administering</strong> NIS+<br />
<strong>Administering</strong> NIS+<br />
To Add a User to an NIS+ Domain<br />
To add users to an NIS+ domain, follow this procedure, or use SAM<br />
(System Administration Manager). To run SAM, type sam at the HP-UX<br />
prompt.<br />
1. Issue the following comm<strong>and</strong>, from any NIS+ client host, to add the<br />
new user to the NIS+ passwd table:<br />
nistbladm -a name=loginname passwd= uid=userID gid=groupID \<br />
gcos=user_info home=home_dir shell=shell shadow= \<br />
passwd.org_dir.domainname<br />
You must have create permission for the passwd table to use this<br />
comm<strong>and</strong>.<br />
If the domain is the default domain, you do not have to specify the<br />
domain name, as in the following example:<br />
nistbladm -a name=sara passwd= uid=7899 gid=20 \<br />
gcos=”Sara Sena,,x77555,” home=/home/sara shell=/bin/ksh \<br />
shadow= passwd.org_dir<br />
2. Issue the following comm<strong>and</strong>s to add Local <strong>and</strong> DES credentials for<br />
the new user to the cred table:<br />
nisaddcred -p UID -P loginname.domainname local domainname<br />
nisaddcred -p unix.UID@domainname -P loginname.domainname<br />
des \<br />
domainname<br />
If you do not specify the domain name as the last argument, the<br />
credentials are created in the default domain, as in the following<br />
example:<br />
nisaddcred -p 7899 -P sara.Eng.Wiz.Com. local<br />
nisaddcred -p unix.7899@Eng.Wiz.Com -P sara.Eng.Wiz.Com.<br />
des<br />
The user ID must not belong to any other user in the passwd table.<br />
The argument following the -P option is the user’s NIS+ principal<br />
name <strong>and</strong> must end with a period.<br />
When the nisaddcred comm<strong>and</strong> prompts you for a password, enter a<br />
temporary password for the user.<br />
You must have create permission for the cred table to use this<br />
comm<strong>and</strong>.<br />
3. Issue the following comm<strong>and</strong> to change the user’s password:<br />
Chapter 5 233
Configuring <strong>and</strong> <strong>Administering</strong> NIS+<br />
<strong>Administering</strong> NIS+<br />
passwd -r nisplus loginname<br />
When the nispasswd comm<strong>and</strong> prompts you for a password, type the<br />
same password you typed when you created the user’s DES credential<br />
in step 2.<br />
You can ignore the message that tells you what to do if the user’s<br />
login password is different from the user’s secure RPC password. If<br />
you followed the steps in this section, the user’s two passwords are<br />
the same.<br />
4. Issue the following comm<strong>and</strong> to make the user the owner of the user’s<br />
passwd table entry:<br />
nischown username.domainname<br />
’[name=username],passwd.org_dir.domainname’<br />
The following example changes the ownership of a passwd table entry<br />
in the default domain:<br />
nischown sara.Eng.Wiz.Com. ’[name=sara],passwd.org_dir’<br />
5. Add the user to the primary group you specified when you added the<br />
user to the passwd table.<br />
a. Issue the following comm<strong>and</strong> to dump the current NIS+ group<br />
table to a file:<br />
nisaddent -d group > filename<br />
b. Use a text editor to add the new user to the appropriate group in<br />
filename.<br />
c. Issue the following comm<strong>and</strong> to merge the contents of the<br />
temporary file into the NIS+ group table:<br />
nisaddent -m -f filename group<br />
You must have modify permission for the group table to add a user to<br />
a group.<br />
6. Create the user’s home directory, <strong>and</strong> make the user the owner of it,<br />
as in the following example:<br />
mkdir /export/home/sara<br />
chown sara /export/home/sara<br />
7. If you are using the automounter to mount users’ home directories,<br />
add the new user’s home directory to the auto_home table. For<br />
information on the automounter, see “Configuring <strong>and</strong> <strong>Administering</strong><br />
the <strong>NFS</strong> Automounter” on page 55. For instructions on adding an<br />
234<br />
Chapter 5
Configuring <strong>and</strong> <strong>Administering</strong> NIS+<br />
<strong>Administering</strong> NIS+<br />
entry to an NIS+ table, see “To Add an Entry to an NIS+ Table” on<br />
page 226.<br />
8. Tell the new user to log in with the password you specified in steps 2<br />
<strong>and</strong> 3 <strong>and</strong> change passwords with the nispasswd comm<strong>and</strong>.<br />
For more information, see the following man pages: nistbladm(1),<br />
nisaddcred(1M), passwd(1), nisaddent(1), sam(1M), <strong>and</strong> nis(1).<br />
Chapter 5 235
Configuring <strong>and</strong> <strong>Administering</strong> NIS+<br />
<strong>Administering</strong> NIS+<br />
To Create New Credentials for an Existing NIS+<br />
Principal<br />
Sometimes a user or host needs new credentials, because the old ones<br />
have become corrupted or cannot be used. Follow these steps:<br />
1. Log in as root to the NIS+ master server for the domain.<br />
2. Issue the following comm<strong>and</strong> to create new credentials for the NIS+<br />
principal <strong>and</strong> overwrite any existing credentials:<br />
/usr/lib/nis/nisclient -co principalname<br />
where principalname is username.domainname for a non-root user or<br />
hostname.domainname for a root user (host).<br />
Supply the password when you are prompted for it.<br />
3. Wait two minutes for the NIS+ replicas to be updated.<br />
4. If the principal is a root user (host), log into the host as root, <strong>and</strong> issue<br />
the following comm<strong>and</strong> to reinitialize it:<br />
/usr/lib/nis/nisclient -i -h master_servername -d<br />
domainname<br />
5. Test the login by having the user or root user log in. If the login does<br />
not work, try killing <strong>and</strong> restarting rpc.nisd on the master server:<br />
ps -ef | grep rpc.nisd<br />
kill PID<br />
rpc.nisd<br />
If you are running in NIS compatibility mode, be sure to restart<br />
rpc.nisd with the -Y option:<br />
rpc.nisd -Y<br />
For more information, see the following man pages: nisclient(1M) <strong>and</strong><br />
rpc.nisd(1M).<br />
236<br />
Chapter 5
Configuring <strong>and</strong> <strong>Administering</strong> NIS+<br />
<strong>Administering</strong> NIS+<br />
To Create New Credentials for the Root Master Server<br />
Sometimes the credentials for the root master server become corrupted<br />
<strong>and</strong> unusable, <strong>and</strong> it is necessary to create new ones. Follow this<br />
procedure to recreate the credentials for the root master server host.<br />
1. Log in as root to every NIS+ server in the namespace, <strong>and</strong> issue the<br />
following comm<strong>and</strong>s to kill the nis_cachemgr process <strong>and</strong> restart<br />
rpc.nisd at security level 0:<br />
ps -ef | grep nis_cachemgr<br />
kill PID<br />
ps -ef | grep rpc.nisd<br />
kill PID<br />
rpc.nisd -S 0<br />
2. Log into the root master server, <strong>and</strong> issue the following comm<strong>and</strong> to<br />
create new credentials for the root master server host:<br />
nisaddcred -p unix.hostname@domain -P hostname.domain des<br />
where hostname is the name of the root master server. Note that the<br />
secure RPC netname (following -p) does not end in a dot, while the<br />
NIS+ principal name (following -P) does end in a dot.<br />
Enter the root password when prompted for it.<br />
If the nisaddcred comm<strong>and</strong> hangs, perform step 3, below, then try<br />
step 2 again.<br />
3. On the root master server, issue the following comm<strong>and</strong>s to kill the<br />
keyserv daemon <strong>and</strong> remove the /etc/.rootkey file:<br />
ps -ef | grep keyserv<br />
kill PID<br />
rm /etc/.rootkey<br />
4. On the root master server, issue the following comm<strong>and</strong>s. Note that<br />
the domainname must end in a dot.<br />
nisupdkeys org_dir.domainname.<br />
nisupdkeys groups_dir.domainname.<br />
nisupdkeys domainname.<br />
5. On the root master server, issue the following comm<strong>and</strong>s:<br />
nisping org_dir<br />
nisping groups_dir<br />
nisping domainname<br />
Chapter 5 237
Configuring <strong>and</strong> <strong>Administering</strong> NIS+<br />
<strong>Administering</strong> NIS+<br />
6. On the root master server, issue the following comm<strong>and</strong>:<br />
keylogin -r<br />
Supply the root password when prompted for it.<br />
7. Log in as root to every server in the namespace, <strong>and</strong> issue the<br />
following comm<strong>and</strong>s. Note that the domainname must end in a dot.<br />
nisupdkeys org_dir.domainname.<br />
nisupdkeys groups_dir.domainname.<br />
nisupdkeys domainname.<br />
8. Log in as root to every server in the namespace, including the root<br />
master server, <strong>and</strong> issue the following comm<strong>and</strong>s to restart the<br />
nis_cachemgr process <strong>and</strong> restart rpc.nisd at security level 2:<br />
nis_cachemgr -i<br />
ps -ef | grep rpc.nisd<br />
kill PID<br />
rpc.nisd<br />
For more information, see the following man pages: nis_cachemgr(1M),<br />
rpc.nisd(1M), nisaddcred(1M), keyserv(1M), nisupdkeys(1M),<br />
nisping(1M), <strong>and</strong> keylogin(1).<br />
238<br />
Chapter 5
Configuring <strong>and</strong> <strong>Administering</strong> NIS+<br />
<strong>Administering</strong> NIS+<br />
To Change a Password<br />
• To change the password of a non-root user, issue the following<br />
comm<strong>and</strong> from any NIS+ client host:<br />
passwd -r nisplus username -D domainname<br />
The username is not necessary if you are logged in as a non-root user<br />
<strong>and</strong> are changing your own password. The -D domainname is<br />
necessary only if you are changing the password of a user in another<br />
domain.<br />
The nispasswd comm<strong>and</strong> changes the password in the NIS+ passwd<br />
<strong>and</strong> cred tables. It does not change the password in the /etc/passwd<br />
file. To change the password in the /etc/passwd file, use the<br />
passwd(1) comm<strong>and</strong>.<br />
If your NIS+ servers are running in NIS compatibility mode, users on<br />
NIS clients must use the yppasswd comm<strong>and</strong> to change their<br />
passwords in the NIS+ passwd table.<br />
To change a non-root user’s password, you must have modify<br />
permission for the passwd <strong>and</strong> cred tables or for the user’s entries in<br />
the passwd <strong>and</strong> cred tables.<br />
• To change the password of a root user, follow these steps:<br />
1. Log in as root to the host whose password you want to change.<br />
2. Issue the passwd comm<strong>and</strong> to change the root password in the<br />
/etc/passwd file:<br />
passwd<br />
3. Issue the following comm<strong>and</strong> to encrypt the root user’s secret key<br />
with the new password:<br />
chkey -p<br />
CAUTION<br />
You can change the root password on the root master server, but do not<br />
change the public or private key on the root master server. The root<br />
master server’s keys are embedded in every directory object on every<br />
client, replica server, <strong>and</strong> subdomain server.<br />
For more information, see the following man pages: nispasswd(1),<br />
yppasswd(1), passwd(1), chkey(1), <strong>and</strong> nis(1).<br />
Chapter 5 239
Configuring <strong>and</strong> <strong>Administering</strong> NIS+<br />
<strong>Administering</strong> NIS+<br />
To Create an NIS+ Table<br />
When you set up an NIS+ domain, the nisserver script creates a default<br />
set of tables. You can also create your own custom tables.<br />
1. Issue the following comm<strong>and</strong> from any NIS+ client host:<br />
nistbladm -c table_type column=flags column=flags ...<br />
tablename<br />
The following example creates a three-column table called<br />
hostinfo.Wiz.Com. The S flag indicates that the first two columns<br />
are searchable.<br />
nistbladm -c hostinfo host=S user=S \<br />
location= hostinfo.org_dir.Wiz.Com.<br />
In most cases, the table type can be the same as the table name<br />
(without org_dir <strong>and</strong> the domain name). In most of the st<strong>and</strong>ard<br />
tables, the table type is the same as the table name. Two-column<br />
tables in which only the first column is searchable have type<br />
key-value. All automounter maps have type key-value.<br />
2. If your table has type key-value (two columns with only the first<br />
column searchable), you can use the nisaddent comm<strong>and</strong> to populate<br />
it from a file or an NIS map. The following example populates the<br />
auto_direct map from the /etc/auto.direct file:<br />
nisaddent -f /etc/auto.direct -t auto_direct.org_dir<br />
key-value<br />
If your table is not of type key-value, you must add entries to it one at<br />
a time. You can use SAM, or you can use the nistbladm comm<strong>and</strong>.<br />
See “To Add an Entry to an NIS+ Table” on page 226.<br />
At least one column in a table must be searchable.<br />
To create a table, you must have create permission for the org_dir<br />
directory (or the directory where you want to put the new table).<br />
For more information, see the following man pages: nistbladm(1),<br />
nisaddent(1M), <strong>and</strong> sam(1M).<br />
240<br />
Chapter 5
Configuring <strong>and</strong> <strong>Administering</strong> NIS+<br />
<strong>Administering</strong> NIS+<br />
To Remove an NIS+ Table<br />
1. Issue the following comm<strong>and</strong> from any NIS+ client host, to remove all<br />
the entries in the table:<br />
nistbladm -R ’[],tablename’<br />
The following example removes all the entries from the<br />
mail_aliases table in the Wiz.Com. domain:<br />
nistbladm -R ’[],mail_aliases.org_dir.Wiz.Com.’<br />
2. Issue the following comm<strong>and</strong> from any NIS+ client host to remove the<br />
table:<br />
nistbladm -d tablename<br />
The following example removes the mail_aliases table from the<br />
Wiz.Com. domain:<br />
nistbladm -d mail_aliases.org_dir.Wiz.Com.<br />
If the table is in the default domain, you do not have to specify the fully<br />
qualified domain with the table name, but you still have to include<br />
“org_dir” in the table name.<br />
A table must be empty before you can remove it.<br />
To remove a table, you must have destroy permission for the NIS+<br />
directory where the table resides.<br />
For more information, type man 1 nistbladm at the HP-UX prompt.<br />
Chapter 5 241
Configuring <strong>and</strong> <strong>Administering</strong> NIS+<br />
<strong>Administering</strong> NIS+<br />
To Create or Remove Paths Among Tables<br />
A concatenation path or table path is a property of a table. If a table<br />
does not contain information requested by an NIS+ principal, but it has a<br />
concatenation path, NIS+ searches the other tables in the concatenation<br />
path until it finds the requested information or comes to the end of the<br />
path. NIS+ does not follow paths recursively; that is, if one of the tables<br />
in the concatenation path has its own concatenation path, NIS+ will not<br />
follow it.<br />
Do not use table paths if your server is running in NIS compatibility<br />
mode. NIS clients cannot follow table paths.<br />
• To find out whether a table has a concatenation path, issue this<br />
comm<strong>and</strong>:<br />
niscat -o tablename<br />
The Search Path line in the output is the table’s concatenation path.<br />
• To create or modify a concatenation path for a table, issue this<br />
comm<strong>and</strong>:<br />
nistbladm -u -p othertable:othertable... tablename<br />
The following example creates a path from passwd.Sales.Wiz.Com.<br />
to passwd.Eng.Wiz.Com. It causes NIS+ to search the passwd table<br />
of the Eng.Wiz.Com. domain if it fails to find requested information<br />
in the passwd table of the Sales.Wiz.Com. domain.<br />
nistbladm -u -p passwd.Eng.Wiz.Com. passwd.Sales.Wiz.Com.<br />
• To remove a concatenation path from a table, issue this comm<strong>and</strong>:<br />
nistbladm -u -p ”” tablename<br />
The following example removes the concatenation path from the<br />
passwd table in the Sales.Wiz.Com. domain:<br />
nistbladm -u -p ”” passwd.Sales.Wiz.Com.<br />
You can also create NIS+ links to other tables, but links are slower than<br />
paths <strong>and</strong> are not recommended. Type man 1 nisln for more<br />
information.<br />
You need modify permission for a table to change its concatenation path.<br />
For more information, type man 1 nistbladm at the HP-UX prompt.<br />
242<br />
Chapter 5
Configuring <strong>and</strong> <strong>Administering</strong> NIS+<br />
<strong>Administering</strong> NIS+<br />
To Create or Remove an NIS+ Group<br />
• To create an NIS+ group, type the following comm<strong>and</strong> on any NIS+<br />
client host:<br />
nisgrpadm -c groupname<br />
The following example creates an NIS+ group called engineers in<br />
the Sales.Wiz.Com. domain:<br />
nisgrpadm -c engineers.Sales.Wiz.Com.<br />
• To remove an NIS+ group, type the following comm<strong>and</strong> on any NIS+<br />
client host:<br />
nisgrpadm -d groupname<br />
The following example removes the NIS+ group called engineers<br />
from the Sales.Wiz.Com. domain:<br />
nisgrpadm -d engineers.Sales.Wiz.Com.<br />
NIS+ groups are not the same as the HP-UX groups stored in the<br />
group.org_dir table or the /etc/group file. NIS+ groups are used to<br />
determine group ownership of NIS+ objects. NIS+ objects allow certain<br />
access permissions to their group owners. NIS+ groups are stored in the<br />
groups_dir subdirectory of the domain directory.<br />
To create an NIS+ group, you must have create permission for the<br />
groups_dir directory. To remove a group, you must have destroy<br />
permission for group or for the groups_dir directory.<br />
You can use SAM (System Administration Manager) to create or remove<br />
NIS+ groups. To run SAM, type sam at the HP-UX prompt.<br />
For more information, see the following man pages: nisgrpadm(1) <strong>and</strong><br />
sam(1M).<br />
Chapter 5 243
Configuring <strong>and</strong> <strong>Administering</strong> NIS+<br />
<strong>Administering</strong> NIS+<br />
To Add or Remove Members of an NIS+ Group<br />
• To add members to an NIS+ group, type the following comm<strong>and</strong> on<br />
any NIS+ client host:<br />
nisgrpadm -a groupname group_member [group_member...]<br />
The following example adds the host principal thyme.Wiz.Com. <strong>and</strong><br />
the NIS+ group tempadmin.Wiz.Com. to the group admin.Wiz.Com.:<br />
nisgrpadm -a admin.Wiz.Com. thyme.Wiz.Com.<br />
@tempadmin.Wiz.Com.<br />
• To remove members from an NIS+ group, type the following<br />
comm<strong>and</strong> on any NIS+ client host:<br />
nisgrpadm -r groupname group_member [group_member...]<br />
The following example removes the user principal amy.Wiz.Com. <strong>and</strong><br />
all principals in the Eng.Wiz.Com. domain from the group<br />
admin.Wiz.Com.:<br />
nisgrpadm -r admin.Wiz.Com. amy.Wiz.Com. *.Eng.Wiz.Com.<br />
• To list the current members of an NIS+ group, type the following<br />
comm<strong>and</strong> on any NIS+ client host:<br />
nisgrpadm -l groupname<br />
An NIS+ group member may take any of the following forms:<br />
principal<br />
@group<br />
Any host or user principal (for example, amy.Wiz.Com.)<br />
Another NIS+ group (for example,<br />
@tempadmin.Wiz.Com.)<br />
*.domain All principals in an NIS+ domain (for example,<br />
*.Eng.Wiz.Com.)<br />
You can exclude any of these types of members from a group by putting a<br />
minus sign (-) before the member (for example, -@tempadmin.Wiz.Com.).<br />
A user must have a Local credential in the cred table of the group’s<br />
domain before you can add the user to the group.<br />
NIS+ groups are not the same as the HP-UX groups stored in the<br />
group.org_dir table or the /etc/group file. NIS+ groups are used to<br />
determine group ownership of NIS+ objects. NIS+ objects allow certain<br />
access permissions to their group owners. NIS+ groups are stored in the<br />
groups_dir subdirectory of the domain directory.<br />
244<br />
Chapter 5
Configuring <strong>and</strong> <strong>Administering</strong> NIS+<br />
<strong>Administering</strong> NIS+<br />
To add or remove members of an NIS+ group, you must have modify<br />
permission for the group.<br />
You can use SAM (System Administration Manager) to add or remove<br />
members of NIS+ groups. To run SAM, type sam at the HP-UX prompt.<br />
For more information, see the man pages nisgrpadm(1) <strong>and</strong> sam(1M).<br />
Chapter 5 245
Configuring <strong>and</strong> <strong>Administering</strong> NIS+<br />
<strong>Administering</strong> NIS+<br />
To Remove a Replica Server from an NIS+ Domain<br />
1. Log into the replica you want to remove, <strong>and</strong> issue the following<br />
comm<strong>and</strong>s to kill rpc.nisd <strong>and</strong> nis_cachemgr:<br />
ps -ef | grep rpc.nisd<br />
kill PID<br />
ps -ef | grep nis_cachemgr<br />
kill PID<br />
2. Issue the following comm<strong>and</strong> to remove the /var/nis directory:<br />
rm -R /var/nis<br />
3. Reinitialize the host as an NIS+ client. See “To Set Up NIS+ Client<br />
Hosts” on page 206.<br />
4. From any NIS+ client host, issue the following comm<strong>and</strong>s:<br />
nisrmdir -s -f replica_hostname org_dir.domainname<br />
nisrmdir -s -f replica_hostname groups_dir.domainname<br />
nisrmdir -s -f replica_hostname domainname<br />
The following comm<strong>and</strong>s removes replica server thyme from domain<br />
Eng.Wiz.Com.:<br />
nisrmdir -s -f thyme org_dir.Eng.Wiz.Com.<br />
nisrmdir -s -f thyme groups_dir.Eng.Wiz.Com.<br />
nisrmdir -s -f thyme Eng.Wiz.Com.<br />
The -f option forces the replica to be removed, even if the replica<br />
cannot be reached.<br />
To remove a replica server from a domain, you must have modify<br />
permission for the domain the replica serves.<br />
For more information, see the following man pages: nisrmdir(1) <strong>and</strong><br />
nis(1).<br />
246<br />
Chapter 5
Configuring <strong>and</strong> <strong>Administering</strong> NIS+<br />
<strong>Administering</strong> NIS+<br />
To Remove an NIS+ Domain<br />
• Issue the following comm<strong>and</strong>s to remove an NIS+ domain:<br />
nisrmdir org_dir.domainname<br />
nisrmdir groups_dir.domainname<br />
nisrmdir domainname<br />
You must remove the org_dir <strong>and</strong> groups_dir directories before you<br />
remove the domain directory. You will not be able to remove the<br />
org_dir <strong>and</strong> groups_dir subdirectories if you remove the domain<br />
directory first.<br />
The nisrmdir comm<strong>and</strong> dissociates all servers from the domain <strong>and</strong><br />
removes the domain directory.<br />
You must have destroy permission for the parent domain in order to<br />
remove a subdomain.<br />
For more information, see the following man pages: nisrmdir(1) <strong>and</strong><br />
nis(1).<br />
Chapter 5 247
Configuring <strong>and</strong> <strong>Administering</strong> NIS+<br />
<strong>Administering</strong> NIS+<br />
To Back Up NIS+ Tables<br />
It is recommended that you back up your NIS+ tables at least once a day.<br />
1. Create a directory for your flat files, <strong>and</strong> make it the current<br />
directory:<br />
mkdir /nis+files<br />
cd /nis+files<br />
2. Set the PATH variable to include /usr/lib/nis. If you are running<br />
the C shell, type the following comm<strong>and</strong>:<br />
setenv PATH $PATH:/usr/lib/nis<br />
If you are running the Bourne or Korn shell, type the following<br />
comm<strong>and</strong>s:<br />
PATH=$PATH:/usr/lib/nis<br />
export PATH<br />
3. Issue the following comm<strong>and</strong>s to dump your NIS+ tables to files:<br />
nisaddent -d aliases > aliases<br />
nisaddent -d bootparams > bootparams<br />
nisaddent -d ethers > ethers<br />
nisaddent -d group > group<br />
nisaddent -d hosts > hosts<br />
nisaddent -d netgroup > netgroup<br />
nisaddent -d netid > netid<br />
nisaddent -d netmasks > netmasks<br />
nisaddent -d networks > networks<br />
nisaddent -d passwd > passwd<br />
nisaddent -d protocols > protocols<br />
nisaddent -d publickey > publickey<br />
nisaddent -d rpc > rpc<br />
nisaddent -d services > services<br />
nisaddent -d trusted > trusted<br />
nisaddent -d timezone > timezone<br />
niscat auto_home.org_dir > auto_home<br />
niscat auto_master.org_dir > auto_master<br />
niscat auto_direct.org_dir > auto_direct<br />
4. Make sure your NIS+ tables are fully checkpointed. Issue the<br />
following comm<strong>and</strong> to check the size of your transaction log:<br />
nislog | head -10<br />
If your transaction log contains only three entries, then your tables<br />
are fully checkpointed. If your transaction logs contain more than<br />
248<br />
Chapter 5
Configuring <strong>and</strong> <strong>Administering</strong> NIS+<br />
<strong>Administering</strong> NIS+<br />
three entries, issue the following comm<strong>and</strong> to checkpoint them:<br />
nisping -Ca<br />
5. Use your favorite backup utility (tar[1], dump[1M], etc.) to back up<br />
the following:<br />
• The /var/nis directory<br />
• The /etc/.rootkey file<br />
• The flat files you created by dumping the NIS+ tables<br />
Chapter 5 249
Configuring <strong>and</strong> <strong>Administering</strong> NIS+<br />
Summary of NIS+ Comm<strong>and</strong>s<br />
Table 5-2<br />
chkey(1)<br />
domainname(1)<br />
keylogin(1)<br />
keylogout(1)<br />
nisaddent(1M)<br />
nisaddcred(1M)<br />
nis_cachemgr(1M)<br />
niscat(1)<br />
nischgrp(1)<br />
nischmod(1)<br />
nischown(1)<br />
nischttl(1)<br />
nisclient(1M)<br />
nisdefaults(1)<br />
niserror(1)<br />
Summary of NIS+ Comm<strong>and</strong>s<br />
Summary of NIS+ Comm<strong>and</strong>s<br />
Creates or changes a secure RPC key.<br />
Sets or displays the name of the NIS+ domain.<br />
Decrypts <strong>and</strong> stores a secure RPC key. keylogin is called when<br />
a user logs in, but the user must issue keylogin if no password<br />
was provided at login or if the login password is different from<br />
the secure RPC password.<br />
Deletes a stored decrypted secure RPC key.<br />
Populates or updates an NIS+ table with the contents of a file or<br />
NIS map.<br />
Adds credentials for NIS+ principals to the cred table.<br />
A daemon that caches information about servers <strong>and</strong> their<br />
locations.<br />
Displays the entries in an NIS+ table or the properties of an<br />
NIS+ object.<br />
Changes the group owner of an NIS+ object.<br />
Changes the permissions on an NIS+ object.<br />
Changes the owner of an NIS+ object.<br />
Changes the time to live of an NIS+ object. The time to live is<br />
the length of time a directory or group object may remain<br />
cached.<br />
Initializes NIS+ client hosts. Creates credentials for NIS+<br />
users.<br />
Lists the default values for the current process. Default values<br />
include permissions <strong>and</strong> ownership for any new NIS+ objects<br />
created.<br />
Displays the error message that corresponds to an NIS+ error<br />
number.<br />
250<br />
Chapter 5
Configuring <strong>and</strong> <strong>Administering</strong> NIS+<br />
Summary of NIS+ Comm<strong>and</strong>s<br />
Table 5-2<br />
nisgrep(1)<br />
nisgrpadm(1)<br />
nisinit(1M)<br />
nisln(1)<br />
nislog(1M)<br />
nismatch(1)<br />
nismkdir(1M)<br />
nispasswd(1)<br />
nisping(1M)<br />
nispopulate(1M)<br />
nisrm(1)<br />
nisrmdir(1)<br />
nisserver(1M)<br />
nisetup(1M)<br />
nisstat(1M)<br />
Summary of NIS+ Comm<strong>and</strong>s<br />
Searches an NIS+ table for a specified string or regular<br />
expression.<br />
Creates or destroys NIS+ groups. Adds or removes NIS+ group<br />
members. Lists the members or tests for membership in an<br />
NIS+ group.<br />
Initializes an NIS+ client or NIS+ root master server.<br />
Hewlett-Packard recommends that you use the nisclient(1M)<br />
<strong>and</strong> nisserver(1M) scripts instead of the nisinit script.<br />
Symbolically links NIS+ objects.<br />
Displays the contents of the NIS+ transaction log.<br />
Searches specified columns in an NIS+ table for specified<br />
values.<br />
Creates an NIS+ directory or adds a replica server to an<br />
existing NIS+ directory.<br />
Changes a user’s login password in the NIS+ passwd table <strong>and</strong><br />
encrypts the user’s secret key with the new password.<br />
Causes servers to update their tables with the information in<br />
their transaction logs.<br />
Populates NIS+ tables with data from files or NIS maps.<br />
Removes an NIS+ object.<br />
Removes an NIS+ directory or removes a replica server from a<br />
directory.<br />
Sets up a host as an NIS+ server.<br />
Creates all the default tables for an NIS+ domain.<br />
Displays statistics <strong>and</strong> configuration information about an NIS+<br />
server.<br />
nisshowcache(1M)<br />
Displays the contents of the NIS+ directory cache.<br />
Chapter 5 251
Configuring <strong>and</strong> <strong>Administering</strong> NIS+<br />
Summary of NIS+ Comm<strong>and</strong>s<br />
Table 5-2<br />
nistbladm(1)<br />
nistest(1)<br />
nisupdkeys(1M)<br />
Summary of NIS+ Comm<strong>and</strong>s<br />
Creates or destroys NIS+ tables. Adds, removes, or modifies<br />
entries in NIS+ tables. Modifies table properties, like the<br />
concatenation path <strong>and</strong> separator character.<br />
Tests for the existence, object type, <strong>and</strong> access rights of NIS+<br />
objects.<br />
Updates the public keys in an NIS+ directory object.<br />
rpc.nisd(1M)<br />
rpc.nisd_resolv(1M)<br />
rpc.nisd is the NIS+ server daemon. The nisd_resolv process<br />
is started when you run rpc.nisd in NIS compatibility mode<br />
with DNS forwarding.<br />
252<br />
Chapter 5
6 Configuring the Name Service<br />
Switch<br />
Chapter 6 253
Configuring the Name Service Switch<br />
The Name Service Switch determines where your host will look for the<br />
information that is traditionally stored in the following files:<br />
• /etc/mail/aliases<br />
• automounter maps (like /etc/auto_master <strong>and</strong> /etc/auto_home)<br />
• /etc/group<br />
• /etc/hosts<br />
• /etc/netgroup<br />
• /etc/networks<br />
• /etc/passwd<br />
• /etc/protocols<br />
• /etc/publickey<br />
• /etc/rpc<br />
• /etc/services<br />
You can configure your host to look for each type of information in NIS,<br />
NIS+, or the local /etc file. You can configure your host to consult any<br />
combination of these sources, in any order; however, it is recommended<br />
that you do not configure your host to consult both NIS <strong>and</strong> NIS+.<br />
For host information (host names <strong>and</strong> IP addresses), you can configure<br />
your host to consult BIND (DNS) in addition to NIS, NIS+, or the local<br />
/etc/hosts file. Again, it is recommended that you do not configure your<br />
host to consult both NIS <strong>and</strong> NIS+.<br />
The Name Service Switch on HP-UX 10.30 has a different default<br />
behavior from the Name Service Switch in previous releases. If you are<br />
using the default Name Service Switch configuration (or if you do not<br />
have an /etc/nsswitch.conf file), <strong>and</strong> you want your host to behave<br />
the same way after you upgrade to HP-UX 10.30, copy the<br />
/etc/nsswitch.hp_defaults file to /etc/nsswitch.conf. See “Default<br />
Configuration” on page 261 for more information.<br />
The ability to consult more than one name service for host information is<br />
often called hostname fallback. The Name Service Switch provides<br />
client-side hostname fallback, because it is used by client-side<br />
programs (for example, gethostbyname) which request host information.<br />
NIS <strong>and</strong> NIS+ allow you to configure a server-side hostname<br />
fallback, which causes the NIS or NIS+ server to query BIND when it<br />
254<br />
Chapter 6
Configuring the Name Service Switch<br />
fails to find requested host information in its database. The NIS or NIS+<br />
server then returns the host information to the client through NIS or<br />
NIS+. An NIS+ server must run in NIS compatibility mode to support<br />
server-side hostname fallback. This server-side hostname fallback is<br />
intended for use with clients like PCs that do not have a feature like the<br />
Name Service Switch. Hewlett-Packard recommends that you use the<br />
Name Service Switch if possible, instead of server-side hostname<br />
fallback. For more information on the NIS server-side hostname fallback,<br />
see “To Query BIND for Host Information After Querying NIS” on page<br />
158. For information on NIS+ server-side hostname fallback, see “To<br />
Configure an NIS+ Server to Return BIND Information to Clients” on<br />
page 215.<br />
This chapter tells you how to configure the Name Service Switch. It<br />
contains the following sections:<br />
• <strong>Installing</strong> <strong>and</strong> Customizing the nsswitch.conf File<br />
• Syntax of the nsswitch.conf File<br />
• Default Configuration<br />
• Troubleshooting the Name Service Switch<br />
NOTE<br />
Configuring the Name Service Switch is a separate task from configuring<br />
the name services themselves. You must also configure the name services<br />
before you can use them. The Name Service Switch just determines<br />
which name services are queried <strong>and</strong> in what order.<br />
Chapter 6 255
Configuring the Name Service Switch<br />
<strong>Installing</strong> <strong>and</strong> Customizing the nsswitch.conf File<br />
<strong>Installing</strong> <strong>and</strong> Customizing the<br />
nsswitch.conf File<br />
The configuration file for the Name Service Switch is called<br />
/etc/nsswitch.conf. If this file does not exist, the system has a default<br />
Name Service Switch configuration, described in “Default Configuration”<br />
on page 261, later in this chapter.<br />
Table 6-1<br />
File Name<br />
nsswitch.files<br />
nsswitch.nis<br />
nsswitch.nisplus<br />
1. Copy the appropriate Name Service Switch configuration file to<br />
/etc/nsswitch.conf.<br />
Table 6-1 lists the Name Service Switch configuration files supplied in<br />
the /etc directory <strong>and</strong> describes the purpose of each one.<br />
If you plan to use BIND (DNS) for host information, step 2 in this<br />
procedure explains how to add BIND to the Name Service Switch<br />
configuration file.<br />
Name Service Switch Configuration Files in /etc <strong>Directory</strong><br />
Purpose<br />
For hosts not configured as NIS or NIS+ clients. All types of<br />
lookups consult files on the local host.<br />
For hosts configured as NIS clients. Some types of lookups use<br />
local files first <strong>and</strong> consult NIS if the local files do not contain the<br />
requested information. Other types of lookups consult NIS first<br />
<strong>and</strong> look in local files only if NIS does not respond.<br />
For hosts configured as NIS+ clients. Some types of lookups use<br />
local files first <strong>and</strong> consult NIS+ if the local files do not contain<br />
the requested information. Other types of lookups consult NIS+<br />
first <strong>and</strong> look in local files only if NIS+ does not respond.<br />
nsswitch.hp_defaults<br />
For hosts that used the HP-UX default Name Service Switch<br />
configuration on earlier releases <strong>and</strong> will continue to use it on<br />
HP-UX 10.30. See “Default Configuration” on page 261.<br />
2. If you chose a configuration file other than nsswitch.hp_defaults,<br />
<strong>and</strong> you want to use BIND (DNS) for host name <strong>and</strong> IP address<br />
lookups, change the hosts line to read as follows:<br />
256<br />
Chapter 6
Configuring the Name Service Switch<br />
<strong>Installing</strong> <strong>and</strong> Customizing the nsswitch.conf File<br />
hosts: dns [NOTFOUND=return] files<br />
If you want your host to consult NIS or NIS+ when BIND is not<br />
running, change the hosts line to read as follows:<br />
hosts: dns [NOTFOUND=return] nis [NOTFOUND=return] files<br />
or<br />
hosts: dns [NOTFOUND=return] nisplus [NOTFOUND=return]<br />
files<br />
3. Reboot your host to force long-running processes to read the new<br />
/etc/nsswitch.conf file. Many processes, like the keyserv(1M)<br />
daemon, read the file only at startup <strong>and</strong> continue to use the values<br />
they read at startup even though the file has changed. The safest way<br />
to restart all necessary processes in the correct order is to reboot the<br />
host.<br />
HP recommends that you maintain at least a minimal /etc/hosts file<br />
that includes important addresses like gateways, diskless boot servers<br />
<strong>and</strong> root servers, <strong>and</strong> your host’s own IP address. HP also recommends<br />
that you include the word files in the hosts line to help ensure a<br />
successful system boot using the /etc/hosts file when BIND <strong>and</strong> NIS or<br />
NIS+ are not available.<br />
For more information on the Name Service Switch, type man 4<br />
nsswitch.conf at the HP-UX prompt.<br />
Chapter 6 257
Configuring the Name Service Switch<br />
Syntax of the nsswitch.conf File<br />
Syntax of the nsswitch.conf File<br />
Each line in the /etc/nsswitch.conf file has the following syntax:<br />
lookup_type name_service [status=action status=action ...]<br />
name_service ...<br />
If you include any status=action pairs after a name service, the square<br />
brackets are required.<br />
lookup_type<br />
name_service<br />
status<br />
action<br />
The type of information to be looked up. The supported<br />
keywords <strong>and</strong> the information types they represent are<br />
listed in Table 6-2. These keywords are case-sensitive.<br />
A name service to use for the type of information in the<br />
lookup_type field. Supported keywords <strong>and</strong> the name<br />
services they represent are listed in Table 6-3. These<br />
keywords are case-sensitive.<br />
One of the following statuses returned by a name<br />
service query. These values may be entered in<br />
uppercase or lowercase.<br />
SUCCESS<br />
NOTFOUND<br />
UNAVAIL<br />
TRYAGAIN<br />
The lookup was successful, <strong>and</strong> the<br />
requested information was found.<br />
The name service returned a<br />
response, but the requested data was<br />
not in its database.<br />
The name service is not configured.<br />
The name service was busy <strong>and</strong> the<br />
request timed out. This value is<br />
returned only by NIS+ <strong>and</strong> DNS.<br />
The action to take based on the status of the name<br />
service query. The following values may be entered in<br />
uppercase or lowercase.<br />
continue Try the next name service in the list.<br />
return End the lookup <strong>and</strong> return control to<br />
the calling process without consulting<br />
the next name service in the list.<br />
If a line beginning with one of the lookup_types does not exist in the<br />
258<br />
Chapter 6
Configuring the Name Service Switch<br />
Syntax of the nsswitch.conf File<br />
Table 6-2<br />
Keyword<br />
aliases<br />
automount<br />
group<br />
hosts<br />
netgroup<br />
networks<br />
passwd<br />
protocols<br />
publickey<br />
rpc<br />
/etc/nsswitch.conf file, the default Name Service Switch<br />
configuration for that type of information is used. If the<br />
/etc/nsswitch.conf file does not exist, the default configuration is<br />
used for every type of information. The default Name Service Switch<br />
configuration is described in “Default Configuration” on page 261.<br />
Types of Lookups Controlled by the Name Service Switch<br />
Type of Information Represented by Keyword<br />
sendmail aliases stored in the /etc/mail/aliases file, the NIS<br />
mail.aliases <strong>and</strong> mail.byaddr maps, or the NIS+ mail_aliases<br />
table.<br />
<strong>NFS</strong> automounter maps stored in files like /etc/auto_master <strong>and</strong><br />
/etc/auto_home, NIS maps like auto.master <strong>and</strong> auto.home, or<br />
NIS+ tables like auto_master <strong>and</strong> auto_home.<br />
Information about HP-UX groups stored in the /etc/group file, the<br />
NIS group.bygid <strong>and</strong> group.byname maps, or the NIS+ group table.<br />
Host names <strong>and</strong> IP addresses stored in the /etc/hosts file, the NIS<br />
hosts.byaddr <strong>and</strong> hosts.byname maps, or the NIS+ hosts table.<br />
<strong>NFS</strong> netgroups stored in the /etc/netgroup file, the NIS netgroup,<br />
netgroup.byhost <strong>and</strong> netgroup.byuser maps, or the NIS+<br />
netgroup table.<br />
Network names <strong>and</strong> IP addresses stored in the /etc/networks file,<br />
the NIS networks.byaddr <strong>and</strong> networks.byname maps, or the<br />
NIS+ networks table.<br />
User login information stored in the /etc/passwd file, the NIS<br />
passwd.byname <strong>and</strong> passwd.byuid maps, or the NIS+ passwd<br />
table.<br />
Networking protocol names <strong>and</strong> numbers stored in the<br />
/etc/protocols file, the NIS protocols.byname <strong>and</strong><br />
protocols.bynumber maps, or the NIS+ protocols table.<br />
Secure RPC credentials stored in the /etc/publickey file, the NIS<br />
publickey.byname map, or the NIS+ cred table.<br />
RPC program names <strong>and</strong> numbers stored in the /etc/rpc file, the<br />
NIS rpc.byname <strong>and</strong> rpc.bynumber maps, or the NIS+ rpc table.<br />
Chapter 6 259
Configuring the Name Service Switch<br />
Syntax of the nsswitch.conf File<br />
Table 6-2<br />
Keyword<br />
services<br />
Table 6-3<br />
Keyword<br />
files<br />
nis<br />
nisplus<br />
dns<br />
compat<br />
Types of Lookups Controlled by the Name Service Switch<br />
Type of Information Represented by Keyword<br />
Mapping of networking services to port numbers <strong>and</strong> protocols, stored<br />
in the /etc/services file, the NIS services.byname <strong>and</strong><br />
services.bynp maps, or the NIS+ services table.<br />
Name <strong>Services</strong> Supported by the Name Service Switch<br />
Name Service Represented by Keyword<br />
Files in the /etc directory on the local host (/etc/passwd, /etc/hosts,<br />
<strong>and</strong> so on)<br />
Network Information Service (NIS)<br />
Network Information Service Plus (NIS+)<br />
Domain Name System (DNS), which is implemented by Berkeley Internet<br />
Name Domain (BIND) on HP-UX. See the <strong>Installing</strong> <strong>and</strong> <strong>Administering</strong><br />
Internet <strong>Services</strong> manual for more information. The dns keyword may be<br />
used only on the line beginning with hosts.<br />
NIS compatibility mode, used only for passwd <strong>and</strong> group information. If<br />
you specify compat as a name service, your local /etc/passwd or<br />
/etc/group file will be consulted first, <strong>and</strong> any lines in the file beginning<br />
with plus (+) or minus (-) will direct lookups to NIS, just as they did in<br />
earlier releases.<br />
If you want lookups to go to NIS+ instead of NIS when a plus or minus is<br />
encountered in the file, specify compat for passwd or group, <strong>and</strong> add the<br />
following lines to the bottom of your /etc/nsswitch.conf file:<br />
passwd_compat: nisplus<br />
group_compat: nisplus<br />
If you omit these lines, the compat keyword causes lookups to go to NIS,<br />
not NIS+.<br />
260<br />
Chapter 6
Configuring the Name Service Switch<br />
Default Configuration<br />
Default Configuration<br />
If the /etc/nsswitch.conf file does not exist, or if the line for a<br />
particular type of information is absent or syntactically incorrect, the<br />
following default configuration is used.<br />
passwd: files nis<br />
group: files nis<br />
hosts: dns [NOTFOUND=return] nis [NOTFOUND=return] files<br />
networks: nis [NOTFOUND=return] files<br />
protocols: nis [NOTFOUND=return] files<br />
rpc: nis [NOTFOUND=return] files<br />
publickey: nis [NOTFOUND=return] files<br />
netgroup: nis [NOTFOUND=return] files<br />
automount: files nis<br />
aliases: files nis<br />
services: nis [NOTFOUND=return] files<br />
If your /etc/nsswitch.conf file contains a syntactically correct line for<br />
a particular type of information, that line is used instead of the default.<br />
If you specify a name service for a particular type of information, but you<br />
do not specify four status=action pairs after the name service, the<br />
following default status=action pairs are used for any statuses you did<br />
not specify:<br />
SUCCESS=return<br />
NOTFOUND=continue<br />
UNAVAIL=continue<br />
TRYAGAIN=continue<br />
So, for example, in the default configuration for passwd, the local<br />
/etc/passwd file will be consulted first, <strong>and</strong> if the query returns<br />
anything but SUCCESS, the NIS passwd map will be consulted.<br />
The default Name Service Switch behavior on HP-UX changed at release<br />
10.30. The file /etc/nsswitch.hp_defaults gives the default Name<br />
Service Switch behavior for HP-UX prior to release 10.30. If you want<br />
your host to keep the same Name Service Switch behavior when you<br />
upgrade to release 10.30, copy /etc/nsswitch.hp_defaults to<br />
/etc/nsswitch.conf. Following is the old default Name Service Switch<br />
for HP-UX prior to release 10.30.<br />
Chapter 6 261
Configuring the Name Service Switch<br />
Default Configuration<br />
passwd: compat<br />
group: compat<br />
hosts: dns [NOTFOUND=return] nis [NOTFOUND=return] files<br />
networks: nis [NOTFOUND=return] files<br />
protocols: nis [NOTFOUND=return] files<br />
rpc: nis [NOTFOUND=return] files<br />
publickey: nis [NOTFOUND=return] files<br />
netgroup: nis [NOTFOUND=return] files<br />
automount: files nis<br />
aliases: files nis<br />
services: nis [NOTFOUND=return] files<br />
This configuration uses the +/- syntax in the /etc/passwd <strong>and</strong><br />
/etc/group files. The local /etc/passwd or /etc/group file is consulted<br />
first, <strong>and</strong> when a plus (+) or minus (-) sign is encountered in the file, the<br />
query goes to the NIS database.<br />
This configuration uses BIND (DNS) for host name <strong>and</strong> IP address<br />
lookups. NIS is consulted only if the local host is not configured to use<br />
BIND. The local /etc/hosts file is consulted only if the local host is not<br />
configured as a DNS or NIS client.<br />
262<br />
Chapter 6
Configuring the Name Service Switch<br />
Troubleshooting the Name Service Switch<br />
Troubleshooting the Name Service Switch<br />
• Issue the nsquery comm<strong>and</strong> to perform a hosts, passwd, or group<br />
lookup, as follows:<br />
/usr/contrib/bin/nsquery lookup_type lookup_query<br />
The lookup_type may be hosts, passwd, or group.<br />
The lookup_query may be a host name or IP address, a user name or<br />
user ID, or a group name or group ID.<br />
The nsquery comm<strong>and</strong> displays the Name Service Switch configuration<br />
that is currently in use. Then, it displays the results of the query. The<br />
following example uses nsquery to perform a lookup of the host name<br />
romney:<br />
# /usr/contrib/bin/nsquery hosts romney<br />
Using “nisplus [NOTFOUND=return] files” for the hosts policy.<br />
Searching nisplus for romney<br />
romney was NOTFOUND<br />
Switch configuration: Terminates Search<br />
As an optional third argument to nsquery, you can supply a Name<br />
Service Switch configuration in double quotes, as in the following<br />
example:<br />
# /usr/contrib/bin/nsquery passwd 30 “files nis”<br />
Using “files nis” for the passwd policy.<br />
Searching /etc/passwd for 30<br />
User name: www<br />
User Id: 30<br />
Group Id: 1<br />
Gecos:<br />
Home <strong>Directory</strong>: /<br />
Shell:<br />
Switch configuration: Terminates Search<br />
For more information, type man 1 nsquery at the HP-UX prompt.<br />
Chapter 6 263
Configuring the Name Service Switch<br />
Troubleshooting the Name Service Switch<br />
264<br />
Chapter 6
7 Configuring <strong>and</strong> Using the<br />
Remote Execution Facility<br />
(REX)<br />
Chapter 7 265
Configuring <strong>and</strong> Using the Remote Execution Facility (REX)<br />
The Remote Execution Facility (REX) allows you to execute comm<strong>and</strong>s<br />
on a remote host. REX is similar to the remsh(1) comm<strong>and</strong>, except REX<br />
simulates the user’s home environment on the remote host <strong>and</strong> mounts<br />
the user’s current working directory on the remote host. REX consists of<br />
the following:<br />
• The on comm<strong>and</strong>, which is the user interface to REX <strong>and</strong> runs on the<br />
host where the user is logged in. The host where the on comm<strong>and</strong> is<br />
issued is known as the REX client.<br />
• The rexd daemon, which runs on the remote host. The host running<br />
the rexd daemon is known as the REX server.<br />
This chapter contains the following sections:<br />
• How REX Works<br />
• Configuring REX<br />
266<br />
Chapter 7
Configuring <strong>and</strong> Using the Remote Execution Facility (REX)<br />
How REX Works<br />
How REX Works<br />
1. A user issues the on comm<strong>and</strong>, specifying a comm<strong>and</strong> to execute <strong>and</strong><br />
the name of a remote host on which to execute it.<br />
The user must be logged in as a non-root user (a user with a non-zero<br />
user ID) to use the on comm<strong>and</strong>. Also, an account with the user’s local<br />
user ID must exist on the remote host.<br />
2. The on comm<strong>and</strong> passes the user’s environment variables to the<br />
remote host. If the comm<strong>and</strong> is interactive, the on comm<strong>and</strong> also<br />
passes some of the user’s tty settings to the remote host. Note that<br />
the user’s environment <strong>and</strong> tty settings on the remote system will<br />
not be identical to those on the user’s home system.<br />
3. The rexd daemon running on the remote host <strong>NFS</strong>-mounts the user’s<br />
current working directory on the remote host, if it is not already<br />
mounted there.<br />
By default, rexd mounts the user’s current working directory under<br />
/var/spool/rexd/rexdAXXXX/current_directory, where AXXXX is<br />
a letter followed by a four-digit number, <strong>and</strong> current_directory is<br />
the full pathname of the user’s current working directory on the local<br />
system.<br />
4. The comm<strong>and</strong> that the user specified with the on comm<strong>and</strong> is<br />
executed on the remote host (the REX server). If the user did not<br />
specify a comm<strong>and</strong> to execute, a shell is started on the REX server.<br />
5. After the comm<strong>and</strong> has executed on the REX server, rexd unmounts<br />
the user’s current working directory. If the directory is busy, rexd will<br />
not be able to unmount it.<br />
For more information on REX, type man 1M rexd or man 1 on at the<br />
HP-UX prompt.<br />
Chapter 7 267
Configuring <strong>and</strong> Using the Remote Execution Facility (REX)<br />
How REX Works<br />
REX Example<br />
In the following example, user tracy is logged into host sage. Her<br />
current working directory is her home directory, /home/sage/tracy. She<br />
issues the on comm<strong>and</strong> to run more on host thyme:<br />
on -i thyme more /etc/exports<br />
The -i option is required, because more is an interactive comm<strong>and</strong>.<br />
tracy’s home environment on host sage is transferred to host thyme.<br />
tracy’s current working directory (her home directory, in this example)<br />
is mounted on host thyme.<br />
Figure 7-1<br />
REX Example<br />
sage<br />
/<br />
home<br />
sage<br />
tracy<br />
HOME=/home/sage/tracy<br />
PATH=:/usr:/usr/bin<br />
SHELL=/usr/bin/ksh<br />
...<br />
thyme<br />
/<br />
var<br />
spool<br />
rexd<br />
rexdD4253<br />
home<br />
sage<br />
tracy<br />
HOME=/home/sage/tracy<br />
PATH=:/usr:/usr/bin<br />
SHELL=/usr/bin/ksh<br />
...<br />
The more comm<strong>and</strong> from the /usr/bin directory on host thyme executes,<br />
listing the /etc/exports file from host thyme. The output of the more<br />
comm<strong>and</strong> is directed to tracy’s display on host sage.<br />
After tracy types q to quit the more program, her current working<br />
directory is unmounted from host thyme.<br />
268<br />
Chapter 7
Configuring <strong>and</strong> Using the Remote Execution Facility (REX)<br />
Configuring REX<br />
Configuring REX<br />
This section tells you how to set up REX clients <strong>and</strong> REX servers. It also<br />
explains how to configure added security for REX servers <strong>and</strong> how to<br />
configure logging for the rexd daemon.<br />
To Configure REX<br />
1. Make sure all the hosts to which users need access are listed in your<br />
hosts database (BIND, NIS, or /etc/hosts).<br />
2. Make sure users have accounts on all the hosts they need to use.<br />
Make sure the user ID for each user is the same on all hosts where<br />
that user has an account.<br />
If you are using NIS or NIS+, <strong>and</strong> users do not need access to any<br />
hosts outside your NIS domain or NIS+ namespace, this step is not<br />
necessary. With NIS <strong>and</strong> NIS+, user accounts are administered<br />
centrally on the master server, <strong>and</strong> all hosts have access to the same<br />
user information. See “Configuring <strong>and</strong> <strong>Administering</strong> NIS” on page<br />
135 for instructions on setting up NIS. See “Configuring <strong>and</strong><br />
<strong>Administering</strong> NIS+” on page 185 for instructions on setting up<br />
NIS+.<br />
3. Make sure all REX clients (hosts from which users will issue the on<br />
comm<strong>and</strong>) are configured as <strong>NFS</strong> servers. See “Configuring <strong>and</strong><br />
<strong>Administering</strong> an <strong>NFS</strong> Server” on page 24.<br />
4. Make sure users’ home directories on all REX clients are exported to<br />
REX servers (available to be mounted with <strong>NFS</strong>). See “To Make<br />
Directories Available to <strong>NFS</strong> Clients (Export Directories)” on page<br />
24.<br />
5. Make sure all REX servers (hosts where the rexd daemon will run)<br />
are configured as <strong>NFS</strong> clients. See “Configuring <strong>and</strong> <strong>Administering</strong><br />
an <strong>NFS</strong> Client” on page 34.<br />
6. Use a text editor to uncomment the following line in the<br />
/etc/inetd.conf file, which starts rexd:<br />
rpc stream tcp nowait root /usr/sbin/rpc.rexd 100017 1<br />
rpc.rexd<br />
7. Issue the following comm<strong>and</strong> to force inetd to reread its<br />
Chapter 7 269
Configuring <strong>and</strong> Using the Remote Execution Facility (REX)<br />
Configuring REX<br />
configuration file:<br />
/usr/sbin/inetd -c<br />
270<br />
Chapter 7
Configuring <strong>and</strong> Using the Remote Execution Facility (REX)<br />
Configuring REX<br />
To Configure REX Security<br />
1. On each REX server, add the -r option to the line in<br />
/etc/inetd.conf that starts the rexd daemon, as follows:<br />
rpc stream tcp nowait root /usr/sbin/rpc.rexd 100017 1 \<br />
rpc.rexd -r<br />
2. Issue the following comm<strong>and</strong> to force inetd to reread<br />
/etc/inetd.conf:<br />
/usr/sbin/inetd -c<br />
3. Add lines to the /etc/hosts.equiv file on the REX server to allow<br />
REX clients to use the server,<br />
or<br />
have each REX user add lines to a .rhosts file in the user’s home<br />
directory on the REX server to allow access from REX clients.<br />
The -r option causes rexd to deny requests from a user on a REX client<br />
unless the client is listed in /etc/hosts.equiv or the user’s<br />
$HOME/.rhosts file on the REX server.<br />
A line in the /etc/hosts.equiv or $HOME/.rhosts file has the following<br />
syntax:<br />
hostname<br />
[username]<br />
For example, if user paula has accounts on REX clients broccoli <strong>and</strong><br />
cabbage <strong>and</strong> on REX server cauliflower, she would create a .rhosts<br />
file in her home directory on cauliflower with the following lines:<br />
broccoli<br />
cabbage<br />
paula<br />
paula<br />
CAUTION<br />
The /etc/hosts.equiv <strong>and</strong> $HOME/.rhosts files create a significant<br />
security risk. Make sure these files <strong>and</strong> users’ home directories are<br />
writable only by the owner.<br />
For more information, see the man pages for rexd(1M) <strong>and</strong><br />
hosts.equiv(4).<br />
Chapter 7 271
Configuring <strong>and</strong> Using the Remote Execution Facility (REX)<br />
Configuring REX<br />
To Configure Logging for the rexd Daemon<br />
1. Use a text editor to add the -l log_file option to the line in<br />
/etc/inetd.conf that starts rexd, as in the following example:<br />
rpc stream tcp nowait root /usr/sbin/rpc.rexd 100017 1 \<br />
rpc.rexd -l /var/adm/rexd.log<br />
2. Issue the following comm<strong>and</strong> to force inetd to reread its<br />
configuration file:<br />
/usr/sbin/inetd -c<br />
When logging is turned on, rexd logs any diagnostic, warning, <strong>and</strong> error<br />
messages to log_file.Iflog_file exists, rexd appends messages to the<br />
file. If log_file does not exist, rexd creates it. Messages are not logged<br />
if the -l option is not specified.<br />
Information logged to the file includes date <strong>and</strong> time of the error, host<br />
name, process ID <strong>and</strong> name of the function generating the error, <strong>and</strong> the<br />
error message.<br />
Different RPC services can share a single log file, because enough<br />
information is included to uniquely identify each error.<br />
Type man 1M rexd for explanations of the messages logged by the rexd<br />
daemon.<br />
Many of the errors logged by rexd are also returned to the user who<br />
issued the on comm<strong>and</strong>. Type man 1 on for explanations of the messages<br />
returned by the on comm<strong>and</strong>.<br />
272<br />
Chapter 7
8 Troubleshooting <strong>NFS</strong> <strong>Services</strong><br />
This chapter describes tools <strong>and</strong> procedures for troubleshooting the <strong>NFS</strong><br />
<strong>Services</strong>. It contains the following sections:<br />
• Common Problems with <strong>NFS</strong><br />
Chapter 8 273
Troubleshooting <strong>NFS</strong> <strong>Services</strong><br />
• Common Problems with NIS<br />
• Common Problems with NIS+<br />
• Performance Tuning<br />
• Logging <strong>and</strong> Tracing of <strong>NFS</strong> <strong>Services</strong><br />
• Normal System Startup<br />
274<br />
Chapter 8
Troubleshooting <strong>NFS</strong> <strong>Services</strong><br />
Common Problems with <strong>NFS</strong><br />
Common Problems with <strong>NFS</strong><br />
This section lists the following common problems encountered with <strong>NFS</strong><br />
<strong>and</strong> suggests ways to correct them.<br />
• If You Receive an <strong>NFS</strong> “Server Not Responding” Message, see<br />
page 276.<br />
• If You Receive an “Access Denied” Message, see page 279.<br />
• If You Receive a “Permission Denied” Message, see page 281.<br />
• If You Receive an “Unknown Host” or “Not In Hosts Database”<br />
Message, see page 283.<br />
• If You Receive a “Device Busy” Message, see page 284.<br />
• If You Receive a “Stale File H<strong>and</strong>le” Message, see page 285.<br />
• If a Program Hangs, see page 287.<br />
• If Data is Lost Between the Client <strong>and</strong> the Server, see page 289.<br />
• If You Cannot Start New Processes, see page 290.<br />
• If You Receive a “Too Many Levels of Remote in Path” Message, see<br />
page 291.<br />
Chapter 8 275
Troubleshooting <strong>NFS</strong> <strong>Services</strong><br />
Common Problems with <strong>NFS</strong><br />
If You Receive an <strong>NFS</strong> “Server Not Responding”<br />
Message<br />
❏ Issue the /usr/sbin/ping(1M) comm<strong>and</strong> on the <strong>NFS</strong> client to make<br />
sure the <strong>NFS</strong> server is up <strong>and</strong> is reachable on the network. If the<br />
ping comm<strong>and</strong> fails, either the server is down, or the network has a<br />
problem. If the server is down, reboot it, or wait for it to come back up.<br />
For information on troubleshooting network problems, see <strong>Installing</strong><br />
<strong>and</strong> <strong>Administering</strong> LAN/9000 Software.<br />
❏ Issue the following comm<strong>and</strong> on the <strong>NFS</strong> client to make sure the<br />
server is running all the <strong>NFS</strong> server processes:<br />
/usr/bin/rpcinfo -p servername<br />
The rpcinfo comm<strong>and</strong> should display the following processes:<br />
— rpcbind<br />
— nfs<br />
— mountd<br />
— status<br />
— nlockmgr<br />
— llockmgr<br />
If any of these processes is not running, follow these steps:<br />
1. Make sure the /etc/rc.config.d/nfsconf file on the <strong>NFS</strong> server<br />
contains the following lines:<br />
<strong>NFS</strong>_SERVER=1<br />
START_MOUNTD=1<br />
2. Make sure that the /etc/inetd.conf file on the <strong>NFS</strong> server does<br />
not contain a line to start rpc.mountd. If it does, make sure the<br />
START_MOUNTD variable in /etc/rc.config.d/nfsconf is set to 0.<br />
3. Issue the following comm<strong>and</strong> on the <strong>NFS</strong> server to start all the<br />
necessary <strong>NFS</strong> processes:<br />
/sbin/init.d/nfs.server start<br />
❏ Issue the following comm<strong>and</strong> on the <strong>NFS</strong> client to make sure the<br />
rpc.mountd process on the <strong>NFS</strong> server is available <strong>and</strong> responding to<br />
RPC requests:<br />
276<br />
Chapter 8
Troubleshooting <strong>NFS</strong> <strong>Services</strong><br />
Common Problems with <strong>NFS</strong><br />
/usr/bin/rpcinfo -u servername mountd<br />
If the rpcinfo comm<strong>and</strong> returns RPC_TIMED_OUT, the rpc.mountd<br />
process may be hung. Issue the following comm<strong>and</strong>s on the <strong>NFS</strong><br />
server to restart rpc.mountd (PID is the process ID returned by the<br />
ps comm<strong>and</strong>):<br />
/usr/bin/ps -ef | /usr/bin/grep mountd<br />
/usr/bin/kill PID<br />
/usr/sbin/rpc.mountd<br />
❏ You can receive “server not responding” messages when the server or<br />
network is heavily loaded <strong>and</strong> the RPC requests are timing out. Try<br />
doubling the timeo mount option for the directory, as in the following<br />
example from the /etc/fstab file, which changes the timeo value<br />
from 7 (the default) to 14. (The timeo option is in tenths of a second.)<br />
cabbage:/usr /usr nfs nosuid,timeo=14 0 0<br />
❏ Issue the following comm<strong>and</strong> on the <strong>NFS</strong> client to check that your<br />
hosts database returns the correct address for the <strong>NFS</strong> server:<br />
/usr/bin/nslookup server_name<br />
If your client cannot resolve the server’s hostname, see “If You<br />
Receive an “Unknown Host” or “Not In Hosts Database” Message” on<br />
page 283.<br />
Issue the same nslookup comm<strong>and</strong> on the <strong>NFS</strong> server, <strong>and</strong> compare<br />
the address with the one returned by the nslookup comm<strong>and</strong> on the<br />
<strong>NFS</strong> client. If they are different, correct your NIS, NIS+, BIND, or<br />
/etc/hosts configuration. For information on NIS troubleshooting,<br />
see “Common Problems with NIS” on page 292. For information on<br />
NIS+ troubleshooting, see “Common Problems with NIS+” on page<br />
301. For information on BIND or /etc/hosts, see <strong>Installing</strong> <strong>and</strong><br />
<strong>Administering</strong> Internet <strong>Services</strong>.<br />
❏ If you are using the automounter, issue the ps -ef comm<strong>and</strong> to make<br />
sure the automount process is running on your <strong>NFS</strong> client. If it is not,<br />
follow these steps:<br />
1. Make sure the AUTOMOUNT variable is set to 1 in the<br />
/etc/rc.config.d/nfsconf file on the <strong>NFS</strong> client.<br />
AUTOMOUNT=1<br />
2. Issue the following comm<strong>and</strong> on the <strong>NFS</strong> client to start the<br />
automounter:<br />
Chapter 8 277
Troubleshooting <strong>NFS</strong> <strong>Services</strong><br />
Common Problems with <strong>NFS</strong><br />
/sbin/init.d/nfs.client start<br />
❏ If the “server not responding” message was followed by<br />
RPC_AUTH_ERROR; why=AUTH_BOGUS_CREDENTIAL, this could mean<br />
that you (or the user who received the message) are a member of too<br />
many groups. On HP-UX release 9.0 or later, you can be a member of<br />
up to 16 groups. On HP-UX releases prior to 9.0, you can be a member<br />
of up to 8 groups.<br />
278<br />
Chapter 8
Troubleshooting <strong>NFS</strong> <strong>Services</strong><br />
Common Problems with <strong>NFS</strong><br />
If You Receive an “Access Denied” Message<br />
❏ Issue the following comm<strong>and</strong> on the <strong>NFS</strong> client to check that the <strong>NFS</strong><br />
server is exporting the directory you want to mount:<br />
/usr/sbin/showmount -e server_name<br />
If the server is not exporting the directory, edit the /etc/exports file<br />
on the server so that it allows your <strong>NFS</strong> client access to the directory.<br />
Then, issue the following comm<strong>and</strong> to force the server to read its<br />
/etc/exports file.<br />
/usr/sbin/exportfs -a<br />
If the directory is exported with the access option, make sure your<br />
<strong>NFS</strong> client is included in the access list, either individually or as a<br />
member of a netgroup.<br />
❏ If your <strong>NFS</strong> client is included in the access list as a member of a<br />
netgroup, make sure it is a member of the netgroup in the server’s<br />
/etc/netgroup file.<br />
If you are using NIS to manage your netgroups, issue the following<br />
comm<strong>and</strong> to determine whether your NIS server has up-to-date<br />
information about the netgroup that includes your client:<br />
/usr/bin/ypmatch netgroup_name netgroup<br />
If your NIS server does not return the correct information, see<br />
“Common Problems with NIS” on page 292.<br />
If you are using NIS+ to manage your netgroups, issue the following<br />
comm<strong>and</strong> to determine whether the NIS+ database has up-to-date<br />
information about the netgroup that includes your client:<br />
nismatch name=netgroup_name netgroup.org_dir<br />
If your NIS+ server does not return the correct information, see<br />
“Common Problems with NIS+” on page 301.<br />
❏ Issue the following comm<strong>and</strong>s on the <strong>NFS</strong> server to make sure your<br />
<strong>NFS</strong> client is listed in its hosts database:<br />
nslookup client_name<br />
nslookup client_IP_address<br />
If the server cannot resolve your client’s hostname, see “If You<br />
Receive an “Unknown Host” or “Not In Hosts Database” Message” on<br />
page 283.<br />
Chapter 8 279
Troubleshooting <strong>NFS</strong> <strong>Services</strong><br />
Common Problems with <strong>NFS</strong><br />
❏ If rpc.mountd is configured in /etc/inetd.conf on the <strong>NFS</strong> server,<br />
check the server’s /var/adm/inetd.sec file to make sure your <strong>NFS</strong><br />
client is allowed access to rpc.mountd.<br />
280<br />
Chapter 8
Troubleshooting <strong>NFS</strong> <strong>Services</strong><br />
Common Problems with <strong>NFS</strong><br />
If You Receive a “Permission Denied” Message<br />
❏ Check the mount options in the /etc/fstab file on the <strong>NFS</strong> client. A<br />
directory you are attempting to write to may have been mounted<br />
read-only.<br />
❏ Issue the ls -l comm<strong>and</strong> to check the HP-UX permissions on the<br />
server directory <strong>and</strong> on the client directory that is the mount point.<br />
You may not be allowed access to the directory.<br />
❏ Issue the following comm<strong>and</strong> on the <strong>NFS</strong> server:<br />
/usr/sbin/exportfs<br />
Or, issue the following comm<strong>and</strong> on the <strong>NFS</strong> client:<br />
/usr/sbin/showmount -e server_name<br />
Check the export permissions on the exported directory. The directory<br />
may have been exported read-only to your client. The system<br />
administrator of the <strong>NFS</strong> server can use the remount mount option to<br />
mount the directory read/write without unmounting it. See “To<br />
Change the Default Mount Options” on page 43.<br />
If you are logged in as root to the <strong>NFS</strong> client, check the export<br />
permissions to determine whether root access to the directory is<br />
granted to your <strong>NFS</strong> client.<br />
❏ If you are logged in as root to the <strong>NFS</strong> client, <strong>and</strong> your client is not<br />
allowed root access to the exported directory, check the passwd<br />
database on the <strong>NFS</strong> server to determine whether it contains an<br />
entry for user nobody. Without root access, the root user on an <strong>NFS</strong><br />
client is given the access permissions of user nobody. Also, check<br />
whether anonymous users are denied access to the directory (with the<br />
anon=65535 export option).<br />
If your client is not allowed root access or anonymous user ID access<br />
to the exported directory, log in as a non-root user to get access to the<br />
directory.<br />
❏ If you are not running NIS or NIS+, or if the server is in a different<br />
domain from the client, check the passwd databases on the server <strong>and</strong><br />
the client to make sure you have a valid login on both machines <strong>and</strong><br />
that your user ID is the same on both machines. If your user ID is<br />
unrecognized on the <strong>NFS</strong> server, you will be granted the permissions<br />
of user nobody.<br />
❏ If you were attempting to run a program when you received the<br />
Chapter 8 281
Troubleshooting <strong>NFS</strong> <strong>Services</strong><br />
Common Problems with <strong>NFS</strong><br />
“permission denied” message, issue the ls -l comm<strong>and</strong> on the <strong>NFS</strong><br />
server to check whether the program you tried to run has the setuid<br />
bit set. If it does, check /etc/fstab to determine whether the<br />
directory was mounted with the nosuid mount option. If necessary,<br />
remove the nosuid option from the /etc/fstab file, then unmount<br />
<strong>and</strong> remount the directory.<br />
282<br />
Chapter 8
Troubleshooting <strong>NFS</strong> <strong>Services</strong><br />
Common Problems with <strong>NFS</strong><br />
If You Receive an “Unknown Host” or “Not In Hosts<br />
Database” Message<br />
❏ Issue the following comm<strong>and</strong> to trace a lookup of the unknown host:<br />
/usr/contrib/bin/nsquery hosts hostname<br />
The trace will indicate which name services (BIND, NIS, NIS+, or<br />
/etc/hosts) were queried <strong>and</strong> in what order. If your host is not<br />
performing lookups the way you want, see “Configuring the Name<br />
Service Switch” on page 253 for instructions on configuring the Name<br />
Service Switch.<br />
❏ If your host is using the /etc/hosts file to resolve hostnames, edit<br />
the file to add or correct the entry for the unknown host. Type man 4<br />
hosts for the correct syntax.<br />
❏ If your host is using NIS to resolve hostnames, see “Common<br />
Problems with NIS” on page 292.<br />
❏ If your host is using NIS+ to resolve hostnames, see “Common<br />
Problems with NIS+” on page 301.<br />
❏ If your host is using BIND (DNS) to resolve hostnames, see <strong>Installing</strong><br />
<strong>and</strong> <strong>Administering</strong> Internet <strong>Services</strong> for instructions on<br />
troubleshooting BIND.<br />
Chapter 8 283
Troubleshooting <strong>NFS</strong> <strong>Services</strong><br />
Common Problems with <strong>NFS</strong><br />
If You Receive a “Device Busy” Message<br />
❏ If you received the “device busy” message while attempting to mount<br />
a directory, try to access the mounted directory. If you can access it,<br />
then it is already mounted.<br />
❏ If you received the “device busy” message while attempting to<br />
unmount a directory, a user or process is currently using the<br />
directory. Wait until the process completes, or follow these steps:<br />
1. Issue the following comm<strong>and</strong> to determine who is using the<br />
mounted directory:<br />
/usr/sbin/fuser -cu local_mount_point<br />
The fuser(1M) comm<strong>and</strong> will return a list of process IDs <strong>and</strong> user<br />
names that are currently using the directory mounted under<br />
local_mount_point. This will help you decide whether to kill the<br />
processes or wait for them to complete.<br />
2. To kill all processes using the mounted directory, issue the<br />
following comm<strong>and</strong>:<br />
/usr/sbin/fuser -ck local_mount_point<br />
3. Try again to unmount the directory.<br />
284<br />
Chapter 8
Troubleshooting <strong>NFS</strong> <strong>Services</strong><br />
Common Problems with <strong>NFS</strong><br />
If You Receive a “Stale File H<strong>and</strong>le” Message<br />
Table 8-1<br />
A “stale file h<strong>and</strong>le” occurs when one client removes an <strong>NFS</strong>-mounted file<br />
or directory that another client has open, as in the following sequence of<br />
events:<br />
<strong>NFS</strong> client 1 <strong>NFS</strong> client 2<br />
1 % cd /proj1/source<br />
2 % cd /proj1<br />
3 % rm -Rf source<br />
4 % ls<br />
.:Stale File H<strong>and</strong>le<br />
If a server stops exporting a directory that a client has mounted, the<br />
client will receive a stale file h<strong>and</strong>le error. Stale file h<strong>and</strong>les also occur if<br />
you restore the <strong>NFS</strong> server’s file systems from a backup or r<strong>and</strong>omize the<br />
inode numbers with fsir<strong>and</strong>(1M).<br />
❏ If the stale file h<strong>and</strong>le occurred because someone removed a file or<br />
directory that was in use, or because a server stopped exporting a<br />
directory that was in use, follow these steps:<br />
1. Issue the /usr/bin/cd comm<strong>and</strong> to move out of the <strong>NFS</strong>-mounted<br />
directory that is causing the problem, then try unmounting the<br />
directory:<br />
/usr/bin/cd ..<br />
/usr/sbin/umount directory<br />
2. If the directory cannot be unmounted because it is busy (in use),<br />
issue the following comm<strong>and</strong>s to kill the processes using the<br />
directory <strong>and</strong> to try again to unmount it:<br />
/usr/sbin/fuser -ck local_mount_point<br />
/usr/sbin/umount local_mount_point<br />
3. If the directory still cannot be unmounted, reboot the client.<br />
4. To avoid stale file h<strong>and</strong>les caused by users deleting <strong>NFS</strong>-mounted<br />
files, try using a source code control system, like Revision Control<br />
System (RCS). A source code control system allows only one user<br />
at a time to modify a file or directory, so one user cannot remove<br />
Chapter 8 285
Troubleshooting <strong>NFS</strong> <strong>Services</strong><br />
Common Problems with <strong>NFS</strong><br />
files another user is accessing. Type man 5 rcsintro for more<br />
information.<br />
❏ If someone has restored the server’s file systems from backup or<br />
issued the fsir<strong>and</strong> comm<strong>and</strong> on the server, follow these steps on each<br />
of the <strong>NFS</strong> clients to prevent stale file h<strong>and</strong>les by restarting <strong>NFS</strong>:<br />
1. Issue the mount(1M) comm<strong>and</strong> with no options, to get a list of all<br />
the mounted file systems on the client:<br />
/usr/sbin/mount<br />
2. For every <strong>NFS</strong>-mounted directory listed by the mount comm<strong>and</strong>,<br />
issue the following comm<strong>and</strong> to determine whether the directory<br />
is currently in use:<br />
/usr/sbin/fuser -cu local_mount_point<br />
This comm<strong>and</strong> lists the process IDs <strong>and</strong> user names of everyone<br />
using the mounted directory.<br />
3. Warn any users to cd out of the directory, <strong>and</strong> kill any processes<br />
that are using the directory, or wait until the processes terminate.<br />
You can use the following comm<strong>and</strong> to kill all processes using the<br />
directory:<br />
/usr/sbin/fuser -ck local_mount_point<br />
4. Issue the following comm<strong>and</strong> on the client to unmount all<br />
<strong>NFS</strong>-mounted directories:<br />
/usr/sbin/umount -at nfs<br />
5. Issue the following comm<strong>and</strong>s to restart the <strong>NFS</strong> client:<br />
/sbin/init.d/nfs.client stop<br />
/sbin/init.d/nfs.client start<br />
286<br />
Chapter 8
Troubleshooting <strong>NFS</strong> <strong>Services</strong><br />
Common Problems with <strong>NFS</strong><br />
If a Program Hangs<br />
❏ Check whether the <strong>NFS</strong> server is up <strong>and</strong> operating correctly. See “If<br />
You Receive an <strong>NFS</strong> “Server Not Responding” Message” on page 276.<br />
If the server is down, wait until it comes back up, or, if the directory<br />
was mounted with the intr mount option (the default), you can<br />
interrupt the <strong>NFS</strong> mount, usually with CTRL-C.<br />
❏ If the program uses file locking, issue the following comm<strong>and</strong>s (on<br />
either the client or the server) to make sure rpc.statd <strong>and</strong><br />
rpc.lockd are available <strong>and</strong> responding to RPC requests:<br />
/usr/bin/rpcinfo -u servername status<br />
/usr/bin/rpcinfo -u servername llockmgr<br />
/usr/bin/rpcinfo -u servername nlockmgr<br />
/usr/bin/rpcinfo -u clientname status<br />
/usr/bin/rpcinfo -u clientname llockmgr<br />
/usr/bin/rpcinfo -u clientname nlockmgr<br />
If any of these comm<strong>and</strong>s returns RPC_TIMED_OUT, the rpc.statd or<br />
rpc.lockd process may be hung. Follow these steps to restart<br />
rpc.statd <strong>and</strong> rpc.lockd:<br />
1. Issue the following comm<strong>and</strong>s, on both the <strong>NFS</strong> client <strong>and</strong> the<br />
<strong>NFS</strong> server, to kill rpc.statd <strong>and</strong> rpc.lockd (PID is a process ID<br />
returned by the ps comm<strong>and</strong>):<br />
/usr/bin/ps -ef | /usr/bin/grep rpc.statd<br />
/usr/bin/kill PID<br />
/usr/bin/ps -ef | /usr/bin/grep rpc.lockd<br />
/usr/bin/kill PID<br />
2. Issue the following comm<strong>and</strong>s, on both the client <strong>and</strong> the server, to<br />
remove the contents of the sm <strong>and</strong> sm.bak directories:<br />
/usr/bin/rm -r /etc/sm<br />
/usr/bin/rm -r /etc/sm.bak<br />
3. Issue the following comm<strong>and</strong>s to restart rpc.statd <strong>and</strong><br />
rpc.lockd on both the client <strong>and</strong> the server:<br />
/usr/sbin/rpc.statd<br />
/usr/sbin/rpc.lockd<br />
NOTE<br />
Always start rpc.statd before starting rpc.lockd.<br />
Chapter 8 287
Troubleshooting <strong>NFS</strong> <strong>Services</strong><br />
Common Problems with <strong>NFS</strong><br />
4. Issue the following comm<strong>and</strong>s to verify that rpc.statd,<br />
rpc.lockd, <strong>and</strong> nfsd are all running <strong>and</strong> responding to RPC<br />
requests:<br />
/usr/bin/rpcinfo -u servername status<br />
/usr/bin/rpcinfo -u servername llockmgr<br />
/usr/bin/rpcinfo -u servername nlockmgr<br />
/usr/bin/rpcinfo -u servername nfs<br />
/usr/bin/rpcinfo -u clientname status<br />
/usr/bin/rpcinfo -u clientname llockmgr<br />
/usr/bin/rpcinfo -u clientname nlockmgr<br />
/usr/bin/rpcinfo -u clientname nfs<br />
5. Wait two minutes before retrying the mount that caused the<br />
program to hang.<br />
6. If the problem persists, restart rpc.statd <strong>and</strong> rpc.lockd, <strong>and</strong><br />
turn on tracing. See “To Start <strong>and</strong> Stop Detailed Logging of<br />
rpc.statd <strong>and</strong> rpc.lockd” on page 327 <strong>and</strong> “To Start <strong>and</strong> Stop Basic<br />
Logging of rpc.statd <strong>and</strong> rpc.lockd” on page 328.<br />
288<br />
Chapter 8
Troubleshooting <strong>NFS</strong> <strong>Services</strong><br />
Common Problems with <strong>NFS</strong><br />
If Data is Lost Between the Client <strong>and</strong> the Server<br />
❏ Make sure the directory is exported from the server with the noasync<br />
option (the default). If the directory is exported with the async<br />
option, the <strong>NFS</strong> server will acknowledge <strong>NFS</strong> writes before actually<br />
writing data to disk. Changing an exported directory from async to<br />
noasync degrades write performance for that directory.<br />
❏ If users or applications will be writing to the <strong>NFS</strong>-mounted directory,<br />
make sure it is mounted with the hard option (the default), rather<br />
than the soft option.<br />
❏ If you have a small number of <strong>NFS</strong> applications that require absolute<br />
data integrity, add the O_SYNC flag to the open() calls in your<br />
applications. When you open a file with the O_SYNC flag, a write()<br />
call will not return until the write request has been sent to the <strong>NFS</strong><br />
server <strong>and</strong> acknowledged. The O_SYNC flag degrades write<br />
performance for applications that use it.<br />
❏ If you have a large number of <strong>NFS</strong> applications requiring absolute<br />
data integrity, or if your entire installation needs a high degree of<br />
data integrity, set the NUM_<strong>NFS</strong>IOD variable to 0 in the<br />
/etc/rc.config.d/nfsconf file on each client, as follows,<br />
NUM_<strong>NFS</strong>IOD=0<br />
<strong>and</strong> issue the following comm<strong>and</strong>s to kill all the biod processes (PID<br />
is a process ID returned by the ps comm<strong>and</strong>):<br />
/usr/bin/ps -ef | /usr/bin/grep biod<br />
/usr/bin/kill PID PID ...<br />
The biod daemons improve performance by h<strong>and</strong>ling <strong>NFS</strong> read <strong>and</strong><br />
write requests from users <strong>and</strong> applications. After a write request is<br />
passed to a biod daemon, control is returned to the user or<br />
application. Running a client without biod daemons degrades <strong>NFS</strong><br />
performance for all users <strong>and</strong> applications on that client.<br />
❏ If multiple <strong>NFS</strong> users will be writing to the same file, add the<br />
lockf() call to your applications to lock the file so that only one user<br />
may modify it at a time.<br />
If multiple users on different <strong>NFS</strong> clients will be writing to the file,<br />
you must also turn off attribute caching on those clients by mounting<br />
the file with the noac mount option. Turning off attribute caching<br />
degrades <strong>NFS</strong> performance.<br />
Chapter 8 289
Troubleshooting <strong>NFS</strong> <strong>Services</strong><br />
Common Problems with <strong>NFS</strong><br />
For more information, see the following man pages: mount(1M), open(2),<br />
write(2), lockf(2), <strong>and</strong> biod(1M).<br />
If You Cannot Start New Processes<br />
❏ Issue the following comm<strong>and</strong> to check your server’s memory<br />
utilization:<br />
netstat -m<br />
If the number of requests for memory denied is high, your server<br />
does not have enough memory. Consider adding more memory or<br />
using a different host as the <strong>NFS</strong> server.<br />
❏ Issue the ps -ef comm<strong>and</strong> on the <strong>NFS</strong> server, <strong>and</strong> check for many<br />
instances of the same application. Sometimes an application clones<br />
itself indefinitely until it uses up all the available inodes on a system.<br />
❏ The default maximum number of inodes shipped with HP-UX tends<br />
to be too small for sites that make extensive use of <strong>NFS</strong>. Follow this<br />
procedure to increase the maximum number of inodes on your <strong>NFS</strong><br />
server:<br />
1. Log in as root to the <strong>NFS</strong> server.<br />
2. Type /usr/sbin/sam to start SAM (System Administration<br />
Manager).<br />
3. Open Kernel Configuration.<br />
4. Open Configurable Parameters.<br />
5. Highlight the line that begins with ninode, <strong>and</strong> choose Modify<br />
Configurable Parameter from the Actions menu.<br />
6. Increase the value in the Formula/Value field, either by changing<br />
the constant multiplier in the formula or replacing the formula<br />
with a value. If your ninode value is currently set to the default<br />
(606), try changing it to 2048.<br />
7. Use SAM to regenerate the kernel <strong>and</strong> reboot the system.<br />
For more information on using SAM, choose SAM’s Help button, or press<br />
the F1 key for context-sensitive help.<br />
290<br />
Chapter 8
Troubleshooting <strong>NFS</strong> <strong>Services</strong><br />
Common Problems with <strong>NFS</strong><br />
If You Receive a “Too Many Levels of Remote in Path”<br />
Message<br />
This message indicates that you are attempting to mount a directory<br />
from a server that has <strong>NFS</strong>-mounted the directory from another server.<br />
You cannot “chain” your <strong>NFS</strong> mounts this way. You must mount the<br />
directory from the server that has it mounted on a local disk.<br />
Chapter 8 291
Troubleshooting <strong>NFS</strong> <strong>Services</strong><br />
Common Problems with NIS<br />
Common Problems with NIS<br />
This section lists the following common problems encountered with NIS<br />
<strong>and</strong> suggests ways to correct them.<br />
• If You Receive an NIS “Server Not Responding” Message, see<br />
page 293.<br />
• If a User Cannot Log In, see page 294.<br />
• If You Receive an “Unknown Host” Message, see page 296.<br />
• If an NIS Client Cannot Bind to a Server, see page 298.<br />
• If NIS Returns Incorrect Information, see page 299.<br />
292<br />
Chapter 8
Troubleshooting <strong>NFS</strong> <strong>Services</strong><br />
Common Problems with NIS<br />
If You Receive an NIS “Server Not Responding”<br />
Message<br />
❏ Issue the /usr/sbin/ping(1M) comm<strong>and</strong> on the NIS client to make<br />
sure the NIS server is up <strong>and</strong> is reachable on the network. If the ping<br />
comm<strong>and</strong> fails, either the server is down, or the network has a<br />
problem. If the server is down, reboot it, or wait for it to come back up.<br />
For information on troubleshooting network problems, see <strong>Installing</strong><br />
<strong>and</strong> <strong>Administering</strong> LAN/9000 Software.<br />
To boot your NIS client without waiting for the server to come up,<br />
boot the client in single user mode, set NIS_CLIENT=0 in the<br />
/etc/rc.config.d/namsvrs file, then boot your client the rest of the<br />
way up.<br />
❏ Issue the domainname comm<strong>and</strong> (with no arguments) on both the NIS<br />
server <strong>and</strong> the NIS client to check whether their domain names are<br />
the same. If they are different, log in as root to the NIS client <strong>and</strong><br />
issue the following comm<strong>and</strong> to change its domain name:<br />
domainname domainname<br />
❏ Issue the ps -ef comm<strong>and</strong> on the NIS server to check whether<br />
ypserv is running. If it is not, follow these steps:<br />
1. In the /etc/rc.config.d/namesvrs file on the NIS server, make<br />
sure the following variables are set:<br />
NIS_MASTER_SERVER=1<br />
2. Issue the following comm<strong>and</strong> to start up the NIS server:<br />
/sbin/init.d/nis.server start<br />
❏ Make sure an NIS server exists on the same subnet as the NIS client.<br />
The client broadcasts its bind request, <strong>and</strong> it binds to the first server<br />
that responds to the request. Broadcasts do not cross gateways or<br />
routers, so the server must be on the same subnet as the client in<br />
order to receive the bind request. If you cannot configure an NIS<br />
server on the same subnet as your NIS clients, see “To Bind an NIS<br />
Client to a Server on a Different Subnet” on page 177.<br />
Chapter 8 293
Troubleshooting <strong>NFS</strong> <strong>Services</strong><br />
Common Problems with NIS<br />
If a User Cannot Log In<br />
❏ If the user has recently changed passwords, ask the user to try<br />
logging in with the old password. If the user can log in using the old<br />
password, follow these steps:<br />
1. Issue the ps -ef comm<strong>and</strong> on the NIS master server to make sure<br />
the yppasswdd daemon is running. If it is not, issue the following<br />
comm<strong>and</strong> to start all the NIS server processes:<br />
/sbin/init.d/nis.server start<br />
2. Check the cron scripts on the slave servers to make sure transfers<br />
of the passwd map from the master server are frequent enough.<br />
Once per hour is usually frequent enough, but frequent map<br />
transfers may cause too much network traffic. You might want to<br />
schedule map transfers for late at night, <strong>and</strong> advise users to make<br />
their password changes just before they go home.<br />
❏ Issue the following comm<strong>and</strong> on the NIS client to determine which<br />
master server supplies the passwd map to the client:<br />
/usr/bin/ypwhich -m passwd<br />
If the server does not respond, see “If You Receive an NIS “Server Not<br />
Responding” Message” on page 293.<br />
If the ypwhich comm<strong>and</strong> returns the name of the NIS master server,<br />
log in as root to the master server <strong>and</strong> make sure the user has an<br />
entry in its /etc/passwd file. Then, issue the following comm<strong>and</strong>s on<br />
the master server to generate the NIS passwd database from the<br />
/etc/passwd file <strong>and</strong> push it to the NIS slave servers:<br />
cd /var/yp<br />
/usr/ccs/bin/make passwd<br />
❏ Issue the domainname comm<strong>and</strong> (with no arguments) to make sure<br />
the client’s default domain is the domain served by the NIS master<br />
server. If it is not, log in as root to the NIS client, <strong>and</strong> issue the<br />
following comm<strong>and</strong> to change its domain name:<br />
domainname domainname<br />
❏ Issue the following comm<strong>and</strong> to check whether the NIS client has an<br />
entry in the passwd database on the NIS server to which it is bound:<br />
/usr/bin/ypmatch username passwd<br />
If the client has no entry in the passwd database, issue the following<br />
294<br />
Chapter 8
Troubleshooting <strong>NFS</strong> <strong>Services</strong><br />
Common Problems with NIS<br />
comm<strong>and</strong> on the NIS server to which the client is bound:<br />
/usr/sbin/ypxfr passwd<br />
This comm<strong>and</strong> transfers the passwd database from the NIS master<br />
server to the server where you issue the comm<strong>and</strong>.<br />
❏ If the user’s NIS client is bound to a slave server, make sure the slave<br />
server is listed in the NIS master server’s ypservers database.<br />
Follow these steps:<br />
1. Issue the following comm<strong>and</strong> on the NIS client to determine which<br />
server the client is bound to:<br />
/usr/bin/ypwhich<br />
2. Log into the NIS master server, <strong>and</strong> issue the following comm<strong>and</strong>:<br />
cd /var/yp/domainname<br />
3. Issue the following comm<strong>and</strong> on the NIS master server to write<br />
the contents of the ypservers database to a temporary file:<br />
/usr/sbin/makedbm -u ypservers > tempfile<br />
4. If the NIS slave server is not listed in tempfile, use a text editor<br />
to add it, <strong>and</strong> then issue the following comm<strong>and</strong> to rebuild the<br />
ypservers database:<br />
/usr/sbin/makedbm tempfile ypservers<br />
❏ If you are using NIS compat mode, make sure the NIS escape entry in<br />
the /etc/passwd file on the client does not have an asterisk in the<br />
password field. On HP systems, the NIS escape entry in the<br />
/etc/passwd file should be<br />
+::-2:60001:::<br />
Chapter 8 295
Troubleshooting <strong>NFS</strong> <strong>Services</strong><br />
Common Problems with NIS<br />
If You Receive an “Unknown Host” Message<br />
❏ Issue the following comm<strong>and</strong> to trace a lookup of the unknown host:<br />
/usr/contrib/bin/nsquery hosts hostname<br />
The trace will indicate which name services (BIND, NIS, NIS+, or<br />
/etc/hosts) were queried <strong>and</strong> in what order. If your host is not<br />
performing lookups the way you want, see “Configuring the Name<br />
Service Switch” on page 253 for instructions on configuring the Name<br />
Service Switch.<br />
❏ Issue the following comm<strong>and</strong> on the NIS client to determine which<br />
master server supplies the hosts map:<br />
/usr/bin/ypwhich -m hosts<br />
If the server does not respond, see “If You Receive an NIS “Server Not<br />
Responding” Message” on page 293.<br />
If the ypwhich comm<strong>and</strong> returns the name of the NIS master server,<br />
log in as root to the master server <strong>and</strong> make sure the unknown host is<br />
listed in its /etc/hosts file. Then, issue the following comm<strong>and</strong>s on<br />
the master server to generate the NIS hosts database from the<br />
/etc/hosts file <strong>and</strong> push it to the NIS slave servers:<br />
cd /var/yp<br />
/usr/ccs/bin/make hosts<br />
❏ Issue the domainname comm<strong>and</strong> (with no arguments) to make sure<br />
the client’s default domain is the domain served by the NIS master<br />
server. If it is not, log in as root to the NIS client <strong>and</strong> issue the<br />
following comm<strong>and</strong> to change its domain name:<br />
domainname domainname<br />
❏ Issue the following comm<strong>and</strong> to check whether the unknown host is<br />
listed in the hosts database on the NIS server to which the client is<br />
bound:<br />
/usr/bin/ypmatch hostname hosts<br />
If the host is not listed in the hosts database, issue the following<br />
comm<strong>and</strong> on the NIS server to which the client is bound:<br />
/usr/sbin/ypxfr hosts<br />
This comm<strong>and</strong> transfers the hosts database from the NIS master<br />
server to the server where you issue the comm<strong>and</strong>.<br />
296<br />
Chapter 8
Troubleshooting <strong>NFS</strong> <strong>Services</strong><br />
Common Problems with NIS<br />
❏ If the NIS client is bound to a slave server, make sure the slave server<br />
is listed in the NIS master server’s ypservers database. Follow these<br />
steps:<br />
1. Issue the following comm<strong>and</strong> on the NIS client to determine which<br />
server the client is bound to:<br />
/usr/bin/ypwhich<br />
2. Log in as root to the NIS master server <strong>and</strong> issue the following<br />
comm<strong>and</strong> to change to the directory where the domain databases<br />
reside:<br />
cd /var/yp/domainname<br />
3. On the NIS master server, issue the following comm<strong>and</strong> to write<br />
the contents of the ypservers database to a temporary file:<br />
/usr/sbin/makedbm -u ypservers > tempfile<br />
4. If the NIS slave server is not listed in tempfile, use a text editor<br />
to add it, <strong>and</strong> then issue the following comm<strong>and</strong> to rebuild the<br />
ypservers database:<br />
/usr/sbin/makedbm tempfile ypservers<br />
Chapter 8 297
Troubleshooting <strong>NFS</strong> <strong>Services</strong><br />
Common Problems with NIS<br />
If an NIS Client Cannot Bind to a Server<br />
If NIS comm<strong>and</strong>s return any of the following messages,<br />
ypcat: can’t bind to an NIS server for domain domainname<br />
ypmatch: can’t match key.<br />
reason: can’t communicate with ypbind<br />
ypwhich: clntudp_create error RPC_PROG_NOT_REGISTERED<br />
then ypbind is not running on the client. Issue the following comm<strong>and</strong> to<br />
start all the NIS client processes:<br />
/sbin/init.d/nis.client start<br />
298<br />
Chapter 8
Troubleshooting <strong>NFS</strong> <strong>Services</strong><br />
Common Problems with NIS<br />
If NIS Returns Incorrect Information<br />
❏ Issue the following comm<strong>and</strong> on the NIS client to determine which<br />
master server supplies the appropriate NIS map:<br />
/usr/bin/ypwhich -m mapname<br />
If the server does not respond, see “If You Receive an NIS “Server Not<br />
Responding” Message” on page 293.<br />
❏ Log in as root to the NIS master server, <strong>and</strong> issue the following<br />
comm<strong>and</strong> to check the contents of the appropriate NIS map:<br />
/usr/bin/ypcat -k mapname<br />
If the map contents are not correct, edit the ASCII file from which the<br />
map is generated. Then issue the following comm<strong>and</strong>s to regenerate<br />
the map <strong>and</strong> push it to the slave servers:<br />
cd /var/yp<br />
/usr/ccs/bin/make mapname<br />
❏ Issue the domainname comm<strong>and</strong> (with no arguments) to make sure<br />
the client’s default domain is the domain served by the NIS master<br />
server. If it is not, log in as root to the NIS client, <strong>and</strong> issue the<br />
following comm<strong>and</strong> to change its domain name:<br />
domainname domainname<br />
❏ Issue the following comm<strong>and</strong> on the NIS client to check the contents<br />
of the map on the NIS server to which the client is bound:<br />
/usr/bin/ypcat -k mapname<br />
If the contents are not correct, log in as root to the server that serves<br />
the NIS client, <strong>and</strong> issue the following comm<strong>and</strong>:<br />
/usr/sbin/ypxfr mapname<br />
This comm<strong>and</strong> transfers the map from the NIS master server to the<br />
server where you issue the comm<strong>and</strong>.<br />
❏ If the NIS client is bound to a slave server, make sure the slave server<br />
is listed in the NIS master server’s ypservers database. Follow these<br />
steps:<br />
1. Issue the following comm<strong>and</strong> on the NIS client to determine which<br />
server the client is bound to:<br />
/usr/bin/ypwhich<br />
Chapter 8 299
Troubleshooting <strong>NFS</strong> <strong>Services</strong><br />
Common Problems with NIS<br />
2. Log in as root to the NIS master server <strong>and</strong> issue the following<br />
comm<strong>and</strong> to change to the directory where the domain databases<br />
reside:<br />
cd /var/yp/domainname<br />
3. On the NIS master server, issue the following comm<strong>and</strong> to write<br />
the contents of the ypservers database to a temporary file:<br />
/usr/sbin/makedbm -u ypservers > tempfile<br />
4. If the NIS slave server is not listed in tempfile, use a text editor<br />
to add it, <strong>and</strong> then issue the following comm<strong>and</strong> to rebuild the<br />
ypservers database:<br />
/usr/sbin/makedbm tempfile ypservers<br />
❏ Make sure the slave servers have cron scripts that schedule regular<br />
updates of the map.<br />
300<br />
Chapter 8
Troubleshooting <strong>NFS</strong> <strong>Services</strong><br />
Common Problems with NIS+<br />
Common Problems with NIS+<br />
This section lists the following common problems encountered with NIS+<br />
<strong>and</strong> suggests ways to correct them.<br />
• If NIS+ Cannot Find an Object, see page 302.<br />
• If You Have Authentication or Permissions Problems, see page 304.<br />
• If You Have Insufficient Memory or Disk Space, see page 307.<br />
• If You Receive an “Unable to Fork” Message, see page 308.<br />
• If a User Cannot Log In, see page 309.<br />
• If nisping -C Fails or Transaction Logs Are Not Truncated, see<br />
page 311.<br />
• If a Replica Update Fails, see page 312.<br />
• If You Receive an “Illegal Object Type” Message, see page 312.<br />
• If You Receive a “Could Not Bind to Server” Message, see page 313.<br />
• If You Receive a “Generic System Error” or “Possible Loop Detected”<br />
Message, see page 313.<br />
• If You Receive a “Corrupt Log” or “Corrupt Database” Message, see<br />
page 314.<br />
Appendix A lists the NIS+ error messages, along with their causes <strong>and</strong><br />
the actions you can take to correct them.<br />
Chapter 8 301
Troubleshooting <strong>NFS</strong> <strong>Services</strong><br />
Common Problems with NIS+<br />
If NIS+ Cannot Find an Object<br />
❏ Make sure you typed the name of the object correctly <strong>and</strong> specified<br />
the correct path. The path to a system table must include “org_dir.”<br />
The path to an NIS+ group must include “groups_dir,” unless it is an<br />
argument to the nisgrpadm comm<strong>and</strong>, which cannot find a group if<br />
you include “groups_dir” in its path.<br />
❏ Make sure the value of the NIS_PATH variable includes the domain<br />
where the object resides. If the NIS_PATH variable is not set, the<br />
default search path is the default domain <strong>and</strong> all domains up to the<br />
root domain. See “To Change the Search Order of Domains” on page<br />
223.<br />
❏ If you are logged into a non-root server, <strong>and</strong> you are searching for an<br />
object in the domain the server serves, specify the full path name of<br />
the object, including the domain. A non-root server is a client of its<br />
parent domain, <strong>and</strong> any searches initiated from the server will search<br />
the server’s parent domain by default.<br />
❏ Make sure any fully qualified names end with a period. If a name<br />
does not end with a period, NIS+ appends a domain name to it.<br />
❏ Make sure the object exists. Issue the nisls -l directory<br />
comm<strong>and</strong>, where directory is the directory where the object should<br />
exist.<br />
❏ If the object was created recently, the replica servers might not have<br />
been updated yet. You can issue the nisping(1M) comm<strong>and</strong> to<br />
synchronize the replica servers, or you can just wait a few minutes for<br />
the replicas to synchronize themselves automatically.<br />
❏ If the object is configured in an automounter map, use the niscat(1)<br />
comm<strong>and</strong> to make sure your automounter maps contain the proper<br />
information. If the source files or NIS maps used to build the NIS+<br />
tables contained periods in their names, NIS+ cannot build the tables<br />
correctly. Before you run nissetup(1M) or nisserver(1M) to set up<br />
an NIS+ master server, replace periods in automounter map names<br />
with underbars. For example, if your master map is called<br />
auto.master, rename it to auto_master.<br />
❏ Issue the nisls -l comm<strong>and</strong> in the directory where the object should<br />
exist, <strong>and</strong> look closely to make sure the object name does not begin<br />
with a blank. If you type an extra space before the object name when<br />
you create an object, some NIS+ comm<strong>and</strong>s take the space as part of<br />
the object name. Rename the object, or remove it <strong>and</strong> recreate it<br />
302<br />
Chapter 8
Troubleshooting <strong>NFS</strong> <strong>Services</strong><br />
Common Problems with NIS+<br />
without the extra space.<br />
❏ A table or log file may have been corrupted. Restore the file from your<br />
most recent backup.<br />
❏ If you have changed the name of a domain, many NIS+ operations<br />
will fail, because the old domain name is embedded in objects<br />
throughout the domain. Do not change the name of an existing<br />
domain. If you have already done so, change the name back to the<br />
original. To rename a domain, create a new domain, initialize clients<br />
in the new domain, <strong>and</strong> then remove the old domain.<br />
Chapter 8 303
Troubleshooting <strong>NFS</strong> <strong>Services</strong><br />
Common Problems with NIS+<br />
If You Have Authentication or Permissions Problems<br />
❏ Issue the following comm<strong>and</strong> to determine whether you are<br />
authenticated:<br />
niscat passwd.org_dir<br />
If you are authenticated, you should be able to see the encrypted<br />
password field for your user ID. If you are not authenticated, the<br />
password field for your user ID will display *NP*.<br />
❏ If you are not authenticated, try to keylogin using your login<br />
password. If that does not work, try the password “nisplus”. If that<br />
does not work, try your most recent login password.<br />
❏ If the error you see is “Password does not decrypt sectet key,” you can<br />
probably fix it by issuing the keylogin comm<strong>and</strong>. This error is<br />
normal if you are running in a secure environment where a user’s<br />
login password <strong>and</strong> secure RPC password are different. Users whose<br />
login <strong>and</strong> secure RPC password should be the same can fix this error<br />
by performing a keylogin <strong>and</strong> then issuing the following comm<strong>and</strong>:<br />
/usr/lib/nis/nisclient -u<br />
❏ If you are a root user on an NIS+ replica server, <strong>and</strong> you cannot<br />
become authenticated, recreate the credentials for the replica, then<br />
remove <strong>and</strong> add the replica. See “To Create New Credentials for an<br />
Existing NIS+ Principal” on page 236, “To Remove a Replica Server<br />
from an NIS+ Domain” on page 246, <strong>and</strong> “To Set Up NIS+ Replica<br />
Servers” on page 208.<br />
❏ If you are a root user on the root master server, <strong>and</strong> you cannot<br />
become authenticated, recreate the credentials for the root master<br />
server. See “To Create New Credentials for the Root Master Server”<br />
on page 237.<br />
❏ Use the niscat(1) or nismatch(1) comm<strong>and</strong> to make sure the cred<br />
table contains credentials for you. If necessary, log in as an<br />
authenticated user <strong>and</strong> issue the nisaddcred(1M) comm<strong>and</strong> to create<br />
credentials for your NIS+ principal.<br />
❏ Issue the niscat -o comm<strong>and</strong> to check the ownership <strong>and</strong><br />
permissions on the object you are trying to access. If necessary, use<br />
the nischmod(1) comm<strong>and</strong> to modify the permissions on the object.<br />
If you must be a member of an NIS+ group to access the object, issue<br />
the nisgrpadm -l comm<strong>and</strong> to make sure your NIS+ principal name<br />
304<br />
Chapter 8
Troubleshooting <strong>NFS</strong> <strong>Services</strong><br />
Common Problems with NIS+<br />
is included in the group. If necessary, use the nisgrpadm(1) comm<strong>and</strong><br />
to add your principal name to the group.<br />
❏ Issue the ps -ef comm<strong>and</strong> to make sure the keyserv(1M) daemon is<br />
running. If it is not, start it. Make sure automount, rpc.nisd, <strong>and</strong><br />
sendmail are running. If they are not, start them.<br />
❏ If you changed the root password with the nispasswd comm<strong>and</strong>, log<br />
in as a user with modify permission for the passwd <strong>and</strong> cred tables,<br />
<strong>and</strong> change the root password back. To change the root password,<br />
issue the passwd comm<strong>and</strong> followed by the chkey -p comm<strong>and</strong>.<br />
CAUTION<br />
You can change the root password on the root master server, but do not<br />
change the public or private key on the root master server. The root<br />
master server’s keys are embedded in every directory object on every<br />
client, replica server, <strong>and</strong> subdomain server.<br />
❏ Make sure the NIS+ hosts table does not contain a host with the<br />
same name as the user. If a host has the same name as a user, one<br />
credential will overwrite the other, <strong>and</strong> either the user or the root<br />
user will no longer be able to perform a keylogin. (The keylogin is<br />
performed automatically when a user logs in, if the user’s login<br />
password is the same as the user’s secure RPC password.)<br />
Use nismatch(1) to find the credentials for the user or host in the<br />
cred table. If both a Local <strong>and</strong> a DES credential exist, the credentials<br />
are for a non-root user. If only a DES credential exists, the credential<br />
is for a root user. If necessary, change the host name. (It is easier to<br />
change a host name than to change a user name.) You can set up an<br />
alias to map the host’s old name to the new name.<br />
NOTE<br />
When you are running nisaddcred or nisclient, if you see a Changing<br />
Key message instead of an Adding Key message, you have a duplicate<br />
user or host name in your domain.<br />
❏ If you have recently changed the default domain of a client host,<br />
remove the /etc/.rootkey file on the host <strong>and</strong> rerun the<br />
nisclient(1M) script to initialize the host.<br />
❏ If a user’s login password is different from the user’s secure RPC<br />
Chapter 8 305
Troubleshooting <strong>NFS</strong> <strong>Services</strong><br />
Common Problems with NIS+<br />
password, the user must perform a keylogin after login in order to<br />
become authenticated.<br />
❏ If a user logs into a remote host that does not require a password, for<br />
example, because it has an entry for the user in a $HOME/.rhosts or<br />
/etc/hosts.equiv file, the user must perform a keylogin after login<br />
in order to become authenticated.<br />
❏ Make sure the publickey entry in the /etc/nsswitch.conf file is<br />
set to nisplus.<br />
❏ A user’s or host’s credentials may have become corrupted. If the user<br />
experiencing the problem is a non-root user, tell the user to issue the<br />
keylogout comm<strong>and</strong> followed by the keylogin comm<strong>and</strong>. If the user<br />
experiencing the problem is a root user, tell the root user to remove<br />
the /etc/.rootkey file <strong>and</strong> then issue the keylogout -f comm<strong>and</strong><br />
followed by the keylogin -r comm<strong>and</strong>.<br />
❏ An out-of-date /etc/.rootkey file might exist. Use the ls -l<br />
comm<strong>and</strong> to compare the date on the /etc/.rootkey file with the<br />
date on the cred.org_dir table. If the /etc/.rootkey file is much<br />
older than the cred table, it could be out of date. Run keylogin -r as<br />
root on the problem host, <strong>and</strong> then reinitialize the host as an NIS+<br />
client.<br />
❏ If your server is running at security level 0, <strong>and</strong> you try to run<br />
nispasswd to change your password, NIS+ will display an error<br />
message saying that you do not have secure RPC credentials for the<br />
domain.<br />
❏ If you have changed the name of a domain, many NIS+ operations<br />
will fail, because the old domain name is embedded in objects<br />
throughout the domain. Do not change the name of an existing<br />
domain. If you have already done so, change the name back to the<br />
original. To rename a domain, create a new domain, initialize clients<br />
in the new domain, <strong>and</strong> then remove the old domain.<br />
306<br />
Chapter 8
Troubleshooting <strong>NFS</strong> <strong>Services</strong><br />
Common Problems with NIS+<br />
If You Have Insufficient Memory or Disk Space<br />
❏ As a short-term solution to free up memory, kill all unnecessary<br />
windows <strong>and</strong> processes. If necessary, exit your windowing system <strong>and</strong><br />
work from the terminal comm<strong>and</strong> line.<br />
Use the ps -el comm<strong>and</strong> to check the size of running processes.<br />
Sometimes programs develop memory leaks <strong>and</strong> grow very large. If<br />
necessary, compare the size of processes on your host with processes<br />
on a host that is not having memory problems to determine whether<br />
the processes on your host are growing too large.<br />
❏ As a long-term solution, install more memory or swap space, or move<br />
your NIS+ server to a system that has more memory or swap space.<br />
❏ If you have a shortage of disk space, clean out the /tmp directory <strong>and</strong><br />
remove any unnecessary files. Remove core files from the root<br />
directory <strong>and</strong> home directories.<br />
❏ If you do not checkpoint your transaction log regularly, it becomes<br />
very large. However, in order to checkpoint your transaction log, you<br />
need sufficient disk space to allow NIS+ to make a complete copy of<br />
the log before removing it. You might have to add disk space to your<br />
server before checkpointing the log.<br />
To checkpoint the log, issue the nisping -Ca comm<strong>and</strong>. If your<br />
transaction log is large, or if you have a large number of replica<br />
servers, the nisping comm<strong>and</strong> can take a long time. It is<br />
recommended that you create a cron job to run nisping -Ca every<br />
night while the network is not busy.<br />
Chapter 8 307
Troubleshooting <strong>NFS</strong> <strong>Services</strong><br />
Common Problems with NIS+<br />
If You Receive an “Unable to Fork” Message<br />
❏ Kill any unnecessary processes on your server host. This message<br />
occurs when your host has run out of available processes.<br />
❏ If necessary, follow this procedure to increase the maximum number<br />
of inodes on your NIS+ server:<br />
1. Log in as root to the NIS+ server.<br />
2. Type /usr/sbin/sam to start SAM (System Administration<br />
Manager).<br />
3. Open Kernel Configuration.<br />
4. Open Configurable Parameters.<br />
5. Highlight the line that begins with ninode, <strong>and</strong> choose Modify<br />
Configurable Parameter from the Actions menu.<br />
6. Increase the value in the Formula/Value field, either by changing<br />
the constant multiplier in the formula or replacing the formula<br />
with a value. If your ninode value is currently set to the default<br />
(606), try changing it to 2048.<br />
7. Use SAM to regenerate the kernel <strong>and</strong> reboot the system.<br />
308<br />
Chapter 8
Troubleshooting <strong>NFS</strong> <strong>Services</strong><br />
Common Problems with NIS+<br />
If a User Cannot Log In<br />
❏ Have the user issue the keylogin comm<strong>and</strong> using the user’s secure<br />
RPC password. In most cases, this password should be the same as<br />
the user’s login password. If the keylogin does not work, have the<br />
user try it with the password “nisplus.” If that doesn’t work, have the<br />
user try to keylogin with his or her most recent password.<br />
❏ If the user changed passwords with the passwd comm<strong>and</strong>, the user<br />
will not be able to log into an NIS+ host. The passwd comm<strong>and</strong> affects<br />
only the /etc/passwd file on the local host. Users must run<br />
nispasswd to change their passwords in the NIS+ passwd table. If<br />
your NIS+ server is running in NIS compatibility mode, users on NIS<br />
clients must issue the yppasswd comm<strong>and</strong> to change their passwords<br />
in the NIS+ passwd table.<br />
❏ After a user has changed passwords, there may be a delay before the<br />
new password is propagated through the domain. This delay can be<br />
as long as many minutes, depending on the size of your domain. The<br />
problem will probably resolve itself if you wait, or you can issue the<br />
nisping org_dir comm<strong>and</strong> to force the servers to resynchronize.<br />
❏ If the user is trying to log into a host in a remote domain, use<br />
nismatch(1) to make sure the remote domain has a Local credential<br />
for the user. Use nisaddcred(1M) to add a Local credential for the<br />
user if none exists.<br />
❏ Use the niscat(1) comm<strong>and</strong> to make sure your automounter maps<br />
contain the proper information. If the source files or NIS maps used<br />
to build the NIS+ tables contained periods in their names, NIS+<br />
cannot build the tables correctly. Before you run nissetup(1M) or<br />
nisserver(1M) to set up an NIS+ master server, replace periods in<br />
automounter map names with underbars. For example, if your master<br />
map is called auto.master, rename it to auto_master.<br />
❏ If the /etc/nsswitch.conf file has been modified recently on the<br />
user’s host, reboot the host to make sure all processes are using the<br />
new configuration.<br />
❏ Make sure the NIS+ hosts table does not contain a host with the<br />
same name as the user. If a host has the same name as a user, one<br />
credential will overwrite the other, <strong>and</strong> either the user or the root<br />
user will no longer be able to perform a keylogin. (The keylogin is<br />
performed automatically when a user logs in, if the user’s login<br />
password is the same as the user’s secure RPC password.)<br />
Chapter 8 309
Troubleshooting <strong>NFS</strong> <strong>Services</strong><br />
Common Problems with NIS+<br />
Use nismatch(1) to find the credentials for the user or host in the<br />
cred table. If both a Local <strong>and</strong> a DES credential exist, the credentials<br />
are for a non-root user. If only a DES credential exists, the credential<br />
is for a root user. If necessary, change the host name. (It is easier to<br />
change a host name than to change a user name.) You can set up an<br />
alias to map the host’s old name to the new name.<br />
NOTE<br />
When you are running nisaddcred or nisclient, if you see a Changing<br />
Key message instead of a Adding Key message, you have a duplicate<br />
user or host name in your domain.<br />
310<br />
Chapter 8
Troubleshooting <strong>NFS</strong> <strong>Services</strong><br />
Common Problems with NIS+<br />
If nisping -C Fails or Transaction Logs Are Not<br />
Truncated<br />
❏ Issue the following comm<strong>and</strong> to check the update status of your<br />
replica servers:<br />
nisping -u<br />
❏ If you do not issue the nisping -Ca comm<strong>and</strong> regularly, your<br />
transaction log may grow too large, <strong>and</strong> you may not have enough<br />
disk space to checkpoint it.<br />
Make sure every master server in your namespace has a cron job that<br />
runs nisping -Ca at least once a day, during a time when the<br />
network is not busy. The following example crontab file runs<br />
nisping -Ca once a day, at 3:00 AM. It directs st<strong>and</strong>ard output <strong>and</strong><br />
st<strong>and</strong>ard error from the nisping comm<strong>and</strong> to the file<br />
/tmp/nisping.log.<br />
0 3 * * * /usr/lib/nis/nisping -Ca > /tmp/nisping.log 2&>1<br />
The nisping -Ca comm<strong>and</strong> causes all servers of the domain to<br />
update their tables with the changes in the transaction log <strong>and</strong> to<br />
clear the transaction log.<br />
❏ The most common cause of a checkpoint failure is lack of swap or disk<br />
space. The checkpoint process creates a temporary copy of the<br />
transaction log before it truncates the log <strong>and</strong> removes the temporary<br />
copy. Check your available swap <strong>and</strong> disk space, <strong>and</strong> free up all that<br />
you can. Remove core files. If necessary, configure more swap space.<br />
❏ One or more replica servers may be down. Logs are not cleared on a<br />
master server until all replicas for the master’s domain have been<br />
updated. If a replica server is going to be down or out of service for a<br />
period of time, issue the nisrmdir -s comm<strong>and</strong> to remove it as a<br />
replica.<br />
❏ Make sure the /var/nis/hostname.log file exists. Make sure it is<br />
readable <strong>and</strong> that you are allowed to write to it.<br />
❏ Check for error messages in syslog. Appendix A lists the NIS+ error<br />
messages, their causes, <strong>and</strong> the actions you can take to resolve them.<br />
Chapter 8 311
Troubleshooting <strong>NFS</strong> <strong>Services</strong><br />
Common Problems with NIS+<br />
If a Replica Update Fails<br />
❏ The master server might be busy, or another replica might be<br />
performing an update. The update is usually rescheduled<br />
automatically <strong>and</strong> retried later.<br />
❏ The server might be out of child processes to allocate. See “If You<br />
Receive an “Unable to Fork” Message” on page 308.<br />
❏ A read-only process might have been requested to dump.<br />
Usually, problems with replica updates solve themselves. Check the<br />
system log on the replica server <strong>and</strong> the master server for more<br />
information.<br />
If You Receive an “Illegal Object Type” Message<br />
❏ You may have attempted to create a table with no searchable<br />
columns. See “To Create an NIS+ Table” on page 240.<br />
❏ A database operation may have returned the error code<br />
DB_BADOBJECT. Type man 3N nis_db for a list of error codes <strong>and</strong> their<br />
meanings.<br />
❏ You may have tried to add or modify an object with a length of zero.<br />
❏ You may have tried to perform an NIS+ directory operation on an<br />
object that was not a directory.<br />
❏ You may have tried to link an NIS+ directory to a LINK object.<br />
❏ You may have specified an NIS+ object that was not a group in the<br />
nisgrpadm comm<strong>and</strong> or in another NIS+ group operation.<br />
❏ You may have tried to perform an NIS+ table operation on an object<br />
that was not a table.<br />
312<br />
Chapter 8
Troubleshooting <strong>NFS</strong> <strong>Services</strong><br />
Common Problems with NIS+<br />
If You Receive a “Could Not Bind to Server” Message<br />
❏ Issue the following comm<strong>and</strong> to make sure your default domain name<br />
does not end with a period:<br />
domainname<br />
❏ In the /etc/rc.config.d/namesvrs file, make sure the value of the<br />
NIS_DOMAIN variable does not end with a period.<br />
If You Receive a “Generic System Error” or “Possible<br />
Loop Detected” Message<br />
❏ Make sure you are specifying the correct domain for the operation you<br />
are trying to perform.<br />
Remember that non-root servers are clients of the directory above the<br />
one they serve. If you do not specify a domain when you perform an<br />
operation on a server, the operation is performed on the default domain,<br />
in which the server is a client. To perform an operation on the domain<br />
the server serves, specify the domain name in the comm<strong>and</strong>, or set the<br />
NIS_PATH variable so that the first domain in the list is the domain the<br />
server serves. See “To Change the Search Order of Domains” on page<br />
223.<br />
Chapter 8 313
Troubleshooting <strong>NFS</strong> <strong>Services</strong><br />
Common Problems with NIS+<br />
If You Receive a “Corrupt Log” or “Corrupt Database”<br />
Message<br />
❏ Issue the following comm<strong>and</strong> to determine whether you have multiple<br />
independent rpc.nisd processes running:<br />
ps -ef | grep nisd<br />
In normal operation, rpc.nisd may spawn child rpc.nisd processes,<br />
<strong>and</strong> this causes no problem. However, if two parent rpc.nisd<br />
processes are running on the same host at the same time, they will<br />
overwrite each other’s data <strong>and</strong> corrupt logs <strong>and</strong> databases. (Two<br />
parent rpc.nisd processes can be running only if someone started<br />
one by h<strong>and</strong>.)<br />
If you have more than one parent rpc.nisd process running, issue<br />
the kill -9 processID comm<strong>and</strong> to kill all but one of them, <strong>and</strong><br />
then issue the ps -ef comm<strong>and</strong> again to make sure only one parent<br />
process remains. If you are running rpc.nisd in NIS compatibility<br />
mode (with the -Y or -B option), kill all independent<br />
rpc.nisd_resolv processes as well.<br />
If an NIS+ table is corrupt, restore it from your most recent backup<br />
that contains an uncorrupted version. You can then use your<br />
transaction logs to update the table with any changes that occurred<br />
since the backup was made. However, if the transaction log is also<br />
corrupt, you must recreate your NIS+ environment. You can do this in<br />
one of two ways:<br />
1. Restore the /var/nis directory <strong>and</strong> the /etc/.rootkey file from a<br />
backup.<br />
2. Recreate the NIS+ environment all over again, either from current<br />
/etc files or from flat files, if you have been backing up your<br />
databases to flat files.<br />
314<br />
Chapter 8
Troubleshooting <strong>NFS</strong> <strong>Services</strong><br />
Performance Tuning<br />
Performance Tuning<br />
This section gives suggestions for identifying performance problems in<br />
your network <strong>and</strong> improving <strong>NFS</strong> performance on your servers <strong>and</strong><br />
clients. It contains the following sections:<br />
• To Diagnose <strong>NFS</strong> Performance Problems, see page 316.<br />
• To Improve <strong>NFS</strong> Server Performance, see page 318.<br />
• To Adjust the Number of nfsd Processes, see page 320.<br />
• To Improve <strong>NFS</strong> Client Performance, see page 321.<br />
• To Improve NIS+ Performance, see page 323.<br />
Chapter 8 315
Troubleshooting <strong>NFS</strong> <strong>Services</strong><br />
Performance Tuning<br />
To Diagnose <strong>NFS</strong> Performance Problems<br />
1. Issue the following comm<strong>and</strong> on several of your <strong>NFS</strong> clients:<br />
nfsstat -rc<br />
2. If the timeout <strong>and</strong> retrans values displayed by nfsstat -rc are<br />
high, but the badxid value is close to zero, packets are being dropped<br />
before they get to the <strong>NFS</strong> server.<br />
Try decreasing the values of the wsize <strong>and</strong> rsize mount options to<br />
4096 or 2048 on the <strong>NFS</strong> clients. See “To Change the Default Mount<br />
Options” on page 43.<br />
See <strong>Installing</strong> <strong>and</strong> <strong>Administering</strong> LAN/9000 Software for<br />
information on troubleshooting LAN problems.<br />
3. If the timeout <strong>and</strong> badxid values displayed by nfsstat -rc are of<br />
the same magnitude, your server is probably slow. Client RPC<br />
requests are timing out <strong>and</strong> being retransmitted before the <strong>NFS</strong><br />
server has a chance to respond to them.<br />
See “To Improve <strong>NFS</strong> Server Performance” on page 318.<br />
Try doubling the value of the timeo mount option on the <strong>NFS</strong> clients.<br />
See “To Change the Default Mount Options” on page 43.<br />
4. If the null value displayed by nfsstat -rc is greater than 1%, the<br />
automounter is trying too frequently to mount a directory from<br />
multiple servers. It sends out null procedure calls to all the<br />
configured servers <strong>and</strong> mounts the directory from the server that<br />
answers first.<br />
Increase the time between mount attempts by adding the -tm 60<br />
option to the AUTO_OPTIONS variable in /etc/rc.config.d/nfsconf,<br />
as follows:<br />
AUTO_OPTIONS=”-f $AUTO_MASTER -tm 60”<br />
Then, restart the automounter. See “To Restart the Automounter” on<br />
page 83.<br />
Continue to increase the value of the -tm parameter until the null<br />
value displayed by nfsstat is less than 1%.<br />
5. Issue the following comm<strong>and</strong> on any machine on the network:<br />
netstat -i<br />
The number of collisions (Coll) divided by the number of output<br />
316<br />
Chapter 8
Troubleshooting <strong>NFS</strong> <strong>Services</strong><br />
Performance Tuning<br />
packets (Opkts) is the collision rate. If your collision rate is greater<br />
than 10%, consider dividing your network into smaller segments <strong>and</strong><br />
putting an <strong>NFS</strong> server on each segment. See <strong>Installing</strong> <strong>and</strong><br />
<strong>Administering</strong> LAN/9000 Software for information on dividing your<br />
network.<br />
Chapter 8 317
Troubleshooting <strong>NFS</strong> <strong>Services</strong><br />
Performance Tuning<br />
To Improve <strong>NFS</strong> Server Performance<br />
❏ Issue the following comm<strong>and</strong> to check your server’s memory<br />
utilization:<br />
netstat -m<br />
If the number of requests for memory denied is high, your server<br />
does not have enough memory, <strong>and</strong> <strong>NFS</strong> clients will experience poor<br />
performance. Consider adding more memory or using a different host<br />
as the <strong>NFS</strong> server.<br />
❏ Put heavily used directories on different disks on your <strong>NFS</strong> servers so<br />
they can be accessed in parallel.<br />
❏ Make sure your server is running the correct number of nfsd<br />
processes. See “To Adjust the Number of nfsd Processes” on page 320.<br />
❏ Issue the following comm<strong>and</strong> on the <strong>NFS</strong> server:<br />
vmstat -n<br />
If the us <strong>and</strong> sy values under cpu are high, <strong>and</strong> the id (idle time)<br />
value under cpu is close to zero, your server’s CPU is heavily loaded.<br />
Try using a faster machine as your <strong>NFS</strong> server. Do not use a gateway<br />
or a terminal server as an <strong>NFS</strong> or NIS server.<br />
❏ Issue the following comm<strong>and</strong> to determine which processes are using<br />
the most CPU:<br />
/usr/bin/top<br />
The top program sorts the processes running on your system, with<br />
the most CPU-intensive process at the top of the display. It refreshes<br />
the display every five seconds. Try taking some CPU-intensive<br />
processes off the server.<br />
Type q to exit the top program.<br />
❏ Log into the <strong>NFS</strong> server <strong>and</strong> issue the following comm<strong>and</strong>:<br />
nfsstat -s<br />
If the number of readlink calls is of the same magnitude as the<br />
number of lookup calls, you have a symbolic link in a file system that<br />
is frequently traversed by <strong>NFS</strong> clients.<br />
On the <strong>NFS</strong> clients that require access to the linked directory, mount<br />
the target of the link. Then, remove the link from the exported<br />
directory on the server.<br />
318<br />
Chapter 8
Troubleshooting <strong>NFS</strong> <strong>Services</strong><br />
Performance Tuning<br />
When a client requests access to a linked file or directory, two<br />
requests are sent to the server: one to look up the path to the link,<br />
<strong>and</strong> another to look up the target of the link. You can improve <strong>NFS</strong><br />
performance by removing symbolic links from exported directories.<br />
CAUTION<br />
Do not remove symbolic links in an <strong>NFS</strong> diskless environment. File<br />
sharing in <strong>NFS</strong> diskless is done by means of symbolic links.<br />
❏ If the value of getattr displayed by nfsstat -s is greater than 60%,<br />
one or more clients have either turned off attribute caching (with the<br />
noac mount option) or set the caching timeout values too low.<br />
Increase the attribute caching timeouts on the clients that have them<br />
set below the default values. See “To Change the Default Mount<br />
Options” on page 43.<br />
❏ Export directories with the async option. When async is specified,<br />
the server acknowledges write requests from clients before writing<br />
data to disk. Clients do not have to wait for a write request to<br />
complete before issuing another request.<br />
Chapter 8 319
Troubleshooting <strong>NFS</strong> <strong>Services</strong><br />
Performance Tuning<br />
To Adjust the Number of nfsd Processes<br />
1. Issue the following comm<strong>and</strong> on the <strong>NFS</strong> server:<br />
netstat -s<br />
If the UDP statistics displayed by the netstat comm<strong>and</strong> indicate a<br />
large number of socket overflows, as in the following example, then<br />
your server is not running enough nfsd daemons.<br />
udp:<br />
0 incomplete headers<br />
0 bad data length fields<br />
0 bad checksums<br />
1375 socket overflows<br />
2. To increase the number of nfsd daemons running, change the value of<br />
the NUM_<strong>NFS</strong>D variable in the /etc/rc.config.d/nfsconf file, as in<br />
the following example:<br />
NUM_<strong>NFS</strong>D=8<br />
3. Issue the following comm<strong>and</strong> to start more nfsd processes:<br />
/usr/sbin/nfsd number<br />
4. Issue the netstat -s comm<strong>and</strong> again to check the number of socket<br />
overflows. Continue to adjust the NUM_<strong>NFS</strong>D value <strong>and</strong> start nfsd<br />
processes until the number of new socket overflows is close to zero.<br />
(The output of nfsstat is cumulative, so when there are no new<br />
socket overflows, the number will stay the same.)<br />
As a general rule, an <strong>NFS</strong> server should run approximately two nfsd<br />
daemons for each entry in the /etc/exports file.<br />
For more information, type man 1M nfsd at the HP-UX prompt.<br />
320<br />
Chapter 8
Troubleshooting <strong>NFS</strong> <strong>Services</strong><br />
Performance Tuning<br />
To Improve <strong>NFS</strong> Client Performance<br />
❏ Issue the ps -ef comm<strong>and</strong> to make sure four biod processes are<br />
running on each client. To start four biod processes, set the<br />
NUM_<strong>NFS</strong>IOD variable to 4 in the /etc/rc.config.d/nfsconf file,<br />
<strong>and</strong> issue the following comm<strong>and</strong>:<br />
/usr/sbin/biod 4<br />
NOTE<br />
If your performance bottleneck is a slow server, increasing the number of<br />
biod processes beyond four will not improve <strong>NFS</strong> performance, <strong>and</strong> it<br />
might make it worse.<br />
❏ For files <strong>and</strong> directories that are mounted read-only <strong>and</strong> never<br />
change, set the actimeo mount option to 120 or greater in the<br />
/etc/fstab file on your <strong>NFS</strong> clients. See “To Change the Default<br />
Mount Options” on page 43.<br />
❏ If you see several “server not responding” messages within a few<br />
minutes, try doubling the value of the timeo mount option in the<br />
/etc/fstab file on your <strong>NFS</strong> clients. See “To Change the Default<br />
Mount Options” on page 43.<br />
❏ If you frequently see the following message when attempting access<br />
to a soft-mounted directory,<br />
<strong>NFS</strong> operation failed for server servername: Timed out<br />
try increasing the value of the retrans mount option in the<br />
/etc/fstab file on the <strong>NFS</strong> clients. Or, change the soft mount to an<br />
interruptible hard mount, by specifying the hard <strong>and</strong> intr options<br />
(the defaults). See “To Change the Default Mount Options” on page<br />
43.<br />
❏ Type the following comm<strong>and</strong> on the <strong>NFS</strong> server, to find out the block<br />
size of the server’s file system:<br />
/usr/sbin/tunefs -v devicefilename<br />
On the <strong>NFS</strong> clients, set the wsize <strong>and</strong> rsize mount options to the<br />
bsize value displayed by tunefs. See “To Change the Default Mount<br />
Options” on page 43.<br />
❏ On the <strong>NFS</strong> clients, look in the /etc/fstab file for “stepping-stone”<br />
mounts (hierarchical mounts), as in the following example:<br />
Chapter 8 321
Troubleshooting <strong>NFS</strong> <strong>Services</strong><br />
Performance Tuning<br />
thyme:/usr /usr nfs defaults 0 0<br />
basil:/usr/share /usr/share nfs defaults 0 0<br />
sage:/usr/share/lib /usr/share/lib nfs defaults 0 0<br />
Wherever possible, change these “stepping-stone” mounts so that<br />
whole directories are mounted from a single <strong>NFS</strong> server.<br />
Stepping-stone (hierarchical) mounts, like the one in the example<br />
above, cause more <strong>NFS</strong> requests than mounts from a single server. In<br />
the example, if a client wants access to something in<br />
/usr/share/lib, a request must be sent to server thyme, then to<br />
server basil, <strong>and</strong> finally to server sage.<br />
322<br />
Chapter 8
Troubleshooting <strong>NFS</strong> <strong>Services</strong><br />
Performance Tuning<br />
To Improve NIS+ Performance<br />
❏ Issue the following comm<strong>and</strong> to check the size of your transaction log:<br />
/usr/lib/nis/nislog | head -10<br />
If your transaction log is fully checkpointed, it will contain only three<br />
entries. If it contains many entries, issue the following comm<strong>and</strong> to<br />
checkpoint it:<br />
nisping -Ca<br />
❏ The nisping -C comm<strong>and</strong> can cause a long delay if your namespace<br />
is large. Do not reboot the system. Do not reenter the nisping<br />
comm<strong>and</strong>. This problem will solve itself. Just wait until the server<br />
finishes checkpointing.<br />
❏ Make sure your NIS_PATH environment variable is set to something<br />
clean <strong>and</strong> simple, like org_dir.$:$. A complex NIS_PATH value,<br />
particularly one that contains a variable, will slow your system <strong>and</strong><br />
may cause some operations to fail. See “To Change the Search Order<br />
of Domains” on page 223.<br />
❏ Concatenation paths in tables slow performance. If performance is a<br />
problem in your NIS+ namespace, do not use concatenation paths.<br />
See “To Create or Remove Paths Among Tables” on page 242.<br />
❏ Make sure you have 10 or fewer replica servers per domain.<br />
❏ NIS+ groups that contain other groups (recursive groups) slow NIS+<br />
performance. If performance is a problem in your NIS+ namespace,<br />
do not use recursive NIS+ groups. See “To Add or Remove Members of<br />
an NIS+ Group” on page 244.<br />
❏ Large transaction logs slow NIS+ performance, particularly at system<br />
startup. If your transaction logs are large, or if you have just run the<br />
nispopulate script to populate your domain tables, issue the<br />
nisping -Ca comm<strong>and</strong> to checkpoint your directories. Make sure<br />
your master server has a cron job scheduled to issue the nisping<br />
-Ca comm<strong>and</strong> daily. Type man 1 crontab for information.<br />
❏ Issue the ps -ef comm<strong>and</strong> to make sure nis_cachemgr is running on<br />
every NIS+ client host. Start it if it is not. Type man 1M<br />
nis_cachemgr for information.<br />
❏ An NIS+ lookup comm<strong>and</strong> like niscat returns the error message<br />
Server busy. Try again.<br />
Chapter 8 323
Troubleshooting <strong>NFS</strong> <strong>Services</strong><br />
Performance Tuning<br />
for one of the following reasons:<br />
• The server is busy synchronizing <strong>and</strong> checkpointing its directories.<br />
Just wait until the server is finished checkpointing <strong>and</strong> try the<br />
comm<strong>and</strong> again.<br />
• The server is out of swap or disk space. Increase the swap space on<br />
the server, <strong>and</strong> then checkpoint the server’s directories with<br />
nisping -Ca.<br />
324<br />
Chapter 8
Troubleshooting <strong>NFS</strong> <strong>Services</strong><br />
Logging <strong>and</strong> Tracing of <strong>NFS</strong> <strong>Services</strong><br />
Logging <strong>and</strong> Tracing of <strong>NFS</strong> <strong>Services</strong><br />
This section tells you how to start the following tools:<br />
• <strong>NFS</strong> Logging<br />
• Automounter Logging<br />
• Automounter Tracing<br />
• Logging for the Other <strong>NFS</strong> <strong>Services</strong><br />
• NIS Logging<br />
• NIS+ Logging<br />
• Logging With nettl <strong>and</strong> netfmt<br />
• Tracing With nettl <strong>and</strong> netfmt<br />
Chapter 8 325
Troubleshooting <strong>NFS</strong> <strong>Services</strong><br />
Logging <strong>and</strong> Tracing of <strong>NFS</strong> <strong>Services</strong><br />
<strong>NFS</strong> Logging<br />
You can configure logging for the following <strong>NFS</strong> daemons:<br />
• rpc.mountd<br />
• rpc.statd<br />
• rpc.lockd<br />
Each message logged by these daemons can be identified by the date,<br />
time, host name, process ID, <strong>and</strong> name of the daemon that generated the<br />
message. You can direct logging messages from all these <strong>NFS</strong> daemons to<br />
the same file.<br />
To Control the Size of Log Files<br />
Log files grow without bound, using up disk space. You might want to<br />
create a cron job to truncate your log files regularly. Following is an<br />
example crontab entry that empties the log file at 1:00 AM every<br />
Monday, Wednesday, <strong>and</strong> Friday:<br />
0 1 * * 1,3,5 cat /dev/null > log_file<br />
For more information, type man 1M cron or man 1 crontab at the<br />
HP-UX prompt.<br />
326<br />
Chapter 8
Troubleshooting <strong>NFS</strong> <strong>Services</strong><br />
Logging <strong>and</strong> Tracing of <strong>NFS</strong> <strong>Services</strong><br />
To Start <strong>and</strong> Stop rpc.mountd Logging<br />
1. Issue the following comm<strong>and</strong>s to kill the rpc.mountd process <strong>and</strong><br />
restart it with logging turned on (PID is a process ID returned by the<br />
ps comm<strong>and</strong>):<br />
ps -ef | grep mountd<br />
kill PID<br />
/usr/sbin/rpc.mountd -l /var/adm/mountd.log<br />
2. If you want rpc.mountd to log mount requests <strong>and</strong> mount failures as<br />
well as errors, add the -t2 option to the rpc.mountd comm<strong>and</strong>, as in<br />
the following example:<br />
/usr/sbin/rpc.mountd -l /var/adm/mountd.log -t2<br />
3. To stop logging, kill rpc.mountd <strong>and</strong> restart it without the -l<br />
logfile <strong>and</strong> -t2 options.<br />
If you do not specify the -l or-t option, rpc.mountd logs only errors to<br />
/var/adm/mountd.log. If this file does not exist, rpc.mountd creates it.<br />
rpc.mountd can share the same log file with the other <strong>NFS</strong> daemons.<br />
For more information, type man 1M mountd at the HP-UX prompt.<br />
To Start <strong>and</strong> Stop Detailed Logging of rpc.statd <strong>and</strong> rpc.lockd<br />
To start detailed logging of rpc.statd <strong>and</strong> rpc.lockd while they are<br />
running, issue the following comm<strong>and</strong>s (PID is a process ID returned by<br />
the ps comm<strong>and</strong>):<br />
/usr/bin/ps -ef | /usr/bin/grep rpc.statd<br />
/usr/bin/kill -SIGUSR2 PID<br />
/usr/bin/ps -ef | /usr/bin/grep rpc.lockd<br />
/usr/bin/kill -SIGUSR2 PID<br />
The SIGUSR2 signal sets the logging to level 3 (the most detailed level).<br />
The logging for rpc.statd is appended to the file<br />
/var/adm/rpc.statd.log. The logging for rpc.lockd is appended to<br />
the file /var/adm/rpc.lockd.log.<br />
To stop detailed logging of rpc.statd <strong>and</strong> rpc.lockd, issue the same<br />
comm<strong>and</strong>s listed above to send the SIGUSR2 signal to the processes. The<br />
SIGUSR2 signal is a toggle that turns logging on or off, depending on its<br />
current state.<br />
For more information, type man 1M statd or man 1M lockd at the<br />
HP-UX prompt.<br />
Chapter 8 327
Troubleshooting <strong>NFS</strong> <strong>Services</strong><br />
Logging <strong>and</strong> Tracing of <strong>NFS</strong> <strong>Services</strong><br />
To Start <strong>and</strong> Stop Basic Logging of rpc.statd <strong>and</strong> rpc.lockd<br />
To start basic logging of rpc.statd <strong>and</strong> rpc.lockd (just errors,<br />
warnings, startup, <strong>and</strong> shutdown), issue the following comm<strong>and</strong>s (PID is<br />
a process ID returned by the ps comm<strong>and</strong>):<br />
ps -ef | grep lockd<br />
kill PID<br />
ps -ef | grep statd<br />
kill PID<br />
/usr/sbin/rpc.statd -l /var/adm/rpc.statd.log<br />
/usr/sbin/rpc.lockd -l /var/adm/rpc.lockd.log<br />
NOTE<br />
Always start rpc.statd before starting rpc.lockd.<br />
To stop basic logging of rpc.statd <strong>and</strong> rpc.lockd, kill them <strong>and</strong> restart<br />
them without the -l logfile option.<br />
The rpc.statd <strong>and</strong> rpc.lockd daemons can share the same log file with<br />
the other <strong>NFS</strong> daemons.<br />
For more information, type man 1M lockd or man 1M statd at the<br />
HP-UX prompt.<br />
328<br />
Chapter 8
Troubleshooting <strong>NFS</strong> <strong>Services</strong><br />
Logging <strong>and</strong> Tracing of <strong>NFS</strong> <strong>Services</strong><br />
Automounter Logging<br />
Automounter logs messages through /usr/sbin/syslogd. By default,<br />
syslogd writes messages to the file /var/adm/syslog/syslog.log.<br />
Type man 1M syslogd for more information on syslogd.<br />
For explanations of the automounter log messages, type man 1M<br />
automount.<br />
To Start Automounter Logging<br />
1. Log in as root to the <strong>NFS</strong> client.<br />
2. Issue the following comm<strong>and</strong> to get a list of all the automounted<br />
directories on the client:<br />
/usr/bin/grep tmp_mnt /etc/mnttab<br />
3. For every automounted directory listed by the grep comm<strong>and</strong>, issue<br />
the following comm<strong>and</strong> to determine whether the directory is<br />
currently in use:<br />
/usr/sbin/fuser -cu local_mount_point<br />
This comm<strong>and</strong> lists the process IDs <strong>and</strong> user names of everyone using<br />
the mounted directory.<br />
4. Warn any users to cd out of the directory, <strong>and</strong> kill any processes that<br />
are using the directory, or wait until the processes terminate. You can<br />
issue the following comm<strong>and</strong> to kill all the processes using the<br />
mounted directory:<br />
/usr/sbin/fuser -ck local_mount_point<br />
5. Issue the following comm<strong>and</strong>s to kill the automounter (PID is the<br />
process ID returned by the ps comm<strong>and</strong>):<br />
ps -ef | grep automount<br />
kill -SIGTERM PID<br />
CAUTION<br />
Do not kill the automounter with -SIGKILL (-9). The SIGKILL signal can<br />
cause any currently automounted directories to become inaccessible<br />
until you reboot your system.<br />
6. Issue the following comm<strong>and</strong> to start the automounter with logging<br />
enabled:<br />
Chapter 8 329
Troubleshooting <strong>NFS</strong> <strong>Services</strong><br />
Logging <strong>and</strong> Tracing of <strong>NFS</strong> <strong>Services</strong><br />
/usr/sbin/automount options -v<br />
options is the list of options configured in the AUTO_OPTIONS<br />
variable in the /etc/rc.config.d/nfsconf file. You can also source<br />
the /etc/rc.config.d/nfsconf file, <strong>and</strong> then enter the automount<br />
comm<strong>and</strong> as follows:<br />
/usr/sbin/automount $AUTO_OPTIONS -v<br />
To Stop Automounter Logging<br />
To stop automounter logging, kill the automounter <strong>and</strong> restart it (as<br />
described in the previous section), except start it without the -v option.<br />
330<br />
Chapter 8
Troubleshooting <strong>NFS</strong> <strong>Services</strong><br />
Logging <strong>and</strong> Tracing of <strong>NFS</strong> <strong>Services</strong><br />
Automounter Tracing<br />
Two levels of automounter tracing are available:<br />
Detailed (level 3) Includes traces of all automounter requests <strong>and</strong><br />
replies, mount attempts, timeouts, <strong>and</strong> unmount<br />
attempts. You can start level 3 tracing while the<br />
automounter is running.<br />
Basic (level 1) Includes traces of all automounter requests <strong>and</strong><br />
replies. You must restart the automounter to start level<br />
1 tracing.<br />
To Start <strong>and</strong> Stop Automounter Detailed Tracing<br />
1. Log in as root to the <strong>NFS</strong> client.<br />
2. Issue the following comm<strong>and</strong>s (PID is the process ID returned by the<br />
ps comm<strong>and</strong>):<br />
ps -ef | grep automount<br />
kill -SIGUSR2 PID<br />
Level 3 tracing is appended to the file /var/adm/automount.log.<br />
To stop level 3 tracing, issue the same comm<strong>and</strong>s listed above to send the<br />
SIGUSR2 signal to the automounter. The SIGUSR2 signal is a toggle that<br />
turns tracing on or off depending on its current state.<br />
If you have basic (level 1) tracing turned on when you send the SIGUSR2<br />
signal to the automounter, the SIGUSR2 signal turns tracing off.<br />
To Start <strong>and</strong> Stop Automounter Basic Tracing<br />
1. Log in as root to the <strong>NFS</strong> client.<br />
2. Add “2> tracefile” to the AUTO_OPTIONS variable in the<br />
/etc/rc.config.d/nfsconf file, as in the following example:<br />
AUTO_OPTIONS=”-f $AUTO_MASTER 2> /var/adm/automount.log”<br />
This change redirects st<strong>and</strong>ard error to the file<br />
/var/adm/automount.log. Automounter basic trace output is sent to<br />
st<strong>and</strong>ard error.<br />
3. Issue the following comm<strong>and</strong> to get a list of all the automounted<br />
directories on the client:<br />
/usr/bin/grep tmp_mnt /etc/mnttab<br />
Chapter 8 331
Troubleshooting <strong>NFS</strong> <strong>Services</strong><br />
Logging <strong>and</strong> Tracing of <strong>NFS</strong> <strong>Services</strong><br />
4. For every automounted directory listed by the grep comm<strong>and</strong>, issue<br />
the following comm<strong>and</strong> to determine whether the directory is<br />
currently in use:<br />
/usr/sbin/fuser -cu local_mount_point<br />
This comm<strong>and</strong> lists the process IDs <strong>and</strong> user names of everyone using<br />
the mounted directory.<br />
5. Warn any users to cd out of the directory, <strong>and</strong> kill any processes that<br />
are using the directory, or wait until the processes terminate. You can<br />
issue the following comm<strong>and</strong> to kill all the processes using the<br />
mounted directory:<br />
/usr/sbin/fuser -ck local_mount_point<br />
6. Issue the following comm<strong>and</strong>s to kill the automounter (PID is the<br />
process ID returned by the ps comm<strong>and</strong>):<br />
ps -ef | grep automount<br />
kill -SIGTERM PID<br />
CAUTION Do not kill the automounter with -SIGKILL (-9).<br />
7. Issue the following comm<strong>and</strong> to start the automounter with tracing<br />
enabled:<br />
/usr/sbin/automount options -T<br />
options is the list of options configured in the AUTO_OPTIONS<br />
variable in the /etc/rc.config.d/nfsconf file. You can also source<br />
the /etc/rc.config.d/nfsconf file, <strong>and</strong> then enter the automount<br />
comm<strong>and</strong> as follows:<br />
/usr/sbin/automount $AUTO_OPTIONS -T<br />
To stop automounter logging, kill the automounter <strong>and</strong> restart it (as<br />
described in the previous section), except start it without the -T option.<br />
332<br />
Chapter 8
Troubleshooting <strong>NFS</strong> <strong>Services</strong><br />
Logging <strong>and</strong> Tracing of <strong>NFS</strong> <strong>Services</strong><br />
Logging for the Other <strong>NFS</strong> <strong>Services</strong><br />
You can configure logging for the following <strong>NFS</strong> services:<br />
• rpc.rexd<br />
• rpc.rstatd<br />
• rpc.rusersd<br />
• rpc.rwalld<br />
• rpc.sprayd<br />
Logging is not available for the rpc.quotad daemon.<br />
Each message logged by these daemons can be identified by the date,<br />
time, host name, process ID, <strong>and</strong> name of the function that generated the<br />
message. You can direct logging messages from all these <strong>NFS</strong> services to<br />
the same file.<br />
To Control the Size of Log Files<br />
Log files grow without bound, using up disk space. You might want to<br />
create a cron job to truncate your log files regularly. Following is an<br />
example crontab entry that empties the log file at 1:00 AM every<br />
Monday, Wednesday, <strong>and</strong> Friday:<br />
0 1 * * 1,3,5 cat /dev/null > log_file<br />
For more information, type man 1M cron or man 1 crontab at the<br />
HP-UX prompt.<br />
To Configure Logging for the Other <strong>NFS</strong> <strong>Services</strong><br />
1. Add the -l logfile option to the lines in /etc/inetd.conf for the<br />
services you want to log. In the following example, logging is turned<br />
on for rpc.rexd <strong>and</strong> rpc.rstatd:<br />
rpc stream tcp nowait root /usr/sbin/rpc.rexd 100017 1 \<br />
rpc.rexd -l /var/adm/rpc.log<br />
rpc dgram udp wait root /usr/lib/netsvc/rstat/rpc.rstatd \<br />
100001 1-3 rpc.rstatd -l /var/adm/rpc.log<br />
2. Issue the following comm<strong>and</strong> to restart inetd:<br />
/usr/sbin/inetd -c<br />
If you do not specify a log file for the other <strong>NFS</strong> services (with the -l<br />
Chapter 8 333
Troubleshooting <strong>NFS</strong> <strong>Services</strong><br />
Logging <strong>and</strong> Tracing of <strong>NFS</strong> <strong>Services</strong><br />
option), they do not log any messages. The <strong>NFS</strong> services can all share the<br />
same log file.<br />
Type man 1M rexd for descriptions of the messages logged by the<br />
rpc.rexd daemon.<br />
For more information, see the following man pages: rexd(1M),<br />
rstatd(1M), rusersd(1M), rwalld(1M), <strong>and</strong> sprayd(1M).<br />
334<br />
Chapter 8
Troubleshooting <strong>NFS</strong> <strong>Services</strong><br />
Logging <strong>and</strong> Tracing of <strong>NFS</strong> <strong>Services</strong><br />
NIS Logging<br />
You can configure logging for the following NIS processes:<br />
• ypxfr<br />
• ypserv<br />
• ypbind<br />
• yppasswdd<br />
Each message logged by these daemons can be identified by the date,<br />
time, host name, process ID, <strong>and</strong> name of the function that generated the<br />
message. You can direct logging messages from all these NIS daemons to<br />
the same file.<br />
To Control the Size of Log Files<br />
Log files grow without bound, using up disk space. You might want to<br />
create a cron job to truncate your log files regularly. Following is an<br />
example crontab entry that empties the log file at 1:00 AM every<br />
Monday, Wednesday, <strong>and</strong> Friday:<br />
0 1 * * 1,3,5 cat /dev/null > log_file<br />
For more information, type man 1M cron or man 1 crontab at the<br />
HP-UX prompt.<br />
To Stop <strong>and</strong> Start Logging of ypxfr<br />
If ypxfr is run interactively from the comm<strong>and</strong> line, it logs messages to<br />
st<strong>and</strong>ard output. If ypxfr is run by cron or by yppush, it logs messages<br />
to the file /var/yp/ypxfr.log, if the file exists. To start logging of<br />
ypxfr, issue the following comm<strong>and</strong> to make sure the<br />
/var/yp/ypxfr.log file exists:<br />
/usr/bin/touch /var/yp/ypxfr.log<br />
To stop logging of ypxfr, remove the ypxfr.log file:<br />
/usr/bin/rm /var/yp/ypxfr.log<br />
You cannot redirect the logging output of ypxfr.<br />
For more information, see the following man pages: ypxfr(1M),<br />
cron(1M), <strong>and</strong> yppush(1M).<br />
Chapter 8 335
Troubleshooting <strong>NFS</strong> <strong>Services</strong><br />
Logging <strong>and</strong> Tracing of <strong>NFS</strong> <strong>Services</strong><br />
To Start <strong>and</strong> Stop Logging of ypserv<br />
By default, the ypserv daemon logs messages to the file<br />
/var/yp/ypserv.log, if it exists. To start logging of ypserv, issue the<br />
following comm<strong>and</strong> to make sure the /var/yp/ypserv.log file exists:<br />
/usr/bin/touch /var/yp/ypserv.log<br />
To stop logging of ypserv, remove the ypserv.log file:<br />
/usr/bin/rm /var/yp/ypserv.log<br />
If you want to direct ypserv logging to a different file, follow these steps:<br />
1. Add the -l logfile option to the YPSERV_OPTIONS variable in<br />
/etc/rc.config.d/namesvrs, as in the following example:<br />
YPSERV_OPTIONS=”-l /var/yp/nis_log”<br />
2. Issue the following comm<strong>and</strong>s to restart ypserv (PID is the process<br />
ID returned by the ps comm<strong>and</strong>):<br />
ps -ef | grep ypserv<br />
kill PID<br />
/usr/lib/netsvc/yp/ypserv options<br />
options is the list of options configured in the YPSERV_OPTIONS<br />
variable in the /etc/rc.config.d/namesvrs file. You can also source<br />
the /etc/rc.config.d/namesvrs file, <strong>and</strong> then enter the ypserv<br />
comm<strong>and</strong> as follows:<br />
/usr/lib/netsvc/yp/ypserv $YPSERV_OPTIONS<br />
If you specify a log file with the -l option, ypserv can share the same log<br />
file with the other NIS daemons.<br />
For more information, type man 1M ypserv at the HP-UX prompt.<br />
To Configure ypbind Logging<br />
1. Add the -l logfile option to the YPBIND_OPTIONS variable in<br />
/etc/rc.config.d/namesvrs, as in the following example:<br />
YPBIND_OPTIONS=”-l /var/yp/nis_log”<br />
2. Issue the following comm<strong>and</strong>s to restart ypbind (PID is the process<br />
ID returned by the ps comm<strong>and</strong>):<br />
ps -ef | grep ypbind<br />
kill PID<br />
/usr/lib/netsvc/yp/ypbind options<br />
336<br />
Chapter 8
Troubleshooting <strong>NFS</strong> <strong>Services</strong><br />
Logging <strong>and</strong> Tracing of <strong>NFS</strong> <strong>Services</strong><br />
options is the list of options configured in the YPBIND_OPTIONS<br />
variable in the /etc/rc.config.d/namesvrs file. You can also source<br />
the /etc/rc.config.d/namesvrs file, <strong>and</strong> then enter the ypbind<br />
comm<strong>and</strong> as follows:<br />
/usr/lib/netsvc/yp/ypbind $YPBIND_OPTIONS<br />
If you do not specify a log file for ypbind (with the -l option), it logs<br />
messages to the system console, /dev/console. The ypbind daemon can<br />
share the same log file with the other NIS daemons.<br />
For more information, type man 1M ypbind at the HP-UX prompt.<br />
To Configure yppasswdd Logging<br />
1. Add the -l logfile option to the YPPASSWDD_OPTIONS variable in<br />
/etc/rc.config.d/namesvrs, as in the following example:<br />
YPPASSWDD_OPTIONS=”-l /var/yp/nis_log”<br />
2. Issue the following comm<strong>and</strong>s to restart yppasswdd (PID is the<br />
process ID returned by the ps comm<strong>and</strong>):<br />
ps -ef | grep yppasswdd<br />
kill PID<br />
/usr/lib/netsvc/yp/rpc.yppasswdd options<br />
options is the list of options configured in the YPPASSWDD_OPTIONS<br />
variable in the /etc/rc.config.d/namesvrs file. You can also source<br />
the /etc/rc.config.d/namesvrs file, <strong>and</strong> then enter the yppasswdd<br />
comm<strong>and</strong> as follows:<br />
/usr/lib/netsvc/yp/rpc.yppasswdd $YPPASSWDD_OPTIONS<br />
For more information, type man 1M yppasswdd at the HP-UX prompt.<br />
Chapter 8 337
Troubleshooting <strong>NFS</strong> <strong>Services</strong><br />
Logging <strong>and</strong> Tracing of <strong>NFS</strong> <strong>Services</strong><br />
NIS+ Logging<br />
You can log the activities of the NIS+ rpc.nisd daemon with the -A <strong>and</strong><br />
-v options.<br />
1. On the NIS+ server, add the -A or -v option to the RPC_NISD_OPTIONS<br />
variable, as in the following example:<br />
RPC_NISD_OPTIONS=”$EMULYP -v”<br />
2. Issue the following comm<strong>and</strong>s to restart rpc.nisd:<br />
/sbin/init.d/nisplus.server stop<br />
/sbin/init.d/nisplus.server start<br />
3. To stop NIS+ logging, remove the -v <strong>and</strong> -A options from the<br />
RPC_NISD_OPTIONS variable, <strong>and</strong> issue the comm<strong>and</strong>s in step 2 to<br />
restart rpc.nisd.<br />
The -v option causes rpc.nisd to send a running narration of what it is<br />
doing to syslogd. Messages are logged at LOG_INFO priority.<br />
The -A option logs NIS+ authentication activities to syslogd with<br />
LOG_INFO priority.<br />
You might have to modify your /etc/syslog.conf file to allow messages<br />
of LOG_INFO priority to be logged.<br />
For more information, type man 1M syslogd or man 1M nisd at the<br />
HP-UX prompt.<br />
338<br />
Chapter 8
Troubleshooting <strong>NFS</strong> <strong>Services</strong><br />
Logging <strong>and</strong> Tracing of <strong>NFS</strong> <strong>Services</strong><br />
Logging With nettl <strong>and</strong> netfmt<br />
1. Issue the following comm<strong>and</strong> to make sure nettl is running:<br />
/usr/bin/ps -ef | grep nettl<br />
If nettl is not running, issue the following comm<strong>and</strong> to start it:<br />
/usr/sbin/nettl -start<br />
2. Issue the following comm<strong>and</strong> to start logging:<br />
/usr/sbin/nettl -l i w e d -e all<br />
The logging classes are specified following the -l option. They are i<br />
(informational), w (warning), e (error), <strong>and</strong> d (disaster). Disaster<br />
logging is always on. You cannot turn it off. Information logging (i)<br />
fills up your log file faster than the other classes, so you might want to<br />
leave it off.<br />
3. Recreate the event you want to log.<br />
4. Issue the following comm<strong>and</strong> to turn logging off:<br />
/usr/sbin/nettl -l d -e all<br />
This comm<strong>and</strong> changes the logging class back to disaster only for all<br />
subsystems.<br />
5. Issue the following comm<strong>and</strong> to format the binary log file:<br />
/usr/sbin/netfmt -lN -f /var/adm/nettl.LOG00 ><br />
formatted_file<br />
where formatted_file is the name of the file where you want the<br />
formatted output from netfmt. The default log file,<br />
/var/adm/nettl.LOGnn, is specified in the nettl configuration file,<br />
/etc/nettlgen.conf. If the file /var/adm/nettl.LOG00 does not<br />
exist on your system, the default log file may have been changed in<br />
/etc/nettlgen.conf.<br />
NIS+ logging is not supported by nettl.<br />
For more information, type man 1M nettl or man 1M netfmt.<br />
Chapter 8 339
Troubleshooting <strong>NFS</strong> <strong>Services</strong><br />
Logging <strong>and</strong> Tracing of <strong>NFS</strong> <strong>Services</strong><br />
Tracing With nettl <strong>and</strong> netfmt<br />
1. Issue the following comm<strong>and</strong> to make sure nettl is running:<br />
/usr/bin/ps -ef | grep nettl<br />
If nettl is not running, issue the following comm<strong>and</strong> to start it:<br />
/usr/sbin/nettl -start<br />
2. Issue the following comm<strong>and</strong> to start tracing:<br />
/usr/sbin/nettl -tn pduin pduout loopback -e all -s 1024 \<br />
-f tracefile<br />
3. Recreate the event you want to trace.<br />
4. Issue the following comm<strong>and</strong> to turn tracing off:<br />
/usr/sbin/nettl -tf -e all<br />
5. Create the following filter file for netfmt:<br />
filter ip_saddr remote_host_IP_address<br />
filter ip_daddr remote_host_IP_address<br />
filter rpcprogram nfs<br />
filter rpcprogram nlockmgr<br />
filter rpcprogram llockmgr<br />
filter rpcprogram status<br />
filter rpcprogram mount<br />
filter rpcprogram rpcbind<br />
remote_host_IP_address is the IP address of the host with which<br />
your host was communicating when the event you want to trace<br />
occurred.<br />
6. Issue the following comm<strong>and</strong> to format the binary trace file:<br />
/usr/sbin/netfmt -c filter_file -lN -f tracefile.TRC0 ><br />
formatted_file<br />
where tracefile is the name of the file you specified when you<br />
started tracing, <strong>and</strong> formatted_file is the name of the file where<br />
you want the formatted output from netfmt.<br />
NIS+ tracing is not supported by nettl.<br />
For more information, type man 1M nettl or man 1M netfmt.<br />
340<br />
Chapter 8
Troubleshooting <strong>NFS</strong> <strong>Services</strong><br />
Normal System Startup<br />
Normal System Startup<br />
This section explains the system startup sequence <strong>and</strong> how the <strong>NFS</strong>,<br />
NIS, <strong>and</strong> NIS+ daemons are started up in a normal system boot.<br />
1. The /sbin/rc script sources all the files in the /etc/rc.config.d<br />
directory. The files in /etc/rc.config.d contain environment<br />
variables that control the startup <strong>and</strong> behavior of various processes.<br />
2. The /sbin/rc script runs the scripts in the directories /sbin/rc0.d,<br />
/sbin/rc1.d, /sbin/rc2.d, /sbin/rc3.d, <strong>and</strong> /sbin/rc4.d, in that<br />
order.<br />
The scripts in the /sbin/rcn.d directories are named<br />
SNNNscriptname, where NNN is a sequence number, <strong>and</strong> scriptname<br />
is the name of a startup script in the /sbin/init.d directory. Each of<br />
these scripts is actually a link to a startup script in /sbin/init.d.<br />
The /sbin/rc script runs them in order by sequence number.<br />
Following is a partial listing of the /sbin/rc2.d directory:<br />
lrwxr-xr-x 1 root ... S400nfs.core -><br />
/sbin/init.d/nfs.core<br />
lrwxr-xr-x 1 root ... S406nisplus.server -><br />
/sbin/init.d/nisplus.server<br />
lrwxr-xr-x 1 root ... S408nisplus.client -><br />
/sbin/init.d/nisplus.client<br />
lrwxr-xr-x 1 root ... S410nis.server -><br />
/sbin/init.d/nis.server<br />
lrwxr-xr-x 1 root ... S420nis.client -><br />
/sbin/init.d/nis.client<br />
lrwxr-xr-x 1 root ... S430nfs.client -><br />
/sbin/init.d/nfs.client<br />
All the startup scripts for the <strong>NFS</strong> services are started at run level 2<br />
except the nfs.server script, which is started at run level 3. Table<br />
8-2 shows the <strong>NFS</strong>, NIS, <strong>and</strong> NIS+ startup scripts, in the order they<br />
are run at system startup. It lists the processes that each script starts<br />
<strong>and</strong> the files <strong>and</strong> environment variables in /etc/rc.config.d that<br />
influence their behavior.<br />
All of the startup scripts start rpcbind if it is not already started, but<br />
Chapter 8 341
Troubleshooting <strong>NFS</strong> <strong>Services</strong><br />
Normal System Startup<br />
Table 8-2<br />
only one rpcbind process should be running at once.<br />
Startup Scripts for the <strong>NFS</strong> <strong>Services</strong><br />
Startup<br />
script in<br />
/sbin/init.d<br />
Processes started<br />
Related file in<br />
/etc/rc.config.d<br />
Environment variable<br />
used<br />
nfs.core rpcbind(1M) none none<br />
nisplus.server<br />
rpcbind(1M)<br />
domainname(1)<br />
keyserv(1M)<br />
rpc.nisd(1M)<br />
rpc.nispasswdd(1M)<br />
namesvrs<br />
NISPLUS_SERVER<br />
NIS_DOMAIN<br />
KEYSERV_OPTIONS<br />
RPC_NISD_OPTIONS<br />
RPC_NISPASSWDD_OPTION<br />
S<br />
nisplus.client<br />
rpcbind(1M)<br />
domainname(1)<br />
keyserv(1M)<br />
nis_cachemgr(1M)<br />
namesvrs<br />
NISPLUS_CLIENT<br />
NIS_DOMAIN<br />
KEYSERV_OPTIONS<br />
NIS_CACHEMGR_OPTIONS<br />
nis.server<br />
rpcbind(1M)<br />
domainname(1)<br />
ypserv(1M)<br />
ypxfrd(1M)<br />
yppasswdd(1M)<br />
ypupdated(1M)<br />
keyserv(1M)<br />
namesvrs<br />
NIS_MASTER_SERVER<br />
NIS_SLAVE_SERVER<br />
NIS_DOMAIN<br />
YPSERV_OPTIONS<br />
YPPASSWDD_OPTIONS<br />
KEYSERV_OPTIONS<br />
YPUPDATED_OPTIONS<br />
YPXFRD_OPTIONS<br />
nis.client<br />
rpcbind(1M)<br />
domainname(1)<br />
ypbind(1M)<br />
keyserv(1M)<br />
namesvrs<br />
NIS_CLIENT<br />
NIS_DOMAIN<br />
WAIT_FOR_NIS_SERVER<br />
MAX_NISCHECKS<br />
YPBIND_OPTIONS<br />
KEYSERV_OPTIONS<br />
YPSET_ADDR<br />
nfs.client<br />
rpcbind(1M)<br />
biod(1M)<br />
statd(1M)<br />
lockd(1M)<br />
automount(1M)<br />
mount(1M)<br />
swapon(1M)<br />
nfsconf<br />
<strong>NFS</strong>_CLIENT<br />
NUM_<strong>NFS</strong>IOD<br />
STATD_OPTIONS<br />
LOCKD_OPTIONS<br />
AUTOMOUNT<br />
AUTO_MASTER<br />
AUTO_OPTIONS<br />
342<br />
Chapter 8
Troubleshooting <strong>NFS</strong> <strong>Services</strong><br />
Normal System Startup<br />
Table 8-2<br />
Startup Scripts for the <strong>NFS</strong> <strong>Services</strong><br />
Startup<br />
script in<br />
/sbin/init.d<br />
Processes started<br />
Related file in<br />
/etc/rc.config.d<br />
Environment variable<br />
used<br />
nfs.server<br />
rpcbind(1M)<br />
exportfs(1M)<br />
mountd(1M)<br />
nfsd(1M)<br />
statd(1M)<br />
lockd(1M)<br />
pcnfsd(1M)<br />
swapon(1M)<br />
nfsconf<br />
<strong>NFS</strong>_SERVER<br />
NUM_<strong>NFS</strong>D<br />
STATD_OPTIONS<br />
LOCKD_OPTIONS<br />
START_MOUNTD<br />
MOUNTD_OPTIONS<br />
PC<strong>NFS</strong>_SERVER<br />
Chapter 8 343
Troubleshooting <strong>NFS</strong> <strong>Services</strong><br />
Normal System Startup<br />
344<br />
Chapter 8
A<br />
NIS+ Error Messages<br />
Appendix A 345
NIS+ Error Messages<br />
This section lists alphabetically the more common NIS+ error messages.<br />
“Common Problems with NIS+” on page 301 describes various types of<br />
problems <strong>and</strong> their solutions.<br />
Error messages may appear in pop-up windows, shell tool comm<strong>and</strong><br />
lines, user console window, the syslog file, or in log files. You can raise or<br />
lower the severity threshold level for reporting error conditions in your<br />
/etc/syslog.conf file.<br />
Some of the error messages documented in this chapter are documented<br />
more fully in the appropriate man pages.<br />
You may encounter error messages generated by Remote Procedure<br />
Calls. These RPC error messages are not documented here.<br />
In the most cases, the error messages that you see are generated by the<br />
comm<strong>and</strong>s you issued or the table or directory your comm<strong>and</strong> is<br />
addressing. However, in some cases an error message may be generated<br />
by a server invoked in response to your comm<strong>and</strong>. (These messages<br />
usually show in syslog.) For example, a “permission denied” message<br />
most likely refers to you or the host you are using, but it could also be<br />
caused by software on a server not having the correct permissions to<br />
carry out some function passed on to it by your comm<strong>and</strong> or your host.<br />
Similarly, some comm<strong>and</strong>s cause a number of different NIS+ objects to<br />
be searched or queried. Any one of these objects could return an error<br />
message regarding permissions, read-only state, not available, <strong>and</strong> so<br />
forth. In such cases the message may or may not be able to inform you of<br />
which object the problem occurred in.<br />
If you cannot trace the cause of an error message to your comm<strong>and</strong> or<br />
machine, consider the possibility that the message may have been<br />
generated by a server in response to your comm<strong>and</strong> or in response to<br />
some other NIS+ function.<br />
In normal operation, the NIS+ software <strong>and</strong> servers make routine NIS+<br />
function calls. Sometimes those calls fail <strong>and</strong> in doing so generate an<br />
error message. It occasionally happens that before a client or server<br />
processes your most recent comm<strong>and</strong>, some other NIS+ call fails <strong>and</strong> you<br />
see the resulting error message. Such a message might appear as if it<br />
were in response to your comm<strong>and</strong>, when in fact it is in response to some<br />
other operation entirely.<br />
A single NIS+ error message may have slightly different meanings<br />
depending on which part of the NIS+ software generated the message.<br />
For example, when the message “Not found” is generated by the nisls<br />
346<br />
Appendix A
NIS+ Error Messages<br />
comm<strong>and</strong>, it means that there are no NIS+ objects that have the<br />
specified name, but when it is generated by the nismatch comm<strong>and</strong> it<br />
means that no table entries were found that meet the search criteria.<br />
The error messages in this appendix are sorted alphabetically according<br />
to the following rules:<br />
• Capitalization is ignored. Thus, messages that begin with “A” <strong>and</strong> “a”<br />
are alphabetized together.<br />
• Nonalphabetic symbols are ignored. Thus, a message that begins with<br />
_svcauth_des is listed with the other messages that begin with the<br />
letter “S”.<br />
• Many messages contain variable strings such as user IDs, domain<br />
names, host names, <strong>and</strong> so forth. Variables are ignored when sorting<br />
the messages. For example, the message Sales: is not a table<br />
would be listed in this appendix as name: is not a table <strong>and</strong><br />
would be alphabetized under the letter ‘I’ for the first non-variable<br />
letter.<br />
• Error messages that begin with asterisks, such as **ERROR:<br />
domainname does not exist are generated by the NIS+ installation<br />
<strong>and</strong> setup scripts. They are alphabetized according to their first letter,<br />
ignoring the asterisks.<br />
abort_transaction: Failed to action NIS+_objectname<br />
The abort_transaction routine failed to back out of an incomplete<br />
transaction due to a server crash or some other unrecoverable error.<br />
abort_transaction: Internal database error<br />
abort_transaction: Internal error, log entry corrupt NIS+_objectname<br />
These two messages indicate corruption in a namespace database or log.<br />
add_cleanup: Cant allocate more rags.<br />
add_pingitem: Couldn’t add directoryname to pinglist (no memory)<br />
These messages indicate that your system is running low on available<br />
memory. See “If You Have Insufficient Memory or Disk Space” on page<br />
307.<br />
add_update: Attempt add transaction from read only child.<br />
add_update Warning: attempt add transaction from read only child<br />
An attempt by a read-only child rpc.nisd process to add an entry to a<br />
log. An occasional appearance of this message in a log is not serious. If<br />
this message appears frequently, call your HP support contact.<br />
Appendix A 347
NIS+ Error Messages<br />
Attempting to free a free rag!<br />
This message indicates a software problem with rpc.nisd. The<br />
rpc.nisd process should have aborted. Run ps -ef | grep rpc.nisd<br />
to see if rpc.nisd is still running. If it is, kill it <strong>and</strong> restart it. If it is not<br />
running, start it. If a core file was dumped in /var/nis, delete it.<br />
If you started rpc.nisd with the -Y or -B option, you must also kill the<br />
rpc.nisd_resolv daemon.<br />
Attempt to remove a non-empty table<br />
The nistbladm comm<strong>and</strong> has attempted to remove an NIS+ table that<br />
still contains entries. Or, nisrmdir has attempted to remove a directory<br />
that contains files or subdirectories. If you are trying to delete a<br />
directory, use nisls -lR to check for existing files or subdirectories <strong>and</strong><br />
delete them first. If you are trying to delete a table, use nistbladm to<br />
delete any existing entries.<br />
This message is generated by the NIS+ error code constant<br />
NIS_NOTEMPTY. See the nis_tables(3N) man page for additional<br />
information.<br />
authdes_marshal: DES encryption failure<br />
DES encryption for some authentication data failed. Possible causes:<br />
• Corruption of a library function or argument.<br />
• A problem with a DES encryption chip if you are using one.<br />
Call your HP support contact for assistance.<br />
authdes_refresh: keyserv is unable to encrypt session key<br />
authdes_refresh: unable to encrypt conversation key<br />
The keyserv process was unable to encrypt the indicated key with the<br />
public key that it was given. See “If You Have Authentication or<br />
Permissions Problems” on page 304.<br />
authdes_refresh: unable to synchronize clock<br />
This indicates a synchronization failure between client <strong>and</strong> server clocks.<br />
This will usually correct itself. However, if this message is followed by<br />
any timestamp-related error, you should manually resynchronize the<br />
clocks. If the problem reoccurs, check that remote rpcbind is functioning<br />
correctly.<br />
348<br />
Appendix A
NIS+ Error Messages<br />
authdes_refresh: unable to synch up w/server<br />
The client/server clock synchronization has failed. This could be caused<br />
by the rpcbind process on the server not responding. Use ps -ef on the<br />
server to see if rpcbind is running. If it is not, restart it. If this error<br />
message is followed by any timestamp-related message, then you need to<br />
use date to manually resync the client clock to the server clock.<br />
authdes_seccreate: keyserv is unable to generate session key<br />
This indicates that keyserv was unable to generate a r<strong>and</strong>om DES key<br />
for this session. This requires some action on your part:<br />
• Check to make sure that keyserv is running properly. If it is not,<br />
restart it along with all other long-running processes, like automount,<br />
rpc.nisd, <strong>and</strong> sendmail, that use secure RPC or make NIS+ calls.<br />
Then do a keylogin.<br />
• Ifkeyserv is up <strong>and</strong> running properly, restart the process that logged<br />
this error.<br />
authdes_seccreate: no public key found for servername<br />
The client side cannot get a DES credential for the server named<br />
servername. This requires some action on your part:<br />
• Check to make sure that servername has DES credentials. If it does<br />
not, create them.<br />
• Check the /etc/nsswitch.conf file to see which name service is<br />
specified, <strong>and</strong> then make sure that service is responding. If it is not<br />
responding, restart it.<br />
authdes_seccreate: out of memory<br />
See “If You Have Insufficient Memory or Disk Space” on page 307.<br />
authdes_seccreate: unable to gen conversation key<br />
The keyserv process was unable to generate a r<strong>and</strong>om DES key. The<br />
most likely cause is that the keyserv process is down or otherwise not<br />
responding. Use ps -ef to check whether the keyserv process is<br />
running on the keyserv host. If it is not, then start it <strong>and</strong> then run<br />
keylogin.<br />
If restarting keyserv fails to correct the problem, it may be that other<br />
processes that use secure RPC or make NIS+ calls are not running (for<br />
example, automount, rpc.nisd, or sendmail). Check to see whether<br />
Appendix A 349
NIS+ Error Messages<br />
these processes are running, <strong>and</strong> if they are not, restart them.<br />
See “If You Have Authentication or Permissions Problems” on page 304.<br />
authdes_validate: DES decryption failure<br />
DES decryption for some authentication data failed. Possible causes:<br />
• Corruption of a library function or argument.<br />
• A problem with a DES encryption chip if you are using one.<br />
Call your HP support contact for assistance.<br />
authdes_validate: verifier mismatch<br />
The time stamp that the client sent to the server does not match the one<br />
received from the server. (This is not recoverable within a secure RPC<br />
session.) Possible causes:<br />
• Corruption of the session key or time stamp data in the client or<br />
server cache.<br />
• The server deleted from this cache a session key for a still active<br />
session.<br />
• Network data corruption.<br />
Try re-executing the comm<strong>and</strong>.<br />
CacheBind: xdr_directory_obj failed.<br />
The most likely causes for this message are the following:<br />
• Bad or incorrect parameters being passed to the xdr_directory_obj<br />
routine. Check the syntax <strong>and</strong> accuracy of whatever comm<strong>and</strong> you<br />
most recently entered.<br />
• An attempt to allocate system memory failed. See “If You Have<br />
Insufficient Memory or Disk Space” on page 307.<br />
• If your comm<strong>and</strong> syntax is correct, <strong>and</strong> your system does not seem to<br />
be short of memory, call your HP support contact.<br />
Cache expired<br />
The entry returned came from an object cache that has expired. This<br />
means that the time to live value has gone to zero <strong>and</strong> the entry may<br />
have changed. If the flag NO_CACHE was passed to the lookup function,<br />
then the lookup function will retry the operation to get an unexpired<br />
copy of the object.<br />
350<br />
Appendix A
NIS+ Error Messages<br />
This message is generated by the NIS+ error code constant<br />
NIS_CACHEEXPIRED. See the nis_tables(3N) <strong>and</strong> nis_names(3N) man<br />
pages for more information.<br />
Callback: - select failed message number<br />
CALLBACK_SVC: bad argument<br />
An internal system call failed. In most cases this problem will correct<br />
itself. If it does not correct itself, make sure that rpc.nisd has not been<br />
aborted. If it has, restart it. If the problem reoccurs frequently, call your<br />
HP support contact.<br />
Cannot grow transaction log error string-variable<br />
The system cannot add to the log file. The reason is indicated by the<br />
variable. The most common cause of this message is lack of disk space.<br />
See “If You Have Insufficient Memory or Disk Space” on page 307.<br />
Cannot truncate transaction log file<br />
An attempt has been made to checkpoint the log, <strong>and</strong> the rpc.nisd<br />
daemon is trying to shrink the log file after deleting the checkpointed<br />
entries from the log. See the ftruncate(2) man page for a description of<br />
various factors that might cause this routine to fail. See also “If You<br />
Have Insufficient Memory or Disk Space” on page 307.<br />
Cannot write one character to transaction log, error message<br />
An attempt has been made by the rpc.nisd daemon to add an update<br />
from the current transaction into the transaction log, <strong>and</strong> the attempt<br />
has failed for the reason given in the message which has been returned<br />
by the function. Additional information may be obtained from the write<br />
routine’s man page.<br />
Can’t compile regular expression variable<br />
Returned by the nisgrep comm<strong>and</strong> when the expression in keypat was<br />
malformed.<br />
Can’t find name’s secret key<br />
Possible causes are as follows:<br />
• You may have incorrectly typed the password.<br />
• There may be no entry for name in the cred table.<br />
• NIS+ could not decrypt the key (possibly because the entry might be<br />
corrupt).<br />
Appendix A 351
NIS+ Error Messages<br />
• The /etc/nsswitch.conf file may be directing the query to a local<br />
password in an /etc/passwd file that is different than the NIS+<br />
password recorded in the cred table.<br />
See “If You Have Authentication or Permissions Problems” on page 304.<br />
checkpoint_log: Called from read only child ignored.<br />
This is simply a status message indicating that a read-only process<br />
attempted to perform an operation restricted to the parent process, <strong>and</strong><br />
the attempt was aborted. No action need be taken.<br />
checkpoint_log: Unable to checkpoint, log unstable.<br />
An attempt was made to checkpoint a log that was not in a stable state.<br />
That is, the log was in a resync, update, or checkpoint state. Wait until<br />
the log is stable, <strong>and</strong> then rerun the nisping comm<strong>and</strong>.<br />
check_updaters: Starting resync.<br />
This is simply a system status message. No action need be taken.<br />
Child process requested to checkpoint!<br />
This message indicates a minor software problem that the system is<br />
capable of correcting. If these messages appear often, you can change the<br />
threshold level in your /etc/syslog.conf file. See the syslogd(1M)<br />
man page for details.<br />
Column not found: columnname<br />
The specified column does not exist in the specified table.<br />
Could not find name's secret key<br />
Possible causes are as follows:<br />
• You may have incorrectly typed the password.<br />
• There may be no entry for name in the cred table.<br />
• NIS+ could not decrypt the key (possibly because the entry might be<br />
corrupt).<br />
• The /etc/nsswitch.conf file may have the wrong publickey policy.<br />
It may be directing the query to a local password in the /etc/passwd<br />
file that is different from the NIS+ password recorded in the cred<br />
table.<br />
See “If You Have Authentication or Permissions Problems” on page 304.<br />
352<br />
Appendix A
NIS+ Error Messages<br />
Could not generate netname<br />
The secure RPC software could not generate the secure RPC netname for<br />
your user ID when performing a keylogin. This could be due to the<br />
following causes:<br />
• You do not have Local credentials in the NIS+ cred table of the host’s<br />
home domain.<br />
• You have a local entry in /etc/passwd with a user ID that is different<br />
from the user ID you have in the NIS+ passwd table.<br />
String-variable: could not get secret key for 'name'<br />
Possible causes are as follows:<br />
• You may have incorrectly typed the password.<br />
• There may be no entry for name in the cred table.<br />
• NIS+ could not decrypt the key (possibly because the entry might be<br />
corrupt).<br />
• The /etc/nsswitch.conf file may have the wrong publickey policy.<br />
It may be directing the query to a local password in an /etc/passwd<br />
file that is different from the NIS+ password recorded in the cred<br />
table.<br />
See “If You Have Authentication or Permissions Problems” on page 304.<br />
Couldn’t fork a process!<br />
The server could not fork a child process to satisfy a callback request.<br />
This is probably caused by your system reaching its maximum number of<br />
processes. You can kill some unneeded processes, or increase the number<br />
of processes your system can h<strong>and</strong>le. See “If You Receive an “Unable to<br />
Fork” Message” on page 308.<br />
Couldn't parse access rights for column string-variable<br />
This message is usually returned by the nistbladm -u comm<strong>and</strong> when<br />
something other than a plus sign (+), a minus sign (-), or an equal sign<br />
(=) is entered as the operator. Other possible causes are failure to<br />
separate different column rights with a comma, or the entry of<br />
something other than r, d, c, or m for the type of permission. See the<br />
nistbladm(1) man page to check the syntax for this type of entry error. If<br />
everything is entered correctly <strong>and</strong> you still get this error, the table<br />
might have been corrupted.<br />
Appendix A 353
NIS+ Error Messages<br />
Database for table does not exist<br />
At attempt to look up a table has failed. See “If NIS+ Cannot Find an<br />
Object” on page 302.<br />
This message is generated by the NIS+ error code constant<br />
NIS_NOSUCHTABLE. See the nis_tables(3N) <strong>and</strong> nis_names(3N) man<br />
pages for additional information.<br />
_db_add: child process attempting to add/modify<br />
_db_addib: non-parent process attempting an add<br />
These messages indicate that a read-only or non-parent process<br />
attempted to add or modify an object in the database. In most cases,<br />
these messages do not require any action on your part. If these messages<br />
are repeated frequently, call your HP support contact.<br />
db_checkpoint: Unable to checkpoint string-variable<br />
This message indicates that for some reason NIS+ was unable to<br />
complete checkpointing of a directory. The most likely cause is that the<br />
disk is full. See “If You Have Insufficient Memory or Disk Space” on page<br />
307.<br />
_db_remib: non-parent process attempting a remove<br />
_db_remove: non-parent process attempting a remove<br />
These messages indicate that a read-only or non-parent process<br />
attempted to remove a table entry. In most cases, these messages do not<br />
require any action on your part. If these messages are repeated<br />
frequently, call your HP support contact.<br />
Do you want to see more information on this comm<strong>and</strong>?<br />
This indicates that there is some kind of syntax or spelling error on your<br />
script comm<strong>and</strong> line.<br />
Entry/Table type mismatch<br />
This occurs when an attempt is made to add or modify an entry in a<br />
table, <strong>and</strong> the entry passed is of a different type from the table (for<br />
example, if the number of columns is not the same). Check that your<br />
update correctly matches the table type.<br />
This message is generated by the NIS+ error code constant<br />
NIS_TYPEMISMATCH. See the nis_tables(3N) man page for additional<br />
information.<br />
**ERROR: chkey failed again. Please contact your network<br />
354<br />
Appendix A
NIS+ Error Messages<br />
administrator to verify your network password.<br />
This message indicates that you typed the wrong network password.<br />
• If this is the first time you are initializing this machine, contact your<br />
network administrator to verify the network password.<br />
• If this machine has been initialized before as an NIS+ client of the<br />
same domain, try typing the root login password at the secure RPC<br />
password prompt.<br />
• If this machine is currently an NIS+ client <strong>and</strong> you are trying to<br />
change it to a client of a different domain, remove the /etc/.rootkey<br />
file, <strong>and</strong> then rerun the nisclient script, using the network<br />
password given to you by your network administrator (or the network<br />
password generated by the nispopulate script).<br />
Error: Could not create a valid NIS+ coldstart file<br />
This message is from nisinit, the NIS+ initialization routine. It is<br />
followed by another message preceded by a string that begins<br />
“lookup:..”. This second message will explain why a valid NIS+<br />
coldstart file could not be created.<br />
**ERROR: could not restore file filename<br />
This message indicates that NIS+ was unable to rename<br />
filename.no_nisplus to filename.<br />
Check your system console for system error messages.<br />
• If there is a system error message, fix the problem described in the<br />
error message <strong>and</strong> then rerun nisclient -i.<br />
• If there aren’t any system error messages, try renaming this file<br />
manually, <strong>and</strong> then rerun nisclient -i.<br />
**ERROR: Couldn’t get the server NIS+_server’s address.<br />
The script was unable to retrieve the server’s IP address for the specified<br />
domain. Manually add the IP address for the server NIS+_server into<br />
the /etc/hosts file, then rerun nisclient -i.<br />
**ERROR: directory directory-path does not exist.<br />
This message indicates that you typed an incorrect directory path. Type<br />
the correct directory path.<br />
Appendix A 355
NIS+ Error Messages<br />
**ERROR: domainname does not exist.<br />
This message indicates that you are trying to replicate a domain that<br />
does not exist. If domainname is spelled incorrectly, rerun the script with<br />
the correct domain name.<br />
**ERROR: parent-domain does not exist.<br />
This message indicates that the parent domain of the domain you typed<br />
on the comm<strong>and</strong> line does not exist. This message should appear only<br />
when you are setting up a non-root master server.<br />
• If the domain name is spelled incorrectly, rerun the script with the<br />
correct domain name.<br />
• If the domain’s parent domain does not exist, you have to create the<br />
parent domain first, <strong>and</strong> then you can create this domain.<br />
**ERROR: Don’t know about the domain “domainname”. Please check<br />
your domainname.<br />
This message indicates that you typed an unrecognized domain name.<br />
Rerun the script with the correct domain name.<br />
**ERROR: failed dumping tablename table.<br />
The script was unable to populate the cred table because the script did<br />
not succeed in dumping the tablename table.<br />
• If niscat tablename.org_dir fails, make sure that all the servers<br />
are operating, then rerun the script to populate the tablename table.<br />
• If niscat tablename.org_dir is working, the error may have been<br />
caused by the NIS+ server being temporarily busy. Rerun the script to<br />
populate the tablename table.<br />
**ERROR: host hostname is not a valid NIS+ principal in domain<br />
domainname. This host hostname must be defined in the credential table<br />
in domain domainname. Use nisclient -c to create the host credential<br />
A machine has to be a valid NIS+ client with proper credentials before it<br />
can become an NIS+ server. To convert a machine to an NIS+ root replica<br />
server, the machine first must be an NIS+ client in the root domain.<br />
Before you can convert a machine to an NIS+ non-root master or a<br />
replica server, the machine must be an NIS+ client in the parent domain<br />
of the domain that it plans to serve. See “To Set Up NIS+ Replica<br />
Servers” on page 208.<br />
356<br />
Appendix A
NIS+ Error Messages<br />
Error in accessing NIS+ cold start file is NIS+ installed?<br />
This message is returned if NIS+ is not installed on a machine, or if for<br />
some reason the file /var/nis/NIS_COLD_START could not be found or<br />
accessed. Check to see if there is a /var/nis/NIS_COLD_START file. If the<br />
file exists, make sure your path is set correctly <strong>and</strong> that NIS_COLD_START<br />
has the proper permissions. Then rename or remove the old coldstart file<br />
<strong>and</strong> rerun the nisclient script to install NIS+ on the machine.<br />
This message is generated by the cache manager that sends the NIS+<br />
error code constant NIS_COLDSTART_ERR. See the write(2) <strong>and</strong> open(2)<br />
man pages for additional information on why a file might not be<br />
accessible.<br />
Error in RPC subsystem<br />
This fatal error indicates the RPC subsystem failed in some way.<br />
Generally, there will be a syslog message on either the client or server<br />
side indicating why the RPC request failed.<br />
This message is generated by the NIS+ error code constant<br />
NIS_RPCERROR. See the nis_tables(3N) <strong>and</strong> nis_names(3N) man pages<br />
for more information.<br />
**ERROR: it failed to add the credential for root.<br />
The NIS+ comm<strong>and</strong> nisaddcred failed to create the root credential when<br />
trying to set up a root master server. Check your system console for<br />
system error messages.<br />
• If there is a system error message, fix the problem described in the<br />
error message <strong>and</strong> then rerun nisserver.<br />
• If there aren’t any system error messages, check to see whether the<br />
rpc.nisd process is running. If it is not running, restart it <strong>and</strong> then<br />
rerun nisserver.<br />
**ERROR: it failed to create the tables.<br />
The NIS+ comm<strong>and</strong> nissetup failed to create the directories <strong>and</strong> tables.<br />
Check your system console for system error messages.<br />
• If there is a system error message, fix the problem described in the<br />
error message <strong>and</strong> rerun nisserver.<br />
• If there aren’t any system error messages, check to see whether the<br />
rpc.nisd process is running. If it is not running, restart it <strong>and</strong> rerun<br />
nisserver.<br />
Appendix A 357
NIS+ Error Messages<br />
**ERROR: it failed to initialize the root server.<br />
The NIS+ comm<strong>and</strong> nisinit -r failed to initialize the root master<br />
server. Check your system console for system error messages. If there is a<br />
system error message, fix the problem described in the error message<br />
<strong>and</strong> rerun nisserver.<br />
**ERROR: it failed to make the domainname directory<br />
The NIS+ comm<strong>and</strong> nismkdir failed to make the new directory<br />
domainname when running nisserver to create a non-root master. The<br />
parent domain does not have create permission to create this new<br />
domain.<br />
• If you are not the owner of the domain or a group member of the<br />
parent domain, rerun the script as the owner or as a group member of<br />
the parent domain.<br />
• If rpc.nisd is not running on the new master server of the domain<br />
that you are trying to create, restart rpc.nisd.<br />
**ERROR: it failed to promote new master for the domainname directory<br />
The NIS+ comm<strong>and</strong> nismkdir failed to promote the new master for the<br />
directory domainname when creating a non-root master with the<br />
nisserver script.<br />
• If you do not have modify permission in the parent domain of this<br />
domain, rerun the script as the owner or as a group member of the<br />
parent domain.<br />
• If rpc.nisd is not running on the servers of the domain that you are<br />
trying to promote, restart rpc.nisd on these servers <strong>and</strong> rerun<br />
nisserver.<br />
**ERROR: it failed to replicate the directory-name directory<br />
The NIS+ comm<strong>and</strong> nismkdir failed to create the new replica for the<br />
directory directory-name.<br />
• If rpc.nisd is not running on the master server of the domain that<br />
you are trying to replicate, restart rpc.nisd on the master server,<br />
<strong>and</strong> rerun nisserver.<br />
• If rpc.nisd is not running on the new replica server, restart it on the<br />
new replica <strong>and</strong> rerun nisserver.<br />
**ERROR: invalid group name. It must be a group in the root-domain<br />
domain.<br />
358<br />
Appendix A
NIS+ Error Messages<br />
This message indicates that you used an invalid group name while trying<br />
to configure a root master server. Rerun nisserver -r with a valid<br />
group name for root-domain.<br />
**ERROR: invalid name “client-name” It is neither an host nor an user<br />
name.<br />
This message indicates that you typed an invalid client name.<br />
• If the client-name was spelled incorrectly, rerun nisclient -c with<br />
the correct client-name.<br />
• If the client-name was spelled correctly, but it does not exist in the<br />
hosts or passwd table, put the client name into the hosts or passwd<br />
table <strong>and</strong> rerun nisclient -c.<br />
**ERROR: hostname is a master server for this domain. You cannot<br />
demote a master server to replica. If you really want to demote this<br />
master, you should promote a replica server to master using nisserver<br />
with the -M option.<br />
You cannot directly convert a master server to a replica server of the<br />
same domain. You can, however, change a replica to be the new master<br />
server of a domain by running nisserver -M with the replica host name<br />
as the new master. This automatically makes the old master a replica.<br />
**ERROR: missing hostnames or usernames.<br />
This messages indicates that you did not type the client names on the<br />
comm<strong>and</strong> line. Rerun nisclient -c with the client names.<br />
**ERROR: NIS+ group name must end with a “.”<br />
This message indicates that you did not specify a fully qualified group<br />
name ending with a period. Rerun the script with a fully qualified group<br />
name.<br />
Appendix A 359
NIS+ Error Messages<br />
**ERROR: NIS+ server is not running on remote-host. You must do the<br />
following before becoming a NIS+ server: 1. become a NIS+ client of<br />
the parent domain or any domain above the domain which you plan to<br />
serve. (nisclient) 2. start the NIS+ server. (rpc.nisd)<br />
This message indicates that rpc.nisd is not running on the remote<br />
machine that you are trying to convert to an NIS+ server. Use the<br />
nisclient script to become an NIS+ client of the parent domain or any<br />
domain above the domain you plan to serve. Start rpc.nisd on<br />
remote-host.<br />
**ERROR: nisinit failed.<br />
nisinit was unable to create the NIS_COLD_START file.<br />
Check the following:<br />
• Use ping(1M) to check that the NIS+ server that you specified with<br />
the -H option is running.<br />
• Make sure you typed the correct domain name.<br />
• Make sure rpc.nisd is running on the server.<br />
• Make sure the nobody class has read permission for this domain.<br />
**ERROR: NIS map transfer failed. tablename table will not be loaded.<br />
NIS+ was unable to transfer the NIS map for this table to the NIS+<br />
database.<br />
• If the NIS server host is running, try running the script again. The<br />
error may have been due to a temporary failure.<br />
• If all tables have this problem, try running the script again using a<br />
different NIS server.<br />
**ERROR: no permission to create directory domainname<br />
The parent domain does not have create permission to create this new<br />
domain. If you are not the owner of the domain or a group member of the<br />
parent domain, rerun the script as the owner or as a group member of<br />
the parent domain.<br />
**ERROR: no permission to replicate directory domainname.<br />
This message indicates that you do not have permission to replicate the<br />
domain. Rerun the script as the owner or as a group member of the<br />
domain.<br />
360<br />
Appendix A
NIS+ Error Messages<br />
**ERROR: table tablename.org_dir. domain does not exist. “tablename<br />
table will not be loaded.”<br />
The script did not find the NIS+ table tablename.<br />
• If tablename is spelled incorrectly, rerun the script with the correct<br />
table name.<br />
• If the tablename table does not exist, <strong>and</strong> tablename is one of the<br />
st<strong>and</strong>ard NIS+ tables, use nissetup to create the table. Or use<br />
nistbladm to create the private table tablename. Then rerun the<br />
script to populate this table.<br />
• If the tablename table exists, the error may have been caused by the<br />
NIS+ server being temporarily busy. Rerun the script to populate this<br />
tablename table.<br />
**ERROR: this name “client-name” is in both the passwd <strong>and</strong> hosts<br />
tables. You cannot have an username same as the hostname.<br />
client-name appears in both the passwd <strong>and</strong> hosts tables. One name is<br />
not allowed to be in both of these tables. Manually remove the entry from<br />
either the passwd or hosts table. Then, rerun nisclient -c.<br />
**ERROR: You cannot use the -u option as a root user.<br />
This message indicates that the superuser tried to run nisclient -u.<br />
The -u option is for initializing ordinary users only. Superusers do not<br />
need to be initialized as NIS+ clients.<br />
**ERROR: You have specified the Z option after having selected the X<br />
option. Please select only one of these options [list]. Do you want to<br />
see more information on this comm<strong>and</strong>?<br />
The script you are running allows you to choose only one of the listed<br />
options.<br />
• Type y to view additional information.<br />
• Type n to stop the script <strong>and</strong> exit.<br />
After exiting the script, rerun it with just one of the options.<br />
**ERROR: you must specify a fully qualified groupname.<br />
This message indicates that you did not specify a fully qualified group<br />
name ending with a period. Rerun the script with a fully qualified group<br />
name.<br />
**ERROR: you must specify both the NIS domainname (-y) <strong>and</strong> the NIS<br />
Appendix A 361
NIS+ Error Messages<br />
server hostname (-h).<br />
This message indicates that you failed to type either the NIS domain<br />
name or the NIS server host name. Type the NIS domain name <strong>and</strong> the<br />
NIS server host name at the prompt or on the comm<strong>and</strong> line.<br />
**ERROR: you must specify one of these options: -c, -i, -u, -r.<br />
**ERROR: you must specify one of these options: -r, -M or -R<br />
**ERROR: you must specify one of these options: -C, -F, or -Y<br />
These messages indicate that a required option was missing from the<br />
comm<strong>and</strong> line. Rerun the script with the correct option.<br />
**ERROR: You must be root to use -i option.<br />
This message indicates that an ordinary user tried to run nisclient -i.<br />
Only the superuser has permission to run nisclient -i.<br />
Error while talking to callback proc<br />
An RPC error occurred on the server while it was calling back to the<br />
client. The transaction was aborted at that time <strong>and</strong> any unsent data<br />
was discarded. Check the syslog record on the server for more<br />
information.<br />
This message is generated by the NIS+ error code constant<br />
NIS_CBERROR. See the nis_tables(3N) man page for additional<br />
information.<br />
First/Next chain broken<br />
This message indicates that the connection between the client <strong>and</strong> server<br />
broke while a callback routine was posting results. This could happen if<br />
the server died in the middle of the process.<br />
This message is generated by the NIS+ error code constant<br />
NIS_CHAINBROKEN.<br />
Generic system error<br />
Some form of generic system error occurred while attempting the<br />
request. Check the syslog record on your system for error messages<br />
from the server.<br />
This message usually indicates that the server has crashed or the<br />
database has become corrupted. This message may also be generated if<br />
you incorrectly specify the name of a server or replica as if it belonged to<br />
the domain it was serving rather than the domain above.<br />
This message is generated by the NIS+ error code constant<br />
362<br />
Appendix A
NIS+ Error Messages<br />
NIS_SYSTEMERROR. See the nis_tables(3N) <strong>and</strong> nis_names(3N) man<br />
pages for more information.<br />
Illegal object type for operation<br />
The fields of the object do not conform to the fields of the table to which it<br />
is being added. This message is generated by the NIS+ error code<br />
constant DB_BADOBJECT.<br />
insufficient permission to update credentials.<br />
This message is generated by the nisaddcred comm<strong>and</strong> when you have<br />
insufficient permission to execute an operation. This could be insufficient<br />
permission at the table, column, or entry level. Use niscat -o<br />
cred.org_dir to determine what permissions you have for that cred<br />
table. If you need additional permission, you or the system administrator<br />
can change the permission requirements of the object with nischmod(1)<br />
or add you to a group that does have the required permissions with<br />
nisgrpadm(1).<br />
See “If You Have Authentication or Permissions Problems” on page 304.<br />
Invalid Object for operation<br />
• Name context: the name passed to the function is not a legal NIS+<br />
name.<br />
• Table context: the object pointed to is not a valid NIS+ entry object for<br />
the given table. This could occur if it had a mismatched number of<br />
columns, or a different data type (for example, binary or text) from<br />
the associated column in the table.<br />
This message is generated by the NIS+ error code constant<br />
NIS_INVALIDOBJ. See the nis_tables(3N) <strong>and</strong> nis_names(3N) man<br />
pages for more information.<br />
tablename is not a table<br />
The object with the name tablename is not a table object. For example,<br />
the nisgrep <strong>and</strong> nismatch comm<strong>and</strong>s will return this error if the object<br />
you specify on the comm<strong>and</strong> line is not a table.<br />
invalid usecs Routine_name: invalid usecs<br />
This message is generated when the value in the tv_usecs field of a<br />
variable of type struct timestamp is larger than the number of<br />
microseconds in a second. This is usually due to some type of software<br />
error.<br />
Appendix A 363
NIS+ Error Messages<br />
Link Points to illegal name<br />
The passed name resolved to a LINK type object <strong>and</strong> the contents of the<br />
object pointed to an invalid name.<br />
This message is generated by the NIS+ error code constant<br />
NIS_LINKNAMEERROR. See the nis_tables(3N) <strong>and</strong> nis_names(3N) man<br />
pages for more information.<br />
Load limit of numeric-variable reached!<br />
An attempt has been made to create a child process when the maximum<br />
number of child processes has already been created on this server. This<br />
message is seen on the server’s system log, but only if the threshold for<br />
logging messages has been set to include LOG_WARNING level messages.<br />
login <strong>and</strong> keylogin passwords differ.<br />
This message is displayed when you are changing your password with<br />
nispasswd. The system has changed your password but has been unable<br />
to update your credentials in the cred table with the new password or to<br />
restore your original password in the passwd table. The message is<br />
followed by these instructions:<br />
Use NEW password for login <strong>and</strong> OLD password for keylogin. Use<br />
“chkey -p” to reencrypt the credentials with the new login<br />
password. You must keylogin explicitly after your next login.<br />
These instructions are then followed by a status message explaining why<br />
it was not possible to revert back to the old password. If you see these<br />
messages, be sure to follow the instructions as given.<br />
log_resync: Cannot truncate transaction log file<br />
An attempt has been made to checkpoint the log, <strong>and</strong> the rpc.nisd<br />
daemon is trying to shrink the log file after deleting the checkpointed<br />
entries from the log. See the ftruncate(2) man page for a description of<br />
various factors that might cause this routine to fail. See also “If nisping<br />
-C Fails or Transaction Logs Are Not Truncated” on page 311.<br />
Malformed Name or illegal name<br />
The name passed to the function is not a legal or valid NIS+ name.<br />
One possible cause is that someone changed an existing domain name.<br />
Existing domain names should not be changed.<br />
This message is generated by the NIS+ error code constant<br />
NIS_BADNAME. See the nis_tables(3N) man page for more information.<br />
364<br />
Appendix A
NIS+ Error Messages<br />
_map_addr: RPC timed out.<br />
A process or application could not contact NIS+ within its default time<br />
limit to get necessary data or resolve host names. In most cases, this<br />
problem will solve itself after a short wait. See “To Improve NIS+<br />
Performance” on page 323 for information about performance problems.<br />
Master server busy full dump rescheduled<br />
This message indicates that a replica server has been unable to update<br />
itself with a full dump from the master server because the master is<br />
busy. See “If a Replica Update Fails” on page 312.<br />
String Missing or malformed attribute<br />
The name of an attribute did not match with a named column in the<br />
table, or the attribute did not have an associated value.<br />
This could indicate an error in the syntax of a comm<strong>and</strong>. The string<br />
should give an indication of what is wrong. Common causes are spelling<br />
errors, failure to correctly place the equal sign (=), an incorrect column or<br />
table name, <strong>and</strong> so forth.<br />
This message is generated by the NIS+ error code constant<br />
NIS_BADATTRIBUTE. See the nis_tables(3N) man page for additional<br />
information.<br />
Modification failed<br />
Returned by the nisgrpadm comm<strong>and</strong> when someone else modified the<br />
group during the execution of your comm<strong>and</strong>. Check to see who else is<br />
working with this group. Reissue the comm<strong>and</strong>.<br />
This message is generated by the NIS+ error code constant<br />
NIS_IBMODERROR.<br />
Modify operation failed<br />
The attempted modification failed for some reason.<br />
This message is generated by the NIS+ error code constant<br />
NIS_MODFAIL. See the nis_tables(3N) <strong>and</strong> nis_names(3N) man pages<br />
for more information.<br />
Name not served by this server<br />
A request was made to a server that does not serve the specified name.<br />
Normally this will not occur, however if you are not using the built in<br />
location mechanism for servers, you may see this if your mechanism is<br />
broken.<br />
Appendix A 365
NIS+ Error Messages<br />
Other possible causes are as follows:<br />
• Coldstart file corruption. Delete the /var/nis/NIS_COLD_START file<br />
<strong>and</strong> then reboot.<br />
• Cache problem such as the local cache being out of date. Kill the<br />
nis_cachemgr <strong>and</strong> remove /var/nis/NIS_SHARD_DIR_CACHE, <strong>and</strong><br />
then reboot. If the problem is not in the root directory, you may be<br />
able to simply kill the domain cache manager <strong>and</strong> try the comm<strong>and</strong><br />
again.<br />
• Someone removed the directory from a replica.<br />
This message is generated by the NIS+ error code constant NIS_NOT_ME.<br />
See the nis_tables(3N) <strong>and</strong> nis_names(3N) man pages for more<br />
information.<br />
Named object is not searchable<br />
The table name resolved to an NIS+ object that was not searchable.<br />
This message is generated by the NIS+ error code constant<br />
NIS_NOTSEARCHABLE. See the nis_tables(3N) man page for more<br />
information.<br />
Name/entry isn't unique<br />
An operation has been requested based on a specific search criterion that<br />
returns more than one entry (for example, if you used nistbladm -r to<br />
delete a user from the passwd table, <strong>and</strong> there were two entries in the<br />
table for that user name).<br />
You can apply your comm<strong>and</strong> to multiple entries by using the -R option<br />
to nistbladm instead of -r.<br />
NisDirCacheEntry::write: xdr_directory_obj failed<br />
The most likely causes for this message are the following:<br />
• An attempt to allocate system memory failed. See “If You Have<br />
Insufficient Memory or Disk Space” on page 307.<br />
• If your system does not seem to be short of memory, call your HP<br />
support contact.<br />
366<br />
Appendix A
NIS+ Error Messages<br />
NIS+ operation failed<br />
This generic error message should be rarely seen. Usually it indicates a<br />
minor software problem that the system can correct on its own. If it<br />
appears frequently, or if it appears to indicate a problem that the system<br />
is not successfully dealing with, call your HP support contact.<br />
This message is generated by the NIS+ error code constant NIS_FAIL.<br />
String-variable: NIS+ server busy try again later.<br />
NIS+ server busy try again later.<br />
Try the comm<strong>and</strong> later. See “If a Replica Update Fails” on page 312 or<br />
“To Improve NIS+ Performance” on page 323.<br />
NIS+ server for string-variable not responding still trying<br />
NIS+ server not responding<br />
See “To Improve NIS+ Performance” on page 323.<br />
NIS+ server needs to be checkpointed. Use nisping -C domainname<br />
This message is generated at the LOG_CRIT level on the server’s system<br />
log. It indicates that the log is becoming too large. Use nisping -C<br />
domainname to truncate the log by checkpointing. Checkpoint<br />
immediately! Do not wait.<br />
See “If nisping -C Fails or Transaction Logs Are Not Truncated” on page<br />
311.<br />
NIS+ servers unreachable<br />
This soft error indicates that a server for the desired directory of the<br />
named table object could not be reached. This can occur when there is a<br />
network failure or the server has crashed. A new attempt may succeed.<br />
See the description of the HARD_LOOKUP flag in the nis_tables(3N) <strong>and</strong><br />
nis_names(3N) man pages.<br />
This message is generated by the NIS+ error code constant<br />
NIS_NAMEUNREACHABLE. See the nis_tables(3N) <strong>and</strong> nis_names(3N)<br />
man pages for additional information.<br />
NIS+ service is unavailable or not installed<br />
This message is generated by the NIS+ error code constant<br />
NIS_UNAVAIL.<br />
NIS+: write ColdStart File: xdr_directory_obj failed<br />
The most likely causes for this message are as follows:<br />
Appendix A 367
NIS+ Error Messages<br />
• Bad or incorrect parameters. Check the syntax <strong>and</strong> accuracy of<br />
whatever comm<strong>and</strong> you most recently entered.<br />
• An attempt to allocate system memory failed. See “If You Have<br />
Insufficient Memory or Disk Space” on page 307.<br />
If your comm<strong>and</strong> syntax is correct, <strong>and</strong> your system does not seem to be<br />
short of memory, call your HP support contact.<br />
nis_checkpoint_svc: readonly child instructed to checkpoint ignored.<br />
nis_dumplog_svc: readonly child called to dump log, ignored<br />
These are simply status messages indicating that a read-only process<br />
attempted to perform an operation restricted to the parent process, <strong>and</strong><br />
the attempt was aborted. No action need be taken.<br />
nis_dump_svc: load limit reached.<br />
The maximum number of child processes permitted on your system has<br />
been reached. See “If You Receive an “Unable to Fork” Message” on page<br />
308.<br />
nis_dump_svc: one replica is already resyncing.<br />
Only one replica can resync from a master at a time. Try the comm<strong>and</strong><br />
later. See “If a Replica Update Fails” on page 312.<br />
nis_dump_svc: Unable to fork a process.<br />
The fork system call has failed. See “If a Replica Update Fails” on page<br />
312, or see the fork(2) man page.<br />
nis_mkdir_svc: readonly child called to mkdir, ignored<br />
nis_ping_svc: readonly child was pung ignored.<br />
nis_rmdir_svc: readonly child called to rmdir, ignored<br />
These are simply status messages indicating that a read-only process<br />
attempted to perform an operation restricted to the parent process, <strong>and</strong><br />
the attempt was aborted. No action need be taken.<br />
nisaddcred: no password entry for uid userid<br />
nisaddcred: unable to create credential.<br />
These two messages are generated during execution of the nispopulate<br />
script. The NIS+ comm<strong>and</strong> nisaddcred failed to add a Local credential<br />
for the user ID userid on a remote domain. This happens only when you<br />
are trying to populate the passwd table in a remote domain.<br />
To correct the problem, add a table path in the local passwd table:<br />
368<br />
Appendix A
NIS+ Error Messages<br />
# nistbladm -u -p passwd.org_dir.remote-domain passwd.org_dir<br />
The remote-domain must be the same domain that you specified with<br />
the -d option when you ran nispopulate. Rerun the script to populate<br />
the passwd table.<br />
No file space on server<br />
See “If You Have Insufficient Memory or Disk Space” on page 307. This<br />
message is generated by the NIS+ error code constant NIS_NOFILESPACE.<br />
No match<br />
This is most likely an error message from the shell, caused by failure to<br />
escape the brackets when specifying an indexed name. For example,<br />
failing to set off a bracketed indexed name with quote marks would<br />
generate this message because the shell would fail to interpret the<br />
brackets as shown below:<br />
# nistbladm -m shell=/bin/csh [name=miyoko],passwd.org_dir<br />
No match<br />
The correct syntax is as follows:<br />
# nistbladm -m shell=/bin/csh ’[name=miyoko],passwd.org_dir’<br />
No memory<br />
Your system does not have enough memory to perform the specified<br />
operation. See “If You Have Insufficient Memory or Disk Space” on page<br />
307.<br />
No password entry for uid userid<br />
No password entry found for uid userid<br />
Both of these messages indicate that no entry for this user was found in<br />
the passwd table when trying to create or add a credential for that user.<br />
Before you can create or add a credential, the user must be listed in the<br />
passwd table.<br />
• The most likely cause is mistyping the user’s user ID on the comm<strong>and</strong><br />
line. Check your comm<strong>and</strong> line for correct syntax <strong>and</strong> spelling.<br />
• Check that you are either in the correct domain or specifying the<br />
correct domain on the comm<strong>and</strong> line.<br />
• If the comm<strong>and</strong> line is correct, use nismatch to check the passwd<br />
table <strong>and</strong> make sure the user is listed under the user ID you are<br />
entering.<br />
Appendix A 369
NIS+ Error Messages<br />
If the user is not listed in the passwd table, use nistbladm or<br />
nisaddent to add the user to the passwd table before creating the<br />
credential.<br />
Non NIS+ namespace encountered<br />
The name could not be completely resolved. This usually indicates that<br />
the name passed to the function resolves to a namespace that is outside<br />
the NIS+ name tree. In other words, the name is contained in an<br />
unknown directory. When this occurs, this error is returned with an<br />
NIS+ object of type DIRECTORY.<br />
This message is generated by the NIS+ error code constant<br />
NIS_FOREIGNNS. See the nis_tables(3N) or nis_names(3N) man pages<br />
for more information.<br />
Not found<br />
String Not found<br />
Names context: the named object does not exist in the namespace.<br />
Table context: no entries in the table matched the search criteria. If the<br />
search criteria was null (return all entries), then this result means that<br />
the table is empty <strong>and</strong> may safely be removed.<br />
If the FOLLOW_PATH flag was set, this error indicates that none of the<br />
tables in the path contain entries that match the search criteria.<br />
This message is generated by the NIS+ error code constant<br />
NIS_NOTFOUND. See the nis_tables(3N) <strong>and</strong> nis_names(3N) man pages<br />
for more information.<br />
See also “If NIS+ Cannot Find an Object” on page 302.<br />
Not Found no such name<br />
This hard error indicates that the named directory of the table object<br />
does not exist. This could occur when the server that should be the<br />
parent of the server that serves the table does not know about the<br />
directory in which the table resides.<br />
This message is generated by the NIS+ error code constant<br />
NIS_NOSUCHNAME. See the nis_names(3N) <strong>and</strong> nis_names(3N) man pages<br />
for more information.<br />
See also “If NIS+ Cannot Find an Object” on page 302.<br />
370<br />
Appendix A
NIS+ Error Messages<br />
Not master server for this domain<br />
This message may mean that an attempt was made to directly update<br />
the database on a replica server.<br />
This message may also mean that a change request was made to a server<br />
that serves the name, but it is not the master server. This can occur<br />
when a directory object changes <strong>and</strong> it specifies a new master server.<br />
Clients that have cached copies of that directory object in their<br />
/var/nis/NIS_SHARD_DIR_CACHE file should run ps to obtain the<br />
process ID of the nis_cachemgr, kill the nis_cachemgr process, remove<br />
the /var/nis/NIS_SHARD_DIR_CACHE file, <strong>and</strong> then restart<br />
nis_cachemgr.<br />
This message is generated by the NIS+ error code constant<br />
NIS_NOTMASTER. See the nis_tables(3N) <strong>and</strong> nis_names(3N) man pages<br />
for more information.<br />
Not owner<br />
The operation you attempted can be performed only by the object’s<br />
owner, <strong>and</strong> you are not the owner.<br />
This message is generated by the NIS+ error code constant<br />
NIS_NOTOWNER.<br />
Object with same name exists<br />
An attempt was made to add a name that already exists. To add the<br />
name, first remove the existing name <strong>and</strong> then add the new name or<br />
modify the existing named object.<br />
This message is generated by the NIS+ error code constant<br />
NIS_NAMEEXISTS. See the nis_tables(3N) <strong>and</strong> nis_names(3N) man<br />
pages for more information.<br />
parse error: string-variable (key variable)<br />
This message is displayed by the nisaddent comm<strong>and</strong> when it attempts<br />
to use database files from an /etc directory <strong>and</strong> there is an error in one<br />
of the file’s entries. The first variable should describe the problem, <strong>and</strong><br />
the variable after key should identify the particular entry at fault. If the<br />
problem is with the /etc/passwd file, you can use pwck(1M) to check it.<br />
Password does not decrypt secret key for name<br />
Possible causes are as follows:<br />
• You may have incorrectly typed the password.<br />
Appendix A 371
NIS+ Error Messages<br />
• There may be no entry for name in the cred table.<br />
• NIS+ could not decrypt the key (possibly because the entry might be<br />
corrupt).<br />
• The /etc/nsswitch.conf file may be directing the query to a local<br />
password in an /etc/passwd file that is different from the NIS+<br />
password recorded in the cred table.<br />
See “If You Have Authentication or Permissions Problems” on page 304.<br />
Partial Success<br />
This result is similar to NIS_NOTFOUND except that it means the request<br />
succeeded but resolved to zero entries.<br />
When this occurs, the server returns a copy of the table object instead of<br />
an entry so that the client may then process the path or implement some<br />
other local policy.<br />
This message is generated by the NIS+ error code constant<br />
NIS_PARTIAL. See the nis_tables(3N) man page for additional<br />
information.<br />
Passed object is not the same object on server<br />
An attempt to remove an object from the namespace was aborted because<br />
the object that would have been removed was not the same object that<br />
was passed in the request.<br />
This message is generated by the NIS+ error code constant<br />
NIS_NOTSAMEOBJ. See the nis_tables(3N) <strong>and</strong> nis_names(3N) man<br />
pages for more information.<br />
Permission denied<br />
Returned when you do not have the permissions required to perform the<br />
operation you attempted. See “If You Have Authentication or<br />
Permissions Problems” on page 304.<br />
This message is generated by the NIS+ error code constant<br />
NIS_PERMISSION.<br />
Probable success<br />
Name context: the request was successful; however, the object returned<br />
came from an object cache, <strong>and</strong> not directly from the server. If you do not<br />
wish to see objects from object caches, you must specify the flag<br />
NO_CACHE when you call the lookup function.<br />
372<br />
Appendix A
NIS+ Error Messages<br />
Table context: even though the request was successful, a table in the<br />
search path was not able to be searched, so the result may not be the<br />
same as the one you would have received if that table had been<br />
accessible.<br />
This message is generated by the NIS+ error code constant<br />
NIS_S_SUCCESS. See the nis_tables(3N) <strong>and</strong> nis_names(3N) man pages<br />
for more information.<br />
Probably not found<br />
The named entry does not exist in the table, however not all tables in the<br />
path could be searched, so the entry may exist in one of those tables.<br />
This message is generated by the NIS+ error code constant<br />
NIS_S_NOTFOUND. See the nis_tables(3N) man page for more<br />
information.<br />
Query illegal for named table<br />
A problem was detected in the request structure passed to the client<br />
library.<br />
This message is generated by the NIS+ error code constant<br />
NIS_BADREQUEST. See the nis_tables(3N) man page for additional<br />
information.<br />
replica_update: Child process attempting update, aborted<br />
This is simply a status message indicating that a read-only process<br />
attempted an update <strong>and</strong> the attempt was aborted.<br />
replica_update: error result was string<br />
This message indicates a problem (identified by the string) in carrying<br />
out a dump to a replica. See “If a Replica Update Fails” on page 312.<br />
replica_update: error result was Master server busy, full dump<br />
rescheduled<br />
replica_update: master server busy rescheduling the resync.<br />
replica_update: master server is busy will try later.<br />
replica_update: nis dump result Master server busy, full dump<br />
rescheduled<br />
These messages all indicate that the server is busy <strong>and</strong> the dump will be<br />
done later.<br />
Appendix A 373
NIS+ Error Messages<br />
replica_update: nis dump result nis_perror error string<br />
This message indicates a problem (identified by the error string) in<br />
carrying out a dump to a replica. See “If a Replica Update Fails” on page<br />
312.<br />
replica_update: number updates number errors<br />
A status message indicating a successful update.<br />
replica_update: WARNING: last_update (directoryname) returned 0!<br />
An NIS+ process could not find the last update timestamp in the<br />
transaction log for that directory. This will cause the system to perform a<br />
full resync of the problem directory.<br />
Results Sent to callback proc<br />
This is simply a status message. No action need be taken.<br />
This message is generated by the NIS+ error code constant<br />
NIS_CBRESULTS. See the nis_tables(3N) man page for additional<br />
information.<br />
root_replica_update: update failed string-variable: could not fetch<br />
object from master.<br />
This message indicates a problem in carrying out a dump to a replica.<br />
See “If a Replica Update Fails” on page 312.<br />
Security exception on local system. UNABLE TO MAKE REQUEST.<br />
This message may be displayed if a user has the same login ID as a<br />
machine name. See “If a User Cannot Log In” on page 309.<br />
Server busy, try again<br />
The server was too busy to h<strong>and</strong>le your request.<br />
• For the add, remove, <strong>and</strong> modify operations, this message is returned<br />
when the master server for a directory is either unavailable or in the<br />
process of checkpointing its database.<br />
• This message can also be returned when the server is updating its<br />
internal state.<br />
• In the case of nis_list, this message can be returned if the client<br />
specifies a callback <strong>and</strong> the server does not have enough resources to<br />
h<strong>and</strong>le the callback.<br />
Retry the comm<strong>and</strong> at a later time when the server is available.<br />
374<br />
Appendix A
NIS+ Error Messages<br />
This message is generated by the NIS+ error code constant<br />
NIS_TRYAGAIN. See the nis_tables(3N) <strong>and</strong> nis_names(3N) man pages<br />
for more information.<br />
Server out of memory<br />
In most cases this message indicates a fatal result. It means that the<br />
server ran out of heap space. See “If You Have Insufficient Memory or<br />
Disk Space” on page 307.<br />
This message is generated by the NIS+ error code constant<br />
NIS_NOMEMORY. See the nis_tables(3N) <strong>and</strong> nis_names(3N) man pages<br />
for more information.<br />
Success<br />
The request was successful.<br />
This message is generated by the NIS+ error code constant<br />
NIS_SUCCESS. See the nis_tables(3N) man page for additional<br />
information.<br />
_svcauth_des: bad nickname<br />
The nickname received from the client is invalid or corrupted, possibly<br />
due to network congestion. The severity of this message depends on what<br />
level of security you are running. At a low security level, this message is<br />
informational only; at a higher level, you may have to try the comm<strong>and</strong><br />
again later.<br />
_svcauth_des: corrupted window from principal-name<br />
The window that was sent does not match the one sent in the verifier.<br />
The severity of this message depends on what level of security you are<br />
running. At a low security level, this message is primarily for your<br />
information; at a higher level you may have to try the comm<strong>and</strong> again at<br />
some later time or take corrective action as described below.<br />
Possible causes:<br />
• The server’s key pair has been changed. The client used the server’s<br />
old public key while the server has a new secret key cached with<br />
keyserv. Run keylogin on both client <strong>and</strong> server.<br />
• The client’s key pair has been changed <strong>and</strong> the client has not run<br />
keylogin on the client system so that system is still sending the<br />
client’s old secret key to the server, which is now using the client’s<br />
new public key. Naturally, the two do not match. Run keylogin again<br />
Appendix A 375
NIS+ Error Messages<br />
on both client <strong>and</strong> server.<br />
• Network corruption of data. Try the comm<strong>and</strong> again. If that does not<br />
work, investigate <strong>and</strong> correct any network problems. Then run<br />
keylogin again on both server <strong>and</strong> client.<br />
_svcauth_des: decryption failure for principal-name<br />
_svcauth_des: encryption failure<br />
DES decryption for some authentication data failed. Possible causes are<br />
as follows:<br />
• Corruption to a library function or argument.<br />
• A problem with a DES encryption chip, if you are using one.<br />
The severity of this message depends on what level of security you are<br />
running. At a low security level, this message is primarily for your<br />
information; at a higher level, you may have to call your HP support<br />
contact for assistance. If the problem appears to be related to a DES<br />
encryption chip, call your HP support contact.<br />
_svcauth_des: invalid timestamp received from principal-name<br />
The time stamp received from the client is corrupted, or the server is<br />
trying to decrypt it using the wrong key. Possible causes are as follows:<br />
• Congested network. Retry the comm<strong>and</strong>.<br />
• Server cached out the entry for this client. Check the network load.<br />
_svcauth_des: key_decrypt<br />
sessionkey failed for principal-name<br />
The keyserv process failed to decrypt the session key with the given<br />
public key. Possible causes are as follows:<br />
• The keyserv process is dead or not responding. Use ps -ef to check<br />
whether the keyserv process is running on the keyserv host. If it is<br />
not, then restart it <strong>and</strong> run keylogin.<br />
• The server principal has not run keylogin. Run keylogin for the<br />
server principal.<br />
• The server principal (host) does not have credentials. Run nismatch<br />
hostname.domainname.cred.org_dir on the client’s home domain<br />
cred table. Create new credentials if necessary.<br />
• keyserv may have been restarted, in which case certain long-running<br />
applications, such as rpc.nisd, sendmail, <strong>and</strong> automount, also need<br />
376<br />
Appendix A
NIS+ Error Messages<br />
to be restarted.<br />
• DES encryption failure. Call your HP support contact.<br />
_svcauth_des: no public key for principal-name<br />
The server cannot get the client’s public key. Possible causes are as<br />
follows:<br />
• The principal has no public key. Run niscat on the cred table of the<br />
principal’s home domain. If there is no DES credential in that table<br />
for the principal, use nisaddcred to create one, <strong>and</strong> then run<br />
keylogin for that principal.<br />
• The name service specified by the /etc/nsswitch.conf file is not<br />
responding.<br />
_svcauth_des: replayed credential from principal-name<br />
The server has received a request <strong>and</strong> finds an entry in its cache for the<br />
same client name <strong>and</strong> conversation key with the time stamp of the<br />
incoming request before that of the one currently stored in the cache.<br />
The severity of this message depends on what level of security you are<br />
running. At a low security level, this message is primarily for your<br />
information. At a higher level, you may have to take corrective action as<br />
described below.<br />
Possible causes are as follows:<br />
• The client <strong>and</strong> server clocks are out of sync. Use date to resync the<br />
client clock to the server clock.<br />
• The server is receiving requests in r<strong>and</strong>om order. This could occur if<br />
you are using multithreading applications. If your applications<br />
support TCP, then set /etc/netconfig (or your NETPATH<br />
environment variable) to tcp.<br />
Appendix A 377
NIS+ Error Messages<br />
_svcauth_des: timestamp is earlier than the one previously seen from<br />
principal-name<br />
The time stamp received from the client on a subsequent call is earlier<br />
than one seen previously from that client. The severity of this message<br />
depends on what level of security you are running. At a low security<br />
level, this message is primarily for your information; at a higher level,<br />
you may have some corrective action as described below.<br />
Possible causes are as follows:<br />
• The client <strong>and</strong> server clocks are out of sync. Use date to resynch the<br />
client clock to the server clock.<br />
• The server cached out the entry for this client. The server maintains a<br />
cache of information regarding the current clients. This cache size<br />
equals 64 client h<strong>and</strong>les.<br />
_svcauth_des: timestamp expired for principal-name<br />
The time stamp received from the client is not within the default<br />
35-second window in which it must be received. The severity of this<br />
message depends on what level of security you are running. At a low<br />
security level, this message is primarily for your information; at a higher<br />
level you may have to take corrective action as described below.<br />
Possible causes are as follows:<br />
• The 35-second window is too small to account for slow servers or a<br />
slow network.<br />
• The client <strong>and</strong> server clocks are so far out of sync that the window<br />
cannot allow for the difference. Use date to resynchronize the client<br />
clock to the server clock.<br />
• The server has cached out the client entry. Retry the operation.<br />
Too Many Attributes<br />
The search criteria passed to the server had more attributes than the<br />
table had searchable columns.<br />
This message is generated by the NIS+ error code constant<br />
NIS_TOOMANYATTRS. See the nis_tables(3N) man page for additional<br />
information.<br />
378<br />
Appendix A
NIS+ Error Messages<br />
Unable to authenticate NIS+ client<br />
This message is generated when a server attempts to execute the<br />
callback procedure of a client <strong>and</strong> gets a status of RPC_AUTHERR from the<br />
RPC clnt_call. This is usually caused by out-of-date authentication<br />
information. Out-of-date authentication information can occur when the<br />
system is using data from a cache that has not been updated, or when<br />
there has been a recent change in the authentication information that<br />
has not yet been propagated to this server. In most cases, this problem<br />
should correct itself in a short period of time.<br />
If this problem does not correct itself, it may indicate one of the following<br />
problems:<br />
• Corrupted /var/nis/NIS_SHARD_DIR_CACHE file. Kill nis_cachemgr,<br />
remove this file, <strong>and</strong> restart nis_cachemgr.<br />
• Corrupted /var/nis/NIS_COLD_START file. Remove the file <strong>and</strong> then<br />
run nisinit to recreate it.<br />
• Corrupted /etc/.rootkey file. Run keylogin -r.<br />
This message is generated by the NIS+ error code constant<br />
NIS_CLNTAUTH.<br />
Unable to authenticate NIS+ server<br />
In most cases this is a minor software error from which your system<br />
should quickly recover without difficulty. It is generated when the server<br />
gets a status of RPC_AUTHERR from the RPC clnt_call.<br />
If this problem does not quickly clear itself, it may indicate a corrupted<br />
/var/nis/NIS_COLD_START, /var/nis/NIS_SHARD_DIR_CACHE, or<br />
/etc/.rootkey file.<br />
This message is generated by the NIS+ error code constant<br />
NIS_SRVAUTH.<br />
Unable to bind to master server for name 'string-variable'<br />
See “If NIS+ Cannot Find an Object” on page 302. This particular<br />
message may be caused by adding a trailing dot to the server’s domain<br />
name in the domainname comm<strong>and</strong> or the NIS_DOMAIN variable in the<br />
/etc/rc.config.d/namesvrs file.<br />
Appendix A 379
NIS+ Error Messages<br />
Unable to create callback.<br />
The server was unable to contact the callback service on your machine.<br />
This results in no data being returned. See the nis_tables(3N) man<br />
page for more information.<br />
Unable to create process on server<br />
This error is generated if the NIS+ service routine receives a request for<br />
a procedure number it does not support.<br />
This message is generated by the NIS+ error code constant NIS_NOPROC.<br />
String-variable: Unable to decrypt secret key for name.<br />
Possible causes are as follows:<br />
• You may have incorrectly typed the password.<br />
• There may be no entry for name in the cred table.<br />
• NIS+ could not decrypt the key because the entry might be corrupt.<br />
• The /etc/nsswitch.conf file may be directing the query to a local<br />
password in the /etc/passwd file that is different from the NIS+<br />
password recorded in the cred table.<br />
See “If You Have Authentication or Permissions Problems” on page 304.<br />
Unknown error<br />
This is displayed when the NIS+ error h<strong>and</strong>ling routine receives an error<br />
of an unknown type.<br />
Unknown object<br />
The object returned is of an unknown type.<br />
This message is generated by the NIS+ error code constant<br />
NIS_UNKNOWNOBJ. See the nis_tables(3N) <strong>and</strong> nis_names(3N) man<br />
pages for more information.<br />
update_directory: number objects still running.<br />
This is a status message displayed on the server during the update of a<br />
directory during a replica update. You do not need to take any action.<br />
380<br />
Appendix A
NIS+ Error Messages<br />
WARNING: db::checkpoint: could not dump database: No such file or<br />
directory<br />
This message indicates that the system was unable to open a database<br />
file during a checkpoint. Possible causes are as follows:<br />
• The database file was deleted.<br />
• The server is out of file descriptors.<br />
• There is a disk problem<br />
• You or the host do not have correct permissions.<br />
WARNING: db_dictionary::add_table: could not initialize database from<br />
scheme<br />
The database table could not be initialized. Possible causes are as<br />
follows:<br />
• There was a system resource problem (see “If You Have Insufficient<br />
Memory or Disk Space” on page 307).<br />
• You incorrectly specified the new table in the comm<strong>and</strong> syntax.<br />
• The database is corrupted.<br />
WARNING: db_query::db_query:bad index<br />
In most cases this message indicates incorrect specification of an indexed<br />
name. Make sure that the indexed name is found in the specified table.<br />
Check the comm<strong>and</strong> for spelling <strong>and</strong> syntax errors.<br />
**WARNING: domain domainname already exists.<br />
This message indicates that the domain you tried to create already<br />
exists.<br />
• If you are trying to promote a new non-root master server or are<br />
recovering from a previous nisserver problem, continue running the<br />
script.<br />
• If domainname was spelled incorrectly, rerun the script with the<br />
correct domain name.<br />
Appendix A 381
NIS+ Error Messages<br />
**WARNING: failed to add new member NIS+_principal into the<br />
groupname group. You will need to add this member manually: 1.<br />
/usr/sbin/nisgrpadm -a groupname NIS+_principal<br />
The NIS+ comm<strong>and</strong> nisgrpadm failed to add a new member into the<br />
NIS+ group groupname. Use the nisgrpadm comm<strong>and</strong> to add this NIS+<br />
principal manually.<br />
**WARNING: failed to populate tablename table.<br />
The nisaddent comm<strong>and</strong> was unable to load the NIS+ tablename table.<br />
A more detailed error message usually appears before this warning<br />
message.<br />
**WARNING: hostname specified will not be used. It will use the local<br />
hostname instead.<br />
This message indicates that you typed a remote host name with the -H<br />
option. The nisserver -r script does not configure remote machines as<br />
root master servers.<br />
• If the local machine is the one that you want to convert to an NIS+<br />
root master server, no other action is needed. The nisserver -r<br />
script will ignore the host name you typed.<br />
• If you actually want to convert the remote host (instead of the local<br />
machine) to an NIS+ root master server, exit the script. Rerun the<br />
nisserver -r script on the remote host.<br />
**WARNING: hostname is already a server for this domain. If you<br />
choose to continue with the script, it will try to replicate the groups_dir<br />
<strong>and</strong> org_dir directories for this domain.<br />
This is a message warning you that hostname is already a replica server<br />
for the domain that you are trying to replicate.<br />
• If you are running the script to fix an earlier nisserver problem,<br />
continue running the script.<br />
• Ifhostname was mistakenly entered, rerun the script with the correct<br />
host name.<br />
382<br />
Appendix A
NIS+ Error Messages<br />
**WARNING: alias-hostname is an alias name for host<br />
canonical_hostname. You cannot create credential for host alias.<br />
This message indicates that you have typed a host alias in the name list<br />
for nisclient -c. The script asks you if you want to create the<br />
credential for the canonical host name, since you should not create<br />
credentials for host alias names.<br />
**WARNING: file directory-path/tablename does not exist!<br />
tablename table will not be loaded.<br />
The script was unable to find the input file for tablename.<br />
• If directory-path/tablename is spelled incorrectly, rerun the script<br />
with the correct table name.<br />
• If directory-path/tablename file does not exist, create <strong>and</strong> update<br />
this file with the proper data. Then rerun the script to populate this<br />
table.<br />
**WARNING: NIS auto.master map conversion failed. auto.master table<br />
will not be loaded.<br />
The auto.master map conversion failed while trying to convert all the<br />
dots to underscores in the auto_master table. Rerun the script with a<br />
different NIS server.<br />
**WARNING: NIS netgroup map conversion failed. netgroup table will<br />
not be loaded.<br />
The netgroup map conversion failed while trying to convert the NIS<br />
domain name to the NIS+ domain name in the netgroup map. Rerun the<br />
script with a different NIS server.<br />
**WARNING: nisupdkeys failed on directory domainname. This script<br />
will not be able to continue. Please remove the domainname directory<br />
using ‘nisrmdir’.<br />
The NIS+ comm<strong>and</strong> nisupdkeys failed to update the keys in the listed<br />
directory object. If rpc.nisd is not running on the new master server<br />
that is supposed to serve this new domain, restart rpc.nisd. Then use<br />
nisrmdir to remove the domainname directory. Finally, rerun nisserver.<br />
Appendix A 383
NIS+ Error Messages<br />
WARNING: nisupdkeys failed on directory directory-name<br />
You will need to run nisupdkeys manually:<br />
1. /usr/lib/nis/nisupdkeys directory-name<br />
The NIS+ comm<strong>and</strong> nisupdkeys failed to update the keys in the listed<br />
directory object. Use the nisupdkeys comm<strong>and</strong> to update the keys<br />
manually.<br />
**WARNING: once this script is executed, you will not be able to<br />
restore the existing NIS+ server environment. However, you can<br />
restore your NIS+ client environment using “nisclient -r” with the<br />
proper domainname <strong>and</strong> server information. Use “nisclient -r” to<br />
restore your NIS+ client environment.<br />
These messages appear if you have already run the script at least once<br />
before to set up an NIS+ server. They indicate that NIS+ related files will<br />
be removed <strong>and</strong> recreated as needed if you decide to continue running<br />
this script.<br />
• If it is all right for these NIS+ files to be removed, continue running<br />
the script.<br />
• If you want to save these NIS+ files, exit the script by typing n at the<br />
Do you want to continue? prompt. Then save the NIS+ files in a<br />
different directory <strong>and</strong> rerun the script.<br />
**WARNING: this script removes directories <strong>and</strong> files related to NIS+<br />
under /var/nis directory with the exception of the NIS_COLD_START<br />
<strong>and</strong> NIS_SHARED_DIRCACHE files which will be renamed to<br />
.no_nisplus. If you want to save these files, you should abort<br />
from this script now to save these files first.<br />
See the message above for an explanation.<br />
**WARNING: you must specify the NIS domainname.<br />
**WARNING: you must specify the NIS server hostname. Please try<br />
again.<br />
These messages indicates that you did not type the NIS domain name at<br />
the prompt. Type the NIS server domain name at the prompt.<br />
Window verifier mismatch<br />
This is a debugging message generated by the _svcauth_des code. A<br />
verifier could be invalid because a key was flushed out of the cache.<br />
When this occurs, _svcauth_des returns the AUTH_BADCRED status.<br />
You (string-variable) do not have secure RPC credentials in NIS+<br />
384<br />
Appendix A
NIS+ Error Messages<br />
domain 'string-variable'<br />
This message could be caused by trying to run nispasswd on a server<br />
that does not have the credentials required by the comm<strong>and</strong>. Keep in<br />
mind that servers running at security level 0 do not create or maintain<br />
credentials.<br />
See “If You Have Authentication or Permissions Problems” on page 304.<br />
verify_table_exists: cannot create table for string nis_perror message.<br />
To perform an operation on a table, NIS+ first verifies that the table<br />
exists. If the table does not exist, NIS+ attempts to create it. If it cannot<br />
create the table, it returns this error message. The string identifies the<br />
table that could not be located or created; the nis_perror message<br />
portion provides information as to the cause of the problem. You can look<br />
up that portion of the message as if it were an independent message in<br />
this appendix. Possible causes problem are as follows:<br />
• The server was just added as a replica of the directory, <strong>and</strong> it may not<br />
have the directory object. Run nisping -C to checkpoint.<br />
• You are out of disk space. See “If You Have Insufficient Memory or<br />
Disk Space” on page 307.<br />
• Database corruption<br />
• Some other type of software error. Call your HP support contact.<br />
Appendix A 385
NIS+ Error Messages<br />
386<br />
Appendix A
Index<br />
Symbols<br />
$ (dollar sign) in NIS_PATH, 223<br />
$HOME/.rhosts file, 119, 271, 306<br />
* (asterisk)<br />
in /etc/group, 163, 171<br />
in /etc/passwd, 162, 295<br />
*NP* in NIS+ table output, 224<br />
+ (plus sign)<br />
in $HOME/.rhosts file, 119<br />
in /etc/hosts.equiv file, 119<br />
in automounter maps, 79, 109<br />
in group file, 120, 163, 171<br />
in passwd file, 119, 162, 170, 295<br />
Numerics<br />
32k transfer size, 52<br />
A<br />
access denied, <strong>NFS</strong>, 279<br />
access export option, 118, 279<br />
acdirmax mount option, 48<br />
acdirmin mount option, 48<br />
acregmax mount option, 48<br />
acregmin mount option, 48<br />
actimeo mount option, 49, 321<br />
admin group, NIS+, 232, 305<br />
aliases, mail, 137<br />
anon export option, 27<br />
asterisk (*)<br />
in /etc/group, 163, 171<br />
in /etc/passwd, 162, 295<br />
async export option, 49, 289, 319<br />
asynchronous I/O, 49, 289, 319, 321<br />
attribute caching, 47, 50, 128, 289, 319, 321<br />
AUTH_BOGUS_CREDENTIAL, 278<br />
authentication, NIS+, 194, 210, 216, 236, 304<br />
authorization, NIS+, 194, 205, 216, 304<br />
auto_direct map, 62, 96<br />
auto_master map, 56, 61, 64, 90, 95, 99, 137<br />
AUTO_MASTER variable, 81, 111, 342<br />
AUTO_OPTIONS variable, 57, 63, 66, 69, 84,<br />
316, 330, 331, 332, 342<br />
autoFS, 86<br />
autofs script, 111<br />
AUTOMOUNT variable, 51, 81, 111, 342<br />
AUTOMOUNT_OPTIONS variable, 91, 97,<br />
100<br />
AUTOMOUNTD_OPTIONS variable, 104<br />
automounter, 55<br />
advantages, 35<br />
direct vs. indirect, 58, 92<br />
duration of mounts, 57, 63, 66, 91, 97, 100<br />
environment variables in map, 69, 103<br />
hierarchical mounts, 77, 108<br />
-hosts map, 39, 56, 90<br />
improving performance, 77<br />
in SAM, 56<br />
included files, 79, 109<br />
interval between mount attempts, 316<br />
logging, 329, 330<br />
maps in NIS, 153, 155<br />
maps in NIS+, 202, 240, 302, 309<br />
mounting home directories, 70, 71, 74, 105,<br />
106<br />
multiple servers, 68, 102<br />
-null map, 80, 111<br />
-passwd map, 71<br />
replicated servers, 68, 102<br />
restarting, 83, 329, 332<br />
simultaneous mounts, 77, 108<br />
starting, 81, 111, 342<br />
subdirectory notation, 77<br />
tracing, 331, 332<br />
unmounting directories, 83, 114<br />
verifying configuration, 81, 112<br />
vs. st<strong>and</strong>ard mount, 35<br />
wildcards in maps, 69, 74, 104, 106<br />
with CacheFS, 133<br />
B<br />
back file system, CacheFS, 129<br />
backups, of NIS+ data, 248<br />
badxid, displayed by nfsstat, 316<br />
bdf, 25<br />
bg mount option, 44<br />
BIND, 277, 279<br />
troubleshooting, 283<br />
with NIS, 158, 255, 283, 296<br />
with NIS+, 202, 214, 215, 255<br />
binding, NIS, 138, 169<br />
across gateways or routers, 177<br />
to authorized servers, 176<br />
biod, 50, 289, 342<br />
number of, 321<br />
stopping, 289<br />
block size, file system, 321<br />
bootparams file, 159<br />
bsize, displayed by tunefs, 321<br />
387
Index<br />
C<br />
CacheFS, 128<br />
automounted directories, 133<br />
configuring, 131<br />
creating directory, 131<br />
whether to use, 128<br />
caching attributes<br />
see attribute caching, 50<br />
can’t bind message, ypcat, 298<br />
cant match key message, ypmatch, 298<br />
cfsadmin, 131<br />
checkpoint, NIS+, 191, 201, 212, 307, 323<br />
failed, 311<br />
chkey, 179, 182, 183, 239, 250, 305<br />
client connections, 52<br />
client, <strong>NFS</strong>, 20, 34<br />
restarting, 286<br />
starting, 42, 81, 111<br />
stopping, 51, 286<br />
too slow, 321<br />
verifying configuration, 43<br />
client, NIS, 138, 169<br />
binding, 138<br />
binding across gateways or routers, 177<br />
configuring, 169<br />
/etc/group file, 171<br />
/etc/passwd file, 170<br />
preventing unauthorized bindings, 176<br />
starting, 172<br />
verifying configuration, 174<br />
client, NIS+, 189, 191<br />
configuring, 206<br />
verifying configuration, 207<br />
clntudp_create error, ypwhich, 298<br />
cold cache, 129<br />
collision rate, 316<br />
column names, NIS+ tables, 218, 226, 228<br />
compat, in nsswitch.conf file, 162, 163, 170,<br />
171, 260<br />
compatibility mode, NIS, 196, 200, 208, 211,<br />
239, 260, 309<br />
concatenation paths, NIS+, 242, 323<br />
connection<br />
severing, 54<br />
connections<br />
advertised, 53<br />
<strong>NFS</strong> server, 53<br />
continue, in nsswitch.conf file, 258<br />
corrupt database message, NIS+, 314<br />
corrupt log message, NIS+, 314<br />
could not bind to server message, NIS+, 313<br />
CPU load, 318<br />
identifying CPU-intensive processes, 318<br />
create permission, NIS+, 226, 231, 240, 243<br />
cred table, 194, 200, 210, 216, 231, 233, 304,<br />
305<br />
populated by nispopulate, 204<br />
required permissions, 220<br />
credentials, NIS+, 178, 194, 231, 233, 304<br />
corrupted, 306<br />
creating for users, 210<br />
recreating, 236<br />
recreating for root master, 237<br />
cron <strong>and</strong> crontab, 167, 201, 212, 294, 300, 311,<br />
323, 326<br />
D<br />
data integrity, <strong>NFS</strong>, 49, 289<br />
data traffic, 316<br />
DB_BADOBJECT, 312<br />
DES credential, NIS+, 194, 216<br />
destroy permission, NIS+, 228, 241, 243, 247<br />
device busy, 284<br />
devs mount option, 45<br />
direct map, 61, 95<br />
advantages, 58, 92<br />
environment variables in, 69, 103<br />
examples, 63, 97<br />
modifying, 63, 97, 101<br />
directories, NIS+, 190, 191<br />
disk space required for NIS+, 198, 307, 311<br />
Diskless, <strong>NFS</strong>, 14, 319<br />
DNS, 277, 279<br />
troubleshooting, 283<br />
with NIS, 158, 255, 283, 296<br />
with NIS+, 202, 214, 215, 255<br />
dollar sign ($) in NIS_PATH, 223<br />
domain, NIS, 138<br />
number of, 140, 197<br />
planning, 140, 197<br />
domain, NIS+, 190, 191<br />
changing name of, 303, 306<br />
default search order, 223<br />
number of, 197<br />
removing, 247<br />
removing a replica, 246<br />
search path, 302, 323<br />
domainname, 147, 164, 172, 183, 200, 206,<br />
250, 293, 294, 296, 299, 313, 342<br />
dropped packets, 316<br />
388
Index<br />
E<br />
EMULYP variable, 211, 215<br />
environment variables<br />
in automounter maps, 69, 103<br />
in rc.config.d directory, 342<br />
error messages, NIS+, 346<br />
/etc/.rootkey file, 305, 306<br />
/etc/auto_direct file<br />
see auto_direct map, 62, 96<br />
/etc/auto_master file<br />
see auto_master map, 56, 90<br />
/etc/bootparams file<br />
see bootparams file, 159<br />
/etc/ethers file<br />
see ethers file, 159<br />
/etc/exports file<br />
see exports file, 25<br />
/etc/fstab file<br />
see fstab file, 32<br />
/etc/group file<br />
see group database, 22<br />
/etc/hosts file<br />
see hosts database, 137<br />
/etc/hosts.equiv file<br />
see hosts.equiv file, 119<br />
/etc/inetd.conf file<br />
see inetd.conf file, 28<br />
/etc/mnttab file<br />
see mnttab file, 66, 101<br />
/etc/netgroup file<br />
see netgroup file, 115<br />
/etc/netid file<br />
see netid database, 137<br />
/etc/netmasks file<br />
see netmasks file, 159<br />
/etc/networks file<br />
see networks file, 137<br />
/etc/nsswitch.conf file<br />
see nsswitch.conf file, 158<br />
/etc/protocols file<br />
see protocols file, 137<br />
/etc/publickey file<br />
see publickey database, 137<br />
/etc/rc.config.d/namesvrs file<br />
see namesvrs file, 28<br />
/etc/rc.config.d/nfsconf file<br />
see nfsconf file, 28<br />
/etc/rpc file<br />
see rpc file, 124<br />
/etc/services file<br />
see services file, 137<br />
/etc/sm <strong>and</strong> /etc/sm.bak directories, 287<br />
ethers file, 159<br />
export options, 24<br />
access, 118, 279<br />
anon, 27<br />
async, 49, 289, 319<br />
noasync, 49, 289<br />
ro, 26<br />
rw, 26<br />
exportfs, 25, 30, 32, 279, 281, 342<br />
exporting directories, 25<br />
examples, 26<br />
on different disks, 25<br />
with root access, 27<br />
exports file, 25<br />
example entries, 26<br />
forcing a reading of, 279<br />
netgroups in, 118<br />
removing entries, 28<br />
F<br />
fcntl, 16<br />
fg mount option, 44<br />
file locking, 50, 289<br />
file system block size, 321<br />
front file system, CacheFS, 129, 131<br />
fsir<strong>and</strong>, 285, 286<br />
fstab file, 32, 40, 42, 43, 50, 321<br />
CacheFS entries, 132<br />
example entries, 41<br />
fuser, 29, 31, 50, 51, 83, 284, 285, 286, 329, 332<br />
G<br />
gateways, 177<br />
with NIS, 293<br />
generic system error message, NIS+, 313<br />
getattr, displayed by nfsstat, 319<br />
gethostbyname, 255<br />
group database, 22, 23, 137, 163, 278<br />
modifying NIS+, 234<br />
netgroups in, 120<br />
on NIS client, 171<br />
on NIS master server, 145, 202<br />
on NIS slave server, 163<br />
plus sign (+) in, 163<br />
group ID, 22<br />
group owner, NIS+, 195, 218, 222<br />
group_compat, in nsswitch.conf file, 260<br />
groups, NIS+, 190<br />
adding members, 205, 244<br />
389
Index<br />
admin group, 205, 232, 305<br />
recursive, 323<br />
removing, 243<br />
removing members, 244<br />
types of members, 244<br />
groups_dir directory, NIS+, 190<br />
in path name, 302<br />
grpid mount option, 47<br />
H<br />
hard mount option, 32, 44, 289, 321<br />
hierarchical mounts, automounter, 77, 108<br />
home directories, automounting, 70, 71, 74,<br />
105, 106<br />
home domain, NIS+, 216<br />
$HOME/.rhosts file, 119, 271, 306<br />
hostname fallback, 158, 255, 283, 296<br />
hosts database, 137, 158, 277, 279, 283<br />
on NIS master server, 146<br />
using BIND, 158, 255<br />
-hosts map, 39, 56, 90<br />
examples, 58, 91, 58, 91<br />
hosts table, 231<br />
hosts.equiv file, 119, 306<br />
HP 9000, 19<br />
hung program, 287<br />
hung system, 32, 38<br />
I<br />
ignore, in mnttab file, 63, 66, 97, 101<br />
illegal object type message, NIS+, 312<br />
included files, in automounter maps, 79, 109<br />
indirect map, 64, 99<br />
advantages, 58, 92<br />
environment variables in, 69, 103<br />
examples, 67, 101<br />
modifying, 66, 101<br />
subdirectory notation, 77<br />
wildcards in, 69, 74, 104, 106<br />
inetd.conf file, 32, 122, 269, 271, 272, 276, 280,<br />
333<br />
starting mountd from, 28<br />
inetd.sec file, 124, 280<br />
examples, 125<br />
init.d directory, 342<br />
inodes, not enough, 290<br />
installing <strong>NFS</strong> <strong>Services</strong>, 15<br />
interruptible mounts, 33, 287<br />
intr mount option, 44, 287, 321<br />
K<br />
kernel parameter, ninode, 290, 308<br />
keylogin, 180, 182, 183, 238, 250, 305, 306, 309<br />
keylogout, 183, 250, 306<br />
keyserv, 181, 237, 305, 342<br />
KEYSERV_OPTIONS variable, 342<br />
key-value type, NIS+ table, 240<br />
L<br />
LAN, 21<br />
collision rate, 316<br />
further reading, 21<br />
NIS supported configurations, 136, 169<br />
troubleshooting, 293<br />
links, NIS+, 242, 312<br />
Local credential, NIS+, 194, 216, 309<br />
lock manager<br />
see lockd, 16<br />
lockd, 16, 276, 342<br />
checking for hung process, 287<br />
logging, 327, 328<br />
restarting, 287, 288, 327, 328<br />
LOCKD_OPTIONS variable, 327, 342<br />
lockf(), 16, 50, 289<br />
log in, unable to, 294, 309<br />
logging, 325<br />
automounter, 329, 330<br />
h<strong>and</strong>ling log files, 326<br />
lockd, 327, 328<br />
mountd, 327<br />
nettl <strong>and</strong> netfmt, 339<br />
<strong>NFS</strong>, 326<br />
NIS, 335<br />
NIS+, 338<br />
nisd, 338<br />
rexd, 272, 333<br />
rstatd, 333<br />
rusersd, 333<br />
rwalld, 333<br />
sprayd, 333<br />
statd, 327, 328<br />
ypbind, 336<br />
yppasswdd, 337<br />
ypserv, 336<br />
ypxfr, 335<br />
lookup, displayed by nfsstat, 318<br />
lost data, <strong>NFS</strong>, 49, 289<br />
ls, with automounter, 81, 112<br />
390
Index<br />
M<br />
mail aliases, 137<br />
make, 115, 149, 152, 153, 154, 155, 158, 180,<br />
294, 296, 299<br />
makedbm, 153, 156, 157, 158, 183, 295, 297,<br />
300<br />
Makefile, NIS, 149, 153, 155<br />
maps, automounter in NIS+, 202, 240, 302,<br />
309<br />
maps, NIS, 137, 138<br />
adding, 153<br />
automounter, 153, 155<br />
determining server for, 148, 174, 299<br />
listing contents of, 151, 211, 299<br />
modifying, 152<br />
pushing to slaves, 167, 175, 294<br />
removing, 155<br />
master map, 61, 64, 95, 99, 137<br />
master server, NIS, 138<br />
choosing a host, 141, 198<br />
configuring, 143<br />
/etc/group file, 145, 202<br />
/etc/hosts file, 146<br />
/etc/passwd file, 144, 149<br />
in Sun network, 159<br />
number of, 141, 198<br />
restricting access to, 149, 150<br />
starting, 147<br />
verifying configuration, 148<br />
master server, NIS+, 189<br />
memory required for NIS+, 198, 307<br />
memory, for <strong>NFS</strong> server, 290, 318<br />
mnttab file, 63, 66, 97, 101<br />
modify permission, NIS+, 220, 222, 229, 232,<br />
242, 245, 246<br />
mount, 40, 43, 51, 52, 286, 342<br />
with CacheFS, 132<br />
mount options<br />
acdirmax, 48<br />
acdirmin, 48<br />
acregmax, 48<br />
acregmin, 48<br />
actimeo, 49, 321<br />
bg, 44<br />
changing, 43, 63, 66, 97, 101<br />
devs, 45<br />
fg, 44<br />
grpid, 47<br />
hard, 32, 44, 49, 289, 321<br />
intr, 44, 287, 321<br />
noac, 47, 50, 289, 319<br />
nocto, 47<br />
nodevs, 45<br />
nointr, 33, 44<br />
nosuid, 42, 43, 56, 90, 282<br />
O, 46<br />
remount, 47<br />
retrans, 45, 321<br />
retry, 45<br />
ro, 43<br />
rsize, 46, 316, 321<br />
rw, 43<br />
secure, 178<br />
soft, 44, 49, 289, 321<br />
suid, 43<br />
timeo, 45, 277, 316, 321<br />
vers, 46<br />
wsize, 46, 316, 321<br />
mountd, 276, 342<br />
in /etc/inetd.conf file, 28, 32, 276, 280<br />
logging, 327<br />
restarting, 277, 327<br />
MOUNTD_OPTIONS variable, 342<br />
mounting directories, 40<br />
examples, 41, 42<br />
with automounter, 62, 64, 96, 99<br />
multiple mounts, automounter, 68, 102<br />
multiple servers, for automounted<br />
directories, 68, 102<br />
N<br />
Name Service Switch, 158, 162, 163, 170, 171,<br />
204, 207, 214, 215, 255, 283, 296, 306, 309<br />
default configuration, 261<br />
defaults before HP-UX 10.30, 256, 261<br />
namespace, NIS+, 187, 189, 199<br />
planning, 197<br />
namesvrs file, 147, 149, 157, 164, 166, 172,<br />
208, 211, 293, 336, 337, 338<br />
/net directory, 56, 90<br />
netfmt, 339, 340<br />
netgroup file, 115<br />
netgroup table, NIS+, 117<br />
netgroups, 115, 279<br />
creating, 115<br />
examples, 116<br />
files where valid, 118<br />
in $HOME/.rhosts, 119<br />
in /etc/exports, 118<br />
in /etc/group, 120<br />
391
Index<br />
in /etc/hosts.equiv, 119<br />
in /etc/passwd, 119<br />
in NIS, 115, 137<br />
netid database, 137, 152<br />
netmasks file, 159<br />
netnames, 137, 179, 180, 181<br />
netstat, 316, 320<br />
nettl, 339, 340<br />
network<br />
see LAN, 21<br />
Network File System<br />
see <strong>NFS</strong>, 16<br />
Network Information Service<br />
see NIS, 16<br />
Network Information Service Plus<br />
see NIS+, 16<br />
network map, NIS, 142<br />
networks file, 137<br />
newkey, 180, 181, 182, 183<br />
<strong>NFS</strong>, 16<br />
see also client, <strong>NFS</strong>, 20<br />
see also server, <strong>NFS</strong>, 20<br />
client, 20, 34<br />
further reading, 14<br />
installing the software, 15<br />
logging, 326<br />
secure <strong>NFS</strong>, 178<br />
server, 20, 24<br />
starting, 42, 81, 111<br />
startup scripts, 341<br />
stopping, 31, 51, 286<br />
system startup, 341<br />
troubleshooting, 275<br />
<strong>NFS</strong> client<br />
connections, 52<br />
<strong>NFS</strong> Diskless, 14, 319<br />
<strong>NFS</strong> server<br />
daemon, 53<br />
nfs.client script, 49, 51, 81, 111, 122, 277, 286,<br />
327, 341, 342<br />
nfs.core script, 341, 342<br />
nfs.server script, 28, 30, 276, 341, 342<br />
<strong>NFS</strong>_CLIENT variable, 42, 51, 81, 111, 342<br />
<strong>NFS</strong>_SERVER variable, 28, 32, 276, 342<br />
nfsconf file, 28, 30, 32, 42, 49, 51, 57, 63, 66,<br />
69, 81, 91, 97, 100, 104, 111, 276, 289, 316,<br />
320, 321, 327, 331<br />
nfsd, 276, 318, 342<br />
number of, 320<br />
nfsstat, 316, 318, 320<br />
ninode kernel parameter, 290, 308<br />
NIS, 16, 135<br />
see also client, NIS, 138<br />
see also domain, NIS, 138<br />
see also maps, NIS, 137<br />
see also master server, NIS, 138<br />
see also slave server, NIS, 138<br />
binding, 138, 169<br />
client, 138, 169<br />
domain, 138<br />
files managed by, 137, 191<br />
further reading, 14<br />
LAN support, 136<br />
list of comm<strong>and</strong>s, 183, 250<br />
logging, 335<br />
maps, 137, 138, 153, 155, 191<br />
master server, 138<br />
network planning, 140, 197<br />
number of servers, 141, 198<br />
PATH required, 147, 164, 172<br />
querying BIND, 158, 255<br />
slave server, 138, 161<br />
startup scripts, 147, 341<br />
Sun vs. HP, 159<br />
system startup, 341<br />
troubleshooting, 292<br />
with short file names, 159<br />
ypmake vs. Makefile, 159<br />
NIS compatibility mode, NIS+, 196, 200, 208,<br />
211, 239, 260, 309<br />
NIS+, 16, 185<br />
see also groups, NIS+, 190<br />
see also server, NIS+, 198<br />
see also tables, NIS+, 191<br />
see also domain, NIS+, 190<br />
adding a host, 231<br />
adding a user, 233<br />
adding table entries, 226, 227<br />
admin group, 205, 232, 305<br />
advantages over NIS, 187<br />
authentication, 194, 210, 216, 304<br />
authorization, 194, 205, 216, 304<br />
backing up data, 248<br />
changing root password, 239<br />
client, 206<br />
configuration, 199<br />
creating subdomains, 211<br />
creating tables, 240<br />
credentials, 178, 194, 304<br />
default password, 204, 207<br />
392
Index<br />
determining number of domains, 197<br />
determining number of servers, 198<br />
directories, 190, 191<br />
disadvantages, 188<br />
disk space required, 198, 307, 311<br />
domain search order, 223<br />
domain structure, 190, 191<br />
error messages, 346<br />
files managed by, 192<br />
further reading, 186<br />
groups, 190, 205, 243, 244<br />
home domain, 216<br />
initializing users, 210<br />
links, 242, 312<br />
list of comm<strong>and</strong>s, 250<br />
listing table contents, 224<br />
logging, 338<br />
memory required, 198, 307<br />
modifying table entries, 229, 230<br />
NIS compatibility mode, 196, 200, 208, 211,<br />
309<br />
object properties, 218, 219<br />
ownership of objects, 222<br />
PATH required, 200, 206, 208, 211, 248<br />
permissions, 194, 205, 216, 220<br />
planning the namespace, 197<br />
populating tables, 202<br />
principal name, 216<br />
querying BIND, 255<br />
removing a domain, 247<br />
removing a replica server, 246<br />
removing table entries, 228<br />
removing tables, 241<br />
replica server, 208<br />
root master server, 305<br />
searching tables, 225<br />
security level, 306<br />
startup scripts, 341<br />
system startup, 341<br />
table paths, 242, 323<br />
table type, 240<br />
tables, 191, 192<br />
time to live, 219<br />
troubleshooting, 301<br />
verifying configuration, 212<br />
NIS+ principal, 194<br />
nis.client script, 147, 165, 166, 173, 176, 177,<br />
298, 341, 342<br />
nis.server script, 147, 150, 157, 165, 168, 293,<br />
294, 341, 342<br />
nis_cachemgr, 237, 250, 323, 342<br />
NIS_CACHEMGR_OPTIONS variable, 342<br />
NIS_CLIENT variable, 147, 164, 172, 342<br />
NIS_COLD_START file, 191<br />
NIS_DEFAULTS variable, 219<br />
NIS_DOMAIN variable, 147, 164, 172, 293,<br />
313, 342<br />
NIS_GROUP variable, 219<br />
NIS_MASTER_SERVER variable, 147, 293,<br />
342<br />
NIS_MAXCHECKS variable, 342<br />
NIS_PATH variable, 223, 302, 313, 323<br />
NIS_SHARED_DIRCACHE file, 191<br />
NIS_SLAVE_SERVER variable, 147, 157,<br />
164, 293, 342<br />
nisaddcred, 216, 231, 233, 237, 250, 304, 309<br />
Adding Key message, 305, 310<br />
Changing Key message, 305, 310<br />
nisaddent, 227, 230, 234, 240, 250<br />
niscat, 203, 207, 218, 224, 226, 228, 242, 250,<br />
304, 323<br />
nischgrp, 195, 219, 222, 250<br />
nischmod, 195, 219, 220, 250<br />
nischown, 195, 219, 222, 234, 250<br />
nischttl, 219, 250<br />
nisclient, 206, 210, 236, 250, 305<br />
Adding Key message, 305, 310<br />
Changing Key message, 305, 310<br />
nisd, 208, 211, 215, 236, 237, 252, 305, 314,<br />
342<br />
logging, 338<br />
nisd_resolv, 314<br />
nisdefaults, 195, 219, 250, 304<br />
niserror, 250<br />
nisgrep, 225, 251<br />
nisgrpadm, 205, 232, 243, 244, 251, 305<br />
nisinit, 251<br />
nisln, 242, 251<br />
nislog, 248, 251<br />
nisls, 200, 207, 212, 302, 303<br />
nismatch, 216, 225, 226, 251, 279, 304, 305,<br />
309<br />
nismkdir, 251<br />
nispasswd, 233, 239, 251, 309<br />
nispasswdd, 342<br />
nisping, 191, 201, 203, 209, 212, 237, 249, 251,<br />
302, 307, 309, 323<br />
failed, 311<br />
nisplus.client script, 341, 342<br />
nisplus.server script, 341, 342<br />
NISPLUS_CLIENT variable, 342<br />
393
Index<br />
NISPLUS_SERVER variable, 208, 211, 342<br />
nispopulate, 202, 251, 323<br />
nisrm, 251<br />
nisrmdir, 246, 247, 251, 311<br />
nisserver, 200, 209, 212, 251, 302, 309<br />
nissetup, 251, 302, 309<br />
nisshowcache, 251<br />
nisstat, 209, 251<br />
nistbladm, 220, 226, 228, 229, 231, 233, 240,<br />
241, 242, 252<br />
nistest, 252<br />
nisupdkeys, 237, 252<br />
noac mount option, 47, 50, 289, 319<br />
noasync export option, 49, 289<br />
nobody, 27, 162, 170, 179, 180, 194, 281, 304<br />
nocto mount option, 47<br />
nodevs mount option, 45<br />
nointr mount option, 33, 44<br />
NOPUSH option, make, 154<br />
nosuid mount option, 42, 43, 56, 90, 282<br />
not in hosts database, 283, 296<br />
NOTFOUND, in nsswitch.conf file, 258<br />
nslookup, 277, 279<br />
tracing, 283<br />
nsquery, 263, 283, 296<br />
nsswitch.conf file, 158, 162, 163, 170, 171,<br />
204, 207, 215, 255, 256, 306<br />
default configuration, 261<br />
defaults before HP-UX 10.30, 256, 261<br />
modifying, 309<br />
syntax, 258<br />
-null map, 80, 111<br />
null, displayed by nfsstat, 316<br />
NUM_<strong>NFS</strong>D variable, 320, 342<br />
NUM_<strong>NFS</strong>IOD variable, 49, 289, 321, 342<br />
O<br />
O mount option, 46<br />
O_SYNC flag, open(), 49, 289<br />
object properties, NIS+, 218, 219<br />
on, 266, 267<br />
example, 268<br />
org_dir directory, NIS+, 190<br />
in path name, 302<br />
owner, NIS+, 195, 218, 222<br />
P<br />
packets dropped, 316<br />
passwd comm<strong>and</strong>, 175, 181, 309<br />
passwd database, 22, 137, 175, 281, 294<br />
asterisk (*) in, 295<br />
netgroups in, 119<br />
on NIS client, 170<br />
on NIS master server, 144, 149<br />
on NIS slave server, 162<br />
plus sign (+) in, 162, 295<br />
-passwd map, 71<br />
passwd table, NIS+, 233, 305<br />
passwd_compat, in nsswitch.conf file, 260<br />
password, changing<br />
root password with NIS+, 239<br />
with NIS, 175<br />
with NIS+, 210, 233, 239, 305, 309<br />
with secure RPC, 179, 180, 181, 182<br />
password, default NIS+, 204, 207<br />
password, different from secure RPC<br />
password, 306<br />
path names, NIS+, 191, 302<br />
PATH, for NIS, 147, 164, 172<br />
PATH, for NIS+, 200, 206, 208, 211, 248<br />
PC <strong>NFS</strong>, 30, 158<br />
PC<strong>NFS</strong>_SERVER variable, 30, 342<br />
pcnfsd, 30, 342<br />
performance, 315<br />
finding <strong>NFS</strong> problems, 316<br />
improving <strong>NFS</strong> client, 128, 321<br />
improving <strong>NFS</strong> server, 318<br />
improving NIS+, 323<br />
permission denied, <strong>NFS</strong>, 281<br />
permissions<br />
default for new NIS+ object, 195, 219<br />
NIS+, 194, 205, 216, 218, 220<br />
on exported directories, 25, 26<br />
ping, 21, 276, 293<br />
plus sign (+)<br />
in $HOME/.rhosts file, 119<br />
in /etc/hosts.equiv file, 119<br />
in automounter maps, 79, 109<br />
in group file, 120, 163, 171<br />
in passwd file, 119, 162, 170, 295<br />
possible loop detected message, NIS+, 313<br />
principal, NIS+, 194, 216<br />
printer, in pcnfsd.conf file, 30<br />
private keys, on root master server, 305<br />
processes cannot start, 290<br />
program hangs, 287<br />
protocols file, 137<br />
public keys, on root master server, 305<br />
publickey database, 137, 179, 180, 181, 182<br />
publickey, in nsswtich.conf, 306<br />
pwd, with automounter, 37<br />
394
Index<br />
Q<br />
quota, 18, 124<br />
R<br />
rc script, 341<br />
rc.config.d directory, 341, 342<br />
rc0.d directory, 341<br />
rc1.d directory, 341<br />
rc2.d directory, 341<br />
rc3.d directory, 341<br />
rc4.d directory, 341<br />
RCS, 286<br />
read permission, NIS+, 224, 225<br />
read/write access, <strong>NFS</strong>, 26<br />
readlink, displayed by nfsstat, 318<br />
read-only access, <strong>NFS</strong>, 26<br />
Remote Execution Facility<br />
see REX, 17<br />
Remote Procedure Call<br />
see RPC, 17<br />
remount mount option, 47<br />
replica server, NIS+, 189, 208<br />
number to configure, 209, 323<br />
removing, 246<br />
update fails, 312<br />
updating from master, 302<br />
replicated servers, for automounted<br />
directories, 68, 102<br />
retrans mount option, 45, 321<br />
retrans, displayed by nfsstat, 316<br />
retry mount option, 45<br />
return, in nsswitch.conf file, 258<br />
Revision Control System<br />
see RCS, 286<br />
REX, 17, 122, 123, 266<br />
client, 266<br />
configuring, 269<br />
example, 268<br />
security, 124, 271<br />
server, 266<br />
rexd, 123, 266, 267, 269<br />
logging, 272, 333<br />
.rhosts file, 119, 271<br />
rlogin, with secure RPC, 182<br />
ro export option, 26<br />
ro mount option, 43<br />
root access to exported directories, 27, 281<br />
root domain, NIS+, 189<br />
root master server, NIS+, 189, 305<br />
configuring, 200<br />
verifying configuration, 200<br />
root password<br />
changing with NIS+, 239<br />
on NIS+ master server, 200, 305<br />
secure RPC, 181<br />
root replica server, NIS+, 189<br />
.rootkey file, 305, 306<br />
routers, 177<br />
with NIS, 293<br />
RPC, 17<br />
authentication error, 23, 278<br />
netnames, 137<br />
secure, 178, 194<br />
rpc file, 124, 137<br />
rpc.nisd_resolv, 252, 314<br />
rpc.rquotad<br />
see rquotad, 18<br />
rpc.rstatd<br />
see rstatd, 17<br />
rpc.rusersd<br />
see rusersd, 17<br />
rpc.rwalld<br />
see rwalld, 17<br />
rpc.sprayd<br />
see sprayd, 17<br />
rpc.statd<br />
see statd, 287<br />
RPC_AUTH_ERROR, 278<br />
RPC_NISD_OPTIONS variable, 338, 342<br />
RPC_NISPASSWDD_OPTIONS variable,<br />
342<br />
RPC_TIMED_OUT, 277, 287<br />
rpcbind, 122, 276, 342<br />
rpcgen, 17<br />
rpcinfo, 276<br />
rquotad, 18, 124<br />
security, 124<br />
rsize mount option, 46, 316, 321<br />
rstatd, 17, 123<br />
logging, 333<br />
security, 124<br />
rup, 17, 123<br />
rusers, 17, 123<br />
rusersd, 17, 123<br />
logging, 333<br />
security, 124<br />
rw export option, 26<br />
rw mount option, 43<br />
rwall, 17, 123<br />
rwalld, 17, 123<br />
logging, 333<br />
security, 124<br />
395
Index<br />
S<br />
SAM, 20, 24, 34, 56, 186, 205, 219, 220, 222,<br />
224, 226, 228, 229, 232, 243, 290, 308<br />
/sbin/init.d directory<br />
see init.d directory, 342<br />
/sbin/init.d/nfs.client<br />
see nfs.client script, 28<br />
/sbin/init.d/nfs.core<br />
see nfs.core script, 28<br />
/sbin/init.d/nfs.server<br />
see nfs.server script, 28<br />
/sbin/init.d/nis.client<br />
see nis.client script, 28<br />
/sbin/init.d/nis.server<br />
see nis.server script, 28<br />
/sbin/init.d/nisplus.client<br />
see nisplus.client script, 28<br />
/sbin/init.d/nisplus.server<br />
see nisplus.server script, 28<br />
/sbin/rc script<br />
see rc script, 341<br />
/sbin/rc0.d directory, 341<br />
/sbin/rc1.d directory, 341<br />
/sbin/rc2.d directory, 341<br />
/sbin/rc3.d directory, 341<br />
/sbin/rc4.d directory, 341<br />
SD (Software Distributor), 15<br />
search order, NIS+ domains, 223<br />
secure mount option, 178<br />
secure RPC, 178<br />
administering keys, 180<br />
host keys, 181<br />
NIS+ credentials, 194, 210<br />
user-created keys, 179<br />
using, 182<br />
securenets file, 150, 168<br />
examples, 151, 168<br />
secureservers file, 176<br />
examples, 176<br />
security<br />
in exported directories, 27<br />
in inetd.conf file, 124<br />
in mounted directories, 42<br />
on NIS client, 176<br />
on NIS master server, 149, 150<br />
on NIS slave server, 168<br />
REX, 271<br />
secure RPC, 178<br />
using netgroups, 115<br />
security level, NIS+, 306<br />
sendmail, 305<br />
sendmail aliases, 137<br />
server busy message, niscat, 323<br />
server not responding, <strong>NFS</strong>, 276, 321<br />
server not responding, NIS, 293<br />
server, <strong>NFS</strong>, 20, 24<br />
CPU load, 318<br />
memory requirements, 290, 318<br />
PC <strong>NFS</strong>, 30<br />
starting, 28<br />
stopping, 31<br />
too slow, 316, 318<br />
server, NIS+<br />
configuring, 208<br />
determining number of, 198<br />
disk space required, 198<br />
memory required, 198<br />
populating tables, 202<br />
serving NIS clients, 196, 200, 208, 211<br />
verifying configuration, 203, 209<br />
services file, 137<br />
short file names, 159<br />
showmount, 28, 31, 279, 281<br />
SIGUSR2 signal<br />
to automount, 331<br />
to lockd <strong>and</strong> statd, 327<br />
simultaneous mounts, automounter, 77, 108<br />
slave server, NIS, 138<br />
adding, 156, 161, 165<br />
choosing a host, 141, 198<br />
/etc/group file, 163<br />
/etc/passwd file, 162<br />
getting maps from master, 167<br />
number of, 141, 198<br />
removing, 157<br />
restricting access to, 168<br />
starting, 164, 166<br />
verifying configuration, 166<br />
slow server, <strong>NFS</strong>, 316, 318<br />
sm <strong>and</strong> sm.bak directories, 287<br />
socket overflows, 320<br />
soft mount, 49<br />
timed out, 321<br />
soft mount option, 44, 289, 321<br />
Software Distributor (SD), 15<br />
spray, 17, 124<br />
sprayd, 17, 124<br />
logging, 333<br />
security, 124<br />
stale file h<strong>and</strong>le, 30, 285<br />
avoiding, 286<br />
st<strong>and</strong>ard mount, 35, 40<br />
396
Index<br />
START_MOUNTD variable, 28, 276, 342<br />
startup scripts, 341, 342<br />
statd, 16, 276, 342<br />
checking for hung process, 287<br />
logging, 327, 328<br />
restarting, 287, 288, 327, 328<br />
STATD_OPTIONS variable, 342<br />
status monitor<br />
see statd, 16<br />
subdirectory notation, automounter, 77<br />
subdomains, NIS+, 211<br />
SUCCESS, in nsswitch.conf file, 258<br />
suid mount option, 43<br />
Sun ONC/<strong>NFS</strong><br />
Makefile vs. ypmake, 159<br />
with HP-UX, 159<br />
swap space, for NIS+ checkpoint, 311<br />
swapon, 342<br />
swinstall, 15<br />
symbolic links<br />
created by automounter, 60<br />
in exported directories, 26<br />
in mounted file systems, 318<br />
synchronous I/O, 49, 289<br />
syslog, 329, 338, 346<br />
system hang, 32, 38<br />
system startup, 341, 342<br />
T<br />
table type, NIS+, 240<br />
tables, NIS+, 191<br />
adding entries, 226, 227<br />
backing up, 248<br />
column names, 218, 226, 228<br />
corrupted, 303, 314<br />
creating, 240<br />
dumping to files, 248<br />
links, 242<br />
list of st<strong>and</strong>ard, 192<br />
listing contents, 224<br />
modifying entries, 229, 230<br />
populating, 202<br />
removing, 241<br />
removing entries, 228<br />
searching, 225<br />
table paths, 242, 323<br />
table type, 227, 230<br />
updating transaction logs, 191, 201, 212<br />
TCP connection<br />
server, 53<br />
specifying, 52<br />
TCP connections, 52<br />
time to live, for NIS+ objects, 219<br />
timeo mount option, 45, 277, 316, 321<br />
timeout, displayed by nfsstat, 316<br />
/tmp_mnt directory, 60, 83, 329, 331<br />
TMPDIR variable, 202<br />
too many levels of remote, 291<br />
top, 318<br />
tracing, 325<br />
automounter, 331, 332<br />
nettl <strong>and</strong> netfmt, 340<br />
traffic, LAN, 316<br />
transaction log, NIS+, 191, 201, 212, 307, 323<br />
cannot truncate, 311<br />
corrupt, 314<br />
transfer sizes, 52<br />
transport connections, 52<br />
troubleshooting, 273<br />
Name Service Switch, 263<br />
<strong>NFS</strong>, 275<br />
NIS, 292<br />
NIS+, 301<br />
NIS+ error messages, 346<br />
TRYAGAIN, in nsswitch.conf file, 258<br />
ttl, for NIS+ objects, 219<br />
tunefs, for displaying bsize, 321<br />
U<br />
UDP statistics, 320<br />
uidrange, in pcnfsd.conf file, 30<br />
umount, 29, 31, 50, 51, 84, 284, 285, 286<br />
unable to fork message, NIS+, 308<br />
uname, 15<br />
UNAVAIL, in nsswitch.conf file, 258<br />
unexporting directories, 28<br />
unknown host, 283, 296<br />
unmounting directories, 50, 51, 83, 84, 114,<br />
284, 285<br />
UPD connection<br />
specifying, 52<br />
updating software, 15<br />
user ID, 22<br />
unknown, 27<br />
user nobody<br />
see nobody, 27<br />
V<br />
/var/adm/inetd.sec file<br />
see inetd.sec file, 124<br />
/var/yp/Makefile<br />
397
Index<br />
see Makefile, 149<br />
/var/yp/securenets file<br />
see securenets file, 150<br />
/var/yp/secureservers file<br />
see secureservers file, 176<br />
vers mount option, 46<br />
VHE, 137<br />
vmstat, 318<br />
logging, 335<br />
ypxfrd, 342<br />
YPXFRD_OPTIONS variable, 342<br />
W<br />
WAIT_FOR_NIS_SERVER variable, 342<br />
warm cache, 129<br />
wildcards in automounter maps, 69, 74, 104,<br />
106<br />
world, in NIS+ permissions string, 195<br />
write access<br />
see read/write access, 26<br />
wsize mount option, 46, 316, 321<br />
Y<br />
ypbind, 166, 298, 342<br />
logging, 336<br />
restarting, 336<br />
YPBIND_OPTIONS variable, 166, 177, 336,<br />
342<br />
ypcat, 151, 183, 211, 299<br />
cant bind message, 298<br />
ypinit, 147, 153, 155, 159, 164, 183<br />
ypmake, 115, 158, 180, 183, 294, 296, 299<br />
ypmatch, 183, 279, 294, 296<br />
can’t match key message, 298<br />
yppasswd, 175, 179, 180, 182, 183<br />
yppasswdd, 294, 342<br />
logging, 337<br />
restarting, 337<br />
YPPASSWDD_OPTIONS variable, 149, 337,<br />
342<br />
yppoll, 183<br />
yppush, 183<br />
ypserv, 293, 342<br />
logging, 336<br />
restarting, 336<br />
YPSERV_OPTIONS variable, 336, 342<br />
ypservers, 152, 156, 157, 165, 295, 297, 299<br />
ypset, 166, 177, 183<br />
YPSET_ADDR variable, 177, 342<br />
ypupdated, 342<br />
YPUPDATED_OPTIONS variable, 342<br />
ypwhich, 148, 166, 174, 183, 294, 295, 296, 299<br />
clntudp_create error, 298<br />
ypxfr, 154, 167, 184, 295, 296, 299<br />
398