BA Mediasat ID Sat URC 3000 v3, 105x210 mm CS4.indd - Ruwido
BA Mediasat ID Sat URC 3000 v3, 105x210 mm CS4.indd - Ruwido
BA Mediasat ID Sat URC 3000 v3, 105x210 mm CS4.indd - Ruwido

You also want an ePaper? Increase the reach of your titles
YUMPU automatically turns print PDFs into web optimized ePapers that Google loves.
GB<br />
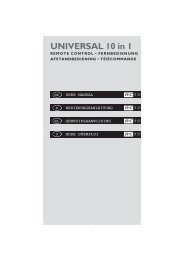
USER MANUAL<br />
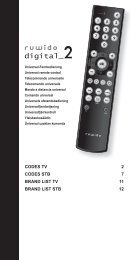
<strong>ID</strong> SAT universal remote control 3 in 1<br />
B. Setup of the DTT, SAT and TV mode<br />
1. Insert two new 1.5V AAA/LR03 batteries (correct position is indicated at the base<br />
of the battery slot).<br />
2. Switch on your device (to progra<strong>mm</strong>e the remote control for the TV set, ensure that<br />
the television shows a picture).<br />
3. Look at your TV set and fi nd out which brand it is i.e. Mitsubishi, Sony, Panasonic<br />
etc.<br />
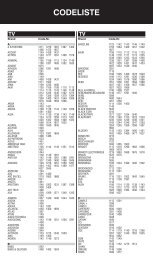
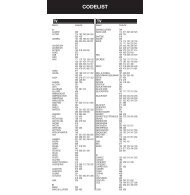
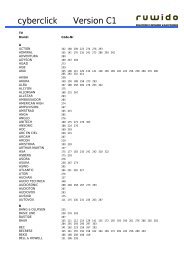
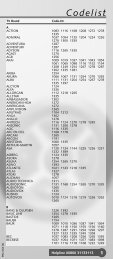
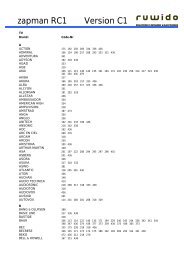
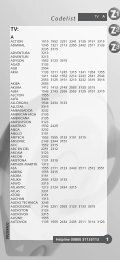
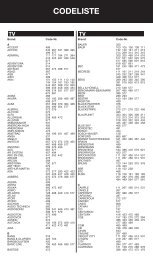
4. Look up the brand name in your code list section. You will fi nd one or more 3 digit<br />
codes for your TV brand.<br />
5. Press the TV key and keep it pressed until the green LED fl ashes twice in quick<br />
succession (after approx. 3 seconds).<br />
6. Within 10 seconds of seeing the 2 fl ashes above, enter the 3 digit code for your<br />
device.<br />
7. After you have entered the code the green LED will fl ash twice, indicating that the<br />
code has been accepted by your <strong>ID</strong> SAT remote control. This does not necessarily<br />
mean it is the correct code for your model of device.<br />
8. Press the standby key to check whether your <strong>ID</strong> SAT remote control is working<br />
properly. If your TV is thereby not set to standby mode, refer to the next code in the<br />
list and repeat the progra<strong>mm</strong>ing procedure from step 3.<br />
9. If your TV is set to standby check all other functions of the TV. If certain functions<br />
are not available or not working properly, refer to the next code in the list and<br />
repeat the progra<strong>mm</strong>ing procedure from step 3.<br />
To program the DTT mode please proceed as described in the progra<strong>mm</strong>ing<br />
instructions for television sets, but instead of “TV” key use the “DTT” key as<br />
well as the codes from the DTT section.<br />
To program the SAT mode please proceed as described in the progra<strong>mm</strong>ing<br />
instructions for television sets, but instead of “TV” key use the “SAT” key as<br />
well as the codes from the SAT section.<br />
C. Brand code scan<br />
If the listed codes are not working or if the manufacturer of your device is not listed,<br />
you have the option to search for a suitable code by means of the brand code scan.<br />
1. Insert the batteries (correct position is indicated at the base of the battery slot).<br />
2. Switch on your TV set.<br />
3. Press the TV key and keep it pressed until the green LED fl ashes twice in quick<br />
succession (after approx. 3 seconds).<br />
4. Within the next 10 seconds enter the code 0 0 3, the green LED fl ashes twice<br />
again.<br />
5. Within the next 10 seconds enter the 3 digit brand code of your device, the green<br />
LED fl ashes twice, in case a wrong code was entered the red LED lights up for two<br />
seconds.<br />
6. After the LED has fl ashed twice, press the Standby key and keep it pressed<br />
until the device has switched off. During the code scan, the LED fl ashes every 2<br />
seconds, this indicates that the automatic scan is in progress. After the device has<br />
switched off, switch it on again to check the other functions of the device. If all<br />
functions work as desired, press the “OK” key to save the found code.<br />
7. If certain functions are not available or not working properly, repeat the code scan<br />
procedure (steps 2 to 6) until you have found the best code.<br />
18<br />
<strong>BA</strong> <strong>Mediasat</strong> <strong>ID</strong> <strong>Sat</strong> <strong>URC</strong> <strong>3000</strong> <strong>v3</strong>, <strong>105x210</strong> <strong>mm</strong> <strong>CS4.indd</strong> 18 19.05.2010 17:52:09