Working with concrete. - PlaceMakers
Working with concrete. - PlaceMakers
Working with concrete. - PlaceMakers

You also want an ePaper? Increase the reach of your titles
YUMPU automatically turns print PDFs into web optimized ePapers that Google loves.
HOW TO<br />
6<br />
<strong>Working</strong> <strong>with</strong><br />
<strong>concrete</strong>.<br />
www.placemakers.co.nz
Tools and Material Checklist<br />
Concrete Mix<br />
Garden hose<br />
Wooden float<br />
Steel float<br />
Hammer<br />
Spade<br />
Groover<br />
Length of 50x50 timber for a screed<br />
Stringline<br />
Brush or broom<br />
Bucket<br />
Timber for boxing, pegs and braces<br />
Nails<br />
Rubber boots<br />
Line level<br />
Reinforcing mesh and possibly steel<br />
Shovel<br />
Wheelbarrow<br />
Here are tips and instructions on how to work <strong>with</strong> <strong>concrete</strong>.<br />
Take time to read them thoroughly. Following these can<br />
save time and effort. It can also help you achieve a neater,<br />
more satisfactory installation, <strong>with</strong> less waste.<br />
Decide how to obtain your <strong>concrete</strong><br />
Concrete comes in many forms. Bagged, dry pre-mix which<br />
requires only the addition of water is the simplest to use.<br />
It is ideal for small jobs but is expensive for large projects.<br />
Ready-mix <strong>concrete</strong> is delivered in <strong>concrete</strong> mixer trucks.<br />
This is the simplest and easiest way to buy <strong>concrete</strong> for<br />
large projects. However you obviously have to pay for the<br />
delivery and convenience of ready-mix <strong>concrete</strong>.<br />
<strong>PlaceMakers</strong> can arrange the supply of ready-mix.<br />
You can of course buy the dry ingredients and mix them<br />
yourself. Whether that proves to be cheaper or not will<br />
depend on prices in your area. It also involves hiring or<br />
purchasing of the necessary mixers, and cartage. There is<br />
also more risk that you won't achieve the optimum mix for<br />
your job.<br />
1
Mixing your own <strong>concrete</strong><br />
There are four basic elements involved in mixing <strong>concrete</strong>:<br />
1. cement,<br />
2. fine aggregate such as sand,<br />
3. coarse aggregate such as crushed rock or gravel,<br />
4. water for mixing the ingredients to type of paste or<br />
sloppy mix.<br />
The aggregates can be bought ready graded as 'builders<br />
mix'. All aggregates used should be free of organic matter.<br />
Water for making <strong>concrete</strong> should be clean, free of acids,<br />
alkalis, oils and sulphates.<br />
The ingredients in <strong>concrete</strong> are always the same, but results<br />
depend largely on the proper mix of the four elements. The<br />
intended use of the <strong>concrete</strong> will determine their proportions.<br />
If you are pouring heavy footings for walls where<br />
waterproofing is not a requirement, your mix can be 1 part<br />
cement to 6 parts builders mix.<br />
For paths, steps and driveways use 1 part cement to 5 parts<br />
builders mix.<br />
You can measure the ingredients on small jobs <strong>with</strong> a<br />
bucket.<br />
Always follow the instructions on the cement bag when<br />
mixing <strong>concrete</strong>.<br />
Add water to the ingredients to achieve a pliable or plastic<br />
mix of <strong>concrete</strong>.<br />
Concrete admixtures are available at <strong>PlaceMakers</strong> to help<br />
make the <strong>concrete</strong> easier to work <strong>with</strong>.<br />
A very sloppy mix will result in weak <strong>concrete</strong> and a poor<br />
surface which is likely to be dusty when cured.<br />
Calculate the Volume of <strong>concrete</strong> required<br />
1. Multiply the length by the width. This gives the area<br />
in square metres. (eg: Your drive is 24 metres long<br />
and 2.4 metres wide and you need it 75mm (0.075m)<br />
thick).<br />
(eg.24 x 2.4 = 57.6 M 2 ).<br />
2. Multiply the square metres by the thickness in metres.<br />
(eg. 57.6 x 0.075 = 4.32 M 3 ).<br />
This gives the volume of <strong>concrete</strong> required, in cubic<br />
metres.<br />
Fig 1<br />
2
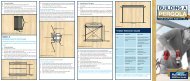
Building the boxing for <strong>concrete</strong><br />
Almost any job involving <strong>concrete</strong> requires some type of 'boxing'<br />
which holds the freshly poured <strong>concrete</strong> in place and stops it<br />
spreading and slumping into areas where it is not needed.<br />
Sometimes the boxing is above the ground. At other times,<br />
some digging is needed. Special boxing grade timber is available<br />
from all <strong>PlaceMakers</strong> Stores.<br />
• Dig down to the desired level and build the boxing to the<br />
necessary shape and size.<br />
• Establish a reference height at the highest point.<br />
• Paths against a house must be kept 150mm below <strong>concrete</strong><br />
floor level and slope slightly away, so water does not drain<br />
under the house.<br />
• Gardens against the house must be kept 225mm below<br />
<strong>concrete</strong> floor level.<br />
So for a path against a house:<br />
• Start at the house.<br />
• Set the desired height at the reference end.<br />
• Use a level to establish the slope and then run the boxing<br />
planks to the other end.<br />
• For a long path, you can use a stringline and line level to<br />
establish an even slope.<br />
• Peg and fix the boxing planks at both ends.<br />
• Then drive pegs between the ends and nail the boxing to<br />
them.<br />
• Keep the boxing planks straight and sloping evenly as you<br />
go.<br />
Pouring <strong>concrete</strong><br />
After the boxing is fixed, lightly spray the entire area <strong>with</strong>in<br />
the boxing <strong>with</strong> water from a garden hose, then pour in the<br />
<strong>concrete</strong>. After the boxing is filled:<br />
• 'Tamp' the freshly poured <strong>concrete</strong> to compact it. This can<br />
be done either by tamping <strong>with</strong> the end of a sturdy piece of<br />
timber, or by walking around on the poured <strong>concrete</strong> wearing<br />
rubber boots.<br />
• Pay particular attention to the edges.<br />
• After tamping, use a 150 x 50mm length of timber as a<br />
screed.<br />
• Work the screed back and forth in a saw like fashion to level<br />
the <strong>concrete</strong> surface at all points.<br />
3
Wire Reinforcing Mesh<br />
100 x 25mm Boxing<br />
50 x 50mm Stakes<br />
Build the boxing to the correct size and shape.<br />
Wire reinforcing mesh is used to strengthen <strong>concrete</strong>.<br />
Fig 2<br />
Fig 3<br />
Use 150 x 50mm straightedge to level <strong>concrete</strong><br />
Crack control joints<br />
Concrete shrinks and cracks as it hardens. Grooving the<br />
<strong>concrete</strong> to form crack control joints will encourage it to<br />
crack in neat straight lines. Crack control joints should be<br />
a third of the thickness of the <strong>concrete</strong> deep. In a footpath<br />
they should be across the width every 2 metres.<br />
4
Concrete Groover<br />
Fig 4<br />
For a larger slab up to 100mm thick, they should be at 3<br />
metre intervals in both directions for unreinforced <strong>concrete</strong>,<br />
and at 5 metres in reinforced <strong>concrete</strong>.<br />
To groove in a straight line:<br />
• Wait until the <strong>concrete</strong> is dry enough to support a 200x50<br />
plank.<br />
• Lay the plank across the <strong>concrete</strong> and run the groover<br />
across, using the plank as a guide.<br />
Draw groover along 200 x 50mm plank<br />
to create crack control joint<br />
Fig 5<br />
Reinforcing<br />
Reinforcing is not mandatory in driveways, paths or nonloadbearing<br />
slabs in single storey houses. However it will<br />
help to control cracking and to hold a slab together if there<br />
is uneven settlement of the subgrade. To do that reinforcing<br />
must be positioned in the top half of the thickness of the<br />
<strong>concrete</strong> slab.<br />
Reinforcing steel sizes mainly used are No's 665 and 668.<br />
Both have 150x150 squares. 665 is made from 5.3mm<br />
diameter steel. 668 is made from 4mm steel. Both are available<br />
in various sized sheets.<br />
5
Expansion joints<br />
Concrete expands and contracts <strong>with</strong> temperature variations.<br />
To allow for this movement, expansion joints must be<br />
provided at 18 metre intervals. These must be the full depth<br />
of the slab and must be filled only <strong>with</strong> flexible material,<br />
not timber.<br />
• To create an expansion joint, paint a thin plank <strong>with</strong><br />
motor or form oil.<br />
• Set the plank on edge into the <strong>concrete</strong>, so that it spans<br />
the full depth of the <strong>concrete</strong>.<br />
• To allow screeding, it's top edge should be at the same<br />
level as the surface.<br />
• When the <strong>concrete</strong> has partly hardened, screw a strong<br />
screw into the edge of the plank and pulling on that,<br />
gently remove the plank.<br />
• The resulting gap can be filled <strong>with</strong> flexible material<br />
when the <strong>concrete</strong> is completely hard.<br />
Different ways to finish <strong>concrete</strong><br />
No final finishing should be done before all free surface<br />
moisture has evaporated. Concrete can be given a smooth<br />
finish <strong>with</strong> a wooden, and then a steel float. If a completely<br />
smooth finish is not wanted, use only the wooden float.<br />
A light swirled pattern can be created by holding a steel<br />
float flat on the surface and moving it in a swirling motion<br />
during the last floating off.<br />
Wooden float smooths<br />
<strong>concrete</strong> prior to<br />
finishing surface<br />
Steel finishing trowel<br />
gives <strong>concrete</strong> a<br />
smooth, even surface<br />
• For a heavier swirling imprint use a wooden float when<br />
the <strong>concrete</strong> is still slightly wet.<br />
• A soft pattern of parallel lines can be created by dragging<br />
a soft brush across while the surface is still moist.<br />
• All brush strokes can be made in the same direction, or<br />
each block between contraction joints can be brushed<br />
in opposite directions (fig 6) for a very desirable effect.<br />
• An ordinary garage floor brush can be used to create<br />
extremely attractive wavy patterns in newly laid <strong>concrete</strong>.<br />
The wavy patterns add to the appearance and make the<br />
surface safer when wet.<br />
6
Different brooms can create different<br />
finished effects on <strong>concrete</strong> surfaces<br />
Fig 6<br />
Letting the <strong>concrete</strong> cure<br />
All <strong>concrete</strong> must be given time to cure. During this curing<br />
period, the <strong>concrete</strong> surface should be kept wet down by<br />
repeated hosing <strong>with</strong> a fine mist. Such a hosing down process<br />
should be done at least twice during any 24 hour period for<br />
about three days. Concrete poured in a basement, garage<br />
or other under-cover area can be left exposed. However, a<br />
guard rail should be placed around it to keep any child or<br />
animal from walking on the surface until it is dry.<br />
Concrete laid in the open air or direct sun should be covered<br />
<strong>with</strong> roofing felt or building paper during the curing period.<br />
This protective covering should be removed before the<br />
<strong>concrete</strong> is wet down.<br />
Never attempt a big <strong>concrete</strong> job on an extremely hot day.<br />
Concrete will set extremely fast in direct sunshine. It is always<br />
better to wait until mid-afternoon even if this means working<br />
late in the evening.<br />
Produced in association <strong>with</strong><br />
The Building Research Association of New Zealand<br />
Please Note:<br />
Whilst the advice and recommendations contained in this brochure<br />
have been produced <strong>with</strong> proper care, they are offered only <strong>with</strong><br />
the objective of assisting those interested in home improvement projects<br />
and <strong>PlaceMakers</strong> does not accept responsibility for the advice,<br />
recommendations, etc. contained herein.<br />
Information correct at time of printing: December 2002<br />
7