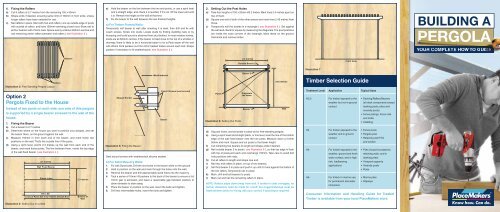
PERGOLA - PlaceMakers
PERGOLA - PlaceMakers
PERGOLA - PlaceMakers

Create successful ePaper yourself
Turn your PDF publications into a flip-book with our unique Google optimized e-Paper software.
4. Fixing the Rafters<br />
a) Cut 9 rafters at 2.7 metres from the remaining 150 x 50mm.<br />
b) Shape ends if desired, ensuring same limit of 150mm in from ends, unless<br />
longer rafters have been selected for use.<br />
c) Nail rafters in place. Start with two end rafters. Line up outside edge of posts<br />
with outside of rafters, and have 150mm overhang at each end. Skew nail to<br />
all four bearers with 75mm nails. Space evenly at about 300mm centres and<br />
nail remaining seven rafters between end rafters ( see Illustration 3 ).<br />
e) Hold the bearer on the line between the two end points, or use a spirit level<br />
and a straight edge, and check it is levelled. If it’s not, lift the lower end until<br />
it is. Remark the height on the wall at that end.<br />
f) Fix the bearer to the wall between the two fi nished heights.<br />
a) For Timber Framed Walls:<br />
Temporarily nail bearer to wall after checking it is level, then drill and fi x with<br />
coach screws. Screw into studs. Locate studs by fi nding cladding nails or by<br />
thumping until solid sound is obtained from stud behind. In most modern homes,<br />
studs are at 600mm centres. If the bearer is fi xed close to the top of a window or<br />
doorway, there is likely to be a horizontal beam to fi x to.Pack beam off the wall<br />
with 20mm thick packers cut from H3.2 treated timber around each bolt. Shape<br />
packers if necessary to fit weatherboard ( see Illustration 5 ).<br />
2. Setting Out the Post Holes<br />
a) Take four lengths of 150 x 50mm H3.2 timber. Mark lines 2.4 metres apart on<br />
two of them.<br />
b) Square one end of both of the other pieces and mark lines 2.45 metres from<br />
those.<br />
c) Temporarily nail the boards in a rectangle ( see Illustration 6 ). Set against<br />
the wall and check for square by measuring the diagonals. The post positions<br />
are inside the outer corners of the rectangle. Mark these on the ground.<br />
Dismantle and remove timber.<br />
BUILDING A<br />
<strong>PERGOLA</strong><br />
YOUR COMPLETE HOW TO GUIDE<br />
Bearers<br />
2.4 metres<br />
Outside Bearer 2<br />
Front View<br />
Illustration 7<br />
Rafters<br />
Weatherboard<br />
Bearer 3<br />
2.45 metres<br />
Timber Selection Guide<br />
Illustration 3: Free Standing Pergola Layout<br />
Option 2<br />
Pergola Fixed to the House<br />
Instead of two posts on each side, one side of this pergola<br />
is supported by a single bearer screwed to the wall of the<br />
house.<br />
1. Fixing the Bearer<br />
a) Cut a bearer to 2.7 metres<br />
b) Determine where on the house you want to position your pergola, and set<br />
the bearer there, on the ground against the wall.<br />
c) Measure 150mm in from each end of the bearer, and mark those two<br />
positions on the wall. That’s the outside line of the posts.<br />
d) Using a spirit level, plumb 2.3 metres up the wall from each end of the<br />
bearer, and mark those points. The line between them, marks the top edge<br />
of the wall fi xed bearer ( see Illustration 4 ).<br />
2.7 metres<br />
Wall Fixed Bearer<br />
Plumb Lines<br />
150 x 50<br />
Lines of Posts Set in by 150mm at Each End<br />
2.3 metres<br />
Bottom of<br />
Wall<br />
Shaped Packer<br />
Illustration 5: Fixing the Bearer<br />
Seal around screws with weatherproof silicone sealant.<br />
Coach Screws (seal around)<br />
Bearer<br />
b) For Solid Masonry Walls:<br />
1. Fix with Dyna bolts. Drill the end holes in the bearer while on the ground.<br />
2. Hold in position on the wall and mark through the holes onto the wall.<br />
3. Remove the bearer and drill appropriately sized holes into the masonry.<br />
4. Tack a series of 10mm H3 packers to the back of the bearer to ensure a full<br />
10mm gap is achieved, and leave a reasonable gap between packers to<br />
allow rainwater to drain away.<br />
5. Place the bearer in position on the wall, insert the bolts and tighten.<br />
6. Drill two intermediate holes, insert the bolts and tighten.<br />
Posts<br />
Illustration 6: Setting Out Posts<br />
Diagonals<br />
the same<br />
Bearer 1<br />
d) Dig post holes, and set posts in place as for free-standing pergola.<br />
e) Using a spirit level and straight plank, or line level, level the line of the bottom<br />
edge of the wall fi xed bearer onto the two posts. Measure down a further<br />
50mm and mark. Square and cut posts to that lower height.<br />
f) Cut remaining two bearers to length and shape ends if desired.<br />
g) Nail outside bearer 2 to posts ( see Illustration 6 ), so that top edge is fl ush<br />
with top of posts,and each end overhangs 150mm. Take care to avoid bolt<br />
hole positions with nails.<br />
h) Cut all rafters to length and shape one end.<br />
i) Nail two end rafters in place, on top of two bearers.<br />
j) Set third bearer 3 in place and push it up until it’s hard against the bottom of<br />
the two rafters. Temporarily nail in place.<br />
k) Mark, drill and bolt bearers to posts.<br />
l) Mark out and nail the remaining rafters in place.<br />
NOTE: Rafters slope down away from wall. If roofed in clear corrugate, no<br />
further allowance need be made for runoff, but noggins/dwangs must be<br />
fixed between joists for fixing. Ask your council if spouting is required.<br />
Wall<br />
Treatment Level Application Typical Uses<br />
H3.2 For timber exposed to the • Decking/Rafters/Bearers<br />
weather but not in-ground (all deck components except<br />
contact<br />
decking posts, piles and<br />
veranda posts)<br />
• Fence palings, fence rails<br />
and trellis<br />
• Cladding<br />
H4 For timber exposed to the • Fence posts<br />
weather and in-ground • Pergola post<br />
contact<br />
• Retaining wall TGV<br />
and lumber<br />
H5 For timber exposed to the • Piles (house foundations,<br />
weather, ground and fresh retaining walls, and in<br />
water contact; and in high decking piles)<br />
risk, loadbearing<br />
• Vineyard supports<br />
applications<br />
• Veranda posts<br />
• Poles<br />
H6 For timber in marine use, • Marine piles<br />
for permanent salt water • Slipways<br />
immersion<br />
Consumer Information and Handling Guide for Treated<br />
Timber is available from your local <strong>PlaceMakers</strong> store.<br />
Illustration 4: Setting Out on a Wall
GETTING STARTED<br />
Pergolas are a useful and attractive addition ion to any<br />
section.<br />
• They provide support for climbing plants like roses,<br />
clematis, jasmine and honeysuckle.<br />
• Pergolas offer a focus and architectural form in a flat<br />
garden; or on a plain building.<br />
• Add a roof in clear corrugated material to provide<br />
shelter over a doorway or as a gazebo.<br />
This brochure has instructions for a free-standing pergola,<br />
and one fixed to a building or a wall.<br />
Materials<br />
Instructions<br />
1. Free Standing Option 1<br />
Free Standing Pergola<br />
• 100 x 100mm H5 posts – 4 @ 3 metres<br />
• 150 x 50mm H3.2 bearers – 4 @ 2.7 metres<br />
• 150 x 50mm H3.2 rafters – 9 @ 2.7 metres<br />
• 10mm H3 Packers<br />
• 8 x 210mm x 12mm diameter hot-dipped galvanised coach bolts, nuts and<br />
50 x 50mm square washers or 55mm diameter round washers.<br />
• Petroleum grease<br />
• 75mm hot-dipped galvanised jolthead nails<br />
• Cement<br />
• Builders mix<br />
2. Fixed to the House<br />
1. Setting out the holes:<br />
a) Take two lengths of 150 x 50mm timber, and mark two lines, 2.4 metres<br />
apart, across both.<br />
b) Take two more pieces and mark two lines 2.3 metres apart<br />
2.4 metres<br />
d) Leave the concrete to set for at least 24 hours.<br />
When the concrete is set, top up hole with soil, then measure 2.3 metres<br />
from ground level on one post.<br />
e) Level that mark around onto each of the others. Level using a string level<br />
and string line, or a spirit level on a plank. Check accuracy of all marks by<br />
levelling between fourth and fi rst post.<br />
f) Square and cut posts to height(s).<br />
NOTE: If you intend to cover your pergola with clear corrugate, allow a fall<br />
of 50mm in the direction you want it to drain. E.G. on Post 2 mark 50mm<br />
below level line. Level that lower mark across to Post 3. Then level the<br />
original height from Post 1 to 4.<br />
3. Fixing the Bearers<br />
a) Cut four bearers from 150 x 50mm at 2.7metres long. Check dimensions at<br />
post top before cutting. Shape ends of bearers if desired, remembering that<br />
no part of the shaping should extend more than 150mm from end of bearer<br />
( see Illustration 2 ), unless you wish to use bearers longer than 2.7metres.<br />
“The most renewable natural resource” for more information visit our<br />
website www.nzwood.co.nz<br />
The Law<br />
You should ask your council if you need a building<br />
consent and/or planning permission.<br />
Ideas & Inspiration<br />
• 100 x 100mm H5 posts – 2 @ 3 metres<br />
• 150 x 50mm H3.2 bearers – 3 @ 2.7 metres<br />
• 150 x 50mm H3.2 rafters – 9 @ 2.7 metres<br />
• 4 x 210mm x 12mm diameter hot-dipped galvanised coach bolts, nuts and<br />
washers<br />
• Petroleum grease<br />
• 4 x 125mm x 12mm diameter hot-dipped galvanised coach screws and<br />
washers; or 4 x 125mm x 12mm Dyna bolts.<br />
• 75mm hot-dipped galvanised jolthead nails<br />
• Cement<br />
• Builders mix<br />
2.3<br />
metres<br />
2<br />
Diagonals<br />
the same<br />
3<br />
Posts<br />
Note<br />
Where corrosion levels are high, as in the case of a coastal environment subject<br />
to sea spray, stainless steel should be used for bolts, nails and fittings.<br />
1<br />
4<br />
Tools<br />
Spade or post hole<br />
borer<br />
Circular saw<br />
Electric drill, 12mm<br />
auger bit & either 9mm<br />
twist bit or masonry bit<br />
(check requirements for<br />
Dyna bolts)<br />
Adjustable spanner<br />
(250mm)<br />
2 G or F clamps<br />
Spirit level or line level<br />
Tape measure, square<br />
and pencil<br />
Sandpaper<br />
Jigsaw if cutting<br />
curves on ends of<br />
rafters (optional)<br />
Illustration 1: Laying out post holes<br />
c) Lay planks together in a rectangle so the inside of each plank rests on the<br />
lines of planks beneath it. (The planks can be temporarily tacked at the<br />
corners).<br />
d) Position rectangle where you want your pergola.<br />
e) Square the corners by checking that diagonals are the same length<br />
( see Illustration 1 ).<br />
f) The inside of each corner of the rectangle, marks the outside corner of each<br />
post.<br />
g) Mark post positions on the ground, dismantle and remove rectangle. Dig four<br />
300mm diameter holes at least 900mm deep.<br />
2. Installing the Posts<br />
a) Place 100mm concrete in the bottom of each hole and set the posts in place<br />
on top. Make sure uncut treated ends go into the hole.<br />
b) Check for plumb levels (vertical) in both directions and brace securely.<br />
c) Pour concrete to 150mm below ground level. Check for plumb again and<br />
rebrace if necessary.<br />
Illustration 2: Bearer and joist end shape option<br />
b) Temporarily nail bearers to Posts 1 and 4 and Posts 2 and 3. Top edge of<br />
bearers should be fl ush with tops of posts. Sandwich post between bearers<br />
( see Illustration 3 ). Bearers should overhang posts by 150mm at each end.<br />
Ensure that temporary nails are in the middle of each bearer as bolt holes<br />
have to be bored above and below that.<br />
c) Mark points 40mm from the bottom and top edges of the bearers, in the<br />
centre of the posts. Bore two 12mm holes through the bearers and posts on<br />
those points. If your auger bit is less than 200mm long, measure and bore<br />
from both sides, ensuring that you maintain holes level and square to the<br />
face of the bearer, so the holes from each side meet up.<br />
d) Grease the bolts liberally, bolt through holes and tighten.<br />
Please Note:<br />
While the advice and recommendations contained in this brochure<br />
have been produced with proper care, they are offered only with<br />
the objective of assisting those interested in home improvement<br />
projects. <strong>PlaceMakers</strong> does not accept responsibility for the advice,<br />
recommendations, etc. contained herein.<br />
Updated: December 2008 (FM1002 12/08)<br />
www.placemakers.co.nz