your complete guide to outstanding outdoor areas - PlaceMakers
your complete guide to outstanding outdoor areas - PlaceMakers
your complete guide to outstanding outdoor areas - PlaceMakers

Create successful ePaper yourself
Turn your PDF publications into a flip-book with our unique Google optimized e-Paper software.
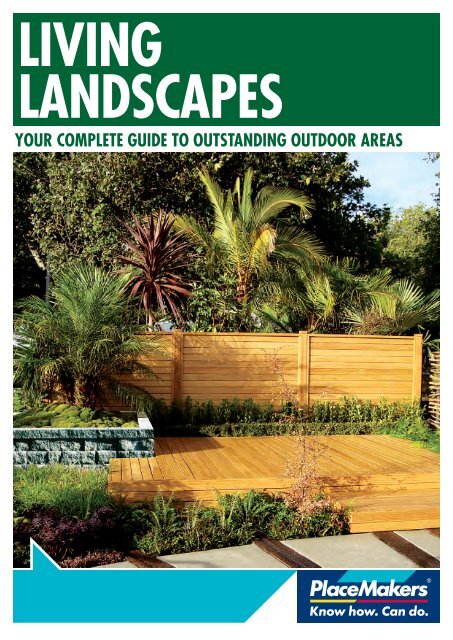
LIVING<br />
LANDSCAPES<br />
YOUR COMPLETE GUIDE TO OUTSTANDING OUTDOOR AREAS
INTRODUCTION<br />
S & J Mackay Builders Ltd; Silver Award<br />
and Category Winner – Welling<strong>to</strong>n Region,<br />
Sustainable Homes $500,000 – $1 million.<br />
QUALITY BRANDS AND<br />
PRODUCTS TO BUILD A<br />
QUALITY OUTDOOR AREA<br />
At <strong>PlaceMakers</strong> we are well equipped <strong>to</strong> help<br />
you turn <strong>your</strong> landscaping dream in<strong>to</strong> a reality.<br />
As well as a comprehensive supply of the<br />
materials and <strong>to</strong>ols you will need, we also offer<br />
sound advice. We know landscaping and are<br />
eager <strong>to</strong> share our knowledge <strong>to</strong> ensure you<br />
achieve the best result.<br />
Check out our large range of How To Guides<br />
in-s<strong>to</strong>re or at www.placemakers.co.nz<br />
These step-by-step instructions will take the<br />
mystery out of many landscaping projects.<br />
THINKING OF EXTENDING<br />
KNOW<br />
HOW<br />
CARD<br />
SPEND *<br />
$<br />
250<br />
GET A<br />
$<br />
25<br />
*Terms and conditions apply.<br />
BONUS<br />
VOUCHER<br />
EARN BONUS VOUCHERS<br />
WITH A KNOW HOW CARD<br />
<strong>PlaceMakers</strong> has everything you need <strong>to</strong> get<br />
the job done, and with a Know How Card<br />
you’ll earn a $25 Bonus Voucher with every<br />
$250 you spend*.<br />
For example, spend $10,000 on <strong>your</strong><br />
decking project and you’ll get a whopping<br />
$1,000 of Bonus Vouchers …that’s a new<br />
BBQ right there!<br />
If you don’t have <strong>your</strong> free Know How Card,<br />
apply at any <strong>PlaceMakers</strong> s<strong>to</strong>re or sign up<br />
online at placemakers.co.nz/knowhowcard<br />
* Know How Card terms and conditions apply.<br />
See www.placemakers.co.nz for details. Bonus Vouchers are<br />
not awarded on purchases using a GE CreditLine card.<br />
Please Note: While the advice and recommendations<br />
contained in this catalogue have been produced with<br />
proper care, they are offered only with the objective of<br />
assisting those interested in home improvement projects.<br />
<strong>PlaceMakers</strong> does not accept responsibility for the<br />
advice, recommendations, etc. contained herein.<br />
Front Cover: Verda Pre-finished Decking and<br />
Verda Pre-finished Fence Panels as shown at 2010<br />
Ellerslie Garden Show Gold winning exhibit.<br />
2
YOUR LIVING OUTDOORS<br />
CONTENTS<br />
4 – 5<br />
DECKING<br />
6 – 7<br />
PAVING - DRYCAST<br />
8 – 9<br />
PAVING - WETCAST & STONE<br />
10 – 11<br />
TIMBER RETAINING WALLS<br />
12 – 13<br />
RETAINING BLOCKS<br />
14 – 15<br />
TIMBER FENCING<br />
16<br />
TIMBER FENCING SYSTEMS<br />
17<br />
METAL FENCING SYSTEMS<br />
18<br />
CLEAR FENCING<br />
19<br />
TRELLIS<br />
20<br />
WIRE FENCING & NETTING<br />
21<br />
TRANSLUCENT ROOFING<br />
22 – 23<br />
LANDSCAPING AGGREGATES<br />
24<br />
OUTDOOR FABRIC SHEETING<br />
25<br />
TIMBER TREATMENT<br />
26 – 27<br />
DRICON, PASLODE & WATTYL<br />
FORESTWOOD PRODUCT GUIDES<br />
THE GROUND RULES<br />
Before you start any project, be<br />
sure the finished job will comply<br />
with the Building Code and council<br />
regulations. For full information,<br />
consult <strong>your</strong> local council.<br />
EXTRA SERVICES<br />
We make every project easier with<br />
these services:<br />
• Free estimates and quotes<br />
• Delivery <strong>to</strong> site or free loan trailer<br />
• 15% off at Hirepool on specialist<br />
<strong>to</strong>ols when you present <strong>your</strong><br />
<strong>PlaceMakers</strong> Know How Card<br />
• Free How To Guides available<br />
in-s<strong>to</strong>re or online at<br />
www.placemakers.co.nz<br />
3
DECKING<br />
NATURAL LIVING<br />
Wood from sustainably managed<br />
forests is the ultimate sustainable<br />
building material. As a tree grows,<br />
it removes and s<strong>to</strong>res carbon dioxide<br />
from the air, helping reduce carbon<br />
levels in the atmosphere. Harvesting<br />
and using the timber locks away<br />
carbon and prevents its release back<br />
in<strong>to</strong> the atmosphere. Replanting the<br />
forests continues the cycle of removal<br />
and s<strong>to</strong>rage.<br />
<strong>PlaceMakers</strong> s<strong>to</strong>cks radiata pine<br />
timber products from sawmills<br />
which source their logs from<br />
New Zealand’s sustainably managed<br />
forests. <strong>PlaceMakers</strong> also offers<br />
hardwood decking options from<br />
legally verified sources including<br />
Forest Stewardship Council<br />
(FSC). Please see our website,<br />
www.placemakers.co.nz for<br />
more details.<br />
Deck Bearers<br />
• H4 or H5 treated radiata<br />
• Planer gauge or rough sawn finish<br />
• SG8 wet graded timber<br />
• Available in 100 x 75mm, 100 x 100mm or 150 x 50mm<br />
Deck Joist<br />
• H3.2 treated radiata<br />
• Planer gauge or rough sawn finish<br />
• SG8 wet graded timber<br />
• Available in 150 x 50mm or 200 x 50mm<br />
FOREST<br />
STEWARDSHIP<br />
COUNCIL<br />
Dricon HandiCrete ®<br />
• Quality concrete with a<br />
super smooth finish<br />
• Formulated <strong>to</strong> reach a target<br />
strength of 20MPa in 28<br />
days<br />
• Ideal for paths, foundations,<br />
mowing strips, letter boxes<br />
and block fill<br />
Deck Balustrades<br />
• H3.2 treated radiata<br />
• Planer gauge or rough<br />
sawn finish<br />
• No.1 or SG8 wet<br />
graded timber<br />
• Available in 50 x 40mm<br />
or 50 x 50mm<br />
FSC is an independent,<br />
non-governmental, not for profit<br />
organisation established <strong>to</strong> promote<br />
the responsible management of the<br />
world’s forests. It is represented in<br />
more than 50 countries.<br />
FSC’s certification system is<br />
recognised internationally, and<br />
when you buy timber with the FSC<br />
label, you know you’re making a<br />
responsible choice.<br />
Merch Decking<br />
NZ grown radiata pine. Standard<br />
decking where cost is more<br />
important than appearance.<br />
Contains some knots and may be<br />
liable <strong>to</strong> dis<strong>to</strong>rtion.<br />
• Graded best face <strong>to</strong> grip<br />
tread profile<br />
• H3.2 treated radiata<br />
• Available in 100 x 25mm or<br />
100 x 40mm<br />
Premium Decking<br />
NZ grown radiata pine. Quality<br />
product with minimal defects,<br />
specially selected for a high-class<br />
fi n i s h .<br />
• Graded best face <strong>to</strong> grip<br />
tread profile<br />
• H3.2 treated radiata<br />
• Available in 100 x 25mm or<br />
100 x 40mm<br />
Verda Prefinished Decking<br />
NZ grown radiata pine. Superior <strong>to</strong> standard<br />
radiata, clear grade and knot-free. Graded<br />
<strong>to</strong> smooth face. Non-bleeding/leaching.<br />
• TanE treatment – 25 year guarantee<br />
against rot and insect attack*<br />
• Available in 100 x 25mm or 100 x 40mm<br />
• Available colours Honey Gold, Natural<br />
Amber and Antique Grey<br />
Available colours<br />
* Subject <strong>to</strong> conditions – see<br />
guarantee on www.verda.co.nz<br />
for more details<br />
4<br />
Whilst every care has been taken <strong>to</strong> obtain an accurate representation, the colours shown here are subject <strong>to</strong> the limitations of the<br />
colour reproduction process. Visit <strong>your</strong> nearest <strong>PlaceMakers</strong> <strong>to</strong> view samples prior <strong>to</strong> ordering.
“The most renewable natural resource” for more information visit our<br />
website www.nzwood.co.nz<br />
Please Note:<br />
Whilst the advice and recommendations contained in this brochure<br />
have been produced with proper care, they are offered only with the<br />
objective of assisting those interested in home improvement projects<br />
and <strong>PlaceMakers</strong> does not accept responsibility for the advice,<br />
recommendations, etc. contained herein.<br />
Updated: July 2008 (BSPG110116)<br />
www.placemakers.co.nz<br />
0800 KNOW HOW (0800 566 946)<br />
The piles in this example deck are 125 x 125mm H5 radiata pine piles, spaced at<br />
a maximum of 1200mm in each direction. The front row of piles is also set back<br />
from the front edge of the deck <strong>to</strong> allow it <strong>to</strong> overhang the piles and bearers.<br />
This provides a neater finish <strong>to</strong> the front of the deck, but the construction<br />
details used and the ‘best’ way are ultimately a personal preference. The piles<br />
themselves can also continue up through the deck <strong>to</strong> support a handrail or<br />
overhead pergola. A pergola may require a building consent. The construction<br />
methods used at this stage must be modified <strong>to</strong> suit any of these alternatives.<br />
(See Illustration 3).<br />
Illustration 3<br />
If you are running the piles up<br />
through the deck <strong>to</strong> form part of<br />
the handrail, or support an<br />
overhead pergola, fix the bearer<br />
by bolting it in place<br />
Nail a small wooden block <strong>to</strong> the<br />
pile or use a G Clamp <strong>to</strong> support<br />
the bearer in the correct position<br />
while you drill the hole. Remember<br />
<strong>to</strong> treat the holes with a timber<br />
preservative.<br />
If you are running the piles up through the deck <strong>to</strong> form part of the handrail,<br />
or <strong>to</strong> support an overhead pergola, fix the bearer by bolting it in place. Nail a<br />
small wooden block <strong>to</strong> the pile or use a G Clamp <strong>to</strong> support the bearer in the<br />
correct position while you drill the hole. Remember <strong>to</strong> treat the holes with a<br />
timber preservative.<br />
The concrete pads need <strong>to</strong> be at least 300mm in diameter or 300 x 300mm<br />
square and, for a low deck, 300mm deep. After you’ve dug the holes, insert the<br />
piles <strong>to</strong> check there will be at least 100mm of concrete all around each pile,<br />
including underneath.<br />
You have a choice about when <strong>to</strong> set the piles in concrete.<br />
Option 1<br />
Cover the bot<strong>to</strong>m of the hole with 100mm of concrete. Place the pile back in the<br />
hole with the cut end up. Pour a further 200mm of concrete and position the<br />
pile. Brace the pile in the correct position and leave <strong>to</strong> set for at least 24 hours.<br />
Then trim the piles <strong>to</strong> height and continue building the deck on <strong>to</strong>p. This option<br />
requires you set the posts exactly in place before the bearers are there <strong>to</strong> give<br />
you a line <strong>to</strong> work <strong>to</strong>.<br />
Option 2<br />
Hang the piles 100mm above the bot<strong>to</strong>m of the holes, and brace them in<br />
all directions very firmly. Trim the piles <strong>to</strong> height, and build and fix <strong>your</strong> deck<br />
framing on <strong>to</strong>p, supporting it with props of timber.<br />
Illustration 4: Bearers and Piles<br />
When the framing (bearers and joists) is fitted and fixed <strong>to</strong>gether <strong>to</strong> the piles,<br />
check that everything is straight, level and square, and then pour concrete in<strong>to</strong><br />
the holes.<br />
(Leave <strong>your</strong> concrete slightly lower than the <strong>to</strong>p of the hole <strong>to</strong> allow lawn or<br />
<strong>to</strong>psoil <strong>to</strong> cover it up.)<br />
When the concrete has set, nail down the decking, removing the temporary<br />
props at any stage.<br />
An alternative <strong>to</strong> setting the piles in concrete is using a Bowmac post bracket.<br />
These require less concrete, but provide little lateral bracing compared with<br />
posts set in concrete. (See Illustration 5).<br />
Trimming hint:<br />
Mark the piles on three<br />
sides before cutting.<br />
With Bowmac<br />
Illustration 5: Post Setting Detail<br />
Ledger<br />
With post<br />
embedded<br />
The piles are trimmed off <strong>to</strong> the underside of the bearers. (See Illustration 4 & 5).<br />
The ledger on the wall is actually a bearer. Level a stringline from under that, or<br />
a straight bearer held against it, <strong>to</strong> give you the trim-off height of the piles. Mark<br />
the cut around three sides of the pile with <strong>your</strong> square before cutting.<br />
This deck uses two 100 x 50mm nailed <strong>to</strong>gether as bearers. Nail at 300mm<br />
centres from opposite faces. Fix <strong>to</strong> each pile with two nails skewed (angle nailed)<br />
from each face. The piles at each end should also be connected <strong>to</strong> the bearer with<br />
a stainless steel ‘Nailon’ plate on each face.<br />
SPACING BETWEEN PILES ALONG THE BEARER<br />
Maximum span of joist<br />
Bearer size<br />
1.45m 100 x 75mm<br />
2.00m 100 x 100mm or two 100 x 50mm<br />
3.20m 125 x 100mm or two 125 x 50mm<br />
4.65m 150 x 100 or two 150 x 50mm<br />
Fitting the Joists<br />
You can see from Illustration 6 that the deck cantilevers over the last bearer <strong>to</strong><br />
produce an overhanging deck.<br />
Illustration 6: Cantilevered Deck Construction<br />
The joists should be spaced at maximum centres according <strong>to</strong> the table below.<br />
The spacing depends on the thickness of decking used.<br />
JOIST SELECTION CHART<br />
Joist size: mm Maximum Span of Joists<br />
Joist Spacings<br />
400mm<br />
450mm 600mm<br />
100 x 50 1.45m 1.40m 1.25m<br />
125 x 50 1.85m 1.80m 1.60m<br />
150 x 50 2.60m 2.40m 2.00m<br />
200 x 50 3.50m 3.35m 2.85m<br />
250 x 50 4.40m 4.25m 3.60m<br />
300 x 50 5.20m 5.05m 4.30m<br />
When you rest each joist on the ledger on the side of the house, leave a 10mm<br />
gap between the end of each joist and the wall. That s<strong>to</strong>ps moisture becoming<br />
trapped and causing decay. Fix each joist <strong>to</strong> every bearer with two nails through<br />
each face at every crossing. Let the end of each joist overlap <strong>your</strong> profile strings.<br />
Trim them all at once later, using the line and a square <strong>to</strong> accurately mark each<br />
joist. Fit a boundary joist <strong>to</strong> the ends of the main joists <strong>to</strong> give the edge of <strong>your</strong><br />
deck a neat finish.<br />
Decking<br />
Gap between<br />
joist and wall<br />
Gap between<br />
decking and wall<br />
150mm Step<br />
Decking height<br />
Joist<br />
Deck joist depth<br />
Ledger<br />
Packer<br />
Illustration 7<br />
DECKING MATERIAL SELECTION CHART<br />
Joist Spacing<br />
Decking Material<br />
400mm<br />
25mm thick Radiata Timber<br />
450mm<br />
25mm thick imported Hardwood<br />
600mm<br />
40mm thick Radiata Timber<br />
Start laying timber decking from the house in a full length board. Make sure that,<br />
like the joists, there’s a gap left between the first board and the wall. If joins are<br />
necessary they should be made on the joists and staggered at random between<br />
rows. An overhang of 10mm <strong>to</strong> 20mm at each end is usually preferred. The first<br />
two boards should be cut <strong>to</strong> this size before fixing with galvanized nails: • 60mm<br />
Galvanized Nails for 19mm decking • 75mm Galvanized Nails for 30mm decking.<br />
Check the boards are true and in a straight line as you fix them. Also check the<br />
distance <strong>to</strong> the outside bearer remains constant. Make up a spacer of 3mm <strong>to</strong><br />
5mm <strong>to</strong> ensure an even gap. Move it along as you nail. Small variations can be<br />
adjusted slightly as each board is fixed. Don’t cut the rest of the decking <strong>to</strong> length<br />
(apart from the first two). Let them overhang the end joists. Then trim them all off<br />
<strong>to</strong>gether by nailing a board <strong>to</strong> the deck as a <strong>guide</strong> for <strong>your</strong> circular saw.<br />
Kitset steps of various lengths are available from <strong>PlaceMakers</strong>. These are<br />
easily fitted <strong>to</strong> <strong>your</strong> deck. If the deck gives access <strong>to</strong> a building the steps must<br />
comply with the New Zealand Building Code Access requirements.<br />
There are various types of interior stains available, oilbased<br />
pigmented, solvent-based dye stain and waterbased<br />
dye stains. They all allow the grain of the timber <strong>to</strong><br />
show through. Stains are designed <strong>to</strong> be applied <strong>to</strong> raw or<br />
new timber only and all interior stains must be over coated<br />
with a clear finish <strong>to</strong> protect the colour from rubbing off<br />
due <strong>to</strong> excess handling.<br />
Clear finishes are available in water-based, oil-based and solvent-based<br />
formulations. Most are only suitable for interior surfaces; <strong>to</strong> protect, enhance and<br />
highlight the timber being coated.<br />
Oil-based clears will give timber a ‘golden’ look whereas water-based preparations<br />
will keep the timber looking natural without discolouration.<br />
Prior <strong>to</strong> staining/clear coating interior timbers, it is essential<br />
that all timber is clean, dry and free from contamination.<br />
The right preparation can greatly enhance the natural grains on the timber surface<br />
and while sanding may be tedious it is an important step in preparing the surface.<br />
Timber should be sanded smooth <strong>to</strong> allow the penetration of the stain/clear<br />
coating. If this is not carried out the product will not penetrate the timber surface<br />
creating adhesion problems. Sand out any marks, including planer ripples. Sand<br />
with the grain, starting with coarse sandpaper and working up <strong>to</strong> fine. Overfill any<br />
cracks or holes with appropriate filler then sand back levelling with the surrounding<br />
timber. Wood dust from sanding will cause problems if it is not removed properly.<br />
Ensure that the surface has been properly cleaned and free of contaminants.<br />
Always check the colour of the stain prior <strong>to</strong> commencement <strong>to</strong> see if the colour<br />
is correct as it is difficult <strong>to</strong> remove the stain from the timber fibres once staining<br />
has been <strong>complete</strong>d.<br />
Apply one coat of stain with a rag, following the grain of<br />
Please Note:<br />
Whilst the advice the and timber. recommendations contained in this brochure<br />
have been produced with proper care, they are offered only with the<br />
objective of assisting Oil-based those interested pigmented in home stains improvement projects<br />
and <strong>PlaceMakers</strong> Oil-based does not pigmented accept stains responsibility are designed for the for advice, use on light timbers such as Pine,<br />
recommendations, Ash etc. and contained Tawa. They herein. are applied in a circular motion on larger <strong>areas</strong> or following<br />
Updated: July 2008 the grain (BSPG110116) on smaller <strong>areas</strong>. Avoid applying <strong>to</strong>o much stain as this can lead <strong>to</strong><br />
excess film build and premature failure.<br />
Solvent-based dye stains<br />
Solvent-based dye stains are designed for harder exotic timbers. They penetrate<br />
and dye the fibres of the timber and give crisp colours allowing the natural beauty<br />
of the timber grain <strong>to</strong> show through.<br />
Water-based gel stains<br />
Water-based gel stains tend <strong>to</strong> be the easiest <strong>to</strong> use. They can be applied direct <strong>to</strong><br />
vertical surfaces without the stain running down the surface, are quicker drying,<br />
low odour, have good clarity and are suitable for all timber types.<br />
All rags used for staining must be disposed of correctly by soaking in water <strong>to</strong><br />
neutralise any oil/solvent content present. If this is not carried out the rags can<br />
become combustible and ignite, causing fires.<br />
Polyurethane clear coatings are available in oil-based,<br />
water-based and moisture cured finishes. They are normally<br />
available in gloss, satin and matt finishes. A clear coat will<br />
enhance and protect the natural beauty and colour of the<br />
timber and protect any stained surface from excess wear.<br />
Gloss products are preferred for floors as the lower gloss<br />
levels may polish up in high traffic <strong>areas</strong>.<br />
When clear coating Rimu, Totara and Matai timbers, avoid using oil-based<br />
finishes as these can react with the oils in the timber causing drying problems.<br />
Water-based is recommended for these timbers as a first coat.<br />
Surfaces must be in good, clean, dry condition, free from wax, grease and dust<br />
prior <strong>to</strong> clear coating. Sanding the surface smooth <strong>to</strong> remove any defects or<br />
damaged <strong>areas</strong> will give you a better look. Remember that clear coating over<br />
such defects will highlight them making them stand out. If the coating is left longer<br />
than 48 hours, a light sanding is required between coats <strong>to</strong> aid adhesion.<br />
Polyurethanes can be applied by brush or speed brush. Do not apply <strong>to</strong>o much<br />
at once, keep an even coating and wet edge. This will enable you <strong>to</strong> continue<br />
blending the coating in on larger <strong>areas</strong>. When coating <strong>to</strong>ngue and groove, <strong>complete</strong><br />
each board from one end <strong>to</strong> the other, this will help <strong>to</strong> maintain an even coating.<br />
The use of sanding sealer is recommended prior <strong>to</strong> clear coating; this helps seal<br />
porous timber and gives a greater film build on finishing coats.<br />
A minimum of 2 coats is recommended with a light sanding between coats <strong>to</strong> give<br />
you a smoother finish.<br />
For an exceptionally hard-wearing finish on floors, bench <strong>to</strong>ps, labora<strong>to</strong>ry and<br />
kitchen benches, moisture cured polyurethane is recommended. It is a single<br />
pack clear coating which cures by absorbing water from the atmosphere.<br />
All polyurethanes start as a gloss finish. A flattening agent is added <strong>to</strong> lower the<br />
gloss level, therefore it is very important that satin and matt finishes are stirred<br />
well with a flat stick <strong>to</strong> bind the agent and give a uniform gloss level.<br />
YOUR COMPLETE KNOW HOW GUIDE<br />
Deck piles<br />
• H5 treated radiata<br />
• 125 x 125mm available<br />
in various lengths from<br />
600mm <strong>to</strong> 3.6M<br />
SPACING THE PILES<br />
DIGGING THE HOLES<br />
PILES & BEARERS<br />
PILES & BEARERS<br />
FIXING THE BEARERS<br />
JOISTS & DECKING<br />
CONCRETING THE PILES<br />
Deck Railings<br />
TRIMMING THE PILES (If using option 1)<br />
• H3.2 treated radiata<br />
• Planer gauge or rough sawn finish<br />
• No.1 or SG8 wet graded timber<br />
• Available in 75 x 50mm or 100 x 50mm<br />
PILES & BEARERS / JOISTS & DECKING<br />
FITTING THE DECKING<br />
STEPS<br />
JOISTS & DECKING<br />
Interior Stains & Clears<br />
BUILDING A<br />
TIMBER<br />
DECK<br />
YOUR COMPLETE HOW TO GUIDE<br />
Preparation<br />
Staining<br />
CHOOSING YOUR<br />
DECKING<br />
TIMBER<br />
Clear Coating<br />
YOUR COMPLETE HOW TO GUIDE<br />
HOW TO GUIDES<br />
PUTTING UP A<br />
TIMBER<br />
STAINS<br />
AND CLEARS<br />
For help choosing <strong>your</strong> decking timber<br />
and instructions on how <strong>to</strong> build and<br />
stain <strong>your</strong> deck see these how <strong>to</strong><br />
<strong>guide</strong>s, available in-s<strong>to</strong>re or online at<br />
www.placemakers.co.nz<br />
KNOW<br />
HOW<br />
CARD<br />
SPEND *<br />
$<br />
250<br />
GET A<br />
$<br />
25<br />
*Terms and conditions apply.<br />
BONUS<br />
VOUCHER<br />
Don’t forget <strong>to</strong> use <strong>your</strong> Know How<br />
Card with every purchase.<br />
Stair Stringers<br />
• H4 treated radiata<br />
• 1-15 step sizes available<br />
*Steps purchased<br />
separately <strong>to</strong><br />
preferred width<br />
Metalex Timber<br />
Preservative<br />
Treat all timber cut ends <strong>to</strong><br />
protect against rotting and<br />
mildew growth.<br />
• Water resistant finish<br />
• Protects fibrous substrates<br />
• Easy <strong>to</strong> apply<br />
• Available in clear or green<br />
PROJECT CHECK LIST<br />
Materials<br />
• Timber pegs • Decking • Joists<br />
• Bearers • Stringers • Nails<br />
• Concrete • Fixings and brackets<br />
• Timber Preservative<br />
Tools<br />
• Stringline • Tape measure<br />
• Spirit level • Circular saw<br />
• Hammer • Hand saw<br />
• Electric drill • Set square<br />
Makita 1050W<br />
185mm Circular<br />
Saw 5030425<br />
Vitex Decking<br />
A medium-density, naturally stable<br />
and durable hardwood harvested<br />
as “community production” from the<br />
Solomon Islands, it silvers off <strong>to</strong> a<br />
fine even finish.<br />
• Available in 100 x 25mm<br />
or 150 x 25mm<br />
Purple Heart Decking<br />
Purple Heart hardwood is superior<br />
quality decking. It provides class 1<br />
durability for decking, with minimal<br />
leaching/bleeding.<br />
• Available in 100 x 25mm<br />
or 150 x 25mm<br />
Massa Decking<br />
Sustainably harvested heavy<br />
hardwood, kiln-dried, stable and<br />
extremely strong with a Class 1<br />
durability rating. A proven<br />
performer for decking, fl ooring<br />
beams and exterior joinery.<br />
Non-bleeding/leaching.<br />
• Available in 100 x 25mm<br />
or 150 x 25mm<br />
Composite Decking<br />
– Hybrideck<br />
This new generation composite<br />
decking is extremely stylish, looks<br />
and feels like timber. Made from<br />
recycled wood and plastic materials,<br />
it won’t warp, crack or splinter.<br />
• Available in finished sizes of<br />
130 x 19mm or 140 x 25mm<br />
Available colours<br />
All decking sizes quoted are nominal. FSC timber only available from selected s<strong>to</strong>res.<br />
5
PAVING-<br />
DRYCAST<br />
At <strong>PlaceMakers</strong> you will find an<br />
extensive range of contemporary<br />
paving that will transform <strong>your</strong><br />
<strong>outdoor</strong> living spaces in<strong>to</strong><br />
statements of <strong>your</strong> individual style.<br />
With so many options available<br />
there is a selection of colours,<br />
shapes and sizes in classic masonry<br />
through <strong>to</strong> handcrafted large-format<br />
wet-cast pavers.<br />
Laying paving is a very achievable<br />
DIY project with <strong>PlaceMakers</strong><br />
providing the materials and Know<br />
How, or choose a professional<br />
contrac<strong>to</strong>r <strong>to</strong> transform <strong>your</strong><br />
<strong>outdoor</strong> living <strong>areas</strong>.<br />
Dricon PaveLock ®<br />
Dricon PaveLock ® is a stabilised<br />
jointing sand that enhances the<br />
durability and appearance of<br />
paved surfaces.<br />
• Provides long term locked<br />
in strength and durability<br />
• Resistant <strong>to</strong> weed growth<br />
and insect infestation<br />
• Ideal for paving joints in<br />
driveways and footpaths<br />
Dricon PaveSand TM<br />
• Essential <strong>to</strong> ensure the<br />
overall performance and<br />
quality<br />
• Ideal for paving joints in<br />
footpaths, domestic<br />
and industrial driveways<br />
• Flows easily in<strong>to</strong> paving<br />
joints providing strength<br />
maximising the long term<br />
performance of paving<br />
WHICH PAVERS<br />
Our range will help you create<br />
stylish patios, courtyards, paths,<br />
driveways and parking <strong>areas</strong>.<br />
Typically, pavers used for traffic<br />
<strong>areas</strong> will be smaller format and<br />
thicker <strong>to</strong> withstand the weight,<br />
while pedestrian <strong>areas</strong> only<br />
requires a thinner paver for ease<br />
of installation.<br />
Then, there’s the shape, size, colour<br />
and laying patterns which effect the<br />
overall look and performance.<br />
<strong>PlaceMakers</strong> can advise you<br />
which pavers are best suited <strong>to</strong><br />
<strong>your</strong> requirements.<br />
Firth Holland Paver<br />
The clean lines of the Holland Paver<br />
offer a flexible and stylish paving<br />
solution. Built-in spacer nibs allow<br />
for easy and accurate laying.<br />
• Ideal for domestic driveways and<br />
parking <strong>areas</strong><br />
• 200 x 100 x 50mm<br />
• 50 pavers per M 2<br />
Firth Walkway Paver<br />
With their traditional look, Walkway<br />
Pavers are an economical option for<br />
paving different <strong>areas</strong> around <strong>your</strong><br />
home.<br />
• Ideal for paths, pool surrounds,<br />
courtyards and patios<br />
• 230 x 190 x 45mm<br />
• 22 pavers per M 2<br />
Firth Classic<br />
Cobbles<strong>to</strong>ne Paver<br />
The Classic Cobbles<strong>to</strong>ne provides<br />
the look and feel of a traditional old<br />
world cobbles<strong>to</strong>ne for a variety of<br />
residential applications.<br />
• Ideal for domestic driveways,<br />
residential patios and pathways<br />
• 230 x 219 x 60mm<br />
• 22 pavers per M 2<br />
Available colours Available colours Available colours<br />
6<br />
Whilst every care has been taken <strong>to</strong> obtain an accurate representation, the colours shown here are subject <strong>to</strong> the limitations of the colour reproduction process.<br />
Visit <strong>your</strong> nearest <strong>PlaceMakers</strong> <strong>to</strong> view samples prior <strong>to</strong> ordering.
suB GraDe testiNG<br />
Sub-grade Weak moderate Strong<br />
Strength<br />
Walking & Walking Heel Neither walking<br />
heel test leaves distinct leaves an nor heel leaves<br />
footprints footprints impression an impression<br />
Driveways 175mm base 125mm base 75mm base<br />
(light vehicle material material material<br />
traffic only)<br />
Pedestrian 75mm base 50mm base No base<br />
use only material material material required,<br />
just sand<br />
exCavatioN exaMple<br />
Paver thickness (driveway)<br />
60 mm<br />
Bedding sand (compacted)<br />
30 mm<br />
Base Course (moderate sub-grade firmness) 125 mm<br />
= <strong>to</strong>tal exCavatioN Depth<br />
(below finished paving level)<br />
215mm<br />
Base Course Material<br />
• Should be crushed rock including particles of all sizes.<br />
• No particles should have a diameter more than one third of the<br />
thickness of the required base course layer.<br />
• It should contain no soil or plant material.<br />
• Lay geotextile fabric first where soft clay which might push in<strong>to</strong><br />
and through the base course material.<br />
• For layers of 100mm thick or more, use 40mm all in aggregate.<br />
This should also be laid in layers no thicker than 100mm and compacted <strong>to</strong> a<br />
uniform dense condition, especially around manholes and kerbs. The finished<br />
texture of the base course should not allow bedding sand <strong>to</strong> filter through. The<br />
final surface of the base course should match the con<strong>to</strong>ur of <strong>your</strong> finished<br />
paving with no bumps, and no holes deeper than 10mm.<br />
Edging is important <strong>to</strong> prevent sideways movement of pavers, and <strong>to</strong> s<strong>to</strong>p<br />
bedding sand leaking out.<br />
edging options<br />
• Soldier course of either standing or flat pavers (See Illustration 3)<br />
• Paving kerb – segmented raised kerbing<br />
• Paving edge – concealed, underground PVC strip<br />
• Haunching – concealed concrete strip. (See Illustration 4)<br />
Concrete<br />
Soldier Course<br />
Subgrade<br />
Illustration 3: Soldier course of standing pavers<br />
Concrete Haunching<br />
Soldier Course<br />
100mm<br />
Min<br />
Illustration 4: Concealed haunching<br />
Bedding sand supports <strong>your</strong> pavers, but will not hide irregularities in the base<br />
course. It should be coarse river sand (not beach sand), and damp but not wet.<br />
1. Don’t compact bedding sand directly. It compacts under the pavers. To test<br />
how much the thickness will reduce, spread some sand over a small area.<br />
Lay a paver on <strong>to</strong>p, and thump that with a rubber hammer. The resulting<br />
reduction in sand thickness will tell you how much <strong>your</strong> sand compacts.<br />
2. Pave in manageable sized <strong>areas</strong>. Spread sand only over an area you know<br />
you can finish in one session, and get <strong>to</strong> without walking on. Spread the<br />
sand <strong>to</strong> slightly more than the depth <strong>your</strong> rubber hammer test indicated<br />
would produce a compacted sand depth of between 20mm and 30mm. You<br />
will usually need <strong>to</strong> start with the uncompacted sand bed between 5mm<br />
and 10mm thicker than its compacted depth. (See Illustration 5A)<br />
3. Screed the sand <strong>to</strong> a uniform level. As with any screeding, you need<br />
temporary <strong>guide</strong>s or runners at each side <strong>to</strong> run <strong>your</strong> screed board on.<br />
If you have already laid a soldier or kerb course, you may be able <strong>to</strong> use<br />
that <strong>to</strong> support <strong>your</strong> runners. If the area <strong>to</strong> be paved is <strong>to</strong>o wide you’ll<br />
need <strong>to</strong> drive pegs, and fix <strong>your</strong> runners <strong>to</strong> them, just like concrete boxing.<br />
(See Illustration 5B)<br />
1. Start from the straightest convenient edge, and lay <strong>your</strong> pavers with a<br />
space of 2mm <strong>to</strong> 4mm between them. Some pavers have spacer nibs<br />
which achieve that au<strong>to</strong>matically. The space allows joint sand <strong>to</strong> penetrate<br />
around the pavers. Always start at the bot<strong>to</strong>m of sloped <strong>areas</strong>.<br />
2. Lay all full pavers first: then cut and lay any pieces. Cut pavers with a<br />
diamond concrete saw, paver splitter (both available from hire centres) or,<br />
for small <strong>areas</strong>, a bolster.<br />
3. Don’t run vehicles over the paving until it’s <strong>complete</strong>ly finished. To get a<br />
loaded wheelbarrow across, lay heavy planks down as running boards.<br />
Soldier Course<br />
on Concrete<br />
Illustration 5A: Screed on Runners<br />
Screed<br />
Sand<br />
Basecourse<br />
Subgrade<br />
Illustration 5B: (Detail) Not <strong>to</strong> scale<br />
Timber Screed<br />
Subgrade<br />
Guide Cleats<br />
Fixed <strong>to</strong> Screed<br />
Timber Runner<br />
Fixed <strong>to</strong> Peg<br />
Guide cleats<br />
fixed <strong>to</strong> screed<br />
Timber runner at<br />
correct height fixed<br />
<strong>to</strong> pegs<br />
Peg<br />
Your pavers now need <strong>to</strong> be consistently compacted over the whole area. Include<br />
a minimum of three passes with compac<strong>to</strong>r each at 90 degrees <strong>to</strong> each other.<br />
1. For a small area, use a rubber hammer on a short length of heavy timber:<br />
say a piece of 150 x 50mm. For most other jobs, use a plate compac<strong>to</strong>r.<br />
2. When the pavers are all compacted, sweep joint sand over the whole area<br />
and compact again. The compac<strong>to</strong>r will drive the sand in<strong>to</strong> the joints. Keep<br />
sweeping and compacting until all joints are filled.<br />
3. Joint sand should be fine dry plaster sand with angular particles that lock<br />
well <strong>to</strong>gether. It is also sold as paving sand and some types incorporate a<br />
weed preventative.<br />
In most cases maintenance will be minimal. If some pavers settle unevenly, or<br />
if underground services need <strong>to</strong> be exposed, <strong>your</strong> paving may require re-laying.<br />
To do this simply follow the procedures given above. It would pay <strong>to</strong> add a<br />
layer of weed matting below the sand layer <strong>to</strong> s<strong>to</strong>p any weeds that could grow<br />
up and between <strong>your</strong> pavers. Where paving is cleaned or has water running<br />
across it the joint sand may require <strong>to</strong>pping up periodically. To enhance the<br />
appearance of <strong>your</strong> paving special sealers are available, and these may require<br />
reapplication over time. Ask about these at <strong>your</strong> <strong>PlaceMakers</strong> Firth Centre.<br />
note: Building or landscaping work has <strong>to</strong> comply with the new Zealand<br />
Building code and <strong>your</strong> local council requirements. talk <strong>to</strong> the building<br />
inspec<strong>to</strong>rs at <strong>your</strong> council. they can provide helpful details of such<br />
matters and say whether or not a permit is required for the work you wish<br />
<strong>to</strong> do.<br />
Choose <strong>your</strong> site carefully, watch and compensate for potential problems such<br />
as drains, trees and electrical wiring.<br />
Check the height of the surface <strong>to</strong> be paved, take measurements and draw design<br />
plans <strong>to</strong> allow for the paving’s <strong>to</strong> be below the floor level and slightly sloped away<br />
from the house or <strong>areas</strong> that you would want <strong>to</strong> keep water away from.<br />
Choose <strong>your</strong> pavers and design…measure up and order.<br />
If the ground is firm and well compacted excavate <strong>to</strong> a depth of 75 mm, then<br />
move <strong>to</strong> next step. If soft or a filled site, excavate 75-100mm deeper and add<br />
75-100mm of <strong>to</strong>p course, compact well with a plate compacter.<br />
Now set up string lines <strong>to</strong> give you lines <strong>to</strong> follow for both height and gapping.<br />
now you can choose 1 of 2 laying methods:<br />
1. Spread and level a fine loose bedding sand, dampen and lightly compact.<br />
Then screed level and choose <strong>your</strong> laying pattern. (This method is quick<br />
easy and if the leveling is done well gives a great finish).<br />
2. Mix up a mix of sand and cement with water <strong>to</strong> make a wet mix that you<br />
put on the base, roughly level and then tamp <strong>your</strong> pavers down in<strong>to</strong> it,<br />
remember where they sit is where they stay. (This method requires more<br />
work, precision laying as it is far less forgiving, once the sand and cement<br />
mix hardens <strong>your</strong> pavers are not able <strong>to</strong> be easily lifted or moved).<br />
nB: It is critical you allow a gap between pavers of a minimum of 8mm,<br />
although 10-15mm is gap is recommended.<br />
This gap allows you <strong>to</strong> have some flexibility if there are any minor height<br />
discrepancies and also remove the effect of any slight size variation that occurs<br />
in hand made pavers.<br />
Some pavers may need cutting, you can hire a suitable saw from hire centres<br />
or use an angle grinder with a masonry blade installed. Remember <strong>your</strong> safety<br />
equipment.<br />
do not uSe comPActIon eQuIPment over PAverS<br />
Hose off pavers, let them dry, then use either pave joint sand, mortar pointing, or<br />
pavelock grouting sand…remember follow the product directions, if compaction<br />
is required, go over pavers tapping with a rubber mallet.<br />
Use dry sand and cement mix, <strong>to</strong> trowel an edge from the <strong>to</strong>p of the paver<br />
away at a 45 degree angle <strong>to</strong> give the pavers a border or haunch <strong>to</strong> hold them<br />
in place.<br />
Remember, if at any stage you are unsure of what you are doing or need further<br />
advice, seek professional help.<br />
Firth Grass Paver<br />
Ideal for driveways or<br />
parking <strong>areas</strong><br />
• Suitable for light vehicle<br />
traffic<br />
• Widely spaced openings<br />
let grass growth through<br />
• 400 x 400 x 80mm<br />
• 6 pavers per M 2<br />
3. PrePArIng the BASe<br />
courSe<br />
4. PlAcIng the edgIng<br />
installation instructions<br />
Firth Gobi Block<br />
Ideal for turning or<br />
5. PrePArIng the BeddIng<br />
parking<br />
SAnd BASe<br />
<strong>areas</strong> for boats<br />
and caravans<br />
• Provides superior<br />
traction, even on<br />
6. lAyIng the PAverS<br />
sloping surfaces<br />
• 200 x 200 x 100mm<br />
• 25 pavers per M 2<br />
installation instructions<br />
7. comPActIng the PAverS<br />
mAIntenAnce<br />
installation instructions / maintenance<br />
Wet cASt PAvIng<br />
wet cast paving<br />
LAYING<br />
PAVING<br />
STONES<br />
<strong>your</strong> <strong>complete</strong> how <strong>to</strong> <strong>guide</strong><br />
HOW TO GUIDE<br />
For instructions on how <strong>to</strong><br />
lay <strong>your</strong> pavers, see our<br />
How To Guide available<br />
in-s<strong>to</strong>re or online at<br />
www.placemakers.co.nz<br />
KNOW<br />
HOW<br />
CARD<br />
SPEND *<br />
$<br />
250<br />
GET A<br />
$<br />
25<br />
*Terms and conditions apply.<br />
BONUS<br />
VOUCHER<br />
Don’t forget <strong>to</strong> use <strong>your</strong> Know How<br />
Card with every purchase.<br />
PROJECT CHECKLIST<br />
Materials<br />
• Pavers • Dricon PaveLock<br />
• Base course • Sika Pave Sealant<br />
• Weed matting • Dricon PaveSand<br />
• Concrete<br />
Tools<br />
• Tape measure • Pencil • Stringline<br />
• Spirit level • Spade • Shovel<br />
• Screed board • Plate compac<strong>to</strong>r<br />
• Rake • Broom<br />
• Concrete saw/paver splitter/bolster<br />
Stanley FatMax<br />
Extreme 1200mm Level<br />
• Magnified centre vial for improved visibility<br />
4861609<br />
Firth Boulevard Paver<br />
These pavers are larger format<br />
pavers robust enough for heavy foot<br />
and light vehicular traffic.<br />
• Ideal for <strong>outdoor</strong> uses such as<br />
domestic driveways, patios and<br />
pathways<br />
• 297 x 297 x 60mm<br />
• 11 pavers per M 2<br />
Firth Chancery Paver<br />
Large format pavers provide a<br />
contemporary designer look for<br />
<strong>outdoor</strong> <strong>areas</strong>.<br />
• Ideal for patios, garden terraces<br />
and paths<br />
• 497 x 497 x 50mm<br />
• 4 pavers per M 2<br />
Not suitable for <strong>areas</strong> carrying heavy foot traffic or vehicles<br />
Firth Courtyard Flags<strong>to</strong>ne Paver<br />
Classically attractive paving option for<br />
<strong>your</strong> larger <strong>outdoor</strong> <strong>areas</strong>.<br />
• Ideal for pathways, formal garden<br />
or patio settings<br />
• 450 x 450 x 50mm<br />
• 5 pavers per M 2<br />
Not suitable for <strong>areas</strong> carrying heavy foot traffic or vehicles<br />
Firth Palermo Paver †<br />
Stylish modular, larger format paver<br />
with a distinctive polished finish.<br />
• Ideal for patios, courtyards<br />
and light pedestrian <strong>areas</strong><br />
• 450 x 450 x 50mm • 5 pavers per M 2<br />
Not suitable for <strong>areas</strong> carrying heavy foot traffic or vehicles<br />
† Palermo Paver must be sealed once laid as it is a honed<br />
product, all Palermo pavers are delivered unsealed. It is<br />
the responsibility of the installer <strong>to</strong> seal Palermo Pavers.<br />
Available colours Available colours Available colours Available colours<br />
7
PAVING-<br />
WETCAST<br />
& STONE<br />
With our range of stylish, quality<br />
wetcast pavers you can create an<br />
exceptional <strong>outdoor</strong> living area that<br />
stands the test of time.<br />
<strong>PlaceMakers</strong> offers wetcast paving<br />
in a range of textures, sizes and<br />
colours that will suit any <strong>outdoor</strong><br />
space. A key aspect of wetcast<br />
paving is the finish or texture of the<br />
paver. From our range, you can<br />
select pavers that have a smooth,<br />
glossy finish or ones that are highly<br />
textured which give the look and<br />
feel of natural s<strong>to</strong>ne.<br />
Natural Split Paving<br />
Create a stunning patio<br />
with the unrivalled,<br />
natural beauty of schist<br />
s<strong>to</strong>ne paving<br />
• Fast and easy <strong>to</strong> lay<br />
• Extremely durable<br />
• Low maintenance<br />
Must be laid on on full<br />
concrete bed<br />
Waterworn S<strong>to</strong>nes<br />
Create a natural<br />
pathway with these<br />
beautiful s<strong>to</strong>nes<br />
• Fast and easy <strong>to</strong> lay<br />
• Extremely durable<br />
• Low maintenance<br />
Wetcast pavers suit a number of<br />
applications and are particularly<br />
ideal for patios, pool <strong>areas</strong>, paths,<br />
entranceways and garden edging.<br />
Wetcast pavers generally come in<br />
a larger format than most traditional<br />
pavers. Many of the pavers in the<br />
wetcast range feature slip resistant<br />
qualities which reduce accidents<br />
around pool <strong>areas</strong> and other parts<br />
of the home.<br />
Milano Paver<br />
The Milano is an elegant smooth style<br />
paver perfect for every application<br />
from classic <strong>to</strong> modern contemporary.<br />
It has a slightly etched finish creating a<br />
more slip resistant surface.<br />
• Available in 300 x 300, 450 x 450,<br />
600 x 150, 600 x 300 or 600 x 600mm<br />
Romani Paver<br />
The Romani creates a timeless look<br />
with a beautiful, softly textured<br />
surface that ties in perfectly with<br />
almost any style of house and<br />
landscape.<br />
• Available in 300 x 300, 450 x 450,<br />
600 x 300 or 600 x 600mm<br />
Vil<strong>to</strong>rio Paver<br />
A smooth bevelled edge lends the<br />
Vil<strong>to</strong>rio true class. The diamond facet<br />
surface pattern makes it an excellent<br />
choice for entrance ways and other<br />
<strong>areas</strong> where safety is a priority.<br />
• Available in 600 x 600mm<br />
Available colours Available colours Available colours<br />
8<br />
Whilst every care has been taken <strong>to</strong> obtain an accurate representation, the colours shown here are subject <strong>to</strong> the limitations of the colour reproduction process.<br />
Visit <strong>your</strong> nearest <strong>PlaceMakers</strong> <strong>to</strong> view samples prior <strong>to</strong> ordering.
suB GraDe testiNG<br />
Sub-grade Weak moderate Strong<br />
Strength<br />
Walking & Walking Heel Neither walking<br />
heel test leaves distinct leaves an nor heel leaves<br />
footprints footprints impression an impression<br />
Driveways 175mm base 125mm base 75mm base<br />
(light vehicle material material material<br />
traffic only)<br />
Pedestrian 75mm base 50mm base No base<br />
use only material material material required,<br />
just sand<br />
exCavatioN exaMple<br />
Paver thickness (driveway)<br />
60 mm<br />
Bedding sand (compacted)<br />
30 mm<br />
Base Course (moderate sub-grade firmness) 125 mm<br />
= <strong>to</strong>tal exCavatioN Depth<br />
(below finished paving level)<br />
215mm<br />
Base Course Material<br />
• Should be crushed rock including particles of all sizes.<br />
• No particles should have a diameter more than one third of the<br />
thickness of the required base course layer.<br />
• It should contain no soil or plant material.<br />
• Lay geotextile fabric first where soft clay which might push in<strong>to</strong><br />
and through the base course material.<br />
• For layers of 100mm thick or more, use 40mm all in aggregate.<br />
This should also be laid in layers no thicker than 100mm and compacted <strong>to</strong> a<br />
uniform dense condition, especially around manholes and kerbs. The finished<br />
texture of the base course should not allow bedding sand <strong>to</strong> filter through. The<br />
final surface of the base course should match the con<strong>to</strong>ur of <strong>your</strong> finished<br />
paving with no bumps, and no holes deeper than 10mm.<br />
Edging is important <strong>to</strong> prevent sideways movement of pavers, and <strong>to</strong> s<strong>to</strong>p<br />
bedding sand leaking out.<br />
edging options<br />
• Soldier course of either standing or flat pavers (See Illustration 3)<br />
• Paving kerb – segmented raised kerbing<br />
• Paving edge – concealed, underground PVC strip<br />
• Haunching – concealed concrete strip. (See Illustration 4)<br />
Concrete<br />
Soldier Course<br />
Subgrade<br />
Illustration 3: Soldier course of standing pavers<br />
Concrete Haunching<br />
Soldier Course<br />
100mm<br />
Min<br />
Illustration 4: Concealed haunching<br />
Bedding sand supports <strong>your</strong> pavers, but will not hide irregularities in the base<br />
course. It should be coarse river sand (not beach sand), and damp but not wet.<br />
1. Don’t compact bedding sand directly. It compacts under the pavers. To test<br />
how much the thickness will reduce, spread some sand over a small area.<br />
Lay a paver on <strong>to</strong>p, and thump that with a rubber hammer. The resulting<br />
reduction in sand thickness will tell you how much <strong>your</strong> sand compacts.<br />
2. Pave in manageable sized <strong>areas</strong>. Spread sand only over an area you know<br />
you can finish in one session, and get <strong>to</strong> without walking on. Spread the<br />
sand <strong>to</strong> slightly more than the depth <strong>your</strong> rubber hammer test indicated<br />
would produce a compacted sand depth of between 20mm and 30mm. You<br />
will usually need <strong>to</strong> start with the uncompacted sand bed between 5mm<br />
and 10mm thicker than its compacted depth. (See Illustration 5A)<br />
3. Screed the sand <strong>to</strong> a uniform level. As with any screeding, you need<br />
temporary <strong>guide</strong>s or runners at each side <strong>to</strong> run <strong>your</strong> screed board on.<br />
If you have already laid a soldier or kerb course, you may be able <strong>to</strong> use<br />
that <strong>to</strong> support <strong>your</strong> runners. If the area <strong>to</strong> be paved is <strong>to</strong>o wide you’ll<br />
need <strong>to</strong> drive pegs, and fix <strong>your</strong> runners <strong>to</strong> them, just like concrete boxing.<br />
(See Illustration 5B)<br />
1. Start from the straightest convenient edge, and lay <strong>your</strong> pavers with a<br />
space of 2mm <strong>to</strong> 4mm between them. Some pavers have spacer nibs<br />
which achieve that au<strong>to</strong>matically. The space allows joint sand <strong>to</strong> penetrate<br />
around the pavers. Always start at the bot<strong>to</strong>m of sloped <strong>areas</strong>.<br />
2. Lay all full pavers first: then cut and lay any pieces. Cut pavers with a<br />
diamond concrete saw, paver splitter (both available from hire centres) or,<br />
for small <strong>areas</strong>, a bolster.<br />
3. Don’t run vehicles over the paving until it’s <strong>complete</strong>ly finished. To get a<br />
loaded wheelbarrow across, lay heavy planks down as running boards.<br />
Soldier Course<br />
on Concrete<br />
Illustration 5A: Screed on Runners<br />
Screed<br />
Sand<br />
Basecourse<br />
Subgrade<br />
Illustration 5B: (Detail) Not <strong>to</strong> scale<br />
Timber Screed<br />
Subgrade<br />
Guide Cleats<br />
Fixed <strong>to</strong> Screed<br />
Timber Runner<br />
Fixed <strong>to</strong> Peg<br />
Guide cleats<br />
fixed <strong>to</strong> screed<br />
Timber runner at<br />
correct height fixed<br />
<strong>to</strong> pegs<br />
Peg<br />
Your pavers now need <strong>to</strong> be consistently compacted over the whole area. Include<br />
a minimum of three passes with compac<strong>to</strong>r each at 90 degrees <strong>to</strong> each other.<br />
1. For a small area, use a rubber hammer on a short length of heavy timber:<br />
say a piece of 150 x 50mm. For most other jobs, use a plate compac<strong>to</strong>r.<br />
2. When the pavers are all compacted, sweep joint sand over the whole area<br />
and compact again. The compac<strong>to</strong>r will drive the sand in<strong>to</strong> the joints. Keep<br />
sweeping and compacting until all joints are filled.<br />
3. Joint sand should be fine dry plaster sand with angular particles that lock<br />
well <strong>to</strong>gether. It is also sold as paving sand and some types incorporate a<br />
weed preventative.<br />
In most cases maintenance will be minimal. If some pavers settle unevenly, or<br />
if underground services need <strong>to</strong> be exposed, <strong>your</strong> paving may require re-laying.<br />
To do this simply follow the procedures given above. It would pay <strong>to</strong> add a<br />
layer of weed matting below the sand layer <strong>to</strong> s<strong>to</strong>p any weeds that could grow<br />
up and between <strong>your</strong> pavers. Where paving is cleaned or has water running<br />
across it the joint sand may require <strong>to</strong>pping up periodically. To enhance the<br />
appearance of <strong>your</strong> paving special sealers are available, and these may require<br />
reapplication over time. Ask about these at <strong>your</strong> <strong>PlaceMakers</strong> Firth Centre.<br />
note: Building or landscaping work has <strong>to</strong> comply with the new Zealand<br />
Building code and <strong>your</strong> local council requirements. talk <strong>to</strong> the building<br />
inspec<strong>to</strong>rs at <strong>your</strong> council. they can provide helpful details of such<br />
matters and say whether or not a permit is required for the work you wish<br />
<strong>to</strong> do.<br />
Choose <strong>your</strong> site carefully, watch and compensate for potential problems such<br />
as drains, trees and electrical wiring.<br />
Check the height of the surface <strong>to</strong> be paved, take measurements and draw design<br />
plans <strong>to</strong> allow for the paving’s <strong>to</strong> be below the floor level and slightly sloped away<br />
from the house or <strong>areas</strong> that you would want <strong>to</strong> keep water away from.<br />
Choose <strong>your</strong> pavers and design…measure up and order.<br />
If the ground is firm and well compacted excavate <strong>to</strong> a depth of 75 mm, then<br />
move <strong>to</strong> next step. If soft or a filled site, excavate 75-100mm deeper and add<br />
75-100mm of <strong>to</strong>p course, compact well with a plate compacter.<br />
Now set up string lines <strong>to</strong> give you lines <strong>to</strong> follow for both height and gapping.<br />
now you can choose 1 of 2 laying methods:<br />
1. Spread and level a fine loose bedding sand, dampen and lightly compact.<br />
Then screed level and choose <strong>your</strong> laying pattern. (This method is quick<br />
easy and if the leveling is done well gives a great finish).<br />
2. Mix up a mix of sand and cement with water <strong>to</strong> make a wet mix that you<br />
put on the base, roughly level and then tamp <strong>your</strong> pavers down in<strong>to</strong> it,<br />
remember where they sit is where they stay. (This method requires more<br />
work, precision laying as it is far less forgiving, once the sand and cement<br />
mix hardens <strong>your</strong> pavers are not able <strong>to</strong> be easily lifted or moved).<br />
nB: It is critical you allow a gap between pavers of a minimum of 8mm,<br />
although 10-15mm is gap is recommended.<br />
This gap allows you <strong>to</strong> have some flexibility if there are any minor height<br />
discrepancies and also remove the effect of any slight size variation that occurs<br />
in hand made pavers.<br />
Some pavers may need cutting, you can hire a suitable saw from hire centres<br />
or use an angle grinder with a masonry blade installed. Remember <strong>your</strong> safety<br />
equipment.<br />
do not uSe comPActIon eQuIPment over PAverS<br />
Hose off pavers, let them dry, then use either pave joint sand, mortar pointing, or<br />
pavelock grouting sand…remember follow the product directions, if compaction<br />
is required, go over pavers tapping with a rubber mallet.<br />
Use dry sand and cement mix, <strong>to</strong> trowel an edge from the <strong>to</strong>p of the paver<br />
away at a 45 degree angle <strong>to</strong> give the pavers a border or haunch <strong>to</strong> hold them<br />
in place.<br />
Remember, if at any stage you are unsure of what you are doing or need further<br />
advice, seek professional help.<br />
Garden Edging<br />
With a sharp, stylish profile,<br />
garden edging is perfect<br />
for framing <strong>your</strong> paving or<br />
garden area.<br />
• Fast and easy <strong>to</strong> lay<br />
• Available in a variety of<br />
shapes and sizes that<br />
allow you <strong>to</strong> create almost<br />
any shape garden or<br />
mowing edge<br />
Green Plus Matting<br />
Green Plus matting is designed <strong>to</strong><br />
5. PrePArIng the BeddIng<br />
allow for damage SAnd BASe free vehicle<br />
7. comPActIng the PAverS<br />
access or parking on or across<br />
lawns, driveways and playing fields.<br />
mAIntenAnce<br />
It is virtually invisible when<br />
6. lAyIng the PAverS<br />
it is installed.<br />
• Suitable for parking or access<br />
for cars, 4x4 vehicles, light<br />
trucks, caravans, trailer boats<br />
• Available in 387 x 387 x 50mm<br />
3. PrePArIng the BASe<br />
courSe<br />
4. PlAcIng the edgIng<br />
installation instructions<br />
installation instructions<br />
installation instructions / maintenance<br />
Wet cASt PAvIng<br />
wet cast paving<br />
LAYING<br />
PAVING<br />
STONES<br />
<strong>your</strong> <strong>complete</strong> how <strong>to</strong> <strong>guide</strong><br />
HOW TO GUIDE<br />
For instructions on how <strong>to</strong><br />
lay <strong>your</strong> pavers, see our<br />
How To Guide available<br />
in-s<strong>to</strong>re or online at<br />
www.placemakers.co.nz<br />
KNOW<br />
HOW<br />
CARD<br />
SPEND *<br />
$<br />
250<br />
GET A<br />
$<br />
25<br />
*Terms and conditions apply.<br />
BONUS<br />
VOUCHER<br />
Don’t forget <strong>to</strong> use <strong>your</strong> Know How<br />
Card with every purchase.<br />
PROJECT CHECKLIST<br />
Materials<br />
• Pavers • Base course material<br />
• Mortar mix • Sweep in grout<br />
Tools<br />
• Shovel<br />
• Spade<br />
• Rubber mallet • Tape measure<br />
• Spirit level • Rake<br />
• Compac<strong>to</strong>r • Wheel barrow<br />
• Screed board • Soft broom<br />
• Stakes and stringline<br />
• Gloves and earmuffs<br />
• Paving saw <strong>to</strong> cut paver<br />
• Acid wash <strong>to</strong> clean pavers<br />
when laid<br />
Leathers<strong>to</strong>ne Paver<br />
Distinctive pavers that look like leather,<br />
with a low skid surface.<br />
• Pinstripe edging gives the pavers a<br />
tile-like look when they are grouted<br />
• Available in 450 x 450 x 45mm<br />
Sawns<strong>to</strong>ne Paver<br />
Square pavers with a finish similar <strong>to</strong> that<br />
of cut limes<strong>to</strong>ne, with bandsaw cut marks<br />
across the surface. This provides a soft<br />
sawn limes<strong>to</strong>ne effect with the durability<br />
of concrete.<br />
• Available in 360 x 360 or 450 x 450mm<br />
Exposed Aggregate Paver<br />
The exposed aggregate range has an<br />
important place in landscaping which<br />
gives a traditional yet ageless look.<br />
• Slip resistant for really wet <strong>areas</strong><br />
• Available in 300 x 300, 450 x 450,<br />
500 x 500 or 600 x 600mm<br />
Indian Sands<strong>to</strong>ne Paver<br />
Indian Sands<strong>to</strong>ne will introduce a<br />
timeless aspect of quality and longevity<br />
<strong>to</strong> any <strong>outdoor</strong> area.<br />
• Can be used for patios, paths and<br />
pool surrounds<br />
• Available in 100 x 100, 300 x 300,<br />
600 x 300, 600 x 600, 900 x 600<br />
or 900 x 900mm<br />
Available colours Available colours Available colours Available colours<br />
9
TIMBER<br />
RETAINING<br />
WALLS<br />
In recent times retaining walls have<br />
become an integral part of any<br />
garden design. They are perfect<br />
for creating a focal point in <strong>your</strong><br />
garden, highlighting a special<br />
feature or levelling off <strong>areas</strong> <strong>to</strong><br />
create a flat lawn.<br />
Retaining walls are great for<br />
creating terracing and raised<br />
gardens where space is limited.<br />
On a steep site, they give <strong>your</strong><br />
garden structure, highlight natural<br />
features and help control soil<br />
erosion. Best of all, they’re low<br />
maintenance, easy <strong>to</strong> build and<br />
they last for years.<br />
Wattyl Forestwood<br />
Aquatech Oil<br />
Stain 5L<br />
• Water clean up<br />
• Penetrates, whilst<br />
adding natural colour<br />
<strong>to</strong> timber<br />
• Available in a range<br />
of colours<br />
Dricon High<br />
Strength HandiCrete ®<br />
High strength concrete mix,<br />
formulated <strong>to</strong> reach a target<br />
strength of 40MPa in 28 days<br />
• Ideal for foundations, heavy<br />
duty paths, bridge repair<br />
work, bollards and block fill<br />
SLEEPERS<br />
There are a variety of sleepers<br />
available with the most common<br />
being Hardwood, Macrocarpa and<br />
Radiata Pine. It is vital <strong>to</strong> assess if<br />
the sleeper application is purely<br />
aesthetic in which case any species<br />
will do, accepting that untreated<br />
sleepers will breakdown over time.<br />
However, if the use is for more<br />
structural retaining application<br />
and longevity is required then it is<br />
recommended that treated Radiata<br />
Pine sleepers are used.<br />
Rough Sawn<br />
Retaining Timber<br />
Visually graded radiata pine with<br />
rough sawn finish on both faces.<br />
Used <strong>to</strong> construct a retaining structure<br />
both residentially and commercially.<br />
• H4 treated radiata No.2<br />
• Available in 150 x 50mm or<br />
200 x 50mm<br />
Retaining Cap<br />
• Helps prevent erosion<br />
and water damage<br />
• Ideal for a finishing<br />
<strong>to</strong>uch <strong>to</strong> any<br />
retaining wall<br />
construction<br />
Edged Half Round<br />
Retaining Timber<br />
Can be used <strong>to</strong> construct a retaining<br />
wall, also looks good when making a<br />
raised garden.<br />
• H4 treated radiata<br />
• Available in 150mm<br />
& 175mm widths<br />
H4 Retaining Post<br />
• H4 treated radiata<br />
• Available in 100 x 75mm or<br />
100 x 100mm<br />
• Lengths 1.8, 2.4, 2.7 or 3M<br />
Larger dimension posts and dressed<br />
are available on request.<br />
Tongue & Groove<br />
Retaining Timber<br />
With a refined <strong>to</strong>ngue and groove<br />
profile, you can transform an<br />
unwanted sloping area in<strong>to</strong> a flat<br />
garden or lawn.<br />
• H4 treated radiata No.2<br />
• Available in 150 x 50mm<br />
or 200 x 50mm<br />
10
Drainage Coil<br />
Designed for the<br />
economic removal of<br />
excess ground water<br />
• Ideal for effluent<br />
soakage fields, retaining<br />
wall drainage and<br />
s<strong>to</strong>rmwater diversion<br />
• Available in diameters<br />
of 65, 110 & 150mm<br />
Scoria<br />
Ideal for bedding under<br />
constructions such as<br />
paving <strong>areas</strong> or for<br />
drainage behind retaining<br />
walls and piping trenches<br />
HOW TO GUIDE<br />
For instructions on how<br />
<strong>to</strong> build <strong>your</strong> retaining<br />
wall, see our How To<br />
Guide available<br />
in-s<strong>to</strong>re or online at<br />
www.placemakers.co.nz<br />
KNOW<br />
HOW<br />
CARD<br />
SPEND *<br />
$<br />
250<br />
GET A<br />
$<br />
25<br />
*Terms and conditions apply.<br />
BONUS<br />
VOUCHER<br />
Don’t forget <strong>to</strong> use <strong>your</strong> Know How<br />
Card with every purchase.<br />
H5 Retaining Post<br />
• H5 treated radiata<br />
• Available in 100 x<br />
75mm or 100 x 100mm<br />
• Lengths 1.8, 2.4,<br />
2.7 or 3M<br />
Larger dimension posts and<br />
dressed are available on<br />
request.<br />
H5 Round Post<br />
• H5 treated radiata<br />
• Available in various sizes<br />
from 125mm <strong>to</strong> 300mm<br />
• Lengths from 900mm<br />
<strong>to</strong> 7M<br />
PROJECT CHECKLIST<br />
Materials<br />
• H5 treated post<br />
• H4 treated rough sawn or <strong>to</strong>ngue &<br />
groove rails. Alternatively use edged<br />
half rounds<br />
• Concrete • Timber preservative<br />
• Scoria • Nails<br />
• Pegs • Geotextile fabric<br />
• Drainage coil<br />
Tools<br />
• Stringline • Spirit level<br />
• Hammer • Old paintbrush<br />
• Shovel • Sledgehammer<br />
• Spade or post hole borer<br />
• Hand saw or circular saw<br />
• Tape, square and pencil<br />
Macrocarpa Sleepers<br />
Naturally durable and suitable for non<br />
structural landscaping projects. It will<br />
weather <strong>to</strong> a silvery grey colour or<br />
can be stained or painted.<br />
• Available in 150 x 100mm<br />
& 200 x 100mm<br />
Verda Pine Sleepers<br />
Sleepers are H4 treated for long term<br />
durability. Suitable for a wide range of<br />
landscaping applications.<br />
• Available in 200 x 100 x 2.1M<br />
• Available unstained or prestained<br />
Hardwood Sleeper<br />
Australian Hardwood is suitable<br />
for a wide range of landscaping<br />
applications such as garden edging<br />
or low retaining walls.<br />
• Available in 220 x 110 x 2.1M<br />
& 220 x 130mm x 2.1M<br />
DeWalt 305mm Slide<br />
Compound Mitre Saw DW718<br />
• 1600W belt drive mo<strong>to</strong>r<br />
• 4000rpm<br />
• 48° bevel left or right<br />
• Cuts up <strong>to</strong> 355mm x 50mm @ 90°<br />
5032174<br />
11
RETAINING<br />
BLOCKS<br />
Retaining block walls are perfect<br />
for creating boundary walls, a focal<br />
point or levelling off an area <strong>to</strong><br />
establish a lawn.<br />
There are many different looks you<br />
can create <strong>to</strong> establish interesting<br />
<strong>outdoor</strong> <strong>areas</strong> or “rooms” on a<br />
property. These will enhance <strong>your</strong><br />
overall design and add value <strong>to</strong><br />
<strong>your</strong> home.<br />
The new range of retaining wall<br />
products (available from December<br />
2011) are designed <strong>to</strong> add beauty<br />
and definition <strong>to</strong> <strong>your</strong> garden and<br />
larger structural projects.<br />
Dricon High<br />
Strength HandiCrete ®<br />
High strength concrete mix,<br />
formulated <strong>to</strong> reach a target<br />
strength of 40MPa in 28 days<br />
• Ideal for foundations, heavy<br />
duty paths, bridge repair<br />
work, bollards and block fill<br />
Drainage Coil<br />
Designed for the economic<br />
removal of excess ground<br />
water<br />
• Ideal for effluent soakage<br />
fields, retaining wall<br />
drainage and s<strong>to</strong>rmwater<br />
diversion<br />
• Available in diameters of<br />
65, 110 & 150mm<br />
HELPFUL HINTS<br />
• Terraced retaining walls will let<br />
more light in<strong>to</strong> an area rather<br />
than one high wall.<br />
• Raised beds showcase plants and<br />
are better for vegetable gardens<br />
in particular, as they improve<br />
drainage.<br />
• The modular shape and design of<br />
Firth retaining walls means you<br />
can install them <strong>your</strong>self<br />
• Retaining walls require little<br />
maintenance but if you need <strong>to</strong><br />
clean them, use a pre-emergent<br />
spray and low-pressure water<br />
Colours<br />
Available<br />
Rockface<br />
Granite<br />
Firth Ezi Wall<br />
Firth Keys<strong>to</strong>ne Sedona<br />
Retaining Block<br />
S<strong>to</strong>ne Retaining Block<br />
Easily constructed using the<br />
Virtually maintenance free.<br />
unique interlocking system<br />
Ideal for finishing <strong>your</strong> lawn<br />
• Suitable for low<br />
edge, for decorative tree<br />
freestanding retaining<br />
rings, planters or raised<br />
walls, garden edging or<br />
garden beds<br />
beds and tree wells<br />
• Builds wall up <strong>to</strong><br />
• Concave or convex curved<br />
300mm high<br />
walls up <strong>to</strong> 500mm high<br />
Colours<br />
• 5 units per lineal metre<br />
Available<br />
• 7 units per lineal metre or<br />
or 66 units per M 2<br />
57 units per M 2<br />
Rockface<br />
Granite<br />
Sands<strong>to</strong>ne<br />
Sands<strong>to</strong>ne<br />
New Range - Available in December 2011<br />
12<br />
Whilst every care has been taken <strong>to</strong> obtain an accurate representation, the colours shown here are subject <strong>to</strong> the limitations of the colour reproduction process.<br />
Visit <strong>your</strong> nearest <strong>PlaceMakers</strong> <strong>to</strong> view samples prior <strong>to</strong> ordering.
Grass Paver<br />
per m 2 =6<br />
Note; Available in<br />
natural only.<br />
Scoria<br />
• Ideal for bedding<br />
under constructions<br />
such as paving <strong>areas</strong><br />
or for drainage behind<br />
retaining walls and<br />
piping trenches<br />
Base Course Material<br />
• Can be compacted<br />
under pavers or cobbles<br />
prior <strong>to</strong> laying <strong>to</strong> give a<br />
firm solid foundation<br />
• Can also be used<br />
around pipes,<br />
compaction required<br />
HOW TO GUIDE<br />
For instructions on how<br />
<strong>to</strong> build <strong>your</strong> concrete<br />
block retaining wall,<br />
see our How To Guide<br />
available in-s<strong>to</strong>re or<br />
online at www.placemakers.co.nz<br />
KNOW<br />
HOW<br />
CARD<br />
SPEND *<br />
$<br />
250<br />
GET A<br />
$<br />
25<br />
*Terms and conditions apply.<br />
BONUS<br />
VOUCHER<br />
Don’t forget <strong>to</strong> use <strong>your</strong> Know How<br />
Card with every purchase.<br />
PROJECT CHECKLIST<br />
Materials<br />
It is best <strong>to</strong> purchase <strong>your</strong> retaining wall<br />
blocks from one place and from the<br />
same batch if possible. Below are <strong>your</strong><br />
three main materials:<br />
• Retaining wall blocks<br />
• Base course material<br />
• Drainage aggregate<br />
Tools<br />
• Tape measure • Pencil • Spade<br />
• Spirit level • Stakes & stringline<br />
• Hammer • Shovel • Gloves<br />
• Safety glasses • Masonry chisel<br />
• Compac<strong>to</strong>r • Wheelbarrow<br />
Large<br />
Small<br />
Colours<br />
Available<br />
Rockface<br />
Sands<strong>to</strong>ne<br />
Medium<br />
Firth Keys<strong>to</strong>ne Country<br />
Manor Retaining Block<br />
Three piece system lets you<br />
create <strong>your</strong> own laying pattern<br />
<strong>to</strong> achieve the look and feel of a<br />
natural s<strong>to</strong>ne wall<br />
• Builds walls up <strong>to</strong> 900mm<br />
high<br />
• 8.3 units per lineal metre<br />
or 66 per M 2<br />
• Retaining caps also available<br />
Colours<br />
Available<br />
Rockface<br />
Granite<br />
Firth Keys<strong>to</strong>ne Garden<br />
Firth Keys<strong>to</strong>ne Compac<br />
Wall Retaining Block<br />
IV Retaining Block<br />
Perfect for landscape walls,<br />
Perfect for those heavy duty<br />
tree rings, patio, lawn or edging,<br />
garden retaining walls<br />
and garden or flowerbed borders<br />
• Uses pins for<br />
• Builds straight, curved or<br />
additional stability<br />
terraced walls <strong>to</strong> fit the<br />
• Creates walls up <strong>to</strong> 1.2M<br />
con<strong>to</strong>urs of <strong>your</strong> garden.<br />
high (can go higher with<br />
• Builds wall up <strong>to</strong> 1000mm high<br />
specific design)<br />
• 3.33 units per lineal metre or Colours<br />
• 3 units per lineal metre<br />
33.3 per M 2 Available<br />
or 11 units per M 2<br />
Rockface • Retaining caps<br />
also available<br />
New Range - Available in December 2011 Sands<strong>to</strong>ne<br />
New Range - Available in December 2011 Sands<strong>to</strong>ne New Range - Available in December 2011<br />
Granite<br />
13
TIMBER<br />
FENCING<br />
Building a fence is not difficult.<br />
It requires just a few standard<br />
hand<strong>to</strong>ols (though a posthole borer<br />
and a circular saw will make the job<br />
easier) and a methodical approach.<br />
A “dry build” is a good idea - lay<br />
<strong>your</strong> fencing out before you start <strong>to</strong><br />
ensure measurements are correct.<br />
Classic Post Head Cap<br />
The Classic Post Head Cap will<br />
create a statement on any post.<br />
• Available <strong>to</strong> suit 100 x 75mm<br />
& 100 x 100mm posts<br />
Classic Acorn Post Cap<br />
The Classic Acorn will complement<br />
many fences, but is commonly<br />
used with picket fencing.<br />
• Available <strong>to</strong> suit 100 x 75mm<br />
& 100 x 100mm posts<br />
Classic Pyramid Post Cap<br />
The nice clean lines and peak of<br />
the Classic Pyramid Cap will<br />
complement any fence line.<br />
• Available <strong>to</strong> suit 100 x 100mm,<br />
125 x 125mm or 150 x 150mm posts<br />
Classic Dome Post Cap<br />
The Classic Dome will give the finishing<br />
<strong>to</strong>uches <strong>to</strong> any fence tall or short.<br />
• Available <strong>to</strong> suit 100 x 75mm<br />
or 100 x 100mm posts<br />
Classic Ball Post Cap<br />
The Classic Ball will complement any<br />
fence, but is commonly used <strong>to</strong> create<br />
a statement on an entrance way.<br />
• Available <strong>to</strong> suit 100 x 75mm<br />
& 100 x 100mm posts<br />
Classic Plain Post Cap<br />
The nice clean lines of the Classic<br />
Plain cap will complement any<br />
fence line.<br />
• Available <strong>to</strong> suit 100 x 75mm,<br />
100 x 100mm, 125 x 125mm<br />
& 150 x 150mm posts<br />
POSTS AND RAILS<br />
These form the framework for most<br />
styles like paling, picket and trellis<br />
fences. All timber posts must be at<br />
least H4 treated. H3.2 is adequate<br />
for rails. With both posts and rails,<br />
all cut ends should be treated with a<br />
timber preservative. Never sink the<br />
sawn end of a post in<strong>to</strong> the ground.<br />
FENCE PANELS<br />
Pre-made fence panels are a visually<br />
appealing product and offer the<br />
same security and shelter as a<br />
standard timber fence. Some types<br />
of fence panels can be difficult or<br />
impossible <strong>to</strong> cut <strong>to</strong> size, so take<br />
time <strong>to</strong> layout the fence properly and<br />
allow for the width of <strong>your</strong> panels.<br />
You will need help when attaching<br />
fence panels <strong>to</strong> the posts. There are<br />
a few options for fixing <strong>your</strong> fence<br />
panels depending on their size<br />
Rough Sawn<br />
Fence Palings<br />
• H3.2 treated<br />
radiata<br />
• Available in 12, 19<br />
or 25mm thickness<br />
• Lengths 1.2, 1.5,<br />
1.8, 2.4M<br />
12mm not available<br />
in 2.4M lengths<br />
Rustic Style<br />
Fence Palings<br />
• Similar <strong>to</strong> a standard<br />
fence paling except<br />
with one dog-eared end<br />
• H3.2 treated radiata<br />
• 19mm thickness<br />
available in 1.2, 1.5,<br />
1.8, 2.4M lengths<br />
Windsor<br />
Pickets – Colonial<br />
& Windsor<br />
• H3.2 treated radiata<br />
• Available in 0.9,<br />
1.0, 1.2, 1.5 and<br />
1.8M lengths<br />
and weight, so ask one of our<br />
staff members.<br />
Colonial<br />
14
Left unpainted or unstained, <strong>your</strong> new picket fence will change colour <strong>to</strong> a silvergrey,<br />
and may appear darker with time due <strong>to</strong> natural mould growth. Periodic light<br />
water blasting will res<strong>to</strong>re some natural colouring. Painted or stained fences will<br />
require recoating with time. When painting apply at least one coat <strong>to</strong> posts and<br />
pales before fi xing. That way no unpainted <strong>areas</strong> will show up when the timber<br />
naturally shrinks in summer.<br />
Please Note: As with all fences, check with <strong>your</strong> local council if it borders<br />
council property, find out about any height restrictions, and speak with any<br />
neighbours the fence will affect.<br />
“The most renewable natural resource” for more information visit our<br />
website www.nzwood.co.nz<br />
Please Note:<br />
Whilst the advice and recommendations contained in this brochure<br />
have been produced with proper care, they are offered only with the<br />
objective of assisting those interested in home improvement projects<br />
and <strong>PlaceMakers</strong> does not accept responsibility for the advice,<br />
recommendations, etc. contained herein.<br />
Updated: July 2008 (BSPG110116)<br />
www.placemakers.co.nz<br />
0800 KNOW HOW (0800 566 946)<br />
8. Use a spare picket as a spacer (see Illustration 4) and fi x the next picket<br />
using steps 2 through 7.<br />
Illustration 4: Use the thickness of one<br />
picket <strong>to</strong> space the pickets<br />
9. At a corner, set out the pickets as shown in Illustration 5.<br />
Illustration 5: Corner post<br />
While this brochure provides construction details<br />
for a simple picket fence, there are many variations<br />
<strong>to</strong> this design that can be used. Here are a couple of<br />
suggestions.<br />
Trimming the length of the intermediate pickets can give a graceful curving<br />
profile <strong>to</strong> the fence.<br />
Illustration 6: Pickets trimmed <strong>to</strong> give a curving profile<br />
Fix the rails between the posts and set them higher than the surrounding<br />
pickets. A simple groove cut in<strong>to</strong> the <strong>to</strong>p of the posts as a shadow line can<br />
provide decoration. Post caps that fi x <strong>to</strong> the <strong>to</strong>p of the fence.<br />
Posts are also available in a range of styles.<br />
Illustration 7: Pickets set between featured posts<br />
Illustration 8: Post caps in a variety of styles are available<br />
Fence Posts<br />
• H4 treated radiata<br />
• Available in 100 x 75mm<br />
or 100 x 100mm<br />
• Lengths 1.8, 2.4,<br />
2.7 or 3M<br />
Larger dimension posts<br />
and dressed are available<br />
on request.<br />
Fence Rails<br />
• H3.2 treated radiata<br />
• Available in 75 x 50mm<br />
or 100 x 50mm<br />
MAINTENANCE<br />
VARIATIONS<br />
CHANGE THE PROFILE<br />
VARIATIONS / MAINTENANCE<br />
BUILDING YOUR FENCE / VARIATIONS<br />
EMPHASISE THE POSTS<br />
PUTTING UP A<br />
PICKET<br />
FENCE<br />
YOUR COMPLETE HOW TO GUIDE<br />
HOW TO GUIDES<br />
For instructions on how <strong>to</strong> build <strong>your</strong><br />
fence, see our How To Guides<br />
available in-s<strong>to</strong>re or online at<br />
www.placemakers.co.nz<br />
KNOW<br />
HOW<br />
CARD<br />
SPEND *<br />
$<br />
250<br />
GET A<br />
$<br />
25<br />
*Terms and conditions apply.<br />
BONUS<br />
VOUCHER<br />
Don’t forget <strong>to</strong> use <strong>your</strong> Know How<br />
Card with every purchase.<br />
PROJECT CHECK LIST<br />
Materials<br />
• Fence post • Fence rails<br />
• Nails • Concrete<br />
• Timber pegs • Timber preservative<br />
• Timber fencing (paling, panels or pickets)<br />
• Post caps<br />
Tools<br />
• Stringline • Tape measure<br />
• Set square • Hammer<br />
• Spirit level • Adjustable wrench<br />
• Hand saw/circular saw<br />
• Spade/post hole borer<br />
Picket Fence Panel<br />
These picket panels are easy<br />
<strong>to</strong> install and are the fastest<br />
way <strong>to</strong> put up a picket fence.<br />
It has been preservative<br />
treated <strong>to</strong> withstand the<br />
weather and is fastened<br />
<strong>to</strong>gether with rust-proof<br />
galvanized nails.<br />
• Available in 1.2M x 900mm<br />
& 1.8M x 900mm<br />
Danube Fence Panel<br />
Lakeview Fence Panel<br />
Verda Pre-Finished<br />
Fence Panels<br />
Verda’s superior quality preconstructed<br />
fence panels can be<br />
used as fences, screens, dividers,<br />
and <strong>to</strong> create sheltered <strong>areas</strong>.<br />
• H3.2 TanE treatment – 25 year<br />
guarantee against rot and<br />
insect attack*<br />
• Available in 1.2M x 900mm,<br />
1.2M x 1.8M, 1.8M x 900mm<br />
or 1.8M x 1.8M<br />
• Chromium & arsenic free<br />
* Subject <strong>to</strong> conditions – see guarantee<br />
on www.verda.co.nz for more details<br />
Trellis Top Fence Panels<br />
These panels are popular<br />
in creating privacy screens,<br />
weather screens, fence panels<br />
and gate panels.<br />
• H3.2 treated radiata<br />
• Available in various sizes in<br />
diagonal, square, vertical or<br />
horizontal trellis <strong>to</strong>p<br />
15
TIMBER<br />
FENCING<br />
SYSTEMS<br />
Frontier Gates<br />
The Fentec Frontier gives a drawing appeal<br />
<strong>to</strong> any entrance way.<br />
• Constructed from H3.2 KD pine, using the mortise<br />
and tenon joint system<br />
Gate Hardware<br />
<strong>PlaceMakers</strong> provide a <strong>complete</strong> range<br />
of fence and gate hardware with a<br />
variety of options <strong>to</strong> suit <strong>your</strong> particular<br />
requirements.<br />
TIMBER FENCES<br />
AND GATES<br />
Double Driveway Gate<br />
Pedestrian Gate<br />
<strong>PlaceMakers</strong> provide quality<br />
timber fences and gates. These<br />
are commonly suited for farms and<br />
lifestyle blocks.<br />
Our designs suit pedestrian gates,<br />
double swing gates, super single swing<br />
and double or single sliding gates.<br />
You can also have a gate made <strong>to</strong><br />
any size you require, <strong>to</strong> <strong>your</strong> own<br />
individual design or with a con<strong>to</strong>ured<br />
lower and/or upper edge <strong>to</strong><br />
accommodate a sloping driveway or<br />
fence-line.<br />
PROJECT CHECKLIST<br />
Materials<br />
• Gate posts • Fence posts<br />
• Fence panels • Gates<br />
• Post caps • Fence panel fixings<br />
• Tek screw • Concrete<br />
• Gate hardware set/s<br />
Tools<br />
• Shovel • Wheelbarrow<br />
• Spade • 10mm drill bit<br />
• Level • String line<br />
• Pegs • Hammer<br />
• Crescent • Drill<br />
Double Driveway Gate<br />
Gate Panel<br />
Double Driveway Gate<br />
Homestyle Fence<br />
Panel & Gates<br />
The Fentec Homestyle<br />
design will complement<br />
any fence line.<br />
• Constructed from<br />
H3.2 KD pine, using<br />
the mortise and tenon<br />
joint system<br />
• Available in 1.2, 1.5<br />
& 1.8M heights<br />
Manor Fence<br />
Panel & Gates<br />
The Fentec Manor design<br />
will suit a high or low<br />
fence line giving security<br />
yet a nice open appeal.<br />
• Constructed from<br />
H3.2 KD pine, using<br />
the mortise and tenon<br />
joint system<br />
• Available in 1.2, 1.5<br />
& 1.8M heights<br />
Double Gate<br />
Gate Panel<br />
Double Driveway Gate<br />
Pool Fence<br />
Panel & Gates<br />
The Fentec Pool design<br />
is ideal for around<br />
swimming and<br />
spa pool.<br />
• Constructed from<br />
H3.2 KD pine, using<br />
the mortise and tenon<br />
joint system<br />
• Available in 1.2, 1.5<br />
& 1.8M heights<br />
Cottage Fence<br />
Panel & Gates<br />
The Fentec Cottage is<br />
a nice finish fence line<br />
design.<br />
• Constructed from H3.2<br />
KD pine, using the<br />
mortise and tenon<br />
joint system<br />
• Available in 1.2, 1.5<br />
& 1.8M heights<br />
Gate<br />
Panel<br />
Gate<br />
Panel<br />
16
Dricon RapidSet TM<br />
• Quality concrete that is<br />
designed <strong>to</strong> harden in<br />
15 minutes<br />
• Formulated <strong>to</strong> reach target<br />
strength of 12.5MPa in<br />
28 days<br />
• Ideal for fence posts, small<br />
washing lines and non<br />
structural applications<br />
such as letterboxes placed<br />
in<strong>to</strong> soils<br />
Fence Brackets<br />
• The brackets are<br />
tek screwed in<strong>to</strong> the<br />
post with the Panel<br />
rail fitting in<strong>to</strong> the<br />
bracket<br />
• Comes in a pack of<br />
4 brackets with 10<br />
tek screws<br />
VALU GATES<br />
& FENCING<br />
METAL<br />
FENCING<br />
SYSTEMS<br />
VALU Fencing is <strong>your</strong> time and<br />
cost saving alternative. With<br />
standard sizes and one colour, the<br />
popular VALU range satisfi es all.<br />
Installation is a breeze with all our<br />
DIY friendly hardware.<br />
• Aluminium - Lightweight<br />
• Welded Construction - Strength<br />
• Powder Coated Black - Durability<br />
• Designed <strong>to</strong> New Zealand<br />
manufacturers standard.<br />
VALU gates and fencing are<br />
compliant with ‘The Fencing of<br />
Swimming Pools act 1987’.<br />
Panel<br />
Double Gate<br />
Secura 15<br />
KNOW<br />
HOW<br />
CARD<br />
SPEND *<br />
$<br />
250<br />
GET A<br />
$<br />
25<br />
VOUCHER<br />
BONUS<br />
*Terms and conditions apply.<br />
Don’t forget <strong>to</strong> use <strong>your</strong> Know How<br />
Card with every purchase.<br />
Gate<br />
Gate<br />
Panel<br />
Secura 18<br />
PROJECT CHECKLIST<br />
Valu Plain style<br />
Panels can be used as boundary<br />
or pool fencing<br />
• Available in a fence panel<br />
and single gate<br />
• Panels available in 1.2 x 2.4M<br />
• Single gate available in<br />
1.2M x 900mm<br />
• Powder coated black<br />
Valu Duo style<br />
Panels can be used as boundary<br />
or pool fencing<br />
• Available in a fence panel,<br />
driveway gate and pedestrian gate<br />
• Driveway gate available in 6 sizes<br />
• Pedestrian gate available in 3 sizes<br />
• Powder coated black<br />
Valu Secura style<br />
The ultimate in security fencing<br />
• Panels available in 2.4 x 1.5M<br />
or 2.4 x 1.8M<br />
• A wide range of gates can be<br />
cus<strong>to</strong>m made <strong>to</strong> match<br />
• Available in single, double,<br />
swing or sliding<br />
• Powder coated black<br />
Materials<br />
• Fence panels • Fence posts<br />
• Rail brackets • Tek screws<br />
• Concrete<br />
Tools<br />
• Battery drill • Tape measure<br />
• Level • Shovel<br />
17
CLEAR<br />
FENCING<br />
Clear fencing gives a stylish, clean<br />
look <strong>to</strong> boundaries surrounding pools<br />
and other <strong>outdoor</strong> <strong>areas</strong>.<br />
ClearVue Acrylic Fencing<br />
PSP ClearVue Acrylic Pool Fencing allows you <strong>to</strong> enjoy the unobstructed<br />
views you desire without breaking the bank. Utilising Plexiglas Acrylic<br />
sheets and powder coated aluminium posts and rails, you get a shatter<br />
proof guarantee, easy installation you can do <strong>your</strong>self and long lasting<br />
good looks.<br />
• 2 types of fixing, in ground or base plates<br />
• Impact resistance<br />
It enhances the look of <strong>your</strong> <strong>outdoor</strong><br />
living space whilst still maintaining<br />
the safety and security required by<br />
a standard pool fence.<br />
<strong>PlaceMakers</strong> now offers three different<br />
options of clear fencing <strong>to</strong> suit a range<br />
of <strong>outdoor</strong> environments.<br />
• ClearVue Acrylic Fencing<br />
• FD Semi Frameless Glass Fencing<br />
• FD Frameless Glass Fencing<br />
GLASS FENCING<br />
PROJECT CHECKLIST<br />
Materials<br />
• Fence panels<br />
• Glazing post or spigots<br />
• Glazing kit<br />
• Glass gate kit<br />
Tools<br />
• Tape measure<br />
• Post hole shovel<br />
• Cordless battery drill<br />
• Spirit level<br />
• Stanley knife<br />
• Hacksaw/angle grinder<br />
Glass hinge<br />
Glass gate latch<br />
Semi Frameless<br />
Glass Fencing<br />
The semi frameless<br />
glass fencing system<br />
uses 10mm <strong>to</strong>ughened<br />
glass panels, combined<br />
with powder coated<br />
aluminium glazing posts.<br />
This fencing comes in<br />
two types:<br />
• FDF 100 series, with<br />
post height in line with<br />
the height of the glass.<br />
• FDF 75 series, with<br />
posts set approximately<br />
100-130mm from the<br />
<strong>to</strong>p of the panels.<br />
Stainless steel<br />
spigot fixes fence<br />
panel in place<br />
Frameless Glass<br />
Fencing<br />
FDF 12mm <strong>to</strong>ughened<br />
frameless glass fencing<br />
combines luxury, beauty,<br />
design and safety in<br />
a modular system that<br />
has been designed<br />
<strong>to</strong> meet pool safety<br />
standards while easily<br />
accommodating <strong>your</strong><br />
installation plans.<br />
• Uses modern 316<br />
grade stainless steel<br />
spigots and fixings for<br />
strength and longevity.<br />
18
Dricon RapidSet TM<br />
• Quality concrete that is<br />
designed <strong>to</strong> harden in 15<br />
minutes<br />
• Formulated <strong>to</strong> reach target<br />
strength of 12.5MPa in 28 days<br />
• Ideal for fence posts, small<br />
washing lines and non<br />
structural applications such as<br />
letterboxes placed in<strong>to</strong> soils<br />
Fence Post<br />
• H4 treated radiata<br />
• Available in 100 x 75mm<br />
or 100 x 100mm<br />
• Lengths 1.8, 2.4,<br />
2.7 or 3M<br />
Larger dimension posts<br />
and dressed are available<br />
on request.<br />
TRELLIS<br />
Trellis comes in a variety of patterns<br />
including square, diagonal and<br />
venetian. They all offer a lighter,<br />
airier alternative <strong>to</strong> the traditional<br />
fences. You can also combine trellis<br />
with palings <strong>to</strong> create a trellis -<br />
<strong>to</strong>pped paling fence which gives<br />
you the best of both worlds.<br />
KNOW<br />
HOW<br />
CARD<br />
SPEND *<br />
$<br />
250<br />
GET A<br />
$<br />
25<br />
*Terms and conditions apply.<br />
BONUS<br />
VOUCHER<br />
Don’t forget <strong>to</strong> use <strong>your</strong> Know How<br />
Card with every purchase.<br />
PROJECT CHECKLIST<br />
Materials<br />
• Nails<br />
• Pegs<br />
Framed<br />
Unframed<br />
Framed<br />
Unframed<br />
Venetian<br />
Vertical Trellis<br />
A great feature in any<br />
garden or landscape<br />
project. Can be used<br />
<strong>to</strong> contrast horizontal<br />
structures such<br />
as a vegetable garden.<br />
• Available in framed<br />
or unframed<br />
• H3.2 treated radiata<br />
Diagonal Trellis<br />
The diagonal pattern is<br />
suitable for all situations.<br />
It can be used as support<br />
for climbing plants and<br />
windbreak. It is self<br />
bracing and tends not<br />
<strong>to</strong> sag with time.<br />
• Available in framed<br />
or unframed<br />
• H3.2 treated radiata<br />
Framed<br />
Unframed<br />
Framed<br />
Unframed<br />
Venetian<br />
Horizontal Trellis<br />
Sophisticated and<br />
stylish. Can be used <strong>to</strong><br />
compliment horizontal<br />
structures such as houses<br />
with venetian blinds or<br />
shiplap cladding.<br />
• Available in framed<br />
or unframed<br />
• H3.2 treated radiata<br />
Square Trellis<br />
Traditional and<br />
conservative. Can be<br />
used in <strong>to</strong>day’s modern<br />
building designs.<br />
• Available in framed or<br />
unframed<br />
• H3.2 treated<br />
radiata<br />
• H4 treated fence post<br />
• Concrete <strong>to</strong> set the posts<br />
• Timber preservative<br />
Tools<br />
• Stringline<br />
• Spirit level<br />
• Shovel<br />
• Hammer<br />
• Spade or post hole borer<br />
• Hand saw or circular saw<br />
• Tape, square and pencil<br />
HOW TO GUIDES<br />
For instructions on how <strong>to</strong> install<br />
<strong>your</strong> trellis, see our How To Guides<br />
available in-s<strong>to</strong>re or online at<br />
www.placemakers.co.nz<br />
19
WIRE<br />
FENCING &<br />
NETTING<br />
<strong>PlaceMakers</strong> offers the full range<br />
of wire fencing and netting<br />
products <strong>to</strong> suit cus<strong>to</strong>mers from<br />
the casual DIY’er <strong>to</strong> the serious<br />
tradesman.<br />
Wire Coil<br />
Lightweight 5kg coils<br />
reduce waste for fencing<br />
and gardening projects.<br />
Great for grape and kiwi<br />
fruit vines. Zinc/Aluminium<br />
coated for long life.<br />
Available in 1.6mm, 2mm,<br />
3.15mm & 4mm diameters.<br />
Bag Ties<br />
The fast and effective<br />
accessory for bag<br />
closures and attaching<br />
Chainlink, Netting and<br />
Mesh fencing products<br />
<strong>to</strong> support structures.<br />
Bag Tie Tool also<br />
available.<br />
WIRE NETTING<br />
& CHAINLINK<br />
Hex netting, square welded mesh<br />
and chainlink wire are versatile<br />
products that can be used in<br />
a number of applications from<br />
boundary fencing <strong>to</strong> pet enclosures<br />
or general garden use.<br />
We can supply product in different<br />
heights, lengths and gauges <strong>to</strong> suit<br />
the requirements of any job. From<br />
1M cut lengths <strong>to</strong> full 50M rolls and<br />
mesh heights of 100mm <strong>to</strong> 2M.<br />
FENCING WIRE<br />
<strong>PlaceMakers</strong> supplies everything you<br />
need for <strong>your</strong> wire fencing project.<br />
From steadfast high tensile wire <strong>to</strong><br />
the humble No. 8 wire (now known<br />
as 4mm low tensile wire). We supply<br />
wire that is made from durable zinc<br />
alloy coated steel suitable for harsh<br />
New Zealand climates.<br />
<strong>PlaceMakers</strong> offers competitive<br />
quotes on wire fencing and wire<br />
mesh products for larger projects.<br />
Please speak <strong>to</strong> <strong>your</strong> local branch<br />
for a quote.<br />
Y Post<br />
Fantastic for permanent<br />
and temporary fencing<br />
and garden projects.<br />
Also known as waratahs.<br />
• Available 1.35M,<br />
1.50M, 1.65M, 1.80M<br />
& 2.40M heights<br />
• Ram or hammer in<strong>to</strong><br />
the soil<br />
• Wire spacing holes<br />
allow easy attachment<br />
Hex Netting<br />
Perfect for pet shelters,<br />
cages, garden trellises<br />
and fencing. Also known<br />
as chicken wire.<br />
• Range from 100mm<br />
<strong>to</strong> 2M hight options<br />
• Manufactured from<br />
durable heavy duty<br />
steel<br />
Chainlink Fencing<br />
Great for gardens,<br />
fences and tennis courts.<br />
• Available in zinc alloy<br />
and pvc protective<br />
coatings<br />
• Colour co-ordinated<br />
with a choice of<br />
galvanised, black and<br />
green colour options<br />
• Range from 900mm <strong>to</strong><br />
1.8M height options<br />
Square Mesh<br />
Netting<br />
Perfect netting for cages,<br />
aviaries, boundaries and<br />
tree protection.Often<br />
called Aviary Mesh.<br />
• 3 colours- galv, black<br />
and green<br />
• Available in 900mm<br />
height & 5M, 30M<br />
lengths or cut <strong>to</strong> length<br />
20<br />
Cut <strong>to</strong> length option may not be available in all branches.
• Is it spaced correctly Measure from reference point multiplying the<br />
spacing by the number of gaps.<br />
• Does it follow the fenceline Use packers against both stringlines.<br />
• Is it tall enough Measure from the stringline <strong>to</strong> the <strong>to</strong>p of the post.<br />
• Is it vertical Check the side of each post with a spirit level.<br />
5. With posts braced in position, fill the holes with concrete as with end posts.<br />
Recheck as in Step 4 above and if necessary adjust and rebrace.<br />
6. Leave 7 days for the concrete <strong>to</strong> harden. If you also intend <strong>to</strong> pour a mowing<br />
strip along the fenceline, do it now.<br />
Once the concrete has set hard you can start fitting the rails.<br />
Check each of the posts and make sure they are firm in the ground. If there is<br />
any movement, brace the post with temporary bracing. This will hold it steady<br />
until the rails are fixed. The posts can now be trimmed <strong>to</strong> the post height.<br />
1. Fix the stringline <strong>to</strong> both of the end posts at the post height, and mark<br />
this height on all posts. On a level site use a square. On a sloping site the<br />
rails won’t be at right angles <strong>to</strong> the posts. In that case follow the stringline.<br />
Before taking the stringline down, check the height again.<br />
2. Once you have checked that the heights are marked correctly on all posts<br />
trim the posts at height marks.<br />
There are different ways of fixing the rails <strong>to</strong> the fence posts and the<br />
method you use will depend on the type of fence you are building. The<br />
major difference between rail fixing methods is:<br />
• the rails are fixed <strong>to</strong> the outside of the posts,<br />
• the rails are fixed between the posts,<br />
• or, the rails are checked in <strong>to</strong> the posts.<br />
In this method the rails run from the centre of one post <strong>to</strong> the centre of the next.<br />
If the timber you are using is long enough, you can run the rails across three<br />
posts. The procedure is similar whether you are fixing <strong>to</strong> the face of the post or<br />
the <strong>to</strong>p of the post (see Illustrations 5 & 6).<br />
1. On a level site, trim one end of the first rail square. On a sloping site support<br />
the rail in the correct position against the posts and mark the cutting angle.<br />
Transfer that angle <strong>to</strong> a piece of scrap timber and use it <strong>to</strong> ensure all cuts<br />
are the same.<br />
Illustration 6<br />
Rails fixed<br />
<strong>to</strong> face of post<br />
Rails fixed<br />
<strong>to</strong> face of post<br />
Illustration 5: Rails fixed outside post<br />
Centre <strong>to</strong> Centre<br />
Centre <strong>to</strong> Centre<br />
Rails fixed on<br />
<strong>to</strong>p of post<br />
Rails fixed on<br />
<strong>to</strong>p of post<br />
2. Fix a block <strong>to</strong> the first post <strong>to</strong> support the rail at the correct fixing height<br />
(see Illustrations 7 & 8). The rail should be held flush with the leading edge<br />
of the first post and the rail then marked at the centre of the joining post.<br />
3. Cut the rail <strong>to</strong> that mark and then nail in<strong>to</strong> the correct position.<br />
4. Remove the supporting block from the first post, and repeat the whole<br />
process for the rest of the rails.<br />
Illustration 7: Packer <strong>to</strong> support fence rail<br />
Illustration 8<br />
Measure distance<br />
between posts<br />
Position of fence rail<br />
In this method the rails run between the posts. The procedure is similar whether<br />
you are fixing the rails <strong>to</strong> be flush with the face, or setback from the face<br />
(see Illustration 9).<br />
Rails fixed flush<br />
with face<br />
Illustration 9: Rails fixed between post<br />
Rails fixed back<br />
from face<br />
1. On a level site, trim one end of the first rail square. On a sloping site<br />
support the rail in the correct position against the posts and mark the<br />
cutting angle.<br />
Transfer that angle <strong>to</strong> a piece of scrap timber and use it <strong>to</strong> ensure all cuts<br />
are the same.<br />
2. Lay the rail on the ground against the base of the first post and mark it<br />
against the edge of the next post in the line (see Illustration 10).<br />
Illustration 10: Marking length of rail between posts<br />
3. Cut the rail <strong>to</strong> that mark.<br />
4. Nail a supporting block <strong>to</strong> each post and place the rail in its correct position.<br />
5. Skew nail the rail <strong>to</strong> the post using at least 4 nails.<br />
6. Remove the supporting block from the first post and repeat the process for<br />
the rest of the rails.<br />
Edgelock Polycarbonate Roofing<br />
Edgelock is a simple flat roof system, offering a solution for<br />
domestic and residential applications.<br />
• Easy <strong>to</strong> install<br />
• Low maintenance<br />
• Very durable giving <strong>your</strong> next DIY project a unique look<br />
without the cost attached<br />
• Suitable for pergolas, sunrooms, porches, carports and<br />
can also be used as fencing<br />
• Available in 2.4, 3 & 3.6M lengths<br />
• Available in 300 or 600mm widths<br />
TRANSLUCENT<br />
ROOFING<br />
PERGOLAS<br />
Pergolas are a useful and attractive<br />
addition <strong>to</strong> any garden setting. They<br />
offer a focus and architectural form in<br />
a flat garden. They can also provide<br />
shelter over a doorway or can be<br />
used as gazebo when a roof in clear<br />
corrugated material is added.<br />
FIXING THE RAILS<br />
INSTRUCTIONS<br />
INSTRUCTIONS<br />
Twice the rail<br />
thickness<br />
INSTRUCTIONS<br />
BETWEEN POST FIXING<br />
INSTRUCTIONS / TIMBER SELECTION GUIDE<br />
INSTALLING<br />
POSTS<br />
& RAILS<br />
YOUR COMPLETE HOW TO GUIDE<br />
OUTSIDE POST FIXING &<br />
CHECKED IN FIXING<br />
a<br />
Sunlite PVC Roofing<br />
Sunlite is a light blue, easy<br />
<strong>to</strong> install, low cost corrugated<br />
sheet.<br />
• 690mm wide<br />
• Available in 1.8, 2.4,<br />
3 & 3.6M lengths<br />
• Ideal for pergolas<br />
and carports<br />
Suntuf Polycarbonate<br />
Roofing<br />
As the name suggests, Suntuf<br />
is a <strong>to</strong>ugh polycarbonate<br />
product designed <strong>to</strong> offer<br />
year-round protection from<br />
the harsh New Zealand<br />
environment.<br />
• 860mm wide<br />
• Available in various lengths<br />
from 1.8 – 6M<br />
• Ideal for roofing, external<br />
cladding, veranda covers<br />
and carports<br />
Tufclad Ultra<br />
Polycarbonate Roofing<br />
Tufclad Ultra is a cost<br />
effective polycarbonate sheet<br />
that offers all-weather<br />
protection.<br />
• Excellent UV ray resistance<br />
(up <strong>to</strong> 99.9%)<br />
• Super strong and durable<br />
• Suitable for pergolas,<br />
sunrooms, porches<br />
and carports<br />
Clearvue Polycarbonate<br />
Roofing<br />
Clearvue is a high quality<br />
product with the fantastic<br />
seamless, flat look of glass.<br />
• Very high impact<br />
resistance<br />
• Sleek modern look<br />
• Easy installation<br />
• Very adaptable<br />
• High UV protection<br />
• Solid, flat sheeting<br />
HOW TO GUIDES<br />
For instructions on how <strong>to</strong> build<br />
<strong>your</strong> pergola or install <strong>your</strong> posts<br />
and rails, see our How To Guides<br />
available in-s<strong>to</strong>re or online at<br />
www.placemakers.co.nz<br />
PROJECT CHECKLIST<br />
Materials<br />
• Nails • Pegs<br />
• H3.2 bearers • H3.2 rafters<br />
• Concrete <strong>to</strong> set the posts<br />
• H5 treated post<br />
• Timber preservative<br />
Tools<br />
• Electric drill • Shovel • Hammer<br />
• Sand paper • G or F clamps<br />
• Stringline • Old paintbrush<br />
• Spirit level • Adjustable spanner<br />
• Spade or post hole borer<br />
• Hand saw or circular saw<br />
• Tape, square and pencil<br />
• Jigsaw if cutting curves on<br />
ends or rafters (optional)<br />
21
LANDSCAPING<br />
AGGREGATES<br />
Bark<br />
Bark chips & nuggets are suitable for all<br />
landscaping applications.<br />
• Fine bark size is 10-15mm, medium size is<br />
15-25mm and bark nuggets size is 25-50mm.<br />
Topsoil<br />
Used for <strong>to</strong>pping up existing garden bedding,<br />
use in new garden bedding, lawn maintenance<br />
& general garden soil repair.<br />
Our range of decorative landscape<br />
products will add visual appeal <strong>to</strong><br />
any <strong>outdoor</strong> area. Finish off <strong>your</strong><br />
project in style and add value<br />
<strong>to</strong> <strong>your</strong> home with any one or a<br />
combination of our decorative<br />
bagged or bulk products.<br />
We also supply a <strong>complete</strong> range<br />
of aggregate and garden soil<br />
products for use in the construction<br />
and completion of <strong>your</strong> <strong>outdoor</strong><br />
landscaping project.<br />
<strong>PlaceMakers</strong> supplies landscaping<br />
aggregates in bulk and bagged<br />
sizes, ranging from 20kg <strong>to</strong> large<br />
1M 3 bulk bags.<br />
Bulk bags are designed for efficient<br />
transport and s<strong>to</strong>rage of bulk<br />
materials. They are made from high<br />
strength woven polypropylene. The<br />
benefits of using bulk bags include:<br />
• Protection of the product from<br />
contamination and the elements<br />
• Efficient use of space<br />
They are ideal for use on building<br />
sites or in exposed <strong>areas</strong>.<br />
Crushed Shell<br />
Use crushed shell <strong>to</strong> make a seashell<br />
path, for display in pots or planters,<br />
petanque courts or use as a decorative<br />
landscaping product.<br />
• Dries <strong>to</strong> a very white colour<br />
• 7-13mm in size<br />
Flat Grey Beach S<strong>to</strong>ne<br />
Flat Grey Beach S<strong>to</strong>nes create a<br />
stunning look for around professionally<br />
designed entrance ways, pool surrounds<br />
or <strong>outdoor</strong> fireplaces.<br />
• Small grade s<strong>to</strong>nes are 30-80mm<br />
• Medium grade s<strong>to</strong>nes are 80-150mm<br />
White Chip<br />
Use white chip <strong>to</strong> make a garden<br />
path, landscaped parking area<br />
or as a bulk landscaping<br />
mulch product.<br />
• 6-16mm in size<br />
22<br />
Bulk Bag
Sand<br />
Commonly used as a base underneath pavers.<br />
Sand is usually laid on <strong>to</strong>p of <strong>your</strong> compacted base<br />
course, but underneath <strong>your</strong> pavers or cobbles<strong>to</strong>nes.<br />
Waterworn S<strong>to</strong>nes<br />
Create a natural pathway<br />
with these beautiful s<strong>to</strong>nes<br />
• Fast and easy <strong>to</strong> lay<br />
• Extremely durable<br />
• Low maintenance<br />
KNOW<br />
HOW<br />
CARD<br />
SPEND *<br />
$<br />
250<br />
GET A<br />
$<br />
25<br />
VOUCHER<br />
BONUS<br />
*Terms and conditions apply.<br />
Don’t forget <strong>to</strong> use <strong>your</strong> Know How<br />
Card with every purchase.<br />
PROJECT CHECKLIST<br />
Materials<br />
• Landscape mix<br />
• Weedmat<br />
• Weedmat pins<br />
Tools<br />
• Spade or shovel<br />
• Rake<br />
• Gloves<br />
• Wheelbarrow<br />
FREE TRAILER HIRE<br />
Need help getting <strong>your</strong> landscaping<br />
supplies home<br />
<strong>PlaceMakers</strong> offers free trailer hire<br />
<strong>to</strong> cus<strong>to</strong>mers <strong>to</strong> help with transport of<br />
heavy or bulky loads of product.<br />
River Pebble<br />
Use in pots, planters or as a ground cover for<br />
feature rock gardens.<br />
Available in three different sizes<br />
• Small grade pebbles 13mm<br />
• Medium grade pebbles 20-40mm<br />
• Large grade pebbles 60-150mm<br />
Waitaha Crushed S<strong>to</strong>ne<br />
A rugged nugget-like s<strong>to</strong>ne, from the<br />
Waitaha River in the west coast of the<br />
South Island. Mainly used for decorative<br />
purposes, they look fantastic in planter<br />
boxes, as ground cover or in water features<br />
• 20-60mm in size<br />
River Pebble Irish Gold<br />
Irish Gold River Pebble is smooth<br />
in texture and is sourced from the<br />
Coromandel region of New Zealand.<br />
Commonly used as decorative garden<br />
cover or as a path and courtyard cover<br />
Available in two grades<br />
• 12-20mm in size<br />
• 20-40mm in size<br />
23
OUTDOOR<br />
FABRIC<br />
SHEETING<br />
<strong>PlaceMakers</strong> offers a wide array<br />
of <strong>outdoor</strong> fabric sheeting suitable<br />
for applications from residential<br />
landscaping <strong>to</strong> commercial<br />
construction <strong>to</strong> horticultural and<br />
agricultural purposes.<br />
Polythene<br />
General purpose polythene.<br />
Suitable for drop sheets,<br />
covering, damp proof<br />
course, concrete underlay,<br />
insulation. Available in<br />
black and clear.<br />
• Available in 5, 10, 15,<br />
25, 50 & 100M lengths<br />
Muds<strong>to</strong>p<br />
Non-woven polyester<br />
suitable for applications for<br />
drainage behind retaining<br />
walls, driveway construction,<br />
underneath gravel pathways,<br />
roof gardens/atriums and a<br />
number of other applications.<br />
• Available in 10, 50 or<br />
100M rolls or cut <strong>to</strong> length<br />
PLANT PROTECTION<br />
Our range of fabric sheeting helps<br />
you <strong>to</strong> create optimal conditions<br />
for improved plant growth and<br />
maintenance. Shadecloth and<br />
windbreak provide protection<br />
above the ground from wind,<br />
rain and the sun, while weedmat<br />
provides protection below the<br />
ground by impeding weeds and<br />
maintaining ideal soil conditions<br />
for growth.<br />
BUILDING<br />
CONSTRUCTION<br />
We supply product that is ideal<br />
for building sites, that is able <strong>to</strong><br />
maintain a protective barrier from<br />
mud and soil, preventing excessive<br />
moisture and allowing drainage<br />
<strong>to</strong> occur.<br />
Please contact <strong>PlaceMakers</strong><br />
<strong>to</strong> discuss <strong>your</strong> needs.<br />
Weedmat<br />
Woven design allows water<br />
and air <strong>to</strong> drain reducing the<br />
risk of root rot and ponding<br />
of water.<br />
• Woven polypropylene<br />
construction<br />
• UV stabilised<br />
• Available in 10, 25 &<br />
50M rolls or cut <strong>to</strong> length<br />
Windbreak<br />
An ideal permanent shelter<br />
from the wind or can be used<br />
as a temporary shelter until<br />
plants and trees become<br />
established.<br />
• Available in 20 & 50M<br />
lengths or cut <strong>to</strong> length<br />
Plastic Pins<br />
Weedmat Pins<br />
Used <strong>to</strong> secure weedmat <strong>to</strong><br />
the ground.<br />
• Available in galvanised<br />
steel or plastic<br />
• Available in packs of 20,<br />
100 or 1000 pins<br />
• 130mm in size<br />
Shadecloth<br />
Used as a cover <strong>to</strong> reduce<br />
the effect of light and heat<br />
from the sun.<br />
• Available in black,<br />
green and white<br />
• Available in 50M roll<br />
or cut <strong>to</strong> length<br />
24<br />
Cut <strong>to</strong> length option may not be available in all branches.
H<br />
3 . 2<br />
TIMBER SELECTION GUIDE<br />
For wood exposed <strong>to</strong> the weather<br />
but not in ground contact.<br />
H<br />
4<br />
H<br />
5<br />
APPLICATION<br />
TYPICAL USES<br />
• Decking / Joists / Bearers<br />
• Fence palings, fence rails<br />
and trellis<br />
• Cladding<br />
TIMBER<br />
TREATMENT<br />
CONSUMER<br />
INFORMATION AND<br />
HANDLING GUIDE<br />
FOR CCA PRESSURE<br />
TREATED TIMBER<br />
The Chromated Copper Arsenate<br />
(CCA) preservative used <strong>to</strong> treat<br />
<strong>outdoor</strong> Radiata Pine reacts with the<br />
wood <strong>to</strong> form chemical complexes<br />
that are highly insoluble and leach<br />
resistant. The CCA preservative<br />
penetrates deeply in<strong>to</strong> and will<br />
remain in the wood for a long<br />
period of time. However, some<br />
preservative may migrate from the<br />
preserved wood in<strong>to</strong> surrounding<br />
soil over time and there may also be<br />
incidental contact with skin during<br />
construction or use.<br />
APPLICATION<br />
For wood exposed <strong>to</strong> the weather<br />
and in ground contact.<br />
APPLICATION<br />
For wood exposed <strong>to</strong> the<br />
weather, in ground and fresh<br />
water contact; and in high<br />
risk, load-bearing structural<br />
applications.<br />
TYPICAL USES<br />
Non structural use.<br />
• Fence posts<br />
• Pergola posts<br />
• Retaining wall TGV and lumber<br />
TYPICAL USES<br />
• Piles (house foundations,<br />
retaining walls and decking piles)<br />
• Vineyard supports<br />
• Verandah posts<br />
• Poles<br />
RECOMMENDATIONS<br />
• Do not burn preserved wood (See<br />
Disposal information below)<br />
• Wear a dust mask (P1 or better – AS/<br />
ZS 1716) and goggles when cutting or<br />
handling wood<br />
• Wear gloves when working with wood<br />
• All sawdust and construction debris<br />
should be cleared up and disposed of<br />
after construction<br />
• After working with the wood wash<br />
exposed <strong>areas</strong> thoroughly<br />
• Wash work clothes separately from other<br />
household clothing before reuse<br />
• Preserved wood should not be used<br />
where it may come in<strong>to</strong> direct or indirect<br />
contact with drinking water exp for uses<br />
involving incidental contact such as fresh<br />
water docks and bridges<br />
• Do not use preserved wood under<br />
circumstances where the preservative may<br />
become a component of food, animal<br />
feed or beehives<br />
• Do not use preserved wood for mulch<br />
• Only preserved wood that is visibly clean<br />
and free of surface residue should be<br />
used for patios, decks and walkways<br />
• Do not use preserved wood shavings or<br />
sawdust as animal litter<br />
• Use light spirit based preservative or<br />
sealing agent on all cut, notched or<br />
drilled surfaces<br />
DISPOSAL<br />
• Preserved wood may be disposed of<br />
in landfills or burned in commercial<br />
or industrial incinera<strong>to</strong>rs or boilers in<br />
accordance with National and Regional<br />
rules and regulations.<br />
25
HandiCrete ®<br />
High Strength HandiCrete ®<br />
High Strength RapidSet TM<br />
RapidSet TM<br />
Coloured Mortar<br />
Trade Mortar<br />
Clay Brick Mortar<br />
MortarPlaster<br />
SuperSet TM<br />
PaveLock ®<br />
PaveSand TM<br />
Paths<br />
Mowing Strips<br />
Foundations<br />
Structural Applications<br />
Commercial Structural Applications<br />
Letter Boxes<br />
Fence Posts<br />
Heavy Duty Fencing<br />
Retaining Walls<br />
Sun Sail Posts<br />
Washing Lines<br />
Bricks<br />
Blocks<br />
Block Fill<br />
S<strong>to</strong>ne<br />
Plaster<br />
Roughcast<br />
Kerbing & Roadway Repair<br />
Gully Trap Installations<br />
General Grouting<br />
Water Tank Repair<br />
Flooring Patch Repairs<br />
Paving Joints<br />
INSTANT CONCRETE / SANDS / MORTARS<br />
www.dricon.co.nz<br />
NAIL<br />
GUIDE<br />
The right one for the job.<br />
FLAT HEAD NAILS<br />
FLAT HEAD<br />
- galvanised or stainless steel<br />
FOR CONSTRUCTION<br />
A timber <strong>to</strong> timber connec<strong>to</strong>r with a large head<br />
<strong>to</strong> avoid pull through in soft timbers.<br />
CLOUTS<br />
- galvanised<br />
TO CONNECT THIN METAL<br />
PROFILES TO TIMBER<br />
Sheet metal <strong>to</strong> timber connec<strong>to</strong>r. Wide,<br />
flat head prevents pull through.<br />
SPECIALITY NAILS<br />
STAPLES<br />
- galvanised<br />
FOR WIRE, WIRE MESH – NETTING<br />
OR SHADE CLOTH<br />
U-shaped double ended nail for fixing<br />
mesh/cloth <strong>to</strong> a timber frame.<br />
ROOFING-TWISTED<br />
- galvanised<br />
FOR CORRUGATED SHEETS<br />
– ROOFING / CLADDING<br />
Used for fixing external roofing & cladding.<br />
Twisted shank for extra holding power.<br />
DECKING AND PALING NAILS<br />
DECKING<br />
- galvanised or stainless steel<br />
FOR DECKING<br />
Timber <strong>to</strong> timber connec<strong>to</strong>r for heavy duty<br />
landscaping and decking applications.<br />
Nail thread increases holding power.<br />
FIBRE CEMENT<br />
- galvanised<br />
FOR FIXING CEMENT<br />
SHEET LINING BOARD<br />
Used <strong>to</strong> connect cement sheets <strong>to</strong><br />
timber framework.<br />
TIMBER CONNECTOR NAILS<br />
JOLT HEAD NAILS<br />
JOLT HEAD<br />
- galvanised or stainless steel<br />
FOR USE WITH IN FRAMING<br />
Skew nail <strong>to</strong> maximise joint strength<br />
and avoid end grain nailing.<br />
PALING<br />
- galvanised<br />
FOR FENCE PALINGS<br />
Timber <strong>to</strong> timber connec<strong>to</strong>r for heavy duty<br />
landscaping and fencing applications.<br />
Nail thread increases holding power.<br />
BRACKET<br />
- galvanised or stainless steel<br />
FOR USE WITH TIMBER CONNECTORS<br />
Specifically designed for fixing brackets and<br />
timber connec<strong>to</strong>rs.<br />
KEY<br />
FOR EXTERNAL USE<br />
TIPS AND HINTS<br />
TIPS AND HINTS<br />
We recommend the use of Stainless Steel or Silicone<br />
Bronze for all timber fasteners exposed <strong>to</strong> the weather<br />
When nailing in<strong>to</strong> hardwood, drill pilot holes using<br />
a slightly smaller diameter than nail shank.<br />
26
KNOW<br />
HOW<br />
CARD<br />
SPEND *<br />
$<br />
250<br />
GET A<br />
$<br />
25<br />
*Terms and conditions apply.<br />
BONUS<br />
VOUCHER<br />
EARN BONUS VOUCHERS<br />
WITH A KNOW HOW CARD<br />
<strong>PlaceMakers</strong> has everything you need <strong>to</strong> get the job<br />
done, and with a Know How Card you’ll earn a<br />
$25 Bonus Voucher with every $250 you spend*.<br />
For example, spend $10,000 on <strong>your</strong> decking<br />
project and you’ll get a whopping $1,000<br />
of Bonus Vouchers …that’s a new BBQ right<br />
there! If you don’t have <strong>your</strong> free Know How<br />
Card, apply at any <strong>PlaceMakers</strong> s<strong>to</strong>re, or sign<br />
up online at placemakers.co.nz/knowhowcard<br />
*Know How Card terms and conditions apply.<br />
See www.placemakers.co.nz for details. Bonus vouchers are not<br />
awarded on purchases using a GE CreditLine card.<br />
GE CREDITLINE CARD<br />
<strong>PlaceMakers</strong> provides you with the opportunity<br />
<strong>to</strong> finance <strong>your</strong> whole <strong>outdoor</strong> project. Use <strong>your</strong><br />
existing Gem Visa or GE CreditLine card and<br />
receive 120 days interest free and deferred<br />
payment on all purchases over $100.*<br />
* Minimum purchase for new applications $250. Credit and lending<br />
criteria, $48 establishment fee and $48 annual account fee apply.<br />
Prevailing interest rate will apply <strong>to</strong> any <strong>outstanding</strong> balance on the<br />
expiry of the interest free period. Not valid in conjunction with trade<br />
discounts. Gem Visa and GE Creditline is provided by GE Finance<br />
and Insurance trading as GE Money. Finance application must be<br />
approved before any cus<strong>to</strong>m products will be ordered.<br />
NORTHLAND<br />
Kaitaia .................................. 408 0630<br />
Kerikeri .................................. 407 4820<br />
Mangawhai ........................... 431 4236<br />
Whangarei ............................ 470 3970<br />
AUCKLAND<br />
Albany .................................. 414 0900<br />
Cook St, City ........................ 356 2899<br />
Helensville ............................. 420 9150<br />
Mt Welling<strong>to</strong>n ........................ 570 8300<br />
New Lynn .............................. 825 0088<br />
Pakuranga ............................. 538 0200<br />
Pukekohe ............................... 237 0020<br />
Waiheke Island ...................... 372 0060<br />
Wairau Park .......................... 444 5155<br />
Westgate ............................... 815 6800<br />
Whangaparaoa ..................... 424 9000<br />
WAIKATO/BAY OF PLENTY<br />
Clarence St, Hamil<strong>to</strong>n ............. 846 6700<br />
Huntly .................................... 828 2000<br />
Morrinsville ............................ 889 8057<br />
Mt Maunganui ....................... 575 4009<br />
Ro<strong>to</strong>rua.................................. 345 6892<br />
Taupo .................................... 376 0220<br />
Tauranga ............................... 575 4009<br />
Te Kuiti .................................. 878 8149<br />
Te Rapa ................................. 846 6700<br />
Thames .................................. 868 0130<br />
Whakatane ............................ 306 0230<br />
Whitianga ............................. 867 2000<br />
CENTRAL NORTH ISLAND<br />
Egmont Road ......................... 755 9040<br />
Hawera ................................. 278 6013<br />
Hawkes Bay ........................... 843 5816<br />
New Plymouth ........................ 755 9040<br />
Ohakune* ............................ 385 8414<br />
Palmers<strong>to</strong>n North .................... 353 5777<br />
Stratford ................................ 765 7152<br />
Wanganui ............................. 349 1919<br />
WELLINGTON<br />
Evans Bay .............................. 387 8692<br />
Kaiwharawhara .....................472 1616<br />
Levin .....................................366 0960<br />
Kapiti ....................................296 1086<br />
Porirua Megacentre ................ 237 9189<br />
Seaview Park ......................... 568 5042<br />
UPPER SOUTH ISLAND<br />
Blenheim ................................ 520 6030<br />
Motueka ................................ 528 8164<br />
Port Nelson ............................ 547 9111<br />
Sax<strong>to</strong>n Rd .............................. 547 9111<br />
CHRISTCHURCH<br />
Antigua Street ........................ 353 8155<br />
Cranford Street ....................... 375 4119<br />
Riccar<strong>to</strong>n ............................... 348 2039<br />
CANTERBURY<br />
Ashbur<strong>to</strong>n .............................. 308 9099<br />
Timaru ................................... 687 4035<br />
Twizel .................................... 435 3133<br />
SOUTHERN<br />
Alexandra.............................. 440 2335<br />
Cromwell ............................... 445 0401<br />
Dunedin ................................. 466 4609<br />
Gore ..................................... 209 0055<br />
Invercargill ............................. 211 0366<br />
Oamaru ................................ 433 0460<br />
Queens<strong>to</strong>wn........................... 450 9000<br />
Te Anau .................................249 7774<br />
Wanaka ................................443 0080<br />
FM759 Rev Sept 11<br />
0800 PLACEMAKERS (752 236) www.placemakers.co.nz