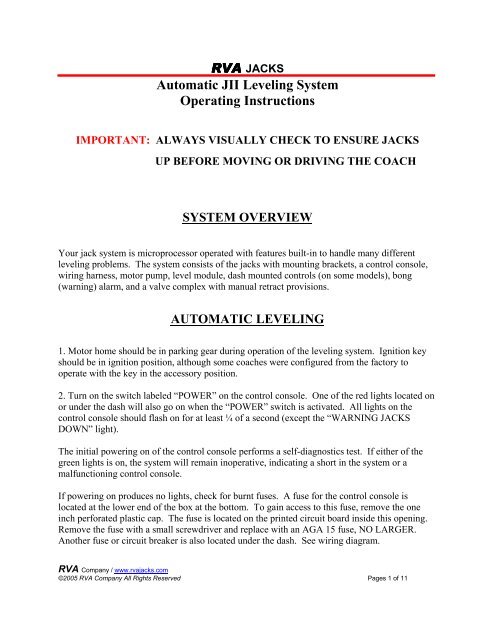
Automatic JII Leveling System Operating Instructions - RVA Jacks
Automatic JII Leveling System Operating Instructions - RVA Jacks
Automatic JII Leveling System Operating Instructions - RVA Jacks

You also want an ePaper? Increase the reach of your titles
YUMPU automatically turns print PDFs into web optimized ePapers that Google loves.
<strong>RVA</strong> JACKS<br />
<strong>Automatic</strong> <strong>JII</strong> <strong>Leveling</strong> <strong>System</strong><br />
<strong>Operating</strong> <strong>Instructions</strong><br />
IMPORTANT: ALWAYS VISUALLY CHECK TO ENSURE JACKS<br />
UP BEFORE MOVING OR DRIVING THE COACH<br />
SYSTEM OVERVIEW<br />
Your jack system is microprocessor operated with features built-in to handle many different<br />
leveling problems. The system consists of the jacks with mounting brackets, a control console,<br />
wiring harness, motor pump, level module, dash mounted controls (on some models), bong<br />
(warning) alarm, and a valve complex with manual retract provisions.<br />
AUTOMATIC LEVELING<br />
1. Motor home should be in parking gear during operation of the leveling system. Ignition key<br />
should be in ignition position, although some coaches were configured from the factory to<br />
operate with the key in the accessory position.<br />
2. Turn on the switch labeled “POWER” on the control console. One of the red lights located on<br />
or under the dash will also go on when the “POWER” switch is activated. All lights on the<br />
control console should flash on for at least ¼ of a second (except the “WARNING JACKS<br />
DOWN” light).<br />
The initial powering on of the control console performs a self-diagnostics test. If either of the<br />
green lights is on, the system will remain inoperative, indicating a short in the system or a<br />
malfunctioning control console.<br />
If powering on produces no lights, check for burnt fuses. A fuse for the control console is<br />
located at the lower end of the box at the bottom. To gain access to this fuse, remove the one<br />
inch perforated plastic cap. The fuse is located on the printed circuit board inside this opening.<br />
Remove the fuse with a small screwdriver and replace with an AGA 15 fuse, NO LARGER.<br />
Another fuse or circuit breaker is also located under the dash. See wiring diagram.<br />
<strong>RVA</strong> Company / www.rvajacks.com<br />
©2005 <strong>RVA</strong> Company All Rights Reserved Pages 1 of 11
<strong>RVA</strong> JACKS<br />
<strong>Automatic</strong> <strong>JII</strong> <strong>Leveling</strong> <strong>System</strong><br />
<strong>Operating</strong> <strong>Instructions</strong><br />
Once the system is powered on, one or two yellow lights may be illuminated. Whichever yellow<br />
light or lights are on, indicate that particular jack or jacks need to be lowered in order to obtain a<br />
level condition. If no yellow lights are on after initial power up, your coach is level.<br />
3. Press rocker switch labeled “AUTOMATIC LEVELING” and release. The top green light<br />
will start blinking and after a ½ second delay the motor pump will come on and all the jacks will<br />
start extending downward. The system will attempt to do a complete level in one operation. The<br />
coach is level when all yellow lights go out and the top green light stops blinking and goes out.<br />
If leveling is not accomplished on the first all jacks plant down phase, the system will attempt to<br />
level four more times at seven second intervals.<br />
Note: If the battery is weak and is wired to power both the automatic leveling system motor<br />
pump and the control console, during the automatic leveling phase either green light may stay on<br />
and the system will become inoperative. If this occurs, cycle the main “POWER” switch off and<br />
on and attempt “AUTOMATIC LEVELING” again. If the above re-occurs, check the battery<br />
voltage. It should not drop below 9 volts during automatic operation. If the battery is good and<br />
the system continues to be inoperative, one of the following things can be done:<br />
a) Install larger capacity battery<br />
b) Install heavier gauge battery cable to the motor pump<br />
c) Power the control console from a separate battery from the one used for the motor pump.<br />
Motor pumps can operate down to 6 volts. The control console is designed become<br />
inoperative at approximately 8 volts.<br />
4. As the jacks extend downward the “WARNING JACKS DOWN” red light and the other dash<br />
mounted red light will start blinking and a bong alarm will begin sounding. This alarm will also<br />
come on if the control console is off but the jacks are down when the ignition key is turned on.<br />
5. During automatic leveling phase, if both green lights start flashing alternately, this is an<br />
indication that you have either reached maximum physical extension on one or more of the jacks<br />
or have reached maximum pressure for automatic operation. After the automatic leveling phase<br />
has ceased, if one or more of the yellow lights are on, press the manual extend switch for the<br />
appropriate jack. This action by-passes the automatic pressure switch limit and allows an<br />
increased pressure to be applied to the jack. If the yellow light is still on, a block could be placed<br />
under one of the jack pads to get additional height or find another place to attempt leveling. If a<br />
block is placed under a jack, only one jack should be blocked at any time. If blocking the jack<br />
pad of one of he rear jacks is necessary and the coach is on a slope, the opposite set of rear<br />
<strong>RVA</strong> Company / www.rvajacks.com<br />
©2005 <strong>RVA</strong> Company All Rights Reserved Pages 2 of 11
<strong>RVA</strong> JACKS<br />
<strong>Automatic</strong> <strong>JII</strong> <strong>Leveling</strong> <strong>System</strong><br />
<strong>Operating</strong> <strong>Instructions</strong><br />
wheels must first be blocked to prevent rolling. If anyone is going to change a tire or go under<br />
the motor home, the chassis frame must first be supported with appropriately rated jack stands.<br />
*DO NOT ATTEMPT TO CHANGE TIRES OR GO UNDER THE MOTORHOME<br />
WITH <strong>RVA</strong> JACKS EXTENDED<br />
6. The motor home will be level when the top green light stops blinking and all the yellow lights<br />
are out. If desired the “ALL JACKS RETRACT” or “MANUAL” mode can be done instantly at<br />
any time during any operation. However, this will override and cancel the automatic operation.<br />
To re-initiate the automatic operation, press the automatic switch.<br />
7. When leveling is complete, turn off switch labeled “POWER” on the control console. Turn<br />
off the ignition key.<br />
ALL JACKS RETRACT<br />
(AUTOMATIC RETRACT)<br />
1. Turn on switch labeled “POWER” on the control console.<br />
2. Press rocker switch labeled “ALL JACKS RETRACT” and release. The bottom green light<br />
will start blinking and all jacks will start retracting. This operation has a four minute timer after<br />
which the bottom green light will stop blinking and go out.<br />
NOTE: On coaches prior to 2000, the “ALL JACKS RETRACT” switch has a built in<br />
redundancy feature that allows you to retract the jacks when the “POWER” switch is off. If<br />
there is power to the control console (ignition key is on and all fuses related to the automatic are<br />
good), simply press and hold the “ALL JACKS RETRACT” switch and the jacks will retract as<br />
long as you hold the switch down. This feature can be used if the control console malfunctions<br />
after the jacks are extended. In the event that all power is disabled, not available, or the control<br />
console is not powered, the jacks, can still be retracted with your manual retract T-valves on the<br />
valve complex located somewhere outside your motor home. Contact your dealer, installer, or<br />
manufacturer for its location. As you face the valve complex you will see three T-valve handles.<br />
The valve located furthest from the reservoir corresponds to the left rear jack, the valve in the<br />
<strong>RVA</strong> Company / www.rvajacks.com<br />
©2005 <strong>RVA</strong> Company All Rights Reserved Pages 3 of 11
<strong>RVA</strong> JACKS<br />
<strong>Automatic</strong> <strong>JII</strong> <strong>Leveling</strong> <strong>System</strong><br />
<strong>Operating</strong> <strong>Instructions</strong><br />
center corresponds to the front jack, and the T-valve on the right corresponds to the right rear<br />
jack. When the T-valves are opened (counterclockwise) the fluid flows back to the motor pump<br />
reservoir and the appropriate jack will retract. When these valves are used, remember to close<br />
the T-valves after use, otherwise neither the automatic nor the manual system will operate<br />
properly.<br />
3. Turn off switch labeled “POWER” on your control console. Turn off the ignition key.<br />
MANUAL OPERATION<br />
OF<br />
LEVELING SYSTEM<br />
1. Turn on switch labeled “POWER” on the control console.<br />
2. Each of the yellow light and switch combinations corresponds to each jack as positioned on<br />
the motor home and is labeled as such. If a particular jack is to be extended, simply push the<br />
rocker switch on the extend side and hold until desired extension is reached. If a jack needs to be<br />
retracted, push the rocker switch on the retract side and hold until desired position is reached.<br />
When the corresponding yellow light for a jack is off, that particular jack is at the level position.<br />
3. When leveling is complete turn off switch labeled “POWER” on the control console. Turn off<br />
the ignition key.<br />
IMPORTANT NOTES<br />
1. The leveling system is equipped with a warning device to indicate the position of your<br />
jacks. The pulsating red light and bong alarm will come on when any jack is extended to<br />
more than 5” to 6” from full retracted position. This device will also indicate low fluid<br />
level. SEE Note #3 for filling instructions.<br />
<strong>RVA</strong> Company / www.rvajacks.com<br />
©2005 <strong>RVA</strong> Company All Rights Reserved Pages 4 of 11
<strong>RVA</strong> JACKS<br />
<strong>Automatic</strong> <strong>JII</strong> <strong>Leveling</strong> <strong>System</strong><br />
<strong>Operating</strong> <strong>Instructions</strong><br />
2. Learn the sounds of a normal pump as jacks extend, the relief valve as jacks extend<br />
fully, and the gurgling sound of the pump when the unit is low on fluid. If necessary to<br />
add fluid, use regular <strong>Automatic</strong> Transmission Fluid (Dexron III).<br />
3. If it is necessary to fill with additional fluid, start by extending any jack 6” from fully<br />
retracted position (other jacks should be fully retracted). Unscrew reservoir cap from the<br />
top of the pump, fill with fluid until red light and bong turn off, then stop adding fluid<br />
and replace the cap.<br />
4. Do not attempt to level on an extremely un-leveled surface. This can cause damage<br />
to jacks.<br />
5. When jacks are fully extended, occasionally wipe dirt from the jack ram/rod. This<br />
will help lengthen life of jack. WD-40 will serve as a solvent as well as a lubricant.<br />
6. Some assembly lubrication, both oil and grease on the extended jack ram is normal, and aids<br />
in lubrication of the ram. The presence of assembly lube on the extended jack ram does not<br />
indicate a leak.<br />
7. If a component of the hydraulic system has been removed and replaced (such as a jack, pump,<br />
valve assembly, etc.) air will probably have been introduced into the system. In order for the<br />
system to work properly, each jack must be fully extended and retracted at least twice to remove<br />
all air (self-bleeding operation). Additional air can also be trapped in the manual emergency<br />
release T-valves located on the valve manifold. With the jacks fully extended, open the manual<br />
emergency release valves to bleed out the trapped air. This will retract the jacks at the same<br />
time; close the handles. After the bleeding operation, the liquid level might need to be reset. See<br />
note #3.<br />
8. A majority of the fittings in the hydraulic system are pipe threads. At the factory all male<br />
pipe threads are wrapped with at least three turns of Teflon tape, except for the first thread at the<br />
tip of the fitting. A small amount of grease is applied to the un-tefloned tip of the fitting and to<br />
the mating female thread. The above procedure insures proper sealing and prevention of Teflon<br />
tape entering into the hydraulic system. If a fitting is removed, residual Teflon tape must be<br />
removed from both the male and mating female threads, if they are to be reassembled. A<br />
maximum practical amount of filtration has been incorporated into the system to prevent dirt<br />
from contaminating the operation and sealing of the valves. When assembling components,<br />
special attention is required to maintain cleanliness.<br />
<strong>RVA</strong> Company / www.rvajacks.com<br />
©2005 <strong>RVA</strong> Company All Rights Reserved Pages 5 of 11
<strong>RVA</strong> JACKS<br />
<strong>Automatic</strong> <strong>JII</strong> <strong>Leveling</strong> <strong>System</strong><br />
<strong>Operating</strong> <strong>Instructions</strong><br />
9. If a block is placed under a jack, only one jack should be blocked at any one time. Do<br />
not block more than one jack at a time. If blocking the jack pad of one of the rear jacks<br />
is necessary and the coach is on a slope, the opposite set of rear tires must be first<br />
blocked to prevent rolling. If anyone is going to change a tire or go under the motor<br />
home, the chassis frame must first be supported with appropriately rated jack stands.<br />
10. If the Control console (computer) is to be removed or replaced, all 12V power to the<br />
console should be disconnected. The console power switch should also be in the “OFF”<br />
position. Connecting and disconnecting the console while the 12V power source is<br />
connected (“hot plugging/socketing”) will very likely cause damage to the<br />
microprocessor and other sensitive electrical components in your control console box.<br />
<strong>RVA</strong> Company / www.rvajacks.com<br />
©2005 <strong>RVA</strong> Company All Rights Reserved Pages 6 of 11
<strong>RVA</strong> JACKS<br />
<strong>Automatic</strong> <strong>JII</strong> <strong>Leveling</strong> <strong>System</strong><br />
<strong>Operating</strong> <strong>Instructions</strong><br />
<strong>RVA</strong> Company / www.rvajacks.com<br />
©2005 <strong>RVA</strong> Company All Rights Reserved Pages 7 of 11
<strong>RVA</strong> JACKS<br />
<strong>Automatic</strong> <strong>JII</strong> <strong>Leveling</strong> <strong>System</strong><br />
<strong>Operating</strong> <strong>Instructions</strong><br />
<strong>RVA</strong> Company / www.rvajacks.com<br />
©2005 <strong>RVA</strong> Company All Rights Reserved Pages 8 of 11
<strong>RVA</strong> JACKS<br />
<strong>Automatic</strong> <strong>JII</strong> <strong>Leveling</strong> <strong>System</strong><br />
<strong>Operating</strong> <strong>Instructions</strong><br />
<strong>RVA</strong> Company / www.rvajacks.com<br />
©2005 <strong>RVA</strong> Company All Rights Reserved Pages 9 of 11
<strong>RVA</strong> JACKS<br />
<strong>Automatic</strong> <strong>JII</strong> <strong>Leveling</strong> <strong>System</strong><br />
<strong>Operating</strong> <strong>Instructions</strong><br />
<strong>RVA</strong> Company / www.rvajacks.com<br />
©2005 <strong>RVA</strong> Company All Rights Reserved Pages 10 of 11
<strong>RVA</strong> JACKS<br />
<strong>Automatic</strong> <strong>JII</strong> <strong>Leveling</strong> <strong>System</strong><br />
<strong>Operating</strong> <strong>Instructions</strong><br />
<strong>RVA</strong> Company / www.rvajacks.com<br />
©2005 <strong>RVA</strong> Company All Rights Reserved Pages 11 of 11