User's Manual >>> - Drake Software Support
User's Manual >>> - Drake Software Support
User's Manual >>> - Drake Software Support

Create successful ePaper yourself
Turn your PDF publications into a flip-book with our unique Google optimized e-Paper software.
User’s <strong>Manual</strong> >>><br />
Client Write-Up 2011<br />
> > > S u p p o r t . D r a k e S o f t w a r e . c o m > > > 8 2 8 . 3 4 9 . 5 5 4 7 > > >
2011 Client Write-Up<br />
Copyright<br />
The 2011 <strong>Drake</strong> Client Write-Up <strong>Manual</strong>, <strong>Drake</strong> Client Write-Up, <strong>Drake</strong> Tax<br />
<strong>Software</strong>, and any other related materials are copyrighted material. All rights are<br />
reserved by <strong>Drake</strong> Enterprises, LTD., including all ownership rights. This document,<br />
associated software, and related material are the property of <strong>Drake</strong> Enterprises, LTD.<br />
<strong>Drake</strong> Enterprises, LTD, hereby authorizes you to download, display, print, and<br />
reproduce the material in this document in an unaltered form only for your personal,<br />
non-commercial use or for non-commercial use within your organization. Copyright,<br />
trademark, and other proprietary notices may not be removed.<br />
© 2011 <strong>Drake</strong> Enterprises, LTD. All rights reserved.<br />
While every attempt has been made to produce an accurate and complete manual,<br />
there is no warranty, expressed or implied, to that effect. <strong>Drake</strong> Enterprises, LTD.<br />
assumes no liability for damages or claims resulting from the use of the information<br />
contained herein.<br />
TRADEMARKS<br />
The <strong>Drake</strong> <strong>Software</strong> Logo, <strong>Drake</strong> Tax and Client Write-Up are registered trademarks<br />
of <strong>Drake</strong> Enterprises, LTD.<br />
Other product names mentioned in this manual may be trademarks of registered<br />
trademarks of their respective companies.
2011 Client Write-Up
2011 Client Write-Up<br />
Table of Contents<br />
Introduction ................................................................................................ 1<br />
Features. . . . . . . . . . . . . . . . . . . . . . . . . . . . . . . . . . . . . . . . . . . . . . . . . . . . . . . . . . . . . . . . . . . . . . . . . . . . . 1<br />
What’s New for 2011? . . . . . . . . . . . . . . . . . . . . . . . . . . . . . . . . . . . . . . . . . . . . . . . . . . . . . . . . . . . . . . . . . 3<br />
<strong>Support</strong> . . . . . . . . . . . . . . . . . . . . . . . . . . . . . . . . . . . . . . . . . . . . . . . . . . . . . . . . . . . . . . . . . . . . . . . . . . . . . 4<br />
System Requirements . . . . . . . . . . . . . . . . . . . . . . . . . . . . . . . . . . . . . . . . . . . . . . . . . . . . . . . . . . . . . . . . . . 5<br />
Installation . . . . . . . . . . . . . . . . . . . . . . . . . . . . . . . . . . . . . . . . . . . . . . . . . . . . . . . . . . . . . . . . . . . . . . . . . . 6<br />
Activate Client Write-Up . . . . . . . . . . . . . . . . . . . . . . . . . . . . . . . . . . . . . . . . . . . . . . . . . . . . . . . . . . . . . . . 8<br />
Setup Wizard . . . . . . . . . . . . . . . . . . . . . . . . . . . . . . . . . . . . . . . . . . . . . . . . . . . . . . . . . . . . . . . . . . . . . . . . 8<br />
System Date Format . . . . . . . . . . . . . . . . . . . . . . . . . . . . . . . . . . . . . . . . . . . . . . . . . . . . . . . . . . . . . . . . . . . 9<br />
CWU <strong>Manual</strong> and Help Updates . . . . . . . . . . . . . . . . . . . . . . . . . . . . . . . . . . . . . . . . . . . . . . . . . . . . . . . . 10<br />
Navigation. . . . . . . . . . . . . . . . . . . . . . . . . . . . . . . . . . . . . . . . . . . . . . . . . . . . . . . . . . . . . . . . . . . . . . . . . . 11<br />
Global Setup............................................................................................. 15<br />
Firm Info/Global Settings. . . . . . . . . . . . . . . . . . . . . . . . . . . . . . . . . . . . . . . . . . . . . . . . . . . . . . . . . . . . . . 15<br />
Security Set Up. . . . . . . . . . . . . . . . . . . . . . . . . . . . . . . . . . . . . . . . . . . . . . . . . . . . . . . . . . . . . . . . . . . . . . 17<br />
Direct Deposit. . . . . . . . . . . . . . . . . . . . . . . . . . . . . . . . . . . . . . . . . . . . . . . . . . . . . . . . . . . . . . . . . . . . . . . 20<br />
94X Preparer Setup. . . . . . . . . . . . . . . . . . . . . . . . . . . . . . . . . . . . . . . . . . . . . . . . . . . . . . . . . . . . . . . . . . . 23<br />
MICR Check Set Up. . . . . . . . . . . . . . . . . . . . . . . . . . . . . . . . . . . . . . . . . . . . . . . . . . . . . . . . . . . . . . . . . . 24<br />
MICR Calibration . . . . . . . . . . . . . . . . . . . . . . . . . . . . . . . . . . . . . . . . . . . . . . . . . . . . . . . . . . . . . . . . . . . . 29<br />
Preprinted Check Alignment . . . . . . . . . . . . . . . . . . . . . . . . . . . . . . . . . . . . . . . . . . . . . . . . . . . . . . . . . . . 29<br />
Forms Alignment . . . . . . . . . . . . . . . . . . . . . . . . . . . . . . . . . . . . . . . . . . . . . . . . . . . . . . . . . . . . . . . . . . . . 30<br />
Portals Setup . . . . . . . . . . . . . . . . . . . . . . . . . . . . . . . . . . . . . . . . . . . . . . . . . . . . . . . . . . . . . . . . . . . . . . . . 30<br />
Client Setup .............................................................................................. 31<br />
Setting Up a New Client. . . . . . . . . . . . . . . . . . . . . . . . . . . . . . . . . . . . . . . . . . . . . . . . . . . . . . . . . . . . . . . 31<br />
PIN Applications for Electronic Filing. . . . . . . . . . . . . . . . . . . . . . . . . . . . . . . . . . . . . . . . . . . . . . . . . . . . 39<br />
Editing Client Information . . . . . . . . . . . . . . . . . . . . . . . . . . . . . . . . . . . . . . . . . . . . . . . . . . . . . . . . . . . . . 45<br />
Chart of Accounts (COA) Setup. . . . . . . . . . . . . . . . . . . . . . . . . . . . . . . . . . . . . . . . . . . . . . . . . . . . . . . . . 45<br />
MICR Bank Accounts. . . . . . . . . . . . . . . . . . . . . . . . . . . . . . . . . . . . . . . . . . . . . . . . . . . . . . . . . . . . . . . . . 47<br />
Check Setup . . . . . . . . . . . . . . . . . . . . . . . . . . . . . . . . . . . . . . . . . . . . . . . . . . . . . . . . . . . . . . . . . . . . . . . . 49<br />
Reporting Options. . . . . . . . . . . . . . . . . . . . . . . . . . . . . . . . . . . . . . . . . . . . . . . . . . . . . . . . . . . . . . . . . . . . 53<br />
Employee Payroll ..................................................................................... 59<br />
Setting Up Employee Payroll . . . . . . . . . . . . . . . . . . . . . . . . . . . . . . . . . . . . . . . . . . . . . . . . . . . . . . . . . . . 59<br />
Employee Setup . . . . . . . . . . . . . . . . . . . . . . . . . . . . . . . . . . . . . . . . . . . . . . . . . . . . . . . . . . . . . . . . . . . . . 72<br />
Change Employee Codes . . . . . . . . . . . . . . . . . . . . . . . . . . . . . . . . . . . . . . . . . . . . . . . . . . . . . . . . . . . . . . 86<br />
Payroll Processing . . . . . . . . . . . . . . . . . . . . . . . . . . . . . . . . . . . . . . . . . . . . . . . . . . . . . . . . . . . . . . . . . . . 86<br />
Live Employee Payroll . . . . . . . . . . . . . . . . . . . . . . . . . . . . . . . . . . . . . . . . . . . . . . . . . . . . . . . . . . . . . . . . 86<br />
ATF Employee Payroll. . . . . . . . . . . . . . . . . . . . . . . . . . . . . . . . . . . . . . . . . . . . . . . . . . . . . . . . . . . . . . . . 95<br />
Printing Employee Pay Checks . . . . . . . . . . . . . . . . . . . . . . . . . . . . . . . . . . . . . . . . . . . . . . . . . . . . . . . . 101<br />
Reprinting Employee Pay Checks . . . . . . . . . . . . . . . . . . . . . . . . . . . . . . . . . . . . . . . . . . . . . . . . . . . . . . 104<br />
Check Alignment . . . . . . . . . . . . . . . . . . . . . . . . . . . . . . . . . . . . . . . . . . . . . . . . . . . . . . . . . . . . . . . . . . . 106<br />
Transmitting Employee Direct Deposits . . . . . . . . . . . . . . . . . . . . . . . . . . . . . . . . . . . . . . . . . . . . . . . . . 107<br />
iii
Table of Contents<br />
2011 Client Write-Up<br />
Calculating 94X Series Tax Deposits. . . . . . . . . . . . . . . . . . . . . . . . . . . . . . . . . . . . . . . . . . . . . . . . . . . . 110<br />
Producing 94X Series Tax Returns. . . . . . . . . . . . . . . . . . . . . . . . . . . . . . . . . . . . . . . . . . . . . . . . . . . . . . 112<br />
W-2 Processing. . . . . . . . . . . . . . . . . . . . . . . . . . . . . . . . . . . . . . . . . . . . . . . . . . . . . . . . . . . . . . . . . . . . . 116<br />
W-2c/W-3c Processing . . . . . . . . . . . . . . . . . . . . . . . . . . . . . . . . . . . . . . . . . . . . . . . . . . . . . . . . . . . . . . . 119<br />
Portals - Processing Employee Payroll. . . . . . . . . . . . . . . . . . . . . . . . . . . . . . . . . . . . . . . . . . . . . . . . . . . 120<br />
Contractor Payroll.................................................................................. 123<br />
Setting Up Contractor Payroll . . . . . . . . . . . . . . . . . . . . . . . . . . . . . . . . . . . . . . . . . . . . . . . . . . . . . . . . . 123<br />
Contractor Setup . . . . . . . . . . . . . . . . . . . . . . . . . . . . . . . . . . . . . . . . . . . . . . . . . . . . . . . . . . . . . . . . . . . . 125<br />
Change Contractor Codes. . . . . . . . . . . . . . . . . . . . . . . . . . . . . . . . . . . . . . . . . . . . . . . . . . . . . . . . . . . . . 130<br />
Processing Contractor Payroll . . . . . . . . . . . . . . . . . . . . . . . . . . . . . . . . . . . . . . . . . . . . . . . . . . . . . . . . . 130<br />
Live Contractor Payroll . . . . . . . . . . . . . . . . . . . . . . . . . . . . . . . . . . . . . . . . . . . . . . . . . . . . . . . . . . . . . . 130<br />
ATF Contractor Payroll . . . . . . . . . . . . . . . . . . . . . . . . . . . . . . . . . . . . . . . . . . . . . . . . . . . . . . . . . . . . . . 134<br />
Printing Contractor Pay Checks . . . . . . . . . . . . . . . . . . . . . . . . . . . . . . . . . . . . . . . . . . . . . . . . . . . . . . . . 137<br />
Reprinting Contractor Pay Checks . . . . . . . . . . . . . . . . . . . . . . . . . . . . . . . . . . . . . . . . . . . . . . . . . . . . . . 140<br />
Check Alignment . . . . . . . . . . . . . . . . . . . . . . . . . . . . . . . . . . . . . . . . . . . . . . . . . . . . . . . . . . . . . . . . . . . 142<br />
Transmitting Contractor Direct Deposits . . . . . . . . . . . . . . . . . . . . . . . . . . . . . . . . . . . . . . . . . . . . . . . . . 143<br />
1099/1096/1098 Processing . . . . . . . . . . . . . . . . . . . . . . . . . . . . . . . . . . . . . . . . . . . . . . . . . . . . . . . . . . . 146<br />
Portals - Processing Contractor Payments . . . . . . . . . . . . . . . . . . . . . . . . . . . . . . . . . . . . . . . . . . . . . . . . 148<br />
Bookkeeping .......................................................................................... 151<br />
Adding Accounts to a Chart of Accounts. . . . . . . . . . . . . . . . . . . . . . . . . . . . . . . . . . . . . . . . . . . . . . . . . 151<br />
Entering Journal Transactions . . . . . . . . . . . . . . . . . . . . . . . . . . . . . . . . . . . . . . . . . . . . . . . . . . . . . . . . . 157<br />
Journal Options. . . . . . . . . . . . . . . . . . . . . . . . . . . . . . . . . . . . . . . . . . . . . . . . . . . . . . . . . . . . . . . . . . . . . 162<br />
Editing Stored Descriptions . . . . . . . . . . . . . . . . . . . . . . . . . . . . . . . . . . . . . . . . . . . . . . . . . . . . . . . . . . . 163<br />
Bank Reconciliation . . . . . . . . . . . . . . . . . . . . . . . . . . . . . . . . . . . . . . . . . . . . . . . . . . . . . . . . . . . . . . . . . 164<br />
Posting Transactions. . . . . . . . . . . . . . . . . . . . . . . . . . . . . . . . . . . . . . . . . . . . . . . . . . . . . . . . . . . . . . . . . 165<br />
Year End Close. . . . . . . . . . . . . . . . . . . . . . . . . . . . . . . . . . . . . . . . . . . . . . . . . . . . . . . . . . . . . . . . . . . . . 167<br />
Special Considerations for Fiscal Year Clients . . . . . . . . . . . . . . . . . . . . . . . . . . . . . . . . . . . . . . . . . . . . 168<br />
On the Fly Forms ................................................................................... 171<br />
Update Prior Year On the Fly. . . . . . . . . . . . . . . . . . . . . . . . . . . . . . . . . . . . . . . . . . . . . . . . . . . . . . . . . . 171<br />
W-2 On the Fly . . . . . . . . . . . . . . . . . . . . . . . . . . . . . . . . . . . . . . . . . . . . . . . . . . . . . . . . . . . . . . . . . . . . . 172<br />
1099s and 1098s On the Fly . . . . . . . . . . . . . . . . . . . . . . . . . . . . . . . . . . . . . . . . . . . . . . . . . . . . . . . . . . . 175<br />
94X Series Tax Returns On the Fly . . . . . . . . . . . . . . . . . . . . . . . . . . . . . . . . . . . . . . . . . . . . . . . . . . . . . 178<br />
Electronic Filing ..................................................................................... 183<br />
Forms 941, 940, 944, & 941SS. . . . . . . . . . . . . . . . . . . . . . . . . . . . . . . . . . . . . . . . . . . . . . . . . . . . . . . . . 183<br />
Uploading W-2s and W-3s . . . . . . . . . . . . . . . . . . . . . . . . . . . . . . . . . . . . . . . . . . . . . . . . . . . . . . . . . . . . 186<br />
Uploading 1099s, 1096s, and 1098s. . . . . . . . . . . . . . . . . . . . . . . . . . . . . . . . . . . . . . . . . . . . . . . . . . . . . 190<br />
Filing a 1099 Extension . . . . . . . . . . . . . . . . . . . . . . . . . . . . . . . . . . . . . . . . . . . . . . . . . . . . . . . . . . . . . . 192<br />
Accounts Payable .................................................................................. 195<br />
Vendor Check Setup. . . . . . . . . . . . . . . . . . . . . . . . . . . . . . . . . . . . . . . . . . . . . . . . . . . . . . . . . . . . . . . . . 195<br />
Vendor Bookkeeping Setup . . . . . . . . . . . . . . . . . . . . . . . . . . . . . . . . . . . . . . . . . . . . . . . . . . . . . . . . . . . 196<br />
Vendor Setup . . . . . . . . . . . . . . . . . . . . . . . . . . . . . . . . . . . . . . . . . . . . . . . . . . . . . . . . . . . . . . . . . . . . . . 196<br />
Entering Invoices . . . . . . . . . . . . . . . . . . . . . . . . . . . . . . . . . . . . . . . . . . . . . . . . . . . . . . . . . . . . . . . . . . . 198<br />
Searching for Invoices . . . . . . . . . . . . . . . . . . . . . . . . . . . . . . . . . . . . . . . . . . . . . . . . . . . . . . . . . . . . . . . 202<br />
Editing Invoices . . . . . . . . . . . . . . . . . . . . . . . . . . . . . . . . . . . . . . . . . . . . . . . . . . . . . . . . . . . . . . . . . . . . 204<br />
iv
2011 Client Write-Up<br />
Scheduling Live Payments . . . . . . . . . . . . . . . . . . . . . . . . . . . . . . . . . . . . . . . . . . . . . . . . . . . . . . . . . . . . 205<br />
Recording ATF Payments. . . . . . . . . . . . . . . . . . . . . . . . . . . . . . . . . . . . . . . . . . . . . . . . . . . . . . . . . . . . . 208<br />
Printing Vendor Checks . . . . . . . . . . . . . . . . . . . . . . . . . . . . . . . . . . . . . . . . . . . . . . . . . . . . . . . . . . . . . . 209<br />
Reprinting Vendor Checks . . . . . . . . . . . . . . . . . . . . . . . . . . . . . . . . . . . . . . . . . . . . . . . . . . . . . . . . . . . . 212<br />
Voiding Vendor Checks . . . . . . . . . . . . . . . . . . . . . . . . . . . . . . . . . . . . . . . . . . . . . . . . . . . . . . . . . . . . . . 213<br />
Editing ATF Payments . . . . . . . . . . . . . . . . . . . . . . . . . . . . . . . . . . . . . . . . . . . . . . . . . . . . . . . . . . . . . . . 214<br />
Check Writer. . . . . . . . . . . . . . . . . . . . . . . . . . . . . . . . . . . . . . . . . . . . . . . . . . . . . . . . . . . . . . . . . . . . . . . 216<br />
Viewing 1099 Information . . . . . . . . . . . . . . . . . . . . . . . . . . . . . . . . . . . . . . . . . . . . . . . . . . . . . . . . . . . . 223<br />
Generating 1099 Data. . . . . . . . . . . . . . . . . . . . . . . . . . . . . . . . . . . . . . . . . . . . . . . . . . . . . . . . . . . . . . . . 225<br />
Payables Check Alignment. . . . . . . . . . . . . . . . . . . . . . . . . . . . . . . . . . . . . . . . . . . . . . . . . . . . . . . . . . . . 225<br />
Accounts Receivable............................................................................. 227<br />
Entering Receivables Options. . . . . . . . . . . . . . . . . . . . . . . . . . . . . . . . . . . . . . . . . . . . . . . . . . . . . . . . . . 227<br />
Entering Sales Tax Records . . . . . . . . . . . . . . . . . . . . . . . . . . . . . . . . . . . . . . . . . . . . . . . . . . . . . . . . . . . 230<br />
GL Account Setup for Receivables . . . . . . . . . . . . . . . . . . . . . . . . . . . . . . . . . . . . . . . . . . . . . . . . . . . . . 232<br />
Invoice Item Setup . . . . . . . . . . . . . . . . . . . . . . . . . . . . . . . . . . . . . . . . . . . . . . . . . . . . . . . . . . . . . . . . . . 233<br />
Customer Setup. . . . . . . . . . . . . . . . . . . . . . . . . . . . . . . . . . . . . . . . . . . . . . . . . . . . . . . . . . . . . . . . . . . . . 234<br />
Entering New Invoices . . . . . . . . . . . . . . . . . . . . . . . . . . . . . . . . . . . . . . . . . . . . . . . . . . . . . . . . . . . . . . . 239<br />
Printing an Invoice . . . . . . . . . . . . . . . . . . . . . . . . . . . . . . . . . . . . . . . . . . . . . . . . . . . . . . . . . . . . . . . . . . 242<br />
Batch Printing Invoices. . . . . . . . . . . . . . . . . . . . . . . . . . . . . . . . . . . . . . . . . . . . . . . . . . . . . . . . . . . . . . . 242<br />
Updating Invoices. . . . . . . . . . . . . . . . . . . . . . . . . . . . . . . . . . . . . . . . . . . . . . . . . . . . . . . . . . . . . . . . . . . 243<br />
Deleting Invoices and Line Items. . . . . . . . . . . . . . . . . . . . . . . . . . . . . . . . . . . . . . . . . . . . . . . . . . . . . . . 243<br />
Entering Service Charges and Penalties . . . . . . . . . . . . . . . . . . . . . . . . . . . . . . . . . . . . . . . . . . . . . . . . . . 244<br />
Applying Receivables Payments . . . . . . . . . . . . . . . . . . . . . . . . . . . . . . . . . . . . . . . . . . . . . . . . . . . . . . . 245<br />
Posting Receivables Transactions <strong>Manual</strong>ly . . . . . . . . . . . . . . . . . . . . . . . . . . . . . . . . . . . . . . . . . . . . . . 250<br />
Reports ................................................................................................... 251<br />
Running Reports . . . . . . . . . . . . . . . . . . . . . . . . . . . . . . . . . . . . . . . . . . . . . . . . . . . . . . . . . . . . . . . . . . . . 251<br />
Report Options . . . . . . . . . . . . . . . . . . . . . . . . . . . . . . . . . . . . . . . . . . . . . . . . . . . . . . . . . . . . . . . . . . . . . 252<br />
Display Settings . . . . . . . . . . . . . . . . . . . . . . . . . . . . . . . . . . . . . . . . . . . . . . . . . . . . . . . . . . . . . . . . . . . . 252<br />
Understanding Reports . . . . . . . . . . . . . . . . . . . . . . . . . . . . . . . . . . . . . . . . . . . . . . . . . . . . . . . . . . . . . . . 253<br />
Report Types. . . . . . . . . . . . . . . . . . . . . . . . . . . . . . . . . . . . . . . . . . . . . . . . . . . . . . . . . . . . . . . . . . . . . . . 254<br />
Report Details . . . . . . . . . . . . . . . . . . . . . . . . . . . . . . . . . . . . . . . . . . . . . . . . . . . . . . . . . . . . . . . . . . . . . . 255<br />
Tools ....................................................................................................... 281<br />
Installing Program Updates . . . . . . . . . . . . . . . . . . . . . . . . . . . . . . . . . . . . . . . . . . . . . . . . . . . . . . . . . . . 281<br />
Update Prior Year Clients. . . . . . . . . . . . . . . . . . . . . . . . . . . . . . . . . . . . . . . . . . . . . . . . . . . . . . . . . . . . . 282<br />
File Maintenance . . . . . . . . . . . . . . . . . . . . . . . . . . . . . . . . . . . . . . . . . . . . . . . . . . . . . . . . . . . . . . . . . . . 283<br />
Rebuild Client List . . . . . . . . . . . . . . . . . . . . . . . . . . . . . . . . . . . . . . . . . . . . . . . . . . . . . . . . . . . . . . . . . . 288<br />
Printing Blank Forms . . . . . . . . . . . . . . . . . . . . . . . . . . . . . . . . . . . . . . . . . . . . . . . . . . . . . . . . . . . . . . . . 288<br />
Calculator . . . . . . . . . . . . . . . . . . . . . . . . . . . . . . . . . . . . . . . . . . . . . . . . . . . . . . . . . . . . . . . . . . . . . . . . . 289<br />
Adobe Reader Download . . . . . . . . . . . . . . . . . . . . . . . . . . . . . . . . . . . . . . . . . . . . . . . . . . . . . . . . . . . . . 289<br />
Where to File Tax Returns . . . . . . . . . . . . . . . . . . . . . . . . . . . . . . . . . . . . . . . . . . . . . . . . . . . . . . . . . . . . 290<br />
Client Notes . . . . . . . . . . . . . . . . . . . . . . . . . . . . . . . . . . . . . . . . . . . . . . . . . . . . . . . . . . . . . . . . . . . . . . . 290<br />
Printing Mailing Labels . . . . . . . . . . . . . . . . . . . . . . . . . . . . . . . . . . . . . . . . . . . . . . . . . . . . . . . . . . . . . . 290<br />
Spreadsheet Imports . . . . . . . . . . . . . . . . . . . . . . . . . . . . . . . . . . . . . . . . . . . . . . . . . . . . . . . . . . . . . . . . . 291<br />
Exporting from CWU . . . . . . . . . . . . . . . . . . . . . . . . . . . . . . . . . . . . . . . . . . . . . . . . . . . . . . . . . . . . . . . . 294<br />
Additional Tools . . . . . . . . . . . . . . . . . . . . . . . . . . . . . . . . . . . . . . . . . . . . . . . . . . . . . . . . . . . . . . . . . . . . 295<br />
v
Table of Contents<br />
2011 Client Write-Up<br />
Quick Reference..................................................................................... 305<br />
Pre-Printed Checks . . . . . . . . . . . . . . . . . . . . . . . . . . . . . . . . . . . . . . . . . . . . . . . . . . . . . . . . . . . . . . . . . . 305<br />
MICR Checks . . . . . . . . . . . . . . . . . . . . . . . . . . . . . . . . . . . . . . . . . . . . . . . . . . . . . . . . . . . . . . . . . . . . . . 305<br />
Process Payroll (Live and ATF) . . . . . . . . . . . . . . . . . . . . . . . . . . . . . . . . . . . . . . . . . . . . . . . . . . . . . . . . 305<br />
PIN Applications for e-Filing 94X Returns . . . . . . . . . . . . . . . . . . . . . . . . . . . . . . . . . . . . . . . . . . . . . . . 306<br />
Print and Upload W-2s and W-3s. . . . . . . . . . . . . . . . . . . . . . . . . . . . . . . . . . . . . . . . . . . . . . . . . . . . . . . 307<br />
Print and Upload 1099s and 1096s . . . . . . . . . . . . . . . . . . . . . . . . . . . . . . . . . . . . . . . . . . . . . . . . . . . . . . 307<br />
Create and Process W-2s and W-3s on the Fly. . . . . . . . . . . . . . . . . . . . . . . . . . . . . . . . . . . . . . . . . . . . . 307<br />
Process 1099s, 1096s, and 1098s on the Fly . . . . . . . . . . . . . . . . . . . . . . . . . . . . . . . . . . . . . . . . . . . . . . 308<br />
End of Year Process . . . . . . . . . . . . . . . . . . . . . . . . . . . . . . . . . . . . . . . . . . . . . . . . . . . . . . . . . . . . . . . . . 308<br />
Appendix................................................................................................. 309<br />
Appendix A - E-Filing 1099-MISC FAQ. . . . . . . . . . . . . . . . . . . . . . . . . . . . . . . . . . . . . . . . . . . . . . . . . 309<br />
Appendix B - W-2/W-3 PIN Application FAQ . . . . . . . . . . . . . . . . . . . . . . . . . . . . . . . . . . . . . . . . . . . . 310<br />
Appendix C - IRS “FIRE” Website . . . . . . . . . . . . . . . . . . . . . . . . . . . . . . . . . . . . . . . . . . . . . . . . . . . . . 311<br />
Appendix D - <strong>Drake</strong> Document Manager. . . . . . . . . . . . . . . . . . . . . . . . . . . . . . . . . . . . . . . . . . . . . . . . . 315<br />
Appendix E - Client Write-Up Menus . . . . . . . . . . . . . . . . . . . . . . . . . . . . . . . . . . . . . . . . . . . . . . . . . . . 316<br />
Appendix F - InterceptEFT Holidays . . . . . . . . . . . . . . . . . . . . . . . . . . . . . . . . . . . . . . . . . . . . . . . . . . . . 320<br />
Appendix G - Portals . . . . . . . . . . . . . . . . . . . . . . . . . . . . . . . . . . . . . . . . . . . . . . . . . . . . . . . . . . . . . . . . 321<br />
Appendix H - Home Screen Shortcuts . . . . . . . . . . . . . . . . . . . . . . . . . . . . . . . . . . . . . . . . . . . . . . . . . . . 337<br />
Appendix I - Reporting Agent’s List . . . . . . . . . . . . . . . . . . . . . . . . . . . . . . . . . . . . . . . . . . . . . . . . . . . . 341<br />
Appendix J - Preparing to e-file W-2s . . . . . . . . . . . . . . . . . . . . . . . . . . . . . . . . . . . . . . . . . . . . . . . . . . . 342<br />
Appendix K - Preparing to e-file 1099s . . . . . . . . . . . . . . . . . . . . . . . . . . . . . . . . . . . . . . . . . . . . . . . . . . 343<br />
Appendix L - E-Filing Quick Reference . . . . . . . . . . . . . . . . . . . . . . . . . . . . . . . . . . . . . . . . . . . . . . . . . 344<br />
Glossary.................................................................................................... vii<br />
vi
2011 Client Write-Up Features<br />
1 Introduction<br />
Features<br />
<strong>Drake</strong>'s Client Write-Up (CWU) provides the capability to prepare and print both live<br />
and after-the-fact payroll, W-2/W-3, 1099-MISC/1096, 940, 941, 941SS, 943, 944<br />
and 944SS forms. Payroll information is transferred to the journal with the click of a<br />
button.<br />
CWU also provides the ability to manage basic client financial records through the use<br />
of double-entry bookkeeping. A number of reports are provided including multi-column<br />
profit and loss reports, pre-posted reports, comparative or single column balance<br />
sheets, and payroll reports.<br />
Templates make the creation of a Chart of Accounts easy, but CWU also allows you to<br />
create a custom Chart of Accounts either by editing an existing one or creating one<br />
from scratch. You can also export information into <strong>Drake</strong> <strong>Software</strong>, reducing data<br />
entry time required to prepare your client's tax return.<br />
Use Client Write-Up to enter vendor invoices, print (and reprint) live vendor checks,<br />
and enter after-the-fact vendor invoice information for bookkeeping purposes. Use the<br />
Accounts Payable module or “Check Writer” to print vendor checks.<br />
Use the Accounts Receivable module to record and track customer invoices, shipments,<br />
payments, and balances.<br />
Portals is a new web-based feature that facilitates your clients editing some of their<br />
employee information as well as pay information. Once they create and verify pay<br />
information, the accountant processes payroll and automatically posts the final pay<br />
information for the client to view and export to Excel.<br />
Client Write-Up 2011 has many features, some have been added to the program this<br />
year.<br />
General<br />
• Install Client Write-Up as a complete program each year rather than an upgrade to<br />
last year’s program. Return to a prior year’s program and run reports, reproduce<br />
Forms W-2 and W-3, 1099 and 1096, and all 94X tax returns. All client setup and<br />
Chart of Accounts information can be brought into the new program from last<br />
year’s software. Bring over one client at a time or all at once.<br />
• Automatically backup client data at designated times or at the click of a speed button.<br />
• CWU supports Windows 7.<br />
1
Features<br />
2011 Client Write-Up<br />
• Add, edit, and save client notes. Quickly apply a date and time stamp to the note.<br />
Payroll<br />
• Live Payroll — Create and print payroll checks for employees and contractors<br />
• After-the-Fact Payroll — Enter payroll stub information for bookkeeping purposes<br />
for employees and contractors<br />
• Payroll Reports — Produce and print<br />
• Form 940, 941, 941SS, and 944 — Produce, print, and electronically file<br />
• Form 943 and 944SS — Produce and print<br />
• State Unemployment Reports — Produce and print<br />
• W-2/W-3 — Process, print, and electronically file via EFW2<br />
• 1099-MISC and 1096 — Process, print, and electronically file<br />
• Most State Wage and Tax Reports — Adding new ones as requested and approved<br />
by the state<br />
• Track employer’s contribution to FICA, 401K, and Medicare<br />
• Enter state and locality-specific taxes<br />
• Pay multiple-pay-rate employees<br />
• Track sick and vacation hours earned, used, and remaining<br />
• Portals for employee Payroll, a web-based service helping you save time and<br />
money. Your client performs some of the clerical functions that can take a great<br />
deal of your time. Batch process payroll after your client verifies hours worked<br />
information.<br />
• Split Direct Deposit of payroll checks for employees and payments to contractors<br />
between up to two accounts.<br />
Bookkeeping<br />
• Create a customizable Chart of Accounts (COA)<br />
• Save up to ten years of Chart of Accounts history<br />
• Make prior year adjustments easily with all balances affected by the adjustment<br />
updated automatically<br />
• Journal transactions<br />
• Generate offsetting transactions automatically when entering transactions into the<br />
journal<br />
• Monthly/Yearly breakdown of basic financial reports<br />
• Rename accounts<br />
• Enter Start-of-Year beginning balances and month-to-month balances for each<br />
account.<br />
• Run a start-of-year balance sheet to reflect the year-to-date and run monthly<br />
reports for months entered<br />
• Create accounts (postable and up to nine sub-levels nested)<br />
• Add, edit, or delete transaction descriptions entered and saved during journal<br />
entry<br />
2
2011 Client Write-Up What’s New for 2011?<br />
Accounts Payable<br />
Accounts Receivable<br />
• Set up an unlimited number of vendors<br />
• Enter invoices for future payment or as after-the-fact for bookkeeping purposes<br />
• Use extensive invoice sorting and query capabilities<br />
• Print and reprint vendor checks with automatic entry in the journal<br />
• Print Vendor checks without having to schedule payments using Check Writer<br />
• Generate an invoice for the vendor’s check<br />
• Print NonVendor checks to payees not set up as Vendors using Check Writer<br />
• Write transactions to the journal automatically for vendor and non-vendor checks<br />
• Set up invoicing parameters, service charge indicators, payment terms, account<br />
aging and status information<br />
• Set up sales tax information by state<br />
• Add customer demographics, statuses, shipping information, and balances<br />
• Identify items “for sale” and set prices<br />
• Link transactions to items and debit and credit accounts<br />
• Add, change, print, and delete customer invoices<br />
• Receive and apply payments to one or multiple invoices<br />
Reports<br />
• Print many financial reports to Microsoft Excel<br />
• Compare gross and net profit and loss for a selected month of this year and last<br />
year<br />
• Generate, print, and transmit W-2, W-3, 1099-MISC, 1099-INT, 1099-DIV,<br />
1099-R, 1098-MORT, W-2G, 1099-PATR, 1099-S, 1099-A, 1099-B, 1099-C,<br />
1096, and 94X series tax return information “on the fly”<br />
• Close your books only at the end of the year rather than as part of the end-ofmonth<br />
process<br />
• Run many reports without posting transactions<br />
What’s New for 2011?<br />
Enhancements to Client Write-Up for 2011 include:<br />
• Three levels of security is available for users as determined by the Administrator.<br />
• An option to automatically post payroll transactions to the journal has been added.<br />
• Portals for contractor payments has been added.<br />
• Batch print mailing labels to clients, employees, contractors, vendors, customers,<br />
and one time labels using a strip label printer.<br />
3
<strong>Support</strong><br />
2011 Client Write-Up<br />
• Import employee, contractor, vendor, customer, Chart of Accounts, and journal<br />
transaction information from other accounting programs using the provided Excel<br />
templates.<br />
• Export employee, contractor, accounts payable vendor, accounts receivable customer,<br />
Chart of Accounts, and journal transaction information from Client Write-<br />
Up to a Microsoft Excel ® spreadsheet.<br />
• Bring in last year’s “on the fly” information providing faster and easier W-2s, W-<br />
3s, 1099s, and 1096s.<br />
• Client Write-Up is growing! In order to provide enhancements to meet your<br />
needs, we are already working on our 2012 release. For a sneak preview, open<br />
CWU2011 and go to File > Try Our Alternate Main Menu. It is compatible<br />
with CWU2011 and all data is shared between the two. So, work in it and experience<br />
what we're getting excited about!<br />
<strong>Support</strong><br />
Contacting <strong>Support</strong><br />
There are several options available for you to receive assistance with Client Write-Up.<br />
You can call, e-mail, or fax the Client Write-Up <strong>Support</strong> team.<br />
Telephone <strong>Support</strong><br />
Client Write-Up has its own <strong>Support</strong> phone number.<br />
Call (828) 349-5547 to speak to a dedicated CWU <strong>Support</strong> representative.<br />
For <strong>Support</strong> hours of operation, refer to “<strong>Support</strong> Hours” on page 5<br />
E-mail <strong>Support</strong><br />
Client_WU@<strong>Drake</strong><strong>Software</strong>.com<br />
When you e-mail <strong>Support</strong>, please include:<br />
• Your name<br />
• Your EFIN<br />
• A description of your problem in as much detail as possible<br />
• Attach your client file, if necessary.<br />
Fax <strong>Support</strong><br />
Contact CWU <strong>Support</strong> by fax. Dial (828) 349-5718.<br />
When you send a fax to our CWU <strong>Support</strong> team, please include:<br />
• Attention: Client Write-Up <strong>Support</strong><br />
• Your name<br />
4
2011 Client Write-Up System Requirements<br />
<strong>Support</strong> Hours<br />
• Your EFIN<br />
• Telephone number accessible to the CWU computer and the best time for <strong>Support</strong><br />
to call you back<br />
• Your fax number<br />
• Description of the problem<br />
December 1st — April 20th<br />
Monday — Friday 8a.m. to 10p.m.<br />
Saturday 8a.m. to 6p.m.<br />
April 21 — November 30<br />
System Requirements<br />
Monday — Friday 8a.m. to 9p.m.<br />
Saturday 9a.m. to 5p.m.<br />
Review all system requirements before installing Client Write-Up.<br />
Table 1-1 details the minimum requirements for installing and running CWU. <strong>Drake</strong><br />
<strong>Software</strong> strongly recommends that you upgrade older systems to these minimum<br />
requirements.<br />
Table 1-1: System Requirements<br />
Windows 2000 and XP Windows Vista and 7<br />
233 MHz processor 800 MHz processor<br />
512 MB of RAM 512 MB of RAM<br />
VGA monitor capable of 800 * 600 resolution<br />
and 258 colors<br />
CD drive<br />
Super VGA monitor<br />
CD drive<br />
200 MB of hard disk space 200 MB of hard disk space<br />
Internet Explorer 6.0 Internet Explorer 6.0<br />
To take maximum advantage of the software’s features, you need:<br />
• High-speed Internet access. Internet service is required for immediate updates.<br />
• A TWAIN-compliant scanner<br />
• An HP-compatible printer (laser printer preferred) is strongly recommended.<br />
Other printers are compatible with <strong>Drake</strong> <strong>Software</strong>. Call CWU <strong>Support</strong> to verify<br />
compatibility of your printer.<br />
• CWU offers MICR printing. This requires a laser printer with a magnetic ink cartridge.<br />
5
Installation<br />
2011 Client Write-Up<br />
Installation<br />
Stand-Alone Installation<br />
Installation procedures for Client Write-Up are virtually identical to those used for<br />
<strong>Drake</strong> Tax <strong>Software</strong>. Install to a stand-alone PC or a network.<br />
To install Client Write-Up for single computer use, complete the following:<br />
1. Close all programs.<br />
2. Insert the <strong>Drake</strong> <strong>Software</strong> CD into the CD drive. Use the latest release of the program.<br />
3. Autorun displays a screen with installation selections. If the screen does not open<br />
automatically, from the Start menu, click Start > Run. In the Open field, type<br />
d:\setupcwu.exe (substitute the correct drive letter of your CD drive if not 'd') and<br />
click OK. The installation must be done to the root drive (for example C:).<br />
4. Choose to install Client Write-Up.<br />
5. When the Client Write-Up installation program begins, click Continue.<br />
6. Follow the instructions to complete installation. Install Client Write-Up directly to<br />
the C: drive (root drive). A Client Write-Up icon appears on your desktop once<br />
the installation is complete.<br />
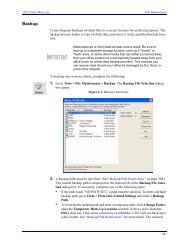
IMPORTANT<br />
The Backup path and Data path are <strong>Drake</strong>-recommended settings.<br />
Please do not change these without first consulting <strong>Drake</strong><br />
<strong>Support</strong>.<br />
Network Installation<br />
NOTE<br />
<strong>Drake</strong> supports the software on networks that are properly configured.<br />
<strong>Drake</strong> cannot provide technical support for the network itself. Please<br />
consult an IT professional for network setup and support.<br />
To install Client Write-Up for network use, complete the following:<br />
1. Close all programs.<br />
2. Install Client Write-Up to the C: drive of the server. The installation to the server<br />
follows the same basic steps as the stand alone installation. The program can be<br />
installed either directly on the server, or to the server from a workstation. Be sure<br />
to select the correct server drive.<br />
3. Insert the <strong>Drake</strong> <strong>Software</strong> CD into the CD drive. Use the latest release of the program.<br />
NOTE<br />
If you are installing to a network, click Print from the opening installation<br />
dialog box to print these instructions.<br />
4. Autorun displays a screen with installation selections. If the screen doesn’t open<br />
automatically, from the Start menu click Start > Run. In the Open field, type<br />
6
2011 Client Write-Up Installation<br />
d:\setupcwu.exe (substitute the correct drive letter of your CD drive if not ‘d’)<br />
and click OK. The installation must be performed to the root drive (C:).<br />
5. Choose to install Client Write-Up.<br />
6. When the Client Write-Up installation program begins, click Continue.<br />
7. Follow the instructions to complete installation. Install Client Write-Up directly to<br />
the C: drive (root drive). A Client Write-Up icon appears on your desktop once<br />
the installation is complete.<br />
WARNING<br />
Map the workstations to the C: drive of the server where Client<br />
Write-Up was installed. Use the same network drive letter for each<br />
workstation. Please consult an IT professional to help map these<br />
drives.<br />
Next, from each workstation, run NWClient.<br />
1. Go to Start > Run.<br />
2. In the Open field, type f:\ (substitute your network drive letter for ‘f’) and press<br />
Enter.<br />
3. Double-click the CWU2011 folder.<br />
4. Double-click NWClient.<br />
5. Click OK on the Shortcut Installed Successfully window. The Client Write-Up<br />
icon is placed on the desktop. This icon opens CWU from the server.<br />
6. Repeat all five steps above on each computer workstation that will be running<br />
CWU.<br />
7. Verify that a <strong>Drake</strong> CWU shortcut exists on the desktop of each workstation. The<br />
caption should say <strong>Drake</strong> 2011 CWU — 'f' Drive where 'f' is the drive letter<br />
mapped in step 2 above.<br />
After installation, the client data path and the backup data path defaults are to the<br />
following locations on both the server and workstations:<br />
Data Path:\CWU2011\clients\<br />
Backup Path:\CWU2011\clients\backups\<br />
WARNING<br />
Please do not change these paths. If you change the Backup or<br />
Data path, it changes for all computers and could prevent opening<br />
a client file.<br />
You can verify these paths by opening Client Write-Up and going to<br />
Firm > Firm Info./Global Settings.<br />
If you have any questions about setting up CWU on a network, please call our<br />
support staff at (828) 349-5547.<br />
7
Activate Client Write-Up<br />
2011 Client Write-Up<br />
Rather than using the CD to install Client Write-Up, you can download<br />
and install the latest version of the software from <strong>Drake</strong>’s <strong>Support</strong> website.<br />
NOTES<br />
To download the software, log in to <strong>Drake</strong>’s <strong>Support</strong> website at http://<br />
www.<strong>Support</strong>.<strong>Drake</strong><strong>Software</strong>.com. Once you’ve logged in, from the<br />
Resources Overview page, click the Download Center link. Click on<br />
the Client Write-Up 2011 link. You’ll have the option of saving the<br />
download to your computer and installing later or installing right from<br />
the Download Center.<br />
Activate Client Write-Up<br />
Setup Wizard<br />
Client Write-Up must be activated for you to have full access to the software. If CWU<br />
is not activated, you may operate the software in Demo mode. In Demo mode, you<br />
have full use of the program for 90 days with the exception of printing and e-filing<br />
Forms W-2 and 1099.<br />
To activate CWU, complete the following:<br />
1. Go to File > Activate CWU.<br />
2. Click Activate <strong>Software</strong>.<br />
3. Enter the software serial number.<br />
4. Click OK.<br />
Designed to guide you through the software setup screens, the Setup Wizard appears<br />
each time the program is opened until all required setup items are completed. A green<br />
check mark indicates that a setup item is complete.<br />
Figure 1-1: Setup Wizard<br />
You are not required to use the Setup Wizard. To keep the Wizard from opening at<br />
program startup, select Do not show Setup Wizard at program startup. Click<br />
File > Setup Wizard to return to the Setup Wizard at any time. Click Exit to close.<br />
8
2011 Client Write-Up System Date Format<br />
System Date Format<br />
Windows 2000<br />
CWU requires that your computer use the MMDDYYYY date format. To set your<br />
computer to use this format, locate the version of Windows you are using and follow<br />
the instructions listed.<br />
1. Click Start, then Settings, then Control Panel.<br />
2. Double-click Regional Options.<br />
3. Select the Date tab.<br />
4. Set the date to the MM/dd/yyyy format.<br />
5. In the Date separator field, select to use a forward slash (“/”) from the drop list.<br />
6. Click OK.<br />
Windows XP<br />
1. Click Start, and then click Control Panel.<br />
2. Double-click Regional and Language Options.<br />
3. From the Regional Options tab, click the Customize button.<br />
4. On the Customize Regional Options dialog box, select the Date tab.<br />
5. In the Short date format field, either type MM/dd/yyyy or select this format<br />
using the drop list.<br />
6. In the Date separator field, select to use a forward slash (“/”) from the drop list.<br />
7. Click OK.<br />
Windows Vista<br />
1. Open the Control Panel.<br />
2. Click Clock, Language, and Region.<br />
3. Click Regional and Language Options.<br />
4. Click the Customize this format button.<br />
5. Select the Date tab.<br />
6. In the Short date format field, select the MM/dd/yyyy format using the drop<br />
list.<br />
7. Click OK.<br />
Windows 7<br />
1. Open the Control Panel (All Items view).<br />
2. Click Clock, Language, and Region.<br />
3. Click Region and Language.<br />
4. Select the Formats tab.<br />
5. In the Short date field, select the MM/dd/yyyy format using the drop list.<br />
9
CWU <strong>Manual</strong> and Help Updates<br />
2011 Client Write-Up<br />
6. Click OK.<br />
CWU <strong>Manual</strong> and Help Updates<br />
Because your Client Write-Up software is continuously being enhanced, the pages in<br />
your software manual and the program Help file will occasionally need to be updated.<br />
The Client Write-Up Help system is updated every time there is a change to the way<br />
the program operates or there is an update to the program’s features. You should<br />
update the Client Write-Up Help file at least once a month.<br />
To download the latest Help file:<br />
1. Go to http://www.<strong>Support</strong>.<strong>Drake</strong><strong>Software</strong>.com.<br />
2. From the Resources Overview page, click the Download Center link.<br />
3. Click the Client Write-Up 2011 Release Date - January 3, 2011 link.<br />
4. Scroll to the bottom of the page.<br />
5. Click the 2011 Client Write-Up Help File link.<br />
6. Click Run.<br />
7. Click Run again (on the Security Warning window).<br />
8. Specify the drive where Client Write-Up is installed and click OK. Installation<br />
should only take a few seconds.<br />
9. When the All items were successfully extracted message displays, click OK.<br />
To download the latest version of the manual:<br />
1. Go to http://www.<strong>Support</strong>.<strong>Drake</strong><strong>Software</strong>.com.<br />
2. Click the Training Tools link on the left side of the page.<br />
3. Click the <strong>Manual</strong>s link.<br />
4. Scroll down to the Client Write-Up <strong>Manual</strong>s section and click the 2011 Client<br />
Write-Up <strong>Manual</strong> link. Once the file opens, you can Save or Print the manual.<br />
If you have a printed copy of the Client Write-Up manual, you will periodically need<br />
to print and replace (or add) pages as they are updated. These are referred to as<br />
“Addendum Pages.”<br />
To download manual addendum pages:<br />
1. Go to http://www.<strong>Support</strong>.<strong>Drake</strong><strong>Software</strong>.com.<br />
2. Click the Training Tools link on the left side of the page.<br />
3. Click the <strong>Manual</strong>s link.<br />
4. Scroll down to the Client Write-Up <strong>Manual</strong>s section and click the Instructions<br />
link. This PDF file lists the details of each manual addendum page update. Once<br />
the file opens, you can Save or Print the file.<br />
10
2011 Client Write-Up Navigation<br />
5. Click the specific addendum page number to view the updated page. Once the file<br />
displays, you can Save or Print the page and insert it into your printed manual.<br />
NOTE<br />
Purchase a printed copy of the Client Write-Up manual by going to<br />
http://www.<strong>Support</strong>.<strong>Drake</strong><strong>Software</strong>.com, click on Client Write-Up on<br />
the left side of the page. Then select the link at the top right of the page<br />
that says Click here to order a copy of the CWU 2011 <strong>Manual</strong>.<br />
We suggest you download the entire manual to your computer’s desktop.<br />
Having an electronic copy of the manual on your computer provides<br />
you the ability to quickly search for your desired topic. Since the<br />
manual is updated frequently, you should download the entire manual<br />
to your desktop at least once a month.<br />
Navigation<br />
CWU is a Windows-based program and has standard drop list menu navigation. The<br />
following tips will aid in navigating the program.<br />
• Press ESC to exit any window or dialog box.<br />
NOTE<br />
Pressing ESC to exit a screen does not save the information on that<br />
screen. You must click the Save button to save your data.<br />
Documentation Standards<br />
• Press ENTER or TAB to move to the next field.<br />
• Press ALT to activate the menu bar, then type the letter that corresponds with the<br />
underlined letter in the menu bar. To choose a command from the drop list, type<br />
the letter that corresponds with its underlined letter. For example: Press<br />
Alt > f > n to select File > New Client.<br />
• Use the mouse to select menu items and commands. Click the right mouse button<br />
for additional selections such as cut, copy, and paste.<br />
• Access many of the functions in Client Write-Up with a single mouse click by<br />
clicking an icon on the Home window. See “Appendix H - Home Screen Shortcuts”<br />
on page 337 for a description of these shortcuts.<br />
Use the following key in reading this manual:<br />
• Window/dialog box names, tab names, and field names — Window/dialog box<br />
names, tab names, and field names appear bold (Account & Payroll Information<br />
dialog box, Payroll Info tab, Firm Name field).<br />
• Dialog box buttons — Dialog box buttons appear bold (Save).<br />
• Keyboard keys to type — Appear in bold. (Press Y for Yes.)<br />
• Command paths — Appear bold and separated by an angle bracket “>”<br />
(Setup > Display Settings).<br />
11
Navigation<br />
2011 Client Write-Up<br />
• “Click” means to press the left mouse button. “Double-click” means to press the<br />
left mouse button twice in rapid succession. “Right-click” means to press the right<br />
mouse button.<br />
Hot Keys<br />
Hot keys are buttons or keyboard shortcuts used to speed data entry. The following list<br />
details some of the most commonly used shortcuts.<br />
F2 — Displays one of the following, depending on the window and field:<br />
• A list of postable account numbers and names from the Chart of Accounts.<br />
• A list of vendor codes and names.<br />
F3 — Displays all employee codes and names.<br />
F4 — Displays a list of contractor codes and names.<br />
Date Fields<br />
Date fields are entered either directly, using the MMDDYYYY format, pressing the<br />
plus (+) or minus (-) keys to increase or decrease the month, day, or year, or by using<br />
the drop list calendar function.<br />
To enter a date using the drop list calendar function, complete the following steps:<br />
1. Click the date selection drop list (Figure 1-2), select the year and month, then<br />
click the specific date. Once the day has been selected, the date field is filled using<br />
the MM/DD/YYYY format.<br />
Figure 1-2: Date Selection Drop List<br />
Figure 1-3: Calendar Function<br />
12
2011 Client Write-Up Navigation<br />
2. Click the year and use the up and down arrows ( ) to increase or decrease the<br />
year (Figure 1-3).<br />
3. Click the month (Figure 1-4) to display the list of months. Select the month from<br />
the list. You can also use the left and right arrows (<br />
forward a month at a time.<br />
) to move backward or<br />
Figure 1-4: Month Selection<br />
Changing the Active Client<br />
4. Once the month and year are selected, click the day on the calendar for the specific<br />
date. The selected date fills the field.<br />
To view a different client’s information, from the Client Write-Up Home window, go<br />
to File > Open Client. Next, select the client and click OK.<br />
13
Navigation<br />
2011 Client Write-Up<br />
14
2011 Client Write-Up Firm Info/Global Settings<br />
2 Global Setup<br />
Global setup options are used throughout CWU for all clients. These include:<br />
• Entering information about your firm (Firm name and contact information, EIN,<br />
EFIN, <strong>Drake</strong> password, etc.)<br />
• Setting up security authorization passwords<br />
• Entering Direct Deposit authentication information (if the Direct Deposit feature<br />
will be used)<br />
• Setting up 94X series tax return preparer information<br />
• Designating the default MICR printer<br />
• Designing MICR check layouts that can be used by all clients<br />
• Check stub and form printing adjustments<br />
Firm Info/Global Settings<br />
The first time you launch Client Write-Up, the program opens the Setup Firm Information<br />
window. Enter the information on this window before entering transactions,<br />
but it is not required at this time. Access this window later from Firm > Firm Info./<br />
Global Settings.<br />
Figure 2-1: Firm Info./Global Settings<br />
15
Firm Info/Global Settings<br />
2011 Client Write-Up<br />
NOTE<br />
There is one Firm Info./Global Settings for all clients and reflects the<br />
information that the IRS associates with your EIN.<br />
To enter the global firm information, complete the following:<br />
1. Go to Firm > Firm Info./Global Settings.<br />
• Firm Name (Required) — Enter the firm name of your bookkeeping or<br />
accounting company.<br />
• Contact — This is the person that can communicate with the IRS in reference<br />
to the clients' accounts. The contact is required in order to file electronically.<br />
• Address — Enter the firm’s address.<br />
• Zip — Enter the Zip and the City and State autofill.<br />
• TCC — Enter the five-character alphanumeric Transmitter Control Code<br />
(TCC) assigned by the IRS/ECC-MTB. A TCC must be obtained to e-file data<br />
with this program. Submit Form 4419 to the IRS to obtain a TCC.<br />
NOTE<br />
See “Appendix K - Preparing to e-file 1099s” on page 343 for details on<br />
getting a Transmitter Control Code and registering to use the IRS’s<br />
FIRE website.<br />
• Phone and Fax — Enter the firm’s primary phone number and fax number.<br />
• EIN (Required) — Enter the firm’s Employer Identification Number (EIN).<br />
NOTE<br />
A Social Security Number may be entered in the EIN field. 1099s and<br />
W-2s can be e-filed using a Social Security Number; however, if transmitting<br />
W-2s with a Social Security Number in the EIN field, the firm<br />
must be a sole proprietorship with no employees.<br />
• EFIN (Required) — Enter the firm’s Electronic Filing Identification Number<br />
(EFIN).<br />
• Acct No (Required for e-filing) — Enter your <strong>Drake</strong> account number that is<br />
found on the software’s packing slip. This number is required to e-file 94X<br />
series tax returns.<br />
• <strong>Drake</strong> PWD — Enter your <strong>Drake</strong> Password that is found on the software's<br />
packing slip.<br />
NOTE<br />
The EIN, EFIN, Account Number, and <strong>Drake</strong> password must be entered<br />
in order to file Forms 940, 941, 944, 941SS electronically.<br />
• Portals Key (Serial Number) — See “Appendix G - Portals” on page 321 for<br />
information on how to get a Portals Key and the use of Portals.<br />
• Email Address (Required for e-filing) — This is used throughout the program<br />
for forms requiring the firm’s e-mail information.<br />
• Tax Rates, Wage Base, Social Security, Medicare, and Minimum Wage<br />
— These fields are determined by the IRS and were accurate when the program<br />
shipped. These figures must be manually updated if they are changed by<br />
16
2011 Client Write-Up Security Set Up<br />
the government. For example, if the government changes the minimum wage,<br />
go to File > Firm Info./Global Settings, enter the new minimum wage rate,<br />
and click Save.<br />
• Backup Path — This is the location where copies of client data are backed<br />
up. The default backup path is \CWU2011\Clients\Backups. To specify a different<br />
location, enter the path or click the button to the right of the text<br />
box and browse to a new location. This is also the backup location used before<br />
every Post Transactions process.<br />
• Data Path — This designates the storage location for the client files. The<br />
default (and recommended) data path is \CWU2011\Clients.<br />
WARNING<br />
Do not change the location of the data path without the supervision<br />
of CWU <strong>Support</strong>. Call CWU <strong>Support</strong> at (828) 349-5547<br />
for assistance.<br />
• MICR Printer — Assign the default printer used to print MICR checks, or at<br />
the time MICR checks are printed. MICR check printing requires a high quality<br />
laser printer using MICR toner.<br />
If using blank (not pre-printed) MICR check stock to print payroll or vendor<br />
checks, specify your MICR printer.<br />
– Click the button to the right of the MICR Printer text box.<br />
– Select your MICR check printer from the drop list and click OK.<br />
Refer to “MICR Check Set Up” on page 24 for additional setup information<br />
for printing MICR checks.<br />
2. Click Save.<br />
IMPORTANT<br />
Always click Save before exiting a dialog box or window or you<br />
will lose your changes.<br />
Security Set Up<br />
NEW FOR<br />
2011<br />
Restrict access to various parts of Client Write-Up using three Administrator-assigned<br />
security groups.<br />
Setting login security is not required but recommended.<br />
Users must correctly enter the user ID and password combination assigned by the<br />
Administrator to access the CWU program.<br />
17
Security Set Up<br />
2011 Client Write-Up<br />
There are three levels of access available: Administrator, Office Manager, and Data<br />
Entry Employee. Each of these levels have specific access to parts of the CWU program..<br />
Table 2-1: Security Access Based on Security Level<br />
Security Level<br />
Access Available<br />
Administrator<br />
Office Manager<br />
Data Entry Employee<br />
Full Access<br />
Full access except Firm > Security Setup<br />
Access to all areas except:<br />
• Home window, New Client icon<br />
• Home window, Setup Options icon<br />
• Home window, Deductions & Benefits icon<br />
• File > New Client<br />
• File > Setup Wizard<br />
• Firm menu<br />
• Employees > Account & Payroll Information<br />
• Employees > Deductions & Benefits<br />
• Contractors > Account & Payroll Information<br />
• Bookkeeping > Enter Transactions (Delete button)<br />
• Payables > Enter New Invoices (Delete button)<br />
• Payables > Check Writer<br />
• Receivables > GL Account Dist File<br />
• Receivables > Delete Invoices/Line Items (Delete Invoice<br />
button)<br />
• Tools > File Maintenance > Delete Client<br />
• Setup > Client Information<br />
• Setup > MICR Bank Accounts<br />
• Setup > Check and Stub Options<br />
• Setup > Headers & Footnotes<br />
• Setup > Report Options<br />
• Setup > 94X Form Settings<br />
Setting Up User IDs and Passwords<br />
The Administrator can set up an unlimited number of each User Type (Administrator,<br />
Office Manager, and Data Entry Employee). Administrators assign all user IDs and<br />
passwords.<br />
IMPORTANT Once security is set up, it cannot be removed.<br />
18
2011 Client Write-Up Security Set Up<br />
To set up user IDs and passwords:<br />
1. Go to Firm > Security Setup.<br />
Figure 2-2: User ID and Password Setup window<br />
IMPORTANT<br />
An Administrator ID and password must be set up before any<br />
other User Type is set up. Once the Administrator is set up, all<br />
users must login to access CWU. The Administrator ID cannot be<br />
deleted.<br />
2. Enter the User ID and user Password. User IDs must be between 3 and 20 characters<br />
long and are not case sensitive. Passwords must be between 8 and 20 characters<br />
long and are case sensitive. Reenter the password to confirm it.<br />
3. Use the drop list to select the User Type. See Table 2-1 for information on security<br />
levels.<br />
4. Click Save.<br />
5. Continue entering and saving User IDs and Passwords as needed.<br />
Click List User IDs to list all users IDs by user type.<br />
Changing a<br />
Password<br />
The Administrator can change a user’s password. Passwords cannot be recovered. If a<br />
password is forgotten or lost, the Administrator can go to the Security Setup window<br />
to change the user’s password.<br />
To change the user’s password:<br />
1. Go to Firm > Security Setup.<br />
19
Direct Deposit<br />
2011 Client Write-Up<br />
2. Enter the user’s ID in the User ID field.<br />
3. Enter and confirm the new user password.<br />
4. Click Save. See “Changing a User’s Password” on page 20 for instructions on<br />
how a user can change his or her own password.<br />
Deleting a<br />
User ID<br />
The Administrator can delete a user ID and eliminate that user’s access to CWU.<br />
NOTE<br />
Deleting all user IDs eliminates all security from CWU. If a passwordonly<br />
user is set up then access is granted to CWU only by using that<br />
password..<br />
To delete a User ID:<br />
1. Go to Firm > Security Setup.<br />
2. Enter the user’s ID of the user to be deleted.<br />
3. Click Delete ID.<br />
Changing a User’s Password<br />
Direct Deposit<br />
All users can change their password.<br />
For a user to change their password:<br />
1. Go to Firm > Change Password<br />
2. Enter the User ID<br />
3. Enter the current user password<br />
4. Enter and confirm the new password<br />
5. Click OK.<br />
There are three options for producing payroll. Payroll checks can be printed using<br />
either preprinted or blank MICR check stock, and you can enter payroll information<br />
after-the-fact (ATF). You can also use Direct Deposit for some or all employee and<br />
contractor pay checks. Two accounts can be established with InterceptEFT for greater<br />
flexibility of payroll disbursement. Specify which account to use for each Direct<br />
Deposit transmission.<br />
IMPORTANT<br />
An Internet connection is required to use the Direct Deposit feature.<br />
To use the Direct Deposit feature, complete the following steps:<br />
1. Establish your account with InterceptEFT. See “Establishing Your Account with<br />
InterceptEFT” on page 21.<br />
2. Complete the Direct Deposit setup. See “Direct Deposit Setup” on page 21.<br />
20
2011 Client Write-Up Direct Deposit<br />
3. Identify which employees and contractors will receive their pay by direct deposit.<br />
Refer to the Direct Deposit tab information under “Employee Setup” on page 72<br />
and under “Contractor Setup” on page 125 for direct deposit set up instructions.<br />
4. Enter live payroll information that includes direct deposit employees and/or contractors.<br />
Print check stubs if you desire. See “Live Employee Payroll” on page 86<br />
and “Live Contractor Payroll” on page 130 for more information.<br />
5. Transmit the pay information to InterceptEFT. See “Transmitting Employee<br />
Direct Deposits” on page 107 and “Transmitting Contractor Direct Deposits” on<br />
page 143.<br />
Establishing Your Account with InterceptEFT<br />
Direct Deposit Setup<br />
<strong>Drake</strong> has partnered with InterceptEFT to provide Direct Deposit services.<br />
Contact InterceptEFT at 1-866-431-9926 to establish your direct deposit account.<br />
<strong>Drake</strong> has negotiated discount pricing with InterceptEFT for this service. When<br />
speaking to InterceptEFT, you must identify yourself as a <strong>Drake</strong> client in order to take<br />
advantage of this special pricing.<br />
Once you’ve sent your request for an account to InterceptEFT, they will send a packet<br />
of information to you regarding your account. All of the information required to complete<br />
the Firm > Direct Deposit Authentication screen is included in that packet.<br />
To complete the Direct Deposit setup, complete the following steps:<br />
1. Go to Firm > Direct Deposit Authentication.<br />
21
Direct Deposit<br />
2011 Client Write-Up<br />
Figure 2-3: Direct Deposit Authentication<br />
2. Carefully enter the letters and numbers to match the Authentication Card received<br />
from InterceptEFT.<br />
• To enter the letters and numbers, double-click a row in the five row grid.<br />
• Use the drop lists to select letters and numbers.<br />
• Save each row entered before proceeding to the next row.<br />
InterceptEFT sends new Authentication cards periodically. Enter the new letters and<br />
numbers each time you receive a new card.<br />
3. Enter the PIN, UserID, and Password of the “Primary” InterceptEFT account.<br />
The fields display asterisks. Reenter the primary UserID and Password.<br />
4. If a second account has been established with InterceptEFT, enter the PIN,<br />
UserID, and Password of the “Secondary” account. The fields display asterisks.<br />
Reenter the secondary UserID and Password.<br />
5. Click Save.<br />
IMPORTANT<br />
InterceptEFT is <strong>Drake</strong>’s agent for Direct Deposit. You must call<br />
them (1-866-431-9926) and establish your account prior to using<br />
the Direct Deposit feature. <strong>Drake</strong> has established a special fee<br />
schedule with InterceptEFT for its clients. It’s important that you<br />
identify yourself as a <strong>Drake</strong> client whenever you communicate<br />
with InterceptEFT.<br />
22
2011 Client Write-Up 94X Preparer Setup<br />
94X Preparer Setup<br />
Complete the 94X Preparers Setup screen and the Paid Preparers Use Only section<br />
of 94X series tax returns automatically fills. This information is available for use by<br />
all clients and is not client specific.<br />
To enter 94X preparer information, complete the following:<br />
1. Go to Firm > 94X Preparer Setup.<br />
Figure 2-4: 94X Preparer’s Setup<br />
2. Enter a preparer code into the Preparer ID field and press ENTER, or click New.<br />
Preparer codes are alphanumeric and can be up to 20 characters long. Once a valid<br />
preparer code is entered, the information fields are enabled. Once the preparer<br />
information has been saved, the Preparer ID cannot be changed.<br />
3. Complete the following field information:<br />
• Preparer Name — Enter the name of the preparer that will be completing the<br />
94X series tax returns.<br />
• Self-Employed — Select this option if the preparer is self-employed and<br />
doesn’t work for a firm.<br />
• Firm Name — If the preparer works for a firm, enter the name of the firm. If<br />
the preparer is self-employed, enter the preparer’s name.<br />
• Address, City, State, Zip Code — Enter the full address of the preparer.<br />
• Zip Code — Enter the preparers Zip Code and the City and State autofill.<br />
• Preparer SSN/PTIN — Enter the preparer’s SSN or PTIN (Preparer Tax<br />
Identification Number). Apply for a PTIN using Form W-7P. Do not include<br />
dashes. The number is formatted when the screen is saved.<br />
• EIN — If the preparer works for a firm, enter the firm’s EIN. Do not include<br />
dashes. The number is formatted when the screen is saved.<br />
23
MICR Check Set Up<br />
2011 Client Write-Up<br />
MICR Check Set Up<br />
MICR Check Stock<br />
• Phone — Enter the preparer’s phone number. Do not include dashes. The<br />
number is formatted when the screen is saved.<br />
4. Enter the following in the Third Party Designee section:<br />
• Allow Third Party Designee/Does not Allow Third Party Designee —<br />
Select to allow or not allow use of a third party designee. By selecting Allow,<br />
you authorize the IRS to talk to the designee about the return. The Designee<br />
Name, Phone, and PIN fields become active when the Allow option is<br />
selected.<br />
• Designee Name — Enter the name of the third party designee.<br />
• Designee Phone — Enter the phone number of the third party designee. Do<br />
not include dashes. The number is formatted when the screen is saved.<br />
• Designee PIN — Enter a 5-digit self-selected numeric PIN for the Third<br />
Party Designee.<br />
5. Click Save.<br />
Magnetic Ink Character Recognition (MICR) was developed in 1956 for the banking<br />
industry and gives banks a secure and faster method of processing checks. It uses special<br />
characters and magnetic ink or toner on blank check stock to print the numbers<br />
and characters found on the bottom of checks — usually the check number, routing<br />
number, and account number. A laser printer that accepts MICR toner is required to<br />
print these checks. A document printed with MICR ink is read by passing it through a<br />
machine that first magnetizes the ink on the MICR line and then reads the magnetic<br />
signals. Each character gives off a magnetic signal unique and identifiable to that<br />
character.<br />
Use the following guidelines when purchasing MICR check stock for printing payroll<br />
checks:<br />
• 8.5 x 11 sheet size.<br />
• Each sheet divided into three sections — one check with two stubs.<br />
• The check section can be at the top, center, or bottom of the sheet. It is recommended<br />
the check be in the bottom section. The checks would thus have a clean<br />
bottom edge (no perforations) to slide through the reader.<br />
• The check should be 3.5 inches high. The two stubs do not have to be of equal size<br />
but should each be between 3.5 and 4.0 inches high.<br />
Table 2-2 displays the NELCO brand MICR check stock item numbers currently supported<br />
by Client Write-Up for printing payroll checks:<br />
Table 2-2: NELCO MICR Check Stock<br />
5110_ 80520 80757 L80501_14<br />
80005 80536 80758 L80502_14<br />
24
2011 Client Write-Up MICR Check Set Up<br />
Table 2-2: NELCO MICR Check Stock<br />
80013 80537 80759 L80503_14<br />
80135 80539 80760 L80503M_14<br />
80136 80544 80761 L80510_14<br />
80137 80546 80762 L8860_13<br />
80138 80550 80763 L8868_13<br />
80139 80552 80764 L8870_13<br />
80140 80610 80765 LSR301_14<br />
80148 80675 80766 LSR501_14<br />
80150 80676 80767 LSR501M_14<br />
80231 80677 80768 LSR601_14<br />
80233 80678 80769 LSR601M_14<br />
80234 80679 80770 LSRBLK_14<br />
80235 80680 80771 LSRBLKM_14<br />
80257 80683 80773 LSRMID_14<br />
80258 80751 80774 WAVEBOT_<br />
80461 80753 80776 WAVEMID_<br />
80468 80754 80778 WAVETOP_<br />
80469 80755 80780<br />
80479 80756 8958<br />
The underscores included in the item numbers above indicate there is a choice of<br />
color. For example, WAVETOP_ includes:<br />
WAVETOPB — Blue<br />
WAVETOPBG — Burgundy<br />
WAVETOPGN — Green<br />
WAVETOPGY — Gray<br />
WAVETOPT — Taupe or Tan<br />
NOTE<br />
Go to www.<strong>Drake</strong>Supplies.com to purchase check stock.<br />
MICR Check Design<br />
Complete the following steps to set up MICR check printing using blank check stock.<br />
These steps are necessary only once.<br />
25
MICR Check Set Up<br />
2011 Client Write-Up<br />
Go to Firm > MICR Check Global Designer to create a new MICR check design or<br />
customize the appearance of an existing MICR check design. Create one or more<br />
check designs. MICR check designs are available for use by all clients and are not client<br />
specific. Every design is available to every client and every MICR bank account.<br />
Figure 2-5: MICR Check Global Designer<br />
Create a New<br />
MICR Check<br />
Design<br />
1. Design Code — Enter any positive whole number between 1 and 9999. This number<br />
should be unique for each design. Click New.<br />
2. Design Name — Enter a name for your design.<br />
3. NELCO Check Forms — Select a form from the drop list of supported blank<br />
check stock. When one of these forms is selected from the list, the check placement<br />
and measurements for printing are automatically set. If needed, the Check<br />
Placement, Perf 1, Perf 2, and Bottom settings can be adjusted to match your<br />
check stock.<br />
NOTE<br />
Nelco check stock is not required to use CWU for printing MICR<br />
checks. If you use a different brand of MICR checks, edit the Check<br />
Placement and Measured from Top of Page settings to match your<br />
check stock.<br />
4. Check Placement — Blank check stock comes in 8.5 X 11 inch sheets and is perforated<br />
with the “check” portion at the top, bottom, or center of the page. Determine<br />
your check placement and select the appropriate option button.<br />
5. Measured from Top of Page — Measure the following from the top of the check<br />
stock:<br />
• Perf 1 — Measure from the top of the page to the first perforation and enter<br />
that measurement into the Perf 1 field.<br />
• Perf 2 — Measure from the top of the page to the second perforation and<br />
enter that measurement into the Perf 2 field.<br />
• Bottom — Enter the measurement of the length of the page, from top to bottom<br />
and enter that into the Bottom field.<br />
26
2011 Client Write-Up MICR Check Set Up<br />
Figure 2-6: MICR Check Designer<br />
6. The MICR Check Designer also shows a mock-up of a check including default<br />
fields with their locations and sizes. Move or resize the check’s fields so that they<br />
print properly. Select a field by clicking it. The field name turns red and resizing<br />
handles (eight small black squares) appear along the border. Rest your pointer<br />
over the resizing handles and the cursor changes to a double-headed arrow; this<br />
indicates the resizing mode. Click, hold down the button, and drag the handle to<br />
resize the field. To move a field, rest your pointer anywhere over the field. The<br />
cursor is displayed as a four-headed arrow. Using this cursor, click, hold, and drag<br />
the field to the desired position on the check.<br />
The routing and account numbers are not accessible in the check designer. There<br />
are strict rules for the format and placement of these fields. CWU prints the information<br />
in the appropriate place when a check is printed. The information that goes<br />
in these fields (the account number and routing number) is entered in<br />
Setup > MICR Bank Accounts.<br />
Figure 2-7: Font Tool<br />
7. Use the Font Tool section at the bottom of the MICR Check Designer to set the<br />
font, font style, and font size of each field on the check. The current settings for<br />
the check appear on the right side under Current Font Settings. To change a<br />
field's font style, select the field. The selected field's font attributes are displayed<br />
on the left side of the Font Tool. Use the Name and Size drop lists and the Bold,<br />
Italic, and Underline check boxes to set the selected field's individual appearance.<br />
To make one field's style look like another field, first select the field with the style<br />
to be copied. Click GetFont. Select the field to be changed. Click Apply. Repeat<br />
the process by selecting another field and click Apply.<br />
27
MICR Check Set Up<br />
2011 Client Write-Up<br />
CWU uses “True Type” fonts only.<br />
NOTE<br />
Use the Defaults button to revert to the default settings for your<br />
checks. Click Save after clicking Defaults. This is also a good way to<br />
return to the default settings if you have been trying to design your own<br />
checks and want to start again.<br />
8. When satisfied with the design, click Save.<br />
Specify the<br />
MICR Printer<br />
You must tell CWU what printer to use for MICR checks. See “MICR Printer” under<br />
the Firm Info./Global Settings section.<br />
To specify the default MICR printer:<br />
1. Go to Firm > Firm Info./Global Settings.<br />
2. Click the button to the right of the MICR Printer text box.<br />
3. Select your MICR check printer from the drop list and click OK.<br />
4. Click Save.<br />
Edit an<br />
Existing<br />
MICR Check<br />
Design<br />
To edit an existing MICR check design:<br />
1. Go to Firm > MICR Check Global Designer<br />
2. Double-click one of the entries in the designs list (below the Design Name<br />
header) to access an existing design, or enter the design code and press Enter.<br />
Sort the order of the designs list by clicking the column header (Design Code or<br />
Design Name). A representation of the check is displayed. In addition, the fields<br />
describing check and stub placement are active.<br />
3. Modify the design (see “Create a New MICR Check Design” on page 26).<br />
4. Use the Reset button to revert to the previously saved version of an existing<br />
design.<br />
5. Click Delete to remove a check layout.<br />
6. Click Save when design modifications are complete.<br />
When a MICR payroll check is printed, the information flows from the fields in<br />
MICR Bank Accounts (see “MICR Bank Accounts” on page 47),<br />
Employees > Employee Setup, Personal Info tab (see “Adding an Employee”<br />
on page 72), and Employees > Live Payroll (see “Live Employee Payroll” on<br />
page 86), or Contractors > Live Contractor Payroll (see “Live Contractor Payroll”<br />
on page 130), Net Pay field.<br />
Click Save when design modifications are complete.<br />
28
2011 Client Write-Up MICR Calibration<br />
MICR Calibration<br />
Calibration is a two-step process that ensures the MICR information is printed at the<br />
correct width and intensity. If the bank rejects the MICR font printed, a new font must<br />
be selected.<br />
NOTE<br />
Please contact CWU <strong>Support</strong> for assistance.<br />
To select a new MICR font, complete the following steps:<br />
1. Go to Firm > MICR Calibration.<br />
Figure 2-8: MICR Calibration<br />
2. Click Print Calibration Tool. This prints to the MICR printer selected in<br />
Firm > Firm Info./Global Settings. Follow the instructions in the calibration<br />
tool to determine the correct MICR font for your system.<br />
3. Once you determine the correct MICR font for your system, select it from the<br />
Step 2 list.<br />
4. Click Save.<br />
Preprinted Check Alignment<br />
To adjust the printing alignment of data on pre-printed checks, complete the following<br />
procedure:<br />
1. Go to Firm > Check Stub Printing Adjustments.<br />
29
Forms Alignment<br />
2011 Client Write-Up<br />
2. Select a Pre-Printed check type (top or bottom check stub). The check type<br />
selected is displayed in the Current Form field and the current settings for this<br />
form are displayed in the Horizontal and Vertical sections.<br />
Make adjustments to the Horizontal and Vertical fields. Adjustments made to<br />
print positions are in inch measurements. For example, ½ inch would be entered<br />
as .5. Click to select Up, Down, Left, or Right.<br />
3. Click Save to save the check alignment. To revert to the original setting, click<br />
Reset.<br />
4. Click Exit.<br />
NOTE<br />
These adjustments are for pre-printed check stubs only and do not<br />
affect the printing of MICR checks.<br />
Forms Alignment<br />
To adjust the printing alignment of data on pre-printed forms, complete the following<br />
procedure:<br />
1. Go to Firm > Form Printing Adjustments.<br />
2. Select a form to adjust (standard W2, 4-Up W2, 4-Down W2, W3, W2c, W3c,<br />
Forms 1099, 1098, W2G, or 1096). The form selected is displayed in the Current<br />
Form field and the current settings for this form are displayed in the Horizontal<br />
and Vertical sections.<br />
Make adjustments to the Horizontal and Vertical fields. Adjustments made to<br />
print positions are in inch measurements. For example, ½ inch would be entered<br />
as .5. Click to select Up, Down, Left, or Right.<br />
3. Click Save to save the form adjustment. To revert to the original setting, click<br />
Reset.<br />
4. Click Exit.<br />
NOTE<br />
These adjustments are for pre-printed forms using the “Data Only”<br />
option and do not effect the printing of pre-printed forms printed using<br />
the “Forms and Data” option.<br />
Portals Setup<br />
Client Write-Up Portals is a web-based service designed to have employers perform<br />
some of the more time consuming and labor intensive parts of payroll processing.<br />
For an overview of Portals, see “Appendix G - Portals” on page 321.<br />
30
2011 Client Write-Up Setting Up a New Client<br />
3 Client Setup<br />
Setting up a new client requires entering:<br />
• Client information (company and contact information, type of business, and tax<br />
deposit frequency)<br />
• 94X series PIN application information<br />
• MICR bank accounts<br />
• Checks and check stub printing options<br />
• Reporting options<br />
• The client's Chart of Accounts (not required if CWU is used only for payroll)<br />
• W-2 and 1099 electronic filing setup information<br />
Setting Up a New Client<br />
To create a new client, go to File > New Client and enter the client’s information.<br />
Click Save when complete.<br />
Figure 3-1: New Client<br />
31
Setting Up a New Client<br />
2011 Client Write-Up<br />
Contact Information<br />
Complete the Contact Information tab of Client Setup<br />
(Setup > Client Information > Contact Information).<br />
• Client Code — Enter up to eight alpha/numeric characters (0 - 9, A - Z, and a - z)<br />
including underscores ( _ ). Once the client information has been saved, the Client<br />
Code cannot be changed. Client codes cannot be reused for another client.<br />
• Password — Create a password to access the client’s information. There is no<br />
password by default and a password is not required. Passwords are case sensitive.<br />
Since you select your own password, <strong>Drake</strong> cannot retrieve a lost or forgotten<br />
password. Choose a password you will not forget. Enter a password. Re-enter the<br />
password when prompted.<br />
• Name, Trade Name, Address, Phone, Fax — Enter all contact information for<br />
the client.<br />
• Zip — Enter the zip and the City and State autofill.<br />
• Contact Person — Enter the client’s primary contact person for tax, payroll, and<br />
accounting information.<br />
• Contact Title — Enter the contact person’s title.<br />
• Email — Enter the contact person’s e-mail address.<br />
• EIN — Enter the client’s federal Employer Identification Number (EIN). If the<br />
client is a sole proprietor, use the SSN field instead of the EIN field.<br />
• State ID — Enter the client’s state identification number.<br />
• Unemployment ID — Enter the client’s state unemployment identification number.<br />
• SSN — If the client is a sole proprietor, enter the owner’s Social Security number.<br />
This would be used in place of an EIN.<br />
• State Tax Entity Code — Enter the client’s state tax entity code (if applicable).<br />
• Seasonal Employer — This information is used on both Form 941 and Form 941-<br />
SS.<br />
• Add Client to <strong>Drake</strong> Document Manager — Select this option to automatically<br />
create the folders and subfolder in the <strong>Drake</strong> Document Manager. Refer to<br />
“Appendix D - <strong>Drake</strong> Document Manager” on page 315 for more information<br />
regarding the <strong>Drake</strong> Document Manager.<br />
NOTE<br />
All information, except Client Code, can be entered or edited at a later<br />
date but must be completed before electronic filing.<br />
32
2011 Client Write-Up Setting Up a New Client<br />
Business Information<br />
Complete the Business Information tab of Client Setup<br />
(Setup > Client Information > Business Information).<br />
Figure 3-2: New Client - Business Information<br />
• Deposit Frequency — Used to determine whether a Schedule B is required to be<br />
filed with Form 941. Select Semi-Weekly to produce a Schedule B with Form<br />
941. Select Monthly to fill in Line 17 of both Form 941 and 941-SS. Refer to the<br />
instructions for Form 941 at www.irs.gov for IRS guidelines regarding the appropriate<br />
deposit frequency.<br />
• Bus. Type — Select one from the drop list: sole proprietor, partnership, corporation,<br />
or an S-corporation.<br />
• Start of Year Date — Set this date to the first day of the client's business year. For<br />
example, if the client's fiscal year begins April 1, the start-of-year date is 04/01/<br />
2011. Fiscal or calendar years are allowed.<br />
• Company No Longer in Business — Select this option if the client went out of<br />
business during 2011. When this option is selected, the Last Business Date field<br />
is activated where the client’s last date in business in 2011 should be entered.<br />
• Live/ATF Portals Payroll — If this client is a portals payroll client, specify<br />
whether they are a “Live” or After-the-Fact (“ATF”) portals payroll client. The<br />
default selection is Live Portals Payroll.<br />
NOTE<br />
Disregard the Live Portals Payroll and ATF Portals Payroll settings if<br />
this client is not a portals payroll client.<br />
• Employer has Private Family Leave Insurance Plan — Select this option if the<br />
client offers employees a private family leave insurance plan. When this option is<br />
selected, the Private Family Leave Insurance Plan Number field is activated<br />
33
Setting Up a New Client<br />
2011 Client Write-Up<br />
W-2/W-3-1099 MISC. Setup<br />
and the employer’s plan number should be entered. Private Family Leave Insurance<br />
should also be set up as a deduction (see “Adding a Deduction” on page 65)<br />
with a Withholding Code of FLIW.<br />
• Employer has Private Disability Plan — Select this option if the client offers<br />
employees a private disability insurance plan. When this option is selected, the<br />
Private Disability Plan Number field is activated and the employer’s plan number<br />
should be entered. Private Disability Plan should also be set up as a deduction<br />
(see “Adding a Deduction” on page 65) with a Withholding Code of EPDW.<br />
Complete the W2/W3-1099/1098 Setup tab of Client Setup<br />
(Setup > Client Information > W2/W3-1099/1098 Setup).<br />
Figure 3-3: New Client - W-2, W-3, 1099, and 1098 Setup<br />
Click to select the desired W-2 printing options.<br />
• Print Employer Name on W-2<br />
• Print Employer Trade Name on W-2<br />
• Print Both Employer Name and Trade Name on W-2<br />
• Standard W2s — This is the default selection. When this option is selected, W-2<br />
forms print two per page, one above the other. When this selection is made, all<br />
copies of the W-2 and the W-3 can be printed on plain paper when using a laser<br />
printer. Print to the preprinted red-line forms if you prefer (or don’t have a laser<br />
printer).<br />
• W2s Using 2D Barcode — Select this option to have a 2D barcode printed at the<br />
top of the W-2 copy A and the W-3.<br />
34
2011 Client Write-Up Setting Up a New Client<br />
NOTES<br />
At this time, neither the IRS nor the SSA mandates the use of barcoded<br />
forms.<br />
Print the W-2 copy A and the W-3 using the Forms and Data option<br />
when using the 2D barcode option. Refer to “Printing W-2s and W-3s”<br />
on page 118.<br />
• Use 4-Up W2s — Four W-2 forms print per page — two at the top and two at the<br />
bottom of the form. All are for the same employee. Use Nelco form BW24UP.<br />
• Use 4-Dn W2s — Four W-2 forms print per page, one above the other. All are for<br />
the same employee. Use Nelco form BW24DWN.<br />
NOTE<br />
If no W-2 format selection is made, Form W-2 prints the standard 2-up<br />
(two per page, one above the other) format.<br />
• W-3 Setup Information [Kind of Payer] — Select the form 94X for the<br />
employer (941, Military/941, 943, 944, CT-1, Household Employer, Medicare<br />
Government Employer, or Third Party Sick Pay).<br />
• State for 1099 — Prints on Form 1099-MISC in the state section. The field<br />
accepts a two-character state abbreviation (for example, NC for North Carolina).<br />
An error message is displayed if the code entered is invalid. This information is<br />
sent to the State field for the contractor payroll.<br />
• Final 1096 Return — Select this option if the client will not be required to file<br />
Forms 1098, 1099, or W-2G in the future, either on paper or electronically.<br />
• Mask ID on 1099/1098 — Select this option to have the SSN and TIN masked on<br />
all copies of the 1099 and 1098 except copy A. The IRS requires the full ID number<br />
to display on copy A. The masked ID number prints with an “X” in the first 5<br />
positions (e.g. XXX-XX-1234).<br />
• Use Client Contact Information for paper W3’s and E-Filing W2/W3’s —<br />
Select this option to use the client’s contact information from<br />
Setup > Client Information > Contact Information rather than the Firm’s contact<br />
information on the paper W-3 and the e-filed W2 and W3.<br />
• W-3 Kind of Employer — Select the option that best describes the employer.<br />
– None Apply — Select this option if none of the check boxes below apply to<br />
the employer.<br />
– 501c non-govt. — Select this option if the employer is a non-governmental<br />
tax-exempt section 501(c) organization.<br />
– State/local non-501c — Select this option if the employer is a state or local<br />
government or instrumentality that is not a tax-exempt section 501(c) organization.<br />
– State/Local 501c — Select this option if the employer is a dual status state or<br />
local government or instrumentality that is also a tax-exempt section 501(c)<br />
organization.<br />
35
Setting Up a New Client<br />
2011 Client Write-Up<br />
– Federal govt. — Select this option if the employer is a Federal government<br />
entity or instrumentality.<br />
NOTE<br />
Click the NELCO Compatible Products link to order <strong>Drake</strong>-compatible<br />
forms, envelopes, and tax office supplies from Nelco Solutions, a <strong>Drake</strong><br />
business partner.<br />
Payables Setup<br />
If the bookkeeping feature is being used and you’ll be using Accounts Payable or the<br />
Check Writer, complete the Payables Setup tab of Client Setup<br />
(Setup > Client Information > Payables Setup).<br />
Figure 3-4: New Client - Payables Setup<br />
Select the applicable bookkeeping options for Accounts Payable transactions:<br />
• Generate Bookkeeping Transactions — When this option is selected, Accounts<br />
Payable transactions automatically post to the transaction journal and the Chart of<br />
Accounts when the Post Transactions process is performed. This option requires<br />
a Chart of Accounts.<br />
IMPORTANT<br />
The Generate Bookkeeping Transactions selection is required<br />
to have Accounts Payable transactions post to the transaction<br />
journal.<br />
• Select to post accounts payable transactions to either the General Journal (GJ) or<br />
the Cash Disbursements (CD) journal.<br />
36
2011 Client Write-Up Setting Up a New Client<br />
EF Setup<br />
If you’ll be electronically filing 94X series tax returns, complete the EF Setup tab of<br />
Client Setup (Setup > Client Information > EF Setup).<br />
Figure 3-5: EF Setup Tab<br />
Form 8633<br />
Application<br />
for EFIN<br />
An Electronic Filing Identification Number (EFIN) is needed to electronically file tax<br />
returns and other tax related documents.<br />
IMPORTANT<br />
If you already have an EFIN, you still must update your Form<br />
8633 (line 4) to be able to e-file 94X series tax returns. Call 866-<br />
255-0654 (option 1, 3) to update your Form 8633.<br />
TIP<br />
<strong>Drake</strong> recommends applying for all individual and business return<br />
types by selecting all options on line 4 of the Form 8633.<br />
Complete and submit Form 8633 to the IRS along with a set of fingerprint cards.<br />
To obtain Form 8633, choose one of the following options:<br />
• Go to Tools > Print Blank Forms, select Federal 94X series, and double-click<br />
Form 8633.<br />
37
Setting Up a New Client<br />
2011 Client Write-Up<br />
Figure 3-6: Form 8633<br />
• Click the Print icon.<br />
• Go to the IRS website (http://www.irs.gov/pub/irs-pdf/f8633.pdf).<br />
Follow the line-by-line instructions to complete the form.<br />
To obtain fingerprint cards to submit with Form 8633 by either:<br />
• Calling <strong>Drake</strong> <strong>Software</strong> at (828) 524-8020.<br />
• Calling the IRS at (866) 255-0654.<br />
IMPORTANT<br />
Fingerprint cards must be federal fingerprint cards. Fingerprints<br />
must be taken by a trained specialist. Individuals can not take<br />
their own fingerprints.<br />
Mail Form 8633 along with the fingerprint card to:<br />
Standard Mail<br />
Internal Revenue Service<br />
Andover Campus<br />
Attn: EFU Acceptance<br />
Testing Stop 983<br />
P.O. Box 4099<br />
Woburn, MA 01888-4099<br />
Overnight Mail<br />
Internal Revenue Service<br />
Andover Campus<br />
Attn: EFU Acceptance<br />
Testing Stop 983<br />
310 Lowell Street<br />
Andover, MA 05501-0001<br />
If you already have an 8633 on file with the IRS but are not activated for the 94X<br />
series of returns, call the IRS Service Center at (866) 255-0654 to activate the 94X<br />
capabilities.<br />
38
2011 Client Write-Up PIN Applications for Electronic Filing<br />
Types of<br />
Filers<br />
There are three types of electronic filers: Individual or Business Taxpayers, Electronic<br />
Return Originators (EROs), and Reporting Agents. The following chart details these<br />
types.<br />
Table 3-1: Types of 94X e-Filers<br />
Description<br />
PIN<br />
Who is<br />
Responsible for<br />
the Return?<br />
Business<br />
Taypayer<br />
Files for own company.<br />
Also, an ERO’s client<br />
10-digit<br />
Business Taxpayer<br />
ERO<br />
Transmits the return for their<br />
customer (business taxpayer)<br />
Each customer<br />
must have their<br />
own, 10-digit PIN<br />
Business Taxpayer<br />
Reporting<br />
Agent<br />
Electronically signs and files<br />
on behalf of the client<br />
Uses same 5-digit<br />
PIN for all clients<br />
Reporting Agent<br />
PIN Applications for Electronic Filing<br />
NOTE<br />
See “PIN Applications for e-Filing 94X Returns” on page 306 for an<br />
overview of PIN application processes.<br />
In order to electronically file 940, 941, 944, and 941-SS tax returns, tax preparers are<br />
required to have a PIN. This serves as an electronic signature for the tax return. The<br />
PIN application process varies according to the type of filer.<br />
Business Taxpayer PIN Application<br />
Use a Business Taxpayer PIN to e-file your own 94X or the ERO’s customers’ 94X<br />
returns. The IRS requires business taxpayers to use 10-digit personal identification<br />
numbers (PIN) when they electronically file Forms 940, 941, 944, and 941-SS.<br />
IMPORTANT<br />
An EFIN is required to e-file tax returns. If you already have an<br />
EFIN, you still must update your Form 8633 (line 4) to be able to<br />
e-file 94X series tax returns. Call 866-255-0654 (option 1, 3) to<br />
update your Form 8633.<br />
To apply for a business taxpayer 10-digit PIN, complete and transmit the application.<br />
39
PIN Applications for Electronic Filing<br />
2011 Client Write-Up<br />
To complete the 94X PIN application, complete these steps:<br />
1. Go to Setup > Client Information > EF Setup. Complete the fields on the right<br />
side of the screen.<br />
Figure 3-7: 94X PIN Application<br />
• Name Control for E-File — This must match the name issued to the client by<br />
the IRS or the application will be rejected. This name appears on all the client’s<br />
mailing labels from the IRS. If you are unsure what to put in the Name<br />
Control for E-File field, call the IRS EIN verification line at (800) 829-4933.<br />
• Transmitter EFIN — This defaults to the firm’s EFIN.<br />
• Signature Name — This is the name of the “signer” of the tax return.<br />
• Application Date — Enter the date of the application for the PIN.<br />
2. Select the Business Taxpayer option button.<br />
3. Click Save. The Create PIN File button is activated.<br />
4. Click Create PIN File.<br />
Next, transmit the PIN application to <strong>Drake</strong>:<br />
1. Go to E-Filing > 94X E-Filing > Select/Transmit PIN Applications.<br />
40
2011 Client Write-Up PIN Applications for Electronic Filing<br />
Figure 3-8: Transmit PIN Application<br />
2. Select the appropriate quarter from the Select Quarter drop list.<br />
3. Click the box in the Client Code column of the application you wish to transmit.<br />
4. Click Transmit.<br />
An acknowledgement (ACK) is received from <strong>Drake</strong>. To view ACKs:<br />
1. Go to E-Filing > 94X E-Filing > View Results.<br />
2. Select the PIN box at the top of the window.<br />
3. Select the <strong>Drake</strong> Status check box.<br />
4. Choose the applications to review from the Status section. Select All, Accepted,<br />
or Rejected.<br />
5. Click View Status. The <strong>Drake</strong> statuses are displayed. If an application is listed as<br />
Rejected, double-click on the line and view the rejection information. Correct any<br />
errors and retransmit the PIN application.<br />
Once the application is accepted, the business taxpayer will receive a 10-digit PIN in<br />
the mail from the IRS within 10 days. Use this PIN when transmitting the 94X.<br />
To complete electronic filing setup:<br />
1. Go to Setup > Client Information > EF Setup.<br />
41
PIN Applications for Electronic Filing<br />
2011 Client Write-Up<br />
Figure 3-9: 94X PIN Setup<br />
2. Verify the Business Taxpayer option button is selected on the right side of the<br />
window.<br />
3. Select the E-File 94x box on the left side of the window. This activates the bottom<br />
portion of the dialog box.<br />
4. Enter the PIN the business taxpayer received from the IRS into the Ten (10) digit<br />
Signature PIN text box.<br />
5. Click Save and Exit.<br />
ERO<br />
Electronic Return Originators, or EROs, are individuals who have passed annual suitability<br />
checks by the Internal Revenue Service and have subsequently been accepted<br />
into the electronic filing program. An ERO does not have signature authority and<br />
should not be issued a 10-digit PIN to sign an OnLine Employment Tax Return for the<br />
taxpayer. The Business taxpayer must sign their own return via the approved software<br />
and should not disclose the PIN to anyone. PINs are confidential.<br />
IMPORTANT<br />
An EFIN is required to e-file tax returns. If you already have an<br />
EFIN, you still must update your Form 8633 (line 4) to be able to<br />
e-file 94X series tax returns. Call 866-255-0654 (option 1, 3) to<br />
update your Form 8633.<br />
Perform the following procedure for each customer for which the<br />
ERO will be e-filing 94X series tax returns.<br />
An ERO can use CWU to transmit an application for their customer to receive a 94X<br />
e-filing PIN. The customer (Business Taxpayer) will receive their 10-digit PIN in the<br />
mail from the IRS.<br />
For the ERO to transmit their customer’s 94X PIN, complete these steps:<br />
42
2011 Client Write-Up PIN Applications for Electronic Filing<br />
1. Go to Setup > Client Information > EF Setup. Complete the fields on the right<br />
side of the screen.<br />
Figure 3-10: 94X PIN Application - ERO’s Customer<br />
• Name Control for E-File — This must match the name issued to the client by<br />
the IRS or the application will be rejected. This name appears on all the client’s<br />
mailing labels from the IRS. If you are unsure what to put in the Name<br />
Control for E-File field, call the IRS EIN verification line at (800) 829-4933.<br />
• Transmitter EFIN — This defaults to the firm’s EFIN.<br />
• Signature Name — This is the name of the “signer” of the tax return.<br />
• Application Date — Enter the date of the application for the PIN.<br />
2. Select the ERO option button.<br />
3. Click Save. The Create PIN File button is activated.<br />
4. Click Create PIN File.<br />
Next, transmit the PIN application to <strong>Drake</strong>:<br />
1. Go to E-Filing > 94X E-Filing > Select/Transmit PIN Applications. See<br />
“Transmit PIN Application”.<br />
2. Select the appropriate quarter from the Select Quarter drop list.<br />
3. Click the box in the Client Code column of the application you wish to transmit.<br />
4. Click Transmit.<br />
An acknowledgement (ACK) is received from <strong>Drake</strong>. To view ACKs:<br />
1. Go to E-Filing > 94X E-Filing > View Results.<br />
2. Select the PIN check box.<br />
3. Click <strong>Drake</strong> Status or IRS Status.<br />
4. Choose the applications to review from the Status section. Select All, Accepted,<br />
or Rejected.<br />
5. Click View Status. The statuses are displayed. If an application is listed as<br />
Rejected, double-click on the line and view the rejection information. Correct any<br />
errors and retransmit the PIN application.<br />
43
PIN Applications for Electronic Filing<br />
2011 Client Write-Up<br />
Once the application is accepted, the client will receive their 10-digit PIN in the<br />
mail within 10 days.<br />
To complete the electronic filing setup:<br />
1. Go to Setup > Client Information > EF Setup.<br />
2. Verify the ERO option button is selected on the right side of the window.<br />
3. Select the E-File 94x box on the left side of the window. This activates the bottom<br />
portion of the dialog box.<br />
4. The ERO’s customer must enter the PIN they received from the IRS into the Ten<br />
(10) digit Signature PIN text box in CWU.<br />
NOTE<br />
The IRS considers PINs to be confidential.<br />
5. Click Save and Exit.<br />
Reporting Agent PIN Application<br />
A reporting agent is an accounting service, franchiser, bank, or person who complies<br />
with IRS Revenue Procedures 96-17 and is authorized to electronically sign and file a<br />
Form 940/941 on behalf of a taxpayer. This authorization is begun with the submission<br />
of Form 8655, either by the client or the reporting agent. There must be a Form<br />
8655 signed by the client for each of the reporting agent's clients. Reporting agents<br />
sign all the electronic returns they file with a single PIN signature.<br />
The reporting agent must have an EFIN before submitting Form<br />
8655. If you already have an EFIN, you still must update your<br />
Form 8633 (line 4) to be able to e-file 94X series tax returns. Call<br />
866-255-0654 (option 1, 3) to update your Form 8633.<br />
IMPORTANT<br />
If a Reporting Agent gives tax advice, they must also have a PTIN<br />
(Preparer Tax Identification Number). If they do not offer tax<br />
advice, a PTIN is not required. Refer to the IRS website for more<br />
information about PTIN requirements.<br />
To complete the 8655:<br />
If you apply to be a Reporting Agent, you can complete and sign a<br />
Form 8655, include your company on the Reporting Agent’s List,<br />
and use your 5-digit Reporting Agent’s PIN to e-file 94X series tax<br />
returns for your own company.<br />
1. Download Form 8655 from the IRS website (http://www.irs.gov/pub/irs-pdf/<br />
f8655.pdf) or from the main menu of Client Write-Up, go to<br />
Tools > Print Blank Forms, select the Federal 94X series, and double-click<br />
Form 8655. Click the print icon. Print and fill out one Form 8655 for each client<br />
for whom the reporting agent will file.<br />
2. Have each client sign a Form 8655.<br />
44
2011 Client Write-Up Editing Client Information<br />
3. Create a Reporting Agent’s List. This is required to accompany Forms 8655 and<br />
is a list of clients included in a batch being submitted for e-filing approval. See<br />
“Appendix I - Reporting Agent’s List” on page 341 for a sample of this document.<br />
4. Fax (IRS preferred) or mail the signed Form 8655s and the Reporting Agent’s List<br />
to the IRS.<br />
IRS Fax: (801) 620-4142<br />
Internal Revenue Service<br />
Accounts Management Service Center<br />
MS 6748 RAF Team<br />
1973 North Rulon White Blvd.<br />
Ogden, UT 84404<br />
In approximately two weeks, reporting agents receive a mailed notification of acceptance<br />
from the IRS and, in a separate mailing, a five-digit signature PIN.<br />
To complete electronic filing setup:<br />
1. Go to Setup > Client Information > EF Setup.<br />
2. Select the E-File 94x box on the left side of the window. This activates the bottom<br />
portion of the dialog box.<br />
3. Select the Reporting Agent option button.<br />
4. Enter the five-digit PIN you received from the IRS into the Reporting Agent PIN<br />
text box.<br />
5. Click Save and Exit.<br />
Follow this procedure for each client the reporting agent is electronically filing a 94X<br />
series tax return.<br />
Editing Client Information<br />
To edit an existing client, go to Setup > Client Information. Edit the desired fields<br />
and click Save. See “Setting Up a New Client” on page 31 for a description of the client<br />
information fields.<br />
Chart of Accounts (COA) Setup<br />
NOTE<br />
A Chart of Accounts must be created to use the bookkeeping function<br />
but is not required if CWU is being used only for payroll.<br />
The Chart of Accounts, or COA, is an organized list of the names and numbers of the<br />
accounts in the general ledger. By entering and categorizing all financial information,<br />
you’ll know the current state of the business. You can export this information to the<br />
<strong>Drake</strong> <strong>Software</strong> tax program, making tax preparation much easier. You can use a preformatted<br />
COA, customize a COA, or import a COA used in another client account.<br />
45
Chart of Accounts (COA) Setup<br />
2011 Client Write-Up<br />
You can create a master account with a customized COA with all the accounts you<br />
need, import it, then adjust for the current client as needed.<br />
NOTE<br />
Client Write-Up keeps ten years of Chart of Accounts history starting<br />
with 2008 data or the year you started using CWU (whichever is later).<br />
This means that when a correcting entry is made to the journal for a<br />
prior year, all balances are updated automatically from that point forward.<br />
Reports reflect the updated balances.<br />
If a Chart of Accounts is not created when a new client is first created, it can be done<br />
at any time.<br />
To create a Chart of Accounts for a client, complete the following steps:<br />
1. Go to Bookkeeping > Chart of Accounts.<br />
Figure 3-11: Chart of Accounts Setup<br />
2. Select the method to create the Chart of Accounts. There are three options when<br />
creating a COA:<br />
• Templates — Templates are provided for the basic business types: 1040 (sole<br />
proprietor), 1120 (C corporation), 1120S (S corporation), 1065 (partnership),<br />
and 990 (tax-exempt). Each of the templates is set to the basic types of<br />
accounts for these businesses. The accounts are assigned numbers and have<br />
no beginning balances. Choose this option, select the business type, and click<br />
Next. The Chart of Accounts for the selected business type is displayed.<br />
• Copy Existing Client Chart of Accounts — Use the Chart of Accounts from<br />
a client that already exists. The copy method can save you time if you have<br />
multiple clients using the same Chart of Accounts. Only the account numbers<br />
and descriptions are imported — not the account balances. When you select<br />
the copy option, a list of all clients with a Chart of Accounts in Client Write-<br />
Up displays. Select the client whose COA you wish to copy and click Next.<br />
The copied Chart of Accounts displays with all accounts having a zero balance.<br />
• Customize — Create your own Chart of Accounts from scratch. Use this<br />
method if the client has an existing Chart of Accounts you wish to duplicate in<br />
CWU. This is the most time- and labor-intensive method. We recommend you<br />
46
2011 Client Write-Up MICR Bank Accounts<br />
create a client file to use as a master. You can then import this file as often as<br />
you need to create new client files. Use GAAP (Generally Accepted Accounting<br />
Principles) guidelines when creating a customized Chart of Accounts.<br />
3. Click Next.<br />
4. If Templates was selected as the method in step 2, select the template to be used<br />
(1040, 1065, 1120, 1120S, or 990). If Copy Existing Client Chart of Accounts<br />
was selected in step 2, select the CWU client to import. If Customize was<br />
selected, the Chart of Accounts displays with just the columns and rows ready for<br />
account creation.<br />
5. Select the account to be designated as the Retained Earnings Account using the<br />
drop list at the bottom of the Chart of Accounts - Setup dialog box. Only<br />
accounts with an Account Type of “Capital” may be designated as the Retained<br />
Earnings Account. Do not change this information once data has been entered in<br />
Bookkeeping > Enter Transactions.<br />
NOTE<br />
To make adjustments to accounts, including beginning balances, see<br />
“Editing an Account” on page 156.<br />
MICR Bank Accounts<br />
Client Write-Up uses MICR bank account information when printing a MICR check.<br />
Set up as many accounts as is needed for each client.<br />
To add a MICR bank account, complete the following procedure:<br />
1. Go to Setup > MICR Bank Accounts.<br />
Figure 3-12: MICR Bank Account<br />
2. Complete the following field information:<br />
• Bank Code (Required) — Select a number (maximum of eight digits) and<br />
enter it in the text box. This number should be unique for each bank and not<br />
47
MICR Bank Accounts<br />
2011 Client Write-Up<br />
used anywhere else in CWU, including client codes, employee codes, contractor<br />
codes, or vendor codes. Click New. If you print checks on more than one<br />
bank account, enter a unique bank code and bank information for each bank<br />
account within each client. The bank code must be unique within each client.<br />
• Payer Name (Required) — Enter the name of the employer who issues<br />
checks.<br />
NOTE<br />
Data entry fields with vertical scroll bars (Payer Name, Payer Info,<br />
Bank Name, Bank Info 1, Bank Info 2, and Fractional Routing) are<br />
multi-line fields. Press Enter to add another line of information within a<br />
field. Press Tab to advance to the next field.<br />
• Payer Info (Optional) — Enter the payer's address, phone number, etc.<br />
• Design (Required) — Click the button to the right of the Design text box. The<br />
Pick a MICR Check Design window opens. Double-click to select a design<br />
or click to select the design and click OK.<br />
NOTE<br />
To display an existing check design, from the Pick a MICR Check<br />
Design window, select a design from the list and click View. This opens<br />
the MICR Check Designer dialog box. Examine each of the designs or<br />
add a new one. Click Exit to go back and select another MICR check<br />
design.<br />
• Bank Name (Required) — Select the bank from which this check will be<br />
drawn.<br />
• Bank Info 1 and Bank Info 2 (Optional) — Enter information pertaining to<br />
the bank (address, phone, etc.)<br />
• Bank Account (Required) — Enter the account number against which the<br />
checks are drawn. This is a MICR encoded field. Include all formatting<br />
(spaces, dashes, special characters, etc).<br />
• Bank Routing (Required) — Enter the routing number for this bank account.<br />
This is a MICR encoded field. If you don't know the routing number, find it on<br />
the bottom of a pre-printed check — the nine-digit number to the left of the<br />
account number.<br />
• Fractional Routing (Required) — This is the fractional information assigned<br />
to this bank account. Identify the fractional routing on a previously printed<br />
check for this account — it is usually in small print and consists of two parts<br />
divided by a slash. Hence the term “fractional.” It sometimes spans more than<br />
one line. If you cannot find it, your bank can supply your fractional routing<br />
number.<br />
• Next Check # (Required field) — Enter the number of the next check to print<br />
for this bank account.<br />
• Digits — Some banks require the check number printed on the MICR line to<br />
be a specific number of digits. If your bank has this requirement, enter the<br />
number of digits required for the check number. Zeros will pad the beginning<br />
of the check number to give the required number of digits.<br />
48
2011 Client Write-Up Check Setup<br />
Check Setup<br />
Security<br />
• Check Min Amt — Enter the minimum dollar amount allowed on a check. A 0 in<br />
this field means zero is the minimum amount. Negative numbers are not allowed<br />
in this field.<br />
• Check Max Amt — Enter the maximum dollar amount allowed on a check. A 0<br />
in this field means there are no restrictions.<br />
• Void After Days — Enter the number of days until a check becomes stale. Once<br />
the number of days entered has passed, the check is considered void. A 0 in this<br />
field means there are no restrictions. The Void After Days information does not<br />
print on the check.<br />
• Signatures Lines — Select to print one, two, or no signature lines.<br />
MICR Line Format<br />
Select to print the MICR line in the wide, business check format, the narrow, personal<br />
check format, or the Pacific Oaks Federal Credit Union format.<br />
3. When bank information is complete, click Save.<br />
Reset — Click Reset to revert to the last saved version of the MICR bank setup information.<br />
MICR Printer — Click MICR Printer to jump to the Setup Firm Information dialog<br />
box so the MICR printer can be assigned. See the section on selecting a MICR<br />
printer under “Firm Info/Global Settings” on page 15. Exiting from the Setup Firm<br />
Information dialog box returns you to MICR Bank Setup.<br />
Check setup for all check types (preprinted and MICR, payroll and payables) is under<br />
Setup > Check and Stub Options.<br />
Preprinted Payroll Check Setup<br />
NOTE<br />
See “Pre-Printed Checks” on page 305 for an overview of this process.<br />
Complete the following options if you are printing payroll checks using preprinted<br />
check stock:<br />
1. Go to Setup > Check and Stub Options > PrePrinted Payroll.<br />
2. Select the applicable preprinted check format on the right side of the screen.<br />
When a check format is selected, the program sets check items to print. Company<br />
information must be preprinted in the upper left corner and the routing/account<br />
numbers pre-printed on the bottom of the check. Go to either<br />
Employees > Check Alignment or Contractors > Check Alignment to adjust<br />
settings if printing is misaligned.<br />
49
Check Setup<br />
2011 Client Write-Up<br />
Client Write-Up supports the following preprinted Nelco brand check stock for<br />
payroll checks<br />
Table 3-2: <strong>Support</strong>ed Preprinted NELCO Checks for Payroll<br />
Top Check Formats Middle Check Formats Bottom Check Formats<br />
L1514HB L1037HB L1331HB<br />
L1513HB L80929HB L1015HB<br />
L1514HB - Alt Stub Format L89417HB L1331HB - Alt Stub Format<br />
L1513HB - Alt Stub Format L1037HB - Alt Stub Format L1015HB - Alt Stub Format<br />
L80929HB - Alt Stub Format<br />
L89417HB - Alt Stub Format<br />
NOTE<br />
“Alt Stub Format” stock can only be used for payroll checks.<br />
TIP<br />
Go to www.<strong>Drake</strong>Supplies.com to purchase check stock.<br />
3. Select the applicable preprinted payroll check stub options:<br />
Figure 3-13: Preprinted Payroll Check Stub Options<br />
• Print Check Number on Check Stub<br />
• Print Check Numbers on Checks<br />
• Print SSN on Check Stub<br />
50
2011 Client Write-Up Check Setup<br />
MICR Payroll Check Setup<br />
• Print SSN Mask with Last Four on Check Stub — The Social Security<br />
Number prints on the check stub in the format XXX-XX-1234 (only the last<br />
four digits of the SSN printing).<br />
• Print Employee/Contractor Number in Lieu of SSN — Select this option<br />
to have the employee (or contractor) number printed on the check stub instead<br />
of their Social Security Number.<br />
• Include Company Name and Address on Check Stub<br />
• Include Trade Name and Address on Check Stub<br />
• Suppress Employee/Contractor Address on Check Stub<br />
• Suppress Vacation, Sick, Holiday Time on Check Stub<br />
• Print Employee’s Pay Rates on Alt Check Stub<br />
• Print Pay Period Date Range on Check Stub<br />
• Print Vacation & Sick Hours Balance on Stub<br />
• Include Company Name and Address on Check<br />
• Include Trade Name and Address on Check<br />
4. Click Save.<br />
NOTE<br />
See “MICR Checks” on page 305 for an overview of this process.<br />
Complete the following options if you are printing payroll checks using blank MICR<br />
check stock:<br />
1. Go to Setup > Check and Stub Options > MICR Payroll.<br />
Figure 3-14: MICR Payroll Check Stub Options<br />
51
Check Setup<br />
2011 Client Write-Up<br />
2. Select the applicable MICR payroll check stub options:<br />
• Alt Check Stub for Middle Checks - Comprehensive — This check stub<br />
format has more information on it than the standard check stub.<br />
• Alt Check Stub for Middle Checks - Locality Taxes — This check stub format<br />
is the same as the “Comprehensive” format but with locality tax withholdings<br />
specified.<br />
• Print Check Number on Check Stub<br />
• Print SSN on Check Stub<br />
• Print SSN Mask with Last Four on Check Stub — The Social Security<br />
Number prints on the check stub in the format XXX-XX-1234 (only the last<br />
four digits of the SSN printing).<br />
• Print Employee/Contractor Number in Lieu of SSN — Select this option<br />
to have the employee (or contractor) number printed on the check stub instead<br />
of their Social Security Number.<br />
• Include Company Name and Address on Check Stub<br />
• Include Trade Name and Address on Check Stub<br />
• Suppress Employee/Contractor Address on Check<br />
• Suppress Vacation, Sick, Holiday Time on Check Stub<br />
• Print Employee’s Pay Rates on Alt Check Stub<br />
• Print Pay Period Date Range on Check Stub<br />
• Print Vacation & Sick Hours Balance on Stub<br />
3. Click Save.<br />
Preprinted Accounts Payable Check Setup<br />
Complete the following options if you are printing accounts payable checks using preprinted<br />
check stock:<br />
1. Go to Setup > Check and Stub Options > PrePrinted Accounts Payable.<br />
2. Select the applicable preprinted check format on the right side of the screen. Go to<br />
Setup > Check Alignment to adjust settings if printing is misaligned.<br />
Client Write-Up supports the following preprinted Nelco brand check stock for<br />
accounts payable checks:<br />
Table 3-3: Preprinted NELCO AP Check Stock<br />
Top Check<br />
Formats<br />
Middle Check<br />
Formats<br />
Bottom Check<br />
Formats<br />
L1514HB L1037HB L1331HB<br />
L1513HB L80929HB L1015HB<br />
L89417HB<br />
3. Select the applicable preprinted accounts payable check stub options:<br />
52
2011 Client Write-Up Reporting Options<br />
Figure 3-15: Preprinted Accounts Payable Check Stub Options<br />
• Print Trade Name on Check Stub<br />
• Print Company Name on Check Stub<br />
• Print Check Number on Check<br />
• Print Vendor Address on Check<br />
4. Click Save.<br />
MICR Accounts Payable Check Setup<br />
Complete the following options if you are printing accounts payable checks using<br />
blank MICR check stock:<br />
1. Go to Setup > Check and Stub Options > MICR Payables.<br />
2. Select the applicable MICR accounts payable check stub options:<br />
Figure 3-16: MICR Accounts Payable Check Stub Options<br />
Reporting Options<br />
• Print Trade Name on Check Stub<br />
• Print Company Name on Check Stub<br />
• Suppress Bank Name & Account on Stub<br />
• Print Vendor Address on Check Stub<br />
3. Click Save.<br />
Use reporting options to tailor the appearance of reports. Customize report headers<br />
and footnotes, font sizes and colors, watermark and logo settings, field labels, and<br />
94X form options.<br />
53
Reporting Options<br />
2011 Client Write-Up<br />
Headers and Footnotes<br />
The header and footnote information for reports can be created and edited.<br />
1. Go to Setup > Headers & Footnotes.<br />
Figure 3-17: Headers and Footnotes<br />
2. To set or edit the title for an option, click the field name to edit and enter the<br />
desired text.<br />
The following field types may be edited:<br />
• Accountant’s Header Info — To add an accountant header to the top of<br />
financial reports, enter the appropriate text in the Accountant Header1 and/<br />
or Accountant Header 2 title fields. The accountant header prints directly<br />
under the company header information. If the reports are set up to use a logo<br />
instead of the company header, the accountant headers do not print.<br />
• Footnotes — To add footnotes to the bottom of the financial reports, enter the<br />
desired text for each footer (Footnote 1 - 3). Using all three footnotes is not<br />
required.<br />
• Profit and Loss Report Title — To add header information to the profit and<br />
loss reports, enter the appropriate text in the Profit and Loss Report Title<br />
field. The profit and loss header prints directly under the company header<br />
information. If the reports are set up to use a logo instead of the company<br />
header, the profit and loss header does not print.<br />
• Balance Sheet Report Title — To add header information to the balance<br />
sheet reports, enter the appropriate text in the Balance Sheet Report Title<br />
field. The balance sheet header prints directly under the company header<br />
information. If the reports are set up to use a logo instead of the company<br />
header, the balance sheet header does not print.<br />
54
2011 Client Write-Up Reporting Options<br />
Report Options<br />
• Divisions — To add divisions to a company's reports, enter the appropriate<br />
division titles in the Division 1 - 12 title fields. Divisions are used to divide<br />
company assets and expenses into sections. Up to 12 divisions can be created<br />
in CWU. Divisions are used in employee and contractor setups, journal<br />
entries, and general reporting.<br />
3. Click Save. No information is saved until the Save button is selected. To revert to<br />
the last save, click Reset.<br />
Customize the field labels that appear on many of Client Write-Up’s reports using<br />
Report Options.<br />
To customize the labels and complete the following steps:<br />
1. Go to Setup > Report Options.<br />
Figure 3-18: Report Options<br />
2. Select a report type from the Select Report Group drop list, then select the report<br />
to customize from the Select Report drop list.<br />
3. Select the desired check boxes to customize the report.<br />
• Remove Report Name From Footer — The name of the report will not print<br />
in the report footer.<br />
• Center Report Footnotes — The footer prints centered on the report.<br />
• Remove Footnotes from non-Financial Statements — No footer prints on<br />
any report except balance sheet and profit and loss reports. For these reports,<br />
55
Reporting Options<br />
2011 Client Write-Up<br />
Display Settings<br />
either the default footer or the footer text entered in<br />
Setup > Headers and Footnotes is printed.<br />
• Print Address in Header — The client’s address as entered on<br />
Setup > Client Information prints in the report header.<br />
• Print Date Time Stamp on Report — The date and time the report ran prints<br />
on the report.<br />
• Change “For the period ended” to “As of” — This option is available only<br />
for balance sheet and profit and loss reports. The words “As of” replace “For<br />
the period ended” on the report.<br />
• Use Default Labels — This option is available only for balance sheet and<br />
profit and loss reports. Select this option to reset the report labels to the<br />
default (as they appear on the right side of the dialog box). Selecting Use<br />
Default Labels does not affect the other options selected.<br />
4. When financial reports (Balance Sheet and Profit and Loss reports) are selected<br />
from the Select Report list, the lower part of the dialog box displays the default<br />
field labels and the current field labels for the report selected. If no edits have<br />
been made to the selected report’s labels, the Labels used and Default Labels<br />
columns are the same.<br />
Make the desired edits to the field labels under the Labels used on reports column.<br />
5. Click Save. Click Exit when editing is complete.<br />
Reset — Restores all options and field labels for the selected report to the default.<br />
The Display Settings dialog box allows client-specific color, logo, font, and watermark<br />
customization of reports.<br />
To customize the appearance of the reports, go to Setup > Display Settings.<br />
Figure 3-19: Display Settings<br />
56
2011 Client Write-Up Reporting Options<br />
Report Settings<br />
To change the color of the header, footer, and text that prints on reports, click the color<br />
box, select the desired color, and click OK. Printing in color requires a printer capable<br />
of color printing.<br />
Font Sizes<br />
Use the drop lists to adjust the font size of the accountants header line, footer, and<br />
page numbers.<br />
WaterMark Settings<br />
• Use the drop list to select the angle and font used for the watermark.<br />
• Enter the wording to be used for the watermark in the Watermark Text box.<br />
Logo<br />
94X Form Settings<br />
• Logo Location — Choose the location for your logo on reports from the drop list.<br />
Selections include Right Justified, Center Justified, and Left Justified.<br />
• Logo Path — Making a selection in the Logo Location field activates Logo<br />
Path. Either enter the path to the logo or click the button and browse to the<br />
location of the logo. The logo file must be a bitmap file (file extension of “bmp”).<br />
• Logo Sizes — Choose the logo size to print on reports from the drop list.<br />
After verifying all information, click Save.<br />
For the 94X forms generated by Client Write-Up (Forms 940, 941, 944, 943, 941-SS,<br />
and 944SS), you can specify how the information is treated.<br />
Complete the following steps to set up these options:<br />
1. Go to Setup > 94X Form Settings.<br />
Figure 3-20: 94X Form Settings<br />
57
Reporting Options<br />
2011 Client Write-Up<br />
2. Select the settings to be activated for this client. These options need to be set for<br />
each client's account.<br />
• Use Tax Deposit Information on 94(X) — This selection automatically<br />
transfers calculations from the 94X Tax Deposits dialog boxes<br />
(Employees > Tax Deposit > 94X) to the 94X form selected.<br />
IMPORTANT<br />
Do not select this option if Client Write-Up was not used to generate<br />
all 94X tax deposits for the year.<br />
• Override Sch B Printing — Schedule B of the 941 and 941-SS tax returns<br />
displays when the Deposit Frequency is set to Semi-Weekly<br />
(Setup > Client Information > Business Information) but prints only when<br />
the Total Taxes After Adjustments for the quarter is at least $2,500. Select<br />
this option to force Schedule B to print when the Total Taxes After Adjustments<br />
amount is less than $2,500.<br />
• Override Calculated Data — CWU displays 94X returns with both calculated<br />
and non-calculated data fields. Select this option to allow you to overwrite<br />
both types of data fields. If this option is not selected, you can overwrite<br />
only the non-calculated fields.<br />
3. Click Save to save the settings and exit or click Exit to exit without saving your<br />
settings.<br />
58
2011 Client Write-Up Setting Up Employee Payroll<br />
4 Employee Payroll<br />
Client Write-Up makes the distinction between “Employees” and “Contractors”.<br />
Employees receive a W-2 at the end of the year and contractors receive a 1099-MISC.<br />
Setting Up Employee Payroll<br />
To set up employee payroll, complete the following steps:<br />
1. Assign account numbers to payroll processing features and enter federal, state,<br />
and local tax rate information. See “Account and Payroll Information”.<br />
2. Set default deductions and benefits offered to any employee. See “Deductions and<br />
Benefits Setup” on page 65.<br />
3. Enter information about the client's W-2 employees. See “Employee Setup” on<br />
page 72.<br />
Account and Payroll Information<br />
To assign specific account numbers from the Chart of Accounts to payroll processing<br />
features, go to Employees > Account & Payroll Information. General payroll settings,<br />
rates, and limits are also entered here.<br />
Payroll<br />
Options<br />
None of the settings on the Payroll Options tab are required to process payroll.<br />
Figure 4-1: Account & Payroll Information - Payroll Options<br />
59
Setting Up Employee Payroll<br />
2011 Client Write-Up<br />
Payroll Options<br />
• Suppress display of Terminated Employees — When this option is selected, terminated<br />
employees are not included in the display on the<br />
Employees > Employee Setup, Employees > Live Payroll, and<br />
Employees > ATF Payroll screens.<br />
• Store all overtime pay separate from regular pay — Select this option to have<br />
all overtime pay reflected as overtime. The default method for figuring overtime<br />
is to take the number of overtime hours and add that to Regular Pay, then add half<br />
the overtime rate to the Overtime Premium.<br />
Example when this option is selected: Bob is paid $10 per hour. Last week he<br />
worked 50 hours. Regular Pay shows $400 (40 x $10) and Overtime Premium<br />
shows $150 (10 x $10 x 1.5). His total pay for the week is $550.<br />
Example when this option is not selected: Bob worked the same 50 hours last<br />
week. Regular Pay shows $500 ((40 x $10) + (10 x $10)) and Overtime Premium<br />
shows $50 (5 x $10). Again, his total pay for the week is $550.<br />
• Do not Print Pay Stub for Direct Deposit Check — This option controls the<br />
default setting for the No Stub check box in Live Payroll. When this option is<br />
selected, check stubs do not print for Direct Deposit employees.<br />
• Auto Post Detailed/Cumulative Payroll to Journal — Select one of these<br />
options to have CWU automatically post employee payroll transactions to the<br />
journal. The Detailed Payroll option creates separate journal entries for each payroll<br />
transaction. The Cumulative option creates one cumulative journal entry for<br />
each payroll account.<br />
IMPORTANT<br />
Payroll transactions auto post to the journal the next time the journal<br />
screen (Bookkeeping > Enter Transactions or<br />
opened.<br />
If neither of the auto post options is selected, manually post payroll<br />
transactions to the journal by going to Bookkeeping ><br />
Enter Transactions and click the Payroll Journal button. See<br />
“Payroll Journal Entry” on page 160 for more information on manually<br />
posting payroll to the journal.<br />
) is<br />
Accrual Options<br />
• Automatic Sick Hours — By default, CWU tracks the number of sick hours<br />
earned and used per year and increments the Sick Hrs Available field for each<br />
employee in Employees > Employee Setup > Payroll Options. If you do not<br />
want CWU to automatically track sick hours, or you want to track sick hours<br />
earned manually, clear the check box. The Sick Calculations check box on the<br />
employee’s Employees > Employee Setup > Payroll Options screen must also<br />
be selected for CWU to track sick hours automatically.<br />
60
2011 Client Write-Up Setting Up Employee Payroll<br />
G/L Account<br />
Numbers<br />
• Automatic Vacation Hours — By default, CWU tracks the number of vacation<br />
hours earned and used per year and increments the Vac Hrs Available field for<br />
each employee in Employees > Employee Setup > Payroll Options. If you do<br />
not want CWU to automatically track vacation hours, or you want to track vacation<br />
hours earned manually, clear the check box. The Vacation Calculations<br />
check box on the employee’s Employees > Employee Setup > Payroll Options<br />
screen must also be selected for CWU to track vacation hours automatically.<br />
• Annual Sick Hours — Enter the number of sick hours that may be earned in a<br />
year.<br />
• Annual Vacation —Enter the number of vacation hours that may be earned in a<br />
year.<br />
Employer 401(K) Match Options<br />
• The Employer will Contribute ___ % of the Employee Contribution — Enter<br />
the percentage of each employee’s 401K contribution the employer is matching. If<br />
the employer is matching dollar for dollar, enter 100%. If the employer is not<br />
matching the employees’ contributions, enter either 0% or leave the field blank.<br />
• Up to ___ % — Enter the maximum percentage the employer will contribute to<br />
the employees’ 401K.<br />
• Select either Gross Wages or Net Wages to indicate the employer’s maximum<br />
401K contribution percentage entered in Up to ___ % is a percentage of the<br />
employee’s earnings before taxes and deductions are taken (gross wages) or after<br />
they are taken (net wages).<br />
• Employee Federal 401(k) Deduction Limit — This amount is determined by the<br />
IRS and was accurate when the program shipped. This figure must be manually<br />
updated if it is changed by the government.<br />
• Employee Federal 401(k) Catch-Up Limit — This is the amount of additional<br />
elective deferral contributions allowed by the government and was accurate when<br />
the program shipped. <strong>Manual</strong>ly update this figure if the government changes the<br />
catch-up limit.<br />
IMPORTANT<br />
This section can be skipped if the bookkeeping feature is not<br />
being used.<br />
The client Chart of Accounts must be created prior to entering<br />
account numbers. See “Chart of Accounts (COA) Setup” on<br />
page 45.<br />
61
Setting Up Employee Payroll<br />
2011 Client Write-Up<br />
Figure 4-2: Employee Account & Payroll Information - G/L Account Numbers<br />
NOTE<br />
There must be a cash account and an expense account assigned from<br />
the Chart of Accounts. Without both accounts listed, the journal will be<br />
out of balance.<br />
The account information entered is used to generate entries into the payroll journal<br />
from payroll entries. Press F2 to select postable accounts from the Chart of Accounts<br />
or type the account number directly into the field. If the appropriate account does not<br />
exist, press F2 in the account field and select New from the list of available accounts<br />
to create an account. To create a new account, see “Create an Account “On the Fly””<br />
on page 156.<br />
Cash Account — This account is credited when a transaction is entered. This field<br />
must have an account number before the first payroll check is entered. The account<br />
number is required in order to post payroll transactions to the journal.<br />
Expense Account — This account is debited when a transaction is entered. This field<br />
must have an account number before the first payroll check is entered, and is required<br />
in order to post payroll transactions to the journal.<br />
• Officer’s Salary — When an employee’s Status (Employees > Employee<br />
Setup > Personal Info > Status) is Officer Salary, CWU uses the designated<br />
cash and expense accounts to post payroll amounts.<br />
62
2011 Client Write-Up Setting Up Employee Payroll<br />
• Employee Salary — Employee payroll amounts are posted to the designated<br />
accounts when payroll is processed.<br />
NOTE<br />
Different Officer’s Salary and Employee Salary Cash and Expense<br />
accounts can be assigned for each employee by going to Employees ><br />
Employee Setup > Payroll Options (see “Payroll Options Tab” on<br />
page 77). If no accounts are assigned for an employee in the<br />
employee’s setup section, the accounts assigned on the G/L Account<br />
Numbers tab are used when transactions are posted to the journal.<br />
• Employer 401(k) — The employer’s contribution to a 401(k) plan is posted<br />
to the designated accounts.<br />
• FICA - Employer (Expense Account) — Press F2 to select an account number<br />
from the Chart of Accounts for tracking the employer’s expense paid to<br />
FICA.<br />
• Medicare - Employer (Expense Account) — Press F2 to select an account<br />
number from the Chart of Accounts used to track the employer’s expense paid<br />
toward Medicare.<br />
Default account numbers for Liability accounts are filled based on the Chart of<br />
Accounts. No adjustment should be necessary to the default liability account numbers.<br />
State Rates<br />
and Limits<br />
State payroll rates and limits are determined by each state's Department of Revenue.<br />
Set the state information needed to generate payroll in this section. If using CWU for<br />
bookkeeping only, this information is not necessary. As rates and limits change, make<br />
the necessary changes.<br />
• State Wage Base — Used to determine taxable wages for unemployment (SUTA)<br />
tax due and state quarterly taxes due.<br />
• State Unemployment Rate — Used to determine state quarterly tax due.<br />
• Assessment Due Rate — Used to determine assessment taxes due for unemployment<br />
(SUTA) Form 940 and state quarterly tax and wage reports.<br />
• Training Contribution Rate — Enter the percentage rate to flow to your state.<br />
This is a tax charged by some states based on state guidelines relating to training<br />
enhancement contributions. Some state forms have the specific calculation information<br />
programmed into their forms.<br />
• Surcharge Rate — If the state charges an unemployment surcharge, enter the<br />
rate. A 5% tax rate should be entered as 0.05. Only South Dakota and Iowa<br />
charge an unemployment surcharge.<br />
• State Disability Rate — Enter the rate of the state disability deduction. An 8%<br />
tax rate should be entered as 0.08. Only CA, HI, NJ, NY, RI, and Puerto Rico<br />
have state disability withholding that is required to be paid by the employee.<br />
• State Disability Wage Base — Enter the maximum amount of wages subject to<br />
this tax.<br />
• State Max SDI Amount — Enter the maximum amount that can be withheld<br />
from the employee in one year.<br />
63
Setting Up Employee Payroll<br />
2011 Client Write-Up<br />
Local Rates<br />
Figure 4-3: Account & Payroll Information - Local Rates<br />
• State — Select the client’s state of record for the client’s Employer Identification<br />
Number (EIN) from the drop list. The bottom portion of the dialog box fills with<br />
the locality tax information appropriate to the state selected.<br />
• Locality Type — View the locality tax information by selecting the locality tax<br />
type from the drop list. Locality taxes are county taxes and any other local tax<br />
needing withheld and are only available with these states: AL, CO, DE, IN, KY,<br />
MD, MI, MO, NY, OH, OR, and PA.<br />
Edit Locality Tax<br />
If a locality tax changes, edit the tax information by selecting the appropriate line in<br />
the table, then updating either the Locality Percent field or the Locality Rate field<br />
with the new rate. Editing one of these fields automatically updates the other field. A<br />
2% tax rate should be entered into the Locality Percent field as 0.02. Click Update<br />
Rate.<br />
Add Locality Tax<br />
To add a locality tax, select the Locality Type from the drop list, then complete the<br />
Locality Name and either the Locality Percent field or the Locality Rate field. Editing<br />
one of these fields automatically updates the other field. A 2% tax rate should be<br />
entered into the Locality Percent field as 0.02. If the tax is for Michigan, Indiana,<br />
or Ohio, enter the Locality Code also. Click Add Rate.<br />
Delete Locality<br />
To delete an entry in the locality tax table, select it by clicking the line in the table,<br />
then click Delete Rate.<br />
64
2011 Client Write-Up Setting Up Employee Payroll<br />
Deductions and Benefits Setup<br />
Go to Employees > Deductions & Benefits to create or modify default deductions<br />
and benefits offered to any employee beyond the standard deductions. These deductions<br />
and benefits are used in setting up employees and in processing live and ATF<br />
payroll. The amounts entered in Employees > Deductions & Benefits (Deductions<br />
and Benefits tabs) become the default amounts on the Deductions and Benefits tabs<br />
of Employees > Employee Setup, where they can then be customized for each<br />
employee.<br />
NOTE<br />
Do not enter standard federal and state withholdings here.<br />
Adding a<br />
Deduction<br />
When adding or editing a deduction, enter a fixed dollar amount, a percentage, or<br />
nothing. The deductions list allows up to 20 entries.<br />
To add a deduction, complete the following steps:<br />
1. Go to Employees > Deductions & Benefits and select the Deductions option in<br />
the Type section (upper left of the window).<br />
Figure 4-4: Deductions<br />
2. Click New. The top entry fields are activated.<br />
3. Complete the following field information:<br />
• Name — This is the name of the deduction as it should appear on the pay stub<br />
and payroll reports.<br />
• Account — Press F2 to access the postable accounts list from the Chart of<br />
Accounts if the bookkeeping function is being used. Select the appropriate<br />
account number for the deduction. If you are not using the bookkeeping function,<br />
the account number information is not required. For more information on<br />
accounts, see “Chart of Accounts (COA) Setup” on page 45.<br />
• Deduction Calculation — Select whether the deduction should be calculated<br />
Based on Hours Worked times the value in the Amount field. If Based on<br />
Hours Worked is selected, you must also select either Dollars/Cents or Percent.<br />
When Based on Hours Worked is selected, the deduction is calculated<br />
by multiplying the number in the Hours Worked field on the Live Payroll (or<br />
65
Setting Up Employee Payroll<br />
2011 Client Write-Up<br />
ATF Payroll) screen times the Amount. If Based on Hours Worked is not<br />
selected, the deduction is calculated by multiplying gross pay by the Amount.<br />
• Amount — This number corresponds either to a dollar amount or a decimal<br />
percentage that is assigned to the deduction. If neither Dollars/Cents or Percent<br />
is selected, an amount of 1 or greater designates a dollar amount. A decimal<br />
value less than 1 (for example .25) designates a percent. This amount can<br />
be edited on an individual basis by going to Employees > Employee Setup,<br />
and selecting the Deductions tab.<br />
If Dollars/Cents is selected, enter any amount and CWU will format the number<br />
as dollars and cents. Enter a value one cent or greater. If Percent is<br />
selected, enter any decimal value less than 1 up to six decimal places.<br />
• Ceiling — Enter the maximum deduction that can be taken. When the<br />
employee reaches the ceiling amount for the year, CWU discontinues this<br />
deduction for that employee.<br />
• W2 Box 12 Code — During W2 processing, this code indicates which letters<br />
to enter for the Box 12 code. Below is a list of codes used in Box 12.<br />
Table 4-1: W2 Box 12 Codes<br />
A<br />
B<br />
Uncollected Social Security or RRTA tax on tips<br />
Uncollected Medicare tax on tips<br />
C Taxable cost of group term life insurance over $50,000<br />
D<br />
E<br />
F<br />
G<br />
H<br />
Elective deferrals to a §401(k) cash or deferred arrangement<br />
(including a SIMPLE 401(k) arrangement)<br />
Elective deferrals to a §403(b) salary reduction plan<br />
Elective deferrals to a §408(k)(6) salary reduction SEP<br />
Elective deferrals and employer contributions (including nonelective<br />
deferrals) to any governmental or nongovernmental §457(b)<br />
deferred compensation plan<br />
Elective deferrals to a 501(c) (18) (D) tax-exempt organization plan<br />
J Nontaxable sick pay (not included in lines 1, 3, or 5)<br />
K<br />
L<br />
M<br />
N<br />
P<br />
Q<br />
R<br />
20% excise tax on excess golden parachute payments<br />
Substantiated employee business expense reimbursements<br />
Uncollected Social Security or RRTA tax on the taxable cost of<br />
group term life insurance over $50,000 (for former employees)<br />
Uncollected Medicare tax on taxable cost of group term life insurance<br />
over $50,000 (for former employees)<br />
Excludable moving expense reimbursements paid directly to the<br />
employee<br />
Nontaxable combat pay<br />
Employer contributions to an Archer medical savings account<br />
(MSA)<br />
66
2011 Client Write-Up Setting Up Employee Payroll<br />
Table 4-1: W2 Box 12 Codes<br />
S<br />
T<br />
V<br />
W<br />
Y<br />
Z<br />
AA<br />
BB<br />
DD<br />
EE<br />
Employee salary reduction contributions under a §408(p) SIMPLE<br />
Adoption benefits<br />
Income from the exercise of nonstatutory stock option(s)<br />
Employer contributions to an employee's Health Savings Account<br />
(HSA)<br />
Deferrals under a §409A nonqualified deferred compensation plan<br />
Income under §409A on a nonqualified deferred compensation plan<br />
Designated Roth contributions to a §401(k) plan<br />
Designated Roth contributions under a §403(b) salary reduction<br />
agreement<br />
Cost of employer-sponsored health coverage<br />
Designated Roth contributions under a governmental §457(b) plan<br />
• Withholding Code — These codes dictate where data appears on the W-2.<br />
Table 4-2: W-2 Withholding Codes<br />
NA<br />
No withholding code applies<br />
CP Cafeteria Plan — W2 Box 14<br />
FS<br />
GW<br />
DI<br />
401K<br />
FLIW<br />
EPDW<br />
PERS<br />
MDSP<br />
Family Services<br />
Garnishment of Wages<br />
Disability Insurance<br />
Identifies the deduction as the employee’s 401K contribution<br />
Employee’s contribution to a family leave insurance plan.<br />
When a deduction is set up using the FLIW withholding code,<br />
you should also select the Employer has Private Family<br />
Leave Insurance Plan check box and enter the plan number<br />
(Setup > Client Information > Business Information).<br />
Employee’s contribution to a private disability insurance plan.<br />
When a deduction is set up using the EPDW withholding<br />
code, you should also select the Employer has Private Disability<br />
Plan check box and enter the plan number (Setup ><br />
Client Information > Business Information).<br />
Employee’s contribution to a public employees retirement<br />
system<br />
Maryland State Pickup Amount. This is a mandatory<br />
employee retirement deduction for all employees in Maryland<br />
that participate in the retirement system. This deduction is not<br />
subject to federal tax but is subject to Maryland state and<br />
local tax.<br />
If this withholding applies, also select the W2 Box 14 box.<br />
67
Setting Up Employee Payroll<br />
2011 Client Write-Up<br />
• Federal, FICA, Medicare, State, Local — Select the appropriate box if the<br />
deduction amount is taxable. When the information is saved, selected boxes<br />
show a Y in the field and boxes not selected show an N in the field. A Y<br />
means the deduction is subject to the specified type of withholding. An N<br />
means the deduction is not subject to the specified type of withholding.<br />
• FUTA, SUTA, and Garnish — Select these boxes if the deduction is exempt<br />
from FUTA (federal unemployment tax), SUTA (state unemployment tax), or<br />
wage garnishment.<br />
• W2 Box 10 — Select this box to assign the deduction to box 10 on the W-2.<br />
• W2 Box 14 — Select this box to assign the deduction to box 14 on the W-2. If<br />
the proper box is not selected, then the information does not flow to the W-2<br />
correctly.<br />
• Match to Benefit Number — Enter the number of a benefit and the deduction<br />
amount will match the benefit amount. If a deduction amount is entered,<br />
that amount is ignored when matching a benefit amount. The deduction<br />
amount will always equal the benefit amount even if the default benefit<br />
amount is edited on the Employees > Employee Setup > Deductions tab or<br />
during payroll processing.<br />
NOTE<br />
To use this option, the benefit to be matched must be setup and saved<br />
first (see “Adding a Benefit” on page 68). Use the reference number of<br />
the saved benefit (far left column on the bottom half of the Employees<br />
> Deductions & Benefits > Benefits window. Enter that reference<br />
number in the Match to Benefit Number field.<br />
4. Click Save. The deductions list shows the added deduction.<br />
NOTE<br />
Assign employee deductions and deduction amounts to each employee<br />
by going to Employees > Employee Setup, select the employee and<br />
click on the Deductions tab.<br />
Adding a<br />
Benefit<br />
When adding or editing a benefit, enter a fixed dollar amount, a percentage, or nothing.<br />
The benefits list allows up to 20 entries.<br />
To add a benefit, complete the following steps:<br />
1. Go to Employees > Deductions & Benefits and click the Benefits button in the<br />
Type section.<br />
68
2011 Client Write-Up Setting Up Employee Payroll<br />
Figure 4-5: Benefits<br />
2. Click New. The top entry fields are activated.<br />
3. Complete the following field information<br />
• Name — This is the name of the benefit as it appears on the pay stub and payroll<br />
reports.<br />
• Account — Press F2 to access the postable accounts list from the Chart of<br />
Accounts if the bookkeeping function is used. Select the appropriate account<br />
number for the benefit. If you are not using the bookkeeping function, the<br />
account number information is not required. For information on setting up a<br />
Chart of Accounts, refer to “Chart of Accounts (COA) Setup” on page 45.<br />
• Benefit Calculation — Select whether the benefit should be calculated<br />
Based on Hours Worked times the value in the Amount field. If Based on<br />
Hours Worked is selected, you must also select either Dollars/Cents or Percent.<br />
When Based on Hours Worked is selected, the benefit is calculated by<br />
multiplying the number in the Hours Worked field on the Live Payroll (or<br />
ATF Payroll) screen times the Amount. If Based on Hours Worked is not<br />
selected, the benefit is calculated by multiplying gross pay by the Amount.<br />
• Amount — This number corresponds either to a dollar amount or a decimal<br />
percentage that is assigned to the deduction. If neither Dollars/Cents or Percent<br />
is selected, an amount of 1 or greater designates a dollar amount. A decimal<br />
value less than 1 (for example .25) designates a percent. This amount can<br />
be edited on an individual basis by going to Employees > Employee Setup,<br />
and selecting the Benefits tab.<br />
If Dollars/Cents is selected, enter any amount and CWU will format the number<br />
as dollars and cents. Enter a value one cent or greater. If Percent is<br />
selected, enter any decimal value less than 1 up to six decimal places.<br />
• Ceiling — Enter the maximum amount of this benefit that can be taken. When<br />
the employee reaches the ceiling amount for the year, CWU discontinues giving<br />
this benefit to that employee.<br />
69
Setting Up Employee Payroll<br />
2011 Client Write-Up<br />
• W2 Box 12 Code — During W2 processing, this code indicates which letters<br />
to enter for the Box 12 code. Below is a list of codes used in Box 12.<br />
Table 4-3: W-2 Box 12 Codes<br />
A<br />
B<br />
Uncollected Social Security or RRTA tax on tips<br />
Uncollected Medicare tax on tips<br />
C Taxable cost of group term life insurance over $50,000<br />
D<br />
E<br />
F<br />
G<br />
H<br />
Elective deferrals to a §401(k) cash or deferred arrangement<br />
(including a SIMPLE 401(k) arrangement)<br />
Elective deferrals to a §403(b) salary reduction plan<br />
Elective deferrals to a §408(k)(6) salary reduction SEP<br />
Elective deferrals and employer contributions (including nonelective<br />
deferrals) to any governmental or nongovernmental §457(b)<br />
deferred compensation plan<br />
Elective deferrals to a 501(c) (18) (D) tax-exempt organization plan<br />
J Nontaxable sick pay (not included in lines 1, 3, or 5)<br />
K<br />
L<br />
M<br />
N<br />
P<br />
Q<br />
R<br />
S<br />
T<br />
V<br />
W<br />
Y<br />
Z<br />
AA<br />
BB<br />
DD<br />
20% excise tax on excess golden parachute payments<br />
Substantiated employee business expense reimbursements<br />
Uncollected Social Security or RRTA tax on the taxable cost of<br />
group term life insurance over $50,000 (for former employees)<br />
Uncollected Medicare tax on taxable cost of group term life insurance<br />
over $50,000 (for former employees)<br />
Excludable moving expense reimbursements paid directly to the<br />
employee<br />
Nontaxable combat pay<br />
Employer contributions to an Archer medical savings account<br />
(MSA)<br />
Employee salary reduction contributions under a §408(p) SIMPLE<br />
Adoption benefits<br />
Income from the exercise of nonstatutory stock option(s)<br />
Employer contributions to an employee's Health Savings Account<br />
(HSA)<br />
Deferrals under a §409A nonqualified deferred compensation plan<br />
Income under §409A on a nonqualified deferred compensation<br />
plan<br />
Designated Roth contributions to a section 401(k) plan<br />
Designated Roth contributions under a section 403(b) salary<br />
reduction agreement<br />
Cost of employer-sponsored health coverage<br />
70
2011 Client Write-Up Setting Up Employee Payroll<br />
Table 4-3: W-2 Box 12 Codes<br />
EE<br />
Designated Roth contributions under a governmental §457(b) plan<br />
• Select the taxing option that applies:<br />
Not taxed - not applied to Gross or Net Pay — The benefit is not taxed.<br />
Not taxed - not applied to Gross applied to Net Pay — The benefit is not<br />
taxed but the amount is added to Net Pay.<br />
Taxed - applied to Gross and Net Pay — The benefit is taxed based on the<br />
check box selections (Federal, FICA, Medicare, FUTA, State, Local, and<br />
SUTA) and the amount is added to Gross and Net pay.<br />
Taxed - not applied to Gross or Net Pay — The benefit is taxed but the benefit<br />
amount is not added to either the Gross or Net pay.<br />
NOTE<br />
Benefits marked as Not taxed - not applied to Gross or Net Pay or<br />
Taxed - not applied to Gross or Net Pay do not transfer to the Journal.<br />
• Federal, FICA, Medicare, FUTA (federal unemployment tax), State, Local,<br />
and SUTA (state unemployment tax) — Select the appropriate box if the benefit<br />
amount is taxable. When the information is saved, selected boxes show a<br />
Y in the field and boxes not selected show an N in the field. A Y means the<br />
benefit is subject to the specified type of withholding. An N means the benefit<br />
is not subject to the specified type of withholding.<br />
• W2 Box 1 — Select this box to add the amount of the benefit to the total federal<br />
wages in box 1 on the W-2.<br />
NOTE<br />
The benefit amount will not be added to the total federal wages if Taxed<br />
- applied to Gross and Net Pay is selected.<br />
• W2 Box 10 — Select this box if the benefit is a dependent care benefit and the<br />
amount should appear in box 10 of the W-2. If this box is not selected, the<br />
item does not appear in box 10 of the W-2.<br />
• W2 Box 14 — Select this box to assign the benefit to box 14 on the W-2. If<br />
the proper box is not selected, then the information does not flow to the W-2<br />
correctly.<br />
4. Click Save. The benefits list shows the added benefit.<br />
NOTE<br />
Assign employee benefits and benefit amounts to each employee by<br />
going to Employees > Employee Setup, select the employee and click<br />
on the Benefits tab.<br />
Editing a Deduction or Benefit<br />
To edit a deduction or benefit, go to Employees > Deductions & Benefits, select<br />
either the Deductions or Benefits option in the upper left of the window, and click the<br />
71
Employee Setup<br />
2011 Client Write-Up<br />
Employee Setup<br />
Adding an Employee<br />
appropriate entry in the list. The top entry fields are activated. Edit the information<br />
and click Save. The list updates to show the changes.<br />
Select Employees > Employee Setup to enter information for the client's W-2<br />
employees. Employee information must be entered before any payroll information is<br />
produced for each employee. When the Employee Information Update dialog box is<br />
open, employees are listed alphabetically by last name.<br />
To add an employee, complete the following steps:<br />
1. Go to Employees > Employee Setup.<br />
2. Click New. Enter a code in the Empl. Code field. Employee codes are alphanumeric<br />
and can be up to 20 characters long.<br />
IMPORTANT<br />
Use only letters and numbers when assigning employee codes.<br />
Do not use spaces or any special characters.<br />
Use any scheme you wish to assign employee codes; however, we recommend<br />
that you use an employee code that is meaningful. For instance, instead of using<br />
the employee’s SSN, you could use “JonesPaul.” By using a meaningful code,<br />
lines on reports that refer to this employee are easily identifiable.<br />
Once a valid employee code is entered, the information fields are enabled. To<br />
change an employee code, see “Change Employee Codes” on page 86.<br />
IMPORTANT<br />
Access is granted to eight tabs when an Employee Code is created.<br />
Complete each tab for each employee.<br />
3. Complete information on the following tabs:<br />
• Personal Info Tab<br />
• Payroll Wages/Rates Tab<br />
• Payroll Options Tab<br />
• Federal Tax Status Tab<br />
• State/Local Tax Status Tab<br />
• Deductions Tab<br />
• Benefits Tab<br />
• Direct Deposit Tab<br />
4. Click Save after verifying the information on all tabs.<br />
72
2011 Client Write-Up Employee Setup<br />
Personal<br />
Info Tab<br />
Complete the Personal Info tab:<br />
Figure 4-6: Employee - Personal Info<br />
• First Name, Middle Name, Last Name, Suffix, Address, and Phone — The<br />
First Name and Last Name are required. The address information is required<br />
in order to generate the W-2 at the end of the year. You can add this information<br />
later.<br />
IMPORTANT<br />
Enter the First Name, Middle Name, Last Name, Suffix, and<br />
Address as they should appear on the employee's paycheck and<br />
W-2. When entering information into the Zip, Phone, and SSN<br />
fields, do not use dashes (-) or slashes (/). These fields are formatted<br />
after information is entered.<br />
• Zip — Enter the employee’s zip code. This field is formatted after information<br />
is typed. The City and State fields autofill with information from the zip<br />
code database.<br />
• ID (Required) — Enter the EIN, SSN, ITIN, or Other. The number is formatted<br />
based on the selection made from the drop list. The OTH selection is any<br />
information approved by the IRS instead of using an EIN, SSN, or ITIN.<br />
• BirthDay — Enter the employee’s birth date. This date is used to figure eligibility<br />
of catch-up amounts for 401k contributions.<br />
• Hire Date — Enter the date the employee was hired. (See “Date Fields” on<br />
page 12.)<br />
• Division (Optional) — Set up Divisions in Setup > Headers & Footnotes.<br />
(See “Headers and Footnotes” on page 54.)<br />
• Status (Required) — Select the status of the employee.<br />
– Statutory — Some workers are deemed to be employees by statute. An<br />
employer should indicate on the worker's Form W-2 that the worker is<br />
classified as a statutory employee. Statutory employees report their<br />
wages, income, and allowable expenses on Schedule C (or Schedule C-<br />
EZ), Form 1040. Statutory employees are not liable for self-employment<br />
tax because their employers must treat them as employees for Social<br />
Security tax purposes.<br />
73
Employee Setup<br />
2011 Client Write-Up<br />
For an exempt organization, the most common statutory employees are its<br />
officers. In addition, while not as prevalent in an exempt organization, the<br />
following workers are also statutory employees:<br />
- A full-time traveling or city salesperson who solicits orders from wholesalers,<br />
restaurants, or similar establishments on behalf of a principal. The<br />
merchandise sold must be for resale (such as food sold to a restaurant) or<br />
for supplies used in the buyer's business.<br />
- A full-time life insurance agent whose principal business activity is selling<br />
life insurance and/or annuity contracts for one life insurance company.<br />
- An agent-driver or commission-driver engaged in distributing meat,<br />
vegetables, bakery goods, beverages (other than milk), or laundry or dry<br />
cleaning services.<br />
- A home worker performing work on material or goods furnished by the<br />
employer.<br />
NOTE<br />
The selection made in the Status field determines the availability of the<br />
employment information in the payroll function and the state wage<br />
report. Selecting Hourly, Salary, or Statutory makes the employee<br />
information available in the payroll function.<br />
– Terminated — Employee who has resigned or was let go by the company.<br />
Making this selection activates the Date Term field.<br />
– Suspended — Employee is not employed by the company at this time. A<br />
suspended employee cannot be deleted until the end of the calendar year.<br />
Making this selection activates the Date Term field.<br />
If an employee is marked as Suspended or Terminated, the employee<br />
does not appear in the Payroll list and his information does not flow to<br />
the state wage report. Run the state wage report prior to setting an<br />
employee's status to Terminated or Suspended so the last payroll information<br />
can be captured. If the state wage report isn't run before setting an<br />
employee's status to Terminated or Suspended, change the employee's<br />
status back, generate the state wage report, then return the employee to<br />
the correct status. Terminated and Suspended employees can be deleted<br />
at the end of the calendar year once all reports, payroll filings, and W-2s/<br />
W-3s have been generated and mailed or electronically filed.<br />
NOTE<br />
Exception: If a business’ fiscal year covers any period other than Jan.1-<br />
Dec.31, the employee cannot be deleted until the end of the fiscal year.<br />
• Date Term — This field is activated when either Suspended or Terminated<br />
is selected in the Status field. Use the drop list to activate the calendar and<br />
select the date.<br />
• Check if Employee is under 18 — Select this box if the employee is under<br />
18 years of age.<br />
Payroll<br />
Wages/Rates<br />
Tab<br />
Enter information about an employee's pay scale on the Payroll Wages/Rates tab.<br />
• Pay Class (Required) — Select the employee’s pay class.<br />
74
2011 Client Write-Up Employee Setup<br />
– Hourly — Employee is paid at an hourly rate.<br />
– Salary — Employee is paid based on an annual salary.<br />
– Officer Salary — Employee is an officer of the company and is paid<br />
based on an annual salary.<br />
– Commission — Employee is paid a commission with no hourly wage or<br />
annual salary.<br />
– Sick Pay — Employee is receiving third party sick pay. When this status<br />
is selected, the Date Sick Pay Started and % Sick Pay Paid by<br />
Employee fields are activated.<br />
• Pay Frequency — Select the appropriate option based on how often this<br />
employee is paid. This information determines the default value of Regular<br />
Hours for hourly employees in Live Payroll and ATF Payroll. It also determines<br />
how the employee’s annual salary is divided and displayed in the Salary<br />
field when processing payroll. For instance, if Weekly is selected, the<br />
annual salary is divided by 52 in Payroll; if BiWeekly is selected, the annual<br />
salary is divided by 26. Select Zero to remove the default hours when processing<br />
live payroll.<br />
• Annual Salary — Enter the annual salary amount. The amount for the payroll<br />
check will be calculated based on the selection made in the Pay Class field.<br />
Entries in Annual Salary take precedence over entries in Pay Rate 1.<br />
• Suppress Regular Hours for Non-Hourly Employees — This option is<br />
available for non-hourly employees only. When this option is selected, “0.00”<br />
displays in the Regular Hours field on the Live and ATF Payroll screens and<br />
the regular hours do not print on the employee’s check stub.<br />
• Suppress Regular Hours on Check Stub — When this option is selected,<br />
regular hours do not print on the employee’s check stub.<br />
• Pay Rate 1 — If the employee is paid on an hourly basis, enter the hourly<br />
wage. Entries in Annual Salary take precedence over entries in Pay Rate 1.<br />
IMPORTANT<br />
Enter information in either the Annual Salary or the Pay Rate 1<br />
field. Payroll does not calculate correctly when there is information<br />
entered in both of these fields for an employee.<br />
• Overtime Factor — Enter the percentage of the hourly wage the employee<br />
receives for working overtime. The default value is time-and-a-half, entered<br />
as 1.5.<br />
• Holiday Factor — Enter the percentage of the hourly wage the employee<br />
receives for working on a holiday. The default value of the holiday pay rate is<br />
double-time, entered as 2.0.<br />
• Pay Per Piece — If the employee is paid by production levels (piece work),<br />
enter the wage the employee receives for each piece produced.<br />
• Date of Pay Raise — Enter the date the employee’s pay raise became effective.<br />
This date is used to determine the correct amount of pay when a paycheck<br />
is generated prior to that date using the old amount or after that date<br />
using the increased amount.<br />
• Date Sick Pay Started — Enter the date the employee began receiving third<br />
party sick pay.<br />
75
Employee Setup<br />
2011 Client Write-Up<br />
• % Sick Pay Paid by Employee — Enter the percentage of sick pay paid by<br />
the employee.<br />
Multiple Pay<br />
Rate<br />
Employees<br />
Use this feature for employees with multiple job descriptions or multiple pay rates<br />
within the company.<br />
A common scenario for multiple pay rate employees is the restaurant business. Some<br />
employees are paid at one rate when they are working as a “Hostess”, another rate<br />
when they are a “Server”, and yet another rate when they are working as a “Prep<br />
Chef”. Use the Pay Rate 1 field for the employee’s “primary” job and the Pay Rate 2<br />
through 4 fields for any “secondary” jobs.<br />
NOTE<br />
When processing payroll for multiple pay rate employees, you must<br />
enter the number of hours worked at each pay rate or job description.<br />
Figure 4-7: Employee - Multiple Pay Rates<br />
• Additional Pay Rates — Click this box to designate the employee is a multiple<br />
pay rate employee. This field must be selected in order to enter multiple<br />
pay rates. Making this selection activates the Pay Rate Description, Pay<br />
Rate 2 through 4 and Pay Rate 2 through 4 Description fields.<br />
– Pay Rate Description — This field is activated only when Additional<br />
Pay Rates is selected. Enter a brief description of the employee’s regular<br />
pay to distinguish it from the other pay rates. This description appears in<br />
Payroll and on the pay stub.<br />
– Pay Rate 2 through 4 — Enter pay rates for each of the employee’s “secondary”<br />
jobs.<br />
– Pay Rate 2 through 4 Description — Enter a brief description of each of<br />
the employee’s “secondary” jobs.<br />
– Use Pay Rate for OT Rate — Select the pay rate to use (rate 1, 2, 3, or 4)<br />
when the employee works overtime.<br />
76
2011 Client Write-Up Employee Setup<br />
Payroll<br />
Options Tab<br />
Select the appropriate payroll options for this employee on the Payroll Options tab.<br />
Figure 4-8: Payroll Options<br />
• Tipped Employee — Select this field if the employee receives tips. Select<br />
whether the employee received tips directly or indirectly.<br />
Direct tipped employees are any tipped employees who receive tips directly<br />
from customers, including employees who turn all tips over to a tip pool. All<br />
taxes and withholdings are deducted from the gross pay and the payroll check<br />
includes tips in the net pay.<br />
Indirect tipped employees are tipped employees who do not ordinarily<br />
receive tips directly from customers, such as busboys, service bartenders, and<br />
cooks.The employee holds the tips and reports the tip amount to the employer.<br />
The tips are included in the gross pay to determine taxes but are not included<br />
in the net pay.<br />
• Seasonal Employee — Select the box to create the correct information on<br />
Forms 941, 941SS, W-2, and W-3 and several state reports.<br />
• Agricultural Employee — Select the box to create the correct information on<br />
Forms 943, W-2, and W-3.<br />
• Employee Exempt From Fed. Withholding — Payroll for this employee is<br />
calculated as exempt from federal withholding.<br />
• Employee Exempt From State Withholding — Payroll for this employee is<br />
calculated as exempt from state withholding.<br />
• Exempt from SUTA — Select this option if the pay amount should not to be<br />
added to payroll for state unemployment purposes.<br />
• Exempt from FUTA — Select this option if the pay amount should not to be<br />
added to payroll for federal unemployment purposes.<br />
• Use Employee’s State for Box 15 on the W2 — Select to use the employee’s<br />
state in box 15 of their W-2 instead of the employer’s state.<br />
• 401k Status — Select whether the employee’s 401k account is active, suspended,<br />
or inactive.<br />
77
Employee Setup<br />
2011 Client Write-Up<br />
Sick/Vacation Hours<br />
Figure 4-9: Sick and Vacation Hours<br />
• Sick Calculations — Select this box to track sick hours available and used.<br />
This box must be selected and the sick hours<br />
(Employees > Account & Payroll Information > Payroll Options)<br />
Accrual Options set up in order to have CWU track sick hours available.<br />
• Rollover Hrs — Select this check box if sick hours not used this year are<br />
available for use next year. The Sick Hours Available rolls over as the Beginning<br />
Balance into next year’s Client Write-Up program.<br />
• Beginning Balance — Enter the current sick hours available including the<br />
rollover balance. This field is updated (if the Rollover Hrs box is selected)<br />
with the amount of Sick Hours Available into next year’s Client Write-Up<br />
program.<br />
• Sick Hrs Per Year — Enter the number of sick hours available in a year.<br />
• Hrs Required — If sick hours accrue on a per-hours-worked basis, enter the<br />
number of hours the employee must work to earn one sick hour.<br />
• Sick Hrs Available — Enter the current number of sick hours available. This<br />
balance calculated based on the formula (Beginning Balance + Earned Sick<br />
Hours) - Sick Hours Used.<br />
• Sick Hrs Used — Enter the current number of sick hours used for the year.<br />
This balance is updated each time payroll (live or ATF) is run.<br />
• Vacation Calculations — Select this box to track vacation hours available<br />
and used.<br />
• Rollover Hrs — Select this box if vacation hours not used this year are available<br />
for use next year. The Vacation Hours Available rolls over as the Beginning<br />
Balance into next year’s Client Write-Up program.<br />
• Beginning Balance — Enter the current vacation hours available including<br />
the rollover balance. This field is updated (if the Rollover Hrs box was<br />
selected) with the amount of Vacation Hours Available into next year’s Client<br />
Write-Up program.<br />
• Vac Hrs Per Year — Enter the number of vacation hours available in a year.<br />
• Hrs Required — If vacation hours accrue on a per-hours-worked basis, enter<br />
the number of hours the employee must work to earn one vacation hour.<br />
78
2011 Client Write-Up Employee Setup<br />
• Vac Hrs Available — Enter the current number of vacation hours available.<br />
This balance is calculated based on the formula (Beginning Balance + Earned<br />
Vacation Hours) - Vacation Hours Used.<br />
• Vac Hrs Used — Enter the current number of vacation hours used for the<br />
year. This balance is updated each time payroll (live or ATF) is run.<br />
IMPORTANT<br />
Employee checks or pay stubs must be printed in order for the<br />
Sick Hrs Available and Vac Hrs Available fields to be updated<br />
automatically. To automatically update these fields for ATF paychecks,<br />
go to Employees > Reprint Checks and print checks<br />
using the Preview checks prior to printing option.<br />
Employee-Officer Expense/Cash Accounts<br />
NOTES<br />
NEW FOR<br />
2011<br />
This section can be skipped if the bookkeeping feature is not being<br />
used.<br />
The client Chart of Accounts must be created prior to entering account<br />
numbers. See “Chart of Accounts (COA) Setup” on page 45.<br />
Different Employee Salary and Officer’s Salary Cash and Expense<br />
accounts can be assigned for each employee. If no accounts are<br />
assigned for an employee on the employee’s Payroll Options tab, the<br />
accounts assigned on the Employees > Account & Payroll Information,<br />
G/L Account Numbers tab are used when transactions are posted<br />
to the journal.<br />
The account information entered is used to generate entries into the payroll journal<br />
from employee payroll entries. Press F2 to select postable accounts from the Chart of<br />
Accounts or type the account number directly into the field. If the appropriate account<br />
does not exist, press F2 in the account field and select New from the list of available<br />
accounts to create an account. To create a new account, see “Create an Account “On<br />
the Fly”” on page 156.<br />
Employee/Officer Cash Account — This account is credited when a transaction is<br />
entered.<br />
Employee/Officer Expense Account — This account is debited when a transaction is<br />
entered.<br />
NOTE<br />
Only use the Officer cash and expense accounts for employees with a<br />
Pay Class of Officer Salary. Use the Employee cash and expense<br />
accounts for all other pay classes. Set the Pay Class on the Payroll<br />
Wages/Rates tab.<br />
Federal Tax<br />
Status Tab<br />
Enter information about an employee's federal withholding on the Federal Tax Status<br />
tab.<br />
Federal Withholding Options<br />
79
Employee Setup<br />
2011 Client Write-Up<br />
• Wage Calculation Method — This option uses annualized payroll to access<br />
the “Tables for Percentage Method of Withholding (table 7)” to calculate the<br />
Federal withholding as described in IRS Pub 15 and is the default method for<br />
figuring the federal tax.<br />
• Fixed Percent Method — This method uses a fixed percentage, which you<br />
select, to determine the federal tax, regardless of income. When the percentage<br />
method is selected, the Federal Withholding Information section<br />
changes to prompt for the actual withholding percent used.<br />
• Rounded — Federal withholding amounts of 50 cents and more are rounded<br />
up to the next dollar. Amounts less than 50 cents are rounded down to give a<br />
whole dollar amount.<br />
• Nonresident Alien Employee — Select this option and the employee is taxed<br />
at the higher nonresident alien rate.<br />
Federal Withholding Information<br />
• Filing Status, Exemptions, and Add’l W/H — These fields are available<br />
when the Wage Calculation Method is selected. Enter information from the<br />
employee's Form W-4.<br />
• Exempt from SS W/H — Select this option if the employee is exempt from<br />
paying Social Security withholding.<br />
• Exempt from Medicare W/H — Select this option if the employee is exempt<br />
from paying Medicare withholding.<br />
• WH Percent — This field is available when the Fixed Percent Method is<br />
selected. Enter the percentage to be used to calculate the employee’s federal<br />
withholdings in decimal format. (For instance, .15 indicates 15%.)<br />
State/Local<br />
Tax Status<br />
Tab<br />
Enter information about an employee's state and local withholding on the State/Local<br />
Tax Status tab.<br />
State Withholding Options<br />
Figure 4-10: State Withholding Options<br />
• Wage Calculation Method — This option uses annualized payroll to calculate<br />
the State withholding as described in the publications for each state.<br />
• Fixed Percent Method — This method uses a fixed percentage, which you<br />
select, to determine the state tax, regardless of income. When the percentage<br />
80
2011 Client Write-Up Employee Setup<br />
method is selected, the State/Locality Information section changes to<br />
prompt for the actual withholding percent used.<br />
• Rounded — State withholding amounts of 50 cents and more will be rounded<br />
up to the next dollar. Amounts less than 50 cents will be rounded down to give<br />
a whole dollar amount.<br />
• Use Gross Pay for Local Tax — Select this option if the locality tax is based<br />
on the gross amount of the employee’s pay check.<br />
• Use Adjusted Pay for Local Tax — Select this option if the locality tax is<br />
based on the net amount of the employee’s pay check.<br />
State/Locality Information<br />
Figure 4-11: State/Locality Information<br />
• Tax Table — Select the employee's state for tax withholding purposes. If state<br />
withholding is not applicable, no selection is necessary or you may choose<br />
None. Selecting a state here puts the same state in the State Code field when<br />
processing live and ATF payroll.<br />
• Locality 1-3 — Select the locality where the employee lives. The contents of<br />
the drop lists is determined by the entries in<br />
Employees > Account & Payroll Information, the Local Rates tab. If there<br />
is no entry in the list for the employee’s locality, there is likely no locality tax<br />
for that location. See “Add Locality Tax” on page 64 if a locality needs to be<br />
added to the drop list.<br />
Filing Status/Exemptions<br />
Filing Status, Exemptions, and Add'l W/H — These fields are available when the<br />
Wage Calculation Method option is selected. Enter information from the employee's<br />
state W-4.<br />
State Fixed Percent WH<br />
WH Percent — This field is available when the Fixed Percent Method is selected.<br />
Enter the percentage to be used to calculate the employee’s state withholdings in decimal<br />
format. (For instance, .15 indicates 15%.)<br />
General Selections<br />
After selecting the employee's state from the Tax Table list under the State/Locality<br />
Information, fill in additional data as required by the selected state. If the state does<br />
not require additional withholding information, no additional data fields are displayed.<br />
81
Employee Setup<br />
2011 Client Write-Up<br />
• Blind — If Tax Table is set to IL or MS, the Blind field is active. If the<br />
employee or spouse is blind, select the appropriate option in this field.<br />
• Over 65 — If Tax Table is set to IL or MS, the Over 65 field is active. If the<br />
employee or spouse is over the age of 65, select the appropriate option in this<br />
field.<br />
• Wage Chart — If Tax Table is set to NJ, the Wage Chart field is active.<br />
Select the appropriate wage chart letter for state withholding purposes.<br />
• % of Federal — If Tax Table is set to AZ, the % of Federal field is active. If<br />
the employee is taxed based on a percentage of the federal tax, choose the<br />
applicable tax rate from the list.<br />
• Reduced WH — If the Tax Table field is set to CT, the Reduced WH field is<br />
active. If the employee qualifies for reduced withholding, enter the amount<br />
here.<br />
• Est Deductions — If the Tax Table field is set to CA or NJ, the Est Deductions<br />
field is active. If the employee qualifies for Estimated Deductions<br />
Reduction withholding, enter the amount of the deductions here.<br />
• No. Dependents — If the Tax Table field is set to AL, LA, or MS, this field<br />
is active. Enter the number of dependents the employee claims for state withholding<br />
purposes.<br />
Deductions<br />
Tab<br />
Enter payroll deductions for the employee on the Deductions tab. Before assigning<br />
deductions to an employee, first create the deductions through<br />
Employees > Deductions & Benefits. Deductions set up in Deductions & Benefits<br />
are available to be assigned to employees on the Employees > Employee Setup,<br />
Deductions tab without amounts.<br />
NEW FOR<br />
2011<br />
Assign only the deductions applicable to each employee. Only the<br />
deductions assigned to that employee appear on their payroll screen<br />
and check stub.<br />
To assign a deduction to an employee:<br />
1. Double-click a deduction in the Deductions List that is to be assigned to the<br />
employee. The deduction number and name display in the Deduction Edit Line<br />
with an “X” in the Assignment Field. See Figure 4-12.<br />
82
2011 Client Write-Up Employee Setup<br />
Figure 4-12: Deductions Assignment<br />
2. Either press F3 to bring forward the default deduction amount for the selected<br />
deduction, or manually enter a deduction Amount, Priority (optional), and Ceiling<br />
(optional).<br />
• Amount — Enter the amount of the deduction for this employee. Default settings<br />
can be edited at this time. If a deduction has been set up to “Match a<br />
Benefit Number”, editing a deduction amount will have no effect since the<br />
deduction amount will match the benefit amount. See Match to Benefit Number.<br />
TIP<br />
Enter a decimal amount less than 1.00 to indicate the deduction is a<br />
percentage of gross pay. To create deductions based on set dollar<br />
amounts, enter amounts of $1.00 or greater.<br />
• Priority — Set the order that deductions are to be subtracted. This information<br />
is valuable in cases of short pay weeks. This way, you know which<br />
deductions are the most important when it is not in the best interest of the<br />
employee to use all deductions.<br />
• Ceiling — Enter the maximum deduction that can be taken by this employee.<br />
When the employee reaches the ceiling amount for the year, CWU discontinues<br />
this deduction for the employee.<br />
3. Click OK. The deduction displays in the Deductions List along with the<br />
Amount, Priority, and Ceiling values. The “X” in the Assignment Field for a<br />
deduction in the Deductions List indicates the deduction has been assigned to the<br />
employee.<br />
Removing a Deduction from an Employee<br />
If an employee does not want to have a deduction taken from his or her pay:<br />
1. Double-click the deduction in the Deductions List that should not be deducted<br />
from the employee’s pay. The deduction information displays in the Deduction<br />
Edit Line with an “X” in the Assignment Field.<br />
2. Delete the “X” from the Assignment Field on the Edit Line.<br />
3. Click OK.<br />
83
Employee Setup<br />
2011 Client Write-Up<br />
Benefits Tab<br />
Enter payroll benefits for the employee on the Benefits tab. Before entering benefits<br />
for payroll purposes, first create the benefits through<br />
Employees > Deductions & Benefits. Benefits set up in Deductions & Benefits are<br />
available to be assigned to employees on the Employees > Employee Setup, Benefits<br />
tab without amounts.<br />
NEW FOR<br />
2011<br />
Assign only the benefits applicable to each employee. Only the benefits<br />
assigned to that employee appear on their payroll screen and check<br />
stub.<br />
To assign a benefit to an employee:<br />
1. Double-click a benefit in the Benefits List that is to be assigned to the employee.<br />
The benefit number and name display in the Benefit Edit Line with an “X” in the<br />
Assignment Field.<br />
2. Either press F3 to bring forward the default benefit amount for the selected benefit,<br />
or manually enter a benefit Amount and Ceiling (optional).<br />
• Amount — Enter the amount of the deduction for this employee. Default settings<br />
may be edited at this time.<br />
TIP<br />
Enter a decimal amount less than 1.00 to indicate the benefit is a percentage<br />
of gross pay. To create benefits based on set dollar amounts,<br />
enter amounts of $1.00 or greater.<br />
• Ceiling — Enter the maximum amount of this benefit that can be taken by<br />
this employee. When the employee reaches the ceiling amount for the year,<br />
CWU discontinues giving this benefit to the employee.<br />
3. Click OK. The benefit displays in the Deductions List along with the Amount<br />
and Ceiling values. The “X” in the Assignment Field for a benefit in the Benefits<br />
List indicates the benefit has been assigned to the employee.<br />
Removing a Benefit from an Employee<br />
If an employee does not want to have a benefit included in his or her pay:<br />
1. Double-click the benefit in the Benefits List that should not be included in the<br />
employee’s pay. The benefit information displays in the Benefit Edit Line with<br />
an “X” in the Assignment Field.<br />
2. Delete the “X” from the Assignment Field on the Edit Line.<br />
3. Click OK.<br />
84
2011 Client Write-Up Employee Setup<br />
Direct<br />
Deposit Tab<br />
Enter direct deposit information for the employee on the Direct Deposit tab.<br />
IMPORTANT<br />
InterceptEFT is <strong>Drake</strong>’s agent for direct deposit. You must call<br />
them (1-866-431-9926) and establish your account prior to using<br />
the Direct Deposit feature. <strong>Drake</strong> has established a special fee<br />
schedule with InterceptEFT for its clients. It’s important that you<br />
identify yourself as a <strong>Drake</strong> client whenever you communicate<br />
with InterceptEFT.<br />
Edit an Employee<br />
Direct Deposit Payroll Checks — Select the check box if payroll checks are to be<br />
deposited directly into the employee’s bank account. The Account Type and Bank<br />
Routing Number fields activate.<br />
• Account Type — Specify whether to deposit the pay into a Checking or Savings<br />
account, or both. Directly deposit payroll checks in up to two accounts<br />
for each employee. If splitting a paycheck between two accounts, both<br />
accounts must be at the same bank. Checks can be split between any combination<br />
of checking and savings accounts including two checking or two savings<br />
accounts or one of each. If both Checking and Savings are selected, the<br />
Enter Amount to Apply to Savings field activates.<br />
• Enter Amount to Apply to Savings — Enter the dollar amount to deposit<br />
into the second Direct Deposit account when the deposit is being split<br />
between two accounts. This amount can be edited for each pay check.<br />
• Bank Routing Number — Enter the routing number for the employee’s bank<br />
account. Find this number on the bottom of the contractor’s personal checks<br />
to the left of the account number. The routing number displays asterisks.<br />
Reenter the routing number in the Retype Bank Routing Number field.<br />
• Checking Account Number — Enter the employee’s checking account number<br />
for the direct deposit. If the deposit is to be split between two savings<br />
accounts, enter the first savings account information here. The account number<br />
displays asterisks. Reenter the account number in the Retype Checking<br />
Account Number field.<br />
• Savings Account Number — Enter the employee’s savings account number<br />
for the direct deposit. If the deposit is to be split between two checking<br />
accounts, enter the second checking account information here. The account<br />
number displays asterisks. Reenter the account number in the Retype Savings<br />
Account Number field.<br />
To edit an existing employee, go to Employees > Employee Setup and double-click a<br />
name from the list of employees or enter the employee’s ID number in Employee<br />
Code field and press ENTER. The data fields for that employee activate. Edit the<br />
desired fields and click Save.<br />
85
Change Employee Codes<br />
2011 Client Write-Up<br />
Change Employee Codes<br />
IMPORTANT<br />
Changing employee codes must be done before producing W-2s.<br />
To change an employee code, complete the following:<br />
1. Go to Employees > Change Employee Code.<br />
NOTE<br />
It is recommended that you back up your client files prior to changing<br />
employee codes. To backup from the Change Employee/Contractor<br />
Code window, click Backup Files.<br />
2. Use the Select the Old Employee Code drop list to select the employee code to<br />
change.<br />
3. Enter the new employee code into the Enter the New Employee Code field.<br />
Employee codes can be up to 20 characters and are alphanumeric.<br />
4. Re-enter the new employee code.<br />
5. Click Save.<br />
IMPORTANT<br />
Portals Users - If an Employee Code needs to be changed, It is<br />
important that the Employer not make any changes to employee<br />
information until the Employee Code has been changed and Portals<br />
has been synched.<br />
Payroll Processing<br />
Make adjustments to state, company, and individual information by going to the following<br />
options under the Employees menu:<br />
• Account & Payroll Information<br />
• Deductions & Benefits<br />
• Employee Setup<br />
Live Employee Payroll<br />
Changes to the federal wage information are made in Firm > Firm Info./<br />
Global Settings. This information can be edited as needed.<br />
Refer to “Process Payroll (Live and ATF)” on page 305 for an overview of the payroll<br />
process.<br />
Use Live Payroll when employee paychecks will be printed.<br />
NOTE<br />
See “Process Payroll (Live and ATF)” on page 305 for an overview of<br />
payroll processes.<br />
To enter live payroll, complete the following steps:<br />
86
2011 Client Write-Up Live Employee Payroll<br />
1. Go to Employees > Live Payroll.<br />
2. Select Employee — Double-click the employee from the employee list or enter<br />
the employee code in the field at the top left of the screen. All existing employees<br />
are listed alphabetically by last name. If necessary, sort the employee list by<br />
Code, Name, or SSN by clicking the column header. Once the employee has been<br />
selected, the other fields activate and information fields are automatically filled<br />
with data previously entered in Employees > Employee Setup.<br />
3. Verify, edit, or complete the following fields:<br />
• Pay Check Exempt from FUTA — Select this option if the pay amount<br />
should not be added to payroll for FUTA purposes.<br />
• Rate One, Rate Two, Rate Three, Rate Four — The amounts in these fields<br />
are determined by the information entered in the<br />
Employees > Employee Setup, Payroll Wages/Rates tab, the Pay Rate 1-4<br />
fields and are active only if the employee is a multiple pay rate employee.<br />
Refer to “Multiple Pay Rate Employees” on page 76. Changes to the Rate<br />
One thru Four fields in Live Payroll affect vacation, holiday, sick, and overtime<br />
pay for this paycheck only. Edit these fields only if the default multiple<br />
pay rates are incorrect.<br />
Figure 4-13: Multiple Pay Rate Rates and Hours<br />
• Hours — Enter the hours worked at each multiple pay rate. The total of all<br />
multiple pay rate hours is displayed in the Total Hours field.<br />
• State Code — This is determined by the state selected in Tax Table in<br />
Employees > Employee Setup, the State/Local Tax Status tab.<br />
NOTE<br />
Fields are formatted when displayed and any changes are formatted<br />
after leaving the field.<br />
• Pay Period Ending — This is the current computer date. To change the date,<br />
enter the appropriate date using the MMDDYYYY format.<br />
• Check Date — This field is not used when preparing live payroll for employees<br />
that receive printed paychecks and is therefore unavailable. For those<br />
employees, the check date is entered when checks are printed. The Check<br />
Date field is required when entering live payroll for direct deposit employees.<br />
Enter the date of the check in MMDDYYYY format.<br />
87
Live Employee Payroll<br />
2011 Client Write-Up<br />
IMPORTANT<br />
Direct Deposit transmissions on Friday, Saturday, or Sunday are<br />
processed by InterceptEFT the following Monday. InterceptEFT<br />
does not accept direct deposit check dates that fall on weekends<br />
or holidays. See “Appendix F - InterceptEFT Holidays” on<br />
page 320 for the Holiday Processing Calendar.<br />
• Check Number — This field is not used when preparing live payroll and is<br />
therefore unavailable. The starting check number is entered when checks are<br />
printed.<br />
• Regular Hours — This field is active when the employee is not a multiple<br />
pay rate employee and reflects information entered in the<br />
Employees > Employee Setup, Payroll Wages/Rates tab, the Pay Frequency<br />
field. Use this field to override the default number of hours worked.<br />
Enter the correct number of hours and the regular pay, earnings, and deductions<br />
adjust automatically. To remove the default hours, go to the<br />
Payroll Wages/Rates tab in Employees > Employee Setup and select Zero<br />
from the Pay Frequency list. Regular Hours changes to Total Hours when<br />
the employee is a multiple pay rate employee.<br />
• Hours Worked — The amount in this field is calculated by adding Regular<br />
Hours plus Overtime Hours or Regular Hours minus Sick Hours. The<br />
amount in this field is used to calculate the employee’s deduction or benefit if<br />
specified to be used in the calculation when the deduction or benefit was set<br />
up. Edit the amount in this field as needed. See Deduction Calculation and<br />
Benefit Calculation.<br />
• Total Hours — This is a calculated field that is displayed only when the<br />
employee is a multiple pay rate employee. Total Hours is the total of the<br />
employee’s multiple pay rate hours. See “Multiple Pay Rate Employees” on<br />
page 76 for information on setting up multiple pay rate employees.<br />
• Salary — The salary is calculated when Salary is selected from the Status<br />
list on the Employees > Employee Setup, the Personal Info tab. Override<br />
the employee's salary on the Live Payroll dialog box. Enter the corrected<br />
amount and the regular pay, earnings, and deductions adjust automatically. To<br />
remove a default, go to Employees > Employee Setup, the Payroll Wages/<br />
Rates tab, and select Zero from the Pay Frequency list. Then, on the same<br />
dialog box, enter 0.00 as the Annual Salary.<br />
• Overtime Hours — Indicate the number of overtime hours worked. The percentage<br />
used to calculate the overtime rate is based on the information entered<br />
in Employees > Employee Setup, Payroll Wages/Rates tab, the Overtime<br />
Rate field. The calculation adds the amount of the time in Regular Pay under<br />
Earnings. The “half” is entered in Overtime Premium under Earnings.<br />
• Vacation Hours — Enter the number of vacation hours used during the pay<br />
period. The amount is calculated based on the information entered for Pay<br />
Rate 1 in Employees > Employee Setup, the Payroll Wages/Rates tab.<br />
• Holiday Hours — Enter the number of holiday hours used during the pay<br />
period. The amount is calculated based on the information entered in Holiday<br />
Rate on the Payroll Wages/Rates tab of Employees > Employee Setup.<br />
88
2011 Client Write-Up Live Employee Payroll<br />
• Sick Hours — Enter the number of sick hours used during the pay period.<br />
The amount is calculated based on the information entered in<br />
Employees > Employee Setup, Payroll Wages/Rates tab, the Pay Rate 1<br />
field.<br />
NOTE<br />
Vacation, holiday, and sick pay are combined under Earnings.<br />
• Tips — Enter the amount of tips received by the employee that is not included<br />
in regular pay. Tips are not included in the calculation of gross pay but automatically<br />
have deductions taken from this amount. The amount is calculated<br />
based on the information entered in Employees > Employee Setup,<br />
Payroll Options tab, the Tipped Employee field.<br />
• Commissions — Enter the amount to show on the pay stub as commissions.<br />
The amount of commissions is added to the regular pay and withholdings calculated<br />
accordingly.<br />
• 3rd Party Sick Pay — Enter the amount of 3rd party sick pay the employee<br />
received during the pay period. This field is only available when the Status<br />
field on the Employees > Employee Setup, Personal Info tab is set to Sick<br />
Pay. Employees cannot receive regular pay and 3rd party sick pay at the same<br />
time.<br />
• No. of Pieces — For employees paid based on piece work. Enter the number<br />
of pieces for which the employee will be paid. The amount is calculated based<br />
on the information entered in Employees > Employee Setup,<br />
Payroll Wages/Rates tab, the Pay Per Piece field. The amount of pay per<br />
piece is added to the regular pay and withholdings calculated accordingly.<br />
4. Verify the employee’s earnings and deductions. Edit if necessary. For details, see<br />
“Earnings” on page 90 and “Deductions” on page 92.<br />
5. Click Save once all the employee's information has been verified.<br />
IMPORTANT<br />
CWU does not recognize a check generated in Live Payroll as<br />
existing until it is printed. Once the check has been printed, it is<br />
recognized in the calculation of Payroll Filings, State Wage<br />
Reports, and Payroll Reports.<br />
For details about printing employee paychecks, see “Printing Employee Pay Checks”<br />
on page 101.<br />
89
Live Employee Payroll<br />
2011 Client Write-Up<br />
Earnings<br />
Figure 4-14: Earnings<br />
NOTE<br />
To edit amounts in the Earnings column, double-click the amount and<br />
enter the new amount in the line above Non-Gross Earnings. Any<br />
changes made to the default earning amounts when entering live payroll<br />
are considered one-time only adjustments. Adjusted amounts are<br />
indicated with an asterisk (*).<br />
• Regular Pay — The amount in this field is based on the information entered<br />
in Employees > Employee Setup, the Payroll Wages/Rates tab. Edit the<br />
Regular Pay amount by either changing the number of Regular Hours on<br />
the left of the dialog box or by double-clicking the Regular Pay line. This<br />
fills the field at the bottom of the Earnings box. With the amount highlighted,<br />
enter the correct amount. Press ENTER for this information and payroll<br />
amounts to be updated.<br />
• Overtime Premium — The amount in this field is based on the information<br />
entered in Employees > Employee Setup, Payroll Wages/Rates tab. Edit the<br />
Overtime Premium amount by either changing the number of Overtime<br />
Hours on the left of the dialog box or by double-clicking the Overtime Premium<br />
line. This fills the field at the bottom of the Earnings box. With the<br />
90
2011 Client Write-Up Live Employee Payroll<br />
amount highlighted, enter the correct amount. Press ENTER for this information<br />
and the payroll amounts to be updated.<br />
NOTES<br />
The Overtime Premium calculates based on the selection made under<br />
Employees > Account & Payroll Information. See Store all overtime<br />
pay separate from regular pay.<br />
The Overtime Premium for a multiple pay rate employee uses the pay<br />
rate selected in Employees > Employee Setup, Payroll Wages/<br />
Rates tab.<br />
• Vac/Hol/Sick — The amount in this field is based on information entered in<br />
Employees > Employee Setup, Payroll Wages/Rates tab. Edit the Vac/Hol/<br />
Sick amount by either changing the number of vacation, holiday, or sick hours<br />
on the left of the dialog box or by double-clicking the Vac/Hol/Sick line. This<br />
fills the field at the bottom of the Earnings box. With the amount highlighted,<br />
enter the correct amount. Press ENTER for this information and the payroll<br />
amounts to be updated.<br />
NOTE<br />
An asterisk (*) next to a field indicates an override amount. This affects<br />
only the current check. Future checks for this employee use the default<br />
amounts.<br />
Benefits<br />
The benefits previously assigned to the selected employee on<br />
Employees > Employee Setup, the Benefits tab display in the Earnings list. The<br />
amounts are based on the information entered on that same tab.<br />
To edit the amounts, double-click the line to be edited. This fills the field at the bottom<br />
of the Earnings box. With the amount highlighted, enter the correct amount. Press<br />
ENTER for the benefit and payroll amounts to be updated.<br />
NOTE<br />
Only benefits assigned to an employee display in this dialog box and<br />
print on the pay stub. If all 10 benefit lines are used, use the scroll bar to<br />
the right of Earnings to see all benefits.<br />
Gross Pay and Earnings<br />
• Non-Gross Earnings (Cannot be edited directly) — To change the amount, edit<br />
the appropriate line in the Earnings box.<br />
• Gross Earnings (Cannot be edited directly) — To change the amount displayed<br />
in this field, edit the appropriate line in the Earnings box. Benefits that are not set<br />
to Apply to Gross are not included in this amount.<br />
• Additional Gross Pay — An amount added to this field is added to the gross pay<br />
produced from the information in Earnings. The standard calculations for withholdings<br />
are applied to this amount. The amount in this field is associated with the<br />
expense account entered in Employees > Employee Setup, Payroll Options tab,<br />
the Expense Account field (if the bookkeeping function is used).<br />
91
Live Employee Payroll<br />
2011 Client Write-Up<br />
• Gross Pay (Cannot be edited directly) — This is a calculated field generated by<br />
adding Gross Earnings and Additional Gross Pay.<br />
Deductions<br />
Figure 4-15: Deductions<br />
NOTE<br />
To edit amounts in the Deductions column, double-click the amount<br />
and enter the new amount in the line above Total Deductions. Any<br />
changes made to the default deduction amounts when entering live<br />
payroll are considered one-time only adjustments. Adjusted amounts<br />
are indicated with an asterisk (*).<br />
• Federal WH — Federal withholding is based on the information entered in<br />
Firm > Firm Info./Global Settings and the Federal Withholding Information<br />
section of the Federal Tax Status tab in Employees > Employee Setup.<br />
• Social Security — Social Security withholding is based on the information<br />
entered in Firm > Firm Info./Global Settings.<br />
• Medicare — Medicare withholding is based on the information entered in<br />
Firm > Firm Info./Global Settings.<br />
• State WH — State withholding is based on the information entered on the State/<br />
Local Tax Status tab in Employees > Employee Setup.<br />
NOTE<br />
Federal withholding, state withholding, Medicare, and Social Security<br />
can be affected by the information in Employees > Deductions &<br />
Benefits and Employees > Employee Setup, the Deductions tab.<br />
• City/County WH — Local withholding is based on the information entered on<br />
the State/Local Tax Status tab in Employees > Employee Setup.<br />
92
2011 Client Write-Up Live Employee Payroll<br />
Additional Deductions<br />
The deductions previously assigned to the selected employee on the<br />
Employees > Employee Setup, the Deductions tab display in the Deductions list.<br />
The amounts are based on the information entered on that same tab.<br />
NOTE<br />
Only deductions assigned to an employee show in this dialog box and<br />
print on the pay stub. If all 12 deduction lines are used, use the scroll<br />
bar to the right of the Deductions box to see all deductions.<br />
To edit deduction amounts, double-click the line to be edited. This fills the field at the<br />
bottom of the Deductions box. With the amount highlighted, enter the correct amount.<br />
Press ENTER for the deduction and payroll amounts to be updated.<br />
NOTE<br />
If a deduction has been “matched” with a benefit, you cannot edit the<br />
deduction amount. Editing the “matched” benefit amount automatically<br />
changes the deduction amount to mirror the benefit amount. See Match<br />
to Benefit Number for more information.<br />
Total Deductions and Net Pay<br />
• Total Deductions (Cannot be edited directly) — This is a calculated field based<br />
on the entries made in Deductions. Make changes to this field by changing the<br />
appropriate deductions lines.<br />
• Additional Net Pay — Enter any amounts added to an employee's paycheck not<br />
subject to withholdings. This amount is associated with the expense account<br />
entered in Employees > Employee Setup, Payroll Options tab, the Expense<br />
Account field (if the bookkeeping function is used).<br />
• Net Pay (Cannot be edited directly) — This is a calculated field based on the<br />
information from Earnings and Deductions sections. Make changes by changing<br />
the appropriate earnings and deductions fields.<br />
• Direct Deposit Applied to Savings — This field is active when a Direct Deposit<br />
employee is splitting their pay between two accounts. The field displays the<br />
amount entered in Employees > Employee Setup, Direct Deposit tab, the Enter<br />
Amount to Apply to Savings field. Edit the amount in this field as desired. The<br />
edited amount affects the current check only.<br />
Additional Live Employee Payroll Options<br />
Mark Printed — The Mark Printed field is an optional field that, when selected,<br />
allows CWU to recognize this particular check as having been printed. The check will<br />
therefore not appear on the Print New Checks dialog box. This field changes to the<br />
No Stub option for direct deposit employees.<br />
No Stub — The No Stub option is available only for direct deposit employees and,<br />
when selected, indicates that no check stub should be printed. When this option is<br />
selected, no print record displays in Employees > Print New Checks. This field<br />
changes to the Mark Printed option for employees not set up for direct deposit.<br />
93
Live Employee Payroll<br />
2011 Client Write-Up<br />
Test Check for Direct Deposit — Select this option to create a “test check” Direct<br />
Deposit file for the selected employee that can be transmitted to InterceptEFT. InterceptEFT<br />
does not require that you transmit a test check. When this option is selected,<br />
all amounts on the check change to zeros. A test transmission file is created when the<br />
test check is saved. Create a separate test transmission file for each employee. See<br />
“Transmitting Employee Direct Deposits” on page 107 for information on transmitting<br />
to InterceptEFT.<br />
NOTE<br />
No information moves to the journal for a test check when the bookkeeping<br />
feature is being used.<br />
Reset — The Reset button clears the payroll information from the dialog box.<br />
Delete — The Delete button removes the payroll check from the payroll reports. All<br />
checks can be deleted whether or not they’ve been printed. To delete a live payroll<br />
check, complete the following steps:<br />
1. From Employees > Live Payroll, select an employee.<br />
2. Select a check to delete from the Previous Checks - Click to edit list. The Pay<br />
Period Ending Date, Check Date, Check Number, and net amount are displayed<br />
to aid in identifying the check to delete.<br />
3. Click Delete.<br />
Editing a Live Employee Check<br />
If a 941 or state wage report that has been processed is affected by this deletion,<br />
manual adjustments must be made to the reports. Deleting a check using this function<br />
removes the information from the payroll reports only and does not delete the<br />
information that has been posted to the transactions journal. Adjusting entries to<br />
the journal must also be made. Adjustments are also required if the deletion<br />
affects previously closed periods.<br />
To edit a live payroll check, complete the following steps:<br />
1. From Employees > Live Payroll, select an employee.<br />
2. Select a check to edit from the Previous Checks - Click to edit list at the top right<br />
of the window. The Pay Period Ending Date, Check Date, Check Number, and<br />
net amount are displayed to aid in identifying the check to edit. The bottom part of<br />
the screen fills with the saved amounts.<br />
3. Make the necessary edits and click Save.<br />
NOTE<br />
All fields that can normally be edited in live payroll can be edited if the<br />
check has not been printed. If the check has been printed, only the<br />
Check Date and Pay Period Ending Date can be edited.<br />
While in Edit mode, click New to enter a new check for the selected<br />
employee.<br />
94
2011 Client Write-Up ATF Employee Payroll<br />
ATF Employee Payroll<br />
Any adjustments to 941s already processed need to be made again. If a posted<br />
check is edited, make adjustments to the journal to accommodate the edits.<br />
Use ATF Payroll for reporting purposes only. Paychecks are not printed when using<br />
ATF payroll.<br />
NOTE<br />
Checks entered in ATF payroll are recognized by CWU as printed. The<br />
Mark Printed field is selected by default when entering ATF payroll and<br />
is disabled so it cannot be changed. This allows you to run payroll<br />
reports, including 941s and state wage reports, for entries made in ATF<br />
payroll.<br />
To enter ATF employee payroll, complete the following steps:<br />
1. Go to Employees > ATF Payroll.<br />
2. Select Employee — Select the employee from the employee list or enter the<br />
employee code in the field at the top left of the screen. All existing employees are<br />
listed alphabetically by last name. If necessary, sort the employee list by Code,<br />
Name, or SSN by clicking the column header. Once the employee has been<br />
selected, the other fields activate and information fields are automatically filled<br />
with data previously entered in Employees > Employee Setup.<br />
3. Verify, edit, or complete the following fields:<br />
• Pay Check Exempt from FUTA — Select this option if the pay amount<br />
should not be added to payroll for FUTA purposes.<br />
• Regular Rate, Rate Two, Rate Three, Rate Four — The amounts in these<br />
fields are determined by the information entered in<br />
Employees > Employee Setup, Payroll Wages/Rates tab, the Pay Rate 1-4<br />
fields and are active only if the employee is a multiple pay rate employee.<br />
Changes to pay rate in ATF Payroll affect Vacation, Holiday, Sick, and<br />
Overtime Pay for this paycheck only. Edit these fields only if the default<br />
multiple pay rates are incorrect.<br />
• Hours— Enter the hours worked at each multiple pay rate. The total of all<br />
multiple pay rate hours is displayed in Total Hours.<br />
• State Code — This is determined by the state selected in the Tax Table field<br />
in Employees > Employee Setup, the State/Local Tax Status tab.<br />
NOTE<br />
Fields are formatted when displayed and any changes are formatted<br />
after leaving the field.<br />
• Pay Period Ending — This is the current computer date. To change the date,<br />
enter the date using the MMDDYYYY format.<br />
• Check Date (required) — The check date should correspond to the date on<br />
the check issued to the employee and determines the quarter to post the pay<br />
check when generating Form 941. This field uses the current computer date<br />
95
ATF Employee Payroll<br />
2011 Client Write-Up<br />
by default. To change the date, use the MMDDYYYY date format. For direct<br />
deposit employees, enter the date the client’s account is to be debited.<br />
IMPORTANT<br />
InterceptEFT does not accept direct deposit check dates that fall<br />
on weekends or holidays. See “Appendix F - InterceptEFT Holidays”<br />
on page 320 for the Holiday Processing Calendar.<br />
• Check Number (optional) — The check number should correspond to the<br />
number on the check that was issued to the employee. This field is not available<br />
for direct deposit employees.<br />
• Regular Hours — The information in this field is displayed only when the<br />
employee is not a multiple pay rate employee and it reflects the information<br />
entered in the Employees > Employee Setup, Payroll Wages/Rates tab, the<br />
Pay Frequency field. Use this field to override the default number of hours<br />
worked. Enter the correct number of hours and the regular pay, earnings, and<br />
deductions adjust automatically. To remove the default hours, go to the<br />
Payroll Wages/Rates tab in Employees > Employee Setup and select Zero<br />
from the Pay Frequency list. Regular Hours changes to Total Hours when<br />
the employee is a multiple pay rate employee.<br />
• Hours Worked — The amount in this field is calculated by adding Regular<br />
Hours plus Overtime Hours or Regular Hours minus Sick Hours. The<br />
amount in this field is used to calculate the employee’s deduction or benefit if<br />
specified to be used in the calculation when the deduction or benefit was set<br />
up. Edit the amount in this field as needed. See Deduction Calculation and<br />
Benefit Calculation.<br />
• Total Hours — This is a calculated field that is active only when the<br />
employee is a multiple pay rate employee. Total Hours is the total of the<br />
employee’s multiple pay rate hours. Refer to “Additional Pay Rates” under<br />
“Employee Setup” on page 72 for information on setting up multiple pay rate<br />
employees.<br />
• Salary — The salary is calculated when Salary is selected from the Status<br />
list on the Employees > Employee Setup, the Personal Info tab. Override<br />
the employee's salary in the Salary field of the ATF Payroll window, and the<br />
regular pay, earnings, and deductions adjust automatically. To remove a<br />
default, go to Employees > Employee Setup, the Payroll Wages/Rates tab,<br />
and select Zero from the Pay Frequency list. Then, on the same dialog box,<br />
enter 0.00 as the Annual Salary.<br />
• Overtime Hours — Indicate the number of overtime hours worked. The percentage<br />
used to calculate the overtime rate is based on the information entered<br />
in Employees > Employee Setup, Payroll Wages/Rates tab, the Overtime<br />
Rate field.<br />
• Vacation Hours — Enter the number of vacation hours used during the pay<br />
period. The amount is calculated based on the information entered in the Pay<br />
Rate 1 field in Employees > Employee Setup, the Payroll Wages/Rates tab.<br />
• Holiday Hours — Enter the number of holiday hours used during the pay<br />
period. The amount is calculated based on the information entered as Holiday<br />
Rate on the Payroll Wages/Rates tab of Employees > Employee Setup.<br />
96
2011 Client Write-Up ATF Employee Payroll<br />
• Sick Hours — Enter the number of sick hours used during the pay period.<br />
The amount is calculated based on the information entered in<br />
Employees > Employee Setup, Payroll Wages/Rates tab, the Pay Rate 1<br />
field.<br />
NOTE<br />
Vacation, holiday, and sick pay are combined under Earnings.<br />
• Tips — Enter the amount of tips received by the employee that is not included<br />
in regular pay. Tips are not included in the calculation of gross pay but have<br />
deductions taken automatically from this amount. The amount is calculated<br />
based on the information entered in Employees > Employee Setup,<br />
Payroll Options tab, Tipped Employee field.<br />
• Commissions — Enter the amount to show on the pay stub as commissions.<br />
The amount of commissions is added to the regular pay and withholdings calculated<br />
accordingly.<br />
• 3rd Party Sick Pay — Enter the amount of 3rd party sick pay the employee<br />
received during the pay period. This field is only available when the Status<br />
field on the Employees > Employee Setup, Personal Info tab is set to Sick<br />
Pay. Employees cannot receive regular pay and 3rd party sick pay at the same<br />
time.<br />
• No. of Pieces — For employees paid based on piece work. Enter the number<br />
of pieces for which the employee was paid. The amount calculated is based on<br />
the information entered in Employees > Employee Setup, Payroll Wages/<br />
Rates tab, Pay Per Piece. The amount of pay per piece is added to the regular<br />
pay and withholdings calculated accordingly.<br />
4. Verify the employee’s earnings and deductions. Edit if necessary. For details, see<br />
“Earnings” on page 97 and “Deductions” on page 99.<br />
5. Click Save once all the employee's information has been verified.<br />
Earnings<br />
NOTE<br />
To edit amounts in the Earnings column, double-click the amount and<br />
enter the new amount in the line above Non-Gross Earnings. Any<br />
changes made to the default earning amounts when entering live payroll<br />
are considered one-time only adjustments. Adjusted amounts are<br />
indicated with an asterisk (*).<br />
• Regular Pay — The amount in this field is based on the information entered<br />
in Employees > Employee Setup, the Payroll Wages/Rates tab. Hourly<br />
employees default to a 40 hour work week. Edit Regular Pay by either<br />
changing the number of Regular Hours on the left of the dialog box or by<br />
double-clicking the Regular Pay line. This fills the field at the bottom of the<br />
Earnings box. With the amount highlighted, enter the correct amount. Press<br />
ENTER for this information to appear on the proper line.<br />
• Overtime Premium — The amount in this field is based on information<br />
entered in Employees > Employee Setup, the Payroll Wages/Rates tab. Edit<br />
Overtime Premium by either changing the number of Overtime Hours on<br />
97
ATF Employee Payroll<br />
2011 Client Write-Up<br />
the left of the dialog box or by double-clicking the Overtime Premium line.<br />
This fills the field at the bottom of the Earnings box. With the amount highlighted,<br />
enter the correct amount. Press ENTER for this information and the<br />
payroll amounts to be updated.<br />
NOTES<br />
The Overtime Premium calculates based on the selection made under<br />
Employees > Account & Payroll Information. See Store all overtime<br />
pay separate from regular pay.<br />
The Overtime Premium for a multiple pay rate employee uses the pay<br />
rate selected in Employees > Employee Setup, Payroll Wages/<br />
Rates tab.<br />
• Vac/Hol/Sick — The amount in this field is based on information entered in<br />
Employees > Employee Setup, the Payroll Wages/Rates tab. Edit the Vac/<br />
Hol/Sick amount by either changing the number of vacation, holiday, or sick<br />
hours on the left of the dialog box or by double-clicking the Vac/Hol/Sick<br />
line. This fills the field at the bottom of the Earnings box. With the amount<br />
highlighted, enter the correct amount. Press ENTER for this information to<br />
appear on the proper line.<br />
NOTE<br />
An asterisk (*) next to a field indicates an override amount that affects<br />
only the current check. Future checks for this employee will use the<br />
default amounts.<br />
Benefits<br />
The benefits previously assigned to the selected employee on<br />
Employees > Employee Setup, the Benefits tab display in the Earnings list. The<br />
amounts are based on the information entered on that same tab.<br />
To edit the amounts, double-click the line to be edited. This fills the field at the bottom<br />
of the Earnings box. With the amount highlighted, enter the correct amount. Press<br />
ENTER for the benefit and payroll amounts to be updated.<br />
NOTE<br />
Only benefits assigned to an employee show in this dialog box and print<br />
on the pay stub. If all 10 benefit lines are used, use the scroll bar to the<br />
right of Earnings to see all benefits.<br />
Gross Pay and Earnings<br />
• Non-Gross Earnings (Cannot be edited directly) — To change the amount in this<br />
field, edit the appropriate line in the Earnings box.<br />
• Gross Earnings (Cannot be edited directly) — To change the amount, edit the<br />
appropriate line in the Earnings box. Benefits that are not set to Apply to Gross<br />
are not included in this amount.<br />
• Additional Gross Pay — An amount added to this field is added to the gross pay<br />
produced by the information in the Earnings box. The standard calculations for<br />
withholdings are applied to this amount. The amount in this field is associated<br />
with the expense account entered in Employees > Employee Setup,<br />
98
2011 Client Write-Up ATF Employee Payroll<br />
Deductions<br />
Payroll Options tab, the Expense Account field (if the bookkeeping function is<br />
used).<br />
• Gross Pay (Cannot be edited directly) — This is a calculated field generated by<br />
adding Gross Earnings and Additional Gross Pay.<br />
NOTE<br />
To edit amounts in the Deductions column, double-click the amount<br />
and enter the new amount in the line above Total Deductions. Any<br />
changes made to the default deduction amounts when entering live<br />
payroll are considered one-time only adjustments. Adjusted amounts<br />
are indicated with an asterisk (*).<br />
• Federal WH — Federal withholding is calculated based on information entered<br />
in Firm > Firm Info./Global Settings and the Federal Withholding Information<br />
section of the Federal Tax Status tab in Employees > Employee Setup.<br />
• Social Security — Social Security withholding is calculated based on information<br />
entered in Firm > Firm Info./Global Settings.<br />
• Medicare — Medicare withholding is calculated based on information entered in<br />
Firm > Firm Info./Global Settings.<br />
• State WH — State withholding is calculated based on information entered on the<br />
State/Local Tax Status tab in Employees > Employee Setup.<br />
NOTE<br />
Federal withholding, state withholding, Medicare, and Social Security<br />
can be affected by the information in<br />
Employees > Deductions & Benefits and<br />
Employees > Employee Setup, the Deductions tab.<br />
Additional Deductions<br />
• City/County WH — Local withholding is calculated based on information<br />
entered on the State/Local Tax Status tab in Employees > Employee Setup.<br />
The deductions previously assigned to the selected employee on the<br />
Employees > Employee Setup, the Deductions tab display in the Deductions list.<br />
The amounts are based on the information entered on that same tab.<br />
NOTE<br />
Only deductions assigned to an employee show in this dialog box and<br />
print on the pay stub. If all 12 deduction lines are used, use the scroll<br />
bar to the right of the Deductions box to see all deductions.<br />
To edit deduction amounts, double-click the line to be edited. This fills the field at the<br />
bottom of the Deductions box. With the amount highlighted, enter the correct amount.<br />
Press ENTER for the deduction and payroll amounts to be updated.<br />
NOTE<br />
If a deduction has been “matched” with a benefit, you cannot edit the<br />
deduction amount. Editing the “matched” benefit amount automatically<br />
changes the deduction amount to mirror the benefit amount. See Match<br />
to Benefit Number for more information.<br />
99
ATF Employee Payroll<br />
2011 Client Write-Up<br />
Total Deductions and Net Pay<br />
• Total Deductions (Cannot be edited directly) — This is a calculated field based<br />
on the entries made in Deductions. Make changes to this field by changing the<br />
appropriate deductions lines.<br />
• Additional Net Pay — Enter any amounts added to an employee's paycheck not<br />
subject to withholdings. This amount is associated with the expense account<br />
entered in Employees > Employee Setup, Payroll Options tab, the Expense<br />
Account field (if the bookkeeping function is used).<br />
• Net Pay (Cannot be edited directly) — This is a calculated field based on the<br />
information from the Earnings and Deductions sections. Make changes to this<br />
field by changing the appropriate earnings and deductions fields.<br />
• Direct Deposit Applied to Savings — This field is active when a Direct Deposit<br />
employee is splitting their pay between two accounts. The field displays the<br />
amount entered in Employees > Employee Setup, Direct Deposit tab, the Enter<br />
Amount to Apply to Savings field. Edit the amount in this field as desired. The<br />
edited amount affects the current check only.<br />
Additional ATF Employee Payroll Options<br />
Mark Printed — The Mark Printed field is permanently selected for non-direct<br />
deposit employees and cannot be edited. ATF checks do not appear as checks to be<br />
printed on the Print New Checks dialog box. This field changes to the No Stub<br />
option for direct deposit employees.<br />
No Stub — The No Stub option is available only for direct deposit employees and,<br />
when selected, indicates that no check stub should be printed. When this option is<br />
selected, no print record displays in Employees > Print New Checks. This field<br />
changes to the Mark Printed option for employees not set up for direct deposit.<br />
Test Check for Direct Deposit — Select this option to create a “test check” Direct<br />
Deposit file for the selected employee that can be transmitted to InterceptEFT. InterceptEFT<br />
does not require that you transmit a test check. When this option is selected,<br />
all amounts on the check change to zeros. A test transmission file is created when the<br />
test check is saved. Create a separate test transmission file for each employee. See<br />
“Transmitting Employee Direct Deposits” on page 107 for information on transmitting<br />
to InterceptEFT.<br />
NOTE<br />
No information moves to the journal for a test check when the bookkeeping<br />
feature is being used.<br />
Reset — The Reset button clears the payroll information from the dialog box.<br />
Delete — The Delete button removes the payroll check from payroll reports. To delete<br />
an ATF payroll check, complete the following steps:<br />
1. From Employees > ATF Payroll, select an employee.<br />
100
2011 Client Write-Up Printing Employee Pay Checks<br />
2. Select a check to delete from the Previous Checks - Click to edit list. The Pay<br />
Period Ending Date, Check Date, Check Number, and net amount are displayed<br />
to aid in identifying the check to delete.<br />
3. Click Delete.<br />
If a 941 or state wage report that has been processed is affected by this deletion,<br />
manual adjustments must be made to the reports. Deleting a check using this function<br />
removes the information from the payroll reports only and does not delete the<br />
information that has been posted to the transactions journal. Adjusting entries to<br />
the journal must also be made. Adjustments are also required if the deletion<br />
affects previously closed periods.<br />
Editing an ATF Employee Check<br />
To edit an ATF employee payroll check, complete the following steps:<br />
1. From Employees > ATF Payroll, select an employee.<br />
2. Select a check to edit from the Previous Checks - Click to edit list. The Pay<br />
Period Ending Date, Check Date, Check Number, and net amount are displayed<br />
to aid in identifying the check to edit. The bottom part of the screen fills<br />
with the saved amounts.<br />
3. Only the Pay Period Ending Date, Check Date, and Check Number can be<br />
edited.<br />
4. Make the necessary edits and click Save.<br />
NOTES<br />
Any adjustments to 941s already processed need to be made again. If<br />
a posted check is edited, make adjustments to the journal to accommodate<br />
the edits.<br />
While in Edit mode, click New to enter a new check for the selected<br />
employee.<br />
Printing Employee Pay Checks<br />
Go to Employees > Print New Checks for a list of “new” payroll checks available to<br />
be printed. A “new” check is one that hasn’t previously been printed. A payroll check<br />
can be printed as a “new” check only once.<br />
IMPORTANT<br />
Place the check stock in the printer before starting this process.<br />
To print checks, complete the following steps:<br />
1. Go to Employees > Print New Checks.<br />
101
Printing Employee Pay Checks<br />
2011 Client Write-Up<br />
Figure 4-16: Print Employee Payroll Checks<br />
2. Select the type of check stock being used, either Blank MICR or Preprinted.<br />
3. MICR Options (not available if Preprinted was selected under Type of Check<br />
Stock):<br />
• MICR Banks — Select the bank from which these checks are drawn. The<br />
Starting Check Number field populates based on the Next Check # field in<br />
Setup > MICR Bank Accounts. Edit the Starting Check Number to<br />
include leading zeroes (e.g. 002001) to meet bank field length requirements.<br />
The bank information must be entered in Setup > MICR Bank Accounts to<br />
use this function.<br />
• MICR Printer — CWU automatically selects the printer specified as the<br />
default MICR Printer in Firm > Firm Info./Global Settings. Use the MICR<br />
Printer list to temporarily override the default MICR printer selection. Verify<br />
the selected printer has the proper ink for MICR printing. Change the default<br />
MICR printer in the MICR Printer field in Firm > Firm Info./<br />
Global Settings.<br />
4. Select All Output Desired — Use this feature to print multiple copies of payroll<br />
checks.<br />
• Check Stock — Prints the check and stub on check stock.<br />
• Plain - Checks & Stubs — Prints a copy of the check and stub on plain paper.<br />
102
2011 Client Write-Up Printing Employee Pay Checks<br />
• Plain - Stubs Only — Prints a copy of the stub only (no check) on plain<br />
paper.<br />
NOTES<br />
When Preview checks prior to printing is selected, a separate file is<br />
created for each output selected.<br />
At least one output selection is required.<br />
5. To view payroll checks on your computer screen prior to printing, select the Preview<br />
checks prior to printing check box. Once selected, the option remains in<br />
effect until the check box is cleared. To print checks from the preview screen,<br />
select the Printer icon ( ).<br />
IMPORTANT<br />
Previewed checks are considered printed by CWU. If previewed<br />
checks are not printed when displayed, either click the Reprint<br />
Screen button or go to Employees > Reprint Checks and print<br />
the check.<br />
6. Enter a check date. This is the current computer date. To change the date that<br />
prints on the check, highlight the date and enter the correct date using the format<br />
MMDDYYYY. Enter only numbers (no slashes (/), dashes (-), or periods (.) in this<br />
date field or an erroneous date error is generated. Once the date is set, it prints on<br />
all checks printed during this session. Always verify this information before printing.<br />
WARNING<br />
The Check Date determines the quarter to which the payroll is<br />
posted for both federal and state payroll filing reports. It is important<br />
to enter the correct Check Date. Entering the wrong date results in<br />
incorrect information being placed on the 94X tax deposit.<br />
7. Enter the starting check number. This is the check number that prints on the first<br />
check printed during the current print session. If using pre-printed check stock,<br />
verify that the number in the Starting Check Number field matches the number<br />
on the first check placed in the printer. Always verify this information before<br />
printing.<br />
8. Type of Payment — Select the Type of Payment. Choose to display paper pay<br />
checks, unprinted direct deposit pay stubs, or both in the unprinted check window.<br />
Be careful not to print direct deposit pay stub information on check stock.<br />
9. Live payroll checks and direct deposit pay stubs that are available to print are displayed<br />
with a box next to the employee name. Select the box next to the employee<br />
names to indicate those checks or stubs to print. Click the desired column header<br />
to arrange the checks to print in order of employee name, SSN/EIN, pay period<br />
ending, or net pay amount. Checks can be printed individually or in groups.<br />
10.Click Print. If you are using MICR blank check stock, the Windows printer dialog<br />
box does not open. Change the MICR printer on the Print Checks dialog box.<br />
If you are not using MICR blank check stock, the Windows printer dialog box<br />
103
Reprinting Employee Pay Checks<br />
2011 Client Write-Up<br />
opens and provides the opportunity to change the printer used during this print<br />
session.<br />
NOTE<br />
Once checks have been printed, they can be reprinted by either clicking<br />
the Reprint Screen button or going to Employees > Reprint Checks.<br />
Additional Check Print Options<br />
MICR Test — Sends a test check to the selected MICR printer. Use this option to test<br />
check alignment. Printing test checks does not mark the check as printed and can still<br />
be printed from the Print Checks screen.<br />
PrePrinted Test — Sends a test check to the printer you select. Use this option to test<br />
check alignment. Printing test checks does not mark the check as printed and can still<br />
be printed from the Print Checks screen.<br />
Refresh — Clears the previously selected checks to print.<br />
Select All — Selects all checks displayed to print.<br />
Reprint Screen — Displays the dialog box where all checks previously printed are<br />
available to be reprinted. For more information about reprinting checks, see “Reprinting<br />
Employee Pay Checks” on page 104.<br />
NOTE<br />
An employee pay check can be printed only once from Print New<br />
Checks. To reprint a check due to loss or damage, go to<br />
Employees > Reprint Checks.<br />
Check Setup — Displays the Setup > Check and Stub Options screen. When check<br />
stub setup is complete, CWU returns to the Print Payroll Checks screen.<br />
Reprinting Employee Pay Checks<br />
Employee payroll checks may be reprinted as many times as needed. Select<br />
Employees > Reprint Checks for a list of all payroll checks that have previously<br />
been printed or click Reprint Screen on the Print New Checks dialog box.<br />
Place the check stock in the printer before starting this process.<br />
IMPORTANT<br />
Reprinting a check overwrites the journal entry of the previously<br />
printed check. The payroll reports show only one check written.<br />
CWU does not keep track of the check stock for you. Once<br />
reprinted, the initial check(s) is not documented in the program.<br />
To reprint checks, complete the following steps:<br />
1. Go to Employees > Reprint Checks.<br />
2. Select the type of check stock being used: Blank MICR or Preprinted.<br />
3. MICR Options (not available if Preprinted was selected under Type of Check<br />
Stock):<br />
104
2011 Client Write-Up Reprinting Employee Pay Checks<br />
• MICR Banks — Select the bank from which these checks are drawn. The<br />
Starting Check Number field populates based on the Next Check # field in<br />
Setup > MICR Bank Accounts. Edit the Starting Check Number to<br />
include leading zeroes (e.g. 002001) to meet bank field length requirements.<br />
The bank information must be entered in Setup > MICR Bank Accounts to<br />
use this function.<br />
• MICR Printer — CWU automatically selects the printer specified as the<br />
default MICR Printer in Firm > Firm Info./Global Settings. Use the MICR<br />
Printer list to temporarily override the default MICR printer selection. Verify<br />
the selected printer has the proper ink for MICR printing. Change the default<br />
MICR printer in the MICR Printer field in Firm > Firm Info./<br />
Global Settings.<br />
4. Select All Output Desired — Use this feature to print multiple copies of payroll<br />
checks.<br />
• Check Stock — Prints the check and stub on check stock.<br />
• Plain - Checks & Stubs — Prints a copy of the check and stub on plain paper.<br />
• Plain - Stubs Only — Prints a copy of the stub only (no check) on plain<br />
paper.<br />
NOTES<br />
When Preview checks prior to printing is selected, a separate file is<br />
created for each output selected.<br />
At least one output selection is required.<br />
5. To view payroll checks on your computer screen prior to printing, select the Preview<br />
checks prior to printing check box. Once selected, the option remains in<br />
effect until the option is cleared. To print checks from the preview screen, select<br />
the Printer icon ( ).<br />
NOTE<br />
The original check date is used when reprinting payroll checks.<br />
6. Enter the starting check number. This is the check number that prints on the first<br />
check printed during the current print session. If using pre-printed check stock,<br />
verify that the number in the Starting Check Number field matches the number<br />
on the first check placed in the printer. Always verify this information before<br />
printing.<br />
7. Type of Payment — Select to display paper pay checks, direct deposit pay stubs,<br />
or both in the window at the bottom of the Reprint Checks dialog box. Be careful<br />
not to print direct deposit pay stub information on check stock.<br />
8. Live employee payroll checks that have been printed for employees are displayed<br />
with boxes next to the employee names. Select a box to indicate those checks to<br />
be reprinted. Arrange the checks to print in order of employee name, pay period<br />
ending, or net pay by clicking the desired column header. Checks can be printed<br />
individually or in groups.<br />
105
Check Alignment<br />
2011 Client Write-Up<br />
9. Select Print. If you are using pre-printed check stock or printing direct deposit<br />
pay stubs, the Windows printer dialog box opens and provides the opportunity to<br />
change the printer used during this print session. When using MICR blank check<br />
stock, the Windows printer dialog box does not open. Change the MICR printer<br />
from the MICR Printer field.<br />
NOTE<br />
Once checks have been printed, they can be reprinted by either clicking<br />
the Reprint Screen button or going to Employees > Reprint Checks.<br />
See “Preprinted Check Alignment” on page 29 for help in resolving preprinted<br />
check stock printing alignment issues.<br />
Additional Check Print Options<br />
MICR Test — Sends a test check to the selected MICR printer. Use this option to test<br />
check alignment. Printing test checks does not mark the check as printed and can still<br />
be printed from the Print Checks screen.<br />
PrePrinted Test — Sends a test check to the printer you select. Use this option to test<br />
check alignment. Printing test checks does not mark the check as printed and can still<br />
be printed from the Print Checks screen.<br />
Refresh — Clears the previously selected checks to print.<br />
Select All — Selects all checks displayed to print.<br />
Print Screen — Displays the dialog box where unprinted checks are available to be<br />
printed. For more information about printing checks, see “Printing Employee Pay<br />
Checks” on page 101.<br />
NOTE<br />
A payroll check can be printed only once from Print New Checks. To<br />
reprint a check due to loss or damage, go to<br />
Employees > Reprint Checks.<br />
Check Alignment<br />
Check Setup — Displays the Setup > Check and Stub Options screen. When check<br />
stub setup is complete, CWU returns to the Reprint Payroll Checks screen.<br />
The check alignment feature is used to change the alignment of information printed on<br />
pre-printed payroll checks. The information in the white fields can be adjusted to<br />
match pre-printed checks.<br />
Complete the following to adjust the pre-printed payroll check alignment:<br />
1. Go to either Employees > Check Alignment or Contractors ><br />
Check Alignment.<br />
106
2011 Client Write-Up Transmitting Employee Direct Deposits<br />
Figure 4-17: Check Alignment<br />
NOTE<br />
Preprinted check alignment made on the Employees > Check Alignment<br />
window also affect contractor payments check alignment.<br />
2. Click the left mouse button on the field to be adjusted.<br />
3. Hold the mouse button down while dragging the field to the desired position on<br />
the check.<br />
4. Release the mouse button to place the field in the new position on the check.<br />
5. Click Save to save the changes.<br />
Click Reset to restore all the fields on the check to their default location.<br />
Due to multiple options of operating systems, printers, and check formats, minor<br />
adjustments may be required to make checks print properly. Copy a check and print a<br />
test check to make sure the information matches and is positioned properly. This prevents<br />
wasting check stock.<br />
Transmitting Employee Direct Deposits<br />
Once live payroll has been entered for direct deposit employees and their pay stubs<br />
have been printed, transmit the pay information to InterceptEFT.<br />
IMPORTANT<br />
An Internet connection is required to transmit Direct Deposit information<br />
to InterceptEFT. If you use a dial-up connection to access<br />
the Internet, you must first connect to the Internet before transmitting<br />
Direct Deposit information. See “Direct Deposit” on page 20<br />
for details on setting up to use Direct Deposit.<br />
To transmit direct deposit pay information, complete the following:<br />
1. Go to Employees > Direct Deposit - Transmit Employees.<br />
2. Enter the date range of paychecks to be transmitted in the Beginning Date and<br />
Ending Date fields. These fields default to today’s date.<br />
107
Transmitting Employee Direct Deposits<br />
2011 Client Write-Up<br />
Direct Deposit Reports<br />
3. Click Accept Dates. Direct Deposit pay records with a Check Date within that<br />
date range display. Previously transmitted pay records are indicated with a “T” in<br />
the Transmitted column.<br />
4. If two accounts have been established with InterceptEFT, select which account<br />
should be used for this transmission - either the Primary UserID and Password<br />
(default) or the Secondary UserID and Password.<br />
5. Select the box next to the employee names to indicate the pay records to transmit<br />
to InterceptEFT. Arrange the pay records in order by ID, Name, Check Date,<br />
Amount, or Transmitted by clicking the column header. Pay records can be transmitted<br />
individually or in groups.<br />
6. Click Verify Dates. InterceptEFT does not accept check dates that fall on weekends<br />
or holidays. If none of the checks selected have “invalid” check dates, the<br />
Transmit button becomes active and you may proceed to transmit pay records to<br />
InterceptEFT.<br />
If any of the checks selected have a check date that falls on a weekend or holiday,<br />
a warning displays stopping the process. See “Appendix F - InterceptEFT Holidays”<br />
on page 320 for InterceptEFT’s Holiday Processing Calendar. Click OK<br />
and a printable report displays the checks with the invalid dates. To change the<br />
invalid check dates, see the appropriate topic: “Editing a Live Employee Check”<br />
on page 94 or “Editing an ATF Employee Check” on page 101.<br />
7. Click Transmit. Pay records transmit to InterceptEFT using your computer’s<br />
Internet connection.<br />
When Auto Display Report of Transmitted Records is selected, a printable<br />
report of the Direct Deposit records that transmitted displays automatically. If you<br />
do not want this report to display, clear the check box. This same report is available<br />
by clicking Review Repts., selecting Display Direct Deposit Transmit<br />
Reports (TXT), and selecting the report.<br />
The Reset button clears all entries in the Select Employees/Contractors section<br />
of the screen.<br />
The Review Repts. button displays the Review Reports screen where previously<br />
produced reports can be viewed and printed. See “Report Review” on page 279<br />
for instructions on running these reports.<br />
Client Write-Up offers many Direct Deposit reports that can be printed in either PDF,<br />
Excel, or Comma Separated Value (CSV) formats.<br />
IMPORTANT<br />
Direct Deposit report requests are uploaded to and report information<br />
is downloaded from InterceptEFT. Therefore, an Internet<br />
connection is required to run Direct Deposit reports. If you use a<br />
dial-up connection to access the Internet, you must first connect<br />
to the Internet before clicking Request Rept.<br />
To run Direct Deposit reports, complete the following:<br />
1. Go to Employees > Direct Deposit - Transmit Employees > Reports.<br />
108
2011 Client Write-Up Transmitting Employee Direct Deposits<br />
2. Select the format for the report in the Available Print Formats field.<br />
3. Enter the beginning and ending date range for the report. To set the beginning and<br />
ending dates for reports, click the next to the date displayed. Dates default to<br />
the current date on the computer. For instructions on setting calendar dates, see<br />
“Date Fields” on page 12.<br />
4. Select the report to run and click Request Rept.<br />
Direct<br />
Deposit<br />
Report<br />
Details<br />
Report Name<br />
Table 4-4: Direct Deposit Report Details<br />
Details<br />
CAR - Active Company<br />
Report<br />
PBR - Batches Submitted<br />
Summary<br />
BRY - Statement and Projections<br />
CAP - Company Applications<br />
CCR - Company Contracts<br />
Report<br />
CFS - Company Fee<br />
Schedule<br />
COR - Corrections<br />
RET - Returns<br />
XCC - Xcelerated Corrections<br />
Company’s last date of activity and their TIN verification.<br />
Batches InterceptEFT has submitted to the Federal<br />
Reserve for processing.<br />
Statement of accounts and a projection of disbursements<br />
to and from your account by InterceptEFT.<br />
Breakdown of the accounts credited and debited.<br />
Status of contracts on file with InterceptEFT.<br />
InterceptEFT’s fee schedule agreement for Direct<br />
Deposit services.<br />
The receiving banks did allow the transaction to go<br />
through, but sent this report so you will change the information<br />
in your software, i.e., name, account number,<br />
routing number, etc. for future transactions. Refer to the<br />
last column of the report to determine what information<br />
needs to be changed.<br />
A transaction was rejected by the receiving bank and<br />
was sent back to InterceptEFT. The Returns report displays<br />
the reason it was returned so it can be corrected<br />
and prevent any future delays in processing.<br />
Non-posted Xcelerated Corrections. The Xcelerated<br />
Corrections is a screening system that compares your<br />
transactions by routing and account number against a<br />
database of previous NOC transactions. The transaction<br />
is stopped before the file is submitted to the Federal<br />
Reserve for processing. This report will only be available<br />
for the day in which they are received. Prior days are<br />
included in the Corrections report.<br />
109
Calculating 94X Series Tax Deposits<br />
2011 Client Write-Up<br />
Table 4-4: Direct Deposit Report Details<br />
Report Name<br />
XCR - Xcelerated returns<br />
FAR - File Acknowledgement<br />
Summary<br />
MBS - Monthly Billing<br />
Summary<br />
MBD - Monthly Billing<br />
Detail<br />
Details<br />
Non-posted Xcelerated returns for the day they were<br />
received only. Xcelerated Returns is a screening system<br />
that compares your transactions by routing and account<br />
number against a database of previously returned transactions.<br />
The transaction is then taken out of the file<br />
before submitting it to the Federal Reserve.<br />
Summary of files that have been received by Intercept-<br />
EFT. The report confirms the files they received by batch<br />
and total dollar amount.<br />
Billing summary of your monthly charges. Each client will<br />
have a lump sum for processing during the month.<br />
Detailed billing statement of your monthly charges. Each<br />
client will have an individual breakdown of transactions<br />
processed during the month.<br />
The Review Repts. button displays the Review Reports screen where previously produced<br />
reports can be viewed and printed. See “Report Review” on page 279 for<br />
instructions on running these reports.<br />
IMPORTANT<br />
To transfer payroll information to the journal, see “Payroll Journal<br />
Entry” on page 160.<br />
Calculating 94X Series Tax Deposits<br />
Client Write-Up calculates tax deposits for Forms 940, 941, 941-SS, 943, 944, and<br />
944-SS.<br />
NOTE<br />
It is recommended that the 94X tax deposit information is entered and<br />
verified. However, this step is not required in order to generate a 94X<br />
tax return.<br />
To calculate and print a 94X series tax deposit, complete the following steps:<br />
1. Go to Employees > Tax Deposit > 94X and select the 94X series deposit.<br />
110
2011 Client Write-Up Calculating 94X Series Tax Deposits<br />
Figure 4-18: 941 Tax Deposit<br />
2. Enter the beginning and ending date for the tax deposit information.<br />
• Beginning Check Date — Enter the beginning date needed for the deposit<br />
calculation.<br />
• Ending Check Date — Enter the ending date needed for the deposit calculation.<br />
3. Enter the payment date for the deposit in the Payment Date field.<br />
IMPORTANT<br />
It is important to enter the correct Beginning Check Date, Ending<br />
Check Date, and Payment Date on the 94X tax deposits.<br />
Entering the wrong dates results in incorrect information on the<br />
94X.<br />
4. Click Calculate. This fills the fields on the 94X Tax Deposit Calculation portion<br />
of the dialog box. The calculations are based on the payroll information created<br />
and printed (if live payroll was used) within the date range entered on the left side.<br />
If, on the Setup > 94X Form Settings dialog box, the Use Tax Deposit Information<br />
on 94X field is selected, this calculation is used in the calculation of the 94X<br />
tax return. Make any adjustments needed.<br />
IMPORTANT<br />
Be careful when adjusting calculations that effect prior quarter<br />
transactions.<br />
5. Click Save when the information is correct. The calculations fill the bottom portion<br />
of the box. Click the desired line in the grid at the bottom of the screen to fill<br />
the fields in the top of the screen.<br />
111
Producing 94X Series Tax Returns<br />
2011 Client Write-Up<br />
6. For the 941 and 941-SS tax deposits, select the quarter of the tax deposit by clicking<br />
the appropriate quarter button on the right side (e.g. 941 1st Qtr, 941 2nd Qtr,<br />
941 3rd Qtr, or 941 4th Qtr).<br />
Editing the 94X Tax Deposit<br />
Click Delete to remove the deposit information.<br />
Click Reset and the data entry fields are cleared.<br />
To edit the 94X tax deposit information after it has been saved:<br />
1. Go to Employees > Tax Deposit > 94X and select the 94X series deposit.<br />
2. Click a line at the bottom of the dialog box. This fills the 94X Tax Deposit Calculation<br />
area so the information can be edited and saved. This replaces the previous<br />
calculation.<br />
IMPORTANT<br />
Make sure calculations do not cross over the quarter change.<br />
Printing the 94X Tax Deposit<br />
94X Reporting Options<br />
Click Print to generate the 94X tax deposit for review. The deposit report can then be<br />
printed or saved.<br />
The Print options available at the top of the report:<br />
• Click the Save icon to save the deposit information.<br />
• Click the Print icon to open the printer dialog box with standard printing options.<br />
Print to PDF to store the report in the <strong>Drake</strong> Document Manager, provided<br />
PDF995 and <strong>Drake</strong> Document Manager are installed. These programs are<br />
included on the <strong>Drake</strong> Tax <strong>Software</strong> CD at no additional charge.<br />
• Click the Email icon to e-mail the deposit information. The report is included as<br />
an attachment to an e-mail message. Your default e-mail program is used. Add the<br />
recipient (To:), the Subject line, and body information, then click Send.<br />
Producing 94X Series Tax Returns<br />
Refer to the table below to determine which 94X tax return to file.<br />
Table 4-5: Which 94X Tax Return to Use<br />
Form Form Use E-Filable?<br />
941 Form 941 is the employer's quarterly federal tax<br />
return.<br />
Yes<br />
112
2011 Client Write-Up Producing 94X Series Tax Returns<br />
Table 4-5: Which 94X Tax Return to Use<br />
Form Form Use E-Filable?<br />
941-SS<br />
Form 941-SS is the employer's quarterly federal tax<br />
return for American Samoa, Guam, the Commonwealth<br />
of the Northern Mariana Islands, and the U.S.<br />
Virgin Islands.<br />
Yes<br />
940 Form 940 is the employer's annual federal unemployment<br />
(FUTA) tax return.<br />
943 Form 943 is the employer's annual federal tax return<br />
for agricultural employees and should be used if<br />
wages were paid to a farm worker and were subject<br />
to Social Security and Medicare taxes or federal<br />
income tax withholding.<br />
944 Form 944 is the employer’s annual tax return<br />
designed for smaller employers whose annual liability<br />
for Social Security, Medicare, and withheld federal<br />
income taxes is $1,000 or less. This form is only<br />
for clients notified by the IRS to use Form 944 in<br />
place of the 941 quarterly report. You must use this<br />
form if you were contacted. If you choose to dispute<br />
the use of this form and continue filing the 941 quarterly<br />
report, contact the IRS first at (800) 829-0115.<br />
Yes<br />
No<br />
Yes<br />
944-SS<br />
Form 944-SS is the employer’s annual tax return for<br />
American Samoa, Guam, the Commonwealth of the<br />
Northern Mariana Islands, and the U.S. Virgin<br />
Islands and is designed for smaller employers<br />
whose annual liability for Social Security, Medicare,<br />
and withheld federal income taxes is $1,000 or less.<br />
This form is only for clients notified by the IRS to use<br />
this form in place of the 941-SS quarterly report. You<br />
must use this form if you were contacted. If you<br />
choose to dispute the use of this form and continue<br />
filing the 941-SS quarterly report, contact the IRS<br />
first at (800) 829-0115.<br />
Yes<br />
941 Form 941 is the employer's quarterly federal tax<br />
return.<br />
Yes<br />
Payroll tax returns are current tax year calculations of the client's tax liabilities based<br />
on payroll generated in Client Write-Up. Use the 2010 Client Write-Up program to<br />
generate 2010 94X series tax returns and the 2011 program to generate 2011 94X<br />
series tax returns.<br />
To produce a 94X tax return:<br />
1. Go to Employees > 94X Forms.<br />
2. Select the preparer of the return from the Preparer Selection drop list. Preparers<br />
display in the list once they’ve been entered in Firm > 94X Preparer Setup (see<br />
“94X Preparer Setup” on page 23).<br />
3. Select the desired 94X tax return and click Go or double-click the desired form.<br />
113
Producing 94X Series Tax Returns<br />
2011 Client Write-Up<br />
4. The white data entry fields on 94X series tax returns can be edited. Verify the<br />
information and edit as needed.<br />
5. Click Save and the print dialogue box is displayed.<br />
If the Use Tax Deposit Information on 94X option on Setup > 94X Form Settings<br />
was selected, the totals from all 94X series tax deposits are used on the tax return.<br />
Click Report Options to access the Form 94X Option Screen. See “94X Form Settings”<br />
on page 57 for more information.<br />
Once the information is verified, click Save to view the final form. Once the final tax<br />
return is saved, it can be transmitted to the IRS by going to E-Filing > 94X E-Filing ><br />
Select/Transmit 94X Forms and selecting the 94X tax return to transmit. Only the<br />
94X tax returns that are approved for electronic filing are listed. See “Forms 941, 940,<br />
944, & 941SS” on page 183 for instructions on transmitting 94X tax returns to the<br />
IRS.<br />
When Client Write-Up is set up to electronically file 94X series tax returns, saving the<br />
return generates the electronic file and a printable copy for your records. If CWU is<br />
not set up to electronically file 94X series tax returns, only the printable copy is generated.<br />
From the printer dialog box you can choose to print multiple copies of the tax<br />
return.<br />
To customize the calculation of the 94X form, see “94X Form Settings” on page 57<br />
and “Calculating 94X Series Tax Deposits” on page 110.<br />
To e-file 94X series tax returns after completing the steps above, go to E-<br />
Filing > 94X E-Filing > Select/Transmit 94X Forms. See “Forms 941, 940, 944, &<br />
941SS” on page 183.<br />
Form 941 Quarter 1, 2, 3, or 4<br />
To generate the Schedule B portion of the 941, select the deposit frequency as Semi-<br />
Weekly in Setup > Client Information, Business Information tab. When the Schedule<br />
B opens, the boxes identifying the report quarter are not selected but are correctly<br />
selected when the report is saved.<br />
Form 941-SS Quarter 1, 2, 3 or 4<br />
To generate the Schedule B part of the 941-SS, select the deposit frequency as Semi-<br />
Weekly in Setup > Client Information, Business Information tab. When the Schedule<br />
B opens, the boxes identifying the report quarter are not selected but are correctly<br />
selected when the report is saved.<br />
NOTE<br />
Schedule B of the 941 and 941-SS tax returns displays when the<br />
Deposit Frequency is set to Semi-Weekly but prints only when the<br />
Total Taxes After Adjustments for the quarter is at least $2,500. Go to<br />
Setup > 94X Form Settings and select Override Sch. B Printing to<br />
force the Schedule B to print when the Total Taxes After Adjustments<br />
amount is less than $2,500.<br />
114
2011 Client Write-Up Producing 94X Series Tax Returns<br />
Form 943<br />
Form 944-SS<br />
Form 941-X<br />
This form cannot be e-filed.<br />
This form cannot be e-filed.<br />
Form 941-X is used to correct errors on a Form 941 or 941-SS that was previously<br />
filed. You may use Form 941-X even though you filed the original return on magnetic<br />
media or electronically. Do not send the 941-X in with a 941 or 941-SS.<br />
This form cannot be e-filed.<br />
Form 944-X<br />
This form will be available in a future release. Form 944-X is used to correct errors on<br />
a Form 944 or 944-SS that was previously filed. Do not send the 944-X in with a 944<br />
or 944-SS.<br />
This form cannot be e-filed.<br />
Form 943-X<br />
This form will be available in a future release. Form 943-X is used to correct errors on<br />
a Form 943 that was previously filed. Do not send the 943-X in with a 943.<br />
This form cannot be e-filed.<br />
115
W-2 Processing 2011 Client Write-Up<br />
W-2 Processing<br />
NOTE<br />
See “Print and Upload W-2s and W-3s” on page 307 for an overview of<br />
this process.<br />
Client Write-Up produces W-2s for employees based on earnings throughout the year.<br />
Only the current end of year data is provided.<br />
NOTE<br />
Prior to processing W-2s, all live employee pay checks must be printed<br />
and ATF employee pay checks created in the correct year.<br />
Processing W-2s is a three-step process.<br />
1. Check W-2 withholding (see “Checking W-2 Withholding” on page 116).<br />
2. Adjust W-2 withholding (see “Adjusting W-2 Withholding” on page 116).<br />
3. Produce and print Forms W-2 (see “Processing W-2s” on page 117).<br />
To electronically file W-2s and W-3s after completing the steps above, see “Uploading<br />
W-2s and W-3s” on page 186.<br />
Checking W-2 Withholding<br />
This process checks employee withholding for the year and compares it to the amount<br />
of FICA that should have been withheld. If the difference is more than $0.10, a report<br />
is generated listing the differences. Running this feature should be necessary only if an<br />
error in the amount of FICA withheld is discovered after processing the W-2.<br />
To check W-2 withholding, go to Employees > Check W2 Withholding. Enter the<br />
four-digit year and click OK.<br />
A report generates with the SSN, SS tax, SS actual, SS difference, Medicare tax,<br />
Medicare actual, and Medicare difference.<br />
Adjusting W-2 Withholding<br />
This process checks employee withholding for the year and compares it to the amount<br />
of FICA that should have been withheld. If a difference of more than $0.10 is found,<br />
transactions are created to correct FICA amounts. Adjusting amounts are added to or<br />
subtracted from your federal withholding to keep the transactions in balance. This<br />
type of transaction affects W-2s when the W-2 process is run, but not the general ledger.<br />
Running this feature should be necessary only if an error in the amount of FICA<br />
withheld is discovered after processing W-2s.<br />
To adjust W-2 withholding, go to Employees > Adjust W2 Withholding. Enter the<br />
four-digit year and click OK.<br />
A report generates with the SSN, SS tax, SS actual, SS difference, Medicare tax,<br />
Medicare actual and Medicare difference.<br />
116
2011 Client Write-Up W-2 Processing<br />
Processing W-2s<br />
Client Write-Up produces W-2s for employees based on earnings throughout a year.<br />
The employee must be set up and at least one payroll check printed and dated before<br />
the last day of the calendar year. Only the current end-of-year data is provided.<br />
NOTE<br />
Process W2s to print W-2s and W-3s and to transmit that information<br />
to the Social Security Administration. After processing the W-2, go to<br />
E-Filing > W2 E-Filing (EFW2) > Create File to generate the upload<br />
file. See “Creating the W-2/W-3 Upload File” on page 186.<br />
To process W-2s, complete the following steps:<br />
1. Go to Employees > Process W2s.<br />
Figure 4-19: Process W-2s<br />
Editing a W-2<br />
2. Process W-2s either individually or for all employees at once.<br />
• Click Process All to process all W-2s at once. This overwrites any edits made<br />
to existing W-2s. If changes were made to one or more W-2, use Process Single.<br />
• To process a W-2 for one employee, select the employee from the employee<br />
list and click Process Single. An X in the W2 column next to the employee’s<br />
name and code indicates the employee’s W-2 has been processed successfully.<br />
To edit a W-2, complete the following steps:<br />
1. Go to Employees > Process W2s.<br />
2. Select an employee from the list.<br />
3. Click View/Edit. The W-2 opens.<br />
4. Make necessary changes directly in the appropriate fields.<br />
117
W-2 Processing 2011 Client Write-Up<br />
5. Click Save then Exit.<br />
IMPORTANT<br />
Edit the W-3 after all W-2s have been edited and reprocessed.<br />
Once the W-3 has been edited, do not reprocess W-2s. Reprocessing<br />
W-2s removes saved edits to the W-3.<br />
Printing W-2s and W-3s<br />
To revert to the original W-2 information, click Reset.<br />
The saved information remains as the calculation amount to print as long as the W-2<br />
process is not run again. The edited information is used to generate the W-3.<br />
TIP<br />
Refer to “W-2 On the Fly” on page 172 if you wish to print W-2s without<br />
using any of CWU’s payroll functions (live or ATF).<br />
W-2s print “2 Up” by default, one above the other. This means information for two<br />
employees prints on the same page. If printing a single W-2, there will be a blank form<br />
where the second employee's information would normally print. CWU can also print<br />
W-2s in either a “4-Up” or “4-Down” format. See “W-2/W-3-1099 MISC. Setup” on<br />
page 34 to make these selections.<br />
1. Go to Employees > Process W2s.<br />
2. Select a print option from the View/Print section:<br />
• Print All W2s prints the W-2 for every employee listed with an X under the<br />
W-2 header to the left.<br />
• Print Single W2 prints the W-2 for a single selected employee.<br />
• Print W3 prints the W-3 using either the Forms and Data or Data Only<br />
options.<br />
3. Select the type of W-2 copies to print from the Types section:<br />
• SSA - Copy A— This option prints a copy of the W-2 for the Social Security<br />
Administration. For copy A, print Data Only on the SSA red form or print<br />
Form and Data on plain paper (this is approved by the IRS).<br />
• Other Copies — This option is used to print W-2s for the employer,<br />
employee, and state DOR. Select to print Forms and Data on blank paper or<br />
Data Only on approved forms.<br />
NOTE<br />
All W-2s and W-3s can be printed on plain paper using a laser printer<br />
and either the Forms and Data or Data Only options. It is not required<br />
to print the W-2 Copy A or the W-3 on the red line form. If Data Only is<br />
selected, the Adjust Form button is activated allowing adjustment of<br />
printing alignment. Refer to “Forms Alignment” on page 27 for more<br />
information.<br />
4. Click Print to print W-2s or W-3s.<br />
5. Click Exit when W-2 processing is complete.<br />
118
2011 Client Write-Up W-2c/W-3c Processing<br />
W-2c/W-3c Processing<br />
Creating a W-2c<br />
Form W-2c is used to correct errors on Form W-2. Corrections reported on Form W-2c<br />
may require you to file Form 941c, <strong>Support</strong>ing Statement to Correct Information. Do<br />
not use Form W-2c to report back pay or to correct Form W-2G, Certain Gambling<br />
Winnings. Form W-3c is required to be filed with Form W-2c.<br />
To edit a W-2c, complete the following:<br />
1. Go to Employees > Process W2c/W3c.<br />
2. Select an employee from the list.<br />
3. Click View/Edit. The W-2c in opened.<br />
4. Make necessary changes directly in the appropriate fields.<br />
5. Click Save then Exit.<br />
To revert to the original W-2 information, click Reset.<br />
Printing W-2c and W-3c Forms<br />
1. Go to Employees > Process W2c/W3c.<br />
2. Select a print option from the View/Print section:<br />
• Create/Edit W2cs displays the completed W-2c.<br />
• Print All W2Cs prints the W-2c for every employee listed with an X under<br />
the W-2 header to the left.<br />
• Print Single W2c prints the W-2c for a single selected employee.<br />
• Create/Edit W3c displays the completed W-3c.<br />
• Print W3c prints the W-3c (SSA - Copy A) using either the Forms and Data<br />
or Data Only options.<br />
3. Select the type of W-2c copies to print from the Types section:<br />
• SSA - Copy A — Prints a copy of the W-2c for the Social Security Administration.<br />
For copy A, print Data Only on the SSA red form or print the Form<br />
and Data on plain paper (this is approved by IRS).<br />
• Other Copies All — The Other Copies option is used to print W-2Cs for the<br />
employer, employee, and state DOR. Print Form and Data or Data Only.<br />
NOTE<br />
All Forms W-2c and W-3c can be printed on plain paper using a laser<br />
printer and the Forms and Data option. It is not required to print the W-<br />
2c Copy A or the W-3c on the red line form. Refer to “Forms Alignment”<br />
on page 30 for information on adjusting form alignment when printing<br />
data only on the red line form.<br />
4. Click Print to print W-2Cs then W-3Cs.<br />
5. Click Exit when W-2c processing is complete.<br />
119
Portals - Processing Employee Payroll<br />
2011 Client Write-Up<br />
NOTE<br />
W-2c and W-3c forms cannot be electronically filed and must be paperfiled.<br />
Portals - Processing Employee Payroll<br />
Once a Portals employee payroll batch is downloaded (Synced), it can be processed.<br />
When Portals pay checks are processed, CWU:<br />
1. Calculates the checks including all withholding information<br />
2. Creates pay records<br />
3. Lists live paychecks on the Print New Checks screen, and<br />
4. Automatically syncs the pay information back to the Portal so Employers have<br />
access to the final pay information.<br />
NOTE<br />
For a full explanation of using Portals, see “Appendix G - Portals” on<br />
page 321.<br />
To process Portals employee payroll, complete the following:<br />
1. Go to Employees > Portals Payroll.<br />
Figure 4-20: Process Portals Employee Payroll<br />
The top part of this screen indicates there is a payroll file to process.<br />
2. If this payroll file replaces one that has already been processed, select the Reprocess<br />
if check exists box. CWU will use the most recent payroll record if a duplicate<br />
record is found.<br />
120
2011 Client Write-Up Portals - Processing Employee Payroll<br />
3. Click Check Process.<br />
4. Click Yes to verify the Payroll Period Ending Dates being processed. If more<br />
than five dates are being processed, you will receive a message stating “Processing<br />
multiple dates.”<br />
5. Click Yes to confirm that you wish to process payroll for all employees. A popup<br />
window displays the number of checks processed. Use this count to confirm that<br />
all records approved were processed.<br />
6. Click OK. Paycheck information uploads to Portals automatically.<br />
NOTE<br />
Adjustments to individual payroll records made in CWU are not seen in<br />
Portals.<br />
7. To print live payroll checks, click Print Checks. This is a shortcut to the<br />
Employees > Print New Checks screen.<br />
8. Transmit Direct Deposit information as needed. See “Transmitting Employee<br />
Direct Deposits” on page 107.<br />
9. Move payroll information to the journal. See “Payroll Journal Entry” on page 160.<br />
121
Portals - Processing Employee Payroll<br />
2011 Client Write-Up<br />
122
2011 Client Write-Up Setting Up Contractor Payroll<br />
5 Contractor Payroll<br />
Client Write-Up makes the distinction between “Employees” and “Contractors”.<br />
Employees receive a W-2 at the end of the year and contractors receive a 1099-MISC.<br />
A few set up steps are needed before contractor payroll information can be entered.<br />
Some of these steps are optional.<br />
Setting Up Contractor Payroll<br />
To set up contractor payroll, complete the following steps:<br />
1. Assign account numbers to payroll processing features (Optional). If the bookkeeping<br />
feature is not being used, do not complete this step.<br />
2. Enter the Direct Deposit authentication information. See “Direct Deposit Setup”<br />
on page 21. This step may have been completed under Global Setup.<br />
3. Enter information about the client’s contracted labor. See “Contractor Setup” on<br />
page 125.<br />
Account & Payroll Information<br />
To assign specific account numbers from the Chart of Accounts to payroll processing<br />
features for contractors and to set up the auto post feature, go to Contractors ><br />
Account & Payroll Information.<br />
Payroll<br />
Options<br />
Cumulative<br />
G/L Account<br />
Numbers<br />
• Do not Print Pay Stub for Direct Deposit Check — This option controls the<br />
default setting for the No Stub check box in Live Contractor Payroll. When this<br />
option is selected, check stubs do not print for Direct Deposit contractors.<br />
• Auto Post Cumulative/Detailed Payroll to Journal — Select one of these<br />
options to have CWU automatically post contractor payroll transactions to the<br />
journal. The Detailed Payroll option creates separate journal entries for each payroll<br />
transaction. The Cumulative option creates one cumulative journal entry for<br />
each payroll account.<br />
Cumulative G/L account numbers are used when the Auto Post Cumulative Payroll<br />
to Journal option is selected on the Payroll Options tab or when the Cumulative<br />
Entry option is selected during manual transfer of contractor payroll information to<br />
the journal (see “Payroll Journal Entry” on page 160).<br />
NOTE<br />
If you are not using the bookkeeping feature in CWU, omit this step.<br />
The client Chart of Accounts must be created prior to entering account<br />
numbers. See “Chart of Accounts (COA) Setup” on page 45.<br />
123
Setting Up Contractor Payroll<br />
2011 Client Write-Up<br />
The account information entered is used to generate entries into the payroll journal<br />
from payroll entries. There must be a cash account and an expense account from the<br />
Chart of Accounts. Without both accounts listed, the journal will be out of balance.<br />
Press F2 to select postable accounts from the Chart of Accounts or type the account<br />
number directly into the field. If the appropriate account does not exist, press F2 in<br />
the account field and select New from the list of available accounts to create an<br />
account. To create a new account, see “Create an Account “On the Fly”” on page 156.<br />
IMPORTANT<br />
If no accounts are assigned under either the Cumulative G/L<br />
Account Numbers tab or the Detailed G/L Account Numbers<br />
tab, they must be set up for each contractor individually. See “Personal<br />
Info Tab” on page 126 to setup contractor specific cumulative<br />
G/L accounts and the “Detailed GL Accounts Tab” on<br />
page 128 to setup contractor specific detailed G/L accounts.<br />
Cumulative General Ledger Account Numbers<br />
• Cash Account — This account is credited when a transaction is entered.<br />
• Expense Account — This account is debited when a transaction is entered. This<br />
is the cumulative total of all expenses from the 1099-Miscellaneous.<br />
Cumulative Liability Account Numbers<br />
The amount of Federal and State withholding deducted from all contractor’s pay is<br />
posted to the designated accounts.<br />
Detailed G/L<br />
Account<br />
Numbers<br />
Detailed G/L account numbers are used when the Auto Post Detailed Payroll to<br />
Journal option is selected on the Payroll Options tab or when the Per Check<br />
Entries option is selected during manual transfer of contractor payroll information to<br />
the journal (see “Payroll Journal Entry” on page 160).<br />
NOTE<br />
If you are not using the bookkeeping feature in CWU, omit this step.<br />
The client Chart of Accounts must be created prior to entering account<br />
numbers. See “Chart of Accounts (COA) Setup” on page 45.<br />
The account information entered is used to generate entries into the payroll journal<br />
from payroll entries. Since Client Write-Up is a double-entry system, there must be a<br />
cash account and an expense account from the Chart of Accounts. Without both<br />
accounts listed, the journal will be out of balance when the Post Transactions process<br />
is performed.<br />
Press F2 to select postable accounts from the Chart of Accounts or type the account<br />
number directly into the field. If the appropriate account does not exist, press F2 in<br />
124
2011 Client Write-Up Contractor Setup<br />
the account field and select New from the list of available accounts to create an<br />
account. To create a new account, see “Create an Account “On the Fly”” on page 156.<br />
IMPORTANT<br />
If no accounts are assigned under either the Cumulative G/L<br />
Account Numbers tab or the Detailed G/L Account Numbers<br />
tab, they must be set up for each contractor individually. See “Personal<br />
Info Tab” on page 126 to setup contractor specific cumulative<br />
G/L accounts and the “Detailed GL Accounts Tab” on<br />
page 128 to setup contractor specific detailed G/L accounts.<br />
Contractor Setup<br />
Detailed General Ledger Account Numbers<br />
• Cash Account — This account is credited when a transaction is entered. This<br />
field must have an account number before the first payroll check is entered. The<br />
account number is required in order to post payroll transactions to the journal.<br />
• Liability Account Numbers — The amount of Federal and State withholding<br />
deducted from each contractor’s pay is posted to the designated accounts.<br />
Expense Accounts<br />
Adding a Contractor<br />
These accounts are debited when a transaction is entered. This field must have an<br />
account number before the first contractor payroll check is entered, and is required in<br />
order to post payroll transactions to the journal.<br />
Select Contractors > Contractor Setup to enter information about contracted labor<br />
or contracted employees. Contractor information must be entered before any payroll<br />
information is produced for the contracted employee. When the Contract Labor dialog<br />
box is displayed, contractors are listed alphabetically by last name.<br />
To add a contractor, complete the following steps:<br />
1. Go to Contractors > Contractor Setup.<br />
2. Click New. Enter a code in the Contractor Code field. Contractor codes are<br />
alphanumeric and can be up to 20 characters long.<br />
IMPORTANT<br />
Use only letters and numbers when assigning contractor codes.<br />
Do not use spaces or any special characters.<br />
Use any scheme you wish to assign contractor codes; however, it is best to use a<br />
contractor code that is meaningful. For instance, instead of using the contractor’s<br />
SSN or EIN, you could use “SmithPlumbing.” By using a meaningful code, lines<br />
on reports that refer to this contractor are easily identifiable.<br />
125
Contractor Setup<br />
2011 Client Write-Up<br />
To change a contractor code, see “Change Contractor Codes” on page 130.<br />
IMPORTANT<br />
Access is granted to three tabs when a Contractor Code is created.<br />
Complete each tab for each contractor.<br />
3. Complete information on the following tabs:<br />
• Personal Info Tab<br />
• Detailed GL Accounts Tab<br />
• Direct Deposit Tab<br />
4. Click Save after verifying the information on all tabs.<br />
Personal<br />
Info Tab<br />
Complete the following information about each contractor on the Personal Info tab:<br />
Figure 5-1: Contractor Setup<br />
• Company Name — Enter the company name associated with the EIN/SSN/<br />
ITIN.<br />
• First Name and Last Name — Enter the name of the individual as it should<br />
appear on the check.<br />
• Address 1 and Address 2 — Enter this information as it needs to appear on<br />
the check.<br />
• Zip — Do not use dashes (-) or slashes (/) when entering the ZIP Code. This<br />
field is formatted after information is typed. Enter the Zip and the City and<br />
State autofill.<br />
126
2011 Client Write-Up Contractor Setup<br />
• Suppress 1099 — Select this option if you do not want to produce a 1099 for<br />
this contractor.<br />
• Add ‘Doing Business As’ name to the 1099 Misc — Select this option to<br />
have the contractor’s “Doing Business As” name printed on the 1099-Misc.<br />
Next, enter the “Doing Business As” name as it should appear on the 1099-<br />
Misc.<br />
• Phone (Optional) — Do not use dashes (-) or slashes (/). This field is formatted<br />
after information is typed.<br />
• ID Number (Required) — Enter the EIN, SSN, ITIN, or Other. The number<br />
is formatted based on the selection made from the list (EIN, SSN, ITIN, or<br />
OTH). OTH is information approved by the IRS for use instead of an EIN,<br />
SSN, or ITIN.<br />
• Hire Date (Optional) — Enter the date the contractor was hired.<br />
• Division (Optional) — Divisions names must first be entered in the<br />
Setup > Headers & Footnotes.<br />
• Name Code 1099 EF — Enter the first four characters of the surname, if they<br />
can be determined; otherwise, leave this field blank. The name code is used to<br />
identify the payee; however, the 1099 will not be rejected if left blank.<br />
• Use First and Last Name and Address — Select this option to have the first<br />
name, last name, and address printed on reports, checks and check stubs, and<br />
the 1099-MISC.<br />
• Use Company Name and Address — Select this option to have the company<br />
name and address printed on reports, checks and check stubs, and the 1099-<br />
MISC.<br />
Cumulative GL Account Numbers<br />
NOTES<br />
NEW FOR<br />
2011<br />
This section can be skipped if the bookkeeping feature is not being<br />
used.<br />
The client Chart of Accounts must be created prior to entering account<br />
numbers. See “Chart of Accounts (COA) Setup” on page 45.<br />
Different cash, liability, and expense accounts can be assigned for each<br />
contractor. If no accounts are assigned for a contractor on the contractor’s<br />
Personal Info or Detailed GL Accounts tabs, the accounts<br />
assigned either on the Contractors > Account & Payroll Information,<br />
Cumulative G/L Account Numbers or Detailed G/L Account Numbers<br />
tabs are used when transactions are posted to the journal.<br />
The account information entered is used to generate entries into the payroll journal<br />
from contractor payroll entries. Press F2 to select postable accounts from the Chart of<br />
Accounts or type the account number directly into the field. If the appropriate account<br />
does not exist, press F2 in the account field and select New from the list of available<br />
accounts to create an account. To create a new account, see “Create an Account “On<br />
the Fly”” on page 156.<br />
127
Contractor Setup<br />
2011 Client Write-Up<br />
Cumulative GL Account Numbers<br />
• Cash Account — This account is credited when a transaction is entered for the<br />
specified contractor.<br />
• Expense Account — This account is debited when a transaction is entered. This<br />
is the cumulative total of all expenses from the specified contractor’s 1099-Miscellaneous.<br />
Cumulative Liability Account Numbers<br />
The amount of Federal and State withholding deducted from the specified contractor’s<br />
pay is posted to the designated accounts.<br />
Detailed GL<br />
Accounts<br />
Tab<br />
NOTES<br />
NEW FOR<br />
2011<br />
This section can be skipped if the bookkeeping feature is not being<br />
used.<br />
The client Chart of Accounts must be created prior to entering account<br />
numbers. See “Chart of Accounts (COA) Setup” on page 45.<br />
Different cash, liability, and expense accounts can be assigned for each<br />
contractor. If no accounts are assigned for a contractor on the contractor’s<br />
Personal Info or Detailed GL Accounts tab, the accounts<br />
assigned either on the Contractors > Account & Payroll Information,<br />
Cumulative G/L Account Numbers or Detailed G/L Account Numbers<br />
tabs are used when transactions are posted to the journal.<br />
The account information entered is used to generate entries into the payroll journal<br />
from contractor payroll entries. Press F2 to select postable accounts from the Chart of<br />
Accounts or type the account number directly into the field. If the appropriate account<br />
does not exist, press F2 in the account field and select New from the list of available<br />
accounts to create an account. To create a new account, see “Create an Account “On<br />
the Fly”” on page 156.<br />
Detailed General Ledger Account Numbers<br />
• Cash Account — This account is credited when a transaction is entered for the<br />
specified contractor.<br />
• Liability Account Numbers — The amount of Federal and State withholding<br />
deducted from the specified contractor’s pay is posted to the designated accounts.<br />
• Expense Accounts — These accounts are debited when a transaction is entered.<br />
128
2011 Client Write-Up Contractor Setup<br />
Direct<br />
Deposit Tab<br />
Enter Direct Deposit information for the contractor on the Direct Deposit tab.<br />
IMPORTANT<br />
InterceptEFT is <strong>Drake</strong>’s agent for direct deposit. You must call<br />
them (1-800-378-3328) and establish your account prior to using<br />
the Direct Deposit feature. <strong>Drake</strong> has established a special fee<br />
schedule with InterceptEFT for its clients. It’s important that you<br />
identify yourself as a <strong>Drake</strong> client whenever you communicate<br />
with InterceptEFT.<br />
Edit a Contractor<br />
• Direct Deposit Payroll Checks — Select the check box if payroll checks are<br />
to be deposited directly into the contractor’s bank account. The Account<br />
Type and Bank Routing Number fields activate.<br />
– Account Type — Directly deposit payroll checks in up to two accounts<br />
for each contractor. If splitting a paycheck between two accounts, both<br />
accounts must be at the same bank. Checks can be split between any combination<br />
of checking and savings accounts including two checking or two<br />
savings accounts or one of each. If both Checking and Savings are<br />
selected, the Enter Amount to Apply to Savings field activates.<br />
– Enter Amount to Apply to Savings — Enter the dollar amount to<br />
deposit into the second Direct Deposit account when the deposit is being<br />
split between two accounts. This amount can be edited for each pay<br />
check.<br />
– Bank Routing Number — Enter the routing number for the contractor’s<br />
bank account. Find this number on the bottom of the contractor’s personal<br />
checks to the left of the account number. The routing number displays<br />
asterisks. Reenter the routing number in the Retype Bank Routing Number<br />
field.<br />
– Checking Account Number — Enter the contractor’s checking account<br />
number for the direct deposit. If the deposit is to be split between two savings<br />
accounts, enter the first savings account information here. The<br />
account number displays asterisks. Reenter the account number in the<br />
Retype CheckingAccount Number field.<br />
– Savings Account Number — Enter the contractor’s savings account<br />
number for the direct deposit. If the deposit is to be split between two<br />
checking accounts, enter the second checking account information here.<br />
The account number displays asterisks. Reenter the account number in the<br />
Retype Savings Account Number field.<br />
5. Click Save once the information has been verified. An unlimited number of contractors<br />
can be set up.<br />
To edit an existing contractor, go to Contractors > Contractor Setup and doubleclick<br />
a name from the list of contractors or enter the contractor's ID number in the<br />
Contractor Code field and press ENTER. The data fields for that contractor activate.<br />
Edit the desired fields and click Save.<br />
129
Change Contractor Codes<br />
2011 Client Write-Up<br />
Change Contractor Codes<br />
IMPORTANT<br />
Changing contractor codes must be done before producing<br />
1099s.<br />
To change a contractor code, complete the following:<br />
1. Go to Contractors > Change Contractor Code.<br />
NOTE<br />
It is recommended that you back up your client files prior to changing<br />
contractor codes. To backup from the Change Employee/Contractor<br />
Code window, click Backup Files.<br />
2. Use the Select the Old Contractor Code drop list to select the contractor code to<br />
change.<br />
3. Enter the new contractor code into the Enter the New Contractor Code field.<br />
Contractor codes can be up to 20 characters and are alphanumeric.<br />
4. Re-enter the new contractor code.<br />
5. Click Save.<br />
Processing Contractor Payroll<br />
Live Contractor Payroll<br />
Refer to “Process Payroll (Live and ATF)” on page 305 for an overview of the payroll<br />
process.<br />
Use Live Contractor Payroll to print contractor paychecks. Payroll entries flow to<br />
the 1099-MISC at the end of the year.<br />
To enter live contractor payroll, complete the following steps:<br />
1. Go to Contractors > Live Contractor Payroll.<br />
2. Select Contractor — Select the contractor from the contractor list or enter the<br />
contractor code in the field at the top left of the screen. All existing contractors are<br />
listed alphabetically by name. If necessary, sort the contractor list by Code,<br />
Name, or SSN/EIN/ITIN/OTH by clicking the column header. Once the contractor<br />
has been selected, the other fields activate.<br />
130
2011 Client Write-Up Live Contractor Payroll<br />
Figure 5-2: Live Contractor Payroll<br />
NOTE<br />
Fields are formatted when displayed and any changes are formatted<br />
after leaving the field.<br />
3. Complete the following fields:<br />
• Pay Period Ending (required) — This is the current computer date. Change<br />
the date using the MMDDYYYY format.<br />
• Check Date — This field is not used when preparing live payroll for contractors<br />
set up to receive printed paychecks and is therefore unavailable. The<br />
check date for live payroll checks is entered when checks are printed. This<br />
field is required when entering payroll for contractors that receive their pay by<br />
Direct Deposit. Enter the date of the deposit in MMDDYYYY format.<br />
IMPORTANT<br />
InterceptEFT does not accept Direct Deposit check dates that fall<br />
on weekends or holidays. See “Appendix F - InterceptEFT Holidays”<br />
on page 320 for the Holiday Processing Calendar.<br />
• Check Number — This field is not used when preparing live contractor payroll.<br />
The starting check number is entered when checks are printed.<br />
• Net Pay (Cannot be edited) — This is a calculated field. Make changes by<br />
adjusting the other fields in the dialog box.<br />
• 1-Rents — Enter amounts of $600 or more for all types of rents including real<br />
estate rentals, machine rentals, and pasture rentals.<br />
• 2-Royalties — Enter gross royalty payments of $10 or more. Include royalties<br />
paid by a publisher directly to an author or literary agent unless the agent is a<br />
corporation.<br />
• 3-Other Income — Enter other income of $600 or more required to be<br />
reported on the 1099-MISC that is not reportable in one of the other boxes on<br />
the form.<br />
• 4-Federal W/H — Enter backup withholding. An entry in this field affects<br />
the net pay the contractor receives.<br />
131
Live Contractor Payroll<br />
2011 Client Write-Up<br />
• 5-Fishing Boat Proceeds — Enter the share of all proceeds from the sale of a<br />
catch or the full market value of the distribution to each crew member of fishing<br />
boats with fewer than 10 crew members.<br />
• 6-Med Health Care Payments — Enter payments of $600 or more made in<br />
the course of doing business to each provider of medical or health care services.<br />
Include payments made by medical and health care insurers under<br />
health, accident, and sickness insurance programs.<br />
• 7-Nonemployee Comp — Enter non-employee compensation of $600 or<br />
more. Include fees, commissions, prizes, and awards for services performed<br />
as a non-employee.<br />
• 8-Substitute Payments — Enter total payments of at least $10 received by a<br />
broker for a customer in lieu of dividends or tax-exempt interest as a result of<br />
a loan of a customer's securities.<br />
• 10-Crop Insurance Proceeds — Enter crop insurance proceeds of $600 or<br />
more paid to farmers by insurance companies.<br />
• 13-Excess Golden Parachute Payments — Enter any excess golden parachute<br />
payments. An excess parachute payment is the amount of the excess<br />
parachute payment over the base amount.<br />
• 14-Gross Proceeds Paid to an Attorney — Enter gross proceeds paid to an<br />
attorney for legal services.<br />
• 15a-Section 409A Deferrals — Enter the total amount deferred during the<br />
year of at least $600 for the non-employee under all nonqualified plans. The<br />
deferrals during the year include earnings on the current year and prior year<br />
deferrals.<br />
• 15b-Section 409A Income — Enter all amounts of current year and prior<br />
year deferrals that are includible as income under section 409A because the<br />
nonqualified deferred compensation plan fails to satisfy the requirements of<br />
section 409A. Include the earnings on the deferrals.<br />
• State Income — Enter the state income amount.<br />
• 16-State W/H — Enter the amount of state income tax withheld. An entry in<br />
this field affects the net pay the contractor receives.<br />
• Direct Deposit Applied to Savings — This field is active when a contractor<br />
is splitting the Direct Deposit of their pay between two accounts. The field<br />
displays the amount entered in Contractors > Contractor Setup,<br />
Direct Deposit tab, the Enter Amount to Apply to Savings field. Edit the<br />
amount in this field as desired. The edited amount affects the current check<br />
only.<br />
4. Click Save once all of the contractor's information has been verified.<br />
IMPORTANT<br />
CWU does not recognize a check generated in Live Contractor<br />
Payroll as existing until it is printed. Once the check has been<br />
printed, it is recognized in the calculation of Payroll Filings, State<br />
Wage Reports, and Payroll Reports.<br />
For details about printing contractor paychecks, see “Printing Contractor Pay Checks”<br />
on page 137.<br />
132
2011 Client Write-Up Live Contractor Payroll<br />
Additional Live Contractor Payroll Options<br />
Mark Printed<br />
The Mark Printed field is an optional field that, when selected, allows CWU to recognize<br />
this particular check as having been printed. The check will therefore not<br />
appear on the Print New Checks dialog box. This field changes to the No Stub option<br />
for direct deposit contractors.<br />
No Stub<br />
The No Stub option is available only for direct deposit contractors and, when<br />
selected, indicates that no check stub should be printed. When this option is selected,<br />
no print record displays in Contractors > Print New Checks. This field changes to<br />
the Mark Printed option for contractors not set up for direct deposit.<br />
Test Check for Direct Deposit — Select this option to create a “test check” Direct<br />
Deposit file for the selected contractor that can be transmitted to InterceptEFT. InterceptEFT<br />
does not require that you transmit a test check. When this option is selected,<br />
all amounts on the check change to zeros. A test transmission file is created when the<br />
test check is saved. Create a separate test transmission file for each contractor. See<br />
“Transmitting Contractor Direct Deposits” on page 143 for information on transmitting<br />
to InterceptEFT.<br />
NOTE<br />
No information moves to the journal for a test check when the bookkeeping<br />
feature is being used.<br />
Reset<br />
The Reset button clears the payroll information from the dialog box.<br />
Delete<br />
The Delete button removes the payroll check from the payroll reports. All checks can<br />
be deleted whether or not they’ve been printed.<br />
To delete a live contractor payroll check, complete the following steps:<br />
1. From Contractors > Live Contractor Payroll, select a contractor.<br />
2. Select a check to delete from the Previous Checks - Click to edit list. The Pay<br />
Period Ending Date, Check Date, and Check Number are displayed to aid in<br />
identifying the check to delete.<br />
3. Click Delete.<br />
Deleting a check using this function removes the information from the payroll reports<br />
only and does not delete the information that has been posted to the transactions journal.<br />
Adjusting entries to the journal must also be made. To make adjusting entries, see<br />
“<strong>Manual</strong> Entry of Journal Transactions” on page 158.<br />
Editing a Live Contractor Check<br />
To edit a Live Contractor’s payroll check, complete the following steps:<br />
133
ATF Contractor Payroll<br />
2011 Client Write-Up<br />
1. From Contractors > Live Contractor Payroll, select a contractor.<br />
2. Select a check to edit from the Previous Checks - Click to edit list. The Pay<br />
Period Ending Date, Check Date, and Check Number are displayed to aid in<br />
identifying the check to edit. The bottom part of the screen fills with the saved<br />
amounts.<br />
3. Only the Pay Period Ending Date, Check Date, and Check Number can be<br />
edited.<br />
4. Make the necessary edits and click Save.<br />
NOTE<br />
ATF Contractor Payroll<br />
All fields that can normally be edited in live contractor payroll can be<br />
edited if the check has not been printed. If the check has been printed,<br />
only the Check Date and Pay Period Ending Date can be edited.<br />
While in Edit mode, click New to enter a new check for the selected<br />
contractor.<br />
If a posted check is edited, make adjustments to the journal to accommodate the edits.<br />
To make adjusting entries, see “<strong>Manual</strong> Entry of Journal Transactions” on page 158.<br />
Use ATF Contractor Payroll for reporting purposes only. Paychecks are not printed<br />
when using ATF payroll. ATF contractor payroll entries flow to the 1099-MISC at the<br />
end of the year.<br />
NOTE<br />
Checks entered in ATF contractor payroll are recognized by CWU as<br />
printed. The Mark Printed field is selected by default when entering<br />
ATF payroll and is disabled so it cannot be changed.<br />
To enter ATF contractor payroll, complete the following steps:<br />
1. Go to Contractors > ATF Contractor Payroll.<br />
2. Select Contractor — Select the contractor from the contractor list or enter the<br />
contractor code in the field at the top left of the screen. All existing contractors are<br />
listed alphabetically by name. If necessary, sort the contractor list by Code,<br />
Name, or SSN/EIN/ITIN/OTH by clicking the column header. Once the contractor<br />
has been selected, the other fields activate.<br />
NOTE<br />
Fields are formatted when displayed and any changes are formatted<br />
after leaving the field.<br />
3. Complete the following fields:<br />
• Pay Period Ending — This is the current computer date by default. Change<br />
the date using the MMDDYYYY format.<br />
• Check Date — The check date should correspond to the date on the check<br />
issued to the contractor. The check date determines the quarter to post the<br />
check when generating Form 941. This is the current computer date by<br />
134
2011 Client Write-Up ATF Contractor Payroll<br />
default. Change the date using the MMDDYYYY date format. For direct<br />
deposit contractors, enter the date the client’s account is to be debited.<br />
IMPORTANT<br />
InterceptEFT does not accept direct deposit check dates that fall<br />
on weekends or holidays. See “Appendix F - InterceptEFT Holidays”<br />
on page 320 for the Holiday Processing Calendar.<br />
• Check Number — The check number should correspond to the number on<br />
the check that was issued to the contractor. This field is not available for<br />
direct deposit contractors.<br />
• Net Pay (Cannot be edited) — This is a calculated field. Make changes by<br />
adjusting the other fields in the dialog box.<br />
• 1-Rents — Enter amounts of $600 or more for all types of rents including real<br />
estate rentals, machine rentals, and pasture rentals.<br />
• 2-Royalties — Enter gross royalty payments of $10 or more. Include royalties<br />
paid by a publisher directly to an author or literary agent unless the agent is a<br />
corporation.<br />
• 3-Other Income — Enter other income of $600 or more required to be<br />
reported on the 1099-MISC that is not reportable in one of the other boxes on<br />
the form.<br />
• 4-Federal W/H — Enter backup withholding.<br />
• 5-Fishing Boat Proceeds — Enter the share of all proceeds from the sale of a<br />
catch or the full market value of the distribution to each crew member of fishing<br />
boats with fewer than 10 crew members.<br />
• 6-Med Health Care Payments — Enter payments of $600 or more made in<br />
the course of doing business to each provider of medical or health care services.<br />
Include payments made by medical and health care insurers under<br />
health, accident, and sickness insurance programs.<br />
• 7-Nonemployee Comp — Enter non-employee compensation of $600 or<br />
more. Include fees, commissions, prizes, and awards for services performed<br />
as a non-employee.<br />
• 8-Substitute Payments — Enter total payments of at least $10 received by a<br />
broker for a customer in lieu of dividends or tax-exempt interest as a result of<br />
a loan of a customer's securities.<br />
• 10-Crop Insurance Proceeds — Enter crop insurance proceeds of $600 or<br />
more paid to farmers by insurance companies.<br />
• 13-Excess Golden Parachute Payments — Enter any excess golden parachute<br />
payments. An excess parachute payment is the amount of the excess<br />
parachute payment over the base amount.<br />
• 14-Gross Proceeds Paid to an Attorney — Enter gross proceeds paid to an<br />
attorney for legal services.<br />
• 15a-Section 409A Deferrals — Enter the total amount deferred during the<br />
year of at least $600 for the non-employee under all nonqualified plans. The<br />
deferrals during the year include earnings on the current year and prior year<br />
deferrals.<br />
• 15b-Section 409A Income — Enter all amounts of current year and prior<br />
year deferrals that are includible as income under section 409A because the<br />
135
ATF Contractor Payroll<br />
2011 Client Write-Up<br />
nonqualified deferred compensation plan fails to satisfy the requirements of<br />
section 409A. Include the earnings on the deferrals.<br />
• State Income — Enter the state income amount.<br />
• 16-State W/H — Enter the amount of state income tax withheld.<br />
• Direct Deposit Applied to Savings — This field is active when a contractor<br />
is splitting the Direct Deposit of their pay between two accounts. The field<br />
displays the amount entered in Contractors > Contractor Setup,<br />
Direct Deposit tab, the Enter Amount to Apply to Savings field. Edit the<br />
amount in this field as desired. The edited amount affects the current check<br />
only.<br />
4. Click Save once all of the contractor's information has been verified.<br />
Additional ATF Contractor Payroll Options<br />
Mark Printed — The Mark Printed field is permanently selected for non-direct<br />
deposit contractors and cannot be edited. ATF checks do not appear as checks to be<br />
printed on the Print New Checks dialog box. This field changes to the No Stub<br />
option for direct deposit contractors.<br />
No Stub — The No Stub option is available only for direct deposit contractors and,<br />
when selected, indicates that no check stub should be printed. When this option is<br />
selected, no print record displays in Contractors > Print New Checks. This field<br />
changes to the Mark Printed option for contractors not set up for direct deposit.<br />
Test Check for Direct Deposit — Select this option to create a “test check” Direct<br />
Deposit file for the selected contractor that can be transmitted to InterceptEFT. InterceptEFT<br />
does not require that you transmit a test check. When this option is selected,<br />
all amounts on the check change to zeros. A test transmission file is created when the<br />
test check is saved. Create a separate test transmission file for each contractor. See<br />
“Transmitting Contractor Direct Deposits” on page 143 for information on transmitting<br />
to InterceptEFT.<br />
NOTE<br />
No information moves to the journal for a test check when the bookkeeping<br />
feature is being used.<br />
Reset — The Reset button clears the payroll information from the dialog box.<br />
Delete — The Delete button removes the payroll check from the payroll reports. All<br />
checks can be deleted whether or not they’ve been printed.<br />
To delete an ATF contractor payroll check, complete the following steps:<br />
1. From Contractors > ATF Contractor Payroll, select a contractor.<br />
2. Select a check to delete from the Previous Checks - Click to edit list. The Pay<br />
Period Ending Date, Check Date, and Check Number are displayed to aid in<br />
identifying the check to delete.<br />
3. Click Delete.<br />
136
2011 Client Write-Up Printing Contractor Pay Checks<br />
Deleting a check using this function removes the information from the payroll reports<br />
only and does not delete the information that has been posted to the transactions journal.<br />
Adjusting entries to the journal must also be made. Adjustments are also required<br />
if the deletion affects previously closed periods.<br />
Editing an ATF Contractor Check<br />
To edit an ATF contractor’s payroll check, complete the following steps:<br />
1. From Contractors > ATF Contractor Payroll, select a contractor.<br />
2. Select a check to edit from the Previous Checks - Click to edit list. The Pay<br />
Period Ending Date, Check Date, and Check Number are displayed to aid in<br />
identifying the check to edit. The bottom part of the screen fills with the saved<br />
amounts.<br />
3. Only the Pay Period Ending Date, Check Date, and Check Number can be<br />
edited.<br />
4. Make the necessary edits and click Save.<br />
NOTE<br />
Any adjustments to 941s already processed need to be made again. If<br />
a posted check is edited, make adjustments to the journal to accommodate<br />
the edits.<br />
While in Edit mode, click New to enter a new check for the selected<br />
contractor.<br />
Printing Contractor Pay Checks<br />
Go to Contractors > Print New Checks for a list of “new” payroll checks available<br />
to be printed. A “new” check is one that hasn’t previously been printed. A payroll<br />
check can be printed as a “new” check only once.<br />
IMPORTANT<br />
Place the check stock in the printer before starting this process.<br />
To print checks, complete the following steps:<br />
1. Go to Contractors > Print New Checks.<br />
137
Printing Contractor Pay Checks<br />
2011 Client Write-Up<br />
Figure 5-3: Print Contractor Payroll Checks<br />
2. Select the type of check stock being used, either Blank MICR or Preprinted.<br />
3. MICR Options (not available if Preprinted was selected under Type of Check<br />
Stock):<br />
• MICR Banks — Select the bank from which these checks are drawn. The<br />
Starting Check Number field populates based on the Next Check # field in<br />
Setup > MICR Bank Accounts. Edit the Starting Check Number to<br />
include leading zeroes (e.g. 002001) to meet bank field length requirements.<br />
The bank information must be entered in Setup > MICR Bank Accounts to<br />
use this function.<br />
• MICR Printer — CWU automatically selects the printer specified as the<br />
default MICR Printer in Firm > Firm Info./Global Settings. Use the MICR<br />
Printer list to temporarily override the default MICR printer selection. Verify<br />
the selected printer has the proper ink for MICR printing. Change the default<br />
MICR printer in the MICR Printer field in Firm > Firm Info./<br />
Global Settings.<br />
4. Select All Output Desired — Use this feature to print multiple copies of payroll<br />
checks.<br />
• Check Stock — Prints the check and stub on check stock.<br />
• Plain - Checks & Stubs — Prints a copy of the check and stub on plain<br />
paper.<br />
138
2011 Client Write-Up Printing Contractor Pay Checks<br />
• Plain - Stubs Only — Prints a copy of the stub only (no check) on plain<br />
paper.<br />
NOTES<br />
When Preview checks prior to printing is selected, a separate file is<br />
created for each output selected.<br />
At least one output selection is required.<br />
5. To view payroll checks on your computer screen prior to printing, select the Preview<br />
checks prior to printing check box. Once selected, the option remains in<br />
effect until the check box is cleared. To print checks from the preview screen,<br />
select the Printer icon ( ).<br />
IMPORTANT<br />
Previewed checks are considered printed by CWU. If previewed<br />
checks are not printed when displayed, either click the Reprint<br />
Screen button or go to Contractors > Reprint Checks and print<br />
the check.<br />
6. Enter a check date. This is the current computer date. To change the date that<br />
prints on the check, highlight the date and enter the correct date using the format<br />
MMDDYYYY. Enter only numbers (no slashes (/), dashes (-), or periods (.) in<br />
this date field or an erroneous date error is generated. Once the date is set, it prints<br />
on all checks printed during this session. Always verify this information before<br />
printing.<br />
WARNING<br />
The Check Date determines the quarter to which the payroll is<br />
posted for both federal and state payroll filing reports. It is important<br />
to enter the correct Check Date. Entering the wrong date results in<br />
incorrect information being placed on the 94X tax deposit.<br />
7. Enter the starting check number. This is the check number that prints on the first<br />
check printed during the current print session. If using pre-printed check stock,<br />
verify that the number in the Starting Check Number field matches the number<br />
on the first check placed in the printer. Always verify this information before<br />
printing.<br />
8. Type of Payment — Select to display paper pay checks, unprinted direct deposit<br />
pay stubs, or both in the unprinted check window. Be careful not to print direct<br />
deposit pay stub information on check stock.<br />
9. Live contractor payroll checks and direct deposit pay stubs to print are displayed<br />
with a box next to the contractor name. Select the box next to the contractor<br />
names to indicate those checks or stubs to print. Arrange the checks to print in<br />
order of contractor name, SSN/EIN, pay period ending, or net pay amount by<br />
clicking the desired column header. Checks can be printed individually or in<br />
groups.<br />
10.Click Print. If you are using MICR blank check stock, the Windows printer dialog<br />
box does not open. Change the MICR printer on the Print Checks dialog box.<br />
If you are not using MICR blank check stock, the Windows printer dialog box<br />
139
Reprinting Contractor Pay Checks<br />
2011 Client Write-Up<br />
opens and provides the opportunity to change the printer used during this print<br />
session.<br />
NOTE<br />
Once checks have been printed, they can be reprinted by either clicking<br />
the Reprint Screen button or going to Contractors > Reprint Checks.<br />
See “Preprinted Check Alignment” on page 29 for help in resolving preprinted<br />
check stock printing alignment issues.<br />
Additional Check Print Options<br />
MICR Test — Sends a test check to the selected MICR printer. Use this option to test<br />
check alignment. Printing test checks does not mark the check as printed and can still<br />
be printed from the Print Checks screen.<br />
PrePrinted Test — Sends a test check to the printer you select. Use this option to test<br />
check alignment. Printing test checks does not mark the check as printed and can still<br />
be printed from the Print Checks screen.<br />
Refresh — Clears the previously selected checks to print.<br />
Select All — Selects all checks displayed to print.<br />
Reprint Screen — Displays the dialog box where all checks previously printed are<br />
available to be reprinted. For more information about reprinting checks, see “Reprinting<br />
Contractor Pay Checks” on page 140.<br />
NOTE<br />
A contractor pay check can be printed only once from Print New<br />
Checks. To reprint a check due to loss or damage, go to<br />
Contractors > Reprint Checks.<br />
Check Setup — Displays the Setup > Check and Stub Options screen. When check<br />
stub setup is complete, CWU returns to the Print Payroll Checks screen.<br />
Reprinting Contractor Pay Checks<br />
Payroll checks may be reprinted as many times as needed. Select<br />
Contractors > Reprint Checks for a list of all payroll checks that have previously<br />
been printed or click Reprint Screen on the Print Checks dialog box.<br />
IMPORTANT<br />
Place the check stock in the printer before starting this process.<br />
Reprinting a check overwrites the journal entry of the previously<br />
printed check. The payroll reports shows only one check written.<br />
CWU does not keep track of the check stock for you. Once<br />
reprinted, the initial check(s) is not documented in the program.<br />
To reprint checks, complete the following steps:<br />
1. Go to Contractors > Reprint Checks.<br />
2. Select the type of check stock being used: Blank MICR or Preprinted.<br />
140
2011 Client Write-Up Reprinting Contractor Pay Checks<br />
3. MICR Options (not available if Preprinted was selected under Type of Check<br />
Stock):<br />
• MICR Banks — Select the bank from which these checks are drawn. The<br />
Starting Check Number field populates based on the Next Check # field in<br />
Setup > MICR Bank Accounts. Edit the Starting Check Number to<br />
include leading zeroes (e.g. 002001) to meet bank field length requirements.<br />
The bank information must be entered in Setup > MICR Bank Accounts to<br />
use this function.<br />
• MICR Printer — CWU automatically selects the printer specified as the<br />
default MICR Printer in Firm > Firm Info./Global Settings. Use the MICR<br />
Printer list to temporarily override the default MICR printer selection. Verify<br />
the selected printer has the proper ink for MICR printing. Change the default<br />
MICR printer in the MICR Printer field in Firm > Firm Info./<br />
Global Settings.<br />
4. Select All Output Desired — Use this feature to print multiple copies of payroll<br />
checks.<br />
• Check Stock — Prints the check and stub on check stock.<br />
• Plain - Checks & Stubs — Prints a copy of the check and stub on plain<br />
paper.<br />
• Plain - Stubs Only — Prints a copy of the stub only (no check) on plain<br />
paper.<br />
NOTES<br />
When Preview checks prior to printing is selected, a separate file is<br />
created for each output selected.<br />
At least one output selection is required.<br />
5. To view payroll checks on your computer screen prior to printing, select the Preview<br />
checks prior to printing check box. Once selected, the option remains in<br />
effect until the option is cleared. To print checks from the preview screen, select<br />
the Printer icon ( ).<br />
NOTE<br />
The original check date is used when reprinting payroll checks.<br />
6. Enter the starting check number. This is the check number that prints on the first<br />
check printed during the current print session. If using pre-printed check stock,<br />
verify that the number in the Starting Check Number field matches the number<br />
on the first check placed in the printer. Always verify this information before<br />
printing.<br />
7. Type of Payment — Select to display paper pay checks, direct deposit pay stubs,<br />
or both in the window at the bottom of the Reprint Checks dialog box. Be careful<br />
not to print direct deposit pay stub information on check stock.<br />
8. Live contractor checks that have been printed display with boxes next to the contractor<br />
name. Select a box to indicate those checks to be reprinted. Arrange the<br />
141
Check Alignment<br />
2011 Client Write-Up<br />
checks to print in order of contractor name, pay period ending, or net pay by clicking<br />
the desired column header. Checks can be printed individually or in groups.<br />
9. Select Print. If you are using pre-printed check stock or printing direct deposit<br />
pay stubs, the Windows printer dialog box opens and provides the opportunity to<br />
change the printer used during this print session. When using MICR blank check<br />
stock, the Windows printer dialog box does not open. Change the MICR printer<br />
from the MICR Printer field.<br />
Additional Check Print Options<br />
MICR Test — Sends a test check to the selected MICR printer. Use this option to test<br />
check alignment. Printing test checks does not mark the check as printed and can still<br />
be printed from the Print Checks screen.<br />
PrePrinted Test — Sends a test check to the printer you select. Use this option to test<br />
check alignment. Printing test checks does not mark the check as printed and can still<br />
be printed from the Print Checks screen.<br />
Refresh — Clears the previously selected checks to print.<br />
Select All — Selects all checks displayed to print.<br />
Print Screen — Displays the dialog box where unprinted checks are available to be<br />
printed. For more information about printing checks, see “Printing Contractor Pay<br />
Checks” on page 137.<br />
NOTE<br />
A payroll check can be printed only once from Print New Checks. To<br />
reprint a check due to loss or damage, go to<br />
Contractors > Reprint Checks.<br />
Check Alignment<br />
Check Setup — Displays the Setup > Check and Stub Options screen. When check<br />
stub setup is complete, CWU returns to the Reprint Payroll Checks screen.<br />
The check alignment feature is used to change the alignment of information printed on<br />
pre-printed payroll checks. The information in the white fields can be adjusted to<br />
match pre-printed checks.<br />
Complete the following to adjust the pre-printed payroll check alignment:<br />
1. Go to either Contractors > Check Alignment or Employees ><br />
Check Alignment.<br />
142
2011 Client Write-Up Transmitting Contractor Direct Deposits<br />
Figure 5-4: Check Alignment<br />
NOTE<br />
Preprinted check alignment made on the Contractors > Check Alignment<br />
window also affect employee paycheck alignment.<br />
2. Click the left mouse button on the field to be adjusted.<br />
3. Hold the mouse button down while dragging the field to the desired position on<br />
the check.<br />
4. Release the mouse button to place the field in the new position on the check.<br />
5. Click Save to save the changes.<br />
Click Reset to restore all the fields on the check to their default location.<br />
Due to multiple options of operating systems, printers, and check formats, minor<br />
adjustments may be required to make checks print properly. Copy a check and print a<br />
test check to make sure the information matches and is positioned properly. This prevents<br />
wasting check stock.<br />
Transmitting Contractor Direct Deposits<br />
Once live payroll has been entered for direct deposit contractors and their pay stubs<br />
have been printed, transmit the pay information to InterceptEFT.<br />
IMPORTANT<br />
An Internet connection is required to transmit Direct Deposit information<br />
to InterceptEFT. If you use a dial-up connection to access<br />
the Internet, you must first connect to the Internet before transmitting<br />
Direct Deposit information.<br />
To transmit direct deposit pay information, complete the following:<br />
1. Go to Contractors > Direct Deposit - Transmit Contractors.<br />
2. Enter the date range of paychecks to be transmitted in the Beginning Date and<br />
Ending Date fields. These fields default to today’s date.<br />
143
Transmitting Contractor Direct Deposits<br />
2011 Client Write-Up<br />
Direct Deposit Reports<br />
3. Click Accept Dates. Direct Deposit pay records with a Check Date within that<br />
date range display. Previously transmitted pay records are indicated with a “T” in<br />
the Transmitted column.<br />
4. If two accounts have been established with InterceptEFT, select which account<br />
should be used for this transmission - either the Primary UserID and Password<br />
(default) or the Secondary UserID and Password.<br />
5. Select the box next to the contractor names to indicate the pay records to transmit<br />
to InterceptEFT. Arrange the pay records in order by ID, Name, Check Date,<br />
Amount, or Transmitted by clicking the column header. Pay records can be transmitted<br />
individually or in groups.<br />
6. Click Verify Dates. InterceptEFT does not accept check dates that fall on weekends<br />
or holidays. If none of the checks selected have “invalid” check dates, the<br />
Transmit button becomes active and you may proceed to transmit pay records to<br />
InterceptEFT.<br />
If any of the checks selected have a check date that falls on a weekend or holiday,<br />
a warning displays stopping the process. See “Appendix F - InterceptEFT Holidays”<br />
on page 320 for InterceptEFT’s Holiday Processing Calendar. Click OK<br />
and a printable report displays the checks with the invalid dates. To change the<br />
invalid check dates, see the appropriate topic: “Editing a Live Contractor Check”<br />
on page 133, or “Editing an ATF Contractor Check” on page 137.<br />
7. Click Transmit. Pay records transmit to InterceptEFT using your computer’s<br />
Internet connection.<br />
When Auto Display Report of Transmitted Records is selected, a printable<br />
report of the Direct Deposit records that transmitted displays automatically. If you<br />
do not want this report to display, clear the check box. This same report is available<br />
by clicking Review Repts., selecting Display Direct Deposit Transmit<br />
Reports (TXT), and selecting the report.<br />
Reset — Clears all entries in the Select Employees/Contractors section of the<br />
screen.<br />
Review Repts. — Displays the Review Reports screen where previously produced<br />
reports can be viewed and printed. See “Report Review” on page 279 for instructions<br />
on running these reports.<br />
Client Write-Up offers many Direct Deposit reports that can be printed in either PDF,<br />
Excel, or Comma Separated Value (CSV) formats.<br />
IMPORTANT<br />
Direct Deposit report requests are uploaded to and report information<br />
is downloaded from InterceptEFT. Therefore, an Internet<br />
connection is required to run Direct Deposit reports. If you use a<br />
dial-up connection to access the Internet, you must first connect<br />
to the Internet before clicking Request Rept.<br />
To run Direct Deposit reports, complete the following:<br />
144
2011 Client Write-Up Transmitting Contractor Direct Deposits<br />
1. Go to Contractors > Direct Deposit - Transmit Contractors > Reports.<br />
2. Select the format for the report in the Available Print Formats field.<br />
3. Enter the beginning and ending date range for the report. To set the beginning and<br />
ending dates for reports, click the next to the date displayed. Dates default to<br />
the current date on the computer. For instructions on setting calendar dates, see<br />
“Date Fields” on page 12.<br />
4. Select the report to run and click Request Rept.<br />
Direct<br />
Deposit<br />
Report<br />
Details<br />
Report Name<br />
Table 5-1: Direct Deposit Report Details<br />
Details<br />
CAR - Active Company Report<br />
PBR - Batches Submitted Summary<br />
BRY - Statement and Projections<br />
CAP - Company Applications<br />
CCR - Company Contracts<br />
Report<br />
CFS - Company Fee Schedule<br />
COR - Corrections<br />
RET - Returns<br />
XCC - Xcelerated Corrections<br />
Company’s last date of activity and their TIN verification.<br />
Batches InterceptEFT has submitted to the Federal<br />
Reserve for processing.<br />
Statement of accounts and a projection of disbursements<br />
to and from your account by InterceptEFT.<br />
Breakdown of the accounts credited and debited.<br />
Status of contracts on file with InterceptEFT.<br />
InterceptEFT’s fee schedule agreement for Direct<br />
Deposit services.<br />
The receiving banks did allow the transaction to go<br />
through, but sent this report so you will change the<br />
information in your software, i.e., name, account number,<br />
routing number, etc. for future transactions. Refer<br />
to the last column of the report to determine what<br />
information needs to be changed.<br />
A transaction was rejected by the receiving bank and<br />
was sent back to InterceptEFT. The Returns report<br />
displays the reason it was returned so it can be corrected<br />
and prevent any future delays in processing.<br />
Non-posted Xcelerated Corrections. The Xcelerated<br />
Corrections is a screening system that compares your<br />
transactions by routing and account number against a<br />
database of previous NOC transactions. The transaction<br />
is stopped before the file is submitted to the Federal<br />
Reserve for processing. This report will only be<br />
available for the day in which they are received. Prior<br />
days are included in the Corrections report.<br />
145
1099/1096/1098 Processing 2011 Client Write-Up<br />
Table 5-1: Direct Deposit Report Details<br />
Report Name<br />
XCR - Xcelerated returns<br />
FAR - File Acknowledgement<br />
Summary<br />
MBS - Monthly Billing Summary<br />
MBD - Monthly Billing Detail<br />
Details<br />
Non-posted Xcelerated returns for the day they were<br />
received only. Xcelerated Returns is a screening system<br />
that compares your transactions by routing and<br />
account number against a database of previously<br />
returned transactions. The transaction is then taken<br />
out of the file before submitting it to the Federal<br />
Reserve.<br />
Summary of files that have been received by InterceptEFT.<br />
The report confirms the files they received<br />
by batch and total dollar amount.<br />
Billing summary of your monthly charges. Each client<br />
will have a lump sum for processing during the month.<br />
Detailed billing statement of your monthly charges.<br />
Each client will have an individual breakdown of transactions<br />
processed during the month.<br />
The Review Repts. button displays the Review Reports screen where previously produced<br />
reports can be viewed and printed. See “Report Review” on page 279 for<br />
instructions on running these reports.<br />
IMPORTANT<br />
To transfer payroll information to the journal, see “Payroll Journal<br />
Entry” on page 160.<br />
1099/1096/1098 Processing<br />
NOTE<br />
See “Print and Upload 1099s and 1096s” on page 307 for an overview<br />
of this process.<br />
Client Write-Up produces Form 1099-MISC for contractors based on earnings<br />
throughout the year. The contractor must be set up and have at least one check printed<br />
and dated during 2011 or an ATF check recorded with a check date of 2011. Only payments<br />
made with a check date in 2011 are included in the contractor’s 2011 1099.<br />
Forms 1099-MISC must be processed before they can be printed or uploaded to the<br />
IRS. After processing the 1099-MISC, go to E-Filing > 1099/1098 E-Filing ><br />
Create File to generate the upload file. See “Creating the 1099/1096/1098 Upload<br />
File” on page 190.<br />
NOTE<br />
Prior to processing 1099s, all live contractor checks must be printed<br />
and ATF contractor checks created in the correct year.<br />
Forms 1099-MISC can also be processed, printed, and uploaded for vendors and nonvendors.<br />
See “Generating 1099 Data” on page 225.<br />
146
2011 Client Write-Up 1099/1096/1098 Processing<br />
IMPORTANT<br />
In order to generate Forms 1099-MISC for vendors and non-vendors,<br />
you must generate the 1099 data file before processing their<br />
1099s. See “Generating 1099 Data” on page 225 for information<br />
on generating the 1099 data file.<br />
To process 1099-MISC forms, complete the following:<br />
1. Go to Contractors > Process 1099 Misc.<br />
NOTE<br />
The check boxes at the top right of the window are set automatically<br />
based on whether the vendor/nonvendor 1099 data file has been generated<br />
and if there is contractor payment information available for a<br />
1099. If both types of data are available, the Process 1099’s for Both<br />
option is selected. If only contractor payment information is available,<br />
the Process 1099’s for Contractors option is selected. If the vendor/<br />
nonvendor 1099 data file has been generated and there is no contractor<br />
payment information available, the Process 1099’s for AP Vendors<br />
option is selected.<br />
2. Process 1099-MISC forms either individually or all at once.<br />
• Click Process All to process all 1099-MISC forms at once. This overwrites<br />
any changes made to existing 1099-MISC forms. If changes were made to one<br />
or more 1099-MISC, use Process Single.<br />
• To process a single 1099-MISC, select the contractor from the contractor list<br />
and click Process Single. An X in the 1099 column next to the contractor’s<br />
name and code indicates the contractor’s 1099 has been processed successfully<br />
NOTE<br />
There is an option to suppress 1099s with compensation less than<br />
$600.<br />
Editing 1099s<br />
To edit a 1099, complete the following:<br />
1. Go to Contractors > Process 1099 Misc.<br />
2. Select a contractor, vendor, or non-vendor from the list.<br />
3. Click View/Edit.<br />
4. Make necessary changes in the appropriate fields.<br />
5. Click Save then Exit.<br />
147
Portals - Processing Contractor Payments<br />
2011 Client Write-Up<br />
Printing 1099s and 1096s<br />
TIP<br />
Refer to “1099s and 1098s On the Fly” on page 175 if you wish to print<br />
1099s without using any of CWU’s payroll functions (live or ATF).<br />
The 1099s are formatted to print “2 Up.” This means information for two contractors<br />
prints on the same page, one above the other. If printing for a single contractor, there<br />
is a blank form where the second contractor's information would normally print.<br />
1. Go to Contractors > Process 1099 Misc.<br />
2. Select an option from the View/Print section:<br />
• View/Edit 1099s allows you to edit the information on the 1099 and 1096.<br />
Use this feature with caution. Click View/Edit to access the Edit 1099 dialog<br />
box. Click Save to save your edits.<br />
• Print All 1099s prints the 1099-MISC for every contractor listed with an X<br />
under the 1099 header to the left.<br />
• Print Single 1099 prints the 1099-MISC for a selected contractor.<br />
• Print 1096 prints the 1096. It can be printed only on red and white forms.<br />
3. Select the type of 1099-MISC copies to print from the Types section.<br />
4. Select to print Forms and Data (using plain paper) or Data Only on a pre-printed<br />
form.<br />
TIP<br />
The 1099-MISC IRS Copy A and 1096 must be printed on the red and<br />
white forms (data only). All other copies can be printed on plain paper<br />
using a laser printer (choose Form and Data) or on preprinted forms<br />
(choose Data Only). If Data Only is selected, the Adjust Form button<br />
is activated allowing adjustment of printing alignment. Refer to “Forms<br />
Alignment” on page 30 for more information.<br />
5. Click Print.<br />
Order the red and white forms from an office supply company or the IRS. Call (800)<br />
TAX FORMS. See “Uploading 1099s, 1096s, and 1098s” on page 190 to upload the<br />
1099/1096 information.<br />
Portals - Processing Contractor Payments<br />
Once a Portals contractor payment batch is downloaded (Synced), it can be processed.<br />
When Portals pay checks are processed, CWU:<br />
1. Creates pay records<br />
2. Lists live paychecks on the Print New Checks screen, and<br />
3. Automatically syncs the pay information back to the Portal so Employers have<br />
access to the final pay information.<br />
NOTE<br />
For a full explanation of using Portals, see “Appendix G - Portals” on<br />
page 321.<br />
148
2011 Client Write-Up Portals - Processing Contractor Payments<br />
To process Portals contractor payments, complete the following:<br />
1. Go to Contractors > Portals Payroll. The top part of this screen indicates there<br />
is a payment file to process.<br />
Figure 5-5: Process Portals Contractor Payroll<br />
2. If this payment file replaces one that has already been processed, select the<br />
Reprocess if check exists box. CWU will use the most recent payment record if a<br />
duplicate record is found.<br />
3. Click Check Process.<br />
4. Click Yes to verify the Payroll Period Ending Dates being processed. If more<br />
than five dates are being processed, you will receive a message stating “Processing<br />
multiple dates.”<br />
5. Click Yes to confirm that you wish to process payments for all contractors. A<br />
popup window displays the number of checks processed. Use this count to confirm<br />
that all records approved were processed.<br />
6. Click OK. Payment information uploads to Portals automatically.<br />
NOTE<br />
Adjustments to individual pay records made in CWU are not seen in<br />
Portals.<br />
7. To print live payment checks, click Print Checks. This is a shortcut to the<br />
Contractors > Print New Checks screen.<br />
8. Transmit Direct Deposit information as needed. See “Transmitting Contractor<br />
Direct Deposits” on page 143.<br />
9. Move payroll information to the journal. See “Payroll Journal Entry” on page 160.<br />
149
Portals - Processing Contractor Payments<br />
2011 Client Write-Up<br />
150
2011 Client Write-Up Adding Accounts to a Chart of Accounts<br />
6 Bookkeeping<br />
Client Write-Up’s bookkeeping program provides an accurate, up-to-date snapshot of<br />
the financial condition of the client’s business. This is accomplished by automating<br />
payroll and accounts payable posting to the general ledger. Numerous financial<br />
reports are available and this financial information can be exported directly into the<br />
<strong>Drake</strong> Tax software reducing the chance for data entry errors.<br />
NOTE<br />
See “Chart of Accounts (COA) Setup” on page 45 for information on<br />
how to set up a Chart of Accounts in CWU.<br />
Adding Accounts to a Chart of Accounts<br />
To add a new account to the Chart of Accounts, complete the following:<br />
1. Go to Bookkeeping > Chart of Accounts.<br />
2. Click Add. The Add/Edit/Delete Account dialog box opens. Enter account information.<br />
Figure 6-1: Add Account<br />
151
Adding Accounts to a Chart of Accounts<br />
2011 Client Write-Up<br />
• Account Number — The account number determines how the transaction is<br />
assigned. Press F2 from any Account Number field in CWU and a list of the<br />
“postable” (level 0) accounts is displayed.<br />
• Name — The reports generated by CWU use this name.<br />
• Type — Choose the correct account type from the drop list. This choice<br />
affects the calculation of transactions entered in the journal to generate financial<br />
reports. Always follow the GAAP.<br />
• Level — Accounts are either “postable” (level 0) or “account group level,”<br />
also known as “nested.” Postable accounts are used when entering transactions.<br />
Nested accounts are used for reporting purposes only.<br />
WARNING<br />
Use caution when changing the account level. Improper changes<br />
can cause inaccurate results in the Chart of Accounts.<br />
Level - Postable Account — Select this option for level 0 accounts. Only<br />
level 0 account information can be exported to the client's tax return in <strong>Drake</strong><br />
<strong>Software</strong>.<br />
Level - Account Group Level — Select this option if the account is a nested<br />
account, then use the list to assign the level (1-9).<br />
See “Understanding Account Levels” on page 154 for further explanation of<br />
account levels.<br />
• Current Balance (debit and credit entries) — This is required to properly set<br />
up the Chart of Accounts. Level 0 accounts are the only accounts for which a<br />
Current Balance can be entered. Enter an amount either in the Debit balance<br />
or the Credit balance fields - not both. The Debit and Credit fields can be<br />
edited during the creation of the COA. These fields are updated automatically<br />
when a Post Transactions process is performed.<br />
NOTE<br />
Current Balance fields become inactive and can not be edited once a<br />
transaction is entered into the journal for this account or a Post Transactions<br />
process is performed.<br />
• Yearly Budget — Enter the amount budgeted for the account. This information<br />
is available for financial management.<br />
• Cash Flow Classification — Designate in which section of a cash flow statement<br />
the account should appear (Operating, Investing, or Financing). Only<br />
accounts with one of these designations appear in a Cash Flow report.<br />
• Tax Form — Designate the tax form on which this field should appear. This<br />
information assists in exporting information to the client's tax return in <strong>Drake</strong><br />
<strong>Software</strong>. If a tax return for the client does not exist in <strong>Drake</strong>, information<br />
from Setup > Client Information is used to create the tax return in <strong>Drake</strong>. If<br />
a tax return for this client exists in <strong>Drake</strong>, the EIN/SSN is used as the identifier<br />
for the client file and the file is exported to the existing tax return. For<br />
more information about exporting to <strong>Drake</strong>, see “Export to <strong>Drake</strong> Tax” on<br />
page 295.<br />
• Tax Line — Specify the line in the Tax Form list appropriate for this<br />
account. Selecting an export form activates the Tax Line drop list.<br />
152
2011 Client Write-Up Adding Accounts to a Chart of Accounts<br />
• Tax Form Instance — Specify which instance of the tax form specified in<br />
the Tax Form field the account information should be exported. For instance,<br />
if the tax return has two Schedule Cs, specify to export to Schedule C “1” or<br />
“2”.<br />
• Setup Balances (optional) — Entering monthly account balances when first<br />
starting to use Client Write-Up and its bookkeeping features is a great way to<br />
ensure accurate reporting for all accounts. By entering Start of Year and<br />
monthly closing balances for each account, a start-of-year balance sheet will<br />
reflect the year-to-date data. You can also run monthly reports for months<br />
entered.<br />
Enter either a debit balance or a credit balance for each account.<br />
The Start of Year and January thru December fields are automatically<br />
updated when transactions are entered and the Post Transactions process is<br />
performed.<br />
IMPORTANT<br />
Use Setup Balances only if you are starting to use Client Write-<br />
Up in the middle of the year and want to bring forward individual<br />
monthly account balances from your existing accounting system.<br />
In order to take advantage of this feature, you must enter balances<br />
for each account and each month of this fiscal year through<br />
the last full month. For instance, if you are starting to use CWU in<br />
July, enter monthly balances for January through June. When this<br />
information is entered correctly, prior period and year-to-date<br />
reporting is available.<br />
Start of Year — Enter start of year balances from balance sheet accounts<br />
only. Double-click under Debit to enter a debit balance and under Credit to<br />
enter a credit balance. Income statement accounts are always zero at the start<br />
of the year and therefore do not require entries. If starting to use CWU in January,<br />
an entry should be made for the Current Balance but not for the Start<br />
of Year.<br />
January thru December — Enter the monthly account balance from January<br />
thru the last full month in the existing accounting system.<br />
For example, you start using Client Write-Up in February and the current balance<br />
of the checking account is $40,000. Assuming you started the year with<br />
$50,000 in the checking account, you would set the Start of Year balance to<br />
$50,000 and the January balance to -$10,000 to show that you spent $10,000<br />
in January and now have a current balance of $40,000. This should match the<br />
Debit balance amount of $40,000 you’ve entered in the Current Balance<br />
field.<br />
NOTE<br />
Setup Balances fields become inactive and can not be edited once a<br />
transaction is entered into the journal or the Post Transactions process<br />
is performed.<br />
153
Adding Accounts to a Chart of Accounts<br />
2011 Client Write-Up<br />
3. Click Save after the information for each account has been entered.<br />
NOTE<br />
CWU can be used as either a double-entry or single-entry bookkeeping<br />
system, or both. The balance must be 0.00 before saving the Chart of<br />
Accounts.<br />
An account can be added “on the fly” at anytime. See “Create an<br />
Account “On the Fly”” on page 156.<br />
The Current Balance of the Chart of Accounts is displayed at the lower right of<br />
the Chart of Accounts - Setup dialog box. When the COA is “in balance,” this<br />
displays 0.00.<br />
TIP<br />
Complete the Chart of Accounts before entering transactions in<br />
Bookkeeping > Enter Transactions.<br />
Understanding Account Levels<br />
Levels in the Chart of Accounts define both “postable” accounts and those that are<br />
created for reporting purposes only. Journal entries can be made only to postable, or<br />
Level 0 accounts. Only level 0 accounts are displayed when F2 is pressed from<br />
account fields throughout CWU.<br />
Levels 1 through 9 define how financial statements are subdivided into logical sections.<br />
They are used only for defining report sections. No transactions can be posted to<br />
these accounts. This allows a high degree of customization of financial statements and<br />
reporting.<br />
Levels are designed to be used in matched pairs. The first instance – the “starting<br />
instance” – provides the “Section Header.” The second instance – the “ending<br />
instance” – marks the end of the section and tells the program to total the section. The<br />
name of this account provides text for the “section total.” Level 0 accounts are<br />
assigned to the section based on their account number. Those with account numbers<br />
between the starting instance and ending instance accounts are tallied.<br />
Nesting<br />
Levels<br />
It is possible to “nest” levels. For instance, there can be a Level 2 subsection within a<br />
Level 1 section. Up to 9 levels can be nested.<br />
The following example shows how to set up nested sections.<br />
154
2011 Client Write-Up Adding Accounts to a Chart of Accounts<br />
.<br />
This example results in a section on the balance sheet that looks like this:<br />
COA<br />
Samples<br />
When creating a COA, the level selected enables you to generate a detailed breakdown<br />
of accounts later. Level 0 accounts are the only postable accounts. Use only<br />
level 0 accounts when entering transactions.<br />
In this example, multiple checking accounts are included in a total of checking<br />
accounts for reporting purposes.<br />
1. Set up a “Beginning Account” for your grouping of checking accounts. This is a<br />
level 1 Account. (Level 1-9 accounts are for reporting purposes only.)<br />
2. Set up each of your checking accounts: account number, account name, account<br />
type, and level 0. This enables entry of transactions for each checking account.<br />
3. Set up an ending account that will show the total of all checking accounts. Use<br />
level 1. (You must always have a beginning and ending level 1.)<br />
Use multiple levels within the 1-1 level to create a nesting of accounts. In the next<br />
example, the accounts associated with “Cash” include “Petty Cash,” “Checking,”<br />
“Savings,” etc.<br />
This example results in a section on the balance sheet that looks similar to this:<br />
155
Adding Accounts to a Chart of Accounts<br />
2011 Client Write-Up<br />
Cash<br />
Editing an Account<br />
100.05 Total Checking 500.00<br />
100.09 Total Savings 500.00<br />
Total Cash 1000.00<br />
To modify an existing account, go to Bookkeeping > Chart of Accounts. Either<br />
select the account and click Edit or double-click the account from the list. Edit the<br />
desired fields and click Save.<br />
NOTE<br />
All information in the Chart of Accounts can be changed until a transaction<br />
has been posted to that account. Once a transaction has been<br />
posted to an account, only the Account Number, Name, Budget, Tax<br />
Form, Tax Line, and Tax Form Instance fields can be edited.<br />
Deleting an Account<br />
An account in the COA can be deleted only if there has been no monetary transaction<br />
for the account. To delete an existing account:<br />
1. Go to Bookkeeping > Chart of Accounts.<br />
2. Either select the account and click Edit or double-click the account from the list.<br />
3. Click Delete. A message box is displayed, confirming the account should be<br />
deleted.<br />
4. Click Yes from the confirmation window to permanently delete the account. Click<br />
No to return to the Chart of Accounts Setup dialog box without deleting the<br />
account.<br />
IMPORTANT<br />
Accounts that have current activity cannot be deleted.<br />
Reset the Chart of Accounts<br />
Use the Reset button when setting up the Chart of Accounts and you wish to restart<br />
the COA setup from scratch. All account information is removed. This option is available<br />
only before entering transactions and performing a Post Transactions.<br />
Create an Account “On the Fly”<br />
Accounts can be added to the Chart of Accounts from any field in CWU that is calling<br />
for an account number (e.g. Employees > Account & Payroll Information > G/<br />
L Account Numbers).<br />
To create an account on the fly, complete the following steps:<br />
156
2011 Client Write-Up Entering Journal Transactions<br />
1. Place the cursor in any account field in CWU and press F2. You can also create<br />
accounts on the fly in account fields with a drop list by selecting New from the<br />
drop list (e.g. Bookkeeping > Enter Transactions).<br />
NOTE<br />
Nested accounts (levels 1-9) can be added only from<br />
Bookkeeping > Chart of Accounts. Accounts added from anywhere<br />
else in CWU are level 0 (postable) accounts.<br />
2. Double-click New.<br />
Figure 6-2: Create an Account “On the Fly”<br />
3. Enter the new account number and name. If you are adding an account that is similar<br />
to one that already exists, use an account number in the same numerical range.<br />
For instance, the expense accounts are in the 700 range, so you may want to use<br />
account #791 for a new cell phone account.<br />
4. Select the account type from the Type drop list (required).<br />
5. Enter the Current Balance information (required).<br />
6. Enter the Yearly Budget for the account (optional).<br />
7. Use the drop list to select the Tax Form and Tax Line information (optional).<br />
8. Enter the Start of Year and month-to-date information (optional).<br />
9. Click Save.<br />
Entering Journal Transactions<br />
There are two methods of bringing transactions into the general ledger: manual entry<br />
of transactions directly into the general ledger, and automatically bringing payroll<br />
information to the general ledger. Before any transactions can be entered, a Chart of<br />
Accounts must be set up. (See “Chart of Accounts (COA) Setup” on page 45).<br />
157
Entering Journal Transactions<br />
2011 Client Write-Up<br />
<strong>Manual</strong> Entry of Journal Transactions<br />
General ledger transactions are entered in the journal. CWU uses the double-entry system<br />
of bookkeeping.<br />
To enter journal transactions:<br />
1. Go to Bookkeeping > Enter Transactions.<br />
Figure 6-3: Enter Transactions<br />
2. Select the journal to use for this transaction from the Journal drop list.<br />
Table 6-1: Journals<br />
GJ<br />
CD<br />
CR<br />
PAY<br />
BUD<br />
General Journal<br />
Cash Disbursements<br />
Cash Receipts<br />
Payroll<br />
Budget<br />
NOTE<br />
Client Write-Up keeps ten years of Chart of Accounts history starting<br />
with 2008 data or the year you started using CWU (whichever is later).<br />
This means that when a correcting entry is made to the journal for a<br />
prior year, all balances are updated automatically from that point forward.<br />
Reports reflect the updated balances.<br />
3. Complete all necessary fields for the transaction.<br />
• Date (Required) — The date of the transaction defaults to today’s date.<br />
Change the date of the transaction using the MMDDYYYY or the MM/DD/<br />
YYYY format. You can also use the plus (+) and minus (-) keys on your keyboard’s<br />
numeric keypad to move the date forward and backward. The date<br />
entered is used until it is changed or until the Enter Transactions dialog box<br />
is exited. After exiting Enter Transactions, the date returns to today’s date<br />
when the dialog box is next opened.<br />
• Account (Required) — Enter the account number, the account name, or use<br />
the drop list to select the appropriate account for this transaction. The drop list<br />
displays only 0 level accounts. Enter only zero level accounts. The account<br />
type displays above the account selected. Select New from the list to create an<br />
158
2011 Client Write-Up Entering Journal Transactions<br />
account on the fly. (See “Create an Account “On the Fly”” on page 156). The<br />
transaction posts to the account selected.<br />
NOTE<br />
When you click Save, CWU verifies that the account entered is a valid<br />
account. If it is not valid, you are given the opportunity to either add the<br />
account on the fly (see “Create an Account “On the Fly”” on page 156)<br />
or enter a different account number to be used for this transaction.<br />
• Debit — If this transaction is a debit, enter the amount.<br />
• Credit — If this transaction is a credit, enter the amount.<br />
WARNING<br />
You must enter an amount in either the Debit or Credit fields. Do<br />
not enter an amount in both fields for one transaction.<br />
• Description (Optional) — Enter the description needed for this transaction. If<br />
you have previously entered descriptions, CWU attempts to fill the field with<br />
one of these descriptions as each character is typed. When the desired entry is<br />
displayed, press ENTER or TAB, or use the mouse to advance to the next data<br />
entry field.<br />
• Reference (Optional) — Enter information associated with this transaction,<br />
such as check number, invoice number, etc.<br />
• AP Vendors/Employees/Contractors/AR Customers (Optional) — To<br />
associate this transaction with a particular AP vendor, employee, contractor,<br />
or AR customer, select the option button beside the appropriate category.<br />
Use the drop list to the right of these categories to select the appropriate AP<br />
vendor, employee, contractor, or AR customer code.<br />
– AP Vendors — When the AP Vendors option button is selected, vendors<br />
entered in Payables > Vendor Setup display from the drop list. Select<br />
the vendor associated with this transaction.<br />
– Employees — When the Employees option button is selected, employees<br />
entered in Employees > Employee Setup display from the drop list.<br />
Select the employee associated with this transaction.<br />
– Contractors — When the Contractors option button is selected, contractors<br />
entered in Contractors > Contractor Setup display from the drop<br />
list. Select the contractor associated with this transaction.<br />
– AR Customers — When the AR Customers option button is selected,<br />
accounts receivable customers entered in<br />
Receivables > Customer Setup display from the drop list. Select the customer<br />
associated with this transaction.<br />
• Division (Optional) — Select the division associated with this transaction.<br />
The drop list displays the list of divisions created in<br />
Setup > Headers & Footnotes.<br />
4. Verify the information and click Save.<br />
Balance (Debit, Credit, or Zero) — This shows the current balance (Debits - Credits)<br />
for journal entries. This balance must be 0.00 in order to post transactions. Post<br />
monthly to facilitate reconciliation.<br />
159
Entering Journal Transactions<br />
2011 Client Write-Up<br />
When a journal transaction is saved, the information for the transaction is moved to<br />
the lower portion of the dialog box. To facilitate recording of the offsetting entry, the<br />
Date, Description, Reference number, and Division remain and the full amount of<br />
the offsetting debit or credit entry remain in the upper portion of the dialog box. To<br />
keep the journal in balance, enter the offsetting Account number and the Description<br />
(if desired), verify the amount, and click Save.<br />
NOTES<br />
If you do not want the Date, Description, Reference, Division, and<br />
the offsetting debit or credit amount filled automatically, go to<br />
Bookkeeping > Enter Transactions, click the Journal Options button,<br />
and verify Prefill Adjusting Entry Amounts Automatically is not<br />
selected.<br />
To automatically increment the Reference number, go to<br />
Bookkeeping > Enter Transactions, click the Journal Options button,<br />
select Auto Increment Reference Number. This option must be<br />
selected prior to entering transactions.<br />
Editing/Deleting a Journal Entry<br />
ATF Payroll Journal Entry<br />
Payroll Journal Entry<br />
To edit or delete a journal entry, complete the following:<br />
1. Go to Bookkeeping > Enter Transactions.<br />
2. Double-click a journal transaction listed on the bottom half of the dialog box. The<br />
information for that transaction fills the fields in the upper portion of the dialog<br />
box.<br />
3. Make the changes as needed.<br />
4. Click Save. Click Delete to remove the line entry. The balancing transaction must<br />
also be manually deleted.<br />
To add an ATF payroll entry to the journal “on the fly,” complete the following:<br />
1. Go to Bookkeeping > Enter Transactions, and click the ATF Payroll button.<br />
2. When the Select ATF Payroll window is opened, enter 1 for an ATF employee<br />
payroll entry or 2 for an ATF contractor payroll entry and click OK.<br />
3. Enter the ATF payroll information.<br />
4. Click Save, then Exit.<br />
Use Payroll Journal Entry to transfer the payroll information to the journal without<br />
having to manually enter each transaction.<br />
IMPORTANT<br />
All setup fields associated with payroll (deductions/benefits, cash/<br />
expense accounts, withholdings, etc.) need the correct account<br />
numbers assigned before the first check is written.<br />
160
2011 Client Write-Up Entering Journal Transactions<br />
If you neglected to enter the cash and expense account numbers when setting up payroll<br />
and have entered payroll information, you can go back to the payroll setup, enter<br />
the account numbers, then return to Bookkeeping > Enter Transactions and process<br />
the payroll information to the journal. For employees, accounts specified on the<br />
Employees > Account & Payroll Information, G/L Account Numbers tab are<br />
used. For contractors, accounts from either the Contractors > Account & Payroll<br />
Information, Cumulative G/L Account Numbers tab or the Contractors ><br />
Account & Payroll Information, Detailed G/L Account Numbers tab are used.<br />
NOTE<br />
Once payroll transactions have been processed to the journal without<br />
account numbers, the transactions cannot be edited to add account<br />
numbers.<br />
Once all necessary setup information is correctly entered:<br />
1. Create the payroll check, employees and contractors, live or ATF.<br />
2. Print the live payroll check. (See “Printing Employee Pay Checks” on page 101<br />
and “Printing Contractor Pay Checks” on page 137.)<br />
3. Go to Bookkeeping > Enter Transactions, and click the Payroll Journal button.<br />
Figure 6-4: Payroll Journal Entry<br />
4. Enter start/end dates or leave blank to process all checks.<br />
5. Click Per Check Entries to create separate journal entries for each payroll transaction<br />
or Cumulative Entry to create one cumulative journal entry for each payroll<br />
account.<br />
IMPORTANT<br />
To display check numbers for individual payroll entries when performing<br />
a bank reconciliation you must select Per Check Entries.<br />
If a journal entry that was entered using the Payroll Journal function is deleted, reenter<br />
the information directly into the journal. CWU allows the transfer of check<br />
information only once.<br />
TIP<br />
Journal entries can be sorted by clicking the field headers at the top of<br />
the journal entry list.<br />
161
Journal Options<br />
2011 Client Write-Up<br />
Journal Options<br />
For example, you find an error in hours on a payroll check. Delete that check and print<br />
a corrected check. Delete that transaction from the journal and add the new transaction.<br />
Use journal options to tailor your interaction with CWU when making manual entries<br />
to the journal. To access journal options, Bookkeeping > Enter Transactions, and<br />
click the Journal Options button.. Click Save when all Journal Options selections<br />
have been made.<br />
Insert Debit/Credit Decimal Automatically<br />
This option automatically inserts a decimal two digits from the right (creating cents)<br />
entered in the debit and credit fields. For instance, enter 15025 and when you tab out<br />
of the field, the entry becomes 150.25. Enter 100 and the entry becomes 1.00.<br />
To enable this option, go to Bookkeeping > Enter Transactions and click the Journal<br />
Options button. Select Insert Debit/Credit Decimal Automatically.<br />
Prefill Adjusting Entry Amounts Automatically<br />
CWU automatically fills the Date, Description, Reference, Division, and the debit or<br />
credit amount for offsetting manual journal entries.<br />
To disable this option, go to Bookkeeping > Enter Transactions and click the Journal<br />
Options button. Verify Prefill Adjusting Entry Amounts Automatically is not<br />
selected.<br />
Auto Increment Reference Number<br />
To automatically increment the Reference number of manual journal entries, go to<br />
Bookkeeping > Enter Transactions and click the Journal Options button. Select<br />
Auto Increment Reference Number. This option must be selected prior to entering<br />
transactions.<br />
Disable AP, Employees, Contractors and AR Selections<br />
Disable Division Selection<br />
To hide the AP Vendors/Employees/Contractors/AR Customers options, go to<br />
Bookkeeping > Enter Transactions and click the Journal Options button. Select<br />
Disable AP, Employees, Contractors and AR Selections. The tab order for entering<br />
journal transactions is adjusted passing over these selections.<br />
To hide the Division selection field, go to Bookkeeping > Enter Transactions and<br />
click the Journal Options button. Select Disable Division Selection. The tab order<br />
for entering journal transactions is adjusted passing over this selection.<br />
162
2011 Client Write-Up Editing Stored Descriptions<br />
NOTE<br />
When both the Disable AP, Employees, Contractors and AR Selections<br />
and the Disable Division Selection options are selected, press<br />
Tab or Enter from the Reference field to go to the Save button.<br />
Disable Payroll Journal and ATF Payroll<br />
To hide the Payroll Journal and ATF Payroll buttons, go to<br />
Bookkeeping > Enter Transactions and click the Journal Options button. Select<br />
Disable Payroll Journal and ATF Payroll. Use this option if payroll services are not<br />
being provided to the client or one of the Auto Post options has been selected on the<br />
Employees > Account & Payroll Information, Payroll Options tab.<br />
Editing Stored Descriptions<br />
To edit a transaction description:<br />
1. Go to Bookkeeping > Edit Stored Descriptions.<br />
NOTE<br />
Click Sort Ascending or Sort Descending to re-sort the list. You can<br />
manually sort the description list by dragging an item up or down into<br />
the desired position in the list.<br />
2. Select the description to edit from the Stored Descriptions list by either selecting<br />
the description and clicking Edit or by double-clicking the description.<br />
3. Edit the description as needed from the Selected Entry field.<br />
4. Click Save.<br />
NOTE<br />
Click Save Changes to permanently save changes made in Edit<br />
Stored Descriptions. Click Exit Without Saving if you do not wish to<br />
save your changes.<br />
Remove Transaction Descriptions<br />
To delete a description, select an entry in the Stored Descriptions list and click<br />
Remove. Click Save Changes to permanently remove the description.<br />
Add Transaction Descriptions<br />
Descriptions can be added to the list of stored descriptions by either saving journal<br />
transactions with descriptions associated with them or by manually adding descriptions.<br />
To manually add a description:<br />
1. Go to Bookkeeping > Edit Stored Descriptions.<br />
2. Type the new description in the Add Entry field.<br />
3. Click Add.<br />
4. Click Save Changes to permanently add the description.<br />
163
Bank Reconciliation<br />
2011 Client Write-Up<br />
Bank Reconciliation<br />
This option checks accounts against the bank balances for those accounts.<br />
1. Go to Bookkeeping > Bank Reconciliation. The Bank Reconciliation dialog<br />
box opens.<br />
Figure 6-5: Bank Reconciliation<br />
2. In the Cash Account field, select an account from the drop list. Only postable<br />
Current Asset accounts from the Chart of Accounts are listed.<br />
3. In the Cutoff Date field, enter the last date to be included in the bank reconciliation<br />
using the MMDDYYYY format.<br />
4. Enter the Starting Balance. The Starting Balance is the previous month’s Ending<br />
Balance.<br />
5. Enter the Ending Balance shown on the bank statement.<br />
IMPORTANT<br />
Whenever possible, enter the Ending Balance as shown on the<br />
bank statement. This will help ensure a correct bank reconciliation.<br />
6. Select to display a traditional Bank Reconciliation report showing only the<br />
cleared transactions or a Comparative Bank Reconciliation report showing both<br />
cleared and non-cleared transactions.<br />
7. Click Load Trans. All unreconciled transactions for the selected account through<br />
the Cutoff Date display. Sort the transactions listed by clicking on the column<br />
headers.<br />
164
2011 Client Write-Up Posting Transactions<br />
8. To begin reconciling the account, select the box to the left of transactions that<br />
appear on the bank statement.<br />
9. If necessary, click Journal Entry to add transactions. Use manual journal entries<br />
to enter bank initiated items, such as interest and penalties or to make any other<br />
corrections. For instance, a check appears on the bank statement but is not displayed<br />
on the Bank Reconciliation screen. See “Entering Journal Transactions”<br />
on page 157 for details on making manual journal entries. Remember that all manual<br />
entries to the journal must have an offsetting entry. To be included in this reconciliation,<br />
the transaction date must be not later than the Cutoff Date.<br />
10.Once the reconciliation process is complete, click Finish. A reconciliation report<br />
opens that can be saved or printed. You must Finish reconciling an account before<br />
you begin a new reconciliation of that same account.<br />
Reconciled Transaction — A transaction that has cleared the bank. Indicate a<br />
cleared transaction by selecting the box to the left of the transaction.<br />
UnReconciled Transaction — A transaction that has not cleared the bank. Do<br />
not select the box to the left of transactions that have not cleared the bank.<br />
Adjusted Bank Balance equals the Starting Balance plus the Reconciled<br />
Transactions (debits - credits).<br />
Closing Book Balance is the same as the Ending Balance.<br />
Accumulated Unreconciled Balance equals the UnReconciled Transactions<br />
(debits - credits).<br />
Calculated Unreconciled Balance equals the Ending Balance minus the<br />
Adjusted Bank Balance (Starting Balance plus the Reconciled Transactions).<br />
NOTES<br />
If the Accumulated Unreconciled Balance does not equal the Calculated<br />
Unreconciled Balance, something is either missing or incorrectly<br />
entered. Look for a missing or incorrect Starting Balance or Ending<br />
Balance. Also look for bank transactions (fees, interest, etc) that have<br />
not been entered into CWU.<br />
Posting Transactions<br />
Once a bank reconciliation using a given Account and Cutoff Date has<br />
been finished, that same Account and Cutoff Date combination cannot<br />
be reconciled again.<br />
The posting process posts the current transactions to the Chart of Accounts. Before<br />
running this process, be sure that:<br />
• Transactions are in balance.<br />
• All transactions have valid account numbers.<br />
165
Posting Transactions<br />
2011 Client Write-Up<br />
To post transactions to the GL:<br />
1. Go to Bookkeeping > Post Transactions.<br />
Figure 6-6: Post Transactions<br />
2. Click Post. The Select Reporting Date dialog box displays.<br />
Figure 6-7: Select Reporting Date<br />
3. Select the date to appear on the Interim Reports by either selecting the month or<br />
using the drop arrow next to the date field. Selecting a month automatically sets<br />
the report date to the last day of the month selected.<br />
NOTE<br />
All transactions in the Bookkeeping > Enter Transactions screen post<br />
to the GL regardless of the reporting date selected.<br />
4. Click OK.<br />
5. Click Yes.<br />
Client Write-Up:<br />
• Backs up the active client’s files.<br />
• Generates interim reports.<br />
• Posts transactions to the General Ledger for the current accounting period.<br />
6. The Interim Reports display on your computer screen. Use these reports to check<br />
for accuracy. Reports can be printed by clicking the Printer icon.<br />
7. If the information on the Interim Reports is correct, click Yes to continue with the<br />
post.<br />
166
2011 Client Write-Up Year End Close<br />
IMPORTANT<br />
The Post Transactions process must be run prior to running the<br />
Year End Close. Some reports require that transactions be<br />
posted prior to running the report. Refer to each report’s description<br />
for posting requirements.<br />
Year End Close<br />
NOTE<br />
See “End of Year Process” on page 308 for an overview of this process.<br />
The Year End Close process zeros out all income, cost of goods sold, and expense<br />
accounts and posts net income to the retained earnings account. Run the Year End<br />
Close after the final period of the year has been posted. Include all adjustments in the<br />
final period as CWU does not offer a 13th adjustment period.<br />
NOTES<br />
You must perform the Post Transactions process<br />
(Bookkeeping > Post Transactions), print all Forms W-2, W-3, 1099,<br />
and 1096, and export to the <strong>Drake</strong> Tax software program prior to performing<br />
the Year End Close. The information required for the export is<br />
not available after closing the year. See “Export to <strong>Drake</strong> Tax” on<br />
page 295.<br />
The Year End Close must be performed in order to bring the Chart of<br />
Accounts into the following year’s Client Write-Up program.<br />
To post the year-end close to the GL:<br />
1. Go to Bookkeeping > Year End Close.<br />
Figure 6-8: Year End Close<br />
2. Enter the year to close.<br />
3. Click OK.<br />
167
Special Considerations for Fiscal Year Clients<br />
2011 Client Write-Up<br />
Client Write-Up:<br />
• Backs up the current year files.<br />
• Prepares the files for the new year.<br />
NOTE<br />
All accounts above the designated retained earnings account are<br />
zeroed out and the net income posts to the retained earnings account.<br />
Special Considerations for Fiscal Year Clients<br />
Using CWU for a client that is on a fiscal accounting year is very similar to the way<br />
you use CWU for a client on a calendar year, except when it comes to closing out the<br />
year.<br />
To identify a client as a fiscal year client in CWU, go to Setup > Client Information<br />
and on the Business Information tab, set the Start of Year Date to something other<br />
than January 1.<br />
The following scenario is used to explain using a fiscal year client in CWU:<br />
• The client’s fiscal accounting year is from August 1, 2011 to July 31, 2012.<br />
Use the appropriate dates for your client’s fiscal year.<br />
• You process AP, AR, and payroll for this client and are keeping their books (a<br />
Chart of Accounts is set up in CWU for this client).<br />
In CWU2011<br />
1. Enter transactions for August 1, 2011 thru December 31, 2011.<br />
2. On January 1, 2012 (or as soon after January 1 as you can), post payroll to the<br />
journal (go to Bookkeeping > Enter Transactions, and click the Payroll Journal<br />
button).<br />
3. Next, post transactions to the GL. Go to Bookkeeping > Post Transactions.<br />
4. DO NOT CLOSE THE YEAR IN CWU2011 AT THIS TIME.<br />
5. DO NOT WORK IN THIS CLIENT IN CWU2011 AGAIN.<br />
In CWU2012<br />
1. After installing CWU2012, bring the client forward from CWU2011 to<br />
CWU2012. In CWU2012, go to Tools > Update Prior Year Clients.<br />
2. Make that client the active client (File > Open Client) and open their Chart of<br />
Accounts (go to Bookkeeping > Chart of Accounts).<br />
You must answer YES to the question, “Do you want to update the bookkeeping<br />
for this client?” This completes the process of bringing account balance<br />
information and payroll transaction information forward into CWU2012 for<br />
this client.<br />
3. Continue using CWU2012 for this client’s accounting work<br />
168
2011 Client Write-Up Special Considerations for Fiscal Year Clients<br />
4. At the end of their fiscal year (July 31, 2012), close the client’s fiscal year in<br />
CWU2012:<br />
• Post payroll to the journal (go to Bookkeeping > Enter Transactions, and<br />
click the Payroll Journal button)<br />
• Post all transactions to the GL (Bookkeeping > Post Transactions)<br />
• Close the year (go to Bookkeeping > Year End Close). Enter 2011 as the<br />
year to close.<br />
5. Continue entering transactions in CWU2012 for fiscal year 2012 – 2013.<br />
169
Special Considerations for Fiscal Year Clients<br />
2011 Client Write-Up<br />
170
2011 Client Write-Up Update Prior Year On the Fly<br />
7 On the Fly Forms<br />
Create, save, process, print, and electronically file Forms W-2, 1099 (MISC, DIV,<br />
INT, R, PATR, S, A, B, and C), 1098-MORT, and 94X series tax returns “on the fly”,<br />
eliminating the complete employee and contractor setup.<br />
Update Prior Year On the Fly<br />
Use this feature to bring forward all client setup, employee, and contractor information<br />
that was entered "on the fly" in last year’s Client Write-Up program.<br />
IMPORTANT<br />
The client must exist in the current program before bringing the<br />
“on the fly” information forward. If the client does not exist in the<br />
current Client Write-Up program, go to Tools > Update Prior<br />
Year Clients to bring the client forward into this year’s program.<br />
See “Update Prior Year Clients” for information on bringing the<br />
client forward.<br />
Close all other instances of Client Write-Up before updating prior<br />
year clients. Only the current year Client Write-Up program<br />
should be running.<br />
To update "on the fly" Client Write-Up clients from last year’s Client Write-Up program,<br />
complete the following steps:<br />
1. Go to On the Fly Forms > Update Prior Year On the Fly.<br />
Figure 7-1: Update Prior Year On the Fly Clients<br />
171
W-2 On the Fly 2011 Client Write-Up<br />
W-2 On the Fly<br />
2. Select the location of the client files to convert to the 2011 program by clicking<br />
the location. If the proper location is not displayed, click the browse icon ( )<br />
and navigate to the correct location.<br />
3. The client files entered "on the fly" in the selected location are displayed at the<br />
bottom of the dialog box. Select individual client files by clicking the box in the<br />
Client Code column, or click Select All to convert all clients in this location.<br />
4. On the right side of the window, select the forms to bring into the current program<br />
or select All to bring all forms for the selected clients forward.<br />
5. Click Update.<br />
This feature enables you to create, process, and print W-2s and W-3s for clients who<br />
keep their own books. Once processed, use CWU to upload these forms to the Social<br />
Security Administration.<br />
W-2 On the Fly Preparation<br />
Before entering W-2 information "on the fly", you must change to the appropriate client.<br />
Open or create the appropriate business (client) employing this employee by<br />
either:<br />
• Going to the Client Write-Up Home window, click and change to the<br />
appropriate client, or<br />
• Creating a new client by going to File > New Client and complete the<br />
Contact Information (see “Contact Information” on page 32) and W-2/W-3-<br />
1099/1098 Setup (see “W-2/W-3-1099 MISC. Setup” on page 34) tabs.<br />
IMPORTANT<br />
Creating W-2s "on the fly" under the wrong client results in an<br />
incorrect W-3 for that client.<br />
If the client was entered into last year’s Client Write-Up program<br />
as an "On the Fly" client, you can bring that client’s information<br />
into the current year CWU program. See “Update Prior Year On<br />
the Fly” on page 171 for more information.<br />
Step 1 - Creating W-2s On the Fly<br />
To enter W-2 information "on the fly", complete the following steps:<br />
1. Go to On the Fly Forms > W2s On the Fly.<br />
2. Double-click an employee name to update prior year information or, for new<br />
employees, enter a code in the Employee Code field and click New. Employee<br />
codes are alphanumeric and can be up to 20 characters long.<br />
172
2011 Client Write-Up W-2 On the Fly<br />
3. Complete the W2s On the Fly form. For more detail on completing this form, go<br />
to www.irs.gov.<br />
NOTE<br />
Do not use dashes (-) or slashes (/) when entering phone numbers, ZIP<br />
codes, or ID numbers. These fields are formatted after information is<br />
entered.<br />
4. Once all information has been entered and verified, click either:<br />
Save — To save the W-2 information.<br />
Delete — To delete a previously entered "on the fly" W-2, double-click the "on the<br />
fly" W-2 to delete from the Name and Employee Code list. Click Delete.<br />
Reset — To clear the information entered without saving.<br />
Process W2s — To display the End of Year W-2 On the Fly window.<br />
Void — To mark the W-2 as voided when printed or e-filed.<br />
Corrected — Select this box when editing a previously issued "on the fly" W-2. Also<br />
use this selection to correct an "on the fly" W-2 that has been transmitted.<br />
Step 2 - Processing W-2s On the Fly<br />
Process W2s On the Fly to print W-2s and W-3s created "on the fly" and to transmit<br />
that information to the Social Security Administration.<br />
After creating, verifying, and saving W-2s created “on the fly”:<br />
1. From the CWU Home window, go to On the Fly Forms > W2s On the Fly<br />
2. Click the Process W2s button on the Create W2s on the Fly dialog box. See “W-<br />
2 Processing” on page 116 for instructions on processing W-2s created "on the<br />
fly".<br />
NOTE<br />
W-2s created "on the fly" do not appear in the Process W2s dialog box<br />
and are only processed from Process W2s On the Fly.<br />
3. Process W-2s either individually or for all employees at once.<br />
• Click Process All to process all W-2s at once.<br />
• To process a W-2 for one employee, select the employee from the employee<br />
list and click Process Single. An X in the W2 column next to the employee’s<br />
name and code indicates the employee’s W-2 has been processed successfully.<br />
NOTE<br />
Once W-2s created "on the fly" are processed, they can be transmitted<br />
with the W-3 to the Social Security Administration like any other W-2.<br />
See “Uploading W-2s and W-3s” on page 186.<br />
173
W-2 On the Fly 2011 Client Write-Up<br />
Editing an On the Fly W-2/W-3<br />
To edit a W-2 created "on the fly", complete the following steps:<br />
1. From the CWU Home window, go to On the Fly Forms > W2s On the Fly<br />
2. Click the Process W2s button on the W2s on the Fly dialog box.<br />
3. Select an employee from the list. It is not necessary to select an employee to view<br />
or edit the W-3.<br />
4. Select the View/Edit W2s or the View/Edit W3 option button.<br />
IMPORTANT<br />
Edit the W-3 after all W-2s have been edited and reprocessed.<br />
Once the W-3 has been edited, do not reprocess W-2s. Reprocessing<br />
W-2s removes saved edits to the W-3.<br />
5. Click View/Edit.<br />
6. Make necessary changes directly in the appropriate fields.<br />
7. Click Save.<br />
8. Click Exit when editing is complete. The End of Year W2 On the Fly window<br />
displays and the X in the W2 column next to the employee’s name and code is<br />
removed for the edited W-2s.<br />
IMPORTANT<br />
On the Fly W-2s that have been edited and saved must be reprocessed.<br />
See “Step 2 - Processing W-2s On the Fly” on page 173.<br />
Printing On the Fly W-2s and W-3s<br />
W-2s print “2 Up” by default, one above the other. This means information for two<br />
employees prints on the same page. If printing a single W-2, there will be a blank form<br />
where the second employee's information would normally print. CWU can also print<br />
W-2s in either a “4-Up” or “4-Down” format. See “W-2/W-3-1099 MISC. Setup” on<br />
page 34 to make these selections.<br />
1. From the CWU Home window, go to On the Fly Forms > W2s On the Fly<br />
2. Click the Process W2s button on the W2s on the Fly dialog box.<br />
3. Select a print option from the View/Print section:<br />
• Print All W2s prints the W-2 for every employee listed with an X under the<br />
W-2 header to the left.<br />
• Print Single W2 prints the W-2 for a single selected employee.<br />
• Print W3 prints the W-3 using either the Forms and Data or Data Only<br />
options.<br />
4. Select the type of W-2 copies to print from the Types section:<br />
• SSA - Copy A— This option prints a copy of the W-2 for the Social Security<br />
Administration. For copy A, print Data Only on the SSA red form or print<br />
Form and Data on plain paper (this is approved by the IRS).<br />
174
2011 Client Write-Up 1099s and 1098s On the Fly<br />
• Other Copies — This option is used to print W-2s for the employer,<br />
employee, and state DOR. Select to print Forms and Data on blank paper or<br />
Data Only on approved forms.<br />
NOTE<br />
All W-2s and W-3s can be printed on plain paper using a laser printer<br />
and either the Forms and Data or Data Only options. It is not required<br />
to print the W-2 Copy A or the W-3 on the red line form. If Data Only is<br />
selected, the Adjust Form button is activated allowing adjustment of<br />
printing alignment. Refer to “Forms Alignment” on page 27 for more<br />
information.<br />
5. Click Print to print W-2s or W-3s.<br />
6. Click Exit when W-2 processing is complete.<br />
1099s and 1098s On the Fly<br />
This feature enables you to create, process, and print 1099s, 1098s, and 1096s for clients<br />
that keep their own books. Once processed, use CWU to print these forms or<br />
upload them forms to the IRS.<br />
Use Client Write-Up to produce the following forms "on the fly":<br />
Table 7-1: 1099s, 1098s, and W-2Gs On the Fly<br />
Form<br />
Title<br />
1096 Annual Summary and Transmittal of U.S. Information Returns<br />
1099-A Acquisition or Abandonment of Secured Property<br />
1099-B Proceeds From Broker and Barter Exchange Transactions<br />
1099-C Cancellation of Debt<br />
1099-DIV<br />
1099-INT<br />
1099-MISC<br />
1099-PATR<br />
Dividends and Distributions<br />
Interest Income<br />
Miscellaneous Income<br />
Taxable Distributions Received From Cooperatives<br />
1099-R Distributions from Pensions, Annuities, Retirement or Profit-<br />
Sharing Plans, IRAs, Insurance Contracts, etc.<br />
1099-S Proceeds from Real Estate Transactions<br />
1098-MORT<br />
W-2G<br />
Mortgage Interest Statement<br />
Certain Gambling Winnings<br />
1099 On the Fly Preparation<br />
Before entering 1099 information “on the fly”, you must change to the appropriate client.<br />
Open or create the appropriate business (client) that is issuing the 1099 by either:<br />
175
1099s and 1098s On the Fly<br />
2011 Client Write-Up<br />
• Going to the Client Write-Up Home window, click and change to the<br />
appropriate client, or<br />
• Creating a new client by going to File > New Client and complete the<br />
Contact Information (see “Contact Information” on page 32) and W-2/W-3-<br />
1099/1098 Setup tabs (see “W-2/W-3-1099 MISC. Setup” on page 34).<br />
IMPORTANT<br />
Creating 1099s "on the fly" under the wrong client results in an<br />
incorrect 1096 for that client.<br />
If the client was entered into last year’s Client Write-Up program<br />
as an "on the fly" client, you can bring that client’s information into<br />
the current year CWU program. See “Update Prior Year On the<br />
Fly” on page 171 for more information.<br />
Step 1 - Creating 1099s and 1098s On the Fly<br />
To enter 1099 and 1098 information “on the fly”, complete the following steps:<br />
1. Go to On the Fly Forms > 1099s, 1098 and W2G on the Fly and select the<br />
appropriate form.<br />
2. Double-click a contractor name to update prior year information or, for new contractors,<br />
enter a code in the Contractor Code field and click New. Contractor<br />
codes are alphanumeric and can be up to 20 characters long.<br />
3. Complete the screen. For more detail on completing the form, go to www.irs.gov<br />
and search for the form. Refer to IRS Pub 1220 for any information not included<br />
in the IRS form instructions.<br />
NOTES<br />
The term “Name Code” in Client Write-Up is equivalent to what the IRS<br />
refers to as the “Name Control”.<br />
Do not use dashes (-) or slashes (/) when entering phone numbers, ZIP<br />
codes, or ID numbers. These fields are formatted after information is<br />
entered.<br />
4. Once all information has been entered and verified, click either:<br />
Save — To save the form information.<br />
Delete — To delete a previously entered "on the fly" version of the form, double-click<br />
the "on the fly" form to delete from the list at the top left of the window. Click Delete.<br />
Reset — To clear the information entered without saving.<br />
Void — To mark the form as voided when printed or e-filed.<br />
Corrected — Select this box when editing a previously issued "on the fly" form. Also<br />
use this selection to correct an "on the fly" form that has been transmitted.<br />
176
2011 Client Write-Up 1099s and 1098s On the Fly<br />
Step 2 - Processing 1099s and 1098s On the Fly<br />
Process 1099s and 1098s "on the fly" to print 1099s, 1098s, W-2Gs, and 1096s created<br />
"on the fly" and to transmit that information to the IRS.<br />
After creating, verifying, and saving these forms created “on the fly”:<br />
1. From the CWU Home window, go to On the Fly Forms ><br />
1099s, 1098 and W2G on the Fly and select the appropriate form.<br />
2. Click the Process 1099 button. This button is labeled Process 1098 on the 1098<br />
Mortgage Interest On the Fly window and Process W2G on the W2G On the<br />
Fly window. See “1099/1096/1098 Processing” on page 146 for instructions on<br />
processing 1099s created "on the fly".<br />
NOTES<br />
1099s created "on the fly" do not appear on the Process 1099 Misc.<br />
dialog box and can be processed only from the End of Year On the<br />
Fly window.<br />
Once 1099s created “on the fly” are processed, they can be transmitted<br />
with the 1096 to the IRS like any other 1099. See “Uploading 1099s,<br />
1096s, and 1098s” on page 190.<br />
3. Process 1099 forms either individually or for all contractors at once.<br />
• Click Process All to process all 1099-MISC forms at once. This overwrites<br />
any changes made to existing 1099-MISC forms. If changes were made to one<br />
or more 1099-MISC, use Process Single.<br />
• To process a 1099-MISC for one contractor, select the contractor from the<br />
contractor list and click Process Single. An X in the 1099 column next to the<br />
contractor’s name and code indicates the contractor’s 1099 has been processed<br />
successfully<br />
NOTES<br />
There is an option to suppress 1099s with compensation less than<br />
$600.<br />
Once 1099s created "on the fly" are processed, they can be transmitted<br />
with the 1096 to the Social Security Administration like any other 1099.<br />
See “Uploading 1099s, 1096s, and 1098s” on page 190.<br />
Editing 1099s On the Fly<br />
To edit a 1099 created “on the fly”, complete the following:<br />
1. From the CWU Home window, go to On the Fly Forms ><br />
1099s, 1098 and W2G on the Fly and select the appropriate form.<br />
2. Click the Process 1099 button.<br />
3. Select a contractor from the list.<br />
4. Select the View/Edit 1099s option button.<br />
5. Click View/Edit.<br />
6. Make necessary changes in the appropriate fields.<br />
177
94X Series Tax Returns On the Fly<br />
2011 Client Write-Up<br />
7. Click Save.<br />
8. Click Exit.when editing is complete. The End of Year 1099 On the Fly window<br />
displays and the X in the 1099 column next to the contractor’s name and code is<br />
removed for the edited 1099.<br />
IMPORTANT<br />
On the Fly 1099s that have been edited and saved must be reprocessed.<br />
See “Step 2 - Processing 1099s and 1098s On the Fly”<br />
on page 177.<br />
Printing 1099s and 1096s<br />
The 1099s are formatted to print “2 Up.” This means information for two contractors<br />
prints on the same page, one above the other. If printing for a single contractor, there is<br />
a blank form where the second contractor's information would normally print.<br />
1. From the CWU Home window, go to On the Fly Forms ><br />
1099s, 1098 and W2G on the Fly and select the appropriate form.<br />
2. Click the Process 1099 button.<br />
3. Select an option from the View/Print section:<br />
• Print All 1099s prints the 1099-MISC for every contractor listed with an X<br />
under the 1099 header to the left.<br />
• Print Single 1099 prints the 1099-MISC for a selected contractor.<br />
• Print 1096 prints the 1096. It can be printed only on red and white forms.<br />
4. Select the type of 1099 copies to print from the Types section.<br />
5. Select to print Forms and Data (using plain paper) or Data Only on a pre-printed<br />
form.<br />
TIP<br />
The 1099 IRS Copy A and 1096 must be printed on the red and white<br />
forms (data only). All other copies can be printed on plain paper using a<br />
laser printer (choose Form and Data) or on preprinted forms (choose<br />
Data Only). If Data Only is selected, the Adjust Form button is activated<br />
allowing adjustment of printing alignment. Refer to “Forms Alignment”<br />
on page 30 for more information.<br />
6. Click Print.<br />
7. Click Exit when processing and printing are complete.<br />
Order the red and white forms from an office supply company or the IRS. Call (800)<br />
TAX FORMS. See “Uploading 1099s, 1096s, and 1098s” on page 190 to upload the<br />
1099/1096 information.<br />
94X Series Tax Returns On the Fly<br />
This feature enables you to create, save, and print 94X series tax returns "on the fly",<br />
eliminating employee and contractor setup and entry of payroll information. Once created<br />
and saved, use CWU to e-file these forms to the IRS. See page 184 for upload<br />
instructions.<br />
178
2011 Client Write-Up 94X Series Tax Returns On the Fly<br />
Use Client Write-Up to produce the following 94X series tax returns "on the fly":<br />
Table 7-2: 94X Series Tax Returns On the Fly<br />
Form<br />
Title<br />
940 Form 940 is the employer's annual federal unemployment<br />
(FUTA) tax return.<br />
941 Form 941 is the employer's quarterly federal tax return.<br />
941-SS<br />
Form 941-SS is the employer's quarterly federal tax return for<br />
American Samoa, Guam, the Commonwealth of the Northern<br />
Mariana Islands, and the U.S. Virgin Islands.<br />
941-X Form 941-X is used to correct errors on a Form 941 that was<br />
previously filed. Use one form 941-X for each quarter you are<br />
correcting. This form cannot be e-filed.<br />
943 Form 943 is the employer's annual federal tax return for agricultural<br />
employees and should be used if wages were paid to<br />
a farm worker and were subject to Social Security and Medicare<br />
taxes or federal income tax withholding. Note: This form<br />
cannot be e-filed using CWU.<br />
943-X Form 943-X is used to correct errors on a Form 943 that was<br />
previously filed. Use a separate form 941-X for each year you<br />
are correcting. This form cannot be e-filed.<br />
944 Form 944 is the employer’s annual tax return designed for<br />
smaller employers whose annual liability for Social Security,<br />
Medicare, and withheld federal income taxes is $1,000 or<br />
less. This form is only for clients notified by the IRS to use<br />
Form 944 in place of the 941 quarterly report. You must use<br />
this form if you were contacted. If you choose to dispute the<br />
use of this form and continue filing the 941 quarterly report,<br />
contact the IRS first at (800) 829-0115.<br />
944-SS<br />
Form 944-SS is the employer’s annual tax return for American<br />
Samoa, Guam, the Commonwealth of the Northern Mariana<br />
Islands, and the U.S. Virgin Islands and is designed for<br />
smaller employers whose annual liability for Social Security,<br />
Medicare, and withheld federal income taxes is $1,000 or<br />
less. This form is only for clients notified by the IRS to use<br />
this form in place of the 941-SS quarterly report. You must<br />
use this form if you were contacted. If you choose to dispute<br />
the use of this form and continue filing the 941-SS quarterly<br />
report, contact the IRS first at (800) 829-0115.<br />
944-X Form 944-X is used to correct errors on a Form 944 that was<br />
previously filed. Use a separate form 944-X for each year you<br />
are correcting. This form cannot be e-filed.<br />
94X Series Tax Returns On the Fly Preparation<br />
Before entering 94X series tax return information "on the fly", you must change to the<br />
appropriate client. Open or create the appropriate employer by either:<br />
179
94X Series Tax Returns On the Fly<br />
2011 Client Write-Up<br />
• Going to the Client Write-Up Home window, click and change to the<br />
appropriate client, or<br />
• Creating a new client by going to File > New Client and complete the<br />
Contact Information (see “Contact Information” on page 32), Business Information<br />
(see “Business Information” on page 33), and W-2/W-3-1099/<br />
1098 Setup (see “W-2/W-3-1099 MISC. Setup” on page 34) tabs.<br />
NOTE<br />
If the client was entered into last year’s Client Write-Up program as an<br />
"on the fly" client, you can bring that client’s information into the current<br />
year CWU program. See “Update Prior Year On the Fly” on page 171<br />
for more information.<br />
Preparing to<br />
e-file 94X<br />
Series Tax<br />
Returns<br />
If the 94X series tax return created “on the fly” is going to be e-filed, the client must<br />
be set up in CWU for e-filing before creating the 94X series tax return. Either the client<br />
must have his or her own 10-digit PIN from the IRS (see “Business Taxpayer PIN<br />
Application” on page 39) or, if the 94X is to be e-filed by a Reporting Agent, the client<br />
must be added to the Reporting Agent’s approved list. See “Reporting Agent PIN<br />
Application” on page 44.<br />
Creating 94X Series Tax Returns On the Fly<br />
To enter 94X series tax information "on the fly", complete the following steps:<br />
1. Go to On the Fly Forms > 94X Forms On the Fly.<br />
2. Select the preparer of the return from the Preparer Selection drop list. Preparers<br />
display in the list once they’ve been entered in Firm > 94X Preparer Setup (see<br />
“94X Preparer Setup” on page 23).<br />
3. Select the desired 94X tax return and click Go or double-click the desired form.<br />
180
2011 Client Write-Up 94X Series Tax Returns On the Fly<br />
Figure 7-2: Form 941 “On the Fly”<br />
4. The blue and white entry form opens. If a quarterly report was selected, the boxes<br />
identifying the report quarter are not selected but are correctly selected when the<br />
report is saved. Fill out the form completely and click Save.<br />
5. The printer dialogue box displays, giving the opportunity to print multiple copies<br />
of the form.<br />
NOTE<br />
When Client Write-Up is set up to e-file 94X forms, saving the completed<br />
94X form generates the upload file.<br />
To e-file 94X tax returns created "on the fly", see “Electronically Filing 94X Forms”<br />
on page 184.<br />
181
94X Series Tax Returns On the Fly<br />
2011 Client Write-Up<br />
182
2011 Client Write-Up Forms 941, 940, 944, & 941SS<br />
8 Electronic Filing<br />
Forms 940, 941, 941SS, 944, W-2, W-3, 1099, 1096, and 1098 can be filed electronically<br />
using Client Write-Up.<br />
NOTE<br />
The procedure for electronically filing forms created on the fly is same<br />
as for forms not created on the fly.<br />
An Electronic Filer Identification Number (EFIN) application (Form 8633) must be<br />
filed or amended to allow the electronic filing of the 94X forms. (See “Form 8633<br />
Application for EFIN” on page 37.) A five- or 10-digit PIN and password are required<br />
to electronically file these forms. To apply for an electronic filing PIN, go to<br />
Setup > Client Information > EF Setup. (See “PIN Applications for Electronic Filing”<br />
on page 39.)<br />
NOTE<br />
All transmissions of 94X series forms to and from the IRS flow through<br />
<strong>Drake</strong>.<br />
Forms 941, 940, 944, & 941SS<br />
To e-file 94X tax returns, there are three basic aspects:<br />
1. Preparation<br />
2. e-filing<br />
3. Viewing the results<br />
Before Electronically Filing 94X Forms<br />
Before you electronically file 94X tax returns, complete the following procedure:<br />
1. Run payroll (live payroll with printed checks or ATF payroll). (See “Live<br />
Employee Payroll” on page 86 and “ATF Employee Payroll” on page 95.)<br />
2. Create tax deposits (Employees > Tax Deposit > 94X.) (See “Calculating 94X<br />
Series Tax Deposits” on page 110.)<br />
NOTE<br />
It is not required to enter tax deposit information in<br />
Employees > Tax Deposit > 94X in order to electronically file the<br />
semi-annual or annual 94X tax deposit. If you are entering tax deposit<br />
information, make sure the Use Tax Deposit Information on 94X field<br />
is selected on Setup > 94X Form Settings. (See “94X Form Settings”<br />
on page 57.) If this field is selected and information is not entered in<br />
Employees > Tax Deposit > 94X, tax liability amounts on the report<br />
generated in step 3 will be blank.<br />
183
Forms 941, 940, 944, & 941SS<br />
2011 Client Write-Up<br />
3. Go to Employees > 94X Forms and select the desired 94X form. (See “Producing<br />
94X Series Tax Returns” on page 112.) Once the file is generated, click Save.<br />
This generates the electronic transmission file and places an entry on E-Filing ><br />
94X E-Filing > Select/Transmit 94X Forms.<br />
NOTE<br />
Please review “EF Setup” on page 37 before attempting to electronically<br />
file 94X forms the first time.<br />
Electronically Filing 94X Forms<br />
To electronically file 94X forms, complete the following steps:<br />
1. Go to E-Filing > 94X E-Filing > Select/Transmit 94X Forms and select the<br />
appropriate form to file. The E-Filing dialog box is opened with that form<br />
selected.<br />
Figure 8-1: Transmit 94X Forms<br />
2. Select the specific quarter or all quarters from the Select Quarter drop list.<br />
3. Check the box beside the file to select one or more files to transmit under Client<br />
Code. Click Select All if you wish to transmit all files.<br />
4. Click Transmit. The system checks for an open Internet connection. If an Internet<br />
connection is not detected, the system attempts to initiate a connection via a dialup<br />
modem. If a connection can not be made, the user is notified to connect to the<br />
Internet prior to transmitting.<br />
While the returns are transmitting a progress bar appears at the bottom of the E-<br />
Filing dialog box. If a connection is not established, the software places the files<br />
184
2011 Client Write-Up Forms 941, 940, 944, & 941SS<br />
back on this dialog box, indicating the connection must be established and the<br />
transmission attempted again.<br />
NOTE<br />
Forms 940 and 943 are annual reports, available all year but filed only<br />
once at the end of the year or 4th quarter.<br />
View Results of 94X Transmission<br />
To view transmission results, go to E-Filing > 94X E-Filing > View Results. Status<br />
information for all tax returns (941, 940, 944, and 941SS) and PIN applications with<br />
the date and time transmitted displayed.<br />
Figure 8-2: View Results<br />
To narrow the search, select:<br />
• A specific quarter or All Quarters to view.<br />
• A status of All, Accepted, or Rejected from the Status field. When Accepted is<br />
selected, only the returns that have been accepted are displayed. When Rejected<br />
is selected, only the rejected returns are displayed.<br />
• Click <strong>Drake</strong> Status to get the results of transmissions to <strong>Drake</strong>.<br />
• Click IRS Status to get the results of transmissions to the IRS.<br />
Click a column header to sort the transmission list.<br />
To look at a specific acknowledgement, double-click a specific line or click the line<br />
and select View Status. When you view a REJ acknowledgement, the system shows<br />
the rejections report with an explanation of the rejection.<br />
185
Uploading W-2s and W-3s<br />
2011 Client Write-Up<br />
Uploading W-2s and W-3s<br />
NOTES<br />
See “Appendix J - Preparing to e-file W-2s” on page 342 for details on<br />
registering to use the Social Security Administration’s website and<br />
downloading and installing the AccuWage error checking software.<br />
See “Print and Upload W-2s and W-3s” on page 307 for an overview of<br />
this process.<br />
Uploading W-2s and W-3s to the Social Security Administration is a three-step process:<br />
1. Create the upload file.<br />
2. Review the upload file.<br />
3. Transmit the file.<br />
NOTE<br />
Prior to creating the W-2/W-3 upload file, W-2s must first be processed.<br />
Complete W-2 Processing (Employees > Process W2s). See “W-2<br />
Processing” on page 116.<br />
Creating the W-2/W-3 Upload File<br />
Use Create File to generate the file containing W-2 and W-3 information that is transmitted<br />
to the Social Security Administration. To create the transmission file, complete<br />
the following steps:<br />
1. Go to E-Filing > W2 E-Filing (EFW2) > Create File. Set the electronic filing<br />
options here for the PIN, agent indicator code, EIN information and preparer,<br />
employment, and tax jurisdiction codes. A file can also be resubmitted here. Individual<br />
field help is available by resting your pointer on the data field.<br />
Figure 8-3: Create W-2 E-File<br />
186
2011 Client Write-Up Uploading W-2s and W-3s<br />
2. On the right side of the screen, select whether to e-file Regular W-2s or W-2s<br />
“On the Fly”. This setting remains once the screen is saved but can be changed as<br />
needed.<br />
3. Complete the General Information section:<br />
• User ID — Enter the 8-character user ID assigned to the employee who is<br />
attesting to the accuracy of the file. This user ID is assigned by the Social<br />
Security Administration when the employee registers to use the SSA’s Business<br />
Services Online. To register, go to http://www.ssa.gov/bso/bsowelcome.htm.<br />
• File is being resubmitted — Select this check box if the W-2 file is being<br />
resubmitted.<br />
• Resubmit Wage File Identifier — Enter the wage file identifier displayed on<br />
the notice received from the SSA.<br />
• Preferred Method of Problem Notification — Select the appropriate option<br />
(E-Mail/Internet or U.S. Postal Service). The e-mail address will flow from<br />
Firm > Firm Info./Global Settings.<br />
• Preparer Code — Select the appropriate code for this client transmission<br />
file.<br />
Table 8-1: W-2 Preparer Codes<br />
A<br />
L<br />
S<br />
P<br />
O<br />
Accounting Firm<br />
Self-Prepared<br />
Service Bureau<br />
Parent Company<br />
Other<br />
4. Complete the Employer Record Information section:<br />
• Agent Indicator Code — Select the appropriate agent indicator code.<br />
2678 Agent (Approved by IRS) — Select this option if you use an IRSapproved<br />
section 2678 agent file returns and make deposits or payments of<br />
employment or other withholding taxes. Access the Form 2678 from<br />
www.IRS.gov.<br />
Common Paymaster — A corporation that pays an employee for two or<br />
more related corporations at the same time is a common paymaster.<br />
3504 Agent — Select this option if using an employer-designated section<br />
3504 agent. For information on this agent type, go to www.IRS.gov.<br />
Other — Use if none of the others applies. The field is left blank in the<br />
EFW2.<br />
• Employer/Agent EIN — Enter the EIN for tax payments that were submitted<br />
to the IRS for Forms 941, 943, 944, CT-1, or Schedule H. If Other was not<br />
selected as the Agent Indicator Code, enter your agent EIN.<br />
• Agent for EIN — Enter the employer's EIN for which you are an agent.<br />
187
Uploading W-2s and W-3s<br />
2011 Client Write-Up<br />
• Terminating Business — Making this selection indicates that this is the last<br />
year that W-2s are filed under this EIN.<br />
5. Review all entries, click Save Screen, then Create File. The upload file name and<br />
location displays. This information is needed to transmit the file to the Social<br />
Security Administration.<br />
If a message displays stating that no W-2s have been processed for the year, go to<br />
Employees > Process W2s. See “Processing W-2s” on page 117 for more information.<br />
6. Once the transmission file has been created, proceed to Review File to identify<br />
possible errors in the file. Then go to Transmit File to upload the information to<br />
the Social Security Administration.<br />
State W-2s<br />
When the W-2 upload file is created, some state W-2s are created automatically in the<br />
background. The state W-2 that is created is determined by the state entered on the<br />
Setup > Client Information > Contact Information window.<br />
CWU creates state W-2s for following states:<br />
Table 8-2: CWU W-2 Upload States<br />
Alabama Maine Pennsylvania<br />
Arkansas Minnesota Rhode Island<br />
Colorado Mississippi South Carolina<br />
Georgia Montana Virginia<br />
Illinois North Carolina Vermont<br />
Indiana Ohio Wisconsin<br />
Kansas Oregon West Virginia<br />
State W-2 upload files are created in the<br />
d:\CWU2011\Clients\client code\st_W2Report folder, where<br />
“d” is the drive where CWU is installed<br />
“client code” is the code used to identify the client when the client was created<br />
“st” is the two-letter state abbreviation.<br />
Example: CWU is installed on drive C:; the client code is “Arnolds”, which is located<br />
in Wisconsin. The state W-2 upload file is created in the<br />
C:\CWU2011\Clients\Arnolds\WI_W2Report folder.<br />
The state W-2 upload file name begins with W2REPORT.<br />
188
2011 Client Write-Up Uploading W-2s and W-3s<br />
Reviewing the W-2 Upload File<br />
Go to E-Filing > W2 E-Filing (EFW2) > Review File. The Social Security Administration's<br />
AccuWage program is launched. It is used to identify most of the common<br />
format errors in wage submissions. Use this program to reduce submission rejections.<br />
Even if no errors are identified by AccuWage, a submission could still be rejected due<br />
to other errors.<br />
NOTE<br />
To install the AccuWage 2011 software, go to the Internet and point<br />
your browser to http://www.ssa.gov/employer/accuwage/. Under the<br />
Download Options section near the bottom of the web page, click the<br />
AccuWage <strong>Software</strong> - 2011 Tax Year link to begin installation.<br />
Transmitting the W-2 Upload File<br />
NOTE<br />
An Internet connection is required to transmit W-2 and W-3 information<br />
to the Social Security Administration.<br />
1. Go to E-Filing > W2 E-Filing (EFW2) > Transmit File. The Web address for<br />
the Business Services Online Social Security site is displayed.<br />
Figure 8-4: Transmit W-2<br />
2. If the upload file has been tested using the AccuWage software, select W2 files<br />
have been tested using AccuWage 2011.<br />
If the upload file has not been tested with AccuWage and you wish to download<br />
and install the AccuWage program, select W2 files have not been tested using<br />
AccuWage 2011. The web address displayed changes to the AccuWage download<br />
page.<br />
3. Select Open Web Site and your Internet browser opens to the Social Security<br />
Administration’s web site.<br />
All W-2s for the client need to be processed before this file is transmitted. A totals<br />
sheet is assigned with the batch that is transmitted. This is used in place of the W-3.<br />
189
Uploading 1099s, 1096s, and 1098s<br />
2011 Client Write-Up<br />
Uploading 1099s, 1096s, and 1098s<br />
NOTES<br />
See “Appendix K - Preparing to e-file 1099s” on page 343 for details on<br />
getting a Transmitter Control Code and registering to use the IRS’s<br />
FIRE website.<br />
See “Print and Upload 1099s and 1096s” on page 307 for an overview<br />
of this process.<br />
Uploading 1099s, 1096s, and 1098s to the IRS is a two-step process:<br />
1. Creating the upload file.<br />
2. Transmitting the file.<br />
NOTE<br />
Prior to creating the 1099/1096/1098 upload file, 1099s must first be<br />
processed. Complete 1099 Processing (Contractors > Process 1099<br />
Misc.). See “1099/1096/1098 Processing” on page 146.<br />
Creating the 1099/1096/1098 Upload File<br />
Use the Create File function to generate the file containing the 1099, 1096, 1098<br />
information that is uploaded to the IRS. To create the upload file, complete the following<br />
steps:<br />
1. Go to E-Filing > 1099/1098 E-Filing > Create File to enter information necessary<br />
to create the upload file.<br />
Figure 8-5: Create 1099 Upload File<br />
IMPORTANT<br />
All 1099s must be processed prior to creating the 1099 electronic<br />
files.<br />
2. On the right side of the window, select to create an upload file for a regular 1099-<br />
MISC or for 1099s and 1098s created On the Fly (1099-A, 1099-B, 1099-C,<br />
190
2011 Client Write-Up Uploading 1099s, 1096s, and 1098s<br />
1099-DIV, 1099-INT, 1099-MISC, 1099-PATR, 1099-R, 1099-S, 1098-MORT,<br />
or W2-G).<br />
3. Select the appropriate File Indicator of file to create.<br />
Original File — Select this option if the information entered is the original data.<br />
Replacement File — Select this option if the file is to replace a file that the IRS<br />
has informed you in writing cannot be processed or the IRS’s FIRE system indicated<br />
a file status of “Bad.”<br />
Electronic File Name — Use for an electronic file with a file status of<br />
“Rejected.” Enter the “Original” or “Correction” electronic file name assigned by<br />
the IRS electronic FIRE (Filing Information Returns Electronically) system.<br />
Test File — If you plan to use the option to file the Combined Federal & State<br />
1099 MISC, first select the test file option. This transmits the test file required by<br />
the IRS after you receive the TCC.<br />
NOTE<br />
Use the Test File option between November and February only.<br />
Once the test file is received and approved, the IRS mails an acceptance letter.<br />
Once the IRS receives the form, you can transmit the 1099-MISC. After a test file<br />
is approved by the IRS, return to E-Filing > 1099/1098 E-Filing > Create File<br />
before transmitting an actual 1099. Click Original File in the File Indicator section.<br />
4. In the Payer Information section, enter the Transfer Agent Indicator information,<br />
if appropriate. When the Transfer Agent Indicator option is selected, the<br />
Transfer Agent Name and Address fields are activated and require entry.<br />
• Transfer Agent Name/Address — Enter the name and address of the transfer<br />
(or paying) agent.<br />
• Last year of filing the 1099 — Select the box if this is the last year this payer<br />
will file returns electronically, magnetically, or on paper.<br />
• Combined Federal/State Program — Select this box when you receive<br />
approval.<br />
NOTE<br />
If your state participates in the federal/state 1099 program but accepts<br />
modified instead of standard 1099s, Client Write-Up electronically files<br />
the federal 1099 only and not the state 1099. Do not transmit a test file<br />
and do not check the Combined Federal/State Program box. If your<br />
state does not participate in the federal/state 1099 program, you do not<br />
need to transmit a test file. Do not check the Combined Federal/State<br />
Program box.<br />
5. Complete the Payer Account Number section:<br />
• Indicates Sales of $5000 or more for all 1099s being reported — Select<br />
this box to indicate sales of $5,000 or more of consumer products to a person<br />
on a buy-sell, deposit-commission, or any other commission basis for resale<br />
anywhere other than a permanent retail establishment.<br />
191
Filing a 1099 Extension<br />
2011 Client Write-Up<br />
• Payer Account Number for Payee — Enter any number assigned by the<br />
payer to the payee that can be used by the IRS to distinguish between information<br />
returns.<br />
6. Click Save Screen then Create File. The upload file name and location displays.<br />
This information is needed to transmit the file to the IRS’s FIRE (Filing Information<br />
Returns Electronically) website.<br />
If a message displays stating that no 1099s have been processed for the year, go to<br />
Contractors > Process 1099 Misc. See “1099/1096/1098 Processing” on<br />
page 146 for more information.<br />
7. Click Exit.<br />
Once the upload file has been created, proceed to Transmit File/View Results to<br />
access the IRS’s FIRE (Filing Information Returns Electronically) website and upload<br />
the information.<br />
Transmit 1099/View Results<br />
Go to E-Filing > 1099/1098 E-Filing > Transmit File/View Results. The IRS's<br />
Internet Web link for electronically filing the 1099-MISC is displayed (https://<br />
fire.irs.gov).<br />
Figure 8-6: Transmit 1099<br />
Click Open Web Site and your Internet browser opens to the 1099-MISC electronic<br />
filing site. An Internet connection is required for this function.<br />
TIP<br />
Refer to “Appendix C - IRS “FIRE” Website” on page 311 for tips on<br />
connecting to the IRS’s FIRE website.<br />
Filing a 1099 Extension<br />
Create 1099 Extension File<br />
The 1099 extension file must be created before it can be filed (either paper or e-file).<br />
To create an extension file for the 1099, complete the following steps:<br />
1. Go to E-Filing > 1099/1098 E-Filing > Create Extension File.<br />
192
2011 Client Write-Up Filing a 1099 Extension<br />
Figure 8-7: Create 1099 Extension<br />
2. Enter the Control Code. This is a five-character alphanumeric Transmitter Control<br />
Code (TCC) assigned by the IRS/ECC-MTB. A Transmitter Control Code<br />
must be obtained to file data with this program. Submit Form 4419 to the IRS to<br />
obtain a TCC.<br />
3. Complete the Payer Information section:<br />
• TIN — Enter a nine-digit Taxpayer Identification Number assigned to the<br />
taxpayer. A number that is all zeros, ones, twos, etc., results in an invalid TIN.<br />
• Name — Enter the name of the payer whose TIN has been entered.<br />
• Recipient Request Indicator — Select this box if the extension request is to<br />
furnish statements to the recipients of the information return.<br />
• Company Address — Enter the address of the payer. The street address<br />
should include number, street, apartment or suite number, or PO box if mail is<br />
not delivered to a street address.<br />
• Company City — Enter the city, town, or post office of the payer.<br />
• Company State — Enter the two-character state code.<br />
• Company Zip — Enter the nine-digit ZIP code assigned by the U.S. Postal<br />
Service. If only the first five digits are known, then use the five-digit ZIP<br />
code.<br />
4. Click Save Screen, Create File, and Exit.<br />
Refer to “Transmit Extension File/View Results” for instructions on transmitting the<br />
extension request information to the IRS.<br />
Transmit Extension File/View Results<br />
Go to E-Filing > 1099/1098 E-filing > Transmit Extension File/View Results to<br />
open the Electronic 1099 Misc Transmission dialog box. Click Open Web Site.<br />
Refer to “Appendix C - IRS “FIRE” Website” on page 311 for tips on connecting to<br />
the IRS's FIRE website.<br />
193
Filing a 1099 Extension<br />
2011 Client Write-Up<br />
194
2011 Client Write-Up Vendor Check Setup<br />
9 Accounts Payable<br />
Use Client Write-Up to enter vendor invoices, print (and reprint) live vendor checks,<br />
and enter after-the-fact (ATF) vendor invoice information for bookkeeping purposes.<br />
Once vendor checks and vendors have been set up, entering and printing vendor<br />
checks is a three-step process:<br />
1. Entering invoice information (page 196)<br />
2. Scheduling the invoice for payment (page 205)<br />
3. Printing the check (page 209)<br />
NOTE<br />
Skip steps 1 and 2 above and go straight to printing checks by using the<br />
Check Writer. See “Check Writer” on page 216 for more information.<br />
Vendor Check Setup<br />
Print vendor checks in Client Write-Up using either pre-printed check stock or MICR<br />
checks.<br />
The following steps are required to set up MICR check printing:<br />
NOTE<br />
These steps are the same used for setting up MICR payroll checks. If<br />
these steps were performed previously, it is not necessary to repeat<br />
them to print vendor checks.<br />
1. Select or create a MICR check design. MICR check designs are global and a single<br />
design can be used by multiple clients. See “MICR Check Set Up” on page 24.<br />
2. Enter MICR bank account information specific to the client. See “MICR Bank<br />
Accounts” on page 47.<br />
3. Designate the printer used for MICR check printing. Go to Firm > Firm Info./<br />
Global Settings and select the appropriate printer from the MICR Printer field.<br />
4. To select MICR check stub options for vendor checks, go to<br />
Setup > Check and Stub Options > MICR Payables. Refer to “MICR Accounts<br />
Payable Check Setup” on page 53 for details.<br />
The following steps are required to set up vendor check printing using pre-printed<br />
check stock:<br />
1. Go to Setup > Check and Stub Options > PrePrinted Payables (see “Preprinted<br />
Accounts Payable Check Setup” on page 52).<br />
2. Select the pre-printed check stock to be used on the right side of the screen.<br />
3. Select the appropriate check and stub options on the left side of the screen.<br />
4. Click Save.<br />
195
Vendor Bookkeeping Setup<br />
2011 Client Write-Up<br />
Vendor Bookkeeping Setup<br />
Vendor Setup<br />
Adding a Vendor<br />
To post vendor transactions to the journal and have them included in the Post Transactions<br />
process, complete the following steps:<br />
1. Setup a Chart of Accounts. See “Chart of Accounts (COA) Setup” on page 45.<br />
2. Go to Setup > Client Information, select the Payables Setup tab, and select<br />
Generate Bookkeeping Transactions as.<br />
3. Select to post accounts payable transactions to either the General Journal (GJ) or<br />
the Cash Disbursements (CD) journal.<br />
Once these steps are completed, vendor transactions automatically post to the transaction<br />
journal.<br />
Before vendor invoices can be entered into Client Write-Up, the vendor must be set<br />
up.<br />
Vendor information must be entered before printing vendor checks. To add a vendor,<br />
complete the following steps:<br />
1. Go to Payables > Vendor Setup.<br />
2. Click New. Enter a code in the Vendor Code field. Vendor codes are alphanumeric<br />
and can be up to 20 characters long. Once a valid vendor code is entered,<br />
the information fields become active and the code cannot be deleted.<br />
Use vendor codes that are meaningful. For instance, instead of using the vendor’s<br />
ID number, you could use “ABC Office Supply”. By using a meaningful code,<br />
transaction information for this vendor is easily identifiable. All characters can be<br />
used in the Vendor Code, including spaces.<br />
196
2011 Client Write-Up Vendor Setup<br />
Figure 9-1: Vendor Setup<br />
3. Complete the following fields:<br />
• Company Name — Vendor's company name.<br />
• First Name and Last Name — Name associated with the vendor.<br />
NOTE<br />
If no Company Name is entered, CWU uses the First Name and Last<br />
Name fields to create a Company Name. For instance, if the First<br />
Name is “Fred” and the Last Name is “Harrison,” CWU uses “FredHarrison”<br />
as the Company Name.<br />
• Address, Country, Phone (Optional fields) — Enter the appropriate vendor<br />
information. Include formatting when entering the Phone field.<br />
• Zip/Postal Code — Enter the vendor’s zip code. This field is formatted after<br />
information is typed. The City and State fields autofill with information from<br />
the zip code database. Include formatting when entering the ZIP field.<br />
• ID Number (Optional) — This is the number associated with the company or<br />
the owner. Enter the EIN, SSN, ITIN, or Other. The number is formatted<br />
based on the selection made. The OTH selection is any information approved<br />
by the IRS instead of using an EIN, SSN, or ITIN.<br />
• Cash Account (Required if using the bookkeeping feature) — Press F2 to<br />
select the default cash account to be associated with the selected vendor. This<br />
account can be changed for each of the vendor’s transactions.<br />
197
Entering Invoices<br />
2011 Client Write-Up<br />
• Expense Account (Required if using the bookkeeping feature) — Press F2 to<br />
select the default expense account to be associated with the selected vendor.<br />
This account can be changed for each of the vendor’s transactions.<br />
NOTE<br />
There must be a cash account and an expense account from the Chart<br />
of Accounts specified. Without both accounts listed, the journal will be<br />
out of balance when the Post Transactions process is performed.<br />
Editing a Vendor<br />
Entering Invoices<br />
• 1099 (Optional) — Using the drop list, select the line from the 1099-MISC to<br />
use as the default payment type for the vendor. A different line can be selected<br />
on each payment made to the vendor.<br />
• Do NOT generate a 1099 — Select this option and a 1099-MISC will not be<br />
generated for this vendor.<br />
4. Click Save once the information has been verified. An unlimited number of vendors<br />
can be set up.<br />
To edit an existing vendor, go to Payables > Vendor Setup and double-click a vendor<br />
code, or enter the vendor code in the Vendor Code field and press ENTER. The data<br />
fields for that vendor are activated. Edit the desired fields and click Save.<br />
Delete — Click to remove a vendor from CWU. Vendors with saved invoices cannot<br />
be deleted.<br />
Reset — Click to revert to the vendor information last saved.<br />
To enter invoice information, complete the following steps:<br />
1. Go to Payables > Enter New Invoices. The Invoice Data Entry dialog box is<br />
displayed.<br />
198
2011 Client Write-Up Entering Invoices<br />
Figure 9-2: Invoice Data Entry<br />
NOTE<br />
The Invoice Data Entry dialog box can also be accessed by clicking<br />
New Invoice on the Payables > View & Pay Invoices window.<br />
2. Click New to enter a new invoice. The next Invoice ID is assigned to this transaction.<br />
This number identifies the invoice, and cannot be edited. CWU uses this ID<br />
for its own internal purposes. This number also appears in the journal along with<br />
the invoice detail.<br />
3. Invoices can be entered for payment by “live” check or as an after-the-fact (ATF)<br />
transaction. ATF invoices have been paid and are entered in CWU for reporting<br />
purposes only.<br />
To create a live invoice, leave the ATF field unselected. To create an ATF invoice,<br />
select the ATF field. When this field is selected, the 1099 Detail for ATF Payment<br />
and ATF - Quick Gen Payment sections of the dialog box are activated.<br />
4. Complete the active fields:<br />
• Invoice Date (Optional) — Use the drop list to enter the date of the invoice.<br />
• Due Date (Optional) — Use the drop list to enter the date the invoice is due.<br />
• Invoice No (Optional) — Enter the number on the vendor’s invoice or any<br />
other identifier.<br />
• PO (Optional) — If this invoice is to be paid using a purchase order, enter the<br />
PO number.<br />
• Vendor Code (Required) — Enter the vendor code or press F2 to display the<br />
vendor list. Double-click the desired vendor. The Expense Account and Cash<br />
Account fields fill based on the information entered in<br />
Payables > Vendor Setup. To edit an existing vendor’s information or add a<br />
new vendor on the fly, click the View button on the Vendor List window. See<br />
“Vendor Setup” on page 196 for information on editing and adding vendors.<br />
199
Entering Invoices<br />
2011 Client Write-Up<br />
• 1099 — This field fills based on the information entered in<br />
Payables > Vendor Setup (see 1099). Use the drop list to select a different<br />
line from the 1099-MISC for this transaction. If no amounts are entered in any<br />
of the fields in the 1099 Detail for ATF Payment section or the 1099 Detail<br />
for Payment section (when scheduling live payments), the invoice will not be<br />
included on the vendor’s 1099-MISC at the end of the year.<br />
• Description (Optional) — Enter a description for the transaction.<br />
• Expense Account and Cash Account — These fields automatically fill when<br />
a vendor code is selected. To select a different account to be used for this<br />
transaction, press F2 to display a list of zero level accounts from the Chart of<br />
Accounts.<br />
• Status — Use the drop list to select if this transaction is: Unpaid, has been<br />
Partially Paid, is Paid in Full, if you are Waiting on a Bill, if the bill is<br />
being Disputed, or the bill has not been received (Not Received). Unpaid is<br />
the default.<br />
• Shipping Information (Optional) — Select the shipper from the drop list,<br />
then enter the tracking number and any shipping notes you desire.<br />
• Net Due (Required) — Enter the full amount of the invoice due. Itemize the<br />
Net Due amount by entering information into the fields below the Net Due<br />
field.<br />
Figure 9-3: Invoice Data Entry - Net Due<br />
Fields on the left beneath Net Due (Purchase Price, Late Fee, Insurance, Other,<br />
Tax, and Ship Charge) are charges. Fields on the right beneath Net Due (Discount<br />
and Rebate) are credits. Enter the actual amount charged or credited - not percentages.<br />
IMPORTANT<br />
The Vendor Code and Net Due fields are required when entering<br />
an invoice. All other fields are optional and primarily for your information.<br />
• Calc’d Net — Calculated Net equals charges minus credits. Use this field to<br />
verify the amount entered in Net Due is correct on the bill and entered correctly<br />
in Client Write-Up.<br />
200
2011 Client Write-Up Entering Invoices<br />
• Print/Preview Invoice on Save — Select this option to have CWU produce<br />
an invoice when Save is selected. Once the invoice displays, you can print,<br />
email, or save the invoice.<br />
ATF - Quick Gen Payment<br />
This section is activated when the ATF box is selected designating the invoice as an<br />
ATF transaction. ATF payments can be recorded either in the ATF - Quick Gen Payment<br />
section or by going to Payables > View & Pay Invoices and clicking Record<br />
ATF Pmts. (See “Recording ATF Payments” on page 208.)<br />
Complete the following fields to record an ATF payment here:<br />
• Pmt Amt — Enter the amount of the ATF payment. If there is an outstanding balance<br />
after the ATF payment is recorded, the invoice shows as partially paid and<br />
additional ATF payments can be made by going to<br />
Payables > View & Pay Invoices and clicking Record ATF Pmts.<br />
• Pmt Date — Enter the date the ATF payment was made using the drop list.<br />
• Pmt Type — Select the method used to make the ATF payment. Credit Card is<br />
the default method of payment for ATF payments. The Check No field is activated<br />
if the payment type is Check.<br />
ATF - 1099 Detail for ATF Payment<br />
This section is activated when the ATF box is selected designating the invoice as an<br />
ATF transaction. CWU puts the amount entered in the Pmt Amt field in the ATF -<br />
Quick Gen Payment section into the field displayed in the 1099 field. Enter or edit<br />
the amount(s) from the invoice as they should be included on the vendor’s 1099-MISC<br />
at the end of the year. If no amounts are entered in this section, the invoice will not be<br />
included on the vendor’s 1099-MISC.<br />
5. Click Save once all invoice information has been entered. Once it is saved, to<br />
enter another invoice, just start entering the next invoice information.<br />
New — Click to clear the screen and enter a new invoice.<br />
Restore — Click to clear the information entered without saving.<br />
Delete — Click to delete a saved invoice.<br />
NOTE<br />
Invoices that have been paid (or partially paid) cannot be deleted.<br />
6. Click Exit once all invoices have been saved.<br />
For example, you write a check putting $1,000 down on a $25,000 computer system<br />
and arrange to make monthly payments of $1,000 over the next two years.<br />
Enter this purchase into Client Write-Up using two invoices, both using the same<br />
invoice number. By using the same invoice number, the transactions are tied<br />
together. Enter one transaction as an ATF invoice for the $1,000 check you wrote<br />
for the down payment. Enter the second as a live invoice for the $24,000 balance.<br />
201
Searching for Invoices<br />
2011 Client Write-Up<br />
Searching for Invoices<br />
Next, schedule the $1,000 monthly payments using Schedule Live Pmts. (See<br />
“Scheduling Live Payments” on page 205.)<br />
Most of the accounts payable screens in Client Write-Up show all saved transactions<br />
by default. Learning to use CWU’s searching capabilities is essential to see just the<br />
invoices you need rather than scrolling through potentially thousands of transactions.<br />
The steps for performing a search are consistent throughout accounts payable with<br />
minor variations on certain screens.<br />
To search for saved invoices, go to Payables > View & Pay Invoices.<br />
The bottom half of the View & Pay Invoices screen displays the invoices selected<br />
based on the search criteria provided in the top of the screen. All invoices are displayed<br />
by default.<br />
Figure 9-4: View & Pay Invoices<br />
Once the desired combination of search criteria is selected, click Search to display<br />
those invoices.<br />
NOTE<br />
When using multiple search criteria, all parts of the criteria must be true<br />
in order for a record match to take place.<br />
• Limit View to these Invoices — Select this box to activate the fields and search<br />
for specific invoices.<br />
202
2011 Client Write-Up Searching for Invoices<br />
Figure 9-5: Limit View to these Invoices<br />
• Due by — Use this list to search for invoices due by a certain date.<br />
• Balance Exceeds — Display invoices with an outstanding balance greater than<br />
the amount you enter. To include invoices with an outstanding balance of $75,<br />
enter 74.99.<br />
• Days Past Due — Enter the number of days past due. Enter a negative number to<br />
display invoices with a future due date. For example, -30 displays invoices due in<br />
the next 30 days.<br />
• Month (1-12) — Enter the month of the current year of invoices to display. Enter<br />
1 for January, 2 for February, 3 for March, etc. If the month entered is greater<br />
than the current month, invoices from the month of the previous year are displayed.<br />
This is a convenient way to see activity for the past 12 months.<br />
For example, if it is September and you enter a 3 in the Month field, invoices<br />
from March of the same year are displayed. If in September you enter a 12 in the<br />
Month field, invoices from December of the previous year are displayed.<br />
NOTE<br />
An entry in Days Past Due or Month disables the Due by search criteria.<br />
• Limit View to these Vendors — Select this box to use the vendor code to search<br />
for invoices. This uses a range (From and To) to search for invoices.<br />
Figure 9-6: Limit View to these Vendors<br />
203
Editing Invoices<br />
2011 Client Write-Up<br />
Press F2 in these fields to make a selection from the popup vendor list or enter the<br />
beginning of the vendor search criteria in the From field and the end of the vendor<br />
search criteria in the To field.<br />
Example:<br />
Vendor Code<br />
Benny S<br />
Bill P<br />
Bo<br />
Bo M<br />
Bob J<br />
Carl N<br />
Enter B in the From field and C in the To field and all vendors with codes beginning<br />
with a B are displayed.<br />
Enter B in the From field and BO in the To field and Benny S, Bill P, and Bo are displayed.<br />
• Live or ATF — Show only live invoices or only ATF invoices. Having both<br />
selected shows all live and ATF invoices. Both are selected by default.<br />
• Unpaid, Partial Pmt, Paid, Waiting on Bill, Disputed, Not Recv’d — Since all<br />
invoices display by default, all check boxes are selected by default. Deselect the<br />
check boxes for invoices you do not wish to display.<br />
• Balance Owed, Credit Balance, Invoice Count — The amounts displayed are<br />
based on the result of the completed search.<br />
Click the column headers in the display at the bottom of the View & Pay Invoices<br />
dialog box to sort the search results.<br />
Use Limit View to these Invoices and Limit View to these Vendors<br />
together for maximum filtering capabilities.<br />
NOTES<br />
The search criteria are cumulative and imply “and,” not “or.” For example,<br />
selecting a Due by date of 2/28/2011, a Balance Exceeds amount<br />
of $500, clicking Live and Unpaid shows all live invoices with an<br />
unpaid balance of $500.01 or more that are due between now and 2/28/<br />
2011.<br />
Editing Invoices<br />
To edit saved invoices:<br />
1. Go to Payables > View & Pay Invoices.<br />
2. Locate the invoice to edit by searching for the invoice using the search method<br />
described in “Searching for Invoices” on page 202.<br />
204
2011 Client Write-Up Scheduling Live Payments<br />
3. Double-click the invoice to edit or select the invoice and click Edit Invoice. Edit<br />
all fields except the ATF - Quick Gen Payment section for ATF invoices.<br />
Scheduling Live Payments<br />
To edit payment information for ATF invoices, go to<br />
Payables > ATF Payments > View ATF Payments. Use the search criteria to<br />
locate the invoice to edit. Once the invoice has been found, double-click the<br />
invoice, edit the Payment Detail information, and click Save.<br />
Vendor checks must be scheduled for payment before they can be printed. Pay<br />
invoices by making partial payments or with a single payment.<br />
Figure 9-7: Invoice Status<br />
Making Payments in Full<br />
The bottom of the View & Pay Invoices window shows:<br />
1. the invoice due date<br />
2. if the invoice is entered as ATF (“T” = ATF, “F” = Live, or not ATF)<br />
3. the unpaid balance<br />
4. the invoice status (Unpaid, Partially Paid, Paid in Full, Waiting on Bill, Disputed,<br />
and Not Received). This status can be set or adjusted when adding or editing<br />
an invoice.. A status of Unpaid indicates that no payments have been made on<br />
the invoice. Partially Paid means that a payment has been made but there is an<br />
outstanding balance, and Paid in Full indicates the invoice has a zero balance and<br />
no payment is required.<br />
To schedule a live invoice to be paid in full, complete the following steps:<br />
1. Go to Payables > View & Pay Invoices.<br />
2. Before scheduling a payment, you must first locate the invoice you wish to pay by<br />
performing a search as described in “Searching for Invoices” on page 202. To narrow<br />
your search, include the Live box as part of your search criteria. Live invoices<br />
show an F in the ATF column.<br />
205
Scheduling Live Payments<br />
2011 Client Write-Up<br />
Making Partial Payments<br />
3. Click the box beside the live invoices you wish to pay. Click Select All to pay all<br />
invoices.<br />
4. Click Schedule Live Pmts. The Schedule Payments dialog box is opened.<br />
5. Double-click an invoice to pay. The Amount field default is the full amount of the<br />
outstanding balance (displayed in the Diff column) and the Sched Date default is<br />
to schedule the payment today.<br />
To schedule the invoice for future payment, edit the date using the Sched Date<br />
drop list.<br />
6. Enter a note in the Memo field (optional). The Memo field prints on the bottom<br />
left of vendor checks (provided information is entered in the Memo field when the<br />
live check is scheduled for payment). This field is not available in the MICR<br />
Check Designer but can be viewed by printing the MICR Test.<br />
7. The Cash and Expense fields default to the accounts associated with the vendor<br />
in Payables > Vendor Setup. To charge this invoice to another account, press F2<br />
to display the zero level accounts from the Chart of Accounts and select the appropriate<br />
account. This change only effects this invoice.<br />
8. Enter the amount(s) from the invoice into the 1099 Detail for Payment section as<br />
they should be included on the vendor’s 1099-MISC at the end of the year. If no<br />
amounts are entered in this section, the invoice will not be included on the vendor’s<br />
1099-MISC.<br />
9. Click Save.<br />
To schedule a partial payment of live invoices, complete the following steps:<br />
1. Go to Payables > View & Pay Invoices.<br />
2. Before scheduling a payment, you must first locate the invoices you wish to pay.<br />
Perform a search as described in “Searching for Invoices” on page 202. To narrow<br />
your search, include clicking Live as part of your search criteria. Live invoices<br />
show an F in the ATF column.<br />
3. Click the box beside the live invoices you wish to pay. Click Select All to pay all<br />
invoices.<br />
4. Click Schedule Live Pmts. The Schedule Payments dialog box is opened.<br />
5. Double-click an invoice to pay. The Amount field default is the full amount of the<br />
outstanding balance (displayed in the Diff column) and the Sched Date default is<br />
to schedule the payment today.<br />
6. To make a partial payment, edit the Amount field. To schedule the invoice for<br />
future payment, edit the date using the Sched Date drop list.<br />
7. Enter a note into the Memo field (optional). This prints on the bottom left corner<br />
of the check.<br />
8. The Cash and Expense defaults are the accounts assigned to the vendor in<br />
Payables > Vendor Setup. To charge this invoice to another account, press F2 to<br />
display the zero level accounts from the Chart of Accounts and select the appropriate<br />
account. This change effects only this invoice.<br />
206
2011 Client Write-Up Scheduling Live Payments<br />
9. Enter the amount(s) from the invoice into the 1099 Detail for Payment section as<br />
they should be included on the vendor’s 1099-MISC at the end of the year. If no<br />
amounts are entered in any of the fields in this section, the invoice will not be<br />
included on the vendor’s 1099-MISC.<br />
10.Click Save.<br />
Making Subsequent Payments<br />
If a partial payment has been made on an invoice and you wish to make another payment,<br />
complete the following steps:<br />
1. Go to Payables > View & Pay Invoices.<br />
2. Before scheduling a payment, you must first locate the invoices you wish to pay.<br />
Perform a search as described in “Searching for Invoices” on page 202. To narrow<br />
your search, include Live as part of your search criteria. Live invoices show an F<br />
in the ATF column.<br />
3. Click the box beside the live invoices you wish to pay.<br />
4. Click Schedule Live Pmts. The Schedule Payments dialog box in opened.<br />
5. Double-click an invoice you wish to pay. If a prior payment has been scheduled<br />
for this invoice, the Authorized but not yet Printed section displays the scheduled<br />
date and amount of the payment.<br />
NOTE<br />
In the example below, the Balance is $150 with a $50 payment scheduled<br />
(payment detail highlighted) and the difference, or outstanding balance,<br />
is $100.<br />
Figure 9-8: Invoice with Scheduled Payments<br />
207
Recording ATF Payments<br />
2011 Client Write-Up<br />
6. To schedule another payment on this invoice, click New and enter the payment<br />
amount in the Amount field. To schedule the invoice for future payment, edit the<br />
date using the Sched Date drop list.<br />
7. Enter a note into the Memo field (optional). The memo is printed on the bottom<br />
left of the check.<br />
8. Enter or edit the amount(s) from the invoice into the 1099 Detail for Payment<br />
section as they should be included on the vendor’s 1099-MISC at the end of the<br />
year. If no amounts are entered in any of the fields in this section, the invoice will<br />
not be included on the vendor’s 1099-MISC.<br />
9. Click Save.<br />
Continue scheduling payments on this invoice by clicking New and entering the payment<br />
amount, payment date, and a memo (optional).<br />
Deleting a Scheduled Payment<br />
To delete a scheduled payment prior to printing the check, complete the following<br />
steps:<br />
1. Go to Payables > View & Pay Invoices.<br />
2. Locate the invoice to delete by performing a search.<br />
3. Click the box beside the invoices with the payment you wish to delete.<br />
4. Click Schedule Live Pmts. The Schedule Payments dialog box in opened.<br />
5. Double-click the invoice. Scheduled payments are shown in the Authorized but<br />
not yet Printed section.<br />
6. Click the payment you wish to delete.<br />
7. Click Delete. Click OK to confirm.<br />
Recording ATF Payments<br />
Payments on an ATF invoice can be recorded when the invoice is entered (see “ATF -<br />
Quick Gen Payment” on page 201) and from Payables > View & Pay Invoices.<br />
Recording ATF Payments in Full<br />
To record an ATF invoice paid in full, complete the following steps:<br />
1. Go to either Payables > View & Pay Invoices or .<br />
2. Find the invoice for which to record an ATF payment. To narrow your search,<br />
click the ATF box before clicking Search. ATF invoices show a T in the ATF column.<br />
3. Click the boxes to select the invoices to record payments. To record payments for<br />
all ATF invoices, click Select All. Records with a zero balance cannot be selected.<br />
4. Click Record ATF Pmts. The Record ATF Payments dialog box is opened.<br />
5. Select the invoices that the full payment should be recorded.<br />
6. Click Record Pmts. The invoice is marked as paid with a zero balance and the<br />
View & Pay Invoices window is opened.<br />
208
2011 Client Write-Up Printing Vendor Checks<br />
Recording Partial ATF Payments<br />
To record a partial payment on an ATF invoice, complete the following steps:<br />
1. Go to Payables > View & Pay Invoices.<br />
2. Find the invoices for which to record the ATF payment. To narrow your search,<br />
click the ATF box before clicking Search. ATF invoices show a T in the ATF column.<br />
3. Click the check box to select the invoices to record payments. Records with a zero<br />
balance cannot be selected.<br />
4. Click Record ATF Pmts. The Record ATF Payments dialog box is opened.<br />
5. Double-click the invoice to record the partial payment. The Payment Detail and<br />
1099 Detail for Payment sections autofill.<br />
The Payment Detail section defaults to paying the full amount of the outstanding<br />
balance by credit card using today’s date as the payment date.<br />
The 1099 Detail for Payment section automatically shows the full amount of the<br />
outstanding balance on the vendor’s default 1099-MISC line.<br />
Figure 9-9: Record Partial ATF Payment<br />
6. Edit the payment Amount, Pmt Type (cash, check, credit card, electronic, or<br />
other), Pmt Date, Cash and Expense accounts, and the Memo. If Check is<br />
selected as the Pmt Type, the Check No field is activated. Enter the check number<br />
that was used to make the payment.<br />
Reset — Click to clear the information entered without saving.<br />
7. Edit the amount(s) from the invoice into the 1099 Detail for Payment section as<br />
they should be included on the vendor’s 1099-MISC at the end of the year. If no<br />
amounts are entered in any of the fields in this section, the invoice will not be<br />
included on the vendor’s 1099-MISC.<br />
8. Click Save Detail.<br />
9. Click Record Pmts. Payments are recorded for all invoices selected.<br />
Printing Vendor Checks<br />
Once live payments have been scheduled, they can be printed at any time by going to<br />
Payables > Live Payments > Print Checks. Refer to “Vendor Check Setup” on<br />
page 195 before attempting to print checks. Vendor checks print using either pre-<br />
209
Printing Vendor Checks<br />
2011 Client Write-Up<br />
printed check stock or MICR technology. Refer to “MICR Check Set Up” on page 24<br />
for a full explanation.<br />
IMPORTANT<br />
If printing MICR checks, print a test check before starting to print<br />
live checks. Go to Payables > Live Payments > Print Checks,<br />
select a check to print and a MICR bank, and click MICR Test.<br />
The check is not removed from the list of live checks to be printed.<br />
If the test check prints properly, you are ready to print live checks.<br />
To print vendor checks, complete the following steps:<br />
1. Go to Payables > Live Payments > Print Checks.<br />
Figure 9-10: Print Vendor Checks<br />
2. Select the type of check stock being used, either Blank MICR or Preprinted.<br />
3. MICR Options (not available if Preprinted was selected under Type of Check<br />
Stock):<br />
• MICR Banks — Select the bank from which these checks are drawn. The<br />
Starting Check Number field populates based on the Next Check # field in<br />
Setup > MICR Bank Accounts. Edit the Starting Check Number to<br />
include leading zeroes (e.g. 002001) to meet bank field length requirements.<br />
The bank information must be entered in Setup > MICR Bank Accounts to<br />
use this function.<br />
• MICR Printer — CWU automatically selects the printer specified as the<br />
default MICR Printer in Firm > Firm Info./Global Settings. Use the MICR<br />
Printer list to temporarily override the default MICR printer selection. Verify<br />
the selected printer has the proper ink for MICR printing. Change the default<br />
MICR printer in the MICR Printer field in Firm > Firm Info./<br />
Global Settings.<br />
210
2011 Client Write-Up Printing Vendor Checks<br />
4. Enter a Check Date. This is the current computer date. To change the date that<br />
prints on the check, either use the drop arrow or highlight the date and enter the<br />
correct date using the format MMDDYYYY. Enter only numbers (no slashes (/),<br />
dashes (-), or periods (.) in this date field or an erroneous date error is generated.<br />
Once the date is set, it prints on all checks printed during this session. Always verify<br />
this information before printing.<br />
5. Edit the Starting Check Number to match your next check. If more than one<br />
check is selected to be printed, the check numbers automatically advance for each<br />
check. If using pre-printed check stock, verify that the number in the Starting<br />
Check Number field matches the number on the first check placed in the printer.<br />
Always verify this information before printing.<br />
6. The list at the bottom of the screen displays checks scheduled for payment on the<br />
date shown in the Check Date field. These dates were assigned at Payables ><br />
View & Pay Invoices > Schedule Live Pmts. To display a different list of checks<br />
scheduled for print, edit the Check Date field using the drop list. This is the date<br />
printed on the check.<br />
Select checks to print by clicking the box next to the desired checks or clicking<br />
Select All to print all checks.<br />
If using pre-printed checks, jump to step 9 below.<br />
7. If printing MICR checks, select the MICR bank account to use for these checks.<br />
The Starting Check Number field fills with the check number from the Next<br />
Check # field on Setup > MICR Bank Accounts.<br />
8. If printing MICR checks, the MICR Printers field shows the printer set up in<br />
Firm > Firm Info./Global Settings. Use the drop list to select a different printer.<br />
9. Optional: To view payables checks on your computer screen prior to printing,<br />
select the Preview checks before printing check box. Once selected, the option<br />
remains in effect until the check box is cleared. To print checks from the preview<br />
screen, select the Printer icon ( ).<br />
10.Click Print. If you are using pre-printed check stock, the Windows printer dialog<br />
box opens and provides the opportunity to change the printer used during this<br />
print session. When using MICR blank check stock, the Windows printer dialog<br />
box does not open. Change the MICR printer on the Print Checks dialog box.<br />
Once a check has been printed, it is removed from the Print Vendor Checks<br />
screen and can be reprinted by clicking Reprint Screen.<br />
Additional Check Print Options<br />
The MICR Test button sends a test check to the selected MICR printer. Use this<br />
option to test check alignment. Printing test checks does not mark the check as printed<br />
and can still be printed from the Print Vendor Checks screen.<br />
The Refresh button clears the previously selected checks to print.<br />
The Select All button selects all checks displayed to print.<br />
211
Reprinting Vendor Checks<br />
2011 Client Write-Up<br />
The Reprint Screen button brings up the dialog box where all vendor checks previously<br />
printed are available to be reprinted. For more information about reprinting<br />
checks, see the “Reprinting Vendor Checks” on page 212.<br />
NOTE<br />
Once checks have been printed, they can be reprinted by going to<br />
Payables > Live Payments > Reprint Checks.<br />
Delete — To delete a check print record prior to printing a check, select a check and<br />
click Delete.<br />
Reprinting Vendor Checks<br />
Previously printed vendor checks are placed on the Reprint Vendor Checks screen<br />
and can be reprinted as many times as necessary.<br />
Select Payables > Live Payments > Reprint Checks for a list of all vendor checks<br />
that have previously been printed or click Reprint Screen on the Print Vendor<br />
Checks dialog box.<br />
IMPORTANT<br />
Place the check stock in the printer before starting this process.<br />
To reprint vendor checks, complete the following steps:<br />
1. Go to Payables > Live Payments > Reprint Checks.<br />
2. Select the type of check stock being used: Blank MICR or Preprinted.<br />
3. MICR Options (not available if Preprinted was selected under Type of Check<br />
Stock):<br />
• MICR Banks — Select the bank from which these checks are drawn. The<br />
Starting Check Number field populates based on the Next Check # field in<br />
Setup > MICR Bank Accounts. Edit the Starting Check Number to<br />
include leading zeroes (e.g. 002001) to meet bank field length requirements.<br />
The bank information must be entered in Setup > MICR Bank Accounts to<br />
use this function.<br />
• MICR Printer — CWU automatically selects the printer specified as the<br />
default MICR Printer in Firm > Firm Info./Global Settings. Use the MICR<br />
Printer list to temporarily override the default MICR printer selection. Verify<br />
the selected printer has the proper ink for MICR printing. Change the default<br />
MICR printer in the MICR Printer field in Firm > Firm Info./<br />
Global Settings.<br />
4. Enter a Check Date. This is the current computer date. To change the date that<br />
prints on the check, either use the drop arrow or highlight the date and enter the<br />
correct date using the format MMDDYYYY. Enter only numbers (no slashes (/),<br />
dashes (-), or periods (.) in this date field or an erroneous date error is generated.<br />
Once the date is set, it prints on all checks printed during this session. Always verify<br />
this information before printing.<br />
212
2011 Client Write-Up Voiding Vendor Checks<br />
5. Edit the Starting Check Number to match your next check. If more than one<br />
check is selected to be reprinted, the check numbers automatically advance for<br />
each check. If using pre-printed check stock, verify that the number in the Starting<br />
Check Number field matches the number on the first check placed in the<br />
printer. Always verify this information before printing.<br />
6. The list at the bottom of the screen displays vendor checks previously printed.<br />
Select checks to reprint by clicking the box next to the desired checks or clicking<br />
Select All to reprint all checks.<br />
If using pre-printed checks, jump to step 9 below.<br />
7. If printing MICR checks, select the MICR bank account to use for these checks.<br />
The Starting Check Number field fills with the check number from the Next<br />
Check # field on Setup > MICR Bank Accounts.<br />
8. If printing MICR checks, the MICR Printers field shows the printer set up in<br />
Firm Firm Info./Global Settings. Use the drop list to select a different printer.<br />
9. Optional: To view payables checks on your computer screen prior to printing,<br />
select the Preview checks before printing check box. Once selected, the option<br />
remains in effect until the check box is cleared. To print checks from the preview<br />
screen, select the Printer icon ( ).<br />
10.Click Print. If you are using pre-printed check stock, the Windows printer dialog<br />
box opens and provides the opportunity to change the printer used during this<br />
print session. When using MICR blank check stock, the Windows printer dialog<br />
box does not open. Change the MICR printer on the Print Checks dialog box.<br />
NOTE<br />
The MICR Test button sends a test check to the selected MICR printer.<br />
Use this option to test check alignment.<br />
Voiding Vendor Checks<br />
Vendor checks that were previously printed can be voided. Voiding a vendor check<br />
reverses the transaction from the journal automatically. If CWU can’t find the original<br />
transaction to reverse, a message appears, indicating that a manual reversal of the<br />
transaction in the journal is required. See “Entering Journal Transactions” on page 157<br />
for instructions on making manual entries to the journal.<br />
To void a check, complete the following steps:<br />
1. Go to Payables > Live Payments > Reprint Checks.<br />
2. Locate the check to void by changing to date in the Check Date field to the date<br />
the check was printed.<br />
3. Click the box beside the check to be voided<br />
4. Click Void. Voided checks display a T in the Void column. The invoice status and<br />
balance are updated.<br />
213
Editing ATF Payments<br />
2011 Client Write-Up<br />
Editing ATF Payments<br />
The following section covers viewing, editing, voiding, and deleting ATF payments.<br />
Before performing any of these functions, search for the payment.<br />
Searching for ATF Payments<br />
To locate the desired payments, complete the following steps:<br />
1. Go to Payables > ATF Payments > View ATF Payments. The ATF Payments<br />
dialog box opens.<br />
Figure 9-11: View ATF Payments<br />
2. The center of the ATF Payments screen displays the invoices selected based on<br />
the search criteria provided in the top of the screen. All invoices are listed by<br />
default. Enter the desired search criteria.<br />
• Vendor Code — Enter the vendor code of the desired vendor or press F2 to<br />
select from the vendor list.<br />
• Invoice ID — This is the unique number CWU assigns to each accounts payable<br />
transaction entered.<br />
• Payment Amount — Enter the exact amount of the ATF payment.<br />
• Date Range — Display all ATF payments recorded within a date range.<br />
Select Date Range and use the drop lists to enter Start and End dates.<br />
214
2011 Client Write-Up Editing ATF Payments<br />
• Month (1-12) — Enter the month of the current year of ATF payments to display.<br />
Enter 1 for January, 2 for February, 3 for March, etc.<br />
NOTE<br />
The Date Range and Month search criteria cannot be used together<br />
within a single search.<br />
3. Once the desired combination of search criteria is selected, click Search.<br />
Viewing and Editing ATF Payments<br />
To view or edit ATF payment detail:<br />
1. Go to Payables > ATF Payments > View ATF Payments.<br />
2. Locate the desired payment by performing a search as described in “Searching for<br />
ATF Payments” on page 214<br />
3. Double-click the desired payment. The payment detail displays on the bottom of<br />
the ATF Payments dialog box. The details of a voided ATF payment (shown with<br />
a T in the Void column) are shown, but since no changes can be made to the<br />
record, the fields are inactive.<br />
4. Make any necessary changes. The Check No field is activated when Check is the<br />
Payment Type.<br />
5. Edit the 1099 Detail section as needed.<br />
6. Click Save.<br />
NOTE<br />
When an ATF payment is edited, the original transaction is automatically<br />
reversed and the new, corrected transaction is recorded in the<br />
transaction journal.<br />
Voiding ATF Payments<br />
With ATF payments displayed according to the search criteria previously entered (see<br />
“Searching for ATF Payments” on page 214), ATF payments can be voided.<br />
To void an ATF payment:<br />
1. Go to Payables > ATF Payments > View ATF Payments.<br />
2. Locate the desired payment by performing a search as described in “Searching for<br />
ATF Payments” on page 214.<br />
3. Double-click the payment you wish to void. Only ATF payments with an F in the<br />
Void column can be voided. The payment detail is displayed on the bottom of the<br />
ATF Payments dialog box.<br />
4. Click Void.<br />
215
Check Writer<br />
2011 Client Write-Up<br />
Deleting ATF Payments<br />
Check Writer<br />
To delete an ATF payment:<br />
Printing Vendor Checks<br />
1. Go to Payables > ATF Payments > View ATF Payments.<br />
2. Locate the desired payment by performing a search as described in “Searching for<br />
ATF Payments” on page 214.<br />
3. Double-click the payment you wish to delete. Previously voided payments—those<br />
with a T in the Void column—cannot be deleted. The payment detail is opened on<br />
the bottom of the ATF Payments dialog box.<br />
4. Click Delete.<br />
Reset — To view all ATF payments after a payment’s detail has been displayed, click<br />
Reset.<br />
Use Check Writer to quickly print Vendor and NonVendor checks on the fly without<br />
having to schedule the payment.<br />
A vendor is set up in CWU as a vendor. A NonVendor can be set up in CWU as an<br />
employee, a contractor, or not at all.<br />
There are different options available for printing Vendor and NonVendor checks.<br />
To write a check to a Vendor using the Check Writer, complete the following steps:<br />
1. Go to Payables > Check Writer.<br />
216
2011 Client Write-Up Check Writer<br />
Figure 9-12: Check Writer<br />
2. Select Vendor as the Type of Payee. The Invoice box is activated.<br />
3. Enter the Invoice information. This information is optional to print a check but<br />
required to print an invoice. This section is not available for NonVendor checks.<br />
4. Select MICR or Preprinted check stock. If MICR is selected, select the appropriate<br />
MICR bank and verify the check number is correct in the Check No. field.<br />
If Preprinted is selected, enter the check number and verify that the number<br />
entered matches the number on the first check placed in the printer.<br />
5. Enter the date to print on the check.<br />
6. Enter the check amount. If using the Payables Bookkeeping Option for this client<br />
(see “Payables Setup” on page 36), the Bookkeeping Transactions section of the<br />
screen is activated and the Cash and Expense Amount fields default to the check<br />
amount. Edit the Cash and Expense Amount in step 12 below.<br />
7. Press F2 in the Pay to field to display a list of vendors. Select the appropriate vendor<br />
to pay from the displayed list. If the vendor code is known, enter the code in<br />
the Pay to field rather than pressing F2 and selecting from the list.<br />
When the Vendor List displays, if any additions or corrections are needed for the<br />
vendor’s information, click Vendor Setup to access the vendor setup screen.<br />
Once the additions or corrections are saved and the vendor setup screen is exited,<br />
the Vendor List redisplays and a vendor can be selected.<br />
The address section of the check fills with information from the vendor’s setup<br />
(Payables > Vendor Setup) and is not available to be edited in the Check Writer.<br />
217
Check Writer<br />
2011 Client Write-Up<br />
If using the Payables Bookkeeping Option for this client, the Cash and Expense<br />
Accounts in the Bookkeeping Transactions section of the screen display the<br />
accounts entered in the vendor’s setup. Edit the Cash and Expense Accounts in<br />
step 13 below.<br />
8. Enter a Memo to print on the check. This field is optional.<br />
9. The top part of the Bookkeeping Transactions section is for entry of transaction<br />
information. The grid at the bottom displays the list of transactions that are generated<br />
in the general ledger when the check prints. Press F2 in the Account fields, or<br />
type the account number directly into the field, to change the default Cash or<br />
Expense account used for this check.<br />
10.Enter the description to display in the general ledger for this transaction in the G/<br />
L Description field.<br />
11. Click Add/Replace to copy the Cash and Expense accounts and Amounts and<br />
the G/L Description to the grid section. The Balance column updates to show the<br />
amount of the total check that has not been allocated to the Cash and Expense<br />
accounts.<br />
12.To edit the Amount or Description for a transaction in the grid, double-click the<br />
entry in the grid. The transaction information displays in the top part of the Bookkeeping<br />
Transactions section. Edit as needed and click Add/Replace. Click Yes<br />
to overwrite the existing entry. The entries in the grid are updated.<br />
NOTE<br />
To split a check among multiple accounts, double-click the entry in the<br />
grid. The transaction information displays in the top part of the Bookkeeping<br />
Transactions section. Enter an amount in the Account column<br />
that is less than the full amount of the check and click Add/<br />
Replace. Click Yes to overwrite the existing entry. Place the cursor in<br />
the Account field that shows an unallocated amount. Press F2 and<br />
select an account or enter an account number if known. Click Add/<br />
Replace.<br />
13.To remove an Account that is listed in the grid, the entry must be deleted. Select<br />
the entry and click Delete. The entry is removed from the grid and the Balance<br />
column updates. Reenter the Account and Amount information and click Add/<br />
Replace. The grid shows the new entry and the Balance column reflects the<br />
change.<br />
IMPORTANT<br />
The Balance column should display 0.00 in order to print a check.<br />
If the Cash and Expense accounts do not show zero when the<br />
check is printed, go to Bookkeeping Enter Transactions to<br />
enter transactions necessary to balance the debits and credits.<br />
Account and amount information must appear in the grid at the<br />
bottom of the Check Writer window in order to generate a journal<br />
entry for this check.<br />
14.Enter the amount(s) from the check into the 1099 Detail section as they should be<br />
included on the vendor’s 1099-MISC at the end of the year. Click the 1099<br />
Default button to have the full amount of the check go to the vendor’s default<br />
1099-MISC line. See 1099 under “Adding a Vendor” on page 196<br />
15.To view checks on your computer screen prior to printing, select the Preview<br />
checks before printing check box. Once selected, the option remains in effect<br />
218
2011 Client Write-Up Check Writer<br />
until the check box is cleared. To print checks from the preview screen, select the<br />
Printer icon ( ).<br />
IMPORTANT<br />
Previewed checks are considered printed by CWU. If previewed<br />
checks are not printed when displayed, go to<br />
Payables > Live Payments > Reprint Checks and reprint the<br />
vendor check.<br />
16.With all check information verified and the Balance column displaying 0.00, click<br />
Print Check. The check prints (or displays if the Preview checks before printing<br />
option was selected) and the invoice and transactions are generated. The Print<br />
Check button is no longer available preventing you from printing the check twice.<br />
The View Invoice button is activated.<br />
Click New from the Check Writer window to either clear check information that<br />
hasn’t been printed or to enter new check information.<br />
17.Click View Invoice to access the Invoice Data Entry window. Make edits as<br />
needed to invoice information. Select Print/Preview Invoice on Save to print an<br />
invoice for this check. Click Save. The Check Writer window redisplays.<br />
Printing NonVendor Checks<br />
To reprint a vendor check, see “Reprinting Vendor Checks” on page 212.<br />
To print NonVendor checks using the Check Writer, complete the following steps:<br />
1. Go to Payables > Check Writer.<br />
2. Select NonVendor as the Type of Payee. The Invoice section is not available for<br />
NonVendor checks.<br />
3. Select MICR or Preprinted check stock. If MICR is selected, select the appropriate<br />
MICR bank and verify the check number is correct in the Check No. field.<br />
If Preprinted is selected, enter the check number and verify that the number<br />
entered matches the number on the first check placed in the printer.<br />
4. Enter the date to print on the check.<br />
5. Enter the check amount. If using the Payables Bookkeeping Option for this client<br />
(see “Payables Setup” on page 36), the Bookkeeping Transactions section of the<br />
screen is activated and the Cash and Expense Amount fields default to the check<br />
amount. Edit the Cash and Expense Amount in step 11 below.<br />
6. In the Pay to field, press F3 to display a list of employees, F4 for contractors, or<br />
F5 to display a list of saved NonVendors. NonVendors are saved when Print<br />
Check is selected from the Check Writer. Double-click the person to pay from the<br />
displayed list. The address information displays. If the appropriate NonVendor is<br />
not listed on any of the saved lists, enter the NonVendor’s information directly<br />
into the Pay to and Address fields.<br />
NOTE<br />
You should press F3, F4, or F5 in the Pay to field to select the NonVendor<br />
each time you enter a NonVendor check. Enter a new NonVendor’s<br />
information only if the NonVendor is not displayed in one of these lists.<br />
219
Check Writer<br />
2011 Client Write-Up<br />
7. Enter a Memo to print on the check. This field is optional.<br />
8. The top part of the Bookkeeping Transactions section is for entry of transaction<br />
information. The grid at the bottom displays the list of transactions that are generated<br />
in the general ledger when the check prints. Press F2 in the Account fields to<br />
select Cash and Expense accounts for this check. You can also type the account<br />
number into the field.<br />
9. Enter the description to display in the general ledger for this transaction in the G/<br />
L Description field.<br />
10.Click Add/Replace to copy the Cash and Expense Accounts and Amounts and<br />
the G/L Description to the grid section. The Balance column updates to show the<br />
amount of the total check that has not been allocated to the Cash and Expense<br />
accounts.<br />
11. To edit the Amount or Description for a transaction in the grid, double-click the<br />
entry in the grid. The transaction information displays in the top part of the Bookkeeping<br />
Transactions section. Make necessary edits and click Add/Replace.<br />
Click Yes to overwrite the existing entry. The entries in the grid are updated.<br />
NOTE<br />
To split a check among multiple accounts, double-click the entry in the<br />
grid. The transaction information displays in the top part of the Bookkeeping<br />
Transactions section. Enter an amount in the Account column<br />
that is less than the full amount of the check and click Add/<br />
Replace. Click Yes to overwrite the existing entry. Place the cursor in<br />
the Account field that shows an unallocated amount. Press F2 and<br />
select an account or enter an account number if known. Click Add/<br />
Replace.<br />
12.To edit the account for a transaction listed in the grid, the transaction must be<br />
deleted. Select the entry and click Delete. The transaction is removed from the<br />
grid and the Balance column updates. Reenter the transaction information and<br />
click Add/Replace. The grid shows the new entry and the Balance column<br />
reflects the change.<br />
IMPORTANT<br />
The Balance column should display 0.00 in order to print a check.<br />
If the Cash and Expense accounts do not show zero when the<br />
check is printed, go to Bookkeeping Enter Transactions to<br />
enter transactions necessary to balance the debits and credits.<br />
Account and amount information must appear in the grid at the<br />
bottom of the Check Writer window in order to generate a journal<br />
entry for this check.<br />
13.Enter the amount(s) from the check into the 1099 Detail section as they should be<br />
included on the NonVendor’s 1099-MISC at the end of the year.<br />
14.To view checks on your computer screen prior to printing, select the Preview<br />
checks before printing check box. Once selected, the option remains in effect<br />
until the check box is cleared. To print checks from the preview screen, select the<br />
Printer icon ( ).<br />
220
2011 Client Write-Up Check Writer<br />
IMPORTANT<br />
Previewed checks are considered printed by CWU. If previewed<br />
checks are not printed when displayed, go to<br />
Payables > Live Payments Reprint Checks and reprint the vendor<br />
check.<br />
15.With all check information verified and the Balance column displaying 0.00, click<br />
Print Check. The check prints (or displays if the Preview checks before printing<br />
option was selected) and the invoice and transactions are generated. The Print<br />
Check button is no longer available preventing you from printing the check twice.<br />
The View Invoice button is activated.<br />
NOTE<br />
The View Invoice button does not activate for NonVendor checks.<br />
Click New from the Check Writer window to clear check information that hasn’t<br />
been printed or to enter new check information.<br />
To reprint a NonVendor check, see “Reprinting NonVendor Checks” on page 221.<br />
Reprinting NonVendor Checks<br />
Previously printed nonvendor checks are placed on the Reprint NonVendor Checks<br />
screen and can be reprinted as many times as necessary.<br />
Select Payables > Live Payments > Reprint NonVendor Checks for a list of all<br />
NonVendor checks that have previously been printed.<br />
IMPORTANT<br />
Place the check stock in the printer before starting this process.<br />
To reprint NonVendor checks, complete the following steps:<br />
1. Go to Payables > Live Payments > Reprint NonVendor Checks.<br />
2. Select the type of check stock being used: Blank MICR or Preprinted.<br />
3. MICR Options (not available if Preprinted was selected under Type of Check<br />
Stock):<br />
• MICR Banks — Select the bank from which these checks are drawn. The<br />
Starting Check Number field populates based on the Next Check # field in<br />
Setup > MICR Bank Accounts. Edit the Starting Check Number to<br />
include leading zeroes (e.g. 002001) to meet bank field length requirements.<br />
The bank information must be entered in Setup > MICR Bank Accounts to<br />
use this function.<br />
• MICR Printer — CWU automatically selects the printer specified as the<br />
default MICR Printer in Firm > Firm Info./Global Settings. Use the MICR<br />
Printer list to temporarily override the default MICR printer selection. Verify<br />
the selected printer has the proper ink for MICR printing. Change the default<br />
MICR printer in the MICR Printer field in Firm > Firm Info./<br />
Global Settings.<br />
221
Check Writer<br />
2011 Client Write-Up<br />
4. Enter a Check Date. This is the current computer date. To change the date that<br />
prints on the check, either use the drop arrow or highlight the date and enter the<br />
correct date using the format MMDDYYYY. Enter only numbers (no slashes (/),<br />
dashes (-), or periods (.) in this date field or an erroneous date error is generated.<br />
Once the date is set, it prints on all checks printed during this session. Always verify<br />
this information before printing.<br />
5. Edit the Starting Check Number to match your next check. If more than one<br />
check is selected to be reprinted, the check numbers automatically advance for<br />
each check. If using pre-printed check stock, verify that the number in the Starting<br />
Check Number field matches the number on the first check placed in the<br />
printer. Always verify this information before printing.<br />
6. The list at the bottom of the screen displays nonvendor checks previously printed.<br />
Select checks to reprint by clicking the box next to the desired checks or clicking<br />
Select All to reprint all checks. Sort the checks listed by clicking on the column<br />
header.<br />
If using pre-printed checks, jump to step 9 below.<br />
7. If printing MICR checks, select the MICR bank account to use for these checks.<br />
The Starting Check Number field fills with the check number from the Next<br />
Check # field on Setup > MICR Bank Accounts.<br />
8. If printing MICR checks, the MICR Printers field shows the printer set up in<br />
Firm > Firm Info./Global Settings. Use the drop list to select a different printer.<br />
9. Optional: To view checks on your computer screen prior to printing, select the<br />
Preview checks before printing check box. Once selected, the option remains in<br />
effect until the check box is cleared. To print checks from the preview screen,<br />
select the Printer icon ( ).<br />
10.Click Print. If you are using pre-printed check stock, the Windows printer dialog<br />
box opens and provides the opportunity to change the printer used during this<br />
print session. When using MICR blank check stock, the Windows printer dialog<br />
box does not open. Change the MICR printer on the Print Checks dialog box.<br />
The MICR Test button sends a test check to the selected MICR printer. Use this<br />
option to test check alignment.<br />
The Refresh button clears the previously selected checks to print.<br />
The Void button marks the check as voided and generates offsetting transactions in the<br />
transaction journal to reverse the original transaction.<br />
Editing NonVendor Information<br />
The nonvendor information that is automatically saved when a nonvendor Check<br />
Writer check is printed can be edited using the nonvendor changes feature.<br />
To edit previously saved nonvendor information:<br />
1. Go to Payables > NonVendor Changes.<br />
222
2011 Client Write-Up Viewing 1099 Information<br />
2. Select the NonVendor to edit by clicking on the desired nonvendor. The bottom of<br />
the window fills with the saved nonvendor name, contact information, and Federal<br />
ID number.<br />
3. Edit the information as needed.<br />
4. Click Save.<br />
NOTES<br />
The NonVendor Changes window cannot be used to enter new nonvendor<br />
information - only to edit the nonvendor information that is saved<br />
when a Check Writer check is printed.<br />
Information saved on the NonVendor Changes window affects both<br />
future checks entered for that nonvendor and nonvendor checks that<br />
are reprinted. For instance, if a nonvendor check prints with incorrect or<br />
mispelled payee or demographic information, edit the information on<br />
the NonVendor Changes window and reprint the check.<br />
Consolidating NonVendor Information<br />
Use this feature to combine or consolidate duplicate NonVendors. Duplicate NonVendors<br />
are created by writing more than one Check Writer check to a single NonVendor<br />
payee but inadvertently creating a new NonVendor record each time. When duplicate<br />
NonVendor records are created, checks appear in reports associated with different<br />
entities rather than a single NonVendor. Additionally, a 1099-MISC would be created<br />
for each of the duplicate NonVendors.<br />
To consolidate NonVendor information:<br />
1. Go to Payables > NonVendor Changes.<br />
2. Click on the Name column header to group by name.<br />
3. Edit the NonVendor information (see “Editing NonVendor Information” on<br />
page 222) so that the same Federal ID number is used for all payees that refer to<br />
the same NonVendor.<br />
4. Edit one of these NonVendor’s information so that it contains the correct information<br />
(correct payee name, address, and phone number).<br />
5. Select the NonVendor displaying the correct information.<br />
6. Click Consolidate. NonVendors with the same SSN or EIN (other than the one<br />
selected) are removed from the window and their transactions are combined with<br />
the selected NonVendor’s transactions.<br />
Viewing 1099 Information<br />
Use the View 1099 Info window to view and edit 1099 information for each payment<br />
made to vendors and nonvendors. It is also a convenient place to view payment details<br />
of vendor invoices.<br />
223
Viewing 1099 Information<br />
2011 Client Write-Up<br />
Editing Vendor Payment Information<br />
To view and edit vendor invoice payment and 1099 information, complete the following:<br />
1. Go to Payables > 1099 Info.<br />
Figure 9-13: View 1099 Info window<br />
2. Select to view Vendors payment information. A list of all vendor Codes and vendor<br />
Names set up in CWU is listed in the Vendors section of the window. Click a<br />
column header to sort the information.<br />
3. Select a vendor to display all invoices saved for that vendor in the Invoices section.<br />
4. Click an invoice one time to display payment information for that invoice in the<br />
Payments section of the window. Double-click an invoice to display the invoice.<br />
5. Click a payment to display the amount of the payment (in the 1099 Detail for<br />
Payment section) that has been allocated to be included on the vendor’s 1099-<br />
MISC.<br />
Edit the 1099 information by:<br />
• Editing the amount directly in the 1099 Detail for Payment section<br />
• Clicking the Reset 1099 button to revert to the 1099 information last saved<br />
• Clicking the 1099 Default button to have the full amount of the payment allocated<br />
to the vendor’s default 1099 field as assigned during Vendor setup<br />
224
2011 Client Write-Up Generating 1099 Data<br />
Generating 1099 Data<br />
• Clicking Clear 1099 to remove the 1099 amount from the 1099 Detail for<br />
Payment section<br />
6. Click Save.<br />
7. Click Exit when all editing is complete.<br />
Editing NonVendor Payment Information<br />
1. Go to Payables > 1099 Info.<br />
2. Select to view NonVendors payment information. Information about nonvendors<br />
that have had a Check Writer check written to them displays. Click a column<br />
header to sort the information.<br />
3. Click a nonvendor in the NonVendors section one time to display payment and<br />
check information for that nonvendor in the Payments section of the window.<br />
Double-click a nonvendor to display the Editing NonVendor Information window.<br />
Edit the 1099 information by:<br />
• Editing the amount directly in the 1099 Detail for Payment section<br />
• Clicking the Reset 1099 button to revert to the 1099 information last saved<br />
• Clicking Clear 1099 to remove the 1099 amount from the 1099 Detail for<br />
Payment section<br />
4. Click Save.<br />
5. Click Exit when all editing is complete.<br />
In order to generate a 1099 MISC for vendors and nonvendors, and include their pay<br />
amounts in the company’s 1096, the 1099 data must first be generated.<br />
To generate the 1099 data file for vendors and nonvendors:<br />
1. Go to Payables > 1099 Info.<br />
2. Click the Gen 1099 Data button<br />
IMPORTANT<br />
The 1099 data file must be generated before processing 1099s<br />
for vendors and nonvendors (see “1099/1096/1098 Processing”<br />
on page 146). If 1099s are processed before the 1099 data file for<br />
vendors and nonvendors is generated, no 1099 is generated for<br />
vendors or nonvendors.<br />
Payables Check Alignment<br />
The check alignment feature is used to change the alignment of information printed on<br />
pre-printed checks. The information in the white fields can be adjusted to match preprinted<br />
checks.<br />
Complete the following to adjust the pre-printed check alignment:<br />
225
Payables Check Alignment<br />
2011 Client Write-Up<br />
1. Go to Payables > Check Alignment.<br />
Figure 9-14: Payables Check Alignment<br />
2. Click the left mouse button on the field to be adjusted.<br />
3. Hold the mouse button down while dragging the field to the desired position on<br />
the check.<br />
4. Release the mouse button to place the field in the new position on the check. The<br />
approximate coordinates from the left and top of the check display in the bottom<br />
left corner of the screen.<br />
5. Click Save to save the changes.<br />
Click Reset to restore all the fields on the check to their default location.<br />
Due to multiple options of operating systems, printers, and check formats, minor<br />
adjustments may be required to make checks print properly. Copy a check and print a<br />
test check to make sure the information matches and is positioned properly. This prevents<br />
wasting check stock.<br />
226
2011 Client Write-Up Entering Receivables Options<br />
10 Accounts Receivable<br />
Use Client Write-Up’s Accounts Receivable module to invoice customers and generate<br />
monthly statements. Define individual customer credit limits, payment terms, discounts,<br />
and penalties, and easily apply a single payment to multiple invoices. Many<br />
receivables reports are available, including past due and aged receivables reports.<br />
Before entering invoice information, complete the following set up information:<br />
1. Enter receivables options (page 227)<br />
2. Enter state, county, and city specific sales tax information (page 230)<br />
3. Define the accounts that will be debited and credited for the various types of transactions.<br />
This step is not required if not using the bookkeeping feature (page 232).<br />
4. Invoice item set up (page 233)<br />
5. Customer set up (page 234)<br />
Entering Receivables Options<br />
There are many options available when setting up Accounts Receivable. You can set<br />
up the auto invoice numbering feature, service charge amounts, short and long dunning<br />
messages, payment terms, and customer status classification messages.<br />
AR Options<br />
To enter accounts receivable options, complete the following steps:<br />
1. Go to Receivables > Receivables Options > AR Options.<br />
2. Complete the following fields:<br />
• Use Chart of Accounts — Select this field if the CWU bookkeeping feature<br />
is being used. A Chart of Accounts must be set up to use this feature. See<br />
“Chart of Accounts (COA) Setup” on page 45 for information on creating a<br />
Chart of Accounts. The Auto-Post to Transaction Register field is activated<br />
when the Use Chart of Accounts field is selected.<br />
• Auto-Post to Transaction Register — When this field is selected, transactions<br />
post to the transaction register, or journal, automatically when the transaction<br />
is saved. If this option is not selected, move transactions to the journal<br />
manually by going to Receivables > <strong>Manual</strong> Post AR Transactions.<br />
• Check Credit Limit — With this option selected and an invoice is saved,<br />
CWU checks a customer’s outstanding balance plus the amount of the invoice<br />
just saved against the credit limit set for the client<br />
(Receivables > Customer Setup > Customer Info, the Credit Limit field).<br />
A popup message displays if the credit limit is exceeded.<br />
227
Entering Receivables Options<br />
2011 Client Write-Up<br />
• Auto Invoice Numbering — Select this option to have CWU auto-increment<br />
the invoice number when a new invoice is entered. This option is recommended<br />
since invoices must be entered using a unique number.<br />
Starting Invoice Number — Specify the starting invoice number to use<br />
when Auto Invoice Numbering is selected. This number must be between 1<br />
and 999999.<br />
Ending Invoice Number — Specify the highest invoice number to use when<br />
Auto Invoice Numbering is selected. This number must be between 1 and<br />
999999.<br />
Invoice Reset Number — This is the number that the invoice number automatically<br />
resets to once the Ending Invoice Number is reached. This number<br />
must be between 1 and 999999.<br />
• Dunning Messages (optional) — Select to use Standard (40 characters<br />
max.) or Extended (375 characters max.) dunning messages. Set up different<br />
“payment of debt” messages to appear on the monthly statement for each<br />
aging period past due (1-30 days, 31-60 days, 61-90 days, 91-120 days, and<br />
over 120 days). To use, select either Extended or Standard. Standard messages<br />
have a maximum of 40 characters each. If extended messages are<br />
selected, the Dunning Messages tab activates. See “Extended Dunning Messages”<br />
on page 228.<br />
• Service Charge (optional) — A service charge may be assessed on all<br />
invoices, invoices for a specific customer type, or no service charge assessed<br />
on any invoices.<br />
Setting up a Service Charge:<br />
1. Select an Account Type (None, Regular, Balance Forward, Temporary, or All)<br />
from the drop list that the service charge should apply to. Each customer is<br />
assigned an Account Type on the Receivables > Customer Setup screen.<br />
2. Code 1 thru Code 4 — Enter a fixed dollar amount to be added to each invoice<br />
for the Account Type selected. Each customer is assigned a Service Charge level<br />
(Code 1 thru Code 4) on the Receivables > Customer Setup screen.<br />
Extended Dunning Messages<br />
Fields on the Dunning Messages tab become active when the Extended Dunning<br />
Messages field on the AR Options tab under Receivables > Receivables Options is<br />
selected.<br />
Enter an extended dunning message (up to 375 characters in length) for each aging<br />
period. Use this format when greater detail is needed for dunning messages. Extended<br />
dunning messages appear on monthly statements. The message that appears on the<br />
statement is based on the number of days an invoice is past due.<br />
Click Save when all extended dunning messages have been entered.<br />
228
2011 Client Write-Up Entering Receivables Options<br />
Payment Terms<br />
Up to five payment terms and discounts for early payment can be set up in Client<br />
Write-Up. Once these terms have been set up, you can identify the terms that apply to<br />
each customer in Customer Setup. Go to Receivables > Customer Setup, select the<br />
customer, and on the Customer Info tab, select the desired terms from the Terms<br />
drop list field. Terms specific to the customer appear on their invoices.<br />
To set up terms, complete the following:<br />
1. Go to Receivables > Receivables Options > Payment Terms.<br />
Figure 10-1: Payment Terms<br />
2. Complete the following fields:<br />
• Description (required) — For Terms codes 1-5, enter a description for the<br />
term (e.g. 5/10 Net 30).<br />
• Discount Pct (optional) — For all codes, enter the percentage of discount to<br />
be applied to an invoice when the invoice is paid in full within the number of<br />
days specified in the Discount Days field.<br />
• Discount Days (optional) — For all codes, enter the number of days after the<br />
invoice date that a customer will receive the early payment discount specified<br />
in the Discount Pct field.<br />
• Due Days (required) — For all codes, enter the number of days after the<br />
invoice date that an invoice must be paid in full before it is considered delinquent.<br />
This value must be equal to or larger than the number in the Discount<br />
Days field.<br />
3. Click Save.<br />
229
Entering Sales Tax Records<br />
2011 Client Write-Up<br />
Customer Status<br />
Designate a customer status and corresponding message to appear in the Status field<br />
on the Receivables > Enter/Update Invoices screen when a customer is selected<br />
from the Customer drop list. When a customer has a status of Active, no message displays.<br />
This message does not print on customer statements or invoices.<br />
To associate messages with customer statuses:<br />
1. Go to Receivables > Receivables Options > Customer Status.<br />
2. On line 1, select a status of Warning, Hold, Inactive, or Notify from the Status<br />
drop list.<br />
3. Enter a message (max. 100 characters) in the Status Message field for line 1.<br />
4. Repeat steps 2 and 3 for lines 2 thru 7.<br />
5. Click Save.<br />
NOTE<br />
Assign a status to a customer by going to<br />
Receivables > Customer Setup.<br />
User Defined<br />
Headings<br />
Store unique information about customers using user defined fields. Enter a heading<br />
that describes the type of information to be stored in the field (e.g. Credit card number,<br />
birthday, etc.). The input fields for these headings appear on the User Defined Info<br />
tab in Customer Setup.<br />
Once User Defined Heading labels have been entered, click Save.<br />
Entering Sales Tax Records<br />
Enter state, county, and city specific sales tax information. Create a sales tax record<br />
for each state in which you do business. If you do business in various counties within<br />
a state, a unique sales tax record is required for each county. This also is true for<br />
unique city tax rates.<br />
Example — You do business in the cities of Highlands and Franklin, both in Macon<br />
County, North Carolina. You should create two sales tax records, both showing North<br />
Carolina and the appropriate state sales Tax Rate and Macon County with the appropriate<br />
county Tax Rate. The City Names will show the two different cities and the<br />
city Tax Rate should be entered - even if the rate is the same for both cities.<br />
NOTE<br />
When the sales tax information is entered, run the Sales Tax Summary<br />
report to calculate the amount of sales tax owed each entity in<br />
which you do business. Go to<br />
Reports > Accounts Receivable > Sales Tax Summary to run this<br />
report.<br />
230
2011 Client Write-Up Entering Sales Tax Records<br />
To enter sales tax records, complete the following:<br />
1. Go to Receivables > Sales Tax Records.<br />
2. Enter a Sales Tax Code and click New. Sales tax codes are alphanumeric and can<br />
be up to 20 characters long. Once these codes are saved, these can be used in Customer<br />
Setup (to assign a default for each customer) and when Entering/Updating<br />
Invoices.<br />
Figure 10-2: Sales Tax Information<br />
3. Select the check boxes that are appropriate for the sales tax code being entered.<br />
• Sales Tax Exempt — The selected entity does not charge sales tax.The sales<br />
tax information is removed from the record.<br />
• Shipping Tax Exempt — The selected entity does not charge sales tax on<br />
shipping charges.<br />
• Tax Code Active/Inactive — Select Tax Code Active when it should be<br />
used. Select Tax Code Inactive when it should not be used. Inactive codes<br />
do not appear as a choice when entering or updating invoices.<br />
4. Enter information for the recording of sales tax. When entering multiple records<br />
for a state or county, repeat the appropriate higher-level information.<br />
• Name — Enter a name for the sales tax.<br />
• Tax Rate — Enter the tax rate as a decimal. A tax rate of 6% should be<br />
entered as 0.06.<br />
• Maximum Taxable — If there is a maximum amount that is subject to this<br />
county’s or city’s sales tax, enter that amount.<br />
231
GL Account Setup for Receivables<br />
2011 Client Write-Up<br />
IMPORTANT<br />
While the Name and Tax Rate for a State or County does not<br />
have to entered for the City tax information to be used, it is recommended<br />
that all preceding entities be given names, even if the<br />
rates (or maximums) remain zero.<br />
5. Save each record before entering the next..<br />
Delete — To delete a previously saved sales tax record, double-click the State Name<br />
or Tax Code of the record to delete. The information for that sales tax record displays<br />
in the Sales Tax Information section. Click Delete then click OK to confirm.<br />
Reset — Click Reset to revert to the last saved sales tax information for this sales tax<br />
record.<br />
GL Account Setup for Receivables<br />
NOTE<br />
If you are not using the Client Write-Up bookkeeping feature, proceed<br />
to “Invoice Item Setup”.<br />
Each transaction type must be assigned a debit and a credit account in order to keep<br />
the Chart of Accounts in balance.<br />
To assign debit and credit accounts to transaction types, complete the following:<br />
1. Go to Receivables > GL Account Dist File.<br />
Figure 10-3: GL Account Setup<br />
232
2011 Client Write-Up Invoice Item Setup<br />
2. Select a Transaction Type. Either double-click a Transaction Type from the list<br />
or click the down arrow next to the Transaction Type field. The Transaction<br />
Type windows displays Transaction Type codes and Descriptions. Double-click<br />
the desired Transaction Type.<br />
3. Click the down arrow next to the Debit Account field to select a debit account. A<br />
list of postable accounts from the Chart of Accounts displays. Double-click the<br />
desired debit account. If the desired account is not listed, double-click New to create<br />
a new postable account on the fly.<br />
4. Click the down arrow next to the Credit Account field to select a credit account.<br />
A list of postable accounts from the Chart of Accounts displays. Double-click the<br />
desired credit account. If the desired account is not listed, double-click New to<br />
create a new postable account on the fly.<br />
NOTE<br />
Include penalties and service charges if these are to be applied.<br />
For more information on creating accounts on the fly, see “Create an<br />
Account “On the Fly”” on page 156.<br />
Invoice Item Setup<br />
5. Click Save. The grid is updated with the new account information.<br />
Delete — To delete a previously saved transaction type and debit/credit account combination,<br />
double-click the line in the grid to be deleted. The information for that line<br />
displays in the top part of the window. Click Delete then click OK to confirm.<br />
Reset — Click Reset to revert to the last saved transaction type and debit/credit<br />
account combination.<br />
Before invoices can be entered, at least one invoice item must be set up in CWU.<br />
To set up invoice items, complete the following:<br />
1. Go to Receivables > Invoice Item Setup.<br />
2. Enter a code in the Item Number field. Item numbers are alphanumeric and can<br />
be up to 20 characters long.<br />
IMPORTANT<br />
Use only letters and numbers when assigning item numbers. Do<br />
not use spaces or any special characters.<br />
3. Click New.<br />
4. Enter the following information about each item in the Item Setup section of the<br />
Item Information tab:<br />
• Item Description — Enter an item description of up to 40 characters. This<br />
description appears on the Enter/Update Invoices screen and on the invoice<br />
when an extended description is not used.<br />
233
Customer Setup<br />
2011 Client Write-Up<br />
• Ext. Description (check box) — Select when more than a 40-character<br />
description is needed. When selected, the Extended Desc must contain the<br />
description for the item.<br />
• Extended Desc — Enter a description not to exceed 200 characters. Cannot<br />
be used unless the Ext. Description (check box) is selected.<br />
• Service/Product — Select whether this item is a service or a product.<br />
• Taxable/Non-Taxable — Select whether this item is taxable or non-taxable.<br />
• Current Cost — Enter the company’s cost for this item.<br />
5. Set up and choose three different types of Pricing:<br />
• Amount – The dollar amount charged for a single, sellable item.<br />
• Percent – The percentage of markup (for a single, sellable item) over and<br />
above the Current Cost amount.<br />
• Quantity – The dollar amount charged for multiple items (bulk pricing).<br />
Prices A – E can interchangeably reflect amount and percent prices; however,<br />
a single price (A – E) cannot both be Amount and Percent pricing. For example,<br />
Price A can either be Amount or Percent pricing (not both) and, if Price<br />
A is Amount pricing, Price B can be Percent pricing. Prices F – P can only<br />
be used for Quantity pricing.<br />
A. For Prices A – E, select either Amount or Percent. Price A defaults to<br />
Percent pricing at .00 percent, if unused.<br />
– Amount — The actual amount charged per item.<br />
– Percent — The percentage (0 – 0.99999) of the Current Cost to add to<br />
the Current Cost that will be charged per item. Enter as a decimal; must<br />
be less than one. If Current Cost is $0.00 and Percent pricing is used,<br />
the item price displays $0.00 on the invoice.<br />
B. For Prices F – P on the Quantity Pricing tab, enter the Quantity and<br />
Price.<br />
– Quantity — The actual quantity (per each) in bulk<br />
– Price — The actual dollar amount charged for the corresponding bulk<br />
quantity<br />
6. Click Save.<br />
Reset<br />
Customer Setup<br />
The Reset button clears the item information from the dialog box and reverts to the<br />
information previously saved.<br />
Delete<br />
To delete an item, double-click the item under Item Description to display the item<br />
information. Then click Delete. Click OK to confirm the deletion.<br />
Select Receivables > Customer Setup to enter information about Accounts Receivable<br />
customers. Accounts Receivable customer information must be entered for a cus-<br />
234
2011 Client Write-Up Customer Setup<br />
Adding a Customer<br />
tomer before any invoice information can be entered for that customer. When the<br />
Customer Setup dialog box is open, customers are listed alphabetically.<br />
To add a customer, complete the following steps:<br />
1. Go to Receivables > Customer Setup.<br />
2. Enter a code in the Customer Code field. Customer codes are alphanumeric and<br />
can be up to 20 characters long.<br />
IMPORTANT<br />
Use only letters and numbers when assigning customer codes.<br />
Do not use spaces or any special characters.<br />
3. Click New. The Customer Information fields are enabled.<br />
4. Enter the following information about each customer on the Customer Info tab:<br />
Figure 10-4: Accounts Receivable - Customer Info tab<br />
• Customer Name, Address, Phone, and Extension (required) — Enter the<br />
Customer Name and their contact information. The address is their billing<br />
address.<br />
• Zip (required) — Enter the customer’s zip code. This field is formatted after<br />
information is typed. The City and State fields autofill with information from<br />
the zip code database.<br />
• Ship Address (optional) — Select this check box to show both the billing and<br />
shipping address on the invoice, automatically. When not selected, the Billing<br />
Address is used in the “Ship To” address area on an invoice. If selected, enter<br />
the shipping information on the Shipping Address tab.<br />
• Contact (optional) — Enter the name of the customer’s contact person.<br />
235
Customer Setup<br />
2011 Client Write-Up<br />
• Salesperson (optional) — Enter the name (or code) of the salesperson servicing<br />
the customer.<br />
• Discount Percent (optional) — Enter the Discount Percent (a decimal value<br />
less than 1.00) to designate the percentage of discount to be applied to this<br />
customer’s invoices. This discount can be used instead of, or in addition to<br />
quantity discounts. (.25 = 25% discount).<br />
• Credit Limit (optional) — The Credit Limit is the maximum dollar amount<br />
of outstanding receivables the customer is allowed at one time. If Check<br />
Credit Limit (check box) was selected on the Receivables > Receivables<br />
Options, AR Options tab, a warning displays when entering the invoice stating<br />
the customer has exceeded this limit.<br />
• Price Code (required) — Select a default Price Code for this customer. Override<br />
this when entering invoice information. Pricing levels are set for each<br />
invoice item by going to Receivables > Invoice Item Setup, the Item Information<br />
tab. While you are selecting to use an overall pricing level for all purchases<br />
made by this customer, line item pricing is available when entering<br />
invoice information.<br />
• Account Type (required) — Select the Account Type as it applies to customer<br />
credit.<br />
– Regular & Temporary types do not track aging balances. Both imply the<br />
customer is not operating “on credit” (does not have a credit account).<br />
The intent of Regular is to indicate regularly active customers without<br />
credit and Temporary indicates those customers who do not regularly<br />
place orders.<br />
– Balance Forward — If selected, the aging balances on the Balance Forward<br />
tab are activated to track the credit and aging balances for the customer.<br />
• Terms (required) — Select the payment terms for this customer. Options in<br />
the list are set up on the<br />
Receivables > Receivables Options > Payment Terms screen.<br />
• Sales Tax Code (optional) — Select the appropriate sales tax code for this<br />
customer. Sales Tax Codes were set up on the<br />
Receivables > Sales Tax Records screen.<br />
• Tax Exempt Number (optional) — The Tax Exempt Number field<br />
becomes active when 000 - Sales Tax Exempt is selected from the Sales Tax<br />
Code field. Enter the customer’s sales tax exempt number. This number prints<br />
on invoices and monthly statements.<br />
• Service Charge (optional) — If using a service charge, select the service<br />
charge Code and amount from the drop list. Service charge codes and<br />
amounts are set up on the Receivables > Receivables Options, AR Options<br />
tab.<br />
• Dunning Notices (optional) — Select this check box to have dunning messages<br />
included on this customer’s monthly statements. Dunning messages are<br />
set up on the Receivables > Receivables Options, AR Options tab and the<br />
Dunning Messages tab.<br />
• Status (required) — Set the Status to be displayed when entering an invoice<br />
for this customer. Valid statuses are: A (Active) - This is the status for regular<br />
236
2011 Client Write-Up Customer Setup<br />
customers and no message displays. The other statuses are: W (Warning), H<br />
(Hold), I (Inactive), and N (Notify). When a customer is selected on the<br />
Enter/Update Invoices screen, this status along with the message that was<br />
associated with this status on the Receivables > Receivables Options, Customer<br />
Status tab displays.<br />
• Ship Via (optional) — Enter the preferred method of shipping to this customer.<br />
If entered, this is the default method used on each invoice for this customer.<br />
NOTE<br />
Information on the right side of the Customer Info tab is for informational<br />
purposes only. CWU automatically updates these fields as transactions<br />
are entered. Do not make any entries in these fields. CWU<br />
automatically updates these fields as transactions are entered. The initial<br />
YTD Amts reflect entries made on the Beginning Balances tab.<br />
• Debit - Last Date — The Debit - Last Date is the date of the last debit transaction<br />
for this customer. CWU updates this date each time a debit transaction<br />
is entered for this customer.<br />
• Debit - Last Amt — The Debit - Last Amt is the amount of the last debit<br />
transaction for this customer. CWU updates this date each time a debit transaction<br />
is entered for this customer.<br />
• Debit - YTD Amt — The Debit - YTD Amt is the total of all debit transactions<br />
entered for this customer during the current year. This field automatically<br />
fills with the amount entered in the Amount Owed field on the<br />
Beginning Balances tab. CWU updates this amount as transactions are<br />
entered.<br />
• Credit - Last Date — The Credit - Last Date is the date of the last credit<br />
transaction for this customer. CWU updates this date each time a credit transaction<br />
is entered for this customer.<br />
• Credit - Last Amt — The Credit - Last Amt is the amount of the last credit<br />
transaction for this customer. CWU updates this date each time a credit transaction<br />
is entered for this customer.<br />
• Credit - YTD Amt — The Credit - YTD Amt is the total of all credit transactions<br />
entered for this customer during the current year. Make an entry in this<br />
field only if you are setting up the customer after the start of the year. In this<br />
case, CWU updates this amount as transactions are entered.<br />
• Payments - Last Date — The Payments - Last Date is the date the last payment<br />
was received from this customer.<br />
• Payments - Last Amt — The Payments - Last Amt is the amount of the last<br />
payment received from this customer.<br />
• Payments - YTD Amt — Enter the total dollar amount of all payments<br />
received from this customer during the current year.<br />
• Service Charges - Last Date — Enter the last date a service charge was<br />
applied to this customer.<br />
• Service Charges - Last Amt — Enter the amount of the last service charge<br />
applied to this customer.<br />
• Service Charges - YTD Amt — Enter the total dollar amount of service<br />
charges applied to this customer during the current year.<br />
237
Customer Setup<br />
2011 Client Write-Up<br />
• Balance — This is a calculated field of the customer’s current balance.<br />
5. All of the information on the Balance Forward tab is calculated by CWU and<br />
becomes active if the Account Type selected for this customer is Balance Forward.<br />
Do not make any entries on this tab.<br />
• Current — The total of all invoices for the current month.<br />
• Aging Periods (1-30, 31-60, 61-90, 91-120, Over 120 Days) — These fields<br />
reflect the balance forward amounts outstanding for the given number of days<br />
past the due date of the customer’s invoices.<br />
• Balance Forward — The total of the past due invoice amounts (1 thru 120+<br />
days).<br />
• Balance Current — The amount owed but not due.<br />
6. On the Beginning Balances tab, any outstanding balance owed by the customer<br />
can be entered. Use this method when the tracking of customer debt is done by<br />
account total only. Do not use when tracking debt at the invoice level.<br />
• Beginning Balance Date —Set this date to the date associated with the<br />
Amount Owed.<br />
• Amount Owed — Enter the amount owed by this customer. After saving this<br />
information, the Debit YTD Amt (on the Customer Info tab) is adjusted by<br />
this total.<br />
IMPORTANT<br />
If using this method, a Beginning Balance invoice must be<br />
entered:<br />
1. Go to Receivables > Enter/Update Invoices and select this<br />
customer.<br />
2. Select BB as the Transaction Type. This brings forward the<br />
appropriate information for the Invoice Date and the line item<br />
Product ID, Quantity Ordered, Unit Price, and Extended Price.<br />
3. Select Add Line Item, then Save.<br />
Editing a Customer<br />
7. On the Shipping Address tab, enter the customer's shipping information (Name,<br />
Billing Address, Phone, and Contact). The Ship Address option on the Customer<br />
Info tab must be selected for this information to show on an invoice..<br />
8. Entries on the User Defined Info tab are for informational purposes only.<br />
• User Defined Fields — The headings for these fields come from the User<br />
Defined Headings section of the Customer Status tab under<br />
Receivables > Receivables Options. Enter the information appropriate to the<br />
field heading.<br />
• E-Mail and Web Address — Enter the customer’s e-mail and website<br />
addresses (if appropriate).<br />
9. Click Save once all entries have been made.<br />
To edit an existing customer, go to Receivables > Customer Setup and double-click<br />
a name from the list of customers. The data fields for that customer activate. Edit the<br />
desired fields and click Save.<br />
238
2011 Client Write-Up Entering New Invoices<br />
Entering New Invoices<br />
To enter invoice information, complete the following steps:<br />
1. Go to Receivables > Enter/Update Invoices. The Enter/Update Invoices dialog<br />
box is displayed.<br />
2. Select the customer for the invoice using the drop list in the Customer field.<br />
When the Customer window displays, double-click the desired customer. Nearly<br />
all fields on the Enter/Update Invoices dialog box autofill with information previously<br />
set up for the selected customer.<br />
IMPORTANT<br />
Editing the prefilled fields on the Invoices dialog box effects this<br />
invoice only. To make permanent edits to this information, refer to<br />
the appropriate Accounts Receivable set up screens.<br />
3. Invoice Number (required) — The next Invoice Number displays if the option to<br />
auto-increment this number was selected during set up<br />
(Receivables > Receivables Options > AR Options). If you did not make this<br />
selection, enter an invoice number. Do not enter a previously used invoice number.<br />
4. Select either a Transaction Type or a Return Transaction Type.<br />
A. Transaction Type is used to identify the majority of items sold on this<br />
invoice:<br />
• Use BB – Beginning Balance - See step 4 on the previous page.<br />
• Use SA – Sale (Stocked) when items are from current inventory.<br />
• Use SN – Sale (Non-Stocked) when items are not from current inventory.<br />
• Use SS – Sale (Service) when the items are one or more services performed.<br />
B. Return Transaction Type to return the entire contents of a previously entered<br />
invoice:<br />
• Use RBB – Reverse Beg. Balance - See step 4 on the previous page.<br />
• Use RE – Return (Stocked) when items are from current inventory.<br />
• Use RN – Return (Non-Stocked) when items are not from current inventory.<br />
• Use RS – Return (Service) when the items are one or more services performed.<br />
NOTE<br />
When a Return Transaction Type is selected, the Return Date must<br />
be entered.<br />
5. Invoice Date (required) — The Invoice Date defaults to today’s date and is used<br />
in the calculation of aging information. Edit the Invoice Date as needed.<br />
6. Invoice Type (required) — Select either Product Invoice, Service Invoice, or<br />
Professional Invoice.<br />
7. Terms (required) — You may select a different term for this invoice than was<br />
previously set up for this customer.<br />
8. Balance/Credit Limit — The customer’s current account balance and credit<br />
limit. These fields cannot be edited; they are for informational purposes only.<br />
239
Entering New Invoices<br />
2011 Client Write-Up<br />
Product Invoice<br />
9. Complete the following fields:<br />
• Shipping Information - Sold To — Edit any of the customer billing information<br />
as needed for this invoice. If the information previously set up is appropriate<br />
for this invoice, no edits are required.<br />
• Shipping Information - Ship To — Edit the customer shipping information<br />
as needed for this invoice. If the information previously set up is appropriate<br />
for this invoice, not edits are required.<br />
• Order Taken By (Optional) — Enter the name of the person that took this<br />
order.<br />
• Ship Date — Enter the date the order is scheduled to ship to the customer.<br />
The current date is the default shipping date.<br />
• Ship Via (Optional) — The method of ship pulls from the Ship Via field in<br />
the customer’s setup (Receivables > Customer Setup > Customer Info).<br />
Change the shipping method as needed for this invoice.<br />
• Sales Tax - Tax Code — Select a different Tax Code as needed for the<br />
invoice. The State, County, and City sales tax rates associated with the<br />
selected Tax Code display. Edit individual State, County, or City tax rates as<br />
needed by entering a decimal value less than one (0.05 equals a 5% sales tax<br />
rate).<br />
10.The Line Items section of the Invoice screen has different fields for Product<br />
Invoices and Service/Professional Invoices. See the appropriate field information<br />
below based on the Invoice Type.<br />
Add one or more line items to an invoice by completing the following fields:<br />
Figure 10-5: Line Items for Product Invoice<br />
• Product ID — Using the drop list in the Product ID field, select an item to<br />
include on this invoice. When the Product ID window displays, double-click the<br />
desired product. Specifics regarding the selected product’s pricing displays.<br />
• Price Code — The Price Code set in Customer Setup for the selected customer<br />
displays. The Quantity Ordered, and Unit Price associated with this product’s<br />
Price Code also displays. Select a different Price Code from the drop list to<br />
select a different single price or quantity discount.<br />
240
2011 Client Write-Up Entering New Invoices<br />
• Quantity Ordered — Edit the quantity of the item ordered as needed. This is an<br />
override of the quantity associated with the selected Price Code. The selected<br />
Price Code is used to calculate the Unit Price and the Extended Price.<br />
• Unit Price — Edit the Unit Price to override the single item price associated with<br />
the Price Code selected.<br />
• Discount Rate — This is the customer’s Discount Percent entered during customer<br />
setup (Receivables > Customer Setup > Customer Info). This discount is<br />
calculated after all other discounts (quantity, etc.) are taken. Edit the discount percentage<br />
for this item by entering a decimal value less than one (0.05 equals a 5%<br />
discount).<br />
• Extended Price — This is a calculated field. Do not edit this field. The<br />
Extended Price equals the (Quantity Ordered x Unit Price) - Discount Percent.<br />
• Item Tax — This is a calculated field. Do not edit this field. The equals the<br />
(Extended Price x State Sales Tax rate) + (Extended Price x County Sales Tax<br />
rate) + (Extended Price x City Sales Tax rate).<br />
• Shipping Charge — If applicable, enter the Shipping Charge amount for this<br />
invoice.<br />
Service/Professional Invoice<br />
Add one or more line items to an invoice by completing the following fields:<br />
Figure 10-6: Line Items for Service and Professional Invoices<br />
• Product ID — Using the drop list in the Product ID field, select an item to<br />
include on this invoice. When the Product ID window displays, double-click the<br />
desired product. Specifics regarding the selected product’s pricing displays.<br />
• Price — Use the field drop list to select a different Price for the service selected.<br />
• Quantity — Edit the quantity as needed.<br />
• Description — The Description fills based on the information entered in Receivables<br />
> Invoice Item Setup. Edit the Description as needed. The edited description<br />
prints on the current invoice only.<br />
• Discount — This is the customer’s Discount Percent entered during customer<br />
setup (Receivables > Customer Setup > Customer Info). This discount is calculated<br />
after all other discounts (quantity, etc.) are taken. Edit the discount percent-<br />
241
Printing an Invoice<br />
2011 Client Write-Up<br />
age for this item by entering a decimal value less than one (0.05 equals a 5%<br />
discount).<br />
• Amount — This is a calculated field. Do not edit this field. The Amount equals<br />
the (Quantity x Price) - Discount.<br />
• Customer Message (optional) — Enter a message to appear at the bottom of the<br />
customer’s invoice.<br />
11. Click Add Line Item. The item information is added to the grid and is included in<br />
the Total Tax and Total fields.<br />
NOTE<br />
Once an item has been added to the grid, you must Save the invoice in<br />
order to exit the screen. See “Deleting Invoices and Line Items” for<br />
information on deleting a saved invoice.<br />
Printing an Invoice<br />
12.The Total Tax and Total fields are calculated fields and should not be edited.<br />
Total Tax is the total of the Item Tax column. Total is the sum of all charges for<br />
this invoice.<br />
13.Once all items for this invoice have been added, select Save.<br />
See “Printing an Invoice” for information on printing a single invoice or “Batch Printing<br />
Invoices” on page 242 to print a range of invoices.<br />
Once an invoice has been saved, you can choose to print a single invoice or batch print<br />
a range of invoices. See “Batch Printing Invoices” on page 242 for information on<br />
printing more than one invoice at a time.<br />
To print a single invoice, complete the following:<br />
NOTE<br />
If an invoice was just saved, proceed to step 2 below.<br />
1. Go to Receivables > Enter/Update Invoices.<br />
2. Select the customer for the invoice you wish to print using the drop list in the Customer<br />
field. When the Customer window displays, double-click the desired customer.<br />
3. Select the invoice to print from the Invoice Number drop list. Details of the<br />
selected invoice display.<br />
4. Select Print Invoice. The invoice displays on the screen.<br />
5. Select the printer icon ( ).<br />
Batch Printing Invoices<br />
Accounts Receivable invoices may be printed one at a time (see “Printing an Invoice”<br />
on page 242) or in a “batch”, more than one at a time.<br />
To print Accounts Receivable invoices in a batch, complete the following:<br />
242
2011 Client Write-Up Updating Invoices<br />
Updating Invoices<br />
1. To run the report, go to Reports > Accounts Receivable<br />
2. Double-click Invoices on the right side of the window. A list of available invoices<br />
to print displays.<br />
3. Select one or more invoices to print. To select a range of consecutive invoices,<br />
click the first invoice to print and, while holding the SHIFT key down, click the last<br />
invoice to print. To print non-consecutive invoices, click the first invoice then,<br />
while holding the CONTROL key down, select the other invoices to print. To print a<br />
single invoice, select the invoice.<br />
4. Select the date to appear on the invoices. The invoices display on your monitor.<br />
5. To print the invoices, either go to File > Print or select the printer icon ( ).<br />
Update invoices to change any of the information on a saved invoice and to handle<br />
invoice returns. For information on deleting a line item from an invoice or deleting an<br />
invoice, see “Deleting Invoices and Line Items” on page 243.<br />
To update a saved invoice, complete the following:<br />
1. Go to Receivables > Enter/Update Invoices.<br />
2. Select the customer for the invoice you wish to edit using the drop list in the Customer<br />
field. When the Customer window displays, double-click the desired customer.<br />
3. Use the Invoice Number drop list to select the invoice to edit. Details of the<br />
selected invoice display.<br />
4. Edit the information as needed.<br />
5. To edit a line item, double-click the item in the grid at the bottom of the window.<br />
Make changes as needed and select Update Line Item.<br />
6. To take a return, select the Ret Trans Type field drop list and select to return<br />
items to Stocked, Non-Stocked, or Service. You must take a return for an entire<br />
invoice rather than line items from an invoice. Enter the Return Date. When the<br />
invoice is saved, CWU makes a reversing entry in the journal.<br />
7. Select Save. To print the updated invoice, see “Printing an Invoice” on page 242.<br />
Reset — Click Reset to revert to the last saved invoice information.<br />
Deleting Invoices and Line Items<br />
To delete a saved invoice, complete the following:<br />
1. Go to Receivables > Delete Invoices/Line Items.<br />
2. Select the customer for the invoice you wish to delete using the drop list in the<br />
Customer field. When the Customer window displays, double-click the desired<br />
customer.<br />
3. Use the Invoice Number drop list to select the invoice to delete. Details of the<br />
selected invoice display.<br />
243
Entering Service Charges and Penalties<br />
2011 Client Write-Up<br />
4. Click Delete Invoice. Click OK to confirm the deletion. If the bookkeeping feature<br />
is being used, CWU makes a reversing entry for the entire invoice in the journal.<br />
To delete a line item from a saved invoice, complete the following:<br />
1. Go to Receivables > Delete Invoices/Line Items.<br />
2. Select the customer for the invoice using the drop list in the Customer field.<br />
When the Customer window displays, double-click the desired customer.<br />
3. Use the Invoice Number drop list to select the invoice with the line item you wish<br />
to delete. Details of the selected invoice display.<br />
4. Double-click the line item to be deleted in the grid at the bottom of the screen.<br />
Details of the line item display above the grid.<br />
5. Click Delete Line Item. The Total Tax and Total fields update. If the bookkeeping<br />
feature is being used, CWU makes a reversing entry for the deleted item in the<br />
journal.<br />
6. Click Exit to save and exit or Print Invoice to print the invoice. After printing the<br />
invoice, click Exit to save and exit.<br />
Entering Service Charges and Penalties<br />
Add and remove service charges and penalties to individual customer invoices.<br />
NOTE<br />
Service Charge and Penalty transactions write automatically to the journal<br />
when the CWU bookkeeping is used.<br />
To enter or remove service charges and penalties, complete the following:<br />
1. Go to Receivables > Enter Service Charges/Penalties.<br />
2. Enter the Transaction Date.<br />
3. Select the customer for the invoice using the drop list in the Customer field.<br />
When the Customer window displays, double-click the desired customer. The<br />
customer’s address and contact information display.<br />
4. Select the invoice from the Invoice Number drop list. Details of the selected<br />
invoice display.<br />
5. In the Invoices section, complete the following field information:<br />
• Transaction Type — Select the type of transaction from the Transaction<br />
Type drop list. You can select to add a penalty, add a service charge, or add a<br />
service charge and a penalty to the invoice. You can also select to remove (or<br />
reverse) a penalty, remove a service charge, or remove both a service charge<br />
and a penalty from an invoice. Penalty and service charge amounts are added<br />
to the amount of the outstanding balance of the selected invoice (or removed<br />
if a reversing Transaction Type is selected).<br />
• Service Charge — The amount of the Service Charge comes from the Customer<br />
Setup screen (Service Charge field). Edit the amount of the Service<br />
Charge as needed for this invoice.<br />
244
2011 Client Write-Up Applying Receivables Payments<br />
• Penalty — Enter a penalty amount for this invoice. This field is available for<br />
all transaction types except Service Charge and Reverse Service Charge.<br />
• Note — Enter a note for informational purposes.<br />
6. Click Save to move the entry to the grid section.<br />
Deleting Service Charges and Penalties<br />
Delete service charges and penalties line items from individual customer invoices.<br />
IMPORTANT<br />
If a line item has previously been reversed then an entry is not<br />
automatically made to the journal when the same line item is<br />
deleted. However, if the line item has not previously been<br />
reversed, a journal entry is made automatically when the line is<br />
deleted (provided the Use Chart of Accounts option has been<br />
selected under Receivables > Receivables Options > AR<br />
Options.<br />
To delete a service charge or penalty from an invoice, complete the following:<br />
1. Go to Receivables > Enter Service Charges/Penalties.<br />
2. Enter the Transaction Date.<br />
3. Select the customer for the invoice using the drop list in the Customer field.<br />
When the Customer window displays, double-click the desired customer. The<br />
customer’s address and contact information display.<br />
4. Select the invoice from the Invoice Number drop list. Details of the selected<br />
invoice display.<br />
5. In the Invoices section grid, double-click the line item to delete.<br />
6. Click Delete. A confirmation screen displays.<br />
7. Click OK.<br />
WARNING<br />
When a line item is deleted, there is no record (other than the journal<br />
entry) of the deletion. Use this option with caution.<br />
Applying Receivables Payments<br />
Apply Accounts Receivable payments to a single outstanding invoice or multiple<br />
invoices.<br />
To apply payments and credits, complete the following:<br />
1. Go to Receivables > Apply Payments.<br />
2. Enter the payment date using the Transaction Date drop list.<br />
3. Select the customer to apply the payment from the drop list in the Customer field.<br />
When the Customer window displays, double-click the desired customer. The<br />
customer’s address, contact information, available credit, and amount owed display.<br />
4. Select the Payment/Credit option button.<br />
245
Applying Receivables Payments<br />
2011 Client Write-Up<br />
Figure 10-7: Accounts Receivable Entering Payments<br />
5. Complete the following fields in the Payments section:<br />
• Reference (optional) — Enter up to a 20 characters to provide additional<br />
information for this transaction (e.g. check or credit card number).<br />
• Payment (required) — Enter the amount of the payment.<br />
• Amount Owed (informational only) — This is the total amount owed by the<br />
selected customer including all invoices, penalties, and service charges.<br />
• Undistributed Payment (informational only) — This is the amount of the<br />
payment that has not been applied to an invoice. The full amount of a payment<br />
must be applied to the customer’s account.<br />
• Distributed Payments (informational only) — This is the amount of the payment<br />
that has been applied to the invoices.<br />
• Invoice Number (required) — Select the invoice to apply the payment using<br />
the drop list. When the Invoice Number window displays, double-click the<br />
desired invoice.<br />
The selected invoice’s Due Date, original Invoice Amount, and Invoice Balance<br />
display for informational purposes. If transactions for the selected invoice have<br />
been saved, they appear in the grid at the bottom of the screen.<br />
6. Complete the following fields in the Transactions section:<br />
• Type (required) — Select from the following transaction types:<br />
Table 10-1: AR Transaction Types<br />
Transaction Type<br />
CR<br />
Credit<br />
Description<br />
246
2011 Client Write-Up Applying Receivables Payments<br />
Table 10-1: AR Transaction Types<br />
Transaction Type<br />
EP<br />
PA<br />
PPA<br />
Description<br />
Early Payment Discount<br />
Payment<br />
Partial Payment<br />
Viewing Transactions<br />
Making an Adjustment<br />
• Amount Applied (required) — Enter the amount of the payment to apply to<br />
the selected invoice.<br />
• Note (optional) — Enter a transaction description. This description posts to<br />
the journal when the transaction is saved.<br />
• Date/Time Stamp (informational only) — CWU autofills this field with the<br />
date and time when the transaction is saved.<br />
7. Click Save. If the full amount of the payment has been distributed, CWU clears<br />
the screen leaving the customer’s contact and amount owed information displayed.<br />
CWU is ready for the next payment to be entered for this customer.<br />
If the payment has not been fully distributed, the Undistributed Payment and<br />
Distributed Payments fields update reflecting the saved transaction. Continue<br />
distributing the payment by selecting the appropriate Invoice Number, Transaction<br />
Type, Amount Applied, and Note until the payment is fully distributed. The<br />
screen clears leaving the customer’s contact and amount owed information.<br />
The View Transactions option provides detail of individual customer invoices. No<br />
transactions can be entered when using the View Transactions option. To view transaction<br />
detail, complete the following:<br />
1. Go to Receivables > Apply Payments.<br />
2. Select the customer from the Customer field.<br />
3. Select the View Transactions option button.<br />
4. Select the invoice from the list. When the Invoice Number window displays,<br />
double-click the desired invoice.<br />
5. Click Exit when finished viewing transaction detail.<br />
Adjusting entries can be made to correct an incorrectly entered payment, credit, or just<br />
about anything else regarding an invoice.<br />
To make an adjusting entry, complete the following:<br />
1. Go to Receivables > Apply Payments.<br />
2. Enter the date of the adjustment using the Transaction Date drop list.<br />
247
Applying Receivables Payments<br />
2011 Client Write-Up<br />
Writing Off Bad Debt<br />
Making a Reversing Entry<br />
3. Select the customer from the Customer field. When the Customer window displays,<br />
double-click the desired customer. The customer’s address, contact information,<br />
available credit, and amount owed display.<br />
4. Select the Adjustments/Bad Debt Write Off option button.<br />
5. Select the invoice to enter the write off amount. When the Invoice Number window<br />
displays, double-click the desired invoice. The selected invoice’s Due Date,<br />
original Invoice Amount, and Invoice Balance display.<br />
6. From the Type field, double-click the AD (Adjustment) Transaction Type.<br />
7. Enter the amount of the adjustment in the Amount Applied field. Enter a negative<br />
amount (e.g. -5.95) to reduce the amount owed and a positive number (e.g. 12.50)<br />
to increase the amount owed.<br />
8. Enter a transaction description in the Note field. A note is optional.<br />
9. Click Save.<br />
There may be times when all or a portion of an outstanding invoice may need to be<br />
written off.<br />
To make a write-off entry, complete the following:<br />
1. Go to Receivables > Apply Payments.<br />
2. Enter the date of the write-off using the Transaction Date drop list.<br />
3. Select the customer from the Customer field. When the Customer window displays,<br />
double-click the desired customer. The customer’s address, contact information,<br />
available credit, and amount they owe display.<br />
4. Select the Adjustments/Bad Debt Write Off option button.<br />
5. Select the invoice to enter the write-off amount. When the Invoice Number window<br />
displays, double-click the desired invoice. The selected invoice’s Due Date,<br />
original Invoice Amount, and Invoice Balance display.<br />
6. From the Type field, double-click the BD (Bad Debt Write off) Transaction<br />
Type.<br />
7. Enter the amount to be written off as a positive number (e.g. 12.50) in the<br />
Amount Applied field.<br />
8. Enter a transaction description in the Note field. A note is optional.<br />
9. Click Save. The amount of the write-off is deducted from the Invoice Balance<br />
and the customer’s Amount Owed.<br />
Another option for making a correcting entry is to reverse a previously saved entry.<br />
You can reverse adjustments, write offs, credits, early payment discounts, and a full or<br />
partial payment.<br />
To make a reversing entry, complete the following:<br />
248
2011 Client Write-Up Applying Receivables Payments<br />
1. Go to Receivables > Apply Payments.<br />
2. Enter the date of the reversing entry using the Transaction Date drop list.<br />
3. Select the customer from the Customer field. When the Customer window displays,<br />
double-click the desired customer.<br />
4. Select the Reverse Entries option button.<br />
5. Select the invoice to enter the reversing entry amount. When the Invoice Number<br />
window displays, double-click the desired invoice. The selected invoice’s transaction<br />
detail displays in the grid at the bottom of the screen.<br />
6. From the Type field, select from the following transaction types:<br />
Table 10-2: AR Transaction Types<br />
Transaction Type<br />
RAD<br />
RBD<br />
RCR<br />
REP<br />
RPAY<br />
RPPA<br />
Description<br />
Reverse Adjustment<br />
Reverse Bad Debt Write-off<br />
Reverse Credit<br />
Reverse Early Payment Discount<br />
Reverse Payment<br />
Reverse Partial Payment<br />
Deleting a Payment<br />
7. Enter the amount of the reversing entry as a postive number (e.g. 12.50) in the<br />
Amount Applied field.<br />
8. Enter a transaction description in the Note field. A note is optional.<br />
9. Click Save.<br />
Delete payments from individual customer invoices.<br />
IMPORTANT<br />
If a line item has previously been reversed then an entry is not<br />
automatically made to the journal when the same line item is<br />
deleted. However, if the line item has not previously been<br />
reversed, a journal entry is made automatically when the line is<br />
deleted (provided the Use Chart of Accounts option has been<br />
selected under Receivables > Receivables Options > AR<br />
Options.<br />
To delete a payment from an invoice, complete the following:<br />
1. Go to Receivables > Apply Payments.<br />
2. Enter the Transaction Date.<br />
3. Select the customer for the invoice using the drop list in the Customer field.<br />
When the Customer window displays, double-click the desired customer. The<br />
customer’s address and contact information display.<br />
4. Select the Delete Entries option button.<br />
249
Posting Receivables Transactions <strong>Manual</strong>ly<br />
2011 Client Write-Up<br />
5. Select the invoice from the Invoice Number drop list. Payment details for the<br />
selected invoice display in the Invoices section grid.<br />
6. In the Invoices section grid, double-click the line item to delete.<br />
7. Click Delete. A confirmation screen displays.<br />
8. Click OK.<br />
WARNING<br />
When a line item is deleted, there is no record (other than the journal<br />
entry) of the deletion. Use this option with caution.<br />
Posting Receivables Transactions <strong>Manual</strong>ly<br />
If the CWU bookkeeping feature is being used but the option to Auto-Post to the<br />
Transaction Register is not selected, you will need to post Accounts Receivable<br />
transactions to the journal manually.<br />
NOTE<br />
To turn on automatic posting to the transaction register, see “AR<br />
Options” on page 227.<br />
To post Accounts Receivable transactions to the journal:<br />
1. Go to Receivables > <strong>Manual</strong> Post AR Transactions.<br />
2. Click Post Transactions.<br />
3. Click OK.<br />
250
2011 Client Write-Up Running Reports<br />
11 Reports<br />
Running Reports<br />
Client Write-Up offers many report options with multiple formats. Review the reports<br />
and choose the ones that meet your needs.<br />
Starting and ending date ranges are required for many reports and are set using the calendar<br />
function. To set the starting and ending dates for reports, click the next to<br />
the date displayed. Dates default to the current date on the computer. For instructions<br />
on setting calendar dates, see “Date Fields” on page 12.<br />
To run Client Write-Up reports, go to Reports and select a type of report. The<br />
Reports window opens with a list of available reports specific to the report group<br />
selected.<br />
Figure 11-1: Reports<br />
Double-click a report on the right side of the screen, or click once and click Go. Once<br />
all report options have been selected, the report runs.<br />
From the Reports window, select another report or change to another report group.<br />
IMPORTANT<br />
All reports display to your computer monitor in “PDF” format. In<br />
order to view reports on your screen, you must have Acrobat<br />
Reader installed.<br />
251
Report Options<br />
2011 Client Write-Up<br />
Report Options<br />
Display Settings<br />
Customize field labels that appear on many of Client Write-Up’s reports using Report<br />
Options. To customize the labels, click the Report Options button and complete the<br />
following steps:<br />
1. Select a report to customize from the Select Report drop list. Select only the lines<br />
in the list that begin with a number. The other lines display the report category and<br />
cannot be customized.<br />
2. Select the desired check boxes to customize the report.<br />
• Remove Report Name From Footer — The name of the report does not<br />
print in the report footer.<br />
• Center Report Footnotes — The footnote is printed centered on the report.<br />
• Remove Footnotes from non-Financial Statements — No footnote is<br />
printed on any report except balance sheet and profit and loss reports. For<br />
these reports, either the default footnote is printed or the footnote text entered<br />
in Setup > Headers and Footnotes is printed.<br />
• Print Address in Header — The client’s address as entered on<br />
Setup > Client Information is printed in the report header.<br />
• Print Date Time Stamp on Report — The date and time the report was run<br />
is printed on the report.<br />
• Change “For the period ended” to “As of” — This box is available only for<br />
balance sheet and profit and loss reports. The words “As of” replace “For the<br />
period ended” on the report.<br />
• Use Default Labels — This box is available only for balance sheet and profit<br />
and loss reports. Select this box to reset the report labels to the default (as they<br />
appear on the right side of the dialog box). Selecting Use Default Labels does<br />
not affect the other selections.<br />
3. When financial reports (Balance Sheet and Profit and Loss reports) are selected<br />
from the Select Report drop list, the lower part of the dialog box fills with the<br />
default field labels and the current field labels for the report selected. If no edits<br />
have been made to the selected report’s labels, the Labels used and Default<br />
Labels columns are the same.<br />
Make the desired edits to the field labels under the Labels used on reports column.<br />
Select the Apply to all Balance Sheet Reports or Apply to all Profit and<br />
Loss Reports box to have those reports use your edited field labels.<br />
4. Click Save. Click Exit when editing is complete.<br />
Click Reset to restore all check boxes and field labels for the selected report to the<br />
default.<br />
Click Report Setup to customize the appearance of reports. The Display Settings<br />
dialog box allows client-specific color, logo, font, and watermark customization of<br />
reports.<br />
252
2011 Client Write-Up Understanding Reports<br />
Report Settings<br />
• To change the color of the header, footer, and text on printed reports, click the<br />
color box, select the desired color, and click OK. Printing in color requires a<br />
printer capable of color printing.<br />
• To remove the report name from the footer, center report footnotes, or remove<br />
footnotes from non-financial statements, select the appropriate check box.<br />
Font Sizes<br />
Use the drop list to adjust the font size of the accountants header line, footer, and page<br />
numbers.<br />
WaterMark Settings<br />
• Use the drop list to select the angle and font used for the watermark.<br />
• Enter the wording to be used for the watermark in the Watermark Text field.<br />
Logo<br />
• Logo Location — Choose the location for your logo on reports from the drop list.<br />
Selections include right aligned, centered, and left aligned. Making a selection in<br />
this field activates the Logo Path and Logo Sizes fields.<br />
• Logo Path — Either enter the path to the logo or click Browse to navigate to the<br />
logo. The logo file must be a bitmap file (file extension of “bmp”).<br />
• Logo Sizes — Choose the logo size to print on reports from the drop list.<br />
Understanding Reports<br />
After verifying all information, click Save.<br />
Consider the following when viewing report output:<br />
• An S indicates a subtotal. Account “Levels” in the Chart of Accounts must be set<br />
in order for subtotals to appear on reports.<br />
• A single line indicates the total of an account type.<br />
• A double line indicates the total of multiple account types. (For example, Total<br />
Assets or Total Liabilities).<br />
• A number within parenthesis ( ) indicates a negative number.<br />
253
Report Types<br />
2011 Client Write-Up<br />
Report Types<br />
The following types of reports are available from the Reports menu:<br />
Table 11-1: Report Types<br />
Report Description Path<br />
Interim<br />
Year-to-Date<br />
Balance Sheets<br />
General Ledger<br />
Profit & Loss<br />
Transaction Listings<br />
Chart of Accounts<br />
Cash Flow<br />
Accounts Payable<br />
Accounts Receivable<br />
Payroll<br />
Interim reports display information that was entered for the current<br />
month or period. Use these reports to review the calculations<br />
and verify accuracy of the entries. Once the month or<br />
period has been posted, corrections to that journal cannot be<br />
made. Review all interim information before running the post<br />
transactions process. Even if the Journals dialog box<br />
(Bookkeeping > Enter Transactions) shows a 0.00 balance,<br />
there could still be data entry errors that cause reports to<br />
be incorrect. Use the interim reports to locate data entry errors.<br />
Reports on the general ledger and journal transactions since<br />
the last post. The journal transaction report can be displayed<br />
based on a single journal code or by the entirety of the journal.<br />
The balance sheet report produces a statement listing the debit<br />
and credit balances of the current client. From the Reports<br />
dialog box, select which type of balance sheet to create. These<br />
reports can be printed in the normal CWU report format or to<br />
an Excel worksheet.<br />
The general ledger report produces a statement that displays<br />
the balances of all accounts.<br />
The P&L reports produce reports of the company’s profits and<br />
losses. The reports can be customized by division, month,<br />
period, or time, and formatted in multi- or single-column. These<br />
reports can be printed in the normal CWU report format or to<br />
an Excel worksheet.<br />
The transactions listings statement can be created based on<br />
journal code or actual order that transactions took place.<br />
Chart of Accounts — The Chart of Accounts reports list the<br />
Account Number, Level, Account Name, and Account Type.<br />
The Chart of Accounts Trial Balance lists the Account Number,<br />
Account Name, and corresponding debits and credits.<br />
The Cash Flow report shows a company’s cash flow on a cash<br />
basis.<br />
Accounts Payable reports show vendors, outstanding balances,<br />
and due dates and amounts for outstanding invoices.<br />
Accounts Receivable reports show customers, invoices, customer<br />
statements, aging reports, and sales tax records.<br />
Payroll reports generate a variety of reports pertaining to<br />
employees and contractors. Once checks are printed, select<br />
Reports > Payroll. Scroll through the list and choose a<br />
report to view.<br />
Reports > Interim<br />
Reports > Year-to-Date<br />
Reports > Balance Sheets<br />
Reports > General Ledger<br />
Reports > P & L<br />
Reports > Transaction<br />
Listings<br />
Reports > Chart of<br />
Accounts<br />
Reports > Cash Flow<br />
Reports > Accounts Payable<br />
Reports > Accounts<br />
Receivable<br />
Reports > Payroll<br />
254
2011 Client Write-Up Report Details<br />
Table 11-1: Report Types<br />
Report Description Path<br />
State Wage<br />
Accountant Info<br />
The State Tax & Wage reports produce the wage report to be<br />
filed with each state's department of revenue. The information<br />
on the State Tax & Wage reports are generated from information<br />
on employee and contractor payroll entries. Each<br />
employee's payroll state is determined by the state information<br />
that was set up for the employee in<br />
Employees > Employee Setup. The State Wage Report<br />
can also be generated. CWU generates only one state per client.<br />
Select Reports > State Tax & Wage and choose the<br />
state, year, and quarter.<br />
The Accountant Info report summarizes each client’s contact<br />
and business information.<br />
Reports > State Tax &<br />
Wage<br />
Reports > Accountant<br />
Info<br />
Report Details<br />
Review the following details for each report to determine which reports suit your specific<br />
office needs.<br />
IMPORTANT<br />
Some reports (mostly financials) require that the Post Transactions<br />
process be run prior to running the report. Each report<br />
description states if this process is required.<br />
Reports stating “Run this report prior to running the Post Transactions<br />
process” are not required to be run as part of the Post<br />
Transactions process. The data for these reports is no longer<br />
available once the Post Transactions process is run.<br />
For information on running the Post Transactions process, see<br />
“Posting Transactions” on page 165.<br />
Interim Reports<br />
Interim reports display the information that was entered for the current month or<br />
period. Use these reports to review the calculations and verify accuracy of the entries.<br />
Interim<br />
Balance<br />
Sheet<br />
Run this report prior to running the Post Transactions process.<br />
NOTE<br />
This report is also produced as part of the Post Transactions process.<br />
The report displays the accounts with a current transaction. There is a total for assets,<br />
liabilities, and capital. This information is displayed for the previous balance, transactions,<br />
and current balance. Previous balance, transactions, and current balance are<br />
shown.<br />
255
Report Details<br />
2011 Client Write-Up<br />
To run the report, go to Reports > Interim > Interim Balance Sheet.<br />
NOTE<br />
The report is formatted to use the account names, not account numbers.<br />
The initial debit and credit amounts entered when the Chart of<br />
Accounts was first created is shown in the report as the previous balance<br />
for the first month. The accounts are displayed if a transaction<br />
amount was entered year-to-date, even if the current month transaction<br />
is 0.00.<br />
Interim Profit<br />
And Loss<br />
Run this report prior to running the Post Transactions process.<br />
NOTE<br />
This report is also produced as part of the Post Transactions process.<br />
The report displays the profit and loss for the current transactions listed in<br />
Bookkeeping > Enter Transactions. This includes the previous month year-to-date<br />
and percentages and year-to-date and percentages.<br />
To run the report, go to Reports > Interim > Interim Profit and Loss.<br />
NOTE<br />
The accounts used for the current journal are listed by account name.<br />
“Account Number” is not used for this report.<br />
Trial Balance<br />
Worksheet<br />
(Start of<br />
Year)<br />
Run this report prior to running the Post Transactions process.<br />
NOTE<br />
This report is also produced as part of the Post Transactions process.<br />
The report displays all account balances since the beginning of the year and includes<br />
the account number, level and name, the start of year balance for each account,<br />
amount posted to each account, and the current balance. The totals on the last page of<br />
the report reflect the total of the columns and do not necessarily represent a balanced<br />
calculation from right to left.<br />
The “Adjustments” and “Ending” headings are included to identify where correcting<br />
transactions may need to be made. Print the report and write the adjustment amounts<br />
and ending balances on the report. Make correcting transactions at<br />
Bookkeeping > Enter Transactions.<br />
To run the report, go to<br />
Reports > Interim > Trial Balance Worksheet (Start of Year).<br />
NOTE<br />
Negative amounts are indicated with negative sign (-) to the left of the<br />
amount. The initial debit and credit amounts entered when the Chart of<br />
Accounts was created shows in the report as “Start of Year.”<br />
256
2011 Client Write-Up Report Details<br />
Trial Balance<br />
Worksheet<br />
(Prior<br />
Period)<br />
Run this report prior to running the Post Transactions process.<br />
The report displays the account number, level and name, the ending balance for each<br />
account from the previous period (since the previous post), amount posted to each<br />
account, and the ending balance. The totals on the last page of the report reflect the<br />
total of the columns and do not necessarily represent a balanced calculation from right<br />
to left.<br />
The “Adjustments” and “Ending” headings are included to identify where correcting<br />
transactions may need to be made. Print the report and write the adjustment amounts<br />
and ending balances on the report. Make correcting transactions at<br />
Bookkeeping > Enter Transactions.<br />
To run the report, go to<br />
Reports > Interim > Trial Balance Worksheet (Prior Period).<br />
Profit And<br />
Loss Activity<br />
Report<br />
Run this report prior to running the Post Transactions process.<br />
NOTE<br />
This report is also produced as part of the Post Transactions process.<br />
Year-to-Date Reports<br />
The report shows the current profit and loss activity. This includes accounts that were<br />
accessed in the current journal listed by account name. Gross profit and total expenses<br />
are calculated to produce the final net profit (or loss) for the current transactions. The<br />
information is listed under headers of “Current Transactions,” “Year to Date,” and<br />
“Percent (%).” Accounts that had a previous balance but were not used for the current<br />
month show “0.00” in the transaction column.<br />
To run the report, go to Reports > Interim > Profit and Loss Activity Report.<br />
The Year-to-Date reports are based on the transactions that have been posted year-todate.<br />
Only transactions that have been posted by the Post Transactions process are<br />
included in these reports.<br />
YTD General<br />
Ledger<br />
Run the Post Transactions process before running this report.<br />
The report generates a year-to-date general ledger. This includes the transaction number,<br />
date, journal, reference, description, debit, and credit.<br />
To run the report, go to Reports > Year-to-Date > YTD General Ledger.<br />
NOTE<br />
Transactions are listed under the appropriate account number and total<br />
each account.<br />
257
Report Details<br />
2011 Client Write-Up<br />
YTD General<br />
Ledger —<br />
ALT Format<br />
Run the Post Transactions process before running this report.<br />
The report is an alternate format for the year-to-date general ledger report. This<br />
includes the transaction number, date, journal, reference, description, beginning balance,<br />
transaction, and ending balance. Transactions are grouped by account number.<br />
To run the report, go to Reports > Year-to-Date > YTD General Ledger-<br />
ALT Format.<br />
NOTE<br />
The beginning balance displayed is the amount entered in the Chart of<br />
Accounts beginning debits and credits. The account ending balance<br />
displayed is the balance of the transactions posted through the Post<br />
Transactions process.<br />
YTD Journal<br />
Code —<br />
Transaction<br />
Listing<br />
Run the Post Transactions process before running this report.<br />
The report is based on the journal selected from the Select a Journal Code list box.<br />
The journal choices are: GJ — General Journal, CD — Cash Disbursements, CR —<br />
Cash Receipts, PAY — Payroll, and BUD — Budget. Included is the transaction number,<br />
date, division, description, reference, account number, debit, and credit.<br />
To run the report, go to Reports > Year-to-Date > YTD Journal Code —<br />
Transaction Listing.<br />
NOTE<br />
There are no totals on this report.<br />
YTD Transaction<br />
Listing<br />
Run the Post Transactions process before running this report.<br />
The report lists all transactions that have been entered in the journal and posted<br />
through the Post Transactions process. This includes the transaction number, date,<br />
journal, division, description, reference, account number, debit, and credit.<br />
To run the report, go to Reports > Year-to-Date > YTD Transaction Listing.<br />
NOTE<br />
The information is listed in order of transaction number.<br />
Single<br />
Account YTD<br />
General<br />
Ledger<br />
Run the Post Transactions process before running this report.<br />
The report displays the transaction listing that has been entered in the journal and<br />
posted through the Post Transactions process. This includes the transaction number,<br />
date, journal, reference, description, debit, and credit.<br />
258
2011 Client Write-Up Report Details<br />
To run the report, go to Reports > Year-to Date ><br />
Single Account YTD General Ledger.<br />
NOTE<br />
The beginning balance for this year from the Chart of Accounts is displayed.<br />
Transactions are listed in order by transaction number and<br />
account ending balance. Only transactions that were entered in the<br />
Bookkeeping > Enter Transactions and posted by the<br />
Bookkeeping > Post Transactions process are displayed in this<br />
report.<br />
Single<br />
Account YTD<br />
General<br />
Ledger —<br />
ALT Format<br />
Run the Post Transactions process before running this report.<br />
The report is an alternate format for the single account year-to-date general ledger<br />
report. This includes the account number, transaction date, journal, reference number,<br />
description, beginning and ending balance, and the transaction amount.<br />
To run the report, go to Reports > Year-to Date ><br />
Single Account YTD General Ledger - ALT Format.<br />
NOTE<br />
The beginning balance for this year from the Chart of Accounts is displayed.<br />
Transactions are listed in order by transaction number and<br />
account ending balance. Only transactions that were entered in the<br />
Bookkeeping > Enter Transactions and posted by the<br />
Bookkeeping > Post Transactions process are displayed in this<br />
report.<br />
Balance Sheet Reports<br />
Balance sheet reports provide a variety of formats for the balance sheets.<br />
Prior Month<br />
Comparison<br />
Run the Post Transactions process before running this report.<br />
After selecting a month, the report displays the closing balances of accounts with<br />
activity for the selected month and the prior month. The difference is also displayed.<br />
To run the report, go to Reports > Balance Sheets > Prior Month Comparison.<br />
Prior Month<br />
Comparison<br />
— Excel<br />
Run the Post Transactions process before running this report.<br />
The report displays the closing balances of accounts with activity for the selected<br />
month and the prior month. The difference is also displayed.<br />
To run the report, go to Reports > Balance Sheets > Prior Month Comparison -<br />
Excel.<br />
Year-to-Date<br />
(All Posted<br />
Transactions)<br />
Run the Post Transactions process before running this report.<br />
The report displays the balances for assets, liabilities, and capital accounts for transactions<br />
posted to the general ledger since the start of the year thru the date selected.<br />
To run the report, go to Reports > Balance Sheets > Year-to-Date<br />
(All Posted Transactions).<br />
259
Report Details<br />
2011 Client Write-Up<br />
Year-to-Date<br />
(All Posted<br />
Transactions)<br />
—<br />
Excel<br />
Start Of Year<br />
Comparison<br />
Run the Post Transactions process before running this report.<br />
The report displays the balances for asset, liability, and capital accounts for transactions<br />
posted to the general ledger since the start of the year thru the date selected.<br />
To run the report, go to Reports > Balance Sheets > Year-to-Date<br />
(All Posted Transactions) - Excel.<br />
Run the Post Transactions process before running this report.<br />
The report displays the balances for asset, liability, and capital accounts for transactions<br />
posted to the general ledger at the start of the year and on the date selected. The<br />
difference is also displayed.<br />
To run the report, go to Reports > Balance Sheets > Start of Year Comparison.<br />
Start Of Year<br />
Comparison<br />
— Excel<br />
Run the Post Transactions process before running this report.<br />
The report displays the balances for asset, liability, and capital accounts for transactions<br />
posted to the general ledger at the start of the year and on the date selected. The<br />
difference is also displayed.<br />
To run the report, go to Reports > Balance Sheets > Start of Year Comparison -<br />
Excel.<br />
Monthly<br />
Run the Post Transactions process before running this report.<br />
The report displays the balances for asset, liability, and capital accounts for the month<br />
selected (if the month has been posted).<br />
To run the report, go to Reports > Balance Sheets > Monthly.<br />
Monthly —<br />
Excel<br />
Run the Post Transactions process before running this report.<br />
The report displays the balances for asset, liability, and capital accounts for the month<br />
selected (if the month has been posted).<br />
To run the report, go to Reports > Balance Sheets > Monthly - Excel.<br />
Date Range<br />
Run this report prior to running the Post Transactions process.<br />
General Ledger Reports<br />
This report displays balances for Asset and Capital accounts.<br />
To run the report, go to Reports > Balance Sheets > Date Range.<br />
The General Ledger reports are a complete set of all accounts used by a business to<br />
create the record of all debits and credits that are made to each account. The General<br />
Ledger is numbered and arranged in the same order and categories as the Chart of<br />
Accounts.<br />
260
2011 Client Write-Up Report Details<br />
General<br />
Ledger<br />
Run this report prior to running the Post Transactions process.<br />
The report is generated based on the transactions entered prior to and for the current<br />
month. Only accounts with transactions are displayed. This includes the account number,<br />
account name, beginning debit and credit balances, transaction number, date,<br />
journal, reference, description, debit and credit, account name, ending balance, and<br />
debit and credit.<br />
To run the report, go to Reports > General Ledger > General Ledger.<br />
NOTE<br />
Accounts that are not affected by the current month transactions show<br />
the beginning and ending balance as the same figure. Accounts that<br />
are affected by the current month transactions show the beginning balance,<br />
the transaction, and the ending balance for the account.<br />
General<br />
Ledger —<br />
ALT Format<br />
Run this report prior to running the Post Transactions process.<br />
The report displays the same information as the General Ledger report, but in a different<br />
format. This includes the account number, account name, beginning balance,<br />
transaction number, transaction date, transaction journal, transaction description,<br />
transaction amount, and account ending balance.<br />
To run the report, go to Reports > General Ledger > General Ledger-ALT Format.<br />
Single<br />
Account<br />
General<br />
Ledger<br />
Run this report prior to running the Post Transactions process.<br />
After selecting an account, the report displays transactions entered for that account for<br />
the current month (prior to the Post Transactions process). Accounts that are<br />
affected by the current month's transactions display the account number, account<br />
name, beginning debit and credit balances, transaction number, transaction date, transaction<br />
journal, transaction description, transaction amount and account ending balance.<br />
To run the report, go to<br />
Reports > General Ledger > Single Account General Ledger.<br />
NOTE<br />
Accounts that are not affected by the current month transactions show<br />
the beginning and ending balance as the same figure.<br />
Single<br />
Account<br />
General<br />
Ledger —<br />
ALT Format<br />
Run this report prior to running the Post Transactions process.<br />
The report displays the same information as the Single Account General Ledger<br />
report, but in a different format. This includes the account number, account name,<br />
beginning balance, transaction number, transaction date, transaction journal, transaction<br />
description, transaction amount, account name ending balance, and ending balance<br />
amount.<br />
To run the report, go to<br />
Reports > General Ledger > Single Account General Ledger-ALT Format.<br />
261
Report Details<br />
2011 Client Write-Up<br />
Monthly<br />
General<br />
Ledger<br />
Run the Post Transactions process before running this report.<br />
The report displays individual account starting and ending balances and transactions<br />
entered for the month selected. This includes the account number, account name,<br />
beginning debit and credit balances, transaction number, date, journal, reference,<br />
description, debits and credits, account name, ending balance, and debit and credit.<br />
To run the report, go to Reports > General Ledger > Monthly General Ledger.<br />
Monthly<br />
General<br />
Ledger —<br />
ALT Format<br />
Run the Post Transactions process before running this report.<br />
The report displays individual account starting and ending balances and transactions<br />
entered for the month selected. This includes the account number, account name,<br />
beginning balance, transaction number, transaction date, transaction journal, reference,<br />
description, transaction amount, account name ending balance, and debits and<br />
credits.<br />
To run the report, go to Reports > General Ledger > Monthly General Ledger-<br />
ALT Format.<br />
Single<br />
Account<br />
Monthly<br />
General<br />
Ledger<br />
Run the Post Transactions process before running this report.<br />
After you select a reporting account and month, the report displays information<br />
regarding a specific account and month. This includes the account number, account<br />
name, beginning debit and credit balances, transaction number, transaction date, transaction<br />
journal, reference, description, and transaction debit and credit.<br />
NOTE<br />
Each transaction is listed and includes the account name, ending balance,<br />
and ending debit and credit.<br />
To run the report, go to<br />
Reports > General Ledger > Single Account Monthly General Ledger.<br />
Single<br />
Account<br />
Monthly<br />
General<br />
Ledger —<br />
ALT Format<br />
Run the Post Transactions process before running this report.<br />
After you select a reporting account and month, the report displays information<br />
regarding a specific account and month. This includes the account number, account<br />
name, beginning balance, transaction number, transaction date, transaction journal,<br />
reference, description, and transaction.<br />
To run the report, go to<br />
Reports > General Ledger > Single Account Monthly General Ledger-<br />
ALT Format.<br />
NOTE<br />
Each transaction is listed and includes the account name, ending balance,<br />
and ending debit and credit.<br />
General<br />
Ledger By<br />
Date<br />
Run this report prior to running the Post Transactions process.<br />
The report displays all transactions for individual accounts with account ending balances<br />
for the designated period. This includes the account number, account name,<br />
262
2011 Client Write-Up Report Details<br />
transaction date, transaction journal, reference number, transaction description, debit<br />
and credit amounts, and ending account balances.<br />
To run the report, go to Reports > General Ledger > General Ledger By Date.<br />
General<br />
Ledger By<br />
Date — ALT<br />
Format<br />
Run this report prior to running the Post Transactions process.<br />
The report displays all transactions for individual accounts with account beginning<br />
and ending balances for the designated period. This includes the account number,<br />
account name, beginning balance, transaction date, transaction journal, reference<br />
number, transaction description, transaction amounts, and ending account balances.<br />
To run the report, go to Reports > General Ledger > General Ledger By Date-<br />
ALT Format.<br />
Single<br />
Account<br />
General<br />
Ledger By<br />
Date<br />
Run this report prior to running the Post Transactions process.<br />
The report displays all transactions for a selected account within the specified date<br />
range. This includes the account name and number, transaction date, transaction journal,<br />
reference number, description, transaction amounts (debit or credit), and ending<br />
account balance.<br />
To run the report, go to<br />
Reports > General Ledger > Single Account General Ledger By Date.<br />
Single<br />
Account<br />
General<br />
Ledger By<br />
Date — ALT<br />
Format<br />
Run this report prior to running the Post Transactions process.<br />
This report is an alternate format of the Single Account General Ledger By Date<br />
report. The report includes the beginning and ending balance, the account name and<br />
number, transaction date, transaction journal, reference number, description, and<br />
transaction amounts<br />
To run the report, go to<br />
Reports > General Ledger > Single Account General Ledger By Date-<br />
ALT Format.<br />
Profit & Loss (P&L) Reports<br />
Profit and loss reports are based on income and expense entries.<br />
1 Column<br />
Divisional<br />
P&L<br />
Run the Post Transactions process before running this report.<br />
The report displays the gross and net profit amounts and percentages based on the<br />
transactions that have been identified in payroll and journal entries with the division<br />
number.<br />
To run the report, go to Reports > P & L > 1 Column Divisional P&L.<br />
NOTE<br />
Refer to the section in this manual under “Headers and Footnotes” on<br />
page 54 to assign division information. Divisions must be set up before<br />
generating any payroll or transaction data in order to be reflected in<br />
division reports.<br />
263
Report Details<br />
2011 Client Write-Up<br />
1 Column<br />
Divisional<br />
P&L —<br />
Prints to<br />
Excel<br />
Run the Post Transactions process before running this report.<br />
The report displays the gross and net profit amounts and percentages based on the<br />
transactions that have been identified in payroll and/or journal entries with the division<br />
number.<br />
To run the report, go to Reports > P & L > 1 Column Divisional P&L-<br />
Prints to Excel.<br />
NOTE<br />
Refer to the section in this manual under “Headers and Footnotes” on<br />
page 54 to assign division information. Divisions must be set up before<br />
generating any payroll or transaction data in order to be reflected in<br />
division reports.<br />
2 Column<br />
Monthly vs.<br />
YTD P&L<br />
Run the Post Transactions process before running this report.<br />
The report displays a breakdown of transactions by account names using amount and<br />
percentage, and YTD and percentage. Gross profit and net profit (or loss) displays the<br />
amount and percentage and year-to-date and percentage.<br />
To run the report, go to Reports > P & L > 2 Column Monthly vs. YTD P&L.<br />
2 Column<br />
Monthly vs.<br />
YTD P&L —<br />
Prints to<br />
Excel<br />
Run the Post Transactions process before running this report.<br />
The report displays a breakdown of transactions by account names using amount and<br />
percentage, and YTD and percentage. Gross profit and net profit (or loss) displays the<br />
amount and percentage and year-to-date and percentage.<br />
To run the report, go to Reports > P & L > 2 Column Monthly vs. YTD P&L-<br />
Prints to Excel.<br />
1 Column<br />
P&L (Year to<br />
Date)<br />
Run the Post Transactions process before running this report.<br />
Based on income and expense transactions entered, the report displays a breakdown<br />
by account name with the year-to-date information for amount and percentage. This<br />
includes the gross profit amount and percentage, total expenses and percentage and<br />
net profit (or loss) amount and percentage.<br />
To run the report, go to Reports > P & L > 1 Column P&L (Year to Date).<br />
1 Column<br />
P&L (Year to<br />
Date) —<br />
Prints to<br />
Excel<br />
Run the Post Transactions process before running this report.<br />
Based on income and expense transactions entered, the report displays a breakdown<br />
by account name with the year-to-date information for amount and percentage. This<br />
includes the gross profit amount and percentage, total expenses and percentage, and<br />
net profit (or loss) amount and percentage.<br />
To run the report, go to Reports > P & L > 1 Column P&L (Year to Date)-<br />
Prints to Excel.<br />
2 Column<br />
P&L (Year to<br />
Date)<br />
Run the Post Transactions process before running this report.<br />
264
2011 Client Write-Up Report Details<br />
The report is based on income and expense transactions that have been entered and the<br />
Post Transactions process performed. This includes the gross profit, total expenses<br />
and net profit (or loss), current amount and percentage and prior month gross profit,<br />
total expenses and net profit (or loss) amount and percentage.<br />
To run the report, go to Reports > P & L > 2 Column P&L (Year to Date).<br />
2 Column<br />
P&L (Year to<br />
Date) —<br />
Prints to<br />
Excel<br />
Run the Post Transactions process before running this report.<br />
The report is based on income and expense transactions that have been entered and the<br />
Post Transactions process performed. This includes the gross profit, total expenses<br />
and net profit (or loss), current amount and percentage, and prior month gross profit,<br />
total expenses, and net profit (or loss) amount and percentage.<br />
To run the report, go to Reports > P & L > 2 Column P&L (Year to Date)-<br />
Prints to Excel.<br />
Budget vs.<br />
Actual<br />
Run the Post Transactions process before running this report.<br />
The report is a comparison of the actual profit and loss and the yearly budget. This<br />
includes the account names with gross profit broken down into actual, budget and difference,<br />
and net profit (or loss) broken down into actual, budget, and difference.<br />
To run the report, go to Reports > P & L > Budget vs. Actual.<br />
Budget vs.<br />
Actual —<br />
Prints to<br />
Excel<br />
Run the Post Transactions process before running this report.<br />
The report is a comparison of the actual profit and loss and the yearly budget. This<br />
includes the account names with gross profit broken down into actual, budget, and difference,<br />
and net profit (or loss) broken down into actual, budget, and difference.<br />
To run the report, go to Reports > P & L > Budget vs. Actual-Prints to Excel.<br />
Prorated<br />
Budget vs.<br />
Actual<br />
Run the Post Transactions process before running this report.<br />
The report is a comparison of the actual amounts and the prorated budget as entered in<br />
the Chart of Accounts. The prorated budget is the budgeted amount for the period that<br />
has been posted year-to-date.<br />
To run the report, go to Reports > P & L > Prorated Budget vs. Actual.<br />
Prorated<br />
Budget vs.<br />
Actual —<br />
Prints to<br />
Excel<br />
Run the Post Transactions process before running this report.<br />
The report is a comparison of the actual amounts and the prorated budget as entered in<br />
the Chart of Accounts. The prorated budget is the budgeted amount for the period that<br />
has been posted year-to-date.<br />
To run the report, go to Reports > P & L > Prorated Budget vs. Actual-<br />
Prints to Excel.<br />
265
Report Details<br />
2011 Client Write-Up<br />
Multi<br />
Column<br />
Divisional<br />
P&L<br />
Run the Post Transactions process before running this report.<br />
The report is a multi-divisional profit and loss report. Select the Division and Number<br />
of Divisions to include in the report. Included is the gross profit and net profit (or loss)<br />
of the selected divisions.<br />
NOTE<br />
The division selected appears as the first division on the report. The<br />
number of divisions chosen indicates how many consecutive divisions<br />
are to be included in the report. The number of divisions includes the<br />
division initially selected. (For example, select Division 3 and the number<br />
of divisions to include is 4. The report will include divisions 3, 4, 5,<br />
and 6.).<br />
To run the report, go to Reports > P & L > Multicolumn Divisional P&L.<br />
Multi<br />
Column<br />
Divisional<br />
P&L —<br />
Prints to<br />
Excel<br />
Run the Post Transactions process before running this report.<br />
The report is a multi-divisional profit and loss report. Select the Division and Number<br />
of Divisions to include in the report. Included is the gross profit and net profit (or loss)<br />
of the selected divisions.<br />
NOTE<br />
The division selected appears as the first division on the report. The<br />
number of divisions chosen indicates how many consecutive divisions<br />
are to be included in the report. The number of divisions includes the<br />
division initially selected. (For example, select Division 3 and the number<br />
of divisions to include is 4. The report will include divisions 3, 4, 5<br />
and 6.).<br />
To run the report, go to Reports > P & L > Multicolumn Divisional P&L-<br />
Prints to Excel.<br />
Multi<br />
Column<br />
Monthly P&L<br />
Run the Post Transactions process before running this report.<br />
After selecting a month and number of months to include, the report displays calculations<br />
for those months based on entries made prior to the last Post Transactions process.<br />
Calculations are listed by the account name with totals for gross and net profit<br />
(or loss).<br />
To run the report, go to Reports > P & L > Multicolumn Monthly P&L.<br />
NOTE<br />
The month selected is the first month of the report. The number of<br />
months chosen indicates how many consecutive months are included<br />
in the report. The number of months includes the month initially<br />
selected. (For example, select the month of May and the number of<br />
months is four. The report includes the months of May, June, July, and<br />
August.<br />
266
2011 Client Write-Up Report Details<br />
Multi<br />
Column<br />
Monthly P&L<br />
— Prints to<br />
Excel<br />
Run the Post Transactions process before running this report.<br />
After selecting a month and number of months to include, the report displays calculations<br />
for those months based on entries made prior to the last Post Transactions process.<br />
Calculations are listed by the account name with totals for gross and net profit<br />
(or loss).<br />
To run the report, go to Reports > P & L > Multicolumn Monthly P&L-<br />
Prints to Excel.<br />
NOTE<br />
The month selected is the first month of the report. The number of<br />
months chosen indicates how many consecutive months are included<br />
in the report. The number of months includes the month initially<br />
selected. (For example, select the month of May and the number of<br />
months is four. The report includes the months of May, June, July, and<br />
August.<br />
Monthly<br />
Prior Year<br />
Comparison<br />
Run the Post Transactions process before running this report.<br />
The report compares gross and net profit and loss for a selected month of this year and<br />
last year. This includes the account name, account amount, and percentage. The report<br />
also shows total income and total gross profit (or loss).<br />
To run the report, go to Reports > P & L > Monthly Prior Year Comparison.<br />
NOTE<br />
The current year is listed first.<br />
Monthly<br />
Prior Year<br />
Comparison<br />
— Prints to<br />
Excel<br />
Run the Post Transactions process before running this report.<br />
The report compares gross and net profit and loss for a selected month of this year and<br />
last year. This includes the account name, account amount, and percentage. The report<br />
also shows total income and total gross profit (or loss).<br />
To run the report, go to Reports > P & L > Monthly Prior Year Comparison-<br />
Prints to Excel.<br />
NOTE<br />
The current year is listed first.<br />
P&L By Date<br />
Run this report prior to running the Post Transactions process.<br />
The report displays gross profit and expense amounts and percentage of change over<br />
the date range. Total expenses and net profit (or loss) is also shown.<br />
To run the report, go to Reports > P & L > P & L By Date.<br />
1 Column<br />
Divisional<br />
P&L By Date<br />
Run this report prior to running the Post Transactions process.<br />
267
Report Details<br />
2011 Client Write-Up<br />
The report displays gross profit and expense amounts and percentage of change over<br />
the date range for a specified division. Total expenses and net profit (or loss) is also<br />
shown.<br />
NOTE<br />
Refer to the section in this manual under “Headers and Footnotes” on<br />
page 54 to assign division information. Divisions must be set up before<br />
generating transaction data in order to be reflected in division reports.<br />
To run the report, go to Reports > P & L > 1 Column Divisional P&L By Date.<br />
Transaction Listing Reports<br />
Transaction Listing reports are based on transactions for periods that have been<br />
entered in Bookkeeping > Enter Transactions.<br />
Journal<br />
Code —<br />
Transaction<br />
Listing<br />
Run this report prior to running the Post Transactions process.<br />
The report generates a list of current transactions based on the journal selected. This<br />
includes the transaction number, transaction date, division, description, reference used<br />
for the transaction, account number, debit and credit entries, and debit and credit<br />
totals.<br />
To run the report, go to Reports > Transaction Listings > Journal Code —<br />
Transaction Listing.<br />
NOTE<br />
Sort order is either Normal Sort or Sort by Reference Number. Normal<br />
Sort order displays transactions in the order they were entered.<br />
Sort by Reference Number lists transactions by order of reference<br />
number assigned to the transactions.<br />
Transaction<br />
Listing<br />
Run this report prior to running the Post Transactions process.<br />
The report displays transactions in the order they were entered for the current month.<br />
This includes the transaction number, transaction date, transaction journal, division,<br />
transaction description, reference used for the transaction, account number, debit and<br />
credit amounts, and debit and credit totals.<br />
To run the report, go to Reports > Transaction Listings > Transaction Listing.<br />
Transaction<br />
Listing (Wide<br />
Format)<br />
Run this report prior to running the Post Transactions process.<br />
The report displays transactions in the order they were entered for the current month.<br />
This includes the transaction number, transaction date, transaction journal, division,<br />
codes for employees, vendors, and contractors, transaction description, reference used<br />
for the transaction, account number, debit and credit amounts, and debit and credit<br />
totals.<br />
To run the report, go to<br />
Reports > Transaction Listings > Transaction Listing (Wide Format).<br />
268
2011 Client Write-Up Report Details<br />
Monthly<br />
Transaction<br />
Listing<br />
Run this report prior to running the Post Transactions process.<br />
The report displays transactions for the selected month in the order entered into<br />
Bookkeeping > Enter Transactions. This includes the transaction number, transaction<br />
date, journal, division, description, reference used for the transaction, account<br />
number, and debit and credit.<br />
To run the report, go to<br />
Reports > Transaction Listings > Monthly Transaction Listing.<br />
Transaction<br />
Listing By<br />
Date<br />
Run this report prior to running the Post Transactions process.<br />
The report displays transactions for the selected date range in the order entered. This<br />
includes the transaction number, transaction date, journal, division, description, reference<br />
used for the transaction, account number, debits, credits, and debit and credit<br />
totals.<br />
To run the report, go to<br />
Reports > Transaction Listings > Transaction Listing By Date.<br />
Monthly<br />
Transaction<br />
Listing -<br />
Sorted By<br />
Date<br />
Run this report prior to running the Post Transactions process.<br />
The report displays transactions for the selected month sorted by the transaction date.<br />
This includes the transaction number, transaction date, journal, division, description,<br />
reference used for the transaction, account number, debits, credits, and debit and credit<br />
totals.<br />
To run the report, go to<br />
Reports > Transaction Listings > Monthly Transaction Listing - Sorted By Date.<br />
Transaction<br />
Listing By<br />
Date - Sorted<br />
By Date<br />
Run this report prior to running the Post Transactions process.<br />
The report displays transactions for the selected month sorted by the transaction date.<br />
This includes the transaction number, transaction date, journal, division, description,<br />
reference used for the transaction, account number, debits, credits, and debit and credit<br />
totals.<br />
To run the report, go to<br />
Reports > Transaction Listings > Transaction Listing By Date - Sorted By Date.<br />
Archived<br />
Bank Reconciliations<br />
This report recreates the Bank Reconciliation report from previously completed bank<br />
reconciliations. This includes the transaction date, reference number, description,<br />
debit or credit amount, cleared transaction totals, adjusted bank balance, closing book<br />
balance, and unreconciled balance.<br />
To run the report, go to<br />
Reports > Transaction Listings > Archived Bank Reconciliations.<br />
269
Report Details<br />
2011 Client Write-Up<br />
Chart of Accounts Reports<br />
Chart of<br />
Accounts<br />
Listing<br />
Run the Post Transactions process before running this report.<br />
The report is of the Chart of Accounts and displays and prints the Chart of Accounts.<br />
This includes the account number, level, account name, account type, and starting balance.<br />
To run the report, go to Reports > Chart of Accounts > Chart of Accounts Listing.<br />
NOTE<br />
Current account balances are not included in this report.<br />
Trial Balance<br />
— Current<br />
Run the Post Transactions process before running this report.<br />
The report displays the current Chart of Accounts trial balance. This includes the<br />
account number, account name, and debit and credit amounts.<br />
To run the report, go to Reports > Chart of Accounts > Trial Balance - Current.<br />
Trial Balance<br />
By Date<br />
Run this report prior to running the Post Transactions process.<br />
The report displays the current balance of each level zero account in the Chart of<br />
Accounts based on the As of date entered. This includes the account number, account<br />
name, and debit and credit balances.<br />
To run the report, go to Reports > Chart of Accounts > Trial Balance By Date.<br />
Chart of<br />
Accounts —<br />
Prints to<br />
Excel<br />
Run the Post Transactions process before running this report.<br />
The report displays the current balance and monthly balances of all accounts in the<br />
Chart of Accounts. This includes the account number and name, account type and<br />
level, budget, current balance and start of year balance, monthly balances (January -<br />
December), and divisional balances.<br />
To run the report, go to Reports > Chart of Accounts-Prints to Excel.<br />
Chart of<br />
Accounts<br />
Listing - No<br />
Beginning<br />
Balances<br />
Run the Post Transactions process before running this report.<br />
The report is of the Chart of Accounts and displays and prints the Chart of Accounts.<br />
This includes the account number, level, account name, and account type. These is<br />
also a column for notes.<br />
To run the report, go to Reports > Chart of Accounts > Chart of Accounts Listing -<br />
No Beginning Balances.<br />
NOTE<br />
Current account balances are not included in this report.<br />
270
2011 Client Write-Up Report Details<br />
Cash Flow Reports<br />
Cash Flow<br />
By Date<br />
Run this report prior to running the Post Transactions process.<br />
NOTE<br />
This report uses the Indirect method. It starts with Net Income for the selected period<br />
and makes adjustments for all accrual based accounting transactions, such as<br />
Accounts Payable and Accounts Receivable, to report a company’s cash flow on a<br />
cash basis.<br />
This report displays Cash Flow From and Net Cash Provided by Operating, Investing,<br />
and Financing activities. The Net Increase (or Decrease) in cash is also displayed<br />
along with the cash at the beginning and end of the period.<br />
Accounts Payable Reports<br />
Only accounts designated in the Chart of Accounts with a Cash Flow<br />
Classification of Operating, Investing, or Financing appear in the<br />
Cash Flow report. Accounts with a Cash Flow Classification of N/A<br />
(no classification) do not appear on the Cash Flow report.<br />
To run the report, go to Reports > Cash Flow > Cash Flow By Date.<br />
These reports are not dependent on posting transactions so they may be run either<br />
before or after running the Post Transactions process.<br />
NOTE<br />
Select Mask SSN to have Social Security Numbers appear in Accounts<br />
Payable, Payroll, and Accountant Info Reports as XXX-XX-1234. This<br />
option remains selected until the check box is cleared.<br />
Vendor<br />
Listing<br />
The report displays basic information about each vendor for the current client. This<br />
includes the vendor code, company name, contact name, SSN/EIN, phone number,<br />
address, and the cash and expense accounts. You can sort the report by Vendor Company<br />
Name or Vendor Code.<br />
To run the report, go to Reports > Accounts Payable > Vendor Listing.<br />
Open Invoice<br />
Report<br />
The report displays information about invoices entered in Client Write-Up that are not<br />
paid in full. They could be partially paid or not paid at all. This includes the vendor<br />
code, vendor name, invoice number and date, the invoice amount, due date, discount<br />
amount, status (Unpaid or Partially Paid), payments made, and the net invoice<br />
amount. The net invoice amount is the actual amount owed (invoice amount less any<br />
discounts and rebates plus late fees, insurance, taxes, shipping charges, and any other<br />
charges). This report is sorted by invoice number.<br />
To run the report, go to Reports > Accounts Payable > Open Invoice Report.<br />
Cash<br />
Requirements<br />
Report<br />
The report displays the due date, amount due on that date, and a running total of the<br />
net amount due. This includes the due date, vendor code, vendor name, invoice number,<br />
invoice date and amount, the discount, net due, total of invoices for each date, and<br />
the running total of all outstanding invoices. This reports is sorted by invoice due date.<br />
271
Report Details<br />
2011 Client Write-Up<br />
To run the report, go to Reports > Accounts Payable > Cash Requirements Report.<br />
List<br />
NonVendors<br />
with Activity<br />
The report displays the check register for NonVendor checks printed based on a starting<br />
and ending date range. Only NonVendors with activity within these dates are<br />
included. The report includes each NonVendor’s name, address, each check date,<br />
check number, and check amount, the total number of checks printed and total check<br />
amount for each NonVendor, and the number of voids.<br />
To run the report, go to<br />
Reports >Accounts Payable > List NonVendors with Activity.<br />
Live Vendor<br />
Check<br />
Register<br />
The report displays the check register for vendor checks printed based on a starting<br />
and ending date range. This includes the check number, check date, the payee, check<br />
amount, and if the check was voided. A total count for valid checks written, voids, and<br />
the total amount for valid checks written is included.<br />
To run the report, go to<br />
Reports >Accounts Payable > Live Vendor Check Register.<br />
Vendor<br />
Payments<br />
Register<br />
The report displays the payment register (live and ATF) for vendor payments based on<br />
a starting and ending date range. This includes the check number and payment type,<br />
live or ATF, payment date, the payee, check amount, invoice ID and invoice number.<br />
Also included is a count of the number of live payments and ATF payments broken<br />
down by type of payment (cash, check, credit card, electronic transfer, and other).<br />
Each of these payment types are totaled with a grand total count and grand total<br />
amount listed.<br />
To run the report, go to Reports >Accounts Payable > Vendor Payments Register.<br />
List<br />
NonVendors<br />
with Activity<br />
— Omit<br />
Voids<br />
The report displays the check register for NonVendor checks printed based on a starting<br />
and ending date range. Only NonVendors with activity within these dates are<br />
included. Checks that have been voided are not included in this report. The report<br />
includes each NonVendor’s name, address, each check date, check number, and check<br />
amount, the total number of checks printed and total check amount for each NonVendor.<br />
Select to include all NonVendors with activity or report on a single NonVendor’s<br />
activity.<br />
To run the report, go to<br />
Reports >Accounts Payable > List NonVendors with Activity - Omit Voids.<br />
Live Vendor<br />
Check<br />
Register —<br />
Omit Voids<br />
The report displays the check register for vendor checks printed based on a starting<br />
and ending date range. Checks that have been voided are not included in this report.<br />
This includes the check number, check date, the payee, check amount, total number of<br />
valid checks written, voids, and the total amount for valid checks written.<br />
To run the report, go to Reports >Accounts Payable > Live Vendor Check Register<br />
- Omit Voids.<br />
272
2011 Client Write-Up Report Details<br />
Accounts Receivable Reports<br />
These reports are not dependent on posting transactions so they may be run either<br />
before or after running the Post Transactions process.<br />
Customer<br />
List<br />
The report displays detailed information about each customer or for an individual customer<br />
of the current client. This includes their status, billing and shipping addresses,<br />
discount rate, credit limit, debit and credit year-to-date amounts, and their current balance.<br />
Sort the report by Customer Name or Customer Code.<br />
To run the report, go to Reports > Accounts Receivable > Customer List.<br />
Invoices<br />
Use this report to batch print invoices. Select to display either Product Invoices or<br />
Service/Professional Invoices. Next, select a range of consecutive invoices by clicking<br />
on the first invoice to print and, while holding the SHIFT key down, click on the<br />
last invoice to print. To print non-consecutive invoices, click on the first invoice then,<br />
while holding the CONTROL key down, select the other invoices to print.<br />
Select the date to appear on the invoices.<br />
To run the report, go to Reports > Accounts Receivable > Invoices.<br />
Customer<br />
Statement<br />
Use this report to print a customer’s monthly statement. Select the Customer and the<br />
Start and End Dates.<br />
The statement includes the client information, the customer name, address, and customer<br />
ID, the statement date and period ending date, invoice numbers and dates,<br />
whether the transaction is an invoice or a return, the transaction type, debit and credit<br />
entries (and totals), and a running balance.<br />
To run the report, go to Reports > Accounts Receivable > Customer Statement.<br />
Customer<br />
Statement —<br />
Balance<br />
Owed<br />
This is the same report as the Customer Statement except that only statements for<br />
customers with an outstanding balance owed prints. If the customer has either a credit<br />
balance or a zero balance, the report is blank. Select the Customer and the Start and<br />
End Dates.<br />
The statement includes the client information, the customer name, address, and customer<br />
ID, the statement date and period ending date, invoice numbers and dates,<br />
whether the transaction is an invoice or a return, the transaction type, debit and credit<br />
entries (and totals), and a running balance.<br />
To run the report, go to Reports > Accounts Receivable > Customer Statement -<br />
Balance Owed.<br />
Past Due<br />
Report<br />
This is a past due aging report for all customers with an outstanding balance. Select<br />
the date to print at the top of the report. Information included is the Customer Code,<br />
Customer Name, and the amount past due for each client 1-30 days, 31-60 days, 91-<br />
120 days, and over 120 days. Individual client totals, totals of all clients for each aging<br />
period, and a grand total past due is also included.<br />
To run the report, go to Reports > Accounts Receivable > Past Due Report.<br />
273
Report Details<br />
2011 Client Write-Up<br />
Aged<br />
Receivables<br />
Report<br />
This report shows every invoice by customer and the amount current and overdue.<br />
This includes the customer code, customer name, invoice number, invoice date, due<br />
date, amount current, amount overdue, total amount current, total amount overdue,<br />
number of days overdue by individual invoice. The number of invoices past due are<br />
counted and totaled by aging periods. Totals of all invoices past due by aging period<br />
are included.<br />
To run the report, go to<br />
Reports > Accounts Receivable > Aged Receivables Report.<br />
Sales Tax<br />
Record List<br />
The report displays detailed information about each sales tax record entered. This<br />
includes the sales tax code and name, the tax rate, if the tax is sales tax or freight tax<br />
exempt, and the maximum taxable amount for each. Sort the report by sales tax code<br />
or sales tax name.<br />
To run the report, go to Reports > Accounts Receivable > Sales Tax Record List.<br />
Sales Tax<br />
Summary<br />
This report displays detailed information about the amount of sales tax charged customers<br />
sorted by either sales tax name or sales tax code. This report is useful in determining<br />
the amount of sales tax to pay each state, county, and city. The detail on the<br />
report includes the state, county, and city name, the amount of sales tax collected for<br />
each entity, taxable and non-taxable sales, taxable and non-taxable shipping charges,<br />
and total sales. Select to run a sales tax summary listing for all tax codes or a single<br />
tax code.<br />
Payroll Reports<br />
To run the report, go to Reports > Accounts Receivable > Sales Tax Summary.<br />
Payroll reports generate a variety of reports regarding employees and contractors.<br />
These reports are not dependent on posting transactions so they may be run either<br />
before or after running the Post Transactions process.<br />
NOTE<br />
Select Mask SSN to have Social Security Numbers appear in Accounts<br />
Payable, Payroll, and Accountant Info Reports as XXX-XX-1234. This<br />
option remains selected until the check box is cleared.<br />
Check<br />
Register —<br />
Contractor<br />
Check<br />
Register —<br />
Employee<br />
Contractor<br />
List<br />
The report displays a check register for contractors. This includes the check number,<br />
check date, payee, check amount, and the total of all checks in the date range selected.<br />
To run the report, go to Reports > Payroll > Check Register - Contractor.<br />
The report displays a check register for employees. This includes the check number,<br />
check date, payee, check amount, and the total of all checks in the date range selected.<br />
To run the report, go to Reports > Payroll > Check Register - Employee.<br />
The report displays basic information about each contractor for the current client. Use<br />
this report for contractor verification. This includes the contractor code, SSN/EIN,<br />
name, division, phone number, and address. Sort the report by contractor name or contractor<br />
code.<br />
274
2011 Client Write-Up Report Details<br />
To run the report, go to Reports > Payroll > Contractor List.<br />
Detailed<br />
Employee<br />
List<br />
The report displays detailed information about each employee for the current client.<br />
This includes payroll, tax detail, payroll earnings information, and HIRE Act eligibility.<br />
Sort the report by Employee Name or Employee Code.<br />
To run the report, go to Reports > Payroll > Detailed Employee List.<br />
NOTE<br />
The report can be run for all employees or for an individual employee.<br />
Employee<br />
List<br />
The report displays basic information about each employee for the current client. Use<br />
this report for employee verification. This includes employee code, SSN/EIN, name,<br />
division, phone number, and address. You can sort the report by Employee Name or<br />
Employee Code.<br />
To run the report, go to Reports > Payroll > Employee List.<br />
Payroll<br />
Journal —<br />
Employees<br />
The report is based on the date checks were written. This includes the employee code,<br />
employee name, employee SSN, check number, check date, pay rate, regular earnings,<br />
regular pay, pay per piece, gross pay, FICA, Medicare, federal, state, tips, benefits and<br />
deductions, net pay, and transaction number. Sort the report by Employee Name,<br />
Employee Code, or Division, then select a report type: Payroll Journal or Payroll<br />
Journal for an Individual. The report prints subtotals by either employee or division,<br />
depending on which sort option was selected.<br />
To run the report, go to Reports > Payroll > Payroll Journal — Employees.<br />
NOTE<br />
Checks are listed individually for each employee with totals for the date<br />
range selected and year to date. A total for all employees for the date<br />
range and year to date is also displayed.<br />
Payroll<br />
Journal —<br />
Employees<br />
Expanded<br />
The report displays all income, benefits, deductions and withholding information for<br />
either an individual or all employees based on a starting and ending date range. This<br />
includes the employee code, employee name, employee SSN, check number, check<br />
date, net pay, medicare, FICA, state, federal, and local tax withholding, tips, sick pay,<br />
overtime pay, holiday and vacation pay, total of benefits and deductions, commissions,<br />
and number of pieces. Sort the report by Employee Name, Employee Code, or Division,<br />
then select a report type: Payroll Journal or Payroll Journal for an Individual.<br />
To run the report, go to Reports > Payroll > Payroll Journal —<br />
Employees Expanded.<br />
Payroll<br />
Journal —<br />
Contractors<br />
The report is based on the date the check was written. This includes the check number,<br />
check date, gross pay, federal withholding, state withholding, net pay, transaction<br />
number, contractor code, contractor name, and SSN/EIN. Sort the report by Contrac-<br />
275
Report Details<br />
2011 Client Write-Up<br />
tor Name, Contractor Code, or Division, then select a report type: Payroll Journal<br />
or Payroll Journal for an Individual.<br />
To run the report, go to Reports > Payroll > Payroll Journal — Contractors.<br />
NOTE<br />
Checks are listed individually for each contractor with totals for the date<br />
range selected and year to date. A total for all contractors for the date<br />
range and year to date is also displayed.<br />
Payroll<br />
Report —<br />
Contractors<br />
The report is based on the pay period ending date and displays the individual contractor<br />
totals and the total of all contractors. This includes the name, date, check number,<br />
gross pay, federal withholding, state withholding, and net pay. Sort the report by the<br />
Contractor Name or Contractor Code, Date, or Division, then select a report type:<br />
Full Payroll Listing, Unpaid Payroll Listing, or Payroll Listing for an Individual.<br />
To run the report, go to Reports > Payroll > Payroll Report — Contractors.<br />
Payroll<br />
Report —<br />
Employees<br />
The report is based on the pay period ending date entered on the check and displays<br />
the total of all checks. This includes the name, pay period ending date, check number,<br />
regular hours, overtime hours, tips, pay rate, regular earnings, regular pay, pay per<br />
piece, gross pay, Social Security, Medicare, federal withholding, state withholding,<br />
deductions, benefits, and net pay. Sort the report by the Employee Name, Employee<br />
Code, Date, or Division, then choose a report type: Full Payroll Listing, Unpaid<br />
Payroll Listing, or Payroll Listing for an Individual.<br />
To run the report, go to Reports > Payroll > Payroll Report — Employees.<br />
Payroll<br />
Report —<br />
Employees<br />
Expanded<br />
The report displays all income, benefits, deductions and withholding information for<br />
either an individual or all employees based on a starting and ending date range. This<br />
includes the employee name, check number, check date, net pay, regular hours and<br />
overtime hours, gross pay, medicare, social security, state, federal, and local tax withholding,<br />
tips, sick pay, overtime pay, holiday and vacation pay, total of benefits and<br />
deductions, commissions, and number of pieces. Sort the report by Employee Name,<br />
Employee Code, Date or Division, then select a report type: Full Payroll Listing,<br />
Unpaid Payroll Listing, or Payroll Listing for an Individual.<br />
To run the report, go to Reports > Payroll > Payroll Report —<br />
Employees Expanded.<br />
Tax Liability<br />
Report by<br />
Check Date<br />
The report displays the tax liability for the employee and the employer with the exception<br />
of the employer's federal and state liability. Included for the employee is the federal,<br />
state, Medicare, and Social Security (plus totals). Included for the employer is<br />
Medicare and Social Security (plus totals). The employer’s HIRE Act reduction is also<br />
included.<br />
To run the report, go to Reports > Payroll > Tax Liability Report by Check Date.<br />
NOTE<br />
FUTA is reported on Reports > Payroll > FUTA Journal. All state<br />
information for the employer is on Report > State Wage Reports<br />
(appropriate state and quarter).<br />
276
2011 Client Write-Up Report Details<br />
Withholdings<br />
The report is based on information in Employees > Deductions & Benefits and<br />
Employees > Employee Setup (Deductions and Benefits tabs). This includes the<br />
employee name, date, and name of deductions or benefits (depending on report selection).<br />
Each benefit or deduction shows a total for each employee and a total for all<br />
employees. Sort the report by Employee Name, Employee Code, or Date, then select<br />
a report type: Benefits or Deductions.<br />
To run the report, go to Reports > Payroll > Withholdings.<br />
NOTE<br />
The report does not include federal, state, Medicare, or Social Security<br />
withholding amounts.<br />
Withholdings<br />
(Wide<br />
Format)<br />
The report is based on information in Employees > Deductions & Benefits and<br />
Employees > Employee Setup (Deductions and Benefits tabs). This includes the<br />
employee name, date, and name of deductions or benefits (depending on report selection).<br />
Each benefit or deduction shows a total for each employee and a total for all<br />
employees. Sort the report by Employee Name, Employee Code, or Date, then<br />
choose a report type: Benefits or Deductions.<br />
To run the report, go to Reports > Payroll > Withholdings (Wide Format).<br />
NOTE<br />
The report does not include federal, state, Medicare, or Social Security<br />
withholding amounts.<br />
Hours<br />
Report —<br />
Employees<br />
The report is based on the hours worked information from live payroll and ATF payroll.<br />
This includes the employee name, employee code, date, regular hours, regular<br />
pay, overtime hours, overtime pay, vacation hours, holiday hours, sick hours, vacation/<br />
holiday/sick pay, and gross pay. Sort the report by Employee Name, Employee Code,<br />
or Date, then by report type: Payroll Hours or Payroll Hours Listing for an Individual.<br />
NOTE<br />
OT Pay displays either the full overtime pay or just the overtime premium<br />
depending upon the selection in the<br />
Employees > Account & Payroll Information > Payroll Options tab.<br />
If Store all overtime pay separate from regular pay is selected, all<br />
overtime pay displays under OT Pay on the Hours Report.<br />
If Store all overtime pay separate from regular pay is not selected,<br />
only the OT premium displays under OT Pay on the Hours Report.<br />
To run the report, go to Reports > Payroll > Hours Report — Employees.<br />
FUTA<br />
Journal<br />
The report displays the employer's annual federal unemployment (FUTA) tax return<br />
report.<br />
The information is generated from data entered on the Firm > Firm Info./<br />
Global Settings, Employees > Account & Payroll Information,<br />
Employees > Employee Setup. This includes the federal wage base, employee name,<br />
employee code, employee SSN, check number, check date, wages subject to taxes,<br />
taxable wages, and FUTA tax. This information is also broken down by quarter. The<br />
277
Report Details<br />
2011 Client Write-Up<br />
quarterly summary includes the quarter number, number of transactions for the quarter,<br />
subject wages, taxable wages, and FUTA tax. There is a grand total for the number<br />
of transactions, wages subject to taxes, taxable wages, and FUTA tax. You can sort the<br />
report by Employee Name or Employee Code, then by report type: Full FUTA Journal<br />
Listing or FUTA Journal Summary Listing.<br />
To run the report, go to Reports > Payroll > FUTA Journal.<br />
SUTA<br />
Journal<br />
The report displays the employer's annual state unemployment (SUTA) tax return<br />
report. Sort the report by employee name or employee code and select to display a full<br />
FUTA journal listing or a FUTA journal summary listing. The report includes a breakdown<br />
by quarter of the number of transactions, the subject and taxable wages, SUTA<br />
tax, and check number and check date.<br />
To run the report, go to Reports > Payroll > SUTA Journal.<br />
401K Report<br />
The report displays the amount of the employee’s 401K contribution and the<br />
employer’s matching contribution. Sort the report by employee name, employee code,<br />
date, or division. The report includes the employee name, pay period date, check number,<br />
employee 401K amount, employer 401K match, and totals for each employee.<br />
To run the report, go to Reports > Payroll > 401K Report.<br />
Consolidated<br />
Check<br />
Register<br />
The report displays individual printed check information for a date range for vendors,<br />
employees, and contractors. Totals for each of these groups are displayed and a grand<br />
total of all three groups is displayed. The report includes the check number, check<br />
date, payee, and check amount. The employee status (hourly, salaried, commission,<br />
officer salary, etc.) is also displayed.<br />
To run the report, go to Reports > Payroll > Consolidated Check Register.<br />
Tax Liability<br />
Report by<br />
Pay Period<br />
End Date<br />
The report displays the total withholding amounts for a date range based on the pay<br />
period ending date rather than check dates. These include the total employee portion<br />
of Federal, Medicare, Social Security, State, and Local withholding. The employers<br />
total of Medicare and Social Security withholding is also included. Totals for each of<br />
these categories are listed along with the grand total tax liability.<br />
To run the report, go to<br />
Reports > Payroll > Tax Liability Report by Pay Period End Date.<br />
Withholdings<br />
— by Check<br />
Date<br />
The report displays the deduction amounts or the benefit amounts for a date range<br />
based on the check date. Sort the report by employee name, employee code, or date.<br />
The report includes the employee name, check date, the deduction or benefit name,<br />
amount withheld for the each deduction or benefit, subtotals and totals for each deduction<br />
and benefit.<br />
State Tax & Wage Reports<br />
To run the report, go to Reports > Payroll > Withholdings - by Check Date.<br />
These reports are the state wage reports. Select the processing payroll state. Reports<br />
are generated for the current year only. Select a quarter for the report.<br />
278
2011 Client Write-Up Report Details<br />
Accountant Info Reports<br />
These reports are not dependent on posting transactions so they may be run either<br />
before or after running the Post Transactions process.<br />
The information for these reports is generated by data entered in<br />
Setup > Client Information, Firm > Firm Info./Global Settings,<br />
Employees > Account & Payroll Information, and Employees > Employee Setup.<br />
To run the report, go to Reports > State Tax & Wage.<br />
Information in the white data entry fields can be edited. Once the information is verified,<br />
click Save to view the final report.<br />
CWU does not electronically file state wage reports. If additional state information is<br />
needed, please contact CWU <strong>Support</strong> at (828) 349-5547.<br />
These reports are not dependent on posting transactions so they may be run either<br />
before or after running the Post Transactions process.<br />
NOTE<br />
Select Mask SSN to have Social Security Numbers appear in Accounts<br />
Payable, Payroll, and Accountant Info Reports as XXX-XX-1234. This<br />
option remains selected until the check box is cleared.<br />
Client Detail<br />
List<br />
This report summarizes each client’s contact and business information. The information<br />
comes from Setup > Client Information > Contact Information and<br />
Setup > Client Information > Business Information. You can sort the report by Client<br />
Name or Client Code, then by report type: Client Info Detail List or Detail Info<br />
List for a selected client.<br />
To run the report, go to Reports > Accountant Info > Client Detail List.<br />
Client List<br />
This report lists each client’s name, client code, business type, and EIN. The information<br />
comes from Setup > Client Information > Contact Information and<br />
Setup > Client Information > Business Information. You can sort the report by Client<br />
Name or Client Code.<br />
Report Review<br />
To run the report, go to Reports > Accountant Info > Client List.<br />
This option displays the reports that have been generated by Client Write-Up and<br />
enables you to reprint a previously produced report.<br />
To review a previously produced CWU report, complete the following steps:<br />
1. Go to Reports > Report Review.<br />
279
Report Details<br />
2011 Client Write-Up<br />
Figure 11-2: Report Review<br />
2. From the drop list at the top left, filter reports by display format including text,<br />
Rich Text Format (RTF) file, Microsoft Word, Microsoft Works, PDF format,<br />
DDOC file format, Excel, Direct Deposit reports in PDF, Excel, and Comma Separated<br />
Value (CSV) formats, Direct Deposit transmission reports in text (TXT)<br />
format and 94X series tax returns. Display Release Notes shows specific information<br />
about each update of the Client Write-Up program that has been downloaded<br />
and installed.<br />
3. Click a column to sort the list in ascending or descending order by report name or<br />
date time stamp.<br />
4. Select the box beside the report you wish to review then click OK.<br />
5. Select the program you wish to use to view the report from the Open With window<br />
and click OK.<br />
Delete — Delete saved reports by selecting the report and click Delete.<br />
280
2011 Client Write-Up Installing Program Updates<br />
12 Tools<br />
This section reviews the following:<br />
• The various tools and file maintenance utilities available on the Tools menu.<br />
• Details on additional utilities and tools in Client Write-Up.<br />
Installing Program Updates<br />
Use this function to update the Client Write-Up program files on your computer.<br />
IMPORTANT<br />
An Internet connection is required for this option.<br />
If you are on a network, everyone on the network must be out of<br />
the program to install an update.<br />
Complete the following steps to download and install updates:<br />
1. Go to Tools > Install Program Updates. CWU uses your Internet connection to<br />
connect to <strong>Drake</strong>.<br />
Figure 12-1: Update Manager<br />
2. Click Check for Available Updates. CWU connects to <strong>Drake</strong> to determine<br />
update needs on your computer.<br />
3. If updates are found, the number of updates available displays. Click Get<br />
Updates. Updates are downloaded and installed into your CWU program. If no<br />
updates were found, click Exit.<br />
281
Update Prior Year Clients<br />
2011 Client Write-Up<br />
Viewing Release Notes<br />
Each time CWU program updates are downloaded and installed, specific information<br />
about each update is also downloaded.<br />
Complete the following steps to view the release notes:<br />
1. Go to Tools > Install Program Updates.<br />
2. Click View Release Notes.<br />
3. Select the box next to the release notes you wish to view.<br />
4. Click OK.<br />
5. Select the program you wish to use to view the release notes.<br />
6. Click OK.<br />
NOTE<br />
You can also view release notes by going to Reports > Report Review<br />
and selecting Display Release Notes from the drop list.<br />
<strong>Drake</strong> Dialer<br />
The <strong>Drake</strong> Dialer is a dial-up connection to <strong>Drake</strong> <strong>Software</strong> that can be used to download<br />
Client Write-Up software updates.<br />
To install the <strong>Drake</strong> Dialer, go to Tools > Install Program Updates. Click the<br />
Install Dialer button at the bottom of the window. A new dial-up connection is<br />
installed to the computer<br />
When CWU attempts to download program updates, it first looks for a regular Internet<br />
connection. If no connection is found, the <strong>Drake</strong> Dialer is invoked. A modem with a<br />
phone line attached is required in order to use the <strong>Drake</strong> Dialer. This connection is a<br />
long distance call.<br />
Update Prior Year Clients<br />
Bring forward all client setup information from the Client Write-Up 2009 program.<br />
Wait until the Year End Close process has been performed for the prior year so the<br />
COA information can be updated.<br />
If Update Prior Year Clients is run before closing out CWU 2010, the client’s COA<br />
is copied into CWU 2011 with no balances. CWU 2011 continues to check if the Year<br />
End Close GL process has been run in CWU 2010. If it has, you will be prompted to<br />
update your bookkeeping whenever you access the CWU 2011 Chart of Accounts.<br />
WARNING<br />
Once you have run Update Prior Year Clients, do not continue to<br />
enter payroll into CWU 2010.<br />
282
2011 Client Write-Up File Maintenance<br />
To update Client Write-Up clients from a prior year, complete the following steps:<br />
WARNING<br />
Close all other instances of Client Write-Up before updating prior<br />
year clients. Only CWU 2011 should be running.<br />
1. Go to Tools > Update Prior Year Clients.<br />
Figure 12-2: Update Prior Year Clients<br />
File Maintenance<br />
2. Select the location of the client files to convert to the 2011 program by clicking<br />
the location. If the proper location isn’t displayed, click the browse icon ( ) and<br />
navigate to the correct location.<br />
3. The client files in the selected location are displayed at the bottom of the dialog<br />
box. Select the individual client files by clicking the box, or click Select All to<br />
covert all clients in this location.<br />
4. Click Update.<br />
The file maintenance features include backing up, restoring, and deleting client files.<br />
To access Client Write-Up file maintenance features, go to<br />
Tools > File Maintenance.<br />
283
File Maintenance<br />
2011 Client Write-Up<br />
Auto Backup<br />
Set up CWU to automatically backup client files at designated times or use the<br />
Backup speed button (<br />
) on the CWU tool bar for manual backups.<br />
When Auto Backup is selected, CWU backs up the current client information to the<br />
default backup folder (see “Backup Path” under “Firm Info/Global Settings”).<br />
To activate the auto backup feature, complete the following:<br />
1. Go to Tools > File Maintenance > Auto Backup. The Auto Backup dialog box<br />
opens.<br />
Figure 12-3: Auto Backup<br />
2. Select either Start of Client Session or End of Client Session. If neither of these<br />
are selected, no backups take place automatically.<br />
• Start of Client Session — When this option is selected, the active client’s<br />
information is backed up when CWU is launched and, when changing the<br />
active client, the newly active client’s information is backed up. Files backed<br />
up using this option have an S (start of session) added to the end of the file<br />
name (e.g. <strong>Drake</strong>_Co_2011-01-15_14-21_S.ZIP).<br />
• End of Client Session — When this option is selected, the active client information<br />
is backed up when you exit CWU and, when changing the active client,<br />
the client you are leaving is backed up. Files backed up using this option<br />
have an E (end of session) added to the end of the file name (e.g.<br />
<strong>Drake</strong>_Co_2011-01-15_14-21_E.ZIP).<br />
NOTE<br />
Both the Start of Client Session and End of Client Session options<br />
may be selected. This results in a backup of the active client taking<br />
place when launching CWU and when exiting CWU. Also, when changing<br />
the active client, the client you are changing from and the client you<br />
are changing to are backed up.<br />
3. Click Save.<br />
284
2011 Client Write-Up File Maintenance<br />
Backup<br />
Create frequent backups of client files to a secure location for archival purposes. The<br />
backup process makes a copy of client data and stores it in the specified backup location.<br />
IMPORTANT<br />
Make backups of client data at least once a week. Be sure to<br />
backup to a separate storage location, such as a “thumb” or<br />
“flash” drive, or some other media that can either be carried away<br />
from your office location or is permanently located away from your<br />
office (such as online data backup provider). This ensures you<br />
can recover data should your office be damaged by fire, flood, or<br />
some other disaster.<br />
To backup one or more clients, complete the following:<br />
1. Go to Tools > File Maintenance > Backup. The Backup File Selection dialog<br />
box opens.<br />
Figure 12-4: Backup Client Files<br />
2. A backup path must be specified. (See “Backup Path Restrictions” on page 286.)<br />
The current backup path is displayed in the bottom left of the Backup File Selection<br />
dialog box. If necessary, complete one of the following steps:<br />
• If the path reads “NO PATH SET,” a path must be selected. To enter a default<br />
backup path, go to Firm > Firm Info./Global Settings and enter a Backup<br />
Path.<br />
• To override the default path and enter a temporary path, click Change Path to<br />
open the Temporary Back-Up Location window. Select a drive from the<br />
Drive drop list. Then select a directory or subfolder. CWU will not back up to<br />
a drive letter. See “Backup Path Restrictions” for more detail. The selected<br />
285
File Maintenance<br />
2011 Client Write-Up<br />
backup location is displayed in the Temporary Back-Up Location field.<br />
Click OK.<br />
3. Click the boxes to select clients for backup from the Client Code column. Once a<br />
box is selected, a check appears in the box. To select all clients, click Select All.<br />
4. Click Backup. A prompt appears when the backup process is complete. Click<br />
OK.<br />
5. Click Exit to exit Backup File Selection.<br />
Backups are created with at time/date stamp added to the name. This prevents overwriting<br />
a previous backup and helps you identify the correct backup to restore.<br />
NOTE<br />
Client Write-Up uses Zip file compression to reduce the amount of disk<br />
space required for backup files.<br />
Backup Path<br />
Restrictions<br />
To prevent unintentionally cluttering key folders on your hard drive, a few restrictions<br />
apply when selecting a backup path.<br />
IMPORTANT<br />
The backup path cannot be a drive's root (topmost) folder.<br />
You must specify a subfolder. An example of an acceptable path<br />
is “C:\CWU2011Archives\”. An example of an unacceptable path<br />
is “C:\”.<br />
You cannot specify CWU's root or CWU's clients folder. An<br />
example of an unacceptable path is “C:\CWU2011\”.<br />
If you don’t specify a valid backup path, the program defaults to<br />
\CWU2011\Clients\Backups\.<br />
Restore<br />
Before client files can be restored, a backup path must be selected in<br />
Firm > Firm Info./Global Settings.<br />
IMPORTANT<br />
The same version of CWU that was used to back up the client file<br />
must be used to restore the file.<br />
To restore files that have been backed up, complete the following steps:<br />
1. Go to Tools > File Maintenance > Restore. The Restore File Selection dialog<br />
box opens with all clients in the current backup location listed.<br />
286
2011 Client Write-Up File Maintenance<br />
Figure 12-5: Restore Client Files<br />
To restore from a different location, click Change Path to open the Locate Files to<br />
Restore window. Select the drive from the Drive list. The selected restore location is<br />
displayed in the field at the bottom of the dialog box. Click Save. This creates a<br />
restore path for this restoration only.<br />
2. Select a client from the list at the top of the window. The files that have been<br />
backed up for the selected client display in the bottom portion of the window.<br />
3. Select a file to restore.<br />
NOTE<br />
CWU uses a time and date stamp when client files are backed up. Let’s<br />
use the file “DRAKE_CO_2011-01-05_09-49.zip” as our example.<br />
Reading this file name left to right, information for client code<br />
“DRAKE_CO” was backed up. The backup was performed on 01/05/<br />
2011 at 9:49 am, and the file is “zipped” to reduce the file size.<br />
4. Click Restore.<br />
Delete Client<br />
Client files can be deleted in Client Write-Up. Always back up a file before deleting.<br />
To delete client files, complete the following steps:<br />
1. Go to Tools > File Maintenance > Delete Client. The Delete a Client window is<br />
opened.<br />
2. Click to select a client from the list.<br />
3. Click Delete.<br />
287
Rebuild Client List<br />
2011 Client Write-Up<br />
4. When the Confirm Folder Delete window appears, click Yes. The deleted file is<br />
moved to the recycle bin.<br />
NOTE<br />
The active client (the client currently open) is not displayed in the list.<br />
To delete the currently open client you must change to another client.<br />
Click Change from the Home window and select a different client, then<br />
proceed with the delete process.<br />
Restore Excel Templates<br />
Rebuild Client List<br />
Printing Blank Forms<br />
CWU provides a duplicate set of Excel import template files in case the working copies<br />
of the templates are overwritten or become corrupted.<br />
To restore the Excel template files:<br />
1. Go to Tools > File Maintenance > Restore Excel Templates.<br />
2. Click Restore Templates. The template files are copied from a backup folder to a<br />
working folder.<br />
3. Click OK.<br />
4. Click Exit.<br />
Run Rebuild Client List any time clients are missing from the Select a Client dialog<br />
box. This may occur when you add or delete clients.<br />
To rebuild the client list, complete the following steps:<br />
1. Go to Tools > Rebuild Client List.<br />
2. When the Reindex Successful message appears, click OK.<br />
Blank forms can be viewed and printed in CWU. Some forms are supplied for informational<br />
purposes only. Not all forms available for viewing and printing are approved<br />
for filing purposes.<br />
Complete the following steps to view and/or print blank forms.<br />
1. Go to Tools > Print Blank Forms. The View/Print Blank Forms window<br />
opens.<br />
288
2011 Client Write-Up Calculator<br />
Figure 12-6: Print Blank Forms<br />
Calculator<br />
2. Enter the form year.<br />
3. Click to select a form group, either Federal W2s/W3, Federal 1099Ms/1096,<br />
Federal 94X series, or State Wage Forms. All forms used in CWU related to the<br />
selected form group display in a list box.<br />
4. Double-click a form, or click to select the form and click Go To Form. The form<br />
is displayed in the report viewer where it can be viewed or printed.<br />
Use the calculator function to assist with calculations prior to making entries in CWU.<br />
To access the calculator, from the CWU Home window, go to Tools > Calculator.<br />
The calculator operates similarly to your desktop calculator. Use either your keyboard’s<br />
numeric keypad to enter numbers or click the calculator’s numbers and functions.<br />
Show as many as three decimal places. You can also show a printable “tape” of<br />
your calculations by clicking View All Calculations.<br />
Adobe Reader Download<br />
When Client Write-Up reports run, a “PDF” file is created. This file type requires<br />
either the Adobe Reader program (sometimes called “Acrobat Reader”) or some other<br />
program that can read PDF files in order to view the report. Download the Adobe<br />
Reader program by going to Tools > Adobe Reader Download. This is a free download.<br />
NOTE<br />
This feature requires an Internet connection.<br />
289
Where to File Tax Returns<br />
2011 Client Write-Up<br />
Where to File Tax Returns<br />
When this option is selected, the IRS.gov website opens and displays their “Where to<br />
File Tax Returns - Addresses Listed by Return Type” webpage. This information is<br />
helpful when mailing tax returns and is the most up-to-date address information. To<br />
access this information, from the CWU Home window, go to Tools > Where to File<br />
Tax Returns.<br />
NOTE<br />
This feature requires an Internet connection.<br />
Client Notes<br />
Use Client Notes to enter and save notes about each of your clients.<br />
To enter client notes:<br />
Printing Mailing Labels<br />
1. Go to Tools > Client Notes.<br />
2. Enter client notes as you would in a word processor.<br />
3. Click Save.<br />
Clear — Deletes the notes. The deletion is not permanent until Save is selected.<br />
Append Date — Select this button to include the current date and time with a note.<br />
Copy All — Select this button to copy all notes to your computer’s clipboard so they<br />
can be pasted into another program (e.g. word processor, e-mail, etc.)<br />
Archive — Save the current notes into a separate file.<br />
Always append Date/Time on startup — Select this option to have the date and time<br />
automatically included with your notes each time the Client Notes window opens.<br />
NEW FOR<br />
2011<br />
Print batch or single mailing labels using a strip label printer.<br />
Batch print mailing labels for your clients’ employees, contractors, AP vendors, AR<br />
customers, or to your clients’ primary contact address. You can also print single mailing<br />
labels by typing an address not already entered in CWU.<br />
NOTE<br />
This feature is to be used with label printers that print on rolls of labels.<br />
The recommended label size is 3 1/2” x 1 1/8”. Printing to sheets of<br />
labels produces one label per page.<br />
290
2011 Client Write-Up Spreadsheet Imports<br />
Printing Single Mailing Labels<br />
Single mailing labels can be printed to individuals not already entered into CWU.<br />
To print single mailing labels:<br />
1. Go to Tools > Print Mailing Labels.<br />
2. Select the label printer from the Printer drop list.<br />
3. Enter the number of copies of the label to be printed in the Copies field.<br />
4. Type the label information in the Single Label area.<br />
5. Click Print Single.<br />
Printing Mailing Labels from CWU Lists<br />
Spreadsheet Imports<br />
Print all or selected labels from a clients list of employees, contractors, vendors, or<br />
customers or print labels to your clients. All of these lists can be sorted based on several<br />
criteria.<br />
To print mailing labels from an existing list in CWU:<br />
1. Go to Tools > Print Mailing Labels.<br />
2. Select the label printer from the Printer drop list.<br />
3. Enter the number of copies of the label to be printed in the Copies field.<br />
4. Select the group (AR Customers, Clients, Contractors, Employees, or Vendors)<br />
from the Label Type field.<br />
5. Select the Sort By criteria.<br />
6. Select and print labels by either:<br />
• Click Print All to print all labels listed in the grid. It is not necessary to select<br />
all when printing all labels listed in the grid.<br />
• Select individual labels to print by clicking beside the Code field in the X column<br />
and click Print Selected.<br />
• Select all but a few labels to print from a list by clicking Select All then clearing<br />
the X column for those that you do not want to print. Click Print<br />
Selected.<br />
Use this feature to import client information into CWU. Excel templates are used so<br />
that the data coming into CWU is in the appropriate order and format. Data can be<br />
typed directly into the appropriate template or pasted into the template after being<br />
exported from another accounting software program.<br />
The following information can be imported into CWU:<br />
• Chart of Accounts including account balances<br />
• Employee information<br />
• Contractor information<br />
• Accounts Payable Vendor information<br />
291
Spreadsheet Imports<br />
2011 Client Write-Up<br />
• Accounts Receivable Customer information<br />
• Journal Transactions<br />
IMPORTANT<br />
Microsoft Excel ® 2007 or Open Office must be installed on your<br />
computer in order to use this feature.<br />
Importing to CWU<br />
Importing information into the CWU program is a three step process:<br />
Step 1 - Copy the blank spreadsheet templates to a work area<br />
Step 2 - Enter or copy data into the template<br />
Step 3 - Import to CWU<br />
Step 1 -<br />
Copy the<br />
Templates<br />
Step 2 -<br />
Entering<br />
Data into the<br />
Template<br />
Copy the blank Excel speadsheet templates to a work area. You can use an existing<br />
folder or make a new folder during this step.<br />
1. Go to Tools > Spreadsheet Templates<br />
2. Click Browse<br />
3. Select a destination folder for the blank templates by browsing to an existing<br />
folder and clicking OK or click Make New Folder and name the new folder<br />
4. Click Copy All<br />
5. Click OK<br />
6. Click Exit<br />
Data to be imported into CWU must be entered into the appropriate template and the<br />
appropriate columns within the template.<br />
IMPORTANT<br />
Entering data into the wrong template or the inappropriate column<br />
will result in an unsuccessful import to CWU.<br />
To enter data into a template:<br />
1. Open Microsoft Excel 2007 or Open Office<br />
2. Browse to the location where the blank templates were copied in step 1.<br />
3. Open the appropriate template.<br />
• To import the client’s Chart of Accounts, open the CWU ChartofAccounts<br />
template<br />
• To import employee information, open the CWU Employees template<br />
• To import contractor information, open the CWU Contractors template<br />
• To import accounts payable vendors, open the CWU AP Vendors template<br />
• To import accounts receivable customers, open the CWU AR Customers<br />
template<br />
292
2011 Client Write-Up Spreadsheet Imports<br />
• To import journal transaction information, open the CWU JournalTrans<br />
template<br />
4. Either type or paste the import data into the template. The preferred method is to<br />
type the data directly into the template.<br />
When typing directly into the template, error checking is used to<br />
verify the appropriate type of data is being entered in each field<br />
(numeric, alphanumeric, date, etc.). When pasting data into the<br />
template, this error checking does not take place.<br />
WARNING<br />
When pasting data into the template, note that some of the fields<br />
use drop lists. The data that is pasted into a drop list field must<br />
match exactly one of the drop list options. If it does not match then<br />
that record and all records listed below that one in the template will<br />
not be imported.<br />
It is not recommended to import more than 200 records at a time. If<br />
more records need to be imported for a data type, it is recommended<br />
that the import be split.<br />
5. Once all data for a data type has been entered into the template, use the Save As<br />
command and name the file something other than the default template name. If<br />
you overwrite the template with your data file, you should restore the templates<br />
(see “Restore Excel Templates” on page 288).<br />
NOTE<br />
The data file must be saved using either the *.xls or the *.xlsx file type.<br />
Step 3 -<br />
Import<br />
The last step is to import the data into CWU and verify the results.<br />
If you are going to be using the bookkeeping feature, import the<br />
Chart of Accounts before importing vendors or journal transactions.<br />
IMPORTANT<br />
The journal file in CWU must not have any transactions in it in<br />
order to import journal transactions. Journal transactions that<br />
appear in the Journals screen (Bookkeeping > Journal Transactions)<br />
must either be deleted or posted (see “Posting Transactions”<br />
on page 165) prior to importing journal transactions.<br />
You may import all data types multiple times. However, the import<br />
will not be successful if there are duplicates. To avoid this issue,<br />
always start with a new template. See “Step 1 - Copy the Templates”<br />
on page 292.<br />
293
Exporting from CWU<br />
2011 Client Write-Up<br />
To import the data saved in step 2:<br />
1. Make the client that the import data is for the active client (see “Changing the<br />
Active Client” on page 13). If the client doesn’t exist in CWU, create the client<br />
(see “Setting Up a New Client” on page 31).<br />
2. Go to Tools > Spreadsheet Imports.<br />
3. Select the type of data to import from the Choose Type field.<br />
4. Click Browse and locate the file to import (file saved in step 2).<br />
5. Click Go. When the import is complete, the bottom left section of the Convert<br />
Speadsheet File window displays the results of the import.<br />
6. Click Exit.<br />
NOTE<br />
It is recommended that you verify the imported data.<br />
Exporting from CWU<br />
NEW FOR<br />
2011<br />
Export employee, contractor, accounts payable vendor, accounts<br />
receivable customer, Chart of Accounts, and journal transaction information<br />
from Client Write-Up to a Microsoft Excel ® spreadsheet.<br />
To export data from CWU:<br />
1. Make the appropriate client the active client (see “Changing the Active Client” on<br />
page 13).<br />
2. Go to Tools > Export CWU to Excel<br />
3. Select the type of data to export from the Choose Type field. The fields available<br />
for exporting are listed in the Select Fields section of the window and the Spreadsheet<br />
File Name field displays the default export file name.<br />
NOTE<br />
Do not change the filename using the Spreadsheet File Name field.<br />
4. Select the fields to export by clicking the field name under the Select Fields section<br />
of the window or click Select All to export all available fields of the selected<br />
data type. Fields selected for export display an X beside the field name.<br />
5. Click Go. An Excel spreadsheet displays the field information.<br />
Save the export spreadsheet using Excel. Do not use spaces in the filename. Once the<br />
export spreadsheet is created, save the exported information to any file name desired<br />
using either a .XLS or .XLSX extension.<br />
294
2011 Client Write-Up Additional Tools<br />
Additional Tools<br />
Export to <strong>Drake</strong> Tax<br />
• “Export to <strong>Drake</strong> Tax” on page 295<br />
• “Importing from QuickBooks” on page 296<br />
• “Importing from PeachTree” on page 299<br />
• “E-mail” on page 301<br />
• “IRS Website” on page 304<br />
This feature exports information from Client Write-Up to the client's tax return in<br />
<strong>Drake</strong> <strong>Software</strong>. If a tax return for the client does not exist in <strong>Drake</strong>, information from<br />
Setup > Client Information in CWU is used to create the tax return in <strong>Drake</strong>. If a tax<br />
return for this client exists in <strong>Drake</strong>, the EIN/SSN is used as the identifier for the client<br />
file and CWU exports to the existing tax return.<br />
IMPORTANT<br />
If a tax return was prepared in <strong>Drake</strong> for the client last year, the<br />
client’s information must be brought forward from the previous<br />
year before exporting CWU data to <strong>Drake</strong>.<br />
In <strong>Drake</strong>, go to Last Year Data > Update 2008 to 2009. Enter<br />
the client’s EIN or SSN, click Add Client, then follow the instructions.<br />
Complete the following steps to select the client data to export:<br />
1. Go to Setup > Client Information, Business Information tab, and verify that<br />
the business type has been selected from the Bus. Type field.<br />
2. Go to Bookkeeping > Chart of Accounts. Double-click a level 0 account number<br />
to export. Only Level 0 accounts are used for this option.<br />
3. Use the Tax Form drop list to select the form for this action.<br />
4. Use the Tax Line drop list to select the line on the tax form.<br />
5. Use the Tax Form Instance field to specify which instance of the form specified<br />
in the Tax Form field should receive the exported account information.<br />
6. Click Save. Follow this procedure for each account number exported.<br />
Complete the following steps to export the client data:<br />
1. Go to File > Export to <strong>Drake</strong> Tax.<br />
295
Additional Tools<br />
2011 Client Write-Up<br />
Figure 12-7: Export to <strong>Drake</strong><br />
2. Type the drive letter where <strong>Drake</strong> Tax <strong>Software</strong> is installed and the tax year. Do<br />
not use colons (:) or slashes (\) when entering the drive letter.<br />
3. Click OK. The export moves data from that account number in CWU to the form<br />
and line you have specified.<br />
No worksheets or schedules are generated in the tax return, so these may need to be<br />
created to support the information exported. When multiple accounts in the Chart of<br />
Accounts are exported to the same form and line in the tax return, only totals are indicated<br />
on the return and overflow sheets are not generated.<br />
WARNING<br />
Export to <strong>Drake</strong> prior to performing the Year End Close. The information<br />
required for the export is not available after closing the year.<br />
Do not run the Year End Close from<br />
Bookkeeping > Year End Close the year prior to exporting. When<br />
you close the year end, zeroes are exported to <strong>Drake</strong> for those<br />
account numbers higher than the Retained Earnings account.<br />
Importing from QuickBooks<br />
Import client, employee, vendor, customer, and Chart of Accounts information<br />
(including account balances) from Intuit’s QuickBooks ® software. There are three<br />
parts to this process.<br />
IMPORTANT<br />
All transactions from the QuickBooks transaction register must be<br />
posted to the Chart of Accounts prior to exporting information<br />
from QuickBooks.<br />
If you will be converting the Chart of Accounts, it is strongly recommended<br />
that you print a Trial Balance report in QuickBooks<br />
prior to beginning this process.<br />
PART I. Complete the following steps in QuickBooks:<br />
1. Select the company to be imported into CWU.<br />
2. Go to Edit > Preferences > Accounting > Company Preferences and verify<br />
that Use > Account > Numbers is selected. In the Chart of Accounts, verify the<br />
accounts exist.<br />
3. Make sure all transactions in the General Journal are posted to the Chart of<br />
Accounts.<br />
296
2011 Client Write-Up Additional Tools<br />
4. Close the Chart of Accounts.<br />
5. Go to File > Utilities > Accounting > Export > Lists to IIF Files.<br />
6. On the Export window, select all check boxes.<br />
Figure 12-8: QuickBooks Export Selection Window<br />
7. Click OK.<br />
8. Save EXPORT.IIF in d:\CWU2011\QB CONVERSION FILES (substitute the<br />
correct drive letter for the drive where Client Write-Up is installed if not ‘d’).<br />
IMPORTANT<br />
The export file from QuickBooks must be named EXPORT.IIF. If<br />
the filename is changed, CWU will not be able to successfully perform<br />
the import.<br />
You can convert only one QuickBooks client at a time to Client<br />
Write-Up. Complete the entire conversion process for a client<br />
before returning to QuickBooks and creating another client export<br />
file.<br />
PART II. Complete the following steps in Client Write-Up:<br />
1. Go to File > Import QuickBooks® or PeachTree® Files. The QuickBooks or<br />
PeachTree File Conversion screen displays.<br />
297
Additional Tools<br />
2011 Client Write-Up<br />
Figure 12-9: QuickBooks File Conversion<br />
2. Select Convert QuickBooks.<br />
3. Enter information in the following fields:<br />
• Client Code — Enter a client code. If the client code exists in Client Write-<br />
Up, you can only convert information that does not exist in CWU. For<br />
instance, if there is an employee in CWU for the client code entered, the Convert<br />
Employees option is not available.<br />
If a client code is entered that does not already exist in CWU, you will be<br />
prompted to enter information about the client. A Client Code must be a<br />
unique code not currently used in CWU. Client codes are up to eight alpha/<br />
numeric characters (0 - 9, A - Z, and a - z) including underscores ( _ ).<br />
• Select to convert employee, customer, Chart of Accounts, or vendor information<br />
or Select All Conversions to import all four. Information can only be<br />
converted once. Selections previously converted are unavailable for conversion.<br />
• Bus. Type — From the drop list, select the same business type that was used<br />
in QuickBooks: sole proprietor (1040), partnership (1065), corporation<br />
(1120), or an S-corporation (1120S).<br />
• Deposit Frequency — Used to determine whether a Schedule B is required to<br />
be filed with Form 941. Select Semi-Weekly to produce a Schedule B with<br />
Form 941. Select Monthly to fill in Line 17 of both Form 941 and 941SS.<br />
• Start of Year Date — Set this date to the first day of the client's business<br />
year. For example, if the client's fiscal year begins April 1, the start-of-year<br />
date is 04/01/2011. Fiscal or calendar years are allowed.<br />
4. Click Save. The conversion process begins.<br />
PART III. Verify the information and complete the setup in CWU:<br />
1. Go to Setup > Client Information. Verify the information and complete the client<br />
setup. See “Client Setup” on page 31 for more detail.<br />
298
2011 Client Write-Up Additional Tools<br />
2. Go to Bookkeeping > Chart of Accounts and verify that each account, its<br />
account type, and account balance is correct. See “Editing an Account” on<br />
page 156 for detail on editing account information.<br />
NOTE<br />
The Chart of Accounts must have a zero balance before it can be<br />
saved.<br />
Importing from PeachTree<br />
3. Go to Employees > Employee Setup. Verify the information and complete the<br />
setup of each employee. See “Setting Up Employee Payroll” on page 59 for more<br />
detail.<br />
4. Go to Payables > Vendor Setup if using CWU’s Accounts Payable feature. Verify<br />
the information and complete the setup of each vendor. See “Accounts Payable”<br />
on page 195 for more detail.<br />
5. Go to Receivables > Customer Setup if using CWU’s Accounts Receivable feature.<br />
Verify the information and complete the setup of each customer. See “Customer<br />
Setup” on page 234 for more detail.<br />
Import client, employee, vendor, customer, and Chart of Accounts information<br />
(including account balances) from PeachTree ® software. There are three parts to this<br />
process.<br />
IMPORTANT<br />
Post all journal entries to the general ledger prior to exporting<br />
information from PeachTree.<br />
If you will be converting the Chart of Accounts, it is strongly recommended<br />
that you print a Balance Sheet report in PeachTree<br />
prior to beginning this process.<br />
PART I. Complete the following steps in PeachTree:<br />
1. Select the company to be imported into CWU.<br />
2. Go to File > Select Import/Export...<br />
3. Select to export one of the following:<br />
• Accounts Receivable - Customer List<br />
• Accounts Payable - Vendor List<br />
• Payroll - Employee List<br />
• General Ledger - Chart of Accounts List<br />
NOTE<br />
These lists can be exported one at a time. You may create all four<br />
export files for a single client before converting them to CWU or create<br />
and convert one file at a time.<br />
4. Click Export.<br />
5. Select the Options tab.<br />
299
Additional Tools<br />
2011 Client Write-Up<br />
6. To specify the location to create the export file, select the arrow ( ) in the<br />
Import/Export File section. Save the export files in d:\CWU2011\PT CONVER-<br />
SION FILES (substitute the correct drive letter for the drive where Client Write-<br />
Up is installed if not ‘d’). Use the default .CSV file name.<br />
7. Click Open.<br />
8. Under Export Options, select Include Headings.<br />
9. Click OK.<br />
NOTE To create the next export file, begin with step 3.<br />
PART II. Complete the following steps in Client Write-Up:<br />
1. Go to File > Import QuickBooks® or PeachTree® Files. The QuickBooks or<br />
PeachTree File Conversion screen displays.<br />
Figure 12-10: PeachTree File Conversion<br />
2. Select Convert PeachTree.<br />
3. Enter information in the following fields:<br />
• Client Code — Enter a client code. If the client code exists in Client Write-<br />
Up, you can only convert information that does not exist in CWU. For<br />
instance, if there is an employee in CWU for the client code entered, the Convert<br />
Employees option is not available.<br />
If a client code is entered that does not already exist in CWU, you will be<br />
prompted to enter information about the client. A Client Code must be a<br />
unique code not currently used in CWU. Client codes are up to eight alpha/<br />
numeric characters (0 - 9, A - Z, and a - z) including underscores ( _ ).<br />
• Select to convert employee, customer, Chart of Accounts, or vendor information<br />
or Select All Conversions to import all four. Information can only be<br />
300
2011 Client Write-Up Additional Tools<br />
converted once. Selections previously converted are unavailable for conversion.<br />
• Bus. Type — From the drop list, select the same business type that was used<br />
in QuickBooks: sole proprietor (1040), partnership (1065), corporation<br />
(1120), or an S-corporation (1120S).<br />
• Deposit Frequency — Used to determine whether a Schedule B is required to<br />
be filed with Form 941. Select Semi-Weekly to produce a Schedule B with<br />
Form 941. Select Monthly to fill in Line 17 of both Form 941 and 941SS.<br />
• Start of Year Date — Set this date to the first day of the client's business<br />
year. For example, if the client's fiscal year begins April 1, the start-of-year<br />
date is 04/01/2011. Fiscal or calendar years are allowed.<br />
4. Click Save. The conversion process begins.<br />
PART III. Verify the information and complete the setup in CWU:<br />
1. Go to Setup > Client Information. Verify the information and complete the client<br />
setup. See “Client Setup” on page 31 for more detail.<br />
2. Go to Bookkeeping > Chart of Accounts and verify that each account, its<br />
account type, and account balance is correct. See “Editing an Account” on<br />
page 156 for detail on editing account information.<br />
NOTE<br />
The Chart of Accounts must have a zero balance before it can be<br />
saved.<br />
3. Go to Employees > Employee Setup. Verify the information and complete the<br />
setup of each employee. See “Setting Up Employee Payroll” on page 59 for more<br />
detail.<br />
4. Go to Payables > Vendor Setup if using CWU’s Accounts Payable feature. Verify<br />
the information and complete the setup of each vendor. See “Accounts Payable”<br />
on page 195 for more detail.<br />
5. Go to Receivables > Customer Setup if using CWU’s Accounts Receivable feature.<br />
Verify the information and complete the setup of each customer. See “Customer<br />
Setup” on page 234 for more detail.<br />
E-mail<br />
NOTE<br />
Internet access and your own e-mail account are required to use this<br />
feature.<br />
Use the Client Write-Up e-mail program to send client files directly to CWU <strong>Support</strong><br />
when they request this information for problem resolution.<br />
Access the CWU e-mail program by going to Help > Email CWU Tech <strong>Support</strong>.<br />
E-Mail Setup<br />
Use the Setup menu to select your method for sending and receiving e-mail. Two<br />
methods are available: the default method, which is compatible with most Internet<br />
301
Additional Tools<br />
2011 Client Write-Up<br />
Service Providers, and the alternate method, which is chosen if the default method<br />
does not work.<br />
The e-mail program uses your 1040.com e-mail address, which is<br />
your EFIN@1040.com (for example, 777777@1040.com). This address is used for<br />
both your sender and reply address.<br />
WARNING<br />
You should use an alternate reply-to address. By default, both<br />
CWU and the <strong>Drake</strong> Tax program use your 1040.com email<br />
account as the reply-to address. If no alternate reply-to address is<br />
specified in CWU, messages must be downloaded and viewed<br />
using the email program in the <strong>Drake</strong> Tax software.<br />
To use an alternate reply-to address:<br />
1. From the menu bar within the e-mail program, select Setup > Options.<br />
2. Select Use Alternative Reply-To Address.<br />
3. Enter an Alternate Address. This address replaces your 1040.com address,<br />
appearing as the sender and reply address on e-mail messages you send.<br />
4. Click Save.<br />
Checking E-<br />
Mail<br />
To check your CWU e-mail, first go to Help > Email CWU Tech <strong>Support</strong> then<br />
select File > Check Mail, click the Send/Receive speed button, or press CTRL+M.<br />
You can also check the status of your mailbox by clicking File > Check Mailbox Status<br />
or pressing CTRL+S.<br />
Downloaded messages appear in your Inbox. To open a message in a new window,<br />
double-click it.<br />
Your mailbox also includes a Sent Items box, a Drafts box, and a Trash box. To<br />
open a box, click it in the left pane.<br />
• Sent Items — Once a message is sent, it is moved to the Sent Items folder.<br />
• Drafts — If you close a message before sending it, you are prompted to save a<br />
draft of the message in your folder to be completed later. To accept, click Yes. To<br />
discard the message, click No.<br />
• Trash — Deleted messages are sent to the Trash folder. To permanently delete a<br />
message, select it and click Delete. Messages deleted from Trash cannot be<br />
recovered.<br />
The following columns display and provide information about each email:<br />
• S(tatus) – The status is dependent upon which folder the message list is presenting<br />
(In, Out, Drafts, or Trash).<br />
• A(ttachment Code) – Indicates if an attachment was sent with the message.<br />
• Who – Indicates to whom the email was sent.<br />
• Date/Time – Indicates the date and time the message was sent.<br />
• Subject – Enter a brief description regarding the content of the email.<br />
302
2011 Client Write-Up Additional Tools<br />
Composing<br />
a New<br />
Message<br />
To compose a new message, click New. Enter an address in the To field, a subject in<br />
the Subject line, and a message in the text box at the bottom. Messages cannot be sent<br />
without a subject. To send the message, click Send.<br />
NOTE<br />
If an alternate reply-to address has not been established in<br />
Setup > Options, a caution message appears when Send is selected<br />
giving you the option of changing your alternate reply-to address. We<br />
recommend you establish one at this time. Click Yes to make this<br />
change.<br />
When composing e-mail messages, you have several address book options. Click To<br />
in the New Message window to access these options. Select either <strong>Drake</strong> <strong>Software</strong><br />
<strong>Support</strong> Address Book or Local Address Book from the Address Book drop list.<br />
The <strong>Drake</strong> <strong>Software</strong> <strong>Support</strong> Address Book displays general e-mail addresses at<br />
<strong>Drake</strong>, such as for CWU support, accounting, spanish support, and client services. To<br />
insert an address in your message, click a General e-mail address and click OK.<br />
The Local Address Book is filled with e-mail addresses that have been added through<br />
the Address Book function. See “Managing the Address Book” on page 304 for more<br />
information. To insert an address in your message, select an e-mail address and click<br />
OK.<br />
NOTE<br />
Close the completed message before sending and you are prompted to<br />
save it in the Drafts folder. The e-mail is saved. To send the saved e-<br />
mail, click the Drafts box from the main screen.<br />
E-Mail<br />
Attachments<br />
To attach a file to an e-mail message, click New, Reply, or Forward, then click the<br />
Add button below the Subject line.<br />
There are three options available to attach files to a message.<br />
1. Backup and Attach — Select a client from the Clients list and click Backup &<br />
Attach. CWU makes a current backup of the selected client’s files and places the<br />
backup file in the list of Attachments on the right.<br />
2. Attach Backup — This option assumes the client’s file you wish to attach to the e-<br />
mail has been backed up. Select a client from the Clients list. All backups for the<br />
selected client display in the Backup Files list box. CWU displays the files<br />
backed up to the default backup location as set under Firm Firm Info/<br />
Global Settings. Select the desired backup file to attach and click Attach<br />
Backup. The backup file is added to the Attachments list on the right.<br />
3. You may attach non-client files by clicking the Browse button and navigating to<br />
the file you wish to attach.<br />
To remove a file that has been attached to an e-mail prior to sending the e-mail, select<br />
the file from the Attachments list and click Remove Attachment.<br />
Once all desired files have been attached to the e-mail, click OK. You are returned to<br />
the e-mail message that was being composed and the attached files are listed in the<br />
Attachments list on the top<br />
303
Additional Tools<br />
2011 Client Write-Up<br />
Replying,<br />
Forwarding,<br />
and Deleting<br />
Messages<br />
To reply to a message, click the message then click Reply (or, with the message open,<br />
click Reply). The original message is included in the reply message.<br />
To forward a message, click the message then click Forward (or, with the message<br />
open, click Forward).<br />
To delete a message, click the message and click Delete (or, with the message open,<br />
click Delete). Deleted messages go to the Trash folder.<br />
Managing<br />
the Address<br />
Book<br />
The Local Address Book can be filled with e-mail addresses of your choice. To add an<br />
address, go to Help > Email CWU Tech <strong>Support</strong>, then either go to<br />
File > Edit Address Book or select the Address Book speed button. Click the Add<br />
icon at the top-left corner of the dialog box. Enter first name, last name, and e-mail<br />
address. Click Save. To finish, click Done.<br />
An address book from outside of CWU can be imported into your Local Address<br />
Book. Click Import, browse to the address book file, and click Open.<br />
NOTE<br />
You may need to export information from another e-mail program prior<br />
to importing this information into CWU. CWU imports CSV (comma<br />
separated value) files only.<br />
To edit an entry in the Local Address Book, select the entry, click the Edit icon, make<br />
the necessary edits, and click Save.<br />
To delete an entry in the Local Address Book, select the entry and click the Delete<br />
icon. Click Yes to confirm the deletion.<br />
Moving<br />
Messages<br />
IRS Website<br />
1. Highlight the message you want to move.<br />
2. Select Message > Move to Folder.<br />
3. Select a folder from the available list.<br />
To access the IRS website, go to Help > IRS Web Site. Click Open Web Site.<br />
If you are using a dial-up connection to access the Internet, launch your Internet connection<br />
before using this option.<br />
304
2011 Client Write-Up Pre-Printed Checks<br />
13 Quick Reference<br />
Pre-Printed Checks<br />
MICR Checks<br />
Some processes in Client Write-Up require numerous steps. Use the following as a<br />
guide to complete these tasks.<br />
To print payroll checks using pre-printed check stock, complete the following steps:<br />
1. Purchase check stock. (<strong>Support</strong>ed stock is listed on page 50.)<br />
2. Enter the type of check stock you are using into the software (page 49).<br />
3. Select the printing options you’ll use for payroll checks and check stubs<br />
(page 50).<br />
To print payroll or vendor checks using blank check stock, complete the following<br />
steps:<br />
1. Purchase blank check stock. (<strong>Support</strong>ed stock is listed on page 24.)<br />
2. Select a printer for MICR checks.<br />
3. Create a MICR check design (page 25).<br />
4. Enter the type of Nelco blank check stock you are using into the software (see<br />
Table 2-2).<br />
5. Set up the MICR bank account (page 47).<br />
6. Select printing options for payroll check stubs (page 51 and page 53).<br />
Process Payroll (Live and ATF)<br />
The live payroll process is much the same as that of After-the-Fact, or “ATF” payroll,<br />
whether for employees or contractors. “ATF” means that the employee or contractor<br />
has been paid, so you are entering the payroll information into CWU for bookkeeping<br />
purposes and do not print checks.<br />
Complete the following steps to produce and process payroll:<br />
1. Enter payroll information.<br />
• Live employee payroll (page 86)<br />
• ATF employee payroll (page 95)<br />
• Live contractor payroll (page 130)<br />
• ATF contractor payroll (page 134)<br />
305
PIN Applications for e-Filing 94X Returns<br />
2011 Client Write-Up<br />
2. Print checks for live employee (page 101) and contractor payroll (page 137).<br />
3. Process payroll for employees and contractors (live and ATF) to the journal (See<br />
“Payroll Journal Entry” on page 160.).<br />
See page 112 to produce 94X payroll filing reports and page 183 for instructions on<br />
electronically filing this information.<br />
PIN Applications for e-Filing 94X Returns<br />
In order to electronically file tax return forms 940, 941, 944, and 941SS, you must<br />
have a personal identification number, or PIN, as required by the IRS. This is a different<br />
PIN from the one you use to electronically filing a tax return. The PIN application<br />
process varies according to the type of filer.<br />
NOTE<br />
You must obtain an EFIN (Electronic Filing Identification Number) prior<br />
to applying for a PIN. If you have an EFIN, use it and do not apply for<br />
another one. See page 37 for information on applying for an EFIN.<br />
Business Taxpayer’s PIN Application<br />
ERO<br />
To apply for a business taxpayer’s PIN, complete the following steps:<br />
1. Complete a 94X PIN application (page 39).<br />
2. Transmit the PIN application to <strong>Drake</strong> (page 40).<br />
3. Enter your 10-digit PIN (it should arrive in the mail from the IRS within 10 days)<br />
into Client Write-Up (page 41).<br />
IMPORTANT<br />
Perform the following procedure for each client for which the ERO<br />
will be transmitting 94X tax returns.<br />
To apply for an ERO PIN, complete the following steps:<br />
1. Complete a 94X PIN application (page 42).<br />
2. Transmit the PIN application to <strong>Drake</strong> (page 43).<br />
3. Have the client enter their 10-digit PIN (it should arrive in the mail from the IRS<br />
within 10 days) into Client Write-Up (page 44).<br />
Reporting Agent’s PIN Application<br />
A reporting agent is authorized to electronically sign and file 94X forms on behalf of a<br />
taxpayer through submission of Form 8655, either by the client or the reporting agent.<br />
There must be a Form 8655 signed by the client for each of the reporting agent's clients.<br />
306
2011 Client Write-Up Print and Upload W-2s and W-3s<br />
To apply for a reporting agent PIN, complete the following steps:<br />
1. Fill out one Form 8655 (page 44) for each client for whom the reporting agent will<br />
file. Have each client sign a Form 8655 and mail or fax the forms to the IRS.<br />
2. Enter your PIN into Client Write-Up (page 45). The reporting agent should<br />
receive a mailed notification of acceptance from the IRS and, in a separate mailing,<br />
a five-digit signature PIN in about two weeks. Reporting agents sign all the<br />
electronic returns they file with a single PIN.<br />
Print and Upload W-2s and W-3s<br />
Complete the following process to print W-2s and W-3s, to create the upload file, and<br />
to upload it to the Social Security Administration. There is a different process for creating<br />
and processing a W-2 “on the fly” (See “W-2 On the Fly” on page 172.).<br />
1. Process W-2s (page 116).<br />
2. Edit W-2s (page 117). This generally won’t be necessary unless manual adjustment<br />
to payroll amounts were made.<br />
3. Print W-2s and W-3s (page 118).<br />
4. Create the W-2/W-3 upload file (page 186).<br />
5. Review the upload file for possible submission rejection issues (page 189).<br />
6. Transmit the W-2 and W-3 information to the Social Security Administration<br />
(page 189).<br />
Print and Upload 1099s and 1096s<br />
Complete the following process to print 1099s and 1096s, to create the upload file,<br />
and to upload it to the IRS. There is a different process for creating and processing<br />
Forms 1099 “on the fly” (See “1099s and 1098s On the Fly” on page 175.).<br />
1. Process 1099s (page 146).<br />
2. Edit 1099s (page 147). This generally won’t be necessary unless manual adjustment<br />
to payroll amounts were made.<br />
3. Print 1099s and 1096s (page 148).<br />
To transmit the 1099 and 1096 to the IRS:<br />
1. Create the 1099/1096 upload file (page 190).<br />
2. Transmit the 1099 and 1096 information to the IRS’s FIRE website (page 192).<br />
Create and Process W-2s and W-3s on the Fly<br />
1. Open or create the appropriate business (client) employing this employee.<br />
WARNING<br />
You must change to the correct active client prior to creating W-2s<br />
on the fly. Creating W-2s on the fly under the wrong client will result<br />
in an incorrect W-3 for that client.<br />
307
Process 1099s, 1096s, and 1098s on the Fly<br />
2011 Client Write-Up<br />
To create a new client, go to File > New Client and complete the<br />
Contact Information (page 32) and W-2/W-3 Setup (page 34) tabs. If the W-2 (and<br />
W-3s) are going to be electronically filed for this client, complete E-Filing > W2 E-<br />
Filing > Create File (page 186). Select only Save Screen at this time and not the<br />
Create File option.<br />
2. Create the W-2 on the fly (“Step 1 - Creating W-2s On the Fly” on page 172).<br />
3. Process and print the on the fly W-2 and W-3 (“Step 2 - Processing W-2s On the<br />
Fly” on page 173).<br />
To e-file the W-2 and W-3:<br />
1. Create the W-2/W-3 upload file (page 186).<br />
2. Review the upload file for possible submission rejection issues (page 189).<br />
3. Transmit the W-2 and W-3 information to the Social Security Administration<br />
(page 189).<br />
Process 1099s, 1096s, and 1098s on the Fly<br />
1. Open or create the appropriate business (client) employing this employee.<br />
WARNING<br />
You must change to the correct active client prior to creating Forms<br />
1099 or 1098 on the fly. Creating 1099s or 1098s on the fly under<br />
the wrong client will result in an incorrect 1096 for that client.<br />
End of Year Process<br />
To create a new client, go to File > New Client and complete the<br />
Contact Information and select the state for 1099 on the W2/W3-1099/1098 Setup<br />
tab. If Forms 1099 (and 1096) or 1098 are going to be electronically filed for this client,<br />
complete the E-Filing > 1099 Misc. E-Filing > Create File screen (see “Creating<br />
the 1099/1096/1098 Upload File” on page 190). Select only Save Screen at this<br />
time and not the Create File option.<br />
2. Create the 1099 or 1098 on the fly (“Step 1 - Creating 1099s and 1098s On the<br />
Fly” on page 176).<br />
3. Process and print the on the fly 1099, 1098, and 1096 (“Step 2 - Processing 1099s<br />
and 1098s On the Fly” on page 177).<br />
To e-file the 1099, 1098, and 1096:<br />
Transmit the 1099, 1098, and 1096 information to the IRS’s FIRE website (page 192).<br />
1. Run the Post Transactions process (page 165).<br />
2. Export to <strong>Drake</strong> Tax software (optional) (page 295).<br />
3. Run the Year End Close (page 167).<br />
Once the End of Year process is completed, you can move the client’s information<br />
including the Chart of Accounts into the next year’s Client Write-Up. See “Update<br />
Prior Year Clients” on page 282 for more information.<br />
308
2011 Client Write-Up Appendix A - E-Filing 1099-MISC FAQ<br />
14 Appendix<br />
The following appendices cover the topics:<br />
• Appendix A - E-Filing 1099-MISC FAQ<br />
• Appendix B - W-2/W-3 PIN Application FAQ<br />
• Appendix C - IRS “FIRE” Website<br />
• Appendix D - <strong>Drake</strong> Document Manager<br />
• Appendix E - Client Write-Up Menus<br />
• Appendix F - InterceptEFT Holidays<br />
• Appendix G - Portals<br />
• Appendix H - Home Screen Shortcuts<br />
• Appendix I - Reporting Agent’s List<br />
• Appendix J - Preparing to e-file W-2s<br />
• Appendix K - Preparing to e-file 1099s<br />
• Appendix L - E-Filing Quick Reference<br />
Appendix A - E-Filing 1099-MISC FAQ<br />
Q. Do I need anything other than CWU to upload 1099-MISC files?<br />
A. Yes. Fill out Form 4419 and mail it to the IRS at least 30 days before the due date<br />
of the return.<br />
Q. What do I receive from the IRS once I’m approved to electronically file the 1099-<br />
Misc?<br />
A. The IRS sends you a TCC (Transmitter Control Code). If you don’t receive a reply<br />
within 30 days, call the IRS’s Martinsburg Computing Center toll free at (866) 455-<br />
7438 between 8:30 am and 4:30 pm ET.<br />
Q. Can I transmit a 1099-MISC while I am waiting for the TCC?<br />
A. No. You can’t transmit until after you have received the TCC from the IRS.<br />
Q. Can I submit Form 4419 without a signature?<br />
A. No. The IRS does not issue the TCC without a valid signature.<br />
Q. Are there other forms that I need that are associated with electronically filing the<br />
1099-MISC?<br />
A. Yes, Forms 8809, 8508, and 6847.<br />
Form 8809 — This is the application to transmit an extension for the 1099-MISC filing.<br />
This form must be filed by the due date of the 1099-MISC.<br />
309
Appendix B - W-2/W-3 PIN Application FAQ<br />
2011 Client Write-Up<br />
Form 8508 — This requests a waiver from filing informational returns electronically.<br />
It must be filed at least 45 days prior to the due date of the returns for which you are<br />
requesting a waiver. If you do not file and do not have an approved waiver on record,<br />
a penalty of $50 per return can be levied.<br />
Appendix B - W-2/W-3 PIN Application FAQ<br />
Q. Is a PIN required before submitting an electronic Form W-2 or W-3?<br />
A. The Social Security Administration has recently changed the PIN requirement.<br />
PINs have been replaced with simply setting up a login ID and Password to their Business<br />
Services Online website.<br />
Go to E-Filing > W2 E-Filing (EFW2) > Transmit File and click Open Web Site.<br />
From the Business Services Online web page, scroll down and click Register. Follow<br />
the directions to complete the registration.<br />
310
2011 Client Write-Up Appendix C - IRS “FIRE” Website<br />
Appendix C - IRS “FIRE” Website<br />
The FIRE (Filing Information Returns Electronically) system is set up for financial<br />
institutions and others to file Information Return Forms 1042-S, 1098, 1099, 5498,<br />
8027, or W-2G. An Information Return is a tax document used to report certain types<br />
of payments made by financial institutions and others who make payments as a part of<br />
their trade or business as required by Internal Revenue Code regulations.<br />
(From IRS Publication 1220, Sec 8, pages 186 - 189)<br />
Connecting to the FIRE system<br />
• Go to http://fire.irs.gov to connect to the FIRE system.<br />
• Filers should turn off their popup-blocking software before transmitting their<br />
files.<br />
• Before connecting, have your Transmitter Control Code (TCC) and EIN available.<br />
• Your browser must support SSL 128-bit encryption.<br />
• Your browser must be set to receive “cookies.” Cookies are used to preserve your<br />
User ID status.<br />
First time connection to the FIRE system<br />
(If you have logged on previously, skip to “Subsequent connections to the FIRE system”.)<br />
1. Click Create New Account.<br />
2. Fill out the registration form and click Submit.<br />
3. Enter your User ID (most users log on with their first and last name).<br />
4. Enter and verify your Password (the password is user assigned and must be eight<br />
alphanumeric characters, containing at least one uppercase, one lowercase and<br />
one numeric character). FIRE may require you to change the password once a<br />
year.<br />
5. Click Create.<br />
6. If you receive the message, Account Created, click OK.<br />
7. Enter and verify your 10-digit self-assigned PIN (Personal Identification Number).<br />
8. Click Submit.<br />
9. If you receive the message, Your PIN has been successfully created!, click OK.<br />
10.Read the bulletins and click Start the FIRE application.<br />
Subsequent connections to the FIRE system<br />
1. Click Log On.<br />
2. Enter your User ID. (Most users log on with their first and last name.)<br />
3. Enter your Password. (The password is user-assigned and is case sensitive.)<br />
311
Appendix C - IRS “FIRE” Website<br />
2011 Client Write-Up<br />
Uploading your file to the FIRE system (complete these steps from Menu<br />
Options)<br />
1. Click Send Information Returns.<br />
2. Enter your TCC.<br />
3. Enter your EIN.<br />
4. Click Submit.<br />
5. The system displays the company name, address, city, state, ZIP code, phone<br />
number, contact, and e-mail address. This information is used to contact or send<br />
correspondence (if necessary) regarding this transmission. Update as appropriate<br />
and click Accept.<br />
6. Click one of the following:<br />
• Original File<br />
• Correction File<br />
• Test File<br />
• Replacement File (if you select this option, select one of the following):<br />
a) New FIRE Replacement (file was originally transmitted on this system). Click<br />
the file to be replaced.<br />
b) Magnetic Media Replacement. Enter the alphabetic character from Form<br />
9267, Media Tracking Slip, that was sent with the request for replacement file.<br />
Click Submit.<br />
7. Enter your 10-digit PIN.<br />
8. Click Submit.<br />
9. Click Browse to locate the file and open it.<br />
10.Click Upload.<br />
When the upload is complete, the name of the file uploaded and total bytes received is<br />
displayed.<br />
If you have more files to upload for that TCC, click File Another.<br />
If you have no more files to upload, click Main Menu.<br />
NOTE<br />
It is your responsibility to check the acceptability of your file. Check<br />
back into the system in 1-2 business days using the Check File Status<br />
option.<br />
Checking the file status<br />
1. At the main menu, click Check File Status.<br />
• Enter your TCC.<br />
• Enter your EIN.<br />
• Click Search.<br />
2. If Results indicate:<br />
• Good, Not Released and you agree with the Count of Payees, you are finished<br />
with this file. The file will automatically be released after 10 calendar<br />
days unless you contact the IRS within this time frame.<br />
312
2011 Client Write-Up Appendix C - IRS “FIRE” Website<br />
• Good, Released — File has been released to our mainline processing.<br />
• Bad — Correct the errors and timely resubmit the file as a “replacement.”<br />
• Not yet processed — File has been received but the IRS does not have results<br />
available yet. Please check back in a few days.<br />
3. Click the desired file for a detailed report of your transmission.<br />
4. When you are finished, click on Main Menu.<br />
• Click Log Out.<br />
• Close your Web browser.<br />
Common Problems and Questions Associated with Electronic Filing<br />
.01 Refer to Part A, Sec. 16, for common format errors associated with electronic/<br />
magnetic files.<br />
.02 The following are the major errors associated with electronic filing:<br />
Non-format<br />
Errors<br />
• Transmitter does not check the FIRE system to determine file acceptability. The<br />
results of your file transfer are posted to the FIRE system within two business<br />
days. It is your responsibility to verify file acceptability and, if the file contains<br />
errors, get an online listing of the errors. Date received and number of payee<br />
records are also displayed. If the file is good but you do not want the file processed,<br />
you must contact IRS/ECC-MTB within 10 calendar days from the transmission<br />
of your file.<br />
• Incorrect file is not replaced timely. If your file is bad, correct the file and resubmit<br />
as a replacement.<br />
• Transmitter compresses several files into one. Compress only one file at a time.<br />
For example, if you have 10 uncompressed files to send, compress each file separately<br />
and send 10 separate compressed files.<br />
• Transmitter sends a file and CHECK FILE STATUS indicates that the file is<br />
good, but the transmitter wants to send a replacement or correction file to replace<br />
the original/correction/replacement file. Once a file has been transmitted, you can<br />
not send a replacement file unless Check File Status indicates the file is bad (1-2<br />
business days after file was transmitted). If you do not want the IRS to process the<br />
file, you must first contact the IRS toll-free (866) 455-7438 to see if this is possible.<br />
• Transmitter sends an original file that is good, and then sends a correction file for<br />
the entire file even though there are only a few changes. The correction file, containing<br />
the proper coding, should contain only the records needing correction, not<br />
the entire file.<br />
• File is formatted as EBCDIC. All files submitted electronically must be in standard<br />
ASCII code.<br />
• Transmitter has one TCC number, but is filing for multiple companies.When<br />
sending the file electronically, enter the EIN of the company assigned to the TCC.<br />
When you upload the file, it contains the EINs for the other companies that you<br />
are filing for. This is the information that is passed forward.<br />
313
Appendix C - IRS “FIRE” Website<br />
2011 Client Write-Up<br />
• If the transmitter sent the wrong file, call the IRS as soon as possible toll free at<br />
(866) 455-7438. The IRS may be able to stop the file before it has been processed.<br />
Please do not send a replacement for a file that is marked as a good file.<br />
314
2011 Client Write-Up Appendix D - <strong>Drake</strong> Document Manager<br />
Appendix D - <strong>Drake</strong> Document Manager<br />
Use the <strong>Drake</strong> Document Manager to create an organizational file structure for storing<br />
electronic documents such as CWU client files and PDF copies of tax returns.<br />
The Document Manager, or DDM, is organized as a three-level system. Think of it as<br />
a virtual filing cabinet with drawers and folders in the drawers: Level 1 is the cabinet;<br />
Level 2 is the drawer; Level 3 is the folder. Folders may also have subfolders. The<br />
actual documents reside in the folders and subfolders.<br />
To access the <strong>Drake</strong> Document Manager, go to Tools > <strong>Drake</strong> Document Manager.<br />
Documentation for DDM can be found in the 2010 <strong>Drake</strong> <strong>Software</strong> <strong>Manual</strong> on the<br />
<strong>Drake</strong> Tax <strong>Software</strong> CD. Insert the CD, select <strong>Manual</strong>s, Practice Returns, and IRS<br />
Pubs, and in the <strong>Manual</strong>s folder, select 2010 <strong>Drake</strong> <strong>Software</strong> <strong>Manual</strong>. You can also<br />
go to the <strong>Drake</strong> <strong>Support</strong> website (http://www.<strong>Support</strong>.<strong>Drake</strong><strong>Software</strong>.com), and under<br />
Training Tools select <strong>Manual</strong>s.<br />
315
Appendix E - Client Write-Up Menus<br />
2011 Client Write-Up<br />
Appendix E - Client Write-Up Menus<br />
Table 14-1: Menus<br />
Task Description Location<br />
Accountant Info Report<br />
Activate CWU<br />
Summarizes each client’s contact and business<br />
information<br />
New users of CWU must activate the program<br />
prior to its use by entering the code received with<br />
the purchase of the software.<br />
Reports > Accountant Info<br />
File > Activate CWU<br />
Add/Edit Clients Add a new client or edit an existing client. Setup > Client Information<br />
Add/Edit Contractors<br />
Add/Edit Employee Deductions<br />
and Benefits<br />
Add/Edit Employees<br />
Add a new contractor or edit an existing contractor.<br />
Create or modify default deductions and benefits<br />
offered to employees beyond the standard<br />
deductions.<br />
Add a new employee or edit an existing<br />
employee.<br />
Contractors > Contractor Setup<br />
Employees > Deductions & Benefits<br />
Employees > Employee Setup<br />
Add/Edit Vendors Add a new vendor or edit an existing vendor. Payables > Vendor Setup<br />
Adjust FICA Withholding<br />
After-the-Fact Contractor<br />
Payroll<br />
After-the-Fact Employee Payroll<br />
Checks employee withholding for the year and<br />
compares it to the amount of FICA that should<br />
have been withheld. If there’s a difference<br />
greater than 10 cents, transactions are<br />
created to correct FICA amounts.<br />
Enter data pertaining to a previously<br />
issued contractor's paycheck.<br />
Enter payroll information when employee checks<br />
are not going to be printed.<br />
Employees > Adjust W2 Withholding<br />
Contractors > ATF Contractor<br />
Payroll<br />
Employees > ATF Payroll<br />
Auto Backup Enable the auto backup feature Tools > File Maintenance > Auto<br />
Backup<br />
Backup Back up client files Tools > File<br />
Maintenance > Backup<br />
Balance Sheet Report<br />
Produces a statement listing the debit and credit<br />
balances of the current client.<br />
Reports > Balance Sheets<br />
Change Contractor Code Change a previously entered contractor code. Contractors > Change Contractor<br />
Code<br />
Change Employee Code Change a previously entered employee code. Employees > Change Employee<br />
Code<br />
Chart of Accounts Report<br />
Lists the account number and name, level, and<br />
type. The Chart of Accounts Trial Balance report<br />
lists the account number, name, and corresponding<br />
debits and credits.<br />
Reports > Chart of Accounts<br />
316
2011 Client Write-Up Appendix E - Client Write-Up Menus<br />
Table 14-1: Menus<br />
Task Description Location<br />
Check Alignment<br />
Check FICA Withholding<br />
Close General Ledger<br />
Change the alignment of information printed on<br />
pre-printed payroll checks.<br />
Checks employee withholding for the year and<br />
compares it to the amount of FICA that should<br />
have been withheld.<br />
Zeros out all income and expense accounts and<br />
posts net income to the retained earnings<br />
account.<br />
Employees > Check Alignment<br />
and<br />
Contractors > Check Alignment<br />
Employees > Check W2 Withholding<br />
Bookkeeping > Year End Close<br />
Create 1099 Extension file Create the 1099-MISC extension request file. E-Filing > 1099/1098 E-Filing ><br />
Create Extension File<br />
Create 94X Tax Deposit<br />
Create/Edit Chart of Accounts<br />
Create/Print 1099 on the Fly<br />
Create/Print 1099/1096<br />
Create/Print W-2 on the Fly<br />
Enter the deposit information. This information<br />
can be transferred to the 94X if required.<br />
Create a client’s chart of accounts for bookkeeping<br />
purposes or edit account numbers, names,<br />
level, and budget. Also define what form and line<br />
account information is exported to in <strong>Drake</strong> Tax<br />
software.<br />
Create a 1099-MISC by entering information<br />
directly onto a 1099-MISC form without setting<br />
up the contractor.<br />
Create the 1099-MISC and 1096 transmission<br />
file. Also print the 1099-MISC and 1096<br />
Create a W-2 by entering information directly<br />
onto a W-2 form without setting up the<br />
employee.<br />
Employees > Tax Deposit > 94X<br />
Bookkeeping > Chart of<br />
Accounts<br />
On the Fly Forms > 1099s, 1098<br />
and W2G on the Fly > 1099 Misc.<br />
on the Fly<br />
Contractors > Process 1099<br />
Misc.<br />
On the Fly Forms > W2s on the<br />
Fly<br />
Create/Print W-2/W-3 Create, edit, and print W-2s and W-3s. Employees > Process W2s<br />
Delete Client Files Permanently delete a client’s files. Tools > File<br />
Maintenance > Delete Client<br />
Edit Appearance of Reports<br />
Edit Report Header and<br />
Footer<br />
Customize the appearance of reports (color,<br />
font, logo, and watermark).<br />
The header and footnote information for reports<br />
can be modified.<br />
Setup > Display Settings<br />
Setup > Headers & Footnotes<br />
E-File 94X Forms Electronically file the 94X forms. E-Filing > 94X E-Filing > Select/<br />
Transmit 94X Forms > 94X<br />
E-File PIN Application<br />
E-File Transmission Status<br />
E-mail CWU Tech <strong>Support</strong><br />
Transmit the PIN application required to e-file<br />
the 94X forms.<br />
View transmission status information for all<br />
tax deposits and PIN applications.<br />
Send e-mail directly to technical support. Include<br />
your name, EFIN, and a description of the problem<br />
in detail.<br />
E-Filing > 94X E-Filing > Select/<br />
Transmit PIN Applications<br />
E-Filing > 94X E-Filing > View<br />
Results<br />
Help > Email CWU Tech <strong>Support</strong><br />
317
Appendix E - Client Write-Up Menus<br />
2011 Client Write-Up<br />
Table 14-1: Menus<br />
Task Description Location<br />
Enter Journal Transactions<br />
Export to <strong>Drake</strong><br />
Enter transactions directly to the General Ledger.<br />
Can also bring the payroll information to the<br />
journal, add an ATF payroll entry to the<br />
journal “On the Fly”, and edit account<br />
names in the Chart of Accounts.<br />
Exports information from Client Write-Up to the<br />
client’s tax return in <strong>Drake</strong>.<br />
Bookkeeping > Enter Transactions<br />
File > Export to <strong>Drake</strong> Tax<br />
General Ledger Report Displays the balances of all accounts. Reports > General Ledger<br />
Install Updates Download and install program update files. Tools > Install Program Updates<br />
Interim Report<br />
Live Contractor Payroll<br />
Live Employee Payroll<br />
MICR Calibration<br />
Monthly Post Report<br />
Report displays information that was entered for<br />
the current month or period.<br />
Enter payroll data before printing a contractor<br />
paycheck.<br />
Enter payroll data before printing an employee<br />
paycheck.<br />
Calibration is a two-step process that ensures<br />
the MICR information is printed on the check at<br />
the correct width and intensity.<br />
Produce a monthly posted balance sheet, profit<br />
and loss, general ledger and transaction listing.<br />
Reports > Interim<br />
Contractors > Live Contractor<br />
Payroll<br />
Employees > Live Payroll<br />
Firm > MICR Calibration<br />
Reports > Monthly Post<br />
New Client Add a new client to Client Write-Up. File > New Client<br />
Payables Check Alignment<br />
Payroll account numbers,<br />
rates, and limitations.<br />
Change the alignment of information printed on<br />
pre-printed paybles checks.<br />
Assign specific account numbers from the Chart<br />
of Accounts to payroll processing features. General<br />
payroll settings, rates and limits must be<br />
entered here.<br />
Payables > Check Alignment<br />
Employees > Account & Payroll<br />
Information and<br />
Contractors > Account & Payroll<br />
Information<br />
Payroll Filing Report Payroll Filings reports generate the 943, 944,<br />
944SS, 940, 941SS, and the 941C; also the 941<br />
and 941SS quarterly reports.<br />
Employees > 94X Forms<br />
Payroll Report<br />
PIN Application<br />
PIN Set Up<br />
Post Transactions to the General<br />
Ledger<br />
Print Employee Payroll<br />
Checks<br />
Generate a variety of payroll reports pertaining<br />
to employees and contractors.<br />
Complete information to apply for a PIN from the<br />
IRS so 94X tax deposit forms can be e-filed.<br />
Complete the PIN setup process after receiving<br />
a PIN from the IRS.<br />
Posts the current transactions to the Chart of<br />
Accounts.<br />
Print new employee pay checks.<br />
Reports > Payroll<br />
Setup > Client Information > EF<br />
Setup<br />
Setup > Client Information > EF<br />
Setup<br />
Bookkeeping > Post Transactions<br />
Employees > Print New Checks<br />
318
2011 Client Write-Up Appendix E - Client Write-Up Menus<br />
Table 14-1: Menus<br />
Task Description Location<br />
Print Contractor Payroll<br />
Checks<br />
Print new contractor pay checks<br />
Contractors > Print New Checks<br />
Profit and Loss Report Reports of the company’s profits and losses. Reports > P & L<br />
Rebuild Client List Re-index client databases. Tools > Rebuild Client List<br />
Reconcile Account Balances<br />
Reprint Employee Payroll<br />
Checks<br />
Reprint Contractor Payroll<br />
Checks<br />
Check account balances against the bank balances.<br />
Reprint a previously printed employee pay<br />
check.<br />
Reprint a previously printed contractor pay<br />
check.<br />
Bookkeeping > Bank Reconciliation<br />
Employees > Reprint Checks<br />
Contractors > Reprint Checks<br />
Restore Restore Client Write-Up client files. Tools > File<br />
Maintenance > Restore<br />
Review W-2 before Uploading<br />
to the SSA<br />
Loads the Social Security Administration's Accu-<br />
Wage program which identifies most of the common<br />
format errors in wage submissions.<br />
E-Filing > W2 E-Filing<br />
(EFW2) > Review File<br />
Select Client Change to view a different client’s information. File > Select Client<br />
Set up 1099 E-Filing Capability.<br />
Set up W-2 E-Filing Capability<br />
State Tax and Wage Report<br />
Transaction Listing Report<br />
Transmit 1099<br />
Transmit 1099 Extension<br />
Request<br />
Set up the necessary information required to<br />
electronically file Forms 1099.<br />
Set the electronic filing options for the PIN, agent<br />
indicator code, EIN information and preparer,<br />
employment, and tax jurisdiction codes.<br />
Produces the wage report to be filed with each<br />
state's department of revenue.<br />
Reports transactions sorted by journal code or in<br />
the order of actual transaction.<br />
Connects to the IRS’s FIRE website to upload<br />
1099 and 1096 information and view results.<br />
Connects to the IRS’s FIRE website to upload<br />
the 1099-MISC extension request and view<br />
results.<br />
E-Filing > 1099 Misc. E-Filing ><br />
Create File<br />
E-Filing > W2 E-Filing (EFW2) ><br />
Create File<br />
Reports > State Tax & Wage<br />
Reports > Transaction Listings<br />
E-Filing > 1099 Misc. E-Filing ><br />
Transmit File/View Results<br />
E-Filing > 1099 Misc. E-Filing ><br />
Transmit Extension File/View<br />
Results<br />
Update Client from prior year Update the previous year’s client data. Tools > Update Prior Year Clients<br />
Upload W-2/W-3 Information<br />
to the SSA<br />
Vendor Setup<br />
Year-to-Date Report<br />
Connects the the Social Security’s website to<br />
upload W-2 and W-3 information.<br />
Set up vendor information for printing of vendor<br />
checks.<br />
Reports on the general ledger and journal transactions<br />
since the last post.<br />
E-Filing > W2 E-Filing (EFW2) ><br />
Transmit File<br />
Payables > Vendor Setup<br />
Reports > Year-to-Date<br />
319
Appendix F - InterceptEFT Holidays<br />
2011 Client Write-Up<br />
Appendix F - InterceptEFT Holidays<br />
Direct Deposit transmissions on Friday, Saturday, or Sunday are processed by InterceptEFT<br />
the following Monday. InterceptEFT does not process any Direct Deposit<br />
transactions that fall on the following holidays:<br />
Holiday Processing Calendar<br />
Holiday 2011 2012 2013 2014<br />
New Year’s Day Sat, Jan 1* Fri, Jan 2** Tues, Jan 1 Wed, Jan 1<br />
Martin Luther King Jr. Day Mon, Jan 17 Mon, Jan 16 Mon, Jan 21 Mon, Jan 20<br />
President’s Day Mon, Feb 21 Mon, Feb 20 Mon, Feb 18 Mon, Feb 17<br />
Memorial Day Mon, May 30 Mon, May 28 Mon, May 27 Mon, May 26<br />
Independence Day Mon, July 4 Wed, July 4 Thur, July 4 Fri, July 4<br />
Labor Day Mon, Sept 5 Mon, Sept 3 Mon, Sept 2 Mon, Sept 1<br />
Columbus Day Mon, Oct 10 Mon, Oct 8 Mon, Oct 14 Mon, Oct 13<br />
Veteran’s Day Fri, Nov 11 Mon, Nov 12** Mon, Nov 11 Tues, Nov 11<br />
Thanksgiving Day Thur, Nov 24 Thur, Nov 22 Thur, Nov 28 Thur, Nov 27<br />
Christmas Day Mon, Dec 26** Tues, Dec 25 Wed, Dec 25 * Thur, Dec 25<br />
* For holidays falling on Saturday, Federal Reserve Banks and branches will be open<br />
the preceding Friday.<br />
** For holidays falling on Sunday, all Federal Reserve offices will be closed the following<br />
Monday.<br />
320
2011 Client Write-Up Appendix G - Portals<br />
Appendix G - Portals<br />
Client Write-Up Portals is a web-based service designed to have employers perform<br />
some of the more time consuming and labor intensive parts of payroll processing. By<br />
having the employer perform these redundant and time consuming tasks, the firm has<br />
more time for the more analytical and profitable tasks on behalf of the employer.<br />
Client Write-Up Portals allows those using CWU (the “firm”) to extend payroll services<br />
to more of their clients (the “employer”). Employers can maintain their own<br />
payroll-specific demographic and pay information. To expedite and standardize the<br />
payroll process, employers create and verify pay information and monitor it during<br />
each payroll cycle. Once the payroll information is processed, the firm prints the<br />
checks (if needed), runs payroll reports, makes the 94X tax deposit and files the 94X<br />
tax return on behalf of the employer.<br />
IMPORTANT<br />
Internet access is required for the firm and the employer to use<br />
Portals.<br />
Portals Users<br />
Getting Started<br />
There are three types of Portals users:<br />
• Admin — This is the CWU user responsible for the overall administration of the<br />
Portal including activating the Portal and maintaining Firm and Employer user<br />
IDs and passwords. The Admin user can perform all Portals functions.<br />
• Firm — This is an employee of the accounting firm and has full Portals capabilities<br />
with the exception of managing portals users and activating the Portal.<br />
• Employer — This is a client of the accounting firm (preferably the employee that<br />
handles payroll). This user has the same functionality as the Firm user but is<br />
restricted to viewing employee/contractor and payroll details of their company.<br />
Throughout the Portals appendix, the appropriate user for each function is indicated in<br />
the margin.<br />
<strong>Drake</strong> provides a 30-day free trial of Portals to give you the opportunity to “try before<br />
you buy”.<br />
Admin<br />
Function<br />
To sign up for the free trial, complete the following:<br />
1. Log on to <strong>Drake</strong>’s <strong>Support</strong> website using your EFIN and <strong>Drake</strong> password at<br />
http://www.<strong>Support</strong>.<strong>Drake</strong><strong>Software</strong>.com.<br />
2. Select the Client Write-Up tab on the left side of the <strong>Support</strong> page or hover your<br />
mouse over the Client Write-Up tab and select CWU Portals.<br />
3. Select the CWU Portals link. The CWU Portals page displays.<br />
4. Click the Start Free Trial of CWU Portals link located just above the Questions.<br />
321
Appendix G - Portals<br />
2011 Client Write-Up<br />
5. Make note of the Portals Serial Number and User ID under Account and Payment<br />
Information. This information is provided to begin your 30-day trial.<br />
The Portals Serial Number must be entered in to CWU. See “Activating Portals<br />
below for instructions on entering this number. The User ID is used to log in to<br />
the Portal. See “Logging in to the Portal” on page 324.<br />
NOTE<br />
At the end of the 30-day trial period, a pop-up window will display letting<br />
you know the evaluation period has expired. Instructions display<br />
explaining how to continue use of Portals.<br />
Activating Portals<br />
Before accessing any of the Portals functions in CWU, you must first activate Portals.<br />
Admin<br />
Function<br />
To activate Portals:<br />
1. Go to Firm > Firm Info./Global Settings.<br />
2. In the Portals Key (Serial Number) field, enter the Portals serial number<br />
received from the <strong>Drake</strong> <strong>Support</strong> website.<br />
NOTE<br />
The <strong>Drake</strong> account number (Acct No) and password (<strong>Drake</strong> Pwd)<br />
must be entered correctly in order to successfully access the Portals<br />
website. None of the Portals functions within CWU are available until<br />
the Portals Key is entered correctly.<br />
3. Click Save.<br />
Identifying Portals Clients<br />
Admin<br />
and Firm<br />
For any client using Portals, Client Write-Up (CWU) must indicate to Portals how that<br />
client’s payroll is processed.<br />
To identify Portals clients as either “live” or After-the-Fact (“ATF”) payroll clients:<br />
1. Make the Portals client the active client by going to File > Open Client. Select a<br />
client and click OK.<br />
2. Go to Setup > Client Information > Business Information.<br />
3. Select either Live Portals Payroll (default) or ATF Portals Payroll. Selecting<br />
ATF Portals Payroll indicates to Portals to collect the Check Date from the<br />
employer before creating a payroll batch.<br />
4. Click Save.<br />
Syncing CWU and Portals Records<br />
Admin<br />
and Firm<br />
CWU copies some of its payroll data to Portals (which resides on web servers at<br />
<strong>Drake</strong> <strong>Software</strong>). Anyone using Portals sees this “copy”. As often as changes occur to<br />
the CWU data or to the Portals copy, CWU and Portals must be kept synchronized so<br />
no one is seeing old information. Because CWU is the hub of all payroll activity,<br />
those using CWU must accept or invoke this synchronization (or “sync”).<br />
322
2011 Client Write-Up Appendix G - Portals<br />
Employee and contractor payroll-specific information must be synchronized manually<br />
the first time. After that, whenever a Portals employer is made the active client, CWU<br />
“syncs” automatically.<br />
CWU clients become Portals employers when a manual sync is<br />
performed with that employer being the active client.<br />
IMPORTANT<br />
An Internet connection is required to perform a sync. If you use a<br />
dial-up connection to the Internet, you must first connect to the<br />
Internet then return to CWU and complete the following steps to<br />
perform the sync.<br />
To manually sync records, complete the following:<br />
1. Make the client you want to sync to Portals the active client (see “Changing the<br />
Active Client” on page 13).<br />
2. Go to Firm > Sync CWU and Portals Records.<br />
Figure 14-1: Sync Portals Records<br />
3. Make sure Sync Portals Records with CWU is selected.<br />
4. Click SYNC. When the Status at the bottom of the screen returns to “Idle”, the<br />
process is complete. If the sync is successful, the Portals Return Code shows<br />
“Successful” in the Sync Status part of the screen.<br />
NOTE<br />
For each Portals client, you must:<br />
• Identify all Portals clients as either Live or ATF payroll clients<br />
(“Identifying Portals Clients” on page 322), and<br />
• Run the sync process (“Syncing CWU and Portals Records” on<br />
page 322).<br />
323
Appendix G - Portals<br />
2011 Client Write-Up<br />
After the initial manual sync of a Portals client, CWU automatically syncs whenever a<br />
Portals employer is made the active client. To disable the auto-sync feature, select<br />
Disable Auto-Sync.<br />
NOTE<br />
The auto-sync feature should be disabled if you are using a dial-up<br />
Internet connection.<br />
IMPORTANT<br />
Each sync updates data based on the “time-stamp” of when the<br />
data was changed. For example: An employer changes an<br />
employee’s status and, before a sync is performed, someone at<br />
the firm changes that same employee’s status to something else.<br />
When the sync is completed, the employer’s value is recorded<br />
first (due to the earlier time-stamp) and then it is overwritten with<br />
the firm’s changes (due to the later time-stamp of the two).<br />
Since the information is time sensitive, it is important to have the<br />
correct date and time on your computer. It is also important to<br />
perform a sync on a timely basis.<br />
Logging in to the Portal<br />
Admin<br />
and Firm<br />
IMPORTANT<br />
An Internet connection is required to access Portals. If your Internet<br />
uses a dial-up connection, you must first connect to the Internet<br />
then return to CWU and complete the following steps.<br />
To log in to the portal, complete these steps:<br />
1. Go to Firm > Access Portals. Your Internet browser window opens a new web<br />
page displaying the Portals Login screen.<br />
NOTE<br />
The firm’s administrator must log in to the Portal the first time in order to<br />
set up the firm’s users and employer users. See “Managing Portals<br />
Users” on page 326 for information on creating firm and employer user<br />
IDs.<br />
See “Portals Login” on page 331 for information on employer’s access<br />
to the Portal.<br />
324
2011 Client Write-Up Appendix G - Portals<br />
Figure 14-2: Portals Login Screen<br />
2. Enter the User ID and Password. This is the firm’s Administrator, or Admin,<br />
login. If this is your first time signing in to Portals, use ‘cwdefault’ as the password.<br />
3. Click Login. You will be prompted to change your password the first time you log<br />
in to Portals. Passwords must be between 8 and 20 characters and must be a combination<br />
of letters and numbers. For security reasons, passwords expire every<br />
three months.<br />
NOTE<br />
If the admin user forgets their Portals password, the administrator<br />
should call Client Write-Up <strong>Support</strong> to have their password reset to the<br />
default password. The next time the admin user logs in to the Portal,<br />
they’ll use the default password and be prompted to create a new password.<br />
After logging in to Portals, firm users and the admin user sees a list of employers<br />
that have been manually synced. If no employers are listed after logging in to the<br />
Portals website, verify the Account Number (Firm > Firm Info./<br />
Global Settings, Acct No field) is entered correctly and perform the sync again<br />
(see “Syncing CWU and Portals Records” on page 322).<br />
After logging in to Portals, employer users are taken directly to the list of employees<br />
in their company.<br />
NOTE<br />
Portals has a 20 minute time-out feature. After 15 minutes of inactivity,<br />
a time out warning displays. After another 5 minutes of inactivity (a total<br />
of 20 minutes of inactivity), Portals automatically logs you out. Log back<br />
in before continuing.<br />
Verifying Employees<br />
Admin<br />
and Firm<br />
After logging in to the Portals website, verify that all employees were uploaded successfully.<br />
1. Click an Employer Code to select an employers. A list of the employer’s “nonterminated”<br />
employees displays.<br />
2. Compare the total number of employees in CWU with that of Portals. To verify all<br />
employees are accounted for, clear the Do not show terminated employees<br />
check box.<br />
325
Appendix G - Portals<br />
2011 Client Write-Up<br />
Managing Portals Users<br />
Admin<br />
Function<br />
Create and maintain logins for staff at your accounting firm (“firm users”) and for clients<br />
(“employer users”) from the Manage Portal Users screen. The Manage Portal<br />
Users link is only visible by the administrative user.<br />
NOTE<br />
Since only the firm’s administrator can add or edit firm and employer<br />
user information, make sure the administrator ID is logged into Portals<br />
when managing user information.<br />
Figure 14-3: Manage Portal Users<br />
Adding Firm<br />
Users<br />
1. From the list of Employers, select the Manage Portal Users link.<br />
2. Click the Add User tab.<br />
3. Select the Firm User option button.<br />
4. Complete the Portal User ID, Email Address, First and Last Name fields. For<br />
security reasons, the Portal Password can only be reset to a default value.<br />
5. Click Save New User.<br />
NOTE<br />
Each user ID must be unique to Portals so it may have to be changed<br />
several times to find one that does not already exist. Consider an alternate<br />
but consistent way of assigning user IDs. For example, a three-letter<br />
firm code could begin each name (ABCjdoe) or the last 4-digits of<br />
the firm’s telephone # could end each name (jdoe1234).<br />
Editing Firm<br />
User Information<br />
1. From the list of Employers, select the Manage Portal Users link.<br />
2. Click the Edit User tab.<br />
3. Select the Firm User option button.<br />
4. Select the user to edit using the Portal User ID drop list.<br />
5. Edit the firm user’s Email Address, First and Last Name.<br />
6. Click Update This User.<br />
326
2011 Client Write-Up Appendix G - Portals<br />
NOTE<br />
If a firm user forgets their Portals password, the administrator can reset<br />
the password to the default password. To reset the password, select<br />
the firm user then select the check box under their Portal User ID. Click<br />
Update This User. The next time the firm user logs in to the portal,<br />
they’ll use the default password and be prompted to create a new password.<br />
Deleting<br />
Firm Users<br />
Adding<br />
Employer<br />
Users<br />
1. From the list of Employers, select the Manage Portal Users link.<br />
2. Click the Edit User tab.<br />
3. Select the Firm User option button.<br />
4. Select the user to delete using the Portal User ID drop list.<br />
5. Click Delete This User.<br />
1. From the list of Employers, select the Manage Portal Users link.<br />
2. Click the Add User tab.<br />
3. Select the Employer User option button.<br />
4. Select the employer from the Employer Code drop list.<br />
5. Complete the Portal User ID, Email Address, First and Last Name fields. For<br />
security reasons, the Portal Password can only be reset to a default value.<br />
6. Click Save New User.<br />
NOTE<br />
Each user ID must be unique to Portals so it may have to be changed<br />
several times to find one that does not already exist. Consider an alternate<br />
but consistent way of assigning user IDs. For example, a three-letter<br />
firm code could begin each name (ABCjdoe) or the last 4-digits of<br />
the firm’s telephone # could end each name (jdoe1234).<br />
Editing<br />
Employer<br />
User Information<br />
1. From the list of Employers, select the Manage Portal Users link.<br />
2. Click the Edit User tab.<br />
3. Select the Employer User option button.<br />
4. Select the employer from the Employer Code drop list.<br />
5. Select the user to edit using the Portal User ID drop list.<br />
6. Edit the firm user’s Email Address, First and Last Name. If the employer user<br />
has forgotten their Portals password, select the check box under their Portal User<br />
ID.<br />
7. Click Update This User.<br />
NOTE<br />
If an employer user forgets their Portals password, the administrator<br />
can reset the password to the default password. The next time the user<br />
logs in to Portals, they’ll use the default password and will be prompted<br />
to create a new password.<br />
Deleting<br />
Employer<br />
Users<br />
1. From the list of Employers, select the Manage Portal Users link.<br />
2. Click the Edit User tab.<br />
3. Select the Employer User option button.<br />
327
Appendix G - Portals<br />
2011 Client Write-Up<br />
4. Select the employer from the Employer Code drop list.<br />
5. Select the user to delete using the Portal User ID drop list.<br />
6. Click Delete This User.<br />
Transferring Files to <strong>Drake</strong> <strong>Support</strong><br />
Admin<br />
Function<br />
To upload backup files to <strong>Drake</strong>’s servers when <strong>Support</strong> requests this information for<br />
problem resolution:<br />
1. Log in to Portals<br />
2. From the list of employers, click the File Xfer link<br />
3. Click Browse in the Upload File box<br />
4. Locate the file to upload and either double-click on it or click Open<br />
NOTE<br />
Only files with a .ZIP extension can be uploaded to <strong>Drake</strong>’s servers.<br />
5. Click Upload File.<br />
To download files from <strong>Drake</strong>’s servers:<br />
1. Log in to Portals<br />
2. From the list of employers, click the File Xfer link<br />
3. Use the drop list in the Download File box to select the file to download<br />
4. Click Download File<br />
E-Mailing a Portals Employer<br />
Admin<br />
and Firm<br />
To e-mail a Portals employer from Portals, log in to Portals and from the list of<br />
employers, click on the desired employer’s e-mail address. This address comes from<br />
the Email field on the Contact Information tab under Setup > Client Information<br />
in Client Write-Up.<br />
Viewing the Payroll Download Log<br />
Admin<br />
and Firm<br />
The payroll download log is helpful in reconciling <strong>Drake</strong>’s charges for using Portals.<br />
From the list of employers, click View Use Report.<br />
328
2011 Client Write-Up Appendix G - Portals<br />
Figure 14-4: Payroll Download Log<br />
Updating the CWU Help System<br />
Admin<br />
and Firm<br />
Working with Employers<br />
Admin<br />
and Firm<br />
The Client Write-Up Help system is updated throughout the year. Update the CWU<br />
desktop Help system by:<br />
1. From the list of employers, click Update CWU Help.<br />
2. Click Save. The Save As window displays.<br />
3. Navigate to the drive and folder of the CWU program. The folder is CWUyyyy<br />
where “yyyy” is the year (2011) of the CWU program. Do not change the default<br />
file name displayed.<br />
4. Click Save.<br />
To begin working with a Portals employer, from the list of employers, click on the<br />
desired Employer Code. A list of the employer’s employees displays. With the<br />
exception of the Employers link, this is the web page that employer users see after<br />
logging in to the Portal.<br />
IMPORTANT<br />
Admin, firm, and employer users use the same web pages once<br />
the list of employees displays. These pages look and operate the<br />
same way regardless of the type of user that is logged in to Portals.<br />
329
Appendix G - Portals<br />
2011 Client Write-Up<br />
330
2011 Client Write-Up Appendix G - Portals<br />
Working with Portals<br />
All<br />
Users<br />
The following section applies to the admin, firm, and employer users. Print this section<br />
and supply it to the employer as their manual for Portals.<br />
IMPORTANT<br />
Admin, firm, and employer users use the same web pages once<br />
the list of employees displays. These pages look and operate the<br />
same way regardless of the type of user that is logged in to Portals.<br />
Portals<br />
Login<br />
To access the Portal, employers must first access the Internet and point their Internet<br />
web browser to https://cwu.1040.com/login.aspx. It is recommended that employers<br />
set up a bookmark in their Internet browser to access this URL. The Portals Login<br />
Screen displays.<br />
Figure 14-5: Portals Login Screen<br />
To log into the Portal:<br />
1. Enter the User ID and Password provided by the firm’s administrator.<br />
2. Click Login. You will be prompted to change your password the first time you log<br />
in to Portals. Passwords must be between 8 and 20 characters and must be a combination<br />
of letters and numbers. For security reasons, passwords expire every 90<br />
days and must be changed at that time.<br />
NOTE<br />
If firm or employer users forget their Portals password, they should contact<br />
the firm’s administrator to have their password reset. The next time<br />
the employer user logs in to the Portal, they’ll be prompted to create a<br />
new password.<br />
After logging in to the Portal, employer users are taken directly to the list of<br />
employees in their company.<br />
NOTE<br />
Portals has a 20 minute time-out feature. After 15 minutes of inactivity,<br />
a time out warning displays. After another 5 minutes of inactivity (a total<br />
of 20 minutes of inactivity), Portals automatically logs you out. Log back<br />
in before continuing.<br />
331
Appendix G - Portals<br />
2011 Client Write-Up<br />
Navigating<br />
Portals<br />
Managing<br />
the<br />
Employees<br />
List<br />
The following tips will aid in navigating Portals:<br />
• Anything underlined is either a link to other information or a way to rearrange the<br />
information by column.<br />
• Check-boxes act as filters including or excluding what information is shown.<br />
• Page numbers appear below lists. Click underlined page numbers to see other<br />
pages in the list.<br />
• To access on-screen Help, click the question-mark.<br />
• A red asterisk (*) to the right of a textbox indicates required information that<br />
needs to be entered.<br />
• To enter dates, click the calendar to select a date or enter a date using either the<br />
MM/DD/YYYY format (08/03/2010) or the MMDDYYYY format (08032010).<br />
• To return to the list of Portals employers, click the Employers link (not available<br />
to employer users).<br />
• Click Payroll in Progress to display the last tab completed.in the payroll process.<br />
Figure 14-6: Portals Employees List<br />
From the employees and contractors lists, you can:<br />
1. Click a column header to sort the data in ascending or descending order.<br />
2. Include or exclude terminated employees in the displayed list. Select or clear the<br />
Do not show terminated employees check box. The default is to exclude terminated<br />
employees from the list. (Not available from Contractors list).<br />
3. Click More Detail (or Less Detail) to display additional (or fewer) columns of<br />
information.<br />
332
2011 Client Write-Up Appendix G - Portals<br />
4. Click Export Labels to generate an Excel file that lists employees’ or contractors’<br />
Name (combines First, Middle, and Last Name fields), Address (lines 1 and 2),<br />
City, State, and Zip. The File Download window displays where you can either<br />
Open the file in Excel (Excel must be installed on your computer) or Save the<br />
file. If you select Save, the Save As window displays giving you the option to<br />
rename the file and specify the location to save the file.<br />
5. Click Blank Forms to access various forms that can be printed or completed on<br />
the screen and saved. (Not available from Contractors list). The forms available<br />
are:<br />
W-4 Employee’s Withholding Allowance Certificate<br />
I-9 Employment Eligibility Verification<br />
SS-8<br />
Determination of Worker Status<br />
W-9 Request for Taxpayer Identification Number and Certification<br />
6847 Consent for IRS to Release Tax Information<br />
4419 Application for Filing Information Returns Electronically<br />
Editing<br />
Employee<br />
and<br />
Contractor<br />
Information<br />
To edit employee and contractor information, complete the following:<br />
1. From the list of employees or contractors, click the Employee/Contractor Code<br />
of the employee or contractor to edit. The Employee/Contractor edit window<br />
displays the employee’s or contractor’s demographic and payroll information.<br />
Figure 14-7: Edit Portals Employee Information<br />
2. All fields may be edited except the Employee or Contractor Code.<br />
3. When finished editing, click Save. Click Reset to close this window without saving.<br />
CWU is updated to reflect these changes the next time a sync is run for this<br />
employer.<br />
Entering<br />
Employee<br />
Payroll Information<br />
To enter timecard information, complete the following:<br />
1. From the list of employees, click the Create New Payroll button to create a group<br />
(or batch) of “timecards”.<br />
2. If the employer is set up as a Live Portals Payroll client, only the Pay Period<br />
Ending Date and Pay Frequency fields display. If the employer is set up as an<br />
ATF Portals Payroll client, the Checks Printed Date field also displays.<br />
333
Appendix G - Portals<br />
2011 Client Write-Up<br />
• Pay Period Ending Date — Enter the ending date of the pay period.<br />
• Pay Frequency — Select to calculate pay for employees that are paid<br />
Weekly, BiWeekly, Monthly, etc. If there are employees with the same Pay<br />
Period Ending Date that are paid at different pay frequencies, create the<br />
batch for one group of employees (e.g. Weekly), then return to the Employees<br />
screen, click Create New Payroll, set the Pay Period Ending Date and<br />
select the next group of employees (e.g. BiWeekly) to include in the batch.<br />
• Checks Printed Date (field displays if this is an ATF Portals Payroll client)<br />
— Enter the date the employer will (or did) pay their employees. This is typically<br />
the date printed on the paychecks. When the employer creates their own<br />
paychecks, this date must be included for the accounting firm to correctly<br />
report filing data to the government.<br />
3. Click Create Payroll Batch. This batch includes one timecard for every<br />
“Active”, “Suspended”, and “Statutory” employee whose Pay Frequency<br />
matches the one selected. If an employee is paid Weekly, Regular Hours 1 equals<br />
40 hours. If an employee is paid BiWeekly, Regular Hours 1 equals 80 hours. If<br />
the Pay Class is “Salary” or Officer Salary”, the salary amount equals the Annual<br />
Salary divided by the Pay Frequency.<br />
NOTE<br />
Re-run this process for each different Pay Frequency. After the batch<br />
is created, all the records using the same Pay Period End Date display,<br />
even if the Pay Frequencys are different.<br />
Editing<br />
Employee<br />
Pay<br />
Approving<br />
Employee<br />
Time Cards<br />
Once the batch is created, you may edit employee pay information for this pay period.<br />
1. From the Payroll in Progress page (time cards displayed), click Edit to the left of<br />
the Employee Code. The timecard information is highlighted.<br />
2. Edit the pay information as needed. Tab from field to field.<br />
3. Once an employee’s pay record has been edited, click Update.<br />
Before the payroll batch can be processed for a Payroll Period End date, it must be<br />
selected and approved. Select the appropriate Pay Period End date. Once all<br />
employee’s pay records have been updated, click Approve Time Cards. Since payroll<br />
records cannot be changed once they are approved, you must confirm the<br />
approval. Click OK.<br />
The approved timecards no longer appear on the Time Card tab but now display on<br />
the Approved tab by the selected Payroll Period End date.<br />
IMPORTANT<br />
Once timecards have been approved, they are available to be<br />
downloaded (synced) and processed by the accounting firm. See<br />
“Portals - Processing Employee Payroll” on page 120.<br />
Once the accounting firm has downloaded the “approved” batch, the information displays<br />
on the Loaded tab and is removed from the Approved tab.<br />
Once the accounting firm has processed the payroll, the information displays on the<br />
Processed tab and is removed from the Loaded tab.<br />
334
2011 Client Write-Up Appendix G - Portals<br />
Viewing<br />
Processed<br />
Payroll<br />
Once the accounting firm has processed payroll in Client Write-Up, paycheck information<br />
is synced back to the Portal and the information appears on the Processed tab.<br />
NOTE<br />
The information on the Processed tab may be particularly helpful to the<br />
employer that prints their own pay checks. By having just one source<br />
for calculating payroll, there is much less opportunity for the withholding<br />
information to be inconsistent between the actual paychecks and the<br />
information the accountant includes on payroll tax returns.<br />
Information on the Processed tab can be exported to Excel.<br />
To export the processed information, complete the following:<br />
1. Access the Processed tab. From the list of employees, click the Payroll Records<br />
button then the Processed tab.<br />
2. Select the Pay Period Ending Date of the payroll you wish to export from the<br />
Select Ending Date drop list.<br />
3. Click To Excel. The File Download window displays where you can either Open<br />
the file in Excel (Excel must be installed on your computer) or Save the file. If<br />
you select Save, the Save As window displays giving you the option to rename<br />
the file and specify the location to save the file.<br />
Entering<br />
Contractor<br />
Payment<br />
Information<br />
Editing<br />
Contractor<br />
Payments<br />
Approving<br />
Contractor<br />
Payments<br />
To enter contractor payment information, complete the following:<br />
1. From the list of contractors, click the New Payments button to create a group (or<br />
batch) of payments.<br />
2. Enter the Payments Ending Date.<br />
3. Click Create Payment Batch.<br />
4. Click Edit to the left of the Contractor Code. The payment information fields are<br />
highlighted.<br />
5. Edit the pay information as needed. Tab from field to field.<br />
6. Once a contractor’s pay record has been edited, click Update.<br />
Once the batch is created, you may edit contractor pay information for this pay period.<br />
1. From the Contractor Payments in Progress page (pay information displayed),<br />
click Edit to the left of the Contractor Code. The pay information is highlighted.<br />
2. Edit the pay information as needed. Tab from field to field.<br />
3. Once a contractor’s pay record has been edited, click Update.<br />
Before the payment batch can be processed for a payment Ending Date, it must be<br />
selected and approved. Select the appropriate Ending Date. Once all contractor’s pay<br />
records have been updated, click Approve Payments. Since pay records cannot be<br />
changed once they are approved, you must confirm the approval. Click OK.<br />
335
Appendix G - Portals<br />
2011 Client Write-Up<br />
The approved payments no longer appear on the Contractor Payments tab but now<br />
display on the Approved tab by the selected payment Ending Date.<br />
IMPORTANT<br />
Once payments have been approved, they are available to be<br />
downloaded (synced) and processed by the accounting firm. See<br />
“Portals - Processing Contractor Payments” on page 148.<br />
Once the accounting firm has downloaded the “approved” batch, the information displays<br />
on the Loaded tab and is removed from the Approved tab.<br />
336
2011 Client Write-Up Appendix H - Home Screen Shortcuts<br />
Appendix H - Home Screen Shortcuts<br />
The icons, or speed buttons, on the CWU Home screen are intended to save you time<br />
and mouse clicks in navigating to the most commonly used parts of Client Write-Up.<br />
The tables below show the speed button and the menu pathing equivalents.<br />
General Shortcuts<br />
Speed Button<br />
Menu Equivalent<br />
File > New Client<br />
(see Setting Up a New Client” on page 31)<br />
File > Open Client<br />
(see Changing the Active Client” on page 13)<br />
Reports menu<br />
(see Report Types” on page 254)<br />
Setup > Client Information<br />
(see Contact Information” on page 32)<br />
Tools > File Maintenance > Backup<br />
(see Backup” on page 285)<br />
Tools > <strong>Drake</strong> Document Manager<br />
(see Appendix D - <strong>Drake</strong> Document Manager” on page 315)<br />
Help > Contents<br />
File > Exit<br />
Employee Payroll Shortcuts<br />
Speed Button<br />
Menu Equivalent<br />
Employees > Employee Setup<br />
(see Employee Setup” on page 72)<br />
337
Appendix H - Home Screen Shortcuts<br />
2011 Client Write-Up<br />
Speed Button<br />
Menu Equivalent<br />
Employees > Live Payroll<br />
(see Live Employee Payroll” on page 86)<br />
Employees > ATF Payroll<br />
(see ATF Employee Payroll” on page 95)<br />
Employees > Print New Checks<br />
(see Printing Employee Pay Checks” on page 101)<br />
Employees > Deductions & Benefits<br />
(see Deductions and Benefits Setup” on page 65)<br />
Employees > Direct Deposit - Transmit Employees<br />
(see Transmitting Employee Direct Deposits” on page 107)<br />
Contractor Payroll Shortcuts<br />
Speed Button<br />
Menu Equivalent<br />
Contractors > Contractor Setup<br />
(see Adding a Contractor” on page 125)<br />
Contractors > Live Contractor Payroll<br />
(see Live Contractor Payroll” on page 130)<br />
Contractors > ATF Contractor Payroll<br />
(see ATF Contractor Payroll” on page 134)<br />
Contractors > Print New Checks<br />
(see Printing Contractor Pay Checks” on page 137)<br />
Contractors > Direct Deposit - Transmit Contractors<br />
(see Transmitting Contractor Direct Deposits” on page 143)<br />
338
2011 Client Write-Up Appendix H - Home Screen Shortcuts<br />
Bookkeeping Shortcuts<br />
Speed Button<br />
Menu Equivalent<br />
Bookkeeping > Chart of Accounts<br />
(see Chart of Accounts (COA) Setup” on page 45)<br />
Bookkeeping > Enter Transactions<br />
(see Entering Journal Transactions” on page 157)<br />
Bookkeeping > Bank Reconciliation<br />
(see Bank Reconciliation” on page 164)<br />
Bookkeeping > Post Transactions<br />
(see Posting Transactions” on page 165)<br />
Accounts Payable Shortcuts<br />
Speed Button<br />
Menu Equivalent<br />
Payables > Vendor Setup<br />
(see Vendor Setup” on page 196)<br />
Payables > Enter New Invoices<br />
(see Entering Invoices” on page 198)<br />
Payables > View & Pay Invoices<br />
(see Scheduling Live Payments” on page 205)<br />
Payables > Check Writer<br />
(see Check Writer” on page 216)<br />
Payables > Check Alignment<br />
(see Payables Check Alignment” on page 225)<br />
339
Appendix H - Home Screen Shortcuts<br />
2011 Client Write-Up<br />
Speed Button<br />
Menu Equivalent<br />
Payables > Live Payments > Print Checks<br />
(see Printing Vendor Checks” on page 209)<br />
Payables > View & Pay Invoices > Record ATF Pmts<br />
(see Recording ATF Payments” on page 208)<br />
Accounts Receivable Shortcuts<br />
Speed Button<br />
Menu Equivalent<br />
Receivables > Customer Setup<br />
(see Customer Setup” on page 234)<br />
Receivables > Enter/Update Invoices<br />
(see Entering New Invoices” on page 239)<br />
Receivables > Enter Service Charges/Penalties<br />
(see Entering Service Charges and Penalties” on page 244)<br />
Receivables > Sales Tax Records<br />
(see Entering Sales Tax Records” on page 230)<br />
Receivables > Invoice Item Setup<br />
(see Invoice Item Setup” on page 233)<br />
Receivables > Receivables Options<br />
(see Entering Receivables Options” on page 227)<br />
Receivables > Apply Payments<br />
(see Applying Receivables Payments” on page 245)<br />
340
2011 Client Write-Up Appendix I - Reporting Agent’s List<br />
Appendix I - Reporting Agent’s List<br />
A Reporting Agent’s List is required to accompany Forms 8655 and is a list of clients<br />
included in a batch being submitted for e-filing approval. Use the format of this<br />
sample list to create your own Reporting Agent’s List.<br />
341
Appendix J - Preparing to e-file W-2s<br />
2011 Client Write-Up<br />
Appendix J - Preparing to e-file W-2s<br />
Before uploading W-2 and W-3 information to the Social Security Administration,<br />
you must:<br />
1. Register to use the Social Security Administration’s Business Services Online<br />
website, and<br />
2. Download and install the AccuWage 2011 software<br />
Registering with the Social Security Administration<br />
When you register to use the the SSA’s website, you will get a login ID and password.<br />
You will also need to establish which of the SSA’s services you will be using.<br />
1. In CWU2011, go to E-Filing > W2 E-Filing (EFW2) > Transmit File.<br />
2. Select the W2 files have been tested using AccuWage 2011 option<br />
3. Click Open Web Site. The Social Security Administration’s Business Services<br />
Online website (http://www.socialsecurity.gov/bso/bsowelcome.htm) displays.<br />
4. Click Register. Enter your registration information. Once you’ve entered your<br />
information, you will be prompted to select the services you will be using.<br />
5. From the Main Menu on the left side of the screen, go to Manage Services.<br />
6. Select Request New Services.<br />
7. Select SSA Services Suite for Employers.<br />
NOTE<br />
An E-Filing Quick Reference sheet is provided for your convenience.<br />
Use this form to write down the various User IDs, passwords, etc. associated<br />
with e-filing. See Appendix L - E-Filing Quick Reference to<br />
access this form.<br />
Download and install the AccuWage2011 software<br />
The Social Security Administration provides the AccuWage program so that you may<br />
check your W-2 upload files for errors that could cause a reject. AccuWage is a free<br />
download.<br />
NOTES<br />
Installing and using the AccuWage is not required but strongly recommended.<br />
AccuWage must be installed on the same drive where CWU is installed.<br />
1. In CWU2011, go to E-Filing > W2 E-Filing (EFW2) > Transmit File.<br />
2. Select the W2 files have not been tested using AccuWage 2011 option<br />
3. Click Yes<br />
4. Click Open Web Site. The AccuWage Information and <strong>Software</strong> web page displays<br />
(http://www.ssa.gov/employer/accuwage/index.html).<br />
5. Click Download AccuWage – 2011 Tax Year on the left side of the screen.<br />
6. Click Run.<br />
342
2011 Client Write-Up Appendix K - Preparing to e-file 1099s<br />
Appendix K - Preparing to e-file 1099s<br />
Before uploading 1099 and 1096 information to the IRS, you must:<br />
1. Get a Transmitter Control Code (TCC), and<br />
2. Register on the IRS’s FIRE web site.<br />
Getting a Transmitter Control Code<br />
1. Go to http://www.irs.gov/pub/irs-pdf/f4419.pdf<br />
2. Complete Form 4419.<br />
NOTE<br />
Select only the first box below line 7 unless the others are absolutely<br />
necessary. If you select more than the first box, the IRS will call you to<br />
verify your selection. This will cause your application to be delayed.<br />
3. Fax the completed form to 877-477-0572.<br />
4. Check on the status of the 4419 application (and receive the 5-character TCC over<br />
the phone, call toll free: 866-455-7438 (option 3). You will also receive a letter<br />
from the IRS with your TCC.<br />
5. In CWU2011, go to Firm > Firm Info./Global Settings and enter the TCC.<br />
6. Click Save.<br />
NOTE<br />
Only one Transmitter Control Code is required to e-file all of your clients’<br />
1099s.<br />
Register to use the IRS’s “FIRE” Website<br />
1. Go to https://fire.irs.gov/firev1r/default.aspx.<br />
2. Click Create New Account on the left side of the screen.<br />
3. Complete and submit the application.<br />
4. Create a User ID and Password.<br />
5. Create a 10-digit Personal Identification Number (PIN).<br />
NOTE<br />
An E-Filing Quick Reference sheet is provided for your convenience.<br />
Use this form to write down the various User IDs, passwords, etc. associated<br />
with e-filing. See Appendix L - E-Filing Quick Reference to<br />
access this form.<br />
343
Appendix L - E-Filing Quick Reference<br />
2011 Client Write-Up<br />
Appendix L - E-Filing Quick Reference<br />
EFIN: ______________<br />
<strong>Drake</strong> Password: _________________<br />
<strong>Drake</strong> Account #: ____________________<br />
W-2 Information<br />
SSA website User ID: _____________________________<br />
SSA website Password: ___________________________<br />
1099 Information<br />
TCC: _________________________<br />
IRS FIRE website User ID: _____________________________<br />
IRS FIRE website Password: ___________________________<br />
94X Information<br />
Your business’s taxpayer PIN: __ __ __ __ __ __ __ __ __ __<br />
Your Reporting Agent PIN: __ __ __ __ __<br />
Alternate way to check 94X IRS Acks:<br />
1. From CWU, go to Help > <strong>Drake</strong> <strong>Support</strong> Web Site<br />
2. Go to My Account > EF Database<br />
3. Click Tools<br />
4. Click Run 94x Report<br />
To download this form from the <strong>Drake</strong> <strong>Support</strong> website, click on the following link:<br />
E-Filing Quick Reference Sheet<br />
344
2011 Client Write-Up<br />
15 Glossary<br />
Account — A detailed record of a particular asset, liability, owners' equity, revenue,<br />
or expense.<br />
Account Type—Designates an account in the chart of accounts as an asset account, a<br />
liability account, expense account, capital account, income account, etc.<br />
AccuWage—This is free software from the Social Security Administration (SSA).<br />
The software checks W-2 (Wage and Tax Statement) and W-2c (Corrected Wage and<br />
Tax Statement) reports for errors before you send them to the SSA. To use the software,<br />
download and install the software on your PC. To download the software, go to<br />
http://www.ssa.gov/employer/accuwage/.<br />
ACK — IRS acknowledges each transmission of electronic return data. There are two<br />
types of ACK files, the Transmission ACK File and the Validation ACK File. Transmission<br />
ACK File is generated if there is a problem in the basic formatting of the<br />
entire file. Validation ACK File is generated when there is a problem within the<br />
return.<br />
Acknowledgement — See ACK<br />
Additional Net Pay — Amounts added to an employee's paycheck not subject to<br />
withholdings.<br />
Advance Earned Income Credit (AEIC) — An employee who expects to be eligible<br />
for the earned income credit (EIC) and expects to have a qualifying child is entitled to<br />
receive EIC payments with his or her pay during the year. To get these payments, the<br />
employee must provide to you a properly completed Form W-5, Earned Income Credit<br />
Advance Payment Certificate, using either the paper form or an approved electronic<br />
format. You are required to make advance EIC payments to employees who give you<br />
a completed and signed Form W-5.<br />
After-the-Fact Payroll — Payroll information is entered for reporting purposes only<br />
and no checks are printed.<br />
ATF Payroll — See After-the-Fact Payroll.<br />
Balance — Either equality between the totals of the credit and debit sides of an<br />
account or the difference between the totals of the credit and debit sides of an account.<br />
Balance Sheet — A summary of all the accounts of a business, it provides a snapshot<br />
of the business at a given point in time. A balance sheet is usually prepared at the end<br />
of each financial year. The term implies that the combined balance of assets equals the<br />
liabilities and equity.<br />
Beginning Balance — The amount on hand at the start of an accounting period.<br />
vii
2011 Client Write-Up<br />
Benefits — Employer provided “non-cash” taxable compensation or fringe benefits.<br />
Cash Account — The general ledger account that reports currency, coins, undeposited<br />
checks, and the checking accounts of a company.<br />
Chart of Accounts — A listing of the accounts available in the accounting system in<br />
which to record entries. The Chart of Accounts consists of balance sheet accounts<br />
(assets, liabilities, stockholders' equity) and income statement accounts (revenues,<br />
expenses, gains, losses). It can be expanded and tailored to reflect the specific operations<br />
of a company.<br />
Close — Refers to procedures at the end of an accounting period. Since an income<br />
statement reports the net income for a single accounting period and shows the<br />
expenses and revenues only for that period, closing clears current period balances but<br />
maintains year to date.<br />
COA — See Chart of Accounts.<br />
Common Paymaster — An entity that pays an employee for two or more related corporations<br />
at the same time.<br />
Credit — To enter an amount on the right side of an account. Generally, these types<br />
of accounts are increased with a credit: Gains, Income, Revenues, Liabilities, and<br />
Stockholders' (Owner's) Equity.<br />
Debit — To enter an amount on the left side of an account. Generally, these types of<br />
accounts are increased with a debit: Dividends (draws), Expenses, Assets, and Losses.<br />
Deduction — An expense incurred by a taxpayer that is subtracted from gross income<br />
and results in a lower overall taxable income.<br />
Double Entry System of Bookkeeping — Every business transaction is recorded into<br />
at least two accounts. For each debit there is an offsetting credit.<br />
Earned Income Credit (EIC) — See EIC.<br />
EFIN (Electronic Filing Identification Number) — Required to electronically file<br />
tax returns and other tax related documents, an EFIN is acquired by submitting Form<br />
8633 and a fingerprint card to the IRS.<br />
EIC — A refundable credit for workers who meet certain requirements and file a tax<br />
return. Persons with or without a qualifying child may claim the EIC. To qualify for<br />
the credit, income must be earned.<br />
EIN — Employer Identification Number. This is required to file the various employment<br />
tax returns. You may obtain an EIN by completing Form SS-4, Application for<br />
Employer Identification Number, and mail or fax it to the IRS for processing.<br />
Electronic Filing Identification Number — See EFIN.<br />
Electronic Return Originator — See ERO.<br />
Employer Identification Number — See EIN.<br />
viii
2011 Client Write-Up<br />
Ending Balance — The amount in an account at the end of an accounting period as a<br />
result of operations during the period.<br />
ERO — Individuals who have passed the suitability checks by the Internal Revenue<br />
Service and have subsequently been accepted into the electronic filing program. EROs<br />
are required to use their clients' 10-digit Personal Identification Numbers (PIN) when<br />
electronically filing the Form 940 series for the client. This PIN serves as an electronic<br />
signature for the return.<br />
Exemption — A subtraction from income in computing taxable income. Also, the<br />
number used when calculating income tax withholding.<br />
Expense Account — An expense represents an event in which an asset is used or a<br />
liability is incurred. Expenses decrease the owner's equity. Examples of expense<br />
accounts are wage expense, supply expense, rent expense, and advertising expense.<br />
FICA — Federal Insurance Contribution Act. FICA indicates the payroll taxes for<br />
both Social Security and Medicare.<br />
FIRE System — “FIRE” refers to the Filing Information Returns Electronically system<br />
at http://fire.irs.gov. The following information returns can be filed electronically:<br />
Forms 1042-S, 1098, 1099, 5498, 8027, W-2G, and QWF (Questionable Forms W-4).<br />
To participate in the FIRE system, submit Form 4419 to request authorization to file<br />
Information Returns with the IRS. Once you are approved, a five-character alphanumeric<br />
Transmitter Control Code (TCC) is assigned. If you already have a TCC for<br />
magnetic media filing, you need not reapply.<br />
Form 1096 — This form is used to transmit paper Form 1099-MISC to the IRS. Do<br />
not use Form 1096 to transmit electronically or magnetically.<br />
Form 1099-MISC — File this form for each person to whom the employer has paid<br />
during the year: at least $10 in royalties or broker payments in lieu of dividends or taxexempt<br />
interest; at least $600 in rents, services (including parts and materials), prizes<br />
and awards, other income payments, medical and health care payments, crop insurance<br />
proceeds, cash payments for fish (or other aquatic life) the employer purchases<br />
from anyone engaged in the trade or business of catching fish, or, generally, the cash<br />
paid from a notional principal contract to an individual, partnership, or estate; any<br />
fishing boat proceeds; or gross proceeds to an attorney. In addition, use this form to<br />
report direct sales of at least $5,000 of consumer products to a buyer for resale anywhere<br />
other than a permanent retail establishment. You must also file this form for<br />
each person from whom the employer has withheld any federal income tax under the<br />
backup withholding rules regardless of the amount of the payment.<br />
Form 940 — Use this form to report annual Federal Unemployment Tax Act (FUTA)<br />
tax.<br />
Form 941 — Use this form to report: payroll taxes (withheld federal income tax and<br />
both employee and employer shares of Social Security and Medicare taxes) for the<br />
quarter; current quarter's adjustments to Social Security and Medicare taxes for fractions<br />
of cents, sick pay, tips, and group-term life insurance; and prior quarters' adjustments<br />
to payroll taxes (attach Form 941c).<br />
ix
2011 Client Write-Up<br />
Form 941C — Use Form 941C to provide background information and certifications<br />
supporting prior period adjustments to income, Social Security, and Medicare taxes<br />
reported on Forms 941, 941-M, 941-SS, 943, 944, 944(SP), 944-SS, or 945. File it<br />
with the tax return on which the adjustment is being claimed. Do not use Form 941C<br />
as a supporting statement for current period adjustments (for example, adjustment for<br />
uncollected employee share of Social Security and Medicare taxes on tips). No supporting<br />
statement is required for the fractions-of-cents, group term life insurance, and<br />
third-party sick pay adjustments.<br />
Form 941-SS — Use this form to report the employer's quarterly federal Social Security<br />
and Medicare taxes for workers in American Samoa, Guam, the Commonwealth<br />
of the Northern Mariana Islands, and the U.S. Virgin Islands.<br />
Form 943 — Use this form to report federal income tax withheld and employer and<br />
employee Social Security and Medicare taxes on wages paid to farm workers.<br />
Form 944 — This form is designed so the small employers (those whose annual liability<br />
for Social Security, Medicare, and withheld federal income taxes is $1,000 or<br />
less) will file and pay these taxes only once a year instead of every quarter. Use Form<br />
944 to report: payroll taxes (withheld federal income tax and both employee and<br />
employer shares of Social Security and Medicare taxes) for the year; current year's<br />
adjustments to Social Security and Medicare taxes for fractions of cents, sick pay, tips,<br />
and group-term life insurance; and prior years' adjustments to payroll taxes (attach<br />
Form 941c). File this form if the IRS has notified you to file Form 944 to report:<br />
wages you have paid, tips your employees have received, both the employer's and the<br />
employee's share of Social Security and Medicare taxes; and Advance earned income<br />
tax credit (EIC) payments. You must file a Form 944 for each year even if you have no<br />
taxes to report unless the IRS notifies you that your filing requirement has been<br />
changed to Form 941 (or you filed a final return).<br />
Form 944-SS — This form is designed so the small employers (those whose annual<br />
liability for Social Security and Medicare taxes is $1,000 or less) in American Samoa,<br />
Guam, the Commonwealth of the Northern Mariana Islands, and the U.S. Virgin<br />
Islands will have to file and pay these taxes only once a year instead of every quarter.<br />
File this form if the IRS has notified you to file Form 944-SS to report: wages you<br />
have paid, tips your employees have received, and both the employer's and the<br />
employee's share of Social Security and Medicare taxes. You must file a Form 944-SS<br />
for each year even if you have no taxes to report unless the IRS notifies you that your<br />
filing requirement has been changed to Form 941-SS (or you filed a final return).<br />
FUTA — Federal Unemployment Tax. Together with state unemployment systems,<br />
FUTA tax provides payments of unemployment compensation to workers who have<br />
lost their jobs. Most employers pay both federal and state unemployment taxes. Only<br />
the employer pays FUTA tax.<br />
GAAP (Generally Accepted Accounting Principles) — These are general rules and<br />
concepts that govern the field of accounting and form the groundwork on which more<br />
detailed, complicated, and legalistic accounting rules are based. GAAP enables us to<br />
assume that there is consistency from year to year in the methods used to prepare a<br />
company's financial statements. And although variations may exist, we can make reasonably<br />
confident conclusions when comparing one company to another.<br />
x
2011 Client Write-Up<br />
General Ledger — The part of the accounting system containing the balance sheet<br />
and income statement accounts used for recording transactions.<br />
Generally Accepted Accounting Principles — See GAAP.<br />
Gross — The total amount of income or expense before deductions or adjustments.<br />
For example, gross pay is the amount before withholding deductions or gross purchases<br />
before discounts.<br />
ITIN — An Individual Taxpayer Identification Number (ITIN) is a tax processing<br />
number issued by the Internal Revenue Service. The IRS issues ITINs to individuals<br />
who are required to have a U.S. taxpayer identification number but who do not have,<br />
and are not eligible to obtain, a Social Security number (SSN) from the Social Security<br />
Administration (SSA). ITINs are issued regardless of immigration status because<br />
both resident and nonresident aliens may have U.S. tax return and payment responsibilities<br />
under the Internal Revenue Code.<br />
Journal — Where transactions are recorded and appear in order by date.<br />
Journal Entry — The entry made in a journal containing the date, the account name,<br />
amount to be debited, the account name and amount to be credited. Each journal entry<br />
must have the dollars of debits equal to the dollars of credits.<br />
Live Payroll — Payroll information is entered and employee paychecks are printed.<br />
MICR — Magnetic Ink Character Recognition. A character recognition system developed<br />
for the banking industry that gives banks a secure and faster method of processing<br />
checks. It uses special characters and magnetic ink or toner on blank check stock<br />
to print the numbers and characters found on the bottom of checks. A document<br />
printed with MICR ink is read by passing through a machine that will first magnetize<br />
the ink on the MICR line, and then read the magnetic signals. Each character gives off<br />
a magnetic signal unique and identifiable to that character.<br />
MMREF — Magnetic Media Reporting and Electronic Filing. Electronic reporting<br />
specifications for Form W-2 set by the Social Security Administration.<br />
Net Pay — Gross wages or gross salaries minus withholdings for payroll taxes and<br />
other items such as insurance, union dues, United Way, etc. Also referred to as “take<br />
home pay”.<br />
Post — The transferring of entries from the journals to be summarized in the general<br />
ledger.<br />
Postable Account — Level 0 accounts. Journal entries can only be made to postable<br />
accounts. Other level accounts are summary accounts.<br />
Reporting Agent — An accounting service, franchiser, bank or other person who<br />
complies with IRS Revenue Procedures 96-17 and is authorized to electronically sign<br />
and file a Form 940/941 on behalf of a taxpayer. This authorization is granted through<br />
submission of Form 8655, either by the client or the reporting agent. There must be a<br />
Form 8655 signed by the client for each of the reporting agent's clients. Reporting<br />
agents sign all of the electronic returns they file with a single PIN signature.<br />
xi
2011 Client Write-Up<br />
Retained Earnings — An equity account that reports the net income of a business<br />
from its inception until the balance sheet date minus the dividends declared from its<br />
inception to the date of the balance sheet. The earnings have been “retained” for use in<br />
the business.<br />
SSN — Social Security Number<br />
Taxpayer Identification Number (TIN) — An identification number used by the<br />
Internal Revenue Service. It can be a SSN (Social Security Number), EIN (Employer<br />
Identification Number), ITIN (Individual Identification Number), ATIN (taxpayer<br />
identification number for pending U.S. adoptions) or PTIN (Preparer Taxpayer Identification<br />
Number).<br />
TIN — See Taxpayer Identification Number<br />
Transfer Agent — The agent authorized by a corporation to maintain the official<br />
record of each registered shareholder's name, address, number of shares purchased or<br />
sold, and their balances.<br />
Trial Balance — A listing of the accounts in the general ledger with the account balances<br />
listed in the appropriate debit or credit column as of a specified date. A trial balance<br />
is usually prepared at the end of an accounting period and is used to determine if<br />
additional adjustments are required to any of the balances. The total of the amounts in<br />
the debit column must equal the total of the amounts in the credit column.<br />
W-2 — Employers must file Form W-2 for wages paid to each employee from whom<br />
income, Social Security, or Medicare tax was withheld or income tax would have been<br />
withheld if the employee had claimed no more than one withholding allowance or had<br />
not claimed exception from withholding on Form W-4.<br />
W-3 — Anyone required to file Form W-2 must file Form W-3 to transmit Copy A of<br />
Forms W-2.<br />
Withholding (W/H) — The term associated with payroll deductions from an employees'<br />
gross wages or gross salary.<br />
xii
2011 Client Write-Up Index<br />
Index<br />
Numerics<br />
1099 On the Fly Preparation 175<br />
1099/1096 MISC Processing<br />
Editing 1099s 147<br />
Generating 1099 Data 225<br />
Printing 1099s and 1096s 148<br />
1099/1096 Misc Processing 146<br />
1099s and 1098s On the Fly 175<br />
94X Form Settings 57<br />
94X Preparer Setup 23<br />
94X Series Tax Deposits and Tax Returns<br />
94X Series Form Settings 57<br />
94X Series Tax Returns 112<br />
94X Series Tax Returns On the Fly Preparation 179<br />
94X Tax Deposits<br />
Calculating 94X Tax Deposits 110<br />
Editing the 94X Tax Deposit 112<br />
Printing the 94X Tax Deposit 112<br />
A<br />
Account and Payroll Information<br />
Add Locality Tax 64<br />
Edit Locality Tax 64<br />
G/L Account Numbers 61<br />
Local Rates 64<br />
Payroll Options 59<br />
State Rates and Limits 63<br />
Accounts Payable<br />
ATF Payments 208<br />
Check Writer 216<br />
Deleting a Scheduled Payment 208<br />
Deleting ATF Payments 216<br />
Editing ATF Payments 214<br />
Editing Invoices 204<br />
Entering Invoices 198<br />
Making Partial Live Payments 206<br />
Making Payments in Full 205<br />
Making Subsequent Live Payments 207<br />
Printing Vendor Checks 209<br />
Recording ATF Payments in Full 208<br />
Recording Partial ATF Payments 209<br />
Reprinting Vendor Checks 212<br />
Scheduling Live Payments 205<br />
Searching for ATF Payments 214<br />
Searching for Invoices 202<br />
Viewing 1099 Information 223<br />
Voiding ATF Payments 215<br />
Voiding Vendor Checks 213<br />
Accounts Payable Setup<br />
Payables Setup Tab 36<br />
Vendor Bookkeeping 196<br />
Vendor Check Setup 195<br />
Vendor Setup 196<br />
Accounts Receivable<br />
Applying Receivables Payments 245<br />
Deleting a Payment 249<br />
Deleting Invoices and Line Items 243<br />
Deleting Service Charges and Penalties 245<br />
Entering New Invoices 239<br />
Entering Service Charges and Penalties 244<br />
Making a Reversing Entry 248<br />
Making an Adjustment 247<br />
Posting Receivables Transactions <strong>Manual</strong>ly 250<br />
Printing an Invoice 242<br />
Updating Invoices 243<br />
Viewing Transactions 247<br />
Writing Off Bad Debt 248<br />
Accounts Receivable Setup<br />
Adding a Customer 235<br />
AR Options 227<br />
Customer Set Up 234<br />
Customer Status 230<br />
Editing a Customer 238<br />
Entering Sales Tax Records 230<br />
Extended Dunning Messages 228<br />
GL Account Setup 232<br />
Invoice Item Setup 233<br />
Payment Terms 229<br />
Receivables Options 227<br />
User Defined Headings 230<br />
Activate Client Write-Up 8<br />
Adding Employer Users 327<br />
Adding Firm Users 326<br />
Adobe Reader Download 289<br />
Applying Receivables Payments 245<br />
ATF<br />
Accounts Payable Payments 208<br />
Contractor Payroll 134<br />
Employee Payroll 95<br />
Payroll Journal Entry 160<br />
Auto Backup 284<br />
B<br />
Backup 285<br />
xiii
Index<br />
2011 Client Write-Up<br />
Bank Reconciliation 164<br />
Benefits Tab 84<br />
Bookkeeping<br />
ATF Payroll Journal Entry 160<br />
Bank Reconciliation 164<br />
Edit Stored Descriptions 163<br />
Editing/Deleting a Journal Entry 160<br />
Enter Transactions 158<br />
Journal Options 162<br />
Payroll Journal Entry 160<br />
Posting Transactions 165<br />
Year End Close 167<br />
C<br />
Calculating 94X Tax Deposits<br />
Printing the 94X Tax Deposit 112<br />
Calculator 289<br />
Change the Active Client 13<br />
Changing a User’s Password 20<br />
Chart of Accounts (COA)<br />
Account Levels 154<br />
Adding Accounts 151<br />
Create an Account "On the Fly" 156<br />
Deleting Accounts 156<br />
Editing Accounts 151, 156<br />
Reset the COA 156<br />
Setup Balances 153<br />
Check Alignment 106, 142<br />
Check Setup<br />
MICR Accounts Payable Check Setup 53<br />
MICR Checks 305<br />
MICR Payroll Check Setup 51<br />
Preprinted Accounts Payable Check Setup 52<br />
Pre-Printed Checks 305<br />
Preprinted Payroll Check Setup 49<br />
Check Stock<br />
MICR Check Stock 24<br />
Check Stub Options<br />
MICR Accounts Payable Checks 53<br />
MICR Payroll Checks 51<br />
Preprinted Accounts Payable Checks 52<br />
Preprinted Payroll Checks 50<br />
Check Writer 216<br />
Consolidating NonVendor Information 223<br />
Editing NonVendor Information 222<br />
Printing NonVendor Checks 219<br />
Printing Vendor Checks 216<br />
Reprinting NonVendor Checks 221<br />
Checks<br />
MICR Calibration 29<br />
MICR Check Design 26<br />
MICR Check Setup 24, 25<br />
MICR Check Stock 24<br />
Payables Check Alignment 225<br />
Payroll Check Alignment 106, 142<br />
Preprinted Check Alignment 29<br />
Printing Contractor Pay Checks 137<br />
Printing Employee Pay Checks 101<br />
Printing Vendor Checks 209<br />
Reprinting Contractor Pay Checks 140<br />
Reprinting Employee Pay Checks 104<br />
Reprinting NonVendor Checks 221<br />
Reprinting Vendor Checks 212<br />
Vendor Check Setup 195<br />
Voiding Vendor Checks 213<br />
Client Notes 290<br />
Client Setup<br />
94X Form Settings 57<br />
Accounts Payable Setup 36<br />
Chart of Accounts 45<br />
Display Settings 56<br />
Editing Client Information 45<br />
Headers and Footnotes 54<br />
MICR Bank Accounts 47<br />
Report Options 55<br />
Setting Up a New Client 31<br />
Client Write-Up Menus 316<br />
Client Write-Up Processes<br />
1099s/1096s on the Fly 308<br />
94X PIN Applications 306<br />
End of Year 308<br />
MICR Check Setup 305<br />
PIN Applications for 94X Tax Returns 306<br />
Pre-Printed Check Setup 305<br />
Print and Upload 1099s and 1096s 307<br />
Print and Upload W-2s and W-3s 307<br />
Process Payroll 305<br />
W-2s/W-3s on the Fly 307<br />
Consolidating NonVendor Information 223<br />
Contractor Payroll 123<br />
Additional ATF Contractor Payroll Options 136<br />
Additional Check Print Options 140<br />
Additional Live Contractor Payroll Options 133<br />
ATF Contractor Payroll 134<br />
Editing a Live Check 133<br />
Editing an ATF Contractor Check 137<br />
Live Contractor Payroll 130<br />
Printing Contractor Pay Checks 137<br />
Reprinting Contractor Pay Checks 140<br />
Transmitting Contractor Direct Deposits 143<br />
Contractor Payroll Set Up 123<br />
Account & Payroll Information 123<br />
Adding a Contractor 125<br />
Contractor Password 123<br />
Contractor Setup 125<br />
Cumulative G/L Account Numbers 123<br />
Detailed G/L Account Numbers 124<br />
xiv
2011 Client Write-Up Index<br />
Direct Deposit 129<br />
Divisions 127<br />
Edit a Contractor 129<br />
Creating W-2s on the Fly 172<br />
CWU <strong>Manual</strong> and Help Updates 10<br />
D<br />
Date Fields 12, 13<br />
Deductions and Benefits<br />
Adding a Benefit 68<br />
Adding a Deduction 65<br />
Editing a Deduction or Benefit 71<br />
Deductions Tab 82<br />
Delete Client 287<br />
Deleting ATF Payments 216<br />
Deleting Employer Users 327<br />
Deleting Firm Users 327<br />
Direct Deposit 20<br />
Direct Deposit Reports 108, 144<br />
Establishing Your Account with InterceptEFT 21<br />
Report Details 109, 145<br />
Setup 21<br />
Transmitting Contractor Payroll Information 143<br />
Direct Deposit Tab 85<br />
Display Settings 56<br />
Division 159<br />
Divisions 55<br />
Documentation Standards 11<br />
<strong>Drake</strong> Dialer 282<br />
<strong>Drake</strong> Document Manager 315<br />
E<br />
Editing 94X Tax Deposits 112<br />
Editing ATF Payments 214<br />
Editing Employer User Information 327<br />
Editing Firm User Information 326<br />
Editing Invoices 204<br />
Editing Stored Descriptions 163<br />
E-Filing 1099-MISC FAQ 309<br />
Electronic Filing<br />
1099 Extension 192<br />
1099s<br />
Preparing to e-file 343<br />
94X Forms 183<br />
Transmit 1099 Extension 193<br />
Transmit 1099/View Results 192<br />
Uploading W-2s and W-3s 186<br />
View Results of 94X Transmission 185<br />
W-2s<br />
Preparing to e-file 342<br />
W-2s and W-3s 186<br />
Electronic Filing Setup<br />
Business Taxpayer’s PIN Application 306<br />
Business Taxpayers PIN Application 39<br />
ERO PIN Application 42<br />
Form 8633 - Application for EFIN 37<br />
Individual Taxpayers PIN Application 306<br />
Reporting Agent PIN Application 44<br />
E-Mail 301<br />
Checking E-Mail 302<br />
Composing a New Message 303<br />
E-Mail Attachments 303<br />
E-Mail Setup 301<br />
Managing the Address Book 304<br />
Moving Messages 304<br />
Replying, Forwarding, and Deleting Messages 304<br />
E-Mailing a Portals Employer 328<br />
Employee Payroll<br />
Additional ATF Employee Payroll Options 100<br />
Additional Check Print Options 104<br />
Additional Deductions 93<br />
Additional Live Employee Payroll Options 93<br />
ATF Employee Payroll 95<br />
Benefits 91<br />
Deductions 92<br />
Earnings 90<br />
Editing a Live Check 94<br />
Editing an ATF Check 101<br />
Gross Pay and Earnings 91<br />
Printing Employee Pay Checks 101<br />
Reprinting Employee Pay Checks 104<br />
Total Deductions and Net Pay 93<br />
Transmitting Employee Direct Deposits 107<br />
Employee Payroll Setup<br />
Account and Payroll Information 59<br />
Deductions and Benefits 65<br />
Employees 72<br />
G/L Account Numbers 61<br />
Payroll Options 59<br />
Setting Up Employee Payroll 59<br />
Employee Setup<br />
Adding an Employee 72<br />
Benefits 84<br />
Benefits Tab 84<br />
Deductions 82<br />
Deductions Tab 82<br />
Direct Deposit 85<br />
Direct Deposit Tab 85<br />
Divisions 73<br />
Edit an Employee 85<br />
Federal Tax Status 79<br />
Federal Tax Status Tab 79<br />
Federal Withholding Options 79<br />
Payroll Options 77<br />
Payroll Options Tab 77<br />
Payroll Wages & Rates 74<br />
xv
Index<br />
2011 Client Write-Up<br />
Payroll Wages/Rates Tab 74<br />
Personal Info Tab 73<br />
Sick & Vacation Hours 78<br />
State & Local Tax Status 80<br />
State & Locality Information 81<br />
State Filing Status & Exemptions 81<br />
State Fixed Percent WH 81<br />
State General Selections 81<br />
State Withholding 80<br />
State/Local Tax Status Tab 80<br />
Entering Invoices 198<br />
Entering Receivables Options 227<br />
Excel Templates - Restoring 288<br />
Export to <strong>Drake</strong> Tax <strong>Software</strong> 295<br />
Exporting from CWU 294<br />
F<br />
Federal Tax Status Tab 79<br />
Federal Withholding Information 80<br />
File Maintenance<br />
Auto Backup 284<br />
Backup 285<br />
Delete Client 287<br />
Restore 286<br />
Restore Excel Templates 288<br />
Filing a 1099 Extension 192<br />
Filing Tax Returns 290<br />
FIRE website 311<br />
Firm<br />
Firm Info/Global Settings 15<br />
Fiscal Year Clients 168<br />
Form 8633 - Application for EFIN 37<br />
Forms Alignment 30<br />
G<br />
Generating 1099 Data 225<br />
Global Setup<br />
94X Preparer Setup 23<br />
Firm Info/Global Settings 15<br />
MICR Check Setup 24<br />
Security Setup 17<br />
H<br />
Headers and Footnotes 54<br />
Home Screen Shortcuts 337<br />
Hot Keys 12<br />
I<br />
ICR 103, 139<br />
Importing from PeachTree 299<br />
Importing from QuickBooks 296<br />
Importing to CWU 292<br />
Step 1 - Copy the Templates 292<br />
Step 2 - Entering Data into the Template 292<br />
Step 3 - Import 293<br />
Installation<br />
Network Installation 6<br />
Stand-Alone Installation 6<br />
Installing Program Updates 281<br />
<strong>Drake</strong> Dialer 282<br />
Viewing Release Notes 282<br />
InterceptEFT Direct Deposit Holidays 320<br />
Invoice Item Setup 233<br />
IRS FIRE Website 311<br />
IRS Web Site 304<br />
J<br />
Journal Options<br />
Auto Increment Reference Number 162<br />
Disable AP, Employees, Contractors and AR Selections<br />
162<br />
Disable Division Selection 162<br />
Disable Payroll Journal and ATF Payroll 163<br />
Insert Debit/Credit Decimal Automatically 162<br />
Prefill Adjusting Entry Amounts Automatically 162<br />
Journal Transactions 157<br />
L<br />
Live Contractor Payroll 130<br />
Live Employee Payroll 86<br />
Logging in to the Portal 324<br />
M<br />
Managing Portals Users 326<br />
Adding Employer Users 327<br />
Adding Firm Users 326<br />
Deleting Employer Users 327<br />
Deleting Firm Users 327<br />
Editing Employer User Information 327<br />
Editing Firm User Information 326<br />
<strong>Manual</strong> and Help Updates 10<br />
MICR Accounts Payable Check Setup 53<br />
MICR Bank Accounts 47<br />
MICR Check Printing<br />
MICR Calibration 29<br />
MICR Check Design 25, 26<br />
MICR Check Stock 24<br />
MICR Check Setup<br />
Vendor Checks 195<br />
MICR Check Stock 24<br />
MICR Payroll Check Setup 51<br />
xvi
2011 Client Write-Up Index<br />
N<br />
Navigation 11<br />
Changing the Active Client 13<br />
Date Fields 12<br />
Documentation Standards 11<br />
Hot Keys 12<br />
New Client<br />
Business Information 33<br />
Contact Information 32<br />
Payables Setup 36<br />
W-2/W-3 Setup 34<br />
NonVendor Changes 222<br />
NonVendor Consolidation 223<br />
O<br />
On the Fly Forms<br />
1099 - Preparation 175<br />
1099s - Editing 177<br />
1099s and 1096s - Printing 178<br />
1099s and 1098s 175<br />
1099s and 1098s - Creating 176<br />
1099s and 1098s - Processing 177<br />
94X Series Tax Return - Preparation 179<br />
94X Tax Returns 178<br />
W-2s - Creating 172<br />
W-2s - Preparation 172<br />
W-2s - Processing 173<br />
W-2s and W-3s - Editing 174<br />
W-2s and W-3s - Printing 174<br />
P<br />
Payables Check Alignment 225<br />
Payroll<br />
ATF Contractor Payroll 134<br />
ATF Employee Payroll 95<br />
ATF Journal Entry 160<br />
Direct Deposit 20<br />
Editing a Live Contractor Check 133<br />
Editing a Live Employee Check 94<br />
Editing an ATF Contractor Check 137<br />
Editing an ATF Employee Check 101<br />
Live Contractor Payroll 130<br />
Live Employee Payroll 86<br />
Payroll Journal Entry 160<br />
Printing Employee Pay Checks 101<br />
Reprinting Payroll Checks 104<br />
Payroll Filings<br />
1099/1096 Misc Processing 146<br />
94X Series Tax Deposits 110<br />
Producing 94X Series Tax Returns 112<br />
W-2 Processing 116<br />
Payroll Journal Entry 160<br />
Payroll Options 59<br />
Payroll Options Tab 77<br />
Payroll Wages/Rates Tab 74<br />
PeachTree Import 299<br />
Personal Info Tab 73<br />
PIN Application<br />
Business Taxpayer 39<br />
EROs 42<br />
Individual Taxpayers 306<br />
Reporting Agents 44<br />
W-2/W-3 PIN Application FAQs 310<br />
Portals<br />
Activating Portals 322<br />
Approving Time Cards 334<br />
Editing Employee Information 333<br />
Editing Employee Pay 334<br />
E-Mailing a Portals Employer 328<br />
Entering Payroll Information 333, 335<br />
Getting Started 321<br />
Identifying Portals Clients 322<br />
Logging in to the Portal 324<br />
Managing Portals Users 326<br />
Managing the Employees List 332<br />
Navigating Portals 332<br />
Portals Login 331<br />
Portals Users 321<br />
Processing Contractor Payroll 148<br />
Processing Employee Payroll 120<br />
Transferring Files to <strong>Drake</strong> <strong>Support</strong> 328<br />
Verifying Employees 325<br />
Viewing Processed Payroll 335<br />
Viewing the Payroll Download Log 328<br />
Working with Employers 329<br />
Working with Portals 331<br />
Portals Setup 30<br />
Portals Users 321<br />
Posting Receivables Transactions <strong>Manual</strong>ly 250<br />
Posting Transactions 165<br />
Preprinted Accounts Payable Check Setup 52<br />
Preprinted Payroll Check Setup 49<br />
Print and Upload W-2s and W-3s 307<br />
Printing Blank Forms 288<br />
Printing Checks<br />
Check Alignment 106, 142<br />
Contractor Pay Checks 137<br />
Employee Pay Checks 101<br />
MICR Check Setup 24<br />
Payables Check Alignment 225<br />
Reprint Payroll Checks 211, 213, 222<br />
Vendor Checks 209, 212<br />
Voiding Vendor Checks 213<br />
Printing Mailing Labels 290<br />
Printing Mailing Labels from CWU Lists 291<br />
Printing Mailing Labels from CWU Lists 291<br />
xvii
Index<br />
2011 Client Write-Up<br />
Process Payroll (Live and ATF) 305<br />
Processing 1099s On the Fly 177<br />
Processing W-2s on the Fly 173<br />
Producing 112<br />
Producing 94X Series Tax Returns<br />
Form 941-X 115<br />
Form 943-X 115<br />
Form 944-X 115<br />
Program Updates 281<br />
Q<br />
QuickBooks Import 296<br />
R<br />
Rebuild Client List 288<br />
Receivables Customer Set Up 234<br />
Recording Partial ATF Payments 209<br />
Report Details 255<br />
Report Options 55, 252<br />
Report Types<br />
Accounts Payable 254<br />
Accounts Receivable 254<br />
Balance Sheets 254<br />
Cash Flow 254<br />
Chart of Accounts 254<br />
General Ledger 254<br />
Interim 254<br />
Payroll 254<br />
Profit & Loss 254<br />
State Tax & Wage 255<br />
Transaction Listings 254<br />
Year-to-Date 254<br />
Reports<br />
Accounts Payable Reports 271<br />
Accounts Receivable Reports 273<br />
Balance Sheet Reports 259<br />
Chart of Accounts Reports 270<br />
Display Settings 252<br />
General Ledger Reports 260<br />
Interim Reports 255<br />
Payroll Reports 274<br />
Profit & Loss (P&L) Reports 263<br />
Report Details 255<br />
Report Options 252<br />
Report Review 279<br />
Running Reports 251<br />
State Tax & Wage Reports 278<br />
The Report Window 253<br />
Transaction Listing Reports 268<br />
Understanding Reports 253<br />
Year-To-Date Reports 257<br />
Restore 286<br />
Restore Excel Templates 288<br />
Running Reports 251<br />
S<br />
Scheduling Live Payments<br />
Deleting a Scheduled Payment 208<br />
Making Partial Payments 206<br />
Making Payments in Full 205<br />
Making Subsequent Payments 207<br />
Searching for ATF Payments 214<br />
Searching for Invoices 202<br />
Security Setup 17<br />
Changing a Password 19<br />
Deleting a User ID 20<br />
Setting Up User IDs and Passwords 18<br />
Setting Up Employee Payroll 59<br />
Setting Up User IDs and Passwords 18<br />
Setup<br />
94X Form Settings 57<br />
Chart of Accounts 45<br />
Checks 49<br />
Client 31<br />
Client Setup 31<br />
Deductions and Benefits 65<br />
Display Settings 56<br />
Electronic Filing 37<br />
Employees 72<br />
Global Setup 15<br />
Headers and Footnotes 54<br />
MICR Bank Accounts 47<br />
MICR Calibration 29<br />
MICR Check Setup 25<br />
New Client 31<br />
Payroll 59<br />
Report Options 55<br />
Reporting Options 53<br />
Vendor Checks 195<br />
Vendors 196<br />
W-2/W-3 34<br />
Setup Wizard 8<br />
Sick/Vacation Hours 78<br />
Spreadsheet Imports 291<br />
Importing to CWU 292<br />
State/Local Tax Status Tab 80<br />
<strong>Support</strong><br />
Contacting <strong>Support</strong> 4<br />
<strong>Support</strong> Hours 5<br />
System Date Format 9<br />
Windows 2000 9<br />
Windows 7 9<br />
Windows Vista 9<br />
Windows XP 9<br />
System Requirements 5<br />
xviii
2011 Client Write-Up Index<br />
T<br />
Tax Deposits<br />
Filing 94X Forms 110<br />
Form 941 114<br />
Form 941-SS 114<br />
Form 943 115<br />
Form 944-SS 115<br />
Producing 94X Tax Returns 112<br />
Tools<br />
Adobe Reader Download 289<br />
Backup 285<br />
Calculator 289<br />
Client Notes 290<br />
Delete Client 287<br />
<strong>Drake</strong> Dialer 282<br />
Exporting from CWU 294<br />
File Maintenance 283<br />
Installing Program Updates 281<br />
Printing Blank Forms 288<br />
Printing Mailing Labels 290<br />
Rebuild Client List 288<br />
Restore 286<br />
Restore Excel Templates 288<br />
Spreadsheet Imports 291<br />
Update Prior Year Clients 282<br />
Viewing Release Notes 282<br />
Where to File Tax Returns 290<br />
Transferring Files to <strong>Drake</strong> <strong>Support</strong> 328<br />
Transmit 1099/View Results 192<br />
Transmitting Employee Direct Deposit 107<br />
Processing W-2s 117<br />
W-2/W-3 PIN Application FAQs 310<br />
W-2c/W-3c Processing<br />
Creating W-2c 119<br />
Printing W-2c and W-3c 119<br />
Y<br />
Year End Close 167<br />
U<br />
Update Prior Year Clients 282<br />
Uploading W-2s and W-3s 186<br />
V<br />
Vendor Bookkeeping Setup 196<br />
Vendor Check Setup 195<br />
Vendor Setup 196<br />
Viewing 1099 Information 223<br />
Viewing Release Notes 282<br />
Voiding ATF Payments 215<br />
Voiding Vendor Checks 213<br />
W<br />
W-2 On the Fly Preparation 172<br />
W-2 Processing<br />
Adjusting W-2 Withholding 116<br />
Checking W-2 Withholding 116<br />
Editing W-2s 117<br />
Printing W-2s and W-3s 118<br />
xix
Index<br />
2011 Client Write-Up<br />
xx