Strömungswächter | SFW/SLW120-E Flow ... - FlowVision GmbH
Strömungswächter | SFW/SLW120-E Flow ... - FlowVision GmbH
Strömungswächter | SFW/SLW120-E Flow ... - FlowVision GmbH

Create successful ePaper yourself
Turn your PDF publications into a flip-book with our unique Google optimized e-Paper software.
Strömungswächter | <strong>SFW</strong>/<strong>SLW120</strong>-E<br />
Montage- und Einstellanleitung<br />
<strong>Flow</strong> Monitor | <strong>SFW</strong>/<strong>SLW120</strong>-E<br />
Instructions for Installation and Adjustment<br />
M_<strong>SFW</strong><strong>SLW120</strong>-E_0310_d_e
GMBH<br />
Strömungswächter<br />
| <strong>SFW</strong>/<strong>SLW120</strong>-E<br />
Diese Anleitung unterstützt Sie beim Einbau,<br />
Anschließen und Einstellen des Strömungs wächters.<br />
Die Garantie erlischt bei unsachgemäßer Handhabung<br />
sowie bei Gerätedemontagen, die nicht in dieser<br />
Anleitung beschrieben sind.<br />
Für mechanische oder elektrische<br />
Beschädigungen als Folge unsachgemäßer<br />
Handhabung sowie deren mögliche<br />
Folgeschäden wird keine Haftung übernommen.<br />
Sicherheitshinweis<br />
Eine Nichtbeachtung der Montage- und Bedienungs<br />
anleitung kann zu erheblichen Schäden<br />
am Gerät und an der Anlage führen. <strong>Flow</strong>Vision<br />
übernimmt gegenüber Kunden oder Dritten keine<br />
Haftung, Gewährleistung oder Garantie für Mängel<br />
oder Schäden, die durch fehlerhaften Einbau oder<br />
unsachgemäße Handhabung unter Nichtbeachtung<br />
der Montage- und Bedienungsanleitung verursacht<br />
sind.<br />
Please follow these installation, connection and<br />
adjustment instructions carefully. Failure to comply<br />
with these instructions or misuse of this<br />
equipment will void your warranty coverage.<br />
Equipment installation, connection and<br />
adjustment by qualified personnel only!<br />
Important<br />
Please follow these instructions carefully. Failure to<br />
comply, or misuse of this equipment, could result<br />
in serious damage both to the equipment itself and<br />
to the installation. <strong>Flow</strong>Vision is unable to accept<br />
responsibility for customer or third party liability,<br />
warranty claims or damage caused by incorrect<br />
installation or improper handling resulting from<br />
non-observance of these instructions.<br />
2
<strong>SFW</strong>/<strong>SLW120</strong>-E | <strong>Flow</strong> Monitor<br />
Beschreibung | Description<br />
GMBH<br />
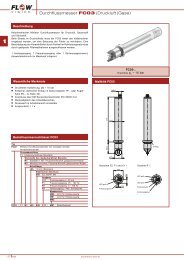
1 Beschreibung<br />
Der Strömungswächter in Kompaktbauweise ist<br />
geeignet für die Strömungsüberwachung kleiner<br />
Mengen von wässerigen Flüssigkeiten (<strong>SFW</strong> 120-E)<br />
oder gasförmigen Medien (SLW 120-E). Die folgenden<br />
Gerätemerkmale steigern die Zuver lässigkeit und<br />
erhöhen die Betriebssicherheit:<br />
• Die Überwachung erfolgt - ohne mechanisch<br />
bewegte Teile - nach dem kalorimetrischen<br />
Prinzip.<br />
• Der MIN- oder MAX-Strömungsschaltpunkt ist mit<br />
einem Potentiometer stufenlos einstellbar.<br />
• Der Schaltzustand wird über eine grüne LED<br />
signalisiert (siehe Fig. 1).<br />
1 Description<br />
These compact flow monitors are designed to<br />
monitor small quantities of water and other liquids<br />
with similar viscosities (<strong>SFW</strong> 120-E) and gases (SLW<br />
120-E). Important operational safety and reliability<br />
enhancing features designed and built into these<br />
units include:<br />
• Calorimetric flow monitoring, which avoids the<br />
need for moving parts in the flow.<br />
• The desired MIN or MAX switch point is continuously<br />
adjustable by means of a potentiometer.<br />
• The correct flow status is clearly indicated by a<br />
green LED (see Fig. 1).<br />
EF-Anschluss<br />
Connection of Ermeto-type Monitoring Heads (EF…)<br />
Ø A<br />
LED<br />
50<br />
38<br />
Überwurfmutter SW 19<br />
Compression nut<br />
(width over flats: 19 mm/.748 in.)<br />
Rohranschlussteil<br />
Pipe connection<br />
32.5<br />
35<br />
35<br />
85<br />
65<br />
53<br />
25 80<br />
130<br />
NPT 1/4" Anschluss<br />
Connection of NPT 1/4" Monitoring Head<br />
38<br />
Ø 20<br />
53<br />
85<br />
65<br />
Ø A (mm)<br />
<strong>SFW</strong> 120-E 6 ... 12<br />
SLW 120-E 12<br />
13.5<br />
LED<br />
32.5<br />
NPT 1/4"<br />
50<br />
90<br />
13.5<br />
Alle Abmessungen in mm<br />
All dimensions in mm<br />
Fig. 1<br />
3
GMBH<br />
Strömungswächter<br />
| <strong>SFW</strong>/<strong>SLW120</strong>-E<br />
Technische Daten | technical data<br />
2 Technische Daten<br />
Überwachungsbereich Strömung:<br />
wässrige Flüssigkeiten 0,1 … 10 l/min<br />
Gase/Luft<br />
2,5 … 250 l/min<br />
2 Technical Data<br />
<strong>Flow</strong> rate range:<br />
Water and other liquids with<br />
similar viscosities<br />
Gases/air<br />
0.1 … 10 l/min<br />
2.5 … 250 l/min<br />
Zulässiger Temperaturbereich:<br />
des Mediums -10 °C … +60 °C<br />
der Auswerteelektronik -10 °C … +60 °C<br />
Druckfestigkeit:<br />
20 bar/290 psi<br />
Temperature range:<br />
of the medium -10 °C … +60 °C<br />
(14 °F to 140 °F)<br />
of the control unit -10 °C … +60 °C<br />
(14 °F to 140 °F)<br />
Pressure resistance:<br />
20 bar/290 psi<br />
Rohranschluss:<br />
<strong>SFW</strong> 120-E EF 6 … 12, NPT 1/4“<br />
SLW 120-E EF 12, NPT 1/4“<br />
Pipe connections:<br />
<strong>SFW</strong> 120-E EF 6 …12, NPT 1/4“<br />
SLW 120-E EF 12, NPT 1/4“<br />
Ansprechzeit:<br />
Wasser ca. 2,5 s*<br />
Luft ca. 18 s*<br />
* Verzögerungswerte gemessen bei Schaltpunkt<br />
einstellung auf 1 m/s und einer<br />
Be triebs strömung von 2 m/s nach plötzlichem<br />
Strömungsstillstand.<br />
Schutzart:<br />
Nennspannung:<br />
Stromaufnahme:<br />
IP 65<br />
DC 24 V (18 … 32 V)<br />
AC 24 V (+10%/-15%)<br />
wässrige Flüssigkeiten (<strong>SFW</strong> 120-E) ca. 55 mA<br />
Luft (SLW 120-E)<br />
ca. 30 mA<br />
Response delay:<br />
Water approx. 2.5 s*<br />
Air approx. 18 s*<br />
* Delay with the switch point set to 1 m/s (3.3<br />
ft./s) and the flow rate at 2 m/s (6.6 ft./s), after<br />
a sudden complete flow stop page.<br />
Degree of protection:<br />
Input voltage:<br />
Current consumption:<br />
Water and other liquids with<br />
similar viscosities (<strong>SFW</strong> 120-E)<br />
Air (SLW 120-E)<br />
IP 65<br />
DC 24 V (18 … 32 V)<br />
AC 24 V (+10%/-15%)<br />
ca. 55 mA<br />
ca. 30 mA<br />
4
<strong>SFW</strong>/<strong>SLW120</strong>-E | <strong>Flow</strong> Monitor<br />
montieren | Installation<br />
GMBH<br />
3 Strömungswächter montieren<br />
1. Überprüfen, ob der einzubauende Strömungswächter<br />
für das Strömungsmedium und die<br />
vorhandene Betriebsspannung ausgelegt ist.<br />
2. Den Einbauort des Strömungswächters wie folgt<br />
wählen (siehe Fig. 2):<br />
a. Um Strömungsturbulenzen an den Messfühlern<br />
zu vermeiden, den Messkopf nur<br />
in gerade Rohrleitungen einbauen. Auf<br />
ausreichenden Abstand zu Querschnittsänderungen<br />
und Rohrkrümmungen achten.<br />
Minimal erforderliche Einlauflänge 10 x D<br />
und Auslauflänge 5 x D (nach DIN 1952).<br />
(D = Rohrnennweite)<br />
b. Bei senkrechter Leitung den Strömungswächter<br />
möglichst nur in Steigleitungen<br />
einbauen, um falsche Signale durch<br />
Luftpolsterbildung zu vermeiden.<br />
c. Bei waagerechter Leitung Strömungswächter<br />
<strong>SFW</strong> 120-E mit der Verschraubung (PG)<br />
nach unten einbauen.<br />
3 <strong>Flow</strong> monitor installation<br />
1. Check that the flow monitor is suitable for the<br />
medium to be monitored and for the available<br />
supply voltage.<br />
2. For best performance the flow monitor should be<br />
installed in the pipeline in accordance with the<br />
following conditions (see fig. 2):<br />
a. The flow monitor should be installed only<br />
in a straight section of piping. There should<br />
be a distance of at least 10 pipe diameters<br />
before the flow monitor and 5 pipe diameters<br />
after the flow monitor before or after<br />
any bends and changes in pipe diameter to<br />
avoid any effects of turbulence.<br />
b. In the case of vertical pipelines the flow<br />
monitor should be installed where the flow<br />
is rising, if possible.<br />
c. For horizontal pipelines the flow monitor<br />
<strong>SFW</strong> 120-E should be mounted with the<br />
cable gland (PG) suspended.<br />
<strong>SFW</strong> 120-E und SLW 120-E<br />
<strong>SFW</strong> 120-E and SLW 120-E<br />
Nur für <strong>SFW</strong> 120-E<br />
only <strong>SFW</strong> 120-E<br />
waagerechte Rohrleitung<br />
horizontal pipeline<br />
senkrechte Rohrleitung<br />
vertical pipeline<br />
G<br />
SC<br />
PG<br />
Strömungsrichtung<br />
flow direction<br />
Fig. 2<br />
5
GMBH<br />
Strömungswächter<br />
| <strong>SFW</strong>/<strong>SLW120</strong>-E<br />
montieren | Installation<br />
d. Um evtl. Funktionsstörungen auszuschließen,<br />
sind energiereiche induktive, kapazitive<br />
und hochfrequente Einstreuungen zu vermeiden.<br />
Hinweis:<br />
Bei Gasen ist die Einbaulage des Strömungswächters<br />
SLW 120-E bei waagerechter Leitung<br />
beliebig.<br />
d. Avoid installing the monitoring head in known<br />
areas of high electrical inductance, capacitance<br />
or highfrequency electro-magnetic<br />
fields.<br />
Note:<br />
If gases are the medium to be monitored, the<br />
mounting attitude of the flow monitor SLW 120-E<br />
is unimportant in horizontal pipelines.<br />
3. Den Strömungswächter mit dem Pfeil in Strömungsrichtung<br />
in die Rohrleitung einbauen (siehe Fig. 2).<br />
3. The flow monitor should be installed in the pipeline<br />
with the arrow pointing in the direction of flow<br />
(see fig. 2).<br />
6
<strong>SFW</strong>/<strong>SLW120</strong>-E | <strong>Flow</strong> Monitor<br />
AnschlieSSen | Electrical connection<br />
GMBH<br />
4 Anschließen<br />
ACHTUNG!<br />
Überprüfen, ob die Versorgungsspannung mit der<br />
Nennspannung des Strömungswächters übereinstimmt.<br />
1. Beide Schlitzschrauben (SC) herausschrauben<br />
und Gehäusedeckel (G) entfernen (siehe Fig. 2).<br />
2. Kabel für Netzanschluss und Relaisausgang<br />
durch die Kabelverschraubung (PG) führen (siehe<br />
Fig. 2).<br />
3. Den Netzanschluß an den Klemmen 1 und 2<br />
und den Relaisausgang an den Klemmen 3 … 5<br />
anschließen (siehe Fig. 3).<br />
4. Kabelverschraubung zur Zugentlastung der Kabel<br />
handfest anziehen.<br />
5. Versorgungsspannung anschließen.<br />
4 Electrical connection<br />
CAUTION!<br />
Check that the supply voltage corresponds with the<br />
voltage rating shown on the system.<br />
1. Loosen the retaining screws (SC) and remove<br />
the cover of the housing (G) (see Fig. 2).<br />
2. Feed the supply input cable and relay connecting<br />
cable through the appropriate cable gland (PG)<br />
(see Fig. 2).<br />
3. Connect the supply input cable to terminals 1<br />
and 2 and the relay connecting cable to terminals<br />
3 … 5 (see Fig. 3).<br />
4. Tighten the cable glands handtight.<br />
5. Connect power supply.<br />
Relais unerregt dargestellt<br />
(LED erloschen)<br />
1 2 3 4 5<br />
relay shown de-energized<br />
(LED extinguished)<br />
0.1 A<br />
24 V AC/DC L<br />
(+)<br />
N<br />
(-)<br />
0 S I<br />
Fig. 3<br />
7
GMBH<br />
Strömungswächter<br />
| <strong>SFW</strong>/<strong>SLW120</strong>-E<br />
Einstellen | Adjustment<br />
5 Ansprechwert Strömung einstellen<br />
Voraussetzung:<br />
Der Strömungswächter ist entsprechend den Kapiteln<br />
3 und 4 montiert und angeschlossen.<br />
1. In der zu überwachenden Rohrleitung ist die<br />
kritische Strömung mit zugehöriger Temperatur<br />
herzustellen, bei welcher der Strömungswächter<br />
ansprechen soll. Die Aufheizzeit beträgt bei flüssigen<br />
Medien ca. 5 Minuten und bei gasförmigen<br />
Medien ca. 15 Minuten.<br />
ACHTUNG!<br />
Auf gleichbleibende Strömungs bedingungen<br />
achten. In flüssigen Medien ist Blasen bildung zu<br />
vermeiden.<br />
2. Strömungsabgleich am Potentiometer (R1) (siehe<br />
Fig. 4) wie folgt durchführen:<br />
MIN-Funktion<br />
a. Umschalter (U) (siehe Fig. 4) auf »MIN«<br />
schalten.<br />
b. Falls die grüne LED nicht leuchtet (Strömung<br />
ist kleiner als der eingestellte Schaltpunkt):<br />
Potentiometer (R1) (siehe Fig. 4) gegen<br />
Uhrzeigersinn drehen, damit der Schaltpunkt<br />
zur niedrig eren Strömungsgeschwindigkeit<br />
bzw. Durch flußmenge verschoben wird.<br />
5 Ajustment of flow response value<br />
Requirement:<br />
Ensure flow monitor has been correctly installed and<br />
connected in accordance with chapters 3 and 4.<br />
1. Start by bringing the system to the critical flow<br />
rate at which the flow monitor should respond and<br />
to its normal operating temperature and allow it<br />
to reach thermal stabilization. This takes at least<br />
5 minutes for liquids and 15 minutes for gases.<br />
Caution!<br />
Care should be taken to ensure that the flow is<br />
continuous and for liquids free of bubbles.<br />
2. Turn the potentiometer (R1) (see fig. 4) as described<br />
below to adjust the switch point:<br />
MIN function<br />
a. Switch (U) (see fig. 4) should be in position<br />
»MIN«.<br />
b. If the green LED is not lighting (flow is below<br />
the set switch point):<br />
turn potentiometer screw (R1) (see fig. 4)<br />
counter-clock wise in order to move the<br />
switch point towards the lower flow rate.<br />
grüne LED<br />
green LED<br />
Anschlussklemmen<br />
Terminals<br />
U<br />
MAX<br />
MIN<br />
R1<br />
Fig. 4<br />
8
<strong>SFW</strong>/<strong>SLW120</strong>-E | <strong>Flow</strong> Monitor<br />
Einstellen | Adjustment<br />
GMBH<br />
c. Falls die grüne LED leuchtet (Strömung ist<br />
größer als der eingestellte Schaltpunkt):<br />
Potentiometer (R1) im Uhrzeigersinn<br />
drehen, damit der Schaltpunkt zur<br />
höheren Strömungsgeschwindigkeit bzw.<br />
Durchflussmenge verschoben wird.<br />
d. Potentiometer (R1) langsam drehen, bis die<br />
grüne LED gerade erlischt. Um sicherzugehen,<br />
Schaltpunkt mehrmals ansteuern. Der<br />
Abgleich ist damit beendet.<br />
MAX-Funktion<br />
a. Umschalter (U) (siehe Fig. 4) auf »MAX«<br />
schalten.<br />
b. Falls die grüne LED nicht leuchtet (Strömung<br />
ist größer als der eingestellte Schaltpunkt):<br />
Potentiometer (R1) (siehe Fig. 4) im Uhrzeigersinn<br />
drehen, damit der Schaltpunkt<br />
zur höheren Strömungsgeschwindigkeit<br />
bzw. Durchflussmenge verschoben wird.<br />
c. Falls die grüne LED leuchtet (Strömung ist<br />
kleiner als der eingestellte Schaltpunkt):<br />
Potentiometer (R1) gegen den Uhrzeigersinn<br />
drehen, damit der Schaltpunkt zur niedrigeren<br />
Strömungsgeschwindigkeit bzw.<br />
Durchflussmenge verschoben wird.<br />
d. Potentiometer (R1) langsam drehen bis die<br />
grüne LED gerade erlischt. Um sicherzugehen,<br />
Schaltpunkt mehrmals ansteuern. Der<br />
Abgleich ist damit beendet.<br />
4. Gehäusedeckel aufsetzen und Befestigungsschrauben<br />
anziehen.<br />
c. If the green LED is lighting (flow is above the<br />
set switch point):<br />
turn potentiometer screw (R1) clockwise in<br />
order to move the switch point towards the<br />
higher flow rate.<br />
d. Turn the potentiometer screw (R1) slowly to<br />
the exact point the green LED extinguishes.<br />
Repeat this procedure several times to<br />
ensure correct adjustment. The adjustment<br />
is now completed.<br />
MAX function<br />
a. Switch (U) (see fig. 4) should be in position<br />
»MAX«.<br />
b. If the green LED is not lighting (flow is above<br />
the set switch point):<br />
turn potentiometer screw (R1) (see fig. 4)<br />
clockwise in order to move the switch point<br />
towards the higher flow rate.<br />
c. If the green LED is lighting (flow is below the<br />
set switch point):<br />
turn potentiometer screw (R1) counterclock<br />
wise in order to move the switch point<br />
towards the lower flow rate.<br />
d. Turn the potentiometer screw (R1) slowly to<br />
the exact point the green LED extinguishes.<br />
Repeat this procedure several times to<br />
ensure correct adjustment. The adjustment<br />
is now completed.<br />
4. Replace cover and tighten the retaining<br />
screws.<br />
9
GMBH<br />
Strömungswächter<br />
| <strong>SFW</strong>/<strong>SLW120</strong>-E<br />
Wartung | Maintenance – Störungen | Difficulties<br />
7 Wartung<br />
Der Strömungswächter ist wartungsfrei bei Medien,<br />
die sich nicht an den Messfühlern festsetzen.<br />
• Die Messfühler in entsprechenden Erfahrungsintervallen<br />
von Ablagerungen reinigen.<br />
• Hierbei mechanische Verletzungen der Messfühler<br />
vermeiden.<br />
Die Erfahrungsintervalle werden durch periodische<br />
Prüfungen der Fühler festgesetzt.<br />
8 Störungen beseitigen<br />
Störung:<br />
Ungewolltes Ansprechen des Schaltpunktes.<br />
7 Maintenance<br />
<strong>Flow</strong>Vision <strong>Flow</strong> Monitors are virtually maintenance<br />
free. However:<br />
• The monitoring head sensors must be kept free<br />
of deposits.<br />
• Avoid damaging the sensors during cleaning.<br />
When first installed the monitoring head should be<br />
checked periodically to see if cleaning is required<br />
until an operating pattern is established.<br />
8 Operating difficulties<br />
Problem:<br />
Incorrect switching<br />
Beseitigung:<br />
• Bei flüssigen Medien Blasenbildung vermeiden.<br />
• Schaltpunkt auf größeren Abstand zur Normalströmung<br />
legen, besonders bei größeren Temperatur<br />
schwankungen.<br />
• Überprüfen, ob der Strömungswächter entsprechend<br />
den Angaben in Kapitel 3 „Strömungswächter<br />
montieren“ eingebaut ist.<br />
Solution:<br />
• Avoid bubbles in the medium.<br />
• Adjust the switch point to permit a greater differential<br />
from the normal flow rate, particularly<br />
in the event of a wide temperature range in the<br />
medium.<br />
• Ensure monitoring head has been correctly<br />
installed in accordance with chapter 3.<br />
10
<strong>SFW</strong>/<strong>SLW120</strong>-E | <strong>Flow</strong> Monitor<br />
GMBH<br />
11
<strong>Flow</strong>Vision <strong>GmbH</strong><br />
Im Erlet 6<br />
90518 Altdorf<br />
Telefon 0049 (9187) 9 22 93 - 0<br />
Telefax 0049 (9187) 9 22 93 - 29<br />
info@flowvision-gmbh.de<br />
www.flowvision-gmbh.de