AVerVision SPB370 User Manual
AVerVision SPB370 User Manual
AVerVision SPB370 User Manual

Create successful ePaper yourself
Turn your PDF publications into a flip-book with our unique Google optimized e-Paper software.
Name<br />
Function<br />
(16) EFFECT Convert and display the image in BW, Negative or Color in Camera and<br />
Playback mode only.<br />
(17) SPLIT SCRN Turn on/off split screen mode. Split Screen divides the screen into two parts.<br />
One side displays the live image from the <strong>SPB370</strong> camera and the other side<br />
displays the captured images from the memory source in 8-thumbnail<br />
preview.<br />
Use the ▲,▼,◄, &► buttons to make a selection and ENTER to enlarge the<br />
selected image in split screen mode. To horizontally or vertically pan the<br />
enlarged image, use the ◄ & ► or ▲&▼ buttons. To switch to different split<br />
screen type, press MENU, go to SPLIT SCREEN and select between vertical<br />
or horizontal splitting type.<br />
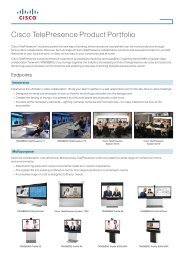
Touch Button Control Panel<br />
The touch button control panel located on the top side of <strong>AVerVision</strong> <strong>SPB370</strong> provides quick<br />
access to commonly used functions.<br />
(1) (2) (3) (4) (5) (6) (7) (8)<br />
POWER<br />
SOURCE<br />
MENU<br />
AUTO IMAGE<br />
CAP/DEL<br />
RGB<br />
CAMERA<br />
FREEZE<br />
ROTATE<br />
TV<br />
PLAYBACK<br />
PC<br />
LAMP<br />
AUTO FOCUS<br />
BRIGHTNESS<br />
(14)<br />
(13) (12) (11)<br />
(10) (9)<br />
Name<br />
Function<br />
(1) POWER Turn the unit on/off.<br />
(2) SOURCE Switch between Camera, Playback, PC mode.<br />
- Camera mode displays the video signal from the built-in camera.<br />
- Playback mode displays the captured image from the memory<br />
source in 16-thumbnail images. Use ▲,▼,◄, & ► buttons or<br />
rotate the shuttle wheel to make a selection and ENTER to display<br />
the selected image in full screen.<br />
Press MENU to display the Playback menu. Select SLIDE SHOW<br />
to start or set the time interval between frames in second,<br />
MEMORY SOURCE to select the image location between the<br />
built-in memory or SD card, and DELETE to permanently remove<br />
the selected image from the selected memory source.<br />
- PC mode displays the video signal from the RGB IN 1 and RGB IN<br />
2 port of <strong>SPB370</strong>. It will first display the signal from RGB IN 1. To<br />
display the signal from RGB IN 2, press the SOURCE button<br />
again. The PC LED light will remain on when it is in PC 1 and PC2.<br />
(3) MENU Pull up and exit the OSD main-menu and sub-menu.<br />
(4) ENTER Make a selection in Playback mode and OSD menu.<br />
(5) AUTO IMAGE Automatically adjust and set the white balance and exposure setting.<br />
(6) FREEZE Toggle to pause or resume the camera.<br />
(7) CAP/DEL - Capture a still image in Camera mode. The captured image is<br />
saved in the selected memory source at 1600 x 1200 resolution<br />
and the built-in memory can store up to 80 images.<br />
- Remove the selected picture from the selected memory source<br />
permanently in Playback mode.<br />
13