Tusk RZR Windshield Instructions - Rocky Mountain ATV/MC
Tusk RZR Windshield Instructions - Rocky Mountain ATV/MC
Tusk RZR Windshield Instructions - Rocky Mountain ATV/MC

Create successful ePaper yourself
Turn your PDF publications into a flip-book with our unique Google optimized e-Paper software.
<strong>Tusk</strong> Teryx Hinged <strong>Windshield</strong> <strong>Instructions</strong><br />
Step 1: Install rubber molding on the bottom of the windshield (fig 1). Fig. 1<br />
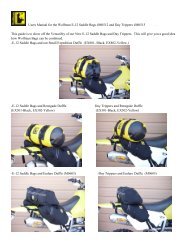
Step 2: Hold windshield up to roll cage to get an idea of where it will<br />
go. Install clamps around roll cage with rubber strap between the clamp<br />
and roll cage. Hinged clamps will be the lower clamps on the roll cage.<br />
Make sure the hinged clamps are installed with the L-bracket to the<br />
front-most part of the machine (see fig. 2). Leave clamps somewhat<br />
loose. Set windshield into place and using hardware provided, mount<br />
the phillips pan headed screw through washer, through L-bracket on<br />
clamp, through windshield, through washer and thread nut on (see fig<br />
2). Leave loose so you can repeat on other side.<br />
Step 3: Next, align upper clamps so they align with the top holes in the<br />
windshield. Loosely thread the knob handled screws into place (see fig.<br />
3).<br />
Fig. 2<br />
Fig.3<br />
Step 4: When you have mounted all of the clamps and everything is lined up, gradually tighten all bolts starting with<br />
the bolts on the windshield. Make sure the clamps are aligned with the windshield as to not put the windshield on a<br />
bind.<br />
Step 5: Now that the windshield is secure you can remove the knob handled screws and fold the windshield down to<br />
see where to mount the windshield standoff (see fig. 4).<br />
Fig. 4<br />
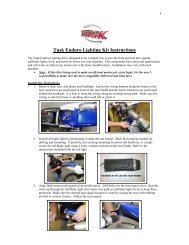
Step 6: Mark where you will need to drill the holes to mount the<br />
standoff. Using 9/64” drill bit, drill holes where you marked the<br />
standoff in its correct position.<br />
Step 7: Install phillips pan headed screws through standoff, through<br />
hood and thread nut on.<br />
Step 8: Check your work. Ensure all mounting hardware is tight and<br />
secure.
Parts List<br />
Hinged clamps (2)<br />
Stop clamps (2)<br />
Rubber straps (4)<br />
Rubber molding strip (1)<br />
Phillips pan head screws (4)<br />
Hex flanged nuts (4)<br />
Flat M6 washers (4)<br />
Knob handled screws (3)<br />
Standoff mount (1)