Shure MX690 User Guide (English) - All Pro Sound
Shure MX690 User Guide (English) - All Pro Sound
Shure MX690 User Guide (English) - All Pro Sound

Create successful ePaper yourself
Turn your PDF publications into a flip-book with our unique Google optimized e-Paper software.
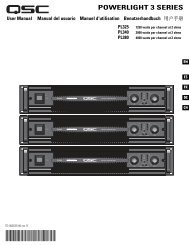
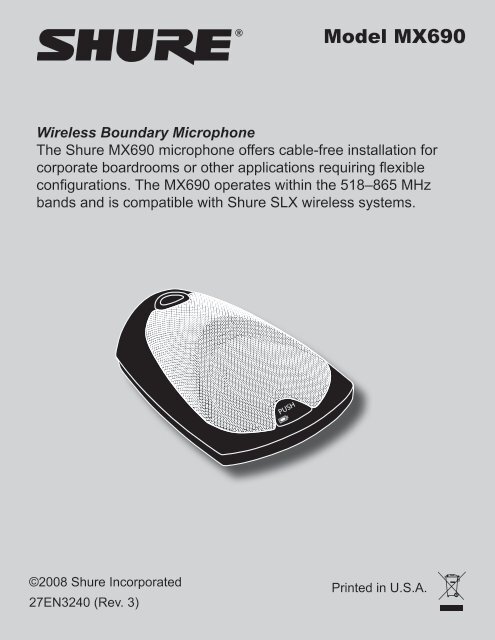
Model <strong>MX690</strong><br />
Wireless Boundary Microphone<br />
The <strong>Shure</strong> <strong>MX690</strong> microphone offers cable-free installation for<br />
corporate boardrooms or other applications requiring flexible<br />
configurations. The <strong>MX690</strong> operates within the 518–865 MHz<br />
bands and is compatible with <strong>Shure</strong> SLX wireless systems.<br />
©2008 <strong>Shure</strong> Incorporated<br />
27EN3240 (Rev. 3)<br />
Printed in U.S.A.
Features<br />
• Sleek, low profile design<br />
•<br />
• IR link to SLX receiver for automatic frequency<br />
synchronization<br />
•<br />
• <strong>Pro</strong>grammable mute function<br />
• Operates on two AA batteries<br />
•<br />
•<br />
Frequency agile, microprocessor controlled transmitter<br />
<strong>Pro</strong>grammable frequency Group/Channel display<br />
Compatible with all <strong>Shure</strong> SLX Wireless systems<br />
Commshield technology for protection from RF interference<br />
2
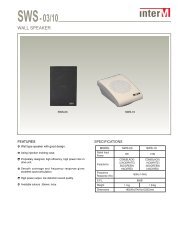
Microphone Placement<br />
Place the <strong>MX690</strong> within 1.5 m (5 ft.) of a talker. Aim the<br />
microphone toward the talkers and away from loudspeakers and<br />
noise sources. Use one microphone for every two talkers. Pickup<br />
angle with a cardioid cartridge is 130° at –3 dB.<br />
Note: To minimize RF interference, maintain a distance of at<br />
least 0.3 m (1 ft.) between transmitters. In case of interference,<br />
increase the distance between transmitters or change channels.<br />
130º<br />
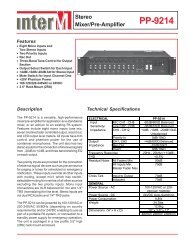
Receiver<br />
Make sure the receiver is within sight of the transmitter. Do not<br />
place receiver behind a metal barrier or any reflective surface.<br />
Refer to the SLX Wireless System <strong>User</strong> <strong>Guide</strong> for more<br />
information, or visit www.shure.com.<br />
30m (100ft)<br />
3
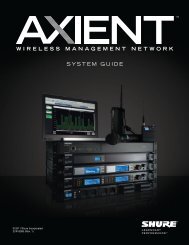
Low-Cut Filter<br />
The low-cut filter attenuates frequencies<br />
below 150 Hz by 6 dB per octave.<br />
Filter disabled (as supplied)<br />
Low-cut filter<br />
4
Battery<br />
Installation<br />
1. Open the battery compartment<br />
as shown.<br />
2. Insert two1.5V “AA” batteries.<br />
Make sure the +/– terminals<br />
are properly oriented.<br />
Note: Alkaline batteries last up to<br />
8 hours. Rechargeable, carbonzinc<br />
and zinc-chloride batteries<br />
provide less operating time.<br />
Power Meter<br />
The battery meter on the<br />
LCD shows remaining<br />
battery life.<br />
Low Power Indicator<br />
Steady Red: Power<br />
low. Replace batteries<br />
immediately<br />
Pulsing Red: Batteries<br />
dead. Transmitter cannot be<br />
turned on until batteries are<br />
replaced.<br />
5
Power On/Off<br />
1. Press and hold the ON/OFF PROGRAM button for<br />
approximately 2 seconds. The LCD illuminates.<br />
2. To turn the transmitter off, press and hold the ON/OFF<br />
PROGRAM button again.<br />
Note: Use the button on the bottom of the transmitter to power it<br />
on without opening the battery compartment.<br />
6
Mute Button<br />
The mute button can be configured for toggle or momentary<br />
operation.<br />
Toggle (as supplied)<br />
The PUSH button toggles the microphone between active and<br />
muted states.<br />
NOTE: The microphone always powers up in the active state.<br />
Momentary<br />
There are two types of momentary operation:<br />
Push-to-Mute: The microphone is muted only while the button is<br />
pressed and held.<br />
Push-to-Talk: The microphone is active only while the button is<br />
pressed and held.<br />
To change between toggle and momentary:<br />
Hold the PUSH button and<br />
press the SELECT button. Hold<br />
(Test the microphone to<br />
confirm the change.)<br />
To change between push-to-talk and push-to-mute:<br />
1. Set the button for<br />
momentary operation. Hold<br />
2. Hold the SELECT button<br />
and press the PUSH button.<br />
7
Mute Indicator<br />
The bi-color LED on the top of the microphone indicates whether<br />
the microphone is active or muted.<br />
The LED can also be set to flash when muted.<br />
Display Mode<br />
Steady<br />
(as supplied)<br />
Flashing<br />
Status Indicator<br />
Active = Green<br />
Muted = Red<br />
Active = Green<br />
Muted = Flashing Green<br />
To toggle between off and flashing, press PUSH and ON/OFF<br />
PROGRAM simultaneously.<br />
+<br />
8
Locking Settings<br />
Press ON/OFF PROGRAM and<br />
SELECT simultaneously to lock<br />
or unlock transmitter settings.<br />
When locked, the current<br />
settings cannot be manually<br />
changed.<br />
Note: Locking the transmitter<br />
settings does not disable IR<br />
frequency synchronization or<br />
the High Pass/Low Cut filter.<br />
LOGIC MODE<br />
To use with a logic enabled<br />
receiver, you must perform<br />
an automatic sync. The LCD<br />
flashes “log” during sync. Once<br />
in logic mode, the LCD flashes<br />
“log” when powered up.<br />
9
Automatic Frequency Synchronization<br />
1. Power off all transmitters.<br />
2. Power on all receivers.<br />
3. Begin with the first transmitter. Open the battery cover and<br />
power it on.<br />
4. Aim the IR sensor at the first receiver IR port. The transmitter<br />
should be no more than 15 cm (6 in.) from the receiver. Press<br />
and hold the receiver SYNC button to send group and channel<br />
data to the transmitter. The red LED on the transmitter will stop<br />
flashing when programming is complete.<br />
5. Power off the first transmitter and repeat the synchronization<br />
with each additional transmitter and receiver pair.<br />
Manual Frequency Synchronization<br />
1. Press and hold the transmitter SELECT button until the desired<br />
group number appears.<br />
2. Press SELECT again and release it when the desired channel<br />
number appears.<br />
10
Tips for Optimum Performance<br />
• Maintain a direct line of sight between the transmitter and<br />
receiver antennas.<br />
• Avoid placing the transmitter on metal surfaces.<br />
• Avoid placing laptop computers or other obstructions in front<br />
of the microphone during use.<br />
• Only use with a <strong>Shure</strong> SLX4 wireless receiver.<br />
Troubleshooting<br />
If you encounter difficulty with the SLX Wireless System:<br />
• Make sure both the transmitter and the receiver are turned on.<br />
• Replace the battery if the battery LED is red.<br />
• Make sure the Group/Channel settings for each transmitterreceiver<br />
pair are identical.<br />
• Make sure there is an unobstructed line of sight between the<br />
transmitter and receiver.<br />
• If necessary, reposition the receiver or decrease the distance<br />
between transmitter and receiver.<br />
• Remove local sources of RF interference, such as computers<br />
or lighting equipment.<br />
• Remove metal objects within 0.3 m (1 ft.) of the transmitter<br />
Note: Refer to the SLX Wireless System <strong>User</strong> <strong>Guide</strong> for<br />
complete troubleshooting procedures.<br />
11
Frequency Selection<br />
<strong>Shure</strong> offers wireless systems in a selection of bands that<br />
conform to the different government regulations of specific<br />
nations or geographic regions. These regulations help limit radio<br />
frequency (RF) interference among different wireless devices and<br />
prevent interference with local public communications channels,<br />
such as television and emergency broadcasts.<br />
The system’s band and frequency range are identified on the<br />
receiver and transmitter. For example, “H4 518-578 MHz.”<br />
For information on bands available in your area, consult your<br />
local dealer or phone <strong>Shure</strong>. More information is also available at<br />
<strong>Shure</strong>’s website (www.shure.com).<br />
Licensing<br />
Licensing of <strong>Shure</strong> wireless microphone equipment is the<br />
user’s responsibility, and licensability depends on the user’s<br />
classification and application, and on the selected frequency.<br />
<strong>Shure</strong> strongly urges the user to contact the appropriate<br />
telecommunications authority concerning proper licensing, and<br />
before choosing and ordering frequencies.<br />
Changes or modifications not expressly approved by <strong>Shure</strong><br />
Incorporated could void your authority to operate this equipment.<br />
12
Frequency Bands<br />
Band Range Output<br />
H5 518–542 MHz 10 mW<br />
J3 572–596 MHz 28 mW<br />
L4 638–662 MHz 10 mW<br />
P4 702–726 MHz 10 mW<br />
R13 794–806 MHz 10 mW<br />
R5 800–820 MHz 10 mW<br />
S6 838–865 MHz 10 mW<br />
JB 806–810 MHz 10 mW<br />
Q4 740–752 MHz 10 mW<br />
G4 470–494 MHz 10 mW<br />
G5 494–518 MHz 10 mW<br />
Note: This radio apparatus may be capable of operating on some<br />
frequencies not authorized in your region. Please contact your<br />
national authority to obtain information on authorized frequencies<br />
for wireless microphone products in your region.<br />
13
Master List Frequencies<br />
The Master List is an index of all frequencies in a band, including<br />
those not assigned to a Group or Channel. The Master List can<br />
only be accessed through the receiver, so the transmitter must<br />
be synchronized via the IR port. When a Master List frequency is<br />
in use, “MASTER LIST” appears on the display. Refer to the SLX<br />
Wireless System <strong>User</strong> <strong>Guide</strong> for more information.<br />
Note: Wireless devices such as cellular phones and two-way<br />
radios may interfere with wireless microphones. Keep these and<br />
other potential sources of interference away from the transmitters<br />
and receivers.<br />
14
Transmitter Specifications<br />
Operating Range<br />
30 m (100 ft.)<br />
Note: Actual range depends on RF signal absorption,<br />
reflection, and interference<br />
Frequency Stability<br />
±10 ppm<br />
Maximum Frequency Deviation<br />
45 kHz<br />
Oscillator Type<br />
Phase-locked loop (PLL) controlled synthesizer<br />
Power Requirements<br />
3V (2 AA alkaline or rechargeable batteries)<br />
Battery Life<br />
≥8 hours (alkaline)<br />
Power Consumption<br />
130 mA, ±15 mA<br />
Operating Temperature Range<br />
-18–57 °C (0–135 °F)<br />
Note: Battery may limit this range<br />
Dimensions<br />
43 mmH x 87 mmW x 148 mmD (1 11/16 x 3 3/8 x 5 13/16 in.)<br />
Weight<br />
Net: 318 g (11.2 oz)<br />
Packaged: 516 g (18.2 oz)<br />
15
Microphone Specifications<br />
Type<br />
Condenser (electret bias)<br />
Frequency Response<br />
50–17000 Hz<br />
Polar Pattern (at 1 kHz)<br />
Cardioid<br />
Sensitivity (at 1 kHz , open circuit voltage)<br />
–33 dBV/Pa (22 mV)<br />
1 Pascal=94 dB SPL<br />
Dynamic Range (1 kΩ load at 1 kHz)<br />
96 dB<br />
Common Mode Rejection (10 Hz to 100 kHz)<br />
45 dB minimum<br />
Preamplifier Output Clipping Level (1% THD)<br />
–6 dBV (0.5 V)<br />
Polarity<br />
Positive sound pressure on diaphragm produces positive<br />
voltage on pin 2 relative to pin 3 of output XLR connector or tip<br />
of 1/4” phone plug.<br />
16
Certification<br />
Certified to FCC Part 74 (FCC ID: DD4<strong>MX690</strong>).<br />
Certified by IC in Canada under RSS-123 and RSS-102 (IC:<br />
616A-<strong>MX690</strong>).<br />
Meets essential requirements of the European R&TTE Directive<br />
99/5/EC (ETSI EN 300-422 Parts 1 & 2, EN 301 489 Parts 1 & 9)<br />
and eligible to carry the CE marking.<br />
Changes or modifications not expressly approved by <strong>Shure</strong><br />
Incorporated could void your authority to operate this equipment.<br />
18
EU Declaration of Conformity<br />
EU DECLARATION OF CONFORMITY<br />
We,<br />
of<br />
<strong>Shure</strong> Incorporated<br />
5800 Touhy Avenue<br />
Niles, Illinois, 60714-4608 U.S.A.<br />
Phone: (847) 600-2000<br />
Web: www.<strong>Shure</strong>.com<br />
Declare under our sole responsibility that the following product<br />
Model: <strong>MX690</strong><br />
Description: Wireless Microphone Transmitter<br />
conforms to the essential requirements and other relevant previsions of the R&TTE<br />
Directive (1999/5/EC).<br />
The product complies with the following product family, harmonized or national<br />
standards:<br />
EN 301 489-1 V1.4.1 (2002-08)<br />
EN 301 489-9 V1.2.1 (2002-08)<br />
EN 300 422-1 V1.2.2 (2000-08)<br />
EN 300 422-2 V1.1.1 (2000-08)<br />
The technical documentation is kept at:<br />
<strong>Shure</strong> Incorporated, Corporate Quality Engineering Division<br />
SHURE Europe GmbH, EMEA Approval<br />
Manufacturer: <strong>Shure</strong> Incorporated<br />
Signed: __________________________________ Date: 20 December 2006<br />
Name and Title: Craig Kozokar, EMC <strong>Pro</strong>ject Engineer, Corporate Quality Engineering<br />
Division<br />
European Representative: SHURE Europe GmbH<br />
Signed: __________________________________ Date: 20 December 2006<br />
Name and Title: Wolfgang Bilz, Dipl. Ing. (FH), EMEA Approval<br />
SHURE Europe GmbH<br />
Headquarters Europe, Middle East & Africa<br />
Wannenäcker Str. 28<br />
D-74078 Heilbronn, Germany<br />
Phone: +49 - (0)7131 - 7214 - 0<br />
Fax: +49 - (0)7131 - 7214 - 14<br />
19
SHURE Incorporated http://www.shure.com<br />
United States, Canada, Latin America, Caribbean:<br />
5800 W. Touhy Avenue, Niles, IL 60714-4608, U.S.A.<br />
Phone: 847-600-2000 U.S. Fax: 847-600-1212 Int’l Fax: 847-600-6446<br />
Europe, Middle East, Africa:<br />
<strong>Shure</strong> Europe GmbH, Phone: 49-7131-72140 Fax: 49-7131-721414<br />
Asia, Pacific:<br />
<strong>Shure</strong> Asia Limited, Phone: 852-2893-4290 Fax: 852-2893-4055