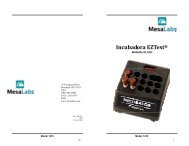
1450 Incubator Manual English - Mesa Labs
1450 Incubator Manual English - Mesa Labs
1450 Incubator Manual English - Mesa Labs

Create successful ePaper yourself
Turn your PDF publications into a flip-book with our unique Google optimized e-Paper software.
Installation and Warm Up<br />
This page intentionally blank.<br />
The inc ubator is designed for continuous opera<br />
tion and does not have a<br />
power switch. The incubator will power on<br />
when it is<br />
plugged into a<br />
power source.<br />
<br />
Note: the incubator must be installed in a location where temperature is<br />
maintained between 10°C (50°F) and 35°C (95°F).<br />
1. Remove the incubator from its packaging.<br />
2. Unpack the power supply. The power supply includes four<br />
interchangeable blades (plugs). Select the appropriate blades<br />
for your region and attach the blades to the power supply.<br />
3. Plug the power supply into a power source.<br />
4. Insert the small connector from the power supply into the<br />
matching receptical in the back of the incubator (see Figure 1).<br />
5. The incubator will automatically power on and perform a selfwill<br />
be<br />
test. Upon completion, the installed firmware revision<br />
displayed on the LED screen for two seconds.<br />
6. The incubator will begin its warm-up phase. During this time<br />
the configured temperature setpoint will fade in and out on the<br />
LED screen.<br />
7. The incubator is ready to use when the configured setpoint is<br />
no longer fading in and out, and the LED screen displays the<br />
current operating temperature of the incubator.<br />
<br />
Note: it may take approximately 30 minutes for the incubator to warm up to<br />
operating temperature, depending on the selected incubation temperature and<br />
the temperature of the environment in which the incubator is installed.<br />
Model <strong>1450</strong><br />
6<br />
Model <strong>1450</strong><br />
15