1450 Incubator Manual English - Mesa Labs
1450 Incubator Manual English - Mesa Labs
1450 Incubator Manual English - Mesa Labs

Create successful ePaper yourself
Turn your PDF publications into a flip-book with our unique Google optimized e-Paper software.
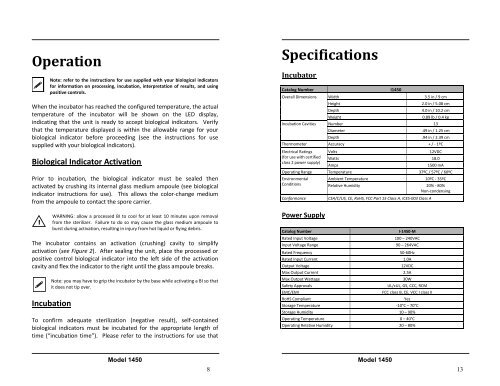
Operation<br />
<br />
<br />
Note: refer to the instructions for use supplied with your biological indicators<br />
for information on processing, incubation, interpretation of results, and using<br />
positive controls.<br />
When the incubator has reached the configured temperature, the actual<br />
temperature of the incubator will be shown on the LED display,<br />
indicating that the unit is ready to accept biological indicators. Verify<br />
that the temperature displayed is within the allowable range for your<br />
biological indicator before proceeding (see the instructions for use<br />
supplied with your biological indicators).<br />
B iological Indicator Activation<br />
Prior to incubation, the biological indicator must be sealed then<br />
activated by crushing its internal glass medium ampoule (see biological<br />
indicator instructions for use). This allows the color-change medium<br />
from the ampoule to contact the spore carrier.<br />
!<br />
WARNING: allow a processed BI to cool for at least 10 minutes upon removal<br />
from the sterilizer. Failure to do so may cause the glass medium ampoule to<br />
burst during activation, resulting in injury from hot liquid or flying debris.<br />
The incubator contains an activation (crushing) cavity to simplify<br />
activation (see Figure 2). After sealing the unit, place the processed or<br />
positive control biological indicator into the left side of the activation<br />
cavity and flex the indicator to the right until the glass ampoule breaks.<br />
Note: you may have to grip the incubator by the base while activating a BI so that<br />
it does not tip over.<br />
Incubation<br />
To confirm adequate sterilization (negative result), self-contained<br />
biological indicators must be incubated for the appropriate length of<br />
time (“incubation time”). Please refer to the instructions for use that<br />
Specifications<br />
<strong>Incubator</strong><br />
Catalog Number<br />
Overall Dimensions<br />
Incubation Cavities<br />
I<strong>1450</strong><br />
Width<br />
3.5 in / 9 cm<br />
Height<br />
2.0 in / 5.08 cm<br />
Depth<br />
4.0 in / 10.2 cm<br />
Weight<br />
0.89 lb / 0.4 kg<br />
Number 13<br />
Diameter<br />
.49 in / 1.25 cm<br />
Depth<br />
.94 in / 2.39 cm<br />
Thermometer Accuracy + / - 1ºC<br />
Electrical Ratings Volts<br />
12VDC<br />
(for use with certified Watts 18.0<br />
class 2 power supply)<br />
Amps<br />
1500 mA<br />
Operating Range Temperature 37ºC / 57ºC / 60ºC<br />
Environmental<br />
Ambient Temperature 10ºC - 35ºC<br />
Conditions<br />
Relative Humidity 20% - 80%<br />
Non-condensing<br />
Conformance<br />
CSA/C/US, CE, RoHS, FCC Part 15 Class A, ICES-003 Class A<br />
Power Supply<br />
Catalog Number<br />
I-<strong>1450</strong>-M<br />
Rated Input Voltage 100 – 240VAC<br />
Input Voltage Range 90 – 264VAC<br />
Rated Frequency<br />
50-60Hz<br />
Rated Input Current 1.0A<br />
Output Voltage<br />
12VDC<br />
Max Output Current 2.5A<br />
Max Output Wattage<br />
30W<br />
Safety Approvals<br />
UL/cUL, GS, CCC, RCM<br />
EMC/EMI<br />
FCC class B, CE, VCC I class II<br />
RoHS Compliant<br />
Yes<br />
Storage Temperature -10°C – 70°C<br />
Storage Humidity 10 – 90%<br />
Operating Temperature 0 – 40°C<br />
Operating Relative Humidity 20 – 80%<br />
Model <strong>1450</strong><br />
8<br />
Model <strong>1450</strong><br />
13