Sorelle Tuscany 4-in-1 Convertible Crib and Changer ... - Hayneedle
Sorelle Tuscany 4-in-1 Convertible Crib and Changer ... - Hayneedle
Sorelle Tuscany 4-in-1 Convertible Crib and Changer ... - Hayneedle

You also want an ePaper? Increase the reach of your titles
YUMPU automatically turns print PDFs into web optimized ePapers that Google loves.
<strong>Sorelle</strong><br />
By <strong>Sorelle</strong> - A Division of C&T International, Inc.<br />
46 Whelan Road East Rutherford N J. 07073 U S A<br />
Tel, +1(201)531 1919 Fax,+1(201)531 1920<br />
1050<br />
CRIB AND MORE<br />
Important Information:<br />
Before assembly, read these <strong>in</strong>structions. Make sure<br />
all preassembled parts are tight. Store this <strong>in</strong>struction<br />
manual <strong>in</strong> envelope (attached to mattress support<br />
tube) for future reference.<br />
Made <strong>in</strong> Ch<strong>in</strong>a
CRIB WARNINGS<br />
!<br />
WARNING -<br />
• Read all <strong>in</strong>structions before assembl<strong>in</strong>g crib. KEEP INSTRUCTIONS FOR FUTURE USE. DO NOT<br />
USE THIS CRIB IF THE INSTRUCTIONS CANNOT BE STRICTLY FOLLOWED.<br />
!<br />
WARNING -<br />
WARNING<br />
• To reduce the risk of SIDS, pediatricians recommend healthy <strong>in</strong>fants be placed on their backs to sleep,<br />
unless otherwise advised by your physician.<br />
• Before each usage or assembly, <strong>in</strong>spect crib for damaged hardware, loose jo<strong>in</strong>ts, miss<strong>in</strong>g parts or<br />
sharp edges. DO NOT use crib is any parts are miss<strong>in</strong>g or broken. Ask your dealer or write to C&T<br />
Internat<strong>in</strong>oal/<strong>Sorelle</strong> for replacement parts <strong>and</strong> <strong>in</strong>structional literature if needed. DO NOT substitute<br />
parts.<br />
• DO NOT use a water mattress with this crib.<br />
• Never use plastic shipp<strong>in</strong>g bags or other plastic film as mattress covers because they can cause<br />
suffocation.<br />
• If ref<strong>in</strong>ish<strong>in</strong>g, use a non-toxic f<strong>in</strong>ish specified for children’s products.<br />
• The product <strong>in</strong>clud<strong>in</strong>g side rails must be erected prior to use.<br />
• Always provide the supervision necessary for the cont<strong>in</strong>ued safety of your child. When used for<br />
play<strong>in</strong>g, never leave child unattended.<br />
STRANGULATION HAZARD<br />
Failure to follow these warn<strong>in</strong>gs <strong>and</strong> assembly <strong>in</strong>structions<br />
could result <strong>in</strong> serious <strong>in</strong>jury or death.<br />
• To help prevent stangulation tighten all fasteners .<br />
• A child can trap parts of the body or cloth<strong>in</strong>g on loose fasteners .<br />
• Str<strong>in</strong>gs can cause strangulation! DO NOT place items with a str<strong>in</strong>g around a child’s neck, such as<br />
hood str<strong>in</strong>gs or pacifier cords. DO NOT suspend str<strong>in</strong>gs over a crib or attach str<strong>in</strong>gs to toys.<br />
• DO NOT place crib near w<strong>in</strong>dow where cords from bl<strong>in</strong>ds or drapes may strangle a child. Child may<br />
fall out of w<strong>in</strong>dow. DO NOT place cords, straps or similar items that could become wound around<br />
the child’s neck <strong>in</strong> or near the crib.<br />
FALL HAZARD<br />
Infants can suffocate <strong>in</strong> gaps between a mattress too small or too<br />
thick <strong>and</strong> product sides. On soft bedd<strong>in</strong>g, NEVER add a mattress,<br />
pillow, comforter, or padd<strong>in</strong>g.<br />
• When child is able to pull to a st<strong>and</strong><strong>in</strong>g position, set matter to lowest position <strong>and</strong> remove bumper<br />
pads, large toys <strong>and</strong> other objects that could serve as steps for climb<strong>in</strong>g out.”<br />
• When child is able to climb out or reaches the height of 35 <strong>in</strong>. (90 cm), the crib shall no longer be<br />
used <strong>and</strong> can be converted to the transitional bed.<br />
CAUTION : ANY MATTRESS USED IN THIS CRIB MUST<br />
BE AT LEAST 24” (61CM) x 38” (96.5CM) WITH A<br />
THICKNESS NOT EXCEEDING 6” (15CM).<br />
• Ensure a safe environment for your child by check<strong>in</strong>g regularly, (that every component is properly<br />
<strong>and</strong> securely <strong>in</strong> place) before plac<strong>in</strong>g your child <strong>in</strong> the crib. Make sure that all bolts <strong>and</strong> fasteners<br />
are tight.<br />
2
CHANGING TABLE WARNINGS<br />
! WARNING -<br />
• FALL HAZARD—to prevent death or serious <strong>in</strong>jury, always keep child with<strong>in</strong> arm’s reach. Never leave<br />
child unattended.<br />
• Read all <strong>in</strong>structions before use of the chang<strong>in</strong>g table. Keep <strong>in</strong>structions for future use.<br />
• Check all screws <strong>and</strong> bolts <strong>and</strong> make sure they are tight before us<strong>in</strong>g. From time to time check over<br />
your Chang<strong>in</strong>g Table. You should never use it if parts are miss<strong>in</strong>g or broken,<br />
• Use only the pad provided by the manufacturer.<br />
• DO NOT use the chang<strong>in</strong>g table if it is damaged or broken.<br />
• Maximum weight of child: 25 lbs. (11.4 kg)<br />
Failure to follow these warn<strong>in</strong>gs <strong>and</strong> assembly <strong>in</strong>structions<br />
could result <strong>in</strong> serious <strong>in</strong>jury or death.<br />
• Always secure the pad provided to the chang<strong>in</strong>g surface by <strong>in</strong>sert<strong>in</strong>g the safety belt through the slot<br />
<strong>in</strong> the chang<strong>in</strong>g pad. Always use the restra<strong>in</strong><strong>in</strong>g strap provided<br />
CLEANING & MAINTENANCE<br />
• ALWAYS STORE THE CRIB & CHANGING TABLE IN A CLEAN AND DRY PLACE.<br />
• TO CLEAN YOUR CRIB & CHANGING TABLE, USE A SOFT DAMP CLOTH WITH A SMALL<br />
AMOUNT OF MILD SOAP, WIPE IMMEDIATELY WITH A DRY CLOTH.<br />
• DO NOT USE ABRASIVES OR DETERGENT ON CRIB & CHANGING TABLE SURFACES.<br />
• REGULARLY CHECK ALL SCREWS AND FITTINGS TO ENSURE THEY ARE TIGHT.<br />
• THE IDEAL BALANCE IS TO MAINTAIN THE TEMPERATURE AROUND 21°C (70°F) AND THE<br />
RELATIVE HUMIDITY AT 40% TO PREVENT WARPING OR SPLITTING.<br />
3
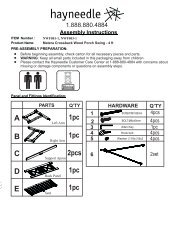
Parts List<br />
<strong>Crib</strong> Assembly<br />
(A1) Left Side Rail (x1)<br />
(B1) Back Side Rail (x1)<br />
(C1) Front Side Rail (x1)<br />
(D1) (x14)<br />
(E1) Front & Back Contoured Top (x2)<br />
(F1) Rear Leg (x1)<br />
(G1) Front Leg (x1)<br />
(H1) (x2)<br />
Allen Wrench<br />
(I1) (x2)<br />
(X1) Dowel P<strong>in</strong> (x4)<br />
Mattress Support Assembly Parts<br />
Allen Wrench<br />
(Q) Bolt with Loctite®<br />
Threadlocker Blue (x4)<br />
PARTS LIST<br />
4
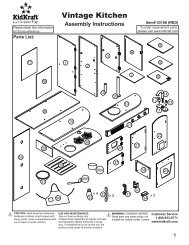
Parts List<br />
Dresser Assembly<br />
v<br />
L<br />
(C-1)Suppor<br />
(C-2)Suppor<br />
r<br />
v<br />
M<br />
(C-3)Suppor<br />
(C-4)Lar<br />
r<br />
r<br />
zer T<br />
r<br />
r z M<br />
(C-5)Lar<br />
r<br />
T r v<br />
2<br />
(C-6)Lar<br />
r<br />
r<br />
v<br />
(C-7)Dec<br />
ra v<br />
r<br />
r<br />
Fr<br />
t<br />
J<br />
rack<br />
rt<br />
W<br />
r<br />
PARTS LIST<br />
5
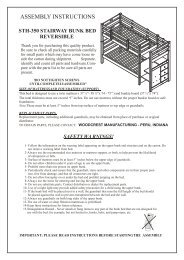
Parts List<br />
Additional Assemblies<br />
(D2)<br />
(B2)<br />
(A2)<br />
(E2)<br />
(A2) Drawer Bottom (x3)<br />
(B2) Drawer Back (x3) (G2)<br />
(C2) Drawer Left (x3) Phillips Screw<br />
(D2) Drawer Right (x3) Long (x24)<br />
(E2) Knob (x3)<br />
(F2) Drawer Front (x3) (H2)<br />
Screw for<br />
(I2)<br />
Knob (x3)<br />
Screwdriver<br />
(C2)<br />
(F2)<br />
Screws shown at actual size.<br />
Full Size Headboard Parts<br />
(L) Rear Dresser Leg (x1)<br />
(M) Front Foot Board Leg (x1)<br />
PARTS LIST<br />
6
Parts Needed: Refer to pg. 6, “Drawer Parts”<br />
1. Work<strong>in</strong>g on a padded<br />
flat surface, attach Drawer<br />
Sides (C2 &D2) to Drawer<br />
Back (B2) with Philips Head<br />
Screw. Figure 1.<br />
1<br />
(C2)<br />
Drawer Assembly<br />
(B2)<br />
Grooves<br />
(D2)<br />
2. Slide Drawer<br />
Bottom (A2) <strong>in</strong>to drawer<br />
assembly. Figure 2.<br />
2<br />
(A2)<br />
3. Secure both sides of<br />
Drawer Front (F2) to drawer<br />
assembly with four (4)<br />
Screws (G2). Figure 3.<br />
3<br />
(G2)<br />
(G2)<br />
(F2)<br />
Check all screws for<br />
tightness.<br />
(G2)<br />
(G2)<br />
4. Us<strong>in</strong>g Drawer Knob<br />
Screw (H2), <strong>in</strong>stall one (1)<br />
Knob (E2) on Drawer.<br />
Figure 4.<br />
4<br />
Repeat for all drawers.<br />
Set drawers aside for<br />
later use.<br />
(E2)<br />
(H2)<br />
(H2)(x3)<br />
(G2) (x24)<br />
(E2) (x3)<br />
ASSEMBLY<br />
7
Parts Needed: Refer to pg. 5, “Dresser Parts”<br />
1<br />
2<br />
(A)<br />
(A)<br />
(F)<br />
(C-3)<br />
(C-5)<br />
1. Insert Wooden Notch of Support Bar (C-3) <strong>in</strong>to<br />
open<strong>in</strong>g on front side of Middle Panel (A) <strong>and</strong><br />
secure with Bolt (F). Figure 1.<br />
2. Insert two (2) wooden pegs on Support Bar<br />
(C-5) <strong>in</strong>to open<strong>in</strong>gs on Middle Panel (A). Figure 2.<br />
NOTE: Grooves face towards back of unit.<br />
3<br />
4<br />
(F)<br />
(A)<br />
(F)<br />
(A)<br />
(C-7)<br />
(C-6)<br />
(F)<br />
3. Insert wooden notch on Rear Support Bar (C-6)<br />
<strong>in</strong>to open<strong>in</strong>gs on Middle Panel (A) <strong>and</strong> secure<br />
with Bolt (F). Figure 3.<br />
(F) (x4)<br />
4. Insert wooden notch on Decorative<br />
Support Bar (C-7) <strong>in</strong>to open<strong>in</strong>gs on Middle Panel<br />
(A) <strong>and</strong> secure top <strong>and</strong> bottom of bar us<strong>in</strong>g two<br />
(2) Bolts (F). Figure 4.<br />
ASSEMBLY<br />
8
5<br />
6<br />
(F)<br />
(D)<br />
(H)<br />
(A)<br />
(E)<br />
(A)<br />
(C-3)<br />
(F)<br />
(C-4)<br />
5. Insert wooden peg on Small Front Support Bar<br />
(H) <strong>in</strong>to open<strong>in</strong>g <strong>and</strong> (C-4) on Middle Side Panel<br />
(A) <strong>and</strong> secure with Bolt (F). Figure 5 .<br />
(C-2)<br />
6. Lay Middle Panel (A) on its side. Insert<br />
Front Support Bar w/groove (C-2) <strong>in</strong>to notch<br />
on Middle Panel (A) <strong>and</strong> slide Dresser Top (E)<br />
<strong>in</strong>to top grooves. Slide Organizer Middle (D)<br />
<strong>in</strong>to grooves. Figure 6.<br />
7<br />
8<br />
(B)<br />
(I)<br />
(C-1)<br />
(A)<br />
7. Insert Bottom Shelf (I) <strong>in</strong>to grooves on middle<br />
<strong>and</strong> back bottom braces. Figure 7.<br />
(F) (x2)<br />
8. Insert Support Bar Solid Ends (C-1) <strong>and</strong> attach<br />
Right End (B) with each support bar on Left Side<br />
Rail (A). Figure 8.<br />
ASSEMBLY<br />
9
9<br />
(F)<br />
(B)<br />
(F)<br />
(F)<br />
(F)<br />
(F)<br />
(F)<br />
9. Secure Right End (B) with six(6) Bolts (F) to<br />
supoort bars. Figure 9.<br />
(F) (x6)<br />
ASSEMBLY<br />
10
<strong>Crib</strong> Assembly<br />
1<br />
(I1)<br />
(A1)<br />
2<br />
(B1)<br />
(X1)<br />
(I1)<br />
(X1)<br />
(F1)<br />
(G1)<br />
(H1)<br />
(H1)<br />
1. Us<strong>in</strong>g two (2) Bolts (H1) <strong>and</strong> two (2) Bolts<br />
(I1), assemble Front Leg (G1) <strong>and</strong> Rear Leg (F1)<br />
to Left Side Rail (A1). Make sure all mattress<br />
support holes are fac<strong>in</strong>g <strong>in</strong>. Figure 1.<br />
3<br />
2. Dowel P<strong>in</strong> Assembly<br />
Slide one (1) Dowel P<strong>in</strong> (X1) <strong>in</strong>to each end of<br />
Back Side Rail (B1) (total of 2). Figure 2.<br />
4<br />
(D1)<br />
(B1)<br />
(B1)<br />
(D1)<br />
(A1)<br />
(D1)<br />
3. Attach Back Side Rail (B1) to Left Side Rail<br />
(A1) with two (2) Bolts (D1). Figure . 3<br />
(D1)<br />
4. Attach Back Side Rail (B1) to Chang<strong>in</strong>g Table<br />
with two (2) Bolts (D1). Figure . 4<br />
(H1) (x2)<br />
(I1) (x2)<br />
(D1) (x4)<br />
(X1) (x2)<br />
ASSEMBLY<br />
11
Attach<strong>in</strong>g Mattress Support<br />
5<br />
6<br />
(Q)<br />
(Q)<br />
(Q)<br />
(Q)<br />
5. Attach completed Mattress Support Assembly<br />
to crib us<strong>in</strong>g four (4) Bolts with Loctite®<br />
Threadlocker Blue (Q). Figure 5 & Figure 6.<br />
NOTE: For <strong>in</strong>fants, set mattress support<br />
assembly <strong>in</strong> an upper position for greater<br />
accessibility. As child grows <strong>and</strong> can st<strong>and</strong>,<br />
mattress support assembly must be lowered.<br />
See Warn<strong>in</strong>g Statements.<br />
7<br />
(C1)<br />
(X1)<br />
8<br />
(D1)<br />
(D1)<br />
(A1)<br />
(X1)<br />
(D1)<br />
(D1)<br />
(C1)<br />
7. Dowel P<strong>in</strong> Assembly<br />
Slide one (1) Dowel P<strong>in</strong> (X1) <strong>in</strong>to each end of<br />
Front Side Rail (C1) (total of 2). Figure 7.<br />
8. Attach Front Side Rail (C1) by thread<strong>in</strong>g two<br />
(2) Bolts (D1) through Left Side Rail (A1) <strong>and</strong> two<br />
(2) Bolts (D1) through <strong>in</strong>ner right side of chang<strong>in</strong>g<br />
table. Figure 8.<br />
NOTE: Bottom right side of Front Side Rail<br />
(C1) must be bolted <strong>in</strong>to top hole at bottom of<br />
chang<strong>in</strong>g table.<br />
(Q) Bolt with<br />
Loctite® Threadlocker<br />
Blue (x4)<br />
(D1) (x4)<br />
(X1) (x2)<br />
ASSEMBLY<br />
12
9<br />
10<br />
(D1)<br />
(E1)<br />
(C1)<br />
(E1)<br />
(C1)<br />
(A1)<br />
9. Insert groove on bottom of Front<br />
Contoured Top (E1) to top of Front Side Rail<br />
(C1). Figure 9.<br />
NOTE: Loosen bolts on Left Side Rail (A1) to fit<br />
Front Contoured Top (E1). Retighten once <strong>in</strong><br />
place.<br />
(D1)<br />
(D1)<br />
10. Secure Front Contoured Top (E1) to top of<br />
Front Side Rail (C1) with two (2) Bolts (D1) <strong>and</strong> one<br />
(1) Bolt (D1). Figure 10.<br />
(D1)<br />
11 12<br />
(D1)<br />
(D1)<br />
(J)<br />
(C- 4)<br />
Bite<br />
11. Secure Back Contoured Top (E1) to top of<br />
Back Side Rail (C1) with two (2) Bolts (D1) <strong>and</strong><br />
one (1) Bolt (D1). Figure . 11<br />
Once complete, <strong>in</strong>sert three (3) drawers <strong>in</strong>to<br />
chang<strong>in</strong>g table.<br />
(D1) (x6)<br />
(K) (x8)<br />
Reta<strong>in</strong>er Screws<br />
(K)<br />
12. Insert Shelf Support Brackets (K) <strong>in</strong>to holes <strong>in</strong><br />
back of organizer. Slide shelves (J) <strong>in</strong>to “bite” of<br />
bracket. When <strong>in</strong> place, tighten reta<strong>in</strong>er screws<br />
on brackets. Figure 12.<br />
NOTE: Reta<strong>in</strong>er screws MUST be tightened to<br />
keep shelves from mov<strong>in</strong>g.<br />
Add chang<strong>in</strong>g pad to top of organizer.<br />
ASSEMBLY<br />
13
Chang<strong>in</strong>g Pad Assembly<br />
Important : If chang<strong>in</strong>g pad <strong>and</strong> safety belt are<br />
assembled, make sure warn<strong>in</strong>gs are fac<strong>in</strong>g up <strong>and</strong> visible.<br />
If not, reassemble by follow<strong>in</strong>g the steps below.<br />
1. Locate safety belt bolted to dresser top. Insert<br />
safety belt through slit <strong>in</strong> chang<strong>in</strong>g pad from<br />
back of pad. Figure 1.<br />
1<br />
2. Pull through front of pad completely. Make<br />
sure pad is fac<strong>in</strong>g up <strong>and</strong> warn<strong>in</strong>gs are always<br />
visible. Figure 2.<br />
3. Make sure that safety belt is fastened around<br />
child, <strong>and</strong> adjusted so safety belt is snug around<br />
child’s mid-section. Make sure buckle is securely<br />
latched. Figure 3.<br />
2<br />
3<br />
CLICK!<br />
Disassembl<strong>in</strong>g <strong>Crib</strong> For Storage<br />
To disassemble crib for storage, follow assembly steps <strong>in</strong> reverse.<br />
Store all parts <strong>and</strong> hardware together <strong>in</strong> a safe place. Store the <strong>in</strong>struction manual <strong>in</strong> the supplied<br />
envelope attached to the mattress support assembly for future reference for reassembly.<br />
For models us<strong>in</strong>g casters, set casters to LOCKED position.<br />
ASSEMBLY<br />
14
Convert<strong>in</strong>g to a Toddler Bed .<br />
Toddler Rail(OPTIONAL PURCHASE)<br />
Assembly the Toddler Rail please refer to the <strong>in</strong>struction of Toddler rail.<br />
Convert<strong>in</strong>g to a Full Size Headboard<br />
IMPORTANT: You MUST use supplied Wall Strap Kit with st<strong>and</strong>-alone organizer. See <strong>in</strong>structions<br />
provided with Wall Strap Kit.<br />
1<br />
1a<br />
Remove Bottom Support Bar,<br />
then replace after rail bolt is<br />
removed.<br />
Remove mattress support assembly <strong>and</strong><br />
drawers from crib.<br />
Remove bolts from front <strong>and</strong> back to remove<br />
organizer. Figures 1 & 1a.<br />
NOTE: REMOVE FRONT BOTTOM SUPPORT BAR<br />
IN ORDER TO ACCESS BOLT TO REMOVE BOTTOM<br />
OF FRONT RAIL. Figure 1a.<br />
ASSEMBLY<br />
15
2<br />
3<br />
(L)<br />
Attach rear leg that was removed from<br />
organizer <strong>and</strong> attach to headboard us<strong>in</strong>g<br />
bolts removed from organizer as shown <strong>in</strong><br />
Figure 3.<br />
Remove larger rear leg from organizer <strong>and</strong> replace<br />
with Rear Dresser Leg (L) as shown <strong>in</strong> Figure 2.<br />
NOTE: REAR ORGANIZER LEG (L) WILL BE SAME<br />
SIZE AS OPPOSITE REAR LEG ON ORGANIZER.<br />
To use extra Front Leg (M) to convert to full<br />
size bed with footboard <strong>and</strong> headboard,<br />
refer to Adult rails 215# <strong>in</strong>struction.<br />
4<br />
After remov<strong>in</strong>g crib from organizer, remove<br />
Left Ride Rail. To do so, remove four (4) Bolts.<br />
Figure 4.<br />
Adult rails 215# & Toddler rail can be purchased to covert the crib to<br />
a full size bed <strong>and</strong> a toddler bed.<br />
Contact the store where you purchased the crib or visit<br />
www.sorellefurniture.com to locate a dealer near you.<br />
16