RTDVD1-EN receiver - Radio Shack
RTDVD1-EN receiver - Radio Shack
RTDVD1-EN receiver - Radio Shack

Create successful ePaper yourself
Turn your PDF publications into a flip-book with our unique Google optimized e-Paper software.
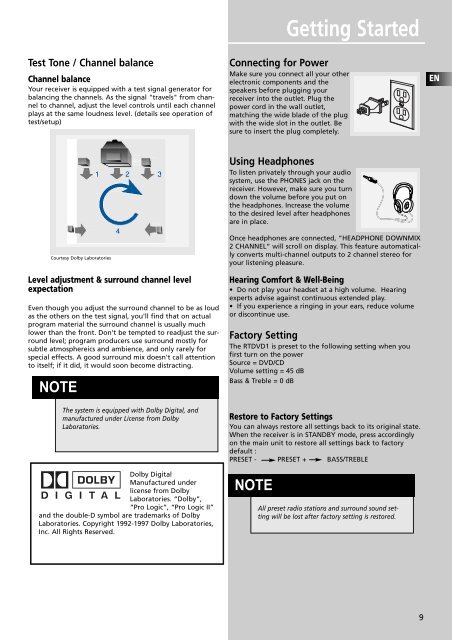
Test Tone / Channel balance<br />
Channel balance<br />
Your <strong>receiver</strong> is equipped with a test signal generator for<br />
balancing the channels. As the signal "travels" from channel<br />
to channel, adjust the level controls until each channel<br />
plays at the same loudness level. (details see operation of<br />
test/setup)<br />
Courtesy Dolby Laboratories<br />
Level adjustment & surround channel level<br />
expectation<br />
Even though you adjust the surround channel to be as loud<br />
as the others on the test signal, you'll find that on actual<br />
program material the surround channel is usually much<br />
lower than the front. Don't be tempted to readjust the surround<br />
level; program producers use surround mostly for<br />
subtle atmosphereics and ambience, and only rarely for<br />
special effects. A good surround mix doesn't call attention<br />
to itself; if it did, it would soon become distracting.<br />
NOTE<br />
The system is equipped with Dolby Digital, and<br />
manufactured under License from Dolby<br />
Laboratories.<br />
Dolby Digital<br />
Manufactured under<br />
license from Dolby<br />
Laboratories. “Dolby”,<br />
“Pro Logic”, “Pro Logic II”<br />
and the double-D symbol are trademarks of Dolby<br />
Laboratories. Copyright 1992-1997 Dolby Laboratories,<br />
Inc. All Rights Reserved.<br />
Getting Started<br />
Connecting for Power<br />
Make sure you connect all your other<br />
electronic components and the<br />
speakers before plugging your<br />
<strong>receiver</strong> into the outlet. Plug the<br />
power cord in the wall outlet,<br />
matching the wide blade of the plug<br />
with the wide slot in the outlet. Be<br />
sure to insert the plug completely.<br />
Using Headphones<br />
To listen privately through your audio<br />
system, use the PHONES jack on the<br />
<strong>receiver</strong>. However, make sure you turn<br />
down the volume before you put on<br />
the headphones. Increase the volume<br />
to the desired level after headphones<br />
are in place.<br />
Once headphones are connected, “HEADPHONE DOWNMIX<br />
2 CHANNEL” will scroll on display. This feature automatically<br />
converts multi-channel outputs to 2 channel stereo for<br />
your listening pleasure.<br />
Hearing Comfort & Well-Being<br />
• Do not play your headset at a high volume. Hearing<br />
experts advise against continuous extended play.<br />
• If you experience a ringing in your ears, reduce volume<br />
or discontinue use.<br />
Factory Setting<br />
The <strong>RTDVD1</strong> is preset to the following setting when you<br />
first turn on the power<br />
Source = DVD/CD<br />
Volume setting = 45 dB<br />
Bass & Treble = 0 dB<br />
Restore to Factory Settings<br />
You can always restore all settings back to its original state.<br />
When the <strong>receiver</strong> is in STANDBY mode, press accordingly<br />
on the main unit to restore all settings back to factory<br />
default :<br />
PRESET - PRESET + BASS/TREBLE<br />
NOTE<br />
All preset radio stations and surround sound setting<br />
will be lost after factory setting is restored.<br />
9<br />
<strong>EN</strong>