Owner's Manual - Radio Shack
Owner's Manual - Radio Shack
Owner's Manual - Radio Shack

Create successful ePaper yourself
Turn your PDF publications into a flip-book with our unique Google optimized e-Paper software.
43-935.fm Page 1 Friday, January 14, 2000 3:07 PM<br />
Cat. No. 43-935<br />
OWNER’S MANUAL<br />
Please read before using this equipment.<br />
Two-Line Caller ID Phone<br />
With Speakerphone
FEATURES<br />
Your <strong>Radio</strong><strong>Shack</strong> Two-Line Caller ID<br />
Phone offers the latest in telephone<br />
technology, combining Caller ID features,<br />
two telephone lines, and speakerphone<br />
all in one easy-to-use telephone.<br />
The system displays a caller’s phone<br />
number (and name, if available in your<br />
area), the current date and time, and call<br />
information as provided by your local<br />
phone company to Caller ID and message<br />
waiting service subscribers.<br />
Your phone includes these features:<br />
Speakerphone — allows hands-free<br />
telephone conversation.<br />
Caller ID Memory — stores and displays<br />
up to 99 incoming phone numbers,<br />
or up to 68 call records (incoming phone<br />
numbers plus names).<br />
Last Number Redial — lets you quickly<br />
dial the last number dialed.<br />
Flash — sends a switchhook signal for<br />
use with special phone services such as<br />
Call Waiting.<br />
Handset Volume Control — lets you<br />
adjust the handset volume to be low,<br />
middle or high.<br />
Large Liquid Crystal Display — displays<br />
four full lines of information, including<br />
the time, the number you dialed,<br />
and other useful information.<br />
2<br />
43-935.fm Page 2 Friday, January 14, 2000 3:07 PM<br />
Two Telephone Lines — allows you to<br />
select which line you prefer.<br />
Caller ID Memory Dial — lets you select<br />
a stored phone number from Caller<br />
ID memory, then dial it with the touch of<br />
a button.<br />
Five Pre-stored Area Codes — allows<br />
you to edit, store, delete or review a<br />
maximum of five area codes. Each area<br />
code contains three digits.<br />
Review — lets you scroll through all call<br />
records in Caller ID memory.<br />
Call Back — lets you quickly dial the<br />
number shown on the display.<br />
Delete — lets you delete one or all call<br />
records from memory.<br />
20-Number Memory — lets you store<br />
and then quickly dial up to 20 important<br />
phone numbers by pressing a single<br />
button or two buttons.<br />
Pulse/Tone Option — lets you use the<br />
system with pulse or tone service and<br />
lets you easily switch from pulse to tone<br />
dialing for long-distance, bank-byphone,<br />
or other special services.<br />
Line Status Indicators — alerts you to<br />
incoming calls and the status of a phone<br />
line using ringing tones, the display, and<br />
indicator lights.<br />
Hearing-Aid Compatible — lets you<br />
use the system with hearing aids.<br />
© 2000 Tandy Corporation.<br />
All Rights Reserved.<br />
<strong>Radio</strong><strong>Shack</strong> and Adaptaplug are registered trademarks used by Tandy Corporation.
43-935.fm Page 3 Friday, January 14, 2000 3:07 PM<br />
Your phone is ETL listed to UL standards<br />
and meets all applicable FCC<br />
standards.<br />
WARNING: To reduce the risk of fire or<br />
shock hazard, do not expose this product to rain<br />
or moisture.<br />
CAUTION<br />
RISK OF ELECTRIC SHOCK.<br />
DO NOT OPEN.<br />
CAUTION: TO REDUCE THE RISK OF<br />
ELECTRIC SHOCK, DO NOT REMOVE<br />
COVER OR BACK. NO USER-SERVICE-<br />
ABLE PARTS INSIDE. REFER SERVICING<br />
TO QUALIFIED PERSONNEL.<br />
!<br />
This symbol is intended to alert<br />
you to the presence of uninsulated<br />
dangerous voltage within the<br />
product’s enclosure that might be<br />
of sufficient magnitude to constitute<br />
a risk of electric shock. Do<br />
not open the product’s case.<br />
This symbol is intended to inform<br />
you that important operating and<br />
maintenance instructions are included<br />
in the literature accompanying<br />
this product.<br />
Notes:<br />
• Your system requires two AA batteries<br />
(not supplied) to protect its memory.<br />
• The AC adapter must be connected<br />
with your system to operate properly.<br />
If no AC adapter is connected,<br />
only LINE1 operates.<br />
!<br />
Important Caller ID Information<br />
To use the phone’s Caller ID and Message<br />
Waiting features you must be in an<br />
area where those services are available<br />
and you must subscribe to those services<br />
through your local phone company.<br />
Where Caller ID is offered, one or more<br />
options are generally available:<br />
• caller’s number only<br />
• caller’s name only<br />
• caller’s name and number.<br />
READ THIS BEFORE<br />
INSTALLATION<br />
We have designed your telephone to<br />
conform to federal regulations, and you<br />
can connect it to most telephone lines.<br />
However, each device that you connect<br />
to the phone line draws power from the<br />
phone line. We refer to this power draw<br />
as the device’s ringer equivalence number,<br />
or REN. The REN is shown on the<br />
bottom of your phone.<br />
If you are using more than one phone or<br />
other device on the line, add up all the<br />
RENs. If the total is more than five (or<br />
three in rural areas), your phones might<br />
not ring. If ringer operation is impaired,<br />
disconnect one of the devices from the<br />
line.<br />
3
FCC STATEMENT<br />
This telephone complies with Part 68 of<br />
FCC Rules. You must, upon request,<br />
provide the FCC Registration Number<br />
and the REN to your phone company.<br />
These numbers are located on the bottom<br />
of your phone.<br />
Note: You must not connect your phone<br />
to any of the following:<br />
• coin-operated systems<br />
• party-line systems<br />
• most electronic key telephone systems<br />
The system complies with the limits for a<br />
Class B device as specified in Part 15 of<br />
FCC Rules. These limits provide reasonable<br />
protection against radio and TV<br />
interference in a residential area. However,<br />
your telephone might cause TV or<br />
radio interference even when it is operating<br />
properly. To eliminate interference,<br />
you can try one or more of the following<br />
corrective measures.<br />
• Reorient or relocate the TV’s receiving<br />
antenna.<br />
• Increase the distance between the<br />
telephone and the radio or TV.<br />
Consult your local <strong>Radio</strong><strong>Shack</strong> store if<br />
the problem still exists.<br />
4<br />
43-935.fm Page 4 Friday, January 14, 2000 3:07 PM<br />
IMPORTANT SAFETY<br />
INSTRUCTIONS<br />
SAVE THESE INSTRUCTIONS — To<br />
reduce the risk of fire, electric shock<br />
and/or injury, always follow these basic<br />
safety precautions when using your telephone<br />
equipment.<br />
1. Read and understand all instructions.<br />
2. Follow all warnings and instructions<br />
marked on the telephone.<br />
3. Unplug this telephone from the wall<br />
outlet before cleaning it or replacing<br />
the batteries. Do not use liquid or<br />
aerosol cleaners. If necessary, use<br />
a soft cloth lightly moistened with a<br />
mild detergent solution.<br />
4. Do not use this telephone near a<br />
bathtub, kitchen sink, wash bowl,<br />
laundry tub, swimming pool, a wet<br />
basement or anywhere else there is<br />
water.<br />
5. Do not place this telephone on an<br />
unstable cart, stand or table. A fall<br />
could cause serious damage to the<br />
phone.<br />
6. Slots and openings in the cabinet at<br />
the back or bottom are provided for<br />
ventilation to protect the unit from<br />
overheating. These openings must<br />
not be blocked or covered. Do not<br />
place this telephone on a bed, sofa,<br />
rug or other similar surface. This<br />
product should never be placed<br />
near or over a radiator or heat register.<br />
This telephone should not be<br />
placed in a built-in installation unless<br />
proper ventilation is provided.
43-935.fm Page 5 Friday, January 14, 2000 3:07 PM<br />
7. Never push objects of any kind<br />
through slots in the phone. You<br />
could touch dangerous voltage<br />
points or short out parts that could<br />
result in a risk of fire or electric<br />
shock. Never spill liquid of any kind<br />
on the telephone.<br />
8. Unplug this telephone from the wall<br />
outlet and refer to a qualified service<br />
representative in any of the following<br />
situations:<br />
• If liquid has been spilled into the<br />
telephone.<br />
• If the telephone has been exposed<br />
to rain or water.<br />
• If the telephone does not operate<br />
normally by following the operating<br />
instructions.<br />
• If the telephone has been<br />
dropped or the case has been<br />
damaged.<br />
• If the telephone exhibits a distinct<br />
change in performance.<br />
9. Adjust only those controls that are<br />
covered by the operating instructions.<br />
Improper adjustment of other<br />
controls may result in damage and<br />
will often require extensive work by<br />
a qualified technician to restore the<br />
telephone to normal operation.<br />
10. Avoid using a telephone (other than<br />
a cordless type) during an electrical<br />
storm. There may be a remote risk<br />
of electric shock from lightning.<br />
11. Do not use the telephone to report a<br />
gas leak in the vicinity of the leak.<br />
12. Never install telephone wiring during<br />
a lightning storm.<br />
13. Never install jacks in a wet location<br />
unless the jack is specifically designed<br />
for wet locations.<br />
14. Never touch uninsulated telephone<br />
wires or terminals unless the telephone<br />
line has been disconnected<br />
at the network interface.<br />
15. Use caution when installing or modifying<br />
telephone lines. To reduce the<br />
risk of electric shock, do not disassemble<br />
this product, but take it to a<br />
qualified serviceman when service<br />
or repair work is required. Opening<br />
or removing covers may expose you<br />
to dangerous voltages or other risks.<br />
Incorrect reassembly can cause<br />
electric shock when the appliance is<br />
subsequently used.<br />
BATTERY SAFETY<br />
INSTRUCTIONS<br />
Caution: To reduce the risk of fire or injury<br />
to persons, read and follow these instructions.<br />
1. Use only two carbon-zinc or alkaline<br />
AA size batteries.<br />
2. Do not dispose of the batteries in a<br />
fire. The cell may explode. Check<br />
with local codes for possible special<br />
disposal instructions.<br />
3. Do not open or mutilate the batteries.<br />
Released electrolyte is corrosive<br />
and may cause damage to the<br />
eyes or skin. It may be toxic if swallowed.<br />
5
4. Exercise care in handling batteries<br />
in order not to short the battery with<br />
conducting materials such as rings,<br />
bracelets and keys. The battery or<br />
conductor may overheat and cause<br />
burns.<br />
5. Do not attempt to recharge the batteries<br />
provided with or identified for<br />
use with this product. The batteries<br />
may leak corrosive electrolyte or explode.<br />
6. Do not attempt to rejuvenate the<br />
batteries provided with or identified<br />
for use with this product by heating<br />
them. Sudden release of the battery<br />
electrolyte may occur causing burns<br />
irritation to eyes or skin.<br />
7. When replacing batteries, all batteries<br />
should be replaced at the same<br />
time. Mixing fresh and discharged<br />
batteries could increase internal cell<br />
pressure and rupture the discharged<br />
batteries.<br />
8. When inserting batteries into this<br />
product, the proper polarity or direction<br />
must be observed. Reverse insertion<br />
of batteries can cause<br />
charging, and that may result in<br />
leakage or explosion.<br />
9. Remove the batteries from this<br />
product if the product will not be<br />
used for a long period of time (several<br />
months or more) since during<br />
this time the battery could leak in the<br />
product.<br />
10. Discard dead batteries as soon as<br />
possible since dead batteries are<br />
more likely to leak in a product.<br />
6<br />
43-935.fm Page 6 Friday, January 14, 2000 3:07 PM<br />
11. Do not store this product, or the batteries<br />
provided with or identified for<br />
use with this product, in high-temperature<br />
areas. Batteries that are<br />
stored in a freezer or refrigerator for<br />
the purpose of extending shelf life<br />
should be protected from condensation<br />
during storage and defrosting.<br />
Batteries should be stabilized at<br />
room temperature prior to use after<br />
cold storage.<br />
SAVE THESE INSTRUCTIONS
43-935.fm Page 7 Friday, January 14, 2000 3:07 PM<br />
CONTENTS<br />
Preparation ...................................................................................................................................... 8<br />
Installing Batteries ..................................................................................................................... 8<br />
Selecting a Location .................................................................................................................. 9<br />
Mounting the System ................................................................................................................. 9<br />
Attaching the Stand ........................................................................................................... 9<br />
On a Desk Top ................................................................................................................. 10<br />
On a Wall Plate ................................................................................................................ 10<br />
On the Wall ...................................................................................................................... 10<br />
Connecting the Handset .......................................................................................................... 11<br />
Connecting AC Power ............................................................................................................. 11<br />
Disabling the Line 2 Indicator .................................................................................................. 12<br />
Adjusting the Display Contrast ................................................................................................ 12<br />
Setting the Ringer Volume ....................................................................................................... 12<br />
Setting the Dialing Mode ......................................................................................................... 12<br />
Initializing the System .............................................................................................................. 13<br />
Operation ....................................................................................................................................... 14<br />
Making and Receiving Calls .................................................................................................... 14<br />
Adjusting the Handset Volume ......................................................................................... 14<br />
Using the Speakerphone ................................................................................................. 14<br />
New Call Indicator ............................................................................................................ 15<br />
Using Mute .............................................................................................................................. 15<br />
Using Flash ............................................................................................................................. 15<br />
Using Redial ............................................................................................................................ 15<br />
Using Hold ............................................................................................................................... 15<br />
Identifying the Indicators ......................................................................................................... 16<br />
Ringer Indicators .............................................................................................................. 16<br />
Display and Light Indicators ............................................................................................. 16<br />
Using Caller ID ........................................................................................................................ 17<br />
Caller ID Display Information ........................................................................................... 17<br />
Reviewing Call Records ................................................................................................... 18<br />
Area Code ........................................................................................................................ 19<br />
Dialing Numbers In Call Records ..................................................................................... 19<br />
Deleting Call Records ...................................................................................................... 20<br />
Storing Call Records Into Memory Locations .................................................................. 20<br />
Memory Dialing ....................................................................................................................... 20<br />
Storing a Pause In Memory ............................................................................................. 20<br />
Storing Numbers Into Memory ......................................................................................... 21<br />
Storing Call Records Into Memory ................................................................................... 21<br />
Storing the Last Number Dialed Into Memory .................................................................. 22<br />
Storing Special Service Numbers .................................................................................... 22<br />
Using the Quick Reference Card ..................................................................................... 22<br />
Using the Memory Card ................................................................................................... 23<br />
Reviewing Stored Numbers ............................................................................................. 23<br />
Dialing Stored Numbers ................................................................................................... 23<br />
Deleting Stored Numbers ................................................................................................ 23<br />
Troubleshooting ............................................................................................................................ 24<br />
Care and Maintenance .................................................................................................................. 25<br />
The FCC Wants You To Know ................................................................................................. 26<br />
Lightning .......................................................................................................................... 26<br />
7
PREPARATION<br />
INSTALLING BATTERIES<br />
Your phone requires two AA batteries<br />
(not supplied) for power. For the best<br />
performance and longest life, we recommend<br />
<strong>Radio</strong><strong>Shack</strong> alkaline batteries.<br />
Note: The batteries protect the phone’s<br />
memory during power failures. If you do<br />
not connect the supplied AC adapter,<br />
the batteries cannot power all the<br />
phone’s functions. (See “Connecting AC<br />
Power” on Page 11.)<br />
Cautions:<br />
• Use only fresh batteries of the required<br />
size and recommended type.<br />
• Do not mix old and new batteries,<br />
different types of batteries (standard,<br />
alkaline, or rechargeable), or<br />
rechargeable batteries of different<br />
capacities.<br />
Follow these steps to install batteries.<br />
1. Use a flat blade screwdriver to loosen<br />
the screw on the battery compartment<br />
cover on the bottom of the<br />
phone, and remove the cover.<br />
2. Place the batteries in the compartment<br />
as indicated by the polarity<br />
symbols (+ and –) marked inside.<br />
3. Replace the cover and secure it with<br />
the screw.<br />
When appears on the display or the<br />
display dims, replace the batteries.<br />
Warning: Dispose of old batteries<br />
promptly and properly. Do not burn or<br />
bury them.<br />
8<br />
43-935.fm Page 8 Friday, January 14, 2000 3:07 PM<br />
Caution: If you do not plan to use the<br />
the phone for a month or more, remove<br />
the batteries. Batteries can leak chemicals<br />
that can destroy electronic parts.<br />
Notes:<br />
• If you replace the batteries, have<br />
fresh batteries on hand before you<br />
begin. You must install fresh batteries<br />
within 1 minute after removing<br />
the old batteries. Otherwise, you<br />
might lose the information stored in<br />
the system.<br />
• When you are replacing the batteries,<br />
do not press any buttons on the<br />
system after you remove the old<br />
batteries. Doing so might erase all<br />
stored information from the system.
43-935.fm Page 9 Friday, January 14, 2000 3:07 PM<br />
SELECTING A LOCATION<br />
You can place the phone on a desk top<br />
or table, or mount it on a standard wall<br />
plate. Select a location that is:<br />
• near an accessible AC outlet<br />
• near a telephone line jack<br />
• out of the way of normal activities<br />
• away from electrical machinery,<br />
electrical appliances, metal walls or<br />
filing cabinets, wireless intercoms,<br />
alarms, and room monitors<br />
Note: The base’s location affects the<br />
phone’s range. If you have a choice of<br />
several locations, try each to see which<br />
provides the best performance.<br />
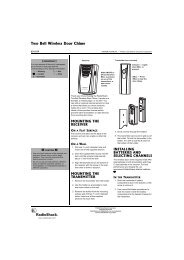
MOUNTING THE SYSTEM<br />
Attaching the Stand<br />
To mount the phone on a wall or desk<br />
top, you need to attach the supplied<br />
stand to the phone.<br />
To place the phone on a desk top, insert<br />
the tab on the narrow end of the stand<br />
into the upper center slot. Then snap the<br />
two spring tabs on the wide end of the<br />
stand into place.<br />
Phone’s<br />
Upper Half<br />
Narrow<br />
End<br />
Spring<br />
Tabs<br />
Upper<br />
Center Slot<br />
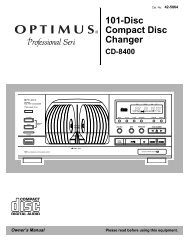
To mount the phone on a wall plate or<br />
directly on the wall, insert the tab on the<br />
narrow end of the stand into the lower<br />
center slot. Then snap the two spring<br />
tabs on the wide end of the stand into<br />
place.<br />
Stand<br />
Stand<br />
Phone’s<br />
Lower Half<br />
To remove the stand from the phone,<br />
while pressing and holding in both<br />
spring tabs, gently pull up the wide end<br />
of the stand and lift it off.<br />
9
43-935.fm Page 10 Friday, January 14, 2000 3:07 PM<br />
On a Desk Top<br />
Follow these steps to mount the system<br />
on a desktop.<br />
1. Plug one end of the supplied long<br />
modular cord into the TEL LINE jack<br />
on the back of the phone.<br />
2. Plug the other end of the modular<br />
cord into a modular phone jack.<br />
3. Place the phone on a flat desk,<br />
shelf, or table.<br />
On a Wall Plate<br />
Follow these steps to mount the system<br />
on a standard wall plate.<br />
1. Plug one end of the supplied short<br />
modular cord into the TEL LINE jack<br />
on the back of the system. Then<br />
route the cord through the strain relief<br />
groove on the bottom of the<br />
phone.<br />
2. Feed any excess modular cord into<br />
the cavity at the base of the strain<br />
relief groove.<br />
3. Plug the other end of the modular<br />
cord into the wall plate’s modular<br />
jack.<br />
10<br />
Strain Relief<br />
Groove<br />
Key Hole Slots<br />
4. Align the base’s keyhole slots with<br />
the wall plate studs and slide the<br />
base downward to secure it.<br />
5. Press and lift out the handset holder.<br />
Rotate it 180°, then snap it back<br />
into place so it holds the handset.<br />
Handset<br />
Holder<br />
On the Wall<br />
To install the system directly on the wall,<br />
you need two screws (not supplied) with<br />
heads that fit into the keyhole slots on<br />
the bottom of the phone and the stand.<br />
1. Drill two holes 3 15 /16 inches<br />
(100 mm) apart. Then<br />
thread a screw into each<br />
hole, letting the heads extend<br />
about 1 /8 inch (3.5<br />
mm) from the wall.<br />
3 15 /16<br />
2. Plug one end of the supplied long<br />
modular cord into the TEL LINE jack<br />
on the back of the system.<br />
3. Align the bracket’s keyhole slots<br />
with the mounting screws and slide<br />
the base downward to secure it.<br />
4. Plug the other end of the modular<br />
cord into a nearby modular jack.<br />
1 /8
43-935.fm Page 11 Friday, January 14, 2000 3:07 PM<br />
5. Press and lift out the handset holder.<br />
Rotate it 180°, then snap it back<br />
into place so it holds the handset.<br />
CONNECTING THE<br />
HANDSET<br />
1. Plug one end of the supplied coiled<br />
cord into the handset’s modular<br />
jack.<br />
2. Plug the other end of the coiled cord<br />
into the handset jack on the side of<br />
the phone nearest the handset cradle.<br />
3. Place the handset on the cradle.<br />
Note: Your local <strong>Radio</strong><strong>Shack</strong> store carries<br />
several different lengths of coiled<br />
phone cords that are especially useful<br />
when wall mounting the phone.<br />
CONNECTING AC POWER<br />
You can power the phone using the supplied<br />
9V, 300-mA AC adapter and a size<br />
K Adaptaplug ® adaptor (available at<br />
your local <strong>Radio</strong><strong>Shack</strong> store).<br />
Note: For the Caller ID function to work<br />
and to use LINE 2, you must connect the<br />
phone to AC power.<br />
Cautions:<br />
You must use a Class 2<br />
! power source that supplies<br />
9V DC and delivers at least<br />
300 mA. Its center tip must be set to<br />
negative and its plug must fit the<br />
phone's DC 9V jack. The supplied<br />
adapter meets these specifications.<br />
Using an adapter that does not meet<br />
these specifications could damage<br />
the phone or the adapter.<br />
• Always connect the AC adapter to<br />
the phone before you connect it to<br />
AC power. When you finish, disconnect<br />
the adapter from AC power before<br />
you disconnect it from the<br />
phone.<br />
Follow these steps to connect the AC<br />
adapter.<br />
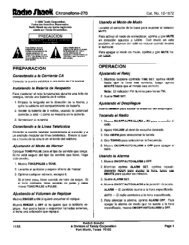
1. Insert the supplied AC adapter’s<br />
barrel plug into the phone’s DC 9V<br />
jack.<br />
2. Route the AC adapter’s cord<br />
through the strain relief slot.<br />
VOLUME<br />
HIGH<br />
L2 RINGER<br />
OFF LOW<br />
HIGH<br />
L2 RINGER<br />
OFF LOW<br />
LO MED HI TONE PULSE<br />
DC 9V<br />
RESET<br />
300mA<br />
3. Plug the other end of the AC adapter<br />
into a standard AC outlet.<br />
TEL. LINE<br />
Strain Relief<br />
Slot<br />
11
43-935.fm Page 12 Friday, January 14, 2000 3:07 PM<br />
DISABLING THE LINE 2<br />
INDICATOR<br />
If you have only one telephone line, the<br />
LINE 2 indicator lights and LINE 2 EX-<br />
TENSION appears on the display. Follow<br />
these steps to disable the LINE 2 indicator.<br />
1. Press REVIEW or repeatedly<br />
until the call total appears.<br />
2. Press REVIEW until LINE 2 EN-<br />
ABLED appears (about 3 seconds).<br />
3. Press REVIEW or . LINE 2<br />
DISABLED appears.<br />
4. Press DELETE to return to the current<br />
time display.<br />
ADJUSTING THE DISPLAY<br />
CONTRAST<br />
1. Press REVIEW or repeatedly<br />
until the call total appears.<br />
2. Press and hold down REVIEW <br />
for about 3 seconds until CONTRAST<br />
X appears.<br />
3. Within 30 seconds, repeatedly press<br />
REVIEW or to adjust the display’s<br />
contrast from 1 to 8.<br />
12<br />
Notes:<br />
• If CONTRAST X disappears before<br />
you press REVIEW or, repeat<br />
Steps 1–3.<br />
• If you did not connect an AC<br />
adapter, you can only adjust the<br />
display contrast from 1 to 3, and<br />
only after you pick up the handset.<br />
4. When you finish adjusting the contrast,<br />
press DELETE to return to the<br />
main display.<br />
SETTING THE RINGER<br />
VOLUME<br />
To set the ringer’s volume for LINE 1 or<br />
LINE 2, set the correlating L1 RINGER or<br />
L2 RINGER to HIGH, LOW, or OFF.<br />
Note: You can still answer calls if you<br />
hear an extension phone ringing, and<br />
you can still make calls.<br />
SETTING THE DIALING<br />
MODE<br />
Set TONE/PULSE for the type of service<br />
you have, tone or pulse. If you are not<br />
sure which type you have, do this test.<br />
1. Set TONE/PULSE to TONE.<br />
2. Pick up the handset and listen for a<br />
dial tone.
43-935.fm Page 13 Friday, January 14, 2000 3:07 PM<br />
3. When you hear the dial tone, press<br />
any number other than 0.<br />
Note: If your phone system requires<br />
that you dial an access code (9, for<br />
example) before you dial an outside<br />
number, do not press the access<br />
code number.<br />
• If the dial tone stops, you have<br />
touch-tone service. Leave TONE/<br />
PULSE set to TONE.<br />
• If the dial tone continues, you<br />
have pulse service. Set TONE/<br />
PULSE to PULSE.<br />
INITIALIZING THE<br />
SYSTEM<br />
Before you use the phone the first time<br />
or any time you need to reset the<br />
phone’s clock, use a pointed object,<br />
such as a straightened paper clip, to<br />
press RESET. 12:00 AM appears on the<br />
display.<br />
Notes:<br />
• The telephone company sends the<br />
correct time with each incoming call,<br />
so the correct date and time are automatically<br />
set when the phone receives<br />
its first call.<br />
• If the system does not work after<br />
you initialize it, remove the batteries,<br />
disconnect the system from the<br />
phone line and the AC outlet, re-<br />
place the batteries with fresh ones,<br />
then reconnect it and try initializing it<br />
again.<br />
13
43-935.fm Page 14 Friday, January 14, 2000 3:07 PM<br />
OPERATION<br />
MAKING AND RECEIVING<br />
CALLS<br />
To make a call using the handset, pick it<br />
up. When you hear the dial tone, dial the<br />
number. Then current time disappears,<br />
and the number appears on the display<br />
as you dial it. When you complete the<br />
call, hang up the handset. The number<br />
disappears from the display, and the<br />
current time reappears.<br />
When you receive a call, the system<br />
rings (if you set the RINGER switch to<br />
HIGH or LOW). To answer the call, pick<br />
up the handset.<br />
Adjusting the Handset Volume<br />
To adjust the handset volume before or<br />
during a call, set H/S VOLUME to LOW/<br />
MED/HI for a comfortable listening level.<br />
Using the Speakerphone<br />
Follow these steps to make a call using<br />
the speakerphone.<br />
1. Rotate VOLUME toward the narrow<br />
end of the arrow until it stops.<br />
2. Press LINE 1 or LINE 2. The speakerphone<br />
turns on and sounds a dial<br />
14<br />
tone. PLEASE DIAL and or<br />
appear on the display according<br />
to the line in use. The SPEAK-<br />
ERPHONE and LINE 1 or LINE 2<br />
indicators light.<br />
3. Adjust VOLUME to a comfortable listening<br />
level.<br />
4. Dial the number. The number appears<br />
on the display as you dial it.<br />
5. To end the call, press SPEAKER-<br />
PHONE. The SPEAKERPHONE indicator<br />
turns off. Then the current<br />
time reappears on the display.<br />
Notes:<br />
• When you use the speakerphone,<br />
you and the other caller cannot hear<br />
each other if you both speak at the<br />
same time.<br />
• If the system is close to loud noises<br />
while you are using the speakerphone,<br />
the system might not switch<br />
to let you hear the person on the<br />
other end of the line. If this happens,<br />
press MUTE to turn off the microphone<br />
so you can hear the caller<br />
(see “Using Mute” on Page 15).<br />
PRIVACY appears on the display.<br />
To answer an incoming call using the<br />
speakerphone, press SPEAKERPHONE,<br />
LINE 1 or LINE 2.<br />
To switch from the handset to the<br />
speakerphone, press SPEAKERPHONE.<br />
The SPEAKERPHONE and LINE 1 or<br />
LINE 2 indicators light. Then hang up<br />
the handset.
43-935.fm Page 15 Friday, January 14, 2000 3:07 PM<br />
To switch from the speakerphone to the<br />
handset, simply pick up the handset.<br />
New Call Indicator<br />
The NEW CALL indicator blinks if the<br />
system has either voice mail or a new<br />
call in call memory. The NEW CALL indicator<br />
stops blinking if you have reviewed<br />
all the voice mail messages and<br />
new calls.<br />
USING MUTE<br />
During a call, press MUTE to talk to<br />
someone else in the room without the<br />
person on the other end of the line hearing<br />
your conversation. PRIVACY appears<br />
on the display.<br />
Press MUTE again to resume your<br />
phone conversation.<br />
USING FLASH<br />
FLASH performs the electronic equivalent<br />
of a switchhook operation for special<br />
services, such as Call Waiting.<br />
For example, if you have Call Waiting,<br />
press FLASH to answer an incoming call<br />
without disconnecting the current call. F<br />
appears on the display to the right of the<br />
displayed numbers. Press FLASH again<br />
to return to the first call.<br />
Notes:<br />
• If you do not have any special<br />
phone services, pressing FLASH<br />
might disconnect the current call.<br />
• Pressing FLASH does not hang up<br />
the system.<br />
• You can store a FLASH entry when<br />
you store a number in memory.<br />
USING REDIAL<br />
Note: The redial memory holds up to 24<br />
digits, so you can redial long distance as<br />
well as local phone numbers.<br />
To quickly redial the last number dialed,<br />
press SPEAKERPHONE or pick up the<br />
handset, press LINE 1 or LINE 2 to select<br />
a line, then press REDIAL when you<br />
hear a dial tone. The number scrolls<br />
across the display, and the phone dials<br />
it.<br />
USING HOLD<br />
To place a call on hold, press HOLD.<br />
The line’s indicator flashes slowly.<br />
Note: Press the other line button without<br />
pressing HOLD to disconnect the current<br />
call on hold.<br />
To release a call from hold, press that<br />
line’s button and begin speaking again.<br />
You can also release a call from hold by<br />
picking up any extension phone on that<br />
line.<br />
15
43-935.fm Page 16 Friday, January 14, 2000 3:07 PM<br />
IDENTIFYING THE<br />
INDICATORS<br />
Your phone has line status indicators<br />
that use ringing tones, the display, and<br />
indicator lights to let you know if a call is<br />
coming in, on hold, or a line is in use.<br />
Display and Light Indicators<br />
16<br />
Ringer Indicators<br />
To indicate which line has an incoming<br />
call, Line 2 has a higher sounding ring<br />
than Line 1.<br />
Display Information Light Indicator Situation<br />
LINE 1 RINGING LINE 1 blinks. Line 1 is ringing.<br />
LINE 2 RINGING LINE 2 blinks. Line 2 is ringing.<br />
LINE 1 & 2 RINGING LINE 1 and 2 blink. Both Line 1 and Line 2 are ringing.<br />
LINE 1 HELD LINE 1 blinks. Line 1 is held.<br />
LINE 2 HELD LINE 2 blinks. Line 2 is held.<br />
BOTH LINES HELD LINE 1 and 2 blink. Both Line 1 and Line 2 are held.<br />
LINE 1 EXTENTION LINE 1 lights. An extension phone on Line 1 is in use.<br />
LINE 2 EXTENTION LINE 2 lights. An extension phone on Line 2 is in use.<br />
LINE 1 EXTENTION<br />
on hold<br />
LINE 1 blinks. Line1 is held by an extension phone.<br />
LINE 2 EXTENTION<br />
on hold<br />
LINE 2 blinks. Line 2 is held by an extension phone.<br />
BOTH LINES EXT.<br />
BOTH LINES EXT.<br />
L1 on hold<br />
BOTH LINES EXT.<br />
L2 on hold<br />
BOTH LINES EXT.<br />
on hold<br />
LINE 1 and 2 light. Both Line 1 and Line 2 are in use by extension<br />
phones.<br />
LINE 1 blinks and<br />
LINE 2 lights.<br />
LINE 1 lights and<br />
LINE 2 blinks.<br />
Line 1 is held by another extension phone<br />
and Line 2 is in use by an extension phone.<br />
Line 1 is in use by an extension phone and<br />
Line 2 is held by another extension phone.<br />
LINE 1 and 2 blink. Both Line 1 and Line 2 are held by extension<br />
phones.
43-935.fm Page 17 Friday, January 14, 2000 3:07 PM<br />
USING CALLER ID<br />
If you subscribe to a Caller ID service,<br />
the phone automatically displays information<br />
about calls you receive and<br />
stores the information in Caller ID memory.<br />
The system can store up to 99 incoming<br />
phone numbers, or up to 68<br />
incoming names and phone numbers<br />
into call records.<br />
During an incoming call, the phone company<br />
automatically sends the correct<br />
time between the first and second rings<br />
to update your system’s display (if you<br />
subscribe to Caller ID service).<br />
The first line of the call record shows the<br />
name (if available) of the caller. The<br />
second line shows the phone number of<br />
the caller. The third line shows the time,<br />
date and number of the calls.<br />
Caller ID Display Information<br />
Refer to this chart to help you interpret<br />
the display’s information.<br />
Display Situation<br />
Appears on the left top<br />
<br />
of the display if the call<br />
is from Line 1.<br />
Appears on the left top<br />
<br />
of the display if the call<br />
is from Line 2.<br />
Appears when an in<br />
L-D-C<br />
coming call is long distance.<br />
Appears the first time<br />
you review a call’s information.<br />
X<br />
XX CALLS<br />
0 CALL<br />
#XX<br />
x X<br />
CALL-Fd<br />
Display Situation<br />
CALL-Fd BUSY<br />
Appears if there are one<br />
or more incoming new<br />
calls saved in memory.<br />
X indicates the number<br />
of new calls.<br />
Appears when there are<br />
a total of XX Caller ID<br />
records stored in the<br />
phone.<br />
Appears if you review<br />
incoming call records<br />
and there are no calls.<br />
Indicates the sequence<br />
number of the current<br />
call record (for example,<br />
#1 is the oldest call).<br />
Appears if the call was<br />
a repeat call. X shows<br />
how many times the<br />
caller called.<br />
Appears instead of the<br />
phone number if the call<br />
was forwarded to you<br />
by a phone which was<br />
set to forward all calls<br />
(using the phone company’s<br />
call forwarding<br />
service). The display<br />
flashes between<br />
CALL-Fd and the call<br />
record.<br />
Appears instead of the<br />
phone number if the call<br />
was forwarded to you<br />
by a phone set to forward<br />
any busy calls,<br />
and the number the<br />
caller dialed was busy.<br />
The display flashes between<br />
CALL-Fd<br />
BUSY and the call<br />
record.<br />
17
43-935.fm Page 18 Friday, January 14, 2000 3:07 PM<br />
ERROR<br />
LINE 1<br />
MESSAGE<br />
LINE 2<br />
MESSAGE<br />
or<br />
LINE 1 & 2<br />
MESSAGE<br />
PRIVATE<br />
NAME/<br />
PRIVATE<br />
NUMBER<br />
?<br />
18<br />
Display Situation<br />
Appears if the Caller ID<br />
information was garbled.<br />
It is normal for this<br />
to happen occasionally.<br />
If this happens often,<br />
contact your local<br />
phone company and<br />
ask them to correct the<br />
problem.<br />
Appears if you subscribe<br />
to a message<br />
waiting service and a<br />
message is waiting. If<br />
MESSAGE appears and<br />
you subscribe to message<br />
waiting, retrieve<br />
the messages as instructed<br />
by your service<br />
provider. If<br />
MESSAGE appears and<br />
you do not have message<br />
waiting, press DE-<br />
LETE twice and<br />
MESSAGE disappears.<br />
Appears if the caller<br />
chose to block sending<br />
Caller ID information.<br />
No caller information<br />
appears.<br />
Appears within the Caller<br />
ID information if one<br />
or more characters<br />
were not properly received.<br />
It is normal for<br />
this to happen occasionally.<br />
If this happens<br />
often, contact your local<br />
phone company and<br />
ask them to correct the<br />
problem.<br />
Display Situation<br />
UNKNOWN<br />
NUMBER/<br />
UNKNOWN NAME<br />
------------<br />
Appears if the caller is<br />
not within a Caller ID<br />
service area, or during<br />
the following types of incoming<br />
calls:<br />
• Long-distance calls<br />
(except when the<br />
long-distance<br />
phone company<br />
used for the call<br />
transmits Caller ID<br />
information)<br />
• Operator-assisted<br />
calls<br />
• Calls made from a<br />
cellular phone<br />
• Calls made with a<br />
credit card<br />
Appears if a caller’s<br />
number or name was<br />
not transmitted during a<br />
call.<br />
Reviewing Call Records<br />
To quickly review call records from newest<br />
to oldest, repeatedly press REVIEW<br />
. To review call records from oldest<br />
to newest, repeatedly press REVIEW.<br />
If you have not received any new calls, 0<br />
CALL is displayed.<br />
Notes:<br />
• If you do not press any button within<br />
30 seconds while you are reviewing<br />
call records, the system automatically<br />
returns to the current time display.
43-935.fm Page 19 Friday, January 14, 2000 3:07 PM<br />
• If a displayed phone number is more<br />
than twelve characters, the rest of<br />
the Caller ID information scrolls automatically.<br />
Area Code<br />
Your phone allows you to pre-store five<br />
area codes of three digits. When you<br />
dial a Caller ID number by pressing the<br />
CALL BACK button, only the last seven<br />
digits will be dialed if the area code of<br />
the dialed Caller ID number matches<br />
one of the area codes you stored previously.<br />
Follow these steps to store an area<br />
code:<br />
1. Press STORE. LOCATION? appears<br />
on the display.<br />
2. Press CALL BACK. AREA CODE NO.<br />
1 appears on the display.<br />
3. Press REVIEW or to select a<br />
location (1–5) where you want to<br />
store the area code.<br />
4. Enter the area code you want to<br />
store using the number keys (0–9).<br />
5. Press STORE. The phone sounds a<br />
tone.<br />
6. Press STORE again to exit.<br />
Note: You may edit a stored area code<br />
by repeating Steps 1– 4.<br />
Follow these steps to review stored area<br />
codes.<br />
1. Press STORE. LOCATION? appears<br />
on the display.<br />
2. Press CALL BACK. AREA CODE NO.<br />
1 appears.<br />
3. Press REVIEW or to review<br />
the area codes which you stored<br />
previously.<br />
4. Press STORE to exit.<br />
Follows these steps to delete stored<br />
area codes.<br />
1. Press STORE. LOCATION? appears.<br />
2. Press CALL BACK. AREA CODE NO.<br />
1 appears.<br />
3. Press REVIEW or to select<br />
the area code you want to delete.<br />
4. Press DELETE.<br />
5. Press STORE to exit.<br />
Dialing Numbers In Call<br />
Records<br />
For your phone’s Caller ID memory dial<br />
feature to operate, the record must contain<br />
the caller’s number.<br />
Follow these steps to dial a number<br />
stored in a call record.<br />
1. Press LINE 1 or LINE 2 to select a<br />
phone line.<br />
2. Repeatedly press REVIEW or<br />
until the phone number you<br />
want to dial appears.<br />
3. If the Caller ID record has the same<br />
area code as one you have stored,<br />
press CALL BACK and the phone dials<br />
only the last 7 digits of the number.<br />
19
43-935.fm Page 20 Friday, January 14, 2000 3:07 PM<br />
20<br />
If the Caller ID record has the same<br />
area code as one you have stored<br />
but you need to include the area<br />
code to make the call, dial the area<br />
code on the number key pad then<br />
press CALL BACK.<br />
If the Caller ID record has a different<br />
area code than one you have<br />
stored, press 1 then press CALL<br />
BACK.<br />
Deleting Call Records<br />
You can select and delete an individual<br />
call record, or all call records stored in<br />
the system.<br />
Note: When the phone’s memory is full,<br />
it automatically replaces the oldest call<br />
record with the newest incoming call.<br />
To delete a single call record, repeatedly<br />
press REVIEW or until the call<br />
record you want to delete appears.<br />
When the phone displays the call<br />
record, press DELETE twice within 30<br />
seconds. The phone beeps, deletes the<br />
call record, and automatically renumbers<br />
the remaining call records. Then,<br />
after 30 seconds, the current time reappears.<br />
To delete all of the call records at once,<br />
press REVIEW or repeatedly until<br />
XX CALLS appears on the display.<br />
Press and hold down DELETE for about<br />
5 seconds. The system beeps and deletes<br />
all call records, and 0 CALL appears.<br />
Note: If you do not press any button<br />
within 30 seconds while deleting call<br />
records, the phone automatically returns<br />
to the current time display.<br />
Storing Call Records Into<br />
Memory Locations<br />
You can move phone numbers from<br />
Caller ID records into the phone’s upper<br />
or lower memory locations. See “Storing<br />
Call Records Into Memory” on Page 21.<br />
MEMORY DIALING<br />
You can store phone numbers (up to 24<br />
digits) and call records in the system’s<br />
20 (10 upper, 10 lower) memory locations.<br />
You can dial a phone number with<br />
the touch of one memory location button.<br />
Storing a Pause In Memory<br />
In some telephone systems, you must<br />
dial an access code (9, for example) and<br />
wait for a 2 second dial tone before you<br />
can dial an outside number. When storing<br />
a number with an access code, you<br />
should also store a pause after the access<br />
code to allow the outside line time<br />
to connect.<br />
To store a 2-second pause, press<br />
PAUSE at the desired point in the phone<br />
number. P appears on the display. For a<br />
longer pause, press PAUSE additional<br />
times.
43-935.fm Page 21 Friday, January 14, 2000 3:07 PM<br />
Storing Numbers Into Memory<br />
Note: For information about storing<br />
numbers from call records into memory<br />
see “Storing Call Records Into Memory”.<br />
Follow these steps to store numbers into<br />
upper or lower memory.<br />
1. Press STORE. LOCATION? appears.<br />
2. Choose the memory location where<br />
you want to store the number.<br />
• For an upper memory location,<br />
press a memory button.<br />
• For a lower memory location,<br />
press LOWER, LOWER appears on<br />
the display, then press a memory<br />
button.<br />
INPUT NUMBER: appears at the top<br />
of the display.<br />
3. Enter the number you want to store,<br />
including any flash and pause entries.<br />
Notes:<br />
• Each flash or pause entry uses<br />
one digit of memory.<br />
• If you make a mistake while entering<br />
the number, repeatedly<br />
press DELETE until you delete the<br />
incorrect digit. Then re-enter the<br />
correct number.<br />
4. Within 30 seconds after entering the<br />
number, press STORE. The system<br />
beeps, then stores the number.<br />
Notes:<br />
• If you do not press STORE within<br />
30 seconds, the system returns to<br />
the current time display. To start<br />
over, repeat Steps 1–4.<br />
• If you answer a call before pressing<br />
STORE, you must begin the<br />
procedure again after you complete<br />
the call.<br />
• If you have pulse service, press<br />
to store a switch from pulse to<br />
tone mode at the appropriate<br />
place in your number.<br />
Storing Call Records Into<br />
Memory<br />
You can move call records (including<br />
stored numbers) from Caller ID memory<br />
into the phone’s memory locations.<br />
Follow these steps to move Caller ID<br />
records to memory locations:<br />
1. Repeatedly press REVIEW or<br />
to select the Caller ID record<br />
you want to store.<br />
2. Press STORE. LOCATION? appears<br />
on the display.<br />
3. Within 30 seconds, choose a memory<br />
location where you want to store<br />
the number. The phone sounds a<br />
tone and stores the number.<br />
• For an upper memory location,<br />
press a memory button.<br />
• For a lower memory location,<br />
press LOWER and then a memory<br />
button.<br />
21
43-935.fm Page 22 Friday, January 14, 2000 3:07 PM<br />
Note: If you do not specify a memory location<br />
within 30 seconds, the system returns<br />
to the current time display. To start<br />
over, repeat Steps 1–3.<br />
Storing the Last Number Dialed<br />
Into Memory<br />
Follow these steps to store the last number<br />
you dialed to a memory location.<br />
1. Press REDIAL. The last dialed number<br />
appears on the display.<br />
2. Press STORE. LOCATION? appears.<br />
3. Within 30 seconds, specify the<br />
memory location where you want to<br />
store the number.<br />
• For an upper memory location,<br />
simply press a memory button.<br />
• For a lower memory location,<br />
press LOWER and then a memory<br />
button.<br />
The system beeps and stores the<br />
number.<br />
Note: If you do not specify a memory location<br />
within 30 seconds, the system returns<br />
to the current time display. To start<br />
over, repeat Steps 1–3.<br />
22<br />
Storing Special Service<br />
Numbers<br />
For a quick recall of numbers for special<br />
services (such as bank-by-phone or alternate<br />
long-distance), you can store<br />
each group of numbers in its own memory<br />
location. Then, when calling special<br />
services, dial the service’s main numbers<br />
first. At the appropriate place in the<br />
call, press the memory location button<br />
for the additional numbers you want to<br />
send.<br />
To store a number for a special service,<br />
follow the steps under “Storing Numbers<br />
Into Memory” on Page 21.<br />
Caution: To prevent unauthorized access<br />
to special services, we recommend<br />
that you do not store a personal identification<br />
number in memory.<br />
Using the Quick Reference<br />
Card<br />
There is a quick reference card that offers<br />
brief phone operation instructions<br />
on “Storing a Number Into Memory” and<br />
“Dialing a Stored Number” located on a<br />
pull out sleeve on the bottom of the<br />
phone. To view the card, gently pull the<br />
tab on the bottom of the phone outward.<br />
When you finish reading the instructions,<br />
gently press the sleeve back under<br />
the phone.
43-935.fm Page 23 Friday, January 14, 2000 3:07 PM<br />
Using the Memory Card<br />
To keep a record of the numbers you<br />
stored in the phone’s upper and lower<br />
memory locations, lift off the clear plastic<br />
cover over the card surrounding the<br />
memory buttons. Then write the person’s<br />
or company’s name next to the appropriate<br />
memory location. Replace the<br />
clear plastic cover.<br />
Reviewing Stored Numbers<br />
To review a number stored in an upper<br />
memory location, press the desired<br />
memory location button.<br />
To review a number stored in a lower<br />
memory location, press LOWER, and<br />
then press the desired memory button.<br />
Note: Only the last fourteen digits of the<br />
stored number appear on the display. If<br />
there is no memory stored, EMPTY appears<br />
on the display.<br />
Dialing Stored Numbers<br />
If you are dialing a number stored in upper<br />
or lower memory, lift the handset or<br />
press SPEAKERPHONE and press LINE<br />
1 or LINE 2 to select which telephone<br />
line you prefer.<br />
To dial a number stored in upper memory,<br />
press the desired memory location<br />
button.<br />
To dial a number stored in lower memory,<br />
press LOWER, then press the desired<br />
memory location button.<br />
Deleting Stored Numbers<br />
To delete a number stored in memory,<br />
press the memory location button for the<br />
number you want to delete, then press<br />
DELETE twice.<br />
To replace a number stored in memory<br />
with another number, see “Storing Numbers<br />
Into Memory” on Page 21.<br />
23
43-935.fm Page 24 Friday, January 14, 2000 3:07 PM<br />
TROUBLESHOOTING<br />
We do not expect you to have any problems with your phone, but if you do, the following<br />
suggestions might help.<br />
If you still have problems, disconnect the phone. If other phones on the same line<br />
work properly, the fault is in this phone or its installation. If you cannot find the problem,<br />
take the phone to your local <strong>Radio</strong><strong>Shack</strong> store for assistance.<br />
24<br />
Problem Suggestion<br />
The phone does not work. Make sure the phone line cord connected properly.<br />
The phone does not ring. Make sure the RINGER switch, it may be set to OFF.<br />
No dial tone. • Make sure the coiled handset cord is connected<br />
properly?.Check the phone jack with a known working<br />
phone.<br />
Cannot dial. • Make sure the you have touch tone service. See<br />
“Setting the Dialing Mode” on Page 12.<br />
• Check the TONE/PULSE switch setting.<br />
Other party cannot hear. Make sure the handset cord connected properly.<br />
Display showing erroneous figures. Remove batteries and press RESET.<br />
The display is faded. • Adjust the display contrast.<br />
See “Adjusting the Display Contrast” on Page 12.<br />
• Make sure the batteries are correctly installed?<br />
CALLER ID does not work. • You must subscribe to a CALLER ID service.<br />
• Make sure the AC adapter is connected.<br />
No caller’s name. Make sure the Caller ID service to which you subscribe<br />
is include the caller name delivery feature.
43-935.fm Page 25 Friday, January 14, 2000 3:07 PM<br />
CARE AND MAINTENANCE<br />
Your <strong>Radio</strong><strong>Shack</strong> Two-Line Caller ID Phone is an example of superior design and<br />
craftsmanship. The following suggestions will help you care for your phone so you<br />
can enjoy it for years.<br />
Keep the phone dry. If it gets wet, wipe it dry immediately. Liquids might<br />
contain minerals that can corrode the electronic circuits.<br />
Use and store the phone only in normal temperature environments. Temperature<br />
extremes can shorten the life of electronic devices, damage batteries,<br />
and distort or melt plastic parts.<br />
Keep the phone away from dust and dirt, which can cause premature<br />
wear of parts.<br />
Handle the phone gently and carefully. Dropping it can damage circuit<br />
boards and cases and can cause the phone to work improperly.<br />
Use only fresh batteries of the required size and recommended type. Batteries<br />
can leak chemicals that damage your phone’s electronic parts.<br />
Wipe the phone with a damp cloth occasionally to keep it looking new. Do<br />
not use harsh chemicals, cleaning solvents, or strong detergents to clean<br />
the phone.<br />
Modifying or tampering with the phone’s internal components can cause a malfunction<br />
and might invalidate its warranty and void your FCC authorization to operate it. If<br />
your phone is not performing as it should, take it to your local <strong>Radio</strong><strong>Shack</strong> store for<br />
assistance. If the trouble is affecting the telephone lines, the phone company can<br />
ask you to disconnect your phone until you have resolved the problem.<br />
25
43-935.fm Page 26 Friday, January 14, 2000 3:07 PM<br />
THE FCC WANTS YOU TO<br />
KNOW<br />
In the unlikely event that your system<br />
causes problems on the phone line, the<br />
phone company can temporarily disconnect<br />
your service. If this happens, the<br />
phone company attempts to notify you<br />
as soon as possible and advise you of<br />
your right to file a complaint with the<br />
FCC.<br />
Also, the phone company can make<br />
changes to its lines, equipment, operations,<br />
or procedures that could affect the<br />
operation of the system. The phone<br />
company notifies you of these changes<br />
in advance, so you can take the necessary<br />
steps to prevent interruption of your<br />
phone service.<br />
LIGHTNING<br />
Your Caller ID Phone has built-in protection<br />
circuits to reduce the risk of damage<br />
from surges in telephone line current.<br />
These protection circuits meet or exceed<br />
the FCC requirements. However,<br />
lightning striking the telephone lines can<br />
damage your system.<br />
Lightning damage is not common. Nevertheless,<br />
if you live in an area that has<br />
severe electrical storms, we suggest<br />
that you unplug your system during<br />
storms to reduce possibility of damage.<br />
26
43-935.fm Page 27 Friday, January 14, 2000 3:07 PM<br />
NOTES<br />
27
43-935.fm Page 28 Friday, January 14, 2000 3:07 PM<br />
Limited One-Year Warranty<br />
This product is warranted by <strong>Radio</strong><strong>Shack</strong> against manufacturing defects in material and workmanship<br />
under normal use for one (1) year from the date of purchase from <strong>Radio</strong><strong>Shack</strong> company-owned<br />
stores and authorized <strong>Radio</strong><strong>Shack</strong> franchisees and dealers. EXCEPT AS PROVIDED HEREIN, <strong>Radio</strong><strong>Shack</strong><br />
MAKES NO EXPRESS WARRANTIES AND ANY IMPLIED WARRANTIES, INCLUDING<br />
THOSE OF MERCHANTABILITY AND FITNESS FOR A PARTICULAR PURPOSE, ARE LIMITED<br />
IN DURATION TO THE DURATION OF THE WRITTEN LIMITED WARRANTIES CONTAINED<br />
HEREIN. EXCEPT AS PROVIDED HEREIN, <strong>Radio</strong><strong>Shack</strong> SHALL HAVE NO LIABILITY OR RE-<br />
SPONSIBILITY TO CUSTOMER OR ANY OTHER PERSON OR ENTITY WITH RESPECT TO ANY<br />
LIABILITY, LOSS OR DAMAGE CAUSED DIRECTLY OR INDIRECTLY BY USE OR PERFOR-<br />
MANCE OF THE PRODUCT OR ARISING OUT OF ANY BREACH OF THIS WARRANTY, IN-<br />
CLUDING, BUT NOT LIMITED TO, ANY DAMAGES RESULTING FROM INCONVENIENCE, LOSS<br />
OF TIME, DATA, PROPERTY, REVENUE, OR PROFIT OR ANY INDIRECT, SPECIAL, INCIDEN-<br />
TAL, OR CONSEQUENTIAL DAMAGES, EVEN IF <strong>Radio</strong><strong>Shack</strong> HAS BEEN ADVISED OF THE<br />
POSSIBILITY OF SUCH DAMAGES.<br />
Some states do not allow limitations on how long an implied warranty lasts or the exclusion or limitation<br />
of incidental or consequential damages, so the above limitations or exclusions may not apply to<br />
you.<br />
In the event of a product defect during the warranty period, take the product and the <strong>Radio</strong><strong>Shack</strong><br />
sales receipt as proof of purchase date to any <strong>Radio</strong><strong>Shack</strong> store. <strong>Radio</strong><strong>Shack</strong> will, at its option, unless<br />
otherwise provided by law: (a) correct the defect by product repair without charge for parts and<br />
labor; (b) replace the product with one of the same or similar design; or (c) refund the purchase<br />
price. All replaced parts and products, and products on which a refund is made, become the property<br />
of <strong>Radio</strong><strong>Shack</strong>. New or reconditioned parts and products may be used in the performance of<br />
warranty service. Repaired or replaced parts and products are warranted for the remainder of the<br />
original warranty period. You will be charged for repair or replacement of the product made after the<br />
expiration of the warranty period.<br />
This warranty does not cover: (a) damage or failure caused by or attributable to acts of God, abuse,<br />
accident, misuse, improper or abnormal usage, failure to follow instructions, improper installation or<br />
maintenance, alteration, lightning or other incidence of excess voltage or current; (b) any repairs<br />
other than those provided by a <strong>Radio</strong><strong>Shack</strong> Authorized Service Facility; (c) consumables such as<br />
fuses or batteries; (d) cosmetic damage; (e) transportation, shipping or insurance costs; or (f) costs<br />
of product removal, installation, set-up service adjustment or reinstallation.<br />
This warranty gives you specific legal rights, and you may also have other rights which vary from<br />
state to state.<br />
<strong>Radio</strong><strong>Shack</strong> Customer Relations, 200 Taylor Street, 6th Floor, Fort Worth, TX 76102<br />
We Service What We Sell 12/99<br />
<strong>Radio</strong><strong>Shack</strong><br />
A Division of Tandy Corporation<br />
Fort Worth, Texas 76102<br />
01A00 Printed in China