MIDI FILES MP3 PLAYER - The Electric Room
MIDI FILES MP3 PLAYER - The Electric Room
MIDI FILES MP3 PLAYER - The Electric Room

You also want an ePaper? Increase the reach of your titles
YUMPU automatically turns print PDFs into web optimized ePapers that Google loves.
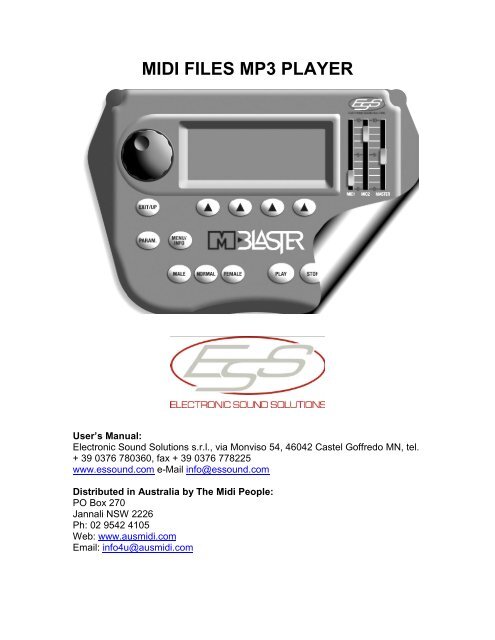
<strong>MIDI</strong> <strong>FILES</strong> <strong>MP3</strong> <strong>PLAYER</strong><br />
User’s Manual:<br />
Electronic Sound Solutions s.r.l., via Monviso 54, 46042 Castel Goffredo MN, tel.<br />
+ 39 0376 780360, fax + 39 0376 778225<br />
www.essound.com e-Mail info@essound.com<br />
Distributed in Australia by <strong>The</strong> Midi People:<br />
PO Box 270<br />
Jannali NSW 2226<br />
Ph: 02 9542 4105<br />
Web: www.ausmidi.com<br />
Email: info4u@ausmidi.com
2<br />
INDEX<br />
INTRODUCTION..........................................................................................3<br />
CONNECTION AND COMMANDS..............................................................4<br />
POWER SUPPLY .......................................................................................6<br />
AUDIO CONNECTIONS..............................................................................6<br />
HOW TO START .........................................................................................6<br />
SWITCHING ON..........................................................................................7<br />
SONGS .......................................................................................................8<br />
HOW TO PLAY A SONG ............................................................................8<br />
EASY TUNE.................................................................................................8<br />
OPERATIONAL MODE................................................................................9<br />
FUNCTION KEYS (FIG.1/6).........................................................................9<br />
SONGS MODE .........................................................................................10<br />
CHORDS AND LYRICS VISUALIZATION.................................................11<br />
PLAY/STOP/CONTINUE ..........................................................................12<br />
PARAM. (PARAMETERS).........................................................................13<br />
TRKCHANG (TRACK CHANGE)...............................................................15<br />
PARAMETERS FOR <strong>MIDI</strong> FILE ................................................................15<br />
PARAMETERS FOR <strong>MP3</strong> <strong>FILES</strong>............................................................. 18<br />
PLAY LIST ................................................................................................19<br />
HOW TO CHOOSE A LIST OF SONGS IN “PLAY LIST” MODE ….….....20<br />
HOW TO PLAY SONGS IN PLAY LIST ................................................... 20<br />
LIST Visualize the list of songs in a group.................................................21<br />
TEXT and TRKCHANG..............................................................................22<br />
MENU/INFO...............................................................................................22<br />
SONGS ERASE.........................................................................................23<br />
USB............................................................................................................24<br />
TV SETUP..................................................................................................24<br />
OPERATING SYSTEM..............................................................................25<br />
TECHNICAL DATA SHEET.......................................................................26<br />
WHAT TO DO IF: ......................................................................................27
3<br />
INTRODUCTION<br />
First of all, ESS would like to thank you for your purchase of M-Blaster. M-Blaster<br />
is a <strong>MIDI</strong>, Karaoke and <strong>MP3</strong> player characterised by a very intuitive user<br />
interface.<br />
M-Blaster plays:<br />
Standard <strong>MIDI</strong> files (.mid format 0 and 1)<br />
Karaoke files (.kar format 1)<br />
<strong>MP3</strong> files (VBR/CBR, successfully tested up to 256 Kbps (depending on<br />
the encoder))<br />
M-Blaster uses a Compact Flash Card as a data storage unit. <strong>The</strong> M-Blaster can<br />
be loaded with up to 511 songs.<br />
Included in the packaging are:<br />
<br />
<br />
<br />
<br />
<br />
<br />
Off- Line Switching Power Supply Adapter;<br />
CD-Rom containing the e-link software to transfer, manage and backup<br />
files;<br />
Operating manual;<br />
USB cable;<br />
Compact Flash card;<br />
Audio/Video cable (L+R Red/White / Video Yellow).
4<br />
CONNECTION AND COMMANDS<br />
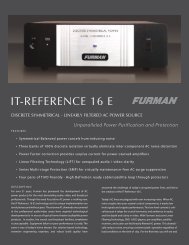
Frontal panel<br />
1 10 11 12<br />
9 2 3 4 5 6 7 8<br />
Fig.1<br />
1) Adjustment knob, to modify the values of the various parameters and change<br />
the displayed page;<br />
2) Use this button to access the global adjustments on the player, like: global<br />
equalization, effects adjustment on the inputs Mic1/Mic2, global transposition on<br />
<strong>MIDI</strong> songs;
5<br />
3) Use this button to access options like: song erasing, adjustment of the TV set<br />
if connected and transferring files from PC to Compact Flash Card. If this button<br />
is pressed while a song is in “play” mode, the screen will display info about the<br />
song. It is possible to adjust the display contrast by pressing this key and rotating<br />
the alpha dial knob.<br />
4) <strong>The</strong>se buttons are used for the “Easy Tune” feature, which enables instant<br />
adjustment of the tonality/key of the song for a Male or a Female performer.<br />
5) Function buttons. <strong>The</strong>se buttons select different functions, depending on the<br />
page displayed on the screen;<br />
6) Compact Flash Card housing;<br />
7) Play/Stop, to start or stop the song playback;<br />
8) Arrow buttons, to select elements visualised on the screen.<br />
9) Exit current screen, or go back to the previous screen;<br />
10) High brightness backlit display;<br />
11) Individual microphones volume fader;<br />
12) Global volume fader.<br />
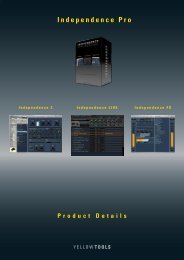
Back Panel<br />
1 2 3 4 5 6 7 8 9<br />
Fig.2<br />
1) Stereo mini-jack output for headphones connection;<br />
2) 2 Microphones inputs (Jack 6.3 mm TSR);<br />
3) 2 Audio outputs (to be connected to the audio system);<br />
4) Video connectors. Output (Video out) / Input (Video in)<br />
5) Connector for optional external lyrics display or video camera power supply
6<br />
6) Port <strong>MIDI</strong> Out to connect an external sonic generator;<br />
7) USB connector to connect M-Blaster to a PC;<br />
8) Switch on;<br />
9) Connection to the supplied external power supply adapter;<br />
POWER SUPPLY<br />
Connect the adapter plug (male) to the PWR IN female connector positioned on<br />
the M-Blaster back panel (Fig.2/9). <strong>The</strong>n connect the adapter plug to a power<br />
point.<br />
IMPORTANT<br />
Please only use the adapter supplied, otherwise the equipment can be<br />
damaged.<br />
AUDIO CONNECTIONS<br />
Connect the M-Blaster Audio Outputs (fig 2/3) to your audio equipment (mixer<br />
line input or directly to the line inputs of audio equipment - AUX or TAPE - of your<br />
home Hi-Fi or similar).<br />
Note: In order not to damage the audio equipment it is strongly recommended<br />
that M-Blaster is not turned on before the amplification set-up.<br />
HOW TO START<br />
M-Blaster is supplied with “e-link” software for the Personal Computer which<br />
allows you to transfer <strong>MIDI</strong> and <strong>MP3</strong> files directly from your PC to the MBlaster<br />
data storage unit (Compact Flash Card). This software can also be used for<br />
backup operations.<br />
First of all install the supplied software on your PC, then connect your M-Blaster<br />
through a standard USB cable A/B (such as the one used for USB printers) to a<br />
properly functioning USB port on the PC.
7<br />
Note: when executing the program, if correctly set, M-Blaster will automatically<br />
position on the “USB” page.<br />
After having done this, launch the program by double clicking on the icon created<br />
during installation. As for the software utilization, please refer to the on-line guide<br />
included with the software.<br />
SWITCHING ON<br />
To switch the M-Blaster on, insert the supplied adapter connector into the<br />
corresponding socket positioned on the back panel and push the ON button.<br />
<strong>The</strong> display will light up and after a few seconds, you will see the following:<br />
READING PROGRAM<br />
Shortly followed by:<br />
ESS<br />
M-BLASTER<br />
VERSION XXXX<br />
<strong>MIDI</strong> Karaoke Mp3 Player<br />
For its correct functioning M-blaster needs the Data storage unit (Compact Flash<br />
Card), to be inserted in its proper housing (fig1/6). Otherwise, the following<br />
message will appear on the screen:<br />
“COMPACT FLASH NOT PRESENT”<br />
Note: <strong>The</strong> Compact Flash Cards are formatted when the product is sold;<br />
however, if necessary, the formatting should be executed with the following<br />
characteristics: FAT 12/16 bit formatting (it will be implemented to FAT 32).
8<br />
Insert the Compact Flash in its proper housing (fig1/6) without forcing it. M-<br />
Blaster will then display the songs page by page. It is possible to adjust the<br />
display contrast by pressing the MENU key (fig 1/3) and rotating the alpha dial<br />
knob (fig. 1/1).<br />
SONGS<br />
<strong>The</strong> page on the display contains the songs list, in <strong>MIDI</strong> or <strong>MP3</strong> format, in<br />
alphabetical order, 6 titles of 26 letters per line. <strong>The</strong> audio songs (<strong>MP3</strong>) are<br />
marked by the “A” letter before the title while the <strong>MIDI</strong> files are preceded by the<br />
suffix “M” (.mid) or “K” (.kar). Above left of the display is the current page<br />
number. To visualize the other pages rotate the switch (fig. 1/1): at every click the<br />
page will change to a new one containing 6 songs. It is also possible to move<br />
one song at a time, utilizing the arrow buttons (fig. 1/8); after the last song the<br />
next page will be displayed.<br />
HOW TO PLAY A SONG<br />
It is extremely easy to play a song. Highlight the required song with the arrow<br />
buttons (fig. 1/8), and then push the PLAY button. To stop the playback, just<br />
push the STOP button. It is also possible to keep playing the song from where<br />
you stopped it by using the function buttons (fig. 1/5) to select CONTINUE as it<br />
appears on the display.<br />
EASY TUNE<br />
Thanks to this exclusive function it is possible to instantly adjust, before or while<br />
playing a <strong>MIDI</strong> song, the tonality key depending on the user needs.<br />
<strong>The</strong> functioning is extremely intuitive:<br />
MALE: if this key is lighted M-Blaster will adjust the <strong>MIDI</strong> song key for a<br />
male voice;
9<br />
<br />
<br />
NORMAL: if this key is lighted M-Blaster will play the <strong>MIDI</strong> song in its original<br />
key;<br />
FEMALE: if this key is lighted M-Blaster will adjust the <strong>MIDI</strong> song key for a<br />
female voice.<br />
Note: the tonal transposition of “EASY TUNE” is not automatically saved. In order<br />
to do that, the transposition will have to be done (and then saved) in the<br />
“TRKCHANG” (track change) page. Despite the fact that “EASY TUNE”<br />
transposes most <strong>MIDI</strong> songs correctly depending on the performer<br />
(male/female), it is possible that certain songs, with special peculiarities, will not<br />
adapt perfectly to the transposition. You can find the tonal transposition of “EASY<br />
TUNE” on the PARAM-<strong>MIDI</strong> page.<br />
OPERATIONAL MODE<br />
<strong>The</strong> meaning of the words and the symbols visualized on the display varies<br />
depending on the chosen mode:<br />
<br />
<br />
<br />
<br />
In SONGS mode: name of the songs;<br />
In PLAYLIST mode: name of the groups;<br />
In MENU/INFO mode: player managing functions or played song<br />
characteristics;<br />
In PARAM. mode: <strong>MIDI</strong>/Audio global adjustments functions, like the <strong>MIDI</strong><br />
transposition and equalizations.<br />
FUNCTION BUTTONS (fig.1/5)<br />
<strong>The</strong> use given to the four function buttons F1-F2-F3-F4 is variable and changes<br />
from time to time depending on the active operational mode. Clearly, it is not<br />
necessary to remember which function is assigned to every button as it shows on<br />
the last line of the display: there are four boxes at the bottom of the display which<br />
correspond to the four function buttons directly below them.
10<br />
In this way the four function keys can always access the “typical” functions of the<br />
operational mode running in that moment.<br />
SONGS MODE<br />
<strong>The</strong> functions offered by the SONGS mode allow to:<br />
<br />
<br />
<br />
<br />
Choose with the arrow buttons a single song to play using the PLAY key;<br />
Visualize chords and lyrics (if memorized in the song);<br />
Adjust volume, effects, transposition and tempo of the song<br />
(“TRKCHANG”);<br />
Instantly exclude the melody track (if present in the <strong>MIDI</strong> file).<br />
Authorised function keys:<br />
When there are no songs playing in SONGS mode, M-Blaster is in “stand-by”<br />
(the STOP button is lighted while the PLAY button is off). In the last line of the<br />
display the following function keys are active:<br />
<br />
<br />
<br />
“TRCK ON” / “TRCK OFF”: this allows stopping the melody track from<br />
playing. <strong>The</strong> factory set <strong>MIDI</strong> channel is 4, however in “Param.” “<strong>MIDI</strong>” it is<br />
possible to assign the value to other channels as well. Once set, the<br />
parameter will remain active until the equipment is turned off or when the<br />
function is disabled;<br />
o “TRCK ON” the melody track (ch4 default) is activated;<br />
o “TRCK OFF” the melody track (ch4 default) is disabled;<br />
“PLAYLIST”: allows to access the PLAYLIST mode described later;<br />
“TEXT”: allows accessing the visualization mode of chords and lyrics.<br />
When the M-Blaster is in “PLAY” (Green led above the PLAY key is lighted), in<br />
the last line of the display the following function keys are active:<br />
<br />
<br />
<br />
<br />
“TRCK ON” / “TRCK.OFF” (see above);<br />
“LIST” (see above);<br />
“TEXT” (see above);<br />
“TRKCHANG (TRACK CHANGE)”: Adjust many variables such as the<br />
volume, reverberation,
11<br />
chorus, transposition and tempo of the song being played.<br />
Note: <strong>The</strong> function TRKCHANG is only available when the song is in “PLAY”<br />
because the adjustment values of the single parameters vary depending on the<br />
starting value that’s preset on each song. To read the preset starting values of<br />
each song (normally included in the first measure of the song) it is necessary to<br />
put the song in PLAY. Pushing the STOP button twice, makes the effects<br />
(Rev./Delay/Chorus) come momentarily off from MIC1/2 (“TALK” mode). <strong>The</strong><br />
effects will automatically reactivate when you start playing a song.<br />
When a song is interrupted by pressing the STOP button, the function<br />
TRKCHANG is replaced by:<br />
<br />
“CONTINUE”: This function is usually coupled with the functions<br />
Play/Stop, and it is used to restart a song exactly from the point where it<br />
had been interrupted by the STOP button.<br />
CHORDS AND LYRICS VISUALIZATION<br />
This function is activated by the “TEXT” function button, and can be used either<br />
before or after having put a song in PLAY. It is probably better to press text<br />
before you start the song so you can be ready for any lyrics at the beginning of<br />
the song. If the song contains lyrics or chords and lyrics, press TEXT and then<br />
PLAY.<br />
To leave the TEXT mode, push the EXIT button.<br />
NOTE: Lyrics and chords, if present in the midi file, are visualized slightly in<br />
advance with respect to the part of the song being played, to give the
12<br />
performer the time to get ready. <strong>The</strong> amount of time the lyrics come up in<br />
advance depends on the setup of the midi file. It is possible to enter the TEXT<br />
mode even after having the song in PLAY. It is also possible to enter and exit the<br />
TEXT mode at any time during the song performance. If you enter the TEXT<br />
mode while the song is being played, it will sometimes be a short wait before<br />
being able to visualize the correct lyrics on the display. It may also “lose” the lyric<br />
portion that should be visualized while activating the TEXT mode. Don’t worry –<br />
the M-Blaster will catch up to itself.<br />
For the chords and lyrics to be seen on the display, they have got to be<br />
memorised in the <strong>MIDI</strong> file. <strong>The</strong> readable formats are:<br />
Tune 1000 (files with extension “.mid”): in format “1” or “0”<br />
Solton (files with extension “.mid”): in format “1” or “0”<br />
Word Box/M-Live (files with extension “.mid”): in format “1” or “0”<br />
Karaoke (files with extension “.kar”): in format “1”<br />
PLAY/STOP/CONTINUE<br />
In SONGS mode, to PLAY a song, select it with the arrow buttons. Pushing the<br />
PLAY button will play the highlighted song. Pushing the MENU/INFO button while<br />
the song is playing will display:<br />
<br />
<br />
<br />
<br />
<strong>The</strong> full title of the song playing;<br />
For <strong>MIDI</strong> files, the time signature (4/4, 3/4 etc);<br />
For <strong>MIDI</strong> files the current position, indicated in measures and in quarters<br />
of measures, for Mp3 files the time gone from the start of the track;<br />
For <strong>MIDI</strong> files the metronomic time, for <strong>MP3</strong> files the bit rate value (kbps).<br />
If the STOP button is pushed during the song playback, the song will be paused.<br />
At this point it is possible to use the CONTINUE function key to continue
13<br />
(to restart the song playback from the point where it was paused). You can also<br />
push the PLAY button again to restart the song from the beginning.<br />
NOTE: <strong>The</strong> song that is playing is always the one highlighted with the arrow<br />
buttons. If one song is playing then another one is highlighted pushing the PLAY<br />
button will stop the first song and the new song will start immediately. If a song is<br />
interrupted with the STOP button read the following:<br />
After halting a song with the STOP button and highlighting another one, using the<br />
PLAY button will start the song from the beginning. Using the CONTINUE<br />
function will resume the first song playing (from the point where it was halted).<br />
PARAM. (Parameters)<br />
Press the PARAM. button while a song is playing to access the “Parameters”<br />
page where it is possible to adjust the <strong>MIDI</strong> and Audio parameters in real time<br />
(during playback). All parameters can be changed using the adjustment<br />
knob (fig. 1/1).<br />
<strong>The</strong> function keys in PARAM permit the selection of the following pages:<br />
1. <strong>MIDI</strong>, which enables adjustment to the following:<br />
<strong>MIDI</strong> TRANSPOSE: This adjusts the global transposition (of all the <strong>MIDI</strong><br />
files). <strong>The</strong> value can be varied by 12 semitones before or during the song<br />
playback. This parameter will be active until the equipment is turned off.<br />
<strong>MIDI</strong> REVERB: This adjusts the global quantity of the reverberation effect<br />
on <strong>MIDI</strong> tracks.<br />
MUTE TRACK: This enables you to choose which track is the melody<br />
track (in case you would like it muted with the TRKON/OFF function. <strong>The</strong><br />
TRKON/OFF factory preset value is 4 as the melody track is usually<br />
assigned to this <strong>MIDI</strong> channel.<br />
EASY TUNE: Shows the ‘easy tune’ value (+4 semitones for male, 0 for<br />
normal or -4 for female).<br />
2. “OUT EQ”: This adjusts the output global equalization.
14<br />
<strong>The</strong> adjustable parameters are:<br />
TREBLE : high frequencies;<br />
BASS: low frequencies.<br />
3. “MIC EQ”: This adjusts the equalization of the microphone inputs Mic1 and<br />
Mic2.<br />
<strong>The</strong> adjustable parameters are:<br />
HIGH: high frequencies;<br />
MID F: MID intervention frequency;<br />
MID: medium frequencies;<br />
LOW: low frequencies.<br />
NOTE: <strong>The</strong> equaliser on the medium frequencies is of the “semi-parametric”<br />
type. <strong>The</strong> “MID F” parameter enables adjustment to a particular frequency,<br />
enhancing or easing it up through the “MID” parameter.<br />
This means that intervening exclusively on the “MID F” parameter will make no<br />
tonal variation. <strong>The</strong> intervention frequencies start from 110hz (identified as low<br />
frequencies) and go up to 1800hz (identified as high frequencies, or high pitched)<br />
and cover the range of frequencies not modifiable by the “HIGH or “LOW”<br />
regulations. A practical example to understand the regulation of the semiparametric<br />
filter: enhance the “MID” parameter, then, speaking in the<br />
corresponding microphone move as you please the parameter “MID F”. It will be<br />
then possible to hear the different frequencies to enhance (or ease up) using the<br />
“MID”.<br />
4. “MIC FX”. This adjusts the type and quantity of the effect for the Mic1 and<br />
Mic2.<br />
<strong>The</strong> adjustable parameters are:<br />
<br />
<br />
<br />
<br />
DELAY TYPE: To choose among three types of delay:<br />
Mono/Stereo/Triple;<br />
DELAY LEVEL: To change the quantity of delay effect;<br />
REVERB SEND: To change the quantity of reverberation;<br />
CHORUS SEND: To change the quantity of chorus effect.<br />
“EXIT”: To leave the “PARAM.” page.
15<br />
TRKCHANG (TRACK CHANGE)<br />
This function allows adjustment to the customized parameters of each song<br />
(volumes/effects /transposition/time etc).<br />
During playback it is possible to adjust and save customizations for each single<br />
song by pressing the TRKCHANG function key (can only be activated while the<br />
song is playing)<br />
<strong>The</strong> TRKCHANG page is different depending on the type of file played,<br />
<strong>MIDI</strong> or audio (<strong>MP3</strong>).<br />
NOTE: <strong>The</strong> effect generator (reverberation and chorus) is common between the<br />
<strong>MIDI</strong> playback and the MIC1/2, so the reverberation and/or chorus characteristics<br />
can be changed depending on the type of messages coming from the <strong>MIDI</strong> file in<br />
playback.<br />
PARAMETERS FOR <strong>MIDI</strong> <strong>FILES</strong><br />
To adjust the volume, effects, transposition, tempo and other parameters of a<br />
<strong>MIDI</strong> file, select the TRKCHANG function. As explained above, this function is<br />
accessible from the main SONGS page and only available after the song has<br />
started.<br />
Once TRKCHANG is activated, this is what the function keys do:<br />
<br />
RESTORE: This zeroes all the variations to their parameters and restores<br />
the presets originally memorized in each song;
16<br />
<br />
<br />
<br />
<br />
SAVE: Saves the modifications made by the user.<br />
RELOAD: Recalls the last values saved by the user.<br />
MUTE: Mutes a track (same as zeroing the volume <strong>MIDI</strong> channel). This<br />
function is only available if ‘VOL’ in the TRKCHANG window is highlighted.<br />
SOLO: “Solos” the highlighted channel. This function is only available if<br />
‘VOL’ in the TRKCHANG window is NOT highlighted.<br />
NOTE: None of the variations done through the TRKCHANG function will modify<br />
the original parameters of a song. To understand how TRKCHANG works,<br />
imagine a chart attached to the song, in which all the variations on the default<br />
song values done by the user are memorised (+/- values). For instance a song<br />
with the volume on the <strong>MIDI</strong> channel n°2 might be recorded with the following<br />
progression:<br />
<br />
<br />
first measure (beat 1.1) set to Volume=100<br />
tenth measure (beat 10.1) set to Volume=110<br />
When the song is in PLAY, the M-Blaster will display (in correspondence to the<br />
<strong>MIDI</strong> channel n°2 volume) the value “100” until the tenth measure. After that we<br />
will read “110”.<br />
Let’s imagine we set a variation on the channel 2 volume using the<br />
PAGE/VALUE knob equal to “-020” (saving the variation with the SAVE function<br />
key). Playing the song again will display (in correspondence to the <strong>MIDI</strong> channel<br />
n°2 volume) the value “080” until the tenth measure and “90” after that.<br />
This means that with the TRKCHANG function it is possible to set variations that<br />
will add up (or subtract) the preset parameter values of songs. Such variations<br />
can be saved on the Compact Flash (in a chart attached to the song) and will<br />
have effect only when the song is being played and will not affect the original<br />
parameters which can be recalled any time.<br />
Once TRKCHANG is activated, the display shows a page divided in two zones by<br />
a status bar.<br />
<strong>The</strong> upper part concerns the managing of the single <strong>MIDI</strong> channels, while the<br />
lower one allows choosing from which parameter to work.
17<br />
Variations can be made on the following parameters:<br />
<br />
<br />
<br />
<br />
<br />
<br />
<br />
<br />
VOL (Volume)<br />
TRN (Transpose)<br />
PRG (Program change)<br />
BNK (Bank select)<br />
REV (Reverberation)<br />
CHR (Chorus)<br />
PAN (Panpot)<br />
TEMPO (metronomic time)<br />
Use the arrow buttons to highlight a parameter of the lower part to work on. You<br />
can also globally modify all the <strong>MIDI</strong> channels using the adjustment knob (fig.<br />
1/1). In that case the modifications shown on the status bar will be those of<br />
GLOBAL followed by the name of the parameter in use and from the word<br />
TRKCHANG. It is impossible to make global changes to PROGRAM CHANGE or<br />
BANK SELECT.<br />
Using the arrow buttons to move to the upper part (the status bar will read the<br />
word “CHANNEL” followed by the name of the variation in use and by the word<br />
TRKCHANG) you can adjust the parameter in use of the particular midi channel<br />
on which the arrow buttons are highlighting. <strong>The</strong> upper bar reports the name of<br />
the instrument assigned to the <strong>MIDI</strong> channel where the arrow buttons are<br />
positioned and the value of the parameter in use, visualized as a variation (-/+)<br />
set by the user for that channel.<br />
NOTE: on channel 10 transposing is only possible in “CHANNEL” mode<br />
<strong>The</strong> usable function keys in the TRACK CHANGE page have the same function<br />
as in the previous operative systems: RESTORE, SAVE, RELOAD and MUTE<br />
with the addiction of a new one that changes its use depending on the parameter<br />
it is working with.<br />
More precisely:<br />
“MUTE”: This is only visualized when working on the volume parameter. Pushing<br />
this function key changes the track on which the arrow buttons are positioned.
18<br />
“SOLO”: Visualized for all the other parameters. Pushing this function key will<br />
play only the channel on which the arrow buttons are positioned in that moment.<br />
PARAMETERS FOR <strong>MP3</strong> <strong>FILES</strong><br />
To make adjustments to an audio file (<strong>MP3</strong>) select the TRKCHANG function. As<br />
described above, this function is accessible from the main SONGS page by using<br />
the corresponding function key. TRKCHANG is only an option after the song has<br />
started: Once TRKCHANG is selected the function keys have the following uses<br />
assigned:<br />
<br />
<br />
<br />
<br />
RESTORE: “Zeroes” all the variations done to the parameters by the user<br />
and restores the presets originally memorized in each song;<br />
SAVE: Saves the modifications made by the user.<br />
RELOAD: Recalls the last values saved by the user.<br />
MUTE: This parameter is not usable on this page.<br />
<strong>The</strong> parameters available in this page are:<br />
LEVEL: Adjusts the volume of the song in playback,
19<br />
<br />
<br />
<br />
<br />
<br />
TREBLE: Increases or decreases the level of the high frequencies (treble),<br />
BASS: Increases or decreases the level of the low frequencies (bass),<br />
PANPOT: Adjusts the balance between the two stereo channels<br />
(left/right),<br />
PITCH: Modifies the key of the song playing without altering its tempo.<br />
<strong>The</strong> values allowed are +/- 6 semitones,<br />
TIME STRETCH: Modifies the tempo of the song in playback without<br />
altering its key (pitch). <strong>The</strong> values allowed are +/- 3.<br />
NOTE: <strong>The</strong> “PITCH” and “TIME STRETCH” functions can be very useful,<br />
however is important to remember that the sound quality will decrease the more<br />
the original mp3 is modified.<br />
PLAY LIST<br />
<strong>The</strong> PLAY LIST is what M-Blaster uses to organize the files in a simple and<br />
intuitive manner. You can create a PLAY LIST containing songs to be played<br />
sequentially (to help organize repertoire) or to group song by genre using the E-<br />
LINK software. Also, any song is able to be part of more than one Play List<br />
(without duplicating the song on the Compact Flash). This means you can<br />
choose the same song from alternative play lists. Each Play List can contain a<br />
maximum of 48 songs, mixed between <strong>MIDI</strong> files and/or <strong>MP3</strong>. M-Blaster has a<br />
capacity of up to 100 groups.<br />
<strong>The</strong> functions offered by the play list mode allow to:<br />
Choose a group of songs to play (using the PLAY button).<br />
Choose whether to play the songs in sequence (one after the other) or to<br />
select and then play songs from the PLAY LIST in any order one at a time,<br />
Visualize chords and lyrics (if memorized into a song),<br />
Customize parameters like volumes, effects, transposition and tempo of<br />
the song playback.<br />
To activate the PLAY LIST mode, start from the SONGS mode and then push the<br />
PLAY LIST function key.
20<br />
Function Keys activated:<br />
If you are in PLAY LIST mode and there are no songs PLAY LIST (or if the<br />
previous song is finished) M-Blaster is in “Stand-by” (STOP button is lighted –<br />
PLAY button is not); in the last line of the display the following function keys are<br />
active:<br />
<br />
<br />
<br />
LOOP/NOLOOP: To decide whether songs start to play immediately after<br />
the previous song is finished (LOOP) or if the M-Blaster should wait for<br />
you to press PLAY before it plays the next song (NOLOOP) ;<br />
LIST: To show the list of songs that are part of that play list and to choose<br />
which song of the list to play,<br />
TEXT: Shows any text (generally lyrics or chords) that are part of the<br />
highlighted file.<br />
When the M-Blaster is in “PLAY” (green ‘PLAY’ button is lighted) there are<br />
more function keys active:<br />
<br />
<br />
TRKCHANG: Adjusts many variables such as the volume, reverberation,<br />
chorus, transposition and tempo of the song being played. When the song<br />
playback is halted through the STOP button, the TRKCHANG function key<br />
is substituted by CONTINUE.<br />
CONTINUE: This is used to restart a song exactly from the point where it<br />
had been interrupted by the STOP button.<br />
HOW TO CHOOSE A LIST OF SONGS IN PLAY LIST MODE<br />
Once the PLAY LIST mode is accessed, you can see the group of songs created<br />
on the display (they can be setup only through the management software<br />
supplied with M-Blaster)<br />
To choose a PLAY LIST highlight it with the arrow buttons (fig. 1/8) or move to<br />
another page with the alpha dialer (fig. 1/1).<br />
HOW TO PLAY SONGS IN PLAY LIST<br />
Before playing the songs contained in a PLAY LIST, decide whether the songs<br />
should be played sequentially (one after another), or if the songs will be played in<br />
a different order to how they are listed in the play list (meaning each song
21<br />
will be selected manually after the previous song is finished). This selection is<br />
made using the LOOP/NOLOOP function key.<br />
<strong>The</strong> current selection (LOOP/NO LOOP) is visible on the lower left part of the<br />
display. Pushing the corresponding function key will change from LOOP to<br />
NOLOOP and vice versa.<br />
NOTE: <strong>The</strong> switchover between the two modes LOOP/NOLOOP can be<br />
activated while a song is playing.<br />
If you push the PLAY button upon first opening the play list, the first song from<br />
the group will start.<br />
Just like in the SONGS mode, pushing the MENU/INFO button during the song<br />
playback, you can view these song characteristics:<br />
<strong>The</strong> name of the selected song;<br />
<strong>The</strong> time signature (4/4 – 3/4 etc);<br />
<strong>The</strong> current position, in beats and quarters (for instance 059.4);<br />
<strong>The</strong> metronomic time.<br />
Just like in SONGS mode, when a song of a PLAY LIST is in playing, the TEXT<br />
and TRKCHANG function keys are active; once the playback is halted with the<br />
STOP button, TRKCHANG switches to CONTINUE.<br />
To see the songs of a PLAY LIST, push the LIST function key. As usual, use the<br />
alpha dial switch to go the next page for a maximum of 8 pages (each of 6 songs<br />
for a total of 48 per list).<br />
You can move among the songs that are part of the group using the arrow<br />
buttons. After having highlighted a song with the arrow buttons, pushing the<br />
PLAY button will start that song. When the LOOP mode is active all the songs<br />
will play in order automatically until the last one of the group. To go back one<br />
page just push the EXIT button. From there you can choose another play list if<br />
you would like.
22<br />
TEXT and TRKCHANG<br />
In PLAY LIST mode the TEXT and TRKCHANG functions are similar to their<br />
functions in SONGS mode. If a playlist is in LOOP mode and the TEXT or<br />
TRKCHANG function is active, the data about the song currently playing will<br />
always be showing. (For example, if the current song finishes and the next one<br />
starts, the data showing in the TEXT or TRKCHANG display will also change to<br />
the new song).<br />
<strong>The</strong> TEXT and TRKCHANG functions can be displayed by pressing their<br />
corresponding function keys, available either on the main PLAY LIST page or in<br />
the LIST pages.<br />
MENU/INFO<br />
<strong>The</strong> MENU/INFO page contains various and important management utilities for<br />
the M-Blaster. To access the MENU page, push the MENU/INFO button when<br />
the M-Blaster is in “Stand-by”, (not playing – PLAY button led is off). It is<br />
otherwise impossible to access the MENU page.<br />
<strong>The</strong> functions contained in the MENU section are:<br />
<br />
<br />
<br />
<br />
<br />
SONGS ERASE: to erase a song from the Data Storage Unit<br />
(Compact Flash);<br />
USB: Go to this page to transfer <strong>MIDI</strong> and/or <strong>MP3</strong> files from the computer<br />
(using the supplied software) to the Data Storage Unit (CompactFlash);<br />
TV SETUP: To access the TV visualization options menu;<br />
CLEAR ALL DATA: To delete every file from the Compact Flash.<br />
Also, in the lower right part of the page it is possible to find info related to the<br />
single device:<br />
<br />
<br />
<br />
<br />
S.N. : Device serial number;<br />
Sysop : Operative system version installed on the device;<br />
Eprom : Version of resident software;<br />
Songs: <strong>The</strong> number of songs in the Compact Flash.
23<br />
<strong>The</strong> activated function keys are:<br />
<br />
<br />
INTRO ON / OFF: Allows the user to activate / deactivate the short<br />
musical intro when the unit is turned on.<br />
SELECT: Allows access to one of the functions previously described (the<br />
selected one).<br />
Once the MENU page is showing, to access one of the functions previously<br />
described, highlight the desired function (using the arrow buttons) and then<br />
select it with the SELECT function key.<br />
SONGS ERASE<br />
This function allows the permanent deleting of a song. To activate it:<br />
1. Push the MENU/INFO button;<br />
2. Highlight SONGS ERASE with the arrow keys;<br />
3. Push the SELECT function key.<br />
All the songs present in the Flash Card will display (divided into pages and<br />
accessible by using the arrow buttons (fig. 1/8) and the alpha dial switch (fig. 1/1)<br />
<strong>The</strong> function keys activated are:<br />
<br />
ERASE: delete procedure<br />
1. Choose the song to delete with the arrow buttons (fig 1/8) (or with the alpha<br />
dial knob) (fig. 1/1) then push the ERASE function key;<br />
2. If you wish to leave the ERASE mode without deleting any files, push the EXIT<br />
button.<br />
To delete the song push the YES function key when requested, otherwise push<br />
NO. You can then either delete another song or push the “EXIT” button to return<br />
to the MENU page.
24<br />
USB<br />
This page should be shown when the M-Blaster is connected to the PC. If you<br />
modify the content of the Compact Flash, the “INDEX” is automatically shown<br />
when you exit from the USB page.<br />
TV SETUP<br />
In this section it is possible to adjust the functions related to the device<br />
connected through the video connector positioned on the back panel (fig 2/4). To<br />
activate the TV SETUP function:<br />
1. Push the MENU button;<br />
2. Use the arrow buttons to highlight TV SETUP;<br />
3. Push the function key SELECT.<br />
<strong>The</strong> activated function keys are:<br />
<br />
<br />
SAVE: This memorizes the changes made in this page;<br />
CHANGE: This allows the variation of the selected parameter.<br />
<strong>The</strong> parameters that are able to change are:<br />
<br />
LIST SONGS ON TV: This allows (or prevents) the list of songs on the<br />
connected TV screen to be shown. If ENABLED is selected, the song titles<br />
will be shown on the external screen at the end of the song, just like on<br />
the M-Blaster display (6 songs). If switched to DISABLED the list will not<br />
be shown on the external screen.<br />
NOTE: Changes to this parameter do not affect the MBlaster’s internal display.<br />
<br />
<br />
<br />
CHORDS ON TV: Allows (or prevents) the visualization of the chords, if<br />
present in the <strong>MIDI</strong> file, on the connected TV screen.<br />
BACKGROUND COLOR: Allows the adjustment of the background colour<br />
in the chords/lyrics page (if present in the <strong>MIDI</strong> file).<br />
CURSOR COLOUR: Allows the adjustment of the highlighted colour;
25<br />
<br />
<br />
VIDEO/CAMERA IN: If the optional Video camera is connected, use this<br />
parameter to adjust signal of the video camera in the background of the<br />
TV.<br />
CLEAR ALL DATA: This function is used to delete all contents of the<br />
Compact Flash. To clear Compact Flash, “YES” has to be pushed, and<br />
then pushed again in order to confirm deleting the songs. At the end of<br />
deleting, this message shows: “SWITCH POWER OFF – THEN ON<br />
AGAIN”.<br />
OPERATING SYSTEM<br />
<strong>The</strong> M-Blaster Operating System comprehends all the commands and functions<br />
that allow all the operations described in this manual to happen. <strong>The</strong> Operating<br />
System is preloaded by ESS and automatically loaded by the device when<br />
switched on. Just like a computer it is possible to update the M-Blaster Operating<br />
System to add new functions and/or to better the already existing ones. <strong>The</strong><br />
update procedure is very easy. Please refer to the on-line guide of the supplied<br />
data transferring software.<br />
PLEASE NOTE CAREFULLY<br />
Once the transfer of the SysOp is over, switch the M-blaster off only when the<br />
following message appears on display:<br />
SWITCH POWER OFF THEN ON AGAIN
26<br />
It requests that the M-Blaster is switched off and then on again. After switching<br />
on, the operating system will be installed and the version number can be verified<br />
on the opening screenshot.<br />
TECHNICAL DATA SHEET<br />
• ADAPTER:<br />
External off-line power supply adapter desktop switching Off Line<br />
In .......90/240 Vac<br />
Out ....15 v. 2A<br />
• CONNECTORS:<br />
Inputs Mic balanced (Jack 6,3mmTSR)<br />
Stereo output (n.2 pin RCA L+R)<br />
Video connector OUT (Pin RCA) cinch<br />
Video connector IN (Pin RCA)<br />
USB Port<br />
Earphones output (mini-jack 3,5mm TSR)<br />
<strong>MIDI</strong> OUT port (din 5p. standard)<br />
• BACKLIT GRAPHIC DISPLAY:<br />
192 x 64 dot size 0,4x0,4 mm / dot pitch 0,45x0,45 mm<br />
• DIMENSIONS<br />
250 x 170 x 60 mm<br />
• WEIGHT<br />
M-Blaster 1.4 Kg<br />
Power supply adapter + Cable 0.45 Kg
27<br />
WHAT TO DO IF<br />
<br />
<br />
<br />
<br />
If the message “compact flash not formatted” appears while the card is in,<br />
format the Card on your PC with file system “fat” in slow Mode.<br />
If the message “fat type not supported” appears while the card is in,<br />
please format the card on your PC with file system “fat” in slow mode.<br />
Important: Not every compact flash is compatible with M-blaster.<br />
If m-blaster stops with the message “init compact Flash” during initialising<br />
of the card, switch it off and turn it on again, pushing simultaneously the<br />
buttons “param” and right Pointer. By this procedure the initializing of the<br />
Songs is stopped and you can cancel the file using the e-link Software.