Instruktionsmanual - Jula
Instruktionsmanual - Jula
Instruktionsmanual - Jula

Create successful ePaper yourself
Turn your PDF publications into a flip-book with our unique Google optimized e-Paper software.
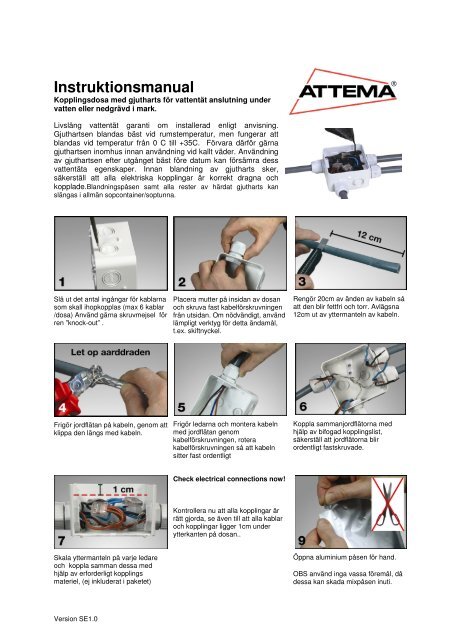
<strong>Instruktionsmanual</strong><br />
Kopplingsdosa med gjutharts för vattentät anslutning under<br />
vatten eller nedgrävd i mark.<br />
Livslång vattentät garanti om installerad enligt anvisning.<br />
Gjuthartsen blandas bäst vid rumstemperatur, men fungerar att<br />
blandas vid temperatur från 0 C till +35C. Förvara därför gärna<br />
gjuthartsen inomhus innan användning vid kallt väder. Användning<br />
av gjuthartsen efter utgånget bäst före datum kan försämra dess<br />
vattentäta egenskaper. Innan blandning av gjutharts sker,<br />
säkerställ att alla elektriska kopplingar är korrekt dragna och<br />
kopplade.Blandningspåsen samt alla rester av härdat gjutharts kan<br />
slängas i allmän sopcontainer/soptunna.<br />
Slå ut det antal ingångar för kablarna<br />
som skall ihopkopplas (max 6 kablar<br />
/dosa) Använd gärna skruvmejsel för<br />
ren ”knock-out” .<br />
Placera mutter på insidan av dosan<br />
och skruva fast kabelförskruvningen<br />
från utsidan. Om nödvändigt, använd<br />
lämpligt verktyg för detta ändamål,<br />
t.ex. skiftnyckel.<br />
Rengör 20cm av änden av kabeln så<br />
att den blir fettfri och torr. Avlägsna<br />
12cm ut av yttermanteln av kabeln.<br />
Frigör jordflätan på kabeln, genom att<br />
klippa den längs med kabeln.<br />
Frigör ledarna och montera kabeln<br />
med jordflätan genom<br />
kabelförskruvningen, rotera<br />
kabelförskruvningen så att kabeln<br />
sitter fast ordentligt<br />
Koppla sammanjordflätorna med<br />
hjälp av bifogad kopplingslist,<br />
säkerställ att jordflätorna blir<br />
ordentligt fastskruvade.<br />
Check electrical connections now!<br />
Kontrollera nu att alla kopplingar är<br />
rätt gjorda, se även till att alla kablar<br />
och kopplingar ligger 1cm under<br />
ytterkanten på dosan..<br />
Skala yttermanteln på varje ledare<br />
och koppla samman dessa med<br />
hjälp av erforderligt kopplings<br />
materiel, (ej inkluderat i paketet)<br />
Öppna aluminium påsen för hand.<br />
OBS använd inga vassa föremål, då<br />
dessa kan skada mixpåsen inuti.<br />
Version SE1.0
Avlägsna mitt-stripen från den<br />
transparenta mixpåsen, så att de<br />
båda komponenterna kan blanda sig<br />
med varandra..<br />
Tryck fram massan från alla kanter<br />
och hörn, så att allt blandas<br />
Knåda massan till en homogen deg<br />
under 3-4minuter. Gjuthartsen<br />
kommer pga. av kemisk reaktion bli<br />
varm (34-40C). Repetera steg 11<br />
varje minut.<br />
Samla all gjuthartsmassa till en ände<br />
av påsen.<br />
Pressa samman gjuthartsmassan så<br />
att påsen blir mindre<br />
Klipp ett litet hål i ett av hörnen.<br />
Häll långsamt i gjuthartsmassan från<br />
en och samma position, för att<br />
minimera uppkomsten av luftbubblor.<br />
Fyll dosan upp till ca 1-2mm under<br />
ytterkant.<br />
Sätt på bifogat lock, två ”klick” skall<br />
höras.<br />
Förslut lufthålet på ovansidan av<br />
locket, med bifogad röd<br />
förslutningsplugg.<br />
För applikationer under vatten skall gjuthartsmassan härda i dosan ytterligare minst en timme. För nedgrävning i<br />
mark är den dock klar att användas och strömmen kan slås på. Dosan och kopplingen är nu vattentät och ingen<br />
gjutharts kan rinna ur.<br />
Version SE1.0
Instruction Manual<br />
AK1 junction box cast-resin joint kit for underground<br />
connections<br />
Ground cables and junction box must be placed, by regulation (Dutch<br />
regulation), 50 cm below the surface. Always switch off the power of the<br />
electrical installation before you start working and assure yourself that<br />
others can not switch on the power unnoticed.<br />
There is a life long guarantee on a waterproof connection if installed<br />
according to this instruction manual. Applications under water (pools,<br />
fountains, etc.) are possible, unless the cast-resin has hardened out for<br />
at least 1 hour.<br />
The handling temperature range of the cast-resin lies between 0°C and +35°C. The cast-resin mixes best at room<br />
temperature. Store the cast-resin in a heated room before using at low temperatures during wintertime. Usage of<br />
the cast-resin after expiring date can affect the water-resistance negatively. Open the cast-resin package after<br />
testing the electrical connections. The mixing bag of the cast-resin with residues of hardened cast-resin can be<br />
disposed at the normal garbage because there are no environmental hazards.<br />
Break out the needed quantity of<br />
inlets. Place a screwdriver, for a<br />
clean knock-out, on the bottom side<br />
of the inlet. Maximum 6 cables per<br />
box.<br />
Place the locknut at the inside of the<br />
inlet and fix it on the cable gland.<br />
Use, if necessary, a tool for this.<br />
Clean cable ends for a length of 20<br />
cm and make it fat free and dry.<br />
Remove 12 cm of the outside mantle<br />
of the cable.<br />
Remove the earth screen by cutting it<br />
with a tool. Attention: do not cut the<br />
earth wires below!<br />
Remove the inside plastic mantle.<br />
Mount the cable with the earth wire<br />
into the cable gland and twist the<br />
cable gland tightly.<br />
Connect the earth wires by using the<br />
special terminal block (included in<br />
package). Screw both screws tightly<br />
to ensure a good connection.<br />
Check electrical connections now!<br />
Strip off the isolation of the wires to a<br />
length prescribed by the<br />
manufacturer of the terminal blocks<br />
(not included) and make the<br />
connections.<br />
Make sure that all conducting parts<br />
are at least 1 cm below the edge of<br />
the box and have sufficient space to<br />
be surrounded by the cast-resin.<br />
Pour the cast-resin in a dry junction<br />
box. Remove all water from the box.<br />
Now open the package with the castresin<br />
(not before!). Open up the<br />
aluminium package. Please do not<br />
use any sharp objects because of<br />
possible damage of the mixing bag.<br />
Versie 1.0 , 30-11-2009
Remove the separation strip from the<br />
transparent mixing bag, so both<br />
components can mix with each other.<br />
Press also on the edges of the bag in<br />
order to mix both components<br />
completely.<br />
Knead the cast-resin into a<br />
homogeneous mass during 3-4<br />
minutes. The mixture will become a<br />
little bit hot (35-40°C) due to the<br />
chemical process. Repeat step 11<br />
every minute.<br />
Press all cast-resin to one side of the<br />
bag.<br />
Make bag smaller in order to pour<br />
more controlled.<br />
Cut a small hole in the mixing bag in<br />
order to form a spout.<br />
Pour the cast-resin slowly at one<br />
position to prevent inclosing of air<br />
bubbles.<br />
Fill the junction box up to 1-2 mm<br />
below the edge.<br />
Close the cover on both “clickers”.<br />
Close the air hole by using the<br />
special included red sealing cap.<br />
The cast-resin joint kit is now ready and can be used directly and power can be switched on. The box and cables<br />
are sealed waterproof. Therefore no liquid cast-resin can come out of the box, also when the box is down on one<br />
side. For applications under water the cast-resin has to be hardened out for at least one hour.<br />
Versie 1.0 , 30-11-2009