Copyright © 2003 by Craftex Industries Inc. - Busy Bee Tools
Copyright © 2003 by Craftex Industries Inc. - Busy Bee Tools
Copyright © 2003 by Craftex Industries Inc. - Busy Bee Tools
Create successful ePaper yourself
Turn your PDF publications into a flip-book with our unique Google optimized e-Paper software.
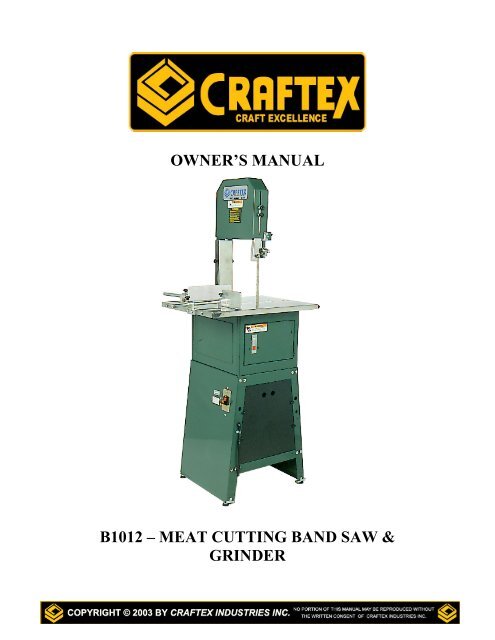
OWNER’S MANUAL<br />
B1012 – MEAT CUTTING BAND SAW &<br />
GRINDER
2<br />
B1012 MEAT CUTTING BANDSAW<br />
Table Of Contents<br />
General Safety Instructions Page 3<br />
B1012 Features Page 4<br />
Carton Contents Page 5<br />
Assembly Instructions<br />
Unpacking Page 6<br />
Base Assembly Page 7<br />
Sliding Table Assembly Page 8<br />
Roller Assembly Page 8<br />
‘L’ Plate Assembly Page 9<br />
Meat Grinder Assembly Page 9<br />
Operating Instructions<br />
Health and Safety Page 10<br />
Power Switch Page 10<br />
Adjusting Drive Wheels Page 10<br />
Adjusting Blade Page 11<br />
Blade Tension Page 11<br />
Guide Blocks Page 12<br />
Bearing Guides Page 12<br />
Fence Guard Page 12<br />
Upper Blade Guard Page 12<br />
Fence and Pusher Page 13<br />
Meat Grinder/Sausage Stuffer Page 13<br />
Band saw Schematic Diagram Page 14<br />
Band saw Parts List Page 15<br />
Base Schematic Diagram Page 16<br />
Base Parts List Page 17<br />
Sliding Table Schematic Drawing Page 18<br />
Sliding Table Parts List Page 19<br />
Miscellaneous Parts List Page 20<br />
Warranty Page 21<br />
<strong>Busy</strong> <strong>Bee</strong> Locations Page 22
3<br />
GENERAL SAFETY INSTRUCTIONS<br />
EXTREME CAUTION SHOULD BE USED IN OPERATING ALL POWER TOOLS. KNOW<br />
YOUR POWER TOOL, BE FAMILIAR WITH ITS OPERATION. READ THE OWNER’S<br />
MANUAL AND PRACTICE SAFE USAGE PROCEDURES AT ALL TIMES.<br />
<br />
<br />
<br />
<br />
<br />
<br />
<br />
<br />
<br />
<br />
<br />
<br />
<br />
<br />
<br />
CONNECT your machine ONLY to the matched and specified power source.<br />
WEAR SAFETY GLASSES, RESPIRATORS, HEARING PROTECTION<br />
and SAFETY SHOES when operating this machine. Always wear safety glasses.<br />
DO NOT wear loose clothing or jewellery when operating machinery.<br />
A Safe Environment is important. Keep the area free of dust, dirt and other<br />
debris in the immediate vicinity of the machine.<br />
BE ALERT! Do Not Use prescription or other drugs that may affect your ability<br />
or judgement to safely use this machine.<br />
DISCONNECT the power source when changing drill bits, hollow chisels or<br />
making other adjustments or repairs.<br />
NEVER leave an operating tool unattended.<br />
NEVER reach over the table when the tool is in operation.<br />
ALWAYS keep blades, knives or bits sharp and properly aligned.<br />
ALWAYS keep all safety guards in place and ensure their proper function.<br />
ALWAYS use push sticks and featherboards to safely feed your work through the<br />
machine.<br />
ALWAYS make sure that any tools used for adjustments are removed before<br />
operating the machine.<br />
ALWAYS secure your work with the appropriate clamps or vises.<br />
ALWAYS keep <strong>by</strong>standers safely away while operating machinery.<br />
THINK SAFETY. WORK SAFELY. Never attempt a procedure if it does not<br />
feel safe or comfortable.
4<br />
B1012 MEAT CUTTING BAND SAW & GRINDER<br />
As part of the growing line of <strong>Craftex</strong> woodworking equipment, we are proud to<br />
offer the B1012 Meat Cutting Band saw & Grinder. The <strong>Craftex</strong> name<br />
guarantees Craft Excellence. By following the instructions and procedures laid<br />
out in this owner’s manual, you will receive years of excellent service and<br />
satisfaction. The B1012 is a professional tool and like all power tools, proper care<br />
and safety procedures should be adhered to.<br />
FEATURES<br />
<br />
The <strong>Craftex</strong> B1012 is a high quality 10” Meat Cutting Band saw with a Meat<br />
Grinder and Sausage Filler.<br />
Motor – 1HP, Single Speed, 110/220 volt, Pre-wired for 110v.<br />
<br />
<br />
Blade Speed – 1300 FPM.<br />
Chrome Steel Sliding Table, 22 1/2" x 16” with an 8” travel.<br />
Table Height – 35”.<br />
Throat Depth – 9 3/4".<br />
Maximum Cutting Height – 9 1/2".<br />
<br />
Blade Length – 77” – 5/8” Wide Blade <strong>Inc</strong>luded.<br />
Overall Height – 57 1/2".<br />
<br />
<br />
<br />
<br />
<br />
<br />
Aluminum Fence and Push Plate.<br />
Die Cast Aluminum Wheels with Sealed Ball Bearings.<br />
Band saw and Meat Grinder are Belt Driven on a Single Shaft.<br />
Sheet Metal Stand <strong>Inc</strong>luded.<br />
Gross Weight – 63kg.<br />
Two Year Warranty.
5<br />
CARTON CONTENTS<br />
Carefully remove all components from the shipping case and set to one side. The<br />
following components in the carton should be as those pictured below.
6<br />
B1012 MEAT CUTTING BAND SAW<br />
Assembly Instructions<br />
Unpacking<br />
Carefully unpack all components from the carton and where applicable, clean<br />
any protective lubricant from the appropriate parts with mineral spirits. Remove<br />
any protective film from the bright components. The following illustration is a<br />
guide to the various components on the B1012 <strong>Craftex</strong> Meat Cutting Band saw.
7<br />
Metal Stand<br />
Assemble the metal<br />
stand as shown in the<br />
following schematic<br />
(See page 16 for an<br />
exploded view)<br />
Assembling the Band Saw to the Base<br />
There are three (A) elliptical holes in the top of the base and these should line up with the base of<br />
the band saw. Using the appropriate nuts and bolts, fit the saw on the base and tighten securely.<br />
Band Saw Assembly<br />
Assemble the meat cutting band saw as indicated in the schematic on page.
8<br />
Sliding Table Assembly<br />
Assemble the sliding table as indicated in<br />
the following schematic diagram.<br />
(See page 18 for an exploded view)<br />
Assembly of the Rollers<br />
Mount the four rollers on the band saw<br />
frame as shown. Do not tighten, as further<br />
adjustments may be required.<br />
Assembly of the Table<br />
Place the two guide rails on the underside of the table, using screws and washers to fix one end<br />
of the rails to the table. Place the table on the saw frame<br />
and carefully adjust the rails and rollers to make sure<br />
that the table assembly slides smoothly.
9<br />
Assembly of the “L”<br />
Plate<br />
As shown, fix the “L” plate onto the<br />
table edge, then screw and tighten<br />
the other end of the rails on the<br />
table. Adjust the table to be sure<br />
that the bandsaw blade is in the<br />
middle of the opening. You may<br />
now tighten the four rollers.<br />
Assembly of the Meat Grinder<br />
The following illustration shows the components and assembly procedure of the included meat<br />
grinder. The photo shows the position on the band saw and the lock knob.
10<br />
B1012 MEAT CUTTING BANDSAW<br />
Operating Instructions<br />
Health and Safety<br />
It is important to keep the <strong>Craftex</strong> B1012 Meat Cutting Band saw, Meat Grinder<br />
and Sausage Stuffer clean and sanitary at all times during the operation of the<br />
machine. Failure to do so could cause contamination of the meat being cut<br />
causing severe or even fatal illness.<br />
YOUR MEAT CUTTING BAND SAW MUST BE CLEANED AFTER EACH USE!<br />
A thorough cleaning should be performed inside and outside the machine prior to<br />
changing to another type of meat (beef to pork etc.).<br />
Sanitary clothing including rubber or other sanitary gloves should be used to<br />
prevent meat contamination.<br />
You can clean your meat band saw thoroughly with anti-bacterial soap and water<br />
or bleach after each use. Your saw was designed with cleaning in mind, so it can<br />
be performed with relative ease.<br />
Power Switch<br />
The power switch, located on the base of the B1012 is<br />
designed to prevent unauthorized use. In the off position,<br />
simply remove the switch and store in a secure place. The<br />
B1012 is pre-wired for 110-volt operation but may be<br />
altered to 220 volts. A qualified electrician should be<br />
consulted for this conversion.<br />
Adjusting the Drive Wheels<br />
The drive wheels must be vertically true so that the ‘V’<br />
belt runs true. Removing the rear base cabinet panel will<br />
allow access to the lower motor mounting bolts. Loosen<br />
these bolts accordingly.
11<br />
Adjusting the Band saw Blade<br />
The band saw blade must run vertically true to prevent it from running off the<br />
wheels.<br />
Remove the upper wheel cover <strong>by</strong> removing<br />
the two thumbscrews on either side of the<br />
cover.<br />
There are four Allen screws located around the<br />
axle of the upper blade wheel. Adjusting these<br />
will alter the horizontal and vertical position of<br />
the upper wheel. The band saw blade must ride<br />
on the center of both the upper and lower<br />
wheels.<br />
Blade Tension<br />
The band saw blade must have enough tension on<br />
it to remain on the center of the wheels and to cut<br />
in a straight line.<br />
With the upper wheel cover removed, a hex-bolt<br />
will be seen on the upper portion of the saw frame.<br />
Tightening or loosening this will alter the band saw<br />
blade tension.
12<br />
Adjusting Guide Blocks<br />
The upper and lower guide blocks must be properly positioned to accurately<br />
guide the band saw blade. These blocks<br />
should be close (but not tight) on the saw<br />
blade and positioned slightly behind the gullet<br />
of the blade.<br />
Adjusting Wheel Bearing Guides<br />
The wheel bearing guides are designed to<br />
prevent the band saw blade from being<br />
pushed off the wheels. These wheel-bearing<br />
guides should be adjusted so that they are<br />
just touching the back of the blade when the<br />
blade is riding on the center of the wheels.<br />
Upper Fence Guard<br />
The upper fence guard should be<br />
positioned so that it is about 1/4" above the<br />
high point of the meat being cut. The fence<br />
lock knob as illustrated adjusts the guard.<br />
Upper Blade Guard<br />
The upper blade guard is a safety guard to<br />
protect your hands and fingers from the<br />
moving band saw blade and should be<br />
positioned to do so. Loosening the knob will<br />
allow the guard to be moved up or down.
13<br />
Fence and Pusher<br />
The fence may be adjusted to give you<br />
consistency in the thickness of the meat<br />
slices. The pusher allows you to cut the<br />
meat while keeping your hands at a safe<br />
distance from the moving saw blade. Both<br />
the fence and the pusher can be locked into<br />
position <strong>by</strong> tightening the lock knobs A and<br />
B.<br />
Installing the Meat Grinder and Sausage Stuffer<br />
The meat grinder and sausage stuffer should not be in position when using the<br />
B1012 Meat Cutting Band saw to cut<br />
meat as it may interfere with the operation<br />
of the sliding table.<br />
To install the meat grinder, loosen the<br />
release knob and simply press into place.<br />
To install or remove the sausage stuffer,<br />
unscrew the outer ring.
B1012 MEAT CUTTING BAND SAW<br />
Schematic Diagram<br />
14
15<br />
B1012 MEAT CUTTING BAND SAW<br />
Parts List<br />
CODE PART # DESCRIPTION QTY. CODE PART # DESCRIPTION QTY<br />
0001 01001 Parent 1 0043 010043 Upper Blade 1<br />
0002 990234 Hex Head screw 4 0044 010044 Blade 1<br />
0003 991743 F.Washer 12 0046 990233 Hex Head Screw 6<br />
0004 010004 Cover 1 0048 010048 H Rod Cover 1<br />
0005 010005 Lwr. Blade Wheel 1 0049 990871 P.H.Screw 2<br />
0006 010006 Seat Bearing 2 0050 010050 Fixed Guide Seat 1<br />
0008 990721 Set Screw 3 0051 991712 F. Washer 2<br />
0011 990210 Hex Head Screw 2 0052 994167 Bearing 1<br />
0012 991211 Nut 2 0053 990232 Hex Bolt 1<br />
0013 991212 Nut 5 0055 010055 Clamping Luge 2<br />
0014 991111 Nut 2 0056 011056 Table 1<br />
0017 993025 V-Belt 1 0057 990622 Screw 14<br />
0018 010018 Pulley 1 0058 990701 Screw 1<br />
0019 994122 Bearing 2 0059 010059 Scale Bar 1<br />
0020 990114 Hex Head Screw 2 0060 010060 Screw 3<br />
0021 010021 Bracket 1 0061 010061 Blade Guide Bar 1<br />
0022 010022 Charging Hopper 1 0062 994110 Bearing 1<br />
0023 994163 Bearing 1 0063 992540 Retaining Ring 2<br />
0024 992544 E-Ring 1 0064 010065 Blade Guide Block 1<br />
0025 992013 Key 2 64-1 010064 Blade Guide Block 1<br />
0026 010026 Shaft 1 0065 990721 Set Screw 1<br />
0028 991598 Set Screw 1 0066 010066 Blade Guide Hldr 1<br />
0029 990505 Lock Clamp 1 0067 010067 Connector Plate 1<br />
0030 010030 Thrust Shaft 1 0068 010068 Lwr Wheel Shaft 1<br />
0031 010031 Bushing 1 0069 010069 Rod Set Screw 1<br />
0032 010032 Reamer 1 0070 010070 Blade Protec Plate 1<br />
0033 010033 Filler Cover 1 0071 992522 Retaining Ring 1<br />
0034 010034 Lock Cover 1 0072 010072 ‘L’ Guard Plate 1<br />
0035 010035 Cover 1 0073 991214 Nut 1<br />
0038 992545 Retaining Ring 1 0074 010074 Rubber Tube Con 1<br />
0039 994123 Bearing 2 0076 010076 Pestle 1<br />
0040 010040 Reg. Screw 1 0077 990710 Set Screw 4<br />
0041 010041 Bracket 1 0078 991951 Spring Washer 1<br />
0042 010042 Shaft Bracket 1 0079 991751 F. Washer<br />
1<br />
0080 991931 Spring Washer 1
B1012 MEAT CUTTING BAND SAW<br />
Base Schematic Drawing<br />
16
17<br />
B1012 MEAT CUTTING BAND SAW<br />
Base Parts List<br />
Code Part No. Description Quantity<br />
0101 011201 Face Plate 1<br />
0102 113102 Rear Plate 1<br />
0103 113103 Front Plate 1<br />
0104 600104 Lower Bracket 2<br />
0105 600107 Motor Plate 1<br />
0106 600109 ‘S’ Upper Bracket 1<br />
0107 Motor 1<br />
0108 Cord 1<br />
0109 990720 Set Screw 1<br />
0110 993636 Cord Bushing 1<br />
0111 Power Cord 1<br />
0112 Switch 1<br />
0113 990852 P.H. Screw 3<br />
0114 990861 G. Screw 4<br />
0115 010215 Motor Pulley 1<br />
0116 010217 Hardware Bag 1<br />
0117 998625 Bushing 1<br />
0118 679112 Side Cover 2<br />
0119 996640 Buckle 12<br />
0121 990811 Screw 12<br />
0122 998001 Manual 1<br />
0123 996638 Switch Cover 1
B1012 MEAT CUTTING BAND SAW<br />
Sliding Table Schematic<br />
18
19<br />
B1012 MEAT CUTTING BANDSAW<br />
Sliding Table Parts List<br />
Code Part Number Description Quantity<br />
0601 013001 Table, Sliding 1<br />
0602 013002 Rollers 4<br />
0603 013003 Stand Rod 2<br />
0604 013004 Guard Cover 1<br />
0605 013005 Roller Shaft 4<br />
0606 013006 Fixed Plate 1<br />
0607 013007 Guard Plate 2<br />
0608 013008 Pusher 1<br />
0609 013009 Roller Fixed Plate 4<br />
0610 013010 Fence 1<br />
0611 013011 Supporter 2<br />
0612 013012 Guide Rail 2<br />
0613 990213 Screw 6<br />
0614 990212 Screw 4<br />
0615 991712 F. Washer 8<br />
0616 990622 Screw<br />
0617 990622 Screw 4<br />
0618 992511 E-Spring 4<br />
0619 992521 R-Spring 4<br />
0620 994167 Bearing 4<br />
0621 991552 Hex Head Screw 8<br />
0622 991211 Nut 8<br />
0623 991712 F. Washer 10
20<br />
B1012 MEAT CUTTING BANDSAW<br />
Miscellaneous Parts List<br />
Code Part Number Description Quantity<br />
HARDWARE PKG.<br />
0201 990233 Hex Head Screw 4<br />
0202 991526 Screw 24<br />
0203 991743 F. Washer 34<br />
0204 991212 Nut 30<br />
0205 010220 Screw 3<br />
0206 998529 ‘L’ Fixed Plate 4<br />
0207 996632 Pad 4<br />
0208 990232 Hex Head Screw 4<br />
0209 991705 F Washer 4<br />
OPTIONAL ACCESS.<br />
0301 014331 Filter Cover 1<br />
0302 014332 Filter Cover 1<br />
SM-100 TABLE<br />
0401 011058 Table – Small 1<br />
0402 011072 ‘L’ Guard Plate 1<br />
SM-100B TABLE<br />
0501 012101 Table – Big 1<br />
0502 012102 ‘L’ Guard Plate 1
21<br />
WARRANTY<br />
CRAFTEX 2 YEAR LIMITED WARRANTY<br />
<strong>Craftex</strong> warrants every product to be free from defects in materials and agrees to correct such defects where applicable.<br />
This warranty covers two years for parts and 90 days for labour (unless specified otherwise), to the original purchaser<br />
from the date of purchase but does not apply to malfunctions arising directly or indirectly from misuse, abuse, improper<br />
installation or assembly, negligence, accidents, repairs or alterations or lack of maintenance.<br />
Proof of purchase is necessary.<br />
All warranty claims are subject to inspection of such products or part thereof and <strong>Craftex</strong> reserves the right<br />
to inspect any returned item before a refund or replacement may be issued.<br />
This warranty shall not apply to consumable products such as blades, bits, belts, cutters, chisels, punches etceteras.<br />
<strong>Craftex</strong> shall in no event be liable for injuries, accidental or otherwise, death to persons or damage to<br />
property or for incidental contingent, special or consequential damages arising from the use of our<br />
products.<br />
RETURNS, REPAIRS AND REPLACEMENTS<br />
To return, repair, or replace a <strong>Craftex</strong> product, you must visit the appropriate <strong>Busy</strong> <strong>Bee</strong> <strong>Tools</strong> showroom.<br />
<strong>Craftex</strong> is a brand of equipment that is exclusive to <strong>Busy</strong> <strong>Bee</strong> <strong>Tools</strong>.<br />
For replacement parts directly from <strong>Busy</strong> <strong>Bee</strong> <strong>Tools</strong>, for this machine, please call 1-800-461-BUSY(2879),<br />
and have your credit card and part number handy.<br />
• All returned merchandise will be subject to a minimum charge of 15% for re-stocking and handling<br />
with the following qualifications.<br />
• Returns must be pre-authorized <strong>by</strong> us in writing.<br />
• We do not accept collect shipments.<br />
• Items returned for warranty purposes must be insured and shipped pre-paid to the nearest warehouse<br />
(see locations on inside back cover of this manual).<br />
• Returns must be accompanied with a copy of your original invoice as proof of purchase. Returns must<br />
be in an un-used condition and shipped in their original packaging a letter explaining your reason for<br />
the return. <strong>Inc</strong>urred shipping and handling charges are not refundable.<br />
• <strong>Busy</strong> <strong>Bee</strong> will repair or replace the item at our discretion and subject to our inspection.<br />
• Repaired or replaced items will be returned to you pre-paid <strong>by</strong> our choice of carriers.<br />
• <strong>Busy</strong> <strong>Bee</strong> reserves the right to refuse reimbursement or repairs or replacement if a third party without<br />
our prior authorization has carried out repairs to the item.<br />
• Repairs made <strong>by</strong> <strong>Busy</strong> <strong>Bee</strong> are warranted for 30 days on parts and labour.<br />
• Any unforeseen repair charges will be reported to you for acceptance prior to making the repairs.<br />
• The <strong>Busy</strong> <strong>Bee</strong> Parts & Service Departments are fully equipped to do repairs on all products purchased<br />
from us with the exception of some products that require the return to their authorized repair depots. A<br />
<strong>Busy</strong> <strong>Bee</strong> representative will provide you with the necessary information to have this done.<br />
• For faster service it is advisable to contact the nearest <strong>Busy</strong> <strong>Bee</strong> location for parts availability prior to<br />
bringing your product in for repairs.
22<br />
BUSY BEE TOOLS - - - SHOWROOMS -Coast to Coast<br />
Head Office<br />
355 Norfinch Drive, North York, Ontario, M3N 1Y7<br />
Tel. - 416-665-8008, Fax – 416-665-8337<br />
Vancouver<br />
30 Braid Street, New Westminister, British Columbia, V3L 3P3<br />
Tel. – 604-517-3922, Fax – 604-517-8272<br />
Mississauga<br />
6325 Dixie Rd. Unit 6 & 7, Mississauga, Ontario, L5T 2E5<br />
Tel. – 905-795-3200, Fax – 905-795-0091<br />
Ottawa<br />
2251 Gladwin Crescent, Ottawa, Ontario, K1B 4K9<br />
Tel. – 613-526-4696, Fax – 613-731-8636<br />
London<br />
1398 Wellington Road, London, Ontario, N5E 1M5<br />
Tel. – 519-659-9868, Fax – 519-659-0771<br />
Dartmouth<br />
133 Ilsley Avenue, Dartmouth, Nova Scotia, B3B 1S9<br />
Tel. – 902-468-8088, Fax – 902-468-8830<br />
Barrie<br />
21 Commerce Park Drive, Barrie, Ontario, L4N 8X1<br />
Tel. – 705-730-0498, Fax – 705-730-0495<br />
Pickering<br />
1064 Salk Road, Pickering, Ontario, L1W 4B5<br />
Tel. – 905-831-9582, Fax – 905-831-4292<br />
Calgary<br />
2611 Hopewell Place, N.E, Unit#109, Calgary, Alberta, T1Y 7K3<br />
Tel – (403) 250-1986, Fax – (403) 250-7768<br />
We have been serving the Canadian woodworking and metalworking industry for over 27<br />
proud years. We stand behind our machines. If you have any questions, comments, or<br />
concerns, please call or write to our head office or call toll free at 1-800-461-BUSY.<br />
Email us at busybee@busybeetools.com or contact us though our web site at


