LG 60PV250 Product Manual - Comparison.com.au
LG 60PV250 Product Manual - Comparison.com.au
LG 60PV250 Product Manual - Comparison.com.au

Create successful ePaper yourself
Turn your PDF publications into a flip-book with our unique Google optimized e-Paper software.
OWNER’S MANUAL<br />
LCD TV / LED LCD TV /<br />
PLASMA TV<br />
Please read this manual carefully before operating the<br />
set and retain it for future reference.<br />
www.lg.<strong>com</strong>
ENGLISH
LICENSES<br />
3<br />
LICENSES<br />
Supported licenses may differ by model. For more information about licenses, visit www.lg.<strong>com</strong>.<br />
<br />
Manufactured under license from Dolby Laboratories. “Dolby” and the double-D<br />
symbol are trademarks of Dolby Laboratories.<br />
<br />
Manufactured under license from Dolby Laboratories. “Dolby” and the double-D<br />
symbol are trademarks of Dolby Laboratories.<br />
HDMI, the HDMI logo and High-Definition Multimedia Interface are trademarks or<br />
registered trademarks of HDMI Licensing LLC.<br />
ABOUT DIVX VIDEO: DivX® is a digital video format created by DivX, Inc. This<br />
is an official DivX Certified® device that plays DivX video. Visit www.divx.<strong>com</strong> for<br />
more information and software tools to convert your files into DivX video.<br />
ABOUT DIVX VIDEO-ON-DEMAND: This DivX Certified® device must be registered<br />
in order to play purchased DivX Video-on-Demand (VOD) movies. To obtain your<br />
registration code, locate the DivX VOD section in your device setup menu. Go to<br />
vod.divx.<strong>com</strong> for more information on how to <strong>com</strong>plete your registration.<br />
“DivX Certified® to play DivX® video up to HD 1080p, including premium content.”<br />
DivX®, DivX Certified® and associated logos are trademarks of DivX, Inc. and are<br />
used under license.<br />
Covered by one or more of the following U.S. patents :<br />
7,295,673; 7,460,668; 7,515,710; 7,519,274<br />
ENGLISH
4<br />
TABLE OF CONTENTS<br />
TABLE OF CONTENTS<br />
ENGLISH<br />
3 LICENSES<br />
4 TABLE OF CONTENTS<br />
6 ASSEMBLING AND PREPAR-<br />
ING<br />
6 Unpacking<br />
9 Separate purchase<br />
9 Parts and buttons<br />
19 Lifting and moving the TV<br />
19 Setting up the TV<br />
19 - Attaching the stand<br />
24 - Not using the Desk Type Stand<br />
25 - Mounting on a table<br />
26 - Mounting on a wall<br />
28 - Tidying cables<br />
29 - Positioning your display<br />
29 - Connection of TV<br />
30 REMOTE CONTROL<br />
33 WATCHING TV<br />
33 Connecting an antenna<br />
33 Turning the TV on for the first time<br />
34 Watching TV<br />
35 Managing programmes<br />
35 - Automatically setting up programme<br />
35 - <strong>Manual</strong>ly setting up programme (In<br />
digital mode) (Only DTV)<br />
36 - <strong>Manual</strong>ly setting up programme (In<br />
analogue mode)<br />
37 - Editing your programme list<br />
39 - Selecting the programme list<br />
41 EPG (Electronic Program Guide) (In digital<br />
mode)<br />
41 - Switch on/off EPG<br />
41 - Select a programme<br />
42 - NOW/NEXT Guide Mode<br />
42 - 8 Day Guide Mode<br />
42 - Date Change Mode<br />
42 - Extended Description Box<br />
42 - Remind Setting Mode<br />
42 - Schedule List Mode<br />
43 MHEG (Multimedia and Hypermedia Information<br />
coding Expert Group) (In digital<br />
mode)<br />
43 - Teletext Within Digital Service<br />
43 - Teletext in Digital Service<br />
44 - Switch on/off MHEG<br />
44 - Select a programme<br />
44 - Programme Listing Mode<br />
44 - NOW/NEXT Guide Mode<br />
45 Using additional options<br />
45 - Adjusting aspect ratio<br />
46 - Changing AV modes<br />
46 - Using the input list<br />
47 - Locking the buttons on the TV (Child<br />
Lock)<br />
48 Using the quick menu<br />
49 Using customer Support.<br />
49 - Testing Software Update<br />
50 - Testing the Picture / Sound<br />
50 - Using Signal Test<br />
50 - Using the product or service information<br />
51 3D Imaging<br />
51 3D Technology<br />
52 - When Using 3D Glasses<br />
52 - 3D Imaging Viewing Range<br />
53 Watching 3D images<br />
55 ENTERTAINMENT<br />
55 - Connecting USB storage devices<br />
56 - Browsing files<br />
57 - Viewing movies<br />
60 - Viewing photos
TABLE OF CONTENTS<br />
5<br />
62 - Listening to music<br />
64 - DivX registration code<br />
65 CUSTOMIZING TV SETTINGS<br />
65 Accessing main menus<br />
66 Customizing settings<br />
66 - SETUP settings<br />
67 - PICTURE settings<br />
73 - AUDIO settings<br />
76 - TIME settings<br />
77 - LOCK settings<br />
78 - OPTION settings<br />
90 Special Teletext Function<br />
91 MAINTENANCE<br />
91 Cleaning your TV<br />
91 - Screen and frame<br />
91 - Cabinet and stand<br />
91 - Power cord<br />
91 Preventing “Image burn” or “Burn-in” on<br />
your TV screen<br />
92 TROUBLESHOOTING<br />
80 MAKING CONNECTIONS<br />
94 SPECIFICATIONS<br />
81 Connection overview<br />
82 Connecting to a HD receiver, DVD, or<br />
VCR player<br />
82 - HDMI connection<br />
82 - DVI to HDMI connection<br />
82 - Component connection<br />
83 - Composite connection<br />
84 Connecting to a PC<br />
84 - HDMI connection<br />
85 - DVI to HDMI connection<br />
85 - RGB Connection<br />
86 Connecting to an <strong>au</strong>dio system<br />
86 - Digital optical <strong>au</strong>dio connection<br />
87 - Headphone connection<br />
87 Connecting to a USB<br />
88 SIMPLINK connection<br />
88 - Activating the SIMPLINK feature<br />
103 IR CODES<br />
104 EXTERNAL CONTROL DEVICE<br />
SETUP<br />
104 RS-232C Setup<br />
104 Type of connector;<br />
D-Sub 9-Pin Male<br />
104 RS-232C Configurations<br />
105 Communication Parameters<br />
105 Command reference list<br />
106 Transmission / Receiving Protocol<br />
111 OPEN SOURCE LICENSE<br />
111 Open source software notice<br />
ENGLISH<br />
89 TELETEXT<br />
89 Switch On/Off<br />
89 Simple Text<br />
89 - Page selection<br />
89 Top Text<br />
89 - Block / Group / Page Selection<br />
89 - Direct Page Selection<br />
90 Fastext<br />
90 - Page selection
6<br />
ASSEMBLING AND PREPARING<br />
ASSEMBLING AND PREPARING<br />
Unpacking<br />
Check your product box for the following items. If there are any missing accessories, contact the local<br />
dealer where you purchased your product.<br />
The illustrations in this manual may differ from the actual product and item.<br />
Remote control and batteries(AAA)<br />
Owner’s manual<br />
ENGLISH<br />
Polishing cloth 1 (This item is not<br />
included for all models.)<br />
Ferrite core (Depending on model)<br />
(This item is not included for all<br />
models.)<br />
1 Gently wipe the spots on the cabinet with the polishing cloth.<br />
Power Cord(This item is not included<br />
for all models.)<br />
Only Plasma TV<br />
x 4 x 3 x 4 x 3<br />
M4 x 26 M5 x 14.5<br />
(Except for 60PV25**,<br />
60PZ55**)<br />
M4 x 28 M5 x 24<br />
(Only 60PV25**,<br />
60PZ55**)<br />
Screw for assembly<br />
Cable Holder<br />
Power Cord holder<br />
Protection cover<br />
Protection cover<br />
tape<br />
3D Glasses<br />
(AG-S250 : Depending on model)<br />
(This item is not included for all<br />
models.)
ASSEMBLING AND PREPARING<br />
7<br />
Only 22LK33**<br />
Cable Holder<br />
Protection cover<br />
Only 26/32LK33**, 32/42LK43**, 42/47/55LK53**, 32/37/42LK45**<br />
x 8<br />
(M4x20)<br />
(Except for 47/55LK53**)<br />
Screw for assembly Screw for fixing Protection cover<br />
Only 19/22/26LV25**, 22/26LV55**<br />
x 2<br />
(M4x16)<br />
or<br />
ENGLISH<br />
Screw for assembly Cable holder DC Adapter Composite gender cable<br />
Only 32LV25**, 32/37/42/47LV35**, 22/26/32LV30**, 32/42LV34**, 32/42/47/55LW45**<br />
x 8<br />
M4 x 14<br />
(Only 32LV25**)<br />
x 8<br />
M4 x 12<br />
(Except for 32LV25**)<br />
(Only 32LV25**,<br />
32/37LV35**,<br />
32LV30**, 32LV34**)<br />
Screw for assembly Cable holder Screw for fixing Composite gender cable<br />
(Only 32/42/47/55LW45**)<br />
3D Glasses<br />
(AG-P110, AG-F110)
8<br />
ASSEMBLING AND PREPARING<br />
C<strong>au</strong>tion<br />
• yDo not use any pirated items to ensure the safety and product life span.<br />
• yAny damages or injuries by using pirated items are not covered by the warranty.<br />
NOTE<br />
• yThe items supplied with your product may vary depending on the model.<br />
• y<strong>Product</strong> specifications or contents of this manual may be changed without prior notice due to<br />
upgrade of product functions.<br />
• yImage shown may differ from your TV.<br />
• yHow to use the ferrite core (Depending on model)<br />
1 Use the ferrite core to reduce the electromagnetic interference in the PC <strong>au</strong>dio cable.<br />
Wind the PC <strong>au</strong>dio cable on the ferrite core thrice. Place the ferrite core close to the TV.<br />
[to an External device]<br />
10 mm(+ / - 5 mm)<br />
[to the TV]<br />
[Figure 1]<br />
[Cross Section of<br />
Ferrite Core]<br />
ENGLISH<br />
2 Use the ferrite core to reduce the electromagnetic interference in the power cable.<br />
Wind the power cable on the ferrite core once. Place the ferrite core close to the TV.<br />
[to a wall plug]<br />
[Figure 2]<br />
[to the TV]<br />
[Cross Section of<br />
Ferrite Core]<br />
3 Use the ferrite core to reduce the electromagnetic interference in the power cable.<br />
Wind the power cable on the ferrite core once. Place the ferrite core close to the TV and a wall plug.<br />
[to a wall plug]<br />
[to the TV]<br />
[Figure 3]<br />
- If there is one ferrite core, follow as shown in Figure 1.<br />
- If there are two ferrite cores, follow as shown in Figures 1 and 2.<br />
- If there are three ferrite cores, follow as shown in Figures 1 and 3.<br />
[Cross Section of<br />
Ferrite Core]<br />
• yFor an optimal connection, HDMI cables and USB devices should have bezels less than 10 mm<br />
thick and 18 mm width.(Except for Plasma TV, 22/26/32LK33**, 32/42LK43**, 42/47/55LK53**)<br />
A<br />
B<br />
B<br />
A<br />
*A 10 mm<br />
*B 18 mm
ASSEMBLING AND PREPARING<br />
9<br />
Separate purchase<br />
Separate purchase items can be changed or modified for quality improvement without any notification.<br />
Contact your dealer for buying these items.<br />
These devices only work with <strong>com</strong>patible <strong>LG</strong> Plasma TV, LED LCD TV or LCD TV.<br />
3D Glasses<br />
(AG-S230, AG-S250, AG-S270 :<br />
Only 3D Models)<br />
ENGLISH<br />
Parts and buttons<br />
NOTE<br />
• yTV can be placed in standby mode in order to reduce the power consumption. And TV should be<br />
turned off if it will not be watched for some time, as this will reduce energy consumption.<br />
• yThe energy consumed during use can be significantly reduced if the level of brightness of the<br />
picture is reduced, and this will reduce the overall running cost.<br />
C<strong>au</strong>tion<br />
• yDo not step on the glass stand or subject it to any impact. It may break, c<strong>au</strong>sing possible injury<br />
from fragments of glass, or the TV may fall.<br />
• yDo not drag the TV. The floor or the product may be damaged.
10<br />
ASSEMBLING AND PREPARING<br />
• yImage shown may differ from your TV.<br />
Only 50/60PV25**, 42/50PT25**<br />
Screen<br />
USB input<br />
USB IN<br />
Remote control and<br />
intelligent 1 sensors<br />
HDMI IN<br />
AV (Audio and<br />
Video) IN<br />
L/MONO AUDIO R<br />
VIDEO<br />
IN 2<br />
AV IN 2<br />
Speakers<br />
Power indicator<br />
Red – In Standby<br />
mode<br />
Off – TV turns on<br />
INPUT HOME OK P<br />
Touch buttons 2<br />
ENGLISH<br />
COMPONENT IN<br />
VIDEO<br />
AUDIO<br />
R L P R P B<br />
Y<br />
1<br />
AV IN 1<br />
R AUDIO L/MONO<br />
VIDEO<br />
2<br />
OPTICAL<br />
DIGITAL<br />
AUDIO OUT<br />
AUDIO IN<br />
(RGB/DVI)<br />
RGB IN (PC)<br />
RS-232C IN<br />
(CONTROL & SERVICE)<br />
/DVI IN<br />
1<br />
ANTENNA<br />
IN<br />
Connection panel<br />
(See p.80)<br />
Button<br />
Description<br />
/I Turns the power on or off<br />
INPUT Changes the input source<br />
HOME Accesses the main menus, or saves your input and exits the menus<br />
OK Selects the highlighted menu option or confirms an input<br />
- + Adjusts the volume level<br />
v P ^ Scrolls through the saved programmes<br />
1 Intelligent sensor - Adjusts the image quality corresponding to the surrounding environment.<br />
2 Touch Button - You can use the desired button function by touching.
ASSEMBLING AND PREPARING<br />
11<br />
• yImage shown may differ from your TV.<br />
Only 42/50PW35**, 42/50PW45**, 50/60PZ55**<br />
1<br />
2<br />
Screen<br />
USB input<br />
USB IN<br />
Remote control and<br />
intelligent 1 sensors<br />
HDMI IN<br />
AV (Audio and<br />
Video) IN<br />
L/MONO AUDIO R<br />
VIDEO<br />
IN 3<br />
AV IN 2<br />
Speakers<br />
Power indicator<br />
Red – In Standby<br />
mode<br />
Off – TV turns on<br />
INPUT HOME OK P<br />
Touch buttons 2<br />
COMPONENT IN<br />
VIDEO<br />
AUDIO<br />
R L P R P B<br />
Y<br />
AV IN 1<br />
VIDEO<br />
R AUDIO L/MONO<br />
OPTICAL<br />
DIGITAL<br />
AUDIO OUT<br />
RGB IN (PC)<br />
RS-232C IN<br />
(CONTROL & SERVICE)<br />
IN<br />
2<br />
1<br />
AUDIO IN<br />
(RGB/DVI)<br />
ANTENNA<br />
IN<br />
Connection panel<br />
(See p.80)<br />
ENGLISH<br />
Button<br />
Description<br />
/I Turns the power on or off<br />
INPUT Changes the input source<br />
HOME Accesses the main menus, or saves your input and exits the menus<br />
OK Selects the highlighted menu option or confirms an input<br />
- + Adjusts the volume level<br />
v P ^ Scrolls through the saved programmes<br />
1 Intelligent sensor - Adjusts the image quality corresponding to the surrounding environment.<br />
2 Touch Button - You can use the desired button function by touching.
12<br />
ASSEMBLING AND PREPARING<br />
• yImage shown may differ from your TV.<br />
Only 22LK33**<br />
Screen<br />
INPUT HOME OK<br />
P<br />
USB input<br />
USB IN<br />
Headphone<br />
Socket<br />
H/P<br />
R<br />
R<br />
Speakers<br />
Remote control<br />
ENGLISH<br />
OPTICAL<br />
DIGITAL<br />
(RGB/DVI)<br />
AUDIO IN<br />
Power Indicator<br />
(Can be adjusted using<br />
the Power Indicator in the<br />
OPTION menu.)<br />
AUDIO OUT<br />
1<br />
RGB IN (PC)<br />
VIDEO<br />
RS-232C IN(CONTROL & SERVICE)<br />
2 1<br />
L/MONO AUDIO R<br />
ANTENNA/<br />
CABLE IN<br />
Connection panel<br />
(See p.80)<br />
Button<br />
Description<br />
/I Turns the power on or off<br />
INPUT Changes the input source<br />
HOME Accesses the main menus, or saves your input and exits the menus<br />
OK Selects the highlighted menu option or confirms an input<br />
- + Adjusts the volume level<br />
v P ^ Scrolls through the saved programmes
ASSEMBLING AND PREPARING<br />
13<br />
• yImage shown may differ from your TV.<br />
Only 26/32LK33**, 32/42LK43**<br />
USB input<br />
USB IN<br />
Screen<br />
(Only<br />
26/32LK33**)<br />
(Only<br />
32/42LK43**)<br />
P<br />
P<br />
HDMI IN<br />
IN 3<br />
OK<br />
Headphone<br />
Socket<br />
H/P<br />
R<br />
L/MONO AUDIO R<br />
OK<br />
HOME<br />
INPUT<br />
HOME<br />
INPUT<br />
AV (Audio and<br />
Video) IN<br />
VIDEO<br />
AV IN 2<br />
Speakers<br />
Remote control<br />
OPTICAL DIGITAL<br />
AUDIO OUT<br />
AUDIO IN<br />
(RGB/DVI)<br />
Power Indicator<br />
(Can be adjusted using<br />
the Power Indicator in the<br />
OPTION menu.)<br />
ENGLISH<br />
1<br />
RGB IN (PC)<br />
VIDEO<br />
RS-232C IN(CONTROL & SERVICE)<br />
2 1<br />
L/MONO AUDIO R<br />
ANTENNA/<br />
CABLE IN<br />
Connection panel<br />
(See p.80)<br />
Button<br />
Description<br />
/I Turns the power on or off<br />
INPUT Changes the input source<br />
HOME Accesses the main menus, or saves your input and exits the menus<br />
OK Selects the highlighted menu option or confirms an input<br />
- + Adjusts the volume level<br />
v P ^ Scrolls through the saved programmes
14<br />
ASSEMBLING AND PREPARING<br />
• yImage shown may differ from your TV.<br />
Only 42/47/55LK53**<br />
Screen<br />
USB input<br />
USB IN<br />
P<br />
ENGLISH<br />
HDMI IN<br />
Headphone<br />
Socket<br />
AV (Audio and<br />
Video) IN<br />
IN 3<br />
L/MONO AUDIO R<br />
VIDEO<br />
R<br />
AV IN 2<br />
Speakers<br />
OPTICAL DIGITAL<br />
AUDIO OUT<br />
RGB IN (PC)<br />
(RGB/DVI)<br />
AUDIO IN<br />
RS-232C IN (CONTROL & SERVICE)<br />
/ DVI IN 2 1<br />
AV IN 1<br />
VIDEO L/MONO AUDIO R<br />
VIDEO AUDIO<br />
COMPONENT IN<br />
2<br />
Y PB PR L R<br />
1<br />
ANTENNA /<br />
CABLE IN<br />
OK<br />
HOME<br />
INPUT<br />
Remote control and<br />
intelligent 1 sensors<br />
Power Indicator<br />
(Can be adjusted using<br />
the Power Indicator in the<br />
OPTION menu.)<br />
Connection panel<br />
(See p.80)<br />
Button<br />
Description<br />
/I Turns the power on or off<br />
INPUT Changes the input source<br />
HOME Accesses the main menus, or saves your input and exits the menus<br />
OK Selects the highlighted menu option or confirms an input<br />
- + Adjusts the volume level<br />
v P ^ Scrolls through the saved programmes<br />
1 Intelligent sensor - Adjusts the image quality corresponding to the surrounding environment.
ASSEMBLING AND PREPARING<br />
15<br />
• yImage shown may differ from your TV.<br />
Only 32/37/42LK45**<br />
Screen<br />
USB input<br />
USB IN<br />
HDMI IN<br />
Headphone<br />
Socket<br />
AV (Audio and<br />
Video) IN<br />
IN 3<br />
L/MONO AUDIO R<br />
VIDEO<br />
R<br />
AV IN 2<br />
Speakers<br />
Remote control and<br />
intelligent 1 sensors<br />
Power Indicator<br />
(Can be adjusted using<br />
the Power Indicator in the<br />
OPTION menu.)<br />
OPTICAL DIGITAL<br />
AUDIO OUT<br />
AUDIO IN<br />
(RGB/DVI)<br />
Touch buttons 2<br />
ENGLISH<br />
1<br />
RGB IN (PC)<br />
VIDEO<br />
RS-232C IN(CONTROL & SERVICE)<br />
2 1<br />
L/MONO AUDIO R<br />
ANTENNA/<br />
CABLE IN<br />
Connection panel<br />
(See p.80)<br />
Button<br />
Description<br />
/I Turns the power on or off<br />
INPUT Changes the input source<br />
HOME Accesses the main menus, or saves your input and exits the menus<br />
OK Selects the highlighted menu option or confirms an input<br />
- + Adjusts the volume level<br />
v P ^ Scrolls through the saved programmes<br />
1 Intelligent sensor - Adjusts the image quality corresponding to the surrounding environment.<br />
2 Touch Button - You can use the desired button function by touching.
16<br />
ASSEMBLING AND PREPARING<br />
• yImage shown may differ from your TV.<br />
Only 19/22/26LV25**<br />
Screen<br />
USB input<br />
USB IN<br />
Remote control and<br />
intelligent 1 sensors<br />
Headphone<br />
Socket<br />
AV (Audio and<br />
Video) IN<br />
AV IN 2<br />
VIDEO / AUDIO<br />
Speakers<br />
Power Indicator<br />
(Can be adjusted using<br />
the Power Indicator in the<br />
OPTION menu.)<br />
Touch buttons 2<br />
ENGLISH<br />
DC-IN<br />
/ DVI IN<br />
OPTICAL<br />
DIGITAL<br />
AUDIO OUT<br />
RGB IN (PC)<br />
(RGB/DVI)<br />
AUDIO IN<br />
RS-232C IN(CONTROL & SERVICE)<br />
2 1<br />
VIDEO L/MONO AUDIO R<br />
AV IN 1<br />
COMPONENT<br />
IN<br />
VIDEO AUDIO<br />
Y PB PR L R<br />
ANTENNA/<br />
CABLE IN<br />
Connection panel<br />
(See p.80)<br />
Button<br />
v P ^<br />
Scrolls through the saved programmes<br />
Description<br />
- + Adjusts the volume level<br />
OK<br />
HOME<br />
INPUT<br />
Selects the highlighted menu option or confirms an input<br />
Accesses the main menus, or saves your input and exits the menus<br />
Changes the input source<br />
/I Turns the power on or off<br />
1 Intelligent sensor - Adjusts the image quality corresponding to the surrounding environment.<br />
2 Touch Button - You can use the desired button function by touching.
AV IN 2<br />
VIDEO / AUDIO<br />
ASSEMBLING AND PREPARING<br />
17<br />
• yImage shown may differ from your TV.<br />
Only 32LV25**, 32/37/42/47LV35**, 22/26/32LV30**, 32/42LV34**, 32/42/47/55LW45**<br />
Screen<br />
USB input<br />
USB IN<br />
Remote control and<br />
intelligent 1 sensors<br />
HDMI IN<br />
Headphone<br />
Socket<br />
AV (Audio and<br />
Video) IN<br />
IN 3<br />
Speakers<br />
Power Indicator<br />
(Can be adjusted using<br />
the Power Indicator in the<br />
OPTION menu.)<br />
Touch buttons 2<br />
OPTICAL<br />
DIGITAL<br />
AUDIO OUT<br />
RGB IN (PC)<br />
(RGB/DVI)<br />
AUDIO IN<br />
VIDEO<br />
1<br />
ENGLISH<br />
RS-232C IN(CONTROL & SERVICE)<br />
2 1<br />
L/MONO AUDIO R<br />
2<br />
1<br />
ANTENNA/<br />
CABLE IN<br />
Connection panel<br />
(See p.80)<br />
Button<br />
v P ^<br />
Scrolls through the saved programmes<br />
Description<br />
- + Adjusts the volume level<br />
OK<br />
HOME<br />
INPUT<br />
Selects the highlighted menu option or confirms an input<br />
Accesses the main menus, or saves your input and exits the menus<br />
Changes the input source<br />
/I Turns the power on or off<br />
1 Intelligent sensor - Adjusts the image quality corresponding to the surrounding environment.<br />
2 Touch Button - You can use the desired button function by touching.
18<br />
ASSEMBLING AND PREPARING<br />
• yImage shown may differ from your TV.<br />
Only 22/26LV55**<br />
Screen<br />
USB input<br />
USB IN<br />
Remote control and<br />
intelligent 1 sensors<br />
Headphone<br />
Socket<br />
AV (Audio and<br />
Video) IN<br />
AV IN 2<br />
VIDEO / AUDIO<br />
Speakers<br />
Power Indicator<br />
(Can be adjusted using<br />
the Power Indicator in<br />
the OPTION menu.)<br />
Touch buttons 2<br />
OPTICAL<br />
DIGITAL<br />
AUDIO IN<br />
(RGB/DVI)<br />
ENGLISH<br />
DC-IN<br />
RGB IN (PC)<br />
RS-232C IN<br />
(CONTROL & SERVICE)<br />
AUDIO OUT<br />
2 1<br />
VIDEO<br />
L/MONO AUDIO R<br />
ANTENNA/<br />
CABLE IN<br />
Connection panel<br />
(See p.80)<br />
Button<br />
Scrolls through the saved programmes<br />
Adjusts the volume level<br />
Description<br />
Selects the highlighted menu option or confirms an input<br />
Accesses the main menus, or saves your input and exits the menus<br />
Changes the input source<br />
/I Turns the power on or off<br />
1 Intelligent sensor - Adjusts the image quality corresponding to the surrounding environment.<br />
2 Touch Button - You can use the desired button function by touching.
ASSEMBLING AND PREPARING<br />
19<br />
Lifting and moving the TV<br />
Setting up the TV<br />
When moving or lifting the TV, read the following to<br />
prevent the TV from being scratched or damaged<br />
and for safe transportation regardless of its type<br />
and size.<br />
C<strong>au</strong>tion<br />
• yAvoid touching the screen at all times, as<br />
this may result in damage on the screen<br />
or some of the pixels used to create<br />
images.<br />
• yIt is re<strong>com</strong>mended to move the TV in the box<br />
or packing material that the TV originally came<br />
in.<br />
• yBefore moving or lifting the TV, disconnect the<br />
power cord and all cables.<br />
• yWhen holding the TV, the screen should face<br />
away from you to avoid damage.<br />
• yHold the top and bottom of the TV frame firmly.<br />
Make sure not to hold the transparent part,<br />
speaker, or speaker grill area.<br />
y • Image shown may differ from your TV.<br />
Put your TV on a pedestal stand and mount the TV<br />
on a table or wall.<br />
Attaching the stand<br />
Only Plasma TV<br />
1 Lay the TV with the screen side down on a flat<br />
surface.<br />
C<strong>au</strong>tion<br />
• yLay a foam mat or soft protective cloth<br />
on the surface to protect the screen from<br />
damage. Make sure no objects press<br />
against the screen.<br />
2 Assemble the parts of the Stand Body with the<br />
Stand Base of the TV.<br />
Stand Body<br />
Stand Base<br />
3 Secure the TV and the stand with the 4 screws.<br />
ENGLISH<br />
• yWhen transporting a large TV, there should be<br />
at least 2 people.<br />
• yWhen transporting the TV by hand, hold the<br />
TV as shown in the following illustration.<br />
Make sure to assemble the front and rear side<br />
of the stand.<br />
Front<br />
• yWhen transporting the TV, do not expose the<br />
TV to jolts or excessive vibration.<br />
• yWhen transporting the TV, keep the TV<br />
upright, never turn the TV on its side or tilt<br />
towards the left or right.<br />
C<strong>au</strong>tion<br />
Rear<br />
• yTighten the screws firmly to prevent<br />
the TV from tilting forward. Do not over<br />
tighten.
20<br />
ASSEMBLING AND PREPARING<br />
Only 22LK33**<br />
1 Lay the TV with the screen side down on a flat<br />
surface.<br />
C<strong>au</strong>tion<br />
• yLay a foam mat or soft protective cloth<br />
on the surface to protect the screen from<br />
damage.<br />
Only 26/32LK33**, 32/42LK43**, 42/47/55LK53**<br />
1 Lay the TV with the screen side down on a flat<br />
surface.<br />
C<strong>au</strong>tion<br />
• yLay a foam mat or soft protective cloth<br />
on the surface to protect the screen from<br />
damage.<br />
2 Assemble the TV as shown.<br />
2 Assemble the parts of the Stand Body with the<br />
Stand Base of the TV.<br />
Stand Body<br />
Stand Base<br />
ENGLISH<br />
3 Secure the TV and the stand with the 4 screws.<br />
C<strong>au</strong>tion<br />
• yTighten the screws firmly to prevent<br />
the TV from tilting forward. Do not over<br />
tighten.<br />
C<strong>au</strong>tion<br />
• yTighten the screws firmly to prevent<br />
the TV from tilting forward. Do not over<br />
tighten.
ASSEMBLING AND PREPARING<br />
21<br />
Only 32/37/42LK45**<br />
1 Lay the TV with the screen side down on a flat<br />
surface.<br />
C<strong>au</strong>tion<br />
• yLay a foam mat or soft protective cloth<br />
on the surface to protect the screen from<br />
damage.<br />
2 Assemble the parts of the Stand Body with the<br />
Stand Base of the TV.<br />
Stand Body<br />
Stand Base<br />
3 Secure the TV and the stand with the 4 screws.<br />
ENGLISH<br />
C<strong>au</strong>tion<br />
• yTighten the screws firmly to prevent<br />
the TV from tilting forward. Do not over<br />
tighten.
22<br />
ASSEMBLING AND PREPARING<br />
Only 19/22/26LV25**, 22/26LV55**<br />
1 Lay the TV with the screen side down on a flat<br />
surface.<br />
Only 32LV25**<br />
1 Lay the TV with the screen side down on a flat<br />
surface.<br />
C<strong>au</strong>tion<br />
• yLay a foam mat or soft protective cloth<br />
on the surface to protect the screen from<br />
damage.<br />
C<strong>au</strong>tion<br />
• yLay a foam mat or soft protective cloth<br />
on the surface to protect the screen from<br />
damage.<br />
2 Assemble the parts of the Stand Body with the<br />
Stand Base of the TV.<br />
2 Assemble the parts of the Stand Body with the<br />
Stand Base of the TV.<br />
Stand Body<br />
Stand Base<br />
ENGLISH<br />
3 Secure the TV and the stand with the 2 screws.<br />
3 Secure the TV and the stand with the 4 screws.<br />
C<strong>au</strong>tion<br />
• yTighten the screws firmly to prevent<br />
the TV from tilting forward. Do not over<br />
tighten.<br />
C<strong>au</strong>tion<br />
• yTighten the screws firmly to prevent<br />
the TV from tilting forward. Do not over<br />
tighten.
ASSEMBLING AND PREPARING<br />
23<br />
Only 32/37/42/47LV35**, 22/26/32LV30**,<br />
32/42LV34**, 32/42/47/55LW45**<br />
1 Lay the TV with the screen side down on a flat<br />
surface.<br />
C<strong>au</strong>tion<br />
• yLay a foam mat or soft protective cloth<br />
on the surface to protect the screen from<br />
damage.<br />
2 Assemble the parts of the Stand Body with the<br />
Stand Base of the TV.<br />
Stand Body<br />
Stand Base<br />
3 Secure the TV and the stand with the 4 screws.<br />
ENGLISH<br />
C<strong>au</strong>tion<br />
• yTighten the screws firmly to prevent<br />
the TV from tilting forward. Do not over<br />
tighten.
24<br />
ASSEMBLING AND PREPARING<br />
Not using the Desk Type Stand<br />
• yImage shown may differ from your TV.<br />
Only Plasma TV<br />
• yPush the supplied protection cover into the<br />
opening at the bottom of the TV until it locks in<br />
place.<br />
• yAttach the protection cover tape.<br />
- This will protect the opening from<br />
accumulating dust and dirt.<br />
- When installing the wall mounting bracket,<br />
use the Protection cover.<br />
Only 26/32LK33**, 32/42LK43**, 32/37/42LK45**,<br />
42/47/55LK53**<br />
1 Push the supplied protection cover into the<br />
opening at the bottom of the TV until clicking<br />
sound.<br />
Protection cover<br />
Protection<br />
cover tape<br />
Only 22LK33**<br />
ENGLISH<br />
Protection cover<br />
1 Lay the TV with the screen side down on a flat<br />
surface.<br />
2 Remove the 2 screws and pull the stand away<br />
from the TV.<br />
3 Push the supplied protection cover into the<br />
opening at the bottom of the TV until it locks in<br />
place.<br />
This will protect the opening from accumulating<br />
dust and dirt.<br />
Protection cover
ASSEMBLING AND PREPARING<br />
25<br />
Mounting on a table<br />
• yImage shown may differ from your TV.<br />
1 Lift and tilt the TV into its upright position on a<br />
table.<br />
- Leave a 10 cm (minimum) space from the<br />
wall for proper ventilation.<br />
Securing the TV to a table<br />
• yImage shown may differ from your TV.<br />
• yThis feature is not available for all models.<br />
Only 26/32LK33**, 32/42LK43**,<br />
42LK53**,32/37/42LK45**, 32LV25**, 32/37LV35**,<br />
32LV30**, 32LV34**<br />
10 cm<br />
Fix the TV to a table to prevent from tilting forward,<br />
damage, and potential injury.<br />
Mount the TV on a table, and then insert and<br />
tighten the supplied screw on the rear of the stand.<br />
10 cm<br />
10 cm<br />
10 cm<br />
2 Connect the power cord to a wall outlet.<br />
warning<br />
• yTo prevent TV from falling over, the TV<br />
should be securely attached to the floor/<br />
wall per installation instructions. Tipping,<br />
shaking, or rocking the TV may c<strong>au</strong>se<br />
injury.<br />
ENGLISH<br />
C<strong>au</strong>tion<br />
• yDo not place the TV near or on sources<br />
of heat, as this may result in fire or other<br />
damage.<br />
NOTE<br />
(Except for 22LK3**, 19/22/26LV25**,<br />
22/26LV55**)<br />
Swivel 20 degrees to the left or right and<br />
adjust the angle of the TV to suit your view.<br />
20<br />
20
26<br />
ASSEMBLING AND PREPARING<br />
Securing the TV to a wall<br />
• yImage shown may differ from your TV.<br />
• yThis feature is not available for all models.<br />
Using the Kensington security system<br />
• yImage shown may differ from your TV.<br />
• yThis feature is not available for all models.<br />
The Kensington security system connector is<br />
located at the rear of the TV. For more information<br />
of installation and using, refer to the manual<br />
provided with the Kensington security system or<br />
visit http://www.kensington.<strong>com</strong>.<br />
Connect the Kensington security system cable<br />
between the TV and a table.<br />
ENGLISH<br />
1 Insert and tighten the eye-bolts, or TV brackets<br />
and bolts on the back of the TV.<br />
- If there are bolts inserted at the eye-bolts<br />
position, remove the bolts first.<br />
2 Mount the wall brackets with the bolts to the<br />
wall.<br />
Match the location of the wall bracket and the<br />
eye-bolts on the rear of the TV.<br />
3 Connect the eye-bolts and wall brackets tightly<br />
with a sturdy rope.<br />
Make sure to keep the rope horizontal with the<br />
flat surface.<br />
C<strong>au</strong>tion<br />
• yMake sure that children do not climb on<br />
or hang on the TV.<br />
Mounting on a wall<br />
Attach a wall mount bracket at the rear of the TV<br />
carefully and install the wall mount bracket on a<br />
solid wall perpendicular to the floor. When you<br />
attach the TV to other building materials, please<br />
contact qualified personnel.<br />
<strong>LG</strong> re<strong>com</strong>mends that wall mounting be performed<br />
by a qualified professional installer.<br />
NOTE<br />
• yUse a platform or cabinet that is strong<br />
and large enough to support the TV<br />
securely.<br />
10 cm<br />
10 cm<br />
10 cm<br />
10 cm
ASSEMBLING AND PREPARING<br />
27<br />
Separate purchase(Wall Mounting Bracket)<br />
Make sure to use screws and wall mount<br />
bracket that meet the VESA standard. Standard<br />
dimensions for the wall mount kits are described in<br />
the following table.<br />
Model<br />
42/50PT25**<br />
50PV25**<br />
42/50PW35**<br />
42/50PW45**<br />
50PZ55**<br />
60PV25**<br />
60PZ55**<br />
VESA (A x B) 400 x 400 600 x 400<br />
Standard screw M6 M8<br />
Number of screws 4 4<br />
Wall mount<br />
bracket<br />
PSW400B,<br />
PSW400BG,<br />
DSW400BG<br />
PSW600B,<br />
PSW600BG<br />
C<strong>au</strong>tion<br />
• yDisconnect the power first, and then<br />
move or install the TV. Otherwise electric<br />
shock may occur.<br />
• yIf you install the TV on a ceiling or slanted<br />
wall, it may fall and result in severe injury.<br />
Use an <strong>au</strong>thorized <strong>LG</strong> wall mount bracket<br />
and contact the local dealer or qualified<br />
personnel.<br />
• yDo not over tighten the screws as this<br />
may c<strong>au</strong>se damage to the TV and void<br />
your warranty.<br />
• yUse the screws and wall mount bracket<br />
that meet the VESA standard. Any<br />
damages or injuries by misuse or using<br />
an improper accessory are not covered<br />
by the warranty.<br />
Model<br />
22LK33**<br />
19/22/26LV25**<br />
22/26LV55**<br />
22/26LV30**<br />
26/32LK33**<br />
32LK43**<br />
32LK45**<br />
32LV25**<br />
32LV35**<br />
32LV30**<br />
32LV34**<br />
32LW45**<br />
VESA (A x B) 100 x 100 200 x 100<br />
Standard screw M4 M4<br />
Number of screws 4 4<br />
Wall mount LSW100B, LSW100BG<br />
bracket<br />
NOTE<br />
• yUse the screws that are listed on the<br />
VESA standard screw specifications.<br />
• yThe wall mount kit includes an installation<br />
manual and necessary parts.<br />
• yThe length of screws may differ<br />
depending on the wall mount. Make sure<br />
to use the proper length.<br />
• yFor more information, refer to the manual<br />
supplied with the wall mount bracket.<br />
ENGLISH<br />
Model<br />
42LK43**<br />
37/42LK45**<br />
42/47LK53**<br />
37LV35**<br />
42/47LV35**<br />
42LV34**<br />
42/47/55LW45**<br />
55LK53**<br />
VESA (A x B) 200 x 200 400 x 400<br />
Standard screw M6 M6<br />
Number of screws 4 4<br />
Wall mount<br />
bracket<br />
LSW200B,<br />
LSW200BG<br />
LSW400B,<br />
LSW400BG
28<br />
ASSEMBLING AND PREPARING<br />
Tidying cables<br />
• yImage shown may differ from your TV.<br />
Only Plasma TV<br />
1 Install the Power Cord Holder and Power<br />
Cord. It will help prevent the power cable from<br />
being removed by accident.<br />
Only 32/37/42/47LV35**, 22/26/32LV30**,<br />
32/42LV34**<br />
1 After connecting the cables as necessary,<br />
install Cable Holder as shown and bundle the<br />
cables.<br />
Power Cord Holder<br />
Cable holder<br />
2 Gather and bind the cables with the Cable<br />
Holder.<br />
Only 26/32LK33**, 32/42LK43**, 32/37/42LK45**,<br />
42/47/55LK53**<br />
ENGLISH<br />
1 Gather and bind the cables with the cable<br />
management clip.<br />
2 Fix the cable management clip firmly to the TV.<br />
Cable Holder<br />
C<strong>au</strong>tion<br />
• yDo not move the TV by holding the Cable<br />
Holder & Power Cord Holder, as the<br />
Cable holders may break, and injuries<br />
and damage to the TV may occur.<br />
Only 22LK33**, 19/22/26/32LV25**, 22/26LV55**<br />
1 After connecting the cables as necessary,<br />
install Cable Holder as shown and bundle the<br />
cables.<br />
NOTE<br />
Cable Management Clip<br />
• yDo not move the TV by holding the<br />
cable management clip, as the cable<br />
management clip may break, and injuries<br />
and damage to the TV may occur.<br />
Cable Holder
ASSEMBLING AND PREPARING<br />
29<br />
Only 32/42/47/55LW45**<br />
1. Secure the power cord with the Cable Holder<br />
on the TV back cover. It will help prevent the<br />
power cable from being removed by accident.<br />
Positioning your display<br />
• yImage shown may differ from your TV.<br />
Only 22LK33**<br />
Adjust the position of the panel in various ways for<br />
maximum <strong>com</strong>fort.<br />
• Tilt range<br />
Cable Holder<br />
12<br />
0<br />
0<br />
3<br />
2. After connecting the cables as necessary,<br />
install Cable Holder as shown and bundle the<br />
cables.<br />
Cable Holder<br />
Connection of TV<br />
• yImage shown may differ from your TV.<br />
ENGLISH<br />
Only 19/22/26LV25**, 22/26LV55**<br />
DC Adapter<br />
1 Connect the antenna cable to the antenna<br />
input port on the TV.<br />
2 Connect the DC adapter plug to the power<br />
input jack on the TV.<br />
3 Connect the power cord to the DC adapter first,<br />
then plug the power cord into the wall power<br />
outlet.
30<br />
REMOTE CONTROL<br />
REMOTE CONTROL<br />
The descriptions in this manual are based on the buttons on the remote control.<br />
Please read this manual carefully and use the TV correctly.<br />
To replace batteries, open the battery cover, replace batteries (1.5 V AAA) matching<br />
and ends to the label inside the <strong>com</strong>partment, and close the battery cover. Be<br />
sure to point the remote control toward the remote control sensor on the TV.<br />
To remove the batteries, perform the installation actions in reverse.<br />
C<strong>au</strong>tion<br />
• yDo not mix old and new batteries, as this may damage the remote control.<br />
• yImage shown may differ from your TV.<br />
• yIn Analogue TV and in some countries, some remote control keys may not work.<br />
ENGLISH<br />
ENERGY<br />
SAVING<br />
AV MODE<br />
INPUT<br />
TV/<br />
RAD<br />
1 2 3<br />
4 5 6<br />
7 8 9<br />
LIST<br />
0<br />
MARK<br />
FAV<br />
RATIO<br />
MUTE<br />
Q.VIEW<br />
P<br />
P<br />
A<br />
G<br />
E<br />
(POWER)<br />
Turns the TV on or off.<br />
ENERGY SAVING (See p.67)<br />
Adjusts the brightness of the screen to reduce energy consumption<br />
AV MODE (See p.46)<br />
Selects an AV mode<br />
INPUT (See p.46)<br />
Changes the input source; Turns the TV on.<br />
TV/RAD<br />
Selects Radio, TV and DTV programme.<br />
GUIDE Home Q.MENU<br />
ENERGY AV MODE INPUT<br />
TV/<br />
RAD<br />
SAVING<br />
OK<br />
1 2 3<br />
4 5 6<br />
EXIT<br />
7 8 9<br />
LIST<br />
0<br />
BACK INFO<br />
MARK<br />
FAV<br />
RATIO<br />
MUTE<br />
Q.VIEW<br />
FREEZE<br />
P<br />
P<br />
A<br />
G<br />
E<br />
Number buttons<br />
Enters numbers.<br />
LIST (See p.39)<br />
Accesses the saved programme list.<br />
Q.VIEW<br />
Returns to the previously viewed programme.<br />
GUIDE Home<br />
Q.MENU<br />
OK
ENERGY<br />
AV MODE<br />
INPUT<br />
TV/<br />
RAD<br />
REMOTE CONTROL<br />
31<br />
SAVING<br />
1 2 3<br />
4 5 6<br />
7 8<br />
LIST<br />
0<br />
MARK<br />
FAV<br />
ENERGY AV MODE INPUT<br />
RATIO<br />
SAVING<br />
MUTE<br />
9<br />
Q.VIEW<br />
P<br />
1 2 3<br />
4 5 6<br />
7 OK 8 9<br />
LIST<br />
0<br />
MARK<br />
BACK INFO FAV EXIT<br />
P<br />
A<br />
TV/ G<br />
RAD E<br />
GUIDE Home Q.MENU<br />
3D<br />
MUTE<br />
Q.VIEW<br />
P<br />
P<br />
A<br />
G<br />
E<br />
+ -<br />
Adjusts the volume level.<br />
MARK<br />
Selects a menu or option.<br />
FAV (See p.40)<br />
Accesses your favourite programme list<br />
3D(See p.51)(Only 3D Models)<br />
Used for viewing 3D video.<br />
RATIO (See p.45)<br />
Resizes an image<br />
MUTE<br />
Mutes all sounds.<br />
P<br />
Scrolls through the saved programmes.<br />
PAGE<br />
Moves to the previous or next screen.<br />
GUIDE Home<br />
FREEZE<br />
Q.MENU<br />
OK<br />
ENERGY<br />
SAVING<br />
BACK INFO<br />
RATIO<br />
AV MODE<br />
INPUT<br />
EXIT<br />
TV/<br />
RAD<br />
1 2 3<br />
4 5 6<br />
7 8<br />
FREEZE<br />
9<br />
LIST<br />
0<br />
MARK<br />
FAV<br />
ENERGY AV MODE RATIOINPUT<br />
SAVING<br />
MUTE<br />
3D SETTING<br />
Q.VIEW<br />
P<br />
1 2 3<br />
4 5 6<br />
7<br />
OK<br />
8 9<br />
LIST<br />
0<br />
GUIDE Home Q.MENU<br />
Q.VIEW<br />
MARK<br />
BACK INFO EXIT<br />
FAV<br />
3D<br />
MUTE<br />
BACK INFO<br />
P<br />
P<br />
A<br />
G<br />
E<br />
TV/<br />
RAD<br />
3D FREEZE OPTION<br />
GUIDE Home Q.MENU<br />
OK<br />
EXIT<br />
P<br />
A<br />
G<br />
E<br />
GUIDE<br />
Shows programme guide.<br />
Home<br />
Accesses the main menus, or saves your input and exit the menus.<br />
Q. MENU (See p.48)<br />
Accesses the quick menus<br />
3D OPTION(Only 32/42/47/55LW45**)<br />
Uses for viewing 3D video.<br />
Navigation buttons (up/down/left/right)<br />
Scrolls through menus or options.<br />
OK<br />
Selects menus or options and confirms your input.<br />
BACK<br />
Returns to the previous level.<br />
INFO (See p.41)<br />
Views the information of the current programme and screen.<br />
EXIT<br />
Clears all on-screen displays and return to TV viewing.<br />
ENGLISH<br />
RATIO
ENGLISH<br />
32<br />
7 8 9<br />
MUTE 0<br />
1<br />
FAV<br />
2 3<br />
Home<br />
4<br />
3D<br />
5 6P<br />
7<br />
MUTE<br />
OK 8<br />
0<br />
9<br />
ENERGY AV MODE INPUT<br />
TV/<br />
RATIO<br />
PRAD<br />
SAVING LIST<br />
Q.VIEW<br />
MARK<br />
REMOTE CONTROL<br />
GUIDE<br />
GUIDE Home Q.MENU<br />
ENERGY<br />
LIST<br />
AV MODE INPUT<br />
Q.VIEW<br />
TV/<br />
MARK<br />
RAD<br />
SAVING FAV<br />
BACK INFO EXIT<br />
P<br />
OK<br />
A<br />
RATIO<br />
G<br />
E<br />
1 2<br />
P3<br />
MUTE<br />
4 5 6<br />
7<br />
FREEZE<br />
INFO Home EXIT<br />
8 9<br />
AV MODE INPUT<br />
LIST<br />
0<br />
GUIDE BACK<br />
ENERGY<br />
SAVING<br />
OK<br />
MARK<br />
FAV<br />
BACK INFO<br />
MUTE<br />
RATIO<br />
MUTE<br />
BACK INFO<br />
ENERGY AV MODE INPUT<br />
TV/<br />
LIST<br />
0<br />
Q.VIEW RAD<br />
FREEZE<br />
SAVING OK MARK<br />
FAV<br />
1 2 3 P<br />
A<br />
RATIO<br />
G<br />
E<br />
4 INFO MUTE 5 EXIT 6<br />
7 8 9<br />
3D SETTING<br />
GUIDE Home Q.MENU<br />
ENERGY AV MODE INPUT<br />
LIST<br />
TV/<br />
0<br />
Q.VIEW<br />
RAD<br />
FREEZE<br />
SAVING MARK<br />
OK<br />
FAV<br />
P<br />
1<br />
RATIO<br />
2 3 A<br />
G<br />
P E<br />
RATIO<br />
4 MUTE 5 6<br />
BACK INFO EXIT<br />
7 8<br />
LIST<br />
0<br />
MARK<br />
OK<br />
FAV<br />
Q.MENU<br />
Q.MENU<br />
TV/ Q.VIEW RAD<br />
1 2 3<br />
RATIO<br />
P<br />
4 5 EXIT 6<br />
7 8 9<br />
LIST<br />
AV MODE0<br />
GUIDE Home Q.MENU<br />
ENERGY<br />
INPUT<br />
Q.VIEW<br />
FREEZE<br />
TV/<br />
RAD<br />
MARK<br />
SAVING OK FAV<br />
1 3D 2 3<br />
BACK<br />
3D SETTING<br />
FREEZE<br />
P<br />
4 5 EXIT 6<br />
7 8 9<br />
GUIDE Home Q.MENU<br />
P<br />
9<br />
GUIDE Home Q.MENU<br />
Q.VIEW<br />
P<br />
A<br />
G<br />
E<br />
P<br />
A<br />
G<br />
E<br />
P<br />
A<br />
G<br />
E<br />
P<br />
A<br />
G<br />
E<br />
Coloured buttons<br />
These buttons are used for teletext (on TELETEXT models only),<br />
Programme edit.<br />
3D SETTING(Only 42/50PW35**, 42/50PW45**, 50/60PZ55**)<br />
Use this to view 3D video.<br />
TELETEXT BUTTONS (See p.89)<br />
These buttons are used for teletext.<br />
For further details, see the ‘Teletext’ section.<br />
SUBTITLE<br />
Recalls your preferred subtitle in digital mode.<br />
Control buttons( , , , , )<br />
Controls the MY MEDIA menus, or the SIMPLINK <strong>com</strong>patible devices<br />
(USB,SIMPLINK).<br />
FREEZE(Only Plasma TV)<br />
Freezes the current frame while using the TV, AV, Component, RGB-PC, or<br />
HDMI input source.<br />
SIMPLINK (See p.88)<br />
Accesses the AV devices connected to the TV;<br />
Opens the SIMPLINK menu.<br />
RATIO (See p.45)<br />
Resizes an image<br />
AD(Only 22/26LV55**)<br />
Switches the Audio Description On or Off.<br />
3D<br />
AD<br />
MUTE<br />
BACK INFO<br />
P<br />
3D EXIT OPTION<br />
P<br />
A<br />
G<br />
E<br />
GUIDE Home<br />
Q.MENU<br />
OK<br />
BACK INFO<br />
EXIT<br />
RATIO
WATCHING TV<br />
33<br />
WATCHING TV<br />
Connecting an antenna<br />
Connect an antenna to watch TV while referring to<br />
the following.<br />
To prevent damage do not connect to the mains<br />
outlet until all connections are made between the<br />
devices.<br />
Connect the TV to a wall antenna socket with an<br />
RF cable (75 Ω).<br />
• yImage shown may differ from your TV.<br />
Turning the TV on for the first<br />
time<br />
When you turn the TV on for the first time, the<br />
Initial setting screen appears. Select a language<br />
and customize the basic settings.<br />
1 Connect the power cord to a power outlet.<br />
2 In Standby mode, press (POWER) to turn<br />
the TV on.<br />
The Initial setting screen appears if you turn<br />
the TV on for the first time.<br />
NOTE<br />
• yYou can also access Factory Reset by<br />
accessing OPTION in the main menus.<br />
3 Follow the on-screen instructions to customize<br />
your TV settings according to your preferences.<br />
Wall Antenna<br />
Socket<br />
or<br />
Language<br />
<br />
Mode Setting<br />
<br />
Power Indicator<br />
<br />
Country<br />
<br />
Time Zone<br />
<br />
Auto Tuning<br />
Selects a language to display.<br />
(Except for Australia, New<br />
Zealand, Singapore, South<br />
Africa),<br />
Selects Home Use for the<br />
Home environment.<br />
Sets the power indicator.<br />
(When you select Home Use<br />
from the Mode Setting - only<br />
LED LCD TV)<br />
Selects a country to display.<br />
(Only Australia, New Zealand)<br />
Selects a Time Zone to<br />
display.(Only Australia)<br />
Scans and saves available<br />
channels <strong>au</strong>tomatically.<br />
ENGLISH<br />
NOTE<br />
• yUse a signal splitter to use more than 2<br />
TVs.<br />
• yIf the image quality is poor, install a signal<br />
amplifier properly to improve the image<br />
quality.<br />
• yIf the image quality is poor with an<br />
antenna connected, aim the antenna to<br />
the correct direction.<br />
• yAn antenna cable and converter are not<br />
supplied.<br />
NOTE<br />
• yDTV mode control buttons may not<br />
function based on country broadcasting<br />
circumstances. (Only DTV)<br />
• yIn country that Digital broadcasting<br />
regulation isn’t fixed, some DTV function<br />
may not work depending on digital<br />
broadcasting circumstances. (Only DTV)
34<br />
WATCHING TV<br />
4 When the basic settings are <strong>com</strong>plete,<br />
press OK.<br />
NOTE<br />
• yIf you do not <strong>com</strong>plete the Initial setting, it<br />
will appear whenever the TV turns on.<br />
• yDisconnect the power cord from the<br />
power outlet when you do not use the TV<br />
for a long period of time.<br />
Watching TV<br />
1 In Standby mode, press (POWER) to turn<br />
the TV on.<br />
2 Press INPUT and select Antenna.<br />
3 To turn the TV off, press (POWER) .<br />
The TV switches to Standby mode.<br />
5 To turn the TV off, press (POWER) .<br />
ENGLISH
WATCHING TV<br />
35<br />
Managing programmes<br />
Automatically setting up<br />
programme<br />
Use this to <strong>au</strong>tomatically find and store all available<br />
programmes.<br />
When you start <strong>au</strong>to programming, all previously<br />
stored service information will be deleted.<br />
1 Press Home to access the main menus.<br />
2 Press the Navigation buttons to scroll to<br />
SETUP and press OK.<br />
3 Press the Navigation buttons to scroll to<br />
Auto Tuning and press OK.<br />
4 Select Start to start <strong>au</strong>tomatic tuning.<br />
The TV scans and saves available programmes<br />
<strong>au</strong>tomatically.<br />
5 When you are finished, press EXIT.<br />
When you return to the previous menu, press<br />
BACK.<br />
<strong>Manual</strong>ly setting up programme (In<br />
digital mode) (Only DTV)<br />
<strong>Manual</strong> Tuning lets you manually add a programme<br />
to your programme list.<br />
1 Press Home to access the Main menus.<br />
2 Press the Navigation buttons to scroll to<br />
SETUP and press OK.<br />
3 Press the Navigation buttons to scroll to<br />
<strong>Manual</strong> Tuning and press OK.<br />
4 Press the Navigation buttons to scroll to DTV<br />
and press OK.<br />
5 Scroll through the programme types, and then<br />
add or delete programmes.<br />
6 When you are finished, press EXIT.<br />
When you return to the previous menu, press<br />
BACK.<br />
NOTE<br />
• yIf the TV scans a blocked programme, you<br />
will be prompted to enter your password to<br />
keep the programme scanned.<br />
• yIf you wish to keep on <strong>au</strong>to tuning select<br />
Start using the Navigation buttons. Then,<br />
press the OK button. Otherwise select<br />
Close.<br />
• yAutomatic Numbering: Decide whether<br />
to use the programme numbers as sent by<br />
broadcasting stations for tuning. (Only DTV)<br />
NOTE<br />
y • If the TV scans a blocked programme, you<br />
will be prompted to enter your password to<br />
keep the programme scanned.<br />
ENGLISH
36<br />
WATCHING TV<br />
ENGLISH<br />
<strong>Manual</strong>ly setting up programme (In<br />
analogue mode)<br />
<strong>Manual</strong> Tuning lets you manually tune and arrange<br />
the stations in whatever order you desire.<br />
1 Press Home to access the main menus.<br />
2 Press the Navigation buttons to scroll to<br />
SETUP and press OK.<br />
3 Press the Navigation buttons to scroll to<br />
<strong>Manual</strong> Tuning and press OK.<br />
4 Press the Navigation buttons to scroll to<br />
TV and press OK. (Only DTV)<br />
5 Press the Navigation buttons or Number buttons<br />
to scroll to the desired programme Storage.<br />
6 Press the Navigation buttons to scroll to<br />
TV System. (Except for Australia)<br />
7 Press the Navigation buttons to scroll to<br />
V/UHF or Cable.<br />
8 Press the Navigation buttons or Number buttons<br />
to scroll to the desired channel number.<br />
9 Press the Navigation buttons to scroll and start<br />
searching.<br />
10 Press the Navigation buttons to scroll to<br />
Store and press OK.<br />
11 When you are finished, press EXIT.<br />
When you return to the previous menu, press<br />
BACK.<br />
Assigning a station name<br />
You can assign a station name with five characters<br />
to each programme number.<br />
1 Press Home to access the main menus.<br />
2 Press the Navigation buttons to scroll to<br />
SETUP and press OK.<br />
3 Press the Navigation buttons to scroll to<br />
<strong>Manual</strong> Tuning and press OK.<br />
4 Press the Navigation buttons to scroll to<br />
TV. (Only DTV)<br />
5 Press the Navigation buttons to scroll to<br />
Name and press OK.<br />
6 Press the Navigation buttons to scroll Select<br />
the position and make your choice of the second<br />
character, and so on. You can use an the<br />
alphabet A to Z, the number 0 to 9, +/ -, and<br />
blank and press OK.<br />
7 Press the Navigation buttons to scroll to<br />
Close and press OK.<br />
8 Press the Navigation buttons to scroll to<br />
Store and press OK<br />
9 When you are finished, press EXIT.<br />
When you return to the previous menu, press<br />
BACK.<br />
NOTE<br />
• yIf the TV scans a blocked programme, you<br />
will be prompted to enter your password to<br />
keep the programme scanned.<br />
• yBG : PAL B/G (New Zealand / South Africa<br />
/ Singapore / Indonesia / Israel / Malaysia /<br />
Vietnam / Asia)<br />
DK : PAL D/K (New Zealand / South Africa /<br />
Singapore / Indonesia / Israel / Malaysia /<br />
Vietnam / Asia)<br />
I : PAL I/II (New Zealand / South Africa /<br />
Singapore / Indonesia / Israel / Malaysia /<br />
Vietnam / Asia)<br />
B/B : Australia<br />
M : NTSC-M (South Africa / Indonesia /<br />
Israel / Malaysia / Vietnam / Asia)<br />
• yTo store another channel, repeat steps 6 to<br />
10.
WATCHING TV<br />
37<br />
Fine Tuning<br />
Normally fine tuning is only necessary if reception<br />
is poor.<br />
1 Press Home to access the main menus.<br />
2 Press the Navigation buttons to scroll to<br />
SETUP and press OK.<br />
3 Press the Navigation buttons to scroll to<br />
<strong>Manual</strong> Tuning and press OK.<br />
4 Press the Navigation buttons to scroll to<br />
TV. (Only DTV)<br />
Editing your programme list<br />
When a programme number is skipped, it means<br />
that you will be unable to select it using P ^ v button<br />
during TV viewing.<br />
If you wish to select the skipped programme,<br />
directly enter the programme number with the<br />
NUMBER buttons or select it in the Programme<br />
edit menu.<br />
This function enables you to skip the stored programmes.<br />
You can change the programme number using<br />
“Move”function, if “Automatic Numbering” is unchecked<br />
when you start Auto Tuning (Only DTV).<br />
5 Press the Navigation buttons to scroll to<br />
Fine.<br />
6 Fine tune for the best picture and sound.<br />
7 Press the Navigation buttons to scroll to<br />
Store and press OK<br />
8 When you are finished, press EXIT.<br />
When you return to the previous menu, press<br />
BACK.<br />
1 Press Home to access the main menus.<br />
2 Press the Navigation buttons to scroll to<br />
SETUP and press OK.<br />
3 Press the Navigation buttons to scroll to Programme<br />
Edit and press OK.<br />
4 Press the Navigation buttons to select a programme<br />
to be stored or skipped.<br />
5 When you are finished, press EXIT.<br />
When you return to the previous menu, press<br />
BACK.<br />
ENGLISH
38<br />
WATCHING TV<br />
In DTV/RADIO mode<br />
Skipping a programme number<br />
In TV mode<br />
Deleting a programme<br />
1 Press the Navigation buttons to scroll to select<br />
a programme number to be skipped.<br />
2 Press Blue button to turn the programme<br />
number.<br />
3 Press Blue button to release.<br />
NOTE<br />
• yWhen programmes are to be skipped, the<br />
skipped programme shows in blue and these<br />
programmes will not be selected by the P ^<br />
v buttons during TV viewing.<br />
• yIf you wish to select a skipped programme,<br />
directly enter the programme number with<br />
the NUMBER buttons or select it in the programme<br />
edit or EPG.<br />
1 Press the Navigation buttons to scroll to select<br />
a programme number to be deleted.<br />
2 Press Red button to turn the programme<br />
number.<br />
NOTE<br />
• yThe selected programme is deleted, all the<br />
following programmes are shifted up one.<br />
Moving a programme<br />
1 Press the Navigation buttons to scroll to select<br />
a programme number to be moved.<br />
ENGLISH<br />
Locking a programme number<br />
2 Press the Green button to turn the programme<br />
number and press the Navigation buttons.<br />
3 Press Green button to release.<br />
1 Press the Navigation buttons to scroll to select<br />
a programme number to be locked.<br />
2 Press Yellow button to turn the programme<br />
number.<br />
3 Press Yellow button to release.<br />
NOTE<br />
• yIt can be registered as Lock programme<br />
even when Lock System is turned Off.<br />
Skipping a programme number<br />
1 Press the Navigation buttons to scroll to select<br />
a programme number to be skipped.<br />
2 Press Blue button to turn the programme<br />
number.<br />
3 Press Blue button to release.<br />
NOTE<br />
• yWhen programmes are to be skipped, the<br />
skipped programme shows in blue and these<br />
programmes will not be selected by the P ^<br />
v buttons during TV viewing.<br />
• yIf you wish to select a skipped programme,<br />
directly enter the programme number with<br />
the NUMBER buttons or select it in the programme<br />
edit.
WATCHING TV<br />
39<br />
Locking a programme number<br />
1 Press the Navigation buttons to scroll to select<br />
a programme number to be locked.<br />
2 Press Yellow button to turn the programme<br />
number.<br />
3 Press Yellow button to release.<br />
Selecting the programme list<br />
You can check which programmes are stored in<br />
the memory by displaying the programme list.<br />
Displaying programme LIST<br />
NOTE<br />
• yIt can be registered as Lock programme<br />
even when Lock System is turned Off.<br />
Selecting favourite programme<br />
1 Press the Navigation buttons to scroll to select<br />
your desired programme.<br />
2 Press the FAV to add corresponding<br />
programme to Favourite list of current Favourite<br />
group.<br />
3 Press FAV to release.<br />
Selecting favourite programme group<br />
1 Press LIST to access the Programme List.<br />
2 Press Blue button to turn the programme edit.<br />
NOTE<br />
• yYou may find some blue programmes. These<br />
have been set up to be skipped by <strong>au</strong>to programming<br />
or in the programme edit mode.<br />
• ySome programmes with the channel number<br />
shown in the programme LIST indicate there<br />
is no station name assigned.<br />
Selecting a programme in the programme list<br />
1 Press the Navigation buttons to select programme.<br />
2 Press OK to switch to the chosen programme<br />
number.<br />
ENGLISH<br />
1 Press the Navigation buttons to scroll to select<br />
your desired programme.<br />
2 Press the Q.MENU to display a pop-up window<br />
where Favourite group can be changed.<br />
3 Press the Navigation buttons to scroll to select<br />
a Favourite group and press OK.<br />
NOTE<br />
y • Press TV/RAD in Digital TV. (The mode will<br />
be switched between TV, DTV, and Radio<br />
from the programme you are currently<br />
watching.)
40<br />
WATCHING TV<br />
Paging through a programme list<br />
1 Press the P ^ v buttons to turn the pages.<br />
2 Press LIST to return normal TV viewing.<br />
Displaying the favourite programme list<br />
1 Press FAV to access the Favourite Programme<br />
List.<br />
2 When you are finished, press EXIT.<br />
Button<br />
Description<br />
Blue button Turn the programme edit.<br />
Yellow<br />
button<br />
ok<br />
Current channel is registered/<br />
cancelled as preferred channel on<br />
currently selected Group.<br />
Selects a programme to view<br />
< > Favourite group is changed.<br />
ENGLISH
WATCHING TV<br />
41<br />
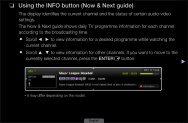
EPG (Electronic Program<br />
Guide) (In digital mode)<br />
This feature is disabled in New Zealand.<br />
• yImage shown may differ from your TV.<br />
This system has an Electronic Programme Guide<br />
(EPG) to help your navigation through all the<br />
possible viewing options.<br />
The EPG supplies information such as programme listings,<br />
start and end times for all available services. In<br />
addition, detailed information about the programme is<br />
often available in the EPG (the availability and amount<br />
of these programme details will vary, depending on the<br />
particular broadcaster).<br />
This function can be used only when the EPG information<br />
is broadcast by broadcasting <strong>com</strong>panies.<br />
The EPG displays the programme details for next 8<br />
days.<br />
You must set the Clock in the Time menu, before using<br />
EPG function.<br />
> Shows next programme information.<br />
^ v<br />
OK<br />
Shows other programme information.<br />
?<br />
Do you want to set a reminder for the<br />
selected programme?<br />
Bob The Builder Special<br />
DTV 1 ABC TV Sydney<br />
22 Dec. 2009 10:15~10:58<br />
Yes<br />
A pop-up window for remind settings appear.<br />
< > Select Timer Remind setting mode.<br />
No<br />
DTV 1 TV ONE<br />
Good Morning<br />
21:00 00:00 Show/Game Show<br />
►Pr. Change<br />
►<br />
► Next<br />
Sarah Bradley, Steve Gray and Brendon Pongia present the<br />
latest in fashion, the arts, entertainment, lifestyle and cooking,<br />
with regular and special guests.<br />
Sarah Bradley, Steve Gray and Brendon Pongia present the<br />
latest in fashion, the arts, entertainment, lifestyle and cooking,<br />
with regular and special guests.<br />
▼<br />
Watch<br />
16:9 720p ... HE-AAC<br />
Up<br />
Down<br />
• yPress INFO to show current programme<br />
information.<br />
Displayed with a TV or DTV Programme.<br />
Displayed with a Radio Programme.<br />
Displayed with a MHEG Programme.<br />
HE-AAC C Displayed with a HE-AAC Programme.<br />
Aspect ratio of broadcasting programme.<br />
Aspect ratio of broadcasting programme.<br />
Displayed with a Teletext Programme.<br />
Displayed with a Subtitle Programme.<br />
Switch on/off EPG<br />
1 Press GUIDE to switch on or off EPG.<br />
Select a programme<br />
1 Press Navigation buttons or P ^ v to select<br />
desired programme.<br />
Programme Guide<br />
That ’70s show<br />
DTV 1 YLE TV1 25 Nov. 2008 09:45~10:15<br />
ALL NOW NEXT<br />
1 YLE TV1 That ’70s show Keno<br />
2 YLE TV2 Your World Today<br />
World Business<br />
4 TV.. Legenen om Den.... Fantomen<br />
5 YLE FST Naturtimmen<br />
Kritiskt<br />
6 CNN Lyssna<br />
ABC<br />
FAV Favourite<br />
Mode<br />
INFO<br />
i Information<br />
▲<br />
Watch/Schedule<br />
<strong>Manual</strong> Timer<br />
25 Nov. 2008 10:05<br />
TV/RAD<br />
RADIO<br />
Schedule List<br />
ENGLISH<br />
Displayed with a Scramble Programme.<br />
Displayed with a Dolby Digital Programme.<br />
Displayed with a Dolby Digital PLUS<br />
Programme.<br />
576i/p, 720p, 1080i/p : Resolution of broadcasting programme
42<br />
WATCHING TV<br />
NOW/NEXT Guide Mode<br />
You can view a programme being broadcasted and<br />
one scheduled to follow.<br />
Button<br />
Description<br />
Red button Change EPG mode.<br />
Yellow button Enter <strong>Manual</strong> Timer mode.<br />
Blue button Enter Schedule List mode.<br />
When ‘Now’ is selected, it is moved to<br />
selected programme and EPG disappears<br />
OK<br />
When ‘Next’ is selected, a reservation<br />
pop-up window appears.<br />
< > Select NOW or NEXT Programme.<br />
^ v<br />
Select the Broadcast Programme.<br />
P ^ v Page Up/Down.<br />
GUIDE<br />
BACK Switch off EPG.<br />
EXIT<br />
TV/RAD Select DTV or RADIO Programme.<br />
INFO Detail information on or off.<br />
Date Change Mode<br />
Button<br />
Description<br />
Green button<br />
v<br />
Switch off Date setting mode.<br />
BACK<br />
OK<br />
Change to the selected date.<br />
< > Select a date.<br />
GUIDE<br />
Switch off EPG.<br />
EXIT<br />
Extended Description Box<br />
Button<br />
GUIDE<br />
^ v<br />
GUIDE<br />
EXIT<br />
Description<br />
The detail information on or off.<br />
Text Up/Down.<br />
Switch off EPG.<br />
ENGLISH<br />
8 Day Guide Mode<br />
Button<br />
Description<br />
Red button Change EPG mode.<br />
Green button Enter Date setting mode.<br />
Yellow button Enter <strong>Manual</strong> Timer mode.<br />
Blue button Enter Schedule List mode.<br />
When ‘Currently broadcasting programme<br />
is selected, it is moved to selected<br />
OK<br />
programme and EPG disappears<br />
When ‘Future broadcasting programme<br />
is selected, a reservation pop-up window<br />
appears.<br />
< > Select Programme.<br />
^ v<br />
Select the Broadcast Programme.<br />
P ^ v Page Up/Down.<br />
GUIDE<br />
BACK Switch off EPG.<br />
EXIT<br />
TV/RAD Select DTV or RADIO Programme.<br />
INFO Detail information on or off.<br />
Remind Setting Mode<br />
Button<br />
Description<br />
BACK Switch off <strong>Manual</strong> Timer mode.<br />
^ v<br />
Select Remind function setting.<br />
< > Select Start Time or Programme.<br />
OK<br />
Save Timer Remind.<br />
Schedule List Mode<br />
If you’ve created a schedule list, a scheduled programme<br />
is displayed at the scheduled time even<br />
when you are watching a different programme at the<br />
time.<br />
Button<br />
Yellow button<br />
Blue button<br />
GUIDE<br />
BACK<br />
OK<br />
^ v<br />
P ^ v<br />
Description<br />
Change to <strong>Manual</strong> Timer mode.<br />
Change to Guide mode.<br />
Switch off Schedule List.<br />
Select your desired Option (Modify/<br />
Delete/Delete All).<br />
Select programme.<br />
Page Up/Down.
WATCHING TV<br />
43<br />
MHEG (Multimedia and<br />
Hypermedia Information<br />
coding Expert Group) (In<br />
digital mode)<br />
This feature is not available for all country.<br />
The TV gives you access to digital teletext which is<br />
greatly improved in various aspects such as text,<br />
graphics etc.<br />
This digital teletext can access special digital teletext<br />
services and specific services which broadcast<br />
digital teletext.<br />
Teletext Within Digital Service<br />
Teletext in Digital Service<br />
1 Press the numeric or P ^ v button to select<br />
a certain service which broadcasts digital<br />
teletext.<br />
2 Press the TEXT or coloured button to switch on<br />
teletext.<br />
3 Follow the indications on digital teletext and<br />
move onto the next step by pressing OK,<br />
Navigation buttons, RED, GREEN, YELLOW,<br />
BLUE or NUMBER buttons and so on.<br />
4 Press the TEXT or colour button to switch off<br />
digital teletext and return to TV viewing.<br />
Some services may allow you to access text<br />
services by pressing the RED button.<br />
1 Press the numeric or P ^ v button to select a<br />
digital service which broadcasts digital teletext.<br />
2 Follow the indications on digital teletext and<br />
move onto the next step by pressing TEXT,<br />
OK, Navigation buttons, RED, GREEN,<br />
YELLOW, BLUE or NUMBER buttons and etc.<br />
ENGLISH<br />
3 To change digital teletext service, select a different<br />
service by the numeric or P ^ v button.
44<br />
WATCHING TV<br />
This feature is enabled only in New Zealand.<br />
- In New Zealand, pressing the Guide key will<br />
display MHEG EPG provided by New Zealand<br />
on the screen.<br />
This system has an MHEG(Multimedia and hypermedia<br />
information coding expert group) to help<br />
your navigation through all the possible viewing<br />
options.<br />
Select a programme<br />
1 Press Navigation buttons to preview the Broadcast<br />
Programme Information.<br />
2 Press Navigation buttons to change to desired<br />
channel.<br />
3 Press OK to remove MHEG after moving to a<br />
selected channel.<br />
DTV 1 TV ONE<br />
►Pr. Change<br />
►<br />
► Next<br />
Watch<br />
Good Morning<br />
21:00 00:00 Show/Game Show<br />
16:9 720p ... HE-AAC<br />
Sarah Bradley, Steve Gray and Brendon Pongia present the<br />
latest in fashion, the arts, entertainment, lifestyle and cooking,<br />
with regular and special guests.<br />
Sarah Bradley, Steve Gray and Brendon Pongia present the<br />
latest in fashion, the arts, entertainment, lifestyle and cooking,<br />
with regular and special guests.<br />
▼<br />
Up<br />
Down<br />
Next Week<br />
EPG/Guide<br />
ENGLISH<br />
• yPress INFO to show current programme<br />
information.<br />
HE-AAC<br />
AC<br />
Displayed with a TV or DTV Programme.<br />
Displayed with a Radio Programme.<br />
Displayed with a MHEG Programme.<br />
Displayed with a HE-AAC Programme.<br />
Aspect ratio of broadcasting programme.<br />
Aspect ratio of broadcasting programme.<br />
Programme Listing Mode<br />
Button<br />
Description<br />
^ v<br />
Select the Broadcast Programme<br />
Information.<br />
< > Select Channel.<br />
Yellow button Change to Next Week or Previous Day.<br />
Blue button Change to Next Day or Today.<br />
OK<br />
The MHEG will disappear after<br />
moving to a selected channel.<br />
GUIDE Change to Now/Next mode.<br />
BACK Switch off MHEG.<br />
INFO Detail information on or off.<br />
Displayed with a Teletext Programme.<br />
Displayed with a Subtitle Programme.<br />
Displayed with a Scramble Programme.<br />
Displayed with a Dolby Digital Programme.<br />
Displayed with a Dolby Digital PLUS<br />
Programme.<br />
576i/p, 720p, 1080i/p : Resolution of broadcasting programme<br />
Switch on/off MHEG<br />
1 Press GUIDE to switch on or off MHEG.<br />
NOW/NEXT Guide Mode<br />
You can view a channel being broadcasted and<br />
one scheduled to follow.<br />
Button<br />
^ v<br />
OK<br />
GUIDE<br />
BACK<br />
INFO<br />
Description<br />
Select desired channel.<br />
The MHEG will disappear after moving<br />
to a selected channel.<br />
Change to Listing mode.<br />
Switch off MHEG.<br />
Detail information on or off.
WATCHING TV<br />
45<br />
Using additional options<br />
Adjusting aspect ratio<br />
Resize an image to view at its optimal size by<br />
pressing RATIO while you are watching TV.<br />
- Just Scan: Displays video images in the original<br />
size without removing parts of the edge of<br />
the image.<br />
Just Scan<br />
NOTE<br />
• yYou can also change the image size by<br />
pressing Q. MENU or accessing Aspect<br />
Ratio in the Picture menus.<br />
• yFor Zoom Setting, select 14:9, Zoom<br />
and Cinema Zoom in Ratio Menu.<br />
After <strong>com</strong>pleting Zoom Setting, the display<br />
goes back to Q.Menu.<br />
• yYou can only select 4:3, 16:9 (Wide),<br />
14:9, Zoom/Cinema Zoom in Component<br />
mode.<br />
• yYou can only select 4:3, Original, 16:9<br />
(Wide), 14:9, Zoom/Cinema Zoom in<br />
HDMI mode.<br />
• yYou can only select 4:3, 16:9 (Wide) in<br />
RGB-PC, HDMI-PC mode only.<br />
• yIn DTV/HDMI/Component (over 720p)<br />
mode, Just Scan is available.<br />
• yIn DTV 576p mode, Just Scan is available<br />
in Australia/New Zealand only.<br />
NOTE<br />
• yIf you select Just Scan, you may see<br />
image noises at the edge of the original<br />
signal.<br />
- Original: When your TV receives a wide<br />
screen signal it will <strong>au</strong>tomatically change to the<br />
picture format broadcasted.<br />
Original<br />
or<br />
Original<br />
- Full Wide(Only DTV): When TV receives the<br />
wide screen signal,it will let you adjust the<br />
picture horizontally or vertically, in a linear<br />
proportion,to fill the entire screen fully.<br />
ENGLISH<br />
- 16:9: Resizes images to fit the screen width.<br />
4:3 and 14:9 video is supported in full screen<br />
without any video distortion through DTV<br />
input.<br />
Full Wide<br />
or<br />
Full Wide<br />
- 4:3: Resizes images at the standard 4:3 without<br />
distortion.
46<br />
WATCHING TV<br />
- 14:9 : You can view a picture format of 14:9<br />
or a general TV programme in the 14:9 mode.<br />
The 14:9 screen is viewed in the same way as<br />
in 4:3, but is moved to the up and down.<br />
Changing AV modes<br />
Each AV mode has the optimized image and sound<br />
settings.<br />
Press AV MODE repeatedly to select an<br />
appropriate mode.<br />
Off<br />
Mode<br />
Description<br />
Changes to the previously customized<br />
settings<br />
- Zoom: Enlarges an image to fit the screen<br />
width. The top and bottom of the image may<br />
not appear.<br />
Cinema or<br />
Cinema<br />
Sport<br />
Game<br />
Use the optimized image and sound<br />
setting for the cinematic look<br />
Use the optimized image and sound<br />
setting for dynamic action sports<br />
Use the optimized image and sound<br />
setting for fast gaming<br />
When playing a video game using<br />
PlayStation or Xbox, it is re<strong>com</strong>mended<br />
to use the Game mode.<br />
When in Game mode, functions related<br />
to picture quality will be optimized<br />
for playing games.<br />
ENGLISH<br />
NOTE<br />
• yIf you access, Aspect Ratio in the quick<br />
menus,<br />
- Press the Navigation buttons to stretch<br />
an image vertically.<br />
- Press the Navigation buttons to move<br />
the zoom focus up or down.<br />
NOTE<br />
• yIf you select Off in AV mode, the picture<br />
and image which you initially set will be<br />
selected.<br />
Using the input list<br />
- Cinema Zoom : Enlarges an image in the<br />
cinemascope ratio, 2.35:1.<br />
• yTo change the ratio of the cinema zoom,<br />
press the Navigation buttons and its range is<br />
from 1 to 16.<br />
• yTo move the zoom focus up or down, press<br />
the Navigation buttons.<br />
Selecting an input source<br />
1 Press INPUT to access the input sources.<br />
- The connected device displays on each input<br />
source.<br />
NOTE<br />
• yYou can also access the input source list<br />
by selecting INPUT in the main menus.<br />
2 Press Navigation buttons to scroll to one of the<br />
input sources and press OK.<br />
• yImage shown may differ from your TV.<br />
Input List<br />
Move<br />
OK<br />
NOTE<br />
Antenna<br />
USB<br />
AV1<br />
AV2 Component1 Component2<br />
• yIf you enlarge or reduce an image, the<br />
image may be distorted.<br />
RGB<br />
HDMI1<br />
HDMI2<br />
SIMPLINK<br />
HDMI3<br />
Input Label<br />
Exit<br />
(Only LCD TV/LED LCD TV)
WATCHING TV<br />
47<br />
Input source<br />
Description<br />
Antenna Select it when watching the TV. (Only<br />
DTV : Select it when watching the DTV/<br />
TV/RADIO.)<br />
USB Select it when using USB depends on<br />
connector.<br />
AV<br />
Select it when watching the VCR or<br />
external equipment.<br />
Component Select it when using the DVD or the<br />
Digital set-top box depends on connector.<br />
RGB Select it when using PC depends on connector.<br />
HDMI Select it when using DVD, PC or Digital<br />
set-top box depend on connector.<br />
The connected input sources display in black<br />
and the disconnected input sources in grey.<br />
- To add an input label, press the Blue button.<br />
You can easily identify a device connected to<br />
each input source.<br />
- To access the SIMPLINK, press the Red<br />
button. If you select “SIMPLINK and On”, the<br />
pop-up window for the HDMI input will not<br />
display.(Only LCD TV/LED LCD TV)<br />
Adding an Input label<br />
Add a label to an input source so that you can<br />
easily identify a device connected to each input<br />
source.<br />
• yImage shown may differ from your TV.<br />
Input Label<br />
Locking the buttons on the TV<br />
(Child Lock)<br />
Lock the buttons on the TV to prevent any<br />
unwanted operations or accidents by children.<br />
1 Press Home to access the main menus.<br />
2 Press the Navigation buttons to scroll to LOCK<br />
and press OK.<br />
3 Press Navigation buttons to scroll to<br />
Key Lock and press OK.<br />
4 Select on to activate the Key lock feature.<br />
- To deactivate the Key lock feature, select Off.<br />
5 When you are finished, press EXIT.<br />
When you return to the previous menu, press<br />
BACK.<br />
NOTE<br />
• yThe TV is programmed to remember the<br />
last setting after you turn the TV off.<br />
• yIf you turn the TV off with the Key Lock<br />
, INPUT,<br />
P ^ v or Number buttons on the remote<br />
control.<br />
• yIf you press any button on the TV with<br />
the Key lock feature activated, Key<br />
Lock appears on the screen.<br />
feature activated, press the INPUT HOME OK<br />
ENGLISH<br />
AV1<br />
AV2<br />
Component1<br />
Component2<br />
RGB<br />
▼<br />
◄<br />
◄<br />
◄<br />
◄<br />
◄<br />
►<br />
►<br />
►<br />
►<br />
►<br />
Close<br />
1 Press INPUT to access the input sources.<br />
2 Press the Navigation buttons to scroll to one of<br />
the input sources.<br />
3 Press the Blue button.<br />
4 Press the Navigation buttons to scroll to one of<br />
the input labels and press OK.<br />
5 When you are finished, press Close. When you<br />
return to the previous menu, press BACK.
48<br />
WATCHING TV<br />
Using the quick menu<br />
Customize the frequently using menus.<br />
1 Press Q. MENU to access the quick menus.<br />
2 Press Navigation buttons to scroll through the<br />
following menus and press OK.<br />
• yImage shown may differ from your TV.<br />
NOTE<br />
• yThe available menus and options may<br />
differ from the input source that you are<br />
using.<br />
3 Press Navigation buttons to scroll to the option<br />
you want.<br />
4 When you are finished, press Q. MENU.<br />
◄ Aspect Ratio ►<br />
1<br />
8<br />
7<br />
6<br />
5<br />
16:9<br />
2<br />
3<br />
4<br />
ENGLISH<br />
Exit<br />
Menu<br />
Description<br />
1 Aspect Ratio Changes the image size<br />
(16:9, Just Scan, Original,<br />
Full Wide, 4:3, 14:9, Zoom,<br />
Cinema Zoom)<br />
2 Clear Voice II By differentiating the human<br />
frequency range from others, it<br />
helps users listen<br />
to human voices better.<br />
3 Picture Mode<br />
(Depending on<br />
Changes the image mode<br />
(Intelligent sensor, Vivid,<br />
model)<br />
Standard, APS, Cinema<br />
or Cinema, Bright Room,<br />
Sport, Game, Expert1,<br />
Expert2)<br />
4 Sound Mode Changes the sound mode<br />
(Standard, Music, Cinema,<br />
Sport, Game)<br />
5 Audio or<br />
Audio Language<br />
Changes the sound output.<br />
6 Sleep Timer Sets the length of time until<br />
the TV to turns off<br />
7 Skip Off/On Sets the Skip Off/On.<br />
8 USB Device Ejects a USB device when a<br />
USB device is connected
WATCHING TV<br />
49<br />
Using customer Support.<br />
Testing Software Update<br />
To download software through the digital terrestrial<br />
broadcasting system.<br />
1 Press Home to access the main menus.<br />
- TV is restarted when download is<br />
<strong>com</strong>pleted.<br />
Rebooting now.<br />
2 Press the Red button to scroll Customer Support.<br />
3 Press the Navigation buttons to scroll Software<br />
Update.<br />
4 Press the Navigation buttons to scroll to On<br />
and press OK.<br />
- If you select On, a user confirm message box<br />
will be displayed to notify that new software is<br />
found.<br />
5 When you are finished, press EXIT.<br />
When you return to the previous menu, press<br />
BACK.<br />
When setting “Software Update”<br />
- Occasionally, a transmission of updated<br />
digital software information will result in the<br />
following menu on the TV screen.<br />
NOTE<br />
• yDuring Progress of a Software Update,<br />
please note the following:<br />
- Power to the TV must not be interrupted.<br />
- The antenna must not be disconnected.<br />
- After Software Update, you can confirm<br />
the updated software version in Software<br />
Update menu.<br />
- It may take hours to download the software,<br />
so make sure that the power stays on<br />
during the download.<br />
- The software is downloaded only in<br />
Standby mode or in MUX with Software<br />
Update Service, and stops when the power<br />
cord is unplugged or when viewing MUX<br />
without Software Update Service.<br />
- When you return to Standby mode or<br />
MUX with Software Update Service, the<br />
software download will resume from where<br />
it stopped.<br />
ENGLISH<br />
?<br />
Software update is available.<br />
Would you like to download now?<br />
Yes<br />
No<br />
- Simple Update : for current update stream<br />
- Download starts when "Yes" is selected. At<br />
this time, progressing pop-up window does<br />
not display.<br />
- Download progress status can be checked<br />
from Software Update menu.<br />
Software Update<br />
◄ On ►<br />
Software downloading progress.<br />
Ver. 00.00.01 ► Ver.00.01.00<br />
4%<br />
Close
50<br />
WATCHING TV<br />
Testing the Picture / Sound<br />
To execute picture and sound tests.<br />
1 Press Home to access the main menus.<br />
2 Press the Red button to scrolll to Customer<br />
Support.<br />
3 Press the Navigation buttons to scroll l to Picture<br />
Test or Sound Test.<br />
4 Press the Navigation buttons to scroll to Yes<br />
and press OK.<br />
5 When you are finished, press EXIT. When you<br />
return to the previous menu, press BACK.<br />
Using the product or service<br />
information<br />
To check the product or service information<br />
1 Press Home to access the main menus.<br />
2 Press the Red button to scroll to Customer<br />
Support.<br />
3 Press the Navigation buttons to scroll <strong>Product</strong>/<br />
Service Info..<br />
You can check the various product/Service<br />
infomation based on your model.<br />
4 When you are finished, press EXIT. When you<br />
return to the previous menu, press BACK.<br />
Using Signal Test<br />
ENGLISH<br />
To view information on the Manufacturer, Model/<br />
Type, Serial Number and Software Version.<br />
1 Press Home to access the main menus.<br />
2 Press the Red button to scroll Customer Support.<br />
3 Press the Navigation buttons to scroll Signal<br />
Test.<br />
4 Press OK.<br />
- Manufacturer, Model/Type, Software Version<br />
and information of Channel.<br />
5 When you are finished, press EXIT. When you<br />
return to the previous menu, press BACK.<br />
NOTE<br />
• yThis displays the information and signal<br />
strength of the tuned *MUX.<br />
• yThis displays the signal information and<br />
service name of the selected MUX.<br />
(*MUX: A higher directory of channels in digital<br />
broadcasting (a single MUX contains multiple<br />
channels.))
3D IMAGING<br />
51<br />
3D Imaging<br />
(Only 42/50PW35**,42/50PW45**, 50/60PZ55**, 32/42/47/55LW45**)<br />
3D Technology<br />
This TV can display in 3D via 3D broadcasting or<br />
when the TV is connected to a <strong>com</strong>patible device,<br />
such as a Blu-ray 3D Player. You need such a<br />
device to watch the TV in 3D. The 3D TV displays<br />
two separate pictures formatted for each eye. The<br />
viewer needs to wear 3D glasses in order to see<br />
these images in 3D format.<br />
WARNING<br />
• yWhen watching 3D images, you should<br />
maintain a distance of at least twice the<br />
screen width, and you should also be<br />
able to see all of the screen at eye level.<br />
Furthermore, the 3D imaging may not<br />
display if it is viewed while you are lying<br />
down (For LED LCD TV).<br />
• yIf you watch the 3D imaging too closely or<br />
for a long period of time, it may harm your<br />
eyesight.<br />
• yWatching the TV or playing video games<br />
that incorporate 3D imaging with the 3D<br />
glasses for a long period of time can<br />
c<strong>au</strong>se drowsiness, headaches or fatigue<br />
to you and/or your eyes. If you have a<br />
headache, or otherwise feel fatigued or<br />
drowsy, stop watching the TV and have<br />
a rest.<br />
• yPregnant woman, seniors, persons with<br />
heart problems or persons who experience<br />
frequent drowsiness should refrain<br />
from watching 3D TV.<br />
• ySome 3D imaging may c<strong>au</strong>se you to<br />
duck or dodge the image displayed in the<br />
video. Therefore, it is best if you do not<br />
watch 3D TV near fragile objects or near<br />
any objects that can be knocked over<br />
easily.<br />
• yPlease prevent children under the age of<br />
5 from watching 3D TV. It may affect their<br />
vision development.<br />
• yWarning for photosensitization seizure:<br />
Some viewers may experience a seizure<br />
or epilepsy when exposed to certain factors,<br />
including flashing lights or images<br />
in TV or video games. If you or anybody<br />
from your family has a history of epilepsy<br />
or seizure, please consult with your doctor<br />
before watching 3D TV.<br />
Also certain symptoms can occur in<br />
unspecified conditions without any previous<br />
history. If you experience any of the<br />
following symptoms, immediately stop<br />
watching the 3D imaging and consult a<br />
doctor: dizziness or light-headedness ,<br />
visual transition or altered vision, visual<br />
or facial instability, such as eye or muscle<br />
twitching, unconscious action, convulsion,<br />
loss of conscience, confusion or disorientation,<br />
loss of directional sense, cramps,<br />
or n<strong>au</strong>sea. Parents should monitor their<br />
children, including teenagers, for these<br />
symptoms as they may be more sensitive<br />
to the effects of watching 3D TV.<br />
• yRisk of photosensitization seizure can be<br />
reduced with the following actions.<br />
» Take frequent breaks from watching 3D<br />
TV.<br />
» For those who have vision that is different<br />
in each eye, they should watch<br />
the TV after taking vision correction<br />
measures.<br />
» Watch the TV so that your eyes are on<br />
the same level as the 3D screen and<br />
refrain from sitting too closely to the TV.<br />
» Do not watch the 3D imaging when<br />
tired or sick, and avoid watching the 3D<br />
imaging for a long period of time.<br />
» Do not wear the 3D glasses for any<br />
other purpose than viewing 3D imaging<br />
on a 3D TV.<br />
» Some viewers may feel disoriented<br />
after watching 3D TV. Therefore, after<br />
you watch 3D TV, take a moment to regain<br />
awareness of your situation before<br />
moving.<br />
ENGLISH
52<br />
3D IMAGING<br />
ENGLISH<br />
NOTE<br />
• yTo watch the TV in 3D, you must put on<br />
your 3D glasses. For best results, you<br />
should wear <strong>LG</strong> Brand 3D glasses. The<br />
3D imaging may not display properly<br />
when using another brand of 3D glasses.<br />
Please see the 3D glasses manual for instructions<br />
on how to use the 3D glasses.<br />
• yAfter powering on the TV, a few seconds<br />
may be needed for your TV to calibrate.<br />
• yIt may take a moment for you to see the<br />
3D imaging if you look away from the TV<br />
and then revert your eyes back to the 3D<br />
program.<br />
• yIf there is an obstacle between the TV<br />
and the 3D glasses, the 3D imaging may<br />
not display properly.<br />
• yDo not use the TV in close proximity<br />
to other electronic equipments and RF<br />
equipments.<br />
• yIn Analogue TV, 3D Imaging does not<br />
work.<br />
• yWhen watching 2D images, it is re<strong>com</strong>mended<br />
to take off the 3D glasses. If you<br />
watch 2D images with the 3D glasses on,<br />
you may see distorted images.<br />
When Using 3D Glasses<br />
CAUTION<br />
• y3D glasses are sold separately. Refer<br />
to the 3D glasses manual for operating<br />
instructions.<br />
• yDo not use the 3D glasses to replace<br />
your corrective glasses, sunglasses or<br />
protective goggles.<br />
• yDo not store the 3D glasses in hot or cold<br />
locations.<br />
• yDo not drop objects onto the 3D glasses.<br />
Do not drop or bend the glasses.<br />
• ySince the lenses of the 3D glasses are<br />
easily scratched, make sure to clean<br />
only with a soft cloth. Shake off any dust<br />
before using the cloth since the glasses<br />
are easily scratched.<br />
3D Imaging Viewing Range<br />
(Only Plasma TV)<br />
TV size, viewing angle & other circumstances may<br />
change the viewing distance and the angle of view.<br />
Viewing<br />
Distance<br />
2 m - 10 m<br />
Viewing<br />
Angle<br />
120 º<br />
(When the viewing distance is 2 m)
3D IMAGING<br />
53<br />
Watching 3D images<br />
• yImage shown may differ from your TV.<br />
View 3D mode for 3D images<br />
1 Play the 3D video or select 3D channel.<br />
(2D to 3D mode is available with all contents)<br />
2 Press 3D and select same type in your displayed<br />
picture on the screen.<br />
(Select type on "3D Video" tab)<br />
Using 3D quick menu option<br />
1 Press 3D SETTING.<br />
2 Use the following options while viewing 3D<br />
imaging.<br />
3D Setting<br />
3D Picture Size ◀ Just Scan ▶<br />
3D Depth 15 ◀ ▶<br />
3D Viewpoint 0 ◀ ▶<br />
3D Video<br />
2D Video<br />
3D Picture Balance ◀ Off ▶<br />
3D Picture Correction ◀ Left/Right ▶<br />
OK<br />
End 3D video<br />
* Notice : Turn on the 3D mode <strong>au</strong>tomatically for<br />
HDMI input playing the 3D blueray titles.<br />
3 Press OK on displayed information window.<br />
3D Setting<br />
or<br />
Image View Mode ◀ 2D 3D ▶<br />
Power on your 3D glasses and put them on.<br />
Sit 2 meters from TV to enjoy the best 3D<br />
view.<br />
OK<br />
ꔅ 3D Setting<br />
Cancel<br />
● 3D Picture Correction ◀ Left/Right ▶<br />
● 3D Depth 15 ◀ ▶<br />
● 3D Viewpoint 0 ◀ ▶<br />
OK<br />
End 3D video<br />
ENGLISH<br />
4 To turn off the 3D mode, press 3D and select<br />
OK.<br />
View 2D mode for 3D images<br />
1 Play the 3D video or select 3D channel.<br />
2 Press 3D and select same type in your<br />
displayed picture on the screen.<br />
(Select type on "2D Video" tab)<br />
3D Video<br />
Turn off 3D Mode.<br />
OK<br />
2D mode<br />
Cancel<br />
ꔅ 3D setting<br />
2D Video<br />
3 To turn off the 2D mode, press 3D and select<br />
OK.<br />
(Depending on model)<br />
Button<br />
Description<br />
Cuts off the outer edges of the<br />
3D Picture Size picture and stretch it to fit the full<br />
screen in 3D mode.<br />
Adjusts the distance between the<br />
3D Depth<br />
object and the background in the<br />
picture to enhance the 3D effect<br />
in 2D to 3D mode.<br />
Brings the picture (including both<br />
3D Viewpoint<br />
the object and background images)<br />
to the front or back to enhance<br />
the 3D effect in 3D mode.<br />
Adjusts the colour and brightness<br />
3D Picture<br />
Balance difference between the right<br />
and left sides of the picture in 3D<br />
mode.<br />
Changes the order of images<br />
3D Picture<br />
in the right and left sides of the<br />
Correction<br />
picture in 3D mode.<br />
Image View<br />
Mode Select 2D 3D or 3D 2D.<br />
Turn off 2D Mode.<br />
3D video<br />
OK<br />
Cancel
54<br />
3D IMAGING<br />
CAUTION<br />
• ySome menus may not work while watching the TV in 3D.<br />
• yIf used 3D effect on the 2D source, 3D may not work.<br />
• yThe 3D imaging mode is disabled <strong>au</strong>tomatically when switching DTV channe ls, input source.<br />
• yThe screen may not be displayed properly if you view 2D DTV images in 3D imaging mode.<br />
• y3D effect can be seen when 3D Mode is selected appropriately for the 3D input signal supplied to<br />
the TV.<br />
• yFor *mpo files (3D camera files), the 3D imaging mode is enabled <strong>au</strong>tomatically.<br />
• y3D may not be displayed properly for some PC graphics cards.<br />
CAUTION<br />
* For LCD TV/LED LCD TV<br />
• yIf you select 3D mode, “Power indicator” is turned off <strong>au</strong>tomatically.<br />
• yWhile watching 3D imaging, you cannot adjust video/<strong>au</strong>dio settings using the menu.<br />
• yYou can only choose “Standard → Cinema → Game” with the AV MODE button on the remote<br />
control. AV Mode is set as Standard while playing in 3D.<br />
• yIf you’d like to play the BGM using *.mpo file(3D camera file), In advance, the contents path for<br />
BGM should be set on full-sized photo view screen which isn’t *.mpo file(3D camera file).<br />
• yPicture mode is set as Standard, Energy Saving Off if entering to 3D mode.<br />
ENGLISH
ENTERTAINMENT<br />
55<br />
ENTERTAINMENT<br />
Connecting USB storage devices<br />
Connect USB storage devices such as a USB<br />
flash memory, external hard drive to the TV and<br />
use multimedia features (See "Browsing files" on<br />
p.56).<br />
Connect a USB flash memory or USB memory<br />
card reader to the TV as shown on the following<br />
illustration. The My media screen appears, “POP<br />
UP MENU” will not be displayed while the OSD<br />
including Menu, EPG or Schedule list is activated.<br />
L/MONO AUDIO R<br />
VIDEO<br />
USB IN<br />
IN 2<br />
To disconnect a USB storage device,<br />
make sure<br />
AV<br />
to<br />
INend 2<br />
the connection properly to prevent<br />
damages to the TV or files.<br />
1 Press Q.MENU to access the quick menus.<br />
2 Press the Navigation buttons to scroll to USB<br />
Device and press OK.<br />
3 Press the Navigation buttons to scroll to Eject<br />
and press OK.<br />
4 Disconnect the USB storage device only when<br />
the message says that it is safe to remove.<br />
C<strong>au</strong>tion<br />
or<br />
• yDo not turn the TV off or remove a USB<br />
storage device while the USB storage<br />
device is connected to the TV, as this<br />
could result in loss of files or damage to<br />
the USB storage device.<br />
• yBack up your files saved on a USB storage<br />
device frequently, as you may lose<br />
or damage the files and this may be not<br />
covered by the warranty.<br />
Tips for using USB storage devices<br />
• yOnly a USB storage device is recognizable.<br />
• yIf the USB storage device is connected<br />
through a USB hub, the device is not recognizable.<br />
• yA USB storage device using an <strong>au</strong>tomatic<br />
recognition programme may not be recognized.<br />
• yA USB storage device which uses its own<br />
driver may not be recognized.<br />
• yThe recognition speed of a USB storage<br />
device may depend on each device.<br />
• yPlease do not turn off the TV or unplug the<br />
USB device when the connected USB storage<br />
device is working. When such device is<br />
suddenly separated or unplugged, the stored<br />
files or the USB storage device may be damaged.<br />
• yPlease do not connect the USB storage<br />
device which was artificially manoeuvred on<br />
the PC. The device may c<strong>au</strong>se the product to<br />
malfunction or fail to be played. Never forget<br />
to use only a USB storage device which has<br />
normal music files, image files or movie files.<br />
• yPlease use only a USB storage device which<br />
was formatted as a FAT32 file system, NTFS<br />
file system provided with the Windows operating<br />
system. In case of a storage device<br />
formatted as a different utility programme<br />
which is not supported by Windows, it may<br />
not be recognized.<br />
• yPlease connect power to a USB storage<br />
device(over 0.5 A) which requires an external<br />
power supply. If not, the device may not be<br />
recognized.<br />
• yPlease connect a USB storage device with<br />
the cable offered by the device maker.<br />
• ySome USB storage devices may not be supported<br />
or operated smoothly.<br />
• yFile alignment method of USB storage<br />
device is similar to Window XP and filename<br />
can recognize up to 100 English characters.<br />
• yBe sure to back up important files since data<br />
stored in a USB memory device may be<br />
damaged. We will not be responsible for any<br />
data loss.<br />
• yIf the USB HDD does not have an external<br />
power source, the USB device may not be<br />
detected. So be sure to connect the external<br />
power source.<br />
- Please use a power adaptor for an external<br />
ENGLISH
56<br />
ENTERTAINMENT<br />
ENGLISH<br />
power source. We do not guarantee an USB<br />
cable for an external power source.<br />
• yIf your USB memory device has multiple<br />
partitions, or if you use a USB multi-card<br />
reader, you can use up to 4 partitions or USB<br />
memory devices.<br />
• yIf a USB memory device is connected to a<br />
USB multi-card reader, its volume data may<br />
not be detected.<br />
• yIf the USB memory device does not work<br />
properly, disconnect and reconnect it.<br />
• yHow fast a USB memory device is detected<br />
differs from device to device.<br />
• yIf the USB is connected in Standby Mode,<br />
specific hard disk will <strong>au</strong>tomatically be<br />
loaded when the TV is turned on.<br />
• yThe re<strong>com</strong>mended capacity is 1 TB or less<br />
for a USB external hard disk and 32 GB or<br />
less for USB memory.<br />
• yAny device with more than the re<strong>com</strong>mended<br />
capacity may not work properly.<br />
• yIf a USB external hard disk with a “Energy<br />
Saving” function does not work, turn the<br />
hard disk off and on again to make it work<br />
properly.<br />
• yUSB storage devices below USB 2.0 are<br />
supported as well. But they may not work<br />
properly in the movie list.<br />
• yMaximum of 999 folders or files can be recognized<br />
under one folder.<br />
• yThe file arrangement of the USB storage<br />
device is similar to that of Windows XP and<br />
supports up to 100 alphabetical characters.<br />
• yIf there are a lot of folders or files all within<br />
one folder, the device may not be able to<br />
access these properly.<br />
Browsing files<br />
Access the photo, music, or movie lists and browse<br />
files.<br />
1 Connect a USB storage device.<br />
2 Press Home to scroll to main menus.<br />
3 Press the Navigation buttons to scroll to My<br />
Media and press OK.<br />
4 Press Navigation buttons to scroll to PHOTO<br />
LIST, MUSIC LIST, or MOVIE LIST and press<br />
OK.<br />
Photo List<br />
USB External<br />
001<br />
Movie List<br />
Photo List<br />
1 2<br />
010 011 012 013 014 015<br />
Page 1/1<br />
Music List<br />
Drive1 Page 1/1<br />
002 003 004 005 006 007 008 009<br />
Move<br />
View<br />
Page Change<br />
To Music List Change Numbers Mark Mode Exit<br />
3<br />
No.<br />
Description<br />
1 Moves to upper level folder<br />
2 Current page/Total pages<br />
Corresponding buttons on the<br />
3<br />
remote control<br />
Current page/ total pages of<br />
4 contents under the folder<br />
focused on 1<br />
Contents under the folder<br />
5<br />
focused on 1<br />
Buttom<br />
Description<br />
Green<br />
button<br />
Repeatedly, press the GREEN button<br />
to converted to Photo List->Music List,<br />
Music List->Movie List or Movie List-<br />
>Photo List.<br />
A method to view in 5 large thumbnail or<br />
simple list.<br />
Yellow<br />
button<br />
Blue<br />
Convert to Mark Mode.<br />
button<br />
P<br />
MARK<br />
Mark<br />
4<br />
5
ENTERTAINMENT<br />
57<br />
Supported file format<br />
Viewing movies<br />
Type<br />
Movie<br />
Supported file format<br />
DAT,MPG,MPEG,VOB,AVI,DIVX,MP4,MKV,T<br />
S,TRP,TP,ASF,WMV,FLV)<br />
Movie(*.mpg/*.mpeg/*dat/*.ts/*.trp/*.tp/*.<br />
vob/*.mp4/*.mov/*.mkv/*.dvix/*.avi/*.asf/*.<br />
wmv/*.flv/*.avi(motion-jpeg)/*.<br />
mp4(motion-jpeg)/*.mkv(motion-jpeg))supporting<br />
file<br />
Play video files on the TV. Your TV displays all of<br />
the video files saved in a USB storage device or<br />
shared folder on a PC.<br />
1 Press the Navigation buttons to scroll to My<br />
Media and press OK.<br />
Photo<br />
Video format : DivX3.11, DivX4.12, DivX5.x,<br />
DivX6, Xvid1.00, Xvid1.01, Xvid1.02,<br />
Xvid1.03, Xvid1.10 beta-1/beta-2,<br />
Mpeg-1, Mpeg-2, Mpeg-4, H.264/AVC, VC1,<br />
JPEG, Sorenson H.263<br />
Audio format : Dolby Digital, AAC, Mpeg,<br />
MP3, LPCM, HE-AAC, ADPCM, WMA<br />
Bit rate : within 32 kbps to 320 kbps(MP3)<br />
External Subtitle format : *.smi/*.srt/*.sub<br />
(MicroDVD,Subviewer1.0/2.0)/*.ass/*.ssa/*.<br />
txt(TMPlayer)/*.psb(PowerDivX)<br />
Internal Subtitle format : only, XSUB (It is<br />
the subtitle format used in DivX6 files)<br />
JPEG<br />
2 Press the Navigation buttons to scroll to Movie<br />
List and press OK.<br />
3 Select Drive1 to access the connected USB<br />
storage device.<br />
4 Press the Navigation buttons to scroll to a<br />
folder you want and press OK.<br />
5 Press the Navigation buttons to scroll to a file<br />
you want and press OK.<br />
Movie List<br />
Page 1/1<br />
Baseline : 64 x 64 to 15360 x 8640<br />
Progressive : 64 x 64 to 1920 x 1440<br />
• yYou can play JPEG files only.<br />
• yNon-supported files are displayed in the<br />
form of predefined icon.<br />
For 3D TV<br />
File<br />
Extensions<br />
Item Profile<br />
USB External Drive1 Page 1/1<br />
001 002 003<br />
004<br />
005 006<br />
Move<br />
Play<br />
P<br />
Page Change<br />
To Photo List Change Numbers Mark Mode Exit<br />
MARK<br />
Mark<br />
ENGLISH<br />
2D jpeg<br />
jpg<br />
jpe<br />
Supported<br />
file format<br />
• ySOF0: baseline<br />
• ySOF1: Extend<br />
Sequential<br />
• ySOF2:<br />
Progressive<br />
Movie List<br />
Page 1/1<br />
Mark Mode<br />
USB External Drive1 Page 1/1<br />
001 002 003<br />
004<br />
005 006<br />
051. Apple_ ......<br />
02:30:25<br />
Photo size<br />
• yMin: 64 x 64<br />
• yMax - Normal<br />
Type: 15360<br />
(W) x 8640 (H)<br />
• yProgressive<br />
Type: 1920 (W)<br />
x 1440 (H)<br />
Mark<br />
Page Change<br />
Play Marked Mark All Unmark All Exit Mark Mode Exit<br />
Move<br />
P<br />
MARK<br />
Mark<br />
Music<br />
3D mpo<br />
MP3<br />
Supported<br />
file format<br />
Photo size<br />
• ympo<br />
• y4:3 size: 3,648<br />
x 2,736<br />
• y2,592 x 1,944<br />
• y2,048 x 1,536<br />
• y3:2 size: 3,648<br />
x 2,432<br />
Menu<br />
Play Marked<br />
Mark All<br />
Unmark All<br />
Description<br />
Play the selected movie file.<br />
Once a movie file finishes playing,<br />
the next selected one will be played<br />
<strong>au</strong>tomatically.<br />
Mark all movie files on the screen.<br />
Deselect all marked movie files.<br />
Bit rate 32 to 320<br />
• ySampling rate MPEG1 Layer3 : 32 kHz,<br />
44.1 kHz, 48 kHz<br />
• ySampling rate MPEG2 Layer3 : 16 kHz,<br />
22.05 kHz, 24 kHz<br />
• ySampling rate MPEG2.5 Layer3 : 8 kHz,<br />
11.025 kHz, 12 kHz<br />
Exit Mark Mode Exit the Mark Mode.
58<br />
ENTERTAINMENT<br />
ENGLISH<br />
6 Play a movie.<br />
7 Control playback by using the following<br />
buttons.<br />
◄►<br />
► 01:02:30 / 02:30:25<br />
■ ► II ◄◄ ►► Q.MENU Option<br />
Hide Exit<br />
Button<br />
r<br />
s<br />
t<br />
v<br />
w<br />
Home or<br />
Q.MENU<br />
BACK<br />
EXIT<br />
< ><br />
NOTE<br />
• yNon-supported files are displayed the preview<br />
image by icon only .<br />
• yAbnormal files are displayed in the form of<br />
bitmap .<br />
ENERGY<br />
SAVING<br />
AV MODE<br />
Description<br />
Stops the playback<br />
Plays a video<br />
P<strong>au</strong>ses or resumes the playback<br />
Scans backward in a file<br />
Scans forward in a file<br />
Show the Option menu.<br />
Hide the menu on the full-sized<br />
screen.<br />
Return to normal TV viewing.<br />
Skips to specific points in a file<br />
during playback. The time of a<br />
specific point will appear on the<br />
status bar. In some files, this function<br />
may not work properly.<br />
Press the ENERGY SAVING<br />
button repeatedly to increase the<br />
brightness of your screen.<br />
Press the AV MODE button<br />
repeatedly to select the desired<br />
source.<br />
Tips for using playing video files<br />
• ySome user-created subtitles may not work<br />
properly.<br />
• ySome special characters are not supported<br />
in subtitles.<br />
• yHTML tags are not supported in subtitles.<br />
• ySubtitles in languages other than the supported<br />
languages are not available.<br />
• yChanging font and colour in subtitles is not<br />
supported.<br />
• ySubtitles in languages other than one specified<br />
are not supported.<br />
• yVideo files with subtitle files of 1 MB or larger<br />
may not be played properly.<br />
• yThe screen may suffer temporary interruptions<br />
(image stoppage, faster playback, etc.)<br />
when the <strong>au</strong>dio language is changed.<br />
• yA damaged movie file may not be played<br />
correctly, or some player functions may not<br />
be usable.<br />
• yMovie files produced with some encoders<br />
may not be played correctly.<br />
• yIf the video and <strong>au</strong>dio structure of recorded<br />
file is not interleaved, either video or <strong>au</strong>dio is<br />
outputted.<br />
• yHD videos with a maximum of<br />
1920x1080@25/30P or 1280x720@50/60P<br />
are supported, depending on the frame.<br />
• yVideos with resolutions higher than<br />
1920X1080@25/30P or 1280x720@50/60P<br />
may not work properly depending on the<br />
frame.<br />
• yMovie files other than the specified types and<br />
formats may not work properly.<br />
• yMax bitrate of playable movie file is 20 Mbps.<br />
(only, Motion JPEG : 10 Mbps)<br />
• yWe do not guarantee smooth playback of<br />
profiles encoded level 4.1 or higher in H.264/<br />
AVC.<br />
• yDTS Audio codec is not supported.<br />
• yA movie file more than 30 GB in file size is<br />
not supported for playback.<br />
• yA DivX movie file and its subtitle file must be<br />
located in the same folder.<br />
• yA video file name and its subtitle file name<br />
must be identical for it to be displayed.<br />
• yPlaying a video via a USB connection that<br />
doesn’t support high speed may not work<br />
properly.<br />
• yFiles encoded with GMC(Global Motion<br />
Compensation) and Qpel (Quarterpel Motion<br />
Estimation) may not be played.<br />
• yWhen you are watching the movie by Movie<br />
List function, you can adjust an image by Energy<br />
Saving and AV Mode key on the remote<br />
control. User setup for each image mode<br />
does not operate.<br />
• yTrick Mode does not support other functions<br />
than w if video files do not have index<br />
information.<br />
• yVideo file names that contain special characters<br />
may not be playable.
ENTERTAINMENT<br />
59<br />
Video options<br />
1 Press Q. MENU to access the Pop-Up menus.<br />
2 Press the Navigation buttons to scroll to Set<br />
Video Play., Set Video. or Set Audio. and<br />
press OK.<br />
NOTE<br />
• yOption values changed in Movie List does<br />
not affect Photo List and Music List.<br />
• yOption value changed in Photo List and Music<br />
List are changed likewise in Photo List<br />
and Music List excluding Movie List.<br />
• yWhen replaying the video file after stopping,<br />
you can play from where it stopped previously.<br />
Sync<br />
Position<br />
Size<br />
Repeat<br />
Adjusts the time synchronisation<br />
of the subtitle from -10 secs to<br />
+10 secs by steps of 0.5 secs<br />
during movie play.<br />
Changes the position of the<br />
subtitle either up or down during<br />
movie play.<br />
Selects your desired Subtitle size<br />
during movie play.<br />
Turn on/off repeat function of<br />
movie playback. When turned<br />
on, the file within the folder will<br />
be played back repeatedly. Even<br />
when the repeated playback<br />
is turned off, it can run the playback<br />
if the file name is similar to<br />
the previous file.<br />
When you select the Set Video Play,,<br />
1 Press the Navigation buttons to scroll to show<br />
the Picture Size, Audio Language, Subtitle<br />
Language or Repeat.<br />
2 Press the Navigation buttons to scroll to make<br />
appropriate adjustments.<br />
Menu<br />
Picture Size<br />
Audio Language<br />
Subtitle<br />
Language<br />
Language<br />
Code Page<br />
Description<br />
Selects your desired picture<br />
format during movie play.<br />
Changes the Language Group of<br />
the <strong>au</strong>dio during movie play. Files<br />
with a single <strong>au</strong>dio track cannot<br />
be selected.<br />
Turn on/off the subtitle.<br />
Activated for SMI subtitle and<br />
can select the language within the<br />
subtitle.<br />
Can select the font for subtitle.<br />
When set to def<strong>au</strong>lt, same font as<br />
general menu will be used.<br />
Subtitle Language<br />
Latin1<br />
Cyrillic<br />
Thai<br />
Hebrew<br />
Arabic<br />
Unicode(UTF-16)<br />
NOTE<br />
Support Language<br />
English, French, Spanish,<br />
Portuguese, Malaysia,<br />
Indonesia<br />
Russian<br />
Thai<br />
Hebrew<br />
Arab, Parsi, Krudish<br />
Vietnamese language<br />
• yOnly 10,000 of sync blocks can be supported<br />
within the subtitle file.<br />
• yWhen playing a video, you can adjust the<br />
Picture Size by pressing the RATIO button.<br />
ENGLISH
60<br />
ENTERTAINMENT<br />
When you select the Set Video,<br />
Photo List<br />
Page 1/1<br />
1 Press the Navigation buttons to scroll to make<br />
appropriate adjustments. (See p.68)<br />
USB1 External<br />
Drive1 Page 1/1<br />
001 002 003 004 005 006 007 008 009<br />
010 011 012 013 014 015<br />
When you select the Set Audio,<br />
1 Press the Navigation buttons to scroll to show<br />
the Sound Mode, Auto Volume, Clear Voice<br />
II or Balance.<br />
2 Press the Navigation buttons to scroll to make<br />
appropriate adjustments. (See p.73)<br />
Move View P Page Change MARK Mark<br />
To Music List Change Numbers Mark Mode Exit<br />
Page 1/1<br />
Photo List<br />
Mark Mode<br />
USB External<br />
Drive1 Page 1/1<br />
001 002 003 004 005 006 007 008 009<br />
011 012 013 014 015<br />
010<br />
Move<br />
Mark<br />
P<br />
Page Change<br />
MARK<br />
Mark<br />
View Marked Mark All Unmark All Exit Mark Mode Exit<br />
Menu<br />
View Marked<br />
Description<br />
Display the selected photo file.<br />
ENGLISH<br />
Viewing photos<br />
Mark All Mark all photo files on the screen.<br />
Unmark All Deselect all marked photo files.<br />
Exit Mark Mode Exit the Mark Mode.<br />
View image files saved in a USB storage device<br />
or shared folder on a PC through the network<br />
connection. The displays on the screen may differ<br />
from the model.<br />
1 Press the Navigation buttons to scroll to My<br />
Media and press OK.<br />
2 Pressthe Navigation buttons to scroll to Photo<br />
List and press OK.<br />
3 Press the Navigation buttons to select Drive1<br />
to access the connected USB storage device.<br />
4 Press the Navigation buttons to scroll to a<br />
folder you want and press OK.<br />
5 Press the Navigation buttons to scroll to a file<br />
you want and press OK.<br />
6 View photos.<br />
NOTE<br />
• yNon-supported files are displayed the preview<br />
image by icon only .<br />
• yAbnormal files are displayed in the form of<br />
bitmap .
ENTERTAINMENT<br />
61<br />
Using photo options<br />
Use the following options while viewing photos.<br />
Option<br />
• ySlide Speed: Selects a slideshow<br />
speed (Fast, Medium, Slow).<br />
• yBGM: Selects a music folder for the<br />
background music.<br />
NOTE<br />
01_a.jpg<br />
2008/12/10<br />
1920 x 1080<br />
479 KB<br />
◄<br />
◄<br />
• yYou cannot change the music<br />
folder while the background<br />
music is playing.<br />
• yYou can only select the MP3<br />
folder saved on the device<br />
that currently displays the<br />
photo.<br />
Hide<br />
Hides the option window.<br />
To display the options, press OK.<br />
◄<br />
2/13<br />
►<br />
Slideshow ► BGM ■<br />
Q.MENU<br />
Option<br />
Hide<br />
Exit<br />
Options<br />
Number of selected photos<br />
Option<br />
Slideshow<br />
Description<br />
Starts or stops a slideshow with<br />
selected photos.<br />
If there are no selected photos, all<br />
photos saved in the current folder<br />
display during a slideshow.<br />
To set a slideshow speed, select<br />
Option.<br />
BGM Turns the background music on or<br />
off. To set the background music<br />
folder, select Option.<br />
You can adjust Option by Q.MENU<br />
or Home button on the remote<br />
control.<br />
(Rotate) Rotates photos clockwise (90°,<br />
180°, 270°, 360°).<br />
NOTE<br />
• yThe supported photo size is<br />
limited. You cannot rotate a<br />
photo if the resolution of the<br />
rotated width is larger than<br />
the supported resolution size.<br />
Photo options<br />
1 Press Q. MENU or Home to show the Option<br />
menus.<br />
2 Press the Navigation buttons to scroll to Set<br />
Photo View., Set Video. or Set Audio. and<br />
press OK.<br />
NOTE<br />
• yOption values changed in Movie List does<br />
not affect Photo List and Music List.<br />
• yOption value changed in Photo List and Music<br />
List are changed likewise in Photo List<br />
and Music List excluding Movie List.<br />
When you select the Set Photo View,<br />
ENGLISH<br />
View the photo by zoom in 2, 4<br />
times.<br />
1 Press the Navigation buttons to scroll to select<br />
Slide Speed or BGM..<br />
ENERGY<br />
SAVING<br />
Press the ENERGY SAVING button<br />
repeatedly to change the brightness<br />
of your screen.<br />
2 Press the Navigation buttons to scroll to make<br />
appropriate adjustments.
62<br />
ENTERTAINMENT<br />
When you select the Set Video,<br />
1 Press the Navigation buttons to scroll to make<br />
appropriate adjustments. (See p.68)<br />
When you select the Set Audio,,<br />
1 Press the Navigation buttons to scroll to show<br />
the Sound Mode, Auto Volume, Clear Voice<br />
II or Balance.<br />
2 Press the Navigation buttons to scroll to make<br />
appropriate adjustments. (See p.73)<br />
6 Play music.<br />
7 Control playback by using the following<br />
buttons.<br />
Music List<br />
3 file(s) Marked<br />
004. - B04.mp3<br />
00:00<br />
►<br />
005. - B05.mp3<br />
00:00<br />
Page 1/1<br />
Drive1 Page 1/1<br />
006. - B06.mp3<br />
00:00<br />
◄►<br />
007. - B07.mp3<br />
00:00<br />
005. - B05.mp3 ► 02:30 / 03:25<br />
■ ► II ◄◄ ►► Play with Photo<br />
Q.MENU Option<br />
008. - B08.mp3<br />
00:00<br />
Hide<br />
Exit<br />
ENGLISH<br />
Listening to music<br />
1 Press the Navigation buttons to scroll to My<br />
Media and press OK.<br />
2 Press the Navigation buttons to scroll to Music<br />
List and press OK.<br />
3 Press the Navigation buttons to select Drive1<br />
to access the connected USB storage device.<br />
4 Press the Navigation buttons to scroll to a<br />
folder you want and press OK.<br />
5 Press the Navigation buttons to scroll to a file<br />
you want and press OK.<br />
USB1 External<br />
Menu<br />
Music List<br />
001. - B01.mp3<br />
00:00<br />
005. - B05.mp3<br />
00:00<br />
002. -B02.mp3<br />
00:00<br />
Page 1/1<br />
Drive1 Page 1/1<br />
Move<br />
Play<br />
003. B03.mp3<br />
00:00<br />
Page Change<br />
004. - B04.mp3<br />
00:00<br />
To Movie List Change Numbers Mark Mode Exit<br />
Music List<br />
Mark Mode<br />
USB External<br />
001. - B01.mp3<br />
00:00<br />
005. - B05.mp3<br />
00:00<br />
Play Marked<br />
Mark All<br />
002. -B02.mp3<br />
00:00<br />
P<br />
Page 1/1<br />
MARK<br />
Mark<br />
Drive1 Page 1/1<br />
003. B03.mp3<br />
00:00<br />
004. - B04.mp3<br />
00:00<br />
Move Mark P Page Change MARK Mark<br />
Play Marked Mark All Unmark All Exit Mark Mode Exit<br />
Description<br />
Display the selected music file.<br />
Mark all music files on the screen.<br />
Button<br />
r<br />
s<br />
t<br />
w<br />
v<br />
v or w<br />
Green<br />
button<br />
ENERGY<br />
SAVING<br />
Home or<br />
Q.MENU<br />
Hide<br />
EXIT<br />
< ><br />
Description<br />
Stops playback<br />
Plays a music file<br />
P<strong>au</strong>ses or resumes playback<br />
Skips to the next file<br />
Skips to the previous file<br />
When playing,<br />
When you press the v button,<br />
the previous music file will be<br />
played.<br />
When you press the w button,<br />
the next music file will be played.<br />
Start playing the selected music<br />
files and then move to the Photo<br />
List.<br />
Press the ENERGY SAVING<br />
button repeatedly to change the<br />
brightness of your screen.<br />
Show the Option menu.<br />
Hides the option window.<br />
To display the options, press OK.<br />
When you press the EXIT button<br />
while the Music player is displayed,<br />
only the music will be<br />
stopped and the player will not<br />
return to normal TV viewing.<br />
When you press the EXIT button<br />
while the music is stopped or<br />
while the music player is hidden,<br />
the player will return to normal TV<br />
viewing.<br />
When using the < > button during<br />
playback a cursor indicating the<br />
position can be played.<br />
Unmark All<br />
Deselect all marked music files.<br />
Tips for playing music files<br />
Exit Mark Mode Exit the Mark Mode.<br />
y • This unit cannot support the ID3 Tag embedded<br />
MP3 files.
ENTERTAINMENT<br />
63<br />
NOTE<br />
Music options<br />
• yNon-supported files are displayed the preview<br />
image by icon only .<br />
• yAbnormal files are displayed in the form of<br />
bitmap .<br />
• yA damaged or corrupted music does not play<br />
but displays 00:00 in playtime.<br />
• yA music downloaded from a paid service with<br />
copyright protection does not start but displays<br />
inappropriate information in playtime.<br />
• yIf you press OK, r buttons, screen saver<br />
is stopped.<br />
• yThe PLAY(s), P<strong>au</strong>se(t), r , w, v<br />
buttons on the remote control are also available<br />
in this mode.<br />
• yYou can use the w button to select the<br />
next music and the v button to select the<br />
previous music.<br />
1 Press Q. MENU to access the Pop-Up menus.<br />
2 Press the Navigation buttons to scroll to Set<br />
Audio Play. or Set Audio. and press OK.<br />
NOTE<br />
• yOption values changed in Movie List does<br />
not affect Photo List and Music List.<br />
• yOption value changed in Photo List and Music<br />
List are changed likewise in Photo List<br />
and Music List excluding Movie List.<br />
file name<br />
002. B02.mp3<br />
► 00:31 / 04:04<br />
Time elapsed /Duration<br />
When you select the Set Audio Play.,<br />
1 Press the Navigation buttons to scroll to select<br />
the Repeat or Random.<br />
2 Press the Navigation buttons to scroll to make<br />
appropriate adjustments.<br />
ENGLISH<br />
When you select the Set Audio,<br />
1 Press the Navigation buttons to scroll to select<br />
the Sound Mode, Auto Volume, Clear Voice<br />
II or Balance.<br />
2 Press the Navigation buttons to scroll to make<br />
appropriate adjustments.(See p.73)
64<br />
ENTERTAINMENT<br />
DivX registration code<br />
Registering the DivX code<br />
Deactivating the DivX feature<br />
ENGLISH<br />
Check and register the DivX registration code of<br />
your TV so that you can rent or purchase the latest<br />
movies at www.divx.<strong>com</strong>/vod. To play a rented or<br />
purchased DivX file, the file’s registration code<br />
should be same with your TV’s DivX registration<br />
code.<br />
1 Press Home to access the main menus.<br />
2 Press the Navigation buttons to scroll to MY<br />
MEDIA and press OK.<br />
3 Press the Blue button.<br />
4 Press the Navigation buttons to scroll to DivX<br />
Reg. Code and press OK.<br />
5 View the registration code of your TV.<br />
6 When you are finished, press EXIT.<br />
When you return to the previous menu, press<br />
BACK.<br />
You must register your device to<br />
play DivX protected videos.<br />
Registration code : **********<br />
Register at http://vod.divx.<strong>com</strong><br />
Deactivate all of the devices through the web<br />
server and block devices from activating.<br />
Delete the existing <strong>au</strong>thentication information to<br />
receive a new DivX user <strong>au</strong>thentication for the<br />
TV. Once this function is executed, a DivX user<br />
<strong>au</strong>thentication is required again to see DivX DRM<br />
files.<br />
1 Press Home to access the main menus.<br />
2 Press the Navigation buttons to scroll to MY<br />
MEDIA and press OK.<br />
3 Press the Blue button.<br />
4 Press the Navigation buttons to scroll to Deactivation<br />
and press OK.<br />
5 Press the Navigation buttons to select Yes to<br />
confirm.<br />
Deregistration code :<br />
********<br />
Deregister at http://vod.divx.<strong>com</strong><br />
Continue with registration?<br />
Yes<br />
No<br />
NOTE<br />
Close<br />
• yMovie files are supported as follows<br />
Resolution : under 1920x1080 WxH pixels<br />
Frame rate : under 30 frames/<br />
sec(1920x1080), under 60 frames/<br />
sec(under 1280x720)<br />
• yVideo Codec : MPEG 1, MPEG 2, MPEG<br />
4, H.264/AVC, DivX 3.11, DivX 4.12,<br />
DivX 5.x, DivX 6, Xvid 1.00, Xvid 1.01,<br />
Xvid 1.02, Xvid 1.03, Xvid 1.10-beta1,<br />
Xvid 1.10-beta2, JPEG, VC1, Sorenson<br />
H.263/H.264.<br />
• yThe DRM/*.tp /*.trp file in DLNA server is<br />
not played when Movie List is in operation.<br />
6 When you are finished, press EXIT.<br />
When you return to the previous menu, press<br />
BACK.
CUSTOMIZING SETTINGS<br />
65<br />
CUSTOMIZING TV SETTINGS<br />
Accessing main menus<br />
1 Press Home to access the main menus.<br />
2 Press the Navigation buttons to scroll to one of the following menus and press OK.<br />
3 Press Navigation buttons to scroll to the setting or option you want and press OK.<br />
4 When you are finished, press EXIT.<br />
PICTURE (See p.67)<br />
Adjusts the image size,<br />
quality, or effect<br />
AUDIO (See p.73)<br />
Adjusts the sound quality,<br />
effect, or volume level<br />
setup (See p.66)<br />
Sets up and edit<br />
programmes<br />
SETUP<br />
PICTURE<br />
AUDIO<br />
TIME<br />
TIME (See p.76)<br />
Sets the time, date,<br />
or Timer feature<br />
ENGLISH<br />
LOCK (See p.77)<br />
Locks or unlocks<br />
channels and<br />
programmes<br />
LOCK<br />
OPTION<br />
OPTION (See p.78)<br />
Customizes<br />
the general settings<br />
INPUT<br />
MY MEDIA<br />
INPUT (See p.46)<br />
Views the input sources<br />
with their labels<br />
MY MEDIA (See p.55)<br />
Display and play<br />
movie, photo and<br />
music content stored<br />
on your USB
66<br />
CUSTOMIZING SETTINGS<br />
Customizing settings<br />
SETUP settings<br />
• yImage shown may differ from your TV.<br />
1 Press Home to access the main menus.<br />
2 Press the Navigation buttons to scroll to SETUP and press OK.<br />
SETUP<br />
● Auto Tuning<br />
● <strong>Manual</strong> Tuning<br />
● Programme Edit<br />
Move<br />
OK<br />
3 Press the Navigation buttons to scroll to the setting or option you<br />
want and press OK.<br />
- To return to the previous level, press BACK.<br />
4 When you are finished, press EXIT.<br />
The available programme settings are described in the following:<br />
Setting<br />
Auto Tuning<br />
<strong>Manual</strong> Tuning<br />
Programme Edit<br />
Description<br />
Tunes and stores all available programmes through antennas or cable inputs (See p.35).<br />
Tunes and stores the programmes you want manually (See p.35).<br />
Adds or deletes programmes on the programme (See p.37).<br />
ENGLISH
CUSTOMIZING SETTINGS<br />
67<br />
PICTURE settings<br />
• yImage shown may differ from your TV.<br />
PICTURE<br />
Move<br />
OK<br />
1 Press Home to access the main menus.<br />
2 Press the Navigation buttons to scroll to PICTURE and press<br />
OK.<br />
3 Press the Navigation buttons to scroll to the setting or option<br />
you want and press OK.<br />
- To return to the previous level, press BACK.<br />
4 When you are finished, press EXIT.<br />
The available picture settings are described in the following.<br />
(Depending on model)<br />
● Aspect Ratio : 16:9<br />
● Picture Wizard<br />
● Energy Saving : Intelligent Sensor<br />
● Picture Mode : Vivid<br />
● Contrast 100<br />
● Brightness 50<br />
● Sharpness 65<br />
● Colour 60<br />
● Tint 0<br />
● Colour Temp. 0<br />
● Advanced Control<br />
● Picture Reset<br />
● Screen<br />
R<br />
W<br />
G<br />
C<br />
Setting<br />
Aspect Ratio<br />
Picture Wizard<br />
Description<br />
Changes the image size to view images at its optimal size (See p.45).<br />
Adjusts the image quality and calibrates the screen by following the on-screen instructions.<br />
The customized options will be saved as Expert1 in the Picture Mode.<br />
Standard<br />
Preferred<br />
NOTE<br />
Mode to set standard picture quality.<br />
(Black Level, White Level, Tint, Colour, Horizontal Sharpness, Vertical<br />
Sharpness, Backlight(Only LCD TV/LED LCD TV)<br />
Mode to set user preferred picture quality rather than standard picture.<br />
(Black Level, White Level, Tint, Colour, Sharpness, Dynamic Contrast,<br />
Colour Temperature, Backlight(Only LCD TV/LED LCD TV))<br />
• yIf you stop the setting before the final stage, the changes will not be applied.<br />
• yIf you use Picture Wizard, the Energy saving feature will turn off <strong>au</strong>tomatically.<br />
• yIf the picture quality setting of Expert1 is changed, use the Picture Reset before entering<br />
the Picture Wizard to reset the picture quality setting.<br />
• yIn RGB-PC/HDMI-PC/DVI-PC mode, the changed Colour, Tint and H/V Sharpness values<br />
are not applied.<br />
ENGLISH<br />
Energy Saving<br />
Reduces the power consumption by adjusting the screen brightness.<br />
Option<br />
Intelligent sensor<br />
(Only Plasma TV)<br />
or Auto (Only LCD<br />
TV/LED LCD TV)<br />
Off<br />
Minimum/Medium/Maximum<br />
Screen off<br />
*This feature is not available for all models.<br />
The most suitable brightness is <strong>au</strong>tomatically adjusted according to the surrounding<br />
conditions.<br />
The Energy Saving is off<br />
Selects the brightness level.<br />
The screen turns off in 3 seconds.<br />
NOTE<br />
• yWhen adjusting Energy Saving in MHEG mode, the Energy Saving setting is applied after<br />
MHEG is finished.<br />
• yWhen you select Screen Off, the screen will be turned off in 3 seconds and Screen Off will start.<br />
• ySelecting ‘Screen Off’ while tuned to a radio station channel will reduce power consumption.<br />
• yIf you adjust “Energy Saving-Auto(Depending on model), Maximum”, Backlight feature will<br />
not work. (LCD TV/LED LCD TV only)<br />
• yIf you adjust “Energy Saving-Intelligent Sensor”, Sharpness, Colour, Colour Temperature<br />
feature will not work. (Plasma TV only)<br />
• yWhen selecting Auto, Backlight is <strong>au</strong>tomatically adjusted through intelligent sensor according<br />
to the surrounding condition when intelligent sensor is in the TV. (LCD TV/LED LCD TV only)<br />
(Depending on model)
68<br />
CUSTOMIZING SETTINGS<br />
ENGLISH<br />
Setting<br />
Picture Mode<br />
Description<br />
Selects one of the preset image or customizes options in each mode for the best TV screen performance.<br />
You are also able to customize advanced options of each mode.<br />
The available preset picture modes vary depending on the TV.<br />
Mode<br />
Intelligent sensor<br />
(Only LCD TV/ LED<br />
LCD TV)<br />
Vivid<br />
Standard<br />
(Only Plasma TV)<br />
Cinema or<br />
Cinema or<br />
Cinema<br />
Bright Room<br />
(Only Plasma TV)<br />
Sport<br />
Game<br />
Expert<br />
NOTE<br />
*This feature is not available for all models.<br />
Adjusts picture according to the surrounding conditions.<br />
Adjusts the video image for the retail environment by enhancing the contrast,<br />
brightness, colour, and sharpness.<br />
Adjusts the image for the normal environment.<br />
Optimizes power consumption.<br />
Optimizes the video image for a cinematic look to enjoy movies as if you are in<br />
a movie theatre<br />
*This feature is not available for all models.<br />
This is the specification to optimize TV viewing in Bright Room.<br />
Optimizes the video image for high and dynamic actions by emphasizing<br />
primary colours such as white, grass, or sky blue.<br />
Optimizes the video image for a fast gaming screen such as PCs or games.<br />
Adjusts the detailed video image settings for video experts as well as general<br />
viewers.<br />
• yPicture Mode adjusts the TV for the best picture appearance. Select the preset value in the<br />
Picture Mode menu based on the programme category.<br />
• yWhen the Intelligent sensor function is on, the most suitable picture is <strong>au</strong>tomatically adjusted<br />
according to the surrounding conditions.<br />
• yYou can also adjust Picture Mode in the Q. Menu.<br />
• y (Auto Power Saving) : Maximize reducing the power consumption without hurting the<br />
picture quality. (Only Plasma TV)<br />
• yIf you adjust “Picture Mode- Cinema, Bright Room”, “Energy Saving-Intelligent<br />
Sensor, Minimum, Medium, Maximum” feature will not work. (Only Plasma TV)<br />
• yIf you adjust “Picture Mode- ”, “Energy Saving-Off, Minimum, Medium, Maximum”<br />
feature will not work. (Only Plasma TV)<br />
»»<br />
Cinema or Cinema(Only Plasma TV) :This is cinema quality mode to provide<br />
you the experience of watching a movie at home.The user will be able enjoy the best level of<br />
satisfactory screen quality in any movie without any separate adjustments.Cinema expresses<br />
the optimal screen quality when it is darkest. When selecting Cinema, Bright<br />
Room Aspect ratio changes to Just scan.<br />
»»<br />
Cinema(Thomlinson Holman ’s Experiment)is the <strong>au</strong>dio and video certification standard<br />
of THX established by George Lucas,who directed the movie Star Wars,and Thomlinson.<br />
This is the product to be certified in THX display area and guarantees screen quality that<br />
exceeds the display standard specification in both hardware and software.
CUSTOMIZING SETTINGS<br />
69<br />
Setting<br />
TruMotion<br />
(Only LCD TV/<br />
LED LCD TV)<br />
SCREEN<br />
Description<br />
*This feature is not available for all models.<br />
It is used for the best picture quality without any motion blur or judder when you enter a quick image<br />
or Film Source.<br />
TruMotion works with all inputs except PC mode.<br />
This feature is disabled in RGB-PC, HDMI-PC and MY MEDIA-Photo List mode.<br />
If you enable “TruMotion”, noise may appear on the screen.<br />
If this occurs, set “TruMotion” to “Off”.<br />
If you select “Picture Mode-Game ”, set “TruMotion” to “Off”.<br />
Option<br />
High<br />
Provide smoother picture movement.<br />
Low<br />
Provide smooth picture movement. Use this setting for standard use.<br />
Off<br />
Turn off TruMotion Operation.<br />
User<br />
User can adjust Judder and Blur level in TruMotion Operation, separately.<br />
Judder Adjusts noise of the screen.<br />
Blur Adjusts after-image of the screen.<br />
Customizes the PC display options.<br />
Option<br />
Resolution Selects a proper resolution when your PC uses.<br />
LED Local Dimming<br />
(Only LCD<br />
TV/LED LCD<br />
TV)<br />
Auto Configure<br />
Position<br />
Sets the TV to optimize the options <strong>au</strong>tomatically for the TV display.<br />
Locates the image at the proper position.<br />
Size<br />
Adjusts the image size.<br />
Phase<br />
Eliminates horizontal streaking.<br />
Reset<br />
Restores the options to the def<strong>au</strong>lt setting.<br />
*This feature is not available for all models.<br />
After analysing the signal of the input video by areas of the screen, it adjusts the backlight to improve<br />
the contrast ratio.<br />
ENGLISH
70<br />
CUSTOMIZING SETTINGS<br />
Basic image options (Depending on model)<br />
Setting<br />
Backlight<br />
(Only LCD TV/LED<br />
LCD TV)<br />
Contrast<br />
Brightness<br />
Sharpness<br />
Colour<br />
Tint<br />
Colour Temp.<br />
Advanced Control or<br />
Expert Control<br />
Picture Reset<br />
Description<br />
Adjusts the brightness of the screen by controlling the LCD backlight. If you decrease the<br />
brightness level, the screen be<strong>com</strong>es darker and the power consumption will be reduced without<br />
any video signal loss.<br />
• yIf you use the “Energy saving - Auto, Minimum, Medium, Maximum”, Backlight will<br />
not be available.<br />
• yBenefits of using Backlight<br />
- The electricity consumption is reduced by up to 60 %.<br />
- The black brightness is reduced. (As the black has greater depth, you can enjoy a<br />
better quality definition.)<br />
- You can adjust brightness with maintaining original signal resolution.<br />
Increases or decreases the gradient of the video signal. You may use Contrast when the<br />
bright part of the picture is saturated.<br />
Adjusts the base level of the signal in the picture.<br />
Adjusts the level of crispness in the edges between the light and dark areas of the picture.<br />
The lower the level, the softer the image.<br />
Adjusts intensity of all colours.<br />
Adjusts the balance between red and green levels.<br />
Set to warm to enhance hotter colours such as red, or set to cool to enhance cooler colours<br />
such as blue.<br />
Customizes the advanced options<br />
Restores the options of each mode to the factory def<strong>au</strong>lt<br />
ENGLISH<br />
NOTE<br />
• yYou cannot adjust colour, sharpness and tint in the RGB-PC/HDMI-PC mode.
CUSTOMIZING SETTINGS<br />
71<br />
Advanced image options (Depending on model)<br />
Setting<br />
Dynamic Contrast<br />
Dynamic Colour<br />
Clear White<br />
Skin Colour<br />
Description<br />
Adjusts the contrast to keep it at the best level according to the brightness of the screen. The<br />
picture is improved by making bright parts brighter and dark parts darker.<br />
Adjusts screen colours so that they look livelier, richer and clearer. This feature enhances hue,<br />
saturation and luminance so that red, blue and green white look more vivid.<br />
Makes the white area of the screen brighter and clearer.<br />
It detects the skin area of video and adjusts it to express a natural skin colour.<br />
Noise Reduction<br />
Digital Noise Reduction<br />
Reduces screen noise without <strong>com</strong>promising video quality.<br />
Removes noise c<strong>au</strong>sed by <strong>com</strong>pressing video.<br />
Gamma<br />
Black Level<br />
Eye Care<br />
Film Mode or Real<br />
Cinema<br />
You can adjust brightness of dark area and middle gray level area of the picture.<br />
• yLow: Make the dark and middle gray level areas brighter.<br />
• yMedium: Express the original picture level.<br />
• yHigh: Make the dark and middle gray level area darker.<br />
Sets black level of the screen to proper level. This function is available in the following modes:<br />
AV (NTSC-M), HDMI, Component or USB(Only Plasma TV).<br />
• yLow: The reflection of the screen gets darker.<br />
• yHigh: The reflection of the screen gets brighter.<br />
• yAuto : Sets black level of the screen to High or Low <strong>au</strong>tomatically according to the input<br />
signal level.<br />
Adjusts the brightness of the screen to prevent the screen from being too bright. Dims extremely<br />
bright pictures.<br />
This feature is disable in “Picture Mode-Vivid, Cinema, Expert1, Expert2, Intelligent<br />
Sensor.”<br />
Makes video clips recorded in film look more natural by eliminating judder effect.<br />
DVD and Blu-ray movies are filmed at 24 frames per second (fps). With <strong>LG</strong> Real Cinema,<br />
every frame is consistently processed 5 times in 1/24 of a second producing 120 fps with<br />
TruMotion or 2 times in 1/24 of a second producing 48 fps without TruMotion, thus totally<br />
eliminating the judder effect.<br />
This function can also work when TruMotion is off.<br />
ENGLISH
72<br />
CUSTOMIZING SETTINGS<br />
Advanced image options (Depending on model)<br />
ENGLISH<br />
Setting<br />
Colour Gamut<br />
Edge Enhancer<br />
xvYCC<br />
(available in Cinema<br />
and Expert mode)<br />
Colour Filter<br />
Expert Pattern<br />
(available in Expert<br />
modes)<br />
Colour Temperature<br />
Colour Manage<br />
System<br />
Description<br />
Advanced Control<br />
Maximizes the utilization of colour to increase colour quality.<br />
Standard: Displays standard set of colours.<br />
Wide: Increase number of colours used.<br />
Expert Control<br />
Displays colour domain of the signal.<br />
Standard: Displays standard set of colours.<br />
Wide: Increase number of colours used.<br />
EBU: Mode to display EBU standard colour area.<br />
SMPTE: Mode to display SMPTE standard colour area.<br />
BT709: Mode to display BT709 standard colour area.<br />
Shows clearer and distinctive yet natural edges of the video.<br />
*This feature is not available for all models.<br />
This is produces richer colours.<br />
This feature represents rich colours as much as a conventional video signal.<br />
This function is enabled in “Picture mode - Cinema, Expert” when xvYCC signal is inputted<br />
through HDMI.<br />
This is the function to filter the specific colours of the video.<br />
You can use the RGB filter to set colour saturation and hue accurately.<br />
This is the pattern used for expert adjustment<br />
This function is enabled in “Picture Mode - Expert” when you watch DTV.<br />
Adjusts the overall colour of the screen by changing the white baseline.<br />
Plasma TV a. Method : 2 Points<br />
• yPattern: Inner, Outer<br />
• yRed/Green/Blue<br />
Contrast, Red/Green/<br />
Blue Brightness: The<br />
adjustment range is<br />
-50 to +50.<br />
b. Method : 20 Point IRE<br />
• yIRE (Institute of Radio Engineers) is the unit to<br />
display the size of the video signal and can be set<br />
among 5, 10, 15 - 100 Plasma TV. You can adjust<br />
Red, Green or Blue according to each setting.<br />
• yRed/Green/Blue: The adjustment range is -50 - +50.<br />
c. Apply to all inputs<br />
LCD TV/<br />
LED LCD<br />
TV<br />
b. Method : 10 Point IRE<br />
• yPattern: Inner, Outer<br />
• yIRE (Institute of Radio Engineers) is the unit to<br />
display the size of the video signal and can be set<br />
among 10, 20, 30 - 100. You can adjust Red, Green<br />
or Blue according to each setting.<br />
• yLuminance: This function displays calculated luminance<br />
value for 2.2 gamma. You can input luminance<br />
value you want at 100 IRE, than the target<br />
luminance value for 2.2 gamma is displayed at every<br />
10 steps from 10 IRE to 90 IRE.<br />
• yRed/Green/Blue: The adjustment range is -50 - +50.<br />
c. Apply to all inputs<br />
As the tool used by the experts to make adjustments by using the test patterns, this does not<br />
affect other colours but can be used to selectively adjust the 6 colour areas (Red/Green/Blue/<br />
Yellow/Cyan/Magenta).<br />
Colour difference may not be distinctive even when you make the adjustments for the general<br />
video.<br />
Adjusts Red/Green/Blue/Yellow/Cyan, Magenta.<br />
Red/Green/Blue/Yellow/Cyan, Magenta Colour: The adjustment range is -30 - +30.<br />
Red/Green/Blue/Yellow/Cyan, Magenta Tint: The adjustment range is -30 - +30.<br />
This feature is disable in RGB-PC and HDMI-PC mode.
CUSTOMIZING SETTINGS<br />
73<br />
AUDIO settings<br />
• yImage shown may differ from your TV.<br />
1 Press Home to access the main menus.<br />
2 Press the Navigation buttons to scroll to AUDIO and press OK.<br />
3 Press the Navigation buttons to scroll to the setting or option you want<br />
and press OK.<br />
- To return to the previous level, press BACK.<br />
4 When you are finished, press EXIT.<br />
L<br />
AUDIO<br />
Move<br />
● Auto Volume : Off<br />
● Clear Voice II : Off 3<br />
● Balance 0<br />
● Sound Mode : Standard<br />
• Infinite Surround : Off<br />
• Treble 50<br />
• Bass 50<br />
• Reset<br />
● Digital Audio Out : PCM<br />
● TV Speaker : On<br />
● DTV Audio Setting : Auto<br />
OK<br />
R<br />
The available <strong>au</strong>dio settings are described in the following.<br />
(Depending on model)<br />
Setting<br />
Auto Volume<br />
Clear Voice<br />
Description<br />
Activates the Auto Volume feature to keep the volume level consistent whenever you change<br />
channels. The volume level may not be consistent due to different signal conditions of broadcasting<br />
stations.<br />
Sets whether to enhance human voice clarity. You can adjust the level of clarity when you set this<br />
feature on.<br />
NOTE<br />
Balance<br />
Sound Mode<br />
• yIf you select “On” for Clear Voice II, Infinite Surround feature will not work.<br />
• ySelect levels from ‘-6’ to ’+6’.<br />
Adjust balance between the left and right speakers according to your room environment.<br />
Selects one of the preset sound modes or customizes options in each mode.<br />
Mode<br />
Standard Select when you want standard-quality sound.<br />
Music<br />
Select when you listen to music.<br />
Cinema<br />
Select when you watch movies.<br />
Sport<br />
Select when you watch sports events.<br />
Game<br />
Select when you play games.<br />
Option<br />
Infinite Surround Infinite Surround is a patented <strong>LG</strong> proprietary sound processing technology that<br />
strives immersive 5.1 surround sound impression with front two loudspeakers.<br />
ENGLISH<br />
Treble<br />
Bass<br />
Reset<br />
Controls the dominant sounds in the output. When you turn up the treble, it will<br />
increase the output to the higher frequency range.<br />
Controls the softer sounds in the output. When you turn up the bass, it will<br />
increase the output to the lower frequency range.<br />
Resets the sound mode to the def<strong>au</strong>lt setting.
74<br />
CUSTOMIZING SETTINGS<br />
Setting<br />
Digital Audio<br />
Out<br />
Description<br />
It is possible to use in DTV, HDMI, DivX mode.<br />
This function allows you to select your preferred Digital Audio Output.<br />
When Dolby Digital is available, selecting Auto in the Digital Audio Out menu will set SPDIF(Sony<br />
Philips Digital InterFace) output to Dolby Digital.<br />
If Auto is selected in the digital <strong>au</strong>dio out menu when Dolby Digital is not available, SPDIF output will<br />
be PCM(Pulse-code modulation).<br />
Even if both Dolby Digital and Audio language have been set in a channel which broadcast Dolby<br />
Digital Audio, only Dolby Digital will be played.<br />
Item Audio Input Digital Audio output<br />
TV Speaker<br />
Auto<br />
MPEG<br />
Dolby Digital<br />
Dolby Digital Plus<br />
HE-AAC<br />
PCM All PCM<br />
PCM<br />
Dolby Digital<br />
Dolby Digital<br />
Dolby Digital<br />
Turns on the internal speaker of the TV when using an external Hi-Fi system. You can use the TV<br />
speaker as an <strong>au</strong>dio output device even if there is no video input.<br />
NOTE<br />
• yWhen the TV speaker is turned off while the Simplink home theatre is operating, the sound<br />
output <strong>au</strong>tomatically switches to the Home theatre speaker, but when the TV speaker is<br />
turned on, the sound output the TV speaker.<br />
• ySome menus in AUDIO are disabled when TV Speaker is set to Off.<br />
ENGLISH<br />
DTV Audio Setting<br />
(In digital<br />
mode only)<br />
When different <strong>au</strong>dio types exist in an input signal, this function allows you to select the <strong>au</strong>dio type<br />
you want.<br />
Mode<br />
Auto Automatically outputs in the order HE-AAC > Dolby Digital+ > Dolby Digital ><br />
MPEG.<br />
HE-AAC, Dolby<br />
Digital+, Dolby<br />
Digital, MPEG<br />
Allows users to select the <strong>au</strong>dio type they want.<br />
ex) If MPEG is selected, MPEG is always outputted.<br />
If MPEG is not supported, another <strong>au</strong>dio type is set in that order.<br />
See "Audio Language" on p.78
CUSTOMIZING SETTINGS<br />
75<br />
This feature may not be applied based on country broadcasting circumstance.<br />
Stereo/Dual Reception (In Analogue Mode Only)<br />
When a programme is selected, the sound information for the station appears with the programme<br />
number and station name.<br />
1 Press Q. MENU and press the Navigation to access the Audio or Audio Language and press OK.<br />
2 Press the Navigation button to scroll to sound output and press OK.<br />
Broadcast<br />
Mono<br />
Stereo<br />
Dual<br />
NICAM<br />
On Screen Display<br />
MONO<br />
STEREO<br />
DUAL I , DUAL II , DUAL I + II<br />
NICAM<br />
• yMono sound selection<br />
If the stereo signal is weak in stereo reception, you can switch to mono. In mono reception, the clarity of<br />
sound is improved.<br />
• yLanguage selection for dual language broadcast<br />
If a programme can be received in two languages (dual language), you can switch to DUAL I,<br />
DUAL II or DUAL I+II.<br />
DUAL I<br />
DUAL I I<br />
DUAL I+I I<br />
Sends the primary broadcast language to the loudspeakers.<br />
Sends the secondary broadcast language to the loudspeakers.<br />
Sends a separate language to each loudspeaker.<br />
ENGLISH<br />
Nicam Reception (In Analogue Mode Only)<br />
If the TV is equipped with a receiver for NICAM reception, high quality NICAM (Near Instantaneous<br />
Companding Audio Multiplex) digital sound can be received.<br />
Sound output can be selected according to the type of broadcast received.<br />
1 When NICAM mono is received, you can select NICAM MONO or FM MONO.<br />
2 When NICAM stereo is received, you can select NICAM STEREO or FM MONO.<br />
If the stereo signal is weak, switch to FM MONO.<br />
3 When NICAM dual is received, you can select NICAM DUAL I, NICAM DUAL II or NICAM DUAL I+II or<br />
FM MONO.<br />
Speaker Sound Output Selection<br />
In AV, Component, RGB and HDMI mode, you can select output sound for the left and right loudspeakers.<br />
Select the sound output.<br />
L+R: Audio signal from <strong>au</strong>dio L input is sent to the left loudspeaker and <strong>au</strong>dio signal from <strong>au</strong>dio R input is<br />
sent to the right loudspeaker.<br />
L+L: Audio signal from <strong>au</strong>dio L input is sent to left and right loudspeakers.<br />
R+R: Audio signal from <strong>au</strong>dio R input is sent to left and right loudspeakers.
76<br />
CUSTOMIZING SETTINGS<br />
TIME settings<br />
• yImage shown may differ from your TV.<br />
1 Press Home to access the main menus.<br />
2 Press the Navigation buttons to scroll to TIME and press OK.<br />
3 Press the Navigation buttons to scroll to the setting or option you want<br />
and press OK.<br />
- To return to the previous level, press BACK.<br />
TIME<br />
● Clock<br />
● Off Time<br />
● On Time<br />
● Sleep Timer<br />
Move<br />
: Off<br />
: Off<br />
: Off<br />
OK<br />
4 When you are finished, press EXIT.<br />
The available time settings are described in the following<br />
Setting<br />
Clock<br />
Description<br />
Sets the time, date, time zone and daylight-saving time feature.<br />
The time will be set <strong>au</strong>tomatically according to a digital channel signal which includes time<br />
information provided by the broadcasting station. If not, set the time and date manually.<br />
Time Zone is enabled only in Australia, Indonesia and Israel only.<br />
NOTE<br />
ENGLISH<br />
• y< Only Australia > When you select a Time Zone city, the TV time is set by the time offset<br />
information based on Time Zone and GMT (Greenwich Mean Time) which is received with<br />
the broadcast signal and the time is set <strong>au</strong>tomatically by a digital signal.<br />
• y GMT (Greenwich Mean Time) which is received with the<br />
broadcast signal and the time is set <strong>au</strong>tomatically by a digital signal.<br />
• yWhen if the city name in Time Zone is changed into offset, you can change time by 1 hour.<br />
• yTime Zone menu can be changed in Auto mode.<br />
Off Time/On<br />
Time<br />
Sets the time to turn on or off the TV <strong>au</strong>tomatically. To use this function, you should set the current<br />
time and date in advance.<br />
NOTE<br />
• yIf you do not press any button within 2 hours after the TV turns on by the On Time feature,<br />
the TV enters the Standby mode <strong>au</strong>tomatically.<br />
• yIf you set both Off time and On time features to the same time, the Off time feature<br />
overrides the On time feature.<br />
Sleep Timer<br />
Sets the length of time until the TV to turns off. When you turn the TV off and turn it on again, the<br />
Sleep timer feature will be set to off.
CUSTOMIZING SETTINGS<br />
77<br />
LOCK settings<br />
• yImage shown may differ from your TV.<br />
1 Press Home to access the main menus.<br />
2 Press the Navigation buttons to scroll to LOCK and press OK.<br />
3 Press the Navigation buttons to scroll to the setting or option you<br />
want and press OK.<br />
- To return to the previous level, press BACK.<br />
LOCK<br />
Move OK<br />
● Set Password<br />
● Lock System : Off<br />
● Block Programme<br />
● Parental Guidance : Blocking Off<br />
● Input Block<br />
● Key Lock : Off<br />
4 When you are finished, press EXIT.<br />
The available lock settings are described in the following.<br />
Setting<br />
Lock System<br />
Activates or deactivates the lock system.<br />
Description<br />
Set Password Changes the 4-digit password. The def<strong>au</strong>lt PIN is “0 0 0 0”.<br />
If you forget your password, press ‘0’, ‘3’,‘2’, ‘5’ on the remote control handset.<br />
Block<br />
Programme<br />
Parental<br />
Guidance<br />
(In Digital mode<br />
only)<br />
Input Block<br />
Key Lock<br />
Blocks the programmes that contain inappropriate contents for children by pressing the Green<br />
button. The Lock icon appears in front of the blocked programmes. The programmes can be selected<br />
but the screen blank and the <strong>au</strong>dio is muted.<br />
To watch a locked channel, enter the password.<br />
It is available to use this function in Lock System ”On”<br />
This function operates according to information from the broadcasting station. Therefore if the signal<br />
has incorrect information, this function does not operate.<br />
A password is required to gain access to this menu.<br />
This set is programmed to remember which option it was last set to even if you switch the set off.<br />
Prevents children from watching certain adult’s TV programmes, according to the ratings limit set.<br />
Enter a password to watch a blocked programme.<br />
Rating differs by country.<br />
Block the input sources.<br />
It is available to use this function in Lock System ”On”<br />
Locks or unlocks the buttons on the TV.<br />
ENGLISH
78<br />
CUSTOMIZING SETTINGS<br />
OPTION settings<br />
1 Press Home to access the main menus.<br />
2 Press the Navigation buttons to scroll to OPTION and press OK.<br />
3 Press the Navigation buttons to scroll to the setting or option you<br />
want and press OK.<br />
- To return to the previous level, press BACK.<br />
4 When you are finished, press EXIT.<br />
The available general settings are described in the following:<br />
(Depending on model)<br />
• yImage shown may differ from your TV.<br />
OPTION<br />
Move<br />
OK<br />
● Language(Language)<br />
● Country<br />
: Australia<br />
● Hard of Hearing( ) : Off<br />
● ISM Method<br />
: Normal<br />
● Factory Reset<br />
● Set ID : 1<br />
● Mode Setting<br />
: Home Use<br />
ENGLISH<br />
Setting<br />
Language<br />
Selects a language for the display or <strong>au</strong>dio.<br />
Option<br />
Menu Language<br />
Audio Language<br />
(In Digital mode<br />
only)<br />
Description<br />
Select your desired language.(Except for Australia, New Zealand, Singapore and<br />
South Africa.)<br />
The Audio function allows selection of a preferred language.<br />
If <strong>au</strong>dio data in a selected language is not broadcast, the def<strong>au</strong>lt language <strong>au</strong>dio<br />
will be played.<br />
Audio Language OSD Information<br />
Display<br />
N.A<br />
Not Available<br />
MPEG Audio<br />
Status<br />
Dolby Digital Audio<br />
Audio for “Visual Impaired”<br />
Audio for “Hearing Impaired”<br />
Dolby Digital Plus Audio<br />
HE-AAC<br />
HE-AAC Audio<br />
Subtitle Language<br />
(In Digital mode<br />
only)<br />
Use the Subtitle function when two or more subtitle languages are broadcast. If<br />
subtitle data in a selected language is not broadcast, the def<strong>au</strong>lt language subtitle<br />
will be displayed.<br />
Subtitle Language OSD Information<br />
Display<br />
N.A<br />
Status<br />
Not Available<br />
Teletext Subtitle<br />
Subtitle for “Hard of Hearing”<br />
Text Language<br />
(In Digital mode<br />
only)<br />
NOTE<br />
In Digital mode, use the Text language function when two or more Text languages<br />
are broadcast. If teletext data in a selected language is not broadcast, the def<strong>au</strong>lt<br />
Text language will be displayed.<br />
If you select the wrong local country, teletext may not appear correctly on the<br />
screen and some problems may occur during teletext operation.<br />
• yWhen the languages you selected as the primary for Audio Language and<br />
Subtitle Language and Text Language are not supported, you can select<br />
language in secondary category (Only New Zealand).<br />
• yThe <strong>au</strong>dio/subtitles can be displayed in a simpler form with 1 to 3 characters<br />
broadcast by the service provider.<br />
• yWhen you select supplementary Audio (Audio for “Visual/Hearing Impaired”)<br />
the TV may output a part of the Main <strong>au</strong>dio.
CUSTOMIZING SETTINGS<br />
79<br />
Setting<br />
Country (Only<br />
Australia & New<br />
Zealand)<br />
Hard of Hearing<br />
( ) (In Digital<br />
mode only)<br />
Power Indicator<br />
(Only LCD TV/LED<br />
LCD TV)<br />
ISM Method<br />
(Only plasma TV)<br />
Data Service<br />
(This menu is enabled<br />
only in South<br />
Africa, Malaysia.)<br />
Selects a desired country.<br />
Description<br />
This function is for the blind, and provides explanatory <strong>au</strong>dio describing the current situation in a TV<br />
programme in addition to the basic <strong>au</strong>dio.<br />
- It is only available to use Hard of Hearing on some TV stations in New Zealand.<br />
Adjust the power/standby indicator light on the front of the TV.<br />
If you select 3D mode, Power indicator is turned off <strong>au</strong>tomatically.<br />
Option<br />
Standby Light<br />
Power Light<br />
Set to turn on or off the indicator light in Standby mode.<br />
Set to turn on or off the indicator light when you turn on the power.<br />
A frozen or still picture displayed on the screen for prolonged periods will result in a ghost image<br />
remaining even when you change the image. Avoid allowing a fixed image to remain on the screen<br />
for prolonged periods.<br />
Option<br />
Orbiter<br />
Orbiter may help prevent ghost images. However, it is best not to allow any<br />
fixed image to remain<br />
on the screen. To avoid a permanent image on the screen, the screen will<br />
move every 2 minutes.<br />
Colour Wash The colour block with the screen moved a little and the white pattern are<br />
alternately displayed. It is difficult to sense the afterimage occurred while the<br />
temporary afterimage is removed and the colour pattern is operating.<br />
White Wash White wash removes permanent images from the screen.<br />
Note: An excessive permanent image may be impossible to clear entirely with<br />
White Wash.<br />
This function allow users to choose between MHEG (Digital Teletext) and Teletext if both exist at the<br />
same time.<br />
ENGLISH<br />
Factory Reset<br />
This function initializes all settings.<br />
NOTE<br />
• yIn Lock System “On”, if you forget your password, press ‘0’, ‘3’, ‘2’, ‘5’ on<br />
the remote control handset.<br />
Set ID<br />
Mode Setting<br />
Adds an ID to the connected devices<br />
Def<strong>au</strong>lt selection is “Home Use”. We re<strong>com</strong>mend setting the TV to “Home Use” mode for the best<br />
picture in your Home environment.<br />
Option<br />
Home Use Selects it for the Home environment.<br />
Store Demo Selects it for the retail environment.<br />
Demo Mode Sets to show special features of the TV. You can cancel the demo mode by<br />
pressing any buttons except the Volume and Mute buttons.<br />
NOTE<br />
• yIt is not possible to use Demo Mode in Home Use mode.<br />
• yIn Store Demo, Demo Mode is <strong>au</strong>tomatically set to On.<br />
• yOnce Demo Mode is set to Off in Store Demo, Demo Mode<br />
does not run and only the screen is reset.<br />
• yThe screen is reset <strong>au</strong>tomatically after 5 minutes in Demo<br />
Mode.
80<br />
MAKING CONNECTIONS<br />
MAKING CONNECTIONS<br />
Connect various external devices to the TV and switch input modes to select an external device. For more<br />
information on external device’s connection, refer to the manual provided with each device.<br />
Available external devices are: HD receivers, DVD players, VCRs, <strong>au</strong>dio systems, USB storage devices,<br />
PC, gaming devices, and other external devices.<br />
NOTE<br />
• yThe external device connection may differ from the model.<br />
• yConnect external devices to the TV regardless of the order of the TV port.<br />
ENGLISH
MAKING CONNECTIONS<br />
81<br />
Connection overview<br />
Connect various external devices to the ports on the TV back panel.<br />
1 Find an external device you want to connect to your TV as shown on the following illustration.<br />
2 Check the connection type of the external device.<br />
3 Go to the appropriate illustration and check the connection details.<br />
(Depending on model)<br />
HD Receiver DVD VCR<br />
HDMI – See p.82<br />
DVI – See p.82<br />
Component – See p.82<br />
Composite – See p.83<br />
HDMI – See p.82<br />
DVI – .See p.82<br />
Component – See p.82<br />
Composite – See p.83<br />
Composite – See p.83<br />
Speaker<br />
USB<br />
ENGLISH<br />
Digital – See p.86<br />
Memory storage –<br />
See p.87<br />
Memory card reader<br />
– See p.87<br />
PC<br />
Gaming device<br />
HDMI – See p.84<br />
DVI – See p.85<br />
RGB – See p.85<br />
HDMI – See p.82<br />
Component – See p.82<br />
Composite – See p.83<br />
NOTE<br />
• yIf you connect a gaming device to the TV, use the cable supplied with the gaming device.<br />
• yRefer to the external equipment's manual for operating instructions.
1<br />
2<br />
1<br />
2<br />
1<br />
2<br />
82<br />
MAKING CONNECTIONS<br />
• yThis section on MAKING CONNECTIONS<br />
mainly uses diagrams for the 50/60PV25**<br />
models.<br />
• yImage shown may differ from your TV.<br />
Connecting to a HD receiver,<br />
DVD, or VCR player<br />
DVI to HDMI connection<br />
Transmits the digital video signal from an external<br />
device to the TV. Connect the external device and<br />
the TV with the DVI-HDMI cable as shown in the<br />
following illustration. To transmit an <strong>au</strong>dio signal,<br />
connect an <strong>au</strong>dio cable.<br />
Connect a HD receiver, DVD, or VCR player to the<br />
TV and select an appropriate input mode.<br />
HDMI connection<br />
Transmits the digital video and <strong>au</strong>dio signals from<br />
an external device to the TV. Connect the external<br />
device and the TV with the HDMI cable as shown<br />
in the following illustration.<br />
COMPONENT IN<br />
AUDIO<br />
VIDEO<br />
R L P P Y<br />
R B<br />
AV IN 1<br />
VIDEO<br />
R AUDIO L/MONO<br />
OPTICAL<br />
DIGITAL<br />
AUDIO OUT<br />
HDMI/DVI IN<br />
AUDIO IN<br />
(RGB/DVI)<br />
RGB IN (PC)<br />
RS-232C IN<br />
(CONTROL & SERVICE)<br />
1<br />
ANTENNA<br />
IN<br />
NOTE<br />
AUDIO OUT<br />
ENGLISH<br />
• yThe TV can receive video and <strong>au</strong>dio<br />
signals simultaneously when using an<br />
HDMI cable.<br />
• yIf the DVD does not support Auto HDMI,<br />
you must set the output resolution<br />
appropriately.<br />
• yCheck that your HDMI cable is High<br />
Speed HDMI Cable. If the HDMI cables<br />
are not High Speed HDMI Cable,<br />
flickering or no screen display can result.<br />
Please use the High Speed HDMI Cable.<br />
DVI OUT<br />
Component connection<br />
Transmits the analogue video and <strong>au</strong>dio signals<br />
from an external device to the TV. Connect the<br />
external device and the TV with the <strong>com</strong>ponent<br />
cable as shown in the following illustration.<br />
COMPONENT IN<br />
AUDIO<br />
VIDEO<br />
R L P P Y<br />
R B<br />
AV IN 1<br />
VIDEO<br />
R AUDIO L/MONO<br />
OPTICAL<br />
DIGITAL<br />
AUDIO OUT<br />
HDMI/DVI IN<br />
AUDIO IN<br />
(RGB/DVI)<br />
RGB IN (PC)<br />
RS-232C IN<br />
(CONTROL & SERVICE)<br />
1<br />
ANTENNA<br />
IN<br />
COMPONENT IN<br />
AUDIO<br />
VIDEO<br />
R L P R P B<br />
Y<br />
AV IN 1<br />
VIDEO<br />
R AUDIO L/MONO<br />
OPTICAL<br />
DIGITAL<br />
AUDIO OUT<br />
1<br />
HDMI/DVI IN<br />
AUDIO IN<br />
(RGB/DVI)<br />
RGB IN (PC)<br />
RS-232C IN<br />
(CONTROL & SERVICE)<br />
ANTENNA<br />
IN<br />
VIDEO<br />
AUDIO<br />
HDMI
MAKING CONNECTIONS<br />
83<br />
Composite connection<br />
Transmits the analogue video and <strong>au</strong>dio signals<br />
from an external device to the TV. Connect the<br />
external device and the TV with the <strong>com</strong>posite<br />
cable as shown in the following illustration.<br />
USB IN<br />
(Depending on model)<br />
VIDEO<br />
1<br />
USB IN<br />
2<br />
IN 2<br />
AV IN 2<br />
VIDEO / AUDIO<br />
L/MONO AUDIO R<br />
or<br />
AV IN 2<br />
VIDEO<br />
L(MONO) R<br />
AUDIO<br />
VIDEO<br />
L(MONO) R<br />
AUDIO<br />
ENGLISH<br />
Only Plasma TV<br />
COMPONENT IN<br />
VIDEO<br />
AUDIO<br />
R L P R P B<br />
Y<br />
AV IN 1<br />
VIDEO<br />
R AUDIO L/MONO<br />
OPTICAL<br />
DIGITAL<br />
AUDIO OUT<br />
1<br />
HDMI/DVI IN<br />
AUDIO IN<br />
(RGB/DVI)<br />
RGB IN (PC)<br />
RS-232C IN<br />
(CONTROL & SERVICE)<br />
ANTENNA<br />
IN<br />
or<br />
OPTICAL DIGITAL<br />
AUDIO OUT<br />
RGB IN (PC)<br />
AUDIO IN<br />
(RGB/DVI)<br />
RS-232C IN(CONTROL & SERVICE)<br />
2 1<br />
VIDEO<br />
L/MONO AUDIO R<br />
1<br />
ANTENNA/<br />
CABLE IN<br />
R<br />
AUDIO<br />
L(MONO)<br />
VIDEO<br />
R AUDIO L(MONO) VIDEO<br />
NOTE<br />
• yIf you have a mono VCR, connect the<br />
<strong>au</strong>dio cable from the VCR to the AUDIO L/<br />
MONO jack of the TV.
84<br />
MAKING CONNECTIONS<br />
Connecting to a PC<br />
NOTE<br />
• yIt is re<strong>com</strong>mended to use the TV set with the<br />
HDMI connection for the best image quality.<br />
HDMI connection<br />
Transmits the digital video and <strong>au</strong>dio signals from<br />
your PC to the TV. Connect the PC and the TV<br />
with the HDMI cable as shown in the following<br />
illustrations.<br />
COMPONENT IN<br />
VIDEO<br />
1<br />
2<br />
AUDIO<br />
R L P R P B<br />
Y<br />
AV IN 1<br />
VIDEO<br />
R AUDIO L/MONO<br />
OPTICAL<br />
DIGITAL<br />
AUDIO OUT<br />
HDMI/DVI IN<br />
AUDIO IN<br />
(RGB/DVI)<br />
RGB IN (PC)<br />
RS-232C IN<br />
(CONTROL & SERVICE)<br />
1<br />
ANTENNA<br />
IN<br />
HDMI<br />
ENGLISH
MAKING CONNECTIONS<br />
85<br />
RGB Connection<br />
1<br />
2<br />
DVI to HDMI connection<br />
Transmits the digital video signal from your PC to<br />
the TV. Connect the PC and the TV with the DVI-<br />
HDMI cable as shown in the following illustration.<br />
To transmit an <strong>au</strong>dio signal, connect an <strong>au</strong>dio<br />
cable.<br />
Transmits the analogue video signal from your<br />
PC to the TV. Connect the PC and the TV with the<br />
supplied D-sub 15 pin signal cable as shown in the<br />
following illustrations. To transmit an <strong>au</strong>dio signal,<br />
connect an <strong>au</strong>dio cable.<br />
COMPONENT IN<br />
VIDEO<br />
AUDIO<br />
R L P R P B<br />
Y<br />
VIDEO<br />
COMPONENT IN<br />
VIDEO<br />
1<br />
AUDIO<br />
2<br />
AV IN 1<br />
R AUDIO L/MONO<br />
OPTICAL<br />
DIGITAL<br />
AUDIO OUT<br />
HDMI/DVI IN<br />
AUDIO IN<br />
(RGB/DVI)<br />
RGB IN (PC)<br />
RS-232C IN<br />
(CONTROL & SERVICE)<br />
1<br />
ANTENNA<br />
IN<br />
R L P R P B<br />
Y<br />
AV IN 1<br />
VIDEO<br />
R AUDIO L/MONO<br />
OPTICAL<br />
DIGITAL<br />
AUDIO OUT<br />
HDMI/DVI IN<br />
AUDIO IN<br />
(RGB/DVI)<br />
RGB IN (PC)<br />
RS-232C IN<br />
(CONTROL & SERVICE)<br />
1<br />
ANTENNA<br />
IN<br />
RGB OUT (PC)<br />
AUDIO OUT<br />
AUDIO OUT<br />
DVI OUT<br />
ENGLISH
86<br />
MAKING CONNECTIONS<br />
ENGLISH<br />
NOTE<br />
• yAvoid keeping a fixed image on the set’s<br />
screen for prolonged periods of time. The<br />
fixed image may be<strong>com</strong>e permanently<br />
imprinted on the screen; use a screen<br />
saver when possible.<br />
• yThere may be interference relating to<br />
resolution, vertical pattern, contrast or<br />
brightness in PC mode. Change the PC<br />
mode to another resolution or change the<br />
refresh rate to another rate or adjust the<br />
brightness and contrast on the menu until<br />
the picture is clear. If the refresh rate of<br />
the PC graphic card cannot be changed,<br />
change the PC graphic card or consult<br />
the manufacturer of the PC graphic card.<br />
• yThe synchronization input waveform for<br />
Horizontal and Vertical frequencies are<br />
separate.<br />
• yWe re<strong>com</strong>mend using 1920x1080,<br />
60 Hz(Except for 42/50PT25**,<br />
42/50PW35**, 42/50PW45**,<br />
22/26/32LK33**, 19/22/26/32LV25**,<br />
26/32LV30**), 1360x768, 60 Hz(Only<br />
22/26/32LK33**, 19/22/26/32LV25**,<br />
26/32LV30**), 1024x768, 60 Hz(Only<br />
42/50PT25**, 42/50PW35**,<br />
42/50PW45**) for the PC mode, this<br />
should provide the best picture quality.<br />
• yConnect the signal cable from the monitor<br />
output port of the PC to the RGB (PC)<br />
port of the TV or the signal cable from the<br />
HDMI output port of the PC to the HDMI<br />
IN (or HDMI/DVI IN) port on the TV.<br />
• yConnect the <strong>au</strong>dio cable from the PC to<br />
the Audio input on the TV. (Audio cables<br />
are not included with the TV).<br />
• yIf using a sound card, adjust PC sound<br />
as required.<br />
• yIf the graphic card on the PC does<br />
not output analogue and digital RGB<br />
simultaneously, connect only one of<br />
either RGB or HDMI IN (or HDMI/DVI IN)<br />
to display the PC output on the TV.<br />
• yDOS mode may not work depending on<br />
the video card if you use an HDMI to DVI<br />
cable.<br />
• yIf you use too long an RGB-PC cable,<br />
there may be interference on the screen.<br />
We re<strong>com</strong>mend using under 5m of cable.<br />
This provides the best picture quality.<br />
Connecting to an <strong>au</strong>dio<br />
system<br />
Use an external <strong>au</strong>dio system instead of the builtin<br />
speaker.<br />
NOTE<br />
• yIf you use an external <strong>au</strong>dio device<br />
instead of the built-in speaker, set the TV<br />
speaker feature to off (See p.74).<br />
Digital optical <strong>au</strong>dio connection<br />
Transmits the digital <strong>au</strong>dio signal from the TV to an<br />
external device. Connect the external device and<br />
the TV with the optical <strong>au</strong>dio cable as shown in the<br />
following illustration.<br />
COMPONENT IN<br />
AUDIO<br />
VIDEO<br />
R L P P Y<br />
R B<br />
1<br />
2<br />
NOTE<br />
AV IN 1<br />
VIDEO<br />
R AUDIO L/MONO<br />
OPTICAL<br />
DIGITAL<br />
AUDIO OUT<br />
HDMI/DVI IN<br />
AUDIO IN<br />
(RGB/DVI)<br />
RGB IN (PC)<br />
RS-232C IN<br />
(CONTROL & SERVICE)<br />
1<br />
ANTENNA<br />
IN<br />
OPTICAL AUDIO IN<br />
• yDo not look into the optical output port.<br />
Looking at the laser beam may damage<br />
your vision.
MAKING CONNECTIONS<br />
87<br />
Headphone connection<br />
• yThis feature is not available for all models.<br />
USB IN<br />
(Except for Plasma TV)<br />
Connecting to a USB<br />
Connect a USB storage device such as s USB<br />
flash memory, external hard drive, a USB memory<br />
card reader to the TV and access the My media<br />
menu to use various multimedia files. See<br />
"Connecting USB storage devices" on p.55 and see<br />
"Browsing files" on p.56 .<br />
IN 2<br />
VIDEO<br />
L/MONO AUDIO R<br />
Transmits the headphone signal from the TV to<br />
an external device. Connect the external device<br />
and the TV with the headphone as shown on the<br />
following illustration.<br />
IN 3<br />
USB IN<br />
or<br />
H/P<br />
AV IN 2<br />
NOTE<br />
• yAUDIO menu items are disabled when<br />
connecting a headphone.<br />
• yWhen changing AV MODE with a<br />
headphone connected, the change is<br />
applied to video but not to <strong>au</strong>dio.<br />
• yOptical Digital Audio Out is not available<br />
when connecting a headphone.<br />
• yHeadphone impedance: 16 Ω<br />
• yMax <strong>au</strong>dio output of headphone: 10 mW<br />
to 15 mW<br />
• yHeadphone jack size: 0.35 cm<br />
ENGLISH
88<br />
MAKING CONNECTIONS<br />
SIMPLINK connection<br />
Use the TV remote control to play and control the<br />
AV device connected with the HDMI cable through<br />
HDMI-CEC. Your TV only works with the devices<br />
that support HDMI-CEC.<br />
Connect one end of the HDMI cable to the HDMI/<br />
DVI IN or HDMI IN terminal on the rear of the TV<br />
and the other end to the SIMPLINK device.<br />
No.<br />
Description<br />
1 Displays the previously viewed TV channel.<br />
Plays discs. When multiple discs are available,<br />
2 the title of the disc appears at the bottom of the<br />
screen.<br />
3 Controls the connected VCR.<br />
HDD recordings playback: Controls the recording<br />
4 stored in HDD.<br />
Audio out to Home theatre speaker or Audio out<br />
5 to TV: Changes the <strong>au</strong>dio output between Home<br />
theatre speaker and TV speaker.<br />
ENGLISH<br />
NOTE<br />
• yIf the connected device does not support<br />
HDMI-CEC, the SIMPLINK feature is<br />
unavailable.<br />
• yTo operate SIMPLINK, an High Speed<br />
HDMI Cable with *CEC function should<br />
be used. (*CEC: Consumer Electronics<br />
Control).<br />
Activating the SIMPLINK feature<br />
1 Press SIMPINK to access the SIMPLINK<br />
menus.<br />
2 Press the Navigation buttons to scroll to On.<br />
3 Press the Navigation buttons to scroll to one of<br />
the devices and press OK.<br />
1<br />
2<br />
3<br />
4<br />
5<br />
• yImage shown may differ from your TV.<br />
◄ On ►<br />
Watch TV<br />
DISC<br />
VCR<br />
VCR HDD Recorder<br />
Speaker<br />
OK<br />
Exit<br />
Selected Device<br />
When a device is<br />
connected (displayed<br />
in bright colour)<br />
When device is<br />
not connected<br />
(displayed in gray)<br />
- A check mark appears in front of the selected<br />
device.<br />
- Available devices display in a bright colour.<br />
- Unavailable devices display in grey.<br />
4 Control the selected AV device.<br />
- Direct Play: After connecting AV devices to<br />
the TV, you can directly control the devices<br />
and play media without additional settings.<br />
- Select AV device: Enables you to select one<br />
of the AV devices connected to the TV.<br />
- Disc playback: Control connected AV devices<br />
by pressing the Navigation buttons, OK,<br />
►, ▀ , l l, ◄◄ and ►► buttons.<br />
- Power off all devices: When you power off<br />
the TV, all connected devices are turned off.<br />
- Switch <strong>au</strong>dio-out: Offers an easy way to<br />
switch <strong>au</strong>dio-out.<br />
- Sync Power on: When the equipment with<br />
SIMPLINK function connected HDMI terminal<br />
starts to play, The TV will <strong>au</strong>tomatically turn<br />
on.<br />
NOTE<br />
• yIf you change the input source by<br />
pressing INPUT, the progressing function<br />
of the SIMPLINK device will stop.<br />
• yIf you select a device that has the<br />
Home theatre feature, the sound output<br />
<strong>au</strong>tomatically switches to the Home<br />
theatre speaker and the TV speaker turns<br />
off.<br />
• yIf a connected SIMPLINK Home theatre<br />
system does not play the <strong>au</strong>dio from the<br />
TV, connect the DIGITAL AUDIO OUT<br />
terminal on the rear of the TV to the<br />
DIGITAL AUDIO IN terminal on the back<br />
of the SIMPLINK device with an optical<br />
cable.
TELETEXT<br />
89<br />
TELETEXT<br />
• yThis feature is not available in all countries.<br />
Teletext is a free service broadcast by most TV<br />
stations which gives up to the minute information<br />
on news, weather, television programmes, share<br />
prices and many other topics.<br />
The teletext decoder of this TV can support the<br />
SIMPLE, TOP and FASTEXT systems. SIMPLE<br />
(standard teletext) consists of a number of pages<br />
which are selected by directly entering the corresponding<br />
page number. TOP and FASTEXT are<br />
more modern methods allowing quick and easy<br />
selection of teletext information.<br />
Simple Text<br />
Page selection<br />
1 Enter the desired page number as a three-digit<br />
number with the NUMBER buttons. If during<br />
selection you press a wrong number, you must<br />
<strong>com</strong>plete the three-digit number and then reenter<br />
the correct page number.<br />
2 The P ^ v button can be used to select the<br />
previous or next page.<br />
Switch On/Off<br />
Press the TEXT button to switch to teletext. The<br />
initial page or last page appears on the screen.<br />
Two page numbers, TV station name, date and<br />
time are displayed on the screen headline. The<br />
first page number indicates your selection, while<br />
the second shows the current page displayed.<br />
Press the TEXT button to switch off teletext. The<br />
previous mode reappears.<br />
Top Text<br />
The user guide displays four fields-red, green,<br />
yellow and blue at the bottom of the screen. The<br />
yellow field denotes the next group and the blue<br />
field indicates the next block.<br />
Block / Group / Page Selection<br />
1 With the blue button you can progress from<br />
block to block.<br />
ENGLISH<br />
2 Use the yellow button to proceed to the next<br />
group with <strong>au</strong>tomatic overflow to the next<br />
block.<br />
3 With the green button you can proceed to the<br />
next existing page with <strong>au</strong>tomatic overflow to<br />
the next group.<br />
4 Alternatively, the P ^ button can be used.<br />
The RED button permits you to return to previous<br />
selection. Alternatively, the P v button can<br />
be used.<br />
Direct Page Selection<br />
As with SIMPLE teletext mode, you can select a<br />
page by entering it as a three digit number using<br />
the NUMBER buttons in TOP mode.
90<br />
TELETEXT<br />
Fastext<br />
The teletext pages are colour coded along the bottom<br />
of the screen and are selected by pressing the<br />
corresponding coloured button.<br />
Page selection<br />
1 Press the T.OPT button and then use the<br />
Navigation button to select menu. Display<br />
the index page.<br />
2 You can select the pages which are colour<br />
coded along the bottom line with corresponding<br />
coloured buttons.<br />
3 AS with SIMPLE teletext mode, you can select<br />
a page by entering its three digit page number<br />
with the NUMBER buttons in FASTEXT mode.<br />
ꕀ Hold<br />
Stops the <strong>au</strong>tomatic page change which will<br />
occur if a teletext page consists of 2 or more<br />
sub pages.<br />
The number of sub pages and the sub page<br />
displayed is, usually, shown on the screen<br />
below the time. When this menu is selected the<br />
stop symbol is displayed at the top left-hand<br />
corner of the screen and the <strong>au</strong>tomatic page<br />
change is inactive.<br />
ꔽ Reveal<br />
Select this menu to display concealed information,<br />
such as solutions to riddles or puzzles.<br />
ENGLISH<br />
4 The P ^ v button can be used to select the<br />
preceding or following page.<br />
Special Teletext Function<br />
Press the T. OPT button and then use Navigation<br />
buttons to select the Text Option menu.<br />
Text Option<br />
Index<br />
Time<br />
Hold<br />
Reveal<br />
Update<br />
Close<br />
ꔼ Update<br />
Displays the TV picture on the screen while<br />
waiting for a new teletext page. The display<br />
will appear at the top left hand corner of the<br />
screen. When the updated page is available<br />
then display will change to the page number.<br />
Select this menu again to view the updated<br />
teletext page.<br />
ꔻ Index<br />
Select the each index page.<br />
ꔾ Time<br />
When viewing a TV programme, select this<br />
menu to display the time at the top right hand<br />
corner of the screen.<br />
In the teletext mode, press this button to select<br />
a sub page number. The sub page number<br />
is displayed at the bottom of the screen. To<br />
hold or change the sub page, press the RED/<br />
GREEN, < > or NUMBER buttons.
MAINTENANCE<br />
91<br />
MAINTENANCE<br />
Update and clean your TV regularly to keep the best performance and to extend the product lifespan.<br />
Cleaning your TV<br />
C<strong>au</strong>tion<br />
• yMake sure to turn the power off and disconnect the power cord and all other cables first.<br />
• yWhen the TV is left unattended and unused for a long time, disconnect the power cord from the wall<br />
outlet to prevent possible damage from lightning or power surges.<br />
Screen and frame<br />
To remove dust or light dirt, wipe the surface with a dry, clean, and soft cloth.<br />
To remove major dirt, wipe the surface with a soft cloth dampened in clean water or a diluted mild detergent.<br />
Then wipe immediately with a dry cloth.<br />
C<strong>au</strong>tion<br />
• yDo not push, rub, or hit the surface with your fingernail or a sharp object, as this may result in<br />
scratches on the screen and image distortions.<br />
• yDo not use any chemicals, such as waxes, benzene, alcohol, thinners, insecticides, air fresheners,<br />
lubricants, as these may as these may damage the screen’s finish and c<strong>au</strong>se discolouration.<br />
Cabinet and stand<br />
To remove dust or light dirt, wipe the cabinet with a dry, clean, and soft cloth.<br />
To remove major dirt, wipe the cabinet with a soft cloth dampened in a clean water or water containing a<br />
small amount of mild detergent. Then wipe immediately with a dry cloth.<br />
C<strong>au</strong>tion<br />
• yDo not spray liquid onto the surface. If water enters the TV, it may result in fire, electric shock, or<br />
malfunction.<br />
• yDo not use any chemicals as this may deteriorate the surface.<br />
ENGLISH<br />
Power cord<br />
Remove the accumulated dust or dirt on the power cord regularly.<br />
Preventing “Image burn” or “Burn-in” on your TV screen<br />
• yIf a fixed image displays on the TV screen for a long period of time, it will be imprinted and be<strong>com</strong>e<br />
a permanent disfigurement on the screen. This is “image burn” or “burn-in” and not covered by the<br />
warranty.<br />
• yIf the aspect ratio of the TV is set to 4:3 for a long period of time, image burn may occur on the<br />
letterboxed area of the screen.<br />
• yAvoid displaying a fixed image on the TV screen for a long period of time (2 or more hours for LCD,<br />
1 or more hours for the Plasma TV) to prevent image burn.
92<br />
TROUBLESHOOTING<br />
TROUBLESHOOTING<br />
General<br />
Problem<br />
Cannot control the TV with the<br />
remote control.<br />
No image display and no sound is<br />
produced.<br />
Image appears slowly when the TV<br />
turns on.<br />
Cannot connect external devices.<br />
The TV turns off suddenly.<br />
Resolution<br />
• yCheck the remote control sensor on the product and try again.<br />
• yCheck if there is any obstacle between the product and the remote control.<br />
• yCheck if the batteries are still working and properly installed ( to , to ).<br />
• yCheck if the appropriate input mode such as TV or VCR is set for using the<br />
remote control.<br />
• yCheck if the product is turned on.<br />
• yCheck if the power cord is connected to a wall outlet.<br />
• yCheck if there is a problem in the wall outlet by connecting other products.<br />
• yThe image is muted during the product start up process. This is normal. If the<br />
image does not appear in a few minutes, unplug the TV for 30 seconds and try<br />
again. If the image still does not appear, contact the <strong>au</strong>thorized service centre<br />
in your local area.<br />
• ySee "Connection overview" on p.81 and connect an external device.<br />
• yCheck the power control settings. The power supply may be interrupted.<br />
• yCheck if the Auto sleep feature is activated in the Time settings.<br />
See "Sleep Timer" on p.76.<br />
• yIf there is no signal while the TV is on, the TV will turn off <strong>au</strong>tomatically after 15<br />
minutes of inactivity.<br />
ENGLISH<br />
Audio<br />
Problem<br />
No sound is produced while images<br />
are displaying.<br />
One of the speakers produce noises<br />
or does not produce sound.<br />
Resolution<br />
• yPress<br />
+ or - button.<br />
• yCheck if the sound is muted by pressing MUTE.<br />
• yScroll to other channels. There may a problem with the broadcast.<br />
• yCheck if the <strong>au</strong>dio cables are connected properly.<br />
• yA change in ambient humidity or temperature may result in an unusual noise<br />
when the product turns on or off.<br />
• yThere is no problem with your product.
TROUBLESHOOTING<br />
93<br />
Video<br />
Problem<br />
An image displays in black and<br />
white or the colour quality is poor.<br />
Horizontal or vertical bars appears<br />
or images blur<br />
Lines or streaks appear on images<br />
Afterimages (ghosts) appear when<br />
the product turns off<br />
The power is on but the screen<br />
appears extremely dark.<br />
“No Signal” appears on the screen.<br />
Resolution<br />
• yAdjust the colour setting in the Picture menu (See p.67).<br />
• yKeep a sufficient distance between this product and other electronic products.<br />
• yScroll to other channels. There may a problem with the broadcast.<br />
• yCheck if there are local interferences such as an electrical appliance or power<br />
tool.<br />
• yCheck the antenna or aim the antenna to the proper direction.<br />
• yPixels may have been damaged from a fixed image displayed for a long time<br />
(image burn). Use a screen saver to prevent the pixel damage on the screen.<br />
• yAdjust the brightness and contrast in the Picture menu (See p.67).<br />
• yCheck if the signal cable is connected between the TV and products properly.<br />
• yCheck the selected input source by pressing INPUT.<br />
Black spots appear on the screen.<br />
The display offset is wrong.<br />
Thin lines appear in the background<br />
of the screen.<br />
Horizontal noises appear or<br />
characters blur.<br />
The reception on some channels is<br />
poor<br />
• ySeveral pixels in red, green, white, or black may appear on the screen that can<br />
attribute to the characteristics of the LCD panel.<br />
This is normal.<br />
• yAdjust the position setting in the Picture menu (See p.67).<br />
• yCheck if the video card resolution and frequency are supported by the product.<br />
If the frequency is out of range, set to the re<strong>com</strong>mended resolution using the<br />
display settings on the external device.<br />
• yCheck the video cable connections.<br />
• yAdjust the Phase setting in the Picture menu.<br />
See "SCREEN" on p.69<br />
• yScroll to other channels. There may a problem with the broadcast.<br />
• yThe station signal may be weak. Aim the antenna to the proper direction.<br />
• yCheck if there is local interference such as an electrical appliance or power tool.<br />
ENGLISH
94<br />
SPECIFICATIONS<br />
SPECIFICATIONS<br />
Dimensions<br />
(W x H x D)<br />
MODELS<br />
42PT25**<br />
42PT250-TA<br />
50PT25**<br />
50PT250-TA<br />
With stand 987.6 mm x 662.8 mm x 230.5 mm 1171.9 mm x 770.9 mm x 289.8 mm<br />
Without stand 987.6 mm x 608.9 mm x 52.5 mm 1171.9 mm x 712.2 mm x 52.5 mm<br />
Weight With stand 21.4 kg 29.5 kg<br />
Without stand 19.9 kg 27.2 kg<br />
50PV25**<br />
60PV25**<br />
MODELS<br />
50PV250-TA<br />
50PV250-TB<br />
<strong>60PV250</strong>-TA<br />
<strong>60PV250</strong>-TB<br />
Dimensions With stand 1171.9 mm x 770.9 mm x 289.8 mm 1390.8 mm x 905.2 mm x 334.7 mm<br />
(W x H x D)<br />
Without stand 1171.9 mm x 712.2 mm x 52.5 mm 1390.8 mm x 835.5 mm x 52.5 mm<br />
ENGLISH<br />
Weight With stand 29.8kg 42.6 kg<br />
Without stand 27.5kg 38.5 kg<br />
MODELS<br />
42PW35**<br />
50PW35**<br />
42PW350-TA<br />
50PW350-TA<br />
Dimensions With stand 991.8 mm x 667 mm x 230.5 mm 1176.1 mm x 774.7 mm x 289.8 mm<br />
(W x H x D) Without stand 991.8 mm x 613.8 mm x 52.5 mm 1176.1 mm x 716.5 mm x 52.5 mm<br />
Weight With stand 21.5 kg 29.6 kg<br />
Without stand 20.0 kg 27.3 kg<br />
MODELS<br />
42PW45**<br />
50PW45**<br />
42PW450-TA / 42PW450-TD 50PW450-TA / 50PW450-TD<br />
Dimensions With stand 984 mm x 662.7 mm x 230.5 mm 1168.7 mm x 768.3 mm x 289.7 mm<br />
(W x H x D) Without stand 984 mm x 608.9 mm x 52.5 mm 1168.7 mm x 712.2 mm x 52.5 mm<br />
Weight With stand 21.5 kg 29.5 kg<br />
Without stand 20.0 kg 27.2 kg<br />
50PZ55**<br />
60PZ55**<br />
MODELS<br />
50PZ550-TA<br />
50PZ550-TC<br />
60PZ550-TA<br />
60PZ550-TC<br />
Dimensions With stand 1172.3 mm x 770.9 mm x 289.8 mm 1390.4 mm x 905.2 mm x 334.7 mm<br />
(W x H x D) Without stand 1172.3 mm x 712.2 mm x 52.5 mm 1390.4 mm x 835.5 mm x 52.5 mm<br />
Weight With stand 29.8 kg 42.6 kg<br />
Without stand 27.5 kg 38.5 kg<br />
<strong>Product</strong> specifications shown above may be changed without prior notice due to upgrade of product<br />
functions.<br />
For the power supply and power consumption, refer to the label attached to the product.
SPECIFICATIONS<br />
95<br />
Dimensions<br />
(W x H x D)<br />
MODELS<br />
22LK33**<br />
22LK330-TA<br />
22LK330-TB<br />
22LK332-TC<br />
26LK33**<br />
26LK330-TA<br />
26LK330-TB<br />
26LK332-TC<br />
With stand 526.0 mm x 377.0 mm x 165 mm 663.0 mm x 484.0 mm x 207 mm<br />
Without stand 526.0 mm x 331.0 mm x 65 mm 663.0 mm x 423.0 mm x 79.9 mm<br />
Weight With stand 4.3 kg 7.6 kg<br />
Without stand 4.0 kg 6.5 kg<br />
Power requirement<br />
AC 100-240 V~ 50 / 60 Hz<br />
32LK33**<br />
32LK43**<br />
MODELS<br />
32LK330-TA<br />
32LK430-TA<br />
32LK330-TB<br />
32LK430-TB<br />
32LK332-TC<br />
Dimensions With stand 800.0 mm x 565.0 mm x 207 mm 799.0 mm x 555.0 mm x 207.0 mm<br />
(W x H x D)<br />
Without stand 800.0 mm x 509.0 mm x 73.8 mm 799.0 mm x 516 mm x 73.5 mm<br />
Weight With stand 9.6 kg 9.6 kg<br />
Without stand 8.6 kg 8.6 kg<br />
Power requirement<br />
AC 100-240 V~ 50 / 60 Hz<br />
42LK43**<br />
42LK53**<br />
MODELS<br />
42LK430-TA<br />
42LK430-TB<br />
42LK530-TA<br />
42LK530-TC<br />
Dimensions With stand 1023.0 mm x 685.0 mm x 261.0 mm 1024.0 mm x 685.0 mm x 261.0 mm<br />
(W x H x D) Without stand 1023.0 mm x 644 mm x 76.6 mm 1024.0 mm x 621.0 mm x 76.8 mm<br />
Weight With stand 15.4 kg 15.5 kg<br />
Without stand 13.7 kg 13.9 kg<br />
Power requirement<br />
AC 100-240 V~ 50 / 60 Hz<br />
47LK53**<br />
55LK53**<br />
MODELS<br />
47LK530-TA<br />
47LK530-TC<br />
55LK530-TA<br />
55LK530-TC<br />
Dimensions With stand 1137.0 mm x 758.0 mm x 270.0 mm 1329.0 mm x 872.0 mm x 330.0 mm<br />
(W x H x D) Without stand 1137.0 mm x 685.0 mm x 76.8 mm 1329.0 mm x 796.0 mm x 96.5 mm<br />
Weight With stand 20.3 kg 33.0 kg<br />
Without stand 18.3 kg 29.8 kg<br />
Power requirement<br />
AC 100-240 V~ 50 / 60 Hz<br />
ENGLISH<br />
<strong>Product</strong> specifications shown above may be changed without prior notice due to upgrade of product<br />
functions.<br />
For the power supply and power consumption, refer to the label attached to the product.
96<br />
SPECIFICATIONS<br />
32LK45**<br />
37LK45**<br />
MODELS<br />
32LK450-TA<br />
32LK452-TC<br />
37LK450-TA<br />
37LK452-TC<br />
Dimensions With stand 795.0 mm x 568.0 mm x 207.0 mm 913.0 mm x 639.0 mm x 265.0 mm<br />
(W x H x D) Without stand 795.0 mm x 504.0 mm x 73.5 mm 913.0 mm x 571.0 mm x 77.4 mm<br />
Weight With stand 9.2 kg 12.8 kg<br />
Without stand 8.1 kg 11.1 kg<br />
Power requirement<br />
AC 100-240 V~ 50 / 60 Hz<br />
42LK45**<br />
19LV25**<br />
MODELS<br />
42LK450-TA<br />
42LK452-TC<br />
19LV2500-TA<br />
19LV2530-TD<br />
Dimensions With stand 1019.0 mm x 698.0 mm x 265.0 mm 455.2 mm X 355 mm X 145 mm<br />
(W x H x D)<br />
Without stand 1019.0 mm x 631.0 mm x 76.5 mm 455.2 mm X 313.1 mm X 40.9 mm<br />
ENGLISH<br />
Weight With stand 15.1 kg 2.7 kg<br />
Without stand 13.4 kg 2.5 kg<br />
Power requirement<br />
AC 100-240 V~ 50 / 60 Hz<br />
DC 24 V, 1.4 A<br />
AC-DC adaptor : 24 V , 2.5 A /<br />
AC 100-240 V~ 50 / 60 Hz<br />
22LV25**<br />
26LV25**<br />
MODELS<br />
22LV2500-TA<br />
22LV2510-TB<br />
22LV2530-TD<br />
26LV2500-TA<br />
26LV2510-TB<br />
26LV2530-TD<br />
Dimensions With stand 471.2 mm X 365.9 mm X 155.4 mm 635.6 mm X 475 mm X 169 mm<br />
(W x H x D) Without stand 471.2 mm X 315.5 mm X 40.9 mm 635.6 mm X 413.5 mm X 40.9 mm<br />
Weight With stand 3.4 kg 5.4 kg<br />
Without stand 3.2 kg 5.0 kg<br />
Power requirement<br />
DC 24 V, 1.7 A<br />
AC-DC adaptor : 24 V , 2.5 A /<br />
AC 100-240 V~ 50 / 60 Hz<br />
32LV25**<br />
MODELS<br />
32LV2500-TA<br />
32LV2510-TB<br />
32LV2530-TD<br />
Dimensions With stand 777.4 mm X 552.3 mm X 216.0 mm<br />
(W x H x D) Without stand 777.4 mm X 501.3 mm X 35.4 mm<br />
Weight With stand 11.5 kg<br />
Without stand 10.7 kg<br />
Power requirement<br />
AC 100-240 V~ 50 / 60 Hz<br />
DC 24 V, 1.8 A<br />
AC-DC adaptor : 24 V , 2.5 A /<br />
AC 100-240 V~ 50 / 60 Hz<br />
<strong>Product</strong> specifications shown above may be changed without prior notice due to upgrade of product<br />
functions.<br />
For the power supply and power consumption, refer to the label attached to the product.
SPECIFICATIONS<br />
97<br />
MODELS<br />
22LV30**<br />
22LV3000-TA<br />
Dimensions With stand 471.2 mm X 365.9 mm X 155.4 mm<br />
(W x H x D) Without stand 471.2 mm X 315.5 mm X 34.4 mm<br />
Weight With stand 3.4 kg<br />
Without stand 3.2 kg<br />
Power requirement<br />
AC 100-240 V~ 50 / 60 Hz<br />
MODELS<br />
26LV30**<br />
32LV30**<br />
26LV3000-TA<br />
32LV3000-TA<br />
Dimensions With stand 635.6 mm X 475 mm X 169 mm 795.0 mm x 568.0 mm x 207.0 mm<br />
(W x H x D) Without stand 635.6 mm X 413.5 mm X 40.9 mm 795.0 mm x 504.0 mm x 73.5 mm<br />
Weight With stand 5.4 kg 9.2 kg<br />
Without stand 5.0 kg 8.1 kg<br />
Power requirement<br />
AC 100-240 V~ 50 / 60 Hz<br />
ENGLISH<br />
<strong>Product</strong> specifications shown above may be changed without prior notice due to upgrade of product<br />
functions.<br />
For the power supply and power consumption, refer to the label attached to the product.
98<br />
SPECIFICATIONS<br />
Dimensions<br />
(W x H x D)<br />
MODELS<br />
32LV35**<br />
32LV3500-TA<br />
32LV3500-TB<br />
32LV3510-TB<br />
32LV3530-TD<br />
37LV35**<br />
37LV3500-TA<br />
37LV3500-TB<br />
37LV3510-TB<br />
37LV3530-TD<br />
With stand 764.0 mm x 545.0 mm x 240.0 mm 888.0 mm x 614.0 mm x 240.0 mm<br />
Without stand 764.0 mm x 484.0 mm x 35.4 mm 888.0 mm x 533.0 mm x 35.4 mm<br />
Weight With stand 11.4 kg 13.5 kg<br />
Without stand 9.6 kg 11.7 kg<br />
Power requirement<br />
AC 100-240 V~ 50 / 60 Hz<br />
42LV35**<br />
47LV35**<br />
MODELS<br />
42LV3500-TA<br />
47LV3500-TA<br />
42LV3500-TB<br />
47LV3500-TB<br />
42LV3510-TB<br />
42LV3530-TD<br />
47LV3510-TB<br />
47LV3530-TD<br />
Dimensions With stand 998.0 mm x 684.0 mm x 256.0 mm 1108.0 mm x 746 mm x 256 mm<br />
(W x H x D)<br />
Without stand 998.0 mm x 615.0 mm x 30.4 mm 1108.0 mm x 677 mm x 30.4 mm<br />
ENGLISH<br />
Weight With stand 15.5 kg 20.9 kg<br />
Without stand 13.3 kg 18.7 kg<br />
Power requirement<br />
AC 100-240 V~ 50 / 60 Hz<br />
22LV55**<br />
26LV55**<br />
MODELS<br />
22LV5500-TA<br />
22LV5500-TB<br />
26LV5500-TA<br />
26LV5500-TB<br />
Dimensions With stand 530 mm X 388 mm X 145 mm 640.0 mm X 468 mm X 169 mm<br />
(W x H x D) Without stand 530 mm X 340 mm X 31.3 mm 640.0 mm X 405.0 mm X 31.0 mm<br />
Weight With stand 3.4 kg 4.7 kg<br />
Without stand 3.2 kg 4.4 kg<br />
Power requirement<br />
DC 24 V, 1.7 A<br />
AC-DC adaptor : 24 V , 2.5 A /<br />
AC 100-240 V~ 50 / 60 Hz<br />
DC 24 V, 2.1 A<br />
AC-DC adaptor : 24 V , 2.5 A /<br />
AC 100-240 V~ 50 / 60 Hz<br />
<strong>Product</strong> specifications shown above may be changed without prior notice due to upgrade of product<br />
functions.<br />
For the power supply and power consumption, refer to the label attached to the product.
SPECIFICATIONS<br />
99<br />
Dimensions<br />
(W x H x D)<br />
MODELS<br />
32LV34**<br />
32LV3400-TA<br />
42LV34**<br />
42LV3400-TA<br />
With stand 764.1 mm x 544.7 mm x 240.0 mm 997.2 mm x 684.2 mm x 256.6 mm<br />
Without stand 764.1 mm x 483.6 mm x 40.4 mm 997.2 mm x 614.7 mm x 40.1 mm<br />
Weight With stand 11.2 kg 15.5 kg<br />
Without stand 9.4 kg 13.3 kg<br />
Power requirement<br />
AC 100-240 V~ 50 / 60 Hz<br />
Dimensions<br />
(W x H x D)<br />
MODELS<br />
32LW45**<br />
32LW4500-TA<br />
42LW45**<br />
42LW4500-TA<br />
With stand 764.1 mm x 544.7 mm x 240.0 mm 997.2 mm x 684.2 mm x 256.6 mm<br />
Without stand 764.1 mm x 483.6 mm x 40.4 mm 997.2 mm x 614.7 mm x 40.1 mm<br />
Weight With stand 11.2 kg 15.5 kg<br />
Without stand 9.4 kg 13.3 kg<br />
Power requirement<br />
AC 100-240 V~ 50 / 60 Hz<br />
MODELS<br />
47LW45**<br />
47LW4500-TA<br />
55LW45**<br />
55LW4500-TA<br />
Dimensions With stand 1107.0 mm x 745.5 mm x 256.3 mm 1175.8 mm x 771.6 mm x 289.7 mm<br />
(W x H x D) Without stand 1107.0 mm x 676.5 mm x 40.1 mm 1175.8 mm x 718.7 mm x 52.5 mm<br />
Weight With stand 20.9 kg 29.4 kg<br />
Without stand 18.7 kg 27.1 kg<br />
Power requirement<br />
AC 100-240 V~ 50 / 60 Hz<br />
ENGLISH<br />
<strong>Product</strong> specifications shown above may be changed without prior notice due to upgrade of product<br />
functions.<br />
For the power supply and power consumption, refer to the label attached to the product.
100<br />
SPECIFICATIONS<br />
Environment condition<br />
Operating Temperature<br />
Operating Humidity<br />
Storage Temperature<br />
Storage Humidity<br />
0 °C to 40 °C<br />
Less than 80 %<br />
-20 °C to 60 °C<br />
Less than 85 %<br />
New Zealand, Singapore<br />
Digital TV<br />
Analogue TV<br />
Television System DVB-T PAL/SECAM-B/G/D/K, PAL-I<br />
Programme Coverage UHF 21 to 69<br />
BG : VHF/UHF 1 to 69, CATV 01 to 47<br />
I : VHF/UHF 1 to 69, CATV 01 to 47<br />
DK : VHF/UHF 1 to 69, CATV 01 to 47<br />
Australia Television System DVB-T PAL B/B<br />
Programme Coverage<br />
VHF 06 to 12,<br />
UHF 27 to 69<br />
B/B : VHF/UHF 0 to 75, CATV : 2 to 44<br />
Indonesia, Israel Television System DVB-T PAL/SECAM-B/G/D/K, PAL-I, NTSC-M<br />
South Africa<br />
Programme Coverage UHF 21 to 69<br />
BG : VHF/UHF 1 to 69, CATV 01 to 47<br />
I : VHF/UHF 1 to 69, CATV 01 to 47<br />
DK : VHF/UHF 1 to 69, CATV 01 to 47<br />
M : VHF/UHF 2 to 78, CATV 01 to 71<br />
Television System DVB-T PAL/SECAM-B/G/D/K, PAL-I, NTSC-M<br />
ENGLISH<br />
Programme Coverage<br />
VHF 4 to 11, 13<br />
UHF 21 to 68<br />
BG : VHF/UHF 1 to 69, CATV 01 to 47<br />
I : VHF/UHF 1 to 69, CATV 01 to 47<br />
DK : VHF/UHF 1 to 69, CATV 01 to 47<br />
M : VHF/UHF 2 to 78, CATV 01 to 71<br />
Veitnam, Malaysia Television System DVB-T PAL/SECAM-B/G/D/K, PAL-I, NTSC-M<br />
Iran<br />
BG : VHF/UHF 1 to 69, CATV 01 to 47<br />
Programme Coverage<br />
VHF 6 to 12, I : VHF/UHF 1 to 69, CATV 01 to 47<br />
UHF 21 to 69 DK : VHF/UHF 1 to 69, CATV 01 to 47<br />
M : VHF/UHF 2 to 78, CATV 01 to 71<br />
Television System DVB-T PAL/SECAM-B/G/D/K, PAL-I, NTSC-M<br />
Programme Coverage<br />
VHF 5 to 12,<br />
UHF 21 to 69<br />
BG : VHF/UHF 1 to 69, CATV 01 to 47<br />
I : VHF/UHF 1 to 69, CATV 01 to 47<br />
DK : VHF/UHF 1 to 69, CATV 01 to 47<br />
M : VHF/UHF 2 to 78, CATV 01 to 71<br />
Analogue model Television System - PAL/SECAM-B/G/D/K, PAL-I, NTSC-M<br />
Programme Coverage -<br />
BG : VHF/UHF 1 to 69, CATV 01 to 47<br />
I : VHF/UHF 1 to 69, CATV 01 to 47<br />
DK : VHF/UHF 1 to 69, CATV 01 to 47<br />
M : VHF/UHF 2 to 78, CATV 01 to 71<br />
External Antenna<br />
Impedance<br />
75 Ω 75 Ω<br />
<strong>Product</strong> specifications shown above may be changed without prior notice due to upgrade of product<br />
functions.<br />
For the power supply and power consumption, refer to the label attached to the product.
SPECIFICATIONS<br />
101<br />
RGB-PC, HDMI-PC mode<br />
Component port connecting information<br />
Resolution<br />
HDMI-DTV mode<br />
Horizontal<br />
Frequency (kHz)<br />
Vertical<br />
Frequency (Hz)<br />
720x400 31.468 70.08<br />
640x480 31.469 59.94<br />
800x600 37.879 60.31<br />
1024x768 48.363 60.00<br />
1280x768<br />
(HDMI-PC<br />
mode : Except 47.78 59.87<br />
for LCD TV/LED<br />
LCD TV)<br />
1360x768 47.72 59.80<br />
1280x1024 63.981 60.02<br />
1920x1080<br />
(RGB-PC)<br />
66.587 59.93<br />
1920x1080<br />
(HDMI-PC)<br />
67.5 60.00<br />
(Except for 42/50PT25**, 42/50PW35**,<br />
42/50PW45**, 22/26/32LK33**, 19/22/26/32LV25**,<br />
26/32LV30**)<br />
Component ports on the<br />
TV<br />
Video output ports<br />
on DVD player<br />
Signal<br />
480i/576i<br />
480p/576p<br />
720p/1080i<br />
1080p<br />
Y P B P R<br />
Y P B P R<br />
Y B-Y R-Y<br />
Y Cb Cr<br />
Y Pb Pr<br />
Component<br />
O<br />
O<br />
O<br />
O<br />
(50 Hz / 60 Hz only)<br />
Resolution<br />
Horizontal<br />
Frequency (kHz)<br />
Vertical<br />
Frequency (Hz)<br />
720x480<br />
31.469<br />
59.94<br />
31.5<br />
60<br />
720x576 31.25 50<br />
1280x720<br />
37.5<br />
44.96<br />
45<br />
50<br />
59.94<br />
60<br />
1920x1080<br />
33.72<br />
33.75<br />
28.125<br />
26.97<br />
27<br />
33.716<br />
33.75<br />
56.25<br />
67.43<br />
67.5<br />
59.94<br />
60<br />
50<br />
23.97<br />
24<br />
29.976<br />
30.00<br />
50<br />
59.94<br />
60<br />
RF SPECIFICATIONS<br />
• yRF module(BM-LDS201) specification(Only<br />
42/50PW35**, 42/50PW45**, 50/60PZ55**,<br />
32/42/47/55LW45**)<br />
For TV By using a 2.4 GHz bandwidth radio<br />
frequency(RF).<br />
» Output : 1 dBm or lower<br />
» Maximum Communication Distance : 10 m<br />
(30 ft) in an open space<br />
» Bandwidth : 2.4 GHz (2.4035 GHz -<br />
2.4783 GHz)<br />
» Transfer Rate : 250 kbps<br />
ENGLISH<br />
FCC ID of RF module inside TV<br />
FCC ID : BEJLDS201
102<br />
SPECIFICATIONS<br />
Video supported mode<br />
File<br />
Extension name<br />
Video Decoder Audio Codec Max Resolution<br />
mpg, mpeg MPEG1, MPEG2 MP2,MP3,Dolby Digital,LPCM<br />
dat MPEG1 MP2<br />
ts,trp,tp<br />
MPEG2, H.264, AVS, VC1<br />
MP2,MP3,Dolby Digital,<br />
AAC,HE-AAC<br />
vob MPEG1, 2 MP2,MP3,Dolby Digital,LPCM<br />
MPEG4,DivX 3.11, DivX 4.12, DivX<br />
mp4, mov<br />
5.x, DivX 6, Xvid 1.00, Xvid 1.01,<br />
Xvid 1.02, Xvid 1.03, Xvid<br />
1.10-beta1/2H.264<br />
AAC,HE-AAC,MP3<br />
mkv<br />
H.264, MPEG-1,2,4<br />
MP2,MP3,Dolby Digital,AAC<br />
HE-AAC,LPCM<br />
divx, avi<br />
Motion JPEG<br />
(avi, mp4, mkv)<br />
MPEG2, MPEG4,DivX 3.11, DivX<br />
4.DivX 5, DivX 6, Xvid 1.00, Xvid<br />
1.01, Xvid 1.02, Xvid 1.03, Xvid<br />
1.10-beta1/2H.264<br />
JPEG<br />
MP2,MP3,Dolby Digital,LPCM,<br />
ADPCM,AAC,HE-AAC<br />
LPCM, ADPCM<br />
asf, wmv VC1 WMA<br />
flv Sorenson H.263, H264 MP3, AAC<br />
3D Supported format<br />
1920x1080@30p<br />
(only , Motion<br />
JPEG<br />
640x480@30p)<br />
ENGLISH<br />
HDMI<br />
Input<br />
USB Input<br />
Signal<br />
720p<br />
1080i<br />
1080p<br />
Resolution<br />
1280x720<br />
1920X1080<br />
1920X1080<br />
Horizontal<br />
Frequency (kHz)<br />
Vertical<br />
Frequency (Hz)<br />
1080p 1920X1080 33.75 30<br />
Other Resolution<br />
Playable 3D video format<br />
44.96/45 59.94/60 Top & Bottom, Side by Side<br />
89.9/90 59.94/60 HDMI 3D Frame Packing<br />
37.5<br />
Top & Bottom, Side by Side<br />
50<br />
75 HDMI 3D Frame Packing<br />
33.72/33.75 59.94/60<br />
Top & Bottom, Side by Side<br />
28.125 50<br />
69.433/67.50 59.94/60 Top & Bottom, Side by Side, Checker<br />
Board,<br />
56.250 50<br />
Single Frame Sequential<br />
Resolution<br />
27 24<br />
Top & Bottom, Side by Side, Checker<br />
Board<br />
53.95/54 23.98/24 HDMI 3D Frame Packing<br />
33.75 30<br />
Top & Bottom, Side by Side,<br />
Checker Board<br />
Top & Bottom, Side by Side,<br />
Checker Board, MPO(Photo)<br />
Playable 3D video format<br />
Top & Bottom, Side by Side<br />
PC Input 1920 X 1080 66.587 59.93 Top & Bottom, Side by Side<br />
Component<br />
Input<br />
(For Plasma<br />
TV)<br />
720p<br />
1080i<br />
1280x720<br />
1920x1080<br />
Signal<br />
44.96<br />
45.00<br />
37.50<br />
33.72<br />
33.75<br />
28.125<br />
59.94<br />
60.00<br />
50.00<br />
59.94<br />
60.00<br />
50.00<br />
Top & Bottom, Side by Side<br />
Top & Bottom, Side by Side<br />
Playable 3D video format<br />
DTV 720p, 1080i Top & Bottom, Side by Side<br />
(Only 50/60PZ55**)
IR CODES<br />
103<br />
IR CODES<br />
• yThis feature is not available for all models.<br />
Code<br />
(Hexa)<br />
Function<br />
Note<br />
08 (POWER) Remote control Button (Power On/Off)<br />
95 ENERGY SAVING Remote control Button<br />
30 AV MODE Remote control Button<br />
0B INPUT Remote control Button<br />
F0 TV/RAD Remote control Button<br />
10-19 Number Key 0-9 Remote control Button<br />
53 LIST Remote control Button<br />
1A Q.VIEW(or 3D OPTION) Remote control Button<br />
02 + Remote control Button<br />
03 - Remote control Button<br />
1E FAV/MARK Remote control Button<br />
DC 3D Remote control Button<br />
09 MUTE Remote control Button<br />
00 P^ Remote control Button<br />
01 Pv Remote control Button<br />
43 Home Remote control Button<br />
AB GUIDE Remote control Button<br />
45 Q.MENU Remote control Button<br />
28 BACK Remote control Button<br />
AA INFO Remote control Button<br />
5B EXIT Remote control Button<br />
44 OK Remote control Button<br />
40 ^ Remote control Button<br />
41 v Remote control Button<br />
07 < Remote control Button<br />
06 > Remote control Button<br />
72 RED Remote control Button<br />
71 GREEN Remote control Button<br />
63 YELLOW Remote control Button<br />
61 BLUE(or 3D SETTING) Remote control Button<br />
20 TEXT Remote control Button<br />
21 T.OPT(T.Option) Remote control Button<br />
39 SUBTITLE Remote control Button<br />
B1 n Remote control Button<br />
B0 ► Remote control Button<br />
BA yy(FREEZE) Remote control Button<br />
8E ►► Remote control Button<br />
8F ◄◄ Remote control Button<br />
7E SIMPLINK Remote control Button<br />
79 RATIO Remote control Button<br />
91 AD Remote control Button<br />
ENGLISH
1<br />
2<br />
104<br />
EXTERNAL CONTROL DEVICE SETUP<br />
EXTERNAL CONTROL DEVICE SETUP<br />
RS-232C Setup<br />
Connect the RS-232C (serial port) input jack to an<br />
external control device (such as a <strong>com</strong>puter or an<br />
A/V control system) to control the product’s functions<br />
externally.<br />
Connect the serial port of the control device to the<br />
RS-232C jack on the product back panel.<br />
Note: RS-232C connection cables are not supplied<br />
with the product.<br />
COMPONENT IN<br />
AUDIO<br />
VIDEO<br />
R L P R<br />
P B<br />
Y<br />
AV IN 1<br />
VIDEO<br />
MONO<br />
OPTICAL<br />
DIGITAL<br />
AUDIO OUT<br />
AUDIO IN<br />
(RGB/DVI)<br />
RGB IN (PC)<br />
RS-232C IN<br />
(CONTROL & SERVICE)<br />
1<br />
/DVI IN<br />
ANTENNA<br />
IN<br />
RS-232C Configurations<br />
7-Wire Configurations (Standard RS-232C cable)<br />
PC<br />
TV<br />
RXD 2 3 TXD<br />
TXD 3 2 RXD<br />
GND 5 5 GND<br />
DTR 4 6 DSR<br />
DSR 6 4 DTR<br />
RTS 7 8 CTS<br />
CTS 8 7 RTS<br />
D-Sub 9 D-Sub 9<br />
3-Wire Configurations(Not standard)<br />
PC<br />
TV<br />
ENGLISH<br />
RXD 2 3 TXD<br />
TXD 3 2 RXD<br />
GND 5 5 GND<br />
DTR 4 6 DTR<br />
DSR 6 4 DSR<br />
RTS 7 7 RTS<br />
CTS 8 8 CTS<br />
Type of connector;<br />
D-Sub 9-Pin Male<br />
1<br />
5<br />
D-Sub 9 D-Sub 9<br />
Set ID<br />
Set ID number. "Real Data Mapping" on See p.110<br />
1 Press Home to access the main menus.<br />
6 9<br />
No.<br />
Pin name<br />
1 No connection<br />
2 RXD (Receive data)<br />
3 TXD (Transmit data)<br />
4 DTR (DTE side ready)<br />
5 GND<br />
6 DSR (DCE side ready)<br />
7 RTS (Ready to send)<br />
8 CTS (Clear to send)<br />
9 No Connection<br />
2 Press the Navigation buttons to scroll to<br />
option and press ok.<br />
3 Press the Navigation buttons to scroll to set<br />
id and press ok.<br />
4 Scroll left or right to select a set ID number and<br />
select close. The adjustment range is 1-99.<br />
5 When you are finished, press exit.
EXTERNAL CONTROL DEVICE SETUP<br />
105<br />
Communication Parameters<br />
• yB<strong>au</strong>d rate: 9600 bps (UART)<br />
• yData length: 8 bits<br />
• yParity : None<br />
• yStop bit: 1 bit<br />
• yCommunication code: ASCII code<br />
• yUse a crossed (reverse) cable.<br />
Command reference list<br />
(Depending on model)<br />
COMMAND1<br />
COMMAND2<br />
DATA<br />
(Hexadecimal)<br />
COMMAND1<br />
COMMAND2<br />
DATA<br />
(Hexadecimal)<br />
01. Power k a 00 to 01 14. Bass k s 00 to 64<br />
02. Aspect<br />
Ratio<br />
k c (See p.107) 15. Balance k t 00 to 64<br />
03. Screen<br />
Mute<br />
04. Volume<br />
Mute<br />
05. Volume<br />
Control<br />
k d (See p.107)<br />
k e 00 to 01<br />
k f 00 to 64<br />
06. Contrast k g 00 to 64<br />
07. Brightness k h 00 to 64<br />
08. Colour k i 00 to 64<br />
16. Colour<br />
Temperature<br />
17. ISM<br />
Method<br />
18. Energy<br />
Saving<br />
19. Auto Configuration<br />
20. Tune Command<br />
21. Programme<br />
Add/Skip<br />
x u 00 to 64<br />
j p (See p.109)<br />
j q 00 to 05<br />
j u 01<br />
m a (See p.109)<br />
m b 00 to 01<br />
09. Tint k j 00 to 64 22. Key m c Key Code<br />
10. Sharpness k k 00 to 64<br />
23. Control m g 00 to 64<br />
Back Light<br />
11. OSD Select k l 00 to 01<br />
24. Input select x b (See p.110)<br />
(Main)<br />
12. Remote<br />
25. 3D x t (See p.110)<br />
Control<br />
Lock Mode<br />
k m 00 to 01<br />
13. Treble k r 00 to 64<br />
26. Extended x v (See p.110)<br />
3D<br />
• y* Note : During USB operations such as DivX or EMF, all <strong>com</strong>mands except Power(ka) and Key(mc)<br />
are not executed and treated as NG.<br />
ENGLISH
106<br />
EXTERNAL CONTROL DEVICE SETUP<br />
Transmission / Receiving Protocol<br />
Transmission<br />
[Command1][Command2][ ][Set ID][ ][Data][Cr]<br />
[Command 1] : First <strong>com</strong>mand to control the TV.(j, k, m or x)<br />
[Command 2] : Second <strong>com</strong>mand to control the TV.<br />
[Set ID] : You can adjust the set ID to choose desired monitor ID number in option menu.<br />
Adjustment range is 1 to 99. When selecting Set ID ‘0’, every connected set is controlled.<br />
Set ID is indicated as decimal (1 to 99) on menu and as Hexa decimal (0x0 to 0x63) on<br />
transmission/receiving protocol.<br />
[DATA] : To transmit <strong>com</strong>mand data. Transmit ‘FF’ data to read status of <strong>com</strong>mand.<br />
[Cr]<br />
: Carriage Return<br />
ASCII code ‘0x0D’<br />
[ ] : ASCII code ‘space (0x20)’<br />
OK Acknowledgement<br />
[Command2][ ][Set ID][ ][OK][Data][x]<br />
ENGLISH<br />
* The set transmits ACK (acknowledgement) based on this format when receiving normal data. At this<br />
time, if the data is data read mode, it indicates present status data. If the data is data write mode, it<br />
returns the data of the PC <strong>com</strong>puter.<br />
Error Acknowledgement<br />
[Command2][ ][Set ID][ ][NG][Data][x]<br />
* The set transmits ACK (acknowledgement) based on this format when receiving abnormal data from<br />
non-viable functions or <strong>com</strong>munication errors.<br />
Data 00: Illegal Code
EXTERNAL CONTROL DEVICE SETUP<br />
107<br />
01. Power (Command: k a)<br />
►►<br />
To control Power On/Off of the set.<br />
Transmission[k][a][ ][Set ID][ ][Data][Cr]<br />
Data 00 : Power Off 01 : Power On<br />
Ack [a][ ][Set ID][ ][OK/NG][Data][x]<br />
►►<br />
To show Power On/Off.<br />
Transmission [k][a][ ][Set ID][ ][FF][Cr]<br />
Ack [a][ ][Set ID][ ][OK/NG][Data][x]<br />
* Similarly, if other functions transmit ‘0xFF’ data based<br />
on this format, Acknowledgement data feed back<br />
presents status about each function.<br />
* OK Ack., Error Ack. and other message may display<br />
on the screen when TV is power On.<br />
04. Volume Mute (Command: k e)<br />
►►<br />
To control volume mute on/off.<br />
You can also adjust mute using the MUTE button on<br />
remote control.<br />
Transmission [k][e][ ][Set ID][ ][Data][Cr]<br />
Data 00 : Volume mute on (Volume off)<br />
01 : Volume mute off (Volume on)<br />
Ack [e][ ][Set ID][ ][OK/NG][Data][x]<br />
05. Volume Control (Command: k f)<br />
►►<br />
To adjust volume.<br />
You can also adjust volume with the volume buttons<br />
on remote control.<br />
02. Aspect Ratio (Command: k c) (Main Picture<br />
Size)<br />
►►<br />
To adjust the screen format. (Main picture format)<br />
You can also adjust the screen format using the Aspect<br />
Ratio in the Q.MENU. or PICTURE menu.<br />
Transmission [k][c][ ][Set ID][ ][Data][Cr]<br />
Data 01 : Normal screen<br />
(4:3)<br />
02 : Wide screen (16:9)<br />
04 : Zoom<br />
06 : Original<br />
07 : 14:9<br />
09 : Just Scan<br />
0B : Full Wide<br />
10 to 1F : Cinema Zoom 1 to 16<br />
Ack [c][ ][Set ID][ ][OK/NG][Data][x]<br />
* Using the PC input, you select either 16:9 or 4:3<br />
screen aspect ratio.<br />
* In DTV/HDMI (1080i 50 Hz / 60 Hz, 720p 50Hz / 60<br />
Hz, 1080p 24 Hz / 30 Hz / 50 Hz / 60 Hz),<br />
Component( 720p, 1080i, 1080p 50 Hz / 60 Hz) mode,<br />
Just Scan is available.<br />
* Full Wide is supported only for DTV.<br />
03. Screen Mute (Command: k d)<br />
►►<br />
To select screen mute on/off.<br />
Transmission [k][f][ ][Set ID][ ][Data][Cr]<br />
Data Min : 00 to Max : 64<br />
* Refer to ‘Real data mapping’. See p.110.<br />
Ack [f][ ][Set ID][ ][OK/NG][Data][x]<br />
06. Contrast (Command: k g)<br />
►►<br />
To adjust screen contrast.<br />
You can also adjust contrast in the PICTURE menu.<br />
Transmission [k][g][ ][Set ID][ ][Data][Cr]<br />
Data Min : 00 to Max : 64<br />
* Refer to ‘Real data mapping’. See p.110.<br />
Ack [g][ ][Set ID][ ][OK/NG][Data][x]<br />
07. Brightness (Command: k h)<br />
►►<br />
To adjust screen brightness.<br />
You can also adjust brightness in the PICTURE menu.<br />
Transmission [k][h][ ][Set ID][ ][Data][Cr]<br />
Data Min : 00 to Max : 64<br />
* Refer to ‘Real data mapping’. See p.110.<br />
Ack [h][ ][Set ID][ ][OK/NG][Data][x]<br />
ENGLISH<br />
Transmission [k][d][ ][Set ID][ ][Data][Cr]<br />
Data 00 : Screen mute off (Picture on)<br />
Video mute off<br />
01 : Screen mute on (Picture off)<br />
10 : Video mute on<br />
Ack [d][ ][Set ID][ ][OK/NG][Data][x]<br />
* In case of video mute on only, TV will display On<br />
Screen Display(OSD). But, in case of Screen mute<br />
on, TV will not display OSD.<br />
08. Colour (Command: k i)<br />
►►<br />
To adjust the screen colour.<br />
You can also adjust colour in the PICTURE menu.<br />
Transmission [k][i][ ][Set ID][ ][Data][Cr]<br />
Data Min : 00 to Max : 64<br />
* Refer to ‘Real data mapping’. See p.110.<br />
Ack [i][ ][Set ID][ ][OK/NG][Data][x]
108<br />
EXTERNAL CONTROL DEVICE SETUP<br />
09. Tint (Command: k j)<br />
►►<br />
To adjust the screen tint.<br />
You can also adjust tint in the PICTURE menu.<br />
Transmission [k][j][ ][Set ID][ ][Data][Cr]<br />
Data Red : 00 to Green : 64<br />
* Refer to ‘Real data mapping’. See p.110.<br />
Ack [j][ ][Set ID][ ][OK/NG][Data][x]<br />
13. Treble (Command: k r)<br />
►►<br />
To adjust treble.<br />
You can also adjust treble in the AUDIO menu.<br />
Transmission [k][r][ ][Set ID][ ][Data][Cr]<br />
Data Min : 00 to Max : 64<br />
* Refer to ‘Real data mapping’. See p.110.<br />
Ack [r][ ][Set ID][ ][OK/NG][Data][x]<br />
10. Sharpness (Command: k k)<br />
►►<br />
To adjust the screen sharpness.<br />
You can also adjust sharpness in the PICTURE menu.<br />
Transmission [k][k][ ][Set ID][ ][Data][Cr]<br />
Data Min : 00 to Max : 64<br />
* Refer to ‘Real data mapping’. See p.110.<br />
Ack [k][ ][Set ID][ ][OK/NG][Data][x]<br />
14. Bass (Command: k s)<br />
►►<br />
To adjust bass.<br />
You can also adjust bass in the AUDIO menu.<br />
Transmission [k][s][ ][Set ID][ ][Data][Cr]<br />
Data Min : 00 to Max : 64<br />
* Refer to ‘Real data mapping’. See p.110.<br />
Ack [s][ ][Set ID][ ][OK/NG][Data][x]<br />
ENGLISH<br />
11. OSD Select (Command: k l)<br />
►►<br />
To select OSD (On Screen Display) on/off when controlling<br />
remotely.<br />
15. Balance (Command: k t)<br />
►►<br />
To adjust balance.<br />
You can also adjust balance in the AUDIO menu.<br />
Transmission [k][l][ ][Set ID][ ][Data][Cr]<br />
Data 00 : OSD off 01 : OSD on<br />
Ack [l][ ][Set ID][ ][OK/NG][Data][x]<br />
Transmission [k][t][ ][Set ID][ ][Data][Cr]<br />
Data Min : 00 to Max : 64<br />
* Refer to ‘Real data mapping’. See p.110.<br />
Ack [t][ ][Set ID][ ][OK/NG][Data][x]<br />
12. Remote control lock mode (Command: k m)<br />
►►<br />
To lock the front panel controls on the monitor and remote<br />
control.<br />
Transmission [k][m][ ][Set ID][ ][Data][Cr]<br />
Data 00 : Lock off 01 : Lock on<br />
Ack [m][ ][Set ID][ ][OK/NG][Data][x]<br />
* If you are not using the remote control, use this mode.<br />
When main power is on/off, external control lock is<br />
released.<br />
* In the standby mode, if key lock is on, TV will not turn<br />
on by power on key of IR & Local Key.<br />
16. Colour Temperature (Command: x u)<br />
►►<br />
To adjust colour temperature. You can also adjust Colour<br />
Temperature in the PICTURE menu.<br />
Transmission [x][u][ ][Set ID][ ][Data][Cr]<br />
Data Min : 00 to Max : 64<br />
* Refer to ‘Real data mapping’. See p.110.<br />
Ack [u][ ][Set ID][ ][OK/NG][Data][x]
EXTERNAL CONTROL DEVICE SETUP<br />
109<br />
17. ISM Method (Command: j p) (Only Plasma TV)<br />
►►<br />
To control the ISM method. You can also adjust ISM<br />
Method in OPTION menu.<br />
Transmission [j][p][ ][Set ID][ ][Data][Cr]<br />
Data 02: Orbiter<br />
04: White wash<br />
08: Normal<br />
20: Colour Wash<br />
Ack [p][ ][Set ID][ ][OK/NG][Data][x]<br />
18. Energy Saving (Command: j q)<br />
►►<br />
To reduce the power consumption of the TV. You can also<br />
adjust Energy Saving in PICTURE menu.<br />
20. Tune Command (Command: m a)<br />
►►<br />
Select channel to following physical number.<br />
Transmission [m][a][ ][Set ID][ ][Data0][ ][Data1][ ][Data2][Cr]<br />
Data00 : High channel data<br />
Data01 : Low channel data<br />
ex. No. 47 -> 00 2F (2FH)<br />
No. 394 -> 01 8A (18AH),<br />
DTV No. 0 -> Don’t care<br />
Data02 : 0x00 : Analogue Main<br />
0x10 : DTV Main<br />
0x20 : Radio<br />
Channel data range<br />
Analogue - Min: 00 to Max: 63 (0 to 99)<br />
Digital - Min: 00 to Max: 3E7 (0 to 999)<br />
Transmission [j][q][ ][Set ID][ ][Data][Cr]<br />
Power Saving<br />
Level<br />
Function<br />
Description<br />
7 6 5 4 3 2 1 0<br />
0 0 0 0<br />
Low<br />
Power<br />
0 0 0 0 Off<br />
0 0 0 0<br />
Low<br />
Power<br />
0 0 0 1 Minimum<br />
0 0 0 0<br />
Low<br />
Power<br />
0 0 1 0 Medium<br />
0 0 0 0<br />
Low<br />
0 0 1 1 Maximum<br />
0 0 0 0<br />
0 0 0 0<br />
0 0 0 0<br />
Power<br />
Low<br />
Power<br />
Low<br />
Power<br />
Low<br />
Power<br />
0 1 0 1 Screen Off<br />
0 1 0 0<br />
0 1 0 0<br />
Intelligent<br />
Sensor<br />
(Plasma TV<br />
only)<br />
Auto<br />
(LCD TV/<br />
LED LCD<br />
TV only)<br />
Ack [a][ ][Set ID][ ][OK/NG][Data][x]<br />
Data Min: 00 to Max: 7DH<br />
21. Programme Add/Skip(Command: m b)<br />
►►<br />
To set skip status for the current Programme.<br />
Transmission [m][b][ ][Set ID][ ][Data][Cr]<br />
Data 00 : Skip 01 : Add<br />
Ack [b][ ][Set ID][ ][OK/NG][Data][x]<br />
22. Key(Command: m c)<br />
►►<br />
To send IR remote key code.<br />
Transmission [m][c][ ][Set ID][ ][Data][Cr]<br />
Data Key code - See p.103.<br />
ENGLISH<br />
(Depending on model)<br />
Ack [c][ ][Set ID][ ][OK/NG][Data][x]<br />
Ack [q][ ][Set ID][ ][OK/NG][Data][x]<br />
19. Auto Configure(Command: j u)<br />
►►<br />
To adjust picture position and minimize image shaking<br />
<strong>au</strong>tomatically. It works only in RGB (PC) mode.<br />
Transmission [j][u][ ][Set ID][ ][Data][Cr]<br />
Data 01: To set<br />
Ack [u][ ][Set ID][ ][OK/NG][Data][x]<br />
23. Control Back Light(Command: m g) (Only LCD<br />
TV/LED LCD TV))<br />
►►<br />
To control the back light.<br />
Transmission [m][g][ ][Set ID][ ][Data][Cr]<br />
Data Min : 00 to Max : 64<br />
Ack [g][ ][Set ID][ ][OK/NG][Data][x]
110<br />
EXTERNAL CONTROL DEVICE SETUP<br />
ENGLISH<br />
24. Input select (Command: x b)<br />
(Main Picture Input)<br />
►►<br />
To select input source for main picture.<br />
Data Structure<br />
MSB<br />
Transmission [x][b][ ][Set ID][ ][Data][Cr]<br />
External Input<br />
* Real data mapping<br />
00 : Step 0<br />
Input Number<br />
LSB<br />
0 0 0 0 0 0 0 0<br />
External Input<br />
Data<br />
0 0 0 0 DTV<br />
0 0 0 1 Analogue<br />
0 0 1 0 AV<br />
0 1 0 0 Component<br />
0 1 1 0 RGB<br />
0 1 1 1<br />
1 0 0 0<br />
1 0 0 1<br />
HDMI<br />
1 0 1 0<br />
Input Number<br />
Data<br />
0 0 0 0 Input1<br />
0 0 0 1 Input2<br />
0 0 1 0 Input3<br />
0 0 1 1 Input4<br />
Ack [b][ ][Set ID][ ][OK/NG][Data][x]<br />
25. 3D(Command: x t) (only 3D models)<br />
(Depending on model)<br />
►►<br />
To change 3D mode for TV.<br />
Transmission [x][t][ ][Set ID][ ][Data01][ ][Data02]<br />
[ ][Data03][ ][Data04][Cr]<br />
Data Structure<br />
Data01 00 : 3D On<br />
01 : 3D Off<br />
02 : 3D to 2D<br />
03 : 2D to 3D<br />
Data02 00 : Top and Bottom<br />
01 : Side by Side<br />
02 : Check Board<br />
03 : Frame Sequential<br />
Data03 00 : Right to Left<br />
01 : Left to Right<br />
Data04 3D Effect(3D Depth): Min : 00 ~ Max : 14<br />
(*transmit by Hexadecimal code)<br />
*If data1 is 00(3D On), data4 has no meaning.<br />
*If data1 is 01(3D off) or 02(3D to 2D), data2, data3 and<br />
data4 have no meaning.<br />
*If data1 is 03(2D to 3D), data2 and data3 have no<br />
meaning.<br />
Data 1 Data 2 Data 3 Data 4<br />
00 O O X<br />
01 X X X<br />
02 X X X<br />
03 X X O<br />
X : don’t care<br />
Ack [t][ ][OK][Data01][Data02][Data03][Data04][x]<br />
[t][ ][NG][Data01][x]<br />
26 . Extended 3D(Command: x v) (only 3D models)<br />
(Depending on model)<br />
►►<br />
To change 3D option for TV.<br />
Transmission [x][v][ ][Set ID][ ][Data01][ ]<br />
[Data02][Cr]<br />
A : Step 10 (Set ID 10)<br />
F : Step 15 (Set ID 15)<br />
10 : Step 16 (Set ID 16)<br />
64 : Step 100<br />
6E : Step 110<br />
73 : Step 115<br />
74 : Step 116<br />
CF : Step 199<br />
FE : Step 254<br />
FF : Step 255<br />
Data01 : 3D option<br />
00 : 3D Picture Correction<br />
01 : 3D Depth (2D to 3D only)<br />
02 : 3D Viewpoint<br />
03 : 3D Picture Size (Plasma TV only)<br />
04 : 3D Picture Balance (Plasma TV only)<br />
05 : 3D Optimization (Active type (LCD TV) only)<br />
Data02<br />
It has own range for each 3D option determined<br />
by Data01.<br />
1) When Data01 is 00<br />
00 : Right to Left<br />
01 : Left to Right<br />
2) When Data01 is 01, 02<br />
Data Min: 0 ~ Max: 14(*transmit by Hexadecimal code)<br />
Data value range(0~20) converts Viewpoint range(-<br />
10~10) <strong>au</strong>tomatically(Depending on model)<br />
3) When Data01 is 03<br />
00 : Just Scan<br />
01 : 16:9<br />
4) When Data01 is 04<br />
00 : Off<br />
01 : On<br />
5) When Data01 is 05<br />
Data<br />
Min: 0 ~ Max: 02(*transmit by Hexadecimal code)<br />
* Refer to ‘Real data mapping’.<br />
Ack [v][ ][OK][Data01][Data02][x][v][ ][NG]<br />
[Data01][x]
OPEN SOURCE LICENSE<br />
111<br />
OPEN SOURCE LICENSE<br />
Open source software notice<br />
Please be informed that <strong>LG</strong> Electronics products may contain open source software listed in the tables<br />
below.<br />
License<br />
OpenSSL license<br />
MIT license<br />
expat license<br />
Freetype license<br />
JPEG license<br />
Zlib/libpng license<br />
X.net license<br />
BSD license<br />
RSA data security license<br />
Component<br />
- openssl<br />
- libcurl<br />
- ncurses<br />
- expat<br />
- freetype<br />
- libjpeg<br />
- libmng<br />
- libpng<br />
- md5 checksum<br />
- tinyxml<br />
- zlib<br />
- libicu<br />
- strace<br />
- xySSL<br />
- MD5<br />
<strong>LG</strong> Electronics products may also contain open source software listed as Components in the table below,<br />
and you may download the <strong>com</strong>plete source code thereof free of charge, from <strong>LG</strong> Electronics website<br />
(http://opensource.lge.<strong>com</strong>) for a period of three (3) years from our last shipment of this product. Please<br />
be informed that the open source software is subject to the terms and conditions of the applicable open<br />
source licenses, which are provided to you hereinbelow.<br />
ENGLISH<br />
License<br />
Component<br />
GNU GPL v2.0 - Linux kernel 2.6<br />
- busybox<br />
- e2fsprogs<br />
- gdbserver<br />
- jfsutils<br />
- mtd-utils<br />
- procps<br />
- u-boot<br />
- udhcpc<br />
GNU <strong>LG</strong>PL v2.1<br />
- directFB<br />
- gconv<br />
- glibc<br />
MPL 1.1<br />
- nanox
112<br />
OPEN SOURCE LICENSE<br />
GNU GENERAL PUBLIC LICENSE<br />
Version 2, June 1991<br />
Copyright (C) 1989, 1991 Free Software Foundation, Inc.<br />
51 Franklin Street, Fifth Floor, Boston, MA 02110-1301, USA<br />
Everyone is permitted to copy and distribute verbatim copies<br />
of this license document, but changing it is not allowed.<br />
Preamble<br />
The licenses for most software are designed to take away your freedom to share and change it. By contrast, the GNU<br />
General Public License is intended to guarantee your freedom to share and change free software--to make sure the<br />
software is free for all its users. This General Public License applies to most of the Free Software Foundation's software<br />
and to any other program whose <strong>au</strong>thors <strong>com</strong>mit to using it. (Some other Free Software Foundation software is covered<br />
by the GNU Lesser General Public License instead.) You can apply it to your programs, too.<br />
When we speak of free software, we are referring to freedom, not price. Our General Public Licenses are designed to<br />
make sure that you have the freedom to distribute copies of free software (and charge for this service if you wish), that<br />
you receive source code or can get it if you want it, that you can change the software or use pieces of it in new free<br />
programs; and that you know you can do these things.<br />
To protect your rights, we need to make restrictions that forbid anyone to deny you these rights or to ask you to surrender<br />
the rights. These restrictions translate to certain responsibilities for you if you distribute copies of the software, or if<br />
you modify it.<br />
ENGLISH<br />
For example, if you distribute copies of such a program, whether gratis or for a fee, you must give the recipients all the<br />
rights that you have. You must make sure that they, too, receive or can get the source code. And you must show them<br />
these terms so they know their rights.<br />
We protect your rights with two steps: (1) copyright the software, and (2) offer you this license which gives you legal<br />
permission to copy, distribute and/or modify the software.<br />
Also, for each <strong>au</strong>thor's protection and ours, we want to make certain that everyone understands that there is no warranty<br />
for this free software. If the software is modified by someone else and passed on, we want its recipients to know that<br />
what they have is not the original, so that any problems introduced by others will not reflect on the original <strong>au</strong>thors' reputations.<br />
Finally, any free program is threatened constantly by software patents. We wish to avoid the danger that redistributors<br />
of a free program will individually obtain patent licenses, in effect making the program proprietary. To prevent this, we<br />
have made it clear that any patent must be licensed for everyone's free use or not licensed at all.<br />
The precise terms and conditions for copying, distribution and modification follow.<br />
TERMS AND CONDITIONS FOR COPYING, DISTRIBUTION AND MODIFICATION<br />
0. This License applies to any program or other work which contains a notice placed by the copyright holder saying it<br />
may be distributed under the terms of this General Public License. The "Program", below, refers to any such program or<br />
work, and a "work based on the Program" means either the Program or any derivative work under copyright law: that is<br />
to say, a work containing the Program or a portion of it, either verbatim or with modifications and/or translated into<br />
another language. (Hereinafter, translation is included without limitation in the term "modification".) Each licensee is<br />
addressed as "you".<br />
Activities other than copying, distribution and modification are not covered by this License; they are outside its scope.<br />
The act of running the Program is not restricted, and the output from the Program is covered only if its contents constitute<br />
a work based on the Program (independent of having been made by running the Program). Whether that is true<br />
depends on what the Program does.<br />
1. You may copy and distribute verbatim copies of the Program's source code as you receive it, in any medium, provided<br />
that you conspicuously and appropriately publish on each copy an appropriate copyright notice and disclaimer of<br />
warranty; keep intact all the notices that refer to this License and to the absence of any warranty; and give any other
OPEN SOURCE LICENSE<br />
113<br />
recipients of the Program a copy of this License along with the Program.<br />
You may charge a fee for the physical act of transferring a copy, and you may at your option offer warranty protection in<br />
exchange for a fee.<br />
2. You may modify your copy or copies of the Program or any portion of it, thus forming a work based on the Program,<br />
and copy and distribute such modifications or work under the terms of Section 1 above, provided that you also meet all<br />
of these conditions:<br />
a) You must c<strong>au</strong>se the modified files to carry prominent notices stating that you changed the files and the date of<br />
any change.<br />
b) You must c<strong>au</strong>se any work that you distribute or publish, that in whole or in part contains or is derived from the<br />
Program or any part thereof, to be licensed as a whole at no charge to all third parties under the terms of this<br />
License.<br />
c) If the modified program normally reads <strong>com</strong>mands interactively when run, you must c<strong>au</strong>se it, when started running<br />
for such interactive use in the most ordinary way, to print or display an announcement including an appropriate<br />
copyright notice and a notice that there is no warranty (or else, saying that you provide a warranty) and that users<br />
may redistribute the program under these conditions, and telling the user how to view a copy of this License.<br />
(Exception: if the Program itself is interactive but does not normally print such an announcement, your work based<br />
on the Program is not required to print an announcement.)<br />
These requirements apply to the modified work as a whole. If identifiable sections of that work are not derived from the<br />
Program, and can be reasonably considered independent and separate works in themselves, then this License, and its<br />
terms, do not apply to those sections when you distribute them as separate works. But when you distribute the same<br />
sections as part of a whole which is a work based on the Program, the distribution of the whole must be on the terms of<br />
this License, whose permissions for other licensees extend to the entire whole, and thus to each and every part regardless<br />
of who wrote it.<br />
Thus, it is not the intent of this section to claim rights or contest your rights to work written entirely by you; rather, the<br />
intent is to exercise the right to control the distribution of derivative or collective works based on the Program.<br />
ENGLISH<br />
In addition, mere aggregation of another work not based on the Program with the Program (or with a work based on the<br />
Program) on a volume of a storage or distribution medium does not bring the other work under the scope of this<br />
License.<br />
3. You may copy and distribute the Program (or a work based on it, under Section 2) in object code or executable form<br />
under the terms of Sections 1 and 2 above provided that you also do one of the following:<br />
a) Ac<strong>com</strong>pany it with the <strong>com</strong>plete corresponding machine-readable source code, which must be distributed under<br />
the terms of Sections 1 and 2 above on a medium customarily used for software interchange; or,<br />
b) Ac<strong>com</strong>pany it with a written offer, valid for at least three years, to give any third party, for a charge no more than<br />
your cost of physically performing source distribution, a <strong>com</strong>plete machine-readable copy of the corresponding<br />
source code, to be distributed under the terms of Sections 1 and 2 above on a medium customarily used for software<br />
interchange; or,<br />
c) Ac<strong>com</strong>pany it with the information you received as to the offer to distribute corresponding source code. (This<br />
alternative is allowed only for non<strong>com</strong>mercial distribution and only if you received the program in object code or<br />
executable form with such an offer, in accord with Subsection b above.)<br />
The source code for a work means the preferred form of the work for making modifications to it. For an executable<br />
work, <strong>com</strong>plete source code means all the source code for all modules it contains, plus any associated interface definition<br />
files, plus the scripts used to control <strong>com</strong>pilation and installation of the executable. However, as a special exception,<br />
the source code distributed need not include anything that is normally distributed (in either source or binary form)<br />
with the major <strong>com</strong>ponents (<strong>com</strong>piler, kernel, and so on) of the operating system on which the executable runs, unless<br />
that <strong>com</strong>ponent itself ac<strong>com</strong>panies the executable.<br />
If distribution of executable or object code is made by offering access to copy from a designated place, then offering<br />
equivalent access to copy the source code from the same place counts as distribution of the source code, even though<br />
third parties are not <strong>com</strong>pelled to copy the source along with the object code.
114<br />
OPEN SOURCE LICENSE<br />
4. You may not copy, modify, sublicense, or distribute the Program except as expressly provided under this License.<br />
Any attempt otherwise to copy, modify, sublicense or distribute the Program is void, and will <strong>au</strong>tomatically terminate<br />
your rights under this License. However, parties who have received copies, or rights, from you under this License will<br />
not have their licenses terminated so long as such parties remain in full <strong>com</strong>pliance.<br />
5. You are not required to accept this License, since you have not signed it. However, nothing else grants you permission<br />
to modify or distribute the Program or its derivative works. These actions are prohibited by law if you do not accept<br />
this License. Therefore, by modifying or distributing the Program (or any work based on the Program), you indicate<br />
your acceptance of this License to do so, and all its terms and conditions for copying, distributing or modifying the<br />
Program or works based on it.<br />
6. Each time you redistribute the Program (or any work based on the Program), the recipient <strong>au</strong>tomatically receives a<br />
license from the original licensor to copy, distribute or modify the Program subject to these terms and conditions. You<br />
may not impose any further restrictions on the recipients' exercise of the rights granted herein. You are not responsible<br />
for enforcing <strong>com</strong>pliance by third parties to this License.<br />
7. If, as a consequence of a court judgment or allegation of patent infringement or for any other reason (not limited to<br />
patent issues), conditions are imposed on you (whether by court order, agreement or otherwise) that contradict the conditions<br />
of this License, they do not excuse you from the conditions of this License. If you cannot distribute so as to satisfy<br />
simultaneously your obligations under this License and any other pertinent obligations, then as a consequence you<br />
may not distribute the Program at all. For example, if a patent license would not permit royalty-free redistribution of the<br />
Program by all those who receive copies directly or indirectly through you, then the only way you could satisfy both it<br />
and this License would be to refrain entirely from distribution of the Program.<br />
If any portion of this section is held invalid or unenforceable under any particular circumstance, the balance of the section<br />
is intended to apply and the section as a whole is intended to apply in other circumstances.<br />
ENGLISH<br />
It is not the purpose of this section to induce you to infringe any patents or other property right claims or to contest<br />
validity of any such claims; this section has the sole purpose of protecting the integrity of the free software distribution<br />
system, which is implemented by public license practices. Many people have made generous contributions to the wide<br />
range of software distributed through that system in reliance on consistent application of that system; it is up to the<br />
<strong>au</strong>thor/donor to decide if he or she is willing to distribute software through any other system and a licensee cannot<br />
impose that choice.<br />
This section is intended to make thoroughly clear what is believed to be a consequence of the rest of this License.<br />
8. If the distribution and/or use of the Program is restricted in certain countries either by patents or by copyrighted interfaces,<br />
the original copyright holder who places the Program under this License may add an explicit geographical distribution<br />
limitation excluding those countries, so that distribution is permitted only in or among countries not thus excluded.<br />
In such case, this License incorporates the limitation as if written in the body of this License.<br />
9. The Free Software Foundation may publish revised and/or new versions of the General Public License from time to<br />
time. Such new versions will be similar in spirit to the present version, but may differ in detail to address new problems<br />
or concerns.<br />
Each version is given a distinguishing version number. If the Program specifies a version number of this License which<br />
applies to it and "any later version", you have the option of following the terms and conditions either of that version or<br />
of any later version published by the Free Software Foundation. If the Program does not specify a version number of<br />
this License, you may choose any version ever published by the Free Software Foundation.<br />
10. If you wish to incorporate parts of the Program into other free programs whose distribution conditions are different,<br />
write to the <strong>au</strong>thor to ask for permission. For software which is copyrighted by the Free Software Foundation, write to<br />
the Free Software Foundation; we sometimes make exceptions for this. Our decision will be guided by the two goals of<br />
preserving the free status of all derivatives of our free software and of promoting the sharing and reuse of software<br />
generally.<br />
NO WARRANTY<br />
11. BECAUSE THE PROGRAM IS LICENSED FREE OF CHARGE, THERE IS NO WARRANTY FOR THE<br />
PROGRAM, TO THE EXTENT PERMITTED BY APPLICABLE LAW. EXCEPT WHEN OTHERWISE STATED IN<br />
WRITING THE COPYRIGHT HOLDERS AND/OR OTHER PARTIES PROVIDE THE PROGRAM "AS IS" WITHOUT<br />
WARRANTY OF ANY KIND, EITHER EXPRESSED OR IMPLIED, INCLUDING, BUT NOT LIMITED TO, THE IMPLIED
OPEN SOURCE LICENSE<br />
115<br />
WARRANTIES OF MERCHANTABILITY AND FITNESS FOR A PARTICULAR PURPOSE. THE ENTIRE RISK AS TO<br />
THE QUALITY AND PERFORMANCE OF THE PROGRAM IS WITH YOU. SHOULD THE PROGRAM PROVE<br />
DEFECTIVE, YOU ASSUME THE COST OF ALL NECESSARY SERVICING, REPAIR OR CORRECTION.<br />
12. IN NO EVENT UNLESS REQUIRED BY APPLICABLE LAW OR AGREED TO IN WRITING WILL ANY<br />
COPYRIGHT HOLDER, OR ANY OTHER PARTY WHO MAY MODIFY AND/OR REDISTRIBUTE THE PROGRAM AS<br />
PERMITTED ABOVE, BE LIABLE TO YOU FOR DAMAGES, INCLUDING ANY GENERAL, SPECIAL, INCIDENTAL<br />
OR CONSEQUENTIAL DAMAGES ARISING OUT OF THE USE OR INABILITY TO USE THE PROGRAM<br />
(INCLUDING BUT NOT LIMITED TO LOSS OF DATA OR DATA BEING RENDERED INACCURATE OR LOSSES<br />
SUSTAINED BY YOU OR THIRD PARTIES OR A FAILURE OF THE PROGRAM TO OPERATE WITH ANY OTHER<br />
PROGRAMS), EVEN IF SUCH HOLDER OR OTHER PARTY HAS BEEN ADVISED OF THE POSSIBILITY OF SUCH<br />
DAMAGES.<br />
END OF TERMS AND CONDITIONS<br />
GNU Lesser General Public License<br />
Version 2.1, February 1999<br />
Copyright (C) 1991, 1999 Free Software Foundation, Inc. 59 Temple Place, Suite 330, Boston, MA 02111-1307 USA<br />
Everyone is permitted to copy and distribute verbatim copies of this license document, but changing it is not allowed.<br />
[This is the first released version of the Lesser GPL. It also counts as the successor of the GNU Library Public License,<br />
version 2, hence the version number 2.1.]<br />
Preamble<br />
The licenses for most software are designed to take away your freedom to share and change it. By contrast, the GNU<br />
General Public Licenses are intended to guarantee your freedom to share and change free software--to make sure the<br />
software is free for all its users.<br />
This license, the Lesser General Public License, applies to some specially designated software packages--typically<br />
libraries--of the Free Software Foundation and other <strong>au</strong>thors who decide to use it. You can use it too, but we suggest<br />
you first think carefully about whether this license or the ordinary General Public License is the better strategy to use in<br />
any particular case, based on the explanations below.<br />
ENGLISH<br />
When we speak of free software, we are referring to freedom of use, not price. Our General Public Licenses are<br />
designed to make sure that you have the freedom to distribute copies of free software (and charge for this service if<br />
you wish); that you receive source code or can get it if you want it; that you can change the software and use pieces of<br />
it in new free programs; and that you are informed that you can do these things.<br />
To protect your rights, we need to make restrictions that forbid distributors to deny you these rights or to ask you to surrender<br />
these rights. These restrictions translate to certain responsibilities for you if you distribute copies of the library or<br />
if you modify it.<br />
For example, if you distribute copies of the library, whether gratis or for a fee, you must give the recipients all the rights<br />
that we gave you. You must make sure that they, too, receive or can get the source code. If you link other code with the<br />
library, you must provide <strong>com</strong>plete object files to the recipients, so that they can relink them with the library after making<br />
changes to the library and re<strong>com</strong>piling it. And you must show them these terms so they know their rights.<br />
We protect your rights with a two-step method: (1) we copyright the library, and (2) we offer you this license, which<br />
gives you legal permission to copy, distribute and/or modify the library.<br />
To protect each distributor, we want to make it very clear that there is no warranty for the free library. Also, if the library<br />
is modified by someone else and passed on, the recipients should know that what they have is not the original version,<br />
so that the original <strong>au</strong>thor's reputation will not be affected by problems that might be introduced by others.<br />
Finally, software patents pose a constant threat to the existence of any free program. We wish to make sure that a<br />
<strong>com</strong>pany cannot effectively restrict the users of a free program by obtaining a restrictive license from a patent holder.<br />
Therefore, we insist that any patent license obtained for a version of the library must be consistent with the full freedom<br />
of use specified in this license.<br />
Most GNU software, including some libraries, is covered by the ordinary GNU General Public License. This license, the
116<br />
OPEN SOURCE LICENSE<br />
GNU Lesser General Public License, applies to certain designated libraries, and is quite different from the ordinary<br />
General Public License. We use this license for certain libraries in order to permit linking those libraries into non-free<br />
programs.<br />
When a program is linked with a library, whether statically or using a shared library, the <strong>com</strong>bination of the two is legally<br />
speaking a <strong>com</strong>bined work, a derivative of the original library. The ordinary General Public License therefore permits<br />
such linking only if the entire <strong>com</strong>bination fits its criteria of freedom. The Lesser General Public License permits more<br />
lax criteria for linking other code with the library.<br />
We call this license the "Lesser" General Public License bec<strong>au</strong>se it does Less to protect the user's freedom than the<br />
ordinary General Public License. It also provides other free software developers Less of an advantage over <strong>com</strong>peting<br />
non-free programs. These disadvantages are the reason we use the ordinary General Public License for many libraries.<br />
However, the Lesser license provides advantages in certain special circumstances.<br />
For example, on rare occasions, there may be a special need to encourage the widest possible use of a certain library,<br />
so that it be<strong>com</strong>es a de-facto standard. To achieve this, non-free programs must be allowed to use the library. A more<br />
frequent case is that a free library does the same job as widely used non-free libraries. In this case, there is little to<br />
gain by limiting the free library to free software only, so we use the Lesser General Public License.<br />
In other cases, permission to use a particular library in non-free programs enables a greater number of people to use a<br />
large body of free software. For example, permission to use the GNU C Library in non-free programs enables many<br />
more people to use the whole GNU operating system, as well as its variant, the GNU/Linux operating system.<br />
Although the Lesser General Public License is Less protective of the users' freedom, it does ensure that the user of a<br />
program that is linked with the Library has the freedom and the wherewithal to run that program using a modified version<br />
of the Library.<br />
ENGLISH<br />
The precise terms and conditions for copying, distribution and modification follow. Pay close attention to the difference<br />
between a "work based on the library" and a "work that uses the library". The former contains code derived from the<br />
library, whereas the latter must be <strong>com</strong>bined with the library in order to run.<br />
TERMS AND CONDITIONS FOR COPYING, DISTRIBUTION AND MODIFICATION<br />
0. This License Agreement applies to any software library or other program which contains a notice placed by the copyright<br />
holder or other <strong>au</strong>thorized party saying it may be distributed under the terms of this Lesser General Public License<br />
(also called "this License"). Each licensee is addressed as "you".<br />
A "library" means a collection of software functions and/or data prepared so as to be conveniently linked with application<br />
programs (which use some of those functions and data) to form executables.<br />
The "Library", below, refers to any such software library or work which has been distributed under these terms. A "work<br />
based on the Library" means either the Library or any derivative work under copyright law: that is to say, a work containing<br />
the Library or a portion of it, either verbatim or with modifications and/or translated straightforwardly into another<br />
language. (Hereinafter, translation is included without limitation in the term "modification".)<br />
"Source code" for a work means the preferred form of the work for making modifications to it. For a library, <strong>com</strong>plete<br />
source code means all the source code for all modules it contains, plus any associated interface definition files, plus<br />
the scripts used to control <strong>com</strong>pilation and installation of the library.<br />
Activities other than copying, distribution and modification are not covered by this License; they are outside its scope.<br />
The act of running a program using the Library is not restricted, and output from such a program is covered only if its<br />
contents constitute a work based on the Library (independent of the use of the Library in a tool for writing it). Whether<br />
that is true depends on what the Library does and what the program that uses the Library does.<br />
1. You may copy and distribute verbatim copies of the Library's <strong>com</strong>plete source code as you receive it, in any medium,<br />
provided that you conspicuously and appropriately publish on each copy an appropriate copyright notice and disclaimer<br />
of warranty; keep intact all the notices that refer to this License and to the absence of any warranty; and distribute a<br />
copy of this License along with the Library.<br />
You may charge a fee for the physical act of transferring a copy, and you may at your option offer warranty protection in<br />
exchange for a fee.
OPEN SOURCE LICENSE<br />
117<br />
2. You may modify your copy or copies of the Library or any portion of it, thus forming a work based on the Library, and<br />
copy and distribute such modifications or work under the terms of Section 1 above, provided that you also meet all of<br />
these conditions:<br />
a) The modified work must itself be a software library.<br />
b) You must c<strong>au</strong>se the files modified to carry prominent notices stating that you changed the files and the date of<br />
any change.<br />
c) You must c<strong>au</strong>se the whole of the work to be licensed at no charge to all third parties under the terms of this<br />
License.<br />
d) If a facility in the modified Library refers to a function or a table of data to be supplied by an application program<br />
that uses the facility, other than as an argument passed when the facility is invoked, then you must make a good<br />
faith effort to ensure that, in the event an application does not supply such function or table, the facility still operates,<br />
and performs whatever part of its purpose remains meaningful.<br />
(For example, a function in a library to <strong>com</strong>pute square roots has a purpose that is entirely well-defined independent<br />
of the application. Therefore, Subsection 2d requires that any application-supplied function or table used by<br />
this function must be optional: if the application does not supply it, the square root function must still <strong>com</strong>pute<br />
square roots.)<br />
These requirements apply to the modified work as a whole. If identifiable sections of that work are not derived from<br />
the Library, and can be reasonably considered independent and separate works in themselves, then this License,<br />
and its terms, do not apply to those sections when you distribute them as separate works. But when you distribute<br />
the same sections as part of a whole which is a work based on the Library, the distribution of the whole must be on<br />
the terms of this License, whose permissions for other licensees extend to the entire whole, and thus to each and<br />
every part regardless of who wrote it.<br />
Thus, it is not the intent of this section to claim rights or contest your rights to work written entirely by you; rather,<br />
the intent is to exercise the right to control the distribution of derivative or collective works based on the Library.<br />
In addition, mere aggregation of another work not based on the Library with the Library (or with a work based on<br />
the Library) on a volume of a storage or distribution medium does not bring the other work under the scope of this<br />
License.<br />
ENGLISH<br />
3. You may opt to apply the terms of the ordinary GNU General Public License instead of this License to a given copy<br />
of the Library. To do this, you must alter all the notices that refer to this License, so that they refer to the ordinary GNU<br />
General Public License, version 2, instead of to this License. (If a newer version than version 2 of the ordinary GNU<br />
General Public License has appeared, then you can specify that version instead if you wish.) Do not make any other<br />
change in these notices.<br />
Once this change is made in a given copy, it is irreversible for that copy, so the ordinary GNU General Public License<br />
applies to all subsequent copies and derivative works made from that copy.<br />
This option is useful when you wish to copy part of the code of the Library into a program that is not a library.<br />
4. You may copy and distribute the Library (or a portion or derivative of it, under Section 2) in object code or executable<br />
form under the terms of Sections 1 and 2 above provided that you ac<strong>com</strong>pany it with the <strong>com</strong>plete corresponding<br />
machine-readable source code, which must be distributed under the terms of Sections 1 and 2 above on a medium<br />
customarily used for software interchange.<br />
If distribution of object code is made by offering access to copy from a designated place, then offering equivalent<br />
access to copy the source code from the same place satisfies the requirement to distribute the source code, even<br />
though third parties are not <strong>com</strong>pelled to copy the source along with the object code.<br />
5. A program that contains no derivative of any portion of the Library, but is designed to work with the Library by being<br />
<strong>com</strong>piled or linked with it, is called a "work that uses the Library". Such a work, in isolation, is not a derivative work of<br />
the Library, and therefore falls outside the scope of this License.<br />
However, linking a "work that uses the Library" with the Library creates an executable that is a derivative of the Library<br />
(bec<strong>au</strong>se it contains portions of the Library), rather than a "work that uses the library". The executable is therefore cov-
118<br />
OPEN SOURCE LICENSE<br />
ered by this License. Section 6 states terms for distribution of such executables.<br />
When a "work that uses the Library" uses material from a header file that is part of the Library, the object code for the<br />
work may be a derivative work of the Library even though the source code is not. Whether this is true is especially significant<br />
if the work can be linked without the Library, or if the work is itself a library. The threshold for this to be true is<br />
not precisely defined by law.<br />
If such an object file uses only numerical parameters, data structure layouts and accessors, and small macros and<br />
small inline functions (ten lines or less in length), then the use of the object file is unrestricted, regardless of whether it<br />
is legally a derivative work. (Executables containing this object code plus portions of the Library will still fall under<br />
Section 6.)<br />
Otherwise, if the work is a derivative of the Library, you may distribute the object code for the work under the terms of<br />
Section 6. Any executables containing that work also fall under Section 6, whether or not they are linked directly with<br />
the Library itself.<br />
6. As an exception to the Sections above, you may also <strong>com</strong>bine or link a "work that uses the Library" with the Library<br />
to produce a work containing portions of the Library, and distribute that work under terms of your choice, provided that<br />
the terms permit modification of the work for the customer's own use and reverse engineering for debugging such modifications.<br />
You must give prominent notice with each copy of the work that the Library is used in it and that the Library and its use<br />
are covered by this License. You must supply a copy of this License. If the work during execution displays copyright<br />
notices, you must include the copyright notice for the Library among them, as well as a reference directing the user to<br />
the copy of this License. Also, you must do one of these things:<br />
ENGLISH<br />
a) Ac<strong>com</strong>pany the work with the <strong>com</strong>plete corresponding machine-readable source code for the Library including<br />
whatever changes were used in the work (which must be distributed under Sections 1 and 2 above); and, if the<br />
work is an executable linked with the Library, with the <strong>com</strong>plete machine-readable "work that uses the Library", as<br />
object code and/or source code, so that the user can modify the Library and then relink to produce a modified executable<br />
containing the modified Library. (It is understood that the user who changes the contents of definitions files<br />
in the Library will not necessarily be able to re<strong>com</strong>pile the application to use the modified definitions.)<br />
b) Use a suitable shared library mechanism for linking with the Library. A suitable mechanism is one that (1) uses at<br />
run time a copy of the library already present on the user's <strong>com</strong>puter system, rather than copying library functions<br />
into the executable, and (2) will operate properly with a modified version of the library, if the user installs one, as<br />
long as the modified version is interface-<strong>com</strong>patible with the version that the work was made with.<br />
c) Ac<strong>com</strong>pany the work with a written offer, valid for at least three years, to give the same user the materials specified<br />
in Subsection 6a, above, for a charge no more than the cost of performing this distribution.<br />
d) If distribution of the work is made by offering access to copy from a designated place, offer equivalent access to<br />
copy the above specified materials from the same place.<br />
e) Verify that the user has already received a copy of these materials or that you have already sent this user a<br />
copy.<br />
For an executable, the required form of the "work that uses the Library" must include any data and utility programs<br />
needed for reproducing the executable from it. However, as a special exception, the materials to be distributed need not<br />
include anything that is normally distributed (in either source or binary form) with the major <strong>com</strong>ponents (<strong>com</strong>piler, kernel,<br />
and so on) of the operating system on which the executable runs, unless that <strong>com</strong>ponent itself ac<strong>com</strong>panies the<br />
executable.<br />
It may happen that this requirement contradicts the license restrictions of other proprietary libraries that do not normally<br />
ac<strong>com</strong>pany the operating system. Such a contradiction means you cannot use both them and the Library together in an<br />
executable that you distribute.<br />
7. You may place library facilities that are a work based on the Library side-by-side in a single library together with other<br />
library facilities not covered by this License, and distribute such a <strong>com</strong>bined library, provided that the separate distribution<br />
of the work based on the Library and of the other library facilities is otherwise permitted, and provided that you do<br />
these two things:
OPEN SOURCE LICENSE<br />
119<br />
a) Ac<strong>com</strong>pany the <strong>com</strong>bined library with a copy of the same work based on the Library, un<strong>com</strong>bined with any other<br />
library facilities. This must be distributed under the terms of the Sections above.<br />
b) Give prominent notice with the <strong>com</strong>bined library of the fact that part of it is a work based on the Library, and<br />
explaining where to find the ac<strong>com</strong>panying un<strong>com</strong>bined form of the same work.<br />
8. You may not copy, modify, sublicense, link with, or distribute the Library except as expressly provided under this<br />
License. Any attempt otherwise to copy, modify, sublicense, link with, or distribute the Library is void, and will <strong>au</strong>tomatically<br />
terminate your rights under this License. However, parties who have received copies, or rights, from you under<br />
this License will not have their licenses terminated so long as such parties remain in full <strong>com</strong>pliance.<br />
9. You are not required to accept this License, since you have not signed it. However, nothing else grants you permission<br />
to modify or distribute the Library or its derivative works. These actions are prohibited by law if you do not accept<br />
this License. Therefore, by modifying or distributing the Library (or any work based on the Library), you indicate your<br />
acceptance of this License to do so, and all its terms and conditions for copying, distributing or modifying the Library or<br />
works based on it.<br />
10. Each time you redistribute the Library (or any work based on the Library), the recipient <strong>au</strong>tomatically receives a<br />
license from the original licensor to copy, distribute, link with or modify the Library subject to these terms and conditions.<br />
You may not impose any further restrictions on the recipients' exercise of the rights granted herein. You are not<br />
responsible for enforcing <strong>com</strong>pliance by third parties with this License.<br />
11. If, as a consequence of a court judgment or allegation of patent infringement or for any other reason (not limited to<br />
patent issues), conditions are imposed on you (whether by court order, agreement or otherwise) that contradict the conditions<br />
of this License, they do not excuse you from the conditions of this License. If you cannot distribute so as to satisfy<br />
simultaneously your obligations under this License and any other pertinent obligations, then as a consequence you<br />
may not distribute the Library at all. For example, if a patent license would not permit royalty-free redistribution of the<br />
Library by all those who receive copies directly or indirectly through you, then the only way you could satisfy both it and<br />
this License would be to refrain entirely from distribution of the Library.<br />
If any portion of this section is held invalid or unenforceable under any particular circumstance, the balance of the section<br />
is intended to apply, and the section as a whole is intended to apply in other circumstances.<br />
ENGLISH<br />
It is not the purpose of this section to induce you to infringe any patents or other property right claims or to contest<br />
validity of any such claims; this section has the sole purpose of protecting the integrity of the free software distribution<br />
system which is implemented by public license practices. Many people have made generous contributions to the wide<br />
range of software distributed through that system in reliance on consistent application of that system; it is up to the<br />
<strong>au</strong>thor/donor to decide if he or she is willing to distribute software through any other system and a licensee cannot<br />
impose that choice.<br />
This section is intended to make thoroughly clear what is believed to be a consequence of the rest of this License.<br />
12. If the distribution and/or use of the Library is restricted in certain countries either by patents or by copyrighted interfaces,<br />
the original copyright holder who places the Library under this License may add an explicit geographical distribution<br />
limitation excluding those countries, so that distribution is permitted only in or among countries not thus excluded.<br />
In such case, this License incorporates the limitation as if written in the body of this License.<br />
13. The Free Software Foundation may publish revised and/or new versions of the Lesser General Public License from<br />
time to time. Such new versions will be similar in spirit to the present version, but may differ in detail to address new<br />
problems or concerns.<br />
Each version is given a distinguishing version number. If the Library specifies a version number of this License which<br />
applies to it and "any later version", you have the option of following the terms and conditions either of that version or<br />
of any later version published by the Free Software Foundation. If the Library does not specify a license version number,<br />
you may choose any version ever published by the Free Software Foundation.<br />
14. If you wish to incorporate parts of the Library into other free programs whose distribution conditions are in<strong>com</strong>patible<br />
with these, write to the <strong>au</strong>thor to ask for permission. For software which is copyrighted by the Free Software<br />
Foundation, write to the Free Software Foundation; we sometimes make exceptions for this. Our decision will be guided<br />
by the two goals of preserving the free status of all derivatives of our free software and of promoting the sharing and<br />
reuse of software generally.
120<br />
OPEN SOURCE LICENSE<br />
NO WARRANTY<br />
15. BECAUSE THE LIBRARY IS LICENSED FREE OF CHARGE, THERE IS NO WARRANTY FOR THE LIBRARY, TO<br />
THE EXTENT PERMITTED BY APPLICABLE LAW. EXCEPT WHEN OTHERWISE STATED IN WRITING THE<br />
COPYRIGHT HOLDERS AND/OR OTHER PARTIES PROVIDE THE LIBRARY "AS IS" WITHOUT WARRANTY OF<br />
ANY KIND, EITHER EXPRESSED OR IMPLIED, INCLUDING, BUT NOT LIMITED TO, THE IMPLIED WARRANTIES<br />
OF MERCHANTABILITY AND FITNESS FOR A PARTICULAR PURPOSE. THE ENTIRE RISK AS TO THE QUALITY<br />
AND PERFORMANCE OF THE LIBRARY IS WITH YOU. SHOULD THE LIBRARY PROVE DEFECTIVE, YOU<br />
ASSUME THE COST OF ALL NECESSARY SERVICING, REPAIR OR CORRECTION.<br />
16. IN NO EVENT UNLESS REQUIRED BY APPLICABLE LAW OR AGREED TO IN WRITING WILL ANY<br />
COPYRIGHT HOLDER, OR ANY OTHER PARTY WHO MAY MODIFY AND/OR REDISTRIBUTE THE LIBRARY AS<br />
PERMITTED ABOVE, BE LIABLE TO YOU FOR DAMAGES, INCLUDING ANY GENERAL, SPECIAL, INCIDENTAL<br />
OR CONSEQUENTIAL DAMAGES ARISING OUT OF THE USE OR INABILITY TO USE THE LIBRARY (INCLUDING<br />
BUT NOT LIMITED TO LOSS OF DATA OR DATA BEING RENDERED INACCURATE OR LOSSES SUSTAINED BY<br />
YOU OR THIRD PARTIES OR A FAILURE OF THE LIBRARY TO OPERATE WITH ANY OTHER SOFTWARE), EVEN<br />
IF SUCH HOLDER OR OTHER PARTY HAS BEEN ADVISED OF THE POSSIBILITY OF SUCH DAMAGES.<br />
END OF TERMS AND CONDITIONS<br />
How to Apply These Terms to Your New Libraries<br />
If you develop a new library, and you want it to be of the greatest possible use to the public, we re<strong>com</strong>mend making it<br />
free software that everyone can redistribute and change. You can do so by permitting redistribution under these terms<br />
(or, alternatively, under the terms of the ordinary General Public License).<br />
ENGLISH<br />
To apply these terms, attach the following notices to the library. It is safest to attach them to the start of each source file<br />
to most effectively convey the exclusion of warranty; and each file should have at least the "copyright" line and a pointer<br />
to where the full notice is found.<br />
OPEN SOURCE LICENSE<br />
121<br />
1.1. ''Contributor''<br />
means each entity that creates or contributes to the creation of Modifications.<br />
1.2. ''Contributor Version''<br />
means the <strong>com</strong>bination of the Original Code, prior Modifications used by a Contributor, and the Modifications made by<br />
that particular Contributor.<br />
1.3. ''Covered Code''<br />
means the Original Code or Modifications or the <strong>com</strong>bination of the Original Code and Modifications, in each case<br />
including portions thereof.<br />
1.4. ''Electronic Distribution Mechanism''<br />
means a mechanism generally accepted in the software development <strong>com</strong>munity for the electronic transfer of data.<br />
1.5. ''Executable''<br />
means Covered Code in any form other than Source Code.<br />
1.6. ''Initial Developer''<br />
means the individual or entity identified as the Initial Developer in the Source Code notice required by Exhibit A.<br />
1.7. ''Larger Work''<br />
means a work which <strong>com</strong>bines Covered Code or portions thereof with code not governed by the terms of this License.<br />
1.8. ''License''<br />
means this document.<br />
1.8.1. "Licensable"<br />
means having the right to grant, to the maximum extent possible, whether at the time of the initial grant or subsequently<br />
acquired, any and all of the rights conveyed herein.<br />
1.9. ''Modifications''<br />
means any addition to or deletion from the substance or structure of either the Original Code or any previous<br />
Modifications. When Covered Code is released as a series of files, a Modification<br />
is:<br />
ENGLISH<br />
(a) Any addition to or deletion from the contents of a file containing Original Code or previous Modifications.<br />
(b) Any new file that contains any part of the Original Code or previous Modifications.<br />
1.10. ''Original Code''<br />
means Source Code of <strong>com</strong>puter software code which is described in the Source Code notice required by Exhibit A as<br />
Original Code, and which, at the time of its release under this License is not already Covered Code governed by this<br />
License.<br />
1.10.1. "Patent Claims"<br />
means any patent claim(s), now owned or hereafter acquired, including without limitation, method, process, and apparatus<br />
claims, in any patent Licensable by grantor.<br />
1.11. ''Source Code''<br />
means the preferred form of the Covered Code for making modifications to it, including all modules it contains, plus any<br />
associated interface definition files, scripts used to control <strong>com</strong>pilation and installation of an Executable, or source code<br />
differential <strong>com</strong>parisons against either the Original Code or another well known, available Covered Code of the<br />
Contributor's choice. The Source Code can be in a <strong>com</strong>pressed<br />
or archival form, provided the appropriate de<strong>com</strong>pression or de-archiving software is widely available for no charge.<br />
1.12. "You'' (or "Your")<br />
means an individual or a legal entity exercising rights under, and <strong>com</strong>plying with all of the terms of, this License or a<br />
future version of this License issued under Section 6.1.For legal entities, "You'' includes any entity which controls, is<br />
controlled by, or is under <strong>com</strong>mon control with You. For purposes of this definition, "control'' means (a) the power, direct<br />
or indirect, to c<strong>au</strong>se the direction or management of such entity, whether by contract or otherwise, or (b) ownership of<br />
more than fifty percent (50%) of the outstanding shares or beneficial ownership of such entity.
122<br />
OPEN SOURCE LICENSE<br />
2. Source Code License.<br />
2.1. The Initial Developer Grant.<br />
The Initial Developer hereby grants You a world-wide, royalty-free, non-exclusive license, subject to third party intellectual<br />
property claims:<br />
(a) under intellectual property rights (other than patent or trademark) Licensable by Initial Developer to use, reproduce,<br />
modify, display, perform, sublicense and distribute the Original Code (or portions thereof) with or without<br />
Modifications, and/or as part of a Larger Work; and<br />
(b) under Patents Claims infringed by the making, using or selling of Original Code, to make, have made, use,<br />
practice, sell, and offer for sale, and/or otherwise dispose of the Original Code (or portions thereof).<br />
(c) the licenses granted in this Section 2.1(a) and (b) are effective on the date Initial Developer first distributes<br />
Original Code under the terms of this License.<br />
(d) Notwithstanding Section 2.1(b) above, no patent license is granted: 1) for code that You delete from the Original<br />
Code; 2) separate from the Original Code; or 3) for infringements c<strong>au</strong>sed by: i) the modification of the Original<br />
Code or ii) the <strong>com</strong>bination of the Original Code with other software or devices.<br />
2.2. Contributor Grant.<br />
Subject to third party intellectual property claims, each Contributor hereby grants You a world-wide, royalty-free, nonexclusive<br />
license<br />
(a) under intellectual property rights (other than patent or trademark) Licensable by Contributor, to use, reproduce,<br />
modify, display, perform, sublicense and distribute the Modifications created by such Contributor (or portions thereof)<br />
either on an unmodified basis, with other Modifications, as Covered Code and/or as part of a Larger Work; and<br />
ENGLISH<br />
(b) under Patent Claims infringed by the making, using, or selling of Modifications made by that Contributor either<br />
alone and/or in <strong>com</strong>bination with its Contributor Version (or portions of such <strong>com</strong>bination), to make, use, sell, offer<br />
for sale, have made, and/or otherwise dispose of: 1) Modifications made by that Contributor (or portions thereof);<br />
and 2) the <strong>com</strong>bination of Modifications made by that Contributor with its Contributor Version (or portions of such<br />
<strong>com</strong>bination).<br />
(c) the licenses granted in Sections 2.2(a) and 2.2(b) are effective on the date Contributor first makes Commercial<br />
Use of the Covered Code.<br />
(d) Notwithstanding Section 2.2(b) above, no patent license is granted: 1) for any code that Contributor has deleted<br />
from the Contributor Version; 2) separate from the Contributor Version; 3) for infringements c<strong>au</strong>sed by: i) third party<br />
modifications of Contributor Version or ii) the <strong>com</strong>bination of Modifications made by that Contributor with other software<br />
(except as part of the Contributor Version) or other devices; or 4) under Patent Claims infringed by Covered<br />
Code in the absence of Modifications made by that Contributor.<br />
3. Distribution Obligations.<br />
3.1. Application of License.<br />
The Modifications which You create or to which You contribute are governed by the terms of this License, including<br />
without limitation Section 2.2. The Source Code version of Covered Code may be distributed only under the terms of<br />
this License or a future version of this License released under Section 6.1, and You must include a copy of this License<br />
with every copy of the Source Code You distribute. You may not offer or impose any terms on any Source Code version<br />
that alters or restricts the applicable version of this License or the recipients' rights hereunder. However, You may<br />
include an additional document offering the additional rights described in Section 3.5.<br />
3.2. Availability of Source Code.<br />
Any Modification which You create or to which You contribute must be made available in Source Code form under the<br />
terms of this License either on the same media as an Executable version or via an accepted Electronic Distribution<br />
Mechanism to anyone to whom you made an Executable version available; and if made available via Electronic<br />
Distribution Mechanism,<br />
must remain available for at least twelve (12) months after the date it initially became available, or at least six (6)<br />
months after a subsequent version of that particular Modification has been made available to such recipients. You are<br />
responsible for ensuring that the Source Code version remains available even if the Electronic Distribution Mechanism<br />
is maintained by a third party.
OPEN SOURCE LICENSE<br />
123<br />
3.3. Description of Modifications.<br />
You must c<strong>au</strong>se all Covered Code to which You contribute to contain a file documenting the changes You made to create<br />
that Covered Code and the date of any change. You must include a prominent statement that the Modification is<br />
derived, directly or indirectly, from Original Code provided by the Initial Developer and including the name of the Initial<br />
Developer in (a) the Source Code, and (b) in any notice in an Executable version or related documentation in which<br />
You describe the origin or ownership of the Covered Code.<br />
3.4. Intellectual Property Matters<br />
(a) Third Party Claims.<br />
If Contributor has knowledge that a license under a third party's intellectual property rights is required to exercise the<br />
rights granted by such Contributor under Sections 2.1 or 2.2, Contributor must include a text file with the Source Code<br />
distribution titled "LEGAL'' which describes the claim and the party making the claim in sufficient detail that a recipient<br />
will know whom to contact. If Contributor obtains such knowledge after the Modification is made available as described<br />
in Section 3.2, Contributor shall promptly modify the LEGAL file in all copies Contributor makes available thereafter and<br />
shall take other steps (such as notifying appropriate mailing lists or newsgroups) reasonably calculated to inform those<br />
who received the Covered Code that new knowledge has been obtained.<br />
(b) Contributor APIs.<br />
If Contributor's Modifications include an application programming interface and Contributor has knowledge of patent<br />
licenses which are reasonably necessary to implement that API, Contributor must also include this information in the<br />
LEGAL file.<br />
(c) Representations.<br />
Contributor represents that, except as disclosed pursuant to Section 3.4(a) above, Contributor believes that<br />
Contributor's Modifications are Contributor's original creation(s) and/or Contributor has sufficient rights to grant the<br />
rights conveyed by this License.<br />
3.5. Required Notices.<br />
You must duplicate the notice in Exhibit A in each file of the Source Code. If it is not possible to put such notice in a<br />
particular<br />
Source Code file due to its structure, then You must include such notice in a location (such as a relevant directory)<br />
where a user would be likely to look for such a notice. If You created one or more Modification(s) You may add your<br />
name as a Contributor to the notice described in Exhibit A. You must also duplicate this License in any documentation<br />
for the Source Code where You describe recipients' rights or ownership rights relating to Covered Code. You may<br />
choose to offer, and to charge a fee for, warranty, support, indemnity or liability obligations to one or more recipients of<br />
Covered Code. However, You may do so only on Your own behalf, and not on behalf of the Initial Developer or any<br />
Contributor You must make it absolutely clear than any such warranty, support, indemnity or liability obligation is offered<br />
by You alone, and You hereby agree to indemnify the Initial Developer and every Contributor for any liability incurred by<br />
the Initial Developer or such Contributor as a result of warranty, support, indemnity or liability terms You offer.<br />
ENGLISH<br />
3.6. Distribution of Executable Versions.<br />
You may distribute Covered Code in Executable form only if the requirements of Section 3.1-3.5 have been met for that<br />
Covered Code, and if You include a notice stating that the Source Code version of the Covered Code is available under<br />
the terms of this License, including a description of how and where You have fulfilled the obligations of Section 3.2. The<br />
notice must be conspicuously included in any notice in an Executable version, related documentation or collateral in<br />
which You describe recipients' rights relating to the Covered Code. You may distribute the Executable version of<br />
Covered Code or ownership rights under a license of Your choice, which may contain terms different from this License,<br />
provided that You are in <strong>com</strong>pliance with the terms of this License and that the license for the Executable version does<br />
not attempt to limit or alter the recipient's rights in the Source Code version from the rights set forth in this License. If<br />
You distribute the Executable version under a different license You must make it absolutely clear that any terms which<br />
differ from this License are offered by You alone, not by the Initial Developer or any Contributor. You hereby agree to<br />
indemnify the Initial Developer and every Contributor for any liability incurred by the Initial Developer or such<br />
Contributor as a result of any such terms You offer.<br />
3.7. Larger Works.<br />
You may create a Larger Work by <strong>com</strong>bining Covered Code with other code not governed by the terms of this License<br />
and distribute the Larger Work as a single product. In such a case, You must make sure the requirements of this<br />
License are fulfilled for the Covered Code.<br />
4. Inability to Comply Due to Statute or Regulation.<br />
If it is impossible for You to <strong>com</strong>ply with any of the terms of this License with respect to some or all of the Covered
124<br />
OPEN SOURCE LICENSE<br />
Code due to statute, judicial order, or regulation then You must: (a) <strong>com</strong>ply with the terms of this License to the maximum<br />
extent possible; and (b) describe the limitations and the code they affect. Such description must be included in<br />
the LEGAL file described in Section 3.4 and must be included with all distributions of the Source Code. Except to the<br />
extent prohibited by statute or regulation, such description must be sufficiently detailed for a recipient of ordinary skill to<br />
be able to understand it.<br />
5. Application of this License.<br />
This License applies to code to which the Initial Developer has attached the notice in Exhibit A and to related Covered<br />
Code.<br />
6. Versions of the License.<br />
6.1. New Versions.<br />
Netscape Communications Corporation (''Netscape'') may publish revised and/or new versions of the License from time<br />
to time. Each version will be given a distinguishing version number.<br />
6.2. Effect of New Versions.<br />
Once Covered Code has been published under a particular version of the License, You may always continue to use it<br />
under the terms of that version. You may also choose to use such Covered Code under the terms of any subsequent<br />
version of the License published by Netscape. No one other than Netscape has the right to modify the terms applicable<br />
to Covered Code created under this License.<br />
ENGLISH<br />
6.3. Derivative Works.<br />
If You create or use a modified version of this License (which you may only do in order to apply it to code which is not<br />
already Covered Code governed by this License), You must (a) rename Your license so that the phrases ''Mozilla'',<br />
''MOZILLAPL'', ''MOZPL'', ''Netscape'', "MPL", ''NPL'' or any confusingly similar phrase do not appear in your license<br />
(except to note that your license differs from this License) and (b) otherwise make it clear that Your version of the<br />
license contains terms which differ from the Mozilla Public License and Netscape Public License. (Filling in the name of<br />
the Initial Developer, Original Code or Contributor in the notice described in Exhibit A shall not of themselves be<br />
deemed to be modifications of this License.)<br />
7. DISCLAIMER OF WARRANTY.<br />
COVERED CODE IS PROVIDED UNDER THIS LICENSE ON AN "AS IS'' BASIS, WITHOUT WARRANTY OF ANY<br />
KIND, EITHER EXPRESSED OR IMPLIED, INCLUDING, WITHOUT LIMITATION, WARRANTIES THAT THE<br />
COVERED CODE IS FREE OF DEFECTS, MERCHANTABLE, FIT FOR A PARTICULAR PURPOSE OR NON-<br />
INFRINGING. THE ENTIRE RISK AS TO THE QUALITY AND PERFORMANCE OF THE COVERED CODE IS WITH<br />
YOU. SHOULD ANY COVERED CODE PROVE DEFECTIVE IN ANY RESPECT, YOU (NOT THE INITIAL<br />
DEVELOPER OR ANY OTHER CONTRIBUTOR) ASSUME THE COST OF ANY NECESSARY SERVICING, REPAIR<br />
OR CORRECTION. THIS DISCLAIMER OF WARRANTY CONSTITUTES AN ESSENTIAL PART OF THIS LICENSE.<br />
NO USE OF ANY COVERED CODE IS AUTHORIZED HEREUNDER EXCEPT UNDER THIS DISCLAIMER.<br />
8. TERMINATION.<br />
8.1. This License and the rights granted hereunder will terminate <strong>au</strong>tomatically if You fail to <strong>com</strong>ply with terms herein<br />
and fail<br />
to cure such breach within 30 days of be<strong>com</strong>ing aware of the breach. All sublicenses to the Covered Code which are<br />
properly granted shall survive any termination of this License. Provisions which, by their nature, must remain in effect<br />
beyond the termination of this License shall survive.<br />
8.2. If You initiate litigation by asserting a patent infringement claim (excluding declatory judgment actions) against<br />
Initial Developer or a Contributor (the Initial Developer or Contributor against whom You file such action is referred to<br />
as "Participant") alleging that:<br />
(a) such Participant's Contributor Version directly or indirectly infringes any patent, then any and all rights granted<br />
by such Participant to You under Sections 2.1 and/or 2.2 of this License shall, upon 60 days notice from Participant<br />
terminate prospectively, unless if within 60 days after receipt of notice You either: (i) agree in writing to pay<br />
Participant a mutually agreeable reasonable royalty for Your past and future use of Modifications made by such<br />
Participant, or (ii) withdraw Your litigation claim with respect to the Contributor Version against such Participant. If<br />
within 60 days of notice, a reasonable royalty and payment arrangement are not mutually agreed upon in writing by<br />
the parties or the litigation claim is not withdrawn, the rights granted by Participant to You under Sections 2.1 and/<br />
or 2.2 <strong>au</strong>tomatically terminate at the expiration of the 60 day notice period specified above.<br />
(b) any software, hardware, or device, other than such Participant's Contributor Version, directly or indirectly infring-
OPEN SOURCE LICENSE<br />
125<br />
es any patent, then any rights granted to You by such Participant under Sections 2.1(b) and 2.2(b) are revoked<br />
effective as of the date You first made, used, sold, distributed, or had made, Modifications made by that Participant.<br />
8.3. If You assert a patent infringement claim against Participant alleging that such Participant's Contributor Version<br />
directly or indirectly infringes any patent where such claim is resolved (such as by license or settlement) prior to the initiation<br />
of patent infringement litigation, then the reasonable value of the licenses granted by such Participant under<br />
Sections 2.1 or 2.2 shall be taken into account in determining the amount or value of any payment or license. 8.4. In<br />
the event of termination under Sections 8.1 or 8.2 above, all end user license agreements (excluding distributors and<br />
resellers) which have been validly granted by You or any distributor hereunder prior to termination shall survive termination.<br />
9. LIMITATION OF LIABILITY.<br />
UNDER NO CIRCUMSTANCES AND UNDER NO LEGAL THEORY, WHETHER TORT (INCLUDING NEGLIGENCE),<br />
CONTRACT, OR OTHERWISE, SHALL YOU, THE INITIAL DEVELOPER, ANY OTHER CONTRIBUTOR, OR ANY<br />
DISTRIBUTOR OF COVERED CODE, OR ANY SUPPLIER OF ANY OF SUCH PARTIES, BE LIABLE TO ANY<br />
PERSON FOR ANY INDIRECT, SPECIAL, INCIDENTAL, OR CONSEQUENTIAL DAMAGES OF ANY CHARACTER<br />
INCLUDING, WITHOUT LIMITATION, DAMAGES FOR LOSS OF GOODWILL, WORK STOPPAGE, COMPUTER<br />
FAILURE OR MALFUNCTION, OR ANY AND ALL OTHER COMMERCIAL DAMAGES OR LOSSES, EVEN IF SUCH<br />
PARTY SHALL HAVE BEEN INFORMED OF THE POSSIBILITY OF SUCH DAMAGES. THIS LIMITATION OF<br />
LIABILITY SHALL NOT APPLY TO LIABILITY FOR DEATH OR PERSONAL INJURY RESULTING FROM SUCH<br />
PARTY'S NEGLIGENCE TO THE EXTENT APPLICABLE LAW PROHIBITS SUCH LIMITATION. SOME<br />
JURISDICTIONS DO NOT ALLOW THE EXCLUSION OR LIMITATION OF INCIDENTAL OR CONSEQUENTIAL<br />
DAMAGES, SO THIS EXCLUSION AND LIMITATION MAY NOT APPLY TO YOU.<br />
10. U.S. GOVERNMENT END USERS.<br />
The Covered Code is a ''<strong>com</strong>mercial item,'' as that term is defined in 48 C.F.R. 2.101 (Oct. 1995), consisting of ''<strong>com</strong>mercial<br />
<strong>com</strong>puter software'' and ''<strong>com</strong>mercial <strong>com</strong>puter software documentation,'' as such terms are used in 48 C.F.R.<br />
12.212 (Sept. 1995). Consistent with 48 C.F.R. 12.212 and 48 C.F.R. 227.7202-1 through 227.7202-4 (June 1995), all<br />
U.S. Government End Users acquire Covered Code with only those rights set forth herein.<br />
11. MISCELLANEOUS.<br />
This License represents the <strong>com</strong>plete agreement concerning subject matter hereof. If any provision of this License is<br />
held to be unenforceable, such provision shall be reformed only to the extent necessary to make it enforceable. This<br />
License shall be governed by California law provisions (except to the extent applicable law, if any, provides otherwise),<br />
excluding its conflict-of-law provisions. With respect to disputes in which at least one party is a citizen of, or an entity<br />
chartered or registered to do business in the United States of America, any litigation relating to this License shall be<br />
subject to the jurisdiction of the Federal Courts of the Northern District of California, with venue lying in Santa Clara<br />
County, California, with the losing party responsible for costs, including without limitation, court costs and reasonable<br />
attorneys' fees and expenses. The application of the United Nations Convention on Contracts for the International Sale<br />
of Goods is expressly excluded. Any law or regulation which provides that the language of a contract shall be construed<br />
against the drafter shall not apply to this License.<br />
ENGLISH<br />
12. RESPONSIBILITY FOR CLAIMS.<br />
As between Initial Developer and the Contributors, each party is responsible for claims and damages arising, directly or<br />
indirectly, out of its utilization of rights under this License and You agree to work with Initial Developer and Contributors<br />
to distribute such responsibility on an equitable basis. Nothing herein is intended or shall be deemed to constitute any<br />
admission of liability.<br />
13. MULTIPLE-LICENSED CODE.<br />
Initial Developer may designate portions of the Covered Code as Multiple-Licensed. Multiple-Licensed means that the<br />
Initial Developer permits you to utilize portions of the Covered Code under Your choice of the MPL or the alternative<br />
licenses, if any, specified by the Initial Developer in the file described in Exhibit A.<br />
EXHIBIT A -Mozilla Public License.<br />
``The contents of this file are subject to the Mozilla Public License<br />
Version 1.1 (the "License"); you may not use this file except in<br />
<strong>com</strong>pliance with the License. You may obtain a copy of the License at<br />
http://www.mozilla.org/MPL/<br />
Software distributed under the License is distributed on an "AS IS"<br />
basis, WITHOUT WARRANTY OF ANY KIND, either express or implied. See the<br />
License for the specific language governing rights and limitations under the License.
126<br />
OPEN SOURCE LICENSE<br />
The Original Code is ______________________________________.<br />
The Initial Developer of the Original Code is ________________________.<br />
Portions created by ______________________ are Copyright (C) ______<br />
_______________________.All Rights Reserved.<br />
Contributor(s): ______________________________________.<br />
Alternatively, the contents of this file may be used under the terms<br />
of the _____ license (the [___] License), in which case the<br />
provisions of [______] License are applicable instead of those<br />
above.If you wish to allow use of your version of this file only<br />
under the terms of the [____] License and not to allow others to use<br />
your version of this file under the MPL, indicate your decision by<br />
deleting the provisions above and replace them with the notice and<br />
other provisions required by the [___] License. If you do not delete<br />
the provisions above, a recipient may use your version of this file<br />
under either the MPL or the [___] License."<br />
[NOTE: The text of this Exhibit A may differ slightly from the text of the notices in the Source Code files of the Original<br />
Code. You should use the text of this Exhibit A rather than the text found in the Original Code Source Code for Your<br />
Modifications.]<br />
OpenSSL License<br />
Copyright (c) 1998-2008 The OpenSSL Project. All rights reserved.<br />
ENGLISH<br />
Redistribution and use in source and binary forms, with or without modification, are permitted provided that the following<br />
conditions are met:<br />
1. Redistributions of source code must retain the above copyright notice, this list of conditions and the following disclaimer.<br />
2. Redistributions in binary form must reproduce the above copyright notice, this list of conditions and the following disclaimer<br />
in the documentation and/or other materials provided with the distribution.<br />
3. All advertising materials mentioning features or use of this software must display the following acknowledgment:<br />
"This product includes software developed by the OpenSSL Project for use in the OpenSSL Toolkit. (http://www.openssl.org/)"<br />
4. The names "OpenSSL Toolkit" and "OpenSSL Project" must not be used to endorse or promote products derived<br />
from this software without prior written permission. For written permission, please contact openssl-core@openssl.org.<br />
5. <strong>Product</strong>s derived from this software may not be called "OpenSSL" nor may "OpenSSL" appear in their names without<br />
prior written permission of the OpenSSL Project.<br />
6. Redistributions of any form whatsoever must retain the following acknowledgment:<br />
"This product includes software developed by the OpenSSL Project for use in the OpenSSL Toolkit (http://www.openssl.<br />
org/)"<br />
THIS SOFTWARE IS PROVIDED BY THE OpenSSL PROJECT ``AS IS'' AND ANY EXPRESSED OR IMPLIED<br />
WARRANTIES, INCLUDING, BUT NOT LIMITED TO, THE IMPLIED WARRANTIES OF MERCHANTABILITY AND<br />
FITNESS FOR A PARTICULAR PURPOSE ARE DISCLAIMED. IN NO EVENT SHALL THE OpenSSL PROJECT OR<br />
ITS CONTRIBUTORS BE LIABLE FOR ANY DIRECT, INDIRECT, INCIDENTAL, SPECIAL, EXEMPLARY, OR<br />
CONSEQUENTIAL DAMAGES (INCLUDING, BUT NOT LIMITED TO, PROCUREMENT OF SUBSTITUTE GOODS<br />
OR SERVICES; LOSS OF USE, DATA, OR PROFITS; OR BUSINESS INTERRUPTION) HOWEVER CAUSED AND<br />
ON ANY THEORY OF LIABILITY, WHETHER IN CONTRACT, STRICT LIABILITY, OR TORT (INCLUDING<br />
NEGLIGENCE OR OTHERWISE) ARISING IN ANY WAY OUT OF THE USE OF THIS SOFTWARE, EVEN IF<br />
ADVISED OF THE POSSIBILITY OF SUCH DAMAGE.<br />
This product includes cryptographic software written by Eric Young (eay@cryptsoft.<strong>com</strong>).<br />
This product includes software written by Tim Hudson (tjh@cryptsoft.<strong>com</strong>).<br />
Original SSLeay License<br />
Copyright (C) 1995-1998 Eric Young (eay@cryptsoft.<strong>com</strong>) All rights reserved.<br />
This package is an SSL implementation written by Eric Young (eay@cryptsoft.<strong>com</strong>).<br />
The implementation was written so as to conform with Netscapes SSL.
OPEN SOURCE LICENSE<br />
127<br />
This library is free for <strong>com</strong>mercial and non-<strong>com</strong>mercial use as long as the following conditions are aheared to. The following<br />
conditions apply to all code found in this distribution, be it the RC4, RSA, lhash, DES, etc., code; not just the<br />
SSL code. The SSL documentation included with this distribution is covered by the same copyright terms except that<br />
the holder is Tim Hudson (tjh@cryptsoft.<strong>com</strong>).<br />
Copyright remains Eric Young's, and as such any Copyright notices in the code are not to be removed. If this package<br />
is used in a product, Eric Young should be given attribution as the <strong>au</strong>thor of the parts of the library used. This can be in<br />
the form of a textual message at program startup or in documentation (online or textual) provided with the package.<br />
Redistribution and use in source and binary forms, with or without modification, are permitted provided that the following<br />
conditions are met:<br />
1. Redistributions of source code must retain the copyright notice, this list of conditions and the following disclaimer.<br />
2. Redistributions in binary form must reproduce the above copyright notice, this list of conditions and the following disclaimer<br />
in the documentation and/or other materials provided with the distribution.<br />
3. All advertising materials mentioning features or use of this software must display the following acknowledgement:<br />
"This product includes cryptographic software written by Eric Young (eay@cryptsoft.<strong>com</strong>)"<br />
The word 'cryptographic' can be left out if the rouines from the library being used are not cryptographic related :-).<br />
4. If you include any Windows specific code (or a derivative thereof) from the apps directory (application code) you<br />
must include an acknowledgement:<br />
"This product includes software written by Tim Hudson (tjh@cryptsoft.<strong>com</strong>)"<br />
THIS SOFTWARE IS PROVIDED BY ERIC YOUNG ``AS IS'' AND ANY EXPRESS OR IMPLIED WARRANTIES,<br />
INCLUDING, BUT NOT LIMITED TO, THE IMPLIED WARRANTIES OF MERCHANTABILITY AND FITNESS FOR A<br />
PARTICULAR PURPOSE ARE DISCLAIMED. IN NO EVENT SHALL THE AUTHOR OR CONTRIBUTORS BE LIABLE<br />
FOR ANY DIRECT, INDIRECT, INCIDENTAL, SPECIAL, EXEMPLARY, OR CONSEQUENTIAL DAMAGES<br />
(INCLUDING, BUT NOT LIMITED TO, PROCUREMENT OF SUBSTITUTE GOODS OR SERVICES; LOSS OF USE,<br />
DATA, OR PROFITS; OR BUSINESS INTERRUPTION) HOWEVER CAUSED AND ON ANY THEORY OF LIABILITY,<br />
WHETHER IN CONTRACT, STRICT LIABILITY, OR TORT (INCLUDING NEGLIGENCE OR OTHERWISE) ARISING IN<br />
ANY WAY OUT OF THE USE OF THIS SOFTWARE, EVEN IF ADVISED OF THE POSSIBILITY OF SUCH DAMAGE.<br />
The licence and distribution terms for any publically available version or derivative of this code cannot be changed. i.e.<br />
this code cannot simply be copied and put under another distribution licence [including the GNU Public Licence.]<br />
ENGLISH<br />
MIT license<br />
- libcurl<br />
Copyright (c) 1996 - 2010, Daniel Stenberg, .<br />
All rights reserved.<br />
Permission to use, copy, modify, and distribute this software for any purpose with or without fee is hereby granted, provided<br />
that the above copyright notice and this permission notice appear in all copies.<br />
THE SOFTWARE IS PROVIDED "AS IS", WITHOUT WARRANTY OF ANY KIND, EXPRESS OR IMPLIED,<br />
INCLUDING BUT NOT LIMITED TO THE WARRANTIES OF MERCHANTABILITY, FITNESS FOR A PARTICULAR<br />
PURPOSE AND NONINFRINGEMENT OF THIRD PARTY RIGHTS. IN NO EVENT SHALL THE AUTHORS OR<br />
COPYRIGHT HOLDERS BE LIABLE FOR ANY CLAIM, DAMAGES OR OTHER LIABILITY, WHETHER IN AN ACTION<br />
OF CONTRACT, TORT OR OTHERWISE, ARISING FROM, OUT OF OR IN CONNECTION WITH THE SOFTWARE<br />
OR THE USE OR OTHER DEALINGS IN THE SOFTWARE.<br />
Except as contained in this notice, the name of a copyright holder shall not be used in advertising or otherwise to promote<br />
the sale, use or other dealings in this Software without prior written <strong>au</strong>thorization of the copyright holder.<br />
- ncurses<br />
Copyright (c) 1998 Free Software Foundation, Inc.<br />
Permission is hereby granted, free of charge, to any person obtaining a copy of this software and associated documentation<br />
files (the "Software"), to deal in the Software without restriction, including without limitation the rights to use,<br />
copy, modify, merge, publish, distribute, distribute with modifications, sublicense, and/or sell copies of the Software, and<br />
to permit persons to whom the Software is furnished to do so, subject to the following conditions:<br />
The above copyright notice and this permission notice shall be included in all copies or substantial portions of the
128<br />
OPEN SOURCE LICENSE<br />
Software.<br />
THE SOFTWARE IS PROVIDED "AS IS", WITHOUT WARRANTY OF ANY KIND, EXPRESS OR IMPLIED,<br />
INCLUDING BUT NOT LIMITED TO THE WARRANTIES OF MERCHANTABILITY, FITNESS FOR A PARTICULAR<br />
PURPOSE AND NONINFRINGEMENT. IN NO EVENT SHALL THE ABOVE COPYRIGHT HOLDERS BE LIABLE FOR<br />
ANY CLAIM, DAMAGES OR OTHER LIABILITY, WHETHER IN AN ACTION OF CONTRACT, TORT OR OTHERWISE,<br />
ARISING FROM, OUT OF OR IN CONNECTION WITH THE SOFTWARE OR HE USE OR OTHER DEALINGS IN<br />
THE SOFTWARE.<br />
Except as contained in this notice, the name(s) of the above copyright holders shall not be used in advertising or otherwise<br />
to promote the ale, use or other dealings in this Software without prior written <strong>au</strong>thorization.<br />
Expat license<br />
The source package was downloaded from .<br />
The original packager is Adam Di Carlo .<br />
The current maintainer is Ardo van Rangelrooij .<br />
Copyright (c) 1998, 1999, 2000 Thai Open Source Software Center Ltd and Clark Cooper<br />
Copyright (c) 2001, 2002, 2003, 2004, 2005, 2006 Expat maintainers.<br />
Permission is hereby granted, free of charge, to any person obtaining a copy of this software and associated documentation<br />
files (the "Software"), to deal in the Software without restriction, including without limitation the rights to use, copy,<br />
modify, merge, publish, distribute, sublicense, and/or sell copies of the Software, and to permit persons to whom the<br />
Software is furnished to do so, subject to the following conditions:<br />
ENGLISH<br />
The above copyright notice and this permission notice shall be included in all copies or substantial portions of the<br />
Software.<br />
THE SOFTWARE IS PROVIDED "AS IS", WITHOUT WARRANTY OF ANY KIND, EXPRESS OR IMPLIED,<br />
INCLUDING BUT NOT LIMITED TO THE WARRANTIES OF MERCHANTABILITY, FITNESS FOR A PARTICULAR<br />
PURPOSE AND NONINFRINGEMENT. IN NO EVENT SHALL THE AUTHORS OR COPYRIGHT HOLDERS BE<br />
LIABLE FOR ANY CLAIM, DAMAGES OR OTHER LIABILITY, WHETHER IN AN ACTION OF CONTRACT, TORT OR<br />
OTHERWISE, ARISING FROM, OUT OF OR IN CONNECTION WITH THE SOFTWARE OR THE USE OR OTHER<br />
DEALINGS IN THE SOFTWARE.<br />
The FreeType Project LICENSE<br />
Copyright 1996-2002, 2006 by David Turner, Robert Wilhelm, and Werner Lemberg<br />
Introduction<br />
============<br />
The FreeType Project is distributed in several archive packages; some of them may contain, in addition to the<br />
FreeType font engine, various tools and contributions which rely on, or relate to, the FreeType Project.<br />
This license applies to all files found in such packages, and which do not fall under their own explicit license. The<br />
license affects thus the FreeType font engine, the test programs, documentation and makefiles, at the very least.<br />
This license was inspired by the BSD, Artistic, and IJG (Independent JPEG Group) licenses, which all encourage inclusion<br />
and use of free software in <strong>com</strong>mercial and freeware products alike. As a consequence, its main points are that:<br />
- We don't promise that this software works. However, we will be interested in any kind of bug reports. (`as is' distribution)<br />
- You can use this software for whatever you want, in parts or full form, without having to pay us. (`royalty-free'<br />
usage)<br />
- You may not pretend that you wrote this software. If you use it, or only parts of it, in a program, you must<br />
acknowledge somewhere in your documentation that you have used the FreeType code. (`credits')<br />
We specifically permit and encourage the inclusion of this software, with or without modifications, in <strong>com</strong>mercial products.<br />
We disclaim all warranties covering The FreeType Project and assume no liability related to The FreeType<br />
Project.<br />
Finally, many people asked us for a preferred form for a credit/disclaimer to use in <strong>com</strong>pliance with this license. We
OPEN SOURCE LICENSE<br />
129<br />
thus encourage you to use the following text:<br />
Portions of this software are copyright The FreeType Project (www.freetype.org). All rights reserved.<br />
Please replace with the value from the FreeType version you actually use.<br />
Legal Terms<br />
0. Definitions<br />
Throughout this license, the terms `package', `FreeType Project' and `FreeType archive' refer to the set of files originally<br />
distributed by the <strong>au</strong>thors (David Turner, Robert Wilhelm, and Werner Lemberg) as the `FreeType Project', be they<br />
named as alpha, beta or final release.<br />
`You' refers to the licensee, or person using the project, where `using' is a generic term including <strong>com</strong>piling the project's<br />
source code as well as linking it to form a `program' or `executable'. This program is referred to as `a program using<br />
the FreeType engine'.<br />
This license applies to all files distributed in the original FreeType Project, including all source code, binaries and documentation,<br />
unless otherwise stated in the file in its original, unmodified form as distributed in the original archive. If you<br />
are unsure whether or not a particular file is covered by this license, you must contact us to verify this.<br />
The FreeType Project is copyright (C) 1996-2000 by David Turner, Robert Wilhelm, and Werner Lemberg. All rights<br />
reserved except as specified below.<br />
1. No Warranty<br />
THE FREETYPE PROJECT IS PROVIDED `AS IS' WITHOUT WARRANTY OF ANY KIND, EITHER EXPRESS OR<br />
IMPLIED, INCLUDING, BUT NOT LIMITED TO, WARRANTIES OF MERCHANTABILITY AND FITNESS FOR A<br />
PARTICULAR PURPOSE. IN NO EVENT WILL ANY OF THE AUTHORS OR COPYRIGHT HOLDERS BE LIABLE<br />
FOR ANY DAMAGES CAUSED BY THE USE OR THE INABILITY TO USE, OF THE FREETYPE PROJECT.<br />
2. Redistribution<br />
This license grants a worldwide, royalty-free, perpetual and irrevocable right and license to use, execute, perform, <strong>com</strong>pile,<br />
display, copy, create derivative works of, distribute and sublicense the FreeType Project (in both source and object<br />
code forms) and derivative works thereof for any purpose; and to <strong>au</strong>thorize others to exercise some or all of the rights<br />
granted herein, subject to the following conditions:<br />
- Redistribution of source code must retain this license file (`FTL.TXT') unaltered; any additions, deletions or changes to<br />
the original files must be clearly indicated in ac<strong>com</strong>panying documentation. The copyright notices of the unaltered, original<br />
files must be preserved in all copies of source files.<br />
- Redistribution in binary form must provide a disclaimer that states that the software is based in part of the work of the<br />
FreeType Team, in the distribution documentation. We also encourage you to put an URL to the FreeType web page in<br />
your documentation, though this isn't mandatory.<br />
These conditions apply to any software derived from or based on the FreeType Project, not just the unmodified files. If<br />
you use our work, you must acknowledge us. However, no fee need be paid to us.<br />
ENGLISH<br />
3. Advertising<br />
Neither the FreeType <strong>au</strong>thors and contributors nor you shall use the name of the other for <strong>com</strong>mercial, advertising, or<br />
promotional purposes without specific prior written permission. We suggest, but do not require, that you use one or<br />
more of the following phrases to refer to this software in your documentation or advertising materials: `FreeType<br />
Project', `FreeType Engine', `FreeType library', or `FreeType Distribution'.<br />
As you have not signed this license, you are not required to accept it. However, as the FreeType Project is copyrighted<br />
material, only this license, or another one contracted with the <strong>au</strong>thors, grants you the right to use, distribute, and modify<br />
it. Therefore, by using, distributing, or modifying the FreeType Project, you indicate that you understand and accept all<br />
the terms of this license.<br />
4. Contacts<br />
There are two mailing lists related to FreeType:<br />
freetype@nongnu.org<br />
Discusses general use and applications of FreeType, as well as future and wanted additions to the library and distribution.<br />
If you are looking for support, start in this list if you haven't found anything to help you in the documentation.<br />
freetype-devel@nongnu.org<br />
Discusses bugs, as well as engine internals, design issues, specific licenses, porting, etc.<br />
Our home page can be found at http://www.freetype.org<br />
JPEG license
130<br />
OPEN SOURCE LICENSE<br />
This software is copyright (C) 1991-1998, Thomas G. Lane.<br />
All Rights Reserved except as specified below.<br />
Permission is hereby granted to use, copy, modify, and distribute this software (or portions thereof) for any purpose,<br />
without fee, subject to these conditions:<br />
(1) If any part of the source code for this software is distributed, then this README file must be included, with this<br />
copyright and no-warranty notice unaltered; and any additions, deletions, or changes to the original files must be clearly<br />
indicated in ac<strong>com</strong>panying documentation.<br />
(2) If only executable code is distributed, then the ac<strong>com</strong>panying documentation must state that "this software is based<br />
in part on the work of the Independent JPEG Group".<br />
(3) Permission for use of this software is granted only if the user accepts full responsibility for any undesirable consequences;<br />
the <strong>au</strong>thors accept NO LIABILITY for damages of any kind.<br />
zlib/libpng License<br />
This product may contain open source software licensed under zlib/libpng License.<br />
● Libmng : Copyright © 2000-2008 Gerard Juyn (gerard@libmng.<strong>com</strong>)<br />
● Libpng : Copyright (c) 1998-2008 Glenn Randers-Pehrson<br />
(Version 0.96 Copyright (c) 1996, 1997 Andreas Dilger)<br />
(Version 0.88 Copyright (c) 1995, 1996 Guy Eric Schalnat, Group 42, Inc.)<br />
● Md5 checksum : Copyright (C) 1999, 2000, 2002 Aladdin Enterprises.<br />
● Zlib : Copyright (C) 1995-2010 Jean-loup Gailly and Mark Adler<br />
ENGLISH<br />
This software is provided 'as-is', without any express or implied warranty. In no event will the <strong>au</strong>thors be held liable for<br />
any damages arising from the use of this software.<br />
Permission is granted to anyone to use this software for any purpose, including <strong>com</strong>mercial applications, and to alter it<br />
and redistribute it freely, subject to the following restrictions:<br />
1. The origin of this software must not be misrepresented; you must not claim that you wrote the original software. If<br />
you use this software in a product, an acknowledgment in the product documentation would be appreciated but is not<br />
required.<br />
2. Altered source versions must be plainly marked as such, and must not be misrepresented as being the original software.<br />
3. This notice may not be removed or altered from any source distribution.<br />
Jean-loup Gailly<br />
Mark Adler<br />
X.net license<br />
Copyright (c) 1995-2001 International Business Machines Corporation and others<br />
All rights reserved.<br />
Permission is hereby granted, free of charge, to any person obtaining a copy of this software and associated documentation<br />
files (the "Software"), to deal in the Software without restriction, including without limitation the rights to use, copy,<br />
modify, merge, publish, distribute, and/or sell copies of the Software, and to permit persons to whom the Software is<br />
furnished to do so, provided that the above copyright notice(s) and this permission notice appear in all copies of the<br />
Software and that both the above copyright notice(s) and this permission notice appear in supporting documentation.<br />
THE SOFTWARE IS PROVIDED "AS IS", WITHOUT WARRANTY OF ANY KIND, EXPRESS OR IMPLIED,<br />
INCLUDING BUT NOT LIMITED TO THE WARRANTIES OF MERCHANTABILITY, FITNESS FOR A PARTICULAR<br />
PURPOSE AND NONINFRINGEMENT OF THIRD PARTY RIGHTS. IN NO EVENT SHALL THE COPYRIGHT<br />
HOLDER OR HOLDERS INCLUDED IN THIS NOTICE BE LIABLE FOR ANY CLAIM, OR ANY SPECIAL INDIRECT<br />
OR CONSEQUENTIAL DAMAGES, OR ANY DAMAGES WHATSOEVER RESULTING FROM LOSS OF USE, DATA<br />
OR PROFITS, WHETHER IN AN ACTION OF CONTRACT, NEGLIGENCE OR OTHER TORTIOUS ACTION, ARISING<br />
OUT OF OR IN CONNECTION WITH THE USE OR PERFORMANCE OF THIS SOFTWARE.<br />
Except as contained in this notice, the name of a copyright holder shall not be used in advertising or otherwise to promote<br />
the sale, use or other dealings in this Software without prior written <strong>au</strong>thorization of the copyright holder.
BSD license<br />
- strace<br />
Copyright (c) 1991, 1992 P<strong>au</strong>l Kranenburg <br />
Copyright (c) 1993 Branko Lankester <br />
Copyright (c) 1993 Ulrich Pegelow <br />
Copyright (c) 1995, 1996 Michael Elizabeth Chastain <br />
Copyright (c) 1993, 1994, 1995, 1996 Rick Sladkey <br />
Copyright (C) 1998-2003 Wichert Akkerman <br />
Copyright (c) 2002-2008 Roland McGrath <br />
Copyright (c) 2003-2008 Dmitry V. Levin <br />
Copyright (c) 2007-2008 Jan Kratochvil <br />
All rights reserved.<br />
OPEN SOURCE LICENSE<br />
131<br />
Redistribution and use in source and binary forms, with or without modification, are permitted provided that the following<br />
conditions are met:<br />
1. Redistributions of source code must retain the above copyright notice, this list of conditions and the following disclaimer.<br />
2. Redistributions in binary form must reproduce the above copyright notice, this list of conditions and the following<br />
disclaimer in the documentation and/or other materials provided with the distribution.<br />
3. Neither the names of PolarSSL or XySSL nor the names of its contributors may be used to endorse or promote<br />
products derived from this software without specific prior written permission.<br />
THIS SOFTWARE IS PROVIDED BY THE COPYRIGHT HOLDERS AND CONTRIBUTORS "AS IS" AND ANY<br />
EXPRESS OR IMPLIED WARRANTIES, INCLUDING, BUT NOT LIMITED TO, THE IMPLIED WARRANTIES OF<br />
MERCHANTABILITY AND FITNESS FOR A PARTICULAR PURPOSE ARE DISCLAIMED. IN NO EVENT SHALL THE<br />
COPYRIGHT OWNER OR CONTRIBUTORS BE LIABLE FOR ANY DIRECT, INDIRECT, INCIDENTAL, SPECIAL,<br />
EXEMPLARY, OR CONSEQUENTIAL DAMAGES (INCLUDING, BUT NOT LIMITED TO, PROCUREMENT OF<br />
SUBSTITUTE GOODS OR SERVICES; LOSS OF USE, DATA, OR PROFITS; OR BUSINESS INTERRUPTION)<br />
HOWEVER CAUSED AND ON ANY THEORY OF LIABILITY, WHETHER IN CONTRACT, STRICT LIABILITY, OR<br />
TORT (INCLUDING NEGLIGENCE OR OTHERWISE) ARISING IN ANY WAY OUT OF THE USE OF THIS<br />
SOFTWARE, EVEN IF ADVISED OF THE POSSIBILITY OF SUCH DAMAGE.<br />
- xyssl<br />
Copyright (C) 2006-2008 Christophe Devine<br />
Copyright (C) 2009 P<strong>au</strong>l Bakker <br />
All rights reserved.<br />
Redistribution and use in source and binary forms, with or without modification, are permitted provided that the following<br />
conditions are met:<br />
1. Redistributions of source code must retain the above copyright notice, this list of conditions and the following disclaimer.<br />
2. Redistributions in binary form must reproduce the above copyright notice, this list of conditions and the following disclaimer<br />
in the documentation and/or other materials provided with the distribution.<br />
3. Neither the names of PolarSSL or XySSL nor the names of its contributors may be used to endorse or promote products<br />
derived from this software without specific prior written permission.<br />
ENGLISH<br />
THIS SOFTWARE IS PROVIDED BY THE COPYRIGHT HOLDERS AND CONTRIBUTORS "AS IS" AND ANY<br />
EXPRESS OR IMPLIED WARRANTIES, INCLUDING, BUT NOT LIMITED TO, THE IMPLIED WARRANTIES OF<br />
MERCHANTABILITY AND FITNESS FOR A PARTICULAR PURPOSE ARE DISCLAIMED. IN NO EVENT SHALL THE<br />
COPYRIGHT OWNER OR CONTRIBUTORS BE LIABLE FOR ANY DIRECT, INDIRECT, INCIDENTAL, SPECIAL,<br />
EXEMPLARY, OR CONSEQUENTIAL DAMAGES (INCLUDING, BUT NOT LIMITED TO, PROCUREMENT OF<br />
SUBSTITUTE GOODS OR SERVICES; LOSS OF USE, DATA, OR PROFITS; OR BUSINESS INTERRUPTION)<br />
HOWEVER CAUSED AND ON ANY THEORY OF LIABILITY, WHETHER IN CONTRACT, STRICT LIABILITY, OR<br />
TORT (INCLUDING NEGLIGENCE OR OTHERWISE) ARISING IN ANY WAY OUT OF THE USE OF THIS<br />
SOFTWARE, EVEN IF ADVISED OF THE POSSIBILITY OF SUCH DAMAGE.<br />
RSA Data Security license<br />
Copyright (C) 1991-2, RSA Data Security, Inc. Created 1991. All rights reserved.<br />
License to copy and use this software is granted provided that it is identified as the "RSA Data Security, Inc. MD5<br />
Message-Digest Algorithm" in all material mentioning or referencing this software or this function.<br />
License is also granted to make and use derivative works provided that such works are identified as "derived from the<br />
RSA Data Security, Inc. MD5 Message-Digest Algorithm" in all material mentioning or referencing the derived work.
132<br />
OPEN SOURCE LICENSE<br />
RSA Data Security, Inc. makes no representations concerning either the merchantability of this software or the suitability<br />
of this software for any particular purpose. It is provided "as is" without express or implied warranty of any kind.<br />
These notices must be retained in any copies of any part of this documentation and/or software.<br />
ENGLISH
(Only DTV)<br />
The model and serial numbers of the TV is<br />
located on the back of the TV<br />
Record it below should you ever need service.<br />
MODEL<br />
SERIAL<br />
Trade Mark of the DVB Digital Video<br />
Broadcasting Project (1991 to 1996)