Apollo Quick Start Guide - Firmware Version 2.608 ... - Qvis Security
Apollo Quick Start Guide - Firmware Version 2.608 ... - Qvis Security
Apollo Quick Start Guide - Firmware Version 2.608 ... - Qvis Security

Create successful ePaper yourself
Turn your PDF publications into a flip-book with our unique Google optimized e-Paper software.
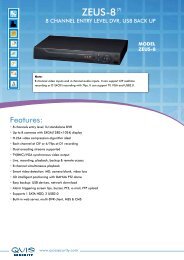
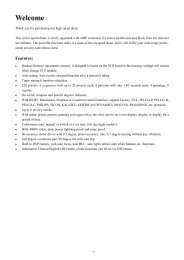
SCHEDULE<br />
The schedule allows for multiple recording types on different channels over a preset period.<br />
The channel box on the top right allows you to select individual channels or all of them, while the period section allows you to<br />
have different recording types at different sections of the day.<br />
As default the DVR will be set to Regular on period 1. As this period covers the full day the DVR is effectively set to always<br />
record. You can activate motion alarm and combined recordings by highlighting the appropriate sections. The display at the<br />
bottom of the screen will highlight the covered recording types by colour.<br />
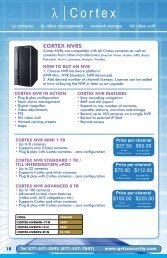
RS232<br />
This section details the use for the RS232 Port of the DVR. A drop down list gives options for the type of device connected to the<br />
unit and the baud rate and protocol for those devices.<br />
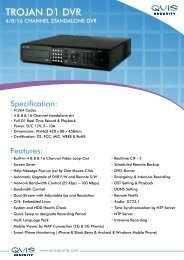
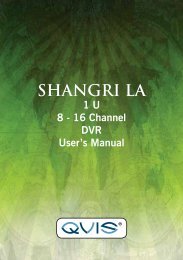
NETWORK<br />
This section details network settings for the DVR.<br />
IP address details subnet mask and gateway settings for the unit should be entered here. The gateway address is the IP address<br />
of your router.<br />
Please note that the ports for the unit should be the default of HTTP: 80 - TCP: 37777 - UDP: 37778. These should be forwarded<br />
on your router. Please see the routers manual for details on how to do this.<br />
The advanced network section contains multiple settings which in most cases won’t need to be touched. However two of the<br />
more common settings are mentioned below:<br />
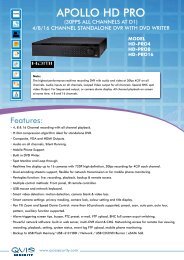
DDNS<br />
Dynamic Domain Name Servers or DDNS are used when the DVR is connecting via a Dynamic IP Address. To enable DDNS double<br />
click to open it and supply the details of your DDNS account in order to connect. (user name password server e.t.c) A good<br />
DDNS provider can be found here. However it is recommended that you use the routers DDNS option instead if it is available as<br />
this will update more accurately.<br />
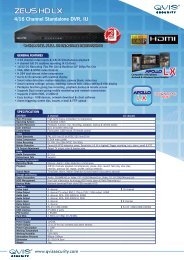
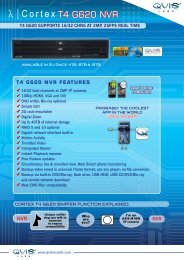
Email<br />
Various sections of the DVR can be configured for email alerts such as Motion Detection and Alarm triggers. To set up email<br />
alerts, double click the email section of the network settings and enter your details in the box provided. SMTP server is the SMTP<br />
host for your email. The user and password are the account login details. Sender is the email address for those details. You can<br />
also set a title for the email. Receiver address is the address you wish to send the email to. While you can send emails to your<br />
sender address it is often a good idea to have a separate receiver address. You can also set to send health check alerts and their<br />
frequency in this section. As well as sending a test email.