
Create successful ePaper yourself
Turn your PDF publications into a flip-book with our unique Google optimized e-Paper software.
<strong>Nova</strong> <strong>Titan</strong>© 5in Chuck<br />
MANUAL<br />
<strong>Teknatool</strong> International Ltd<br />
7D Dallan Place, Albany, Auckland, New Zealand 0632<br />
PHONE :+64 9 477 5600<br />
FAX : +64 9 477 5601<br />
Website: www.teknatool.com<br />
Email: sales@teknatool.com<br />
©Copyright <strong>Teknatool</strong> International 2007<br />
Publication Number: 105-0307-001<br />
READ THIS MANUAL CAREFULLY<br />
AND FAMILIARILISE WITH<br />
CHUCK OPERATIONS THOROUGHLY BEFORE USE.<br />
<strong>Teknatool</strong> International Ltd<br />
7D Dallan Place, Albany, Auckland, New Zealand 0632<br />
Phone :+64 9 477 5600<br />
FAX : +64 9 477 5601<br />
Website: www.teknatool.com<br />
Email: sales@teknatool.com
Thank you for purchasing <strong>Teknatool</strong> <strong>Nova</strong> <strong>Titan</strong> 5inch Chuck. We are confident that it will help in both<br />
enhancing as well as advancing your woodturning. The <strong>Teknatool</strong> <strong>Nova</strong> <strong>Titan</strong> 5inch Chuck is a very<br />
versatile unit, designed to offer a wide range of workholding modes. The <strong>Nova</strong> <strong>Titan</strong> 5inch Chuck has<br />
a powerful grip while being quick and easy to use.<br />
It combines the best features of our <strong>Nova</strong> series chucks and similar woodturning chucks (wide jaw<br />
movement, quick two way grip) with the advantages of superior gripping power and a convenient one<br />
handed operation. The <strong>Nova</strong> <strong>Titan</strong> also has some special safety features: a travel stop on the jaws and<br />
a contracting scroll jaw action to centre under power with no work mounted. This means that there is<br />
very little chance of the jaws flying out of the chuck - a common hazard with many chucks.<br />
The <strong>Nova</strong> <strong>Titan</strong> Chuck has a new and unique 3 screw position jaw slide. This longer jaw slide, with the<br />
extra screw position enables the <strong>Titan</strong> to take a larger series of jaws (no able to be used on the <strong>Nova</strong><br />
or Supernova Chucks). The first of these larger jaws, the <strong>Titan</strong> Power Jaw is ude to be released in<br />
November 2003. Thie longer, three screw Jaw slide, together with the larger series of jaws, will give the<br />
<strong>Titan</strong> the largest capacity and holding power of any woodturning chuck available.<br />
The <strong>Nova</strong> <strong>Titan</strong>, utilizing the two screw position, can also take the existing accessory jaws for the <strong>Nova</strong><br />
and Supernova Chucks. In addition it accepts all of the thread inserts developed for the <strong>Nova</strong> and<br />
Supernova chucks. This provides maximum interchangeability of jaws, inserts and woodworm screws,<br />
between all three chucks. It also provides a perfect upgrade path for the <strong>Nova</strong> or Supernova user who<br />
wants to turn much larger projects.<br />
As with the <strong>Nova</strong> and Supernova, the <strong>Titan</strong> using the wide variety of accessoryjaws, can be used to<br />
expand into recesses or contract around round/square wood wpigots of varying sizes and applications.<br />
The chuck can swap from the expansion/dovetail mode to the spigot mode and back instantly, with no<br />
adjustments or extra fittings being necessary. In both modes, any spigot or recess size can be<br />
selected between the minimum and maximum range of the jaws. With the add-on accessory jaws<br />
removed, the jaw slides can be used to grip smaller spigots. The chuck also utilises a powerful<br />
Woodworm screw for screw chuck work. (Included with standard model only)<br />
The Jaw accessories are included at the back of this manual. However the range is steadily being<br />
expanded to include more options. Check with your reseller for the latest accessories.<br />
As a valued customer, we would be pleased to hear from you and how you found your <strong>Nova</strong> <strong>Titan</strong>. Any<br />
comments on the chuck or accessory ideas would be very welcome so that we can continue to offer<br />
what we believe is the best woodturning chucking system available.<br />
Accuracy: The <strong>Nova</strong> <strong>Titan</strong> Chucks are sample tested from each batch and are made to run within the<br />
following tolerance limits: Face Runout Maximum: 0.1mm (0.0039 inch)<br />
Radial Runout Maximum: 0.13mm (0.005 inch)<br />
The testing is performed with the chuck mounted on a standard insert. To ensure accuracy when<br />
mounted on a lathe, refer to page 6.It is well to note that wood is quite a plastic material - with<br />
different densities even in the same piece, and liable to warp out of place while turning. This is a part<br />
of the beauty and appeal of working with such a medium. However, under these circumstances<br />
pursuing accuracies as quoted above can be very difficult to achieve. For most woodturning<br />
situations (with some exceptions) there is little need to achieve such tolerances.<br />
WARRANTY<br />
DATE PURCHASED.............................................................................<br />
(To be completed by Sales outlet).<br />
This <strong>Teknatool</strong> Product is backed by a period of twenty-four months from the date of purchase.<br />
<strong>Teknatool</strong> International Ltd hereby agrees to make repairs or replace components without charge for any<br />
defects due to faulty material or workmanship, provided that -<br />
1. The warranty period has not elapsed. Proof of purchase date (sales slip etc.) would need to<br />
be forwarded to <strong>Teknatool</strong> International Ltd.<br />
2. If in our opinion the unit has not already been altered, repaired or modified in any way that<br />
would affect its operation; has not been subjected to misuse, negligence, accident or not used<br />
strictly in accordance with instructions.<br />
3. Where necessary transportation is prepaid to Factory Service Centre. Or other authorised<br />
<strong>Teknatool</strong> Service Centre.<br />
Warranty does not cover costs or damages arising directly or indirectly from the operation of this<br />
<strong>Teknatool</strong> Product. No other guarantee, written or verbal is authorised by <strong>Teknatool</strong> International Ltd.<br />
OVERSEAS CUSTOMERS: Our <strong>Teknatool</strong> Distributors can issue their own Warranty to cover this<br />
product. The terms may vary from those stated above - please check with your dealer.<br />
Our policy is one of continuous improvement. We therefore reserve the right to change specification/<br />
design without notice.<br />
Contents<br />
Page<br />
Introduction<br />
2<br />
Safety Rules<br />
3<br />
<strong>Nova</strong><br />
<strong>Titan</strong> 5inch Models<br />
4<br />
Chuck<br />
Operation<br />
4<br />
<strong>Nova</strong><br />
<strong>Titan</strong> 5inch Parts Diagram<br />
5<br />
Mounting<br />
Chuck On Lathe<br />
6<br />
Maintenance,Stop<br />
On Jaw Travel,Jaw Slides,Insertion Of Jaw Slides<br />
7& 8<br />
Mounting<br />
Powergrip Jaws,Operating Modes<br />
8& 9<br />
2<br />
Dovetail<br />
Operation,Forming Recess<br />
10<br />
15<br />
Spigot<br />
Operation<br />
11<br />
Troubleshooting<br />
Guide<br />
12<br />
Optional<br />
Accessories<br />
13&14
JS25N 25mm Jaw Set<br />
Designed for small bowl (expanding dovetail mode) and small<br />
spigot (contracting mode) free end turning work below the size<br />
that can be handled by the standard 50mm jaws.<br />
JSPIN Pin Jaw Set<br />
These special 25mm extended jaws are designed to act like a<br />
pin chuck - expanding into a pre-bored hole. This is a useful<br />
technique for free form edge bowls. The real advantage<br />
though is you don’t have to bore an exact size as with pin<br />
jaws. The longer jaws allow for a very powerful spigot grip for<br />
smaller work like lace bobbins etc. It also has a small dovetail<br />
to mount small bowls.<br />
JS75N Step Jaw Set<br />
Designed primarily to grip footed bowls in the contracting<br />
mode. Provides for optimum grip of three different size foot<br />
diameters. Also dovetail mode.<br />
JS-SP35 35mm Spigot Jaws & JS-SP45 45mm Spigot Jaws.<br />
These two jaws provide a very powerful contracting spigot<br />
grip with the <strong>Titan</strong> Chuck. For long unsupported spigot turning<br />
applications.<br />
SPUR CENTRE Code: NCSC<br />
This is a rugged 4 pronged spur drive with a 19mm<br />
square shank, which fits snugly into the <strong>Nova</strong>/<br />
Super<strong>Nova</strong> jaws. Creep of the spur is prevented as<br />
the shank is slotted to allow the chuck jaws to close<br />
over it. This spur is the answer for turners who use<br />
their <strong>Nova</strong> <strong>Titan</strong> almost all of the time but want to be<br />
able to do those odd spindle jobs without removing the<br />
chuck from the lathe.<br />
INSERT SPANNER Code:23014<br />
Spanner to remove inserts off lathe spindle<br />
or from chuck body.<br />
14<br />
SAFETY<br />
DANGER: THIS CHUCK IS CAPABLE OF CONTRIBUTING TO SERIOUS INJURY, AS WITH ANY<br />
OTHER POWER TOOL ACCESSORY, IF USED IMPROPERLY ON THE LATHE.<br />
Before using the <strong>Nova</strong> <strong>Titan</strong> 5inch Chuck, read and understand this instruction manual. Read<br />
and understand also the lathe owner’s manual. If you do not have a manual, contact the<br />
supplier of your lathe to obtain one before using the lathe and chuck.<br />
User must be professionally trained to use this chuck. Vocational school courses are recommended.<br />
As with other chucking methods, an extremely cautious and sensible approach is necessary. With the<br />
<strong>Nova</strong> <strong>Titan</strong> Chuck it is not possible to give exact directions as to the amount of tightening pressure<br />
required for workholding. Follow closely strict guidelines in this manual for different jaw types on wood<br />
blank diameters and length, plus turning speed.<br />
BEFORE USING <strong>Nova</strong> <strong>Titan</strong> 5inch CHUCK MAKE SURE THAT -<br />
•YOU ALWAYS WEAR EYE PROTECTION WHICH COMPLIES WITH CURRENT ANSI STANDARD<br />
Z87.1 (USA). WE RECOMMEND THAT A FULL FACE SHEILD BE USED AT ALL TIMES.<br />
•Chuck is properly secured on lathe spindle. Follow mounting instructions for your lathe for faceplates<br />
and other spindle fixtures.<br />
•For safety, DO NOT ROTATE CHUCK UNDER POWER WITHOUT WOOD BEING GRIPPED.<br />
WARNING: EXCESSIVE SPEED IS A SERIOUS LATHE HAZARD. ALWAYS TURN AT THE SLOWEST<br />
SPEED POSSIBLE.<br />
•Speed will vary with wood blank size. The larger the blank the slower the speed. Consult your lathe<br />
manual or lathe information plate for speed guidelines.<br />
•DO NOT ATTEMPT TO USE THE CHUCK UNLESS THE LATHE SPEEDS ARE KNOWN. YOU MUST<br />
STRICTLY FOLLOW THE MAXIMUM SPEED LIMITS SET OUT IN THE OPERATING SECTION OF<br />
THIS MANUAL. DO NOT EXCEED THEM UNDER ANY CIRCUMSTANCES.<br />
•EXAMINE WOOD CAREFULLY. ONLY MOUNT WOOD THAT IS SOUND. If any cracks, splits, or<br />
weakness is found in wood - DO NOT MOUNT ON CHUCK. DO NOT MOUNT ANY WOOD THAT<br />
IS LIKELY TO BREAK UP DURING TURNING (E.G. ROTTEN OR SPONGY WOOD). DO NOT<br />
USE POORLY JOINTED/ LAMINATED WOOD.<br />
•Make sure wood is clamped firmly. Follow mounting instructions for different gripping modes and jaw<br />
types. In the expansion mode do not use undue force or jaws may split the wood.<br />
•Do not exceed maximum guidelines in this manual for wood blank diameters/length set out in this<br />
manual for different modes and jaw types. DO NOT USE WITH ANY COPYTURNER OPERATIONS<br />
•Check wood is securely held in chuck, before operation. Check grip by vigorously wrenching wood<br />
blank back and forth. If any loosening occurs, re-examine holding area for adequate grip<br />
(Following mounting guidelines) and any damage to holding area. Rotate manually to make sure of<br />
clearance before switching power on.<br />
•WARNING FOR SAFE OPERATION. DO NOT EXTEND JAW SLIDES BEYOND CHUCK BODY<br />
UNDER ANY CIRCUMSTANCES. ONLY OPERATE CHUCK WITH JAW SLIDE STOP SCREW IN<br />
PLACE AND TEST TO MAKE SURE IT IS ADJUSTED OUT TO STOP JAW SLIDE. This prevents<br />
jaw slides from dislodging from chuck.<br />
•Irregular or out of balance stock needs to be turned at the slowest possible speed until it is in balance.<br />
•For use on outboard/left-hand rotation - MAKE SURE INSERT IS SECURELY LOCKED WITH<br />
GRUBSCREW BEFORE USE.<br />
•Use only hand held woodturning chisels to shape wood being held in chuck.<br />
•USE THE RIGHT CHISEL FOR THE JOB AND DO NOT FORCE TOOLS. Use safe and commonly<br />
approved chisel techniques. Wherever possible stand to one side of the revolving wood.<br />
•WEAR PROPER CLOTHING. Do not wear any loose clothing, neck ties, gloves, bracelets, rings or<br />
other jewellery that could get caught in moving parts. Wear protective hair covering to contain<br />
long hair.<br />
•DRUGS, ALCOHOL, MEDICATION. Do not operate chuck or lathe while under the influence of drugs,<br />
alcohol or any medication.<br />
•KEEP CHILDREN AND VISITORS AWAY. All children and visitors should be kept safe distance from<br />
the work area.<br />
•Make workshop childproof with padlocks, master switches, or by removing starter keys. When<br />
using on DVR3000 lathe, always ensure that the chuck and insert are securely locked<br />
before use. This is to prevent the spindle starting in reverse if the reverse 3 button is<br />
accidentally pressed.
<strong>Nova</strong> <strong>Titan</strong> 5in Models<br />
There are two models of the <strong>Nova</strong> <strong>Titan</strong> 5inch Chuck designed to meet various woodturning requirements.<br />
COMPANION BODY ONLY MODEL(CODE 13023):<br />
A stripped down version for those who already have either a <strong>Nova</strong> or Super<strong>Nova</strong> Chuck. This kit is<br />
without the Woodworm screw, any add-on jaws which the woodturner would have as part of their <strong>Nova</strong><br />
Chuck kit. Comes with a complementary set of jaw screws to mount any <strong>Nova</strong> or Super<strong>Nova</strong> Chuck<br />
accessory jaws. The <strong>Nova</strong> <strong>Titan</strong> 5inch Chuck is fully compatible with either the <strong>Nova</strong> or Super<strong>Nova</strong><br />
Chuck. Companion Body only Accessory Kit: 1x M6 Grubscrew, 2 x Fibre washers, 1 x pinion handle,<br />
8 x M6x10 Jaws screws, <strong>Nova</strong> <strong>Titan</strong> 5inch Chuck <strong>Manual</strong>.<br />
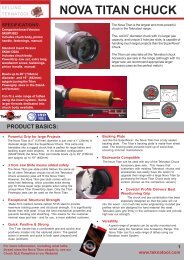
STANDARD MODEL WITH POWERGRIP JAWS(CODE 13024):<br />
This has a special Powergrip add on jaw set for heavy-duty spigot turning and heavy bowl work. These<br />
jaws extend the tremendous gripping power and range of the <strong>Nova</strong> <strong>Titan</strong> 5inch Chuck. Standard Model<br />
with PowerGrip Jaws Accessory Kit: 1x M6 Grubscrew, 2 x Fibre washers, 1 x pinion handle, 8 x M6x10<br />
Jaws screws, 1 x Woodworm screw, 1 x Powergrip jaw set, 1 x M4 Allen key, 1 x M3 Allen key, <strong>Nova</strong><br />
<strong>Titan</strong> 5inch Chuck <strong>Manual</strong>.<br />
EXPLANATION OF TWO OF THE MOST COMMON CHUCKING TECHNIQUES USED IN THIS<br />
MANUAL<br />
EXPANDING DOVETAIL OPERATION<br />
Expansion of the jaws into a recess. This function is for bowl and platter turning where the projection<br />
(depth) of the wood blank is not too great. Specific sizes for each jaw type is stated in the accessory<br />
jaw manual.<br />
OPTIONAL ACCESSORIES<br />
The <strong>Nova</strong> <strong>Titan</strong> 5inch Chuck is one of the most versatile chucking systems. It is fully compatible<br />
with the <strong>Nova</strong> and Super<strong>Nova</strong> Chucks and shares the same extensive accessory range.<br />
Optional accessories include over 16 different jaw sets and other items to enable you to explore<br />
all areas of turning with your <strong>Nova</strong> <strong>Titan</strong> 5in Chuck.<br />
COLE JAW SET Code: JSCOLE<br />
A versatile set designed primarily for rechucking<br />
of bowls to remove chuck marks or re-shape<br />
the bottoms of the bowls that have already<br />
been turned. Most other jaws etc can be mounted<br />
on top of the Cole Jaws for a combination jaw<br />
facility.<br />
130mm JUMBO JAWS Code: JS130N<br />
The big brother to the 100mm jaws. Designed to<br />
handle large work up to 750mm (29") in diameter.<br />
An ideal ‘companion’ jaw to the <strong>Nova</strong> <strong>Titan</strong> 5<br />
inch as the extra power of the <strong>Nova</strong> 5 inch<br />
matches the big capacity of these jaws. No<br />
need to consider larger chucks for those special<br />
jobs - the Jumbo Jaws will perform just as well.<br />
Has a dovetail recess facility up to 149mm<br />
(5.86”).<br />
When making a recess it is important to calculate the depth. The recess depth is an important<br />
consideration for maximising the holding power of the jaws, guidelines under each jaw should be<br />
followed closely. The depth of a recess can be varied according to the size and mass of the workpiece.<br />
Larger bowls and softer woods require a deeper recess. Smaller lids and thin platters generally require<br />
a shallower recess. Always use a recess depth in excess of what is required. IF THERE IS ANY<br />
DOUBT INCREASE RECESS DEPTH.<br />
SPIGOT OPERATION<br />
Contraction of the jaws around a wooden spigot for grip. Mainly used for box, goblet and vase turning,<br />
that is, endgrain items with a fair degree of overhang. Generally tailstock support is minimal or cannot<br />
be used because of the need to hollow out the inside. This method seems to be preferred by many bowl<br />
turners over the internal dovetail recess as the foot can later be re-shaped or removed, if desired, to<br />
make a smooth outside bottom of the bowl.<br />
This situation is one of the most difficult to provide secure holding no matter what fixing method is<br />
used. EXTREME CAUTION WITH THIS OPERATION MUST BE EXERCISED. However if used properly<br />
the <strong>Nova</strong> <strong>Titan</strong> 5inch Chuck provides a very secure grip in this mode.<br />
FREE END TURNING<br />
Turning where the work is not supported by the tailstock.<br />
Check for adequate contact and grip of all four jaws into the wood when using this operation. MAKE<br />
SURE YOU HAVE AN ADEQUATE GRIP BEFORE OPERATION by vigorously wrenching the work<br />
piece mounted in the chuck. If any loosening occurs DO NOT PROCEED with this operation. Repeat<br />
tightening procedure and retest grip. Refer to the <strong>Nova</strong> Chuck/Super<strong>Nova</strong>/<strong>Nova</strong> <strong>Titan</strong> 5inch Chuck<br />
manual for information on forming a spigot.<br />
POWERGRIP JAWS Code: PJSN<br />
These jaws have tremendous holding power. Best<br />
used in conjunction with the <strong>Nova</strong> <strong>Titan</strong> 5inch,<br />
as the extra gripping power of the chuck enhances<br />
the PowerGrip’s action.This jaw is included with<br />
the standard <strong>Nova</strong> <strong>Titan</strong> model. Able to hold<br />
large work up to 750mm (29") in diameter but has<br />
the added advantage over the 130mm jaws, of<br />
being able to hold long spigots up to 19" long.<br />
Also has a dovetail facility with up to 120mm<br />
(5”) recess.<br />
JS100N 100mm Jaw Set<br />
Have an expanding dovetail grip, strong reverse<br />
dovetail grip for footed bowls. Made for a larger<br />
range of work than either the 50mm or Step<br />
jaws.<br />
<strong>Titan</strong> Power Jaw Set<br />
(Available: December 2003)<br />
Using 3 screw holing system these jaws are<br />
designed to hold very large spigot blow<br />
work. See www.teknatool.com product<br />
release specifications November 2003.<br />
13
TROUBLE SHOOTING GUIDE<br />
FAULT<br />
1. Insert jams when partially<br />
threaded into body<br />
2. Chuck body appears not<br />
to be true<br />
3. Add<br />
true<br />
on jaws do not run<br />
4. Jaw Slides closed to<br />
centre and No. 1 slide stays<br />
in centre when jaws are<br />
expanded again<br />
5. Chuck very stiff to<br />
operate or jammed<br />
REMEDY<br />
Check insert thread and chuck body threads are free from damage.<br />
Check insert has engaged with chuck body thread correctly. See<br />
'Fitting to Chuck' Page 7. Make sure the grubscrew has not been<br />
SCREWED IN.<br />
Check insert is properly home in chuck body. Check that the insert is<br />
correctly screwed onto lathe spindle. Insert must back against accurate<br />
face/register or bearing on lathe spindle. See Page 7.<br />
Check jaws are mounted correctly on jaw slides. For method see<br />
Page 9. For accuracy parameters see Page 2. When the jaws are<br />
expanded beyond a 50mm circle they will appear to be running out but<br />
in fact are maintaining concentricity. Always evaluate runout from<br />
turned wood clamped in jaws<br />
Jaw Slide(s) have overtravelled from scroll. It will be necessary to tap<br />
back No 1 jaw slide until it has re-engaged. See page 8 for 'insertion<br />
of jaw slide'.<br />
Wood dust and shavings can clog the chuck<br />
be cleaned. Follow instruction Page 7<br />
in use. The chuck should<br />
6. Jaw Slides when wound<br />
to centre do not meet<br />
7. When chuck is being<br />
removed from spindle the<br />
body unwinds from insert<br />
Slides have not engaged sequentially in clockwise order with scroll - 1-<br />
2-3-4.<br />
Jaw Slides could have been inserted out of order.Check insertion<br />
procedure Page 8.<br />
Either lock insert in body using grubscrew and fibre<br />
use spanner on the insert to wind chuck off lathe.<br />
washer provided or<br />
8. Chuck<br />
spindle<br />
jams on lathe<br />
9. Woodworm screw<br />
creeps forward or is not<br />
seated properly in chuck<br />
10. Wooden spigot shifts<br />
during turning<br />
11. Wood blank does not<br />
seat properly in internal<br />
dovetail mounting<br />
This is a common problem with fixtures on a lathe. Use piece of wood<br />
& knock against base of pinion gear in anticlockwise direction to jar<br />
loose from spindle. To help prevent it try a plastic or fibre washer<br />
between insert/chuck and spigot shoulder of a spindle. Use of washer<br />
could affect accuracy.<br />
Make sure woodworm screw boss is placed correctly between jaw<br />
slides and behind jaws. See Page 9<br />
Check that the spigot area is made correctly for jaws to grip. Check<br />
that the spigot is not oversize. See spigot operation instruction Page<br />
11. Use careful chisel techniques that do not exert too much pressure.<br />
Irregular rough wood blanks need to be checked to see whether there<br />
is enough jaw contact.<br />
Check the angle of the dovetail recess made is the same angle as the<br />
jaws. Make sure the bottom of the recess is flat and square to face.<br />
See dovetail operation Page 10. Check that the bowl is not incorrectly<br />
riding on the flat shoulder of jaws behind the dovetail.<br />
Extra Support is available on our Website!<br />
Go to www.teknatool.com<br />
or email: service@teknatool.com<br />
Code Qty. Part No. Description<br />
1 1 13025 <strong>Nova</strong> <strong>Titan</strong> Body<br />
2 1 13001 <strong>Titan</strong> geared ring<br />
3 2 13002 <strong>Titan</strong> Pinion<br />
4 1 13003 <strong>Titan</strong> backing plate<br />
5 1 13022 <strong>Titan</strong> Jawslide set of 4<br />
9 4 PJSN Power Grip Jaw Segment<br />
10 2 EC48 Circlip dia 48mm external<br />
11 2 13004 Retaining pin<br />
12 1 G0606 6mm grub screw<br />
13 8 CM5010180 Special head M6x10 countersunk<br />
screws<br />
14 1 13006 8mm Hexagon Wrench<br />
15 1 AK3 Allen Key 3mm<br />
16 1 LSM4N Stopper Screw<br />
12
MOUNTING CHUCK ON LATHE<br />
There are two versions of the <strong>Nova</strong> <strong>Titan</strong> 5in Chuck: an insert version for all threads up to 28mm<br />
(1 1/8”) and threaded versions for larger dedicated threads up to 38mm (1 1/2”).<br />
CORRECT MOUNTING OF CHUCK TO INSERT (WITH INSERT VERSION) AND LATHE SPINDLE IS<br />
VERY IMPORTANT TO ACHIEVE ACCURACY.<br />
INSERT VERSION: Check that the correct insert has been supplied to match your lathe spindle thread.<br />
The code of the insert is on a label on the plastic insert cover and stamped on one of the flats of the<br />
hexagon section of the insert. A list of thread sizes that can be fitted with an insert plus the larger<br />
dedicated threads is provided. If you find your lathe thread is not listed, check with your supplier to see<br />
if there have been more recent additions to the thread range. Failing that, you may have a blank insert<br />
or blank chuck machined to your requirements at your own expense.<br />
WE STRONGLY RECOMMEND THAT THE CHUCK IS NOT USED ON LATHE SPINDLES UNDER 1in<br />
(25mm) diameter.<br />
Threads covered by the Insert System (Threads up to 28mm (1 1/8”)<br />
Chuck Code Thread & Lathe Model<br />
Insert 2 (I2NS) : M20X2 Tyme Cub<br />
Insert 3 (I3NS) : M20x1.5Rh Electra Beckum Multico Sumaro<br />
Insert 6 (I6NS) : 3/4” Plain Bore<br />
Insert 7 (I7NS) : 1 1/8" 8 TPI UN<br />
Insert 8 (I8NS) : 7/8"12 UN Left-hand<br />
Insert 9 (I9NS) : 3/4” 16TPI UNF Rh6mm Register,Sears, Coronet Minor/<br />
Major<br />
Insert A (IANS) : 3/4” 14TPI Rh BSP <strong>Teknatool</strong> (Pre 1986)<br />
Insert B (IBNS) : 3/4” 14TPI Lh BSP <strong>Teknatool</strong> (Pre 1986)<br />
Insert C (ICNS) : 1” 10 TPI Rh BSF <strong>Teknatool</strong> Woodfast Durden<br />
Insert D (IDNS) : 1” 8 TPI Rh UNC General Rockwell Delta Golding<br />
Insert E (IENS) : 1”12Tpi Rh Myford MLS<br />
Insert F (IFNS) : 5/8” Plain Bore Shopsmith<br />
Insert H (IHNS) : 3/4” 10TPI Rh BSW Rockwell Homecraft<br />
Insert I (IINS) : M24x3 TPI Rh B Line Arundel K600 K450<br />
Insert J (IJNS) : 1 1/8”12TPI Rh Myford Mystro<br />
Insert K (IKNS) : M18x2.5 Rh ELU DB180<br />
Insert L (ILNS) :1 1/4” 8TPI UNS RH. <strong>Teknatool</strong> DVR3000 Only<br />
Insert M (IMNS) : 1” 10 TPI Lh BSF <strong>Teknatool</strong> Woodfast Durden<br />
Insert N (INNS) : Blank.Can be threaded up to 28mm (1 1/8”)<br />
Insert O (IONS) : 1 1/8” 7 TPI BSW Rh Morton<br />
Insert Q (IQNS) : M30x3.5 Rh <strong>Teknatool</strong> <strong>Nova</strong> 3000/Comet/TL1500<br />
Woodfast, Vicmarc<br />
Insert U (IUNS) : 1 1/8”12 TPI Rh UNF Taiwanese<br />
Insert V (IVNS) : 7/8” 14 TPI NF Rh<br />
Insert W (IWNS) : M25x2 TPI Rh Tyme Avon<br />
Insert Y (IYNS) : 1 1/4" 8 TPI UNS Rh<strong>Teknatool</strong>DVR30003000<br />
(USA),Woodfast USA<br />
Thread Direct to Chuck<br />
4 Chuck (SNC4) : M33x3.5 Rh <strong>Nova</strong> DVR3000 Europe<br />
P Chuck (SNCP) : 1 1/2” BSW Rh Tanner Union Graduate Wadkin Bursgreen<br />
R Chuck (SNCR) : Blank. For threads up to 38mm<br />
6<br />
Before scraping out the recess, slightly hollow out the centre of the bowl blank with a bowl gouge<br />
or round nose scraper. The purpose is to relieve the centre so that when the recess is scraped<br />
out only half the chisel edge needs to be used. We recommend this to reduce tearing of the<br />
wood by scraping action; and to make the recess a little more finished to give a better effect to<br />
the overall bowl. Extra embellishments can also be made to the recess to enhance the bowl.<br />
After the recess is finished and the outside of the bowl is turned to shape, wind bowl back off<br />
screw. Bowl blank is now ready to be reversed into the jaws. Expand the jaws into the recess.<br />
When the jaws are expanded out into the recess, screw the wood blank gently back and forth to<br />
make sure it is seated properly on the bottom face of the jaws.<br />
WARNING: MAKE SURE THE JAWS ARE SEATED PROPERLY IN THE RECESS AND THAT<br />
THE BOWL IS NOT INCORRECTLY RIDING ON THE FLAT SHOULDER SECTION OF THE<br />
JAWS BEHIND THE DOVETAIL. THIS COULD LEAD TO THE BOWL DISLODGING FROM<br />
CHUCK. LOOSEN JAWS AND REMOUNT CORRECTLY.<br />
Now give a few gentle raps with the end of a chisel handle or wooden mallet around centre of<br />
bowl. Use pinion handle to give give an extra nip up. Refer to chuck operation Page 4. Refer<br />
again to safety before operation.<br />
SPIGOT OPERATION<br />
This is where the jaws contract around a wooden spigot for grip. This function is mainly for box,<br />
goblet and vase turning, that is, endgrain items with a fair degree of overhang.<br />
This situation is one of the most difficult to provide secure holding no matter what fixing method<br />
is used. EXTREME CAUTION WITH THIS OPERATION MUST BE EXERCISED. DO NOT<br />
EXCEED 700 RPM FOR THIS OPERATION. If used properly the <strong>Nova</strong> <strong>Titan</strong> Chuck however,<br />
provides a very powerful and secure grip in this mode.<br />
Instructions below apply to the Powergrip jaws but the general spigot technique is the same for<br />
other jaw types. However, maximum turning speed and recess size varies with different jaw<br />
types. Consult accessory jaw manual or instruction sheets.<br />
With the power grip jaws a maximum size woodblank of 200mm (8 inches) diameter (NOT spigot<br />
size) by 310mm (12 inches) length can be turned. Square timber of same length and between<br />
60mm (2 23/64 inches) to 80mm(3 9/64inches) and grip of all four jaws into wood.<br />
MAKE SURE YOU HAVE AN ADEQUATE GRIP BEFORE OPERATION by vigorously wrenching<br />
the limb mounted on chuck. If any loosening occurs DO NOT PROCEED with operation. Repeat<br />
tightening procedure and re-test grip.<br />
SPIGOT SIZE:<br />
Powergrip jaws will grip a round spigot between 80mm (3.15inches) to 100mm (4 inches) approx.<br />
Square timber between 60mm (2 23/64inches) to 80mm(3 9/64inches) square approx.<br />
(Note: EUROPE/UK: Maximum size is 6mm (1/4") less).<br />
Jaw slides only: With the add-on jaws removed, the jaw slides will grip either round or square<br />
timber down to 8mm (5/16inch). Length limits same for spigot work. Small work not greater than<br />
this diameter can be turned at a speed NOT EXCEEDING 1800 RPM. Larger work held in the jaw<br />
slides should not exceed 700 RPM.<br />
FORMING SPIGOT:<br />
When selecting wood make sure it is sound without splits or weakness - especially around the<br />
area where the spigot is to be formed. REMEMBER WITH FREE END TURNING, THIS IS THE<br />
ONLY AREA GRIP. IF ANY WEAKNESS IS FOUND, DO NOT PROCEED. Mount wood<br />
between centres and turn the spigot area. Make the spigot as parallel as possible to maximise<br />
the efficiency of the clamping action. Only approximate sizing of the spigot is necessary, as<br />
the jaws will accommodate a wide range of spigot diameters within the spigot limits stated above.<br />
11
PREPARATION: The 10.5mm thread requires a drilled hole about 8mm (5/16”) in diameter. The screw<br />
has considerable holding power and it is sometimes difficult to unscrew, so wax or oil the thread before<br />
mounting the wood.<br />
CARE: The threads are fine and can be damaged by mishandling. DON’T hammer into wood! DO<br />
screw into a pre-drilled hole. Any nicks on the threads can be removed by carefully filing.<br />
DOVETAIL OPERATION<br />
Expansion of the jaws into a recess. This function is for bowl and platter turning where the projection<br />
(depth) of the wood blank is not too great i.e. up to 150mm (6 inches). Characteristically these items<br />
have a parallel wood grain. IT MUST NOT BE USED FOR ANY LONG WORK (OVER 150MM) AS<br />
THERE WOULD BE GREAT DANGER OF WOOD TEARING OUT AND DISLODGING FROM CHUCK.<br />
Instructions below apply to the Powergrip jaws but the general technique is the same with other<br />
accessory jaws. However the maximum size of wood blank that can be mounted, the maximum turning<br />
speed and recess size varies with the different accessory jaws. Consult specific instructions included<br />
for each jaw set.<br />
This strong holding method, using the power grip jaws, bowls up to 400mm (16 inches) in diameter can<br />
be turned. DO NOT EXCEED 700RPM WITH THIS OPERATION. OUT OF BALANCE STOCK MUST BE<br />
TURNED AT THE SLOWEST SPEED POSSIBLE.<br />
Powergrip jaws: Any recess can be turned between 96mm (3.8”) and 120mm (4.7”) diameter.<br />
EUROPE/UK: Maximum recess size is 8mm (0.30") .<br />
Choose the diameter, that suits your bowl design. However the optimum turning recess diameter (on<br />
the outside) is 99mm(3 57/64”). As the recess diameter is increased above 99mm, less jaw contact is<br />
made.This needs to be kept in mind when considering the recess depth and size of wood blank being<br />
mounted. Increase the recess depth to maximum if a recess diameter in excess of 99mm is used.The<br />
dovetail angle is 15 degrees.<br />
FORMING RECESS<br />
The jaw dovetail has been designed for use with a standard skew scraper. This chisel will make a recess<br />
to the angle required. FOR SAFETY REASONS WE STRONGLY ADVISE AGAINST USING ANY<br />
OTHER TOOL. A profile of this chisel is shown below. It is best to work with a tool, which is already<br />
ground, to the correct angle. All that is necessary then is to keep the leading edge of the chisel flat on<br />
the wood, moving forward and out to form the recess to the required diameter and depth.<br />
Mount bowl blank on screw as described in previous section. It may be convenient to first mark out with<br />
a pencil, a circle on the bowl blank. To mark out the recess diameter with pencil, hold pencil point to<br />
desired radius, supported on the toolrest. Then revolve blank by hand thus creating a pencilled circle.<br />
However, as specified above, any recess diameter can be made between 96mm (3.8”) 120mm (4.7”)<br />
so exact sizing of the recess is unnecessary.<br />
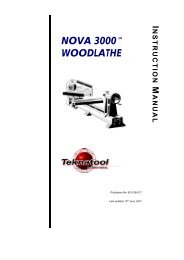
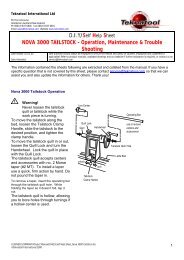
FITTING TO CHUCK: Check that<br />
the internal spigot of chuck body<br />
plus insert threads are clean and<br />
that the spigot end of the insert<br />
is free from damage. Any dents<br />
or nicks must be carefully filed<br />
off so the insert can be fully<br />
screwed home in chuck body.<br />
Refer to fig 2 on right side.<br />
The tolerances of the chuck body<br />
and insert are a tight fit to ensure<br />
accuracy. This means that the<br />
insert may be difficult at first to<br />
engage with the chuck body<br />
thread. One way is to grip the<br />
chuck body in a vice (pad against<br />
damage) and screw in insert using<br />
the optional accessory spanner<br />
or a 1 1/2” AF spanner. Care<br />
needs to be taken that the outer<br />
male insert thread is engaged<br />
properly at the start with the<br />
female body thread. Screw insert<br />
fully into body recess. This is<br />
important to ensure good running.<br />
CHUCK INSERT SPANNER An optional, accessory insert spanner can be purchased to help wind<br />
the inserts into the chuck or remove from the lathe spindle. (Code 23014).<br />
Insert can now be locked to chuck body by means of the M6x6 grubscrew provided. Make sure<br />
that the fibre washer is inserted first to act as a buffer between the grubscrew and insert thread.<br />
DO NOT SCREW IN GRUBSCREW BEFORE INSERT IS SCREWED HOME IN CHUCK.<br />
IMPORTANT: LH THREAD INSERTS MUST BE LOCKED TO CHUCK BODY OR CHUCK BODY<br />
COULD UNWIND FROM INSERT WHILE RUNNING.<br />
FITTING CHUCK TO LATHE: Correct fitting of chuck to lathe spindle is important to ensure<br />
accuracy. The chuck body must contact an accurate shoulder on the lathe spindle or bearings (as<br />
on <strong>Teknatool</strong> <strong>Nova</strong> 3000) to ensure chuck will run true.<br />
There can be a wide variety of lathe spindle thread and spigot dimensions even within the same<br />
thread size. The internal thread size is kept to standard tolerances. The internal thread length and<br />
spigots of <strong>Nova</strong> inserts are manufactured to cover as wide a range of variations as possible. This<br />
will mean that in most situations you should be able to get a satisfactory match.<br />
CHECK THE FOLLOWING:<br />
Although the insert may screw on part way it may not contact properly with spindle spigot - a<br />
spacer or some further modification of the insert may be necessary. This would be the responsibility<br />
of the chuck user. Make sure the chuck is screwed to lathe thread properly - a good check is to<br />
see whether it screws home on the spindle same as any another lathe fixture such as a faceplate.<br />
POOR FIT OF CHUCK TO LATHE SPINDLE CREATES A SERIOUS HAZARD WHERE CHUCK<br />
COULD DISLODGE FROM LATHE. DO NOT ATTEMPT TO USE CHUCK UNLESS THE CHUCK<br />
IS CORRECTLY FITTED TO LATHE SPINDLE.<br />
10 7
MAINTENANCE<br />
CLEANING CHUCK: The <strong>Nova</strong> <strong>Titan</strong> Chuck is perfectly enclosed from behind which makes the gearing<br />
mechanism maintenance free over a long period of time.However the chuck needs to be inspected<br />
periodically for build up of wood dust in the jawslide area on the front side.Wood dust build up can make<br />
the jaws difficult to move. To clean out the wood dust build up, the following method can be used.<br />
Remove Jaw Slides. (First removing stop screw as explained in previous section) then using a piece<br />
of wood (matchstick size) insert in the bottom of scroll and rotate scroll ring. This will scrape out the<br />
accumulated wood dust.<br />
To disassemble chuck: Over a long period of usage there could be some accumulation of very fine<br />
dust in the gearing area behind which may require dismantling of chuck for a full clean.Following are<br />
steps(Refer to exploded chuck diagram, Page 5) Using expanding plier remove the circlip securing the<br />
backing plate.This should give enough access to clean the gears without further dismantling of the<br />
chuck.If you want to dismantle further,follow these instructions.Remove the two M6 grub screws<br />
holding the dowel pins.Next hold the chuck with the jawslide surface facing up.Wiggle the pinions with<br />
the help of 8mm Hexagon Wrench till the two dowel pins have fallen down.Next remove the<br />
pinions.Remove the second circlip securing the scroll ring.The scroll ring can be removed now. After<br />
you have cleaned the chuck assemble the chuck back in the same order.Re-insert the<br />
jawslides.Remember,after you have re-assembled the gears,apply any general grease all around the<br />
gear area!!<br />
Remember to replace jaw travel stop screw!!<br />
STOP ON JAW TRAVEL<br />
Stop screw is located at the end of the number 1 slideway, or number 3 for Europe, in the body section<br />
of the chuck. The stop on No.3 slideway for Europe is to conform to CE regulations to limit the travel<br />
of the jaw slides to the diameter of the chuck body. The screw prevents jaw slides being unwound from<br />
the chuck. Do not exert pressure against the screw with pinion action. If screw is removed for<br />
disassembly it must be replaced before use. Refer exploded view diagram on page 5 of the manual,<br />
and to drawing accompanying insertion of jaw slides below.<br />
Caution: Do not close jaw slides to a diameter less than 8mm (5/16”) for workholding. Do not close jaw<br />
slides to fully closed position because jaw slides could over travel on scroll and become disengaged.<br />
INSERTION OF JAW SLIDES<br />
Jaw slides are numbered 1 - 4 (numbering on end of slide). (Note: Travel stop screw at the end of No.1<br />
body slide needs to be removed. Refer to previous jaw slide travel lock section). When the jaws are<br />
removed from the body they need to be reset in sequence. To reset jaws in chuck body, rotate with<br />
pinion gear until the lead of the scroll (like a thin wedge) appears in the opening of the slide way with ‘1’<br />
marked beside it.<br />
The three screw position slides are inserted using the same method as two position illustrated below.<br />
CAUTION: IT IS IMPORTANT TO ROTATE THE LEADING EDGE OF THE SCROLL BACK SLIGHTLY<br />
TO CLEAR THE SLIDEWAY BEFORE SLIDE CAN BE INSERTED. FAILURE TO ROTATE THE SCROLL<br />
BACK COULD RESULT IN DAMAGE TO SCROLL.<br />
Now insert No.1 slide into slideway and rotate scroll in a clockwise direction (chuck facing you) until the<br />
lead of the scroll appears at the next slideway. Now engage No.2 scroll in the same manner as No.1.<br />
Proceed in the same way in a clock-wise sequence with No.3 and No.4 slides.<br />
Refer to the diagram.<br />
MOUNTING ADD-ON JAWS<br />
Your standard <strong>Nova</strong> <strong>Titan</strong> 5in<br />
chuck is provided with<br />
PowerGrip add-on jaws. They<br />
need to be located and screwed<br />
on to the jaw slides of the<br />
chuck. The same procedure<br />
outlined below must be followed<br />
for all accessory jaws as well.<br />
IT IS IMPORTANT TO LOCATE<br />
JAWS PROPERLY IN THE<br />
JAW SLIDES FOR THE<br />
CHUCK TO FUNCTION<br />
ACCURATELY.<br />
Follow the method set out below<br />
-<br />
1. You will notice that the back<br />
of the jaws have a stepped location ring. This location ring is designed to fit into the grooved<br />
section of the jaw slide for precision location. Ensure that the slide and collet back are clean and<br />
free from any burrs or damage that might affect location. Place the jaw segment over the hole<br />
positions on the jaw. Press the jaw segment firmly onto the jaw slide. For the first few times you<br />
may need to GENTLY tap the jaws into the locator slot with a block of wood.<br />
2. The screws can now be screwed in, using the 4mm Allen Key provided. Lightly grease or oil<br />
screws under each head and on the threads before use to prevent the screws from seizing in the<br />
jaw. Preferably use an anti-seize compound e.g. ROCOL J 166 Anti-Seize Compound. Do all<br />
screws up finger tight and then back them off one quarter to half a turn.<br />
3. Wind the mounted jaws into the centre of the chuck until they all butt against the other. Now<br />
finally tighten screws, starting with centre screws and then outside screws. Nip screws up firmly<br />
but DO NOT OVERTIGHTEN.<br />
4. Check there is no light between jaw slides and add on jaw segments or that one or more<br />
segments is not higher or lower than the rest. If this is the case repeat procedure above.<br />
OPERATING MODES<br />
SCREW CHUCK: This is a convenient mounting method. The powergrip woodworm screw is<br />
purpose-designed for screw chucking. It is a cylindrical screw which maintains its full holding power<br />
along the whole length, unlike normal tapered screws. The thin thread form is specially designed to<br />
cause minimum damage to wood fibres. They grip better than screws with thicker threads because<br />
there is a larger volume of undamaged wood retained within the screw.The woodworm screw is<br />
made complete with the boss section in one piece. The woodworm screw is designed to be used with<br />
the powergrip jaws remaining in place on the chuck. This facility is very convenient for remounting<br />
work directly onto the jaws after the screw is removed. To convert to this operation, place the boss<br />
section into the centre of the chuck making sure flat shanks are aligned to the jaw slides and close<br />
jaws around it. BEFORE FINAL TIGHTENING MAKE SURE THAT THE FRONT OF THE BOSS<br />
SECTION OF THE SCREW IS SEATED BEHIND AND AGAINST THE POWERGRIP JAWS. This<br />
will prevent any tendency for the boss section to creep forward when the screw is being used. The<br />
front face of the powergrip jaws has been machined to provide an accurate backing surface. This<br />
is quite an advantage, providing a much tighter fit and better tolerance for irregular face stock.<br />
This feature is also quite an advantage when using the screw to mount a bowl for first stage bowl<br />
turning - forming the outside of the bowl straight onto the jaws (the screw is first removed) after the<br />
recess has been formed.<br />
SCREW DEPTH: The screw provides 19mm (3/4 inch) of thread beyond the powergrip jaws. With<br />
all wood blocks over 150mm (6 inches) in diameter the full thread depth of 19mm should be used.<br />
Irregular, rough tree blanks (e.g. small sections of tree limbs) not exceeding the above sizes can<br />
be held quite firmly BUT caution must be exercised. Check for adequate contact.<br />
CAPACITY: DO NOT USE THE SCREW FOR VERY LARGE WOOD BLANKS. Its use is intended<br />
9<br />
for small bowl and screw chucking work. The maximum capacity which should be mounted on the<br />
screw - 250mm (10 inches) diameter x 100mm (4 inches). DO NOT EXCEED 600 RPM FOR THIS<br />
OPERATION. Use tailstock support.