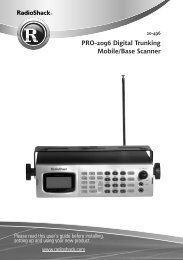
Caller ID Speakerphone Operation - Radio Shack
Caller ID Speakerphone Operation - Radio Shack
Caller ID Speakerphone Operation - Radio Shack

Create successful ePaper yourself
Turn your PDF publications into a flip-book with our unique Google optimized e-Paper software.
<strong>Caller</strong> <strong>ID</strong> <strong>Speakerphone</strong><br />
43-165<br />
User’s Guide<br />
Thank you for purchasing your <strong>Caller</strong> <strong>ID</strong> <strong>Speakerphone</strong><br />
from <strong>Radio</strong><strong>Shack</strong>. Please read this user’s guide before<br />
installing, setting up, and using your new phone.<br />
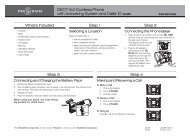
Package contents<br />
• <strong>Speakerphone</strong><br />
• Short Phone Cord<br />
• Wall Mounting Bracket<br />
• User’s Guide<br />
• Long Phone Cord<br />
• Coiled Cord<br />
• Quick Start<br />
Features<br />
• <strong>Caller</strong> <strong>ID</strong> display shows who’s calling.<br />
• 2-way speaker phone makes it easier for you to<br />
multitask while you carry on a conversation.<br />
• 16 one-touch speed-dial numbers plus 20-number<br />
phonebook for dialing convenience.<br />
• <strong>Caller</strong> <strong>ID</strong> memory keeps information for up to 40 calls<br />
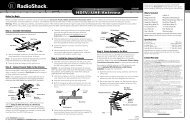
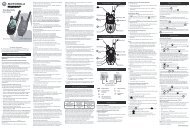
1 Install Batteries<br />
1. Lift the battery compartment cover<br />
from the bottom of the base.<br />
2. Insert three AA alkaline<br />
batteries (not supplied)<br />
into the compartment<br />
as indicated by the polarity<br />
symbols (+ and –) marked inside.<br />
3. Replace the cover.<br />
AA<br />
AA<br />
AA<br />
nNotes:<br />
• Once you install batteries, system information<br />
appears, followed by English, French, and Spanish.<br />
See page 8 to change settings.<br />
• With the battery<br />
cover still<br />
removed, you can<br />
change PULSE/<br />
TONE settings,<br />
ring tone (LO/<br />
M<strong>ID</strong>/HI), and<br />
ringer volume<br />
(OFF/LO/M<strong>ID</strong>/HI).<br />
b Battery Notes:<br />
• When $ appears or the display dims, replace the<br />
batteries.<br />
• To use the speakerphone if no battery is installed, lift<br />
up the handset for 4 seconds and then press .<br />
• During battery replacement, keep the line cord<br />
plugged in and replace the batteries within one<br />
minute to maintain <strong>Caller</strong> <strong>ID</strong> memory.<br />
• Make sure the batteries fit tightly in the battery<br />
compartment.<br />
• Dispose of old batteries promptly and properly.<br />
• Do not burn or bury batteries.<br />
• Use only fresh batteries of the required size and<br />
recommended type.<br />
• Do not mix old and new batteries, different types<br />
of batteries (standard, alkaline, or rechargeable), or<br />
rechargeable batteries of different capacities.<br />
DIAL<br />
Press to dial the displayed<br />
number.<br />
OK/C<br />
Press to confirm phone<br />
functions.<br />
MUTE<br />
Press to mute. Press<br />
again to unmute.<br />
STORE<br />
Press to store<br />
numbers<br />
in memory<br />
locations. See<br />
Memory in<br />
page 11.<br />
FLASH<br />
Press to answer a second<br />
incoming call (if you subscribe to<br />
call waiting).<br />
REDIAL<br />
Press to view the last 5 numbers.<br />
Then press DIAL or , or pick up<br />
the handset to dial the number.<br />
REVIEW /<br />
Scroll up or down to select<br />
options.<br />
C<strong>ID</strong>/<br />
Switch between the phone book<br />
and <strong>Caller</strong> <strong>ID</strong> display.<br />
M1-M16<br />
Dial one of up to 16 stored speed<br />
dial numbers.<br />
Index Card<br />
Flip open the clear cover and use<br />
the supplied index card inside to<br />
record the stored numbers.<br />
Press to make a call or answer a<br />
call when using the headset.<br />
Press to switch between the<br />
handset and speakerphone, or<br />
to make, answer or end calls.<br />
LINE jack<br />
Connect the phone line<br />
here (RJ11).<br />
DATA PORT (Optional)<br />
To connect to additional<br />
telephone equipment<br />
(such as a wireless<br />
telephone, modem,<br />
etc.) with the same line.<br />
Rotate to adjust your<br />
handset or headset<br />
volume.<br />
SPEAKER VOL.<br />
Turn to adjust<br />
speakerphone volume.<br />
Connect an optional headset<br />
with a 3 /32 inch (2.5mm) plug.<br />
Connect the coiled cord here.<br />
• If you do not plan to use the phone for two weeks<br />
or longer, remove the batteries. Batteries can leak<br />
chemicals that can destroy electronic parts.<br />
2 Install Your Phone<br />
You can place your phone on a flat surface or mount it on<br />
a telephone wall plate (not included).<br />
To mount it on the wall plate:<br />
1. Connect one end of the short phone<br />
cord to the telephone wall plate and<br />
the other to the telephone LINE jack.<br />
2. Insert the supplied mounting bracket<br />
into the slots on the back of the<br />
phone and push the bracket up until<br />
it clicks. To detach the bracket, press<br />
the tab and slide down the bracket.<br />
3. Insert the two keyhole slots on<br />
the phone with the wall plate<br />
and slide the phone down,<br />
being careful not to pinch the<br />
telephone line.<br />
4. Slide out the tab in the phone’s<br />
cradle and rotate the tab 180<br />
degrees. Then insert it back to<br />
hold the phone in the cradle.<br />
To connect the handset, plug one end of the supplied<br />
coiled cord into the jack on the left side of the phone.<br />
Plug the other end into the modular jack on the handset.<br />
3 Set Phone Options<br />
1. Peel the plastic label from your phone’s display<br />
before using your phone.<br />
2. Hold down until English flashes, press or <br />
to select the desired display language. Then press<br />
OK/C to confirm.<br />
3. LCD CONTRAST appears in the display. Repeatedly<br />
press or to select one of three settings. Press<br />
OK/C to confirm.<br />
4. The time and date displays, repeatedly press <br />
or to set the time, month and date. Press OK/C<br />
separately to store each setting.<br />
<strong>Operation</strong><br />
Making calls<br />
<strong>Speakerphone</strong><br />
1. Press to switch between the handset and<br />
speakerphone for convenient hands-free use.<br />
2. Dial using the number buttons.<br />
3. To end a call, press .<br />
4. (Optional) When on a call, press to change to<br />
speaker mode.<br />
2/3<br />
2 3 4 5 6 7 8
Group Listening<br />
Group listening allows anyone in the room to hear<br />
both parties and follow the conversation through the<br />
telephone’s speaker.<br />
The ongoing call is not affected and can continue via the<br />
handset or a headset (not included).<br />
1. Once the call has been connected, press to<br />
activate the group listening function.<br />
The LED indicator illuminates and the<br />
conversation can then be heard through the speaker.<br />
2. To deactivate this function, press again.<br />
<strong>Caller</strong> <strong>ID</strong><br />
If you subscribe to <strong>Caller</strong> <strong>ID</strong> service, your phone displays<br />
the following call information:<br />
• Call number (1, 2, 3, etc.)<br />
• <strong>Caller</strong>’s phone number – Your phone displays up to 14<br />
digits. If the number is longer, the display shows only<br />
the last 14 digits.<br />
• Time and date of the call<br />
• <strong>Caller</strong>’s name (if available)<br />
If the <strong>Caller</strong>...<br />
Called more than once<br />
New number not previously<br />
displayed<br />
Blocked number or name<br />
International call or a call<br />
from a PBX (no information<br />
received)<br />
Is calling from long<br />
distance<br />
Left a message<br />
Display Shows<br />
PRIVATE<br />
UNAVAILABLE<br />
LONG DISTANCE<br />
s<br />
(Message icon lights if you<br />
have VMWI signaling.)<br />
nNote: VMWI = Visual Message Waiting Indicator<br />
Your phone stores the caller information. To see <strong>Caller</strong> <strong>ID</strong><br />
records, repeatedly press or .<br />
Saving <strong>Caller</strong> <strong>ID</strong> numbers<br />
To save a <strong>Caller</strong> <strong>ID</strong> number, use or to find the<br />
desired number, then press STORE. COPY NUMBER<br />
appears. Press STORE again and the number is saved.<br />
Call back from the <strong>Caller</strong> <strong>ID</strong> memory<br />
1. Press C<strong>ID</strong>/ until appears.<br />
2. Pick up the handset, press or to select the<br />
desired number, then press DIAL.<br />
nNote: If the <strong>Caller</strong> <strong>ID</strong> number is 10 digits, press<br />
DIAL once. A 1 will be added before the <strong>Caller</strong> <strong>ID</strong><br />
number automatically. Press or to turn the feature<br />
on or off. Press DIAL again. The speakerphone turns on<br />
automatically and dials the displayed number.<br />
Deleting <strong>Caller</strong> <strong>ID</strong> records<br />
• To delete a single record, press OK/C. DELETE?<br />
appears. Hold down OK/C until the number<br />
disappears.<br />
• To delete all records, hold down OK/C until DELETE<br />
ALL? appears. Then, hold down OK/C until NO CALL<br />
appears.<br />
nNote: You cannot delete <strong>Caller</strong> <strong>ID</strong> records that have<br />
not been reviewed or during a call.<br />
Memory<br />
You can store up to16 speed dial numbers (M1-M16)<br />
and 20 phone numbers (22 digits max) with names (16<br />
characters max) in the phonebook.<br />
Storing numbers in speed dial locations<br />
1. Press C<strong>ID</strong>/ until appears.<br />
2. Press STORE. STORE NUMBER appears.<br />
3. Enter the phone number you want to store, including<br />
1+ area code for long distance numbers. Press<br />
STORE, then enter the name using the number<br />
buttons and press STORE again.<br />
4. Press any of the M1-M16 memory buttons.<br />
5. Write the contact’s name or other information on the<br />
supplied index cards next to the speed dial button on<br />
the front of the phone.<br />
nNote: To change a number in memory, store a new<br />
one in its place.<br />
Storing numbers in the phonebook:<br />
1. Press C<strong>ID</strong>/ until appears.<br />
2. Press STORE. SAVE ? appears.<br />
3. Press STORE to confirm.<br />
4. Enter the phone number you want to store, including<br />
1+ area code for long distance numbers. Press<br />
STORE.<br />
5. Enter the name using the number buttons and press<br />
STORE again.<br />
nNote: If you make a mistake while entering the<br />
number, press OK/C to delete, and then re-enter the<br />
phone number.<br />
Changing phone numbers/names:<br />
1. Press C<strong>ID</strong>/ until appears.<br />
2. Press or for the desired number.<br />
3. Press and hold STORE until EDIT ? appears. Press<br />
STORE.<br />
4. Press OK/C, then enter the new number and press<br />
STORE.<br />
5. To correct the name, press OK/C after confirming the<br />
number, then enter the new name. Press STORE to<br />
confirm.<br />
Dialing a stored number<br />
To dial a number stored in the direct memory location,<br />
pick up the handset and press the desired location<br />
number (M1-M16).<br />
To dial a number stored in the phonebook, pick up the<br />
handset, press C<strong>ID</strong>/ until appears. Press or <br />
for the desired number, then press DIAL.<br />
Testing stored emergency numbers<br />
To test a stored emergency number (police department,<br />
fire department, ambulance), make the test call during<br />
the late evening or early morning hours to avoid peak<br />
demand periods. Remain on the line to explain the<br />
reason for your call.<br />
Deleting numbers in the phonebook<br />
• To delete a single number, press OK/C, DELETE?<br />
appears, then hold down OK/C until the number<br />
disappears.<br />
• To delete all numbers, hold down OK/C until DELETE<br />
ALL? appears. Then, hold down OK/C until EMPTY<br />
appears.<br />
Troubleshooting<br />
Problem<br />
No dial tone<br />
Display is blank<br />
Volume drops<br />
or sound is<br />
distorted<br />
Can receive<br />
calls, but cannot<br />
make calls<br />
No <strong>Caller</strong> <strong>ID</strong><br />
information<br />
appears<br />
Possible Solutions<br />
Check the handset and phone line<br />
cord connections.<br />
Check the batteries.<br />
Check if all cords are securely<br />
connected, or if other phones are<br />
being used.<br />
Check the dialing mode, PULSE or<br />
TONE.<br />
Make sure you have subscribed to<br />
<strong>Caller</strong> <strong>ID</strong> service with your phone.<br />
Important Safety Information<br />
When using your telephone equipment, basic safety<br />
precautions should always be followed to reduce the risk<br />
of fire, electric shock and injury to persons, including the<br />
following:<br />
• Do not use this product near water, for example, near<br />
a bath tub, wash bowl, kitchen sink or laundry tub, in a<br />
wet basement or near a swimming pool.<br />
• Avoid using a telephone (other than a cordless type)<br />
during an electrical storm. There may be a remote risk<br />
of electric shock from lightning.<br />
• Do not use the telephone to report a gas leak in the<br />
vicinity of the leak.<br />
• Handle the phone carefully. Do not drop it.<br />
• Do not use or store the phone in extreme<br />
temperatures.<br />
FCC Information<br />
FCC Part 15<br />
This equipment has been tested and found to comply with the limits for a Class B digital device, pursuant<br />
to Part 15 of the FCC Rules. These limits are designed to provide reasonable protection against harmful<br />
interference in a residential installation. This equipment generates, uses, and can radiate radio frequency<br />
energy and, if not installed and used in accordance with the instructions, may cause harmful interference<br />
to radio communications. However, there is no guarantee that interference will not occur in a particular<br />
installation. If this equipment does cause harmful interference to radio or television reception, which can be<br />
determined by turning the equipment off and on, the user is encouraged to try to correct the interference<br />
by one or more of the following measures:<br />
• Reorient or relocate the receiving antenna.<br />
• Increase the separation between the equipment and receiver.<br />
• Connect the equipment into an outlet on a circuit different from that to which the receiver is connected.<br />
• Consult your local <strong>Radio</strong><strong>Shack</strong> store or an experienced radio/TV technician for help.<br />
If you cannot eliminate the interference, the FCC requires that you stop using your equipment. Changes or<br />
modifications not expressly approved by <strong>Radio</strong><strong>Shack</strong> may cause interference and void the user’s authority<br />
to operate the equipment.<br />
This device complies with Part 15 of the FCC rules. <strong>Operation</strong> is subject to the following two conditions: (1)<br />
This device may not cause harmful interference, and (2) This device must accept any interference received,<br />
including interference that may cause undesired operation.<br />
FCC Part 68 and ACTA<br />
a) This phone complies with Part 68 of the FCC rules and the requirements adopted by the ACTA. On the<br />
bottom of this equipment is a label that contains, among other information, a product identifier in the<br />
format US:AAAEQ##TXXXX. If requested, this number must be provided to the telephone company.<br />
b) The registration jack USOC for the equipment is RJ11C or RJ11W.<br />
c) This equipment is designed to be connected to the telephone network or premises wiring using a<br />
compatible modular jack which is Part 68 compliant. A compliant telephone cord and modular plug is<br />
provided with this product. See installation instructions for details.<br />
d) The REN is useful to determine the quantity of devices that may be connected to the telephone line.<br />
Excessive RENs on the telephone line may result in the devices not ringing in response to a n incoming<br />
call. In most, but not all areas, the sum of RENs of all devices should not exceed five (5). To be certain of<br />
the number of devices that may be connected to a line, as determined by the total RENs, contact the local<br />
telephone company.<br />
e) If this phone causes harm to the telephone network, the telephone company will notify you in advance<br />
that temporary discontinuance of service may be required. But if advance notice isn’t practical, the<br />
telephone company will notify the customer will be notified as soon as possible. You will be advised of your<br />
right to file a complaint with the FCC if you believe it is necessary.<br />
f) Your telephone company may make changes in its facilities, equipment, operations, or procedures that<br />
could affect the operation of your equipment. If they do, you will be given advance notice so as to give you<br />
an opportunity to maintain uninterrupted service.<br />
g) If you experience trouble with this phone, please contact your service provider for repair/warranty<br />
information. If your equipment is causing harm to the telephone network, the telephone company may<br />
request that you disconnect the equipment until the problem is resolved.<br />
h) No repair can be done to this equipment.<br />
i) Connection to party line service is subject to state tariffs. Contact the state public utility commission,<br />
public service commission or corporation commission for information.<br />
j) If your home has specially wired alarm equipment connected to the telephone line, ensure the installation<br />
of this phone does not disable your alarm equipment. If you have questions about what will disable alarm<br />
equipment, consult your telephone company or a qualified installer.<br />
k) This phone is hearing aid compatible.<br />
Limited Warranty<br />
<strong>Radio</strong><strong>Shack</strong> warrants this product against defects in materials and workmanship under normal use by<br />
the original purchaser for one (1) year after the date of purchase from a <strong>Radio</strong><strong>Shack</strong>-owned store or an<br />
authorized <strong>Radio</strong><strong>Shack</strong> franchisee or dealer. RADIOSHACK MAKES NO OTHER EXPRESS WARRANTIES.<br />
This warranty does not cover: (a) damage or failure caused by or attributable to abuse, misuse, failure to<br />
follow instructions, improper installation or maintenance, alteration, accident, Acts of God (such as floods<br />
or lightning), or excess voltage or current; (b) improper or incorrectly performed repairs by persons who are<br />
not a <strong>Radio</strong><strong>Shack</strong> Authorized Service Facility; (c) consumables such as fuses or batteries; (d) ordinary wear<br />
and tear or cosmetic damage; (e) transportation, shipping or insurance costs; (f) costs of product removal,<br />
installation, set-up service, adjustment or reinstallation; and (g) claims by persons other than the original<br />
purchaser.<br />
Should a problem occur that is covered by this warranty, take the product and the <strong>Radio</strong><strong>Shack</strong> sales<br />
receipt as proof of purchase date to any <strong>Radio</strong><strong>Shack</strong> store in the U.S. <strong>Radio</strong><strong>Shack</strong> will, at its option, unless<br />
otherwise provided by law: (a) repair the product without charge for parts and labor; (b) replace the product<br />
with the same or a comparable product; or (c) refund the purchase price. All replaced parts and products,<br />
and products on which a refund is made, become the property of <strong>Radio</strong><strong>Shack</strong>. New or reconditioned<br />
parts and products may be used in the performance of warranty service. Repaired or replaced parts and<br />
products are warranted for the remainder of the original warranty period. You will be charged for repair or<br />
replacement of the product made after the expiration of the warranty period.<br />
RADIOSHACK EXPRESSLY DISCLAIMS ALL WARRANTIES AND CONDITIONS NOT STATED IN THIS<br />
LIMITED WARRANTY. ANY IMPLIED WARRANTIES THAT MAY BE IMPOSED BY LAW, INCLUDING<br />
THE IMPLIED WARRANTY OF MERCHANTABILITY AND, IF APPLICABLE, THE IMPLIED WARRANTY<br />
OF FITNESS FOR A PARTICULAR PURPOSE, SHALL EXPIRE ON THE EXPIRATION OF THE STATED<br />
WARRANTY PERIOD.<br />
EXCEPT AS DESCRIBED ABOVE, RADIOSHACK SHALL HAVE NO LIABILITY OR RESPONSIBILITY TO<br />
THE PURCHASER OF THE PRODUCT OR ANY OTHER PERSON OR ENTITY WITH RESPECT TO ANY<br />
LIABILITY, LOSS OR DAMAGE CAUSED DIRECTLY OR INDIRECTLY BY USE OR PERFORMANCE OF THE<br />
PRODUCT OR ARISING OUT OF ANY BREACH OF THIS WARRANTY, INCLUDING, BUT NOT LIMITED<br />
TO, ANY DAMAGES RESULTING FROM INCONVENIENCE AND ANY LOSS OF TIME, DATA, PROPERTY,<br />
REVENUE, OR PROFIT AND ANY INDIRECT, SPECIAL, INC<strong>ID</strong>ENTAL, OR CONSEQUENTIAL DAMAGES,<br />
EVEN IF RADIOSHACK HAS BEEN ADVISED OF THE POSSIBILITY OF SUCH DAMAGES.<br />
Some States do not allow limitations on how long an implied warranty lasts or the exclusion or limitation<br />
of incidental or consequential damages, so the above limitations or exclusions may not apply to you. This<br />
warranty gives you specific legal rights, and you may also have other rights which vary from State to State.<br />
You may contact <strong>Radio</strong><strong>Shack</strong> at:<br />
<strong>Radio</strong><strong>Shack</strong> Customer Relations, 300 <strong>Radio</strong><strong>Shack</strong> Circle, Fort Worth, TX 76102 04/08<br />
www.<strong>Radio</strong><strong>Shack</strong>.com<br />
Protect the environment by recyling used electronics. Go to E-CyclingCentral.com to find<br />
an electronic recycling center near you.<br />
©2010. <strong>Radio</strong><strong>Shack</strong> Corporation.<br />
All rights reserved. <strong>Radio</strong><strong>Shack</strong> and <strong>Radio</strong><strong>Shack</strong>.com are<br />
trademarks used by <strong>Radio</strong><strong>Shack</strong> Corporation.<br />
Printed 01A10<br />
in China 43-165<br />
4LMC21Y2<br />
9 10 11 12 13 14 15 16