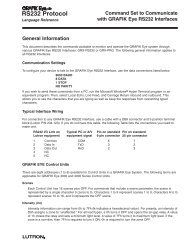
Avant⢠Package: Low-voltage Wiring - Lutron
Avant⢠Package: Low-voltage Wiring - Lutron
Avant⢠Package: Low-voltage Wiring - Lutron

Create successful ePaper yourself
Turn your PDF publications into a flip-book with our unique Google optimized e-Paper software.
Neutral<br />
HOT/LIVE<br />
SSA<br />
Zone 3<br />
Zone 2<br />
Zone 1<br />
CU WIRE ONLY<br />
R<br />
LED1 LED2 1 2 3 4 5 6 7 8<br />
1<br />
4<br />
3<br />
2<br />
1<br />
R<br />
IN<br />
COM<br />
TxD<br />
RxD<br />
LUTRON<br />
1 2 3 4 ADDRESS<br />
0 0 0 0 1<br />
0 0 0 1 2<br />
0 0 1 0 3<br />
0 0 1 1 4<br />
+V<br />
0 = ON; 1 = OFF<br />
1 2 3 4 ADDRESS 1 2 3 4<br />
0 1 0 0 5 1 0 0 0<br />
0 1 0 1 6 1 0 0 1<br />
0 1 1 0 7 1 0 1 0<br />
0 1 1 1 8 1 0 1 1<br />
1 2 3 4 5 6 7 8<br />
R<br />
R<br />
ADDRESS<br />
9<br />
10<br />
11<br />
12<br />
ON<br />
OFF<br />
1 2 3 4 5 6 7 8<br />
1 2 3 4<br />
1 1 0 0<br />
1 1 0 1<br />
1 1 1 0<br />
1 1 1 1<br />
ADDRESS<br />
13<br />
14<br />
15<br />
16<br />
ADDRESS<br />
CONFIG.<br />
TYPE<br />
3/8"<br />
(10mm)<br />
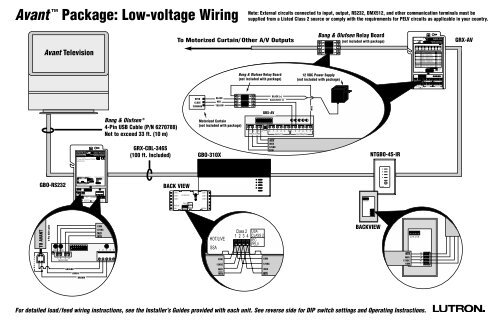
Avant <strong>Package</strong>: <strong>Low</strong>-<strong>voltage</strong> <strong>Wiring</strong><br />
Note: External circuits connected to input, output, RS232, DMX512, and other communication terminals must be<br />
supplied from a Listed Class 2 source or comply with the requirements for PELV circuits as applicable in your country.<br />
Avant Television<br />
To Motorized Curtain/ Other A/V Outputs<br />
Bang & Olufsen Relay Board<br />
5 6 7 8<br />
1 2 3 4<br />
(not included with package)<br />
COOPERSBURG, PA 18036<br />
DIP SWITCH SETTINGS (1-4)<br />
GRX-AV<br />
INTERFACE CONTROL<br />
SELV(CLASS 2:USA)<br />
DIP SWITCH SETTINGS (5-8)<br />
TYPE<br />
CONFIGURATION<br />
DIP SETTING<br />
4S CONTROL SCENES 1-4, MAINTAIN OUTPUTS 5 ON 6 ON<br />
SCENES 5-8, MAINTAIN OUTPUTS 5 OFF 6 ON<br />
7 ON 8 ON SCENES 9-12, MAINTAIN OUTPUTS 5 ON 6 OFF<br />
SCENES 13-16, MAINTAIN OUTPUTS 5 OFF 6 OFF<br />
4S CONTROL SCENES 1-4, MOMENTARY OUTPUTS 5 ON 6 ON<br />
SCENES 5-8, MOMENTARY OUTPUTS 5 OFF 6 ON<br />
7 ON 8 OFF SCENES 9-12, MOMENTARY OUTPUTS 5 ON 6 OFF<br />
SCENES 13-16, MOMENTARY OUTPUTS 5 OFF 6 OFF<br />
GRX-AV<br />
4Q CONTROL SEQUENCE 1-4, MAINTAIN INPUTS 5 OFF 6 ON<br />
SEQUENCE 1-4, MOMENTARY INPUTS 5 ON 6 ON<br />
7 OFF 8 OFF SEQUENCE 5-16, MAINTAIN INPUTS 6 OFF 6 OFF<br />
SEQUENCE 5-16, MOMENTARY INPUTS 6 ON 6 OFF<br />
4PS CONTROL PARTITION STATUS, MOMENTARY INPUTS 5 ON 6 ON<br />
7 OFF 8 ON PARTITION STATUS, MAINTAINED INPUTS 5 OFF 6 ON<br />
SPECIAL OCCUPANCY SENSOR - SCENE 1 & OFF 5 ON 6 OFF<br />
CONTROL OCCUPANCY SENSOR - OFF ONLY 5 OFF 6 OFF<br />
7 OFF 8 ON<br />
Bang & Olufsen Relay Board<br />
(not included with package)<br />
12 VDC Power Supply<br />
(not included with package)<br />
SELV (CLASS 2:USA)<br />
1 2 3 4 C 1 2 3 4 5 1 2 3 4 5 C<br />
MUX LINK INPUTS OUTPUTS<br />
1 2 3 4 C 1 2 3 4 5 1 2 3 4 5 C<br />
MUX LINK INPUTS OUTPUTS<br />
COM<br />
MUX<br />
MUX<br />
PROGRAM<br />
SWITCH<br />
COM<br />
COM<br />
OPEN<br />
CLOSE<br />
COMMON<br />
BLACK<br />
RED<br />
YELLOW<br />
5 6 7 8<br />
1 2 3 4<br />
GRX-AV<br />
BLACK (+)<br />
BLACK/WHITE (-)<br />
COM<br />
Bang & Olufsen ®<br />
4-Pin USB Cable (P/N 6270788)<br />
Not to exceed 33 ft. (10 m)<br />
Motorized Curtain<br />
(not included with package)<br />
1 2 3 4<br />
MUX LINK<br />
1 2 3 4 5 6 7 8<br />
C 1 2 3 4 5 1 2 3 4 5 C<br />
INPUTS<br />
OUTPUTS<br />
GBO-RS232<br />
PROGRAMMING INTERFACE<br />
COOPERSBURG, PA 18036<br />
AUXILIARY CONTROL<br />
PELV (CLASS 2:USA)<br />
For use with Bang and Olufsen<br />
systems only.<br />
GRX-CBL-346S<br />
(100 ft. Included)<br />
GBO-310X<br />
MUX<br />
MUX<br />
12VDC<br />
COM<br />
NTGBO-4S-IR<br />
GRAFIK Eye 3000 Series<br />
TYPICAL EQUIPMENT<br />
GBO-RS232<br />
Class 2<br />
FOR WIRING OF 4000 SERIES, REFER<br />
TO INSTALLATION INSTRUCTIONS<br />
1 2 3 4<br />
MUX LINK 1 2 3 4 5<br />
RS232 LINK<br />
BACK VIEW<br />
LUTRON<br />
1 2 3 4<br />
MUX LINK<br />
1 2 3 4<br />
COM<br />
+V<br />
MUX<br />
MUX<br />
MUX LINK<br />
TO GRAFIK TO TYPICAL<br />
EYE EQUIPMENT<br />
POWER INPUTS:<br />
MUX LINK 2 (+V): 12 (3000 SERIES)<br />
MUX LINK 2 (+V): 24 (4000 SERIES)<br />
2 3 4 5<br />
1 2 3 4 5<br />
COM<br />
DATA<br />
DATA<br />
OUT<br />
N/C<br />
N/C<br />
RS232 LINK<br />
ZONE 2<br />
ZONE 4<br />
ZONE 6<br />
HOT/LIVE<br />
SSA<br />
CU WIRE ONLY<br />
Class 2 USA<br />
1 2 3 4 CLASS 2<br />
IEC<br />
PELV<br />
ZONE 1<br />
ZONE 3<br />
ZONE 5<br />
NEUTRAL<br />
ZONE 6<br />
123456<br />
4<br />
3<br />
2<br />
1<br />
TO AVANT<br />
4-Pin USB Cable<br />
COM<br />
12VDC<br />
MUX<br />
MUX<br />
LED1 LED2 1 2 3 4 5<br />
1 2 3 4 5 6 7 8<br />
HOT/LIVE<br />
SSA<br />
Class 2<br />
1 2 3 4 USA<br />
CLASS 2<br />
IEC<br />
PELV<br />
BACKVIEW<br />
123456<br />
Y<br />
E<br />
L<br />
L<br />
O<br />
W<br />
1 2<br />
4 3<br />
1 2 3 4<br />
MUX LINK<br />
GROUND<br />
GREEN<br />
BROWN<br />
COM<br />
12VDC<br />
MUX<br />
MUX<br />
COM<br />
12VDC<br />
MUX<br />
MUX<br />
MUX<br />
MUX<br />
12VDC<br />
COM<br />
4<br />
32<br />
1<br />
For detailed load/feed wiring instructions, see the Installer’s Guides provided with each unit. See reverse side for DIP switch settings and Operating Instructions.
Operating Instructions<br />
For detailed instructions, please refer to the Installer’s Guides provided with each unit.<br />
Set up communication between the GBO-RS232 and GRAFIK Eye ®<br />
Control Unit.<br />
1 4<br />
1. GBO-RS232. Set DIP switch 1 to the [ON] position, leaving the<br />
other DIP switches in the [OFF] positon. This will allow the Interface<br />
to communicate with the GRAFIK Eye Control Unit.<br />
1 2 3 4 5 6 7 8<br />
Program the GRX-AV to “talk” to the GRAFIK Eye Control Unit.<br />
1. Set Dip switches 1, 2, 3, 7, & 8 to the [ON] position,<br />
and set DIP switches 4, 5, & 6 to the [OFF] position.<br />
1 2 3 4 5 6 7 8<br />
2<br />
3<br />
Assign the GRAFIK Eye Control Unit address [A1].<br />
1. Enter setup mode. Press and hold Scene 1 and OFF buttons for<br />
about 3 seconds, until scene LEDs cycle.<br />
2. Select A- (the address display). Press FADE once, A-<br />
appears in the FADE window.<br />
3. Assign address [A1]. Press MASTER once, the address [A1]<br />
will appear in the FADE window. This will be the Control Unit’s address.<br />
4. Exit setup mode. Press and hold Scene 1 and OFF buttons about<br />
3 seconds, until the LEDs stop cycling.<br />
ZONE 5 ZONE 6<br />
Set up communication between the GRAFIK Eye Control Unit and<br />
the NTGBO-4S-IR.<br />
3<br />
Assign<br />
address [A1]<br />
Select A-<br />
2<br />
FADE<br />
A-<br />
M S<br />
TEMPORARY<br />
ZONES<br />
MASTER<br />
1 4 ,<br />
Enter (Exit)<br />
setup mode<br />
2. Put the GRX-AV control in setup<br />
mode (“talk”). Press and hold the<br />
program switch for 3-5 seconds until the<br />
first four Output Status LEDs begin to<br />
cycle.<br />
3. Identify the GRAFIK Eye Control Unit to<br />
“listen” to this GRX-AV. Press and hold the<br />
Control Unit’s Scene 1 button for about 3<br />
seconds until the four LEDs flash in unison,<br />
showing that this Control Unit is “listening”.<br />
2 ,<br />
1 2 3 4 5 6 7 8<br />
1 2 3 4 C 1 2 3 4 5 1 2 3 4 5 C<br />
MUX LINK INPUTS OUTPUTS<br />
COM<br />
4<br />
1 2 3 4 C 1 2 3 4 5 1 2 3 4 5 C<br />
MUX LINK INPUTS OUTPUTS<br />
+V<br />
Enter(Exit) talk mode<br />
MUX<br />
MUX<br />
PROGRAM<br />
SWITCH<br />
COM<br />
. . . LEDs flash in unison—Control Unit is<br />
“listening”<br />
3<br />
COM<br />
Press and hold<br />
Scene 1 button<br />
for 3 seconds. . .<br />
Note:<br />
DIP switches on the NTGBO-4S-IR must be in the default position as set at the<br />
factory (shown at right). This automatically assigns the unit address as [1] and<br />
programs the scenes as [1-4].<br />
1 2 3 4 5 6<br />
4. Take the GRX-AV out of setup mode. Press<br />
and hold the program switch for 3-5 seconds until<br />
the first Output Status LED stops cycling.<br />
The NTGBO-4S-IR must be configured to “talk” in order to communicate with the GRAFIK Eye Control Unit.<br />
1. Enter setup mode.<br />
LUTRON<br />
Press and hold<br />
top Scene and<br />
OFF button for<br />
3 seconds . . .<br />
. . . LEDs cycle—Wallstation is “talking”<br />
2. Make the Control Unit “listen.”<br />
Press and<br />
hold Scene 1<br />
button for 3<br />
seconds<br />
. . . LEDs flash in unison- Control Unit is “listening”<br />
3. Take the Wallstation out of<br />
setup mode.<br />
LUTRON<br />
. . . LEDs stop cycling<br />
Press and hold<br />
top Scene and<br />
OFF button for<br />
3 seconds . . .<br />
Internet: www.lutron.com<br />
E-mail: product@lutron.com<br />
WORLD HEADQUARTERS<br />
<strong>Lutron</strong> Electronics Co., Inc.<br />
TOLL FREE: (800) 523-9466<br />
(U.S.A., Canada, Caribbean)<br />
Tel: (610) 282-3800;<br />
International 1-610-282-3800<br />
Fax: (610) 282-1243;<br />
GREAT BRITAIN<br />
<strong>Lutron</strong> EA Ltd.,<br />
Tel: (171) 702-0657;<br />
International 44-207-702-0657<br />
Fax: (171) 480-6899; I<br />
International 44-207-480-6899<br />
GERMANY<br />
<strong>Lutron</strong> Electronics GmbH<br />
Tel: (309) 710-4590;<br />
International 49 309 710-4590<br />
Fax: (309) 710-4591;<br />
International 49 309 710-4591<br />
ASIAN HEADQUARTERS<br />
<strong>Lutron</strong> Asuka Corporation<br />
Tel: (03) 5405-7333;<br />
International 81-3-5405-7333<br />
Fax: (03) 5405-7496;<br />
International 81-3-5405-7496<br />
HONG KONG SALES OFFICE<br />
<strong>Lutron</strong> GL (Hong Kong)<br />
Tel: 2104-7733;<br />
International 852-2104-7733<br />
Fax: 2104-7633;<br />
International 852-2104-7633<br />
SINGAPORE<br />
<strong>Lutron</strong> GL (Singapore)<br />
Tel: 65 220 4666; Fax: 65 220 4333<br />
<strong>Lutron</strong> and GRAFIK Eye are registered<br />
trademarks of <strong>Lutron</strong> Electronics Co., Inc.<br />
Bang & Olufsen is a registered trademark<br />
and Avant is a trademark of Bang & Olufsen<br />
Holding A/S.<br />
© 2000 <strong>Lutron</strong> Electronics Co., Inc.<br />
P/N 030-686