Lamp and Filter Replacement Instructions Introduction ... - Christie
Lamp and Filter Replacement Instructions Introduction ... - Christie
Lamp and Filter Replacement Instructions Introduction ... - Christie

You also want an ePaper? Increase the reach of your titles
YUMPU automatically turns print PDFs into web optimized ePapers that Google loves.
<strong>Lamp</strong> <strong>and</strong> <strong>Filter</strong> <strong>Replacement</strong> <strong>Instructions</strong><br />
<strong>Lamp</strong> <strong>Replacement</strong> Procedure<br />
Please read before proceeding.<br />
WARNING<br />
Do not operate the projector when the lamp is removed. Operating<br />
the projector without a lamp may result in malfunctions, fire<br />
hazards, or other accidents.<br />
WARNING<br />
Always power down <strong>and</strong> unplug the projector prior to servicing.<br />
Allow the lamps to cool before h<strong>and</strong>ling.<br />
NOTE<br />
To maintain picture quality we recommend replacing<br />
all four lamps at the same time. Refer to the manual<br />
shipped with the projector for all other lamp related issues.<br />
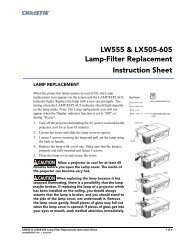
STEP 1 – LAMP REPLACEMENT<br />
(a) From the <strong>Lamp</strong> Status Display check<br />
which lamp requires replacing. It is<br />
recommended that all four lamps are<br />
replaced at the same time.<br />
(b) Turn the projector off <strong>and</strong> disconnect the<br />
AC power cord. Allow the projector to<br />
cool for at least 45 minutes.<br />
(c) Remove the two screws from the lamp<br />
cover <strong>and</strong> press the designated button to<br />
open the cover. Refer to Figure 1.<br />
(d) Loosen the two screws inside the cover<br />
<strong>and</strong> pull out the lamp assembly to be<br />
replaced by grasping the h<strong>and</strong>le. Refer to<br />
Figure 1.<br />
(e) Replace the lamp assembly <strong>and</strong> tighten<br />
both screws to secure it.<br />
(f) Close the lamp cover <strong>and</strong> tighten both<br />
screws.<br />
Figure 1. <strong>Lamp</strong> Cover <strong>and</strong><br />
<strong>Lamp</strong> Assembly Removal<br />
54-003698-04P<br />
2 of 6 Pages