Lamp and Filter Replacement Instructions Introduction ... - Christie
Lamp and Filter Replacement Instructions Introduction ... - Christie
Lamp and Filter Replacement Instructions Introduction ... - Christie

You also want an ePaper? Increase the reach of your titles
YUMPU automatically turns print PDFs into web optimized ePapers that Google loves.
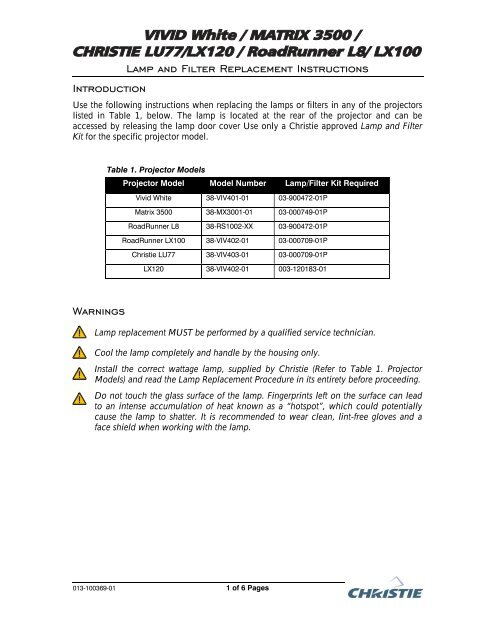
<strong>Introduction</strong><br />
<strong>Lamp</strong> <strong>and</strong> <strong>Filter</strong> <strong>Replacement</strong> <strong>Instructions</strong><br />
Use the following instructions when replacing the lamps or filters in any of the projectors<br />
listed in Table 1, below. The lamp is located at the rear of the projector <strong>and</strong> can be<br />
accessed by releasing the lamp door cover Use only a <strong>Christie</strong> approved <strong>Lamp</strong> <strong>and</strong> <strong>Filter</strong><br />
Kit for the specific projector model.<br />
Table 1. Projector Models<br />
Projector Model Model Number <strong>Lamp</strong>/<strong>Filter</strong> Kit Required<br />
Vivid White 38-VIV401-01 03-900472-01P<br />
Matrix 3500 38-MX3001-01 03-000749-01P<br />
RoadRunner L8 38-RS1002-XX 03-900472-01P<br />
RoadRunner LX100 38-VIV402-01 03-000709-01P<br />
<strong>Christie</strong> LU77 38-VIV403-01 03-000709-01P<br />
LX120 38-VIV402-01 003-120183-01<br />
Warnings<br />
<strong>Lamp</strong> replacement MUST be performed by a qualified service technician.<br />
Cool the lamp completely <strong>and</strong> h<strong>and</strong>le by the housing only.<br />
Install the correct wattage lamp, supplied by <strong>Christie</strong> (Refer to Table 1. Projector<br />
Models) <strong>and</strong> read the <strong>Lamp</strong> <strong>Replacement</strong> Procedure in its entirety before proceeding.<br />
Do not touch the glass surface of the lamp. Fingerprints left on the surface can lead<br />
to an intense accumulation of heat known as a “hotspot”, which could potentially<br />
cause the lamp to shatter. It is recommended to wear clean, lint-free gloves <strong>and</strong> a<br />
face shield when working with the lamp.<br />
013-100369-01 1 of 6 Pages
<strong>Lamp</strong> <strong>and</strong> <strong>Filter</strong> <strong>Replacement</strong> <strong>Instructions</strong><br />
<strong>Lamp</strong> <strong>Replacement</strong> Procedure<br />
Please read before proceeding.<br />
WARNING<br />
Do not operate the projector when the lamp is removed. Operating<br />
the projector without a lamp may result in malfunctions, fire<br />
hazards, or other accidents.<br />
WARNING<br />
Always power down <strong>and</strong> unplug the projector prior to servicing.<br />
Allow the lamps to cool before h<strong>and</strong>ling.<br />
NOTE<br />
To maintain picture quality we recommend replacing<br />
all four lamps at the same time. Refer to the manual<br />
shipped with the projector for all other lamp related issues.<br />
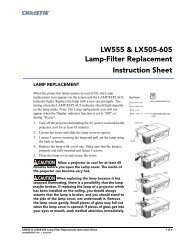
STEP 1 – LAMP REPLACEMENT<br />
(a) From the <strong>Lamp</strong> Status Display check<br />
which lamp requires replacing. It is<br />
recommended that all four lamps are<br />
replaced at the same time.<br />
(b) Turn the projector off <strong>and</strong> disconnect the<br />
AC power cord. Allow the projector to<br />
cool for at least 45 minutes.<br />
(c) Remove the two screws from the lamp<br />
cover <strong>and</strong> press the designated button to<br />
open the cover. Refer to Figure 1.<br />
(d) Loosen the two screws inside the cover<br />
<strong>and</strong> pull out the lamp assembly to be<br />
replaced by grasping the h<strong>and</strong>le. Refer to<br />
Figure 1.<br />
(e) Replace the lamp assembly <strong>and</strong> tighten<br />
both screws to secure it.<br />
(f) Close the lamp cover <strong>and</strong> tighten both<br />
screws.<br />
Figure 1. <strong>Lamp</strong> Cover <strong>and</strong><br />
<strong>Lamp</strong> Assembly Removal<br />
54-003698-04P<br />
2 of 6 Pages
<strong>Lamp</strong> <strong>and</strong> <strong>Filter</strong> <strong>Replacement</strong> <strong>Instructions</strong><br />
NOTE<br />
If the air filter becomes clogged with dust particles the effectiveness of the<br />
cooling fan is reduced <strong>and</strong> may result in internal heat build-up <strong>and</strong> reduced lamp life.<br />
We recommend cleaning the air filter after the projection lamp is replaced.<br />
Refer to the Air <strong>Filter</strong> Care <strong>and</strong> Cleaning procedure, outlined on page 5.<br />
(g) Connect the AC power cord to the projector <strong>and</strong> turn the projector on.<br />
(h) Reset the <strong>Lamp</strong> <strong>Replacement</strong> Counter. For more information, refer to Step 2 — Reset the<br />
<strong>Lamp</strong> <strong>Replacement</strong> Counter, outlined below.<br />
STEP 2 – RESET THE LAMP REPLACEMENT COUNTER<br />
NOTE<br />
Only reset the <strong>Lamp</strong> <strong>Replacement</strong> Counter when the lamp is replaced.<br />
(a) Turn the projector on <strong>and</strong> press the MENU<br />
button to access the onscreen menu.<br />
(b) Press the POINT LEFT/RIGHT button(s) to move<br />
the red frame pointer to the SETTING menu<br />
icon.<br />
(c) Press the POINT DOWN button to move the<br />
pointer to the LAMP COUNTER RESET icon<br />
<strong>and</strong> then press the SELECT button. Refer to<br />
Figure 2.<br />
(d) Move the arrow to select the lamp to be<br />
replaced (lamp 1, lamp 2, lamp 3 or lamp 4)<br />
<strong>and</strong> then press the SELECT button. The<br />
message, “<strong>Lamp</strong> replace counter reset?” is<br />
displayed. Refer to Figure 2.<br />
(e) Move the pointer to [Yes] <strong>and</strong> then press the<br />
SELECT button.<br />
NOTE<br />
The LAMP REPLACE indicator remains on<br />
if the correct lamp number is not reset.<br />
(f)<br />
Another confirmation dialog box appears.<br />
Select [Yes] to reset the <strong>Lamp</strong> <strong>Replacement</strong><br />
Counter.<br />
(g) Select the<br />
menu.<br />
QUIT icon to close the SETTING<br />
Figure 2. Onscreen <strong>Lamp</strong> Selection<br />
For further information, refer to the manual supplied with the projector.<br />
54-003698-04P<br />
3 of 6 Pages
<strong>Lamp</strong> <strong>and</strong> <strong>Filter</strong> <strong>Replacement</strong> <strong>Instructions</strong><br />
STEP 3 – CHECK THE LAMP REPLACEMENT COUNTER<br />
The <strong>Lamp</strong> <strong>Replacement</strong> indicator illuminates when the <strong>Lamp</strong> <strong>Replacement</strong> Counter<br />
reaches 1000 hours. When this occurs it indicates that the lamp must be replaced.<br />
To check lamp hours (applicable to<br />
most models):<br />
(a) Press <strong>and</strong> hold the UP pointer on<br />
the projector for more than 20<br />
seconds.*<br />
(b) The <strong>Lamp</strong> <strong>Replacement</strong> Counter,<br />
as illustrated in Figure 3, will<br />
briefly appear on the top-left<br />
corner of the screen.<br />
Figure 3. <strong>Lamp</strong> <strong>Replacement</strong> Counter Data<br />
Warning Temperature Indicator Maintenance<br />
The WARNING TEMPERATURE indicator flashes red when the internal temperature of the<br />
projector exceeds the normal temperature. The indicator stops flashing when the<br />
temperature of the projector returns to normal. If the WARNING TEMPERATURE indicator<br />
continues to flash, check the items listed below:<br />
1. Check the projector ventilation slots. If they are blocked reposition the projector so the<br />
slots are not obstructed.<br />
2. Check the air filter for dust particles. If the filter is clogged complete the Air <strong>Filter</strong> Care<br />
<strong>and</strong> Cleaning procedure, outlined on page 5.<br />
3. Check the WARNING TEMPERATURE indicator. If the indicator is still on after the<br />
above steps are checked the cooling fans or internal circuits may be malfunctioning.<br />
Contact service personnel from an authorized dealer or service center.<br />
54-003698-04P<br />
4 of 6 Pages
<strong>Lamp</strong> <strong>and</strong> <strong>Filter</strong> <strong>Replacement</strong> <strong>Instructions</strong><br />
Air <strong>Filter</strong> Care <strong>and</strong> Cleaning<br />
NOTE<br />
If the air filter becomes clogged with dust particles the effectiveness of the<br />
cooling fan is reduced <strong>and</strong> may result in internal heat build-up <strong>and</strong> reduced lamp life.<br />
It is recommended the air filter is cleaned every 250 hours of<br />
operation or when the projection lamp is replaced.<br />
The air filter prevents dust from accumulating on the surface of the optical assemblies.<br />
Should the air filter become clogged with dust particles, the effectiveness of the cooling fan<br />
is reduced. This may result in internal heat build-up <strong>and</strong> adversely affect the life of the<br />
projector.<br />
Available <strong>Filter</strong>s (order separately):<br />
• Vivid White <strong>and</strong> original L8: <strong>Filter</strong> #10-A6102834680<br />
• LU77, L8(FLC), LX100, LX120 <strong>and</strong> Matrix 3500: <strong>Filter</strong> #10-A6103014814<br />
To clean the air filter:<br />
NOTE<br />
The following procedure should be undertaken<br />
immediately after Step 1(F) of the <strong>Lamp</strong> <strong>Replacement</strong><br />
Procedure or any other time where it is required.<br />
(a) Turn the projector off <strong>and</strong> disconnect the AC<br />
Power Cord from the AC outlet.<br />
(b) Remove the air filter from the projector. Refer to<br />
Figure 4.<br />
(c) Pull up the center frame to separate the top of the<br />
air filter <strong>and</strong> sponge from the base.<br />
Refer to Figure 4.<br />
(d) Use a brush to clean each part or wash the dust<br />
build-up off. Ensure all components dry before<br />
reassembling.<br />
(e) Reassemble the sponge <strong>and</strong> air filter.<br />
Figure 4. Air <strong>Filter</strong> Removal<br />
(f) Reinsert the air filter into the projector.<br />
CAUTION<br />
To avoid dust accumulation on the LCD Panel <strong>and</strong> Projection Mirror do not operate the<br />
projector with the air filter removed. Failure to do so degrades picture quality.<br />
Do not push small parts into the air intake vents. It may result in projector malfunction.<br />
When operating in poor environments dust may accumulate on the lens, the liquid crystal<br />
panels, or the optical elements inside the projector. These conditions may degrade the<br />
quality of the projected image. When the above symptoms are noticed, contact an<br />
authorized dealer or service center.<br />
54-003698-04P<br />
5 of 6 Pages
<strong>Lamp</strong> <strong>and</strong> <strong>Filter</strong> <strong>Replacement</strong> <strong>Instructions</strong><br />
Technical Support<br />
CHRISTIE Digital Systems, Inc.<br />
809 Wellington St. North<br />
Kitchener, Ontario, Canada N2G 4Y7<br />
Tel. 519-744-8005 (General)<br />
Toll Free 1-800-221-8025 (Technical Support)<br />
Fax 519-749-3302 (Service)<br />
CHRISTIE Digital Systems, Inc.<br />
View Point<br />
200 Ashville Way<br />
Wokingham, Berkshire RG41 2PL<br />
United Kingdom<br />
Tel. +44-118-977-8111<br />
Fax +44-118-977-8112<br />
CHRISTIE Digital Systems, Inc.<br />
7, av Georges Pompidou<br />
92593 Levallois-Perret Cedex<br />
France<br />
Tel. +33-(0)1-47-48-28-07<br />
Fax +33-(0)1-47-48-26-06<br />
CHRISTIE Digital Systems, Inc.<br />
627A Aljunied Road<br />
# 05-02 Biz Tech Centre<br />
Singapore 389842<br />
Tel. 65-6877-8737<br />
Fax 65-6877-8747<br />
NORTH AMERICA<br />
EUROPE<br />
ASIA-PACIFIC / OTHER<br />
CHRISTIE Digital Systems, Inc.<br />
10550 Camden Drive<br />
Cypress, CA 90630 USA<br />
Tel. 714-236-8610 (General)<br />
Toll Free 1-800-221-8025 (Technical Support)<br />
Fax 519-749-3302 (Service)<br />
CHRISTIE Digital Systems, Inc.<br />
Willicher Damm 129<br />
D-41061 Mönchengladbach<br />
Germany<br />
Tel. +49-2161-664540<br />
Fax +49-2161-664546<br />
CHRISTIE Digital Systems, Inc.<br />
Rm. 1109-1116 Shartex Plaza<br />
No. 88 Zun Yi South Road<br />
Shanghai, 200336<br />
People’s Republic of China<br />
Tel. +86-21-6278-7708<br />
Fax +86-21-6270-5816<br />
CHRISTIE Sales (Canada)<br />
CHRISTIE Sales (U.S.)<br />
Tel. 1-800-265-2171 Tel. 1-800-407-7727 or 1-866-880-4462<br />
Fax 519-749-3136 Fax 714-503-3375<br />
54-003698-04P<br />
6 of 6 Pages