EVO-ALL & 4runner, Sienna - Fortin Electronic Systems
EVO-ALL & 4runner, Sienna - Fortin Electronic Systems
EVO-ALL & 4runner, Sienna - Fortin Electronic Systems

You also want an ePaper? Increase the reach of your titles
YUMPU automatically turns print PDFs into web optimized ePapers that Google loves.
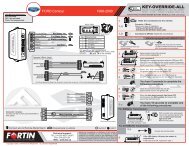
<strong>EVO</strong><br />
INTERFACE MODULE<br />
HARDWARE VERSION : 3<br />
FIRMWARE VERSION : 4.0+<br />
Date: xx-xx<br />
PATENTS PENDING US: 2007-228827-A1<br />
Made in Canada www.fortinbypass.com<br />
Service No : 000 102 04 2536<br />
Page 1 / 6<br />
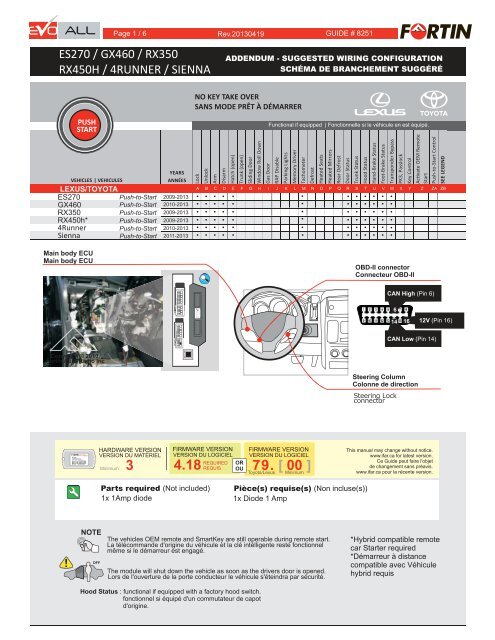
ES270 / GX460 / RX350<br />
RX450H / 4RUNNER / SIENNA<br />
Rev.20130419 GUIDE # 8251<br />
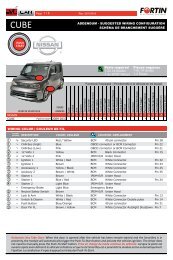
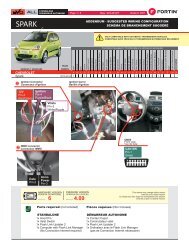
ADDENDUM - SUGGESTED WIRING CONFIGURATION<br />
SCHÉMA DE BRANCHEMENT SUGGÉRÉ<br />
NO KEY TAKE OVER<br />
SANS MODE PRÊT À DÉMARRER<br />
PUSH<br />
START<br />
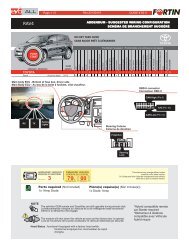
LEXUS/TOYOTA<br />
ES270<br />
Push-to-Start 2009-2013<br />
GX460<br />
Push-to-Start 2010-2013<br />
RX350<br />
Push-to-Start 2009-2013<br />
RX450h* Push-to-Start 2009-2013<br />
4Runner Push-to-Start 2010-2013<br />
<strong>Sienna</strong> Push-to-Start 2011-2013<br />
Main body ECU<br />
Main body ECU<br />
OBD-II connector<br />
Connecteur OBD-II<br />
CAN High (Pin 6)<br />
6<br />
14<br />
16<br />
12V (Pin 16)<br />
CAN Low (Pin 14)<br />
Copyright © 2010,<br />
<strong>Fortin</strong> Auto Radio Inc<br />
Steering Column<br />
Colonne de direction<br />
Steering Lock<br />
connector<br />
HARDWARE VERSION<br />
FIRMWARE VERSION<br />
VERSION DU MATÉRIEL<br />
VERSION DU LOGICIEL<br />
REQUIRED<br />
Minimum 3 Minimum 4.18 4.18 REQUIS<br />
OR<br />
OU<br />
FIRMWARE VERSION<br />
VERSION DU LOGICIEL<br />
79.<br />
Toyota/Lexus<br />
[ 00 ]<br />
Minimum<br />
This manual may change without notice.<br />
www.ifar.ca for latest version.<br />
Ce Guide peut faire l'objet<br />
de changement sans préavis.<br />
www.ifar.ca pour la récente version.<br />
Parts required (Not included)<br />
1x 1Amp diode<br />
Pièce(s) requise(s) (Non incluse(s))<br />
1x Diode 1 Amp<br />
NOTE<br />
OFF<br />
The vehicles OEM remote and SmartKey are still operable during remote start.<br />
La télécommande d'origine du véhicule et la clé intélligente reste fonctionnel<br />
même si le démarreur est engagé.<br />
The module will shut down the vehicle as soon as the drivers door is opened.<br />
Lors de l'ouverture de la porte conducteur le véhicule s'éteindra par sécurité.<br />
*Hybrid compatible remote<br />
car Starter required<br />
*Démarreur à distance<br />
compatible avec Véhicule<br />
hybrid requis<br />
Hood Status : functional if equipped with a factory hood switch.<br />
fonctionnel si équipé d'un commutateur de capot<br />
d'origine.
DESCRIPTION | DESCRIPTION<br />
This Guide may change without notice. www.ifar.ca for latest version. Page 23 // 64<br />
Ce Guide peut faire l’objet de changement sans préavis. www.ifar.ca pour la récente version.<br />
LED | DEL<br />
Blue | Bleu<br />
Yellow | Jaune<br />
Red | Rouge<br />
2 PIN CONNECTOR:<br />
TB CONTROL<br />
(WHITE | BLANC)<br />
E<br />
Red | Rouge<br />
Black | Noir<br />
Blue | Bleu<br />
White | Blanc<br />
B<br />
4 PIN CONNECTOR:<br />
DATA-LINK<br />
(BLACK | NOIR)<br />
12V Battery (+) | 12V Batterie (+)<br />
Ground (-) | Masse (-)<br />
DATA<br />
DATA<br />
Foot Brake | Frein (pied) Signal<br />
Tachometer<br />
Trunk Release | Valise<br />
Hand Brake | Frein à Main Signal<br />
Hood Status | Capot Statuts<br />
See configuration<br />
See configuration<br />
See configuration<br />
See configuration<br />
See configuration<br />
Black | Noir<br />
Pink | Rose<br />
Yellow/Black | Jaune/Noir<br />
Brown/White | Brun/Blanc<br />
Pink/Black | Rose/Noir<br />
Purple/Yellow | Mauve/Jaune<br />
Green/White | Vert/Blanc<br />
Green/Red | Vert/Rouge<br />
White/Black | Blanc/Noir<br />
Lt. Blue | Bleu Pâle<br />
11<br />
12<br />
13<br />
14<br />
15<br />
16<br />
17<br />
18<br />
19<br />
20<br />
1<br />
2<br />
3<br />
4<br />
5<br />
6<br />
7<br />
8<br />
9<br />
10<br />
A<br />
20 PIN CONNECTOR:<br />
MAIN HARNESS | HARNAIS PRINCIPAL<br />
(WHITE|BLANC)<br />
Yellow | Jaune<br />
Purple | Mauve<br />
Purple/White | Mauve/Blanc<br />
Green | Vert<br />
White | Blanc<br />
Orange<br />
Orange/Black | Orange/Noir<br />
Dk. Blue | Bleu foncé<br />
Red/Blue | Rouge/Bleu<br />
Lt. Blue/Black | Bleu Pâle/Noir<br />
See configuration<br />
Lock | Verrouille<br />
Unlock | Déverrouille<br />
Door Status | Statuts Portes<br />
Trunk Status | Statuts Valise<br />
AUX 1<br />
AUX 2<br />
GWR (Ground While Running)<br />
See configuration<br />
See configuration<br />
5<br />
4<br />
3<br />
2<br />
1<br />
5 PIN CONNECTOR: CAN-BUS (WHITE | BLANC)<br />
Brown | Brun<br />
CAN 1 WIRE (SW)<br />
Gray/Black | Gris/Noir<br />
Gray | Gris<br />
Orange/Brown | Orange/Brun<br />
Orange/Green | Orange/Vert<br />
CAN 2 LOW<br />
CAN 2 HIGH<br />
CAN 1 LOW<br />
CAN 1 HIGH<br />
C<br />
Copyright © 2012,<br />
FORTIN AUTO RADIO INC<br />
TOUS DROITS RÉSERVÉS<br />
6<br />
5<br />
4<br />
3<br />
2<br />
1<br />
6 PIN CONNECTOR: RELAY | RELAIS (RED | ROUGE)<br />
White/Red | Blanc/Rouge<br />
COMM2<br />
White/Blue | Blanc/Bleu<br />
NO2<br />
D<br />
White/Green | Blanc/Vert<br />
NC2<br />
Yellow/Red | Jaune/Rouge<br />
COMM1<br />
Yellow/Blue | Jaune/Bleu<br />
NO1<br />
Yellow/Green | Jaune/Vert<br />
NC1<br />
KIA<br />
VEHICLES<br />
RIO - PUSH-TO-START<br />
EQUIPPED WITH AN OEM ALARM VÉHICULES ÉQUIPPÉS D'UNE ALARME D'ORIGINE<br />
Some vehicles must be UNLOCKED to disarm the OEM alarm<br />
before remote start.<br />
Enable option #12 using the FlashLink Manager.<br />
When this option is enabled the module will automatically<br />
UNLOCK before remote start and LOCK after the vehicle has<br />
remote started.<br />
Certains véhicules doivent être DÉVERROUILLÉS avant le<br />
démarrage à distance pour désarmer l'alarme d'origine.<br />
Activez l'option#12 avec le FlashLink Manager.<br />
Lorsque cette option est activée, le module déverrouille<br />
automatiquement avant le démarrage à distance et reverrouille<br />
après que le véhicule a démarré à distance.
E O <strong>ALL</strong><br />
<strong>ALL</strong><br />
This Guide may change without notice. www.ifar.ca for latest version.<br />
Ce Guide peut faire l’objet j de changement g sans préavis. www.ifar.ca pour la récente version.<br />
KIA<br />
WIRING<br />
RIO -<br />
CONNECTION<br />
PUSH-TO-START<br />
| GUIDE DE BRANCHEMENTS<br />
Page 3 // 64<br />
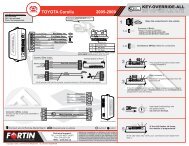
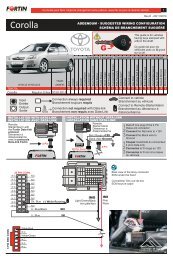
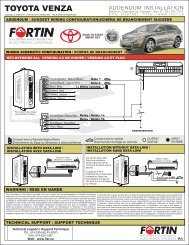
ES270 / GX460 / RX350 / RX450H / 4RUNNER / SIENNA<br />
ALWAYS REQUIRED<br />
TOUJOURS REQUIS<br />
NOT REQUIRED WITH<br />
DATALINK<br />
NON REQUIS EN<br />
DATA-LINK<br />
A15 (-) HOOD STATUS IN RS9<br />
A14 (-) HAND BRAKE IN RS10<br />
A13 (-)<br />
A12<br />
A11 (+)<br />
TRUNK RELEASE<br />
TACHOMETER<br />
FOOT BRAKE<br />
OUT RS11<br />
IN RS12<br />
IN RS13<br />
A8<br />
A5<br />
A4<br />
A3<br />
A2<br />
(-)<br />
(-)<br />
(-)<br />
(-)<br />
(-)<br />
WHILE RUNNING<br />
TRUNK STATUS<br />
DOOR STATUS<br />
UNLOCK/DISARM<br />
LOCK/ARM<br />
OUT RS14<br />
IN RS15<br />
IN RS16<br />
OUT RS17<br />
OUT RS18<br />
WITH | AVEC DATA-LINK:<br />
WITHOUT DATA-LINK:<br />
SANS DATA-LINK:<br />
REMOTE<br />
STARTER<br />
DÉMARREUR<br />
À DISTANCE<br />
WITH | AVEC DATA-LINK:<br />
Direct connection<br />
Branchement directe<br />
Cut | Coupez<br />
Cut | Coupez<br />
B3<br />
Red B4<br />
Black B3<br />
Blue B2<br />
White B1<br />
RS8 OUT<br />
RS7 OUT<br />
STARTER (+)<br />
IGNITION1 (+)<br />
RS6 OUT<br />
RS5 OUT<br />
IGNITION2 (+)<br />
ACCESSORY (+)<br />
RS4 OUT<br />
RS3 OUT<br />
PARKING LIGHT<br />
PARKING LIGHT<br />
(+)<br />
(-)<br />
RS2 IN 12V BATTERY (+)<br />
RS1 Ground | Masse (-)<br />
B4<br />
Red<br />
Black<br />
12V BATTERY<br />
Ground<br />
A9<br />
1A Diode<br />
A1<br />
(+) Ignition<br />
Yellow IN<br />
(-) Lock/Arm<br />
Purple IN<br />
(-) Unlock/Disarm Purple/White IN<br />
(-) Door Status<br />
Green OUT<br />
(-) Trunk Status<br />
White OUT<br />
Orange IN<br />
Orange/Black IN<br />
(-) Ground While Running Dk. Blue IN<br />
(+) Starter<br />
Red/Blue IN<br />
Lt. Blue/Black<br />
Black<br />
(+) Foot Brake<br />
(+/-) Tachometer<br />
(-) Trunk Release<br />
(-) Hand Brake<br />
(-) Hood Status<br />
OUT<br />
OUT<br />
IN<br />
Pink<br />
Yellow/Black<br />
Brown/White OUT<br />
Pink/Black OUT<br />
Purple/Yellow<br />
Green/White<br />
Green/Red<br />
White/Black IN<br />
Lt. Blue<br />
A1<br />
A2<br />
A3<br />
A4<br />
A5<br />
A6<br />
A7<br />
A8<br />
A9<br />
A10<br />
A11<br />
A12<br />
A13<br />
A14<br />
A15<br />
A16<br />
A17<br />
A18<br />
A19<br />
A20<br />
B<br />
A<br />
C<br />
D<br />
C5<br />
C4<br />
C3<br />
C2<br />
C1<br />
D6<br />
D5<br />
D4<br />
D3<br />
D2<br />
D1<br />
Brown<br />
Gray/Black<br />
Gray<br />
Orange/Brown<br />
Orange/Green<br />
White/Red<br />
White/Blue<br />
White/Green<br />
Yellow/Red<br />
Yellow/Blue<br />
Yellow/Green<br />
CAN 2 LOW<br />
CAN 2 HIGH<br />
Ground<br />
Masse<br />
A10<br />
RX<br />
A20<br />
TX<br />
RS3<br />
(-)Parking Lights<br />
C3<br />
CAN High<br />
C4<br />
CAN Low<br />
D6<br />
(-)Steering Lock<br />
RS7<br />
Ignition<br />
ES270 Pink | Rose Light Green | Vert pâle<br />
Violet<br />
Red | Rouge<br />
Green | Vert<br />
Black | Noir<br />
GX460 Red | Rouge Green | Vert White | Blanc Red | Rouge White | Blanc<br />
Lt.Blue | Bleu Pâle White | Blanc<br />
RX350<br />
RX450h*<br />
4Runner<br />
Pink | Rose<br />
Pink | Rose<br />
Gray | Gris<br />
Light Green | Vert pâle<br />
Light Green | Vert pâle<br />
White | Blanc<br />
Violet<br />
Violet<br />
Red | Rouge<br />
Violet<br />
Violet<br />
Red | Rouge<br />
Red | Rouge<br />
Red | Rouge<br />
White | Blanc<br />
Green | Vert<br />
Green | Vert<br />
Lt.Blue | Bleu Pâle<br />
Black | Noir<br />
Black | Noir<br />
White | Blanc<br />
<strong>Sienna</strong> Black | Noir Blue | Bleu<br />
Yellow | Jaune<br />
Red | Rouge White | Blanc<br />
Green | Vert<br />
White | Blanc<br />
RS2<br />
12V<br />
1<br />
2 3 4 5<br />
6<br />
7 8<br />
9 10 14 16<br />
11 12 13 15<br />
1 2 3 4 5 6 7<br />
Back view -<br />
Black connector<br />
Main body ECU<br />
Vue de dos -<br />
Connecteur Noir<br />
Main body ECU<br />
OBD-II connector<br />
Front view<br />
Connecteur OBD-II<br />
Vue de face<br />
Back view - White connector<br />
Steering Lock Connector<br />
At steering colomn<br />
Vue de dos - Connecteur Blanc<br />
Connecteur Steering Lock<br />
À la colonne de direction
This Guide may change without notice. www.ifar.ca for latest version.<br />
Ce Guide peut faire l’objet de changement sans préavis. www.ifar.ca pour la récente version.<br />
KIA RIO - PUSH-TO-START<br />
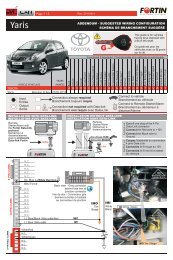
PROGRAMMING PROCEDURE | PROCÉDURE DE PROGRAMMATION<br />
Page 43 // 64<br />
1<br />
x1<br />
HOLD<br />
Press and hold the<br />
programming button:<br />
Insert the 4-Pin (Data-Link)<br />
connector.<br />
The LED will alternate<br />
between BLUE, YELLOW and<br />
RED flashes.<br />
Appuyez et maintenir<br />
enfoncé le bouton de<br />
programmation:<br />
Insérez le connecteur 4 pins<br />
(Data-Link)<br />
Les DELS alternent entre un<br />
flash BLEU, JAUNE et<br />
ROUGE.<br />
2<br />
RELEASE<br />
ON<br />
BLUE<br />
BLEU<br />
Release the programming<br />
button when the LED is BLUE.<br />
If the LED is not solid BLUE<br />
disconnect the 4-Pin connector<br />
(Data-Link) and go back to step 1.<br />
Relâchez le bouton de<br />
programmation quand la DEL<br />
est BLEU.<br />
Si le DEL n'est pas BLEU<br />
débranchez le connecteur 4<br />
pins (Data-Link) et allez au<br />
début de l'étape 1.<br />
3<br />
<strong>EVO</strong>-<strong>ALL</strong><br />
<strong>EVO</strong>-<strong>ALL</strong><br />
<strong>EVO</strong>-<strong>ALL</strong><br />
<strong>EVO</strong>-<strong>ALL</strong><br />
Insert the required remaining<br />
connectors.<br />
Insérez les connecteurs requis<br />
restants.<br />
4<br />
x2<br />
PRESS<br />
IGN ON<br />
IGNITION ON<br />
ON<br />
FLASH RAPIDLY<br />
Do not press the brake<br />
pedal.<br />
Press the Push-to-Start<br />
button twice to turn on<br />
the ignition.<br />
Ne pas appuyer sur la pédale<br />
de frein.<br />
Appuyez 2 fois sur le bouton<br />
démarrage (Push-to-Start)<br />
pour allumer l'ignition.<br />
5<br />
Wait for the BLUE LED<br />
will flash rapidly and<br />
constantly.<br />
Attendre que la DEL<br />
BLEUE clignote rapidement et<br />
constamment.<br />
x1<br />
PRESS<br />
PRESS X1<br />
FLASH RAPIDLY<br />
Press and release the<br />
programming button once<br />
(1x).<br />
Appuyez et relâchez 1 fois le<br />
bouton de programmation.<br />
The BLUE and YELLOW<br />
LED will flash rapidly and<br />
constantly.<br />
Les DELs BLEUE et JAUNE<br />
clignotent rapidement et<br />
constamment.<br />
6<br />
x1<br />
PRESS<br />
OFF<br />
IGNITION ON<br />
IGNITION OFF<br />
OFF<br />
OFF<br />
Press the Push-to-Start<br />
button once to turn off the<br />
ignition.<br />
BLUE The and YELLOW<br />
LED will turn off.<br />
Appuyez 1 fois sur le<br />
bouton démarrage (Pushto-Start)<br />
pour éteindre<br />
l'ignition.<br />
Les DELs BLEUE et JAUNE<br />
s'éteignent.<br />
The module is now<br />
programmed.<br />
Le module est<br />
programmé.<br />
CONTINUED NEXT PAGE | CONTINUEZ À LA PAGE SUIVANTE
This Guide may change without notice. www.ifar.ca for latest version.<br />
Ce Guide peut faire l’objet de changement sans préavis. www.ifar.ca pour la récente version.<br />
KIA RIO - PUSH-TO-START<br />
REMOTE STARTER FUNCTIONNALITY | FONCTIONNALITÉS DU DÉMARREUR À DISTANCE<br />
Page 53 // 64<br />
START<br />
OFF<br />
IGN ON<br />
All doors must<br />
be closed.<br />
Remote start<br />
the vehicle.<br />
The module will<br />
shut down the<br />
vehicle as soon<br />
as the drivers<br />
door is opened.<br />
Enter the<br />
vehicle with the<br />
Smart-Key.<br />
Press the<br />
brake pedal.<br />
Press the<br />
Push-to-Start<br />
button.<br />
The vehicle can<br />
now be put in to<br />
gear and driven.<br />
Toutes les<br />
portes doivent<br />
être fermées<br />
Démarrez à<br />
distance.<br />
Lors de<br />
l'ouverture de la<br />
porte conducteur<br />
le véhicule<br />
s'éteindra par<br />
sécurité.<br />
Entrez dans le<br />
véhicule avec<br />
la clé<br />
intelligente<br />
(Smart-Key)<br />
sur vous<br />
Appuyez sur<br />
la pédale de<br />
frein<br />
Appuyez sur le<br />
bouton<br />
démarrage<br />
(Push-to-Start).<br />
Vous êtes<br />
maintenant prêt<br />
à embrayer et<br />
prendre la route.
Page 6 / 6<br />
<strong>EVO</strong>-<strong>ALL</strong><br />
HARDWARE VERSION<br />
FIRMWARE VERSION<br />
Date: xx-xx<br />
INTERFACE MODULE<br />
PATENTS PENDING US: 2007-228827-A1<br />
Made in Canada www.fortinbypass.com<br />
Service No : 000 102 04 2536<br />
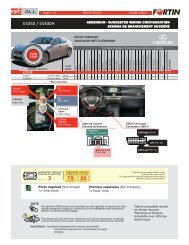
Module label | Étiquette sur le module<br />
Notice: Updated Firmware and Installation Guides<br />
Updated fi rmware and installation guides are posted on our web site on a regular<br />
basis. We recommend that you update this module to the latest fi rmware and<br />
download the latest installation guide(s) prior to the installation of this product.<br />
Notice: Mise à jour microprogramme et Guides d’installations<br />
Des mises à jour du Firmware (microprogramme) et des guides d’installation<br />
sont mis en ligne régulièrement. Vérifi ez que vous avez bien la dernière version<br />
logiciel et le dernier guide d’installation avant l’installation de ce produit.<br />
WARNING<br />
The information on this sheet is provided on an (as is) basis with no representation or warranty of accuracy whatsoever.<br />
It is the sole responsibility of the installer to check and verify any circuit before connecting to it. Only a computer safe<br />
logic probe or digital multimeter should be used. FORTIN ELECTRONIC SYSTEMS assumes absolutely no liability or<br />
responsibility whatsoever pertaining to the accuracy or currency of the information supplied. The installation in every case<br />
is the sole responsibility of the installer performing the work and FORTIN ELECTRONIC SYSTEMS assumes no liability<br />
or responsibility whatsoever resulting from any type of installation, whether performed properly, improperly or any other<br />
way. Neither the manufacturer or distributor of this module is responsible of damages of any kind indirectly or directly<br />
caused by this module, except for the replacement of this module in case of manufacturing defects. This module must be<br />
installed by qualified technician. The information supplied is a guide only. This instruction guide may change without<br />
notice. Visit www.fortinbypass.com to get the latest version.<br />
MISE EN GARDE<br />
L’information de ce guide est fournie sur la base de représentation (telle quelle) sans aucune garantie de précision et<br />
d’exactitude. Il est de la seule responsabilité de l’installateur de vérifier tous les fils et circuits avant d’effectuer les connexions.<br />
Seuls une sonde logique ou un multimètre digital doivent être utilisés. FORTIN SYSTÈMES ÉLECTRONIQUES n’assume<br />
aucune responsabilité de l’exactitude de l’information fournie. L’installation (dans chaque cas) est la responsabilité de<br />
l’installateur effectuant le travail. FORTIN SYSTÈMES ÉLECTRONIQUES n’assume aucune responsabilité suite à<br />
l’installation, que celle-ci soit bonne, mauvaise ou de n’importe autre type. Ni le manufacturier, ni le distributeur ne se<br />
considèrent responsables des dommages causés ou ayant pu être causés, indirectement ou directement, par ce module,<br />
excepté le remplacement de ce module en cas de défectuosité de fabrication. Ce module doit être installé par un technicien<br />
qualifié. L’information fournie dans ce guide est une suggestion. Ce guide d’instruction peut faire l’objet de changement<br />
sans préavis. Consultez le www.fortinbypass.com pour voir la plus récente version.<br />
Copyright © 2006-2012, FORTIN AUTO RADIO INC <strong>ALL</strong> RIGHTS RESERVED PATENT PENDING<br />
TECH SUPPORT<br />
Tél: 514-255-HELP (4357)<br />
1-877-336-7797<br />
ADDENDUM GUIDE<br />
www.fortinbypass.com<br />
WEB UPDATE | MISE À JOUR INTERNET