ELECTRONICS - PbNation
ELECTRONICS - PbNation
ELECTRONICS - PbNation

Create successful ePaper yourself
Turn your PDF publications into a flip-book with our unique Google optimized e-Paper software.
page <br />
10.0 CODE<br />
<strong>ELECTRONICS</strong><br />
Instruction Manual<br />
Troubleshooting Guide<br />
Warranty Information<br />
Manual date: 02/27/07<br />
Code version: 10.2<br />
Predator Electronics 100 West Walnut Ave. suite 48 Dalton, Georgia 30720 / 706.876.0085<br />
www.PREDATOR<strong>ELECTRONICS</strong>.com
page <br />
Introduction<br />
Register Descriptions<br />
Programming 10.0<br />
Predator Board Features<br />
Troubleshooting<br />
photo by Bryan Hallman
Introduction<br />
page <br />
Thank you for purchasing one of our Predator Products. The item you have purchased has been in development for over 6 years and is considered by many<br />
to be the finest control system ever created for the sport of paintball.<br />
You will find that our dual menu system allows you to quickly access all of the features of your new board with only a simple trigger pull. No need to open<br />
the grip or push any internal buttons.<br />
Our Predator line was designed after spending years in the service and repair business. We felt that most stock boards did not offer the consumer the<br />
ability to get the full potential out of their new $1000+ paintball marker. We found that most players simply wanted a board that would turn on and<br />
shoot a paintball without any of the gimmicks associated with some of the high end markers electronics. When a board has been programmed correctly<br />
there is no need to monitor the dwell settings or check the outside temperature.<br />
When you walk onto the playing field and your nipples get hard we found that it is cold. When you walk onto the the playing field and start sweating then<br />
it is probably hot. If you set your dwell or rate of fire then it is still where you set it last. The nipple trick seems to work with most paintball boards while<br />
the ability to remember the settings works with our Predator line all of the time.<br />
With the advanced electronics that are now offered in our Predator line you simply have to point your gun in the direction of its intended target and pull<br />
the trigger. We do the rest of the work. As a matter of fact we do it well. So well that the Predator has become one of the most widely used tournament<br />
boards in the sport of paintball. After spending a day on the field with your new Predator you will see why so many players around the world run in<br />
absolute fear when they see the Predator logo on the side of your hopper. Not only does this allow you to pump your chest like the massive killing machine<br />
you are but you save on paint. We have found that shooting someone in the ass while they run in fear takes far less effort (and paint) than shooting<br />
someone while cowering behind a bunker.<br />
photo by Mark Davis<br />
Please take a few minutes and read through this entire manual.<br />
photo by Mark Davis<br />
photo by Mark Davis<br />
The information is extremely detailed and the majority of your technical support questions will be answered in this pages. We have divided this manual<br />
up into several sections to help you understand your new Predator board and to locate the information that pertains to your specific product. Not only<br />
will you find your boards information inside but the inner workings and troubleshooting of each and every product we produce.<br />
Technical drawings, custom install procedures and advanced troubleshooting is only a small part of the content we have created for you. If you have<br />
trouble following written manuals or prefer a more hands-on approach we have this technical manual as well as other videos available on our web site.<br />
Feel free to contact our technical support team if you have a question or concern. No question is stupid and having the correct information is the key to<br />
using your new Predator properly. Good luck and make sure you shoot a few people for us.
Warranty<br />
Your new Predator board has a limited lifetime warranty on it. If the board stops<br />
working simply return it to Predator Electronics. This warranty does not cover<br />
misuse or damage caused by the customer and is ONLY valid for the original owner.<br />
page <br />
Once the product has arrived at our factory we will determine if the defect is covered<br />
under warranty. At that time the item will either be replaced or repaired at our<br />
discretion. If we find that the item was damaged by the user, the warranty will no<br />
longer be valid for the product and all repairs or purchases must be paid for by the<br />
owner of the non-working product.<br />
Please complete and mail the warranty card that was included in your packaging<br />
immediately upon opening and inspecting your new Predator product. This card<br />
must be on file to activate your warranty. Your warranty is not transferable and is<br />
valid only for the original purchaser.<br />
If your Predator product is sent in for service or upgrades you must include a copy<br />
of your original purchase receipt. Without this receipt, AND this warranty card on<br />
file, you are not eligible for service or upgrades.<br />
Price Guarantee<br />
If you purchase one of our Predator boards directly from us your purchasing price<br />
is guaranteed for 60 days. This means if our price drops you will be issued the<br />
difference as in-shop credit that can be used on any item in our store. This includes<br />
Predator Electronics products and aftermarket items that we offer.<br />
If we raise the price within this 60 day period you are required to send us a check for<br />
the difference. Ok....we are just kidding on that one.<br />
Repairs<br />
If you find that you need to send in your board for a repair, please include a copy<br />
of your original purchase receipt, all of your contact info and your RMA #. Your<br />
RMA number will be issued when you call our office. Returns without the proper<br />
information will be returned postage due to the packages original point of origin.<br />
photo by Bob Sandifer<br />
Please send all repairs to the following address:<br />
Predator Electronics / Your RMA#<br />
100 West Walnut Ave.<br />
suite 48<br />
Dalton, Georgia 30720<br />
Code Upgrades<br />
Your new Predator comes with a FREE lifetime upgrade policy for the original<br />
owner. When a new code is released you simply send your board back to us and we<br />
will flash it with the newest code. You must cover all shipping and handling.<br />
You must include a copy of your original purchase receipt and all of your contact.<br />
Free code upgrades will not be performed unless we have proof that you are the<br />
original owner.<br />
Please send all boards for code upgrades to the following address:<br />
Predator Electronics / Code Upgrade<br />
100 West Walnut Ave.<br />
suite 48<br />
Dalton, Georgia 30720<br />
Non Original Owner<br />
Warranty:<br />
Our warranty is only vaid for the original owner of the Predator board. No<br />
warranty service will be considered without a copy of the original purchase receipt.<br />
The original warranty is not transferable.<br />
Code Upgrades:<br />
Our free code upgrade policy is only valid for the original owner. We do offer a code<br />
upgrade service for our products that no longer belong to the original owner.<br />
photo by Mark Davis
Return and Refund Policy<br />
If you are not satisfied with your Predator Electronics purchase of a product, please call 1-706-876-0085 for a Return Material Authorization (RMA) request within<br />
14 calendar days of the receipt of the product. Configure-to-order, personalized or other customized product may not be returned for refund or exchange under any<br />
circumstances unless DOA. If the item is returned unopened in the original box, we will exchange it or offer you a refund based on your original method of payment. The<br />
product must be returned to the Predator Electronics office within 7 calendar days of the issuance of the RMA. All products must be packed in the original, unmarked<br />
packaging including any accessories, manuals, documentation and registration that shipped with the product. A 20% open box fee will be assessed on any opened hardware<br />
or accessory.<br />
Please note that Predator Electronics does not permit the return of or offer refunds for the following products:<br />
1. Product that is custom configured to your specifications<br />
2. Seated/Installed chips<br />
3. Mounted electronic control boards<br />
4. Any installed electronic components<br />
5. Personalized operating code<br />
•<br />
NOTE: Predator Electronics recommends that you (1) use a carrier that offers shipment tracking for all returns and (2) either insure your package for safe return to<br />
Predator Electronics or declare the full value of the shipment so that you are completely protected if the shipment is lost or damaged in transit. If you choose not to (1)<br />
use a carrier that offers tracking and (2) insure or declare the full value of the product, you will be responsible for any loss or damage to the product during shipping.<br />
Please note that the United States Postal Service (USPS) offers limited tracking capabilities and that there is a 30-calendar-day waiting period before the USPS will<br />
initiate a trace.<br />
Dead On Arrival (DOA) Product: Product Failure Out of the Box<br />
page <br />
A Predator product is considered DOA if it shows symptoms of a component failure, preventing basic operability, upon its first use out of the box. If you believe that your<br />
product is DOA, please call Predator Electronics technical support at 706-876-0085 within 30 calendar days of the invoice date. Predator Electronics will determine<br />
whether the product is DOA and offer you the following options:<br />
1.<br />
2.<br />
Replacement: The same product that you ordered will be shipped to you at Predator Electronics expense. Predator Electronics will put you in touch with a Sales<br />
Support Representative to set up a replacement order and provide the procedure for returning the DOA product.<br />
Service: You may have the product repaired; however, once serviced, the product is no longer eligible for replacement.<br />
Product must be deemed DOA by Predator Electronics within 30 calendar days of the invoice date in order to receive a replacement unit.<br />
•<br />
•<br />
DOA Terms and Conditions<br />
This DOA policy applies only to Predator-branded hardware products currently offered at the Predator Electronics online store. As new products are offered, Predator<br />
Electronics reserves the right to determine whether or not this policy applies.<br />
This DOA policy does not apply to third-party products that do not bear the Predator brand name. You may call the manufacturer directly with any third-party product<br />
issues.<br />
If the product is deemed DOA by Predator Electronics more than 30 calendar days after the invoice date, our standard product warranty will apply.<br />
If the product is deemed by Predator Electronics NOT to be DOA, our standard product warranty will apply.<br />
Shipping will be arranged at Predator Electronics expense for all products determined by Predator Technical Support to be DOA.<br />
Predator Electronics reserves the right to test returned DOA product. If the condition of the product is misrepresented by the customer, we may impose a $30 handling fee.<br />
DEFECTIVE ITEMS<br />
Predator Branded Products<br />
If you discover what you believe is a product defect for any Predator-branded product, please contact Predator Electronics Technical Support at 1-706-876-0085. Such a<br />
defect, if any, is covered under the terms of your product’s warranty. Please refer to the warranty information and other supporting documentation that came with your<br />
product.<br />
Non-Predator Branded/Third-Party Products<br />
If you discover what you believe is a product defect for any third-party product, please contact the manufacturer directly for information regarding the manufacturer’s<br />
warranty.<br />
Note: Products sold through this web site that do not bear the Predator brand name are serviced and supported exclusively by their manufacturers in accordance with terms<br />
and conditions packaged with the products. Predator Electronics Limited Warranty does not apply to products that are not Predator-branded, even if packaged or sold with<br />
Predator products.
Register Descriptions<br />
This register is where you select one of our many firing modes. A firing mode<br />
determines how the gun will fire the paintball when the trigger is pulled. We start<br />
you off with SEVERAL preset firing modes then allow you to custom design many<br />
of the modes features. Let us take a few minutes to walk you through each mode so<br />
you can become accustomed to how each mode works.<br />
Your maximum rate of fire will be determined by the various settings on your board.<br />
Remember that your gun will only fire as fast as your EYE see paint coming into the<br />
breech if you are using the anti-chop system that is built into your board.<br />
1. Semi AUTO<br />
This modes will allow you to fire one shot with each pull and release of the trigger.<br />
This is the standard mode for most paintball play and is probably the absolute<br />
slowest you will ever see your gun shoot with a Predator in it. We have not included<br />
any “hidden” features to make you shoot faster than you actually can pull the trigger.<br />
None of our AFA settings will work with this mode. When you pull the trigger you<br />
will get 1/one/uno shot and nothing else. The next shot will not activate until you<br />
have completely released the trigger and pulled it again. We recommend this mode<br />
for old dudes and people that constantly talk about how the old days were better.<br />
Please feel free to shoot a few of them for me. Life Lesson #1 - The old days are never<br />
better. Note: This mode has been rebuilt for 10.0 code<br />
2. Auto Response<br />
Now we are talking baby ! You will get a shot when you pull the trigger and when<br />
you release it. This means you will get 2 shots EVERY trigger pull. If you pull the<br />
trigger slow it WILL NOT enter auto response mode. This is so you can still take<br />
those aimed shots when needed. The second you speed up you will get 2 shots per<br />
pull.<br />
This mode does not have any hidden speed enhancements because it does not need<br />
them. This mode will allow you to shoot your own players as well as players on the<br />
other team so use it wisely.<br />
3. Full Auto<br />
The gun will continue to shoot as long as you hold the trigger back. It is that simple.<br />
Have you ever seen a machine gun work? Then you understand how this mode<br />
works.<br />
4. Smooth Ramping (AFA dependent)<br />
This is the firing mode that started it all. As you pull and release the trigger our<br />
debounce setting will slowly drop to speed up your rate of fire. As soon as you stop<br />
firing the debounce will go back to the preset level. This mode gives you a nonconstant<br />
sounding firing sequence that actually sounds like you are doing all of the<br />
work yourself. This setting works best if you have setup your trigger so that it will<br />
bounce then raise your debounce several settings higher than the actual bouncing<br />
point.<br />
*This firing mode also monitors the AFA settings. This means that you can tell the<br />
board to ONLY ramp if you reach a certain rate of fire (register 5) AND ONLY<br />
after you have pulled the trigger a certain number of times (register 6).<br />
Example: Trigger will bounce if you set your debounce to 5 (register 3) so you set it<br />
to 8 or above so the electronics will have a place to drop to so the electronics can pick<br />
up extra shots from noise in the trigger switch.<br />
5. Assisted Ramping (AFA dependent)<br />
This is yes another firing mode that we made famous. As soon as you start pulling<br />
the trigger we will start adding shots at a random time to increase your rate of<br />
fire. The faster you pull the trigger the more shots we add at a more constant<br />
interval. This mode has been used for years in both the NPPL and PSP. We do not<br />
recommend using it in either since it would be against the current regulations.<br />
*This firing mode also monitors the AFA settings. This means that you can tell the<br />
board to ONLY ramp if you reach a certain rate of fire (register 5) AND ONLY<br />
after you have pulled the trigger a certain number of times (register 6).<br />
We start adding shots as soon as you reach the predetermined AFA settings. This<br />
mode can be used to create a custom PSP firing mode.<br />
How about an example: You do not like the standard PSP code because you do quiet<br />
a bit of time shooting and end up blasting your bunker when you get 3 shots every<br />
pull. Why not use this ramping mode but tell it to ONLY start ramping after you<br />
have pulled the trigger 3 times (register 6) and only continue to ramp if you shoot at<br />
least 6 balls per second (register 5). As long as your rate of fire does not exceed the<br />
current limit this mode would be perfectly legal. Instead of getting 3 shots each shot<br />
you will simply get a steady ramping rate of fire. Great for back players as well !<br />
*This firing mode also monitors the AFA settings. This means that you can tell the<br />
board to ONLY ramp if you reach a certain rate of fire (register 5) AND ONLY<br />
after you have pulled the trigger a certain number of times (register 6).<br />
7. Triplet Shot Ramping (AFA dependent)<br />
This is the ramping mode we base our PSP code off of. Once you have met the<br />
settings in your AFA registers your gun will give you 3 shots EVERY trigger pull.<br />
This mode is great for creating a custom firing mode if you like the 3 shots per pull<br />
firing sequence. However, what if you want to make a slight modification to the<br />
stock PSP code? Not a problem with a Predator.<br />
Example: You love everything about the PSP mode except you would like the<br />
ramping to start after the 5th trigger pull instead of after the 3rd trigger pull.<br />
Simple, go to register 6 and change that to 5. Now your 3 shot ramping will start<br />
after you pull the trigger 5 times. Why we are making some sweet adjustments<br />
lets go to register 5 and set it to 4. This means we only have to pull the trigger a<br />
maximum of 4 balls per second to keep our ramping active. If we drop below that the<br />
ramping will stop. Get the idea? You have ALL of the control with a Predator.<br />
*This firing mode also monitors the AFA settings. This means that you can tell the<br />
board to ONLY ramp if you reach a certain rate of fire (register 5) AND ONLY<br />
after you have pulled the trigger a certain number of times (register 6).<br />
8. PSP Mode #1 (AFA dependent)<br />
This PSP mode is an excellent choice for those of you that want a preset ramping<br />
mode that does not give you those 3 shots every pull as in the standard PSP firing<br />
mode.<br />
With this firing mode you pull the trigger 3 times then get a fast ramping firing<br />
sequence. You cannot change the need to pull the first 3 shots but you can determine<br />
how fast you need to fire to start and maintain your ramping (register 5).<br />
If you stop firing for more than 1 second you will have to fire the first 3 shots again<br />
before your ramping will activate. If you stop firing for less than 1 second and start<br />
again you will still be in your ramping sequence. This is currently required by the<br />
PSP.<br />
*This firing mode also monitors the AFA settings. This means that you can tell the<br />
board to ONLY ramp if you reach a certain rate of fire (register 5) AND ONLY<br />
after you have pulled the trigger a certain number of times (register 6).<br />
9. PSP Mode #2 (AFA dependent)<br />
page <br />
Yes I realize we call this a PSP mode but it would be best if you did not use it. This<br />
firing mode works like mode 8 except it will add extra shots to the 3 shot maximum<br />
the longer you pull the trigger. We created this mode after a hard night of drinking<br />
and a phone call from a pro player looking for his next big cheat. He didn’t get the<br />
code but you did. Unfortunately there is no way to activate or deactivate this cheat.<br />
In the pro players version it was pretty easy to do. In our version you will get busted<br />
so only use this for it’s novelty intent. Oh yea, don’t use this mode in the PSP. We<br />
realize some of you have a hard time listening so I said it again.<br />
*This firing mode also monitors the AFA settings. This means that you can tell the<br />
board to ONLY ramp if you reach a certain rate of fire (register 5) AND ONLY<br />
after you have pulled the trigger a certain number of times (register 6).<br />
6. Fast Ramping (AFA dependent)
Register Descriptions<br />
10. PSP 3 (AFA dependent)<br />
This is the one baby! The big guy. The true “as required” PSP mode...that can still<br />
be modified. After you have pulled the trigger 3 times you get 3 shots each and<br />
every trigger pull. If you stop firing for more than 1 second you will need to pull the<br />
trigger 3 more times to get your ramping to start back but if you stop firing and start<br />
again before a 1 second period then you are still getting 3 shots every trigger pull.<br />
WOW.<br />
We realize that you can only shoot 15balls per second so you will need to set this in<br />
register 2<br />
We have not hardcoded the rate of fire that you must maintain to keep the gun<br />
ramping so this can be changed in register 5 (AFA Rate of Fire). Many players will<br />
find the ability to set this an important factor in designing a custom code that suits<br />
your style of play.<br />
11. NXL<br />
This is the approved firing mode for the NXL. After the first 3 shots you can hold<br />
the trigger back and the gun will continue to fire FULL auto until the trigger is<br />
released. If you wait 1 second or longer the system will reset and you will need to<br />
pull the trigger another 3 times to get back to full auto. If you release the trigger<br />
and repull before the 1 second time period the gun will continue to fire in full auto as<br />
long as the trigger is held back.<br />
The rate of fire is still determined by register 2 (Eye on Rate of Fire)<br />
12. Break Out (*)<br />
The first shot is full auto. Once the trigger has been released the gun will fire in fast<br />
ramping on each trigger pull afterwards. This can be reset by turing the gun off and<br />
back on again.<br />
invented. Sniper mode is for the woods-ball player who wants the most accuracy out<br />
of his gun. It waits 1/3 of a second after you pull the trigger to actually fire the gun.<br />
This small delay smooths out the clenching and tightening of your hands on the grip,<br />
stabilizing your sight picture. Ask any expert, as you depress the trigger the shot<br />
should come as a ‘surprise’ to you. This mode gives you what the experts all wish they<br />
had, a slight delay to stabilize.<br />
If you decide that you need to increase your rate of fire to get out of a JAM just start<br />
shooting faster and the board will exit sniper mode until you need it again. Curt is<br />
a genius.<br />
16. Spool Valve Test (will be available in 10.2)<br />
This mode allows you to see if you have a leak in your spool valve. We realize that<br />
not everyone uses a spool valve gun but just in case you do here is a test setting that<br />
can be used to diagnose issues with your guns internals.<br />
Pulling the trigger moves your valve forward and releasing it send it back to the rear<br />
position. This allows you to keep the bolt open so you can listen for any leaks while it<br />
is in this forward “sealed” position. All quality manufacturered spool valve guns will<br />
seal in the forward position to eliminate excessive air consumption.<br />
17. Training Mode (will be available in 10.2)<br />
page <br />
When in this firing mode your gun will not actually fire but will simply send the<br />
hammer forward to simulate the gun actually firing. This uses far less AIR and still<br />
gives a realistic feeling to the shot. There is nothing mysterious about this firing<br />
mode. We simply dropped the dwell extremely low. CAUTION: Playing in this<br />
mode will make you look like a dumbass so remember to reset your firing mode or<br />
register bank before hitting the field.<br />
NOTE: We do not have a specific millenium mode. You can adjust your afa settings<br />
to create this firing mode and store it in a register bank.<br />
*This firing mode also monitors the AFA settings. This means that you can tell the<br />
board to ONLY ramp if you reach a certain rate of fire (register 5) AND ONLY<br />
after you have pulled the trigger a certain number of times (register 6).<br />
13. OMFG<br />
Why do we do stuff like this? Massive amount of alcohol and a constant state of<br />
confusion.<br />
You will get a full 1 second burst of fire each and every trigger pull. If your rate of<br />
fire (register 2) is set to 20 then you will get 20 shots each trigger pull. If it is set to<br />
10 you will get 10 shots. Get the idea?<br />
NOTE: We cannot be held responsible for shooting your won team members.<br />
14. NXL Break Out<br />
The first shot is full auto. Once you release the trigger the first time you will need to<br />
pull the trigger 3 times before the gun will fire full auto again.<br />
Example:<br />
Pull trigger and hold = Full auto shot<br />
Release trigger and the next 3 shots are semi<br />
After the 3rd shot you can hold the trigger back for full auto.<br />
If you release the trigger for more than 1 second you will have to pull the trigger 3<br />
more times in semi before the full auto can be used. After the 3rd shot simply hold<br />
the trigger back for full auto.<br />
The rate of fire registers are honored so these must be set if your league requires a<br />
limited rate of fire.<br />
15. Sniper Mode<br />
Curt Hartung (chief engineer and programming GOD) re-introduces a mode he
Register Descriptions<br />
Register 2 - Rate of fire<br />
This is the global rate of fire when you are using anti-chop eyes. If you eyes are<br />
activated this will be maximum rate of fire your gun will shoot. If your eyes are<br />
turned off your rate of fire is determined by register 11.<br />
Remember that your rate of fire is also determined by the speed of your loader AND<br />
how fast your gun can actually cycle. The Predator board does not have a “capped”<br />
rate of fire since you can determine what the setting will be in register 2. This setting<br />
could be 1 or 500. Well free to pull the trigger all you want but what will actually<br />
register is 10bps to 40bps. We suggest keeping this setting in the 20 to 24 range for<br />
most guns. Spool valves gun seem to work better in the 22bps max range.<br />
NOTE: If you participate in a league that requires you to “cap” your rate of fire you<br />
will need to set this register to that cap. None of our firing modes have a rate of fire<br />
cap built in.<br />
1 = Unlimited rate of fire (MROF is determined by your gun and loader)<br />
10 - 40 = Actual rate of fire.<br />
Example: Register 2 is set to 15. Your gun will only fire a maximum of 15 balls per<br />
second.<br />
Register 3 - Electronic and Mechanical Debounce<br />
This register determines if your gun will continue to fire due to a light trigger setting<br />
or excessive kick in your marker. When you pull the trigger your Predator not<br />
only sees the actual trigger pull you performed but also the slight electrical cross<br />
talk that occurs when the switch makes and breaks contact. Our debounce looks<br />
at these small pulses and determines if they are actually a trigger pull. Along with<br />
this advanced trigger logic we also tell the board to only fire if there is a certain time<br />
between these pulses. This allows your Predator to watch for actual pulls and then<br />
fire OR let a few of these extra pulses sneak through.<br />
A higher setting will tell your Predator to ONLY watch for actual trigger pulls<br />
where a lower setting will allow some of these extra pulses to activate the firing<br />
sequence and actually register as a real pull. This means that if you have a light<br />
trigger and/or your gun kicks, you will get extra shots. This is dangerous and it<br />
makes more sense to allow us to do the extra work and add the extra shots by using a<br />
custom firing mode.<br />
We suggest setting this at 5 or 6 then tune your trigger to eliminate any bounce in<br />
your trigger. This should be done with air on your gun and actually firing.<br />
Register 4 - Dwell (bolt forward duration)<br />
This is the time that the bolt stays forward when you pull the trigger. On modern<br />
electronic guns the valve and/or bolt is moved by a pneumatic ram that is usually<br />
positions in the rear of the gun. The dwell setting tells the solenoid to open which<br />
activates the ram and pushes it to the open or forward position.<br />
On a “hammer valve” gun the ram usually has a weighted hammer that hits the valve<br />
stem. This allows the air to flow past the opening that is created and push the ball<br />
down the barrel. The longer this valve stays open the more air enters the breech to<br />
excellerate the paintball down the barrel. Typically low pressure guns use a lower<br />
dwell setting than a spool valve style gun.<br />
On a “spool valve” style gun such as a shocker the dwell tells the bolt how long to stay<br />
open which allows the air that is being held in the dump chamber to empty through<br />
the bolt and propel the ball down the barrel. Spool valve guns usually require a<br />
higher dwell setting so the air supply has time to empty completely.<br />
Register 5 - AFA Rate of Fire<br />
This is one of the 2 main registers that makes the Predator unique to all other<br />
paintball electronics on the market. This setting determines how fast you must pull<br />
the trigger to start your special firing mode and maintain the performance of that<br />
firing mode.<br />
then you must maintain 8 balls per second to keep the gun ramping. Once you drop<br />
below this rate of fire the gun will cease to ramp and it will not start ramping again<br />
until you start pulling at least 8 balls per second again. Pretty freakin’ sweet huh?<br />
Wait til you see what register 6 will do !<br />
Register 6 - AFA Shot Count<br />
This setting determines how many time you must pull the trigger before your<br />
selected special firing mode activates.<br />
This means that if you have selected to use our fast ramping (or any other advanced<br />
firing mode) and placed this register on 20 your ramping will not even start until you<br />
have pulled the trigger 20 times. This feature is reset after you have stopped pulling<br />
the trigger for at least 5 seconds. If you start firing again within that 5 second period<br />
your ramping will still be activate as long as you are maintaining the AFA rate of<br />
fire you set in register 5. If you stop firing for more than 5 seconds you must pull<br />
the trigger the number of times you set in this the AFA shot count register. This<br />
number would be 20 based on this examples settings.<br />
I know what you are thinking. The world has now opened up to me as a player and I will<br />
give my first born child to Bob. Ok, maybe you are not that impressed but these firing<br />
registers are very specific to the Predator and make us unique in the electronics market.<br />
Register 7 - Fire Hold Off<br />
This is the delay that occurs after your bold/ram has return to its original or resting<br />
position. This fire timing is usually locked out by other board manufacturers but we<br />
feel it is important for those that wish to get the absolute best performance out of<br />
their gun.<br />
Lets take a look at where this fire timing sits in our firing sequence.<br />
1. Eyes see a ball in the breech and places the board in a waiting state.<br />
2. You pull the trigger.<br />
3. Board tells ram to move forward to fire the ball.<br />
4. Ram stays forward the amount of time (in milliseconds) that has been set in<br />
register 4 (dwell).<br />
5. Ram returns after dwell time has expired.<br />
6. Ball drops in breech.<br />
7. Eye hold off (register 8) waits the set time for the ball to settle into place.<br />
8. Board will not fire again regardless of trigger pull until the time has expired in<br />
Register 7.<br />
This setting is usually turned up slightly if your gun has a hard time recovering<br />
during extremely fast firing rates. We suggest you leave it to its factory default since<br />
these are set for each board at the factory. However, experimentation can be fun and<br />
rewarding.<br />
Register 8 - Eye Hold Off<br />
This is the time that the boards wait to fire AFTER the eyes have seen a ball in the<br />
correct firing point in the breech. Even though the ball is sitting in the breech that<br />
does not mean the gun can immediately fire. Depending on your loader the paint<br />
might not be seated in the breech fully and this could cause a chop if the gun tried<br />
to fire.<br />
This setting is adjustable for one main reason. All loaders are not created equal. If<br />
you are using a NON force-fed loader like a revolution you will need a longer delay<br />
to keep from breaking paint. If you are using a super fast below the belt bubble<br />
monkey death force fed monster then this setting can be lower.<br />
Here is a small guide to help you determine which setting to use.<br />
1 - 2 = HALO or Q-loader<br />
2 - 3 = Vlocity<br />
3 - 4 = Evolution or Apache<br />
5 - 6 = Revolution (regardless of the high priced mod someone ripped you off to<br />
install.<br />
All Predator boards come stock with this register set to 1.<br />
page <br />
If you have selected to use our fast ramping firing mode and placed this register on 8
Register Descriptions<br />
Register 9 - Anti Bolt Stick<br />
Bolt stick? All guns have bolt stick? Of course not but it makes it easier on us if<br />
ALL Predators have this in the code.<br />
If your gun is experiencing first shot drop off (this is where the first shot barely<br />
comes out of the barrel after waiting a short time to fire again) you need to get your<br />
gun serviced. If this is not possible at this particular point in time then you can<br />
activate this register.<br />
This feature sends a slightly higher dwell setting on the first shot to the ram to<br />
keep it open a little bit longer which allows more air flow. This length of time is<br />
determined by the setting in this register. If you set this register to 4 it will add 4<br />
milliseconds to the current dwell time. This means that if you have a dwell of 10 you<br />
will get a dwell of 14 on your first shot. The length of time it takes to activate this<br />
setting is determined by register 10 below.<br />
1 = Off (Anti Bolt Stick is not activated)<br />
2 = 2 ms increase<br />
3 = 3 ms increase<br />
etc......<br />
Register 10 - Anti Bolt Stick Time<br />
If you have activated register 9 above then this is the time your must stop firing<br />
before your dwell will increase. Each setting represents 1 seconds so a setting of 5<br />
will activate the ABS after you have stopped firing your gun for 5 seconds. At this<br />
point your dwell will increase by the amount determined in register 9 ONLY on the<br />
next shot. Each shot after this will return to the original dwell setting that is set in<br />
register 4 (dwell).<br />
1 = 1 second wait<br />
2 = 2 second wait<br />
3 = 3 second wait<br />
etc......<br />
Register 11 - Eye Off Rate Of Fire<br />
Yes it is true. We thought of everything when we designed the Predator code.<br />
NOTE: When this register is set to “1” it will duplicate the rate of fire you set in<br />
register 2<br />
This setting allows you to set the rate of fire when you turn your eyes off. This is<br />
great for seeing how fast your gun will fire during dry-firing to impress your friends<br />
or to give you a fast but safe rate of fire in the event your eyes stop working and you<br />
need to disable them.<br />
The Predator has 3 Rates of Fire built into the code.<br />
1. Eye on rate of fire (register 2)<br />
2. Eye fault 11 bps rate of fire (hard coded and cannot be adjusted)<br />
3. Eye off rate of fire (register 11)<br />
Here are a few examples of this RATE OF FIRE system in use.<br />
You gun is firing at 18bps then the eyes fail. The gun immediately drops down to 11<br />
balls per second (which is our “eye fault” rate of fire) to stop you from breaking paint.<br />
11 bps is a bit slow for you so you immediately turn your eyes off and start shooting<br />
15bps which your loader is capable of shooting without the worry of breaking paint.<br />
This example is based on you setting register 2 (eye on rof) to 18 and register 11 (eye<br />
off rof) to 15bps.<br />
You wish to have your rof set to 13 bps with your eyes on but 15bps with your eyes<br />
off.<br />
You wish to set your eyes off rate of fire to the maximum your gun will cycle to see<br />
how fast it will shoot when dry firing.<br />
You wish to have the gun fire a maximum of 15bps with the eyes on or off. Register 2<br />
is set to 15 and Register 11 is set to 1.<br />
Register 12 - Rate of Fire Additions<br />
second faster than they are.<br />
1 = Feature is turned off and your maximum rate of fire is determined by register<br />
2.<br />
2 = .20 of a second added to your rate of fire.<br />
3 = .40 of a second added to your rate of fire.<br />
4 = .60 of a second added to your rate of fire.<br />
5 = .80 of a second added to your rate of fire.<br />
Example: You set your rate of fire in register 2 to 18 so your maximum rate of fire<br />
will be 18 balls per second. You then set register 12 to 4 which now makes your<br />
maximum rate of fire 18.6 balls per second.<br />
Register 13 - Disable Eye Through Trigger<br />
This register allows you to turn your eyes on and off through the trigger by<br />
simply holding the trigger back for 2 seconds. Sometimes it is not practical to<br />
stop what you are doing and look for those tiny buttons on the back of your grip.<br />
1 = Feature off<br />
2 = Hold for 2 seconds to turn eyes off<br />
Register 14 - Clearing Shot Activation<br />
This feature allows you to force your gun to shoot by simply holding the trigger<br />
back for for the limit set in the register. This allows you to force your gun to<br />
shoot if the eyes are dirty or they do not see a paintball for some reason. This<br />
features is activated by default on all of our Predator code but can be disabled<br />
through this register.<br />
1 = Feature Off<br />
2 = 1/4 of a second<br />
3 = 1/2 of a second<br />
4 = 3/4 of a second<br />
5 = 1 second<br />
Register 15 - Eye System Control (specific to each board)<br />
This register is used for several eye settings based on which board you are using.<br />
We have provided a small example of the uses of this register below.<br />
Please refer to the section that pertains to your particular Predator board to see<br />
if this register is used.<br />
Shocker:<br />
page <br />
NOTE About NXT shockers: We invented break beam eyes for the shockers.<br />
Our technicians have been putting break beam eyes in the guns since the first<br />
batch was introduced several years so. What does this mean to you as the<br />
consumer? 1. We have been doing it longer than anyone else 2. We have been<br />
doing it right longer than anyone else. Many aftermarket board manufacturers<br />
have tried to base their breakbeam eye logic off of our performance but as we all<br />
know...a copy is still not as good as the original.<br />
1 = Predator Break Beam Eyes are being used in your shocker. This conversion<br />
uses 3mm eyes in your shocker and the modification is usually handled by us. A<br />
Standard shocker that uses reflective eyes should not have this register set to 1<br />
2 - 20 = Sensitivity setting for a stock shocker that uses reflective eyes. This<br />
is the standard way ALL shocker came prior to the release of the 2007 line of<br />
shockers.<br />
2 is less sensitive than 20 and the boards come from the factory with a setting<br />
of 5. This works great for almost all types of playing conditions and paint.<br />
However, if your eyes are not working because you are getting extra light into<br />
the breech OR you are using darker paint then this setting can be adjusted.<br />
Our shocker eye logic is far superior to anything that is on the market today.<br />
With the ability to adjust your eye sensitivity you can even see black shelled<br />
paint ! No other board on the market can do this. Our eye logic is looking for<br />
any reflection/movement at all during its firing cycle and it knows if it is looking<br />
at the bolt or a ball. How is that for an eye logic !<br />
This register allows you to increase your rate of fire in small increments. We have<br />
never used this setting ourselves but we hear it is pretty popular with the pros and<br />
those folks that cannot be happy with knowing someone is shooting 1/5th a ball per
Register Descriptions<br />
page 10<br />
NME / Interceptor Board:<br />
1 - 20 with 20 being the most sensitive. Due to the varied manufacturing of these<br />
markers we decided to allow you to custom design your eye sensitivity. If your eyes<br />
do not see each other simply increase the setting. If your eyes are reading even the<br />
sun light then drop this setting slightly.<br />
Register 16 - Return Fire Activation.<br />
Your gun will fire VERY fast in the brief time after you stop firing and start firing<br />
again.<br />
Example of use: You are firing in semi auto mode then stop firing for some reason. If<br />
you start shooting again the gun will fire at a much higher rate of fire than you were<br />
originally shooting on your own. This feature works in all modes of fire.<br />
1 = Feature Off<br />
2 = Feature Activated<br />
Register 17 - Adaptive Fire Activation<br />
When this register is activated it will ‘conserve ammo’ if you are firing a very long<br />
string of paint. Your rate of fire is reduced by 1 BPS which can equal a pod or better<br />
during a long game.<br />
This feature is great for back players or people that spend a quiet a bit of time<br />
shooting loads of paint in a game. We understand that setting your rate of fire at 20<br />
means you want to shoot 20pbs but at some point what we want and what we need<br />
might overlap. In this case it would be pretty upsetting to reach for that final pod<br />
as an angry pack of paintball playing death midgets is heading your way simply to<br />
determine that you shot it already.<br />
Example for PSP or Xball Use: In the PSP you get 3 shots every trigger pull after<br />
the 3rd pull at 15bps. In the NXL you get 15bps FULL AUTO after teh 3rd trigger<br />
pull. IF you do not always need 15bps to stay in your game then this feature will<br />
help you conserve paint for those of you that do not carry a case onto the field each<br />
game. Cough cough “docs” cough cough<br />
1 = Feature Off<br />
2 = Feature Activated<br />
Register 18 - Power Off Behavior<br />
If set to 1 the power never turns itself off, otherwise its the number of minutes the<br />
gun will wait before powering down.<br />
Example 1 = Register 18 set to 1. Your gun will never turn itself off.<br />
Example 2 = Register 18 set to 10. Your gun will turn itself off after 10 minutes of<br />
inactivity.<br />
Default is 5 on all boards<br />
Register 19 - Eye Logic Type<br />
This register is mainly used for our shocker boards but might be of use to those that<br />
wish to use one of our boards for a custom project. This register determines if the<br />
eyes you are using will be break beam or reflective. This is extremely important if<br />
you are using one of our shocker boards. Since Smart Parts changed the eye logic<br />
from reflective to breakbeam we decided to place both versions of the code on our<br />
boards.<br />
1 = Break Beam (shocker NXT and most all other guns on the market)<br />
2 = Reflective (shocker SFT and very few guns on the market)<br />
If you purchase one of our shocker boards for your SFT shocker you will need to set<br />
this register to “2”. If you have a shocker NXT there is a chance you will not have to<br />
adjust anything unless someone has been playing around with your board.<br />
If you buy one of our boards used, this is the register to check first if your eyes are<br />
not working correctly. The best way to determine if this is the issue would be the<br />
reversal of the eye functionality. Nothing in the breech, the gun fires. Something in<br />
the breech, the gun will not fire. Get it?
Programming 10.0<br />
With the introduction of our 10.0 code we have moved into a new era for board<br />
programming. All control boards currently on the market offer you a single bank<br />
of registers that can be manipulated and adjusted to give you a specific performance<br />
out of your paintball gun. If you participate in several paintball leagues that require<br />
separate and specific settings then you had to physically enter the programming<br />
mode of your current board and make those adjustments each time manually.<br />
Predator 10.0 code features our P-bank feature that allows you to program several<br />
“banks” of settings and recall them at any time. This means not only do you have<br />
several firing modes to select from but you can also program separate dwell, mrof,<br />
ramp activation, ramp deactivation, eye off and eye on mrof that pertains to the<br />
firing mode you need for a particular situation.<br />
Example for programming your Predator 10.0 (current register bank):<br />
Your tournament LOCK must be off if your board has that feature. We strongly<br />
suggest you turn your tournament lock on while playing.<br />
1.<br />
2.<br />
3.<br />
4.<br />
5.<br />
6.<br />
7.<br />
8.<br />
9.<br />
10.<br />
Pull and hold the trigger then turn the gun on by using the button on the back<br />
of the gun<br />
Release trigger.<br />
You are now in the REGISTER select area<br />
Pull trigger the appropriate number of times to go to register. Example: 2 pulls<br />
will take you to the MROF register (register 2)<br />
LED will flash the current setting of the register you selected<br />
You are now in MODE select area<br />
You can now pull the trigger to insert the new setting.<br />
The LED will flash 2 times to indicate it has taken the new setting<br />
You are now back in the REGISTER select area<br />
You can now move to a new register by simple pulling the trigger the<br />
appropriate number of times or turn the gun off and back on to use the new<br />
settings<br />
Programming a Register Bank<br />
1.<br />
2.<br />
3.<br />
4.<br />
Go into programming mode by turning your board on while holding the<br />
trigger until the led starts scrolling through the various color banks listed<br />
below.<br />
Release the trigger on which color/bank you are programming<br />
Use the standard programming method to program that register bank<br />
The last bank you select will be the bank that is active the next time you<br />
activate your board.<br />
Bank 1 = RED<br />
Bank 2 = GREEN<br />
Bank 3 = BLUE<br />
Bank 4 = PURPLE<br />
Bank 5 = AMBER<br />
Bank 6 = TEAL<br />
Bank 7 = Unused in commercial code<br />
Bank 8 = Unused in commercial code<br />
page 11<br />
You can have up to 6 separate banks pre-programmed at any time. This allows you<br />
to switch from the PSP programming to CFOA or NPPL within 10 seconds. This<br />
might not sound very impressive until you include the ability to have every register<br />
set to a unique setting.<br />
NOTE: If you select Register 1, you are expected to enter a fire mode, again in<br />
trigger clicks. After you have made a selection, the light will flash and remain on.<br />
The gun is now prepared to fire. We suggest you make the fire mode the last register<br />
you select as the board will reboot after it has been selected.<br />
Programming advanced firing mode example on Predator board (current<br />
register bank):<br />
Player wishes his or her marker to ramp once they reach 6 bps but NOT start<br />
ramping until they have fired 10 shots.<br />
1.<br />
2.<br />
3.<br />
4.<br />
5.<br />
6.<br />
7.<br />
8.<br />
9.<br />
10.<br />
11.<br />
12.<br />
13.<br />
14.<br />
15.<br />
16.<br />
Go into programming mode by turning your board on while holding the<br />
trigger back (holding the trigger back for an extended length of time will move<br />
you through the different register banks)<br />
LED will flash once to indicate you are in program mode<br />
Release the trigger<br />
Pull trigger 5 times to enter the RAMPING ROF register (register 5)<br />
LED will flash the current setting<br />
Pull the trigger 6 times to set this register to 6bps<br />
LED will flash 2 times to indicate it took the new setting<br />
Pull trigger 6 times to enter the RAMPING SHOT COUNT register<br />
(register 6)<br />
LED will flash the current setting<br />
Pull the trigger 10 times to indicate you wish the ramping to start after you<br />
have fired 10 shots<br />
LED will flash 2 times to indicate it took the new setting.<br />
Pull trigger 1 time to enter the FIRING MODE register<br />
LED will flash the current setting<br />
Pull trigger 6 times to enter FAST RAMPING mode<br />
LED will flash 2 times to indicate that it took the new setting AND the gun<br />
will reboot and be ready to fire.<br />
The gun reboots automatically after you set register 1. This does not happen<br />
after any of the other registers.
Predator Boards - Angel V3<br />
READ FIRST<br />
page 12<br />
FOLLOW DIRECTIONS TO AVOID DAMAGING YOUR NEW V3 PREDATOR BOARD DURING THE INSTALLATION PROCESS.<br />
1.<br />
2.<br />
3.<br />
4.<br />
5.<br />
IF YOUR ANGEL USES A STOCK RECHARGEABLE BATTERY DO NOT INSERT THE 3 PIN POWER CONNECTOR COMING FROM THE<br />
BATTERY INTO THE BOARD. THIS WILL DAMAGE THE BOARD AND VOID YOUR WARRANTY. THE PREDATOR BOARD IS DESIGNED<br />
TO BE USED WITH A 9 VOLT BATTERY ONLY. WE SUGGEST YOU REMOVE THE STOCK BATTERY FROM THE GUN. PLEASE REFER TO<br />
YOUR MANUAL FOR DISASSEMBLY INSTRUCTIONS.<br />
IF YOU INSTALL THE PREDATOR V3 BOARD INTO A GUN THAT DOES NOT HAVE EYES INSTALLED YOU WILL NEED TO DISABLE THE<br />
EYES EACH TIME YOU TURN THE BOARD ON. THIS IS DONE BY PUSHING THE BOTTOM BUTTON ON THE BOARD UNTIL THE EYES<br />
ARE DISABLED. THIS USUALLY TAKE ABOUT 2 OR 3 SECONDS. YOUR MROF IS NOW CONTROLLED BY REGISTER 11 WHICH IS THE “EYE<br />
OFF” RATE OF FIRE. *YOU WILL NEED TO DISABLE THE EYES EACH TIME YOU TURN YOUR GUN ON OR IT WILL ONLY FIRE AT 10BPS<br />
THE 3 PIN CONNECTOR AT THE TOP HALF OF YOUR BOARD (P2A) IS FOR A DM STYLE EYE HARNESS AND NOT THE STOCK BATTERY<br />
PLUG. PLUGGING YOUR STOCK BATTERY HARNESS INTO THIS 3 PIN PLUG WILL DAMAGE THE BOARD AND VOID YOUR WARRANTY.<br />
DO NOT PLUG YOUR STOCK BATTERY CONNECTOR INTO PLUG P2A !<br />
WHEN INSTALLING YOUR BOARD INTO ANY ANGEL YOU WILL ONLY NEED TO PLUG YOUR SOLENOID IN THE PROPER 2 PIN PLUG<br />
ON THE BOARD. THIS PLUG (P1) IS LOCATED ON THE RIGHT SIDE OF THE BOARD JUST ABOVE THE 05 SPEED ON/OFF PLUG (P3). DO<br />
NOT PLUG THE 3 PIN BATTERY CONNECTOR INTO THE DM STYLE EYE HARNESS PLUG (P2A). THIS WILL DAMAGE THE BOARD AND<br />
VOID YOUR WARRANTY.<br />
WHEN INSTALLING THE V3 PREDATOR INTO AN 05 SPEED STYLE ANGEL A PARTICULAR SETUP MUST BE PERFORMED. THIS WILL<br />
ENABLE THE POWER SWITCH ON THE REAR OF THE GUN.<br />
A. DIP SWITCH NUMBER 4 MUST BE TURNED ON<br />
B. THE ON/OFF CONNECTOR THAT IS COMING FROM THE REAR SWITCH OF THE GUN MUST BE PLUGGED INTO THE CORRECT<br />
PLUG ON THE BOARD (P3). THIS PLUG IS LOCATED ON THE RIGHT SIDE OF THE BOARD JUST BELOW THE SOLENOID PLUG (P1).<br />
DIPS 5 AND 6 MUST ALWAYS BE ON OR YOUR BOARD WILL NOT WORK. “ON” IS IN THE UP POSITION.<br />
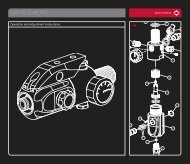
BOARD PLUG LEGEND:<br />
P1 = SOLENOID<br />
P2A = DM STYLE EYE HARNESS (DO NOT PLUG YOUR STOCK BATTERY INTO THIS PLUG )<br />
P2B = STOCK WDP EYE HARNESS<br />
P3 = 05 SPEED ON/OFF CABLE. MUST USE THE INCLUDED JUMPER IF THE BOARD IS NOT IN AN O5 SPEED.<br />
P4 = FACTORY PROGRAMMING PLUG.<br />
NOTE: The DWELL might need to be adjusted before you use your V3 board for the first time.<br />
LCD, IR3 = 14ms dwell time All other Angels should start at 10ms and then tune from there.<br />
LED:<br />
Teal = Ball in breech<br />
Blue = No ball in breech<br />
Red Flashing = Eye off<br />
Green = Program mode<br />
Dip Switches:<br />
1. Anti Bolt Stick (on = ABS activated. This can be set in the registers)<br />
2. Tournament lock (on = will not allow board to go into programming mode)<br />
3. Factory reset<br />
4. 05/06 Speed code activation (this must be turned on ONLY when installing in the 05 speed)<br />
5. ALWAYS ON<br />
6. ALWAYS ON<br />
Activation:<br />
• Push the top button on your frame and hold until the LED activates.<br />
Eye Operation:<br />
• Push and hold the bottom button to activate or deactivate the eyes. Your new Predator V3 is capable of using the stock eye ribbon cable on the A4 Fly, 05 Speed, and<br />
the G7) We have also included a standard 3 pin connector that we use on our custom installs. This is the eye harness that is used on the DM series of paintball guns.<br />
We offer our version of these with a ultra bright RED or BLUE eye component that is visible in the breech.
Predator Boards - Angel V3<br />
page 13<br />
Your new angel board has the ability to be used in any angel from the LCD to the newest release that is available.<br />
We designed a system of break-away TABS to aid in the install. These TABS can be removed with a set of pliers or side<br />
cutters that are available at any hardware store. There is a good chance that you already have these tools since they are<br />
a commonly used item.<br />
We have already installed 2 operating systems on your new Predator to take advantage of how the 05 speed uses a standard<br />
battery on/off and no back buttons. No extra wiring is needed. A simple flip of a switch tells your new Predator that it<br />
has been installed into an 05 Speed.<br />
For any Angel after the A4 fly (05 speed, G7 etc) you will need to remove or flatten the leaf spring that is attached to the<br />
back of your trigger. During our initial testing we found that most players preferred the trigger to have direct contact with<br />
the micro switch instead of having the spring come in contact with the micro switch. This setup gives the player a more<br />
natural feel. If you prefer to leave the leaf spring on the trigger you can push it as flat as you can get it against the back of<br />
the trigger. To remove this spring a set of vicegrips and some determination is all that is needed.<br />
IR3 - G7 Install (not the 05 speed)<br />
1. Dip switch 4 must be off<br />
2. Tab 1 is removed<br />
3. Tab 2 is removed<br />
4. Jumper in place<br />
LCD Install<br />
1. Dip switch 4 must be off<br />
2. Tab 1 is removed<br />
3. Jumper in place<br />
05 SPEED<br />
1. Dip switch 4 must be ON<br />
2. Tab 2 is removed<br />
3. No jumper (on/off harness will plug into this port)
Shocker NXT/SFT<br />
LED:<br />
On Solid = Ball in breech<br />
Slow Flashing = No ball in breech<br />
Fast Flashing = Eye off<br />
Dim = Program mode<br />
Dip Switch’s:<br />
1. Eye sensitivity control when using TAG break beam eyes ONLY. This switch<br />
is NOT used on NXT factory break beam guns. OFF is medium power for<br />
the emitter while ON is full power for the eye system. ALWAYS keep this<br />
switch turned on.<br />
2. Tournament lock. You cannot go into program mode while this DIP is turned<br />
ON.<br />
Activation:<br />
Push and hold the button on the back of the frame until the LED light comes on.<br />
Hold the button again to turn the gun off. A tap will turn the eyes on and off.<br />
Eye Operation:<br />
With the gun on simply tap the back button or hold down the trigger if this feature<br />
has been activated in the register settings.<br />
NXT Shocker (new break beam) - Register 19 = 1<br />
SFT Shocker (reflective eye) - Register 19 = 2<br />
DM6/7<br />
page 14<br />
ION<br />
EGO/ETEK 06<br />
DM4/5/C<br />
Worr Frame
Emag/Xmag<br />
page 15<br />
Tippman A5
Troubleshooting<br />
Gun will not fire:<br />
page 16<br />
1.<br />
2.<br />
3.<br />
4.<br />
5.<br />
6.<br />
Check your dwell. It must be set at our recommended setting.<br />
Check your battery.<br />
Check solenoid wires.<br />
Make sure that your trigger switch is being engaged.<br />
Make sure something is in the breech or the eyes are turned off.<br />
Make sure gun is turned on.<br />
Cannot program the board:<br />
1.<br />
2.<br />
3.<br />
Make sure that the tournament lock is turned off.<br />
Make sure that your trigger is engaging the trigger switch.<br />
Make sure that you are pulling the trigger while turning the gun on.<br />
Eye are not working:<br />
1.<br />
2.<br />
3.<br />
4.<br />
5.<br />
6.<br />
Make sure you are using a new battery. The eyes are the first feature to go<br />
when the battery is going dead. We did this to keep you in the game if you<br />
forget to replace the battery.<br />
Are the eyes clean? Many guns arrive at our shop with eye issues that are<br />
corrected by cleaning the eyes.<br />
Are the eyes damaged in any way?<br />
Are the eye wires damaged?<br />
Make sure your eyes are turned on.<br />
Make sure your board is set to the correct type of eye logic your gun uses. This<br />
would be found in register 19. 1 = Break Beam 2 = Reflective<br />
Gun has first shot drop off or shoots down when fired several times:<br />
1.<br />
2.<br />
3.<br />
4.<br />
Check your battery<br />
Check your dwell<br />
Check your air system<br />
Check your regulator