
Create successful ePaper yourself
Turn your PDF publications into a flip-book with our unique Google optimized e-Paper software.
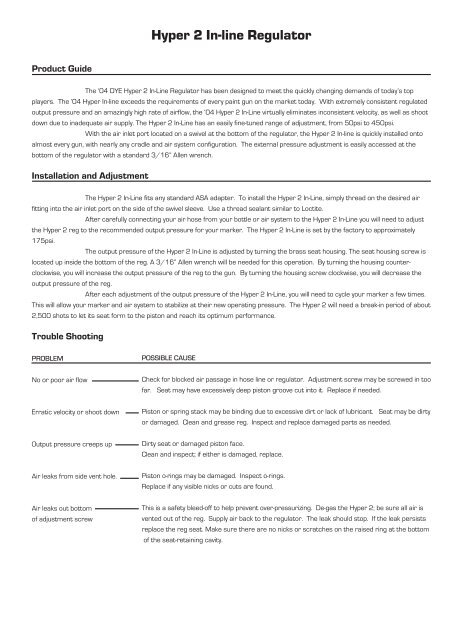
<strong>Hyper</strong> 2 <strong>In</strong>-<strong>line</strong> <strong>Regulator</strong>Product GuideThe ‘04 DYE <strong>Hyper</strong> 2 <strong>In</strong>-Line <strong>Regulator</strong> has been designed to meet the quickly changing demands of today’s topplayers. The ‘04 <strong>Hyper</strong> <strong>In</strong>-<strong>line</strong> exceeds the requirements of every paint gun on the market today. With extremely consistent regulatedoutput pressure and an amazingly high rate of airflow, the ‘04 <strong>Hyper</strong> 2 <strong>In</strong>-Line virtually eliminates inconsistent velocity, as well as shootdown due to inadequate air supply. The <strong>Hyper</strong> 2 <strong>In</strong>-Line has an easily fine-tuned range of adjustment, from 50psi to 450psi.With the air inlet port located on a swivel at the bottom of the regulator, the <strong>Hyper</strong> 2 <strong>In</strong>-<strong>line</strong> is quickly installed ontoalmost every gun, with nearly any cradle and air system configuration. The external pressure adjustment is easily accessed at thebottom of the regulator with a standard 3/16” Allen wrench.<strong>In</strong>stallation and AdjustmentThe <strong>Hyper</strong> 2 <strong>In</strong>-Line fits any standard ASA adapter. To install the <strong>Hyper</strong> 2 <strong>In</strong>-Line, simply thread on the desired airfitting into the air inlet port on the side of the swivel sleeve. Use a thread sealant similar to Loctite.After carefully connecting your air hose from your bottle or air system to the <strong>Hyper</strong> 2 <strong>In</strong>-Line you will need to adjustthe <strong>Hyper</strong> 2 reg to the recommended output pressure for your marker. The <strong>Hyper</strong> 2 <strong>In</strong>-Line is set by the factory to approximately175psi.The output pressure of the <strong>Hyper</strong> 2 <strong>In</strong>-Line is adjusted by turning the brass seat housing. The seat housing screw islocated up inside the bottom of the reg. A 3/16” Allen wrench will be needed for this operation. By turning the housing counterclockwise,you will increase the output pressure of the reg to the gun. By turning the housing screw clockwise, you will decrease theoutput pressure of the reg.After each adjustment of the output pressure of the <strong>Hyper</strong> 2 <strong>In</strong>-Line, you will need to cycle your marker a few times.This will allow your marker and air system to stabilize at their new operating pressure. The <strong>Hyper</strong> 2 will need a break-in period of about2,500 shots to let its seat form to the piston and reach its optimum performance.Trouble ShootingPROBLEMNo or poor air flowErratic velocity or shoot downOutput pressure creeps upAir leaks from side vent hole.Air leaks out bottomof adjustment screwPOSSIBLE CAUSECheck for blocked air passage in hose <strong>line</strong> or regulator. Adjustment screw may be screwed in toofar. Seat may have excessively deep piston groove cut into it. Replace if needed.Piston or spring stack may be binding due to excessive dirt or lack of lubricant. Seat may be dirtyor damaged. Clean and grease reg. <strong>In</strong>spect and replace damaged parts as needed.Dirty seat or damaged piston face.Clean and inspect; if either is damaged, replace.Piston o-rings may be damaged. <strong>In</strong>spect o-rings.Replace if any visible nicks or cuts are found.This is a safety bleed-off to help prevent over-pressurizing. De-gas the <strong>Hyper</strong> 2; be sure all air isvented out of the reg. Supply air back to the regulator. The leak should stop. If the leak persistsreplace the reg seat. Make sure there are no nicks or scratches on the raised ring at the bottomof the seat-retaining cavity.
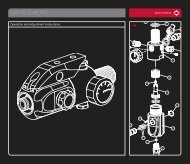
<strong>Hyper</strong> 2 <strong>In</strong>-<strong>line</strong> <strong>Regulator</strong>Maintenance and RepairThe <strong>Hyper</strong> 2 <strong>In</strong>-Line was designed to perform under the most extreme playing conditions, and built to hold up underthe abuse of even the roughest player. Even with this much durability built into the <strong>Hyper</strong> 2 <strong>In</strong>-Line, excessive dirt and debris can affectits performance and increase the need for servicing. Some general maintenance must be performed to ensure optimumperformance.1. Make sure the inlet and outlet ports and connecting fittings are free of all dirt and paint.2. Examine all o-rings for nicks or cuts.3. Carefully inspect the seat for excessive wear that might cause spiking and over-pressurizing.4. Clean any accumulated dirt out of the air chambers and passages.5. Keep the piston o-rings and spring pack well greased to allow smooth velocity adjustment and preventerratic velocity spikes and drop off.6. Clean off all old grease that may be contaminated with dirt; reapply fresh grease to the piston and other necessary areas.7. Be sure to reassemble the internal components in the proper order and direction.8. See diagram for assistance.DisassemblyDisassembly of the <strong>Hyper</strong> 2 <strong>In</strong>-Line is easily done with a 3/8” and a 5/16” Allen wrench.1. Remove all air from your gun and <strong>Hyper</strong> 2 <strong>In</strong>-Line <strong>Regulator</strong> and remove reg from gun.2. Lock the 3/8” Allen wrench into the top of the <strong>Hyper</strong> 2 <strong>In</strong>-Line. Using the 5/16”Allen wrench, unscrew the bottom retaining capfrom the main body.3. Once the bottom-retaining cap is removed, you will be able to unscrew the seat housing from the reg body. Use a 3/16” Allenwrench. With the seat housing extracted from the reg body, inspect the seat for dirt and/or visible damage. The seat should befree of dirt, nicks, and cuts. There will be a recessed ring on the face of the seat. This is normal wear from the piston face sealingagainst the seat.4. Once the bottom-retaining cap has been removed from the reg, the swivel sleeve will pull off the reg with only littleresistance due too-rings dragging. Keep the swivel post o-rings well greased to insure smooth turning of the swivel.5. To access the piston and spring pack, you will need to remove the top cap. Use the 3/8” Allen wrench. The piston and spring packwill then be accessible from the top of the main reg body. <strong>In</strong>spect the piston o-ring and make sure the spring pack is assembledcorrectly. The spring pack is comprised of nine (9) shims. Be sure the shims alternate direction when stacked. Look closely at theface of the piston that makes contact with the seat. Make sure it has no major nicks or scratches on it.6. When installing the spring and piston you must take special care to make sure that the #007 o-ring is fully seated downinto the main reg body. You must make sure to keep the #007 o-ring seated in place when the piston is pressed in.DYE Precision, <strong>In</strong>c.10637 Scripps Summit Ct. San Diego, CA 92131P 858-536-5183 F 858-536-5191www.dyeprecision.comCopyright ©2003 DYE Precision, <strong>In</strong>c. The stylized “dye” logo and the “sphere” logo are either registeredtrademarks, trademarks, or design trademarks of DYE Precision, <strong>In</strong>c.