Autococker® Marker Manual - Paintball Manuals
Autococker® Marker Manual - Paintball Manuals
Autococker® Marker Manual - Paintball Manuals
- No tags were found...
You also want an ePaper? Increase the reach of your titles
YUMPU automatically turns print PDFs into web optimized ePapers that Google loves.
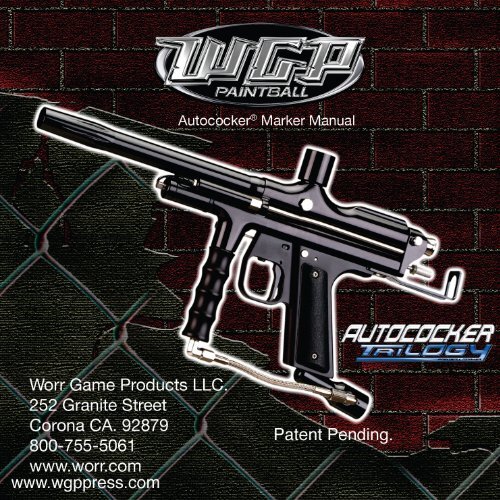
Autococker ® <strong>Marker</strong> <strong>Manual</strong>Worr Game Products2 5 2 G r a n i t e S t r e e t • C o r o n a , C A 9 2 8 7 98 0 0 . 7 5 5 . 5 0 6 1 • 9 0 9 . 5 2 0 . 9 6 9 9www.worr.com www.wgpchat.com
Autococker ® <strong>Marker</strong> <strong>Manual</strong>WORR GAME PRODUCTS, LLC. TRILOGY®AUTOCOCKER® OWNERS MANUALWARNING:This is not a toy. Misuse may cause serious injuryor death. Eye protection designed specifically for paintball must be wornby the user and persons within range. Recommend 18 years or older topurchase. 14 years old to use with adult supervision or 10 years old to useon paintball fields meeting ASTM-standard F1777-97. READ OPERATION ®MANUAL BEFORE USING.WARNING:Never shoot at anyone without proper protectiveequipment for eyes, ears, throat and head, which must be worn at all times.Eye protection must be designed specifically for paintball use. Failure tofollow these safety precautions may result in bodily injury including blindnessand deafness.If you have a problem,DO NOT RETURN TO PLACE OF PURCHASE.Contact WGP for service.WORR GAME PRODUCTS, LLC.252 Granite StreetCorona, Ca 92879-1283Tel: (909) 520-9969Toll Free: (800) 755-5061 www.worr.com© Copyright 2004 Worr Game Products, LLC. All rights reserved.
Autococker ® <strong>Marker</strong> <strong>Manual</strong>I. Rules of Safe <strong>Paintball</strong> <strong>Marker</strong> Handling.• Treat every marker as if it were loaded.• Never look down the barrel of a paintball marker.• Keep your finger off the trigger until ready to shoot.• Never shoot a person not wearing proper protection.• Never point the marker at anything you donʼt wish to shoot, even if it is notloaded and there is no air source attached.• Keep the marker on safe until ready to shoot.• Keep the barrel blocking device in/on the marker when not shooting.• Always remove paintballs and propellant source before disassembly.• After removing propellant source, point marker in safe direction anddischarge until marker is degassed.• Store the marker unloaded and degassed in a secure place.• Follow warnings listed on propellant source for handling and storage.• Do not shoot at fragile objects such as windows.• Every person within range must wear eye, face and ear protection designedspecifically to stop paintballs.• Always measure your markerʼs velocity before playing paintball and nevershoot at velocities in excess of 300 feet per second.• Never engage in vandalism.• Do not modify your markers air system or regulators in any way.• Do not use any paintball marker for drive-by shootings.• Faliure to follow these safety precautions may result in bodily injury includingblindness and death.Page 3
Autococker ® <strong>Marker</strong> <strong>Manual</strong>II. Preparing for Use1. Screw barrel onto marker2. Place barrel blocking device properly onto the markerWARNING: Always wear paintball approved eye and face protectionwhen dealing with a pressurized paintball marker.3. Pull the cocking rod back until it latches into place4. Make sure the safety is pushed to the “PUSH SAFE” position.5. Connect the tank to the ASA (air system adapter.)Note: Make sure to always get your cylinders filled by authorized, skilled andknowledgeable technicians for the correct fill limits of each cylinder.Do not try to refill cylinders by yourself. Do not use cylinders thathave not been properly maintained or that are damaged. WGP recomendscompressed air but C02 will work. Always besure to only use ASTM compliant tanks for your marker. Always usecaution when refilling, attaching and handling any type of air tank.6. Attach the loader to the feed port of the markerNote: Use only 0.68 caliber paintballs in your Worr Game ProductsAutococker ® marker. All WGP Autococker ® markers are timed andtested prior to leaving the factory.Before field use, ensure the velocity is in compliance with field safety guidelines.General field velocity limits are usually between 250-300 fps (feet per second).Your paintball markers velocity should never exceed 300 fps. Observe and abideby all local laws, regulations and field safety guidelines pertaining to the use ofpaintball markers.Page 4
II. Preparing for Use<strong>Marker</strong> Schematic.Autococker ® <strong>Marker</strong> <strong>Manual</strong>Inline gas through grip(on SPORT model)Inline regulatorthat replaces gasthrough grip onCOMPETITIONand PRO models.Push FirePush SafeIf you have a problem contact WGP for service.DO NOT RETURN TO PLACE OF PURCHASE.Page 5
Autococker ® <strong>Marker</strong> <strong>Manual</strong>II. Preparing for UseWARNING: Do not put any part of your body directly in back ofthe cocking block when you activate the trigger.SEQUENCE OF OPERATIONS:The first part of the trigger pull lowers the sear, which releases the hammer.The hammer strikes the valve, which allows gas to flow through the bolt anddown the barrel, propelling a ball out. As you continue to pull the trigger, the 3way shifts the flow of air from the rear to the front of the ram. The incoming airdrives the ram rearward which causes the pump arm to push the bolt, cocking rod,and cocking block backwards. Note that the bolt and cocking assembly willremain in the rearward position until the trigger is fully released. This actionallows a ball to drop into the breach and at the same time completes the recockingprocess. At this point, the marker has completed one full cycle and isonce again ready for use.Note: If you are using a C02 tank, you need to be aware that C02 has somelimitations. If you play in a cold environment and you fire rapidly youmay experience rapid fluctuations in velocity (shoot down) or you mayexperience “marker freeze up”. This is normal for C02. C02 is a frozenliquid, and as you shoot the marker rapidly you are firing this frozenliquid into the marker causing the marker to freeze up. The remedy forthis problem is to allow the marker and tank to warm-up to room temperature.WGP suggests the use of compressed air when shootingrapidly or in cold weather.Page 6
Autococker ® <strong>Marker</strong> <strong>Manual</strong>II. Preparing for Use• <strong>Paintball</strong> industry approved protective gear (for face and eyes) must be worn atall times while operating and performing adjustments on this marker.• Do not insert objects into the space between the cocking block and the mainbody of the marker at any point in time. Improper marker treatment may resultin damage to the marker and serious injury to the operator.• Prior to beginning any work on your marker, check to make sure that all excesspressure has been released by pointing the marker in a safe direction andpulling the trigger. This is a necessary precaution due to the fact that themarker may still contain pressure even after the removal of the gas source.• Damages to the marker due to improper adjustments are NOT coveredunder warranty. If you are uncertain, unable or do not know how to performwork on the marker, have adjustments and repairs made by WGP.III. VelocityWARNING: WGP does not set the velocity prior to leaving the factory. YouMUST set the velocity within field and safety limits using achronograph prior to playing. Always use a chronograph to verify that your markersvelocity does not exceed maximum safety limits.Page 7
Autococker ® <strong>Marker</strong> <strong>Manual</strong>III. VelocitylimiTo adjust Velocity:1. Remove the cocking rod by unscrewing it counterclockwise.2. Insert the provided 3/16” Allen wrench in place of the cocking rod so thatit passes through the IVG (Internal Velocity Governor). Turning the Allenwrench clockwise will increase the velocity while counterclockwise willdecrease the velocity.3. Movement of the wrench quarter turn in either direction will change yourvelocity approximately 15-20 fps (feet per second).-DO NOTEXCEED 300 FPS!Be sure the entirecocking rodcomes outwhen youunscrew itfrom themarker+3/16” Allen WrenchIVG should notbe deeper than 1/4”-1/2” inside of receiverBack ViewPage 8
Autococker ® <strong>Marker</strong> <strong>Manual</strong>IV. Cleaning Your <strong>Marker</strong>WARNING: Always make sure you and everyone around you wears protectionwhen you clean the marker or check it for paintballs.It isnʼt necessary to completely disassemble your marker to clean it. WGPrecommends the following cleaning be done after each day of play:1. Before you start ALWAYS make sure that all paintballs are out of the marker.2. Remove air source and ensure that all air has been released from the marker.3. Remove the barrel sock and then remove the barrel.4. Lightly spray marker down with a 50-50 mix of rubbing alcohol and waterand then wipe down.5. Wipe down the marker with a clean cloth, or blow off the marker withcompressed air (NOT CO 2 ).6. Remove bolt and lubricate bolt O-rings with petroleum jelly or lithiumgrease, then reinstall.7. Lubricate all moving parts with Vaseline, and reassemble.8. WGP recommends that after every 4-5 days of play you place 3-4 dropsof 3 in 1 or other paintball marker specific oil in the air receiver and fire themarker 10-15 times without the barrel. This will distribute the oil throughoutthe marker and lubricate the internals.Factory approved lubricants:• Petroleum Jelly• Lithium Grease• 3 in 1 OilPage 9
Autococker ® <strong>Marker</strong> <strong>Manual</strong>V. Notes---------------------------------------------------------------------------------------------------------------------------------------------------------------------------------------------------------------------------------------------------------------------------------------------------------------------------------------------------------------------------------------------------------------------------------------------------------------------------------------------------------------------------------------------------------------------------------------------------------------------------------------------------------------------------------------------------------------------------------------------------------------------------------------------------------------------------------------------------------------------------------------------------------------------------------------------------------------------------------------------------------------------------------------------------------------------------------------------------------------------------------------------------------------------------------------------------------------------------------------------------------------------------------------------------------------------------------------------------------------------------------------------------------------------------------------------------------------------------------------------------------------------------------------------------------------------------------------------------------------------------------------------------------------------------------------------------------------------------------------------------------------------------------------------------------------------------------------------------------Page 10
Autococker ® <strong>Marker</strong> <strong>Manual</strong>VI. TroubleshootingNote:A qualified technician should make all repairs and adjustments.Do not attempt to perform any factory-only repairs. Call WGP forany service needed on your marker. Any damage caused byimproper adjustments is not covered by the warranty.1. <strong>Marker</strong> will not fire if left in the sun or a hot place with tank attached.• Bottle pressure exceeds 1100 psi. and will not allow exhaust valve toopen. Make sure you are in a safe environment then remove tank frommarker, be sure to point marker at the ground and fire the excess air outof the marker.Place marker and air tank in a cool, safe place.2. <strong>Marker</strong> will not fire properly after removing and replacing bolt.• Bolt installed upside down. Remove bolt. Reinstall after rotating 180degrees. The hole side should be facing down.Make surebolt is installedcorrectly.Page 11
Autococker ® <strong>Marker</strong> <strong>Manual</strong>VI. Troubleshooting3. <strong>Marker</strong> will not fire when trigger is pulled.• Gas source pressure low or tank empty. Fill tank.• Make sure the hole in your bolt, between the 2 o-rings is facing down.4. <strong>Marker</strong> will not cock or cocks every other time or less.• Pressure too low. Fill tank.• Velocity adjustment set too high.• Back block or cocking rod adjustment incorrect.Hand tighten cocking rod to ensureproper function of your marker. Thismight become loose after some use.**Be sure not to cross thread.**Page 12
Autococker ® <strong>Marker</strong> <strong>Manual</strong>VI. Troubleshooting5. Chops paintballs.• Make sure your cocking rod is screwed all the way in.• Paint is soft or swelled. Ensure that paint is not too large for barrel.• Check loader and breech for foreign matter.6. Hose blows off.• Clip off worn tip and reinstall or call WGP for service 800-755-5061.7. Leaking between tank valve and marker air-receiver.• Bad tank valve o-ring. Replace o-ring. This is the external o-ring atthe top of the tank.The tank o-ringis located atthe top of yourtank.8. Low velocity.• Gas source pressure too low or tank empty. Fill tank.• Improper IVG adjustment. Adjust velocity.• Paint rolling down the barrel. Paint too small.• Bolt upside down.9. Gas leaks down the barrel.• In a safe environment, oil your marker and fire it a few times to help seatthe valve. If you still hear excess air escaping from the marker, call WGPfor service.Page 13
Autococker ® <strong>Marker</strong> <strong>Manual</strong>VI. Troubleshooting10. <strong>Marker</strong> fires and block comes back but will not go completely forward;locks approximately halfway.• Remove bolt and lubricate o-rings. Reinstall bolt making sure the holebetween the 2 o-rings is facing down.• <strong>Paintball</strong> shell caught between bolt and body at feed tube. Ball detentscrewed in too tight.• Remove and apply permanent strength thread lock to ball detentthreads making sure not to get any on or behind the ball itself,then reinstall.11. Always be sure that anytime you are working with your marker you are ina safe environment. A safe environment is an area where you and everyone within 200 yards is wearing paintball approved safety goggles andequipment. An area that is netted in and meets ASTM-standard F1777-97.Also be sure to empty all paintballs and exhaust all air from the markerbefore storing the marker in a secure locked place.VII. F.A.Q.Q) How do I safely maintain my WGP Autococker® marker?A) Safely maintaining your marker is simple and easy. You need only clean andoil your marker to keep it up and running.Page 14
Autococker ® <strong>Marker</strong> <strong>Manual</strong>VII. F.A.Q.Q) How do I oil my marker?A) 1.You only need to lubricate your marker after every 4 to 5 days of play. Tooil your maker you first, in a safe environment, remove your loader, then fire allexcess paintballs out of the marker. Next remove your tank and fire all excessair from the marker. Now remove your barrel. Next drop 3 to 4 drops of either 3in 1 oil or any other approved paintball marker oil into the air receiver and safelyfire the marker 10-15 times. This will distribute the oil throughout the internalsof the marker. At this time you can also lubricate your bolt 0-rings. Be sure thatthe hole in between the 2 O-rings on your bolt is always facing down. Factoryapproved lubricants: Petroleum jelly, 3 in 1 oil and lithium grease.Q) How do I safely clean my marker?A)To clean your marker you first find a safe environment then remove yourloader, then fire all excess paintballs out of the marker. Next remove your tankand fire all excess air from the marker. Now remove your barrel, then lightlyspray down marker with a 50-50 mix of rubbing alcohol and water and then wipeit down with a clean cloth.Q) Does WGP recomend C02 or compressed air on my marker?A)WGP recommends compressed air, but the markers will also work on CO2.If you are using a C02 tank, you may experience the marker getting cold, thisis normal for C02. C02 consists of frozen liquid and when this liquid enters thethe marker it will cause the marker to get cold. To remedy this problem, let yourmarker warm up to room temperature in a safe, secure place.Page 15
Autococker ® <strong>Marker</strong> <strong>Manual</strong>VII. F.A.Q.Q) Sometimes when I air up my marker, I hear air coming out of the barrel.What causes that?A) Before you air up your marker always be sure to cock the marker first, this willtake the pressure off of the valve and stop the air from escaping, if you still hearair escaping try oiling and firing the marker a few times in a safe environmentto seat the valve. If you continue to hear air escaping, call WGP for service. Itis not recommended to adjust or remove the hammer or hammer lug withoutproper training.Q) What is timing? And do I need to adjust it?A) Timing is the length of time between when your marker fires and when it startsto recock. Your marker comes timed from the factory and you do not need totime it. It is not recommended to adjust or remove the hammer or hammer lugwithout proper training.Q) I broke a paintball in my marker. How do I clean it?A) To clean broken paintball out of your marker you will first remove your loader,next your tank be sure to fire all excess paintballs and air from your marker. Nextremove your barrel and then your bolt. Using a squeegee or battle swab, runit through the same chamber you pulled the bolt from, then run it through thebarrel. Reinstall the bolt. Be sure that the hole in between the 2 o-rings on yourbolt between the 2 o-rings is facing down and your ready to go.Page 16
Autococker ® <strong>Marker</strong> <strong>Manual</strong>VII. F.A.Q.Q) Iʼve removed my bolt and replaced it, and my velocity has dropped. What isthe problem?A) Any time your remove the bolt from your marker, you must always be surethat the hole in between the 2 O-rings on your bolt is always facing down beforereinstallation. This is common problem that could directly effect the velocity ofyour marker.Q) What is the reason to have different barrel sizes?A) The reason for using different barrel sizes is, paintballs are different sizes dueto freshness, weather and other factors. By having different barrel sizes your areable to match your paint to your barrel to get the best accuracy and consistencyout of your marker.Q) I have a question that is not on this list. What do I do?A) If you have more questions and did not find the answers here, Please contactWGP directly at 800-755-5061. Or visit www.worr.comm or www.wgppress.comQ) Does WGP have an online forum?A) Yes the address is www.wgppress.comPage 17
Autococker ® <strong>Marker</strong> <strong>Manual</strong>VIII. One Year Limited WarrantyWorr Game Products®, LLC. warrants that your Autococker ® marker will be free from defects inmaterials and workmanship for one year from purchase date.Any product determined by WGP to be defective in materials or workmanship in accordance with theabove warranty will be repaired or replaced, at the option of WGP, free of charge when received at thefactory freight prepaid, together with proof of purchase.This warranty is expressly in lieu of all other warranties. Any implied warranties of merchantability or fitnessfor a particular purpose are limited to the same duration as this express warranty.This warranty does not cover incidental or consequential damages. WGP shall not be liable for any incidentalor consequential damages. Some states do not allow the exclusion or limitation of implied warranties,incidental or consequential damages, so the above limitations and exclusions may not apply to you.This warranty does not cover any problem resulting from misuse, abuse, neglect, alteration, failure toperform maintenance as instructed, unauthorized repair or service, or damage caused by contaminants.This warranty does not cover any representation or warranty made by Dealersbeyond the provisions of this warranty. Non warranty repairs may incure a repair charge.This warranty does not cover costs incurred for normal repair, inspection and preventive maintenance.You must establish proof of purchase to obtain warranty service or replacement. You may establishproof of purchase by completing the Warranty Registration Card and mailing it to WGP.This warranty gives you specific legal rights, and you also have other rights which vary from state tostate If you have any questions about your WGP product, please call us toll free at 1-800-755-5061Warranty Service is available by sending your marker to:Worr Game Products LLC.Attn: WARRANTY SERVICE252 Granite St. Corona, CA 92879P: 909-520-9969 F: 909-520-9969www.worr.com www.wgppress.comPage 18
Autococker ® <strong>Marker</strong> <strong>Manual</strong>Please fill out Warranty Card on other side andmail in to Worr Game Products with your RecieptPage 19
Attention Warranty ServiceWorr Game Products LLC.Warranty Registration CardAutococker ® Serial #NameAddressCityState Zip CountryPhoneE-mailPurchased DatePurchased FromAutococker ® <strong>Marker</strong> <strong>Manual</strong>( ) Pro Shop ( ) Internet ( ) Field ( ) Sporting Goods ( ) OtherPlease fill out this warranty card and mail with a photocopy of your purchasereceipt to WGP. Thank YouHow much did you pay for your Autococker ® ?Where did you hear about Autocockers ® ?What paintball marker did shoot prior to this Autococker ® ?How many years have you been playing paintball?____What type of paintball do you play?__What made you choose a WGP marker?_____________________________What paintball magazines do you read?______________________________What model of Autococker® did you purchase?________________________Page 20
®Worr Game Products LLC.U.S.A.252 Granite StreetCorona, CA 92879P: 909.520.9969F: 909.520.9699www.worr.comwww.wgppress.com


